

Page 1

fax
scan-to-email
locked print
copy
Quick Reference Guide
Page 2
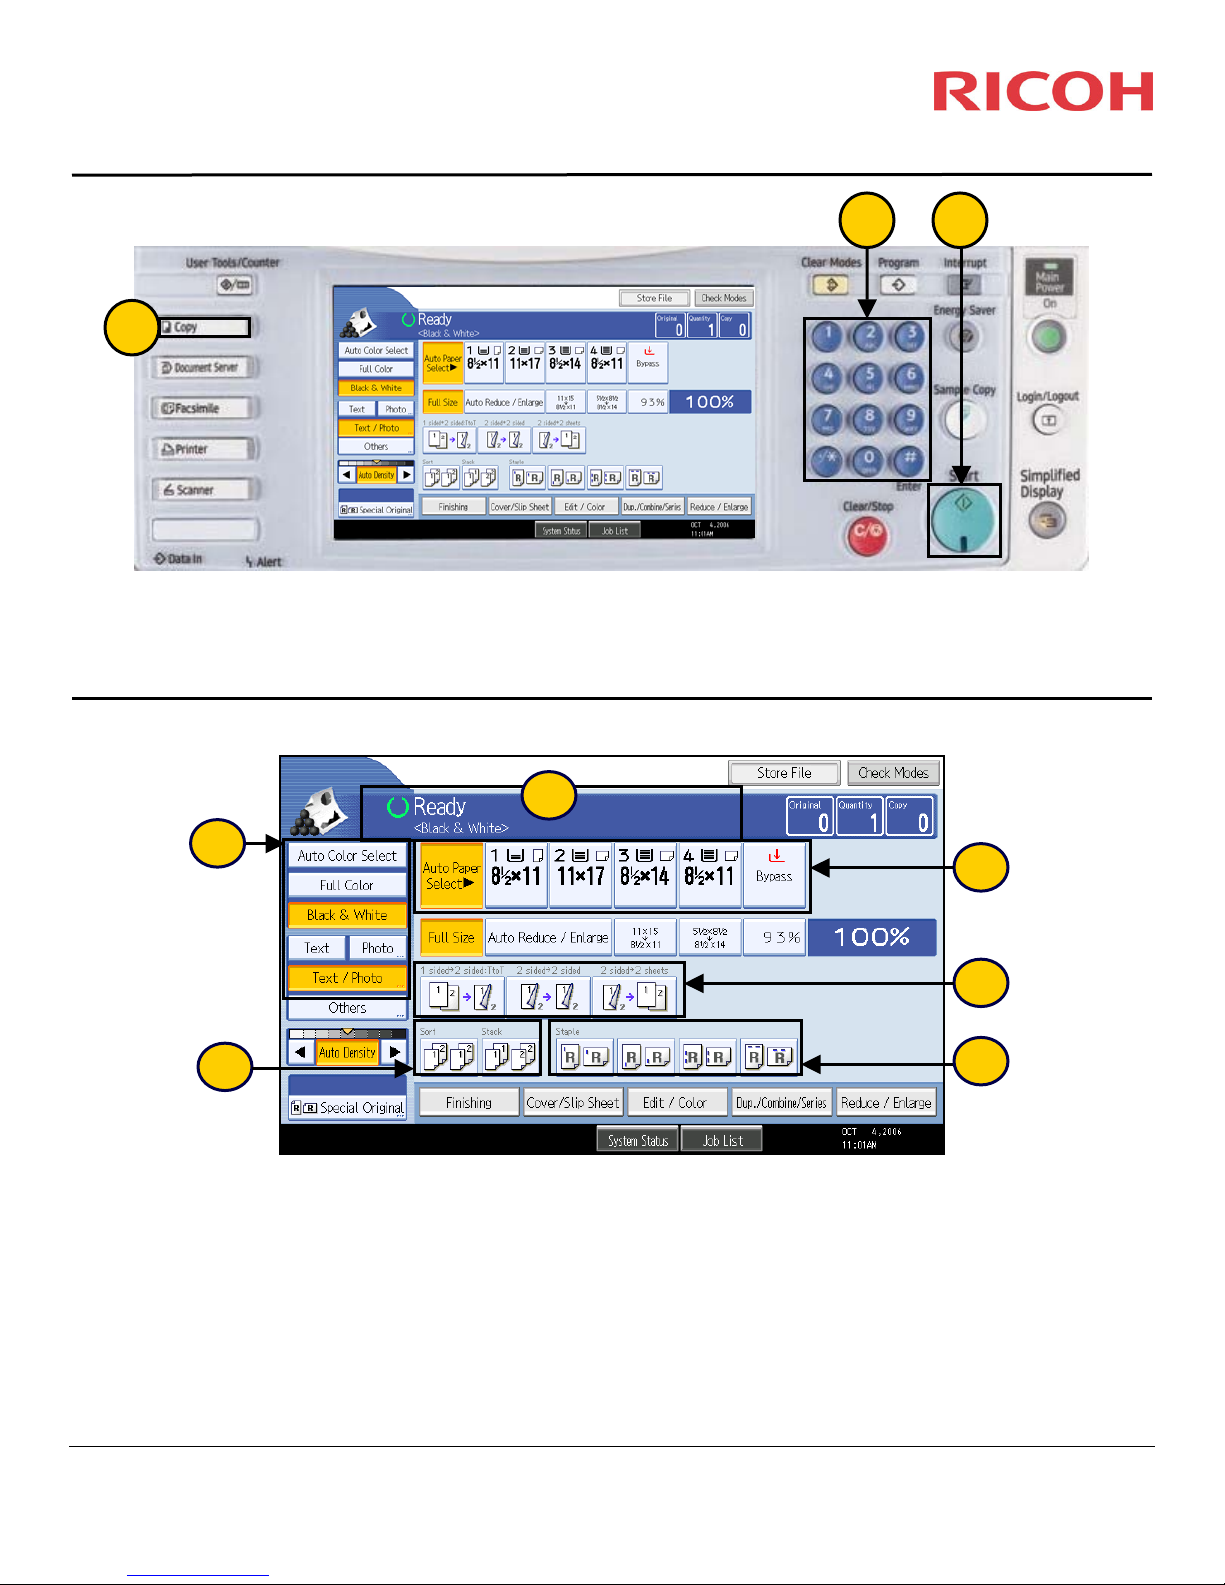
Copy
Basic Copy Procedure
2 3
1
Place original(s) face up in the Auto Document Feeder, or face down on the Platen Glass.
1. Select the [Copy] function on the left side of the control panel.
2. Using the number keypad, enter desired quantity.
3. Press the green [St
art] button. If copying from the glass, press [#] after placing last original.
Additional Copy Features
6
5
1. Status messages/Error messages
2. Paper Trays -- [Auto Paper Select] automatically selects paper based on original size.
3. Duplex options -- 1-
4. Staple options -- Dash indicates where the set will be stapled.
5. Sort (collat
6. Original Type settings
Version 2.0 (26376)
Company Confidential
©2007 Ricoh Americas Corporation. All rights reserved. - 4/07
ed) or Stack (non-collated) multiple sets
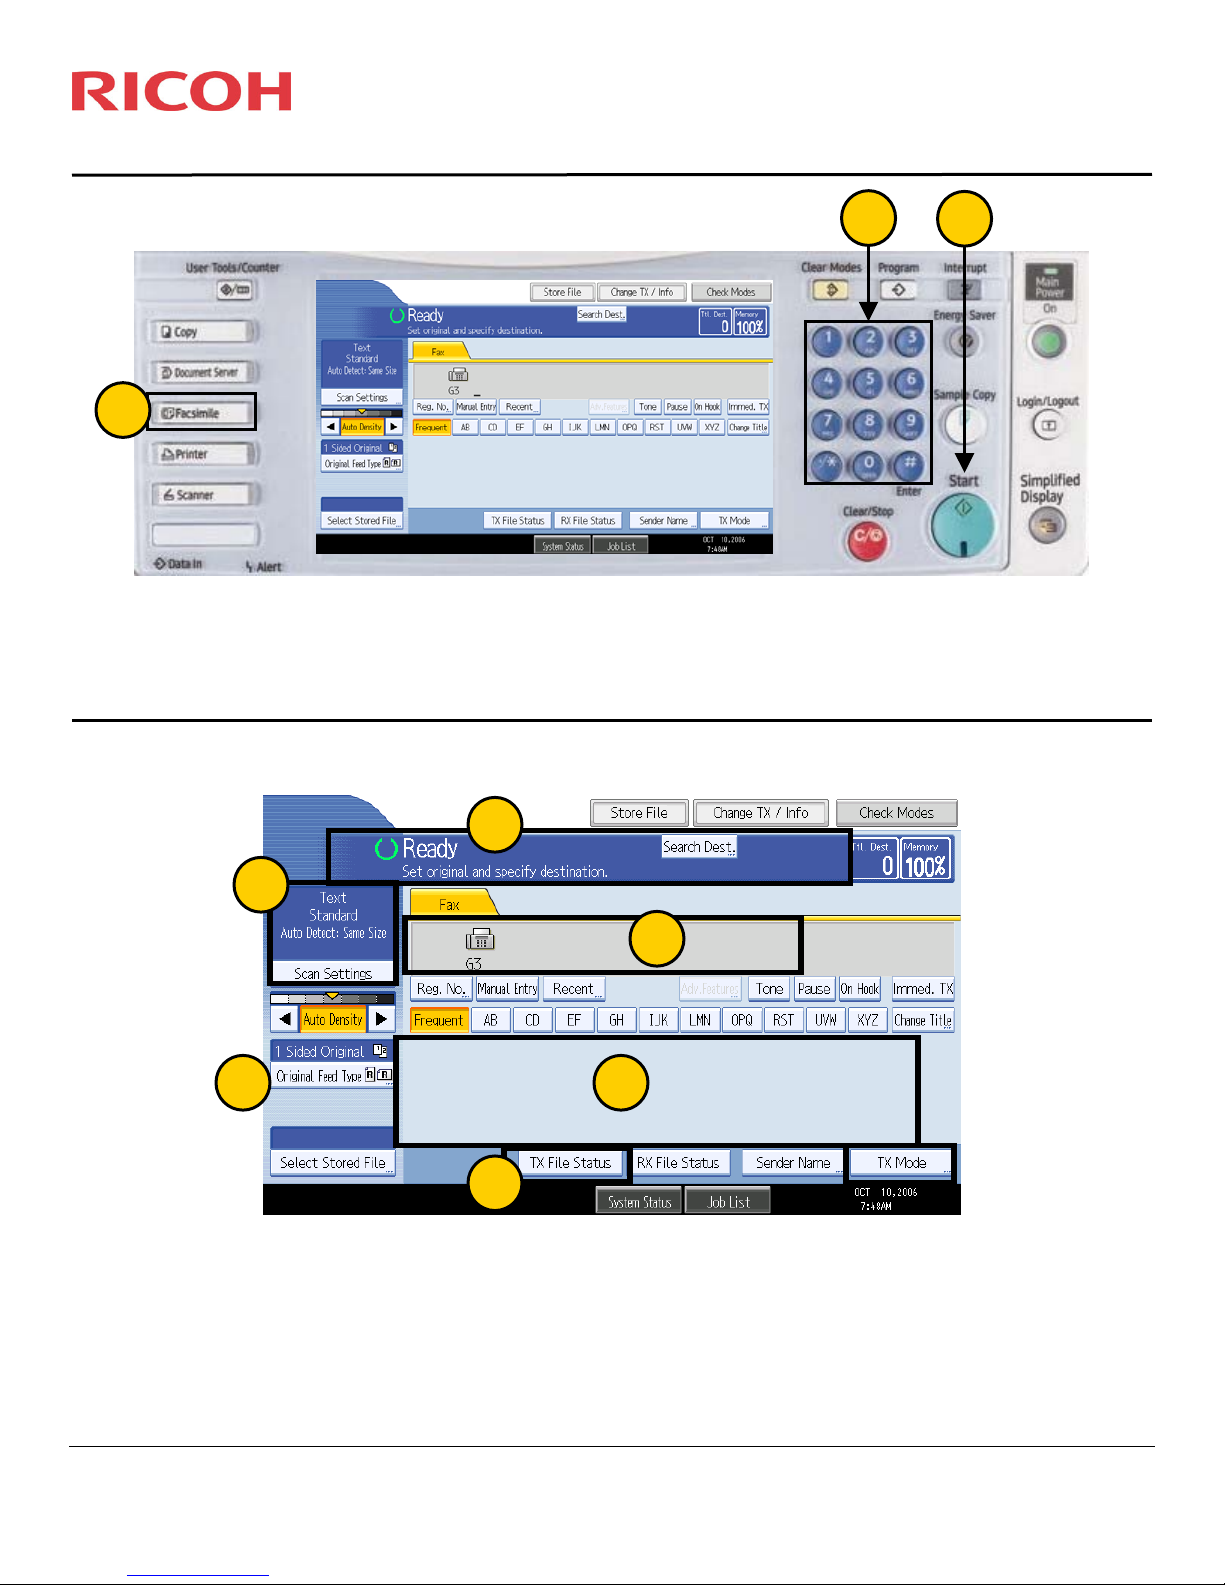
A. [Au
B. [Full Color] -- Copies color originals in color by overlying cyan, yellow, magenta, and black.
C. [Black & White]
D. [Text] -- Or
E. [Photo] -- Delicate tones and gray scale is rep
F. [Text/Photo] -- Originals contain a combination of text and photos or pictures.
sided originals to 2-sided copy, 2-sided original to 2-sided copy, 2-sided original to 1-sided copies
to Color Select] -- Used for mixed originals; deciphers bet
-- Copies color or Black & White originals in Black & White.
iginals contain only text. Text is the default.
1
roduced from photos or pictu
2
3
4
ween B&W and color and copies accordi
res.
ngly.
Page 3
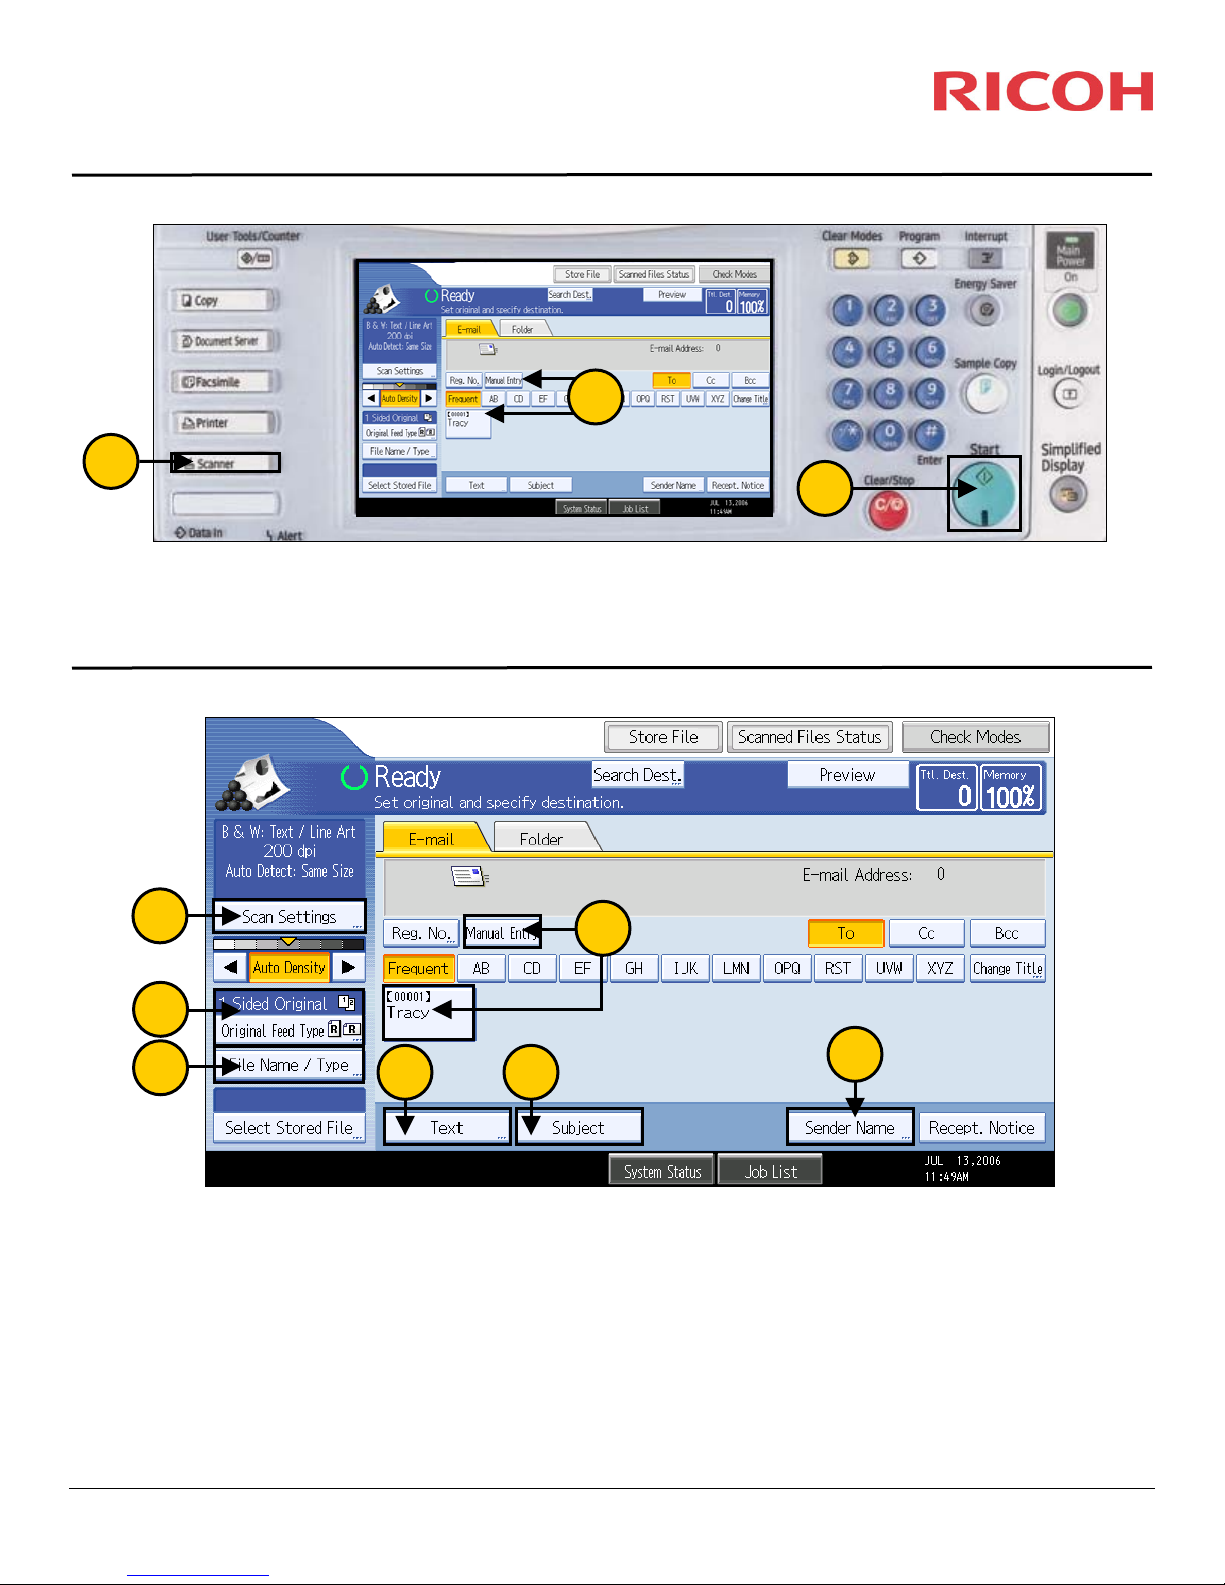
Fax
Basic Fax Procedure
2
3
1
Place original(s) face up, short edge first, in the Auto Document Feeder (ADF), or face down on the platen glass.
1. Select the [Facsimile] function on the left side of the control panel.
2. Using the number keypad, enter destination fax number.
3. Press the green [St
Additional Fax Features
art] button. When
faxing from the glass, press [#] after placing last original.
2
1
3
6
4
5
1. [Scan Settings]
A. [Standard] or [Detail] Resolution -- Standard is 100dpi. Detail is 200dpi.
B. Specify [Text] original, [Photo] original, or [Text/
2. Displays messages a
3. Displays destination fax number.
4. User-programmed Q
5. [TX File Status] -- Displays a log of all sent fax transmissions and their statuses.
6. [2-sided original] -- Use this function for 2-side
nd machine status.
uick Dials.
d originals.
Photo] original.
Version 2.0 (26376)
Company Confidential
©2007 Ricoh Americas Corporation. All rights reserved. - 4/07
Page 4
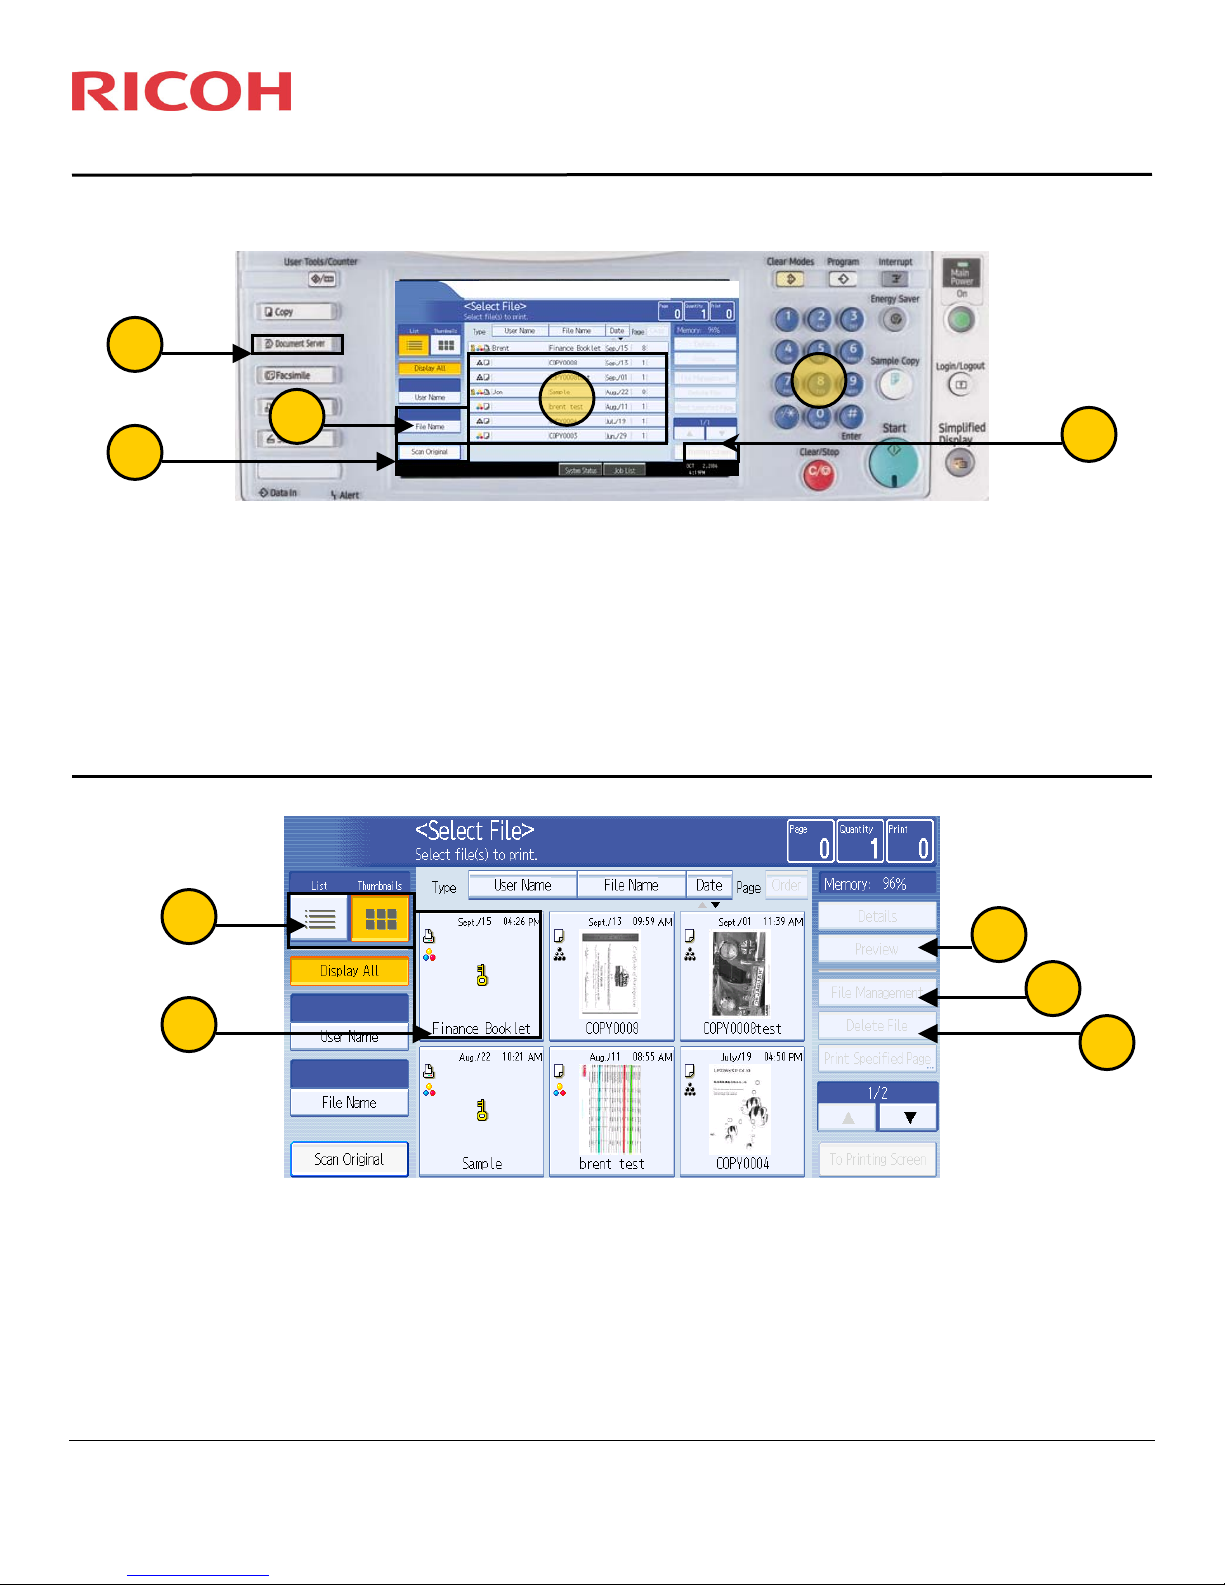
Scan to E-Mail
Basic Scan Procedure
1
2
3
Place original(s) face up in the Auto Document Feeder (ADF) or face down on the platen glass.
1. Select [Scanner
2. Select a pre-prog
3. Press the green [Start] button. When using the platen glass, press [#] after scan
Additional Scan Features
1
] from the left side of
rammed
destination
the control panel.
or [Ma
nual Entry
6
] enter an address.
ning the last original.
2
3
4 5
7
1. [Scan Settings] changes the default Text selection. Choose from available B/W or Color settings.
2. [Original Feed Type] allows for scanning 2-sided originals and Batch scanning.
3. [File Name/Type] is used to assign
TIFF/JPEG] or [Single Page PDF], each page of the scan will b
choosing [Multi-Page TIFF] or [Multi-Page PDF], all scanned documents will be received as one file.
4. [Text] is used to add a message to the body of the e-mail.
5. [Subject] is used to attach a subject to the e-mail.
6. Select destinations from preprogrammed. Multiple destinations may be selected.
7. Some MF
available one-touch destinations show
Version 1.0 (52342)
Company Confidential
©2007 Ricoh Americas Corporation. All rights reserved. - 4/07
Ps may require each scan to attach a sender’s name. If so, select [Sender Name] and
programmed one-tou
a file name and the change the file type. When choosing [Single Page
e received as a separate attachment. When
ch keys, or select [Manual Entry] to enter an e-mail address not
choose from the
n.
Page 5
Document Server
Basic Document Server Procedure
1
4
6
3
2
Store a file:
Place original(s) face up in the auto document feeder (ADF) or face down on the platen glass.
1. Press the [Document Server] button.
2. Press [Scan Original]. Select the type of original to store
3. Press [File Name] and input your file name. Press [Start] key to store your file.
Print a file:
4. Highlight the file(s).
5. Press [To Printing Screen] for more options.
6. Enter the quantity of copies using the number keypad. Press [Start] key
Additional Document Server Features
7
5
6
1
Delete a file:
1. Highlight the file(s).
2. Press [Delete File].
3. Select [Delete] or [Do Not Delete].
Rename a file:
4. To rename a file select [File Management].
5. Three options are available: [User name], [File name], and [Password].
Preview a file:
6. Press [Preview].
7. To change between [Thumbnail] view and [List] view select the option needed.
Version 1.0 (33097)
Company Confidential
©2007 Ricoh Americas Corporation. All rights reserved. - 4/07
4
2
Page 6

Basic RPCS Printing
Print Settings Tab
2
1
3
4
To access printer features, click on [Properties] (may be called Preferences or Options)
1. Choose a Custom Setting (Duplex, Staple etc…)
2. [Add/Change Custom Settings] Add a new or edit a current Custom Setting
Configure Stapling, Hole Punching, Duplex and other options
3. Choose a Paper Source Tray, The Paper Type (cardstock etc…), and The Output Tray
4. Select the Color Mode
5. [Job Type]:
A. Normal: Sends the job and prints immediately
B. Sample Print: Prints one set of the document for review
C. Locked Print: Holds the job in the device’s memory until it is released with a password
D. Hold Print: Holds the job in memory, but requires no password to release
E. Store Print: Stores the job on the device’s hard drive, allowing the job to be reprinted
F. Document Server: Users can print and save their job on the device’s hard drive
Options will vary depending on your device and which programs you are printing from.
5
Version 2.0 (68236)
Company Confidential
©2007 Ricoh Americas Corporation. All rights reserved. - 4/07
Page 7

Basic RPCS Printing
Print Quality Tab
1
2
43
1. [Print Quality]: Allows the user to adjust the print settings for quality, speed and media.
2. Document Type:
A. [General Documents]: Best for documents created with word processing or spreadsheets
B. [Photograph]: Best for documents with photos or gradations
C. [DTP]: Best for documents created with Desktop Publishing Software
D. [CAD]: Best for technical drawings
3. Print Priority: Choose the priority of the job based on speed or quality
4. [User Settings]: Program custom job settings
The RPCS (Refined Print Command Stream) Driver allows for greater user control over printing
quality and custom settings.
Version 2.0 (68236)
Company Confidential
©2007 Ricoh Americas Corporation. All rights reserved. - 4/07
Page 8

Locked Print on RPCS Driver
Locked print allows a user to send files to the printer saving it on the hard disk until the user
manually releases it.
There are two parts to sending a Locked Print file – Sending the file to the printer and
Releasing the Locked Print file at the printer.
Sending the file to the printer as a Locked Print
1. Access printer features, by clicking on properties, preferences or options in the print window.
2. Select [Locked Print] from the drop tab under Job Type.
3. Select [Details].
4. Enter a User ID and a password (4-digit number).
5. Select [OK].
6. Select [OK].
Releasing the Locked Print file at the printer
7. Press [Printer] key on the control panel.
8. Press [Print Jobs].
9. Press [Locked Print Job List].
(If using user authentication, only Locked Print files belonging to the user logged on appear.)
10. Select the Locked Print file to print.
11. Press [Print].
12. Enter the password for the stored file and then press [OK]. (This password is the one that was
entered for the file when it was stored as a locked print file.)
13. Press [Yes].
4
3
5
6
2
8
Version 1.0 (88482)
Company Confidential
©2007 Ricoh Americas Corporation. All rights reserved. - 1/08
10
9
11
Page 9

User Codes
1. Press [User Tools/Counter]
2. Press [System Settings]
3. Press [Administrator Tools]
4. Press [Address Book Ma
5. Press [Ne
6. Press [Change] under the Name Field
7.
Type in the User Code Name and Press [OK]
8. Press [Auth Info]
9. Enter the Use
10. Press [Next] twice
11. Choose wh
12. Press [Exit] or [New Program] if you have more us
w Program]
r Code using the blue number keys and Press [#]
at Available Functions that User gets and Press [OK]
nagement]
ers to ente
r
1
2
Version 1.0 (-----)
Company Confidential
©2007 Ricoh Americas Corporation. All rights reserved. - 4/07
3
Page 10

User Codes
4
5
7
6
8
9
10
Version 1.0 (-----)
Company Confidential
©2007 Ricoh Americas Corporation. All rights reserved. - 4/07
12
11
Page 11

User Codes
Once User Codes have been created in the Address Book, the Ricoh MFP must now be
enabled to except User Codes.
1. Press [User Tools/Counter]
2. Press [System Settings]
3. Press [Administrator Tools] Then [Next] one time
4. Press [User Authentication Manag
5. Press [User Code
] and select which functions you want to restrict access to
1
2
ement]
3
4
Version 1.0 (-----)
Company Confidential
©2007 Ricoh Americas Corporation. All rights reserved. - 4/07
5
Page 12

Changing the Paper Size in the Paper Trays
Important
• If a paper tray is pushed vigorously when putting it back into place, the position of the
tray's side fences may slip out of place.
• Do not stack paper over the limit mark.
• Check the paper edges are aligned with the right side.
• Slide the side fences until they are aligned with the paper size, and then re-lock the side
fences.
1. Check that paper in the paper tray is not being used, and then pull the tray carefully out
until it stops.
2. Remove paper if loaded.
3. Release the lock on the side fences.
4. While pressing down the release lever, slide the side fences until they are aligned with
the paper size you want to load.
Page 13

Changing the Paper Size in the Paper Trays
5. Slide the end fence until it is aligned with the size of paper to you want to load.
6. Square the paper and load it print side up.
Re-lock the side fences again.
7. Carefully slide the paper tray fully in.
8. Check the size on the display.
Page 14

Adding Paper into Tray 1
Important
• When paper loaded in the right side of tray 1 runs out, paper on the left is automatically
shifted to the right. While the paper is moving, a message instructing you to wait appears.
Do not pull out the tray at this time.
• You can load paper even while making copies from tray 1. You can pull out the left side
of tray 1 while copying is in.
• For the right side of tray 1, align the right edge of the paper with the right edge of the tray.
For the left side of tray 1, align the left edge of the paper with the left edge of the tray.
1/2
• Tray 1 uses 8
representative.
• Each tray can hold up to 1,100 sheets of paper. Do not stack paper over the limit mark.
To load paper into tray 1 (tandem tray), follow these steps:
1. Carefully pull out the paper tray until it stops.
11 paper. If you want to load A4 paper, contact your service
2. Square the paper and place it print side down.
• Whole tray pulled out
• Left half of the tray pulled out
Page 15

Adding Paper into Tray 1
3. Carefully push the paper tray fully in.
Page 16

Adding Staples
1. Open the front cover of the finisher, and then pull out the staple unit.
2. Hold the green levers while gently pulling out the cartridge.
3. Hold both sides of the cartridge. Pull up the upper unit of the cartridge.
Page 17

Adding Staples
4. Take out the empty refill in the arrow direction.
5. Align the arrows on the new refill with those on the cartridge, and then push in the refill
until it clicks.
Page 18

Adding Staples
6. Gently push down the upper unit into the cartridge.
7. Pull out the ribbon.
8. Hold the green levers while pushing in the cartridge until it clicks.
9. Replace the staple unit, and then close the front cover of the finisher.
Page 19

Adding Toner
Note: Even when "Toner Near End" is shown, the device can still make a considerable amount
of copies and prints.
Prepare spare toner when "Toner Near End" is shown, and replace toner when "Toner End" is
shown.
1. Open the front cover of the machine.
2. Pull out the toner bottle slowly.
3. Take out the new toner bottle from the box.
Page 20

Adding Toner
4. Hold the toner bottle and shake it five or six times.
5. Check the orientation of the toner bottle and insert it carefully.
6. Close the front cover of the machine.
Note: Do not shake the removed toner bottle. The remaining toner might scatter.
 Loading...