

Ricoh B282-69, B283-69 Service Training

B282-69/B283-69
Service Training
Draft start – 27 June 2011
Final released – 7 July 2011
R
/
.
t
d
.
h
i
c
t
t
h
w
/
w
/
:
p
L
o
C
o
w
o
i
r
c
.
m
o
h
.
c
1

Course Contents
1 Product Outline
2 Specifications
3 Installation
4 Machine Overview
5 PM
6 Scanner
7 Image Processing
8 Laser Exposure
9 PCU
10 Drum Charge
11 Development and Toner Supply
12 Transfer and Separation
13 Drum Cleaning
14 Paper Feed
15 Fusing
16 Duplex
17 ADF
18 ARDF
19 Paper Tray
20 Troubleshooting
21 Environmental Conservation
No additional notes.
R
/
.
t
d
.
h
i
c
t
t
h
w
/
w
/
:
p
L
o
C
o
w
o
i
r
c
.
m
o
h
.
c
2

No additional notes.
B282-69/B283-69
Service Training
1. Product Overview
R
/
.
t
d
.
h
i
c
t
t
h
w
/
w
/
:
p
L
o
C
o
w
o
i
r
c
.
m
o
h
.
c
3
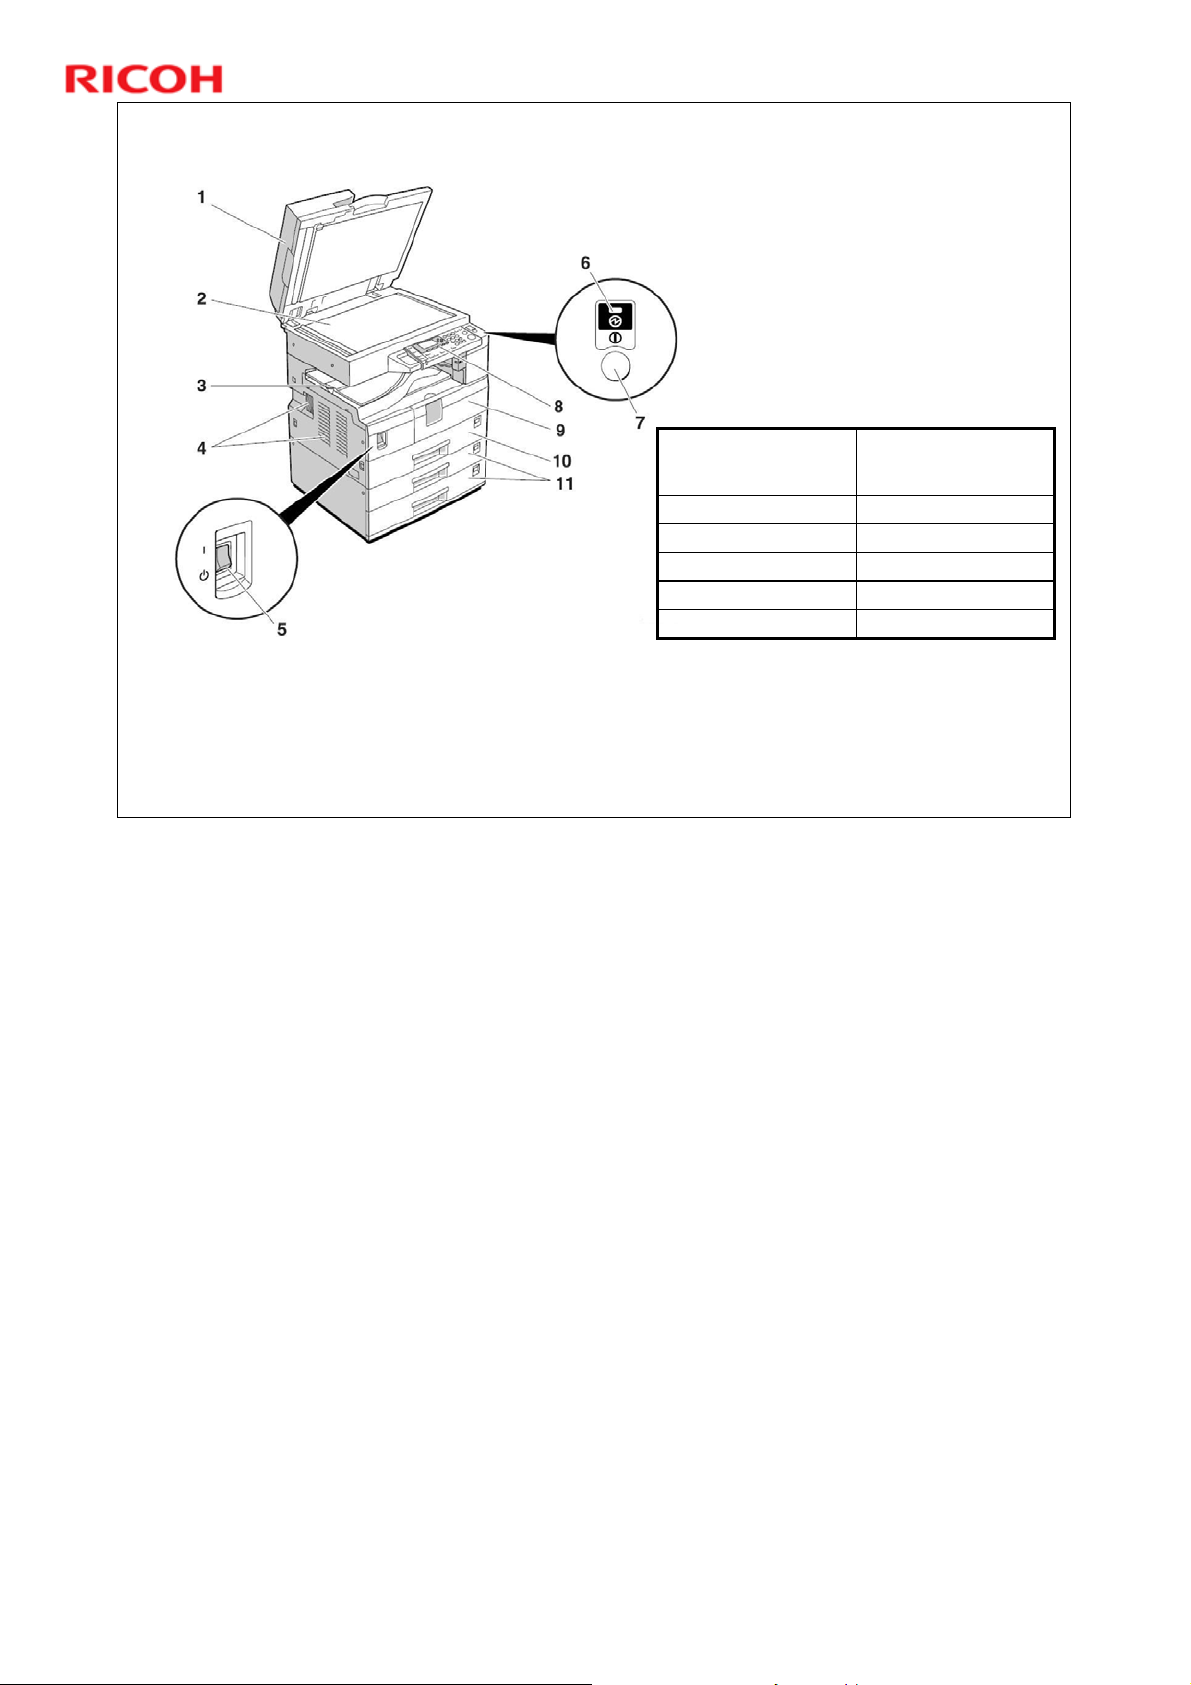
The Machine – Overall
Exposure glass cover
(options)
6. Main power indicator
7. Operation switch1. ARDF, ADF, or
8. Control panel2. Exposure glass
9. Front cover3. Internal tray
10. Paper tray4. Ventilation holes
11. Paper tray unit5. Main power switch
This the machine you will study in this training course.
The B384 Two-Paper Tray unit or the B385 One-Tray unit can attached
below the machine. (Maximum of three paper trays.)
Refer to the operating instructions for more details.
R
/
.
t
d
.
h
i
c
t
t
h
w
/
w
/
:
p
L
o
C
o
w
o
i
r
c
.
m
o
h
.
c
4
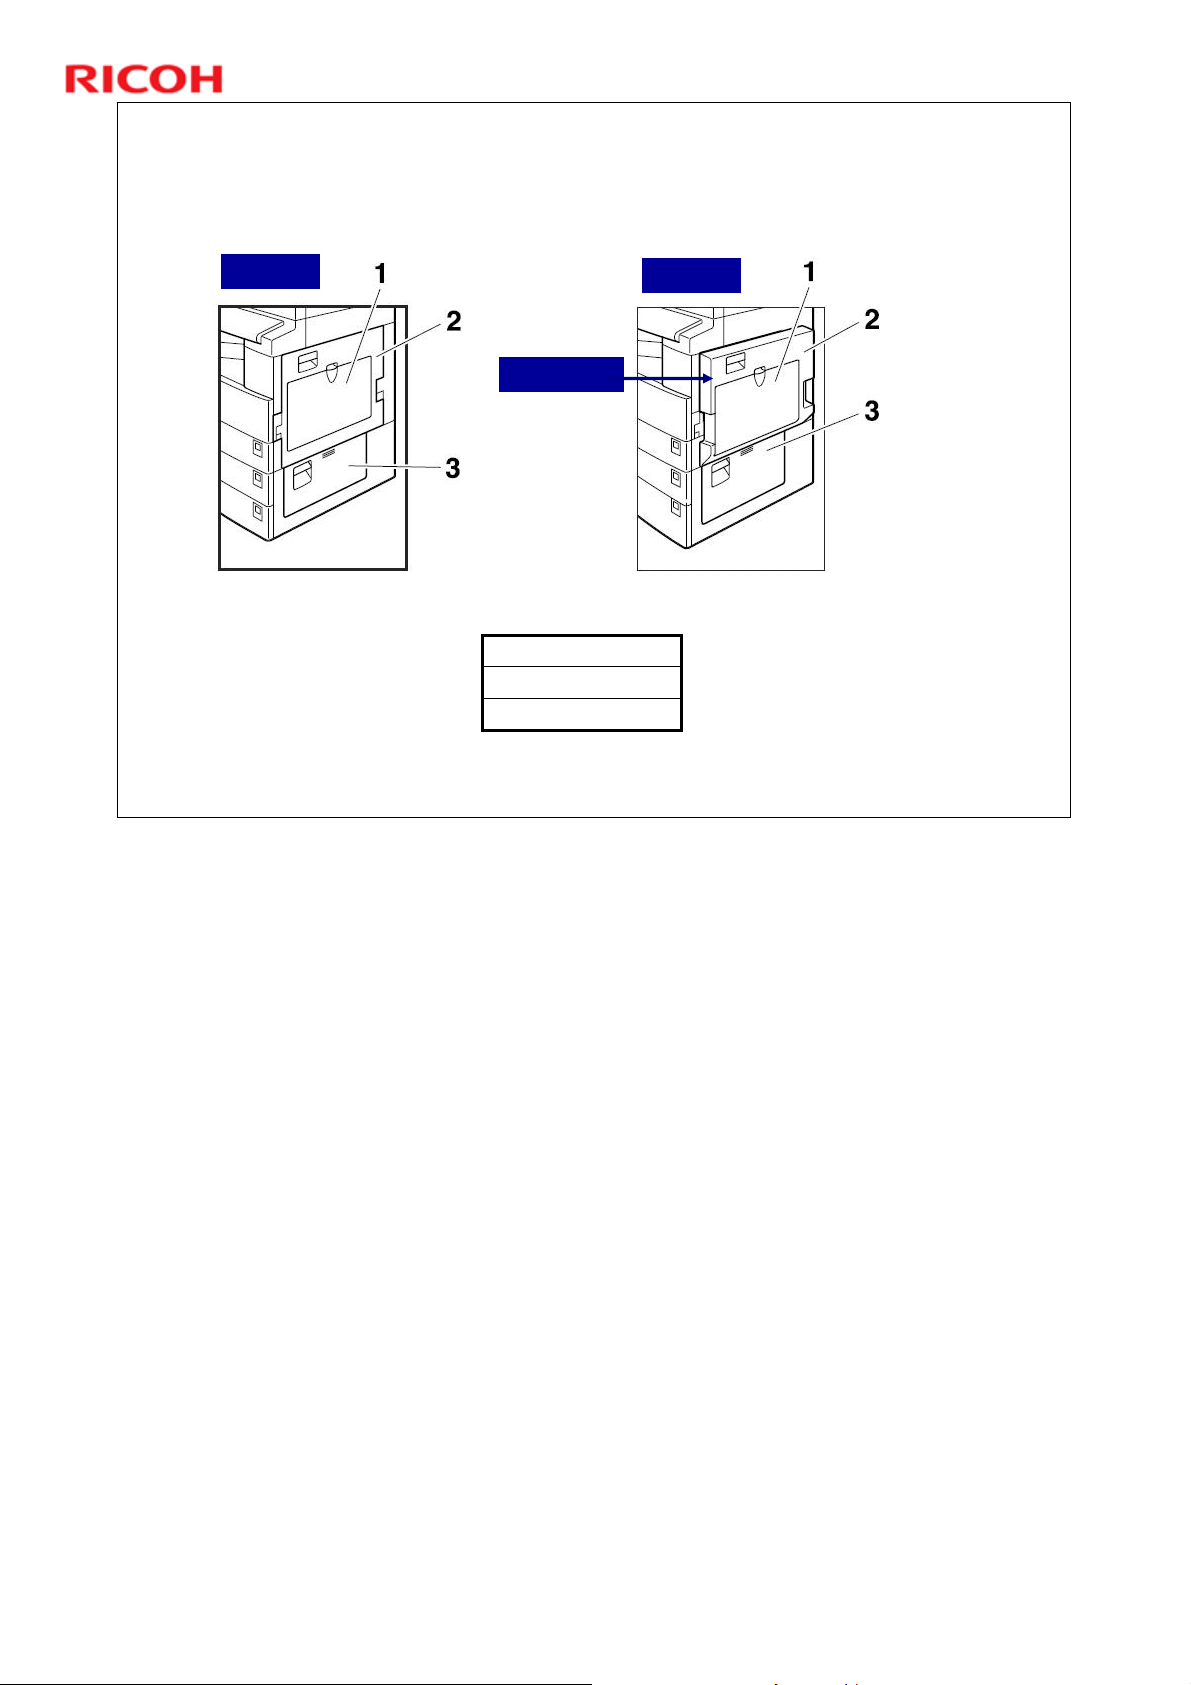
The Machine – Right Side
B283-69
No additional notes.
B282-69
Duplex unit
1. By-pass tray
2. Right cover
3. Lower right cover
R
/
.
t
d
.
h
i
c
t
t
h
w
/
w
/
:
p
L
o
C
o
w
o
i
r
c
.
m
o
h
.
c
5

Operation Panel
Familiarize yourself with the
operation panel.
See the operating instructions
for detailed descriptions of
key and indicator function.
11. Duplex key1. Function keys
12. ID copy key2. Indicators
13. Sort key3. Display panel
14. Image density keys4. Selection keys
15. Escape key5. Scroll keys
16. Original key6. User tools/Counter key
17. OK key7. Clear modes key
18. Number keys8. Clear/Stop key
19. Start key9. Main power indicator
10. Operation switch
Round Start Key and bar in Clear/Stop Key make them easy to find and easy to press.
Color frequency adjusted 4-line LCD display ensures that users with color vision deficiency will be able to
easily distinguish between LED colors.
Panel Keys are easy to press and easy to find.
R
/
.
t
d
.
h
i
c
t
t
h
w
/
w
/
:
p
L
o
C
o
w
o
i
r
c
.
m
o
h
.
c
6

B283-69 Mainframe B282-69 Mainframe
•Copy/Printer/Twain Scanner
•16MB Memory
•16MB+32MB memory (w/o NIC model)
•250-sheet x1 tray
•100-sheet bypass tray
•250-sheet output tray
•USB 2.0
Note: The GDI controller is standard with the B282/B283. There is no GW controller option.
No additional notes.
Standard Components
250
•Copy/Printer/Twain Scanner
•Duplex
•16MB Memory
•16MB+32MB memory (w/o NIC model)
•250-sheet x 1 tray
•100-sheet bypass tray
•250-sheet output tray
•USB 2.0
R
/
.
t
d
.
h
i
c
t
t
h
w
/
w
/
:
p
L
o
C
o
w
o
i
r
c
.
m
o
h
.
c
7

Optional Units
The external optional
units are shown to the
right.
Platen Cover (B406)
ADF (B813)
Internal option:
NIB (Network
interface board)
ARDF (B814): Only for B282-69
500
1-Tray paper bank (B385)
500
500
2-Tray paper bank (B384)
Accessibility handles for standard and
optional trays (B272 and B274)
The following service options are also available.
¾ Tray heaters
¾ Anti-condensation heater (for optics)
R
/
.
t
d
.
h
i
c
t
t
h
w
/
w
/
:
p
L
o
C
o
w
o
i
r
c
.
m
o
h
.
c
8
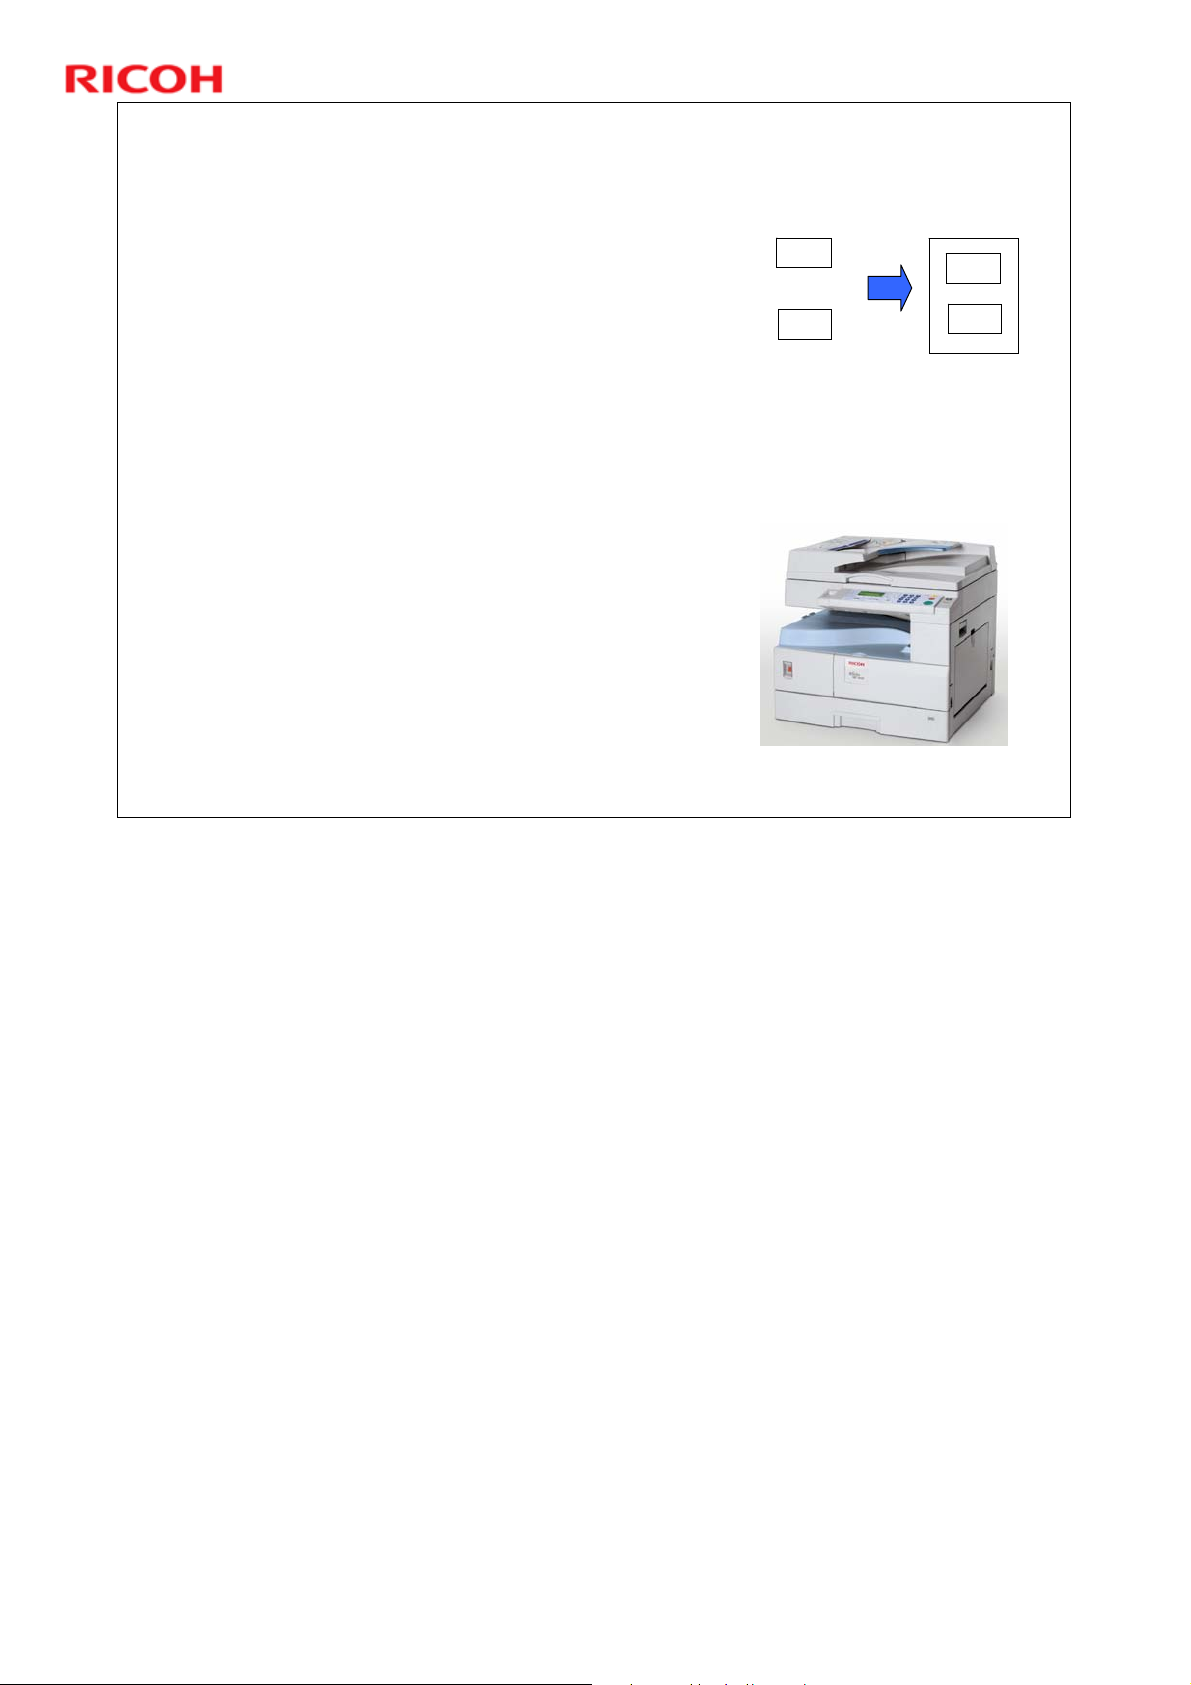
Major Differences from the B283-65 and B282-65
ID Copy Function
Allows copying of both sides of an ID card
(or other small document) onto one sheet.
No alignment problems. Don't have to feed
the paper back into the machine.
Increased Copy Speed
Multicopy rate has been increased for the
B282-69. (18 cpm ⇒ 20 cpm)
ADF 1 to 1 speed is still 18 cpm.
B283-69 multicopy rate is unchanged. (18
cpm)
Design Change
Internal tray is blue.
NIB
Front
Back
Front
Back
The ID Copy function is a requirement of the Chinese market. The Chinese ID
was changed in 2007 and now has important information on the reverse side.
Financial institutions and government offices especially need to easily copy both
sides.
ID Copy is different from Combine Copy function in that the output size is the
same as the original.
Users can identify output documents more easily with the blue internal tray.
The network interface board (NIB) is a new internal option.
R
/
.
t
d
.
h
i
c
t
t
h
w
/
w
/
:
p
L
o
C
o
w
o
i
r
c
.
m
o
h
.
c
9

No additional notes.
B282-69/B283-69
Service Training
2. Specifications
R
/
.
t
d
.
h
i
c
t
t
h
w
/
w
/
:
p
L
o
C
o
w
o
i
r
c
.
m
o
h
.
c
10

Specifications - 1
Copy Process
Dry electrostatic transfer system
Maximum Original Size:
A3/11” x 17”
Maximum Copy Paper Size:
A3/11” x 17”
Reproduction Ratios:
3 enlargement and 4 reduction
Zoom
50% to 200%, in 1% steps
No additional notes.
R
/
.
t
d
.
h
i
c
t
t
h
w
/
w
/
:
p
L
o
C
o
w
o
i
r
c
.
m
o
h
.
c
11

Specifications - 2
Power Source
220-240V, 50/60 Hz, 7A
Noise Emission
Standby (Mainframe/Full System)
» Not above 40 db
Operating (Mainframe only)
» Not above 62.7 db
Oper ating (Full System)
» Not above 66.7 db
Dimensions (W x D x H)
B283-69: 550 x 568 x 420 mm
B282-69: 587 x 568 x 460 mm
» With ADF height is 510 mm. With ARDF height is 615 mm.
No additional notes.
R
/
.
t
d
.
h
i
c
t
t
h
w
/
w
/
:
p
L
o
C
o
w
o
i
r
c
.
m
o
h
.
c
12

Specifications - 3
Weight
B283 - 35 kg
B282 - 40 kg
Warm-up Time
Less than 25 seconds (at 20 C)
First Copy Time
Less than 6.5 seconds
Toner Yield
6,000 copies (A4 LEF, 6% full black)
Copy-Tray Capacity
250 sheets
No additional notes.
R
/
.
t
d
.
h
i
c
t
t
h
w
/
w
/
:
p
L
o
C
o
w
o
i
r
c
.
m
o
h
.
c
13

Specifications - 4
Optional Equipment
Platen Cover
Auto-document feeder
Auto-reverse document feeder (B282-69 only)
Paper tray unit (1 tray)
Paper tray unit (2 trays)
Tray heater
Optics anti-condensation heater
Copy Paper Weight
60 - 90 g/m
2
(16 - 24 lb)
For more details regarding the machine’s
specifications, see the Field Service Manual and also
the User Guides.
No additional notes.
R
/
.
t
d
.
h
i
c
t
t
h
w
/
w
/
:
p
L
o
C
o
w
o
i
r
c
.
m
o
h
.
c
14

No additional notes.
B282-69/B283-69
Service Training
3. Installation
R
/
.
t
d
.
h
i
c
t
t
h
w
/
w
/
:
p
L
o
C
o
w
o
i
r
c
.
m
o
h
.
c
15
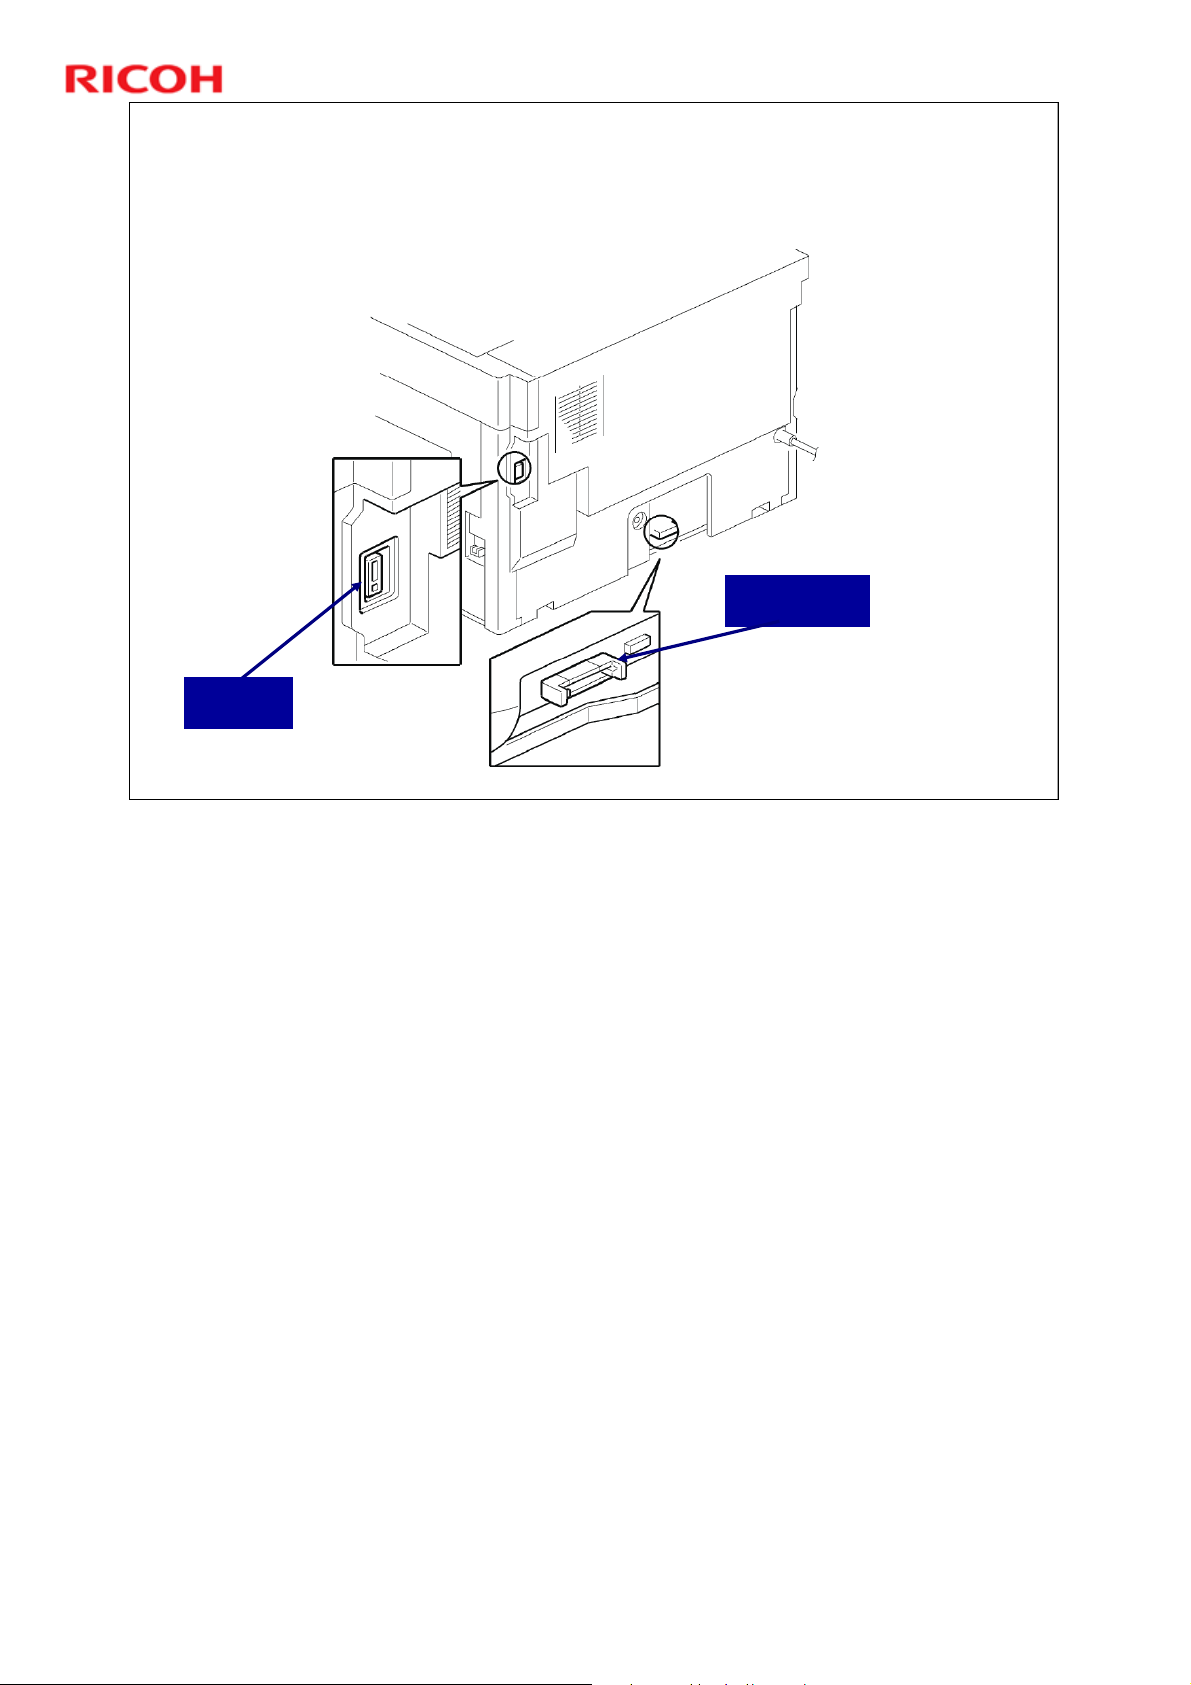
Installation Procedures - 1
In the Field Service Manual, see Copier Installation.
Socket for
Paper Tray Unit
Socket for
ADF/ARDF
No additional notes.
R
/
.
t
d
.
h
i
c
t
t
h
w
/
w
/
:
p
L
o
C
o
w
o
i
r
c
.
m
o
h
.
c
16
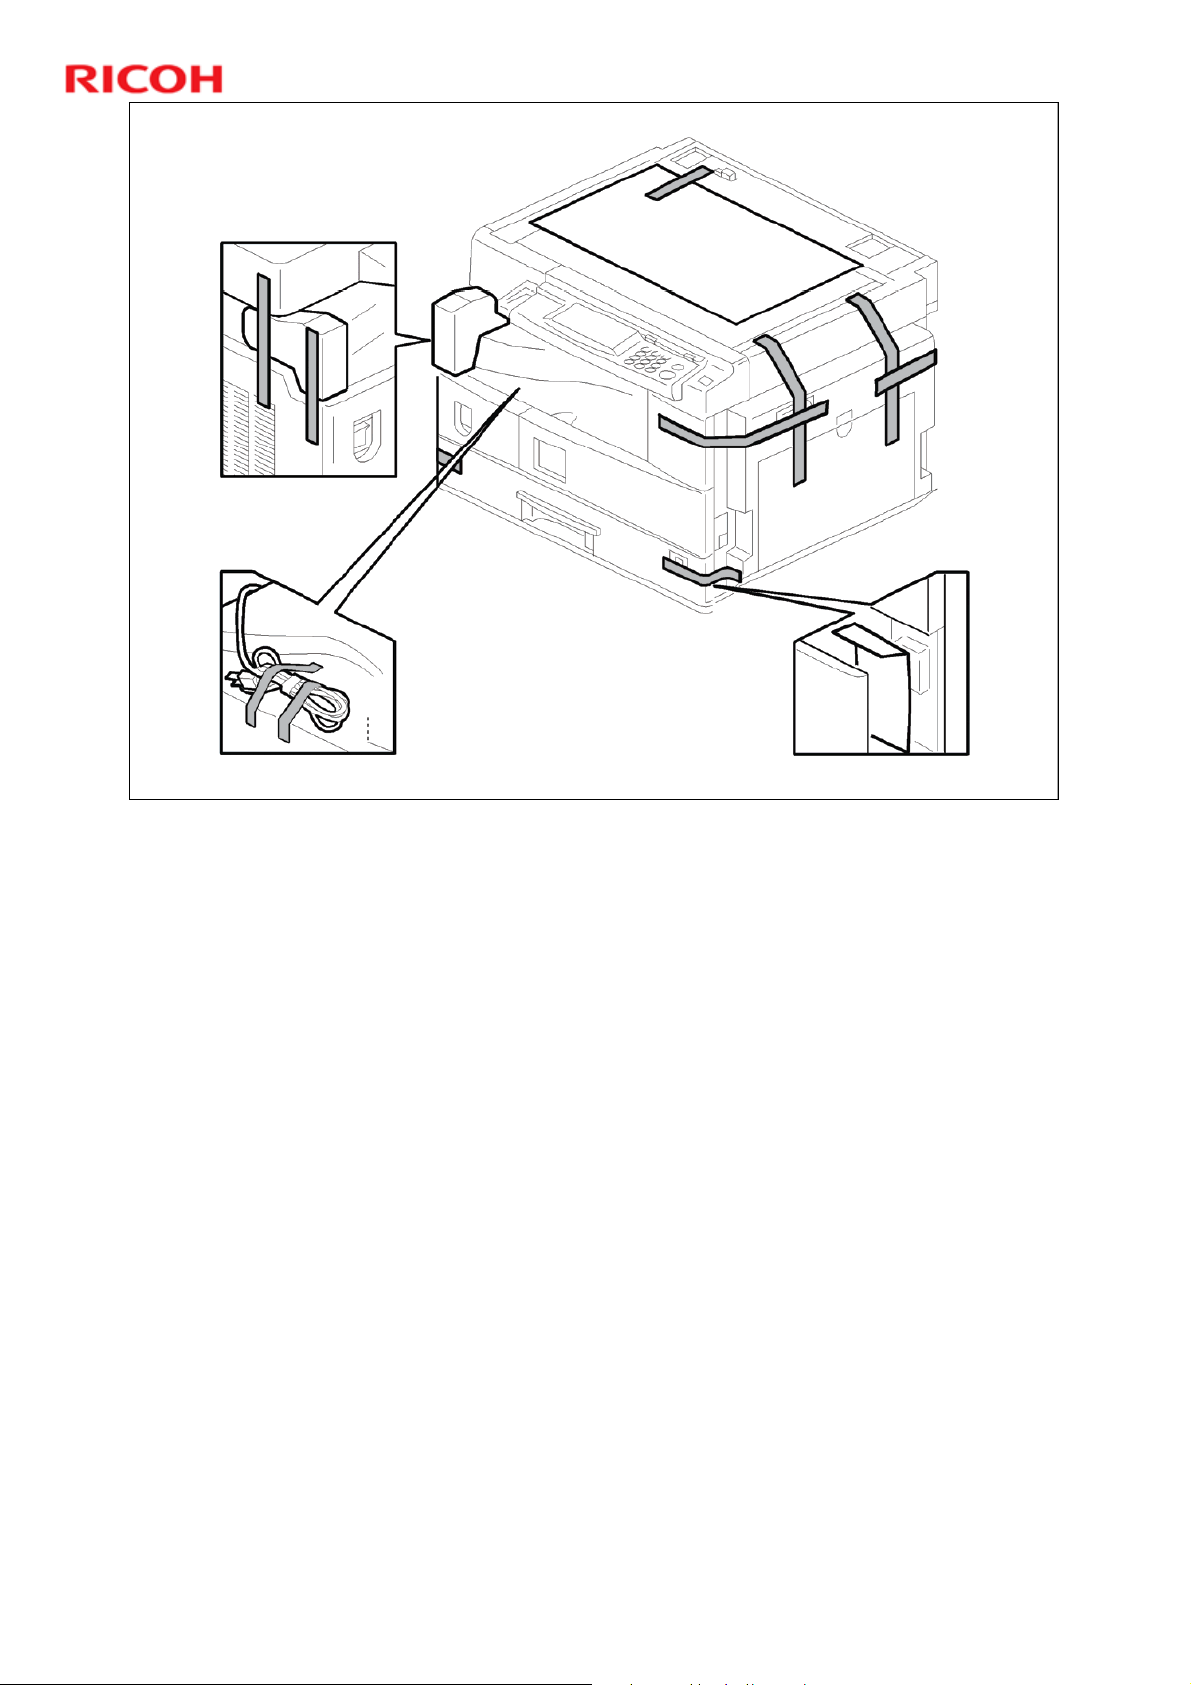
Installation
Procedures - 2
Remove all tape and padding from the machine.
No additional notes.
R
/
.
t
d
.
h
i
c
t
t
h
w
/
w
/
:
p
L
o
C
o
w
o
i
r
c
.
m
o
h
.
c
17
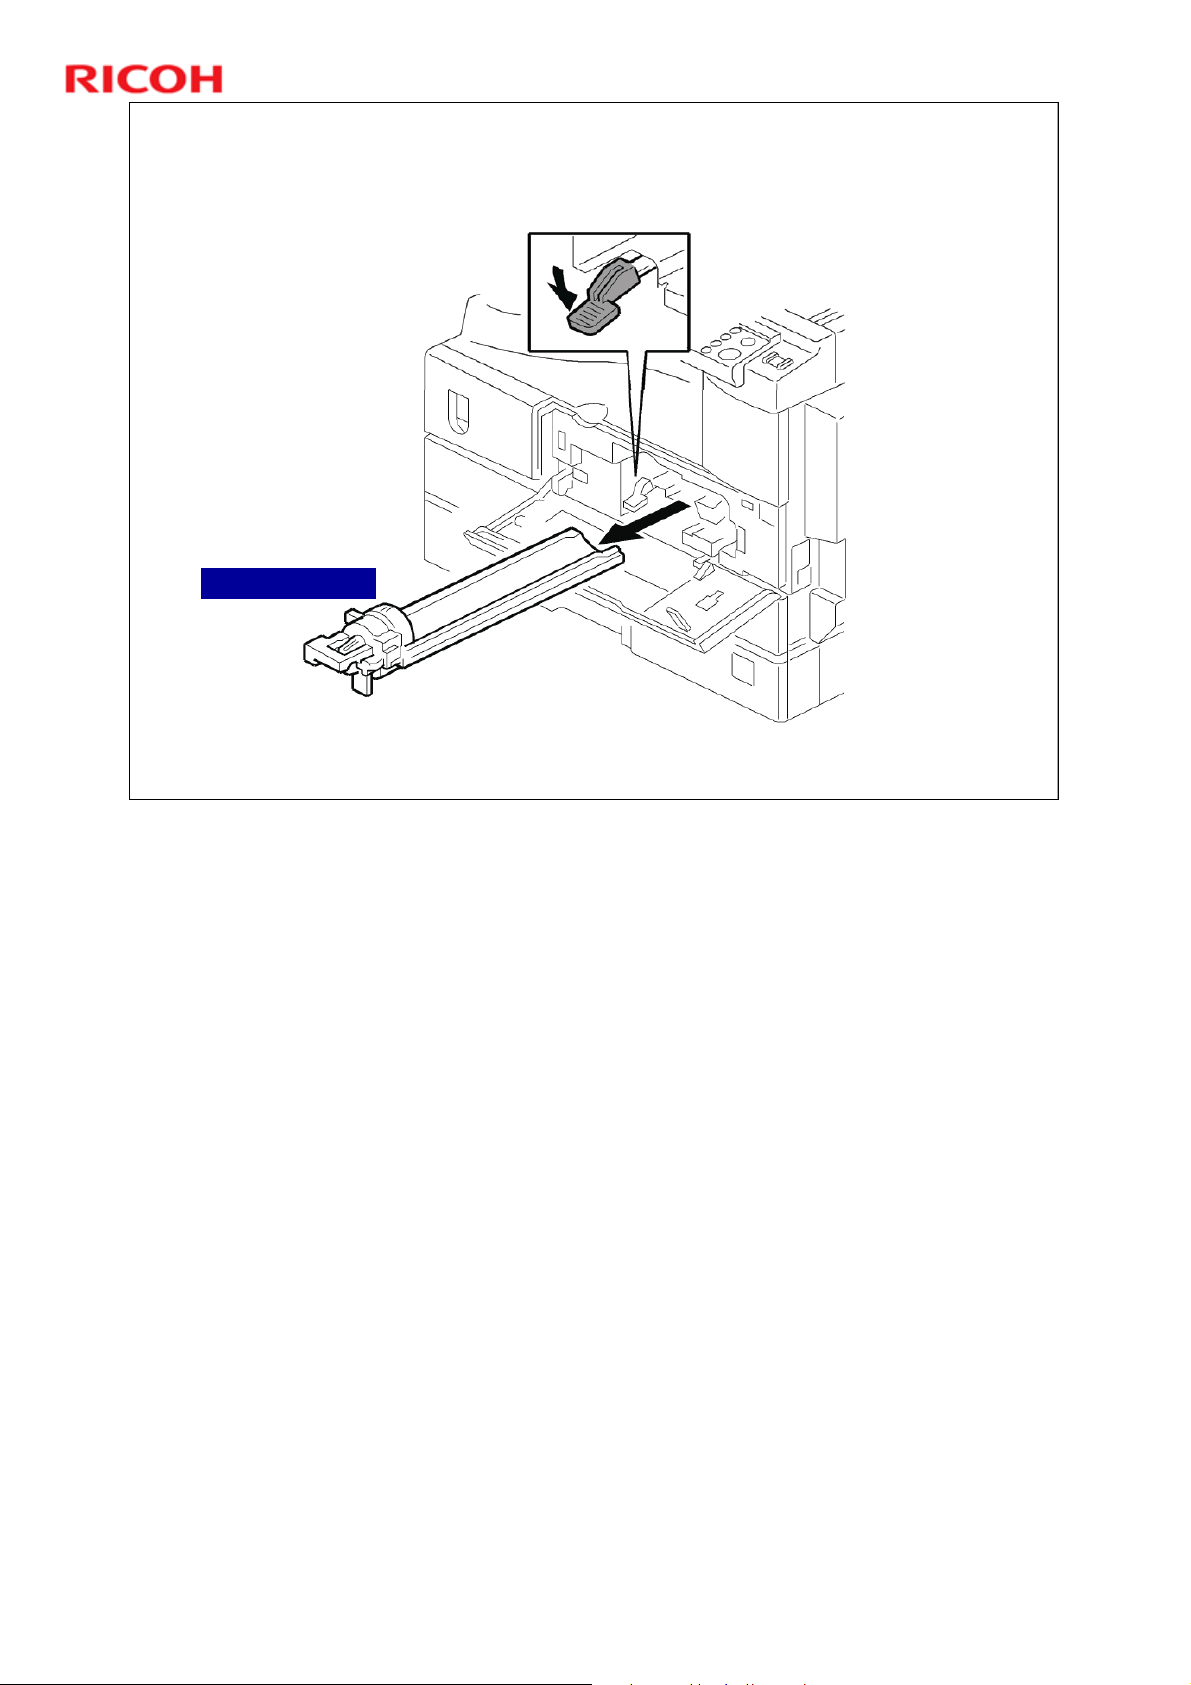
Installation Procedures - 3
Toner Bottle Holder
Open the front door and remove the toner bottle holder.
No additional notes.
R
/
.
t
d
.
h
i
c
t
t
h
w
/
w
/
:
p
L
o
C
o
w
o
i
r
c
.
m
o
h
.
c
18

Installation Procedures - 4
Right Door
PCU (Photoconductor Unit)
Open the Right Door and remove the PCU (Photoconductor Unit)
No additional notes.
R
/
.
t
d
.
h
i
c
t
t
h
w
/
w
/
:
p
L
o
C
o
w
o
i
r
c
.
m
o
h
.
c
19
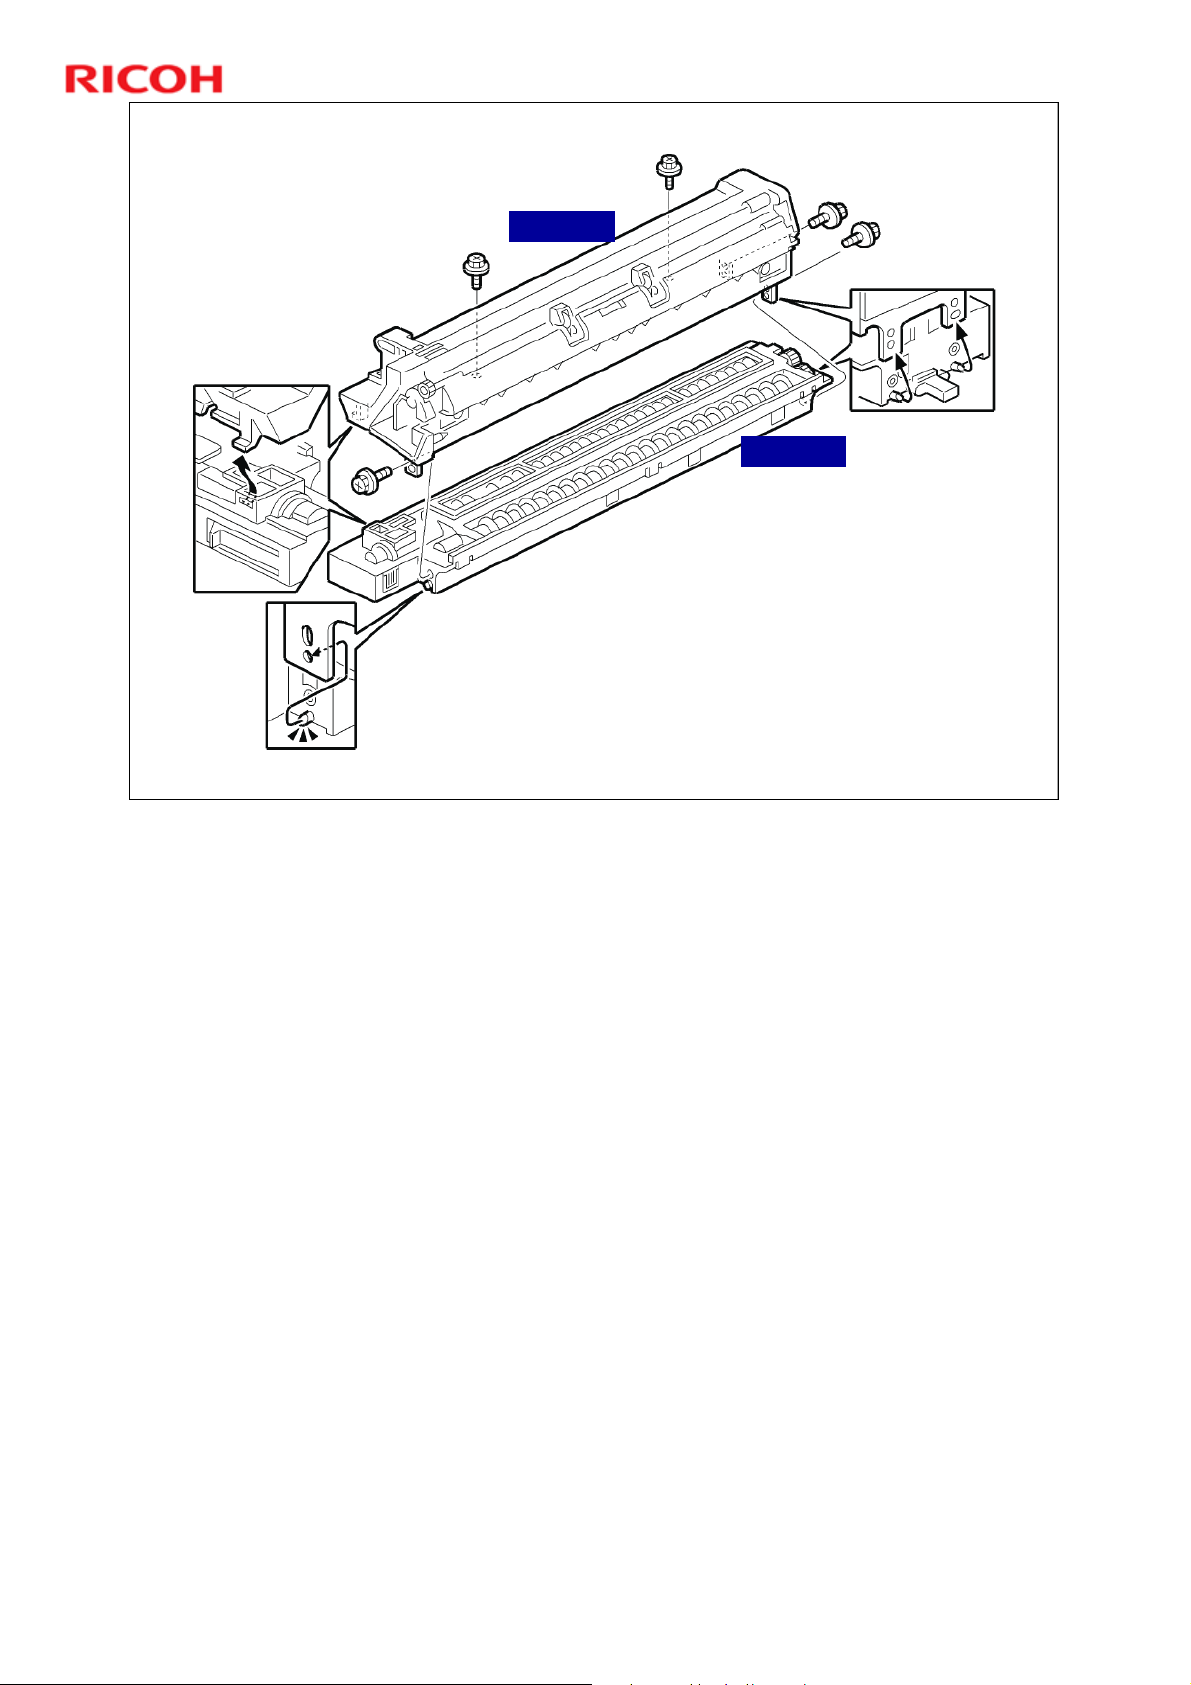
Installation Procedures - 5
Upper Part
Separate the PCU into the
Upper Part and the Lower Part.
Put a sheet of paper on a level
surface and place the Upper
Part on it.
This is to prevent foreign
material from getting onto
the sleeve rollers.
Lower Part
No additional notes.
R
/
.
t
d
.
h
i
c
t
t
h
w
/
w
/
:
p
L
o
C
o
w
o
i
r
c
.
m
o
h
.
c
20
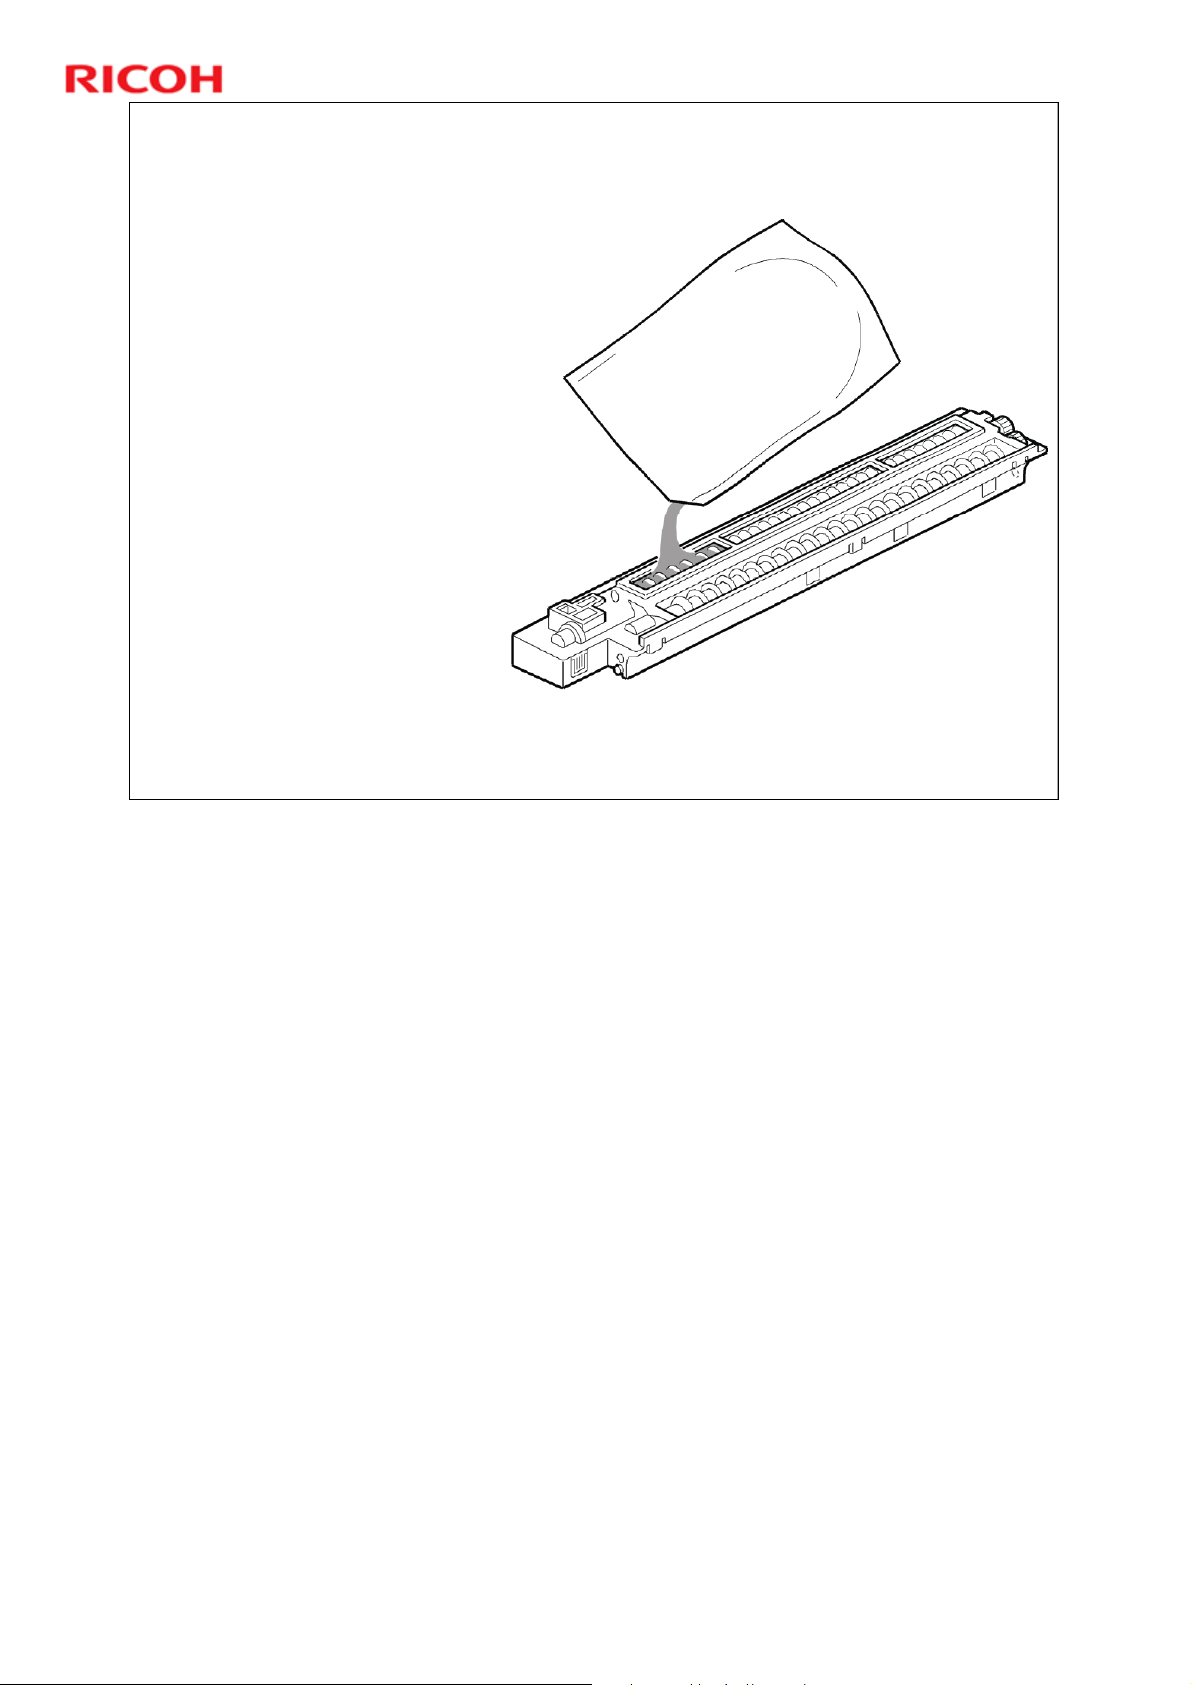
Installation Procedures - 6
Distribute a pack of
developer to all openings
equally.
Make only a small cut in
the top corner of the bag
for better control when
pouring.
Make sure not to spill
developer on the gears.
If you have to turn the gear
to distribute the developer
evenly, make sure to do so
very slowly and as little as
possible. Otherwise the
developer may spill.
No additional notes.
R
/
.
t
d
.
h
i
c
t
t
h
w
/
w
/
:
p
L
o
C
o
w
o
i
r
c
.
m
o
h
.
c
21
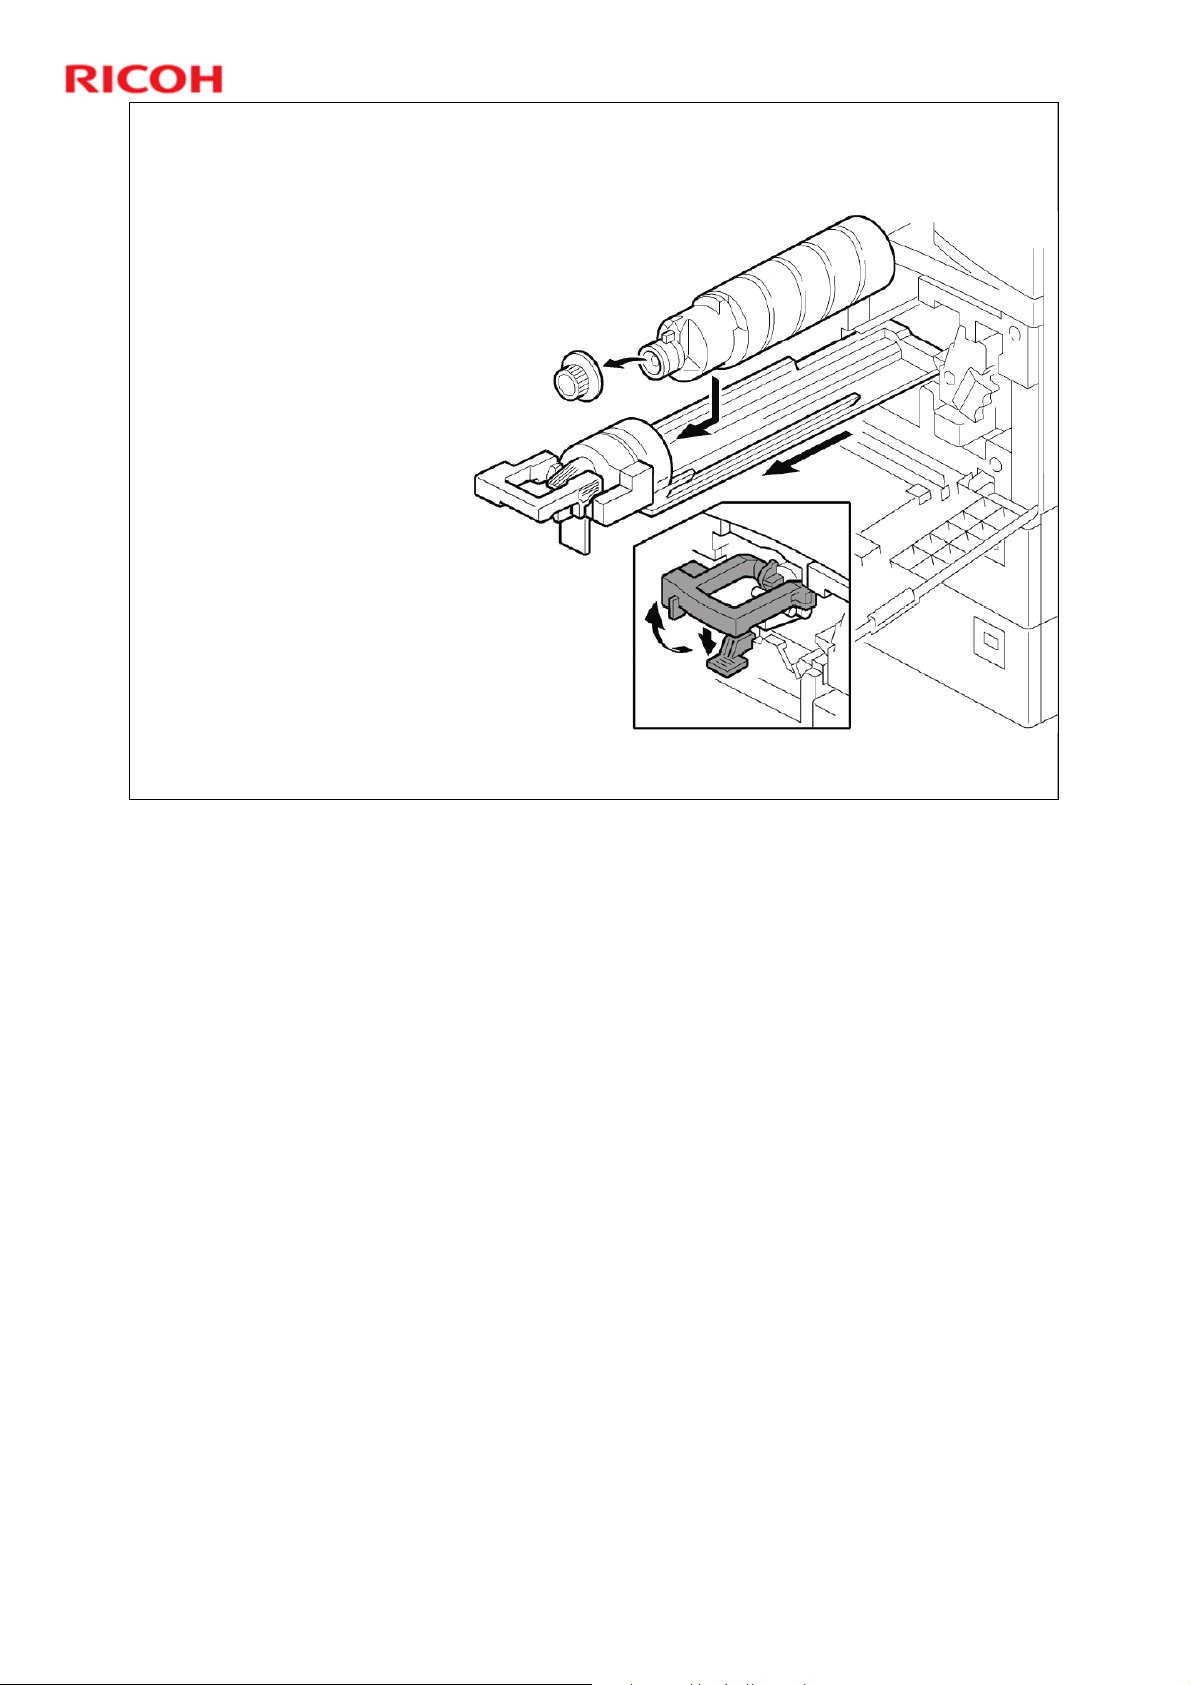
Installation Procedures - 7
Reassemble the PCU
and reinstall it.
Shake the toner bottle
(with the cap still on).
Remove the bottle
cap and install the
bottle on the holder
(do not touch the
inner cap).
Set the holder (with
the toner bottle) in the
machine.
No additional notes.
R
/
.
t
d
.
h
i
c
t
t
h
w
/
w
/
:
p
L
o
C
o
w
o
i
r
c
.
m
o
h
.
c
22
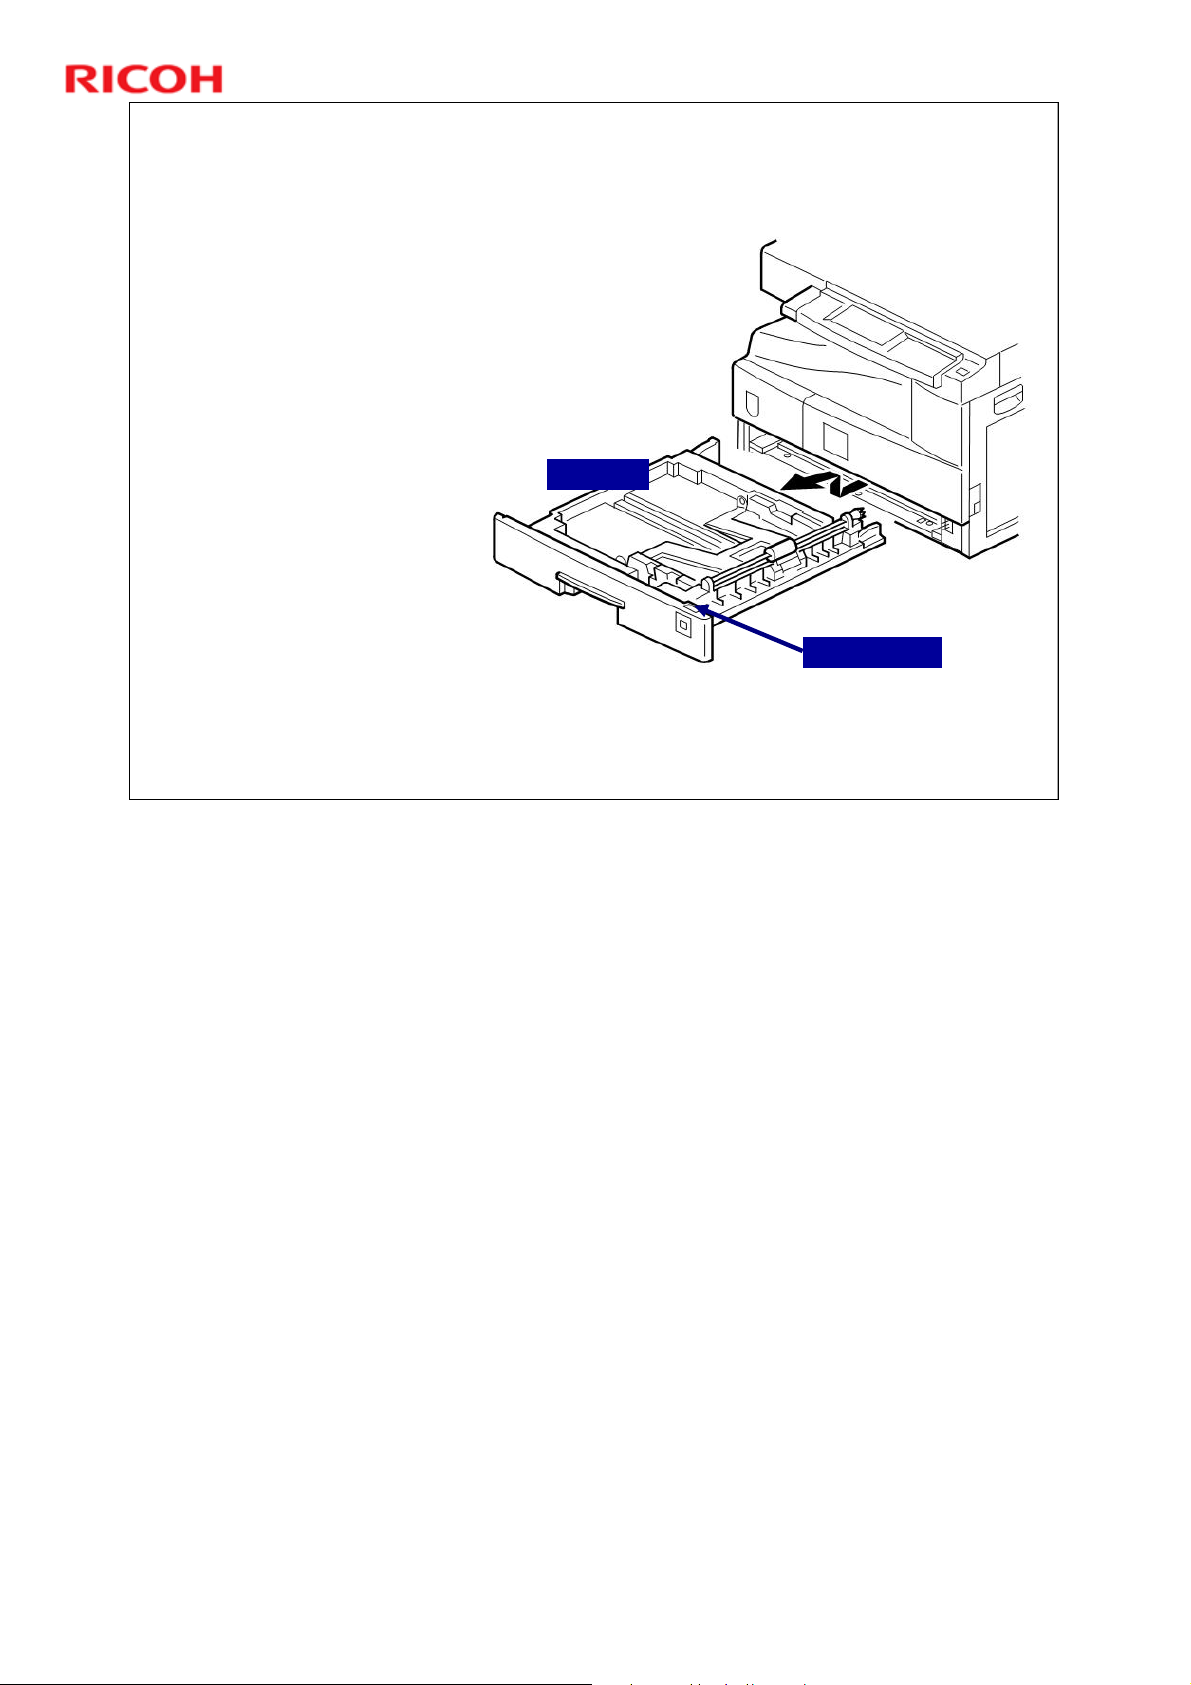
Installation Procedures - 8
Pull out the
paper tray.
Turn the paper
size dial to the
appropriate size.
Adjust the
positions of the
end and side
guides.
Paper tray
Paper size dial
No additional notes.
R
/
.
t
d
.
h
i
c
t
t
h
w
/
w
/
:
p
L
o
C
o
w
o
i
r
c
.
m
o
h
.
c
23

Installation Procedures - 9
ARDF or ADF Platen cover
Install the optional ARDF, ADF, or platen cover.
Follow the appropriate procedure in the field service manual.
Plug in the main power cord and turn on the main switch.
Activate the SP mode and execute "Developer Initialize" (SP 2214 -1).
It takes about 45 seconds. "Completed" will be displayed when finished.
Load paper and make some copies to check side-to-side and leading
edge registrations.
After completing installation, you may need to change the display language. Do
this with the User Tools. (Refer to "Changing the Language" in the operator's
manual.
R
/
.
t
d
.
h
i
c
t
t
h
w
/
w
/
:
p
L
o
C
o
w
o
i
r
c
.
m
o
h
.
c
24
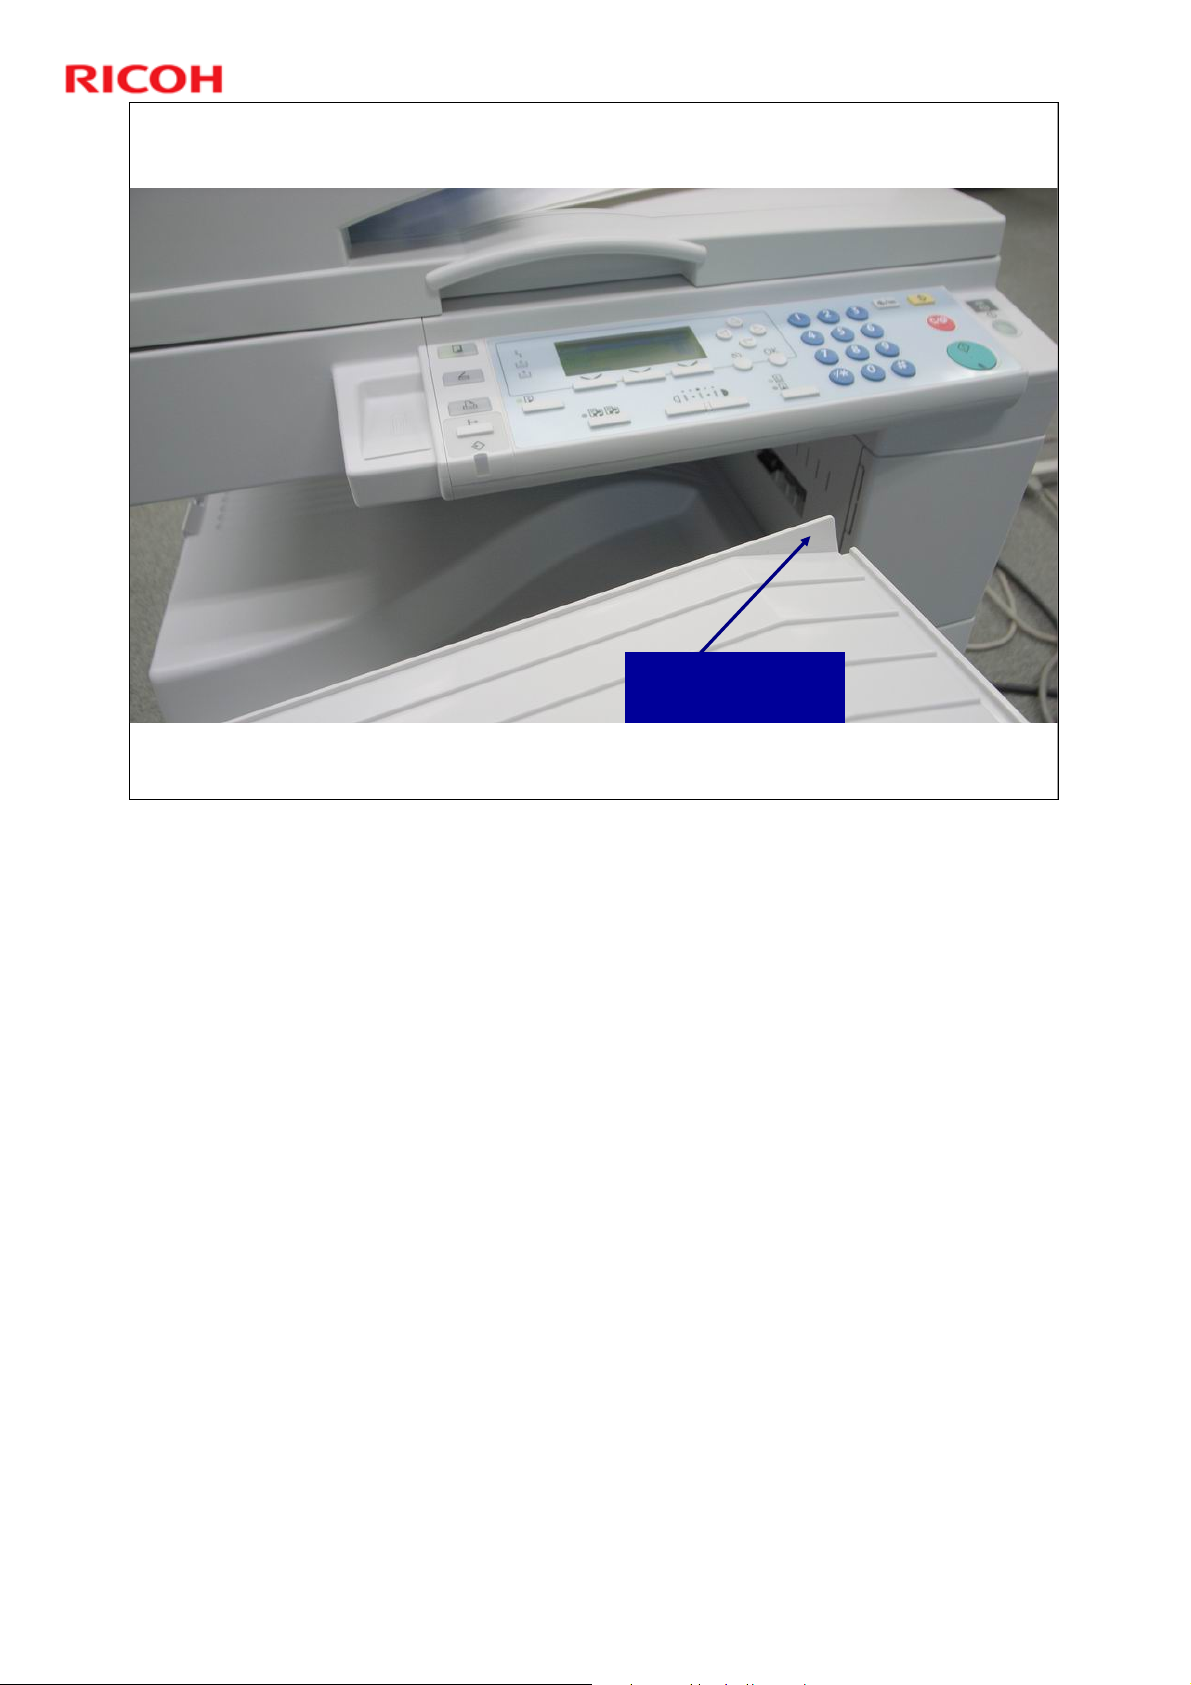
Inverter Tray - 1
(Duplex Model B282-69 only)
Back corner edge
of Inverter Tray
Check that the back corner edge of the Inverter tray is fully against the
back of the slot (see following slides for details).
Note: This is only applicable to when making duplex copies/prints. For single-
sided output, the paper doesn’t come out of the slot just above the Inverter Tray.
For this reason, if the Inverter Tray is out-of-position, single sided
printing/copying will proceed smoothly, with no jamming or errors, while duplex
printing/copying can produce a jam.
R
/
.
t
d
.
h
i
c
t
t
h
w
/
w
/
:
p
L
o
C
o
w
o
i
r
c
.
m
o
h
.
c
25
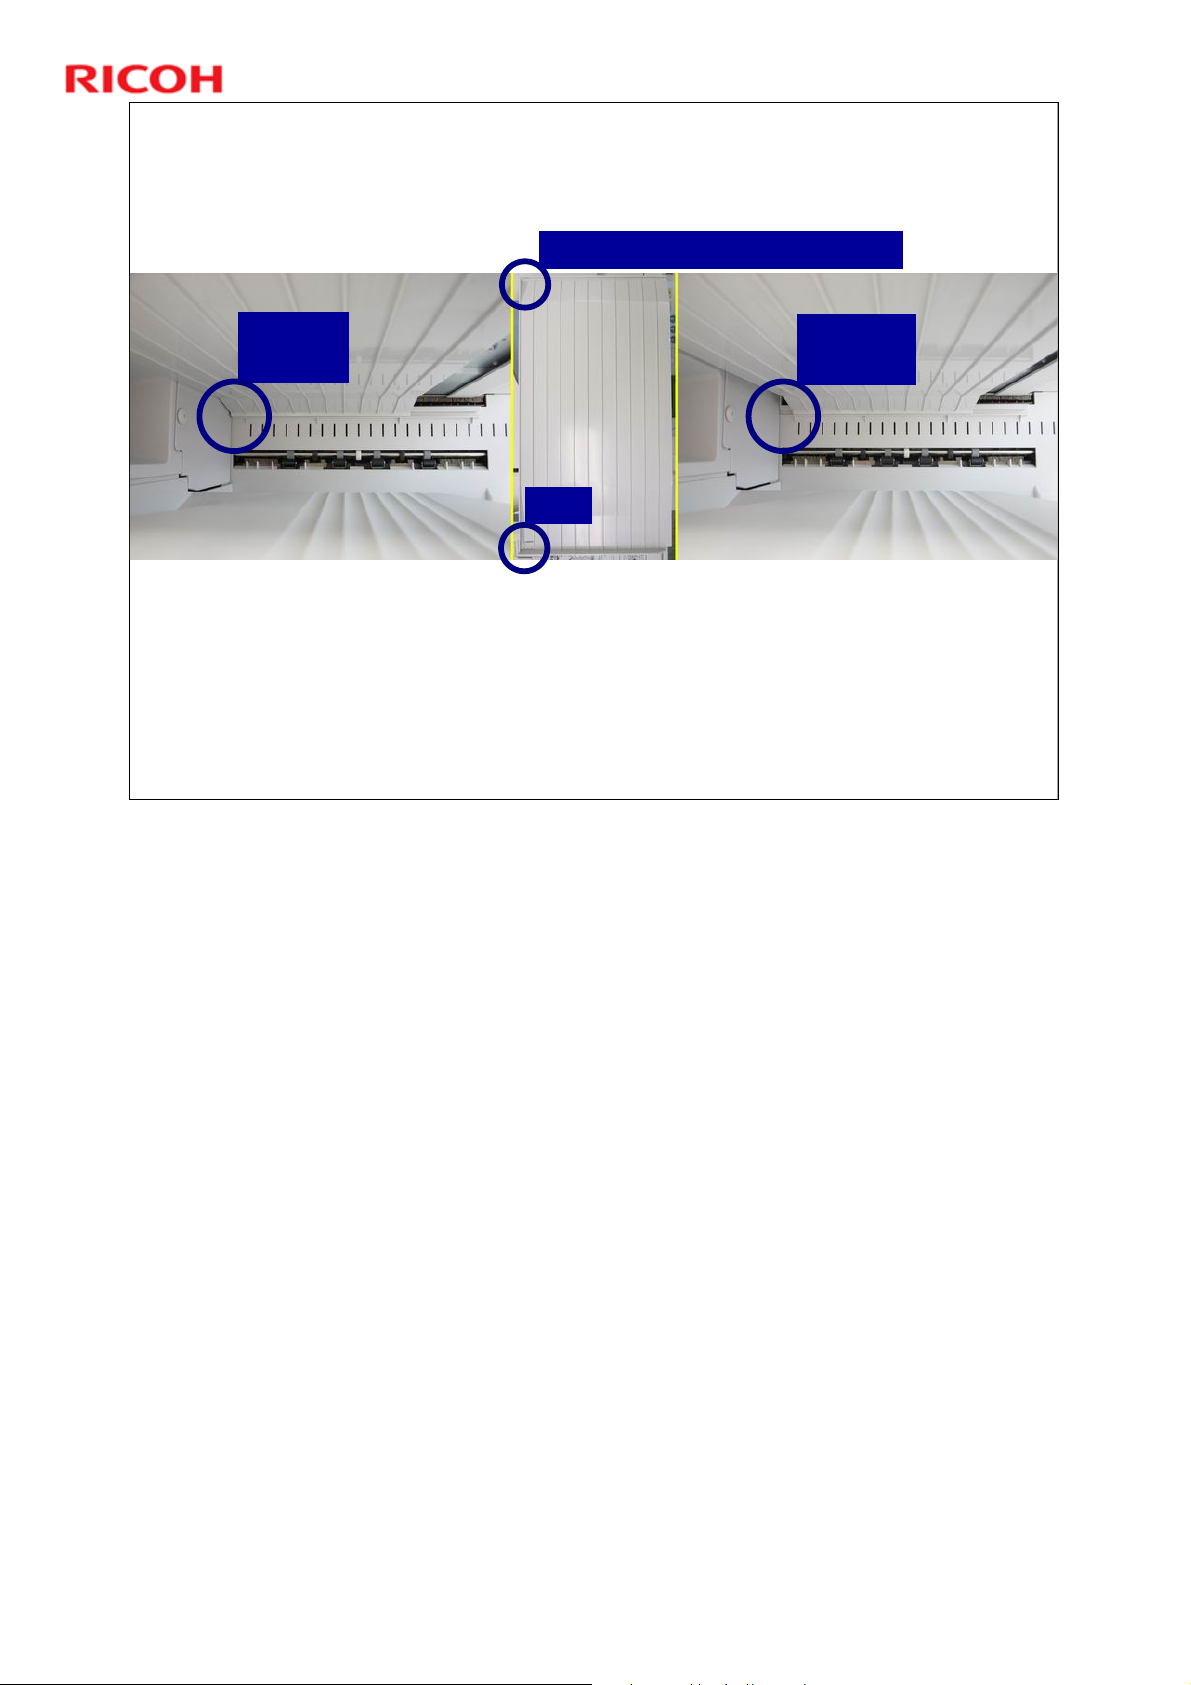
Inverter Tray - 2
(Duplex Model B282-69 only)
Back corner edge of Inverter Tray
Correct
Position
Lock
Incorrect
Position
Insure that the back corner edge of the Inverter Tray is fully against
the back of the slot. If the back corner edge is away from the back
(see right photo above), then duplex printing will jam (see next slide),
due to paper hitting the corner edge (see previous slide).
Note: The Lock is easily released by pulling on the tray to remove it from its
slots.
Note: This is only applicable to when making duplex copies/prints. For single-
sided output, the paper doesn’t come out of the slot just above the Inverter Tray.
For this reason, if the Inverter Tray is out-of-position, single sided
printing/copying will proceed smoothly, with no jamming or errors, while duplex
printing/copying can produce a jam.
R
/
.
t
d
.
h
i
c
t
t
h
w
/
w
/
:
p
L
o
C
o
w
o
i
r
c
.
m
o
h
.
c
26

Inverter Tray
Inverter Tray - 3
(Duplex Model B282-69 only)
Paper jam
Paper jam caused by protruding back corner edge of Inverter Tray
Note: This is only applicable to when making duplex copies/prints. For single-
sided output, the paper doesn’t come out of the slot just above the Inverter Tray.
For this reason, if the Inverter Tray is out-of-position, single sided
printing/copying will proceed smoothly, with no jamming or errors, while duplex
printing/copying can produce a jam.
R
/
.
t
d
.
h
i
c
t
t
h
w
/
w
/
:
p
L
o
C
o
w
o
i
r
c
.
m
o
h
.
c
27

Options
See the Field Service Manual for installation
procedures for the following optional items:
Platen cover, ADF, or ARDF
» Only one of these may be installed.
Network interface board (NIB)
Two-tray paper tray (B384)
One-tray paper tray (B385)
Tray heaters*
Anti-condensation heater (for optics)*
Paper tray grip handles
» *Service options (available if required)
There are tray heaters for the main frame and the optional paper tray units
The paper tray grip handles are accessibility options. Install them if needed.
R
/
.
t
d
.
h
i
c
t
t
h
w
/
w
/
:
p
L
o
C
o
w
o
i
r
c
.
m
o
h
.
c
28

Set SP Modes
Input the product serial number and service contact
numbers.
SP 5811: Serial number
SP 5812: Service telephone
No additional notes.
R
/
.
t
d
.
h
i
c
t
t
h
w
/
w
/
:
p
L
o
C
o
w
o
i
r
c
.
m
o
h
.
c
29

In previous models of this series all firmware
updates were done by flash memory card.
B282-69/B283-69 memory updating is done by:
Flash memory card for BICU firmware update.
SD card for GDI controller update.
Refer to the FSM for update procedure details.
FSM Æ Service Tables Æ Firmware Update
FSM Æ Service Tables Æ Firmware Update
No additional notes.
Firmware Update
Procedure Æ Engine (BICU) Firmware Update
Procedure
Procedure Æ GDI (Printer Scanner) Update
Procedure
R
/
.
t
d
.
h
i
c
t
t
h
w
/
w
/
:
p
L
o
C
o
w
o
i
r
c
.
m
o
h
.
c
30
 Loading...