

Ricoh azalea SAFETY PRECAUTIONS az ed

Warning:
Use of controls or adjustment or performance of procedures other than those specified in this manual may result in hazardous
radiation exposure.
Note: Some illustrations may be slightly different from your machine.
Note: Certain options may not be available in some countries. For details, please contact your local dealer.
Do not make copies of anything which is prohibited from copying by law. The following items are normally prohibited from
copying by national law. Other items may be prohibited by local law.
• Money • Stamps • Bonds • Stocks • Bank drafts
• Checks • Passports • Driver’s licenses
The copy samples in this Operating Instructions differ somewhat from actual copies due to printing effects.
This copier has a function that prevents making counterfeit bills. So, if you use an original image that is similar to a bill, you may not
get proper copies.

SAFETY PRECAUTIONS
SAFETY PRECAUTIONS
About Indications
This manual and product indicate various cautions to allow you to use the product safely in the correct way
and to prevent injuries to you or other people and damages to the property. These indications and their
meanings are shown below.
Warning Indicates that a personal death or serious injury might occur if you handle your copier
R
Caution Indicates that a personal injury or only a property damage might occur if you handle your copier
R
incorrectly ignoring this warning.
incorrectly ignoring this caution.
Examples of Indications
▲▲ indicates an item for which you should take care.
R
m indicates a prohibited operation.
q
Such an operation is drawn specifically within m.
(The mark on the left indicates “No disassembling.”)
r
● indicates an operation which is forced or specified to be performed.
Such an operation is drawn specifically within ●.
(The mark on the left instructs you to “remove the plug from the wall outlet.”)
1

SAFETY PRECAUTIONS
To use your copier safely, the following warnings should always be followed:
RR
R WARNINGS
RR
• Connect the copier to a power source meeting the specifications given on the inside front cover of
this manual. Avoid multiwiring.
• Avoid using an extension cord.
m
• Do not set anything on the power cord.
•Do not plug or unplug the power cord with your hands wet. Otherwise, an electric shock might
occur.
• Make sure that the wall outlet is near the copier and easily accessible.
o
• Do not remove any covers or screws other than those specified in this manual.
q
r
• Do not modify or replace any parts other than those specified in this manual.
• When the main switch is in the Stand-by position, the anticondensation heaters are on. In case of
emergency, unplug the machine’s power cord. Then contact your service representative. Do not
keep using the copier with a fault or defect.
•If foreign matter such as metal, water, or liquid falls inside the copier, turn off the main switch
(including the backup switch for some copier types) and unplug the power cord from the wall outlet.
Then contact your service representative. If you keep using a faulty copier, a fire or electric shock
might occur.
m
s
• Do not place a vase, flowerpot, glass, receptacle containing water, or metal object on the copier. If
the contents fall inside the copier a fire or electric shock might occur.
• Do not incinerate toner or toner containers. Toner dust might ignite when exposed to open flames.
2

To use your copier safely, the following precautions should always be followed:
RR
R CAUTIONS
RR
•Keep the copier away from humidity and dust. Otherwise, a fire or electric shock might occur.
m
o
r
t
o
•The copier must be level within 5 mm, 0.2" both front to rear and left to right.
•After you move the copier, fix it with the caster fixture. Otherwise, the copier might move or fall
causing personal injury.
•When you move the copier, unplug the power cord from the wall outlet. Otherwise, the cord might
be damaged causing a fire or electric shock.
•When the copier will not be used for a long period, disconnect the power cord.
•When you pull out the plug from the socket, grip the plug to avoid damaging the cord and causing
fire or electric shock.
•To avoid possible build-up ozone, make sure to locate this copier in a large well ventilated room
that has an air turnover of more than 30 m3/hr/person.
SAFETY PRECAUTIONS
m
n
•Do not reuse stapled paper . Do not use aluminum foil, carbon-containing paper or other conductive paper. Otherwise, a fire might occur.
•Since some parts of the copier are supplied with high electrical voltage, touch only the parts
specified in this manual otherwise a burn might occur.
3

SAFETY PRECAUTIONS
TABLE OF CONTENTS
SAFETY PRECAUTIONS ...................................................................................................................... 1
About Indications...........................................................................................................................................1
Examples of Indications ................................................................................................................................1
R WARNINGS .............................................................................................................................................. 2
R CAUTIONS ...............................................................................................................................................3
TABLE OF CONTENTS......................................................................................................................... 4
WHERE IS IT & WHAT IS IT...........................................................................7
TOUCH PANEL DISPLAY ..................................................................................................................... 8
FUNCTION INTRODUCTION BY SAMPLE COPIES ..........................................................................10
Coloring An Image And Changing Colors of An Image................................................................................10
Copying Onto A Postcard ............................................................................................................................ 11
Enlarging The Photographic Paper Size (Printed Photograph) To A4 ......................................................... 11
COPIER EXTERIOR ............................................................................................................................ 12
OPTIONS ............................................................................................................................................. 13
OPERATION PANEL ........................................................................................................................... 14
TOUCH PANEL DISPLAY ................................................................................................................... 16
Sample Display and Common Keys............................................................................................................ 16
COLOR FUNCTIONS ...................................................................................17
FULL COLOR COPY/BLACK COPY .................................................................................................. 18
SINGLE COLOR.................................................................................................................................. 19
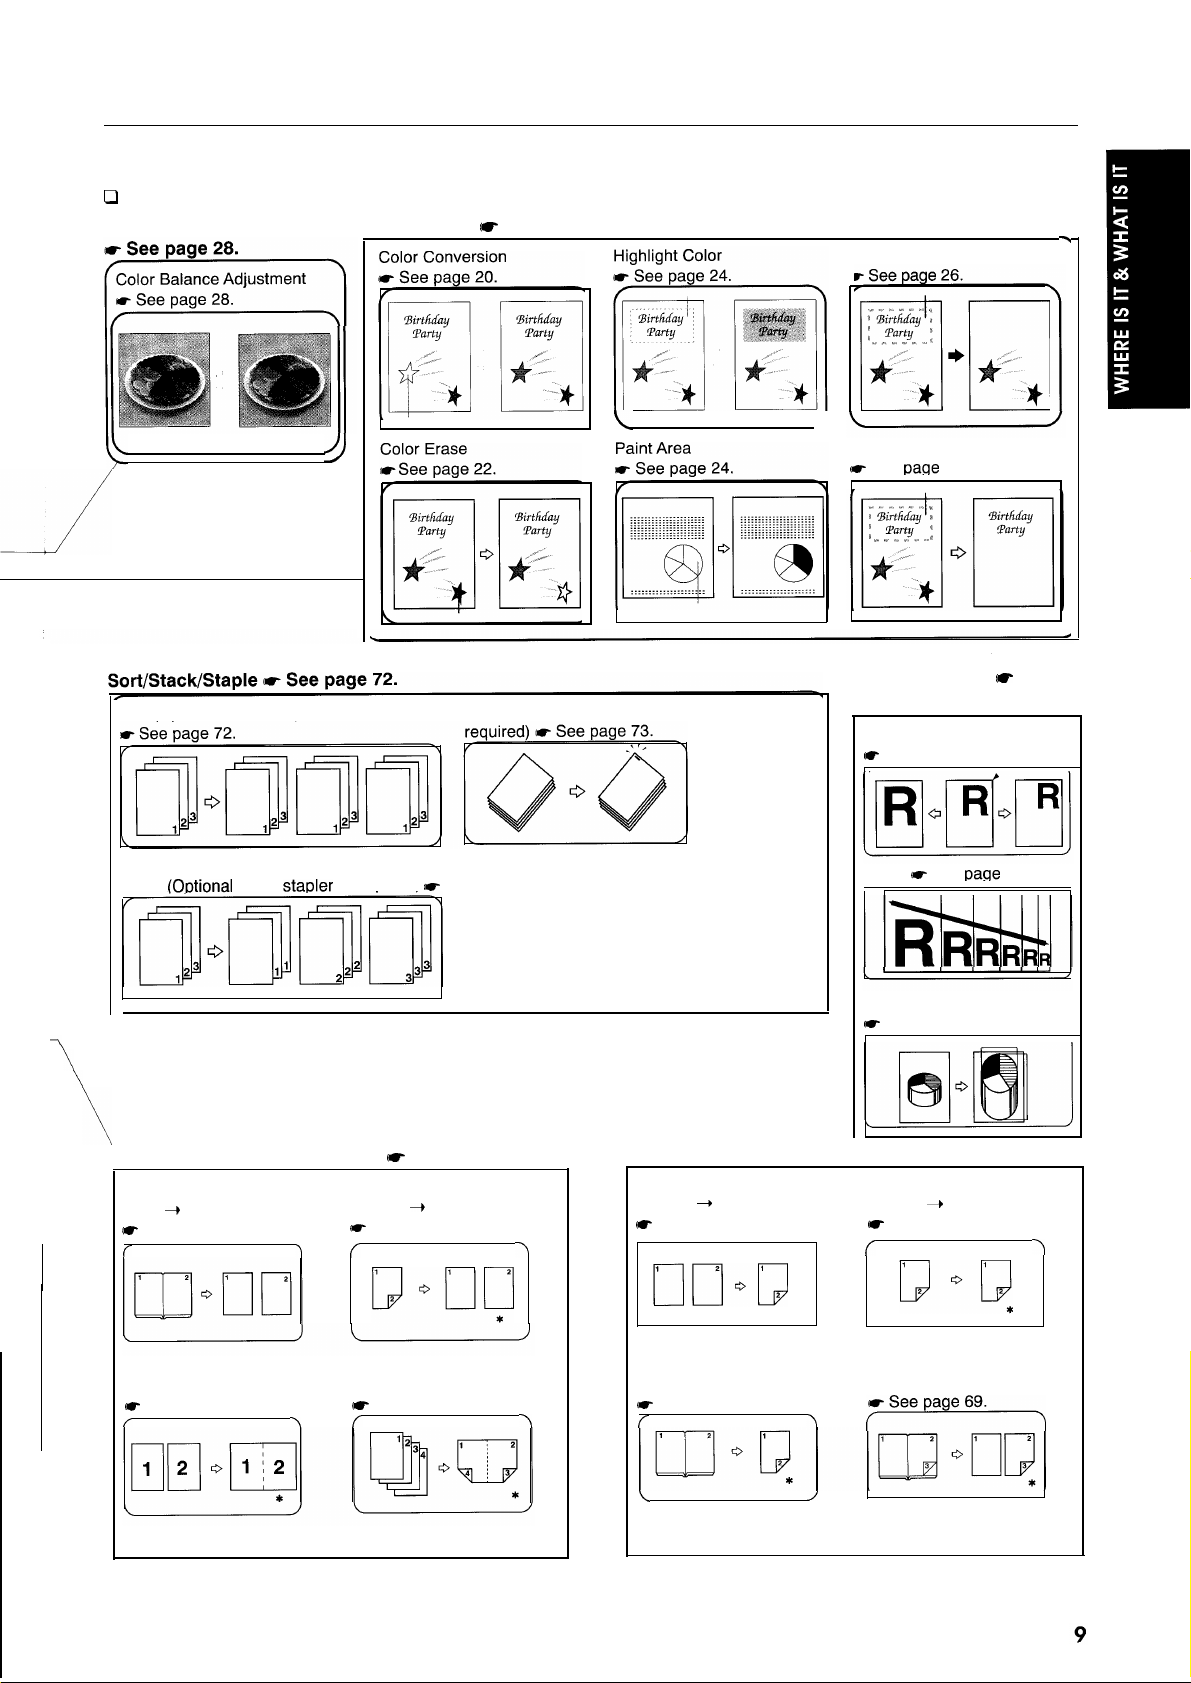
Color Conversion......................................................................................................................................... 20
COLOR CREATION............................................................................................................................. 20
When editing an area .................................................................................................................................. 21
Color Erase .................................................................................................................................................22
When editing an area .................................................................................................................................. 23
AREA EDITING ................................................................................................................................... 24
Highlight Color ............................................................................................................................................. 24
Paint Area....................................................................................................................................................26
Delete Area/Save Area ................................................................................................................................27
COLOR BALANCE.............................................................................................................................. 28
Color Balance Adjustment........................................................................................................................... 28
Color Balance Memory (Change) ................................................................................................................ 29
Color Balance Recall ................................................................................................................................... 29
IMAGE ADJUSTMENT ........................................................................................................................ 30
Background Density Control........................................................................................................................ 30
Pastel ..........................................................................................................................................................31
Sharp/Soft ...................................................................................................................................................31
Auto Color Calibrator ................................................................................................................................... 32
USER COLOR CREATION.................................................................................................................. 34
BASIC ........................................................................................................... 35
Non-recommended Originals For The Optional Document Feeder.............................................................36
ORIGINALS ......................................................................................................................................... 36
Recommended Originals............................................................................................................................. 36
Original Sizes Difficult to Detect ..................................................................................................................37
Original Sizes and Detection Range ...........................................................................................................37
PAPER ................................................................................................................................................. 38
Recommended Paper Sizes and Types...................................................................................................... 38
Non-recommended Paper ...........................................................................................................................39
Paper Storage .............................................................................................................................................39
Paper Loading .............................................................................................................................................39
TONER................................................................................................................................................. 40
Handling Toner ............................................................................................................................................40
Toner Storage ..............................................................................................................................................40
How To Add Toner .......................................................................................................................................40
Used Toner ..................................................................................................................................................40
4

SAFETY PRECAUTIONS
CHANGING PAPER SIZE.................................................................................................................... 41
Changing Paper Size For Optional Paper Tray Unit....................................................................................41
USEFUL FUNCTIONS ......................................................................................................................... 43
Stand-by ......................................................................................................................................................43
Interrupt Copy.............................................................................................................................................. 43
Auto Start ....................................................................................................................................................43
User Code ................................................................................................................................................... 43
Program....................................................................................................................................................... 43
COPYING...................................................................................................... 45
BASIC OPERATION ............................................................................................................................ 46
SETTING ORIGINALS......................................................................................................................... 47
Setting originals on the exposure glass (platen glass) ................................................................................47
Setting originals in the optional document feeder........................................................................................48
FUNCTION COMBINATION CHART................................................................................................... 49
BASIC FUNCTIONS ............................................................................................................................ 50
Color Selection ............................................................................................................................................50
Image Density Adjustment...........................................................................................................................51
Original Image Type Selection ....................................................................................................................52
Auto Reduce/Enlarge .................................................................................................................................. 53
Copy Paper Selection.................................................................................................................................. 53
COPYING FROM THE BYPASS FEED TABLE .................................................................................. 54
When Copying Onto OHP Sheets or Thick Paper....................................................................................... 55
Two-Sided Copies .......................................................................................................................................56
INTERRUPT COPYING ....................................................................................................................... 58
Preset Reduce/Enlarge ............................................................................................................................... 59
ZOOM AND PRESET REDUCE/ENLARGE........................................................................................ 59
ZOOM .................................................................................................................................................. 61
DIRECTIONAL MAGNIFICATION .......................................................................................................62
MARGIN ADJUSTMENT ..................................................................................................................... 63
CENTERING ........................................................................................................................................ 64
FULL IMAGE ....................................................................................................................................... 65
MAKING ONE-SIDED COPIES FROM VARIOUS ORIGINALS.......................................................... 66
COMBINATION COPYING .................................................................................................................. 67
TWO-SIDED COPYING ....................................................................................................................... 69
SORT/STACK AND ST APLE............................................................................................................... 72
Sort/Stack ....................................................................................................................................................72
Staple .......................................................................................................................................................... 73
Auto Staple ..................................................................................................................................................73
Manual Staple .............................................................................................................................................73
PROGRAM .......................................................................................................................................... 74
Program Memory/Recall..............................................................................................................................74
Program Recall............................................................................................................................................ 75
WHEN COPYING A LARGE ORIGINAL ............................................................................................. 76
Removing the platen cover..........................................................................................................................76
Attaching the platen cover...........................................................................................................................76
AREA EDITING............................................................................................. 77
WHAT IS AREA EDITING.................................................................................................................... 78
Function Combination Chart........................................................................................................................ 78
BASIC OPERATION OF AREA EDITING............................................................................................ 79
DESIGNA TING AREAS ....................................................................................................................... 82
Operating the Area Designation Screen......................................................................................................82
How to Designate An Area ..........................................................................................................................83
CHANGING THE COPIER’S SETTINGS ..................................................... 87
CHANGING THE COPIER’S SETTINGS............................................................................................. 88
Resetting The Copier’s Settings.................................................................................................................. 89
FUNCTION OVERVIEW ...................................................................................................................... 90
User Tool Menu ........................................................................................................................................... 92
5

SAFETY PRECAUTIONS
WHAT TO DO IF SOMETHING GOES WRONG ..........................................99
IF YOU CANNOT MAKE COPIES AS YOU WANT...........................................................................100
c IS LIT: LOADING PAPER ............................................................................................................. 102
a IS LIT OR BLINKING: ADDING TONER ...................................................................................... 103
Adding Black Toner ................................................................................................................................... 103
Adding Color Toner .................................................................................................................................... 105
b IS LIT: CLEARING MISFEEDS ....................................................................................................107
When A and/or B Is Lit ...............................................................................................................................107
When C Is Lit .............................................................................................................................................109
When D Is Lit ............................................................................................................................................. 111
When P Is Lit ............................................................................................................................................. 112
When R Is Lit ............................................................................................................................................. 112
When Y Is Lit ............................................................................................................................................. 113
When Z Is Lit .............................................................................................................................................113
d IS LIT: ADDING STAPLES ........................................................................................................... 115
REMOVING JAMMED STAPLES ...................................................................................................... 117
IF YOU CANNOT START COPYING................................................................................................. 120
MAINTAINING YOUR COPIER................................................................... 123
WHERE TO PUT YOUR COPIER...............................................................123
DO’S AND DON’TS .................................................................................... 123
IF YOUR COPIER DOES NOT OPERATE AS YOU WANT ..............................................................124
DO’S AND DON’TS ........................................................................................................................... 125
Storing Color Copies .................................................................................................................................125
WHERE TO PUT YOUR COPIER...................................................................................................... 126
When Moving The Copier To The Same Level .......................................................................................... 126
Copier Environment After Moving..............................................................................................................126
Space Required for Installing The Copier .................................................................................................127
Power Connection .....................................................................................................................................127
Cleaning The Exposure Glass (Platen Glass) ........................................................................................... 128
Cleaning The Platen Cover .......................................................................................................................128
Cleaning The ADF Belt..............................................................................................................................128
MAINT AINING YOUR COPIER.......................................................................................................... 128
PROJECTOR UNIT (OPTION) OPERATION ............................................. 129
GUIDE TO COMPONENTS ...............................................................................................................130
BEFORE OPERATING THE PROJECTOR....................................................................................... 132
Available Films And Setting.......................................................................................................................132
About Copying ...........................................................................................................................................132
Notes For Operation..................................................................................................................................133
OPERATION FLOW........................................................................................................................... 134
SETTING THE PROJECTOR IN POSITION...................................................................................... 135
SHADING........................................................................................................................................... 136
Setting Copier’s Functions ........................................................................................................................140
Adjusting The Color Tone And Brightness................................................................................................. 141
Changing The Copy Settings ....................................................................................................................141
Exiting The Projector Mode .......................................................................................................................143
IF THE PROJECTOR UNIT DOES NOT OPERATE AS YOU WANT................................................144
DAILY MAINTENANCE.............................................................................................................................146
SPECIFICATIONS ...................................................................................... 147
COPIER ............................................................................................................................................. 148
DOCUMENT FEEDER ....................................................................................................................... 150
PAPER TRAY UNIT ........................................................................................................................... 150
SORTER STAPLER........................................................................................................................... 151
PPC TABLE....................................................................................................................................... 152
PPC FILM PROJECTOR ................................................................................................................... 152
INDEX ......................................................................................................... 153
6

k
WHERE IS IT
& WHAT IS IT

TOUCH PANEL DISPLAY
Image Adjustment [= See paqe 30.
Background Density Control & See page
30.
Auto Color Calibrator * See page 32.
Original Image Type,
Selection
w
See page 52.
Copy Paper Selection
[~ See page 53.
TOUCH PANEL DISPLAY
Pastel
(*
See page 31.
Lighter
=
Normal
Y
Auto Reduce/Enlarge
[~ See page 53.
Image Density Adjustment
2olor
Selection [= See
Full Color Copy
e
See page 18.
I
Sinale Color = See
I
pa~e
Daae
19.
(= See page 51.
18.
Black Copy
&
See page 18.
I
I
Shift/Book
[~ See page 63.
Cyan, Magenta, Yellow, Red, Blue, Green
8
TOUCH PANEL DISPLAY
Q
Copy samples are expressed in the print processing mode to clarify the difference between the functions.
(-
Color Balance Adjustment
Area Editing
●
See pages 24 and 77.
Delete Area
Save Area
-
See
~aae
27.
Reduce/Enlarge - See
Sort (Optional sorter stapler is required)
Staple (Optional sorter stapler is
page 59.
Preset Reduce/Enlarge
*
See page 59.
-
\
Stack
(OtXional
sorter sta~ler is required)
\
\
\
\
Single Copies/Duplex/Combine (- See page 66.
Single Copies
+
1 Sided
Book
*
See page 66.
{
Combine
Combine
#
See page 67.
f
>
2 Sided
*
)
(
Combine 4 originals
*
{
See page 66.
See page 67.
-
+
1 Sided
See page
7
72.
\
Duplex
1 Sided
t-
Single
=
+
See page 69.
See page 69.
f
2 Sided
Zoom
Directional Magnification
*
See page 62.
2 Sided
-
See page 69.
(
Multi
>
~
=
See
+
2 Sided
Paqe
61.
>
*Optional document feeder is required.
\
*Optional document feeder is
)
required.
FUNCTION INTRODUCTION BY SAMPLE COPIES
FUNCTION INTRODUCTION BY SAMPLE COPIES
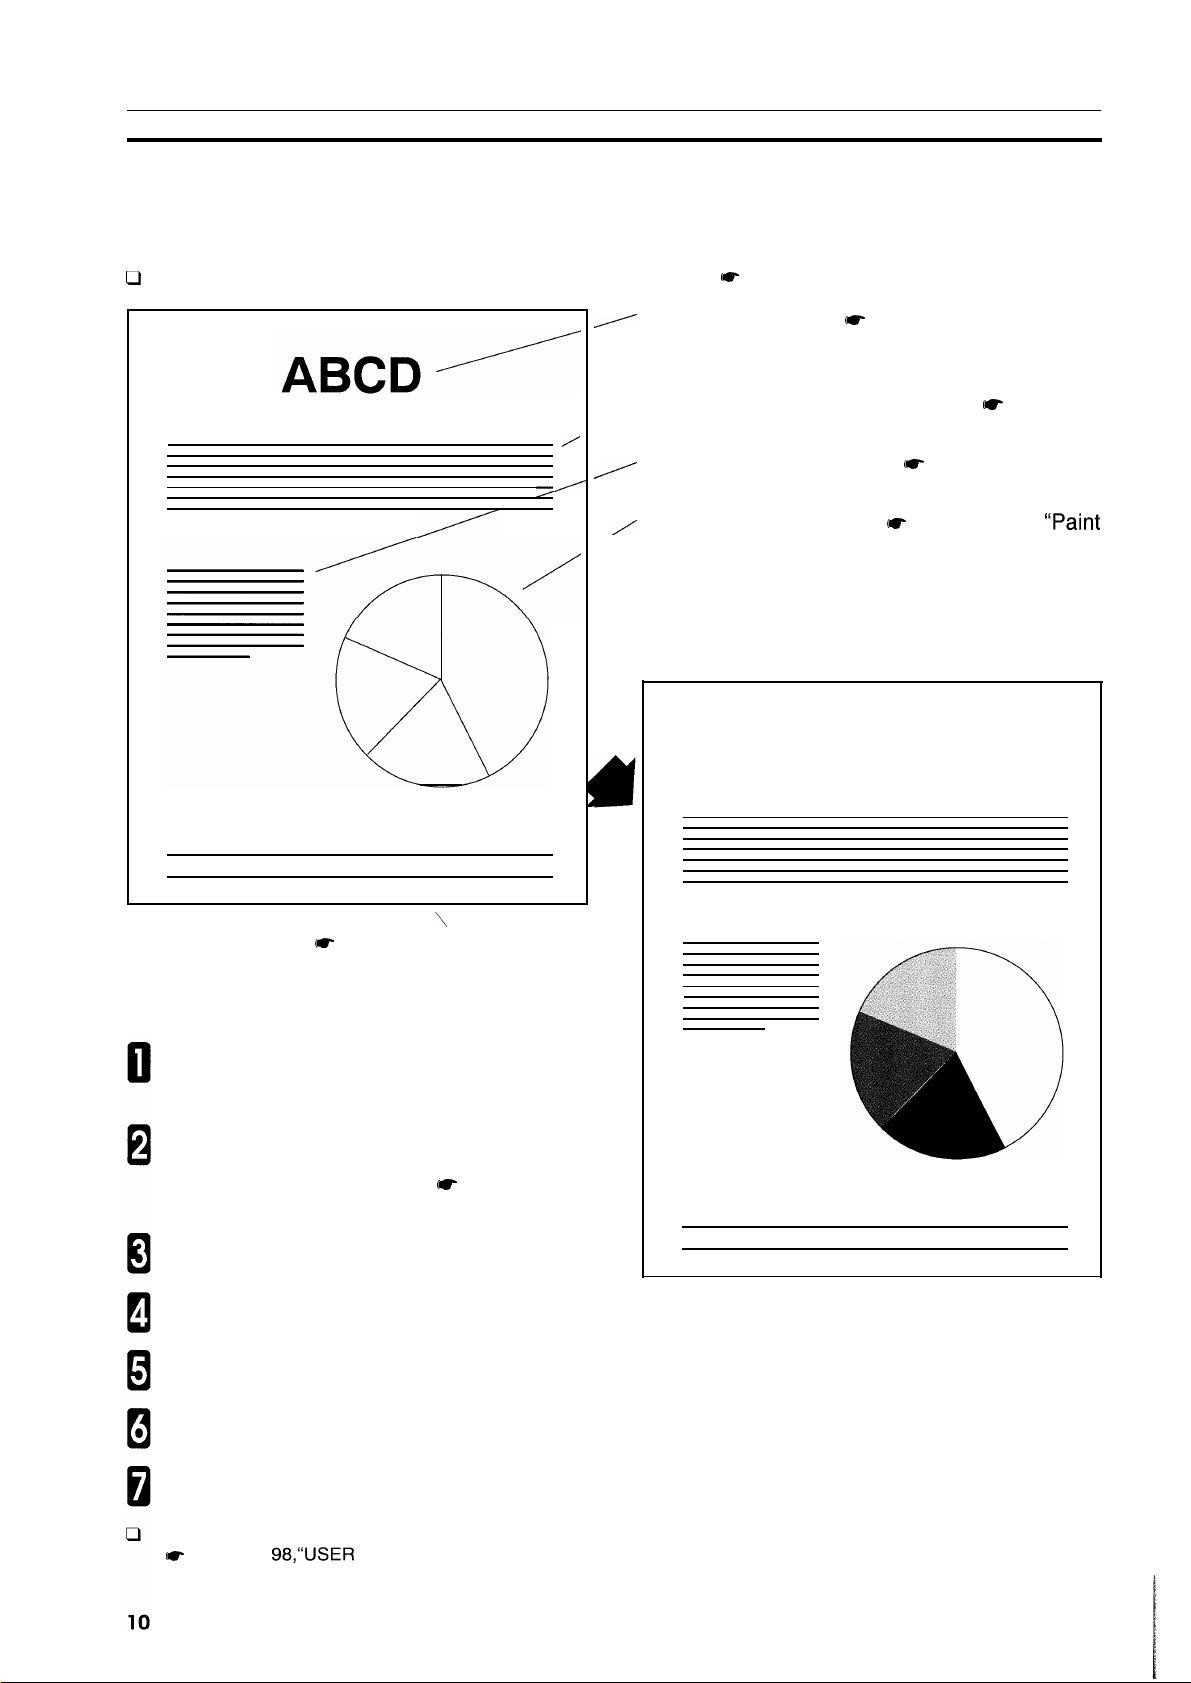
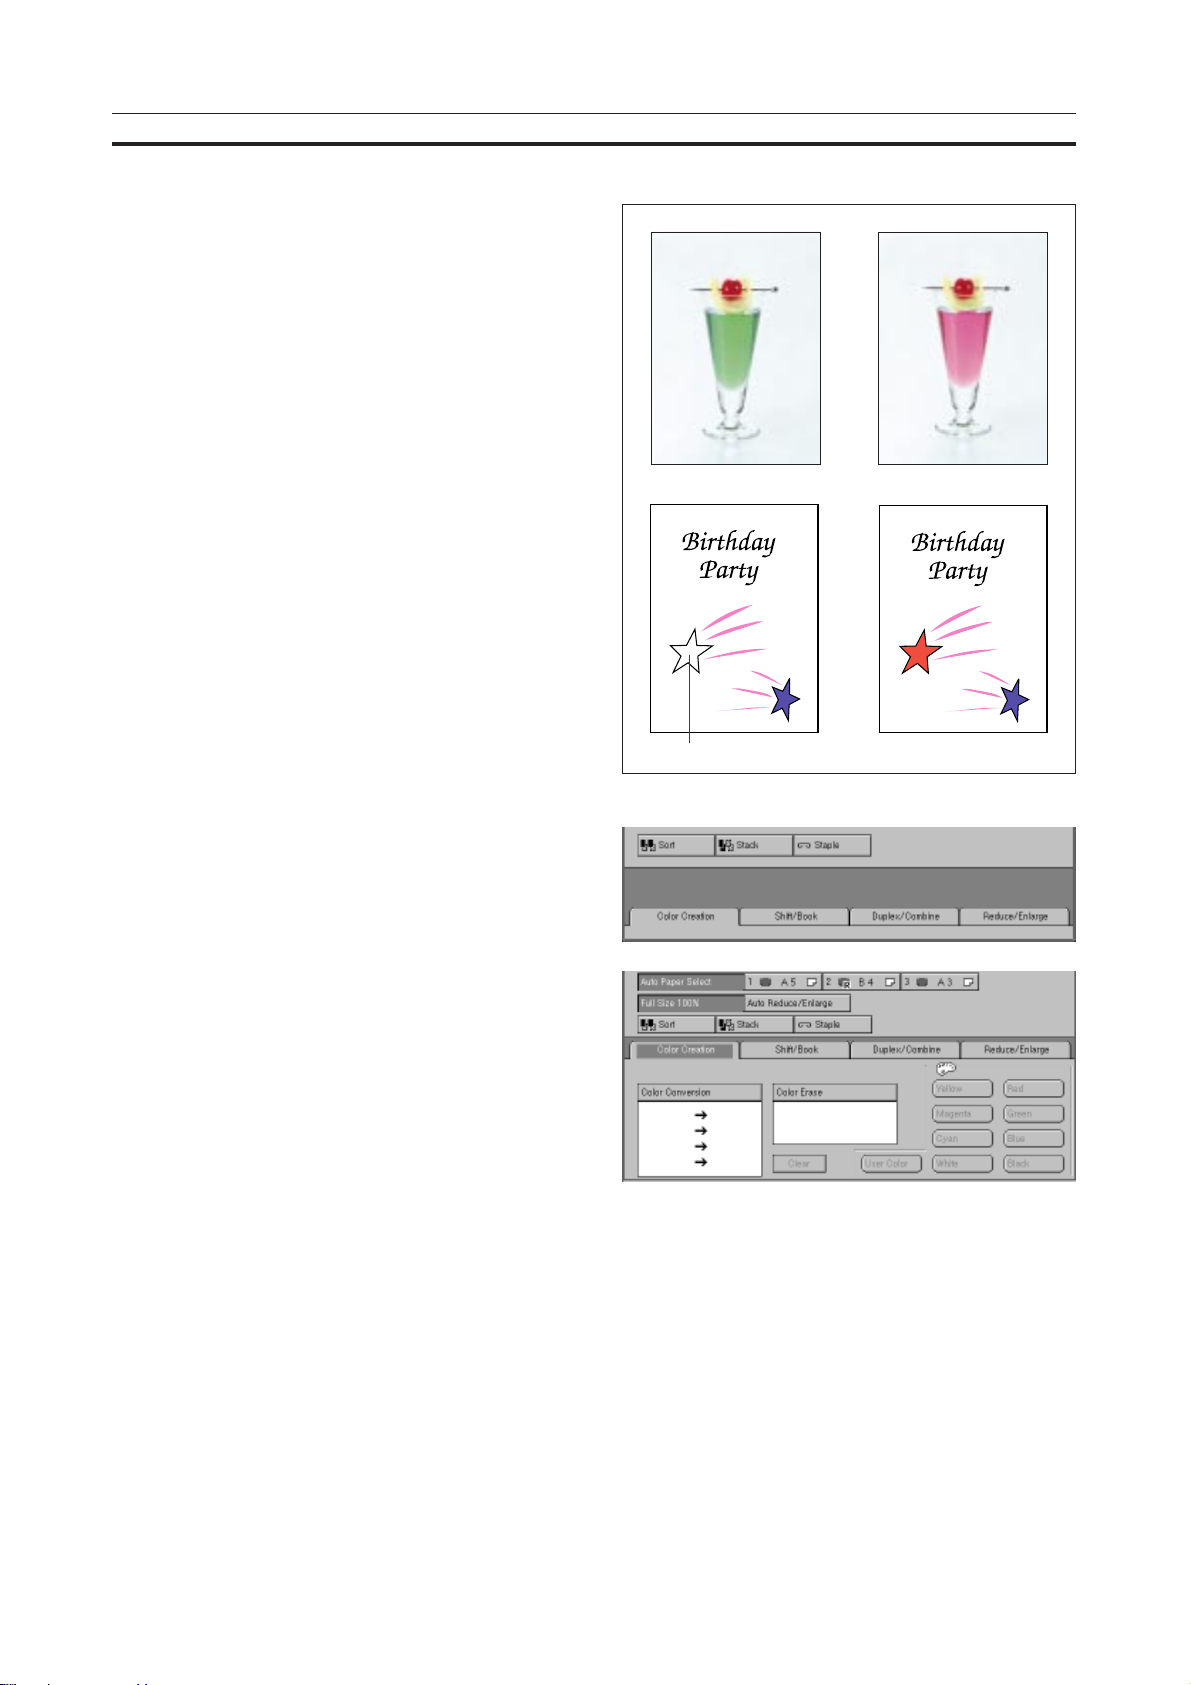
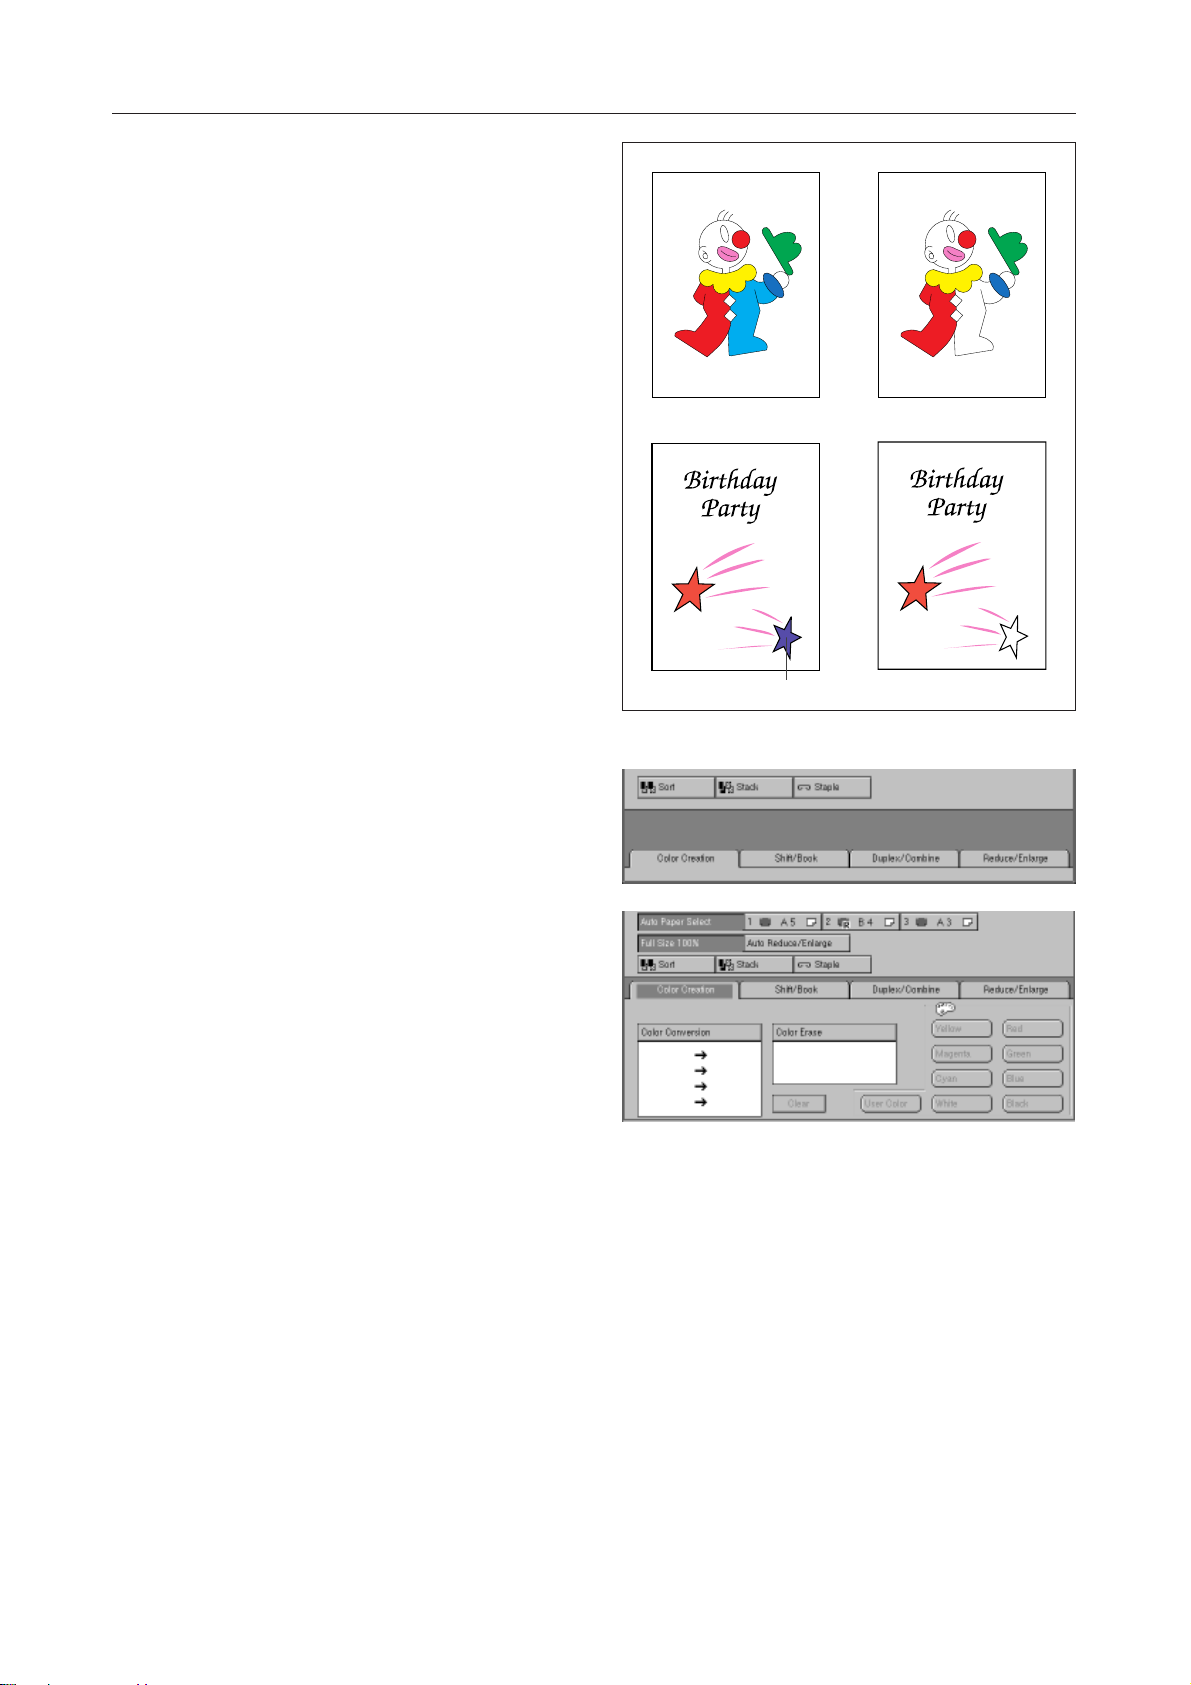
Coloring An Image And Changing Colors of An Image
D
Designate areas with a broken line or a frame and specify functions. t= See page 24, “AREA EDITING.”
-
Turn the letters green. (- See page 20, “Color Con-
version” and page 19, “Color Selection (Single
Color).”
Color the background of the image.
/
/
24, “Highlight Color.”
=
Erase the character strings. (- See page 27, “De-
lete Area.”
z
Fill the areas with colors. w See page 26, “Paint
‘ Area.”
[-
See page
\
Erase the red letters. f- See page 22, “Color Erase.”
Operational Procedure
Touch the [Area Editing] key and set your origi-
nal,
Touch the [Scan] key and select the way to
designate an area ([Rectangle], [Polygon 1],
t-
[Polygon 2], [Closed Loop]).
“How To Designate An Area.”
Use the
area.
Select modes for inside the area and touch the [Exit] key.
Cursor
and
Point
See page 83,
keys to designate the
ABCD
Touch the [Outside (Area)] key. Specify an edit function and touch the [Exit] key.
Touch the [Exit] key .
When you specify Highlight Color, select color modes.
You can also fill (paint) a frame with a created color or make
(~ See page
98,’’USER
TOOLS, [12] Create A User Color.”
copies in a color (single color copying in area editing).
FUNCTION INTRODUCTION BY SAMPLE COPIES
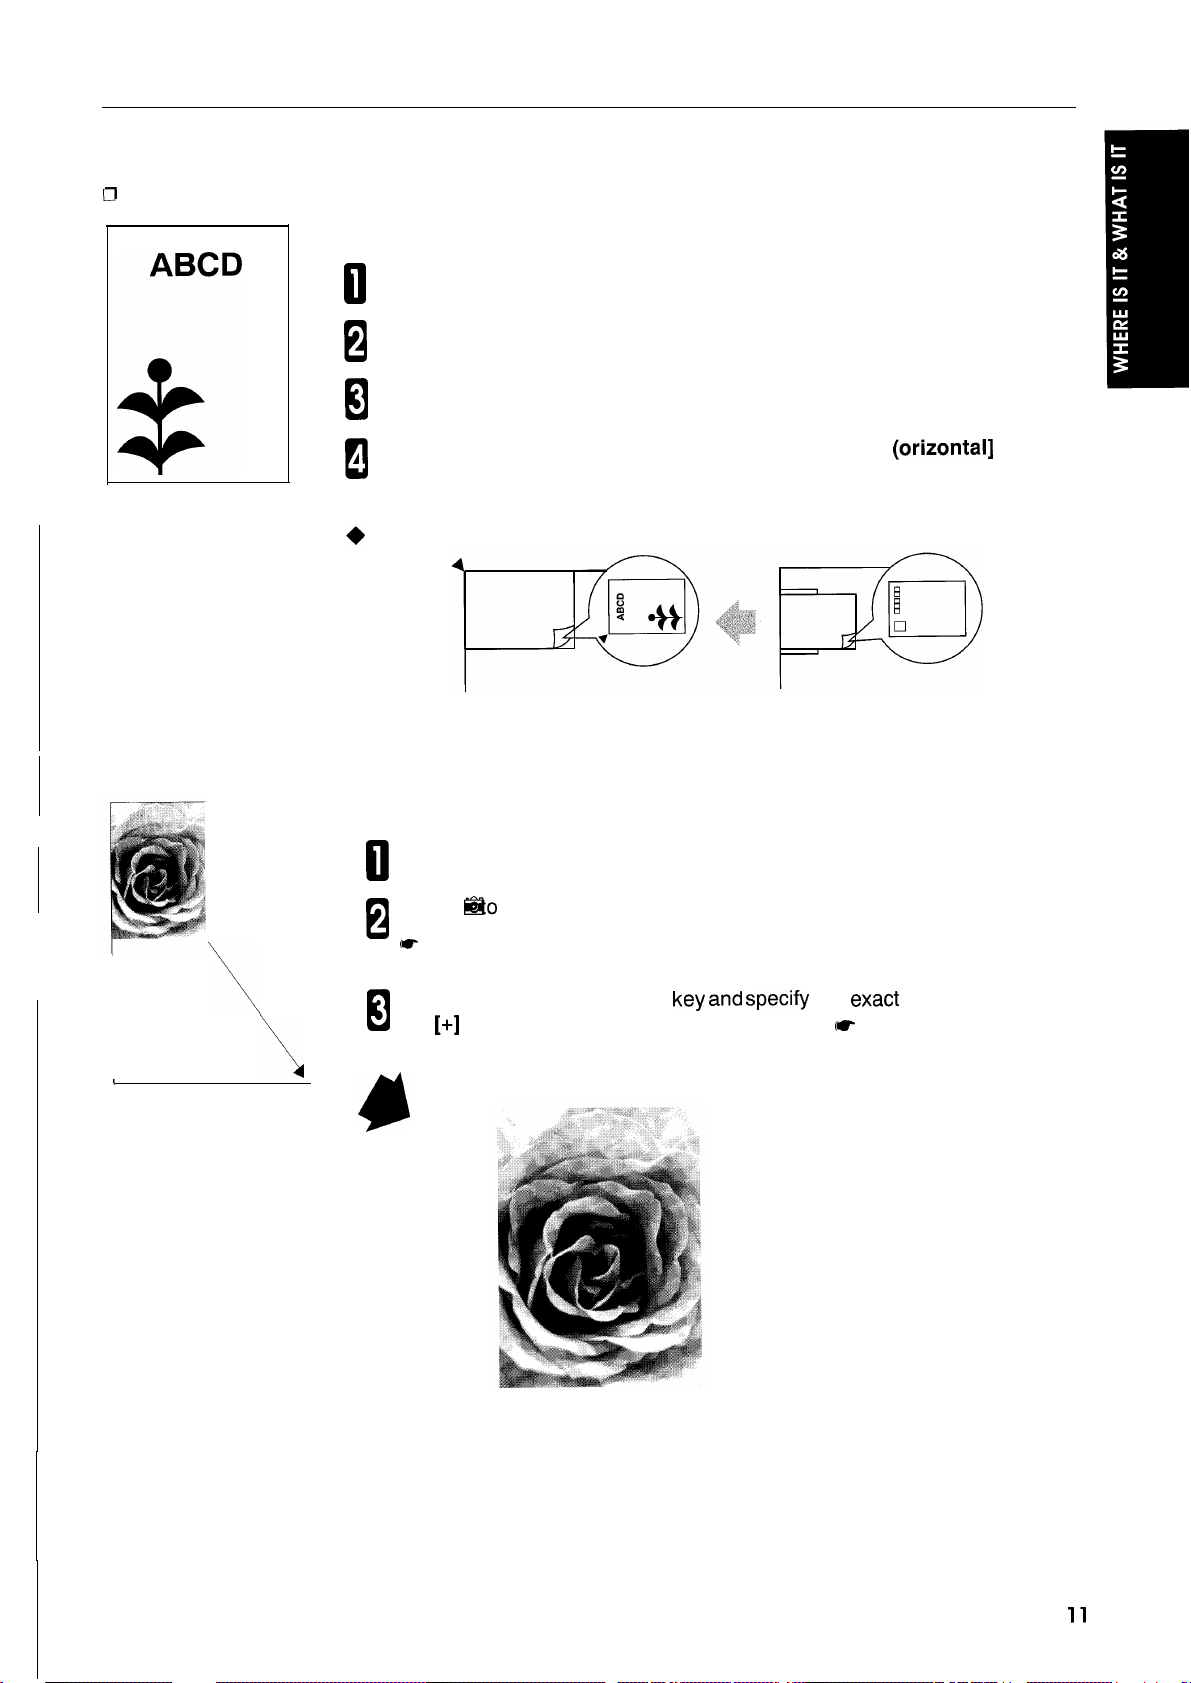
Copying Onto A Postcard
CI
The copier copies onto postcards using the bypass feed tray. Be sure to set a postcard in the correct direction.
Operational Procedure
Touch the [Full Color] key.
u
Set your original.
B
Open the bypass feed table and touch the paper size on the touch panel display.
KI
i
Set a postcard in the bypass feed table. Touch the [H (orizontal] key and
u
touch the [Thick Paper] key. See page
FEED TABLE.”
Direction of setting an original and postcard
54, “COPYING FROM THE BYPASS
Enlarging The Photographic Paper Size (Printed Photograph) To A4
Operational Procedure
Touch the [Full Color] key.
u
I
(88 x 127
mm)
Touch
B
*
Touch the [Reduce/Enlarge]
El
the
@ito
specify the photograph type.
See page 52, “Original Image Type Selection.”
key and specify
[+] and [-] keys or the [Number Keys] key. = See page 61, “ZOOM.”
A4 size (232 %)
the
exact
magnification using
11
COPIER EXTERIOR
COPIER EXTERIOR
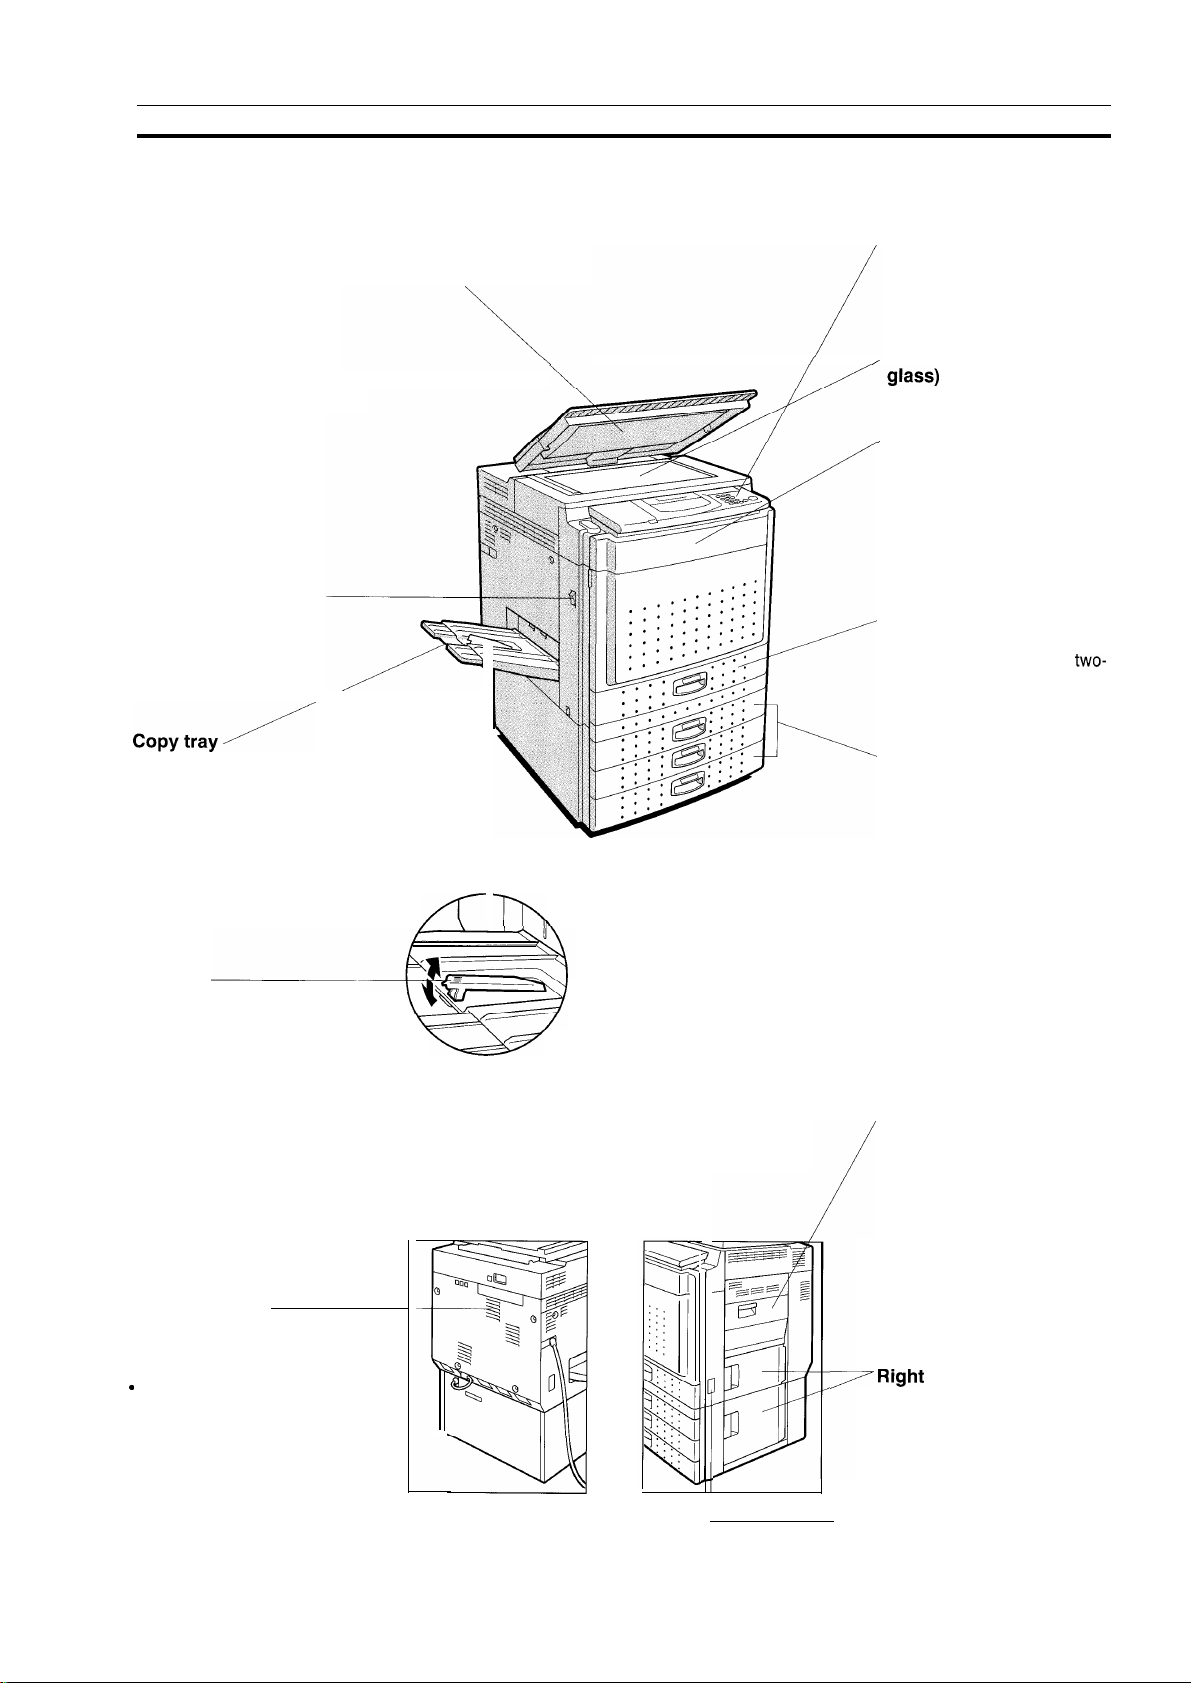
Main switch
Switches copier on/off.
Completed copies are delivered
here,
Platen cover
Presses an original set on the
exposure glass (platen glass).
\
\
Operation panel
/
Exposure glass (platen
/
Fit originals to the rear left corner.
Front cover
Open to remove misfed paper
or supply toner.
Unit for two-sided
copying
This unit is used to make two-
sided copies.
Optional paper tray unit
Stopper
Protects delivered paper from
rounding when copying onto thin
paper.
Ventilation hole
Protects the temperature from
rising excessively inside the machine.
.
Do not obstruct the ventilation
hole by placing or leaning an
object around the hole. If the
temperature rises excessively
inside the copier, a fault might
occur,
Bypass feed table
Used to copy onto postcards,
OHP sheets, or thick paper as
well as non-standard size paper.
/
~ Right
— Key counter holder
side cover
Open to remove misfed paper.
Set the key counter (option).
12
OPTIONS
OPTIONS
– Sorter stapler (1O-bin)
eSee
page 72.
Automatically sorts copies or
binds them with the stapler.
r
Bin
Document feeder
Insert a stack of originals
here.
— Projector unit
I
—
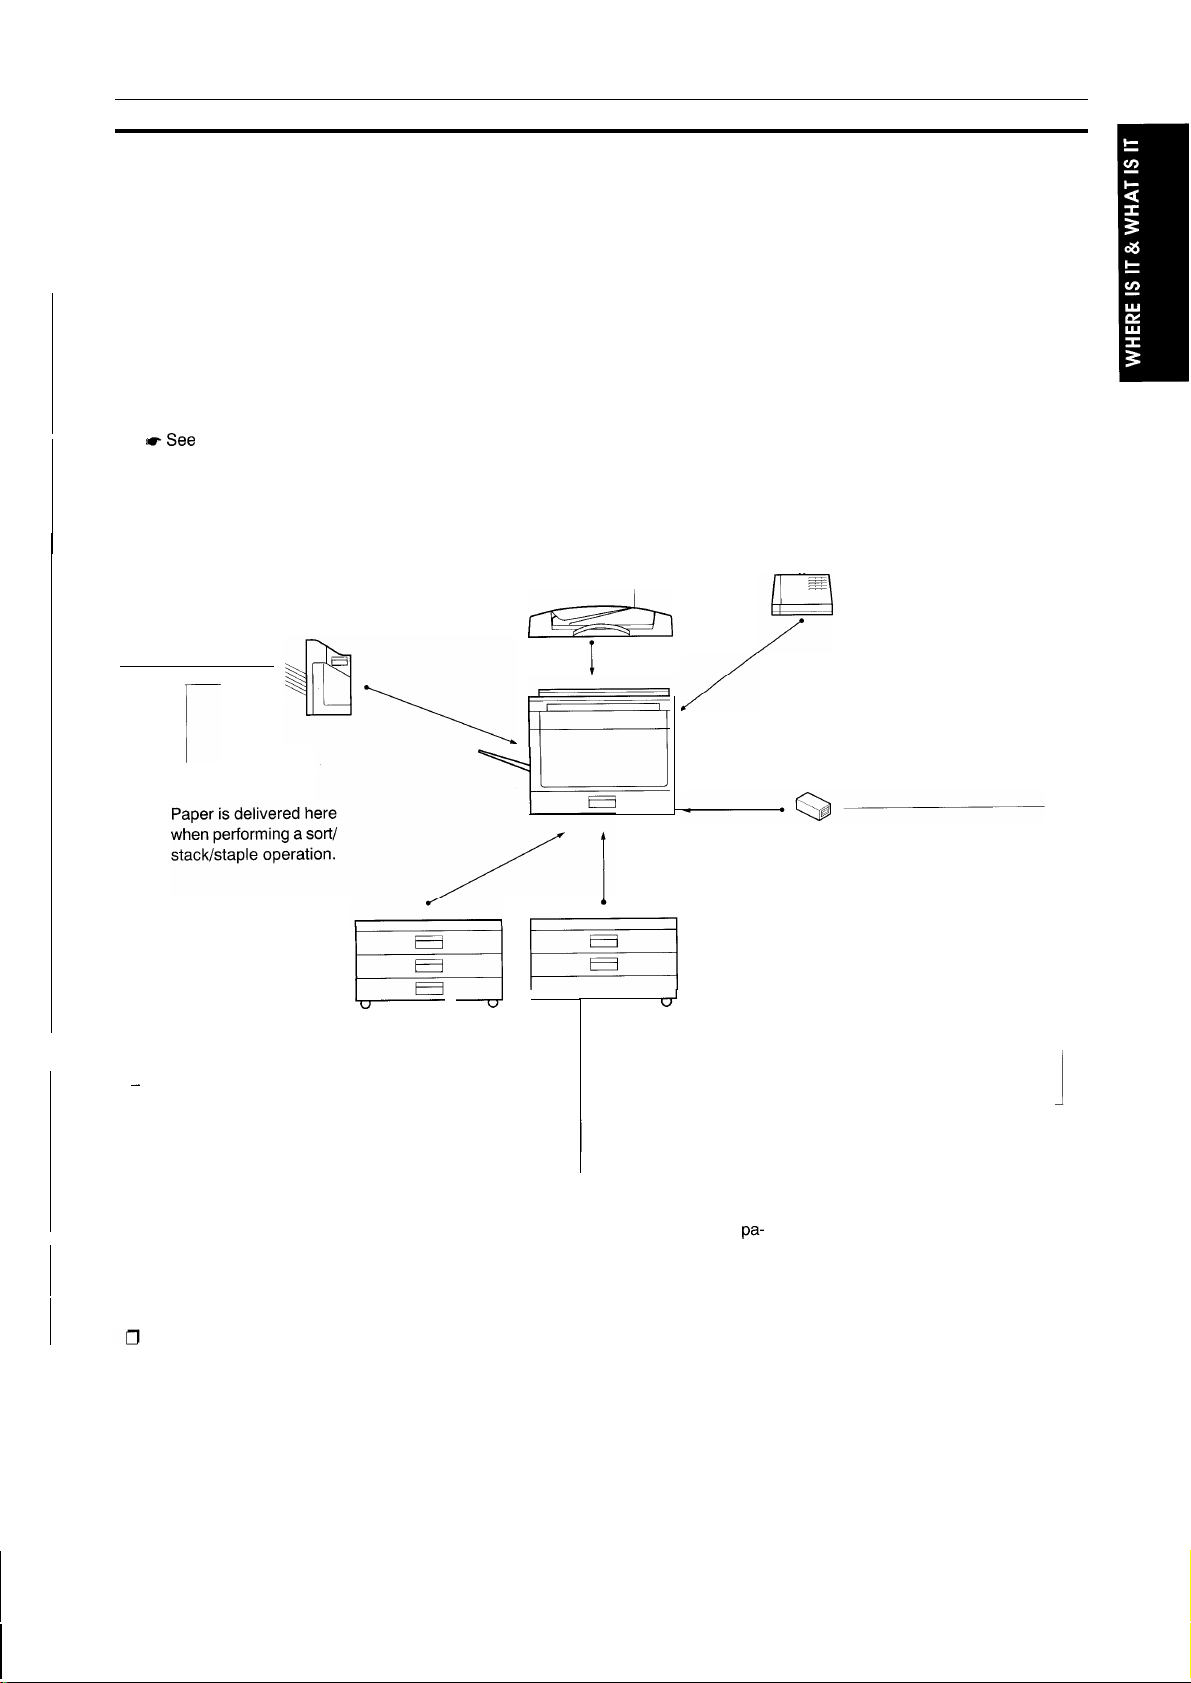
Delivered paper tray
Paper is delivered here
when a sort/
stack/staple operation is not performed.
1500-sheet tray unit
.
(three 500-sheet trays)
Consists of the three-layer
paper trays.
1000-sheet tray unit
(two 500-sheet trays)
Consists of the two-layer
per trays.
For the paper tray unit, either the 1000-sheet tray unit or the
Key counter —
pa-
500-sheet tray unit can be attached.
13

OPERATION PANEL
OPERATION PANEL
Touch Panel Display —
Shows operation status and
messages. See page
‘(TOUCH PANEL DISPLAY.”
8,
Copy Counter
Indicates the specified number
of copies before a copy run, and
the number of copies made or
rest of copies to be made during
a copy run,
14
Number Keys, . Key
Use to enter a value for the
number of copies, magnification,
etc.
Cursor Key
Moves the cursor
area on an image.
● When you press the Cursor key after
touching the [Scroll Screen] key, the
image scrolls on the screen,
(->)
to designate an
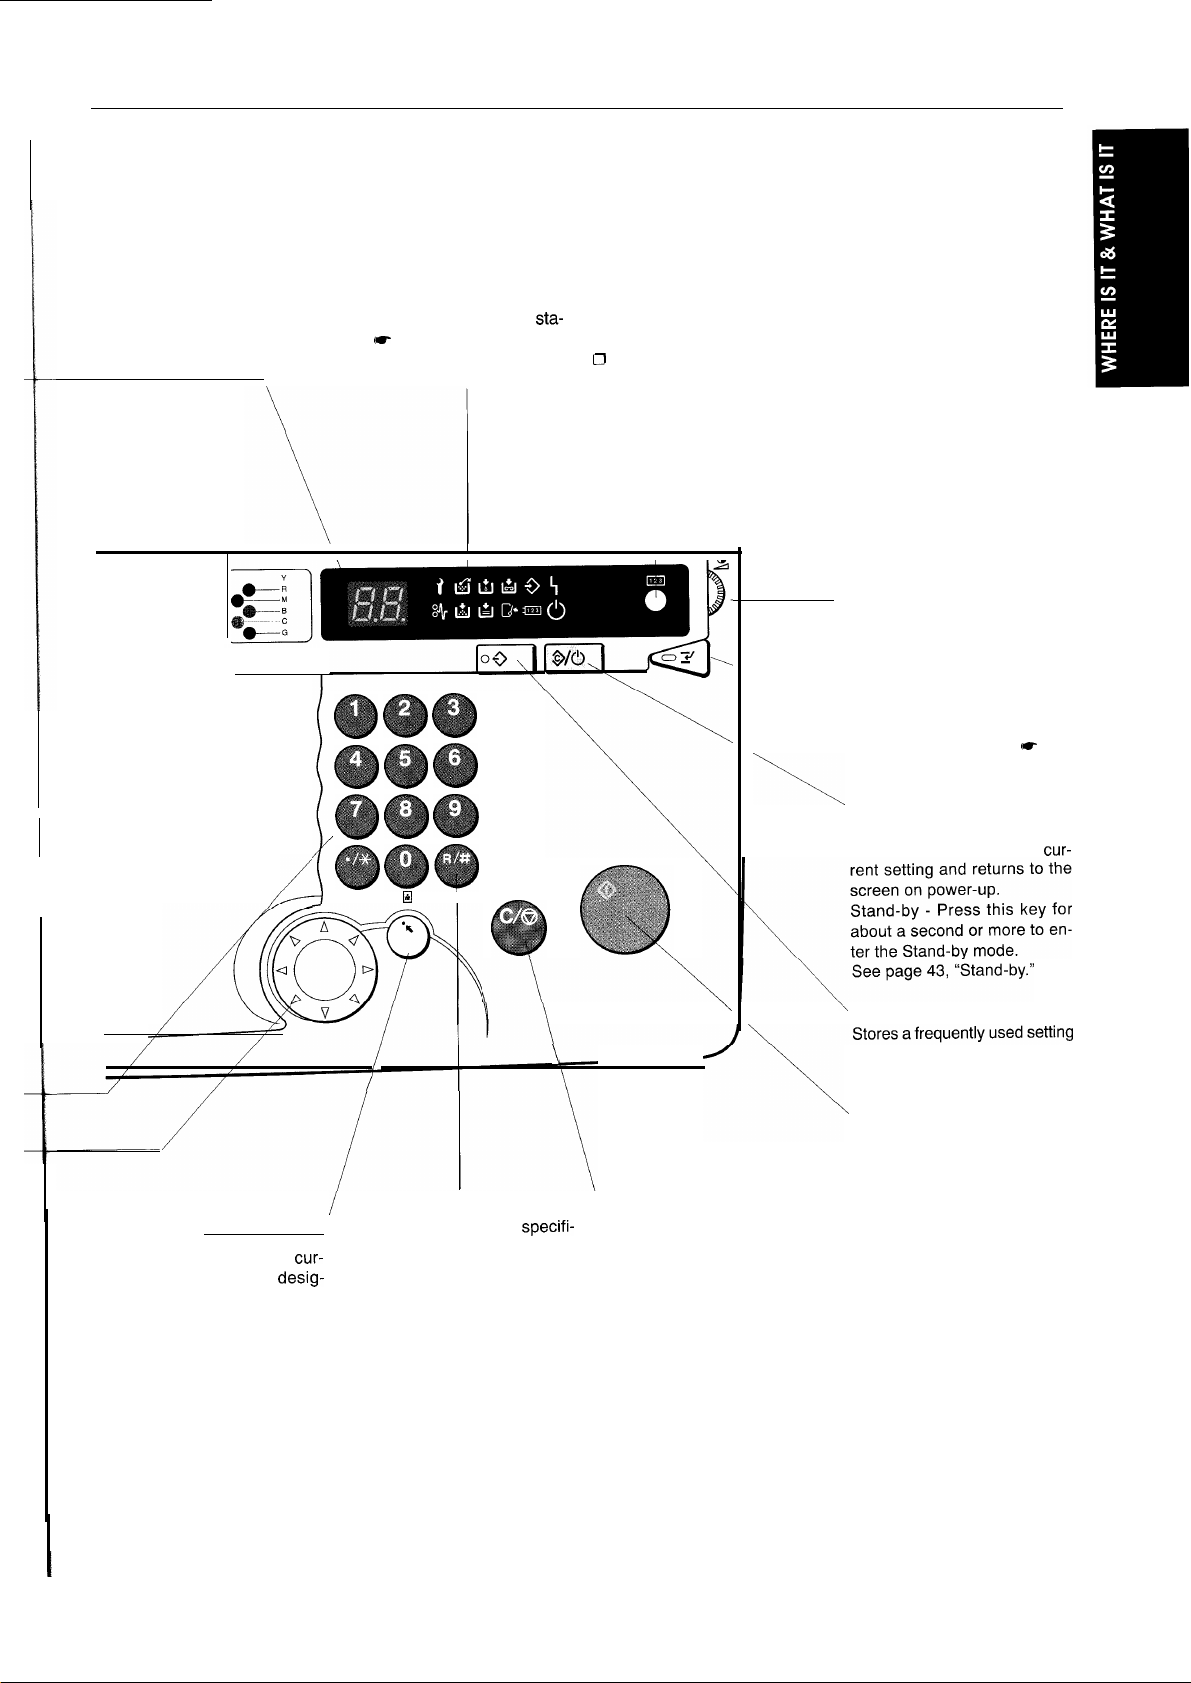
●
The colors of the copier illustrated below might slightly differ from the actual colors of your copier.
●
The colors on sample copies illustrated below might slightly differ from those on actual copies.
OPERATION PANEL
\
L--I
This section indicates error
tus. = See page 99, “WHAT
TO DO IF SOMETHING GOES
WRONG.”
I
I
/
H
I
Counter Key
sta-
Indicates the total number of copies made.
CI
The number of copies made is indicated
separately for the full color copy and
monotone copy (single color/black copy)
modes.
\
Brightness Adjustment
Volume
Adjusts the brightness of the
screen.
Interrupt Key
Interrupts the current copy run
(-
to copy another original.
page 59, ‘(Interrupt Copying.”
See
Clear Modes/Stand-by
Key
Clear Modes - Cancels the
cur-
/
/
Point Key ‘
Sets a point on which the cur-
sor is placed when you
nate an area.
desig-
/
I
f
Recall/Enter Key
Enter - Sets a value or specifi-
/
cation.
Recall - This key can be used
to confirm the specified number
of copies during a copy run or
if a copy run stops halfway.
\
\
Clear/Stop Key
Clear - Cancels a setting such
as the number of copies.
Stop - Stops/cancels a copy
run.
\
“ Program Key
and recalls it.
See page 74, “PROGRAM.”
\
\
Start Key
Starts a copy run.
15
TOUCH PANEL DISPLAY
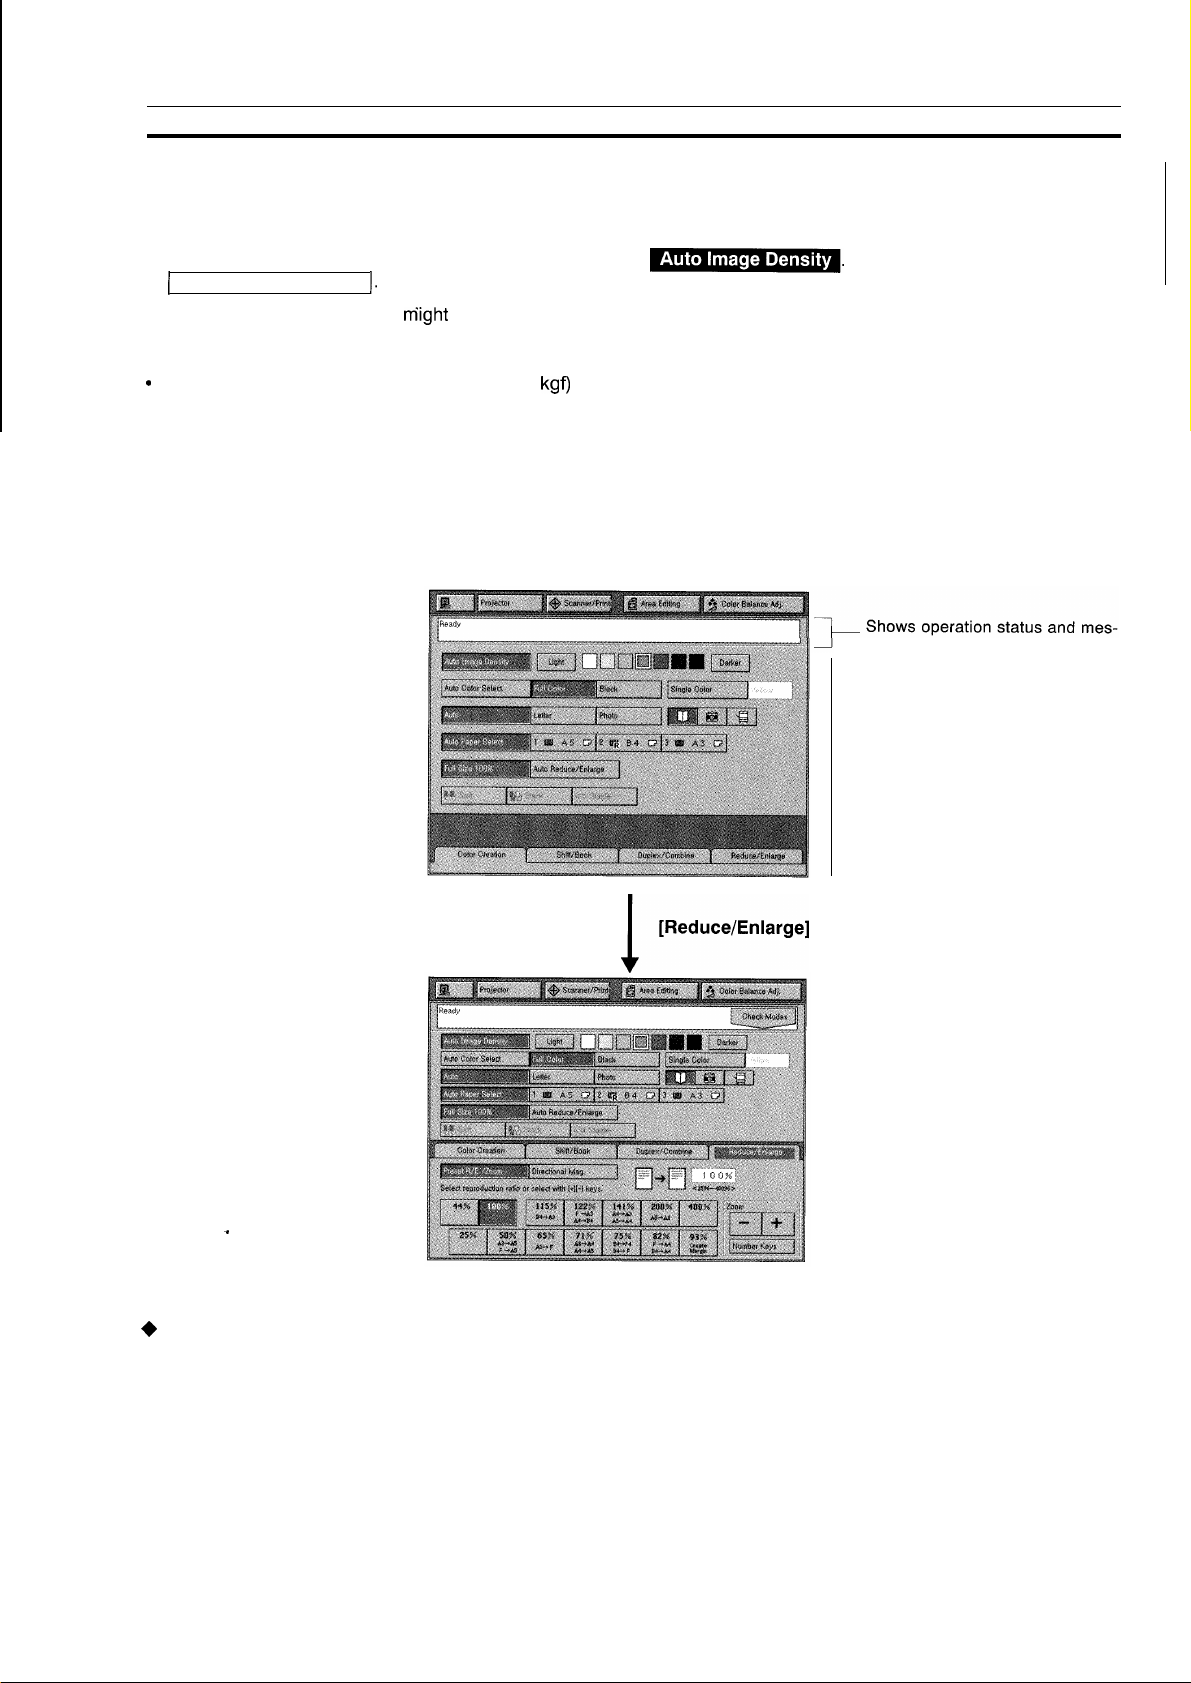
●
The function items are displayed as touch keys.
You can touch these keys lightly to selector specify the corresponding items,
●
When you select or specify a function, it is highlighted like
I
Auto Reduce/Enlarge
●
Different keys or information
1.
m’ight
appear on the display depending on the option configuration.
~.
Important
c
Do not apply a strong shock or force of 30 N (3
damaged.
N = Newton, kgf = Kilogram-force (1 kgf = 9.8 N)
kgf)
or more to the touch panel display. Otherwise, the display might be
TOUCH PANEL DISPLAY
An unavailable key is grayed like
Sample Display and
Common Keys
sages.
Sets a function.
.
+
Common keys
●
[Cancel] . . . . . . . . . . . . . . . . . . . .. . . . . . . . . . . . . .
●
[Exit] . . . . . . . . . . . . . . . . . . . . . . . . . . . . . . . . . . . . . . . . .
Cancels a specified function and returns to the previous screen.
Sets a specified function and returns to the previous screen.
16

COLOR FUNCTIONS
COLOR FUNCTIONSCOLOR FUNCTIONS
17
FULL COLOR COPY/BLACK COPY
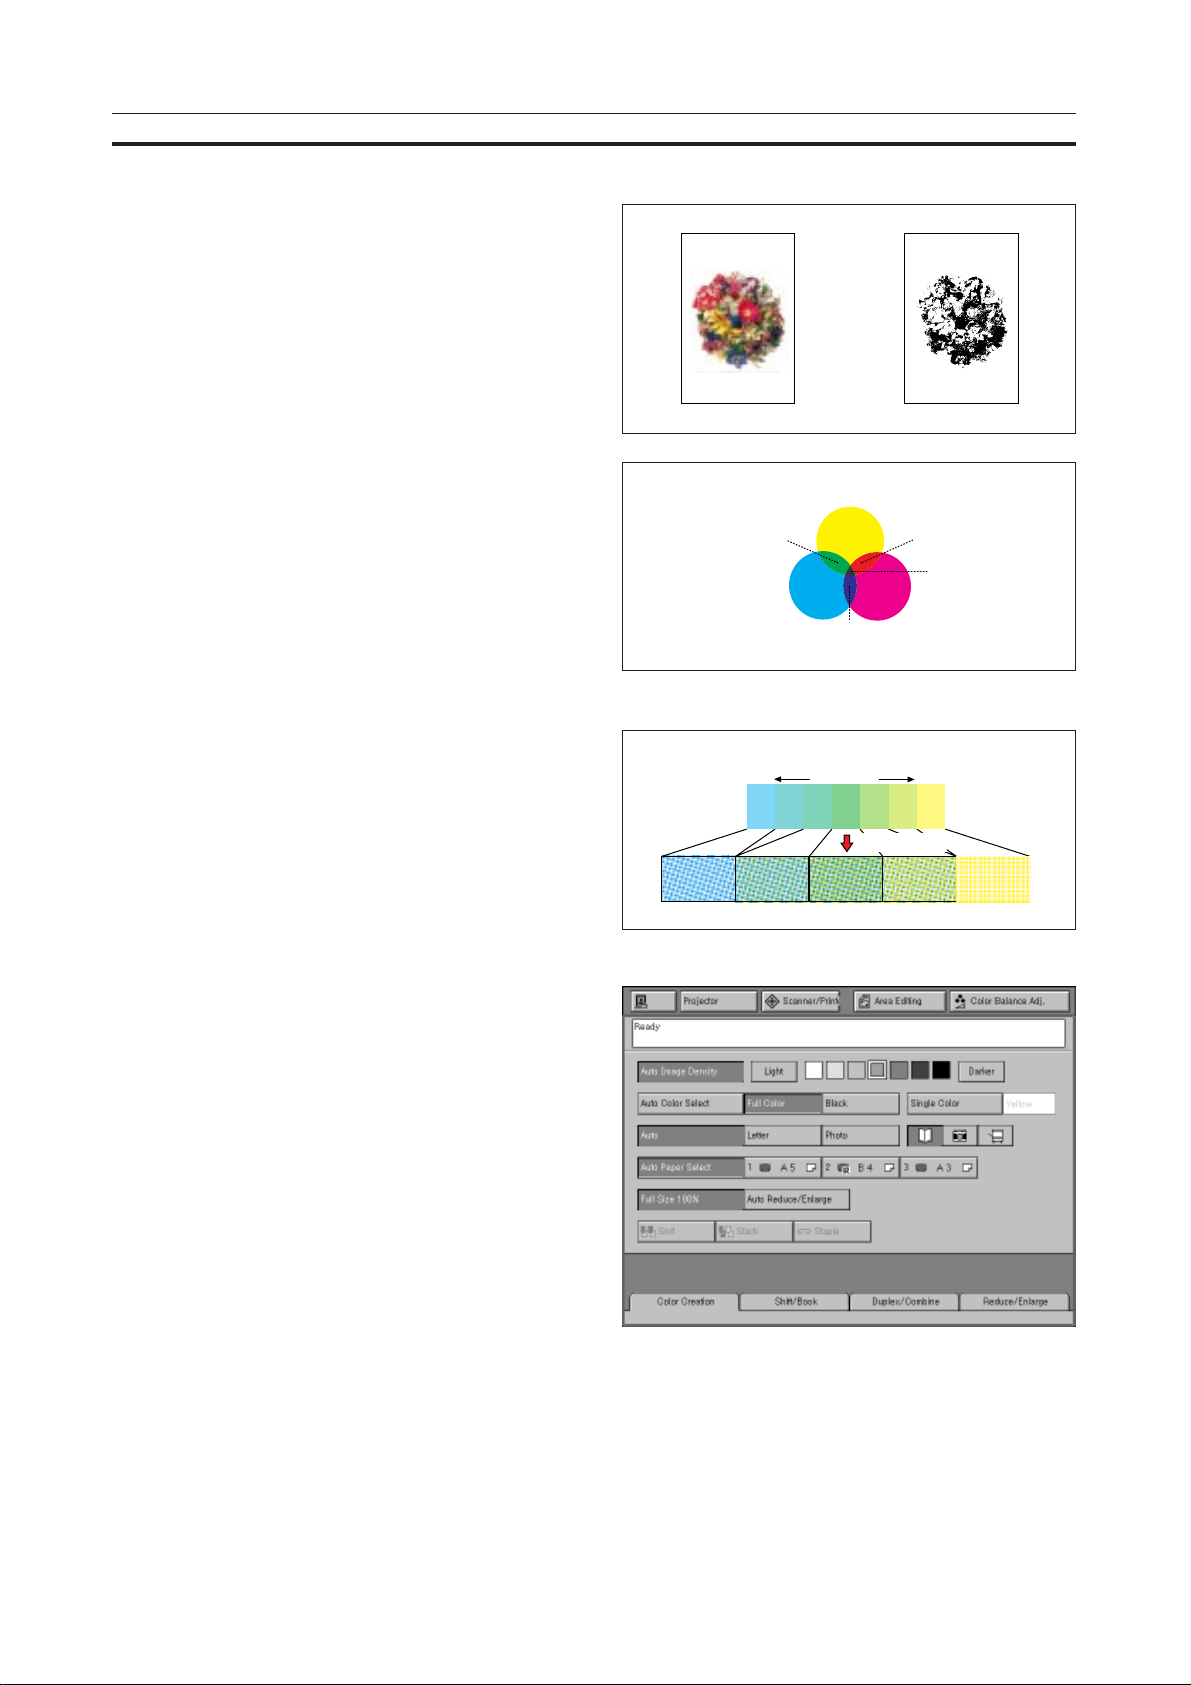
The Full Color Copy function overlays the four colors
(yellow, magenta, cyan, and black) to make copies
in colors close to those of originals.
The Black Copy function makes copies in black regardless of colors of originals.
Three fundamental colors
❐ Yellow, magenta, and cyan (three fundamental colors)
can be combined to express the seven colors shown
in the figure below. If yellow, magenta, and cyan are
overlaid, black is created. However, this copier uses
the black toner to express black because the black
made from the three fundamental colors slightly differs from actual black in the strict sense.
❐ This copier adjusts the amount of the yellow, magenta,
and cyan toner to express green close to yellow (yellowish green) or cyan (bluish green).
FULL COLOR COPY/BLACK COPY
Yelow
Green
Cyan
Blue
Red
Black
Magenta
Difference between greens when combining yellow and cyan
Touch the [Full Color] or [Black] key.
1
❐ When you do not set any other function, press the
Start key to start a copy operation.
❐ You can adjust the overall color tone of a copy or the
edges of an image. See “COLOR BALANCE ADJUSTMENT” for the overall color tone of a copy , and
“Sharp/Soft” for the edges of an image.
☛ See page 28, “COLOR BALANCE ADJUSTMENT”
and page 31, “Sharp/Soft.”
Green close
to cyan
Cyan Yellow
Green
Green close
to yellow
Magnified view
18

SINGLE COLOR
This function makes copies in a specified color. For
single color copying, you can choose yellow, red,
magenta, blue, cyan, or green.
❐ Although still monochrone, some colors you select may
be created with 2 toners. This is because yellow,
magenta and cyan are created with a single toner, while
red, blue and green use two toners.
❐ If you create a color using the user tool, you can select
it as a registered color in area editing. ☛ See page
98, “USER TOOLS, Create A User Color.”
SINGLE COLOR
Cyan Magenta Yellow
COLOR FUNCTIONSCOLOR FUNCTIONS
Touch the [Single Color] key
1
Select a color to be copied and touch the [Exit]
2
key.
❐ When you do not set any other function, press the
Start key to start a copy operation.
Red Blue Green
19
COLOR CREATION
Color Conversion
This function converts a selected color of an original into a different color on the copy.
❐ When you specify the Color Conversion function, the
color mode is set to “Full Color Copy.”
❐ Y ou can convert up to four colors. However, you can
convert only two colors in editing an area.
❐ The color range to be converted can be adjusted
within 5 levels. For example, when you specify yellow with the color width set to “Wide,” other colors
close to yellow, such as orange and yellowish green,
are also converted. When you set the color width to
“Narrow,” only yellow is converted. You can adjust
the color width with the user tools.
☛ See page 94, “USER TOOLS, Color Sensitivity
Adjustment.”
❐ You can specify the following nine colors: yellow,
magenta, cyan, green, blue, red, white, black, and a
user color.
COLOR CREATION
c
When Editing An Area
c
Touch the [Color Creation] key.
1
Touch the [Color Conversion] key.
2
Touch a color before conversion.
3
❐ When changing the selected color, touch the [Clear]
key and select another color.
Touch a color after conversion.
4
When converting two or more colors consecutively
➊Repeat steps 3 and 4 above for all the colors you
want to convert.
Designated area
Set your original and press the Start key.
5
20

When editing an area
Touch the [Area Editing] key and designate an
1
area.
❐ “DESIGNATING AREAS” ☛ See page 82.
T ouch the [Color Creation 1] or [Color Creation
2
2] key and touch the [Color Conversion] key.
• When converting colors, you can specify only two
types of conversion ([Color Creation 1] and [Color
Creation 2]) for all the designated areas.
Touch a color you wish to convert (source) and
3
one to convert to (final).
• When changing the selected color, touch the [Clear]
key and select another color.
• T o convert another color consecutively, repeat step
3.
Touch the [Exit] key.
4
Touch the [Exit] key after specifying the way to
5
edit images outside the area.
COLOR FUNCTIONSCOLOR FUNCTIONS
❐ Step 5 and later in “BASIC OPERATION OF AREA
EDITING” ☛ See page 80.
21
Color Erase
This function erases a selected color from an original image.
❐ Y ou can convert up to four colors. However, you can
convert only two colors in editing an area.
❐ Y ou can adjust the width of a color to be erased within
5 levels. For example, when you specify yellow with
the color width set to “Wide,” other colors close to
yellow, such as orange and yellowish green, are also
erased. When you set the color width to “Narrow,”
only yellow is erased. You can adjust the color width
with the user tool.
☛ See page 94, “USER TOOLS, Color Sensitivity
Adjustment.”
❐ You can specify the following seven colors: yellow,
magenta, cyan, green, blue, red, and black.
COLOR CREATION
c
<When Editing An Area>
c
Touch the [Color Creation] key.
1
Touch the [Color Erase] key.
2
Touch a color to be erased.
3
❐ When changing the selected color, touch the [Clear]
key and select another color.
When erasing two or more colors consecutively
➀Repeat step 3 above for all the colors you want to
erase.
Designated area
22
When editing an area
Touch the [Area Editing] key and designate an
1
area.
❐ “DESIGNATING AREAS” ☛ See page 82.
T ouch the [Color Creation 1] or [Color Creation
2
2] key and touch the [Color Erase] key.
• When converting colors, you can specify only two
types of conversion ([Color Creation 1] and [Color
Creation 2]) for all the designated areas.
Touch a color to be erased.
3
• When changing the selected color, touch the [Clear]
key and select another color.
• To erase another color consecutively, repeat step
3.
Touch the [Exit] key.
4
Touch the [Exit] key after specifying the way to
5
edit images outside the area.
COLOR FUNCTIONSCOLOR FUNCTIONS
❐ Step 5 and later in “BASIC OPERATION OF AREA
EDITING” ☛ See page 80.
23

AREA EDITING
AREA EDITING
This function designates areas on an original and edits images inside or outside the areas.
❐ You can specify only one of the “Color Creation 1,” “Color Creation 2,” “Highlight Color,” and “Paint Area” functions in
an area.
❐ You can also convert a selected color of an original or erase a selected color from an original. For the subsequent
procedures, see “COLOR CREATION.” ☛ See page 20.
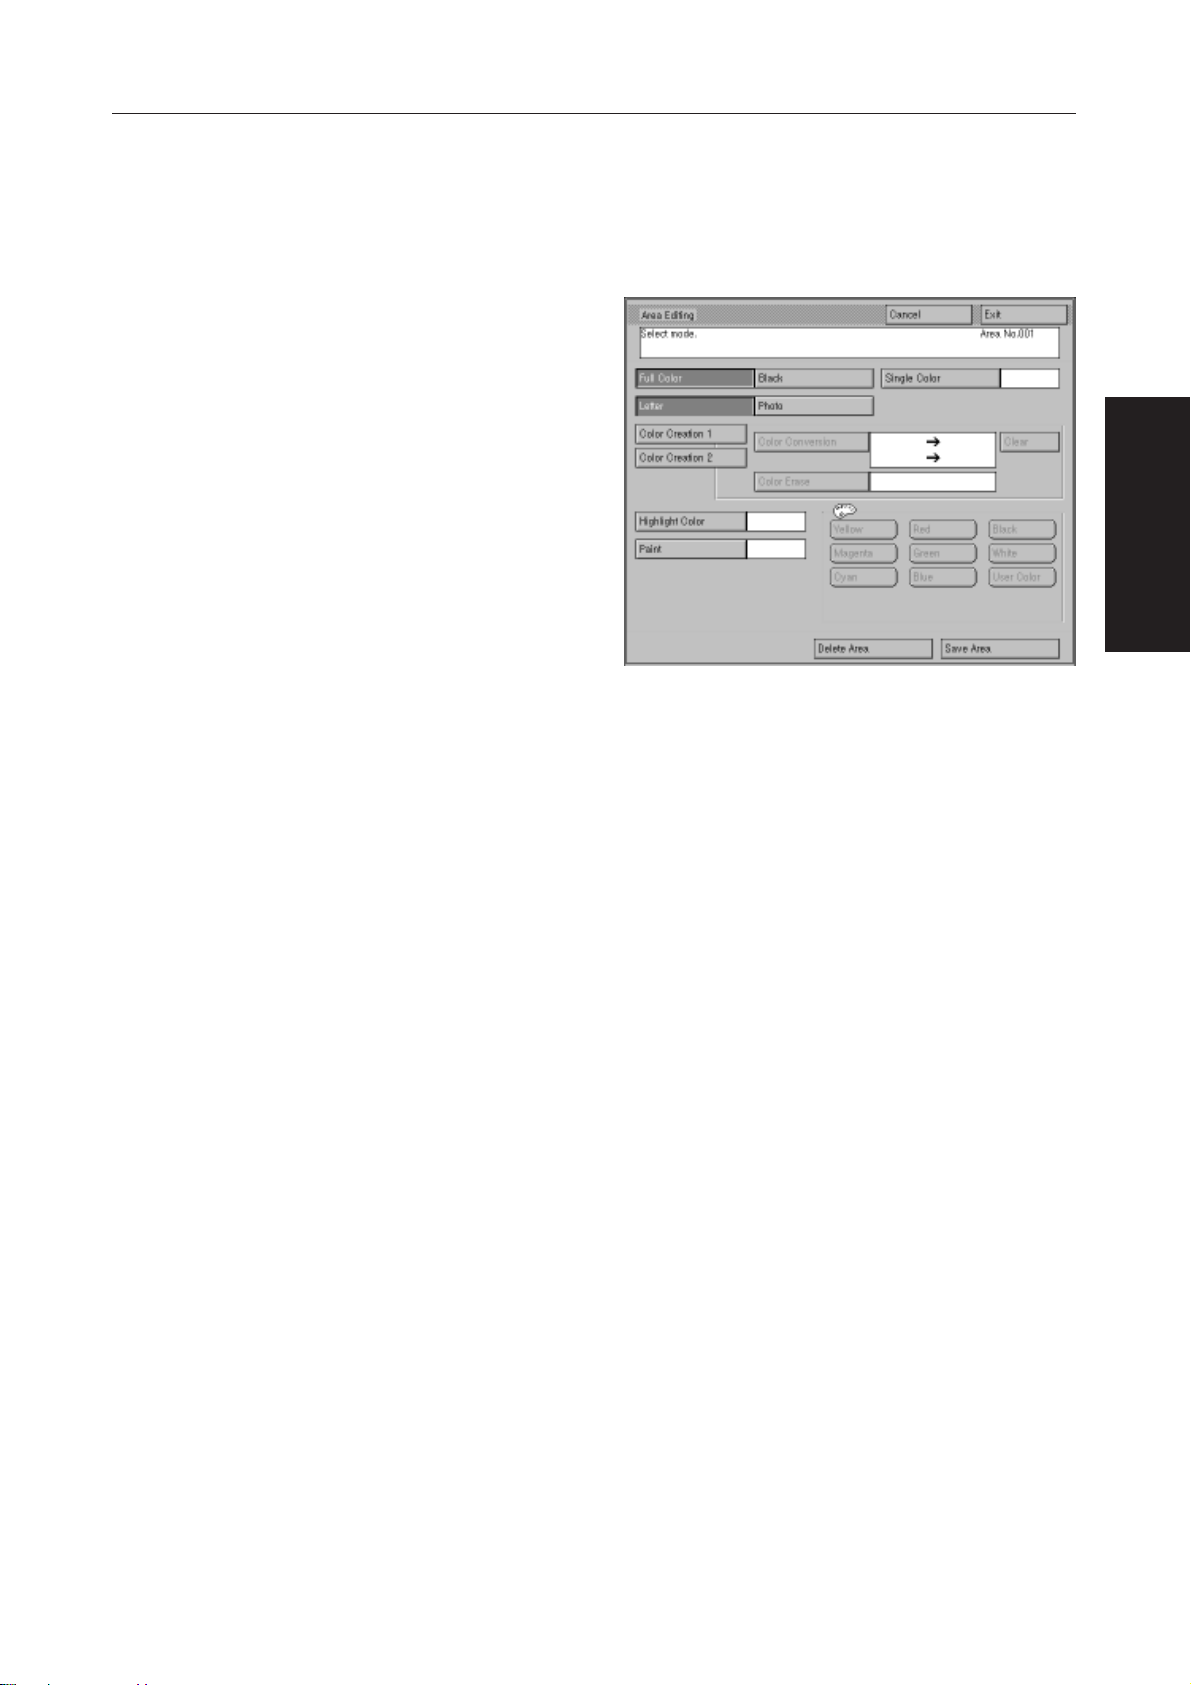
Highlight Color
This function colors the background of a selected
area.
❐ When you make copies in the Highlight Color mode,
the colors of the image might be changed because the
entire image is colored.
❐ If you specify a dark highlight color, the entire image
might become blackish.
❐ When you use the Highlight Color function, copies are
made in the Letter mode in all color modes except the
Full Color Copy mode.
❐ If you specify “Black” and “Photo” for the Single Color
mode when you edit an area in the Full Color mode,
the area is copied in gray using the four colors of toner.
❐ Y ou can specify the following seven colors: yellow , ma-
genta, cyan, green, blue, red, and black.
❐ You can adjust the background color density within 10
levels. ☛ See page 95, “USER TOOLS, Adjust
Highlight.”
Touch the [Area Editing] key and designate an
1
area.
Designated area
c
❐☛ See page 82, “DESIGNATING AREAS.”
Touch the [Highlight Color] key and select a
2
background color.
❐ When changing the selected color, touch the
[Highlight Color] key again to cancel it and select
another color.
Select the [Light] or [Dark] key to adjust the
3
background color density.
Touch the [Exit] key.
4
Touch the [Exit] key after specifying the way to
5
edit images outside the area.
❐ See page 80, Step 5 and later in “BASIC OPERA-
TION OF AREA EDITING.”
24
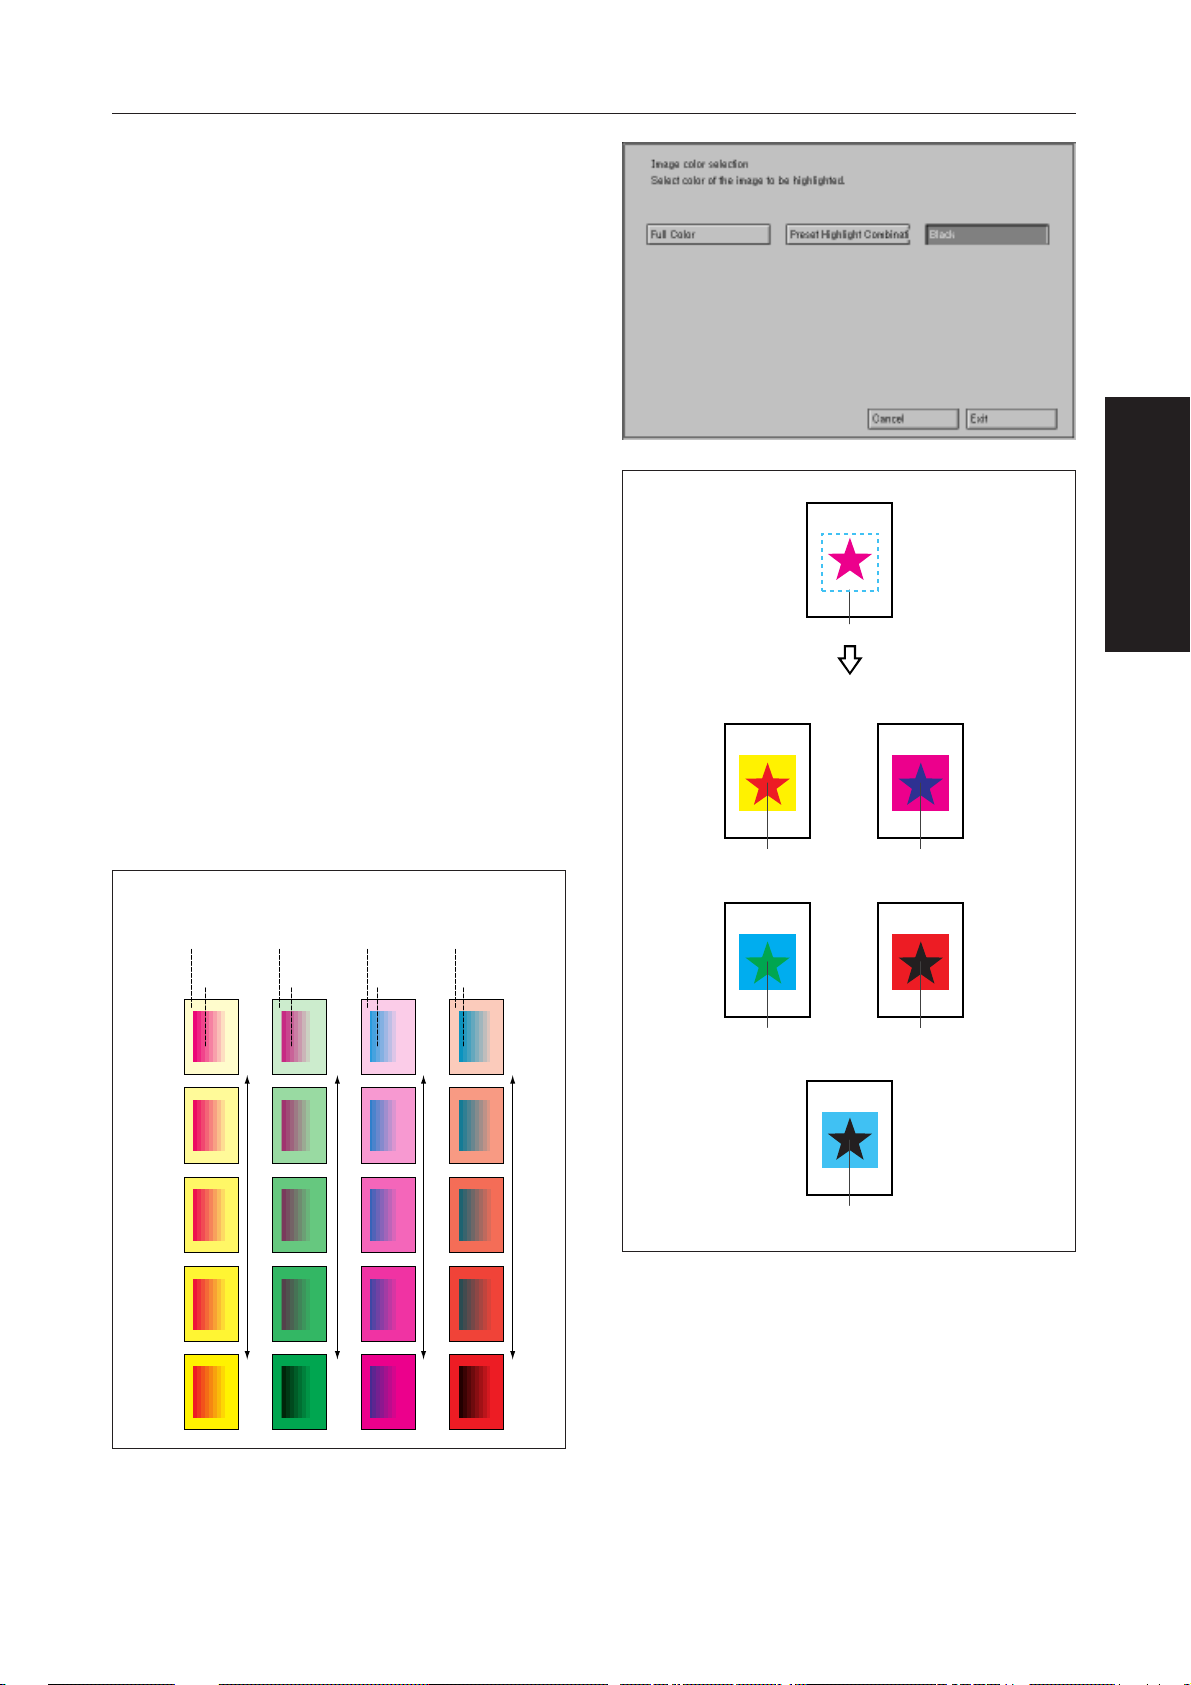
Select color modes for the areas for which you
6
have specified the Highlight Color mode and
touch the [Exit] key.
The color modes are set for all the areas for which
you have specified the Highlight Color mode.
• The image colors differ in the areas depending on
the selected color modes.
• When “Full color” is selected
The images are copied with the original colors
overlaid on the specified highlight colors.
• When “Black” is selected
The images are copied in black regardless of the
colors specified for Color Background.
• When “Preset Highlight Combinations” is selected
The image colors differ depending on the colors
specified for Highlight Color.
Original
• When you specify a highlight color, the image color
overlaid on the highlight color differs depending the
highlight color type and density.
• If you specify a dark highlight color when the
highlight color is green or red, the image color
overlaid on the highlight color might appear in black.
<Combinational color densities and samples>
• The color contrasts are slightly exaggerated for the
purpose of illustration.
Yellow
(Highlight
color)
Red Red Blue Blue
“
@
@
LightDark Highlight color
@
@
@
@
@
@
@
@
@
@
@
@
«
Green
(Highlight
color)
Magenta
@
@
@
@
@
@
@
@
@
@
@
@
@
@
@
@
@
@
@
Red
Magenta
(Highlight
color)
Magenta
@
@
@
@
@
@
@
@
@
@
@
@
@
@
@
@
@
@
Black
Red
(Highlight
color)
Cyan
@
@
@
@
@
@
@
@
@
@
@
@
@
@
@
@
@
@
@
@
Blue
Blue
@
@
@
@
@
@
@
@
@
@
@
@
@
@
@
@
@
@
@
Black
Designated area
<When Preset Highlight Combinations is selected>
When
turning the
background
yellow
When
turning the
background
cyan
Red
<When Black Copy is selected>
Green Blue
Black
Blue
When
turning the
background
magenta
When turning
the background red,
green, blue,
or black
• The image color differs from the above if you specify
a lighter color for Highlight Color.
COLOR FUNCTIONSCOLOR FUNCTIONS
25
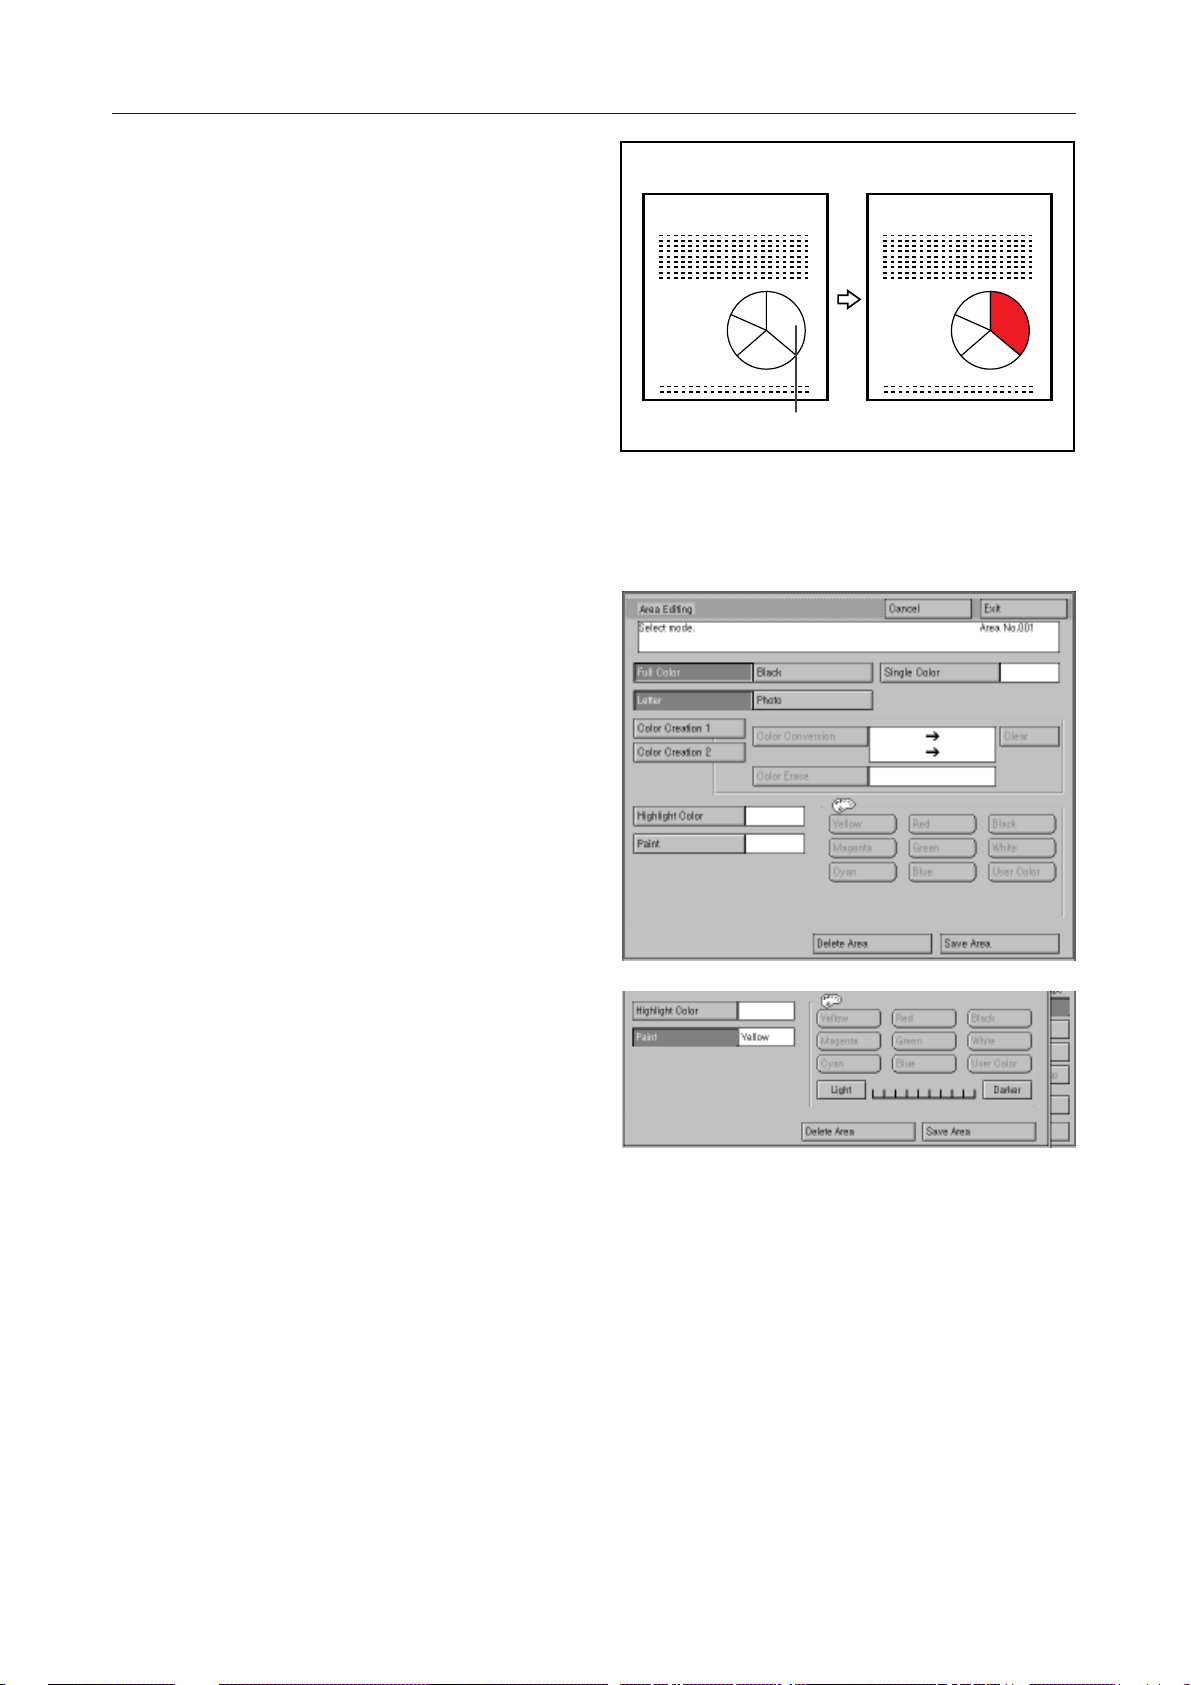
Paint Area
This function fills a designated area with a selected
color.
❐ You can specify the following nine colors: yellow, ma-
genta, cyan, green, blue, red, white, black, and user
color.
❐ If you create a color using the user tool, you can select
it as a registered color. ☛ See page 98, “USER
TOOLS, Create A User Color.”
❐ You can adjust the paint color density within 10 levels.
☛ See page 95, “USER TOOLS, Paint Mode
Brightness.”
Touch the [Area Editing] key and designate an
1
area.
❐☛ See page 82, “DESIGNATING AREAS.”
Touch the [Paint] key and select a paint color.
2
❐ When changing the selected color, touch the [Paint]
key again to cancel it and select another color.
AREA EDITING
Specified area
Select the [Light] or [Dark] key to adjust the
3
paint color density.
❐ When a user color is selected, you cannot adjust the
paint color density.
Touch the [Exit] key.
4
Touch the [Exit] key after specifying the way to
5
edit images outside the area.
❐ See page 80, Step 5 and later in “BASIC OPERA-
TION OF AREA EDITING.”
26
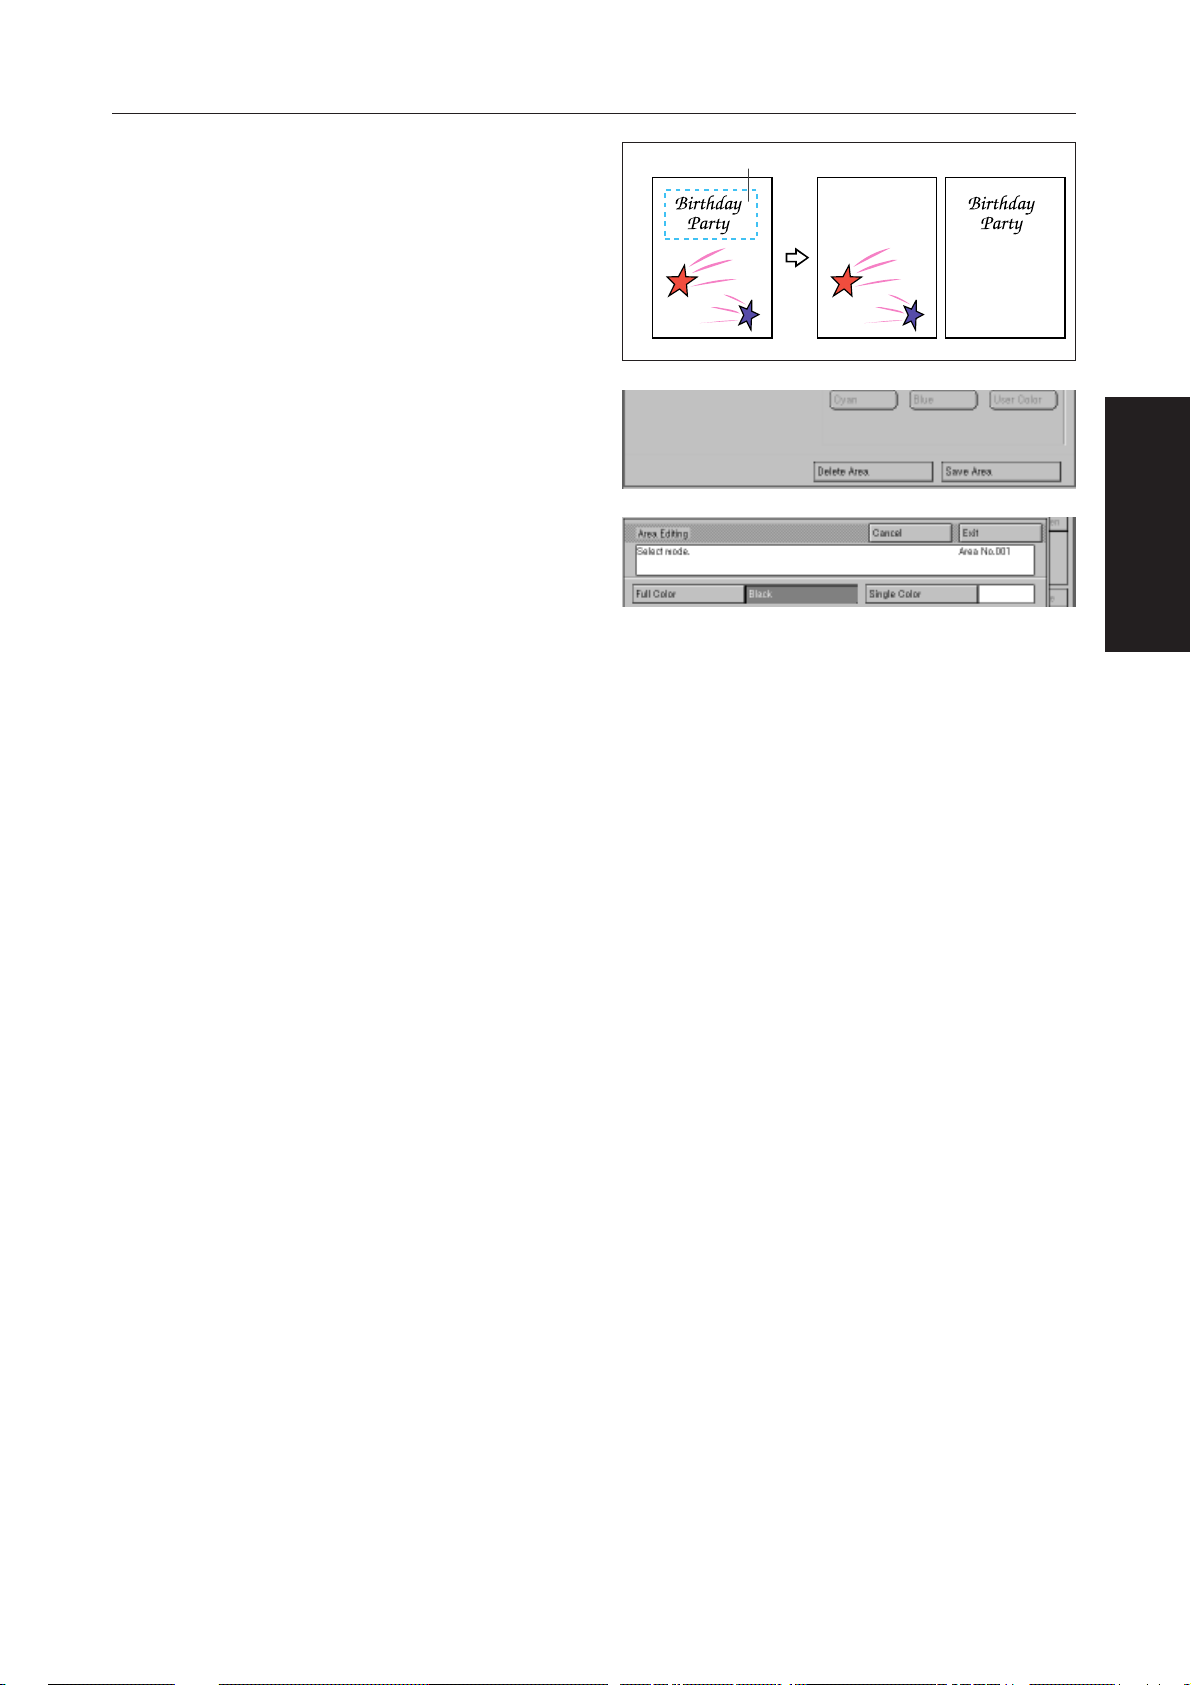
Delete Area/Save Area
This function deletes images inside or outside designated areas.
Touch the [Area Editing] key and designate an
1
area.
❐☛ See page 82, “DESIGNATING AREAS.”
Touch the [Delete Area] or [Save Area] key.
2
Touch the [Exit] key.
3
Touch the [Exit] key after specifying the way to
4
edit images outside the area.
❐ See page 80, Step 5 and later in “BASIC OPERA-
TION OF AREA EDITING.”
Designated area
Save AreaDelete Area
COLOR FUNCTIONSCOLOR FUNCTIONS
27
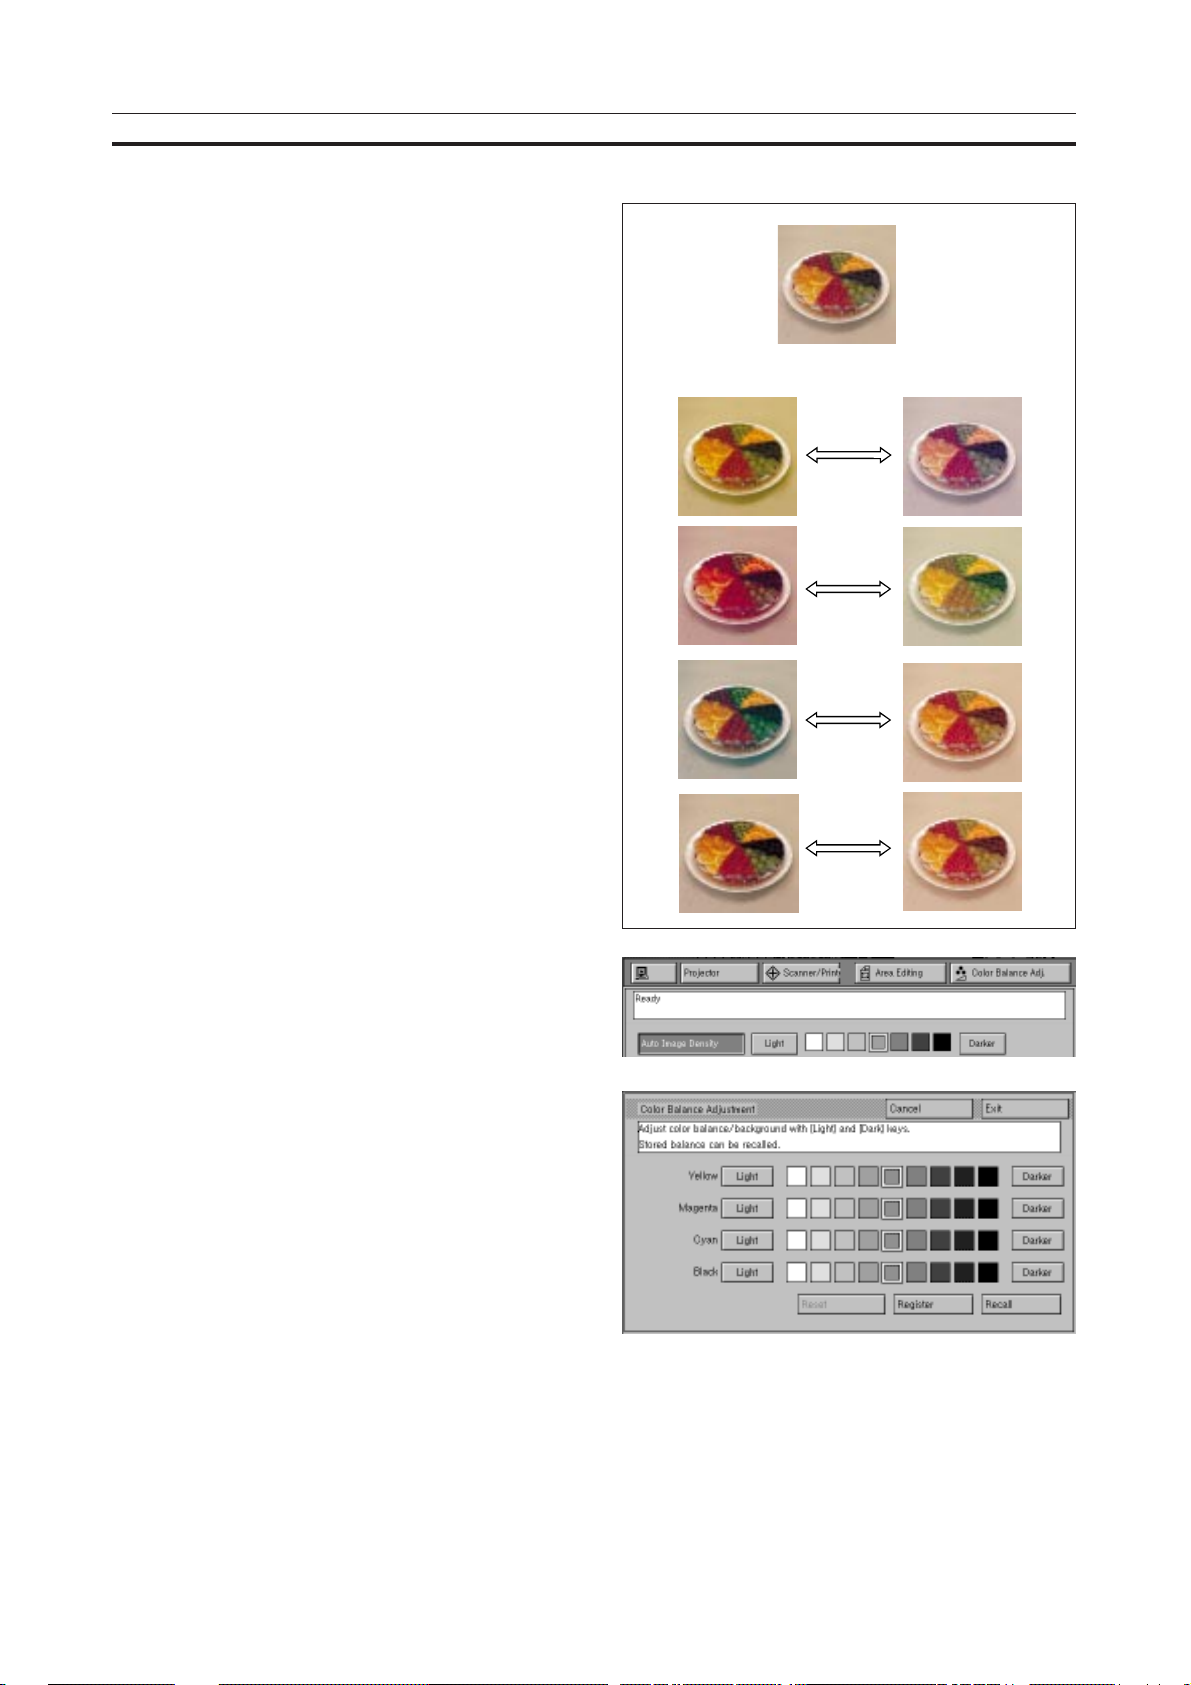
COLOR BALANCE
Color Balance Adjustment
Use this function to adjust the overall color tone of a
copy if the copy is entirely reddish or bluish.
COLOR BALANCE
Darker i Lighter
Yellow
Magenta
Touch the [Color Balance Adj.] key.
1
Adjust the color using the [Light] and [Dark]
2
keys.
❐ If you specify a wrong value, touch the [Reset] key.
The color balance setting returns to that specified
when the Color Balance Adjustment screen was
opened.
❐ You can store the adjusted color balance setting . ☛
See page 29, “Color Balance Memory.”
Cyan
Black
Set your original and press the Start key.
3
❐ When the copier is reset automatically or you press
the Clear Modes/Stand-by key or turn off the power,
the adjusted color balance is reset to the default value.
28
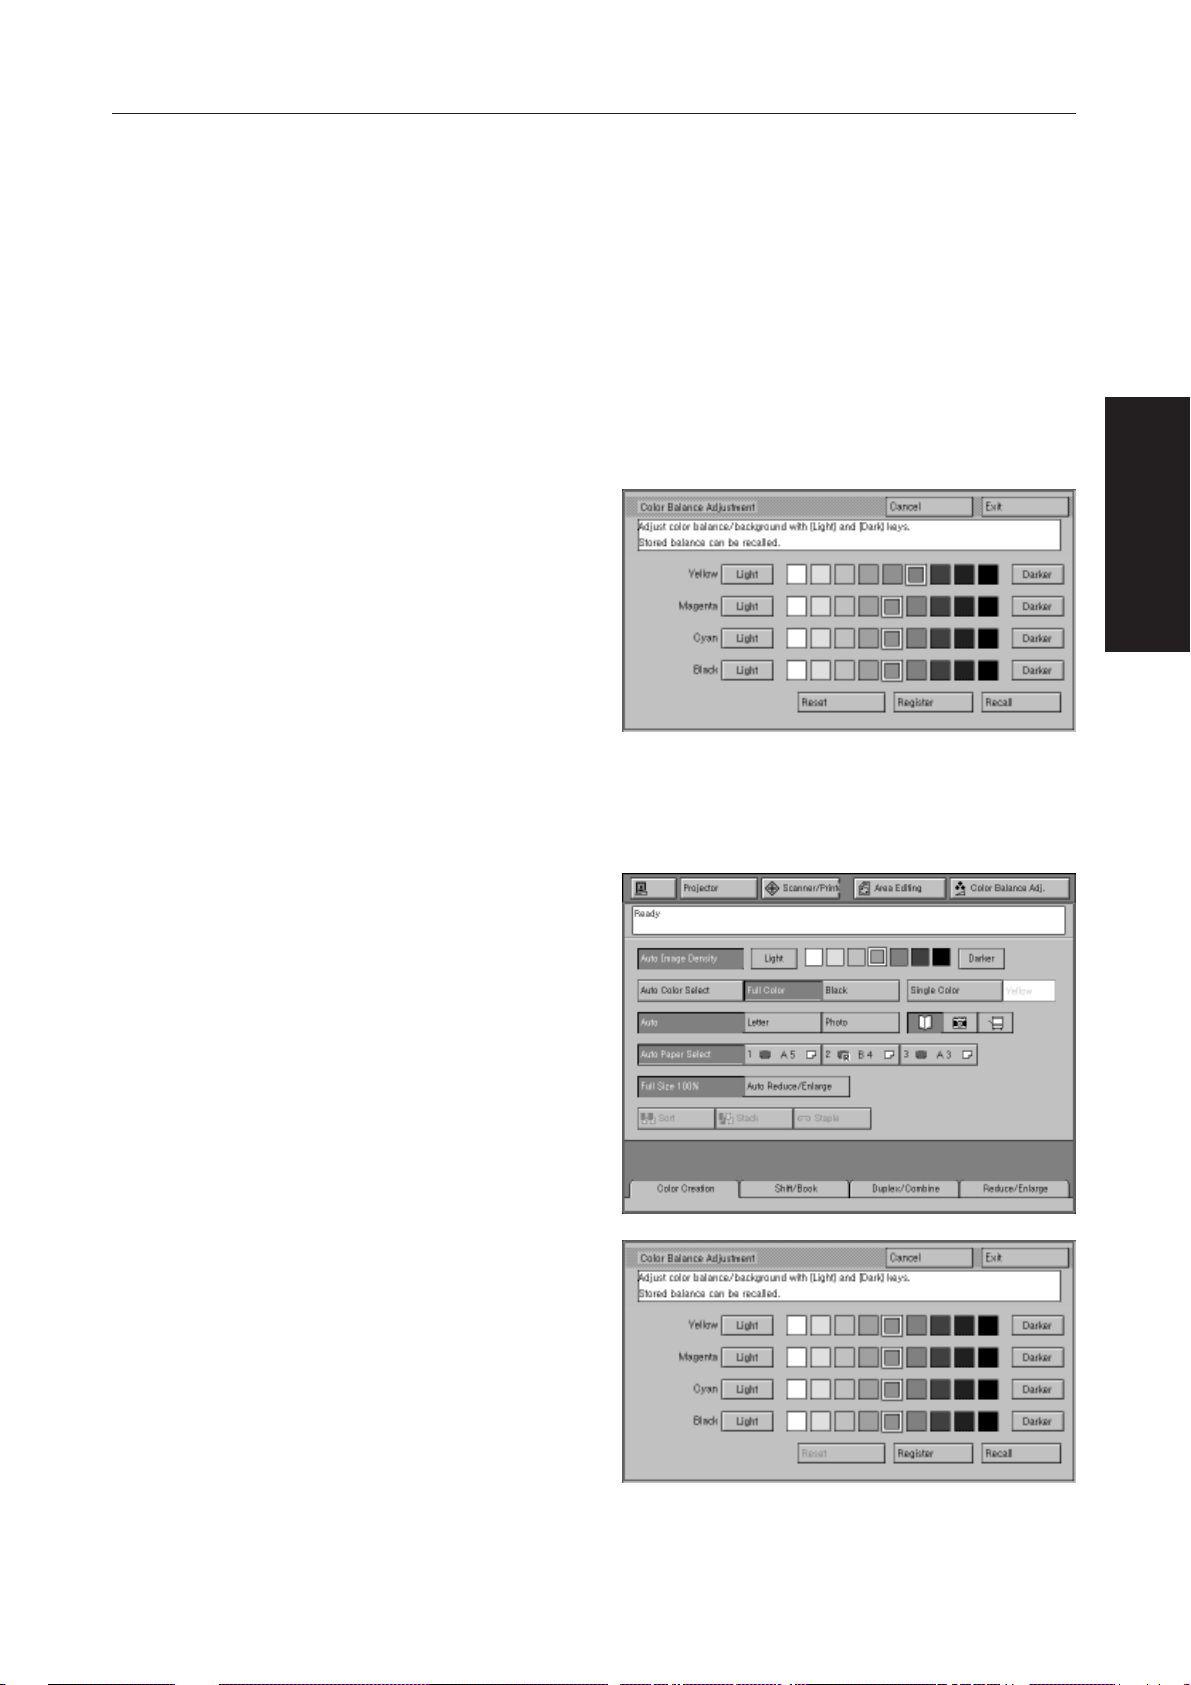
COLOR BALANCE
Color Balance Memory (Change)
This function can be used to store a color balance adjustment setting into memory.
❐ You can store only one color balance setting.
❐ When you want to change a stored setting, store another setting. This replaces the current setting with the new
setting.
❐ You can also store a color balance adjustment setting in the program. ☛ See page 74, “PROGRAM.”
Touch the [Color Balance Adj.] key and adjust
1
the color balance to a setting you want to store.
❐☛ See page 28, steps 1 and 2 in “Color Balance
Adjustment.”
Touch the [Register] key.
2
❐ The color balance setting is stored.
Touch the [Exit] key.
3
COLOR FUNCTIONSCOLOR FUNCTIONS
Color Balance Recall
This function can be used to recall the stored color
balance setting.
Touch the [Color Balance Adj.] key.
1
Touch the [Recall] key.
2
❐ The stored color balance is recalled.
Set your original and press the Start key.
3
❐ If you recall a color balance when a copy run is com-
pleted, the copier is reset automatically, or you press
the Clear Modes/Stand-by key, the color balance is
cancelled.
29
 Loading...