

Ricoh AZALEA OPMANUAL

PRETER300
O p e r a t i n g I n s t r u c t i o n s

Warning:
Use of controls or adjustment or performance of procedures other than those specified in this
manual may result in hazardous radiation exposure.
Note: Some illustrations may be slightly different from your machine.
Note: Certain options may not be available in some countries. For details, please contact
your local dealer.
Do not make copies of anything which is prohibited from copying by law. The
following items are normally prohibited rom copying by national law. Other items may
be prohibited by local law.
• Money • Stamps • Bonds • Stocks • Bank drafts
• Checks • Passports • Driver’s licenses
The copy samples in this Operating Instructions differ somewhat from actual copies due to
printing effects.
The coloring of each Color key may differ somewhat from the actual copies.
This copier has a function that prevents making counterfeit bills. So, if you use an original
image that is similar to a bill, you may not get proper copies.

SAFETY PRECAUTIONS
SAFETY PRECAUTIONS
About Indications
This manual and product indicate various cautions to allow you to use the
product safely in the correct way and to prevent injuries to you or other persons and damages to the property. These indicators and their meanings are
shown below.
Warning Indicates that a personal death or serious injury might oc-
R
cur if you handle your copier incorrectly ignoring this
warning.
Caution Indicates that a personal injury or only a property damage might
R
occur if you handle your copier incorrectly ignoring this caution.
Examples of Indications
▲ indicates an item for which you should take care.
R
q
r
m indicates a prohibited operation.
Such an operation is drawn specifically within m.
(The mark on the left indicates “No disassembling.”)
● indicates an operation which is forced or specified to be performed.
Such an operation is drawn specifically within ●.
(The mark on the left instructs you to “remove the plug from the wall
outlet.”)
1

SAFETY PRECAUTIONS
To use your copier safely, the following warnings should always be followed:
R WARNINGS
• Connect the copier to a power source meeting the specifications
given on the inside front cover of this manual. Avoid multiwiring.
• Avoid using an extension cord.
m
o
q
r
• Do not set anything on the power cord.
• Do not plug or unplug the power cord with your hands wet. Otherwise, an electric shock might occur.
• Make sure that the wall outlet is near the copier and easily accessible.
• Do not remove any covers or screws other than those specified in
this manual.
• Do not modify or replace any parts other than those specified in
this manual.
• When the main switch is in the Stand-by position, the
anticondensation heaters are on. In case of emergency, unplug
the machine’s power cord. Then contact your service representative. Do not keep using the copier with a fault or defect.
• If foreign matter such as metal, water, or liquid falls inside the copier,
turn off the main switch (including the backup switch for some copier
types) and unplug the power cord from the wall outlet. Then contact your service representative. If you keep using a faulty copier,
a fire or electric shock might occur.
m
s
2
• Do not place a vase, flowerpot, glass, receptacle containing water,
or metal object on the copier. If the contents fall inside the copier a
fire or electric shock might occur.
• Do not incinerate toner or toner containers. Toner dust might ignite
when exposed to open flames.

SAFETY PRECAUTIONS
To use your copier safely, the following precautions should always be followed:
R CAUTIONS
• Keep the copier away from humidity and dust. Otherwise, a fire
or electric shock might occur.
m
o
r
t
• The copier must be level within 5 mm, 0.2" both front to rear and
left to right.
• After you move the copier, fix it with the caster fixture. Otherwise, the copier might move or fall causing personal injury.
• When you move the copier, unplug the power cord from the wall
outlet. Otherwise, the cord might be damaged causing a fire or
electric shock.
• When the copier will not be used for a long period, disconnect
the power cord.
• To disconnect the power source, the main plug must be pulled
out.
o
m
n
m
• To avoid possible build-up ozone, make sure to locate this copier
in a large well ventilated room that has an air turnover of more
than 30 m3/hr/person.
• Do not reuse stapled paper. Do not use aluminum foil, carboncontaining paper or other conductive paper. Otherwise, a fire
might occur.
• Since some parts of the copier are supplied with high electrical
voltage, touch only the parts specified in this manual otherwise a
burn might occur.
• Do not plug or unplug the power cord with your hands wet or an
electric shock might occur.
3

SAFETY PRECAUTIONS
• When you move the copier, be sure to pull out the four knobs
from the left and right sides of the body. If you pull the knobs
incompletely or hold parts other than the knobs, you might be
injured (e.g., your fingers are nipped). When you have moved
o
the copier, return the knobs to the original positions.
• When the copier is equipped with the optional paper tray unit, do
not press the top side of the copier excessively. If you do, the
paper tray unit might be detached from the copier and you might
be injured.
4

TABLE OF CONTENTS
SAFETY PRECAUTIONS
TABLE OF CONTENTS
SAFETY PRECAUTIONS........................................................................1
About Indications................................................................................1
Examples of Indications .....................................................................1
R WARNINGS ......................................................................................2
R CAUTIONS........................................................................................3
TABLE OF CONTENTS ..........................................................................5
WHERE IS IT & WHAT IS IT ....................................................... 11
COPIER EXTERIOR.............................................................................12
OPTIONS ...........................................................................................13
MODELS ............................................................................................14
Basic ...................................................................................................14
With unit for two-sided copying ......................................................14
PAPER TRAYS .....................................................................................15
OPERATION PANEL ........................................................................... 16
Main Keys: Basic Model....................................................................16
Basic/Edit Function: With unit for two-sided copying ...................18
Color Functions..................................................................................20
COLOR FUNCTIONS .............................................................. 23
FULL COLOR COPY/BLACK COPY ..................................................24
SINGLE COLOR.................................................................................26
COLOR CONVERSION .....................................................................27
COLOR BALANCE ADJUSTMENT...................................................... 29
COLOR BALANCE RECALL/MEMORY..............................................31
Color Balance Memory (Change)..................................................31
Color Balance Recall........................................................................32
IMAGE ADJUSTMENT........................................................................ 33
Background Density Control............................................................33
Pastel ..................................................................................................35
Sharp/Soft ..........................................................................................36
Auto Color Calibration .....................................................................37
BASIC......................................................................................41
ORIGINALS .......................................................................................42
Recommended Originals.................................................................42
5

TABLE OF CONTENTS
SAFETY PRECAUTIONS
Non-recommended Originals
For The Optional Document Feeder .........................................43
Original Sizes Difficult to Detect ......................................................43
Original Sizes and Detection Range...............................................44
PAPER ................................................................................................45
Recommended Paper Sizes and Types .........................................45
Non-recommended Paper..............................................................48
Paper Storage ...................................................................................48
Paper Loading...................................................................................48
TONER ...............................................................................................49
Handling Toner ..................................................................................49
Toner Storage ....................................................................................49
How To Add Toner .............................................................................49
Used Toner .........................................................................................49
CHANGING PAPER SIZE ...................................................................50
Changing Paper Size For Copier’s 250-sheet Tray ........................50
Changing Paper Size For Optional Paper Tray Unit ......................52
USEFUL FUNCTIONS ..........................................................................55
Stand-by.............................................................................................55
Interrupt Copy ...................................................................................55
Auto Start ...........................................................................................55
User Code ..........................................................................................56
Program .............................................................................................56
Full Image ..........................................................................................56
COPYING................................................................................57
BASIC OPERATION ........................................................................... 58
SETTING ORIGINALS.........................................................................60
Setting originals on the exposure glass (platen glass) ..................60
Setting originals in the optional document feeder.......................61
FUNCTION COMBINATION CHART.................................................. 63
BASIC FUNCTIONS ...........................................................................64
Color Selection..................................................................................64
Image Density Adjustment ..............................................................65
Original Image Type Selection ........................................................67
Copy Paper Selection ......................................................................68
Auto Reduce/Enlarge ......................................................................69
COPYING FROM THE BYPASS FEED TABLE.......................................70
Two-Sided Copies .............................................................................73
6

TABLE OF CONTENTS
SAFETY PRECAUTIONS
INTERRUPT COPYING .......................................................................75
ZOOM AND PRESET REDUCE/ENLARGE ..........................................76
Preset Reduce/Enlarge ....................................................................76
Zoom ..................................................................................................77
Zoom (Number key + #) ...................................................................78
DIRECTIONAL MAGNIFICATION ......................................................79
IMAGE SHIFTING ..............................................................................81
Margin Adjustment ...........................................................................81
Making a margin on 1 sided copies ...............................................81
Making margins on 2 sided copies .................................................82
Centering...........................................................................................84
SINGLE COPIES................................................................................. 85
Combine 2 Originals .........................................................................85
2 Sided Original .................................................................................87
Book Original .....................................................................................88
SORT/STACK AND STAPLE ................................................................89
Sort/Stack...........................................................................................89
Staple .................................................................................................90
Auto Staple ........................................................................................91
Manual Staple ...................................................................................92
PROGRAM ........................................................................................93
Program Memory/Change..............................................................93
Program Recall..................................................................................94
MAKING TWO-SIDED COPIES (ONLY WITH MODEL HAVING THIS
FEATURE)......................................................................................95
From One-Sided Originals (1 Sided Originals)................................95
From Two-Sided Originals (2 Sided Original) ..................................96
From Facing Pages (Book Original) ................................................97
CHANGING THE COPIER’S SETTINGS ....................................99
USER TOOLS ....................................................................................100
Changing the default settings ......................................................100
Resetting the default settings ........................................................102
User Tool Menu ................................................................................103
WHAT TO DO IF SOMETHING GOES WRONG......................113
WHEN COPYING A LARGE ORIGINAL ..........................................114
Removing the platen cover ..........................................................114
Attaching the platen cover...........................................................114
IF YOU CANNOT MAKE COPIES AS YOU WANT ...........................115
7

SAFETY PRECAUTIONS
TABLE OF CONTENTS
IS LIT: LOADING PAPER.............................................................. 118
IS LIT OR BLINKING: ADDING TONER........................................119
Adding Black Toner.........................................................................119
Adding Color Toner.........................................................................121
IS LIT: CLEARING MISFEEDS .......................................................124
When A and/or B Is Lit ....................................................................124
When C Is Lit ....................................................................................126
When D Is Lit.....................................................................................128
When P Is Lit .....................................................................................129
When R Is Lit .....................................................................................130
When Y Is Lit .....................................................................................131
When Z Is Lit......................................................................................131
d IS LIT: ADDING STAPLES.............................................................132
REMOVING JAMMED STAPLES.......................................................134
SETTING KEY COUNTER ..................................................................137
Setting The Key Counter ................................................................137
IF AN ERROR MESSAGE IS DISPLAYED ........................................... 138
IF YOUR COPIER DOES NOT OPERATE AS YOU WANT ..................141
MAINTAINING YOUR COPIER ..............................................143
WHERE TO PUT YOUR COPIER ..............................................143
DO’S AND DON’TS................................................................143
DO’S AND DON’TS ......................................................................... 144
Storing Color Copies.......................................................................144
WHERE TO PUT YOUR COPIER ........................................................145
When Moving The Copier To The Same Level .............................145
Copier Environment After Moving ................................................145
Space Required for Installing The Copier.....................................146
Power Connection..........................................................................147
MAINTAINING YOUR COPIER ........................................................148
Cleaning The Exposure Glass (Platen Glass)................................148
Cleaning The Platen Cover ...........................................................148
Cleaning The ADF Belt....................................................................148
PROJECTOR UNIT
(OPTION) OPERATION ..........................................................149
FOR USERS USING THE PROJECTOR UNIT (OPTION) ..................... 150
Adjusting The Color Tone/Brightness In Using Negative Film ......150
8

SAFETY PRECAUTIONS
TABLE OF CONTENTS
GUIDE TO COMPONENTS ..............................................................151
BEFORE OPERATING THE PROJECTOR ...........................................153
Available Films And Setting............................................................153
About Copying ...............................................................................154
Notes For Operation .......................................................................155
SETTING THE PROJECTOR IN POSITION .........................................156
OPERATION FLOW..........................................................................157
SHADING ........................................................................................158
Selecting Copier’s Functions .........................................................164
Adjusting The Color Tone and Density..........................................166
Changing The Copy Conditions ...................................................167
Exiting The Projector Mode ............................................................169
IF THE PROJECTOR UNIT DOES NOT OPERATE AS YOU WANT ......171
Daily Maintenance .........................................................................173
SPECIFICATIONS ...................................................................175
COPIER ...........................................................................................176
DOCUMENT FEEDER .......................................................................180
PAPER TRAY UNIT ............................................................................180
SORTER STAPLER .............................................................................181
PPC TABLE.......................................................................................182
PPC FILM PROJECTOR....................................................................182
INDEX................................................................................... 183
9

TABLE OF CONTENTS
SAFETY PRECAUTIONS
10

WHERE IS IT
& WHAT IS IT
11
COPIER EXTERIOR
COPIER EXTERIOR
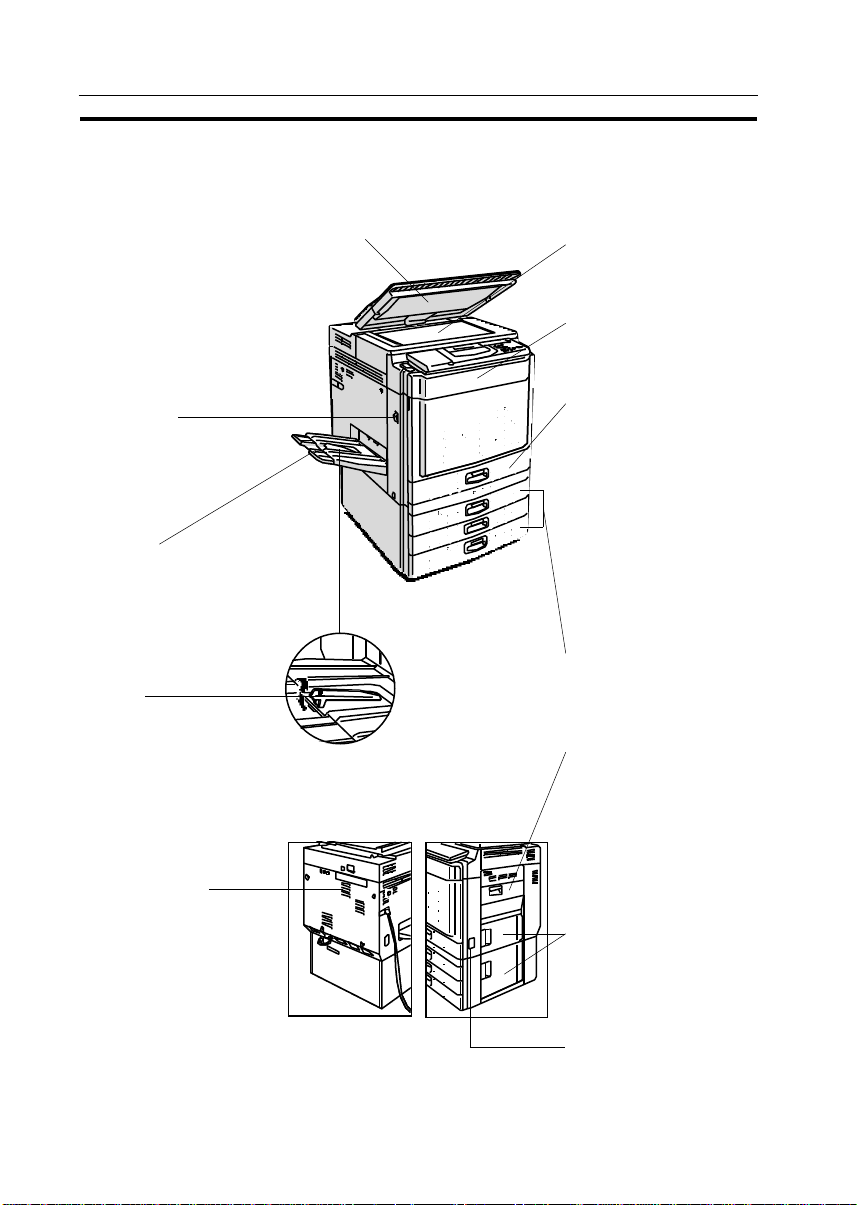
Platen cover
Presses an original set on the
exposure glass (platen glass).
Exposure glass (platen
glass)
Fit originals to the rear left corner.
Front cover
Open to remove misfed paper
or supply toner.
Main switch
Switches copier on/off.
Copy tray
Completed copies are delivered here.
Stopper
Protects delivered paper from
rounding when copying onto
thin paper.
Ventilation hole
Protects the temperature from
rising excessively inside the
machine.
• Do not obstruct the ventilation hole by placing or leaning an object around the
hole. If the temperature
rises excessively inside the
copier, a fault might occur.
Paper tray
Set paper here. The model with
a unit for two-sided copying does
not have this tray. Instead, it has
the unit for two-sided copying.
or
Unit for two-sided
copying
This unit is used to make twosided copies.
Optional paper tray unit
Bypass feed table
Used to copy onto post cards,
OHP sheets, or thick paper as
well as non-standard size paper.
This tray also can be used to
copy onto the underside of
once-copied paper when your
copier is of Basic type.
Right side cover
Open to remove misfed paper.
Key counter holder
Set the key counter (option).
12

OPTIONS
OPTIONS
Sorter stapler (10-bin)
Automatically sorts copies or
binds them with the stapler.
Bin
Paper is delivered here
when performing a sort/
stack/staple operation.
Delivered paper tray
Paper is delivered here when a
sort/stack/staple operation is not
performed.
Document feeder
Insert a stack of originals here.
PPC table
Consumables can
be stored here.
Projector unit
Projector unit holder
Key counter
1500-sheet tray unit
(three 500-sheet
trays)
Consists of the three-layer
paper trays.
1000-sheet tray unit
(two 500-sheet trays)
Consists of the two-layer paper trays.
❐ For the paper tray unit, any of the 1000-sheet tray unit, 1500-sheet tray unit, and
PPC table can be attached.
13
MODELS
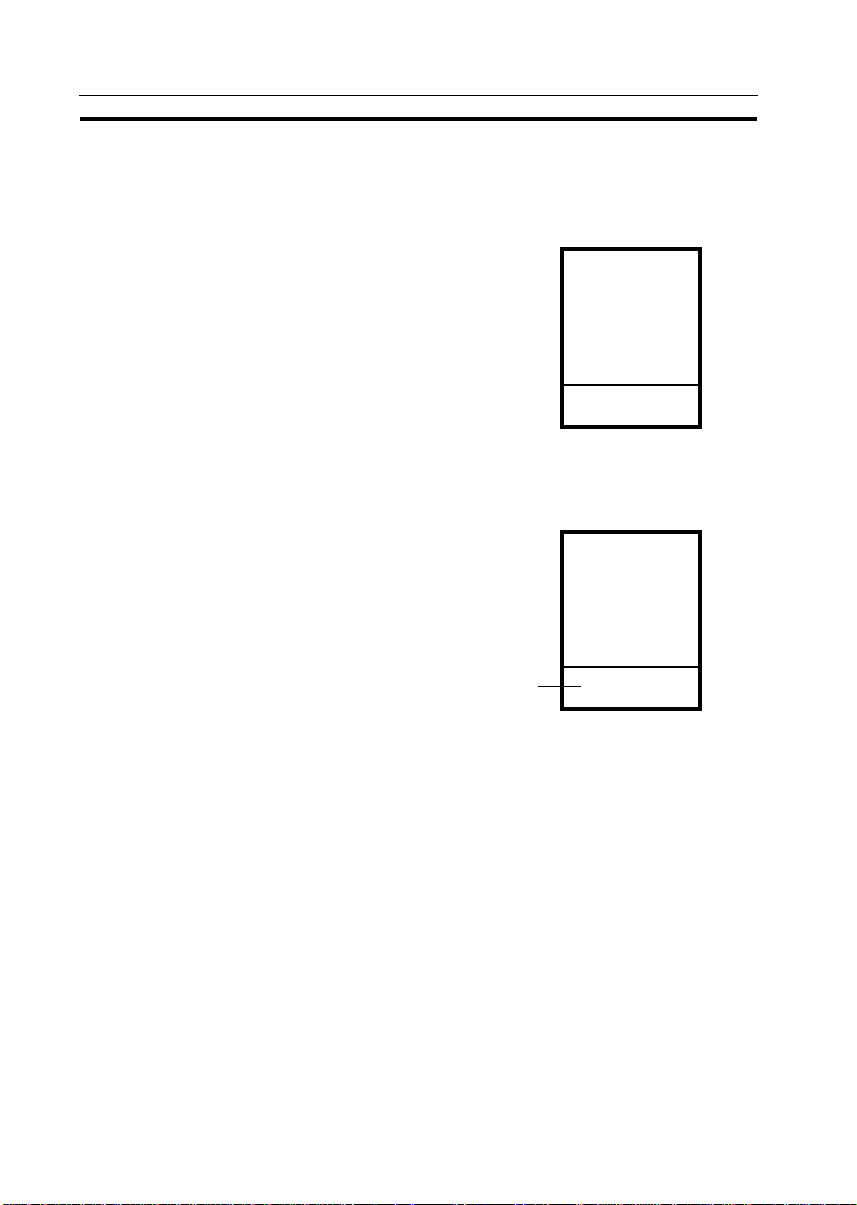
Basic
One 250-sheet tray
With unit for two-sided copying
A unit for two-sided copying
MODELS
250-sheet tray
14
unit for two-sided
copying

PAPER TRAYS
PAPER TRAYS
Each 500-sheet tray’s name changes depending on what kind of copier and
optional paper tray unit you have. Find your copier below and check the
name of your trays and their physical locations.
Basic
1st tray
With unit for two-
sided copying
unit for two-sided
copying
500 sheets
for each tray
With optional 1000sheet tray unit
1st tray
2nd tray
3rd tray
With unit for two-sided
copying and optional
1000-sheet tray unit
unit for two-sided
copying
500 sheets
for each tray
With optional 1500
sheet tray unit
1st tray
2nd tray
3rd tray
4th tray
With unit for two-sided
copying and optional
1500-sheet tray unit
unit for two-sided
copying
500 sheets
for each tray
1st tray
2nd tray
500 sheets
for each tray
1st tray
2nd tray
3rd tray
15
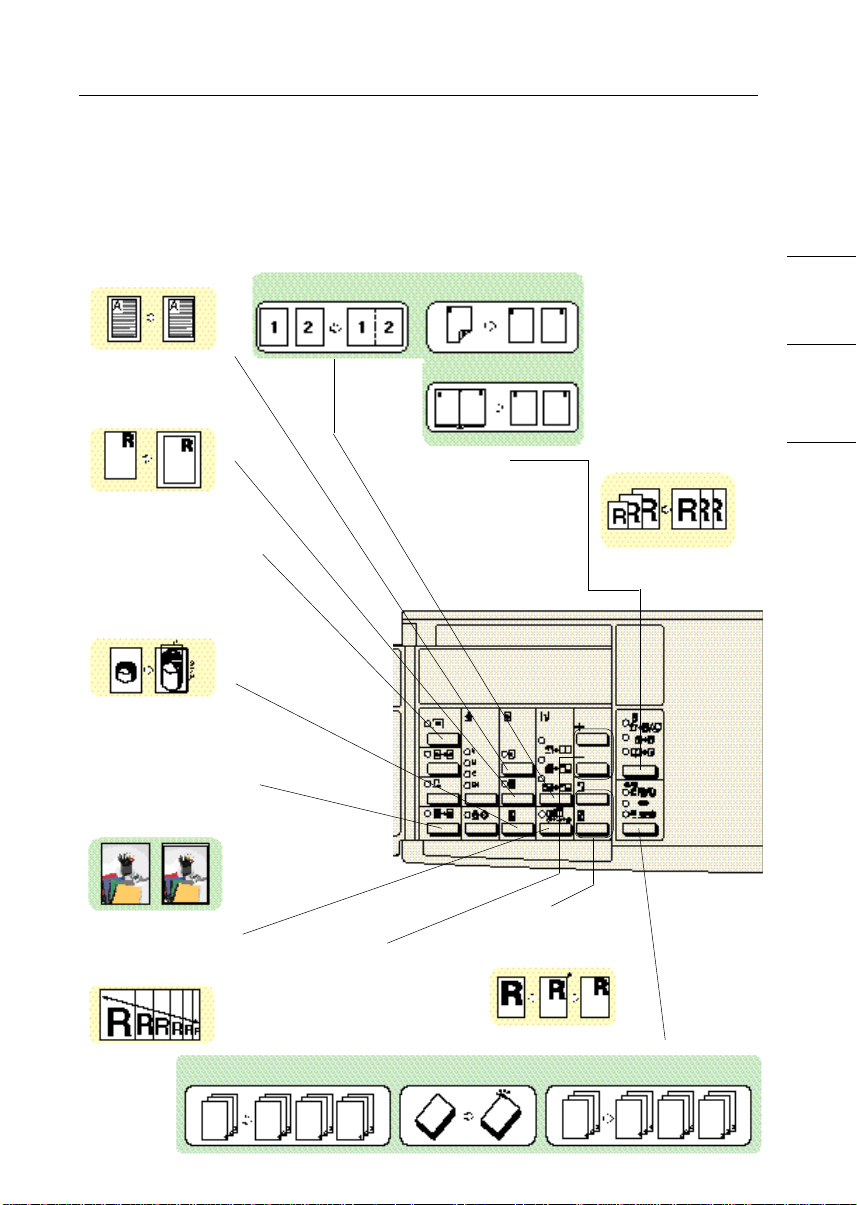
OPERATION PANEL
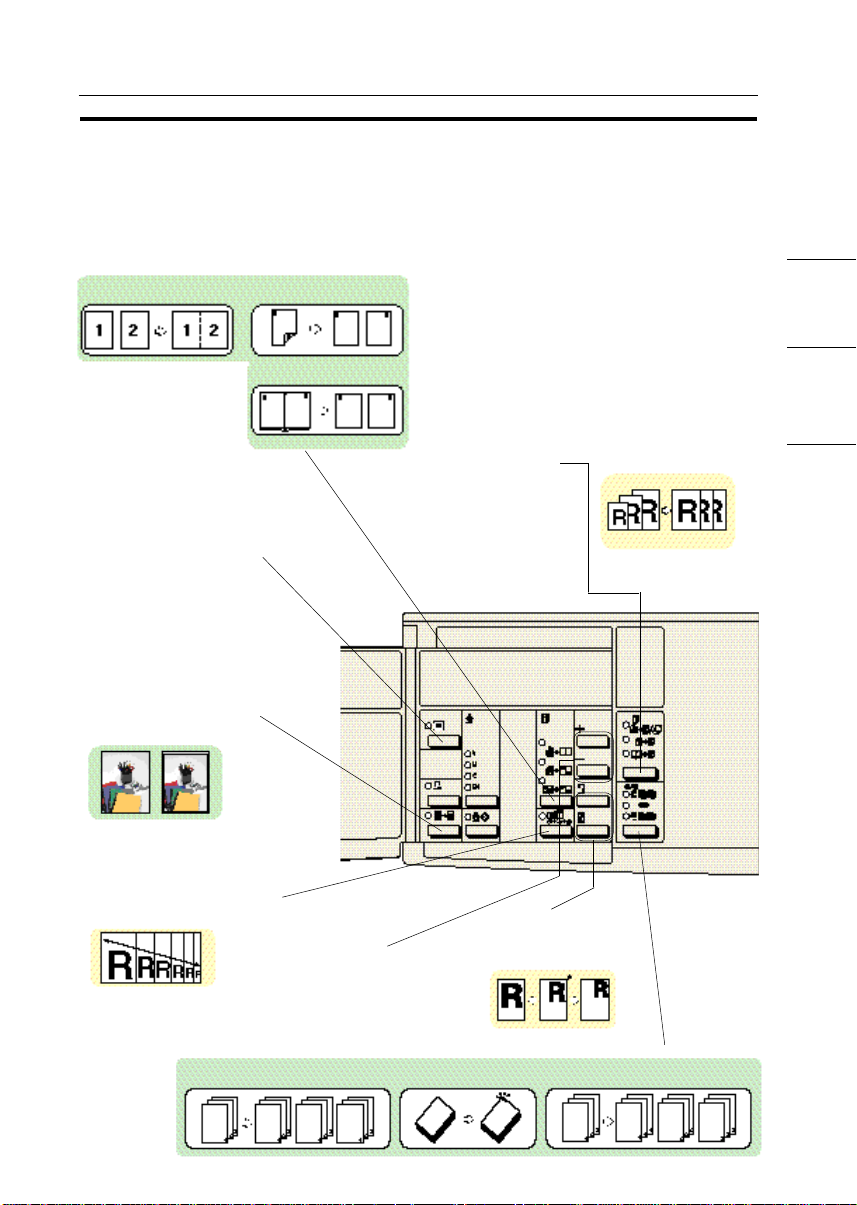
Main Keys: Basic Model
OPERATION PANEL
Single Copies Key
☛
See page 85.
Projector Key
Press to use the projector
unit (option). ☛ See page
149.
Full Image Key
Automatically reduces a
copy to protect an image on
the edges of the original
from being lost. ☛ See page
56.
☛ See page 87.
☛ See page 88.
Duplex Side 2 Key
Press to copy onto the underside of once-copied paper with the bypass feed table. ☛ See page 73.
This lamp indicates that a little or no toner remains; it
blinks when a little toner remains, and lights when no
toner remains.
This section indicates a location having a paper jam or error status. ☛ See page 113”.
Auto Reduce/Enlarge Key
☛ See page 69.
Zoom (Number Key + #) Key
☛ See page 77.
☛ See page 89 (Sorter stapler is
required).
16
+ Up Key
– Down Key
Sets the magnification by percent to enlarge/reduce a copy.
☛ See page 77.
☛ See page 90
stapler is required).
Enlarge Key
Reduce Key
☛ See page 76.
☛ See page 89 (Sorter stapler is
(Sorter
required).
Sorter Key
• For the color function keys, ☛ see page 20.
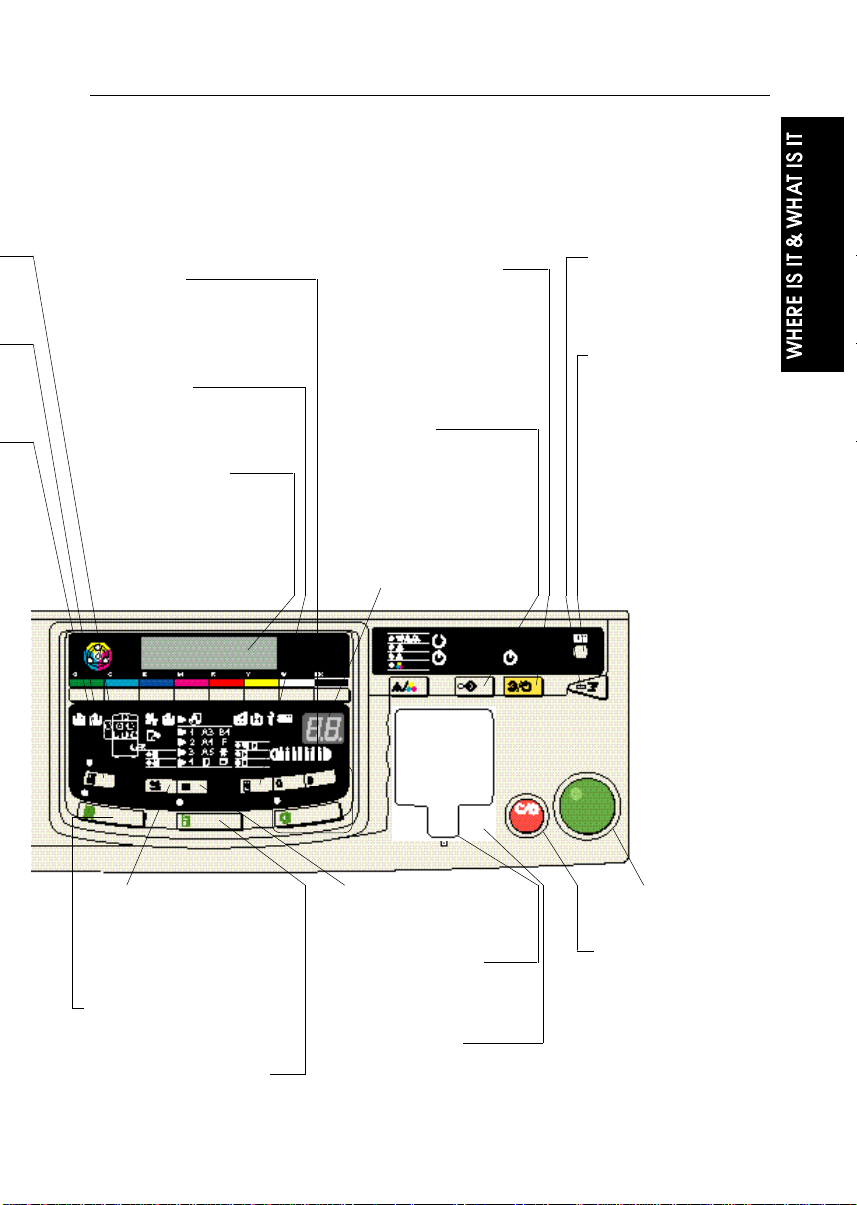
OPERATION PANEL
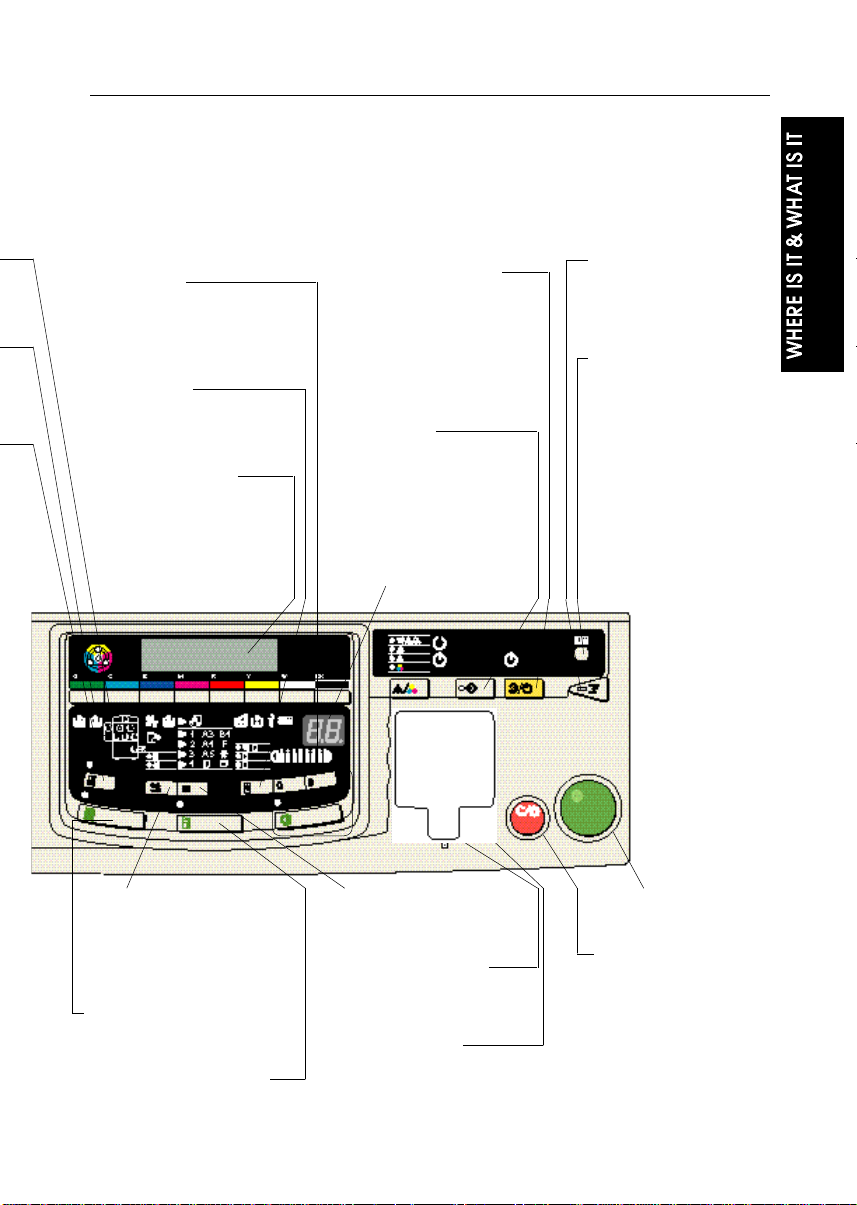
Lighter Key
Darker Key
Auto Image Density Key
Adjusts the copy density.
☛ See page 65.
Original Key
Selects the original type.
☛ See page 67.
Guidance Display
Displays an operation procedure, operation status, error
message, etc.
• Refer to these messages to
execute operations.
Clear Modes/Stand-by
Key
Clear Modes - Cancels the current setting and returns to the
state on power-up.
Stand-by - Hold down this key for
about a second or more to enter
the Stand-by mode. ☛ See page
55.
Program Key
Stores a frequently used setting
and recalls it. ☛ See page 93.
This section displays the specified number of copies before a
copy operation, and the number
of copies made or rest of copies
to be made during a copy operation.
Interrupt Key
Interrupts the current copy
operation to copy another
original.
☛ See page 75.
Counter Key
Displays the total number of
copies that have been made
up to this time in the guidance display.
• This function displays the
number of copies separately for the Full Color and
monotone (Single Color/
Black) modes. Press any
other key to return to the
normal display.
Special Paper Key
Press this key to set special paper such as thick paper and
OHP sheets for copying onto
them from the bypass feed table. ☛ See page 70.
Full Size Key
Makes copies that are the same
size as your originals.
Auto Paper Select Key
Automatically selects the paper
type that fits the size and magnification of an original.
Paper Selection Key
Press to select the paper size
to be used. ☛ See page 68.
Number Keys, . Key
Use to enter a value for the
number of copies, magnification, etc.
Recall/Enter Key
Enter - Sets a value or specification.
• Press this key when the guidance display specifies it (e.g.,
“➝ #”).
Start Key
Starts a copy operation.
Clear/Stop Key
Clear - Cancels a setting such
as the number of copies.
Stop - Stops/cancels a copy
operation.
Recall - This key can be used to
confirm the specified number of
copies during a copy operation or
if a copy operation stops halfway.
17
OPERATION PANEL
Basic/Edit Function: With unit for two-sided copying
Margin Adjustment Key
☛ See page 81.
Centering Key
☛ See page 84.
Projector Key
Press to use the projector
unit (option). ☛ See page
149.
Directional Mag. Key
☛ See page 79.
Single Copies Key
☛
See page 85.
☛ See page 87.
☛ See page 88.
Duplex Key
Press to select one of
Duplex modes.
☛ See page 73.
This lamp indicates that a little or no toner remains; it
blinks when a little toner remains, and lights when no
toner remains.
This section indicates a location having a paper jam or error status. ☛ See page 113.
Auto Reduce/Enlarge Key
☛ See page 69.
Full Image Key
Automatically reduces a
copy to protect an image on
the edges of the original
from being lost. ☛ See page
56.
Zoom (Number Key +
#) Key
☛ See page 77.
☛ See page 89 (Sorter stapler is
required).
18
+ Up Key
– Down Key
Sets the magnification by
percent to enlarge/reduce
a copy. ☛ See page 77.
☛ See page 90
stapler is required).
Enlarge Key
Reduce Key
☛ See page 76.
☛ See page 89 (Sorter stapler
(Sorter
is required).
Sorter Key
• For the color function keys, ☛ see page 20.
OPERATION PANEL
Lighter Key
Darker Key
Auto Image Density Key
Adjusts the copy density.
☛ See page 65.
Original Key
Selects the original type.
☛ See page 67.
Guidance Display
Displays an operation procedure, operation status, error
message, etc.
• Refer to these messages to
execute operations.
Clear Modes/Stand-by
Key
Clear Modes - Cancels the current setting and returns to the
state on power-up.
Stand-by - Hold down this key for
about a second or more to enter
the Stand-by mode. ☛ See page
55.
Program Key
Stores a frequently used setting
and recalls it. ☛ See page 93.
This section displays the specified number of copies before a
copy operation, and the number
of copies made or rest of copies
to be made during a copy operation.
Interrupt Key
Interrupts the current copy
operation to copy another
original.
☛ See page 75.
Counter Key
Displays the total number of
copies that have been made
up to this time in the guidance display.
• This function displays the
number of copies separately for the Full Color and
monotone (Single Color/
Black) modes. Press any
other key to return to the
normal display.
Special Paper Key
Press this key to set special paper such as thick paper and
OHP sheets for copying onto
them from the bypass feed table. ☛ See page 70.
Full Size Key
Makes copies that are the same
size as your originals.
Auto Paper Select Key
Automatically selects the paper
type that fits the size and magnification of an original.
Paper Selection Key
Press to select the paper size
to be used. ☛ See page 68.
Number Keys, . Key
Use to enter a value for the
number of copies, magnification, etc.
Recall/Enter Key
Enter - Sets a value or specification.
• Press this key when the liquid crystal display section
specifies it (e.g., “➝ #”).
Start Key
Starts a copy operation.
Clear/Stop Key
Clear - Cancels a setting such
as the number of copies.
Stop - Stops/cancels a copy
operation.
Recall - This key can be used to
confirm the specified number of
copies during a copy operation or
if a copy operation stops halfway.
19
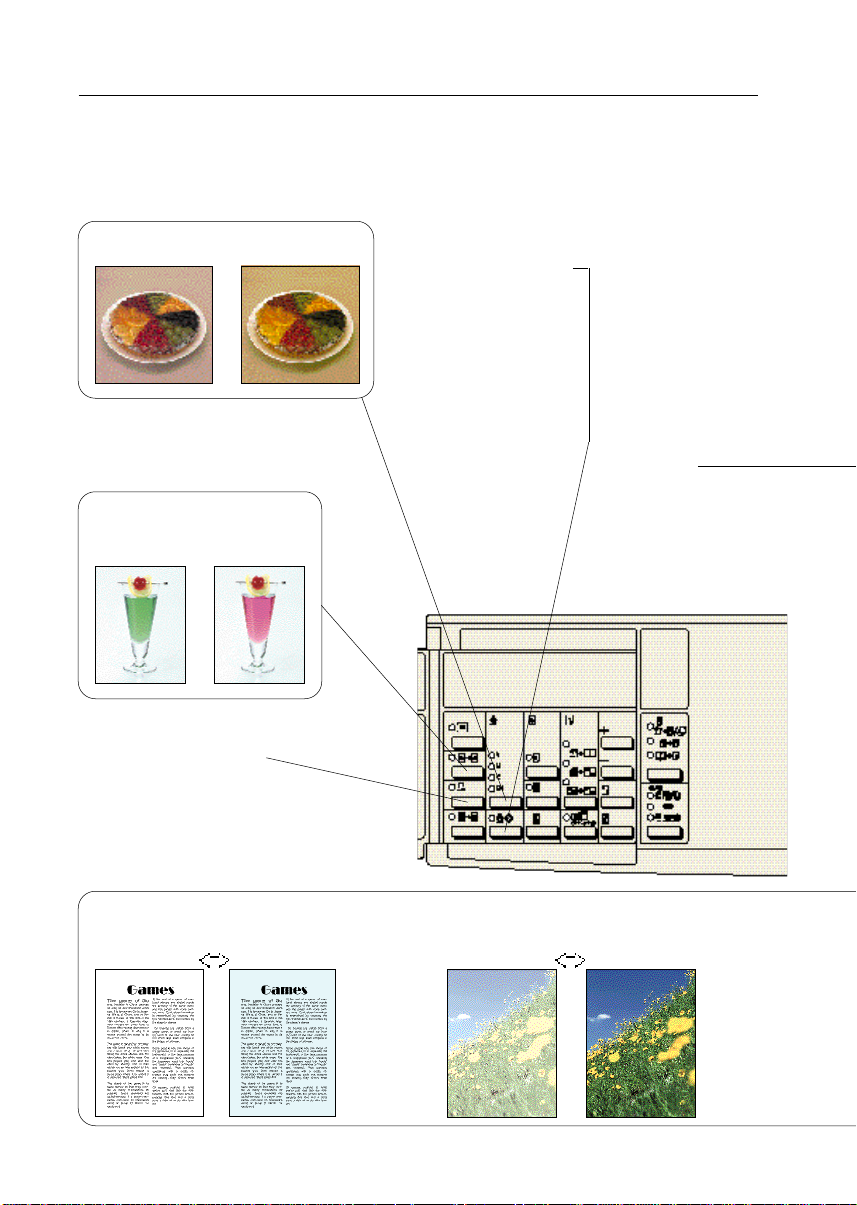
OPERATION PANEL
Color Functions
Color Balance Adjustment Key
Adjusts the overall color tone of a
copy. ☛ See page 29.
➧
Color Balance Recall/
Memory Key
This key can be used to
store a color balance adjustment setting and recall it.
☛ See page 31.
Color Conversion Key
Copies an original by replacing an
original color with another color or
removing an original color. ☛ See
page 27.
➧
Image Adjustment Key
Press to switch between “Background Density Control,” “Pastel,”
“Sharp/Soft,” and “Auto Color Calibration” modes in sequence.
Background Density Control - Adjusts the background density of an image.
☛ See page 33.
Lighter Darker
Color Keys
Press to select colors for
a single color or color
conversion.
Pastel - Copies an image in lighter (pastel) tones.
☛ See page 35.
Lighter Normal
20
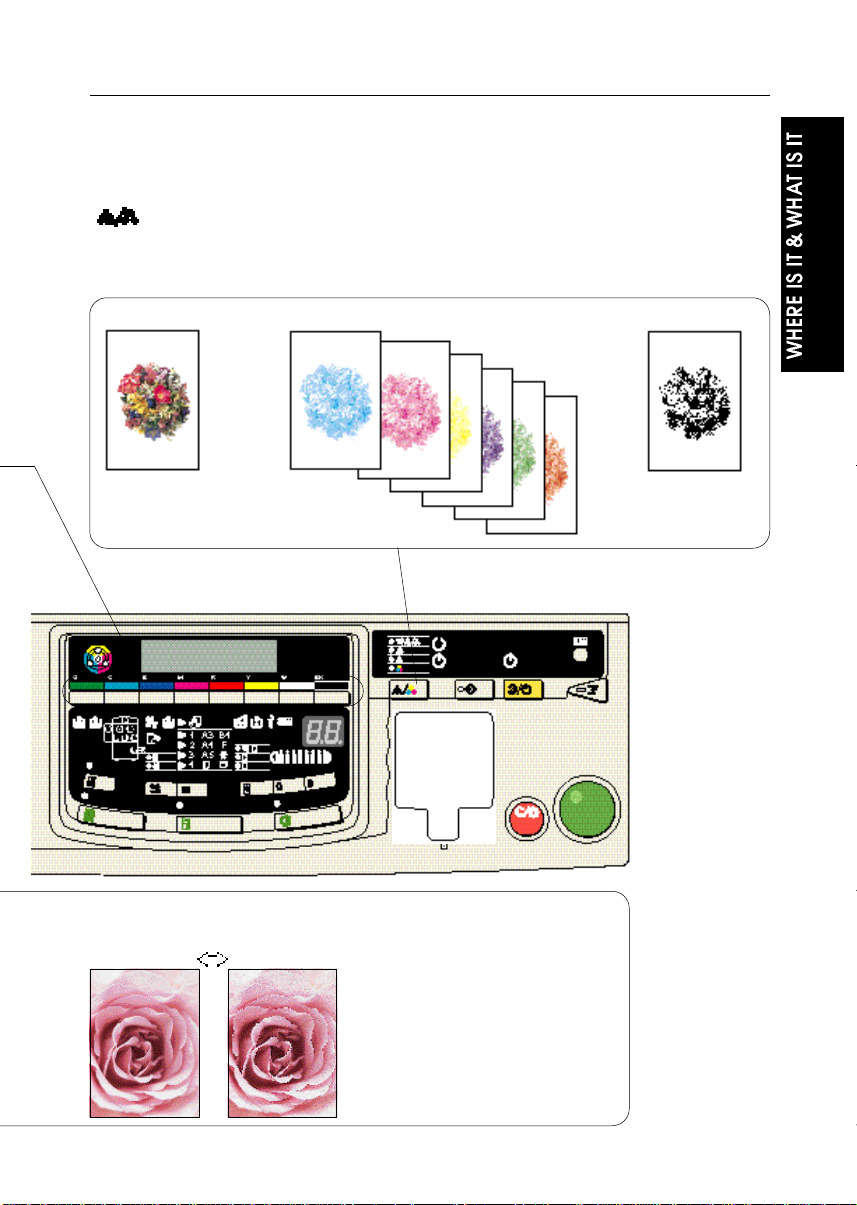
OPERATION PANEL
• Color samples are expressed in the print processing mode to clarify the difference between
the functions.
The colors of the copier illustrated below might slightly differ from actual colors of your copier.
• Colors specified by the Color keys might slightly differ from those on actual copies.
[ ] ☛ See page 64.
Switches among the “Full Color Copy,” “Single Color,” “Auto Color Select,” and “Black Copy” modes in that
order each time you press this key.
Auto Color Select - Automatically detects an original color and makes a copy in full color or black. ☛ See
page 64, “Color Selection”.
☛ See page 24. ☛ See page 26. ☛ See page 24.
Sharp/Soft - Adjusts the edges of an image.
☛ See page 36.
Softer Sharper
Auto Color Calibration - Use this
mode when the balance of the three
colors (yellow, magenta, and cyan)
is thrown off and a certain color tone
is strong in an image.
☛ See page 37.
21

OPERATION PANEL
22

COLOR FUNCTIONS
23
FULL COLOR COPY/BLACK COPY
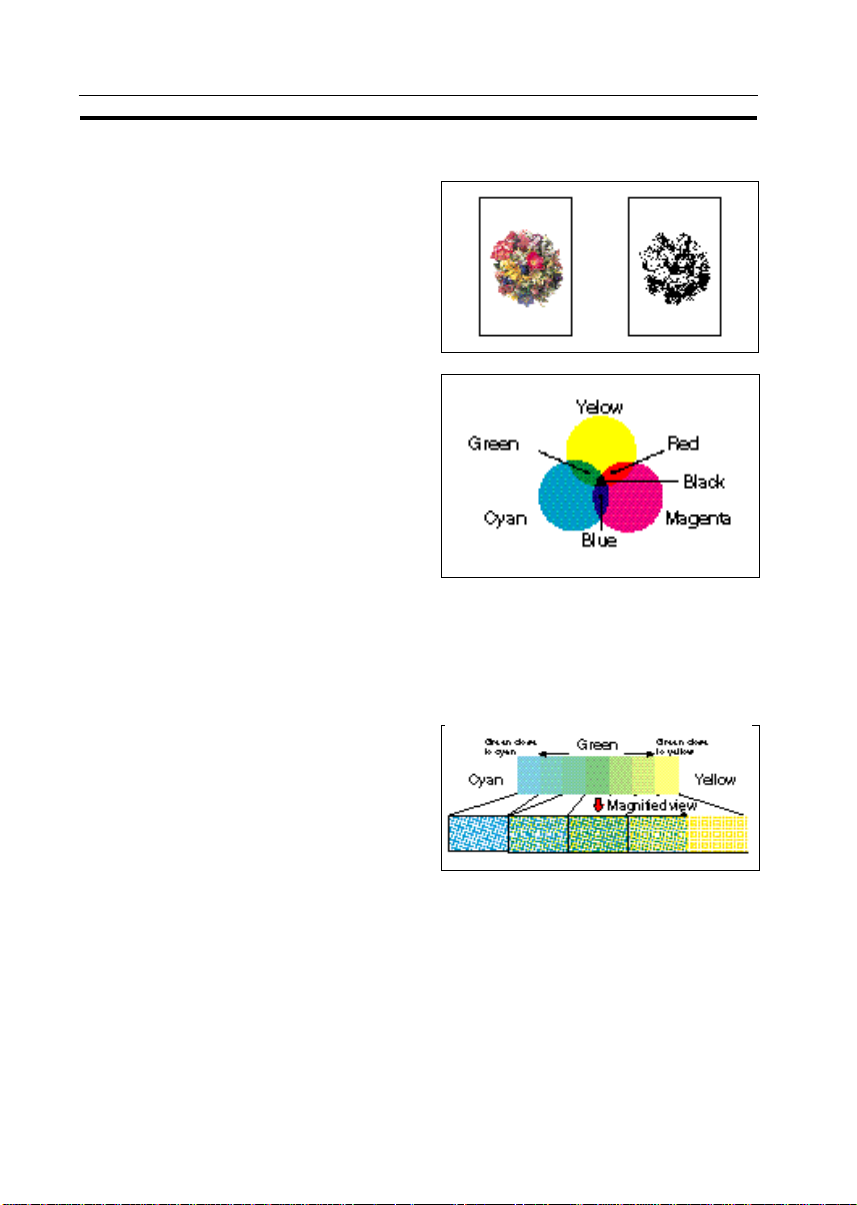
FULL COLOR COPY/BLACK COPY
The Full Color Copy function overlays the four colors (yellow, magenta,
cyan, and black) to make copies in
colors close to those of originals.
The Black Copy function makes copies in black regardless of colors of
originals.
Three fundamental colors
❐ Yellow, magenta, and cyan (three fun-
damental colors) can be combined to
express the seven colors shown in the
figure below. If yellow, magenta, and
cyan are overlaid, black is created.
However, this copier uses the black
toner to express black because the
black made from the three fundamental colors slightly differs from actual
black in the strict sense.
❐ This copier adjusts the amount of the
yellow, magenta, and cyan toner to
express green close to yellow (yellowish green) or cyan (bluish green).
Difference between greens when
combining yellow and cyan
24

Press the key to select the
Full Color Copy or Black Copy
mode.
❐ The “Full Color Copy,” “Single
Color,” “Auto Color Select,” and
“Black Copy” modes are switched in
that order each time you press the
key..
❐ When you do not set any other func-
tion, press the Start key to start a
copy operation.
❐ You can adjust the overall color tone
of a copy or the edges of an image.
See “COLOR BALANCE ADJUSTMENT” for the overall color tone of
a copy, and “Sharp/Soft” for the
edges of an image.
☛ See page 29, “COLOR BALANCE ADJUSTMENT” and page 36,
“Sharp/Soft”.
FULL COLOR COPY/BLACK COPY
25
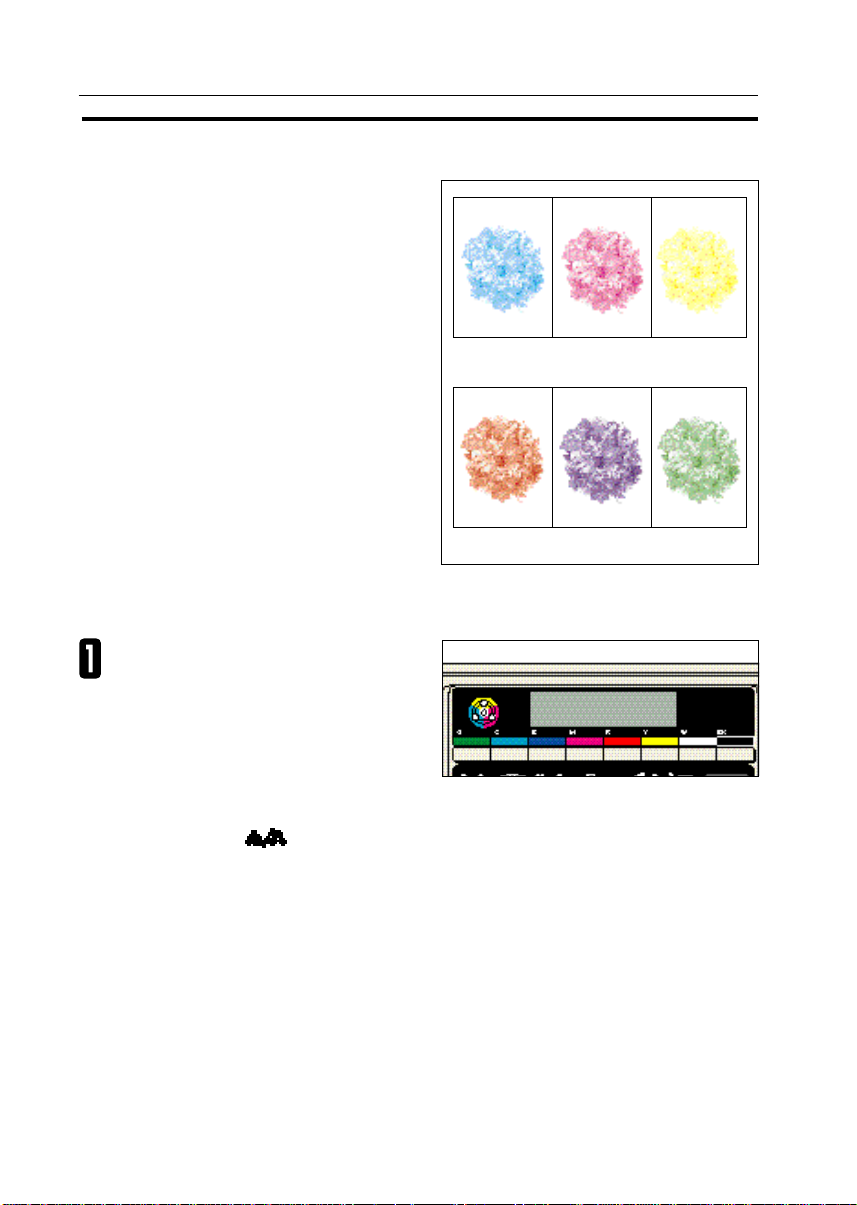
SINGLE COLOR
This function makes copies in a
specified color. For single color
copying, you can choose yellow, red,
magenta, blue, cyan, or green.
❐ Although still monochrone, some
colors you select may be created with
2 toners. This is because yellow,
magenta and cyan are created with a
single toner, while red, blue and green
use two toners.
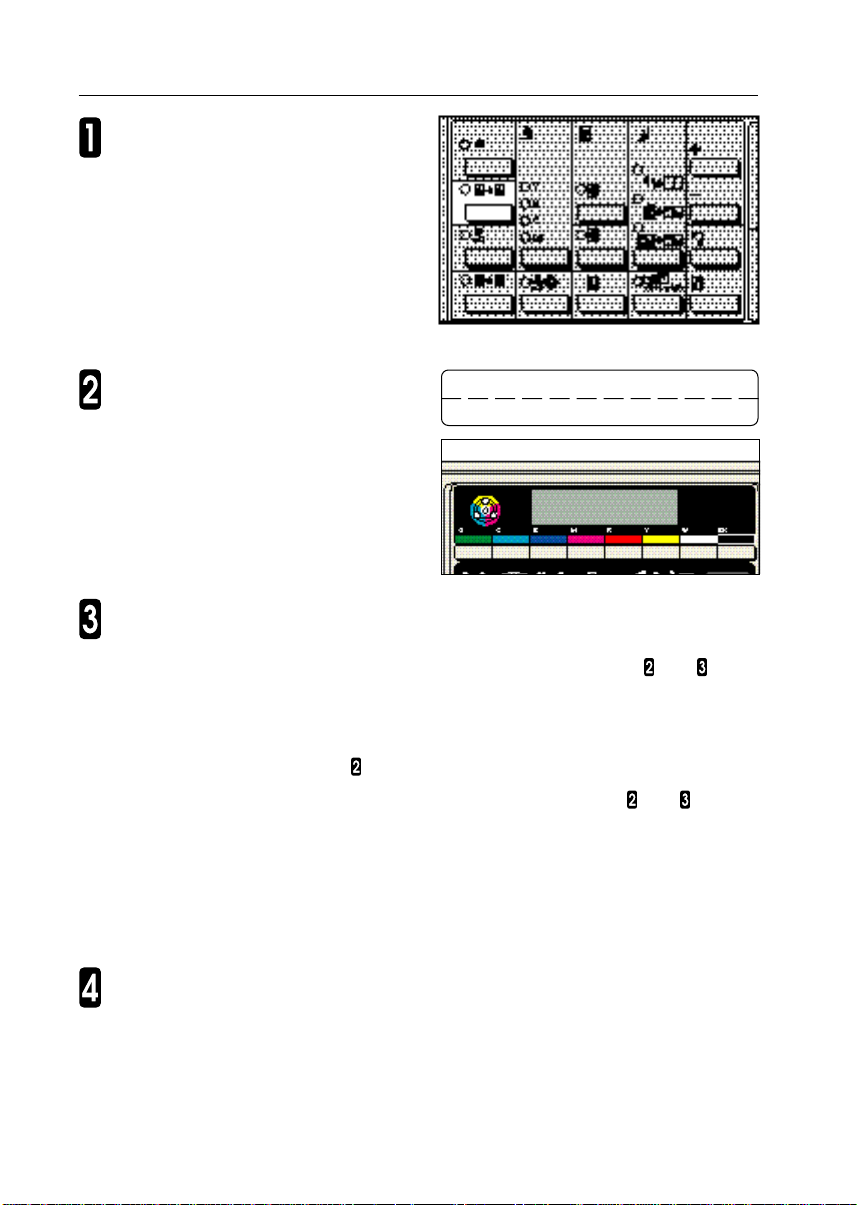
Press a Color key to select a
color you want use.
❐ You cannot select the White key.
❐ When you do not wish to select any
other functions, press the Start key
to begin copying.
❐ After selecting the “Single Color”
mode using the key, you can
also use a Color key to select a
color you want to use.
❐ When you select the Black key, the
color mode is set to “Black Copy.”
SINGLE COLOR
Cyan Magenta Yellow
Red Blue Green
26

Copies an original by replacing a
color with another one or removing
a color in the original.
❐ This function can be used only if your
copier has a unit for two-sided copying.
❐ When you specify the Color Conver-
sion function, the color mode is set to
“Full Color Copy.”
❐ You can convert up to eight colors.
When you convert eight colors, however, four colors of the eight are
changed into “White,” resulting in the
same as removing these four colors.
❐ The color range to be converted can
be adjusted within 5 levels. For example, when you specify yellow with
the color width set to “Wide,” other
colors close to yellow, such as orange
and yellowish green, are also converted. When you set the color width
to “Narrow,” only yellow is converted.
The color width can be adjusted with
the user tools. ☛ See page 104,
“USER TOOLS, Color Conversion”.
❐ You can specify the following eight
colors: yellow, magenta, cyan, green,
blue, red, white, and black.
COLOR CONVERSION
COLOR CONVERSION
c
27
COLOR CONVERSION
Press the Color Conversion
key.
Use a Color key to select the color
you wish to convert (source), and
press the Recall/Enter key.
❐ The selected color is displayed on
the guidance display.
❐ If you change the selected color,
press the Clear/Stop key and select another Color key.
Color Conversion (Color key>#)
1/8_ _ _ _ _>_ _ _ _ _
Use a Color key to select the color to convert to (final), and press the
Recall/Enter key.
❐ When converting two or more colors consecutively, repeat steps and for all
target colors.
❐ When you specify colors other than “White” for the final color four times consecu-
tively, you can only choose “White” as the final color for the next four selections.
In this case, repeat only step .
❐ When you press the – Down key, the colors specified in steps and are dis-
played. Press this key repeatedly when you specify two or more colors you have
entered. Then all the specified colors are displayed. Press the + Up key to go
back to the normal display.
You can change a color you have programmed, but see the above note about
selecting “White”.
Set your originals and press the Start key.
28
 Loading...