

Ricoh AVERIAS 286, AVERIAS 368 Diagram
SC Table
Localization de averias en ingles
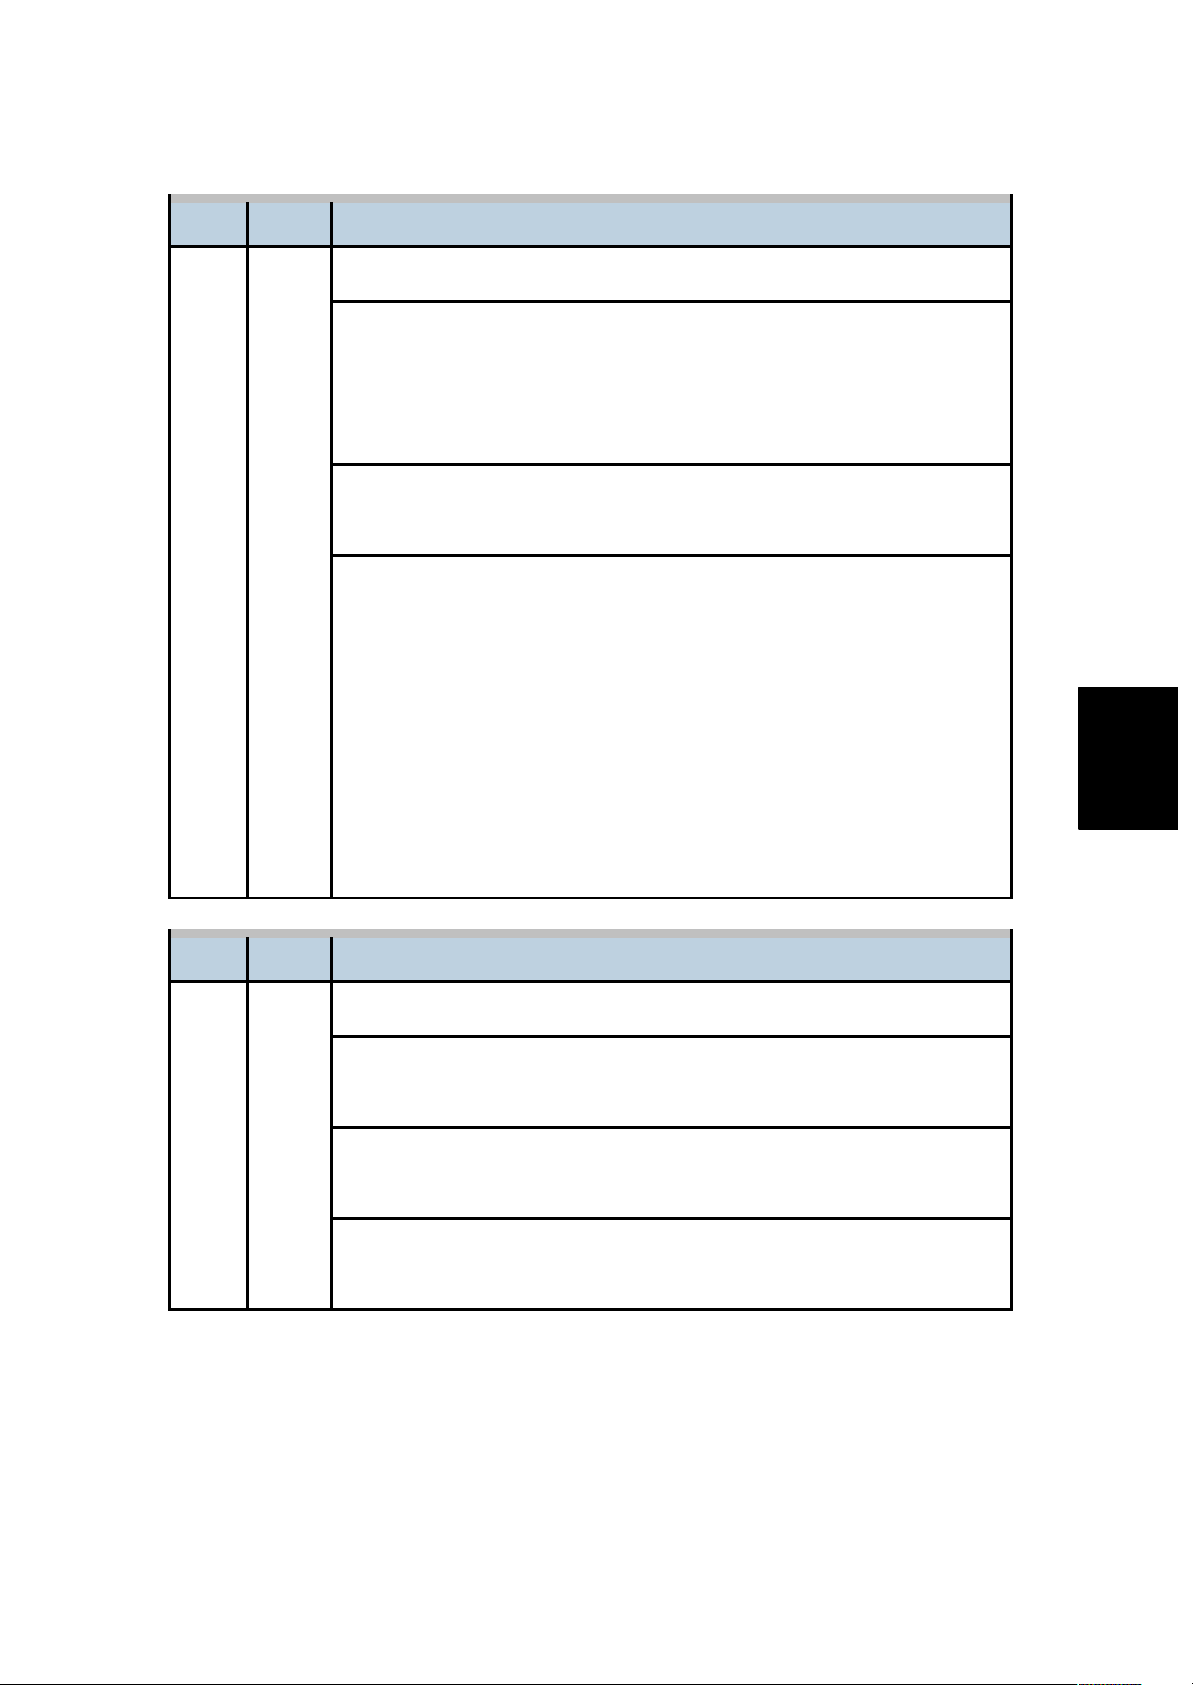
No. Type Details (Symptom, Possible Cause, Troubleshooting Procedures)
101 D
Exposure lamp error
-001: Shading at AGC
-002: Shading at scanning
The peak white level is less than 64/255 digits (8 bits) when scanning the
shading plate. (The shading data peak does not reach the specified
threshold)
ƒ Exposure lamp defective
ƒ Lamp stabilizer defective
ƒ Exposure lamp connector defective
ƒ Standard white plate dirty
ƒ Scanner mirror or scanner lens out of position or dirty
ƒ SBU defective
1. Check and clean the scanner mirror(s) and scanner lens.
2. Check and clean the shading plate.
3. Replace the exposure lamp.
4. Replace the lamp stabilizer.
5. Replace the scanner mirror(s) or scanner lens.
6. Replace the SBU.
No. Type Details (Symptom, Possible Cause, Troubleshooting Procedures)
120 D Scanner home position error 1
The scanner home position sensor does not detect the “OFF” condition
during operation.
B222/B224 4-14 SM
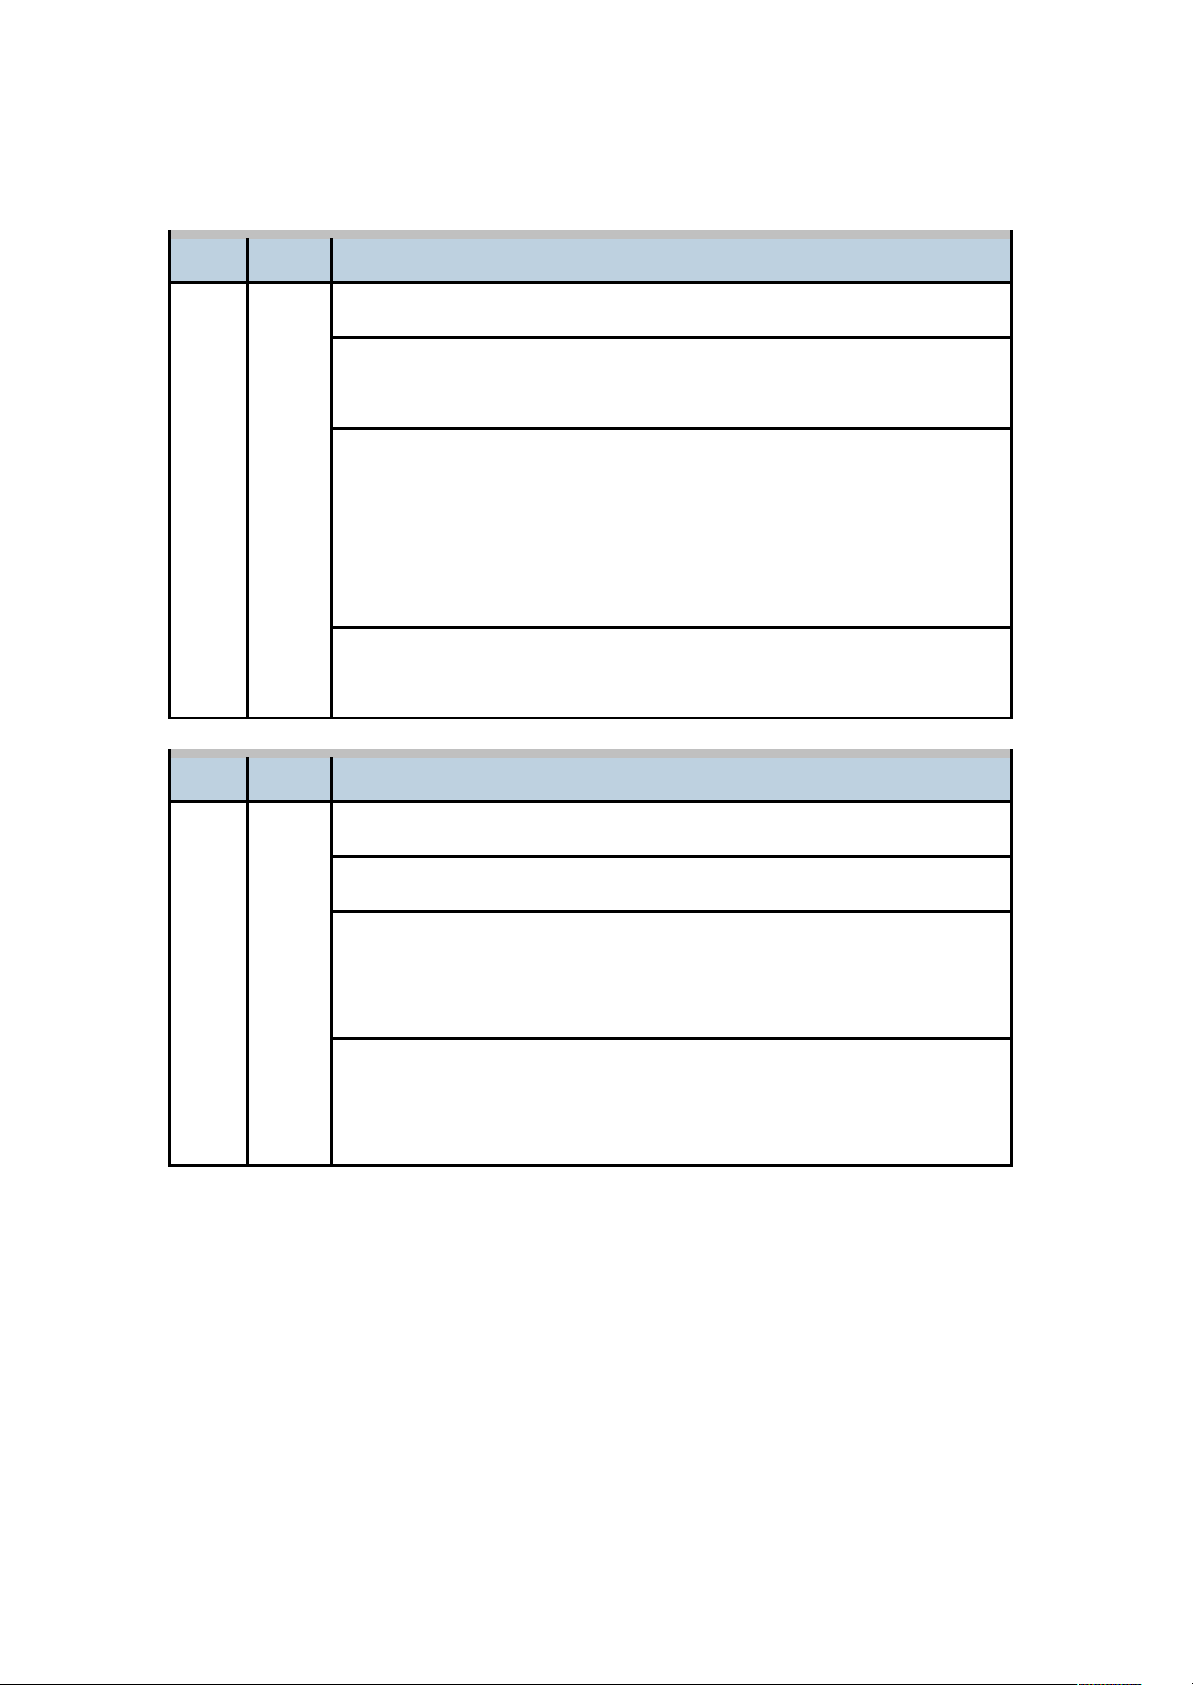
SC Table
Trouble-
shooting
No. Type Details (Symptom, Possible Cause, Troubleshooting Procedures)
ƒ Scanner motor driver defective
ƒ Scanner motor defective
ƒ Harness between SIO board and scanner motor disconnected
ƒ Scanner HP sensor defective
ƒ Harness between SBU and HP sensor disconnected
1. Check the cable connection between the SIO board and scanner
motor.
2. Check the cable connection between the SBU and HP sensor.
3. Replace the scanner motor.
4. Replace the HP sensor.
No. Type Details (Symptom, Possible Cause, Troubleshooting Procedures)
121 D
Scanner home position error 2
The scanner home position sensor does not detect the “ON” condition
during operation.
ƒ Scanner motor driver defective
ƒ Scanner motor defective
ƒ Harness between SIO board and scanner motor disconnected
ƒ Scanner HP sensor defective
ƒ Harness between SBU and HP sensor disconnected
1. Check the cable connection between the SIO board and scanner
motor.
2. Check the cable connection between the SBU and HP sensor.
3. Replace the scanner motor.
4. Replace the HP sensor.
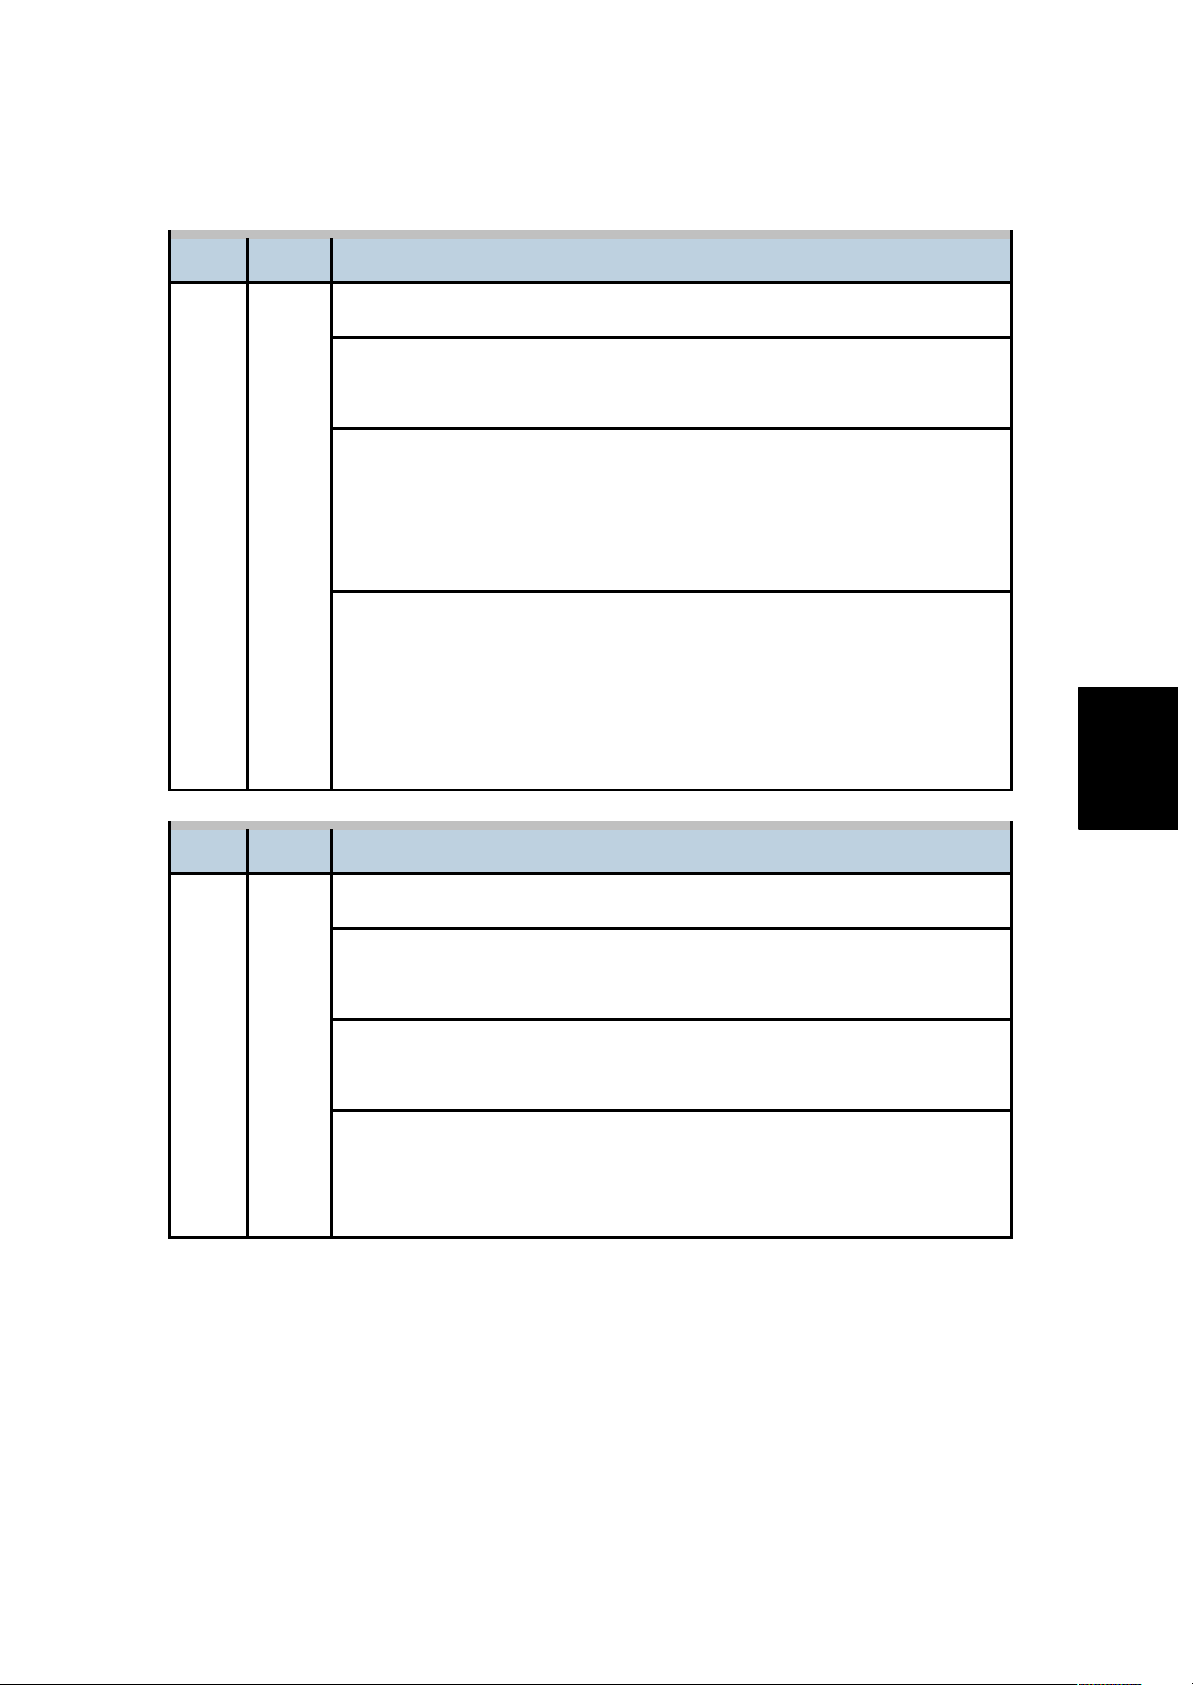
SC Table
No. Type Details (Symptom, Possible Cause, Troubleshooting Procedures)
141 D
Black level detection error
The black level cannot be adjusted within the target value during the
zero clamp.
ƒ Defective SBU
Replace the SBU.
No. Type Details (Symptom, Possible Cause, Troubleshooting Procedures)
142 D
White level detection error
The white level cannot be adjusted within the target during auto gain
control.
ƒ Dirty exposure glass or optics section
ƒ SBU board defective
ƒ Exposure lamp defective
ƒ Lamp stabilizer defective
1. Clean the exposure glass, white plate, mirrors, and lens.
2. Check if the exposure lamp is lit during initialization.
3. Check the harness connection between SBU and IPU.
4. Replace the exposure lamp.
5. Replace the SBU board.
No. Type Details (Symptom, Possible Cause, Troubleshooting Procedures)
144 SBU communication error
-001 D SBU connection error
The SBU connection cannot be detected at power on or recovery from
the energy save mode.
ƒ
Insufficient power supply for SBU
B222/B224 4-16 SM
Trouble-
shooting
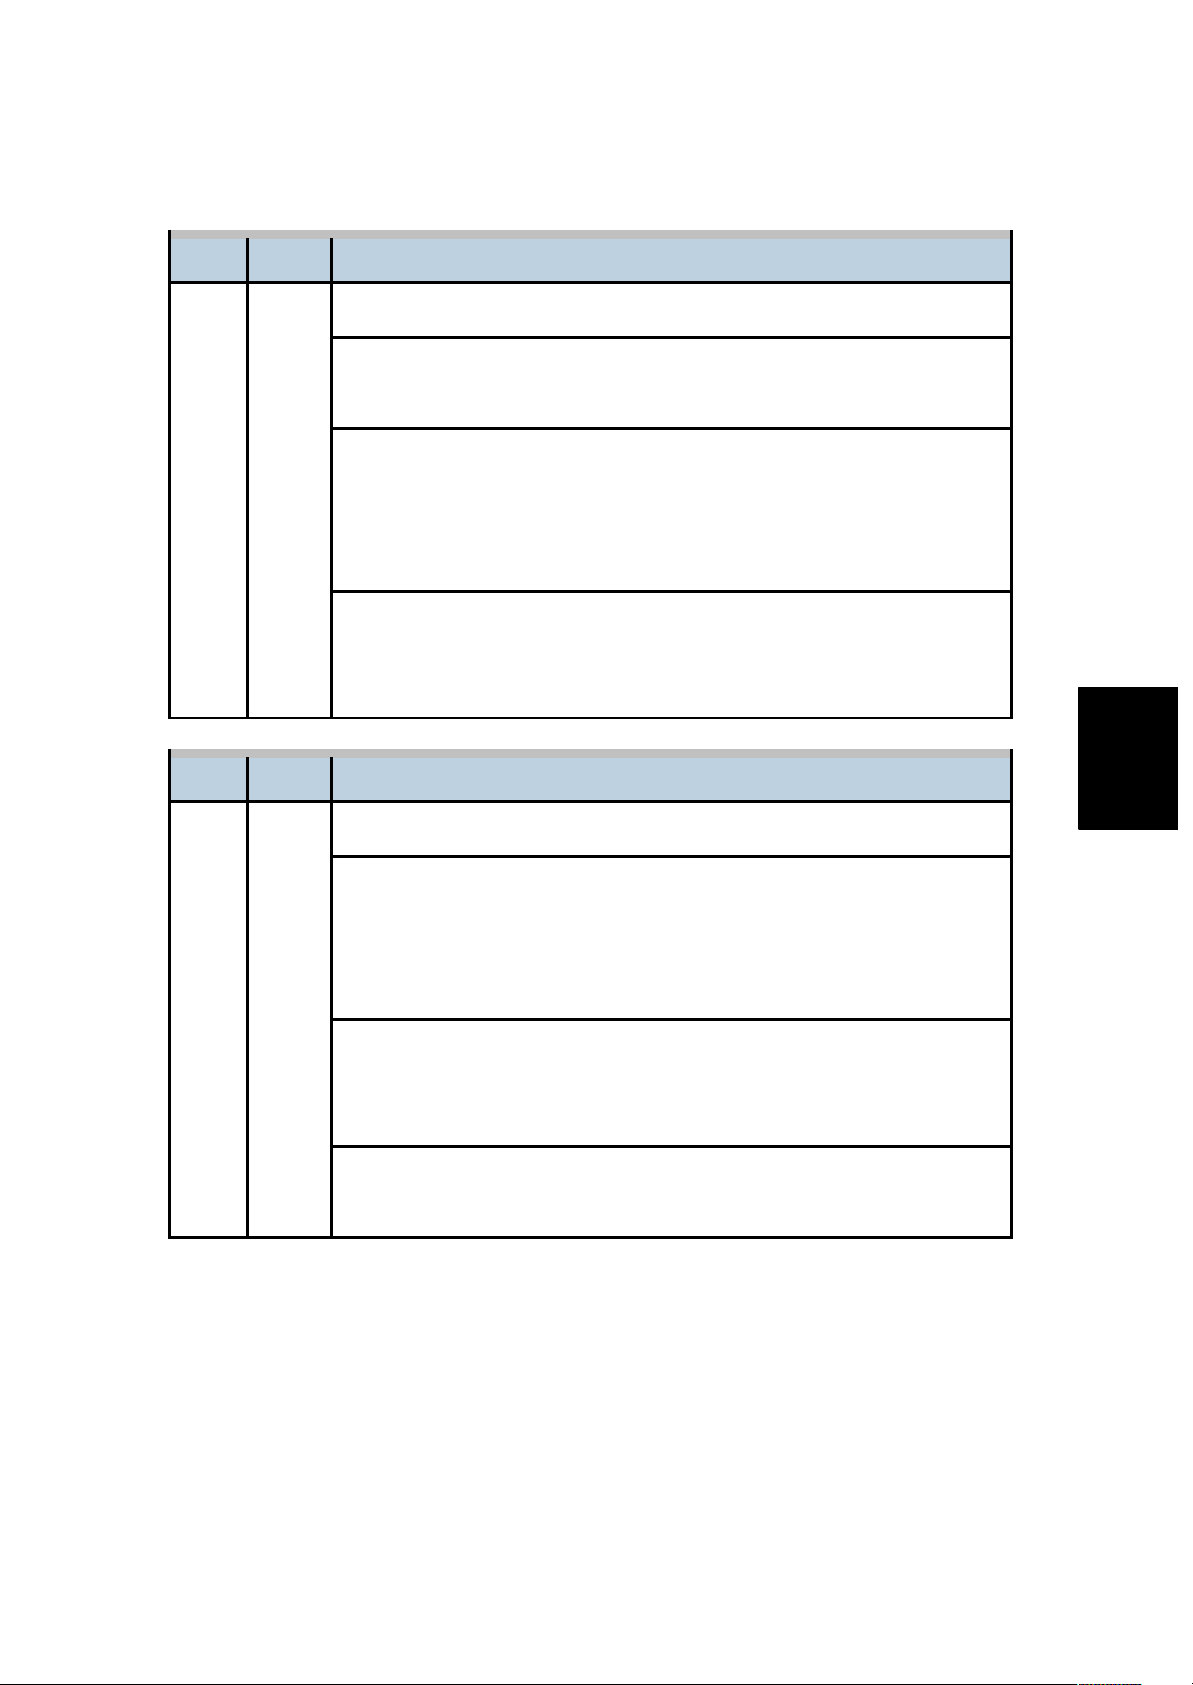
SC Table
No. Type Details (Symptom, Possible Cause, Troubleshooting Procedures)
ƒ Defective SBU
ƒ Defective harness
ƒ Defective detection port on the BCU
1. Replace the harness.
2. Replace the SBU.
3. Replace the BCU.
-002 D
SBU serial communication error
The power ON of the SBU is not detected.
ƒ Defective SIO
ƒ Defective harness
ƒ Defective detection port on the BCU
1. Replace the harness.
2. Replace the SIO.
3. Replace the BCU.
-003 D
GASBU reset error
The serial communication does not work.
ƒ Defective SBU
ƒ Defective detection circuit on the BCU
ƒ Defective harness
1. Replace the SBU.
2. Replace the BCU.
3. Replace the harness.
No. Type Details (Symptom, Possible Cause, Troubleshooting Procedures)
161 D IPU error
The error result of self-diagnostic by the Taurus (ASIC on the IPU) is
detected.
SC Table
No. Type Details (Symptom, Possible Cause, Troubleshooting Procedures)
ƒ Defective IPU
ƒ Defective connection between IPU and SBU
1. Check the connection between IPU and SBU.
2. Replace the IPU.
No. Type Details (Symptom, Possible Cause, Troubleshooting Procedures)
165 D
Copy Data Security Unit error
ƒ The copy data security board is not detected when the copy data
security function is set "ON" with the initial setting.
ƒ A device check error occurs when the copy data security function is
set "ON" with the initial setting.
ƒ Incorrect installation of the copy data security board
ƒ Defective copy data security board
1. Reinstall the copy data security board.
2. Replace the copy data security board.
No. Type Details (Symptom, Possible Cause, Troubleshooting Procedures)
195 D
Serial Number Mismatch
ƒ Serial number stored in the memory does not have the correct
code.
ƒ NVRAM defective
ƒ BCU replaced without original NVRAM
1. Check the serial number with SP5-811-002.
2. If the stored serial number is incorrect, contact your supervisor.
B222/B224 4-18 SM
Trouble-
shooting
SC Table
No. Type Details (Symptom, Possible Cause, Troubleshooting Procedures)
202 D
Polygon motor error 1: ON timeout
The polygon mirror motor does not reach the targeted operating speed
within the specified time after turning on or changing speed
ƒ Defective or disconnected harness to polygon motor driver board
ƒ Defective polygon motor driver board
ƒ Defective polygon motor.
1. Replace the polygon motor.
2. Replace the laser optics housing unit.
3. Replace the harness.
4. Replace the IPU.
No. Type Details (Symptom, Possible Cause, Troubleshooting Procedures)
203 D
Polygon motor error 2: OFF timeout
The polygon mirror motor does leave the READY status within 3
seconds after the polygon motor switches off.
ƒ Disconnected or defective harness to polygon motor driver board
ƒ Defective polygon motor driver board
ƒ Defective polygon motor
1. Check or replace the harness.
2. Replace the polygon motor.
No. Type Details (Symptom, Possible Cause, Troubleshooting Procedures)
204 D
Polygon motor error 3: XSCRDY signal error
The SCRDY_N signal goes HIGH (inactive) while the laser diode is
firing.
SC Table
ƒ Disconnected or defective harness to polygon motor driver board
ƒ Defective polygon motor
ƒ Defective polygon motor driver board
1. Check or replace the harness.
2. Replace the polygon motor.
No. Type Details (Symptom, Possible Cause, Troubleshooting Procedures)
210 C Laser synchronizing detection error: end position [K]
211 C Laser synchronizing detection error: end position [Y]
212 C Laser synchronizing detection error: end position [M]
213 C Laser synchronizing detection error: end position [C]
- -
The laser synchronizing detection signal for the end position of LDB [K],
[Y], [M], [C] is not detected for one second after the LDB unit turned on
when detecting the main scan magnification.
ƒ Disconnected or defective harness to synchronizing detector for
end position
ƒ Defective synchronizing detector board
ƒ Defective LD board or driver
ƒ Defective IPU
1. Replace the harness of the LD board.
2. Replace the laser optics housing unit.
3. Replace the IPU.
No. Type Details (Symptom, Possible Cause, Troubleshooting Procedures)
220 D Laser synchronizing detection error: start position [K]: LD0
221 D Laser synchronizing detection error: start position [K]: LD1
222 D Laser synchronizing detection error: start position [Y]: LD0
B222/B224 4-20 SM
Trouble-
shooting
SC Table
No. Type Details (Symptom, Possible Cause, Troubleshooting Procedures)
223 D Laser synchronizing detection error: start position [Y]: LD1
224 D Laser synchronizing detection error: start position [M]: LD0
225 D Laser synchronizing detection error: start position [M]: LD1
226 D Laser synchronizing detection error: start position [C]: LD0
227 D
Laser synchronizing detection error: start position [C]: LD1
- -
The laser synchronizing detection signal for the start position of the LDB
[K], [Y], [M], [C] is not output for two seconds after LDB unit turns on
while the polygon motor is rotating normally.
ƒ Disconnected cable from the laser synchronizing detection unit or
defective connection
ƒ Defective laser synchronizing detector
ƒ Defective LDB
ƒ Defective IPU
1. Check the connectors.
2. Replace the laser-synchronizing detector.
3. Replace the LDB.
4. Replace the IPU.
No. Type Details (Symptom, Possible Cause, Troubleshooting Procedures)
230 D
FGATE ON error: Bk
The PFGATE ON signal does not assert within 5 seconds after
processing the image in normal job or MUSIC for start position [K].
ƒ Defective ASIC (Lupus)
ƒ Poor connection between controller and IPU.
ƒ Defective IPU
SC Table
No. Type Details (Symptom, Possible Cause, Troubleshooting Procedures)
1. Check the connection between the controller board and the IPU.
2. Replace the IPU.
3. Replace the controller board.
No. Type Details (Symptom, Possible Cause, Troubleshooting Procedures)
231 D
FGATE OFF error: Bk
ƒ The PFGATE ON signal still asserts within 5 seconds after
processing the image in normal job or MUSIC for end position [K].
ƒ The PFGATE ON signal still asserts when the next job starts.
See SC 230 for troubleshooting details.
No. Type Details (Symptom, Possible Cause, Troubleshooting Procedures)
232 D
FGATE ON error: Y
The PFGATE ON signal does not assert within 5 seconds after
processing the image in normal job or MUSIC for start position [Y].
See SC 230 for troubleshooting details.
No. Type Details (Symptom, Possible Cause, Troubleshooting Procedures)
233 D
FGATE OFF error: Y
ƒ The PFGATE ON signal still asserts within 5 seconds after
processing the image in normal job or MUSIC for end position [Y].
ƒ The PFGATE ON signal still asserts when the next job starts.
See SC 230 for troubleshooting details.
B222/B224 4-22 SM
Trouble-
shooting
SC Table
No. Type Details (Symptom, Possible Cause, Troubleshooting Procedures)
234 D
FGATE ON error: M
The PFGATE ON signal does not assert within 5 seconds after
processing the image in normal job or MUSIC for start position [M].
See SC 230 for troubleshooting details.
No. Type Details (Symptom, Possible Cause, Troubleshooting Procedures)
235 D
FGATE OFF error: M
ƒ The PFGATE ON signal still asserts within 5 seconds after
processing the image in normal job or MUSIC for end position [M].
ƒ The PFGATE ON signal still asserts when the next job starts.
See SC 230 for troubleshooting details.
No. Type Details (Symptom, Possible Cause, Troubleshooting Procedures)
236 D
FGATE ON error: C
The PFGATE ON signal does not assert within 5 seconds after
processing the image in normal job or MUSIC for start position [C].
See SC 230 for troubleshooting details.
No. Type Details (Symptom, Possible Cause, Troubleshooting Procedures)
237 D
FGATE OFF error: C
ƒ The PFGATE ON signal still asserts within 5 seconds after
processing the image in normal job or MUSIC for end position [C].
ƒ The PFGATE ON signal still asserts when the next job starts.
See SC 230 for troubleshooting details.
SC Table
No. Type Details (Symptom, Possible Cause, Troubleshooting Procedures)
240 C LD error: Bk
241 C LD error: Y
242 C LD error: M
243 C LD error: C
- -
The IPU detects LDB error a few times consecutively when LDB unit
turns on after LDB initialization.
ƒ Worn-out LD
ƒ Disconnected or broken harness of the LD
1. Replace the harness of the LD.
2. Replace the laser optics housing unit.
3. Replace the IPU.
No. Type Details (Symptom, Possible Cause, Troubleshooting Procedures)
285 D
Line position adjustment (MUSIC) error
Line position adjustment fails four consecutive times.
ƒ Pattern sampling error ( insufficient image density )
ƒ Defective ID sensors for the line position adjustment
ƒ Defective image transfer belt unit
ƒ Defective PCU(s)
ƒ Defective laser optics housing unit
1. Check and reinstall the image transfer belt unit and PCUs.
2. Check if each toner bottle has enough toner.
3. Replace the ID sensor.
4. Replace the image transfer belt unit.
5. Replace the PCU(s).
6. Replace the laser optics housing unit.
B222/B224 4-24 SM
Trouble-
shooting
SC Table
No. Type Details (Symptom, Possible Cause, Troubleshooting Procedures)
290 D
Shutter sensor time over error: Close
The shutter close sensor does not detect "ON" for 2000 msec after the
shutter motor turns on.
ƒ Defective shutter close sensor
ƒ Disconnected or broken harness
ƒ Defective shutter motor
ƒ Defective shutter
ƒ Shutter motor overload
ƒ Defective IOB
1. Check or replace the harness.
2. Replace the shutter on the laser optics housing unit.
3. Replace the shutter motor.
4. Replace the shutter close sensor.
5. Replace the IOB.
No. Type Details (Symptom, Possible Cause, Troubleshooting Procedures)
291 C
Shutter overrun error 1: Close
The shutter close sensor loses the "ON" signal after the shutter was
closed.
ƒ Defective motor
ƒ Change of load to shutter motor
Replace the shutter on the laser optics housing unit.
SC Table
No. Type Details (Symptom, Possible Cause, Troubleshooting Procedures)
292 D
Shutter overrun error 2: Close
The shutter close sensor detects "ON" after SC 291 has occurred.
ƒ Defective motor
ƒ Change of load to shutter motor
Replace the shutter on the laser optics housing unit.
No. Type Details (Symptom, Possible Cause, Troubleshooting Procedures)
293 D
Shutter sensor time over error: Open
The shutter open sensor does not detect "ON" for 2000 msec after the
shutter motor turns on.
ƒ Defective shutter close sensor
ƒ Disconnected or broken harness
ƒ Defective shutter motor
ƒ Defective shutter
ƒ Shutter motor overload
ƒ Defective IOB
1. Check or replace the harness.
2. Replace the shutter on the laser optics housing unit.
3. Replace the shutter motor.
4. Replace the shutter close sensor.
5. Replace the IOB.
B222/B224 4-26 SM
Trouble-
shooting
SC Table
No. Type Details (Symptom, Possible Cause, Troubleshooting Procedures)
294 C
Shutter overrun error 1: Open
The shutter open sensor loses the "ON" signal after the shutter was
closed.
ƒ Defective motor
ƒ Change of load to shutter motor
1. Replace the shutter on the laser optics housing unit.
No. Type Details (Symptom, Possible Cause, Troubleshooting Procedures)
295 D
Shutter overrun error 2: Open
The shutter open sensor detects "ON" after SC 291 has occurred.
ƒ Defective motor
ƒ Change of load to shutter motor
1. Replace the shutter on the laser optics housing unit.
No. Type Details (Symptom, Possible Cause, Troubleshooting Procedures)
296 D
Shutter open/close sensor error
Both shutter open sensor and close sensor detect "ON" at the same
time.
ƒ Broken harness(es) of the shutter open/close sensors
Replace the shutter on the laser optics housing unit.
No. Type Details (Symptom, Possible Cause, Troubleshooting Procedures)
300 D AC charge output error [K]
301 D AC charge output error [M]
302 D AC charge output error [C]
SC Table
No. Type Details (Symptom, Possible Cause, Troubleshooting Procedures)
303 D AC charge output error [Y]
- -
The measured voltage is not proper when IOB measures the charge
output for each color.
ƒ Disconnected or broken high voltage cable
ƒ Defective or not installed PCU
ƒ Defective high voltage power supply
1. Check or replace the connectors.
2. Replace the PCU for the affected colour.
3. Replace the high voltage power supply.
No. Type Details (Symptom, Possible Cause, Troubleshooting Procedures)
360 D TD sensor (Vt high) error 1: K
361 D TD sensor (Vt high) error 1: M
362 D TD sensor (Vt high) error 1: C
363 D TD sensor (Vt high) error 1: Y
- -
ƒ The Vt value of the black, magenta, cyan, or yellow TD sensor
exceeds the specified value (default: 4.7V) with SP3020-002 for
twenty counts.
ƒ The [Vt - Vtref] value of the black, magenta, cyan, or yellow TD
sensor exceeds the specified value (default: 5.0V) with
SP3020-001.
ƒ Black, magenta, cyan, or yellow TD sensor disconnected
ƒ Harness between TD sensor and PCU defective
ƒ Defective TD sensor.
1. Check the black, magenta, cyan, or yellow TD sensor connector
and harness between the TD sensor and PCU for damage.
2. Check the drawer connector.
3. Replace the defective PCU.
B222/B224 4-28 SM

Trouble-
shooting
SC Table
No. Type Details (Symptom, Possible Cause, Troubleshooting Procedures)
364 D TD sensor (Vt high) error 2: K
365 D TD sensor (Vt high) error 2: M
366 D TD sensor (Vt high) error 2: C
367 D TD sensor (Vt high) error 2: Y
- -
The Vt value of the black, magenta, cyan, or yellow TD sensor is below
the specified value with SP3020-004 (default: 0.5V) for 10 counts.
ƒ TD sensor harness disconnected, loose, defective
ƒ A drawer connector disconnected, loose, defective
ƒ TD sensor defective
1. Check the black, magenta, cyan, or yellow TD sensor connector
and harness between the TD sensor and PCU for damage.
2. Check the drawer connector.
3. Replace the defective PCU.
No. Type Details (Symptom, Possible Cause, Troubleshooting Procedures)
372 D TD sensor adjustment error: K
373 D TD sensor adjustment error: M
374 D TD sensor adjustment error: C
375 D TD sensor adjustment error: Y
- -
During TD sensor initialization, the output value of the black, magenta,
cyan, or yellow TD sensor is not within the range of the specified value
with SP3238-001 to -004 (default: 2.7V) ± 0.2V
ƒ Heat seal not removed from a new developer pack
ƒ TD harness sensor disconnected, loose or defective
ƒ TD sensor defective
ƒ Harness between TD sensor and drawer disconnected, defective
SC Table
No. Type Details (Symptom, Possible Cause, Troubleshooting Procedures)
1. Remove the heat seal from each PCU.
2. Replace the defective PCU.
No. Type Details (Symptom, Possible Cause, Troubleshooting Procedures)
380 C
Drum gear position sensor error
The machine does not detect the drum position signal for 3 seconds at
the drum phase adjustment.
ƒ Dirty or defective drum gear position sensor
1. Replace the drum gear position sensor.
2. Replace the PCU.
No. Type Details (Symptom, Possible Cause, Troubleshooting Procedures)
396 D Drum/Development motor error: K
397 D Drum/Development motor error: M
398 D Drum/Development motor error: C
399 D Drum/Development motor error: Y
- -
The machine detects a High signal from the drum/development motor
for 2 seconds after the drum/development motor turned on.
ƒ Overload on the drum/development motor
ƒ Defective drum/development motor
ƒ Defective harness
ƒ Shorted 24 V fuse on the PSU
ƒ Defective interlock system
1. Check or replace the harness.
2. Replace the drum/development motor.
3. Replace the 24V fuse on the PSU.
B222/B224 4-30 SM
Trouble-
shooting
SC Table
No. Type Details (Symptom, Possible Cause, Troubleshooting Procedures)
400 D
ID sensor adjustment error
When the Vsg error counter reaches "3", the machine detects "SC400".
The Vsg error counter counts "1" when the Vsg detected by ID sensor is
more than the value (default: 4.5V) specified with SP3234-005 or less
than the value (default: 3.5V) specified with SP SP3234-006.
ƒ Dirty or defective ID sensor
ƒ Defective ID sensor shutter
1. Check the harness of the ID sensor.
2. Clean or replace the ID sensor.
ƒ After replacing the ID sensor, input the ID sensor
correction coefficient with SP3362-013 to -018. For details,
refer to "ID sensor board" in the Replacement and
Adjustment section.
3. Replace the IOB.
4. Replace the image transfer belt unit.
No. Type Details (Symptom, Possible Cause, Troubleshooting Procedures)
441 D
Image transfer unit motor error
The motor LOCK signal is not detected for more than two seconds
while the motor START signal is on.
ƒ Motor overload
ƒ Defective image transfer unit motor
1. Replace the image transfer belt unit.
2. Replace the IOB.
SC Table
No. Type Details (Symptom, Possible Cause, Troubleshooting Procedures)
442 D
Image transfer belt contact motor error
The image transfer belt contact sensor does not detect the movement
of actuator at the sensor while the polygon motor rotates.
ƒ Dirty image transfer belt contact sensor
ƒ Defective image transfer belt contact motor
ƒ Disconnected connector of image transfer belt contact sensor or
motor
ƒ Disconnected cable
1. Replace the image transfer belt contact sensor.
2. Replace the image transfer belt contact motor.
No. Type Details (Symptom, Possible Cause, Troubleshooting Procedures)
443 D
Image transfer unit error
The machine detects the encoder sensor error.
ƒ Defective encoder sensor
ƒ Image transfer unit installation error
ƒ Defective image transfer unit motor
1. Check if the image transfer unit is correctly set.
2. Replace the image transfer unit motor.
3. Replace the image transfer unit.
B222/B224 4-32 SM
Trouble-
shooting
SC Table
No. Type Details (Symptom, Possible Cause, Troubleshooting Procedures)
452 D
Paper transfer unit contact error
The paper transfer unit contact sensor does not detect the movement of
actuator at the sensor while the polygon motor rotates.
ƒ Defective paper transfer unit contact sensor
ƒ Defective paper transfer unit contact motor
ƒ Broken +24V fuse on PSU
ƒ Defective IOB
1. Check the connection between the paper transfer unit and PSU.
2. Replace the paper transfer unit contact sensor.
3. Replace the paper transfer unit contact motor.
4. Replace the +24V fuse on the PSU.
5. Replace the IOB.
No. Type Details (Symptom, Possible Cause, Troubleshooting Procedures)
460 D
Separation power pack output error
An interrupt checks the status of the power pack every 20 ms. This SC
is issued if the BCU detects a short in the power pack 10 times at D(ac).
ƒ Damaged insulation on the high-voltage supply cable
ƒ Damaged insulation around the high-voltage power supply.
1. Replace the high-voltage supply cable.
2. Replace the high-voltage power supply unit.
3. Replace the IOB.

SC Table
No. Type Details (Symptom, Possible Cause, Troubleshooting Procedures)
490 D
Toner transport motor error
The LOCK signal is not detected for 2 seconds when the transport
motor turns on.
ƒ Toner transport motor overload
ƒ Disconnected or broken harness
ƒ Defective toner transport motor
ƒ Opened +24V fuse on the PSU
ƒ Defective interlock switch
1. Check or replace the harness.
2. Replace the toner transport motor.
3. Replace the +24V fuse on the PSU.
4. Replace the interlock switch.
No. Type Details (Symptom, Possible Cause, Troubleshooting Procedures)
491 D
High voltage power: Drum/ development bias output error
An error signal is detected for 0.2 seconds when charging the drum or
development.
ƒ High voltage leak
ƒ Broken harness
ƒ Defective drum unit or development unit
ƒ Defective high voltage supply unit
1. Check or replace the harness.
2. Replace the drum unit or paper transfer unit.
3. Replace the high voltage supply unit.
B222/B224 4-34 SM
Trouble-
shooting
SC Table
No. Type Details (Symptom, Possible Cause, Troubleshooting Procedures)
492 D
High voltage power: Image transfer/ paper transfer bias output error
An error signal is detected for 0.2 seconds when charging the
separation, image transfer bet or paper transfer roller.
ƒ High voltage leak
ƒ Broken harness
ƒ Defective image transfer belt unit or paper transfer unit
ƒ Defective high voltage supply unit
1. Check or replace the harness.
2. Replace the image transfer belt unit or paper transfer unit.
3. Replace the high voltage supply unit.
No. Type Details (Symptom, Possible Cause, Troubleshooting Procedures)
498 C
Temperature and humidity sensor error 2
ƒ The thermistor output of the temperature sensor was not within the
prescribed range (0.5V to 4.2V).
ƒ The thermistor output of the humidity sensor was not within the
prescribed range (0.01V to 2.4V).
ƒ Temperature and humidity sensor harness disconnected, loose,
defective
ƒ Temperature and humidity sensor defective
1. Check the connector and harness.
2. Replace the temperature/humidity sensor.

SC Table
No. Type Details (Symptom, Possible Cause, Troubleshooting Procedures)
501 B Paper Tray 1 error
502 B Paper Tray 2 error
- -
ƒ When the tray lift motor rotates counterclockwise, (if the upper limit
is not detected within 10 seconds), the machine asks the user to
reset the tray.
ƒ When the tray lift motor rotates clockwise, (if the upper limit is not
detected within 1.5 seconds), the machine asks the user to reset
the tray.
If one of these conditions occurs three consecutive times, the SC is
generated.
ƒ Disconnected or defective paper lift sensor
ƒ Disconnected or defective tray lift motor
ƒ Defective bottom plate lift mechanism
ƒ Too much paper in the tray
ƒ Defective IOB
1. Check if the paper is not loaded too much.
2. Check if the bottom plate smoothly moves up and down manually.
3. Check and/or replace the tray lift motor.
4. Replace the IOB.
B222/B224 4-36 SM

Trouble-
shooting
SC Table
No. Type Details (Symptom, Possible Cause, Troubleshooting Procedures)
503-01 B
Tray 3 error (Paper Feed Unit or LCT)
For the paper feed unit:
ƒ When the tray lift motor is turned on, the upper limit is not
detected within 10 seconds
For the LCT:
ƒ SC 503-01 occurs if the upper or lower limit is not detected
within 8 seconds when the tray lift motor is turned on to lift or
lower the tray.
For the paper feed unit:
ƒ Defective tray lift motor or connector disconnection
ƒ Defective lift sensor or connector disconnection
For the LCT:
ƒ Defective stack transport clutch or connector disconnection
ƒ Defective tray motor or connector disconnection
ƒ Defective end fence home position sensor or connector
disconnection
ƒ Defective upper limit sensor or connector disconnection
ƒ Defective tray lift motor or connector disconnection
1. Check the cable connections.
2. Check and/or replace the defective component.

SC Table
No. Type Details (Symptom, Possible Cause, Troubleshooting Procedures)
503-02 B
Tray 3 error (Paper Feed Unit or LCT)
This SC is generated if the following condition occurs 3 consecutive
times.
For the paper feed unit:
ƒ When the tray lowers, the tray lift sensor does not go off within
1.5 sec.
For the LCT:
ƒ When the main switch is turned on or when the LCT is set, if
the end fence is not in the home position (home position
sensor ON), the tray lift motor stops.
ƒ If the upper limit does not go off for 1.5 seconds even the tray
lift motor turns on to lower the tray after the upper limit has
been detected at power on.
For the paper feed unit:
ƒ Defective tray lift motor or connector disconnection
ƒ Defective lift sensor or connector disconnection
For the LCT:
ƒ Defective stack transport clutch or connector disconnection
ƒ Defective tray motor or connector disconnection
ƒ Defective end fence home position sensor or connector
disconnection
1. Check the cable connections.
2. Check and/or replace the defective component.
B222/B224 4-38 SM
 Loading...