

Ricoh AP900 User Manual

Operating Instructions
Printer Reference
Read This First
Trademarks.............................................................................................................4
Safety Information .................................................................................................5
ENERGY STAR Program .....................................................................................11
Positions of RWARNING and RCAUTION labels ............................................12
Manuals for This Printer......................................................................................14
How to Read This Manual ...................................................................................15
Guide to the Printer
Exterior .................................................................................................................16
Back ......................................................................................................................17
Inside.....................................................................................................................18
Control Panel........................................................................................................19
Setting Up
Where to Put the Printer......................................................................................21
Space Required for Installation ................................................................................22
Installing the Toner bottle...................................................................................24
Loading Paper ......................................................................................................28
Loading paper into Standard paper tray................................................................... 28
Loading Paper in the Large Capacity Tray (LCT) ....................................................30
Turning the Power On .........................................................................................32
Selecting the Display Language.........................................................................34
Test Printing .........................................................................................................36
G1267203_v1.00 EN USA G126-7207 Copyright © 2005 1

Connecting the Machine
Connecting to the Ethernet Interface.................................................................38
Reading the LED Lamps ..........................................................................................39
Connecting the Machine to the host using the parallel cable .........................40
Connecting the machine to the host using a USB cable (optional) ................ 42
Configuration
Ethernet Configuration........................................................................................43
IEEE 802.11b (Wireless LAN) Configuration .....................................................47
Installing the Printer Driver
Quick Install..........................................................................................................52
Install the Operating Instructions.......................................................................54
Paper and Other Media
Paper and Other Media Supported by This Printer...........................................55
Paper Recommendations....................................................................................59
Loading Paper..........................................................................................................59
Storing Paper ...........................................................................................................59
Types of Paper and Other Media .............................................................................59
Paper not supported.................................................................................................61
Print Area .................................................................................................................61
Loading Paper ......................................................................................................63
Loading Paper in Tray 1 (Tandem Tray) ..................................................................63
Loading Paper in Tray 2 and 3.................................................................................66
Loading Paper in the Large Capacity Tray (LCT) ....................................................71
Setting Paper on the Bypass Tray ...........................................................................72
Loading Paper in the Interposer (optional)...............................................................78
Replacing Consumables
Replacing the Toner bottle..................................................................................80
Replacing Toner.......................................................................................................81
Cleaning the Printer
Cautions to Take When Cleaning .......................................................................84
Adjusting the Printer
Adjusting Tray Registration................................................................................85
Troubleshooting
Error & Status Messages on the Display Panel ................................................88
Call-light Lit or Blinking ......................................................................................95
2

When the Machine does Not Print......................................................................96
Checking the port connection...................................................................................96
Other Printing Problems .....................................................................................99
Additional Troubleshooting ..............................................................................106
Removing Misfed Paper ....................................................................................108
Remove Misfeed B-F: Internal ...............................................................................108
Remove Misfeed A, U: Internal ..............................................................................113
Remove Misfeed Q: Interposer ..............................................................................115
Remove Misfeed R: Finisher..................................................................................118
Adding Staples...................................................................................................121
Removing Jammed Staples ..............................................................................125
When the Staple Waste Box is Full ..................................................................128
Removing Punch Waste ....................................................................................129
Appendix
Moving and Transporting the Printer............................................................... 130
Disposal ..............................................................................................................131
Consumables .....................................................................................................132
Toner bottles ..........................................................................................................132
Specification.......................................................................................................133
Mainframe ..............................................................................................................133
Options...................................................................................................................135
3

Read This First
Trademarks
Microsoft, Windows and Windows NT are registered trademarks of Microsoft
Corporation in the United States and/or other countries.
IPS-PRINT Printer Language Emulation Copyright© 1999-2000 Oak Technology, Inc., All rights reserved.
Other product names used herein are for identification purposes only and might
be trademarks of their respective companies. We disclaim any and all rights to
those marks.
The proper names of the Windows operating systems are as follows:
•Microsoft
•Microsoft
•Microsoft
• The product names of Windows
Microsoft
Microsoft
Microsoft
• The product names of Windows
Microsoft
Microsoft
• The product names of Windows Server
Microsoft
Microsoft
Microsoft
• The product names of Windows NT
Microsoft
Microsoft
®
Windows® 95 operating system
®
Windows® 98 operating system
®
Windows® Millennium Edition (Windows Me)
®
®
Windows® 2000 Advanced Server
®
Windows® 2000 Server
®
Windows® 2000 Professional
®
Windows® XP Professional
®
Windows® XP Home Edition
®
Windows ServerTM 2003 Standard Edition
®
Windows ServerTM 2003 Enterprise Edition
®
Windows ServerTM 2003 Web Edition
®
Windows NT® Server 4.0
®
Windows NT® Workstation 4.0
2000 are as follows:
®
XP are as follows:
TM
2003 are as follows:
®
4.0 are as follows:
G1267203_v1.00 Copyright © 2005 4
Read This First
Safety Information
When using your printer, the following safety precautions should always be followed.
In this manual, the following important symbols are used:
Indicates a potentially hazardous situation which, if instructions are not followed, could result in
death or serious injury.
Indicates a potentially hazardous situation which, if instructions are not followed, may result in
minor or moderate injury or damage to property.
5

Read This First
• Confirm the wall outlet is near the machine and freely accessible, so
that in the event of emergency, it can be unplugged easily.
• Only connect the machine to the power source described in the manual.
• Avoid multi-wiring.
• Do not damage, break or make any modifications to the power cord.
Do not place heavy objects on it, pull it hard or bend it more than necessary. These actions could cause an electric shock or fire.
• Do not incinerate spilled toner or used toner. Toner dust is flammable
and might ignite when exposed to an open flame.
• Disposal should take place at an authorized dealer or an appropriate
collection site.
• If you dispose of the used toner bottles yourself, dispose of them according to local regulations.
• Do not store toner, used toner, or toner containers in a place with an
open flame. The toner might ignite and cause burns or a fire.
• Plug and unplug the power cable with dry hands, or an electric shock
could occur.
• Do not risk electric shock by handling the power cord or plug with wet
hands.
• Do not remove any covers or screws other than those specified in this
manual. Some parts of the machine are at a high voltage and could
give you an electric shock. Also, if the machine has laser systems, direct (or indirect) reflected eye contact with the laser beam may cause
serious eye damage. When the machine needs to be checked, adjusted, or repaired, contact your service representative.
• Do not take apart or attempt any modifications to this machine. There
is a risk of fire, electric shock, explosion or loss of sight. If the machine has laser systems, there is a risk of serious eye damage.
• Enclosed set of power cord is only for the use with this product and
should not be used with any other electronic equipment or appliances. Do not use any other power cord with this product. They could
cause electric shock or fire.
• Keep the machine away from flammable liquids, gases, and aerosols.
A fire or an electric shock might occur.
6

Read This First
• If smoke is coming out, there is a strange smell, or anything looks unusual, immediately turn off the power switch of the machine, such as
the main power switch, and then unplug the machine from the outlet.
Otherwise, it could cause an electric shock or fire. Next, contact your
sales or service representative. Do not use the machine if it is malfunctioning or not operating normally. If foreign objects, such as metal, liquid, etc. falls inside the machine, immediately turn off the power
switch of the machine, such as the main power switch, unplug the machine from the wall outlet, and then contact your sales or service representative. Otherwise, it could cause an electric shock or fire.
7
Read This First
• Do not handle the plug with wet hands. Doing so might cause an electrical
shock.
• Keep the machine in an area that is within optimum environmental conditions. Operating the machine in an environment that is outside the recommended ranges of humidity and temperature can cause an electrical fire
hazard. Keep the area around the socket free of dust. Accumulated dust
can become an electrical fire hazard.
• Place the machine on a strong and level surface. Otherwise, it might fall and
injure someone.
• If you use the machine in a confined space, ensure there is continuous air
circulation.
• Keep toner (used or unused) and the toner bottle out of reach of children.
• If toner or used toner is inhaled, gargle with plenty of water and move into
a fresh air environment. Consult a doctor if necessary.
• If your skin comes into contact with toner or used toner, wash the affected
area thoroughly with soap and water.
• If toner or used toner gets into your eyes, flush immediately with large
amounts of water. Consult a doctor if necessary.
• If toner or used toner is swallowed, dilute by drinking a large amount of water. Consult a doctor if necessary
• Avoid getting toner on your clothes or skin when removing a paper jam or
replacing toner. If your skin comes into contact with toner, wash the affected
area thoroughly with soap and water.
• If toner gets on your clothing, wash with cold water. Hot water will set the
toner into the fabric and may make removing the stain impossible.
• Do not pull out the paper tray forcefully. If you do, the tray might fall and
cause an injury.
8
Read This First
• Before installing options, the machine should be turned off and unplugged
for at least an hour. Components inside the machine become very hot, and
can cause a burn if touched.
• Before moving the machine, unplug the power cable from the outlet. If the
cable is unplugged abruptly, it could become damaged. Damaged plugs or
cables can cause an electrical or fire hazard.
• The printer weighs about 185 kg (407.9 lb.). When lifting the machine, use
the inset grips on both sides. Otherwise the printer could break or cause injury if dropped. When moving the machine, contact your sales or service
representive.
• Do not touch the inside of the controller board compartment. Doing so may
cause a malfunction or a burn.
• The inside of this printer becomes very hot. Do not touch parts labelled “v”
(indicating a hot surface). Touching these parts will result in burns.
• When you pull out the plug from the socket, grip the plug, not the cord, to
avoid damaging the cord and causing a fire or an electric shock.
• Do not push or pull the call-light when installed to the printer. Doing so may
result in damage or malfunction of the call-light or the printer.
• Keep the machine away from flammable liquids, gases, and aerosols. A fire
or an electric shock might occur.
• Do not use aluminum foil, carbon paper, or similar conductive paper to
avoid a fire or machine failure.
• If the machine is going to be unused for a long time, such as during holidays, unplug the power cable from the outlet.
❒ When moving from a cold to warm location, or if the local temperature rises
suddenly, condensation may occur inside. If this occurs, leave the machine
unused for at least one hour to let it acclimatize.
❒ Extreme temperature rise inside the machine may cause malfunctions. Do not
place anything in the immediate area of the exhaust and intake vents.
❒ Always keep all covers closed.
❒ During printing, do not open the cover of any parts, and do not move the print-
er.
❒ Do not pull out the paper tray during printing. Printing will stop and paper will
jam.
❒ Prevent foreign objects, such as paper clips, etc., from falling inside the print-
er.
9

Read This First
❒ During printing, do not switch the power off and do not unplug the power ca-
ble. Sudden power interruptions can cause malfunctions.
❒ While printing, protect the printer from external shocks, such as arranging pa-
pers on top of the printer.
❒ Depending on temperature and humidity, during printing a while steam may
come from the printing paper when it leaves the printer.
❒ The paper exit and nearby parts may become hot during printing. This is nor-
mal and no reason for concern.
❒ Voltage must not fluctuate more than 10%.
10
Read This First
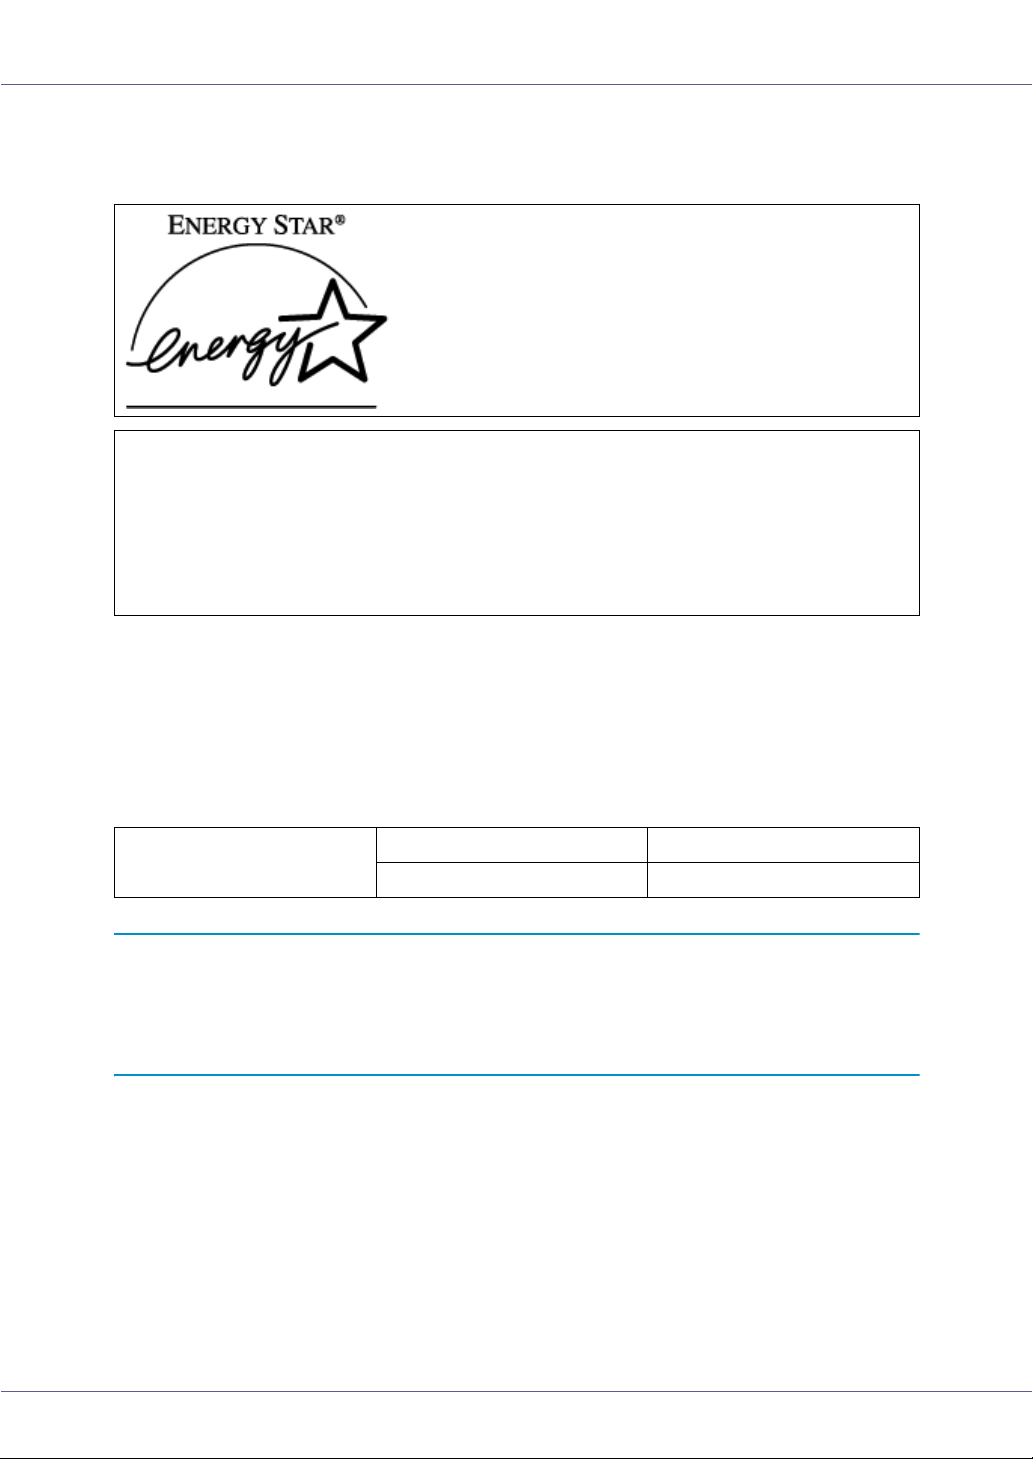
ENERGY STAR Program
As an ENERGY STAR Partner, we have determined that this machine model meets the ENERGY STAR Guidelines for energy efficiency.
The ENERGY STAR Guidelines intend to establish an international energy-saving system for
developing and introducing energy-efficient office equipment to deal with environmental issues,
such as global warming.
When a product meets the ENERGY STAR Guidelines for energy efficiency, the Partner shall
place the ENERGY STAR logo onto the machine model.
This product was designed to reduce the environmental impact associated with office equipment by means of energy-saving features, such as Low-power mode.
❖ Low-power Mode (Energy Saver mode)
This printer automatically lowers its power consumption 60 minutes after the
last operation has been completed. For more information about how to configure Energy Saver mode, see “Making Printer Settings with Control Panel”,
Software Guide as a HTML file on the CD-ROM.
❖ Specifications
Energy Saver mode Power Consumption 50 W or less
Default Time 60 minutes
- Recycled Paper
In accordance with the ENERGY STAR Program, we recommend use of recycled paper which is environment friendly. Please contact your sales representative for recommended paper.
11

Read This First
Positions of RWARNING and RCAUTION
labels
This machine has labels for RWARNING and RCAUTION at the positions
shown below. For safety, please follow the instructions and handle the machine
as indicated.
12
Read This First
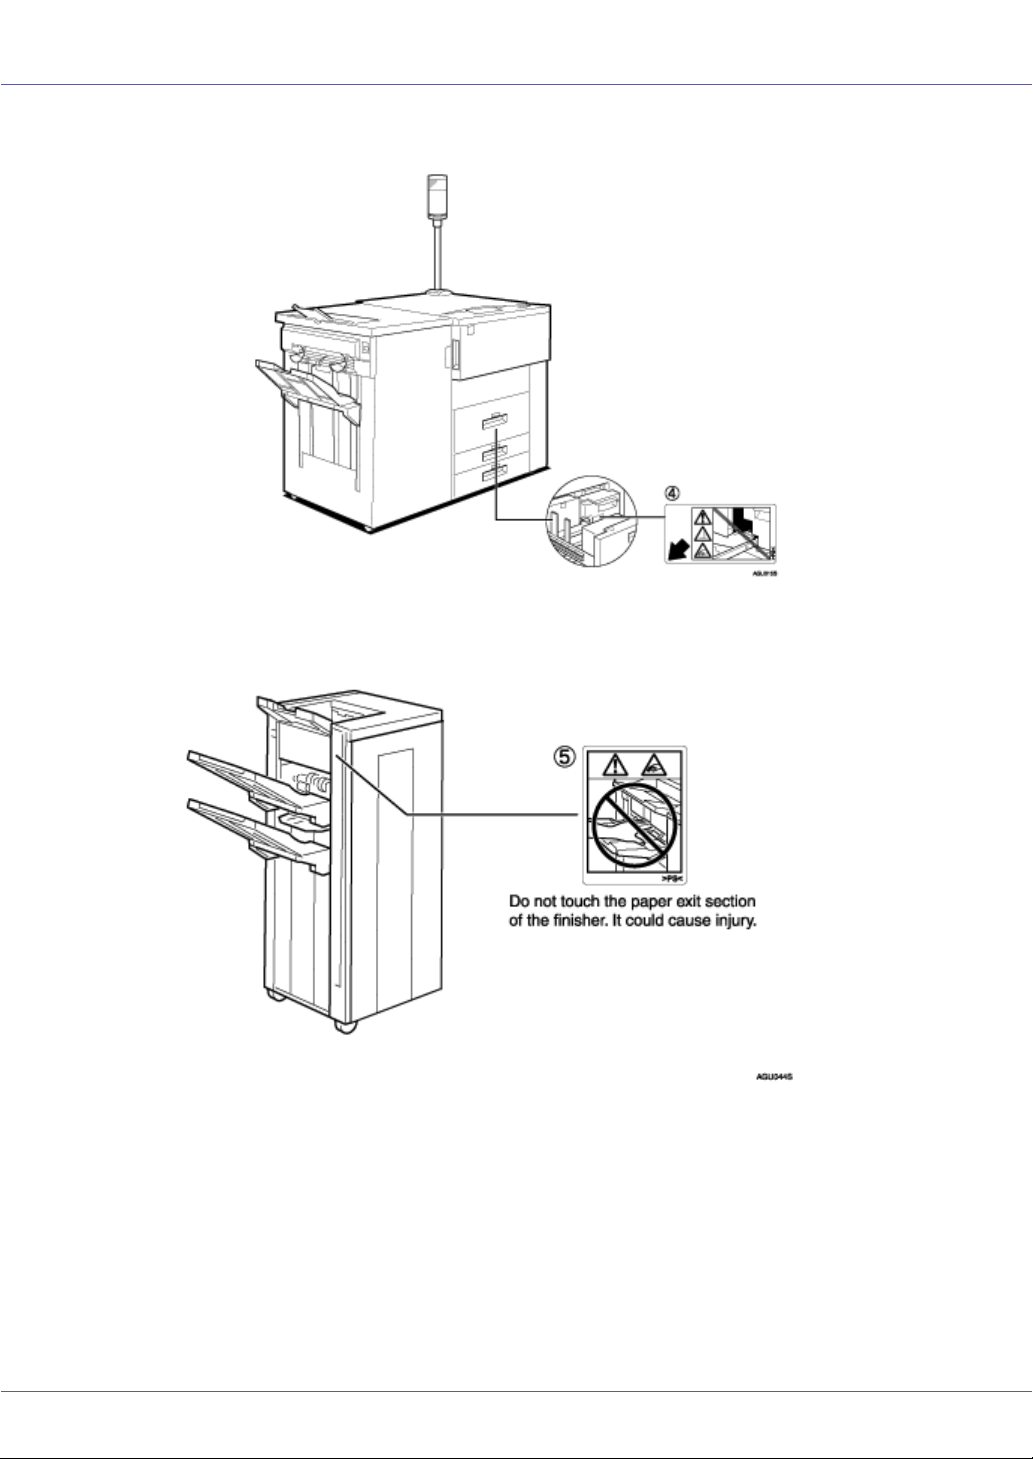
A The inside of this printer becomes very hot. Do not touch parts with this label
(indicating a hot surface). Touching these parts will result in burns.
B Do not touch this section of the finisher. It could cause injury.
C The inside of this printer becomes very hot. Do not touch parts with this label
(indicating a hot surface). Touching these parts will result in burns.
D The inside of this printer becomes very hot. Do not touch parts with this label
(indicating a hot surface). Touching these parts will result in burns.
E Do not touch this section of the finisher. It could cause injury.
13

Read This First
Manuals for This Printer
For particular functions, see the relevant parts of the manual.
❒ A web browser is required for the HTML user manuals. For details about
HTML user manuals, See p.54 “
❖ Printer Reference (This manual)
Provides information about printer setup, options, and dealing with paper
jams and error messages.
❖ Software Guide (HTML)
Provides basic information about installing the printer driver and software, using the printer in a network environment, configuration, and setup.
Also, provides information about configuring and monitoring printer status using software and a Web browser.
Install the Operating Instructions”
14

Read This First
How to Read This Manual
The following set of symbols is used in this manual.
A potentially hazardous situation that might result in death or serious injury if you
misuse the machine without following the instructions under this symbol. Be sure
to read these instructions, all of which are described in the Safety Information
section.
A potentially hazardous situation that might result in minor or moderate injury or
property damage that does not involve personal injury when you misuse the machine without following the instructions under this symbol. Be sure to read these
instructions, all of which are described in the Safety Information section.
* The statements above are notes for your safety.
If this instruction is not followed, paper might misfeed, originals be damaged, or
data be lost. Be sure to read this.
Information or preparations required prior to operating.
Precautions for operation, or actions to take after abnormal operation.
Numerical limits, functions that cannot be used together, or conditions in which
a particular function cannot be used.
This symbol indicates a reference.
Keys that appear on the machine's display.
Keys and buttons that appear on the computer's display.
Keys built into the machine's control panel.
Keys on the computer's keyboard.
15
Guide to the Printer
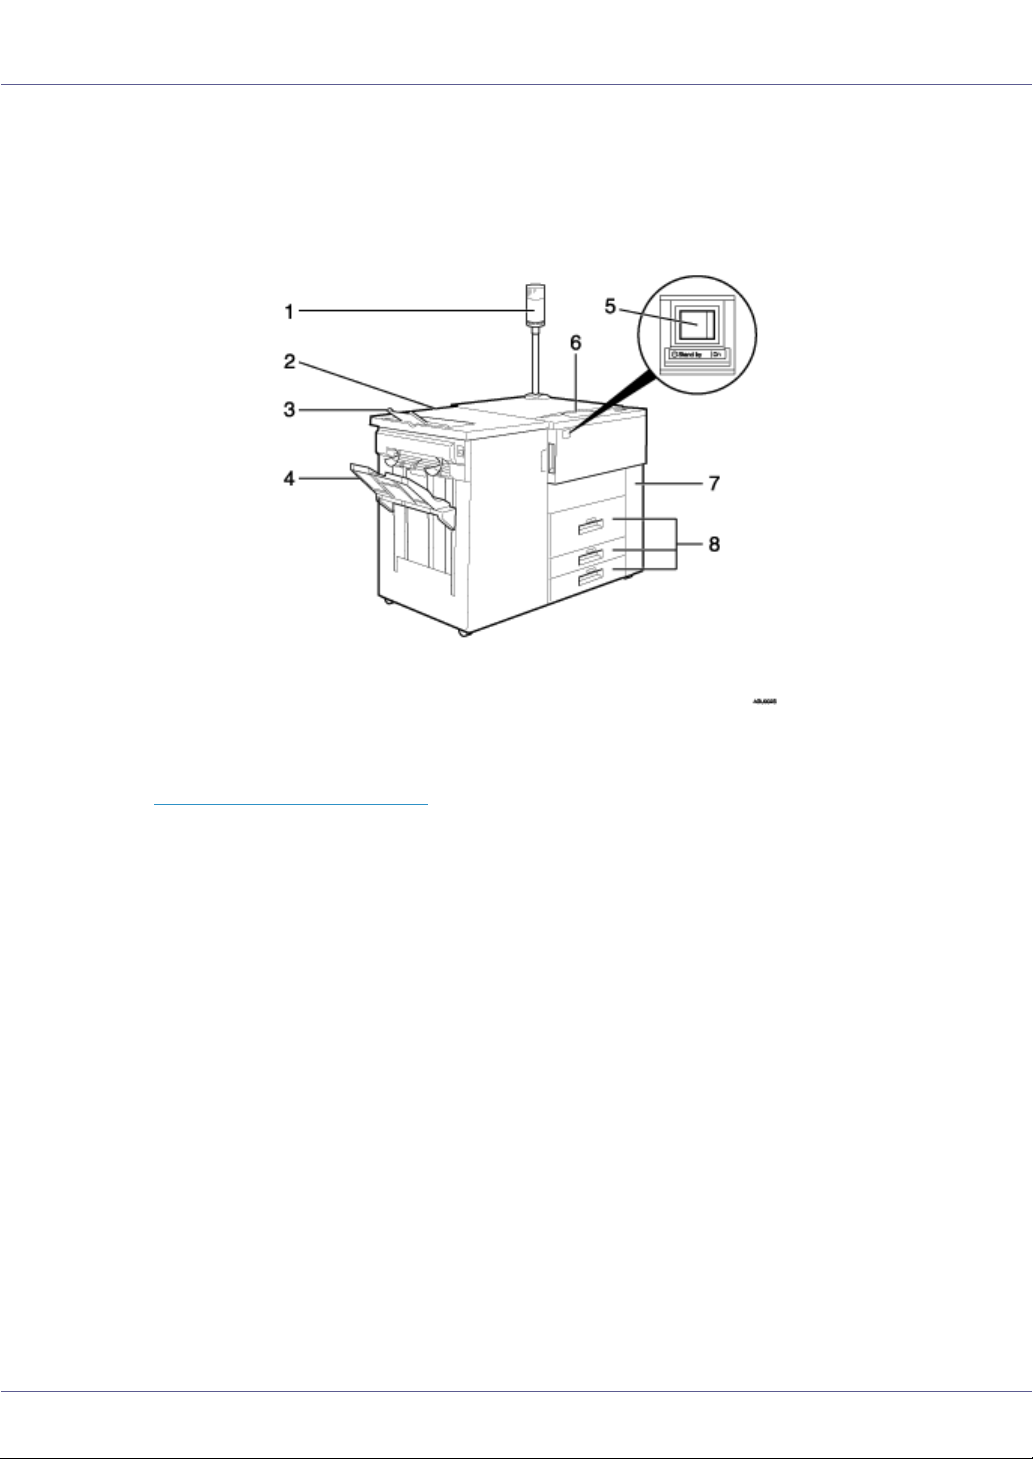
Exterior
1. Call- light
Notifies you of errors during printing, such as paper jam and out of paper. For details,
see p.95 “
Call-light Lit or Blinking”
2. Finisher (optional)
Carries out finishing processes, such as stapling and punching.
The illustration might be slightly different depending on the finisher.
3. Finisher Shift Tray
Collects printed sheets and punched documents.
4. Finisher Shift Tray
Collects printed sheets and stapled and punched documents.
5. Power Switch
Use to switches power to the printer to on/standby, and enter/leave Stand by mode.
6. Control Panel
Contains keys for the printer operation and a panel display that shows the printer status.
7. Front Cover
Open this cover to remove misfed paper or replace the toner bottle.
8. Paper tray (trays 1 to 3)
Load paper here.
G1267203_v1.00 Copyright © 2005 16
Guide to the Printer
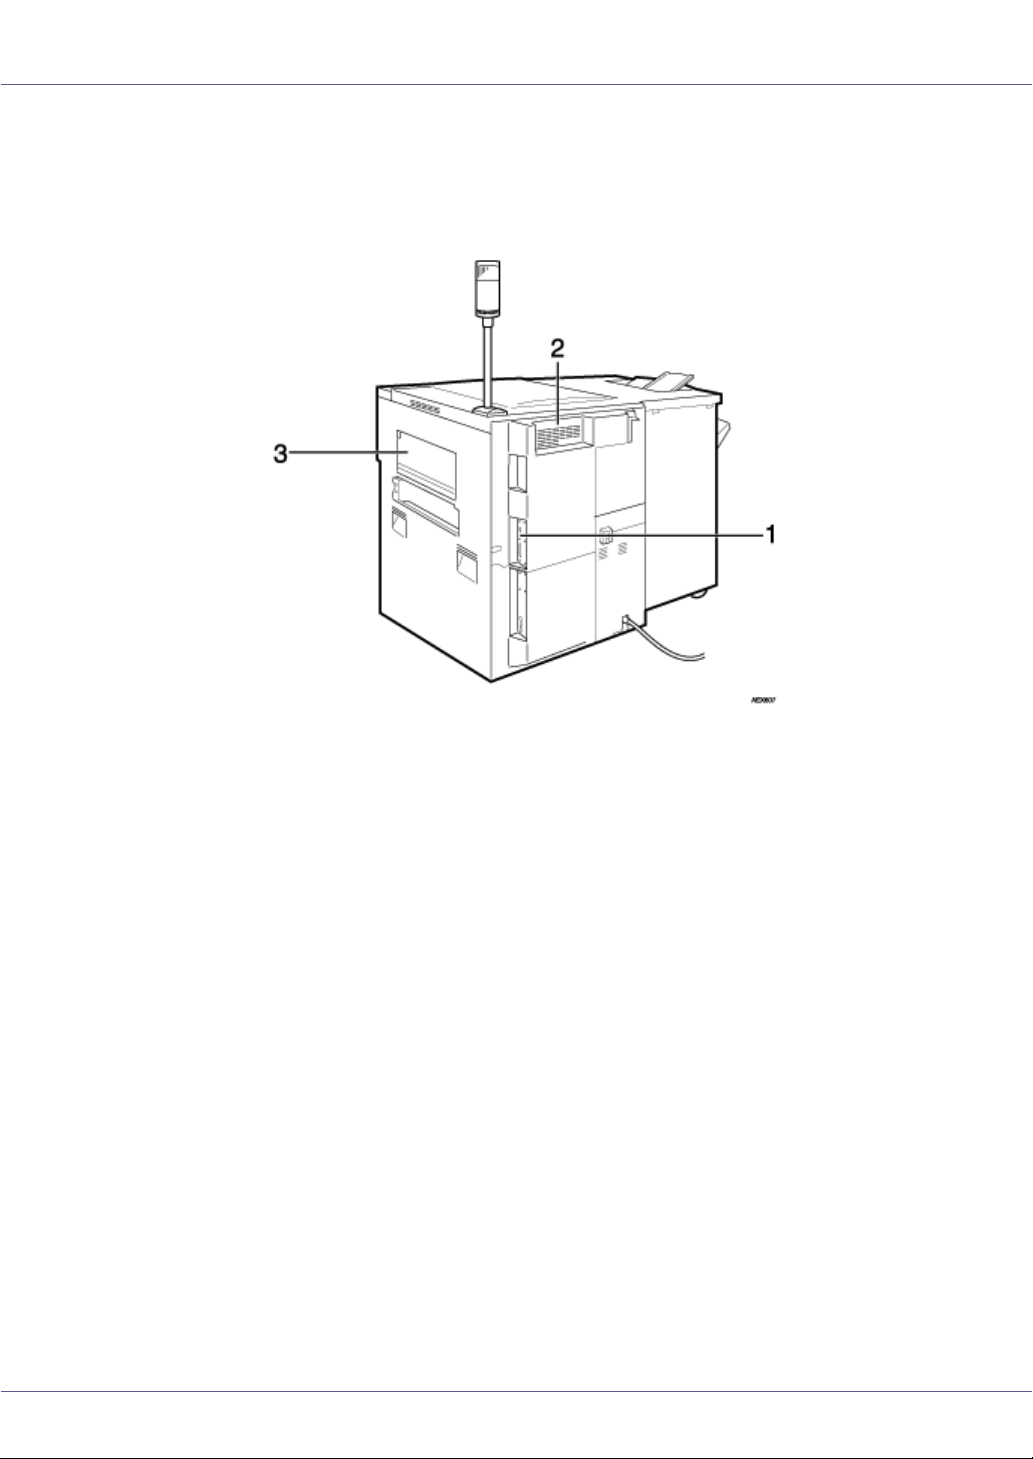
Back
1. Controller Board
Attach the interface cable, network interface cable or the USB interface cable (optional)
here.
2. Ventilation
Prevent overheating. Place no objects against or near these holes.
3. Bypass tray
Use for printing onto OHP transparencies, label paper (adhesive labels), translucent paper, postcards, and custom size paper.
17

Guide to the Printer
Inside
1. Toner bottle
When the message to add toner appears on the panel display, a new toner bottle is required.
2. Fusing Unit
Fuses the image onto paper.
When [Replace Fusing Unit] message appears on the panel display, replace the fusing
unit.
For details about replacing this unit, contact your sales or service representative.
3. Duplex Unit
For printing on both sides of paper.
18
Guide to the Printer
Control Panel
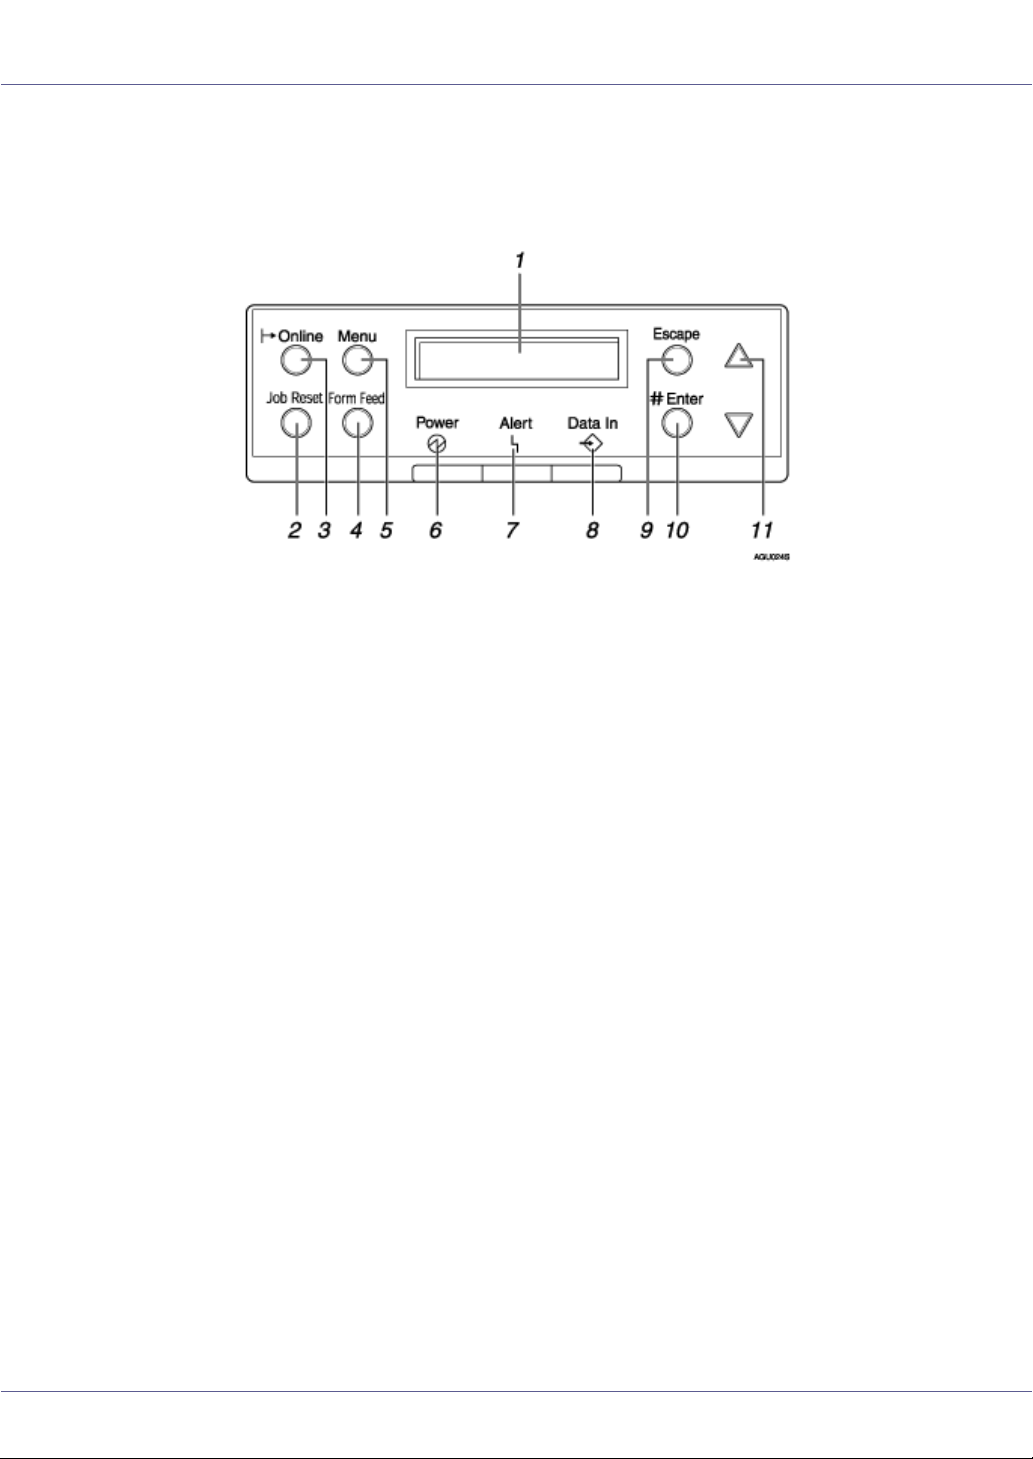
1. Display
Shows the current status of the printer and error messages.
2. {Job Reset} key
When the printer is online, press this key to cancel any ongoing print job.
3. Online Indicator/{Online} key
Indicates whether this machine is online or offline. Pressing the key switches the machine between online and offline.
If online, the machine is ready to receive data, and the lamp is lit.
If offline, the machine is not ready to receive data, and the lamp is unlit.
Pressing the {Online} key during any settings returns the machine to the default screen.
4. {Form Feed} key
When the printer is offline, press this to print all data left in the printer's input buffer.
You can use this to force the printer to print data received in the online status when the
paper size or type does not match the actually set size or type.
5. {Menu} key
Press this key to make and check the current printer settings.
6. Power indicator
Is lit while the printer power is on.
Is unlit when the power is turned Stand by or while the printer is in Energy Saver mode.
7. Error indicator
Blinks or lights whenever a printer error occurs.
When this light is lit in red, take action based on the message displayed on the control
panel.
8. Data In indicator
Blinks while the printer is receiving data. Is lit if there is data to be printed.
19

Guide to the Printer
9. {Escape} key
Press this key to return to the previous condition on the display.
10. {# Enter} key
Used to confirm or apply settings to proceed to the subsequent steps.
11. {U} {T} keys
Use to increase or decrease displayed values when making settings. Keep pressed to
quicken scrolling, and increase or decrease values displayed in increments of 10.
20
Setting Up
Where to Put the Printer
• Confirm the wall outlet is near the machine and freely accessible, so
that in the event of emergency, it can be unplugged easily.
• Only connect the machine to the power source described in the manual.
• Avoid multi-wiring.
• Do not damage, break or make any modifications to the power cord.
Do not place heavy objects on it, pull it hard or bend it more than necessary. These actions could cause an electric shock or fire.
• Enclosed set of power cord is only for the use with this product and
should not be used with any other electronic equipment or appliances. Do not use any other power cord with this product. They could
cause electric shock or fire.
• Do not handle the plug with wet hands. Doing so might cause an electrical
shock.
• Keep the machine in an area that is within optimum environmental conditions. Operating the machine in an environment that is outside the recommended ranges of humidity and temperature can cause an electrical fire
hazard. Keep the area around the socket free of dust. Accumulated dust
can become an electrical fire hazard.
• Place the machine on a strong and level surface. Otherwise, it might fall and
injure someone.
• If you use the machine in a confined space, ensure there is continuous air
circulation.
G1267203_v1.00 Copyright © 2005 21
Setting Up
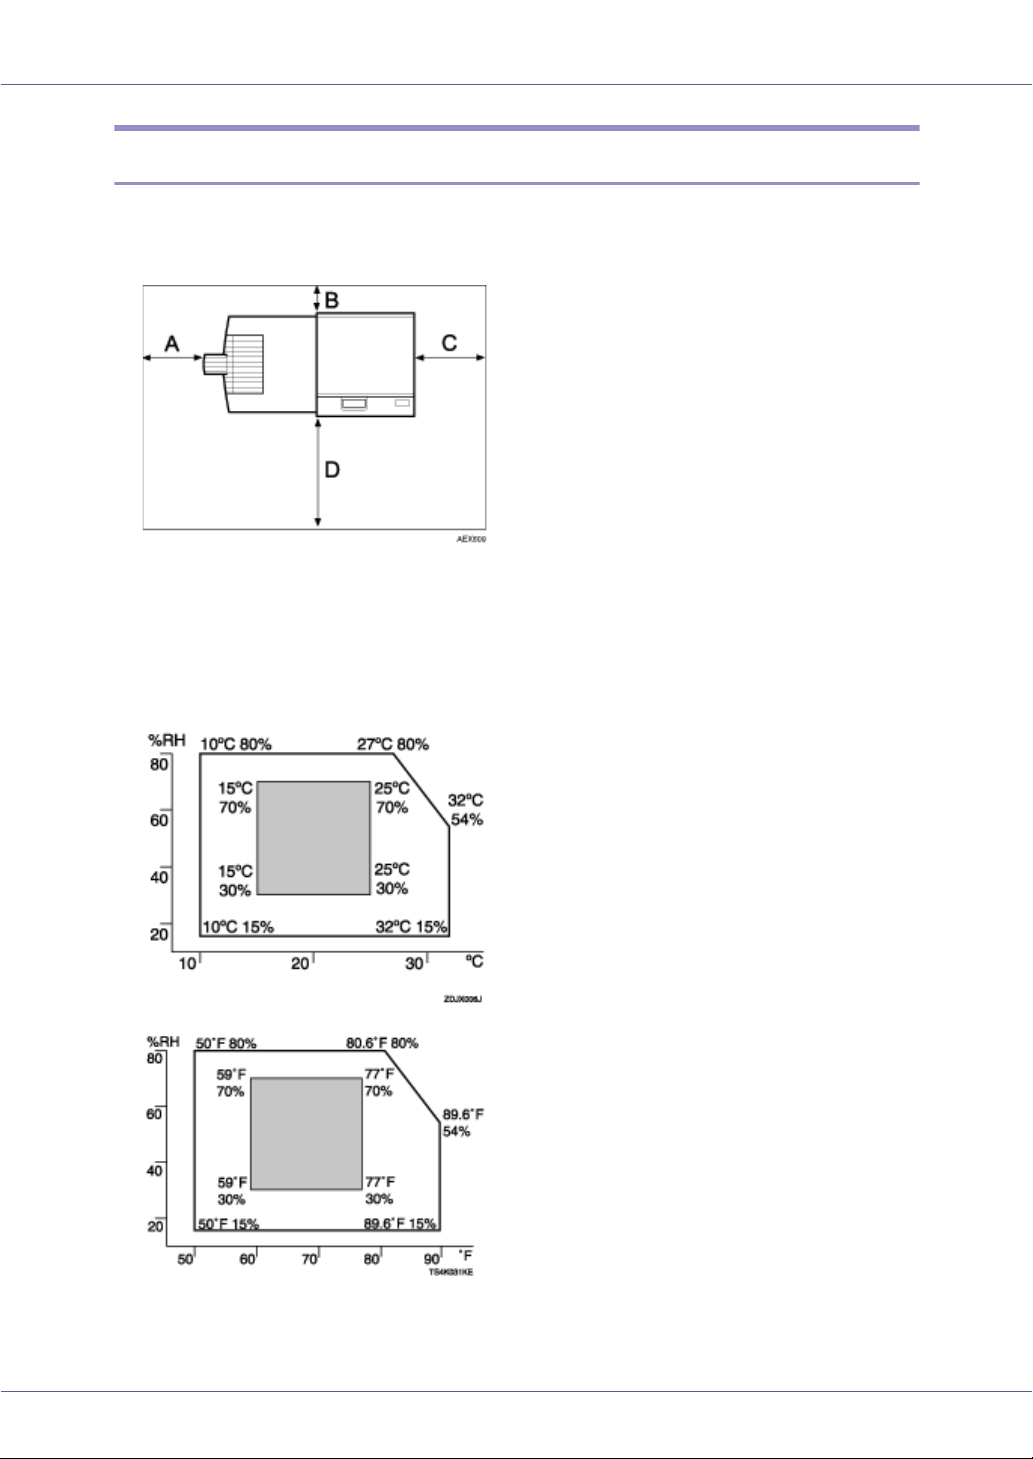
Space Required for Installation
• Ensure there is adequate space around the printer. This space is necessary
to operate the printer. The recommended (or minimum) space requirements
are as follows:
A: 10 cm (4 inches) or more
B: 5 cm (2 inches) or more
C: 4 cm (1.6 inches) or more
D: 70 cm (27.6 inches) or more
• Permissible and recommended temperature and humidity ranges are as follows:
• The machine must be level within 5 mm, 0.2” from both front to rear and left
to right.
22

Setting Up
• To avoid possible build-up of ozone, locate this machine in a large well venti-
3
lated room that has an air turnover of more than 30 m
/hr/person.
• When you use this machine for the long time in a confined space that has poor
ventilation, you may detect an odd smell. To keep the workplace comfortable,
we recommend you keep it well ventilated.
• Do not place the machine in areas that are exposed to:
• direct sunlight or strong light
• dust and airborne particulates
• corrosive gases
• humidity
• extreme temperatures (hot or cold)
• air conditioner or humidifier stream
• frequent strong vibration
• EMF from nearby electronic equipment
23
Setting Up
Installing the Toner bottle
• Do not incinerate spilled toner or used toner. Toner dust is flammable
and might ignite when exposed to an open flame.
• Disposal should take place at an authorized dealer or an appropriate
collection site.
• If you dispose of the used toner bottles yourself, dispose of them according to local regulations.
• Do not store toner, used toner, or toner containers in a place with an
open flame. The toner might ignite and cause burns or a fire.
• Keep toner (used or unused) and the toner bottle out of reach of children.
• If toner or used toner is inhaled, gargle with plenty of water and move into
a fresh air environment. Consult a doctor if necessary.
• If your skin comes into contact with toner or used toner, wash the affected
area thoroughly with soap and water.
• If toner or used toner gets into your eyes, flush immediately with large
amounts of water. Consult a doctor if necessary.
• If toner or used toner is swallowed, dilute by drinking a large amount of water. Consult a doctor if necessary
• Avoid getting toner on your clothes or skin when removing a paper jam or
replacing toner. If your skin comes into contact with toner, wash the affected
area thoroughly with soap and water.
• If toner gets on your clothing, wash with cold water. Hot water will set the
toner into the fabric and may make removing the stain impossible.
❒ Do not expose the toner bottle to light for a long time. If you do, toner becomes
damaged and print quality might be reduced.
❒ Our products are engineered to meet the highest standards of quality and
functionality. When purchasing expendable supplies, we recommend using
only those provided by an authorized dealer.
❒ The toner bottles supplied with the printer allow you to print about 43,000 pag-
es. These numbers were obtained from printing A4 K 5% charts, but the actual number of pages will vary depending on paper type, size, contents, and
print settings.
24
Setting Up
❒ Toner bottles are not covered by warranty. However, if there is problem, con-
tact the store where they were purchased.
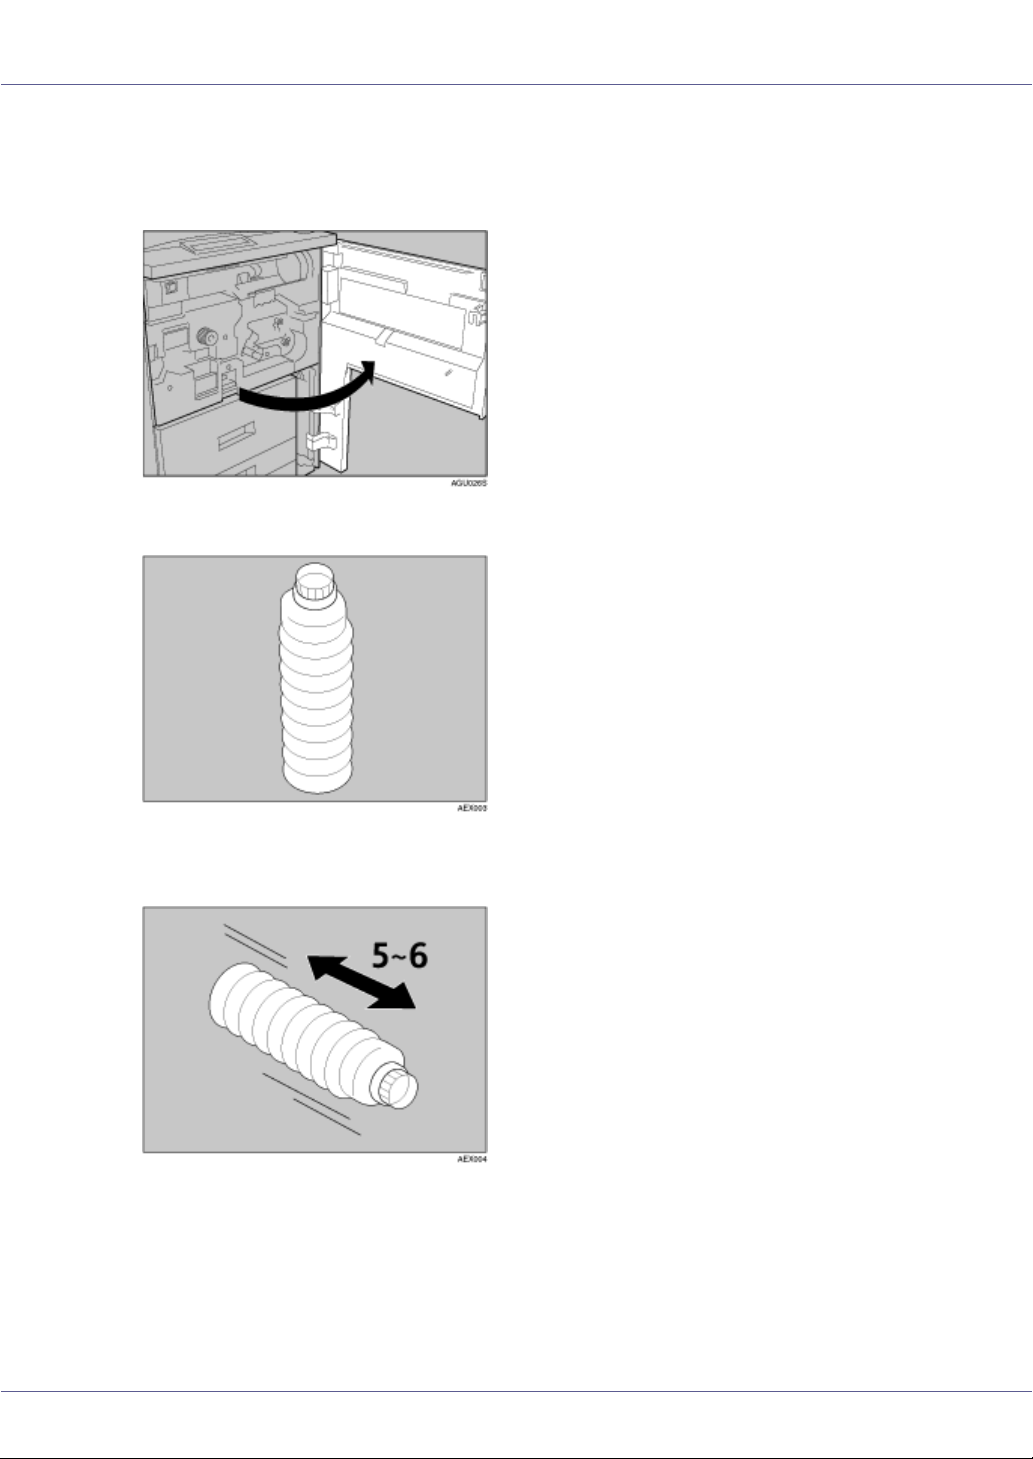
A Open the front cover of the machine.
B Take the new toner bottle from the box.
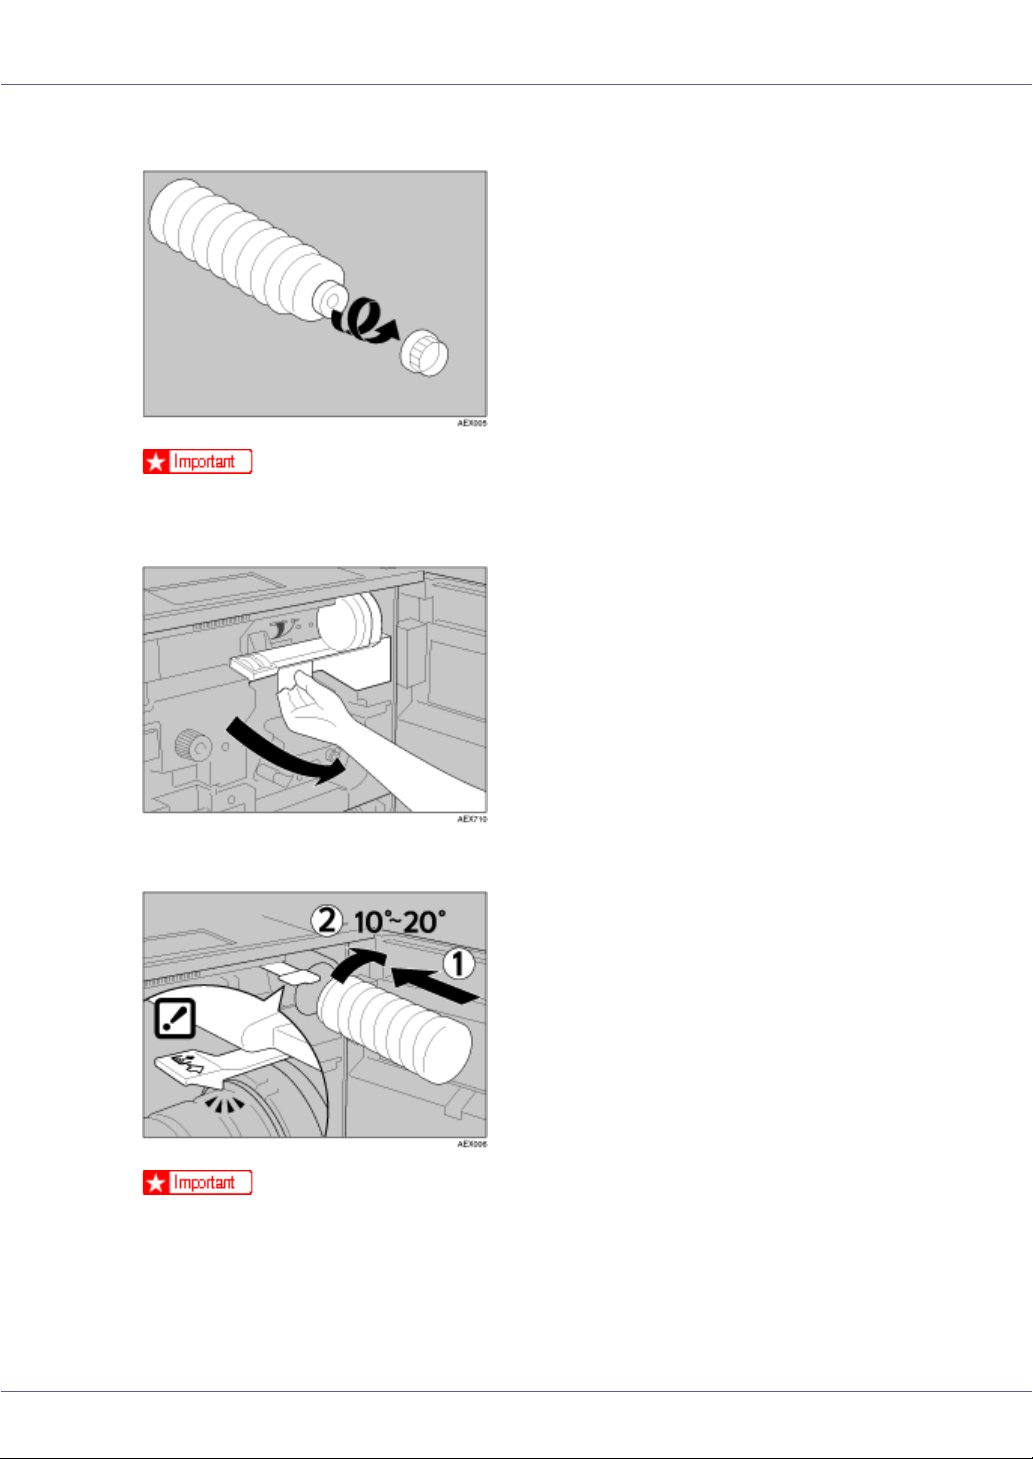
C Keeping the outer cap in place, hold the bottle horizontally, and then
shake it five or six times.
25
Setting Up
D Remove the outer cap.
❒ Do not remove the inner cap.
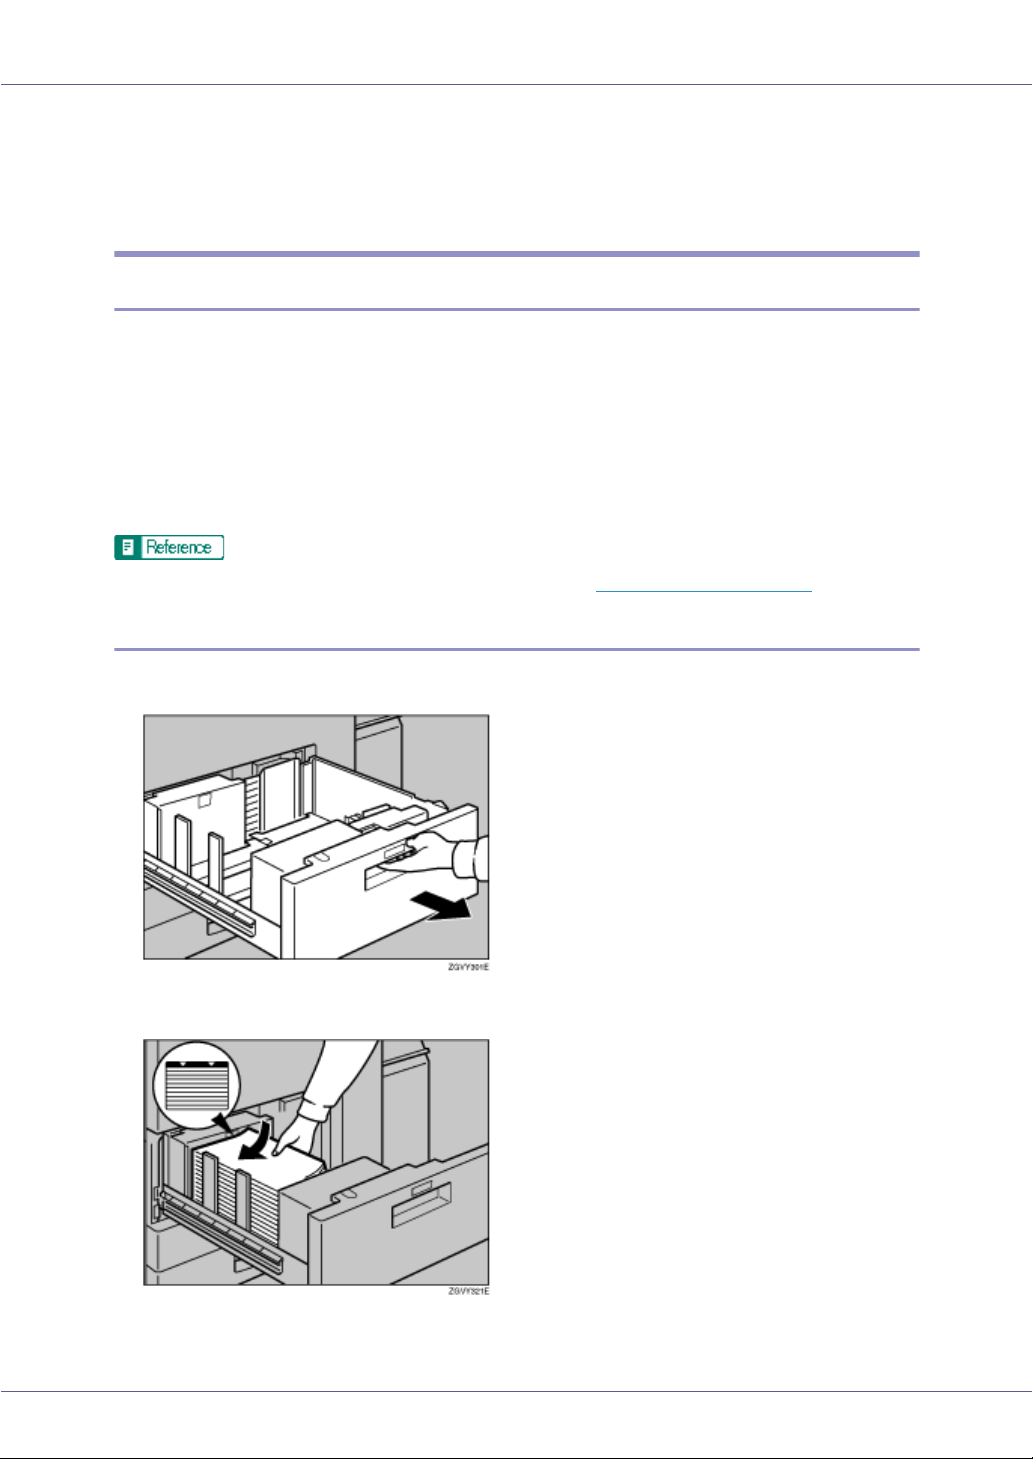
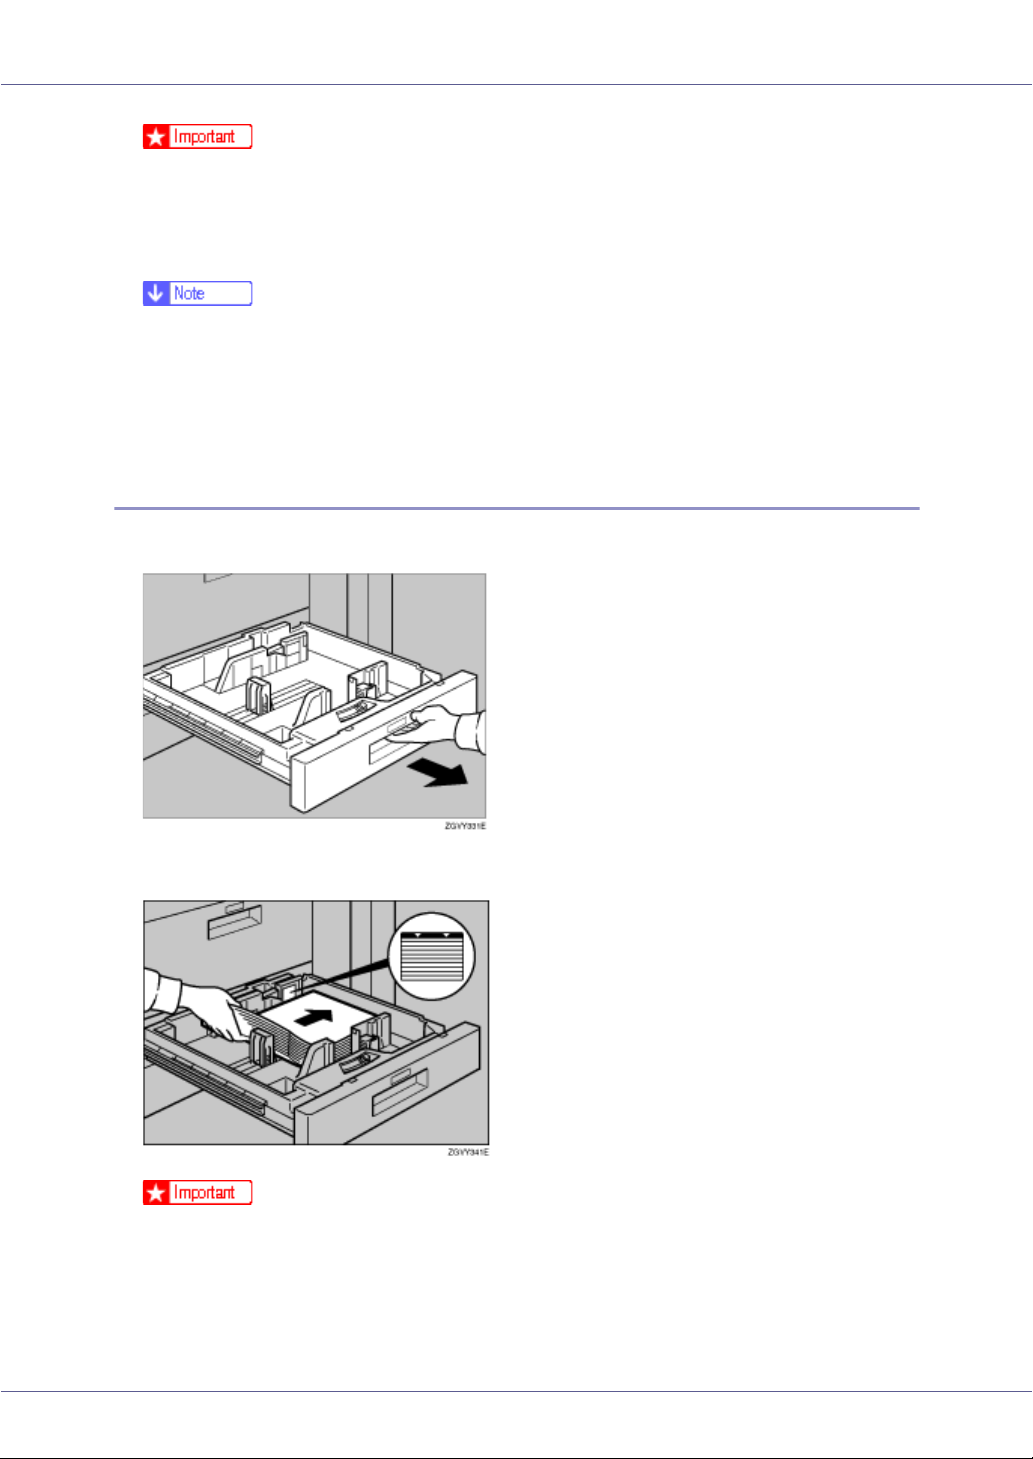
E Pull the lever out toward you, until it is at 90°.
F Insert the toner bottle. Push it in until the green lever clicks.
❒ If the toner bottle does not click into position, pull it slightly back toward you,
rotate it 10-20° to the right, and then re-insert.
❒ Do not insert and remove the toner bottle more than necessary, as toner
spills may result.
26

Setting Up
G Return the lever under the toner bottle to its original position.
H Close the front cover of the machine.
27
Setting Up
Loading Paper
Loading paper into the paper trays.
Loading paper into Standard paper tray.
The paper trays are set by the manufacturer to accommodate the following types
of paper:
❖ Default settings
• Tray 1: 11”×81/2”K
1
•Tray 2: 8
•Tray 3: 8
For details about usable types of paper, see p.63 “Loading Paper”.
Loading Paper in Tray 1 (Tandem Tray)
/2”×13”L
1
/2”×13”L
A Pull out the paper tray until it stops.
B Square the paper, and then load it in the tray.
28
Setting Up
❒ When stacking paper on the right side of the tray, align the right edge of the
stack with the right edge of the tray. When stacking paper on the left side
of the tray, align the left edge of the stack with the left edge of the tray.
❒ Do not stack paper higher than the limit mark inside the tray.
❒ Fan the paper before loading.
❒ Straighten curled or warped paper before loading.
❒ Ensure framed and other types of preprinted paper are correctly loaded.
C Gently push in the paper tray until it stops.
Loading Paper in Tray 2 and 3
A Pull out the paper tray until it stops.
B Square the paper, and then load it in the tray.
❒ When stacking paper on the left side of the tray, align the left edge of the
stack with the left edge of the tray.
❒ Do not stack paper higher than the limit mark inside the tray.
29
Setting Up
❒ Fan the paper before loading.
❒ Straighten curled or warped paper before loading.
❒ Ensure framed and other types of preprinted paper are correctly loaded.
C Gently push in the paper tray until it stops.
Loading Paper in the Large Capacity Tray (LCT)
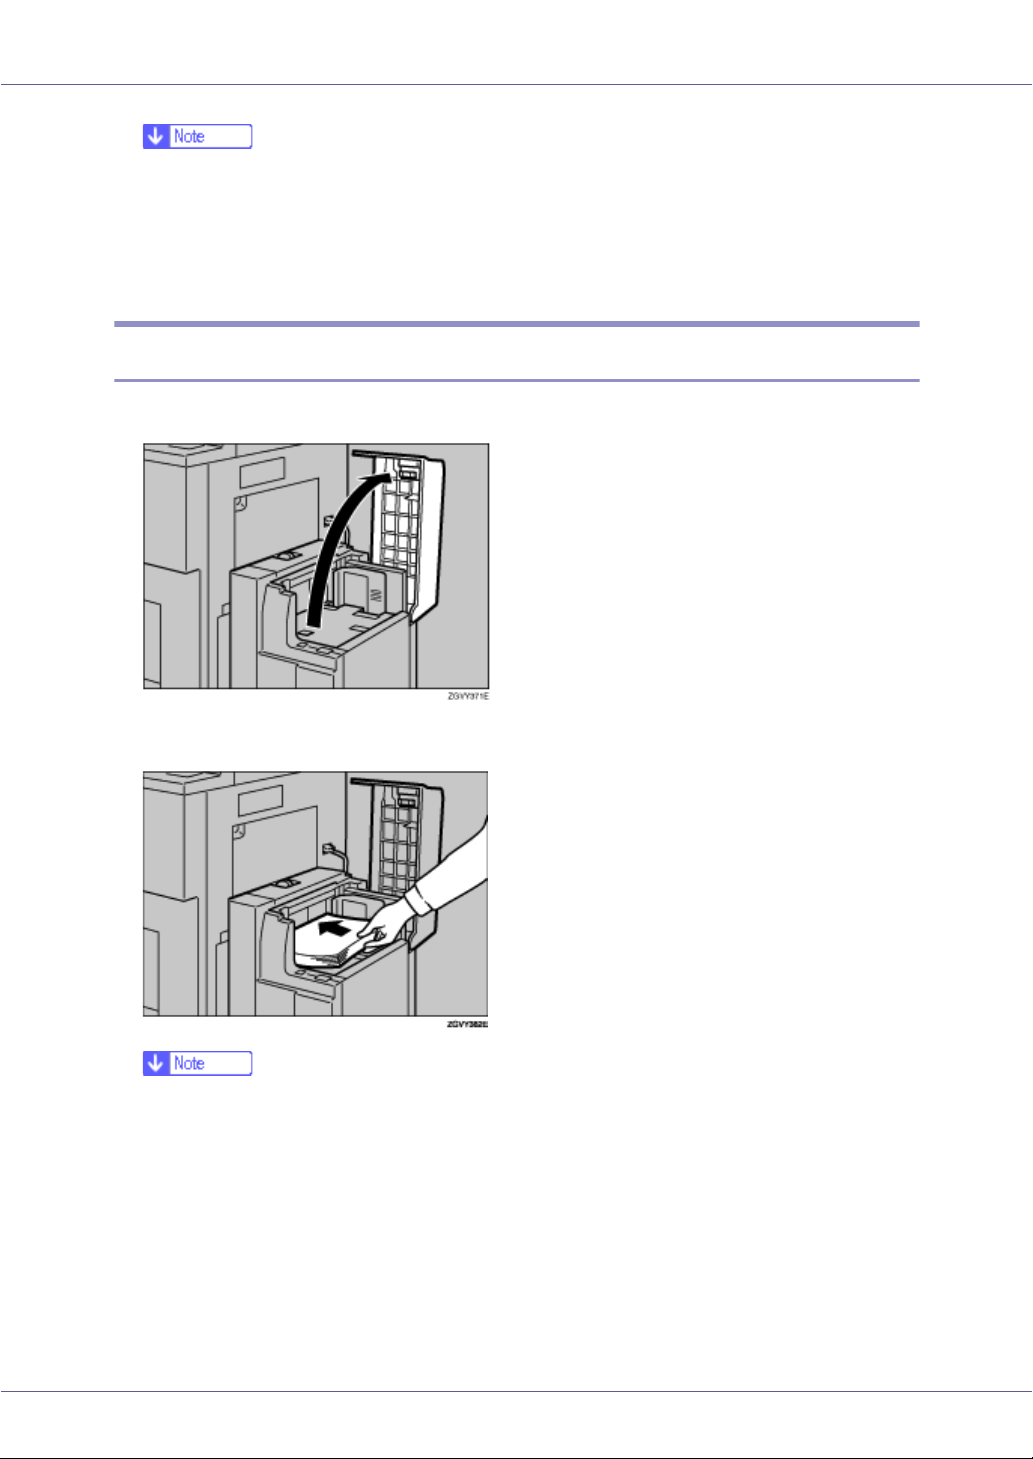
A Open the top cover of the large capacity tray (LCT).
B Load paper by aligning it with the left wall of the tray's interior.
❒ You can load up to 500 sheets (60-105 g/m2, 16-28 lb.) of plain paper into
the tray.
C Press the {Down} key.
30
 Loading...