

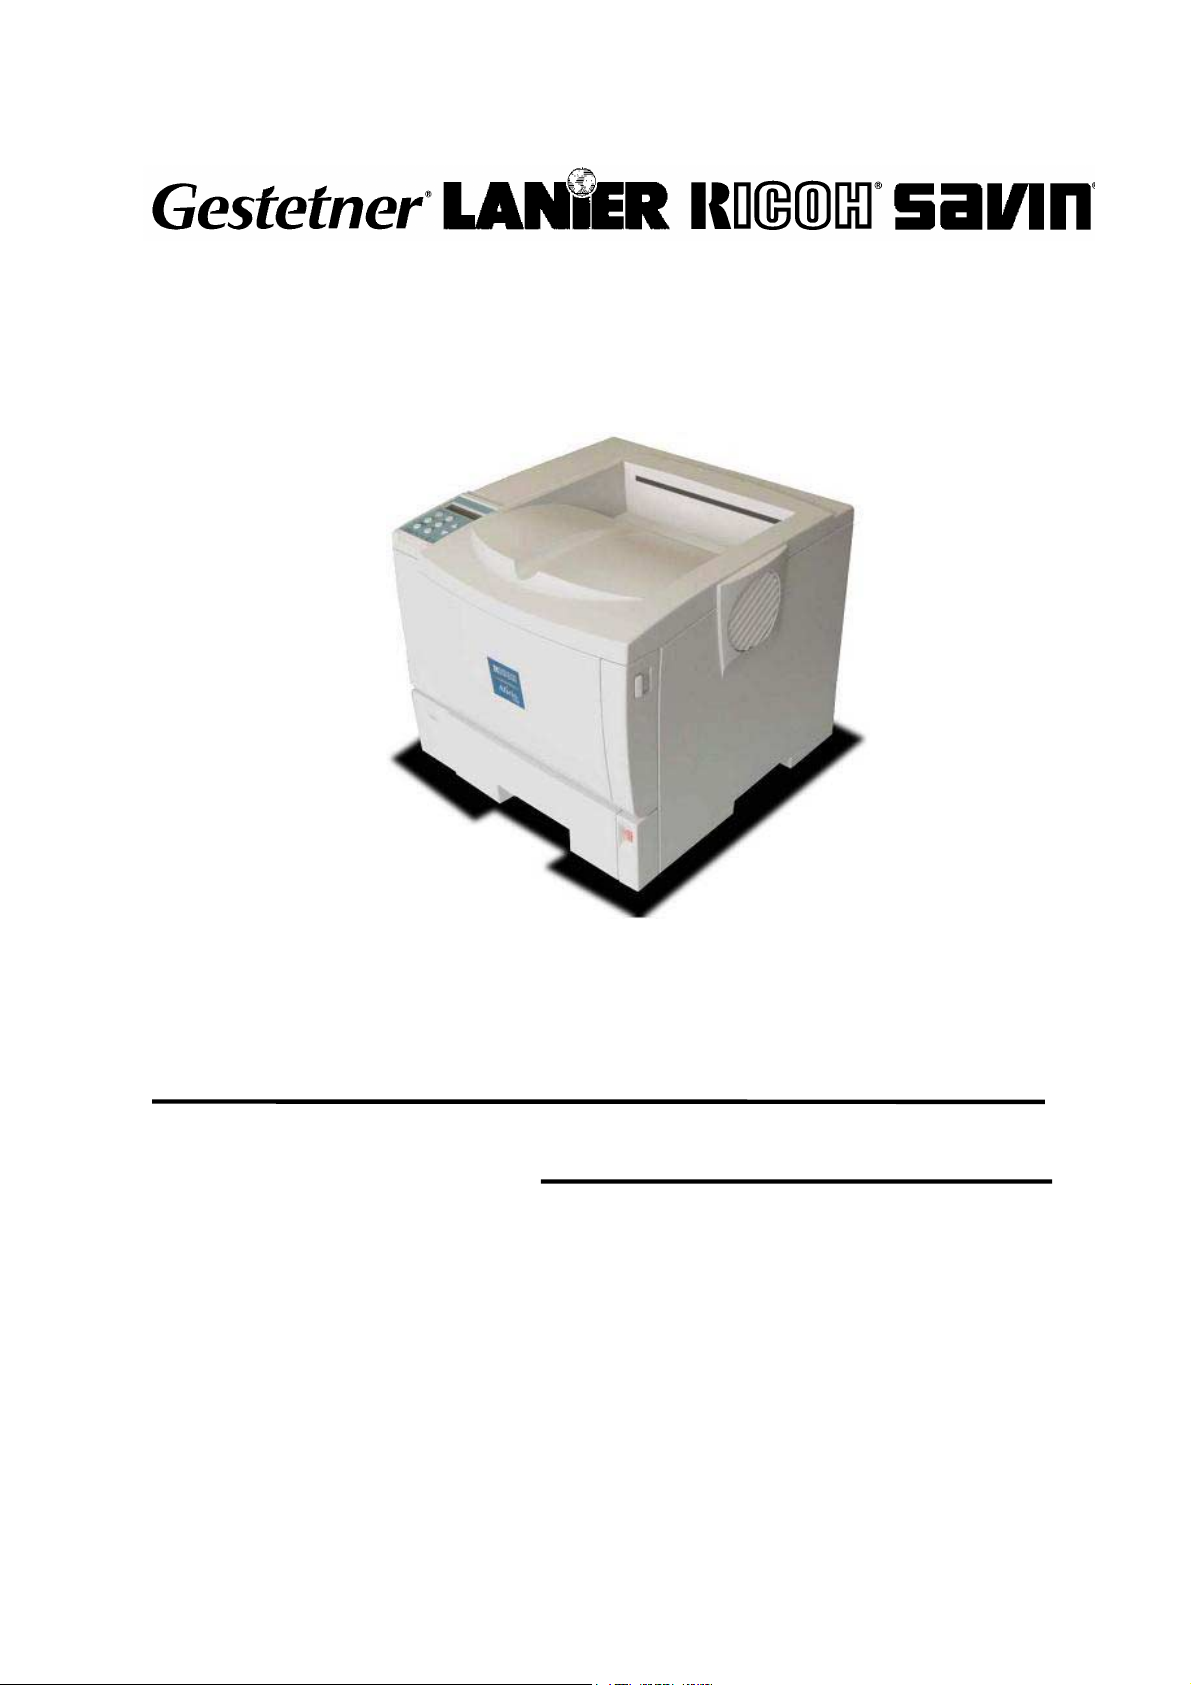
G112/G113/G116/G094/G095/G091
SERVICE MANUAL
001705MIU
RICOH GROUP COMPANIES


SERVICE MANUAL
G112/G113/G116/G094/G095/G091
®
®
RICOH GROUP COMPANIES


G112/G113/G116/
G094/G095/G091
SERVICE MANUAL
001705MIU


f
r
It is the reader's responsibility when discussing the information contained
within this document to maintain a level of confidentiality that is in the best
interest of Ricoh Corporation and its member companies.
NO PART OF THIS DOCUMENT MAY BE REPRODUCED IN ANY
FASHION AND DISTRIBUTED WITHOUT THE PRIOR
PERMISSION OF RICOH CORPORATION.
All product names, domain names or product illustrations, including
desktop images, used in this document are trademarks, registered
trademarks or the property of their respective companies.
They are used throughout this book in an informational or editorial fashion
only and for the benefit of such companies. No such use, or the use o
any trade name, or web site is intended to convey endorsement or othe
affiliation with Ricoh products.
2005 RICOH Corporation. All rights reserved.


p
t
r
g
l
y
p
WARNING
The Service Manual contains information
regarding service techniques, procedures,
rocesses and spare parts of office equipmen
distributed by Ricoh Corporation. Users of this
manual should be either service trained o
certified by successfully completing a Ricoh
Technical Training Program.
Untrained and uncertified users utilizin
information contained in this service manual to
repair or modify Ricoh equipment risk persona
injury, damage to property or loss of warrant
rotection.
Ricoh Corporation


LEGEND
PRODUCT CODE COMPANY
G112 P7527 LP128 Aficio AP410 MLP28
G113 P7527n LP128n Aficio AP410N MLP28n
G116 P7535n LP135n Aficio AP610N MLP35n
G094 P7325 LP026 Aficio AP400 MLP25
G095 P7325n LP026n Aficio AP400N MLP25n
G091 P7132n LP032 Aficio AP600N MLP32
GESTETNER LANIER RICOH SAVIN
DOCUMENTATION HISTORY
REV. NO. DATE COMMENTS
*
1 03/2005 G112/G113/G116 Addition
09/2003 Original Printing

Trademarks
Microsoft®, Windows®, and MS-DOS® are registered trademarks of Microsoft
Corporation in the United States and /or other countries.
PostScript® is a registered trademark of Adobe Systems, Incorporated.
PCL® is a registered trademark of Hewlett-Packard Company.
Ethernet® is a registered trademark of Xerox Corporation.
PowerPC® is a registered trademark of International Business Machines
Corporation.
Other product names used herein are for identification purposes only and may be
trademarks of their respective companies. We disclaim any and all rights involved
with those marks.

NOTE: In this manual, “G112 Series” includes the G112, G113, G094, and G095
models.
“G116 Series” includes the G116 and G091 models.
G112/G113/G116/G094/G095/G091
TABLE OF CONTENTS
INSTALLATION
1. INSTALLATION............................................................................ 1-1
1.1 INSTALLATION REQUIREMENTS ...........................................................1-1
1.1.1 ENVIRONMENT [ALL MODELS]......................................................1-1
1.1.2 MACHINE LEVEL [ALL MODELS]....................................................1-1
1.1.3 MACHINE SPACE REQUIREMENT [ALL MODELS] .......................1-1
1.1.4 POWER SUPPLY [ALL MODELS]....................................................1-2
1.2 MACHINE INSTALLATION [ALL MODELS] ..............................................1-2
1.2.1 MAIN UNIT [ALL MODELS]..............................................................1-2
1.2.2 HARDWARE OPTIONS....................................................................1-2
1.2.3 MEMORY OPTIONS [ALL MODELS]............................................... 1-2
1.2.4 PRINTER INTERFACE OPTIONS [ALL MODELS] ..........................1-3
1.2.5 DRIVERS AND SOFTWARE [ALL MODELS] ..................................1-3
1.2.6 FIRMWARE UPGRADE [ALL MODELS] ..........................................1-3
1.3 SUPPLIES [ALL MODELS]........................................................................1-3
PREVENTIVE MAINTENANCE SCHEDULE
2. PREVENTIVE MAINTENANCE SCHEDULE............................... 2-1
2.1 USER MAINTENANCE .............................................................................2-1
2.1.1 G112 SERIES (G112/G113 AND G094/G095).................................2-1
2.1.2 G116 SERIES (G116 AND G091) ....................................................2-1
2.2 SERVICE MAINTENANCE........................................................................2-2
2.2.1 MAIN UNIT [ALL MODELS]..............................................................2-2
2.2.2 PAPER TRAY UNIT [ALL MODELS] ................................................2-2
2.2.3 ONE-BIN SHIFT TRAY [G091 ONLY] ...............................................2-3
2.2.4 FOUR-BIN MAILBOX [G091 ONLY] ..................................................2-3
REPLACEMENT AND ADJUSTMENT
3. REPLACEMENT AND ADJUSTMENT ........................................ 3-1
3.1 GENERAL .................................................................................................3-1
3.1.1 PRECAUTIONS ON DISASSEMBLY [ALL MODELS]......................3-1
3.1.2 RELEASING PLASTIC LATCHES [ALL MODELS] ..........................3-3
3.1.3 AFTER SERVICING THE MACHINE [ALL MODELS] ......................3-3
3.2 SPECIAL TOOLS [ALL MODELS].............................................................3-3
3.3 COVERS ...................................................................................................3-4
SM i G112/G113/G116/G094/G095/G091

3.3.1 FRONT COVER [ALL MODELS] ......................................................3-4
3.3.2 UPPER COVER [G112 SERIES]......................................................3-4
3.3.3 UPPER COVER [G116 SERIES]......................................................3-5
3.3.4 BY-PASS TRAY UNIT [ALL MODELS].............................................3-5
3.3.5 EXTERIOR COVERS [G112 SERIES] .............................................3-6
3.3.6 EXTERIOR COVERS [G116 MODELS] ...........................................3-6
3.4 LASER UNIT .............................................................................................3-7
3.4.1 CAUTION DECAL LOCATIONS [ALL MODELS] .............................3-7
3.4.2 POLYGON MIRROR MOTOR [ALL MODELS].................................3-8
3.4.3 LASER SYNCHRONIZATION DETECTOR [ALL MODELS] ............3-8
3.4.4 LASER UNIT ....................................................................................3-9
3.4.5 LASER UNIT [G116 SERIES]......................................................... 3-10
3.4.6 LASER DIODE UNIT [ALL MODELS].............................................3-12
3.4.7 LASER BEAM PITCH ADJUSTMENT [ALL MODELS]...................3-13
3.5 TRANSFER ROLLER [ALL MODELS] ....................................................3-14
3.6 TONER END SENSOR [ALL MODELS]..................................................3-14
3.7 FUSING................................................................................................... 3-15
3.7.1 FUSING UNIT [ALL MODELS] .......................................................3-15
3.7.2 HOT ROLLER AND FUSING LAMP [ALL MODELS]......................3-16
3.7.3 PRESSURE ROLLER [ALL MODELS] ...........................................3-18
3.7.4 THERMISTOR AND THERMOSTAT [ALL MODELS] ....................3-19
3.7.5 HOT ROLLER STRIPPERS [G112 SERIES]..................................3-20
3.7.6 HOT ROLLER STRIPPERS [G116 SERIES]..................................3-21
3.8 PAPER FEED..........................................................................................3-22
3.8.1 PAPER FEED ROLLER [ALL MODELS] ........................................3-22
3.8.2 FRICTION PAD [ALL MODELS].....................................................3-22
3.9 BY-PASS TRAY [G112/G113/G116] ....................................................... 3-23
3.9.1 BY-PASS TRAY UNIT AND BY-PASS FEED ROLLER
[ALL MODELS]............................................................................... 3-23
3.10 PRINTER CONTROLLER BOARD [ALL MODELS] .............................. 3-24
3.11 ENGINE BOARD [ALL MODELS]..........................................................3-25
3.12 MAIN MOTOR [ALL MODELS]..............................................................3-26
3.13 SOLENOIDS AND CLUTCHES [ALL MODELS] ...................................3-26
3.14 POWER SUPPLY BOARD AND HIGH VOLTAGE SUPPLY BOARD
[ALL MODELS] ......................................................................................3-27
3.15 COOLING FAN [ALL MODELS] ............................................................3-28
3.16 IMAGE ADJUSTMENT..........................................................................3-29
3.16.1 REGISTRATION ADJUSTMENT [ALL MODELS] ........................3-29
3.16.2 PARALELLOGRAM IMAGE ADJUSTMENT [ALL MODELS] .......3-29
TROUBLESHOOTING
4. TROUBLESHOOTING ................................................................. 4-1
4.1 SERVICE CALL CONDITIONS .................................................................4-1
4.1.1 SUMMARY ....................................................................................... 4-1
4.1.2 SC CODE DESCRIPTIONS .............................................................4-2
4.2 CONTROLLER ERROR ............................................................................4-5
4.3 ELECTRICAL COMPONENT DEFECTS [ALL MODELS] .........................4-7
G112/G113/G116/G094/G095/G091 ii SM

4.3.1 SENSORS ........................................................................................4-7
4.3.2 SWITCHES [ALL MODELS] ............................................................. 4-7
4.4 BLOWN FUSE CONDITIONS [ALL MODELS] ..........................................4-8
4.5 LEDS [ALL MODELS]................................................................................4-8
SERVICE TABLES
5. SERVICE TABLES....................................................................... 5-1
5.1 SERVICE PROGRAM MODE [ALL MODELS] ..........................................5-1
5.1.1 ENABLING AND DISABLING SERVICE PROGRAM MODE ...........5-1
Entering the Service Mode....................................................................5-1
Inputting a Value or Setting for a Service Program............................... 5-1
Exiting Service Mode ............................................................................5-2
5.2 PRINTER CONTROLLER SERVICE MODE [ALL MODELS]....................5-2
5.2.1 SERVICE MODE MENU (“1. SERVICE MENU”)..............................5-2
5.2.2 BIT SWITCH PROGRAMMING ........................................................5-2
5.3 PRINTER ENGINE SERVICE MODE [ALL MODELS] .............................. 5-3
5.3.1 SERVICE MODE TABLE..................................................................5-3
SP1-xxx: Feed ...................................................................................... 5-3
SP2-xxx: Drum......................................................................................5-5
SP3-xxx: Process..................................................................................5-6
SP5-xxx: Mode .....................................................................................5-8
SP7-xxx: Data Log.............................................................................. 5-20
SP8-xxx: Counters..............................................................................5-24
SP9-xxx: Counters..............................................................................5-28
5.4 UPDATING THE FIRMWARE .................................................................5-29
5.4.1 CONTROLLER FIRMWARE [G091/G094/G095] ...........................5-29
5.4.2 ENGINE FIRMWARE [G091/G094/G095] ......................................5-30
5.4.3 TYPE OF FIRMWARE [G112/G113/G116].....................................5-30
5.4.4 PRECAUTIONS [G112/G113/G116]...............................................5-30
5.4.5 MACHINE FIRMWARE [G112/G113/G116] ...................................5-31
5.5 ERROR RECOVERY [ALL MODELS] .....................................................5-32
Controller ............................................................................................ 5-32
Engine.................................................................................................5-32
5.6 REMOTE FIRMWARE UPDATE (RFU) [ALL MODELS] .........................5-33
5.7 LOOP-BACK TEST [ALL MODELS] ........................................................5-33
5.8 POWER-ON SELF TESTS [ALL MODELS].............................................5-33
5.9 USER PROGRAM MODES [ALL MODELS]............................................5-34
User Mode Tree.................................................................................. 5-34
5.10 DIP SWITCHES [ALL MODELS] ...........................................................5-35
Controller Board.................................................................................. 5-35
5.11 NVRAM DATA UPLOAD/DOWNLOAD [G112/G113/G116] ..................5-36
Uploading NVRAM Data .....................................................................5-36
Downloading NVRAM Data.................................................................5-37
5.12 SD CARD APPLI MOVE [G112/G113/G116].........................................5-37
5.12.1 OVERVIEW ..................................................................................5-37
5.12.2 MOVE EXEC ................................................................................5-38
5.12.3 UNDO EXEC ................................................................................5-39
SM iii G112/G113/G116/G094/G095/G091

DETAILED SECTION DESCRIPTIONS
6. DETAILED SECTION DESCRIPTIONS ....................................... 6-1
6.1 OVERVIEW ...............................................................................................6-1
6.1.1 MECHANICAL COMPONENT LAYOUT [ALL MODELS] .................6-1
6.1.2 PAPER PATH [G112 SERIES] .........................................................6-2
6.1.3 PAPER PATH [G116 SERIES] .........................................................6-3
6.2 BOARD STRUCTURE............................................................................... 6-4
6.2.1 BLOCK DIAGRAM [G112 SERIES].................................................. 6-4
6.2.2 BLOCK DIAGRAM [G116 SERIES].................................................. 6-5
6.2.3 DESCRIPTIONS [ALL MODELS] .....................................................6-6
6.2.4 CONTROLLER BOARD [G112 SERIES]..........................................6-8
6.2.5 CONTROLLER BOARD [G116 SERIES]..........................................6-9
6.3 PRINTING PROCESS............................................................................. 6-10
6.3.1 OVERVIEW [ALL MODELS]...........................................................6-10
6.3.2 LASER EXPOSURE [ALL MODELS]..............................................6-11
Overview.............................................................................................6-11
Automatic Process Control (APC) [ALL MODELS] ............................6-12
LD Safety Mechanisms [ALL MODELS]..............................................6-13
6.3.3 CARTRIDGE OVERVIEW [ALL MODELS].....................................6-14
6.3.4 DRUM CHARGE [ALL MODELS] ...................................................6-14
6.3.5 DEVELOPMENT [ALL MODELS] ...................................................6-15
Toner Supply ......................................................................................6-15
Development Unit ...............................................................................6-15
Toner Density Control .........................................................................6-16
Development Bias...............................................................................6-16
Toner End Detection ...........................................................................6-17
Toner near-end ...................................................................................6-17
Toner end ...........................................................................................6-17
6.3.6 IMAGE TRANSFER AND PAPER SEPARATION [ALL MODELS]. 6-18
Overview.............................................................................................6-18
Transfer Roller Cleaning .....................................................................6-19
6.3.7 CLEANING [ALL MODELS]............................................................6-19
6.3.8 QUENCHING [ALL MODELS] ........................................................ 6-20
6.3.9 ID CHIP AND INTERNAL THERMISTOR [ALL MODELS] .............6-20
6.4 PAPER FEED [ALL MODELS] ................................................................6-21
6.4.1 OVERVIEW .................................................................................... 6-21
Paper Tray ..........................................................................................6-21
By-pass Tray.......................................................................................6-21
6.4.2 PAPER TRAY [ALL MODELS] .......................................................6-22
Tray Extension....................................................................................6-22
Paper Sizes [G112 SERIES]...............................................................6-22
Paper Sizes [G116 SERIES]...............................................................6-22
Paper Lift ............................................................................................6-23
Paper Feed and Registration ..............................................................6-24
Paper Size Detection ..........................................................................6-25
Paper Size Detection [G112 SERIES] ................................................6-26
G112/G113/G116/G094/G095/G091 iv SM

Paper Size Detection [G116 SERIES] ................................................6-26
Paper End Detection...........................................................................6-27
Remaining Paper Detection ................................................................6-28
6.4.3 BY-PASS TRAY [G091/G094/G095] ..............................................6-29
6.4.4 BY-PASS TRAY [G112/G113/G116] ..............................................6-30
6.5 IMAGE FUSING AND PAPER EXIT [ALL MODELS] ..............................6-31
6.5.1 OVERVIEW .................................................................................... 6-31
6.5.2 FUSING DRIVE [ALL MODELS]..................................................... 6-32
6.5.3 FUSING ENTRANCE AND GUIDE SHAFT [ALL MODELS] ..........6-32
6.5.4 PRESSURE ROLLER [ALL MODELS] ...........................................6-33
6.5.5 NEW FUSING UNIT DETECTION [ALL MODELS] ........................6-34
6.5.6 FUSING TEMPERATURE CONTROL [ALL MODELS] ..................6-35
Overheat Protection............................................................................6-36
6.5.7 PAPER EXIT [ALL MODELS] .........................................................6-36
6.5.8 ENERGY SAVER MODE [ALL MODELS] ......................................6-37
Entering Energy Saver Mode..............................................................6-37
Exiting Energy Saver Mode ................................................................6-37
6.6 CONTROLLER FUNCTIONS [ALL MODELS].........................................6-38
6.6.1 METER CHARGE MODE ...............................................................6-38
Meter-charge Counter Display ............................................................6-38
PM Warning Display ...........................................................................6-38
SPECIFICATIONS
SPECIFICATIONS (G091)................................................................. 7-1
1. GENERAL SPECIFICATIONS.....................................................................7-1
2. PHYSICAL SPECIFICATIONS.................................................................... 7-2
3. CONTROLLER ............................................................................................7-3
4. SUPPORTED PAPER SIZES...................................................................... 7-4
5. OPERATION PANEL LED SPECIFICATIONS............................................ 7-5
6. EXTERNAL OPTIONS ................................................................................7-6
7. SOFTWARE ACCESSORIES .....................................................................7-7
7.1 PRINTER DRIVERS............................................................................7-7
7.2 CD-ROM CONTENTS .........................................................................7-8
7.2.1 NORTH AMERICAN VERSION........................................................7-8
7.2.2 EUROPEAN VERSION ....................................................................7-9
8. MACHINE CONFIGURATION................................................................... 7-10
8.1 SYSTEM COMPONENTS .................................................................7-10
8.2 INTERNAL OPTIONS........................................................................7-11
SPECIFICATIONS (G094/G095)..................................................... 7-12
1. GENERAL SPECIFICATIONS...................................................................7-12
2. PHYSICAL SPECIFICATIONS................................................................... 713
3. CONTROLLER ..........................................................................................7-14
4. SUPPORTED PAPER SIZES....................................................................7-15
5. OPERATION PANEL LED SPECIFICATIONS.......................................... 7-16
6. EXTERNAL OPTIONS ..............................................................................7-16
7. SOFTWARE ACCESSORIES ...................................................................7-17
SM v G112/G113/G116/G094/G095/G091

7.1 PRINTER DRIVERS .......................................................................... 7-17
7.2 CD-ROM CONTENTS ....................................................................... 7-18
7.2.1 NORTH AMERICAN VERSION...................................................... 7-18
7.2.2 EUROPEAN VERSION ..................................................................7-19
8. MACHINE CONFIGURATION ..................................................................7-20
8.1 SYSTEM COMPONENTS ................................................................. 7-20
8.2 INTERNAL OPTIONS........................................................................7-21
SPECIFICATIONS (G116)............................................................... 7-22
1. GENERAL SPECIFICATIONS...................................................................7-22
2. PHYSICAL SPECIFICATIONS ..................................................................7-23
3. CONTROLLER ..........................................................................................7-24
4. SUPPORTED PAPER SIZES....................................................................7-25
5. OPERATION PANEL LED SPECIFICATIONS .......................................... 7-26
6. EXTERNAL OPTIONS ..............................................................................7-27
7. SOFTWARE ACCESSORIES ...................................................................7-28
7.1 PRINTER DRIVERS .......................................................................... 7-28
7.2 OPERATING SYSTEMS/NETWORKS..............................................7-28
7.3 CD-ROM CONTENTS ....................................................................... 7-29
7.3.1 NORTH AMERICAN VERSION...................................................... 7-29
7.3.2 EUROPEAN VERSION ..................................................................7-30
8. MACHINE CONFIGURATION ................................................................... 7-31
8.1 SYSTEM COMPONENTS ................................................................. 7-31
8.2 INTERNAL OPTIONS......................................................................7-32
SPECIFICATIONS (G112/G113)..................................................... 7-33
1. GENERAL SPECIFICATIONS...................................................................7-33
2. PHYSICAL SPECIFICATIONS ..................................................................7-34
3. CONTROLLER ..........................................................................................7-35
4. SUPPORTED PAPER SIZES....................................................................7-36
5. OPERATION PANEL LED SPECIFICATIONS .......................................... 7-37
6. EXTERNAL OPTIONS ..............................................................................7-37
7. SOFTWARE ACCESSORIES ...................................................................7-38
7.1 PRINTER DRIVERS .......................................................................... 7-38
7.2 CD-ROM CONTENTS ....................................................................... 7-39
7.2.1 NORTH AMERICAN VERSION...................................................... 7-39
7.2.2 EUROPEAN VERSION ..................................................................7-40
8. MACHINE CONFIGURATION ................................................................... 7-41
8.1 SYSTEM COMPONENTS ................................................................. 7-41
8.2 INTERNAL OPTIONS........................................................................7-42
PAPER TRAY UNIT (G360)/ENVELOPE FEEDER (G362)
SEE SECTION G360/G362 FOR DETAILED TABLE OF CONTENTS
DUPLEX UNIT (G361)
SEE SECTION G361 FOR DETAILED TABLE OF CONTENTS
G112/G113/G116/G094/G095/G091 vi SM

DUPLEX UNIT (G552)
SEE SECTION G552 FOR DETAILED TABLE OF CONTENTS
FOUR-BIN MAILBOX (G553)
SEE SECTION G553 FOR DETAILED TABLE OF CONTENTS
ONE-BIN SHIFT TRAY (G554)
SEE SECTION G554 FOR DETAILED TABLE OF CONTENTS
PAPER TRAY UNIT (G555)/ENVELOPE FEEDER (G556)
SEE SECTION G555 FOR DETAILED TABLE OF CONTENTS
PAPER TRAY UNIT (G399)/ENVELOPE FEEDER (G807)
SEE SECTION G399/G807 FOR DETAILED TABLE OF CONTENTS
DUPLEX UNIT (G806)
SEE SECTION G806 FOR DETAILED SECTION DESCRIPTION
SM vii G112/G113/G116/G094/G095/G091


IMPORTANT SAFETY NOTICES
PREVENTION OF PHYSICAL INJURY
1. Before disassembling or assembling parts of the printer and peripherals,
make sure that the printer power cord is unplugged.
2. The wall outlet should be near the printer and easily accessible.
3. Note that some components of the printer and the paper tray unit are
supplied with electrical voltage even if the main power switch is turned off.
4. If any adjustment or operation check has to be made with exterior covers off
or open while the main switch is turned on, keep hands away from electrified
or mechanically driven components.
5. The inside and the metal parts of the fusing unit become extremely hot while
the printer is operating. Be careful to avoid touching those components with
your bare hands.
HEALTH SAFETY CONDITIONS
Toner and developer are non-toxic, but if you get either of them in your eyes by
accident, it may cause temporary eye discomfort. Try to remove with eye drops
or flush with water as first aid. If unsuccessful, get medical attention.
OBSERVANCE OF ELECTRICAL SAFETY STANDARDS
1. The printer and its peripherals must be installed and maintained by a
customer service representative who has completed the training course on
those models.
2. The NVRAM on the system control board has a lithium battery which can
explode if replaced incorrectly. Replace the NVRAM only with an identical
one. The manufacturer recommends replacing the entire NVRAM. Do not
recharge or burn this battery. Used NVRAM must be handled in accordance
with local regulations.
SAFETY AND ECOLOGICAL NOTES FOR DISPOSAL
1. Do not incinerate toner bottles or used toner. Toner dust may ignite suddenly
when exposed to an open flame.
2. Dispose of used toner, developer, and organic photoconductors in
accordance with local regulations. (These are non-toxic supplies.)
3. Dispose of replaced parts in accordance with local regulations.
4. When keeping used lithium batteries in order to dispose of them later, do not
put more than 100 batteries per sealed box. Storing larger numbers or not
sealing them apart may lead to chemical reactions and heat build-up.

LASER SAFETY
The Center for Devices and Radiological Health (CDRH) prohibits the repair of
laser-based optical units in the field. The optical housing unit can only be repaired
in a factory or at a location with the requisite equipment. The laser subsystem is
replaceable in the field by a qualified Customer Engineer. The laser chassis is not
repairable in the field. Customer engineers are therefore directed to return all
chassis and laser subsystems to the factory or service depot when replacement of
the optical subsystem is required.
WARNING
Use of controls, or adjustment, or performance of procedures other than
those specified in this manual may result in hazardous radiation exposure.
WARNING
WARNING: Turn off the main switch before attempting any of the
procedures in the Laser Unit section. Laser beams can seriously damage
your eyes.
Caution Labels
G065RLW.WMF
LASER-3.WMF
LASER-1.WMF

Lithium Batteries (Memory Back-up)
CAUTION
The danger of explosion exists if a battery of this type is incorrectly
replaced. Replace only with the same or an equivalent type recommended
by the manufacturer. Discard used batteries in accordance with the
manufacturer’s instructions.
Warning Concerning Copyright
Many documents are copyrighted. Such documents may not be reproduced by
copying or in any other form without the express permission of the copyright holder.
Conventions in this Manual
This manual uses several symbols and some simple abbreviations.
Symbol What it means
HP Home Position
T/S Transfer/Separation
The following notations are used in text to describe the direction of paper feed:
lengthwise and sideways. The annotations “SEF” and “LEF” denote “Short Edge
Feed” and “Long Edge Feed’. (The arrows indicate the direction of paper feed.)
Refer to section number
See Core Tech Manual for details
Screw
Connector
E-ring
C-ring
Lengthwise (SEF) Sideways (LEF)

INSTALLATION
PREVENTIVE MAINTENANCE
REPLACEMENT AND ADJUSTMENT
TROUBLESHOOTING
FOUR-BIN MAILBOX G553
TAB
POSITION 1
TAB
POSITION 2
TAB
POSITION 3
TAB
POSITION 4
SERVICE TABLES
DUPLEX UNIT G361
DUPLEX UNIT G552
DUPLEX UNIT G806
DETAILED DESCRIPTIONS
SPECIFICATIONS
PAPER TRAY UNIT G360/ENVELOPE FEEDER G362
PAPER TRAY UNIT G555/ENVELOPE FEEDER G556
PAPER TRAY UNIT G399/ENVELOPE FEEDER G807
ONE-BIN SHIFT TRAY G554
TAB
POSITION 5
TAB
POSITION 6
TAB
POSITION 7
TAB
POSITION 8


INSTALLATION

INSTALLATION REQUIREMENTS
1. INSTALLATION
1.1 INSTALLATION REQUIREMENTS
1.1.1 ENVIRONMENT [ALL MODELS]
1. Temperature Range: 10 °C to 32 °C (50 °F to 89.6 °F)
2. Humidity Range: 15 % to 89 % RH
3. Ambient Illumination: Less than 2,000 lux (do not expose to direct sunlight).
4. Ventilation: 3 times/hr/person
5. Avoid areas that are exposed to sudden temperature changes. This includes:
1) Areas directly exposed to cool air from an air conditioner.
2) Areas directly exposed to heat from a heater.
6. Do not install this machine in an area where it will be exposed to corrosive
gases.
7. Do not install the machine at locations over 2,500 m (8,125 ft.) above sea level.
8. Put the machine on a strong and level base. Inclination on any side should not
exceed 5 mm.
9. Do not put the machine where it may be subjected to strong vibrations.
1.1.2 MACHINE LEVEL [ALL MODELS]
Installation
Front to back: Within 5 mm. (0.2 inches) of level.
Right to left: Within 5 mm. (0.2 inches) of level.
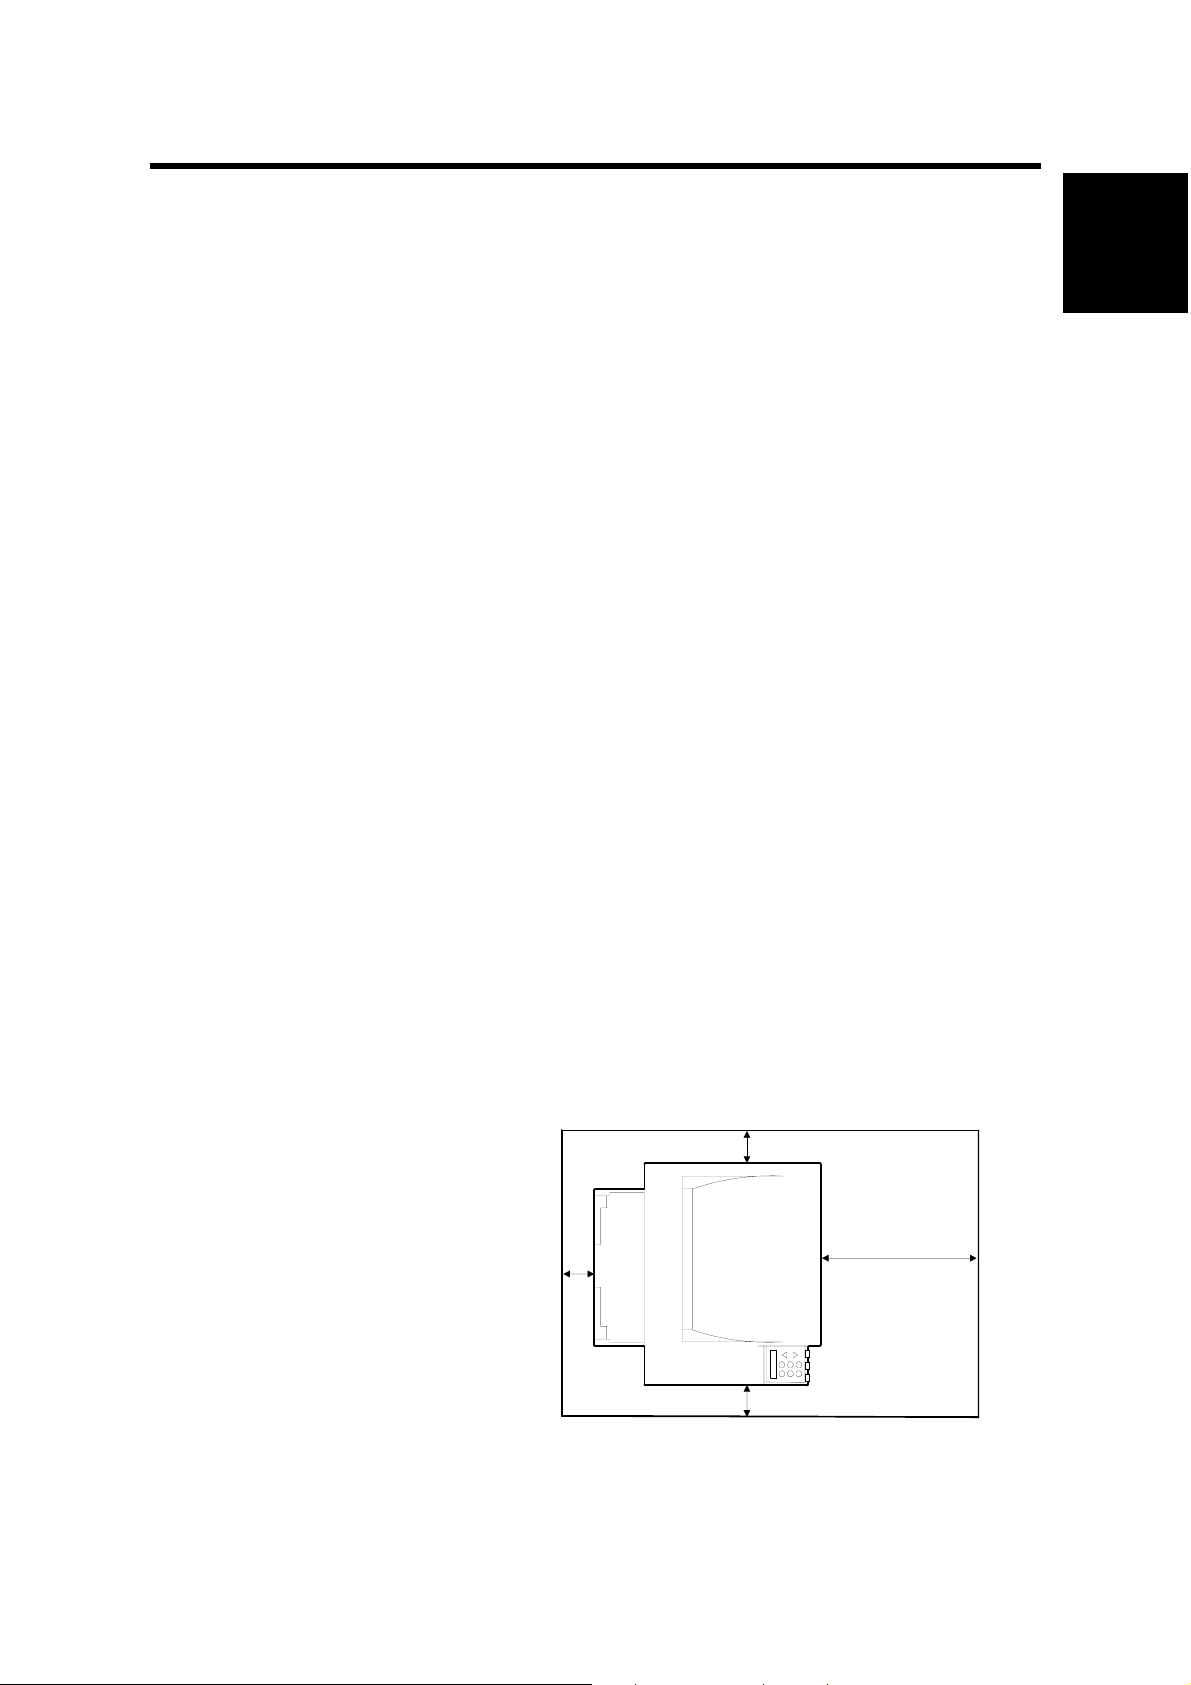
1.1.3 MACHINE SPACE REQUIREMENT [ALL MODELS]
Place the machine near the power source, providing the clearance as shown
below:
A: Over 10 cm (4 inches)
B: Over 10 cm (4 inches)
C: Over 100 cm (40 inches)
A
D: Over 10 cm (4 inches)
B
C
D
G094I500.WMF
SM 1-1 G112/G113/G116/G094/G095/G091
MACHINE INSTALLATION [ALL MODELS]
1.1.4 POWER SUPPLY [ALL MODELS]
CAUTION
1. Make sure the plug is firmly inserted in the outlet.
2. Avoid multi-wiring.
3. Be sure to ground the machine.
Input voltage level
Permissible voltage Fluctuation: ±10 %
Do not set anything on the power cord
120 volts, 60 Hz: More than 10 A
220-240 volts, 50 Hz/60Hz: More than 6 A
1.2 MACHINE INSTALLATION [ALL MODELS]
Refer to the following sections of the Operating Instructions for installation details
for all models.
1.2.1 MAIN UNIT [ALL MODELS]
1. Installing the Printer Unit: Quick Installation Guide.
2. Connecting the machine to a computer: Quick Installation Guide.
1.2.2 HARDWARE OPTIONS
1. Installing the Paper Feed Unit: Section two of the Set-up Guide. (Note: The
G116 Paper Tray is unique and is not compatible with the G091 model.)
2. Installing the Envelope Feeder: Section two of the Set-up Guide. (Note: The
G116 Envelope Feeder is unique, and is not compatible with the G091 model.)
3. Installing the Duplex Unit: Section two of the Set-up Guide. (Note: The G116
Duplex Unit is unique, and is not compatible with the G091 model.)
4. [G091 only] Installing the One-Bin Shift Tray. Section two of the Set-up Guide.
5. [G091 only] Installing the Four-Bin Mailbox. Section two of the Set-up Guide.
(NOTE: The Mailbox and One-Bin Shift Tray are not supported for the G116
model.)
1.2.3 MEMORY OPTIONS [ALL MODELS]
1. Installing the Memory Unit: Section two of the Set-up Guide.
2. Installing the Hard Disk: Section two of the Set-up Guide.
G112/G113/G116/G094/G095/G091 1-2 SM

SUPPLIES [ALL MODELS]
1.2.4 PRINTER INTERFACE OPTIONS
1. Ethernet (G112/G094 models only): Section two of the Set-up Guide.
2. IEEE1394: Section two of the Set-up Guide.
3. IEEE802.11b: Section two of the Set-up Guide.
4. Bluetooth: Section two of the Set-up Guide.
NOTE: The Ethernet is standard for the G113/G116 and G091/G116 models.
1.2.5 DRIVERS AND SOFTWARE [ALL MODELS]
Refer to section 4 of the Set-up Guide for installation procedures.
1.2.6 FIRMWARE UPGRADE [ALL MODELS]
Refer to section 5.4 of the Service Manual.
1.3 SUPPLIES [ALL MODELS]
Installation
• Maintenance kit (NOTE: The G094/G095 and G112/G113 Maintenance
Kits are not interchangeable. The same applies to the G094 versus the
G116 Maintenance Kits. Use the Maintenance Kit that is unique to each
model.)
• AIO (NOTE: The G094/G095 AIO can be used in the G112/G113 models,
and vice versa. The same interchangeability applies to the G091 and
G116 AIO cartridges.)
SM 1-3 G112/G113/G116/G094/G095/G091


PREVENTIVE MAINTENANCE

USER MAINTENANCE
2. PREVENTIVE MAINTENANCE SCHEDULE
2.1 USER MAINTENANCE
NOTE: The G091/G094/G095 and the G112/G113/G116 Maintenance Kits are not
interchangeable. Ensure you are using the correct kit for the model you are
servicing.
The customer can do all PM items with the Maintenance Kit.
Meter-charge mode must be set to “disabled” (Engine SP mode 5930).
Cross-reference: Section 5.3 Engine service mode
The Operation panel shows “Replace Maintenance Kit” when the PM counter gets
to 90K. After the user replaces the fusing unit in the maintenance kit, the machine
automatically resets the PM counter.
2.1.1 G112 SERIES (G112/G113 AND G094/G095)
Item Quantity Remarks
Fusing unit 1
Transfer roller 1
Paper feed roller 3 For standard and optional trays
Friction pad 3 For standard and optional trays
Preventive
Maintenance
2.1.2 G116 SERIES (G116 AND G091)
Item Quantity Remarks
Fusing unit 1
Transfer roller 1
Paper feed roller 1 For standard tray
Paper feed roller 2 For optional tray(s)
Friction pad 1 For standard tray
Friction pad 2 For optional tray(s)
SM 2-1 G112/G113/G116/G094/G095/G091

SERVICE MAINTENANCE
2.2 SERVICE MAINTENANCE
The table shows the PM items done by service.
NOTE:
1) To disable the user's PM warning, set meter-charge mode to “ON” in
Printer Engine Service Mode.
2) Make sure to reset the PM counters with engine SP mode 7-804 after
you complete PM.
• 7-804-1: Transfer roller
• 7-804-2: Paper feed roller
• 7-804-3: Fusing unit.
• (G116/G112/G113 only) SP 7804 255: Paper
Symbol key: C: Clean, R: Replace, L: Lubricate, I: Inspect
2.2.1 MAIN UNIT [ALL MODELS]
Item 90K EM Quantity Remarks
Paper Feed
Paper Feed Roller R C 1 Clean with water
Friction Pad R C 1 Clean with water
Registration Roller C C 1 Clean with water
Bottom Plate Pad C C 1 Clean with water
Around the Drum
Transfer Roller R 1
Fusing Unit and Paper Exit
Hot Roller R 1
Pressure Roller R 1
Hot Roller Strippers
R
Fusing Thermistor
Bushings - Hot Roller R 2
Bushings - Pressure Roller R 2
Fusing Entrance and Exit Guide
Plates
R C
C 1 each
G091/G116: 5
G094/G095/
G112/G113: 3
1
Clean with alcohol if
necessary.
Clean with water or
alcohol
2.2.2 PAPER TRAY UNIT [ALL MODELS]
90K EM Quantity NOTE
Paper Feed Roller R C 1 Clean with water
Friction Pad R C 1 Dry cloth
Bottom Plate Pad C C 1 Clean with water
G112/G113/G116/G094/G095/G091 2-2 SM

SERVICE MAINTENANCE
2.2.3 ONE-BIN SHIFT TRAY [G091 ONLY]
90K EM Quantity NOTE
Exit Rollers
Driven Rollers
Transport Rollers
Paper Tray
Tray Paper Sensor
C
C
C
C
C
Clean with water
Clean with water
Clean with water
Clean with water
Clean with water
2.2.4 FOUR-BIN MAILBOX [G091 ONLY]
90K EM Quantity NOTE
Exit Rollers
Driven Rollers
Trays
C
C
C
NOTE: The optional One-Bin Shift Tray and the Four Bin Mailbox units are for the
G091 machine only. [These two options are not supported for the
successor G116 model.]
Clean with water
Clean with water
Clean with water
Preventive
Maintenance
SM 2-3 G112/G113/G116/G094/G095/G091


REPLACEMENT AND ADJUSTMENT


GENERAL
3. REPLACEMENT AND ADJUSTMENT
CAUTION
Turn off the main power switch and unplug the machine before attempting
any of the procedures in this section.
The Replacement and Adjustment procedures in this section are for all models,
unless otherwise specified. Differences are shown with the machine code.
NOTE: This manual uses these symbols.
: See or Refer to : Screws : Connector
3.1 GENERAL
3.1.1 PRECAUTIONS ON DISASSEMBLY [ALL MODELS]
Use extreme caution when removing and replacing components. The cables in the
machine are located very close to moving parts. Proper cable routing is a must.
Before removing any component from the machine, note any cable routings that
may be affected. After components have been removed, any cables that have been
displaced during the procedure must be rerouted as closely as possible to their
original positions.
Before servicing the machine:
1. Verify that documents are not stored in memory.
2. Remove the toner cartridge before you remove parts.
3. Unplug the power cord.
4. Work on a flat and clean surface.
5. Replace with authorized components only.
6. Do not force plastic material components.
Ensure that all components are returned to their original positions, when you have
completed service activity.
Adjustment
Replacement
SM 3-1 G112/G113/G116/G094/G095/G091

GENERAL
Laser unit
1. Do not loosen or adjust the screws securing the LD drive board on the LD unit.
Doing so will throw the LD unit out of adjustment.
2. Do not adjust the variable resistors on the LD unit, as these are permanently
adjusted at the factory. If replacement of the LD drive board is necessary,
replace the entire LD unit.
3. Keep the polygon mirror and toroidal lens free of dust. Laser performance is
very sensitive to dust on these components.
4. Do not touch the shield glass or the surface of the polygon mirror with bare
hands.
5. Do not adjust the Laser Synchronization detector on the LD unit, as these are
permanently adjusted at the factory. If the position of the Laser Synchronization
detector has changed from the factory set position, SC 322 will be shown.
Transfer Roller
1. Never touch the surface of the transfer roller with bare hands.
2. Be careful not to scratch the transfer roller, as the surface is easily damaged.
Fusing
1. After installing the fusing thermistor, make sure that it is in contact with the hot
roller and that the roller can rotate freely.
2. Be careful to avoid damage to the hot roller stripper pawls and their tension
springs.
3. Do not touch the fusing lamp and rollers with bare hands.
4. Make sure that the fusing lamp is positioned correctly and that it does not touch
the inner surface of the hot roller.
Paper Feed
1. Do not touch the surface of paper feed rollers.
2. To avoid misfeeds, the side and end fences in each paper tray must be
positioned correctly so as to align with loaded paper size.
G112/G113/G116/G094/G095/G091 3-2 SM
SPECIAL TOOLS
3.1.2 RELEASING PLASTIC LATCHES [ALL MODELS]
Many of the parts are held in place with plastic latches. The
latches break easily, so release them carefully.
To remove such parts, press the hook end of the latch away from
the part to which it is latched.
G094R513.WMF
3.1.3 AFTER SERVICING THE MACHINE [ALL MODELS]
1. Make sure all parts that require grounding are properly grounded.
2. Make sure the interlock switch is functioning.
3. Do not leave unused parts inside the machine.
4. Do not leave any tools inside the machine.
5. Make sure all wires are properly connected and routed.
6. Make sure wires are not jammed between parts of the machine.
7. Print a configuration sheet to verify machine operation. (See Printer Reference
Guide for procedure.)
3.2 SPECIAL TOOLS
Part Number Description Q’ty Remarks
N8036701 Flash Memory (PCMCIA) Card - 4MB 1
N8031000 Flash Memory (PCMCIA) Card Case 1
B6456700 PCMCIA Card Adapter 1
A0069104 Scanner Positioning Pin (4 pieces/set) 1
B6455010 SD Card Kit (64MB) 1
B6456800 USB Reader/Writer 1
G0219350 Loop Back Connector 1 Used in common with other printers.
Used in common with other printers.
(Use with G094/G095/G091)
Used in common with other printers.
(Use with G094/G095/G091)
Used to allow SD card download/
upload via a PCMCIA card slot.
(Use with G112/G113/G116)
Used for LD Unit positioning. Used
in common with the G073 series
and other models.
Used for service activities (firmware
update, etc.). (Use with G112/G113/
G116)
For use with SD Card Kit (Use with
G112/G113/G116)
Adjustment
Replacement
SM 3-3 G112/G113/G116/G094/G095/G091

COVERS
3.3 COVERS
3.3.1 FRONT COVER [ALL MODELS]
To open the front cover, gently push the
cover inward (2 hooks).
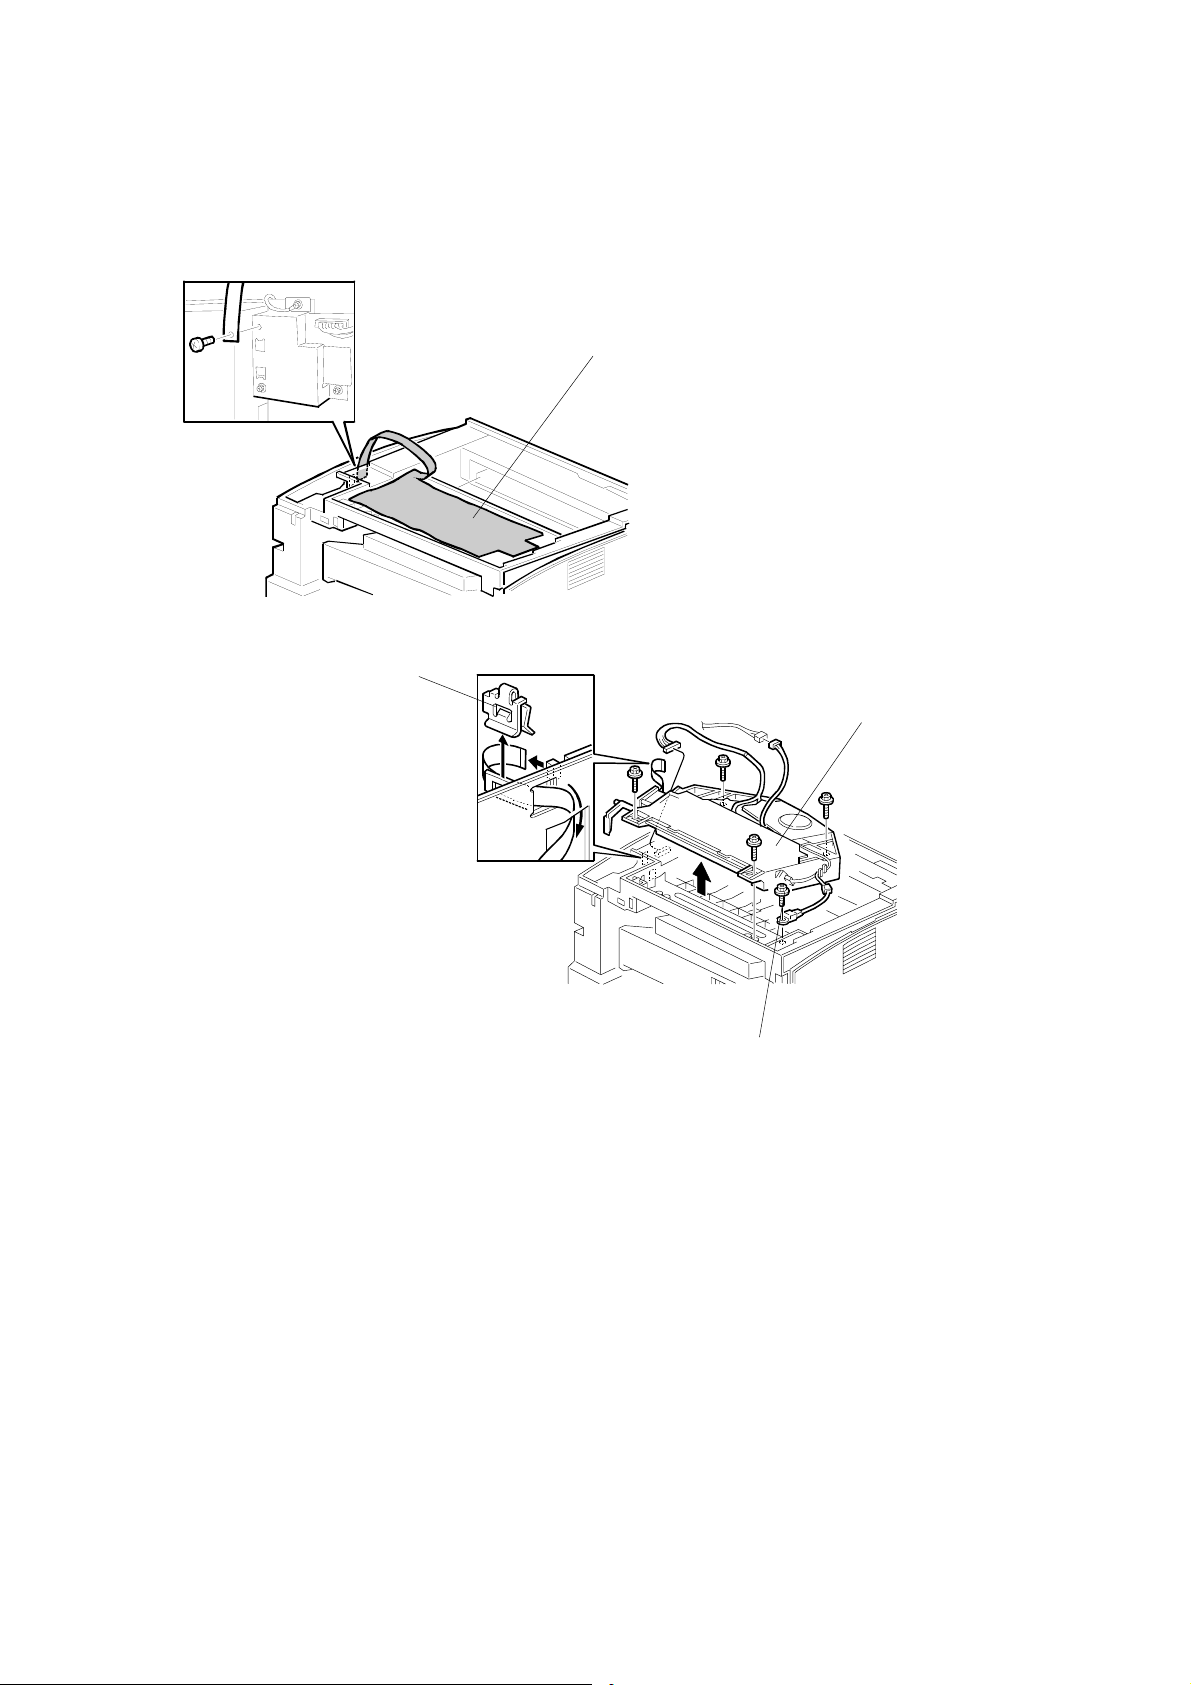
3.3.2 UPPER COVER [G112 SERIES]
NOTE: Remove the exit guide plate
after you have removed the
upper cover.
[A]
G094R514.WMF
[B]
[C]
Open the front cover and rear cover
(3 clamps, 2 harnesses). Then
remove the AIO.
[A]: Operation panel (2 hooks)
[B]: Open the exit guide plate
[C]: Upper cover ( x 4)
NOTE: Remove the exit guide plate
after you have removed the
upper cover.
G094R201.WMF
G112/G113/G116/G094/G095/G091 3-4 SM

COVERS
3.3.3 UPPER COVER [G116 SERIES]
Open the front cover and rear cover
(3 clamps, 2 harnesses). Then
[A]
remove the AIO.
[A]: Operation panel (2 hooks)
[B]: Upper exit cover
[C]: Open the exit guide plate.
[D]: Upper cover ( x4)
3.3.4 BY-PASS TRAY UNIT [ALL MODELS]
[D]
[B]
[C]
G091R201.WMF
Adjustment
Replacement
NOTE: Remove the by-pass tray unit before removing the exterior covers.
[A]: By-pass tray unit (2 hooks)
[A]
G094R006.WMF
SM 3-5 G112/G113/G116/G094/G095/G091

COVERS
3.3.5 EXTERIOR COVERS [G112 SERIES]
NOTE: Pull out the standard paper tray before removing the front cover.
To remove the left or right cover, separate the machine from the optional paper tray
unit first.
[B]
[A]
G094R515.WMF
[A]: Left cover ( x 2)
[B]: Front cover (3 clamps, x 2)
G094R001.WMF
[C]: Right cover (3 hooks, 1 fan cover)
3.3.6 EXTERIOR COVERS [G116 SERIES]
NOTE: Pull out the standard paper tray before removing the front cover.
[A]
G091R702.WMF
To remove the left or right cover, separate the machine from the optional paper
tray unit first.
[B]
G091R703.WMF
[C]
[C]
Open the front cover.
[A]: Left cover ( x 2)
[B]: Front Cover (3 clamps, x 2)
[C]: Right cover (3 hooks)
G112/G113/G116/G094/G095/G091 3-6 SM

LASER UNIT
3.4 LASER UNIT
WARNING
Turn off the main power switch and unplug the machine before attempting
any of the procedures in this section. Laser beams can cause serious eye
damage.
3.4.1 CAUTION DECAL LOCATIONS [ALL MODELS]
G094R516.WMF
Adjustment
Replacement
G094R517.WMF
SM 3-7 G112/G113/G116/G094/G095/G091

LASER UNIT
3.4.2 POLYGON MIRROR MOTOR [ALL MODELS]
WARNING
Turn off the main switch and unplug the machine before attempting any of
the procedures in this section. Laser beams can seriously damage your
eyes.
NOTE: Do not touch the surface of the mirror with bare hands.
Operation panel ( 3.3.2)
Upper cover ([G094/G095] 3.3.2,
[G091] 3.3.3)
[A]: Polygon mirror cover ( x 2)
[B]: Polygon mirror motor ( x 4,
x 1)
[A]
[B]
G094R518.WMF
3.4.3 LASER SYNCHRONIZATION DETECTOR [ALL MODELS]
Operation panel ( 3.3.2)
Upper cover ([G094/G095] 3.3.2,
[G091] 3.3.3)
By-pass tray unit ( 3.3.4)
Exterior covers ([G094/G095] 3.3.5,
[G091] 3.3.6)
[A]: Laser synchronization detector
( x 1)
[A]
G094R519.WMF
G112/G113/G116/G094/G095/G091 3-8 SM

LASER UNIT
3.4.4 LASER UNIT [G112 SERIES]
Upper cover ([G112 Series] 3.3.2, [G116 Series] 3.3.3)
Exterior covers ([G112 Series] 3.3.5, [G116 Series] 3.3.6)
[A]: Clip
[B]: Laser unit ( x 4, 1 flat cable, x
2)
When reinstalling the laser unit.
Use the scanner positioning pins
(P/N: A0069104) to reinstall the
unit.
[C]: Set the positioning pins as
shown above. Then secure the
laser unit.
[A]
[C]
[B]
Adjustment
Replacement
SM 3-9 G112/G113/G116/G094/G095/G091
G094R521.WMF
LASER UNIT
3.4.5 LASER UNIT [G116 SERIES]
[A]
G091R730.WMF
[C]
Operation panel ( 3.2 Exterior Covers)
Upper cover ( 3.2 Exterior Covers)
Left cover ( 3.2 Exterior Covers)
[A]: 230V machine only: Sheet ( x 1)
[B]: Thermistor ( x 1)
[C]: Clip
[D]: Laser unit ( x 4, 1 flat cable, x 2)
[D]
[B]
G091R203.WMF
G112/G113/G116/G094/G095/G091 3-10 SM

LASER UNIT
When reinstalling the laser unit
Use the scanner positioning pin (P/N: A0069104) to reinstall the unit.
[E]
G091R208.WMF
[E]: Set the positioning pins as shown above. Then secure the laser unit.
Adjustment
Replacement
SM 3-11 G112/G113/G116/G094/G095/G091
LASER UNIT
3.4.6 LASER DIODE UNIT [ALL MODELS]
[C]
[a]
[D]
G094R522.WMF
Laser Unit ( 3.4.4)
[A]: Spring
[B]: LD unit holders (x 2)
[C]: Loosen the screw ( NOTE 1 below)
[D]: Nut
[E]: LD unit
NOTE:
1) Do not remove the screws that secure the LD board.
2) Do not touch any variable resistors on the LD board.
[A]
[B]
[E]
When re-installing the LD unit:
Tighten the screw [C] until the unpainted portion of the screw [a] is not visible.
After installing the LD unit, perform the Laser Beam Pitch Adjustment ( 3.4.7).
G112/G113/G116/G094/G095/G091 3-12 SM
LASER UNIT
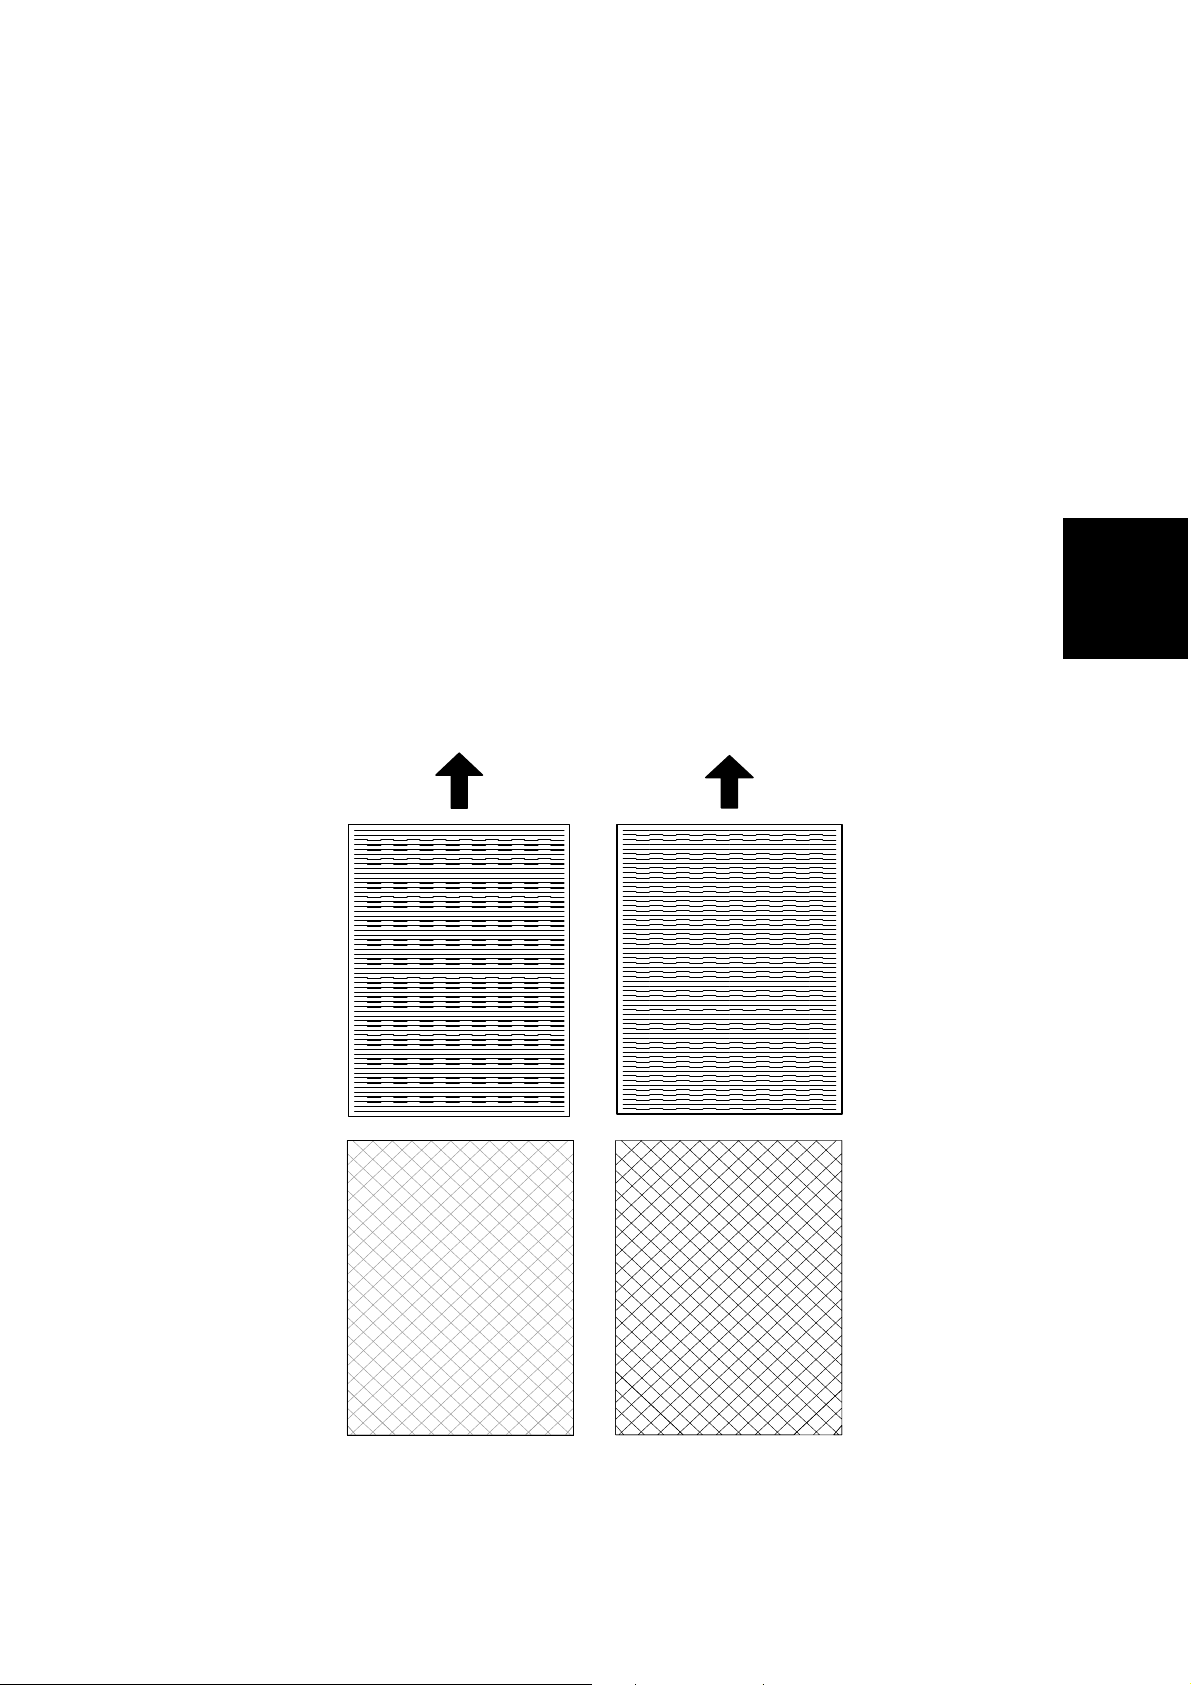
3.4.7 LASER BEAM PITCH ADJUSTMENT [ALL MODELS]
1. Print out the following test patterns – cross-stitch pattern and two-dot argyle
pattern.
• Select the test pattern with SP 2902.
• After selecting a pattern, the display automatically goes to SP 5902. Use SP
5902-1 to print one test pattern.
• After completing the adjustment, reset SP 2902 to ‘no specified’.
2. Check these test patterns. If the laser beam pitch is not correct, the images are
as follows.
• Cross-stitch pattern: Vertical black strips seem to appear.
• Argyle pattern: The density of the diagonal lines is light or the lines have
disappeared.
3. Adjust the LD unit holder position: Tighten or loosen the screw [C] (see the
previous page) until the printout appears as follows.
• Cross-stitch pattern: The thin lines are of uniform thickness (no striping effect
should appear on the printout).
• Grid pattern: The diagonal lines appear clearly and are of normal density.
Adjustment
Replacement
G094R523.WMF
SM 3-13 G112/G113/G116/G094/G095/G091
Adjustment not complete
Adjustment complete

TRANSFER ROLLER [ALL MODELS]
3.5 TRANSFER ROLLER [ALL MODELS]
NOTE: Do not touch the transfer roller surface.
Remove the AIO cartridge before removing the transfer roller
[A]: Transfer roller
[A]
3.6 TONER END SENSOR [ALL MODELS]
Remove the AIO cartridge before removing the transfer roller
[A]: Toner end sensor (4 hooks,
x 1)
[A]
G094R524.WMF
G094R525.WMF
G112/G113/G116/G094/G095/G091 3-14 SM

FUSING
3.7 FUSING
CAUTION
Allow time for the unit to cool before doing the following procedure.
3.7.1 FUSING UNIT [ALL MODELS]
NOTE: Lift both hooks before attempting to remove the fusing unit from the
machine.
[A]: Rear cover
[B]: Fusing unit (2 hooks [C])
[B]
[C]
[A]
Adjustment
Replacement
G094R007.WMF
SM 3-15 G112/G113/G116/G094/G095/G091
FUSING
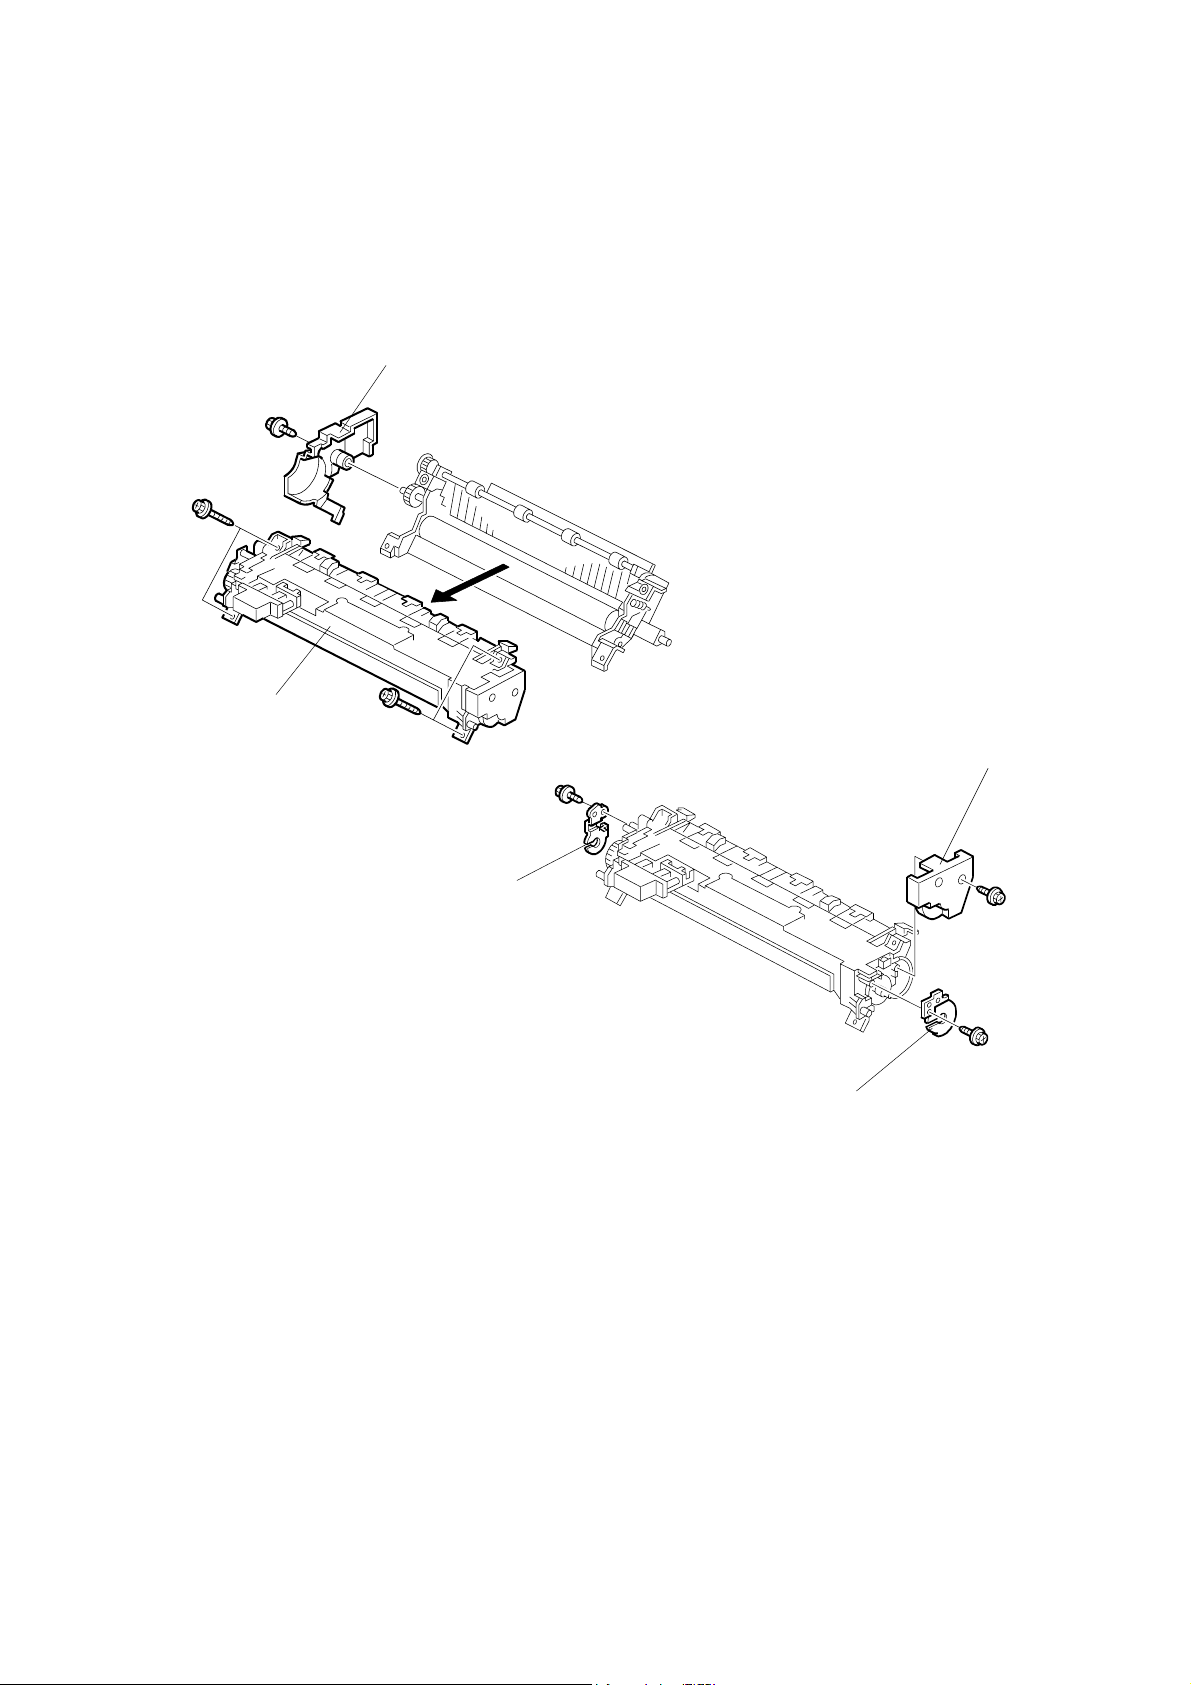
3.7.2 HOT ROLLER AND FUSING LAMP [ALL MODELS]
NOTE:
1) Remove both springs before taking apart the fusing unit assembly. This
will relieve pressure on the unit.
2) When reinstalling the fusing unit assembly, install both springs last. This
will reset the springs back to their default position.
[A]
[B]
G094R008.WMF
[C]
[D]
Fusing Unit ( 3.7.1)
[A]: Left cover ( x 1)
[B]: Upper fusing unit assembly ( x 4, 2 springs)
[C]: Right cover ( x 1)
[D]: Lamp holders ( x 1 each)
(Procedure continued on next page)
G094R009.WMF
[D]
G112/G113/G116/G094/G095/G091 3-16 SM

FUSING
3.7.2 Hot Roller and Fusing Lamp continued
NOTE:
1) Take the gear and the pin off first, before removing the hot roller
from the unit.
2) Use a small screwdriver to separate the guide plate from the unit.
3) Before installing the new hot roller, peel off 3 cm (1 inch) from both
ends of the protective sheet on the new hot roller. Make sure to
remove the rest of the paper before starting the machine.
Adjustment
Replacement
[E]
G094R526.WMF
[E]: Fusing Lamp ( x 2)
NOTE: The colored cable must be at the hot roller gear side.
[F]: Guide plate (3 hooks)
[G]: Hot roller strippers (1 spring each)
[H]: Hot roller (2 C-rings, 1 gear, 2 bushings)
[H]
[F]
[G]
G094R003.WMF
SM 3-17 G112/G113/G116/G094/G095/G091

FUSING
3.7.3 PRESSURE ROLLER [ALL MODELS]
[D]
[C]
[B]
[A]
Fusing Unit ( 3.7.1)
Hot roller and fusing lamp ( 3.7.2)
[A]: Pressure roller
[B]: Bushing
[C]: Pressure roller lever
[D]: Spring
[D]
[C]
G094R012.WMF
[B]
G112/G113/G116/G094/G095/G091 3-18 SM
FUSING
3.7.4 THERMISTOR AND THERMOSTAT [ALL MODELS]
[E]
[C]
[D]
[B]
[A]
Adjustment
Replacement
G094R011.WMF
Hot roller and fusing lamp ( 3.7.2)
[A]: Wire cover ( x 1)
[B]: Grounding plate ( x 2, 1 wire)
[C]: Fusing unit connector ( x 6, x 1, 2 hooks)
[D]: Thermistor ( x 1, 1 harness)
[E]: Thermostat ( x 1)
NOTE:
1) When removing the thermistor, remove the entire unit first and then
separate it into two parts.
2) Do not touch the thermostat with your hands.
SM 3-19 G112/G113/G116/G094/G095/G091

FUSING
3.7.5 HOT ROLLER STRIPPERS [G112 SERIES]
[A]
G094R003.WMF
Hot roller and fusing lamp ( 3.7.2)
NOTE: Extra Hot Roller Strippers
1) Two extra hot roller strippers [A] are available for this machine. These
are used to provide a better grip for narrower paper. This helps prevent
paper from curling around the hot roller.
2) When installing the 2 extra hot roller strippers, insert them in the two
slots using a small pair of pliers until they snap into place.
G112/G113/G116/G094/G095/G091 3-20 SM

FUSING
3.7.6 HOT ROLLER STRIPPERS [G116 SERIES]
[A]
[B]
G091R510.WMF
Adjustment
Replacement
[C]
G091R505.WMF
[A]: Guide plate (3 hooks)
[B]: Hot roller strippers (1 spring each)
[C]: Hot roller (2 C-rings, 1 gear, 2 bushings).
NOTE: Before installing the new hot roller, peel off 3 cm (1 inch) from both ends of
the protective sheet on the new roller. Also, remove the rest of the paper
before starting the machine.
SM 3-21 G112/G113/G116/G094/G095/G091

PAPER FEED
3.8 PAPER FEED
3.8.1 PAPER FEED ROLLER [ALL MODELS]
NOTE: Pull out the paper tray before removing the paper feed roller.
[A]: Paper feed roller
3.8.2 FRICTION PAD [ALL MODELS]
[A]
G094R002.WMF
NOTE: Remove the paper tray unit from the machine before removing the friction
pad.
[A]: Friction pad (2 hooks, 1 spring)
[A]
When reinstalling the friction pad
follow this order
1. Replace the spring.
2. Insert the right side of the friction
pad first followed by the left side.
3. Gently push the friction pad
down into the slot and then pull
forward very slightly.
G094R010.WMF
G112/G113/G116/G094/G095/G091 3-22 SM

BY-PASS TRAY
3.9 BY-PASS TRAY
3.9.1 BY-PASS TRAY UNIT AND BY-PASS FEED ROLLER
[ALL MODELS]
[A]
[B]
[C]
G094R527.WMF
[E]
Left cover ([G112 Series] 3.3.5, [G116 Series] 3.3.6)
Front cover ([G112 Series] 3.3.5, [G116 Series] 3.3.6)
Remove the AIO
[A]: Paper guide ( x 2)
[B]: Actuator
[C]: Solenoid ( x 1)
[D]: By-pass feed roller
[E]: Gear (1 hook)
When reinstalling the paper guide.
1. Set the paper guide on the bushing.
2. Install the right side of the actuator on the paper guide.
3. Install the left side of the actuator in the machine.
[D]
G094R528.WMF
Adjustment
Replacement
4. Install the paper guide.
5. Check that the actuator moves smoothly and swings freely.
SM 3-23 G112/G113/G116/G094/G095/G091

PRINTER CONTROLLER BOARD [ALL MODELS]
3.10 PRINTER CONTROLLER BOARD [ALL MODELS]
The board for the G112/G094 is different from the board for the G113/G095. Make
sure to install the correct board.
NOTE:
1) Remove the Duplex Unit before
you remove the controller
board. [G116/G091 machine
only]
2) The screws on the printer
controller board are hand
screws. Gently turn these
screws when removing the
printer control board.
3) Pull on the handle to remove
the printer controller board from
the machine.
[A]: Printer controller board ( x 2)
[B]: NVRAM
NOTE: Remove the NVRAM from the
old printer controller board
and insert it on the new board.
[A]
G094R005.WMF
[B]
G112/G113/G116/G094/G095/G091 3-24 SM

ENGINE BOARD [ALL MODELS]
3.11 ENGINE BOARD [ALL MODELS]
[B]
[C]
Adjustment
[A]
Replacement
G094R529.WMF
[D]
Left cover ([G112 Series] 3.3.5, [G116 Series] 3.3.6)
Printer controller board ( 3.10)
[A]: Bracket ( x 7, 1 grounding wire)
NOTE: Be careful not to damage the flat cable.
[B]: Clip
[C]: Engine board ( x 4, all connectors)
NOTE: Remove the NVRAM [D] from the old engine board and insert it on the
new board.
SM 3-25 G112/G113/G116/G094/G095/G091
MAIN MOTOR [ALL MODELS]
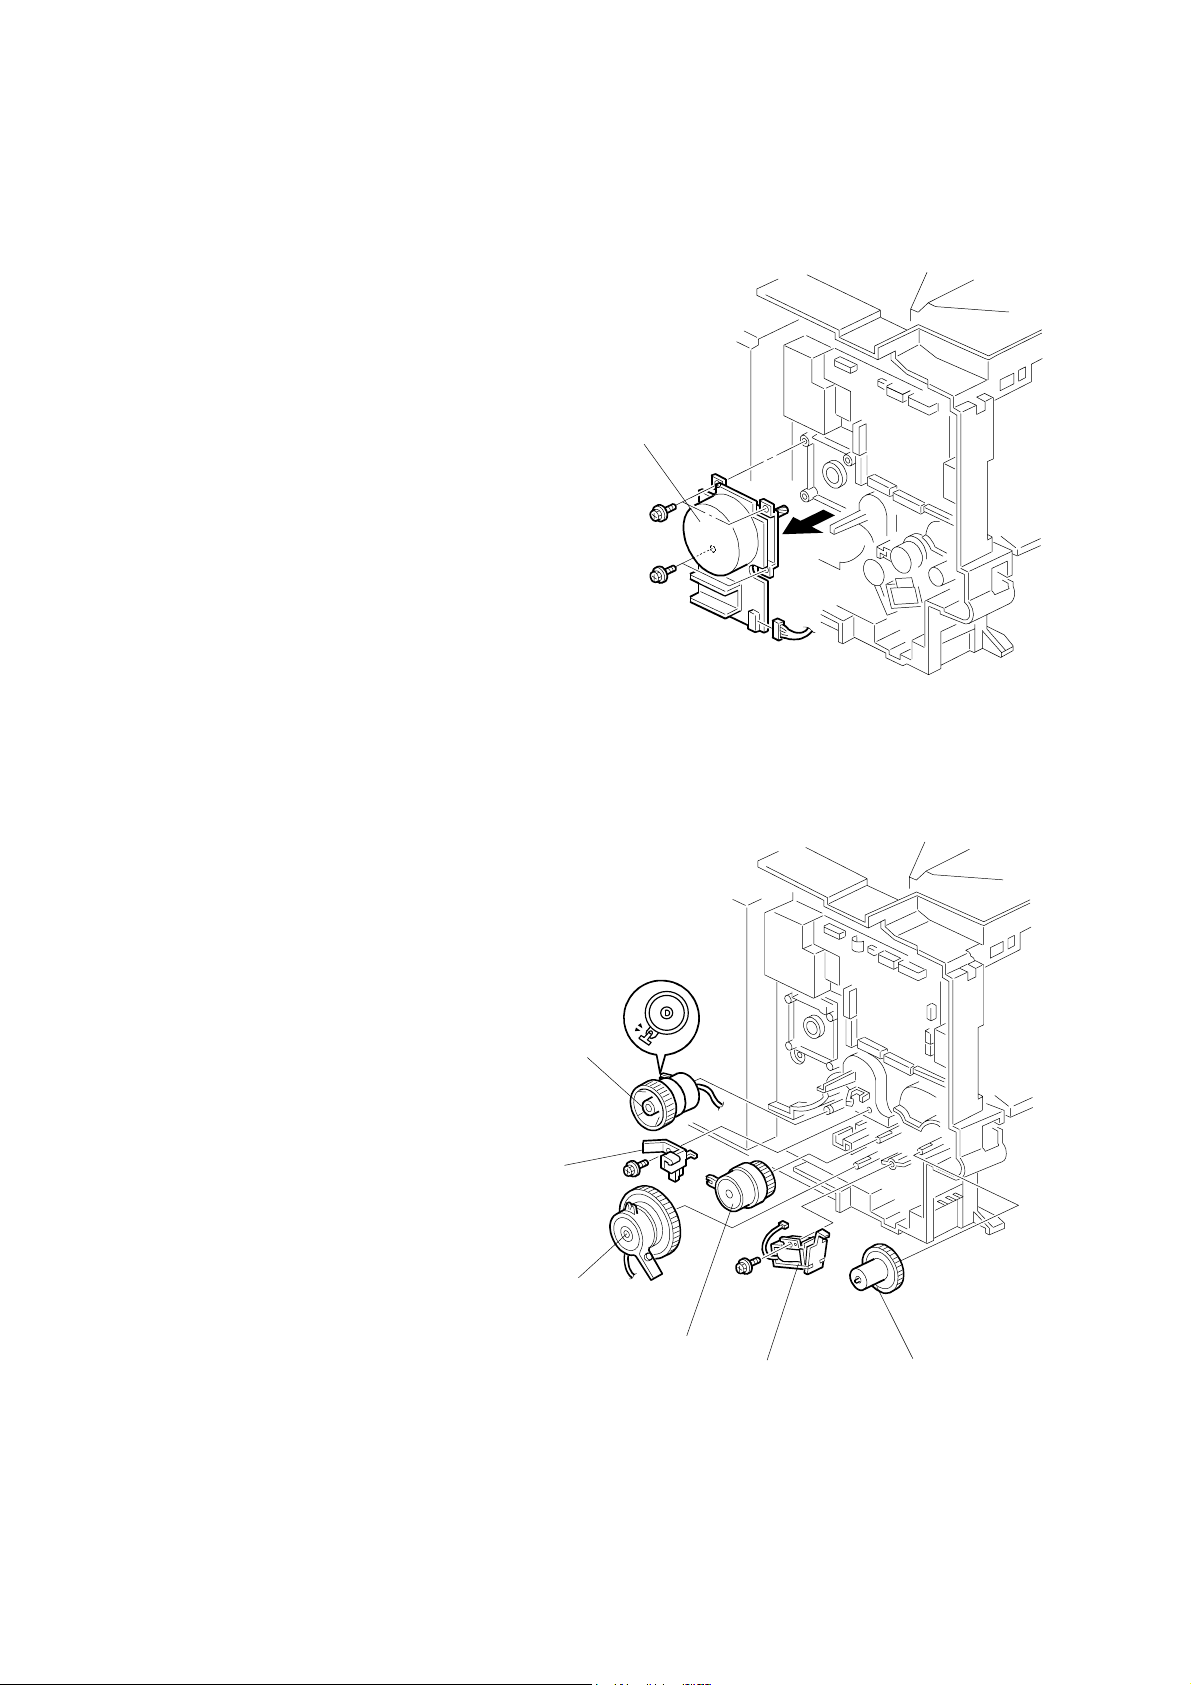
3.12 MAIN MOTOR [ALL MODELS]
Left cover ([G112 Series] 3.3.5, [G116
Series] 3.3.6)
[A]: Main motor ( x 4, x 1)
[A]
G094R530.WMF
3.13 SOLENOIDS AND CLUTCHES [ALL MODELS]
Left cover ([G094/G095] 3.3.5, [G091]
3.3.6)
[A]: By-pass feed solenoid
( x 1, x 1)
[B]: Gear (1 hook)
[C]: Stopper ( x 1)
[D]: Relay clutch ( x 1 x 1)
[E]: Paper feed clutch ( x 1)
Main motor ( 3.12)
[F]: Registration clutch
( x 1 x 1)
[F]
[C]
[E]
G094R531.WMF
[D]
[A]
G112/G113/G116/G094/G095/G091 3-26 SM
[B]

POWER SUPPLY BOARD AND HIGH VOLTAGE SUPPLY BOARD
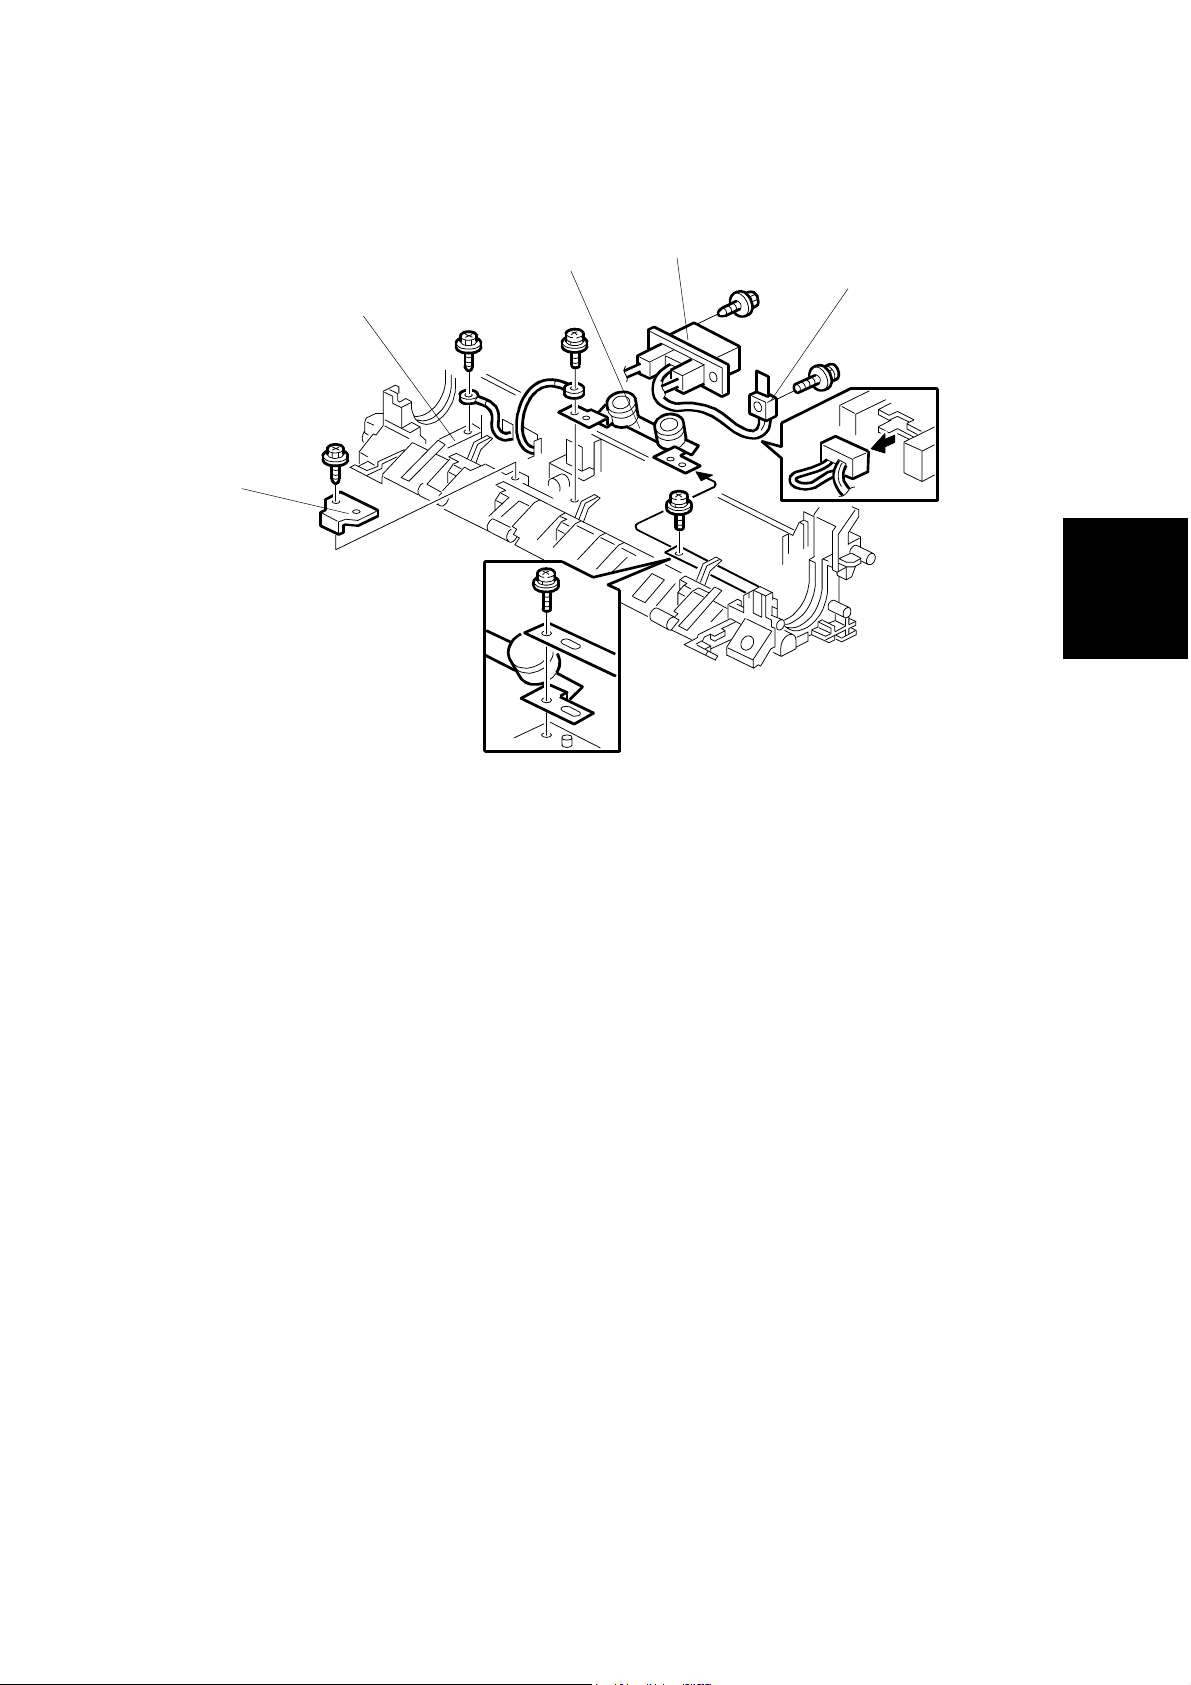
3.14 POWER SUPPLY BOARD AND HIGH VOLTAGE
SUPPLY BOARD
[ALL MODELS]
[A]
[B]
G094R004.WMF
[D]
Adjustment
Replacement
[C]
[E]
G094R532.WMF
Left cover ([G112 Series] 3.3.5, [G116 Series] 3.3.6)
Fusing unit ( 3.7.1)
[A]: PSU cover ( x 2)
[B]: PSU assembly ( x 7, all connectors)
[C]: High voltage supply board ( x 4)
[D]: 230-volt machine only: Choke coil ( x 2 x 1)
[E]: PSU ( x 5)
SM 3-27 G112/G113/G116/G094/G095/G091

COOLING FAN [ALL MODELS]
3.15 COOLING FAN [ALL MODELS]
NOTE: The cooling fan must be reinstalled to the original position. Do not reinstall
the cooling fan opposite to the original position.
Right cover ([G112 Series] 3.3.5, [G116 Series] 3.3.6)
[A]
[A]: Cooling fan ( x 1, x1)
G094R501.WMF
G112/G113/G116/G094/G095/G091 3-28 SM
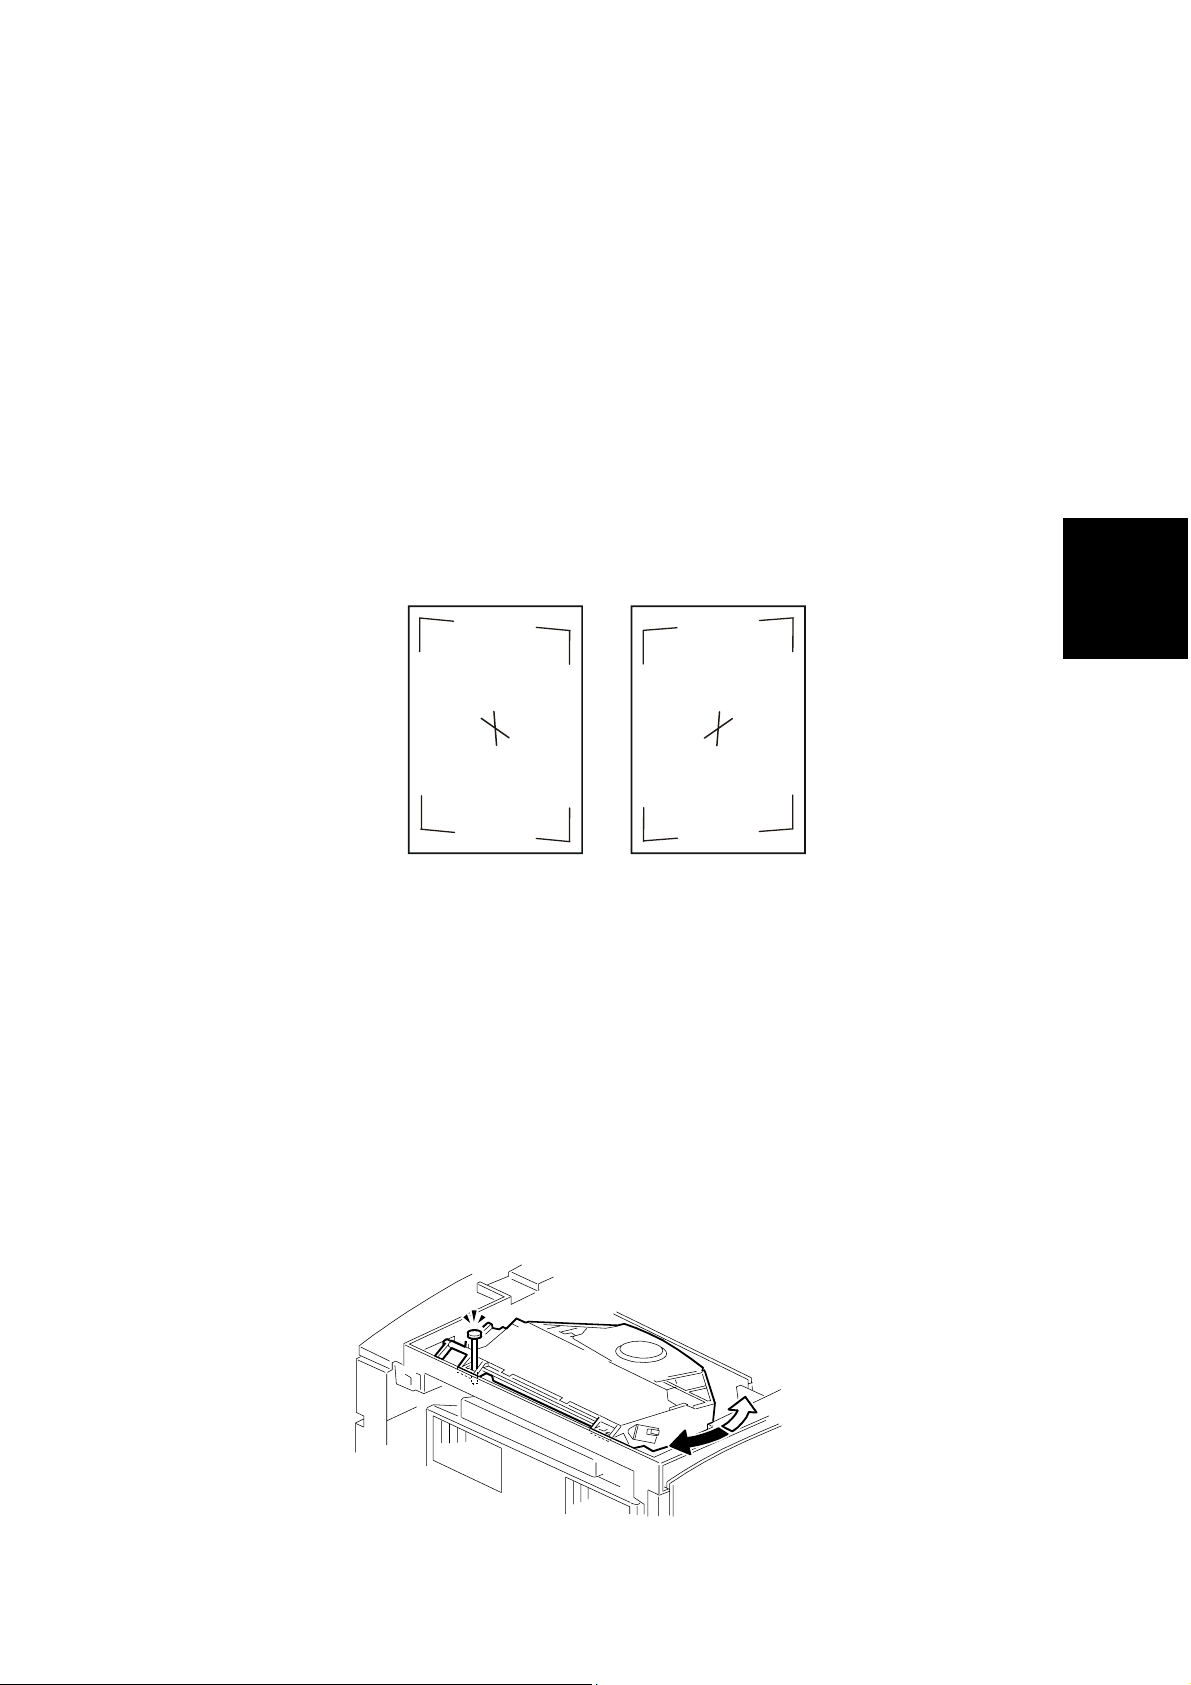
IMAGE ADJUSTMENT
3.16 IMAGE ADJUSTMENT
3.16.1 REGISTRATION ADJUSTMENT [ALL MODELS]
The image registration is adjusted using the User Program Mode menu
“Maintenance-Registration”. See the Printer Reference guide, “Making Printer
Settings with the Control Panel-Maintenance Menu” for more details.
3.16.2 PARALELLOGRAM IMAGE ADJUSTMENT
[ALL MODELS]
If a parallelogram image (see example below) is printed while adjusting printing
registration, use the following procedure.
Examples of parallelogram images
Adjustment
Replacement
(a)
(b)
NOTE: Use the scanner positioning pin (P/N: A0069104) for the adjustment.
1. Remove the upper cover ([G112 Series] 3.3.2, [G116 Series] 3.3.3)
2. Put the positioning pin into one of the two positioning holes on the laser unit,
depending upon the image adjustment required.
3. Loosen the four screws and move the laser unit.
4. Tighten the laser unit.
5. Print the trimming area pattern to check the image alignment. If a parallelogram
still exists, repeat steps 3 to 5 until image squareness is achieved. (If you
cannot achieve image squareness using one positioning hole, try repeating this
procedure using the other positioning hole.)
G094R533.WMF
SM 3-29 G112/G113/G116/G094/G095/G091


TROUBLESHOOTING


SERVICE CALL CONDITIONS
4. TROUBLESHOOTING
4.1 SERVICE CALL CONDITIONS
NOTE: SC codes that are not the same for all models are shown in the left side
margin. If no model-specific identifier is present in the left side margin,
assume that code applies to all models.
4.1.1 SUMMARY
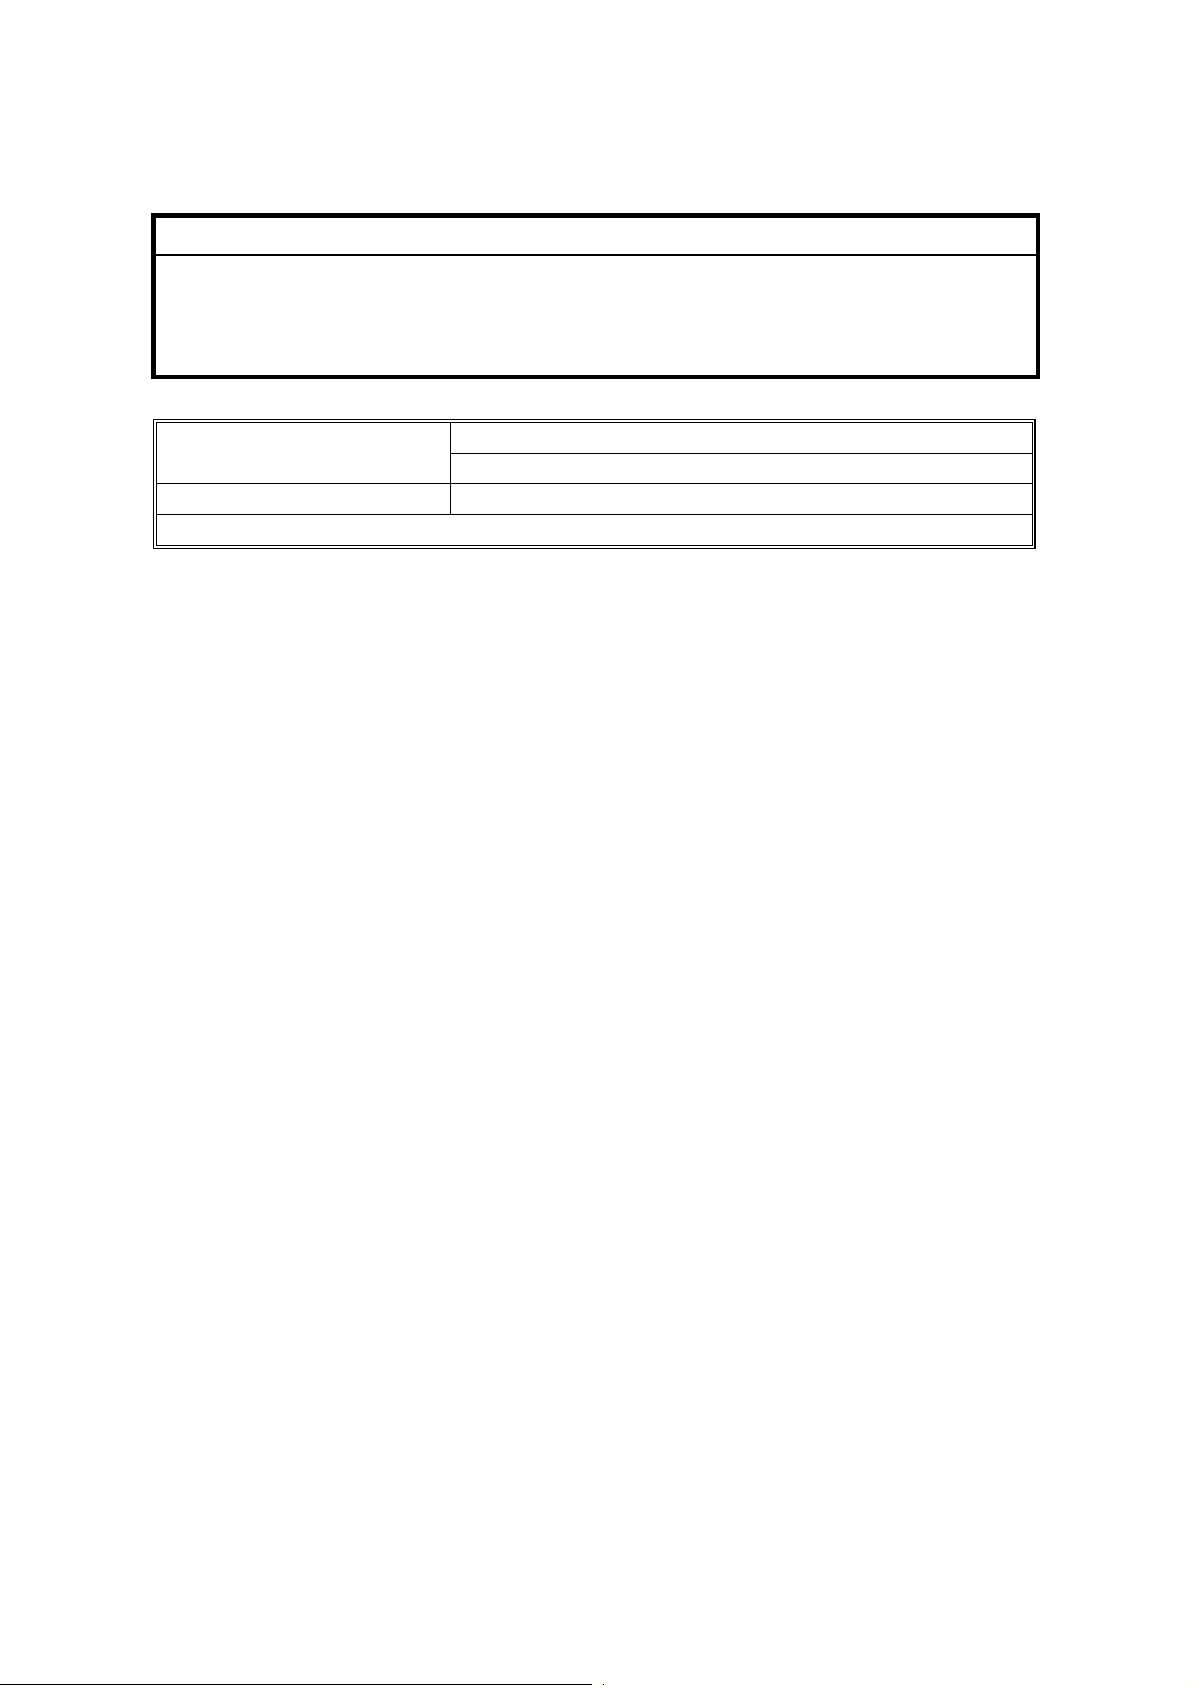
There are 2 levels of service call conditions.
Level Definition Reset Procedure
A
B
Only a service representative can reset
this SC. This will prevent damage to the
machine.
The machine cannot be used.
The SC can be reset by turning the
operation switch off and on (if the SC was
caused by a sensor error).
Enter engine SP mode 5810
and press “#”. When ‘execute’
is displayed, press “#” again.
Then press ‘Escape’. Then
turn the main power off/on.
Switch the main power off and
on.
NOTE:
1) If the problem is with electrical circuit boards,disconnect the connectors
first. Then reconnect the connectors before you replace the PCBs.
2) If the problem is with a motor lock, first examine the mechanical load.
Then replace motors or sensors.
Trouble-
shooting
SM 4-1 G112/G113/G116/G094/G095/G091
SERVICE CALL CONDITIONS
4.1.2 SC CODE DESCRIPTIONS
Code No. Symptom Possible Cause
541 A
Charge roller current leak 302 B
A charge roller current leak signal is
detected.
Polygon motor error 320 B
The polygon motor does not reach its
operating speed within 10 seconds
after the polygon motor on signal, or
the lock signal is not detected for
more than a certain time during
operation.
1st laser synchronization error 322 B
The laser synchronization detector
cannot detect the laser
synchronization signal for more than
5 consecutive 100 ms intervals.
LD drive current exceeded 323 B
The LD driver detects this error for
more than 500 ms.
2nd laser synchronization error 326 B
st
The 1
LD1 is already on, but the
laser synchronization detector cannot
detect the laser synchronization
signal from the 2
nd
LD for more than 5
consecutive 100 ms intervals.
Development bias leak 391 B
A development bias leak signal is
detected.
Main motor lock 500 B
A main motor lock signal is not
detected for more than 700 ms after
the main motor starts to rotate, or the
lock signal is not detected for more
than a certain time during rotation
after the last signal.
Unstable fusing temperature
During warm-up, the fusing
temperature rises by less than 20 °C
during 11 seconds.
The fusing temperature detected by
the thermistor was 0 °C 5 seconds
after the fusing relay was turned on.
• Cartridge (charge roller) defective
• High voltage supply board
defective
• Defective cartridge connection
• Polygon motor
• Polygon motor cable
• Laser synchronization detector
board out of position
• Laser synchronization detector
board or cable defective
• Laser synchronization mirror out of
position
• LD unit defective
• Engine board defective
• LD unit defective
• Laser synchronization detector
board out of position
• LD unit defective
• Engine board defective
• High voltage supply board
defective
• Defective cartridge connection
• Main motor defective
• Too much load on the drive
mechanism
• Thermistor defective
• Fusing lamp open
• Fusing thermostat open
• Power supply board defective
• Defective connection of the fusing
unit
G112/G113/G116/G094/G095/G091 4-2 SM
SERVICE CALL CONDITIONS
Code No. Symptom Possible Cause
Fusing temperature warm-up error 542 A
The fusing temperature does not
reach more than 80 °C 17.5 seconds
after the main switch is turned on.
• Thermistor defective
• Fusing lamp open
• Fusing thermostat open
• Power supply board Defective
• Defective connection of the fusing
unit
543 A
Fusing overheat error
A fusing temperature of over 245 °C
is detected for 1 second by the fusing
• Fusing thermistor defective
• Power supply board defective
thermistor.
A fusing temperature of over 235 °C
is detected for 1 second after the
fusing lamp has been turned off.
The dual monitoring circuitry of the
BICU detects extremely high
temperature and tripped the relay
circuit off.
544
G091
Only
A
Fusing overheat error (hardware
circuit detection)
The dual monitoring circuitry of the
BICU detects extremely high
• Power supply unit defective
• I/O board (IOB) defective
• BICU defective
• Fusing thermistor defective
temperature and tripped the relay
circuit off.
546 A
Fusing lamp stays on 545 A
The fusing lamp stays on more than
12 seconds after the main motor has
been turned off.
Unstable fusing temperature
During standby, within 500 ms, the
fusing temperature goes below 60 °C
twice or over 60 °C three times.
Within 1 minute, a 60 °C increase or
• Fusing thermistor defective
• Power supply board defective
• Defective connection of the fusing
unit
• Fusing thermistor defective
• Power supply board defective
• Defective connection of the fusing
unit
decrease in fusing temperature is
detected during five different onesecond intervals.
590
G112
G113
G094
G095
Zero cross signal malfunction 547 B
Zero cross signals are not detected
within 5 seconds.
B
Fusing fan motor error
The CPU detects an exhaust fan lock
signal for more than 3.5 seconds.
The engine board cannot
communicate with the duplex unit.
• Power supply board defective
• Defective mains power supply
condition
• Poor connection of the exhaust fan
motor
• Too much load on the motor drive
Only
Communication error - duplex unit 610 B
The engine board cannot
communicate with the duplex unit.
• Defective connection between
engine board and duplex unit
• Engine board defective
• Duplex control board defective
Trouble-
shooting
SM 4-3 G112/G113/G116/G094/G095/G091

SERVICE CALL CONDITIONS
Code No. Symptom Possible Cause
Communication error - GAVD 650 B
• The engine board detects an
unknown device on the I
2
C I/F
• Engine board defective
bus (internal bus on the engine
control board).
2
• The engine board detects an I
C
I/F bus error.
651 B
Communication error - FCI
• Engine board defective
• The engine board detects an
unknown device on the IC I/F bus
(internal bus on the engine control
board).
• The engine board detects an IC I/F
bus error.
Tray shift did not finish within a
certain time after the shift motor
turned on.
The IPU does not respond with the
settings required to start memory
image processing.
Shift tray motor error 726
G091
only
B
Tray shift did not finish within a
certain time after the shift motor
• Shift motor defective
• Shift tray: Left shift sensor or right
shift sensor defective
turned on.
G112/G113/G116/G094/G095/G091 4-4 SM

CONTROLLER ERROR
4.2 CONTROLLER ERROR
The following table describes the controller error codes. These codes are displayed
at power-on, or after the power-on self test, if an error occurs.
Code Description Required Action
640
641
670 Engine response error
671
800 Video data error
818 System timeout error
819 Kernal end error
820 Controller CPU error
821 CPU and ASIC timer error
822 HDD timeout error
823 NIB self test error
824 NVRAM error
827 SDRAM error
828 Flash ROM error
829 Optional RAM error
835 Parallel interface error
836 Font ROM error
837 Optional font ROM error
838 Clock generator error
Engine to controller
communication error.
Engine to controller
communication error (no
answer).
Controller-to-operation panel
communication error at startup
• Examine the connection between the
controller and the engine board.
• Replace the engine board if the error is
frequent.
• Replace the controller if the error is frequent.
• Examine the connection between the
controller and the engine board.
• Replace the engine board if the error is
frequent.
• Engine board installed incorrectly
• Engine board defective
• Controller board defective
• Controller stalled
• Controller board installed incorrectly
• Controller board defective
• Operation panel connector loose or defective
• Examine the connection between the
controller and the engine board.
• Replace the engine board if the error is
frequent.
• Defective controller
• Replace the controller if it occurs frequently.
• HDD error
• Software application error
• RAM shortage
• Replace the controller if the error is frequent.
• Turn off the machine and turn it back on.
• Replace the controller if the error is frequent.
• Examine the connection between the HDD
and the controller
• Replace the HDD if the error is frequent.
• Turn off the machine and turn it back on.
• Examine the connection between the NIB
and the controller.
• Replace the NIB if the error is frequent.
• Replace the NVRAM if the error is frequent.
• Replace the controller if the error is frequent.
• Replace the controller if the error is frequent.
• Examine the connection of the optional
memory.
• Replace the optional memory if the error is
frequent.
• Replace the controller if the error is frequent.
• Not used for this model.
• Not used for this model.
• Replace the controller if the error is frequent.
Trouble-
shooting
SM 4-5 G112/G113/G116/G094/G095/G091

CONTROLLER ERROR
Code Description Required Action
850 NIB interface error
851 IEEE1394 interface error
853
Wireless LAN Error: Card Error 1
• Replace the controller if the error is frequent.
• Replace the controller if the error is frequent.
• Wireless LAN card not inserted into the
wireless LAN board
854
855
Wireless LAN Error: Card Error 2
Wireless LAN Error: Card Error 3
• Wireless LAN card has been removed
• Wireless LAN card defective
• Wireless card connection not tight
856
Wireless LAN Error 4: Board
• Wireless LAN card board defective
• PCI connector loose
857 USB I/F Error
• The USB driver can generate three types of
errors: RX, CRC, and STALL errors. Only the
STALL error can generate this SC code.
• Defective controller board
860
G116
G091
Only
862 HDD damaged cluster error
HDD start-up error
• Turn off the machine and turn it back on.
• Examine the connection between the HDD
and the controller.
• Replace the HDD if the error is frequent.
• Replace the HDD if the error is frequent.
863 HDD data unable to read
864 HDD data access error
865 HDD access error
900 Controller counter error
FGATE error 955
The IPU does not respond with
the settings required to start
• Replace the NVRAM if the error is frequent.
• Software bug; reboot the machine
• Internal parameter incorrect
• Insufficient working memory
memory image processing.
990 Software performance error
• Software defective; reboot the machine
• Internal parameter incorrect
• Insufficient working memory
• When this SC occurs, the file name, address,
and data will be stored in NVRAM.
Note the above data and the situation in which
this SC occurs. Then report the data and
conditions to your technical control center.
991 Software continuity error
• Software bug; reboot the machine
• Internal parameter incorrect
• Insufficient working memory
998 Application start error
• Software defective; change the firmware for
the application that failed
• An option required by the application (RAM,
DIMM, board) is not installed
999 Software update error
• Try downloading the controller software
again.
G112/G113/G116/G094/G095/G091 4-6 SM

ELECTRICAL COMPONENT DEFECTS [ALL MODELS]
4.3 ELECTRICAL COMPONENT DEFECTS [ALL
MODELS]
4.3.1 SENSORS
Component CN Condition Symptom
Open
Paper Exit 6-B2
Shorted
Paper Overflow 6-B5
Registration 16-A2
Remaining paper
sensor 1
Remaining paper
sensor 2
Toner End 16-A12
16-A5
16-A8
Open
Shorted The paper overflow message is displayed.
Open
Shorted
Open
Shorted
Open
Shorted
High Toner near-end (toner end) is not detected.
Low The add toner message is displayed.
NOTE: The CN numbers describe the connector number on the engine board.
The Paper Jam indicator will light whenever
a print is made.
The Paper Jam indicator lights even if there
is no paper.
The paper overflow message is not
displayed even when a paper overflow
condition exists.
The Paper Jam indicator will light whenever
a print is made.
The Paper Jam indicator lights even if there
is no paper.
The Paper End indicator lights even if paper
is placed in the 1st paper tray.
The Paper End indicator does not light even
if there is no paper in the 1st paper tray.
The machine cannot determine the paper
near-end condition properly.
Trouble-
shooting
4.3.2 SWITCHES [ALL MODELS]
Component CN Condition Symptom
272-1,3
Main
Front Cover
Safety
Rear Cover
Safety
(PSU 120 V)
270-1,2
(PSU 230 V)
9-1
9-3
5-3
NOTE: The CN numbers describe the connector number on the engine board
(except for the main switch).
Open The machine does not turn on.
The machine does not turn off.
Shorted
Open
Shorted
Open
Shorted
The Front Cover Open message is not
displayed even if the front cover is opened.
The Front Cover Open message is
displayed even if the front cover is closed.
The Rear Cover Open message is not
displayed even if the rear cover or paper
exit cover is opened.
The Rear Cover Open message is
displayed even if the rear cover or paper
exit cover is closed.
SM 4-7 G112/G113/G116/G094/G095/G091

BLOWN FUSE CONDITIONS [ALL MODELS]
4.4 BLOWN FUSE CONDITIONS [ALL MODELS]
Fuse
115 V 220 - 240 V
Power Supply Board
FU1 15 A/125 V ---- Machine does not start
FU2 6.3 A/250 V 3.15 A/250 V Machine does not start
FU3 5 A/125 V 5 A/250 V Machine does not start
FU4 5 A/125 V 5 A/250 V
Rating
Symptom when turning on the main
switch
Machine does not start
(The LEDs turn on for a moment.)
4.5 LEDS [ALL MODELS]
No LEDs are used for this model (except for the NIB - refer to section 6.7).
G112/G113/G116/G094/G095/G091 4-8 SM

SERVICE TABLES


SERVICE PROGRAM MODE [ALL MODELS]
5. SERVICE TABLES
5.1 SERVICE PROGRAM MODE [ALL MODELS]
NOTE: Differences that are machine specific are noted in the margin with the
machine code.
CAUTION
Do these before you go into the service program mode:
• Make sure there is no print data in the printer buffer (the Data In LED must
not be lit or blinking).
• If there is some data in the buffer, wait until all data has been printed.
5.1.1 ENABLING AND DISABLING SERVICE PROGRAM MODE
Entering the Service Mode
There are two ways to enter the service
mode.
Method 1: Turn the machine on while
pressing the “On Line” key and “Escape”
key together until “1. Service Menu1”
appears on the display.
NOTE: If you switch the machine off, any
On Line
Menu
jobs stored on the hard disk using
the sample print and protected print
features will be deleted.
Job Reset
Escape
Check first with the user tools to
see if there are any jobs stored with
these features
Form Feed
# Enter
(Menu key - Sample Print, or
Protected Print).
Power Error Data In
Method 2: Press the “Up/Down arrow” keys
together for about 5 seconds, then press
the “Enter” key.
“1. Service Menu1” appears on the display.
G094S509.WMF
NOTE: The machine automatically goes off line when you enter the service mode
Inputting a Value or Setting for a Service Program
Tables
Service
Enter the required program mode as explained above. The setting appearing on
the display is the current setting.
Select the required setting using the “Up/Down arrow” keys, then press the “Enter”
key. The previous value remains if the “Enter” key is not pressed.
SM 5-1 G112/G113/G116/G094/G095/G091

PRINTER CONTROLLER SERVICE MODE [ALL MODELS]
Exiting Service Mode
Select “3. End” from the service mode main menu, then press the “Enter” key.
NOTE: To make the settings effective, turn the main switch off and on after exiting
service mode.
5.2 PRINTER CONTROLLER SERVICE MODE [ALL
MODELS]
5.2.1 SERVICE MODE MENU (“1. SERVICE MENU”)
Service
Mode
1001 Bit Switch
1003 Clear Setting Initializes settings in the “System” menu of the user mode.
1004 Print summary
1005 Disp Version Displays the version of the controller firmware.
Description Function
Adjusts bit switch settings.
Note: Currently the bit switches are not being used except
for Bit Switch 2 bit 3. See PUB(C)-051 for details.
Prints the service summary sheet (a summary of all the
controller settings).
5.2.2 BIT SWITCH PROGRAMMING
NOTE: Currently the bit switches are not being used except for Bit Switch 2 bit 3.
See PUB(C)-051 for details.
1. Enter the SP mode, select “Service Menu”, then press
[Enter] twice.
2. Select #1, #2, #3, or #4 for the desired bit switch, then
press [Enter].
• [] []: Move to the next switch.
3. Adjust the bit switch using the following keys.
• [] []: Move to the next bit.
• [Escape]: Exit without saving changes.
• [Enter]: Exit and save changes.
NOTE: The left digit on the display is bit 7 and the right digit is bit 0.
Service Menu
BitSW
BitSW
<BitSW#1>
Sw#1 00000000
Bit0 _
4. Press [Enter] to save changes and exit.
G112/G113/G116/G094/G095/G091 5-2 SM

PRINTER ENGINE SERVICE MODE [ALL MODELS]
5.3 PRINTER ENGINE SERVICE MODE [ALL MODELS]
5.3.1 SERVICE MODE TABLE
Notation What it means
[range / default / step]
italics Comments added for reference.
DFU Denotes “Design or Factory Use”. Do not change this value.
Japan only
SP1-xxx: Feed
Regist sag 1003
Adjusts the relay clutch timing at registration. Relay clutch timing determines
the amount of paper buckle at registration. (A “+” setting causes more
buckling.)
1003 1 Cassette [–8 mm ~+8 mm/0/2 mm step]
1003 2 Multi tray [By-pass] [–8 mm ~+8 mm/0/2 mm step]
1003 3 Duplex Tray [–8 mm ~+8 mm/0/2 mm step]
Example: [-9 ~ +9 / +3.0 / 0.1 mm step]. The setting can be
adjusted in the range ±9, value reset to +3.0 after an NVRAM
reset, and the value can be changed in 0.1 mm steps with
each key press.
The feature or item is for Japan only. Do not change this
value.
Fusing control Normal, Phase control 1104
Use phase control if the room lights flicker when the fusing lamp starts.
Defaults: North America – Normal (On/off control), Europe – Phase
Fusing Temp. 1105
Adjusts the fusing temperatures for printing and standby mode.
Fusing temp [150 ~ 200/ 170 / 5 deg.] DFU 1105 1
Adjusts the fusing temperature for printing on normal paper.
Fusing T Stand [140 ~ 175 / 168 / 1 deg.] DFU 1105 2
Adjusts the fusing temperature for standby mode.
1106 Fusing T Display
1106 1 Displays the current fusing temperature.
1902
Selects the number of rotations for the bypass feed roller when the paper type
is set to “Transparencies”.
If jams occur when transparencies are being used, change the setting to 2.
G112 Series: 1 = 1 rotation, 2 = 2 rotations OHP clutch rt
G116 Series: 1 = 1 rotation, 2 = 2 rotations
Tables
Service
SM 5-3 G112/G113/G116/G094/G095/G091

PRINTER ENGINE SERVICE MODE [ALL MODELS]
Fusing start Normal, Roller turn DFU 1910
Roller turn: Warms up the fusing unit for 20 s just after the power switch has
been turned on or when the machine warms up from energy saver mode.
Normal: There is no 20 s warm-up period. However, just after the main power
switch is turned on, the motor turns to clean the drum.
NOTE: This SP mode is effective only when the internal
temperature is less than 15 C.
Warm up control Normal, Curl control 1912
G116
G091
Only
Lowers the fusing temperature (to 150°C) to prevent thin paper from curling.
Use this mode only when a paper jam occurs during duplex rear side printing.
G112/G113/G116/G094/G095/G091 5-4 SM

PRINTER ENGINE SERVICE MODE [ALL MODELS]
SP2-xxx: Drum
Charge rol bias [1000 ~ 2000 / –1700V / 10V step] DFU 2001
G112
Series
Only
G116
Series
Only
Adjusts the voltage applied to the charge roller for printing.
Charge rol bias [1000 ~ 2000 / –1675V / 10V step] DFU 2001
Adjusts the voltage applied to the charge roller for printing.
Mainscan mag [-0.5% ~ 0.5% / 0 / 0.1% step] 2112
Adjusts the main scan magnification.
Subscan mag [-0.5% ~ 0.5% / 0 / 0.1% step] 2113
Adjusts the sub scan magnification.
Developer bias [200 ~ 800 / 750V / 10V step] DFU 2201
Adjusts the development bias for printing.
Toner end count [50 ~ 200 / 200 / 50 sheets/step] 2213
Adjusts the number of prints the machine can make after it detects toner near-
end.
2301
Transfer curr
Adjusts the correction current applied to the transfer roller.
2902 Test Pattern
Printing Test Pattern
Selects a printer test pattern. After selecting a pattern, the display
automatically goes to SP 5902. Use SP 5902 to print either one test pattern
(5902-1) or a few of them (5902-2). Reset SP 2902 to “no specified” after
printing the test pattern, or the selected pattern will appear on every page
printed by the user.
Thermistor adj Yes, No DFU 2910
If this is “Yes”, the machine automatically adjusts the charge roller voltage and
transfer current in response to the temperature within the machine.
[-2 ~ 4 / 0 / 2 µA/step]
No specified
Various test patterns
Tables
Service
Toner end clear Execute DFU 2928
Clears the toner end counter in the engine board. Not used in this machine.
Waste toner cnt 2980
Displays the waste toner counter in the engine board.
SM 5-5 G112/G113/G116/G094/G095/G091

PRINTER ENGINE SERVICE MODE [ALL MODELS]
SP3-xxx: Process
3921
Effective info
Selects which of the cartridge ID chip functions are enabled.
Cartridge lmt [15k ~ 40k / 30k / 5k step] 3922
Adjusts the number of prints the machine can make after a new cartridge is
detected.
Do not use a higher value than 30 k, or waste toner could leak from the
waste toner tank.
Cartridge stop No, Yes 3923
Determines whether the machine stops printing after the cartridge counter
reaches the limit set with SP 3922.
3924 Toner end sensor
Toner near-end [100 ~ 1000 / 200 / 100 ms step] DFU 3924 1
Threshold adjustment for toner near-end detection.
Toner end [250 ~ 1050 / 550 / 100 ms step] DFU 3924 2
Threshold adjustment for toner end detection
Not used: All items ignored
Cartridge dtct: Cartridge detection only
Normal mode (Cartridge detection and Type ID)
All used: All items used
3925 Cartridge info
Machine ID 3925 1
Displays the model name stored in the toner cartridge IC chip.
Version 3925 2
Displays the cartridge version number stored in the toner cartridge IC chip.
Brand ID 3925 3
Displays the OEM brand name stored in the toner cartridge IC chip.
Color ID 3925 4
Displays the cartridge color name stored in the toner cartridge IC chip.
Area ID 3925 5
Displays the region stored in the toner cartridge IC chip.
Kind ID 3925 6
Displays the part code number stored in the toner cartridge IC chip.
Secu ID 3925 7
Displays the cartridge type ID stored in the toner cartridge IC chip.
Maker ID 3925 8
Displays the maker ID number stored in the toner cartridge IC chip.
G112/G113/G116/G094/G095/G091 5-6 SM

PRINTER ENGINE SERVICE MODE [ALL MODELS]
Prevention of filming No, Yes 3926
G112
Series
Only
If set to “Yes”: This is done every 50 prints, for 0.2 s, to lubricate the cleaning
blade. The charge roller voltage is cut, and toner is transferred to the cleaning
blade. If the 50-print interval is reached during a job, printing stops and this
process is done.
Set this to yes to prevent the following:
• Grey banding parallel to the paper feed direction
• Cleaning blade flipping due to friction between blade and drum
• Noise due to friction between blade and drum
Tables
Service
SM 5-7 G112/G113/G116/G094/G095/G091

PRINTER ENGINE SERVICE MODE [ALL MODELS]
SP5-xxx: Mode
mm/inch Display Selection 0: Europe/Asia (mm), 1: North America (inch) 5024
Selects the unit of measurement.
After selection, turn the main power switch off and on.
5046 ROM Update Disp
5104
G091
G116
Only
A3/11x17 Count
5302 Set Time
Adjusts the RTC (real time clock) time setting. Sets the local time. (Montreal: -
300, Paris: + 60, Beijing: +480, Taipei: +480, Hong Kong: +480)
Enables or disables the ROM Update utility.
When enabled, this utility will be displayed in the
user program mode. DFU
[0 or 1 / 1 / –]
• 0: Enabled
1: Disabled
Specifies whether the counter is doubled for
A3/11" x 17" paper. If “Yes” is selected, the total
counter counts up twice when A3/11" x 17" paper
is used.
Yes
(double count)
No
(single count)
[-1440 ∼ 1440 /Montreal: -300/1 minute/step]
DFU
5305 Auto Off Set
Switches energy saver mode on/off
Enable, Disable
Enable: Energy saver mode will be used
Disable: Energy saver mode will be ignored
5307 Summer time
5307 1 Setting Enables or disables the summer time mode.
[0 to 1 / 0 / -] Alphanumeric
0: Off, 1: On
5307 3 Rule set (Start) Specifies the start of the daylight saving time.
5307 4 Rule set (End) Specifies the end of the daylight saving time
U limit auto select Yes, No 5401
Determines whether the machine adds new user codes in the User
Management Tool in Smart Net Monitor.
5404 [UcodeCtrClr] User Code Counter Clear
5404 1 UcodeCtrClr Clears all counters for users.
G112/G113/G116/G094/G095/G091 5-8 SM

PRINTER ENGINE SERVICE MODE [ALL MODELS]
5501 PM Alarm. PM alarm level
Sets the PM alarm level. A PM alarm is made when this condition occurs: PA
x 1000 = or > PC, where PA is the value set in SP5-501 and PC is the value in
the PM counter.
[0 to 9999 / 0 / -]
The alert is sent to the e-mail address that is specified for the system
administrator using a browser and the built-in web server (Web Image
Monitor).
0: Disables the PM alarm
When SP 5866 1 is set to 1, this SP is enabled.
5504 Jam Alarm
Sets the jam alarm level. If a paper jam occurs, the jam alarm counter
increases by +1. If no paper jam occurs while the set number of paper is
output, the jam alarm counter decreases by -1. The jam alarm occurs when
the jam alarm counter gets to +10.
[0 to 3 / 3 / 1/step]
0: Disables the jam alarm
1: 1.5K, 2: 3K, 3: 6K
The alert is sent to the e-mail address that is specified for the system
administrator using a browser and the built-in web server (Web Image
Monitor).
When SP 5866 1 is set to 1, this SP is enabled.
5505 Error Alarm
Occurs, the error alarm counter increases by +1. If no SC code occurs while
the set number of paper is output, the jam alarm counter decreases by -1. The
error alarm occurs when the error alarm counter reaches +5.
[0 to 255 / 18 / 1/step]
0: Disables the PM alarm
The alert is sent to the e-mail address that is specified for the system
administrator using a browser and the built-in web server (Web Image
Monitor).
When SP 5866 1 is set to 1, this SP is enabled.
5507 Supply Alarm
5507 1 Paper Supply Ala
5507 3 Toner Supply Alarm
5507 128 Interval: Others
5507 132
(G116)
5507 133 Interval: A4
5507 134 Interval: A5
5507 141
(G116)
5507 142 Interval: B5
5507 160
(G116)
Interval: A3
Interval: B4
Interval: DLT
Enables or disables the supply alarm.
[0 to 1 / 0 / -] Alphanumeric
0: Off, 1: On
Sets the paper supply alarm level. A paper
supply alarm counter increases by +1 when a
sheet of the related size is used. The paper
supply alarm occurs when one of the paper
supply alarm counters gets to the set value.
[250 to 10000 / 1000 / 1/step]
The alert is sent to the e-mail address that is
specified for the system administrator using a
browser and the built-in web server (Web Image
Monitor).
Tables
Service
SM 5-9 G112/G113/G116/G094/G095/G091

PRINTER ENGINE SERVICE MODE [ALL MODELS]
5507 164 Interval: LG
5507 166 Interval: LT
5507 172 Interval: HLT
Memory Clear 5801
Resets software counters and returns modes and settings to their defaults.
All clear: Clears all data
Engine clear: Clears the printer engine settings
SCS: Clears the systems settings
PRT: Clears user mode system settings
NCS: Network control systems - Clears the items listed in the “Host Interface”
section of the Configuration page.
DCS: Delivery control system (e-mail settings)
MIRS: E-mail addresses
5801 1 Memory all clear
5801 2
5801 3
5801 4 IMH: Clears IMH data. DFU
5801 5 MCS: Clears MCS data DFU
5801 8
5801 10 Web Service
5801 11
5801 14
5801 15 Clear USC Settings
5801 16
5801 17 CCS
Engine memory clear
Resets the following user tool settings:
Maintenance menu: Main scan registration, sub scan registration, image
density, curl control
Resets the settings of the following SPs: 1003, 1104, 1105, 1902, 1910, 2001,
2112, 2113, 2201, 2213, 2301, 2910, 3921, 3922, 3923, 3924, 5930
SCS memory clear
Resets the following user tool settings:
Paper Input menu: Paper type, paper size, tray lock,
System menu: Energy saver timer
Resets the settings of the following SPs: 5009, 5812
Also resets the user code counters.
PRT memory clear
Resets the following user tool settings:
Paper Input menu: Tray priority
System menu: Misfeed recovery, print error report, auto continue, memory
overflow, output tray, job separation, memory usage
Clears the web service data and the network application data.
NCS memory clear
Resets the network settings, such as IP address and subnet mask
DCS setting
Resets the e-mail settings, such as those stored in SP 5860
Resets or deletes the UCS-related data.
MIRS setting
Resets the settings used for the e-mail alert feature (such as the
enable/disable setting and the address used for the e-mail alert)
Resets or deletes the CSS-related data. FA
When SP 5866 1 is set to 1, this SP is enabled.
G112/G113/G116/G094/G095/G091 5-10 SM

PRINTER ENGINE SERVICE MODE [ALL MODELS]
Free run 5802
The machine performs a free run.
Press [Enter] to start.
Press [Enter] to stop.
Please note that the machine will not stop immediately after the [Enter] key is
pressed.
Input check 5803
Displays signals received from sensors and switches.
NOTE: SP Modes other than those listed in this table, are not used in the
machine.
Operation Panel Component Name
5803 1 Front Door Front cover safety switch
5803 2 MainMotLock Main Motor Lock
5803 3 PolygonLock Polygon Motor Lock
5803 5 Duplex door Duplex Unit cover switch
5803 6 Duplex set Duplex Unit
5803 7 Fusing set Fusing Unit
5803 11 StdTrayFul Paper Overflow Sensor
5803 16 Regist Registration Sensor
5803 17 Pap Output Paper Exit Sensor
5803 18 Dup in/out Duplex Invertor Sensor
5803 19 Dup In Duplex Entrance Sensor
5803 20 Duplex Out Duplex Exit Sensor
5803 21 PinBypass Bypass paper sensor
5803 22 NoT1paper Paper end sensor-Standard Paper Tray Unit
5803 23 Tray1 Size Paper size switch-Standard tray
5803 24 T1 Remains Remaining paper sensor-Standard tray
5803 26 No T2 paper Paper end sensor-1st Optional Paper Tray Unit
5803 29 No T3 paper Paper end sensor-2nd Optional Paper Tray Unit
5803 30 Tray 3 Size Paper size switch-2nd Optional Paper Tray Unit
5803 31 T3 remains
5803 32 Carrier 2 Paper feed sensor-1st Optional Paper Tray Unit
5803 33 Carrier 3 Paper feed sensor-2nd Optional Paper Tray Unit
5803 34 Tray 2 size Paper size switch-1st Optional Paper Tray Unit
5803 36 Tray2 Remains
SP 5803 41-54 are for the G116 and G091 models only. These SP Modes are not used
in the G112 Series machines.
5803 41 Exit Door Paper output tray cover sensor
5803 42 Sft Carrier Shift tray paper transport sensor
5803 43 Sft to R Shift tray at right
5803 44 Sft to L Shift tray at left
5803 45 PaperinB1 Paper sensor - 1st bin
5803 46 Bin1 Full Paper overflow sensor- 1st bin
5803 47 PaperinB2 Paper sensor - 2nd bin
5803 48 Bin2 Full Paper overflow sensor- 2nd bin
5803 49 PaperinB3 Paper sensor - 3rd bin
Remaining paper sensor-2nd Optional Paper
Tray Unit
Remaining paper sensor-1st Optional Paper Tray
Unit
Tables
Service
SM 5-11 G112/G113/G116/G094/G095/G091
PRINTER ENGINE SERVICE MODE [ALL MODELS]
Input check 5803
Displays signals received from sensors and switches.
NOTE: SP Modes other than those listed in this table, are not used in the
machine.
Operation Panel Component Name
5803 50 Bin3 Full Paper overflow sensor – 3 rd bin
5803 51 PaperinB4 Paper sensor - 4th bin
5803 52 Bin4 Full Paper overflow sensor – 4th bin
5803 53 4bin Upr Tr Upper paper transport sensor - Mailbox
5803 54 4bin Lwr Tr Lower paper transport sensor - Mailbox
Output check 5804
Turns on electrical components individually for test purposes.
NOTE: SP Modes other than those listed in this table, are not used in the
machine.
Operation Panel Component Name
5804 0 Impossible Not used in this machine
5804 1 Main Motor Main Motor
5804 2 Carr Clutch Relay Clutch
5804 3 Reg Clutch Registration Clutch
5804 5 Tray1 Clutch Paper Feed Clutch
5804 6 Byp Clutch Bypass Feed Solenoid
5804 11 Fan/speedy Exhaust fan
5804 12 Fan/slowly Exhaust fan
5804 13 Fus Relay Fusing Lamp Relay
5804 22 Pol Motor Polygon Motor
5804 23 Pol + LD Polygon Motor and Laser Diode
5804 26 T2 Clutch
5804 27 T2 Motor
5804 28 T3 Clutch
5804 29 T3 Motor
5804 31 Exit motor.
5804 32 Exit solenoid. Paper exit junction gate solenoid
5804 33 Motor to R. 1-bin shift tray - right
5804 34 Motor to L. 1-bin shift tray - left
5804 35 SP1 solenoid. Mailbox turn gate solenoid 2
5804 36 SP2 solenoid. Mailbox turn gate solenoid 3
5804 37 SP3 solenoid. Mailbox turn gate solenoid 4
5804 41 Dup Side Rt. Duplex Invertor Motor-forward
5804 42 Dup Side Rv Duplex Invertor Motor-reverse
5804 43 Dup Long Duplex Transport Motor
5804 44 Dup Split Invertor Gate Solenoid
Paper Feed Clutch-1st Optional Paper Tray
Unit
Paper Tray Motor-1st Optional Paper Tray
Unit
Paper Feed Clutch-2nd Optional Paper Tray
Unit
Paper Tray Motor-2nd Optional Paper Tray
Unit
Paper exit motor (1-bin shift tray, 4-bin
mailbox)
G112/G113/G116/G094/G095/G091 5-12 SM

PRINTER ENGINE SERVICE MODE [ALL MODELS]
Fusing err clear 5810
Resets a service call condition (for fusing unit errors).
After using this SP mode, turn the main switch off and on.
Serial Number DFU 5811
Used to input the machine serial number. This is normally done at the factory.
If you want to know the serial number, print the system parameter list. Press
and then input “A”.
Service Tel. No. Setting 5812
Use these SP modes to input service and support telephone numbers. Enter
the number and press
Press the
telephone number.
5812 1 Tel No.
5812 2 Fax
key to input a pause. Press the “Clear modes” key to delete the
Use this to input the telephone number of the
CE printed on the SP print mode printout.
Use this to input the fax number of the CE
printed on the SP print mode printout.
5816 Remote Service
5816 1 I/F Setting [0 to 2 / 2 / 1/step] Alphanumeric
0: Off, 1: CSS
2: Network (The remote service function is on.)
5816 2 CE Call [0 to 1 / 1 / 1/step]
0: Start, 1: End
5816 3 Function Flag [0 to 1 / 0 / 1/step]
0: Off (The remote service function is disabled.)
1: On (The remote service function is enabled.)
5816 4 Communication Test
5816 5 Device Information DFU
5816 6 Device Information
5816 7 SSL Disable [0 to 1 / 0 / 1/step]
5816 8 RCG Connect Time
5816 9 RCG Write Timeout Sets the timeout counter for writing processing.
Does a communication test. One of the return
codes from 0 to 99 is shown:
• 0: Normal end (The service is operating.)
• 1: Normal end (The service is not operating.)
• Any other code: Abnormal end
Do the test from the User Tools. Do not use SP
5816 4 unless you are told to do it by the
manufacturer.
Shows or does not show the device information
in the User Tools.
[0 to 1 / 0 / 1/step]
0: Not displayed, 1: Displayed
0: On, 1: Off
Sets the timeout counter for the remote
connection.
[1 to 90 / 10 / 1 second/step]
[0 to 100 / 60 / 1 second/step]
Tables
Service
SM 5-13 G112/G113/G116/G094/G095/G091

PRINTER ENGINE SERVICE MODE [ALL MODELS]
5816 10 RCG Read Timeout Sets the timeout counter for reading processing.
[0 to 100 / 60 / 1 second/step]
5816 11 Port 80 Enable
Enables or disables access to the SOAP method
via port 80.
[0 to 1 / 0 / 1/step]
0: Disables, 1: Enables
5821 Remote Service Address
5821 1 CSS-PI Device Co [0 to 4 / 0 / 1/step] DFU
5821 2 RCG IP Address
Sets the IP address of the RCG (Remote
Communication Gate).
[00000000h to FFFFFFFFh / 00000000h / 1/step]
5824
NVRAM Upload
# Uploads the UP and SP mode data (except for counters and the serial
number) from the NVRAM to an SD card.
5825 NVRAM Download
# Downloads the UP and SP mode data from an SD card to the NVRAM.
5828 Network
5828 50 1284 Compatible
5828 52 ECP
5828 65 Job Spool Switches the job spool on/off.
5828 66 HDD Job Clear
5828 69 Job Spool Protocol
5828 84 Print Settings List Prints a list of NCS related parameters.
5828 90 Telnet Enables or disables Telnet.
Switches Centronics IEEE1284 compatibility
on/off for the network.
[ 0 or 1 / 1 / - ]
0: Disabled, 1: Enabled
Selecting “0” disables bi-directional data
transmission.
Switches the ECP setting for Centronics
off/on.
[0 or 1 / 1 / -]
0: Disabled, 1: Enabled
With “1” selected, SP5-828-050 must be
enabled for 1284 mode compatibility.
[0 or 1 / 0 / -]
0: Disabled, 1: Enabled
Selects the treatment of the job when a
spooled job exists at power on.
[0 to 1 / 1 / 1/step]
0: Data is cleared, 1: Automatically printed
Switches job spooling off or on and enables
settings for job spooling protocols.
[0 to 1 / 1 / 1/step]
0: Off, 1: On
[0 to 1 / 1 / 1/step]
0: Disabled, 1: Enabled
G112/G113/G116/G094/G095/G091 5-14 SM

PRINTER ENGINE SERVICE MODE [ALL MODELS]
5828 91 Web Enables or disables the Web monitor.
[0 to 1 / 1 / 1/step]
0: Disabled, 1: Enabled
5832 HDD Init
Initializes the hard disk.
Use this only if there is a hard disk error.
Prog checksum 5837
Displays the checksum for the engine firmware.
5839 IEEE1394
IP Address 5839 001
This is the IP address used for IP over 1394.
Subnet mask 5839 002
This is the subnet mask used for IP over 1394.
5839 003 Physical address DFU
5839 004 Host name DFU
5839 007 Cycle master DFU
5839 008 BCR mode DFU
5839 009 IRM 1394a check DFU
5839 010 Unique ID DFU
5839 011 Logout DFU
5839 012 Login DFU
5839 013 Login max DFU
5840 IEEE802.11b
Current SSID 5840 04
Enters a unique ID (up to 32 characters long) to identify the device.
5840 06 Channel max DFU
5840 07 Channel min DFU
WEP key number 5840 11
Selects the WEP key number
5840 18 SSID key check DFU
WEP mode 5840 20
Sets the type of WEP key (64-bit or 128-bit).
5842 NFA Analysis
Prints or does not print the module log for each bit.
[0 to 1 / 1 / 1/step]
0: Prints, 1: Not print
Tables
Service
SM 5-15 G112/G113/G116/G094/G095/G091
PRINTER ENGINE SERVICE MODE [ALL MODELS]
5844 USB
5844 1
5844 2 Vendor ID DFU
5844 3 Product ID DFU
5844 4 Dev release number DFU
Transfer rate FS Fixation: Full Speed (Fixed)
HS/FS Auto: High Speed/Full Speed
(Automatic change)
Sets the speed for USB data transmission.
Delivery Server Setting 5845
Provides items for delivery server settings.
Retry Interval [60~900 / 300 / 1] 5845 3
Determines the time interval between retries before the machine returns to
standby after an error occurs during an image transfer with the delivery
scanner or SMTP server.
Number of Retries [0~99 / 3 / 1] 5845 4
Determines the number of retries before the machine returns to standby after
an error occurs during an image transfer with the delivery or SMTP server.
5846 UCS Setting
5846 3 Maximum Entries Displays the number of maximum entries. 500
5846 50 Init All Dir
Initializes all address information data except the
administration account.
5848 Web Service
5848 4 ac: ud
5848 11 ac: dm
Enables or disables the udirectory access
limitation.
0000: Disabled, 0001: Enabled
Enables or disables the device management
access limitation.
0000: Disabled, 0001: Enabled
5851 Bluetooth
Sets the Bluetooth security mode.
Public, Private
5856 Remote Program Update: Local port. ( 5.5)
When set to “enable” allows reception of firmware data via the local port (IEEE
1284) during a remote ROM update.
Disable, Enable
This setting is reset to “disable” after the machine is cycled off and on
5857 Debug Log Save Function: Not Used
Do not change this setting.
G112/G113/G116/G094/G095/G091 5-16 SM
PRINTER ENGINE SERVICE MODE [ALL MODELS]
5858 Debug Log Save Function: Not Used
Do not change this setting.
5859 Debug Log Save Function: Not Used
Do not change this setting.
5860 SMTP/POP3/IMAP
5860 2 SMTP ser port no. Input the SMTP server port number
5860 3 SMTP auth SMTP authentication enable/disable
5860 6 SMTP auth encryp
5860 7 POP before SMTP
5860 8 POP to SMTP wait
5860 13 POP auth encryp
5860 14 POP serv port no. Input the POP server port number
5860 22 SMTP from replace
5860 25 SMTP Auth Direct
Encryption mode for SMTP authentication
enable/disable (Only valid if 5860 3 is set to
“enable”)
Enable/disable POP before SMTP. If the SMTP
server does not have authentication, you can
enable POP before SMTP, them POP
authentication is available (SP 5860 13)
When using POP before SMTP, this SP mode
determines the maximum wait time between POP
authentication and connection with SMTP.
Communication stops if this time is exceeded.
If POP before SMTP is enabled, then you can
use this SP to enable or disable encryption mode
for POP authentication
If SMTP authentication is enabled, this SP mode
determines which name is included in the e-mail
header
0: Normal sender name
1: User name used by the authentication feature
Selects directly the way of SMTP authentication if
all SMTP authentications fail due to the error in
the SP5860-006.
This SP is activated only when SP5860-003 is
set to “Enable”.
Bit switch 0: LOGIN
Bit switch 1: PLAIN
Bit switch 2: CRAM MD5
Bit switch 3: DIGEST MD
Bit switch 4 - 7: Not used
Tables
Service
5866 E-mail Alert
5860 1 Notice Func Email
5860 5 Add Date Field
SM 5-17 G112/G113/G116/G094/G095/G091
Enables or disables the alert notice function by email.
[0 to 1 / 0 / 1/step]
0: Off, 1: On
Enables or disables to add the date field on the
alert notice e-mail.
[0 to 1 / 0 / 1/step]
0: Off, 1: On
PRINTER ENGINE SERVICE MODE [ALL MODELS]
5869 RAM disk setting DFU
5870 Common Key Info. Common key information writing
5870 1 Writing
5870 3 Initialize Initializes the authentication data in the memory.
Writes the authentication data (used for NRS) in
the memory.
5873 SD Card Appli Move
5873 1 Move Exec 5.11.2
5873 2 Undo Exec 5.11.3
5876 Security Clear
5876 1 All Clear
5876 11 Clear NCS Security
5876 15 Clear UCS Security
Test print 5902
Prints the test pattern that you selected with SP 2902.
1 sheet test 5902 1
Prints one copy of the test pattern
Cont test 5902 2
Prints consecutive copies of the test pattern
5930
Plug & Play 5907
Sets the brand name and the production name for Windows Plug & Play. This
information is stored in NVRAM. If the NVRAM is defective or has been
replaced, these names should be registered again.
To set the plug and play model name, enter the model number, and then
press
Meter charge mode
Enables or disables meter-charge mode.
Important: Turn the main switch off/on after changing this setting.
Meter charge mode enabled:
• "Replace Maintenance Kit" is not displayed on the operation panel when the
• The meter charge counter is shown immediately after the Menu key is pressed.
• The technician must reset the PM counter after finishing PM.
Meter charge mode disabled:
• "Replace Maintenance Kit" is displayed on the operation panel when the PM
• The meter charge counter is not shown when the Menu key is pressed.
• The PM counter resets automatically after the user replaces the fusing unit.
.
No, Yes
PM counter runs out (the technician replaces the maintenance kit items)
counter runs out (the user replaces the maintenance kit items)
5970 Debug Serial Output DFU
G112/G113/G116/G094/G095/G091 5-18 SM
 Loading...