

Page 1
Operating Instructions Maintenance Guide 2
Introduction ........................................................................................................................... 3
Trademarks............................................................................................................................ 4
ENERGY STAR Program.................................................................................................... 5
How to Read This Manual.................................................................................................... 7
1.Paper and Other Media
Paper and Other Media Supported by This Printer.......................................................... 9
Paper Types and Sizes....................................................................................................................... 9
Loading Paper...................................................................................................................... 21
Loading Paper in Tray 1.................................................................................................................. 21
Loading Paper in Tray 2 and the Optional Paper Feed Unit........................................................... 22
Loading paper in Paper Bank PS470 (2000-sheet Large Capacity Tray) ....................................... 25
If you load a paper size that is not selected automatically.............................................................. 26
Changing the paper type.................................................................................................................. 28
Load Paper in the Bypass Tray........................................................................................................ 30
1
Page 2

Operating Instructions Maintenance Guide 2
2.Troubleshooting
Error & Status Messages on the Operation Panel ........................................................... 37
Printer Does Not Print ........................................................................................................ 55
Other Printing Problems .................................................................................................... 58
Removing Misfed Paper...................................................................................................... 64
Detaching the 2 Tray Finisher......................................................................................................... 64
Opening and Closing the Duplex Reversal Unit............................................................................. 65
When "Remove Misfeed A: Internal Path" Appears....................................................................... 67
When "Remove Misfeed B: Fusing Unit" Appears......................................................................... 68
When "Remove Misfeed W: Mailbox" Appears............................................................................. 70
When "Remove Misfeed R: Finisher" Appears............................................................................... 71
When "Remove Misfeed Y: Paper Tray" Appears.......................................................................... 74
When "Remove Misfeed: Duplex Unit" Appears........................................................................... 75
Removing Jammed Staples................................................................................................. 77
Adding Staples..................................................................................................................... 79
Removing Punch-hole Chips .............................................................................................. 82
2
INDEX.................................................................................................................................. 83
Page 3

Operating Instructions Maintenance Guide 2
Introduction
To get maximum versatility from this machine all operators should carefully read and follow the instructions in this manual. Please keep this manual in a handy place near the machine.
Please read the Safety Information in the "Printer Reference" before using this machine. It contains important information related to USER SAFETY and PREVENTING EQUIPMENT PROBLEMS.
3
Page 4
Operating Instructions Maintenance Guide 2
Trademarks
Microsoft, Windows and Wi ndows NT are reg istered trademark s of Micros oft Corpo ration i n the Unit ed States and/or other countries.
PostScript is a registered trademark of Adobe Systems Incorporated.
PCL is a registered trademark of Hewlett-Packard Company.
IPS-PRINT Printer Language Emula ti on Co pyri ght 19 99- 2000, XIONICS DOCUMENT TECHNOL-
OGIES, INC., All Rights Reserved.
Ethernet is a registered trademark of Xerox Corporation.
Other product names used here in are f or i dent if ic at ion purposes only and might be trad emar ks of thei r
respective companies. We disclaim any and all rights in those marks.
Notes:
Some illustrations might be s lightly different from your machine.
Certain options might not be available in some countries. For details, please contact your local dealer.
Note
The proper names of the Windows operating systems are as follows:
• Microsoft
• Microsoft
• Microsoft
• Microsoft
• Microsoft
• Microsoft
• Microsoft
®
Windows® 95 operating system
®
Windows® 98 operating system
®
Windows® Millennium Edition (Windows Me)
®
Windows ® 2000 Professional
®
Windows ® 2000 Server
®
Windows NT® Server operating system Version 4.0
®
Windows NT® Workstation operating system Version 4.0
4
Page 5
Operating Instructions Maintenance Guide 2
ENERGY STAR Program
As an ENERGY STAR Partner, we have determined that this machine
model meets the ENERGY STAR Guidelines for energy efficiency.
The ENERGY STAR Guidelines intend to establish an international energy-saving system for developing and introducing energy-efficient office equipment to deal with environmental issues, such as global warming.
When a product meets the ENERGY STAR Guidelines for energy efficiency, the Partner shall place the ENERGY
STAR logo onto the machine model.
This product was designed to reduce the environmental impact associated with office equipment by means of energysaving features, such as Low-power mode.
5
❖❖❖❖ Low-power Mode (Energy Saver mode)
This printer aut omatically lower s its power con sumption 60 minu tes after th e last operat ion has been
completed. To exit Low-power (En ergy Save r) mode, pr ess an y key o n the ope rati on panel . For details about how to configure Energy Saver mode, see “Making Printer Settings with the Operation
Panel” in Administrator Reference 2 as a PDF file on the CD-ROM.
Page 6
Operating Instructions Maintenance Guide 2
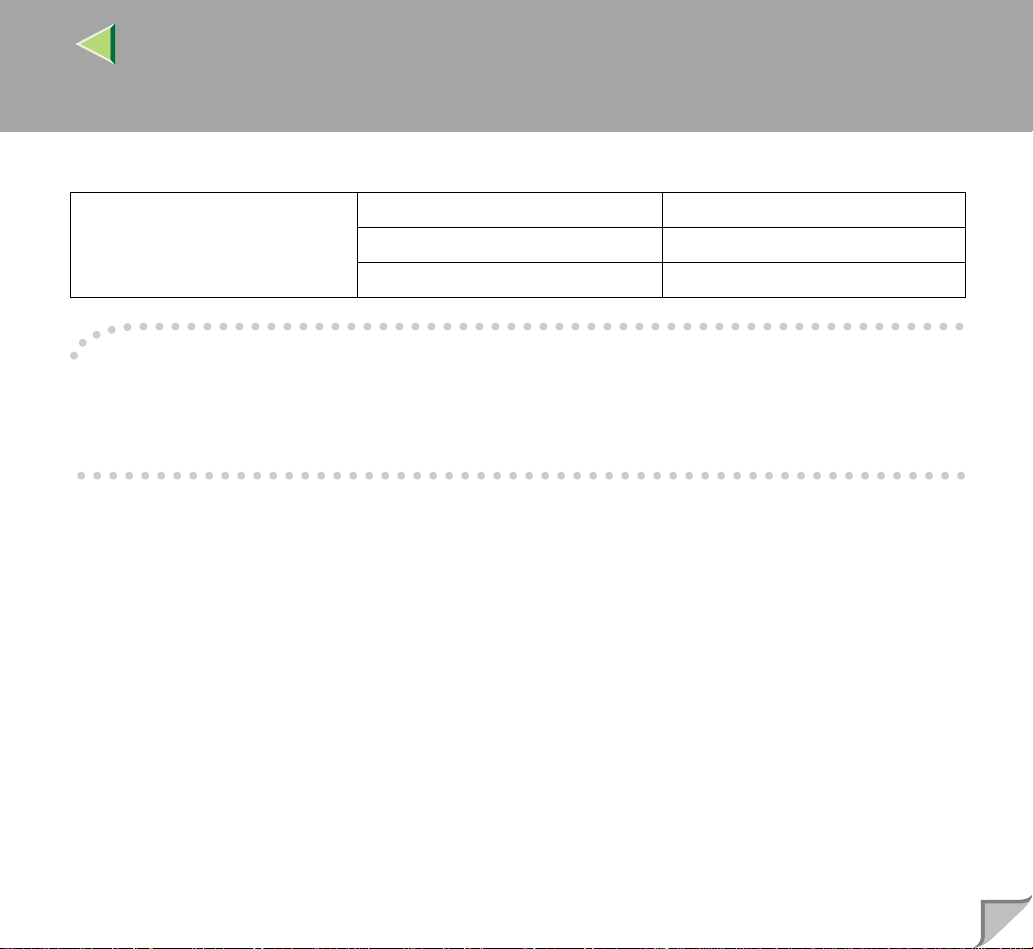
❖❖❖❖ Specifications
Energy Saver mo de Power Consum ption 45 W or less
Default Time 60 minutes
Recovery Time 120 seconds or less
----Recycled Paper
In accordance with the ENERGY STAR Program, we recommend use of recycled paper which is environment friendly. Please contact your sales or service representative for recommended paper.
6
Page 7
Operating Instructions Maintenance Guide 2
R
R
How to Read This Manual
Symbols
In this manual, the following symbols are used:
WARNING:
This symbol indicates a potentially hazardous situation which, if instructions are not followed, could
result in death or serious injury.
CAUTION:
This symbol indicates a potentially hazardous situation which, if instructions are not followed, may result in minor or moderate injury or damage to property.
* The statements above are notes for your safety.
Important
If this instruction is not foll owed, pape r might be misf ed, origin als might be d amaged, or d ata might be
lost. Be sure to read this.
7
Preparation
This symbol indicates the prior knowledge or preparations required before operating.
Note
This symbol indicates precautions for operation, or actions to take after misoperation.
Limitation
This symbol indicates numerical limits, functions that cannot be used together, or conditions in which
a particular function cannot be used.
Page 8
Operating Instructions Maintenance Guide 2
Reference
This symbol indicates a reference.
[]
Keys that appear on the machine's panel display.
Keys and buttons that appear on the computer's display.
{}
Keys built into the machine's operation panel.
Keys on the computer's keyboard.
8
Page 9
Operating Instructions Maintenance Guide 2
1. Paper and Other Media
Paper and Other Media Supp orted by This Printer
Paper Types and Sizes
This section describes the type, size, feed direction , and maximum amou nt of paper that can be loaded
into each paper tray in this printer.
Note
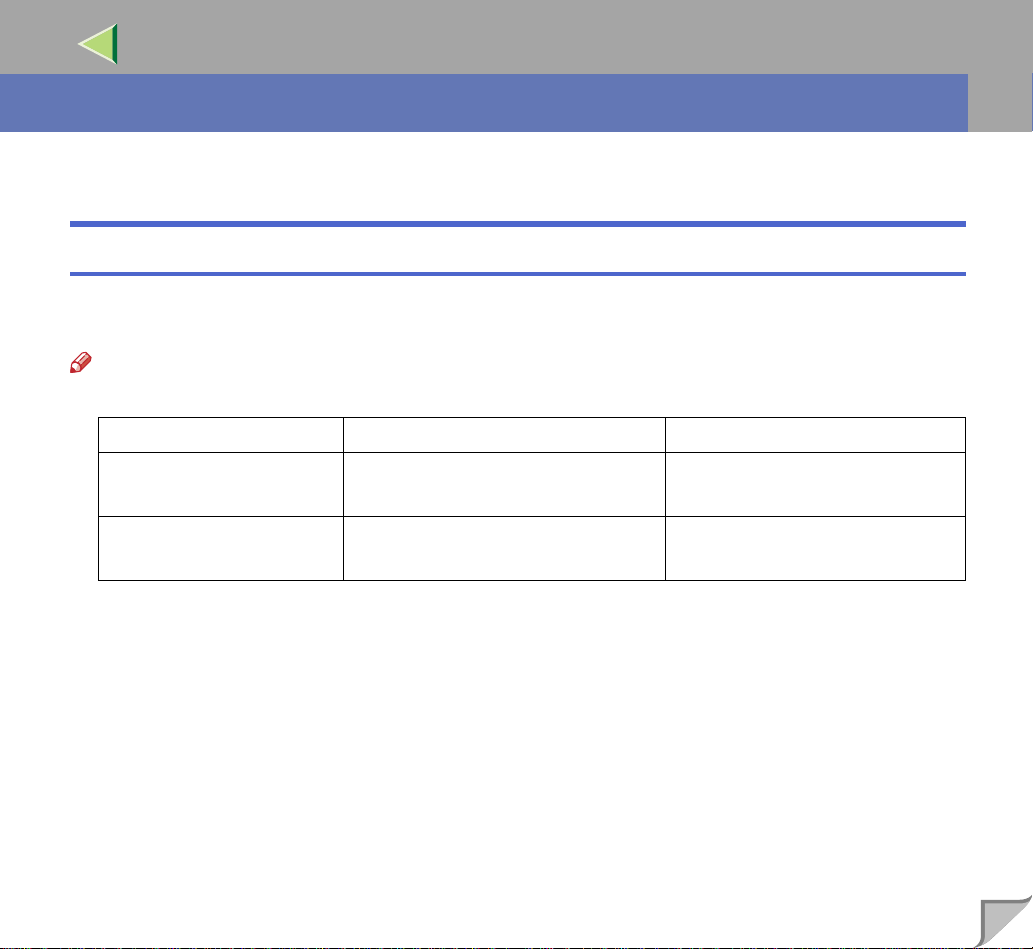
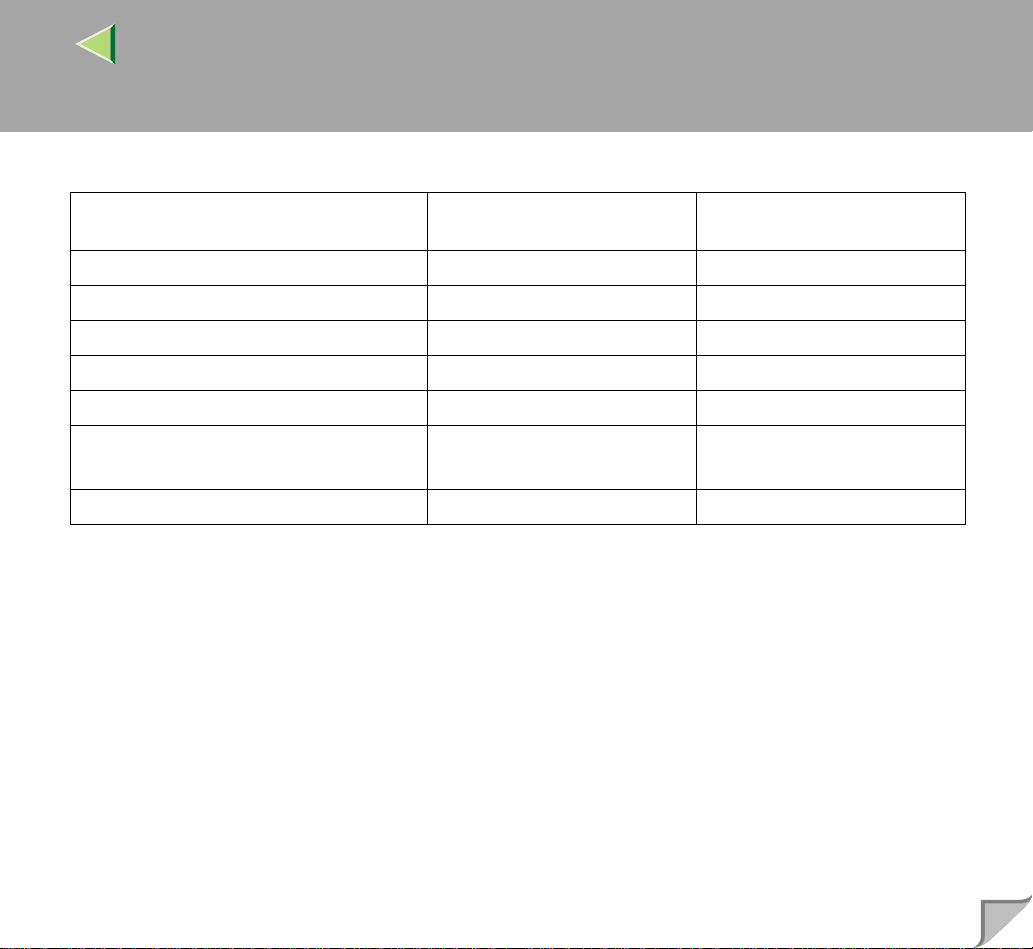
❒ The following symbols and terminology are used to represent the feed direction.
In this manual On the panel display Paper feed direction
L ← (Feed direction)
K ← (Feed direction)
❒ Be careful of the paper feed direction. The direction is determined for each paper size.
A4 (210 x 297)
8 1/2 x 11
A4 (297 x 210)
11 x 8 1/2
Short-edge feed direction
Long-edge feed direction
9
Page 10
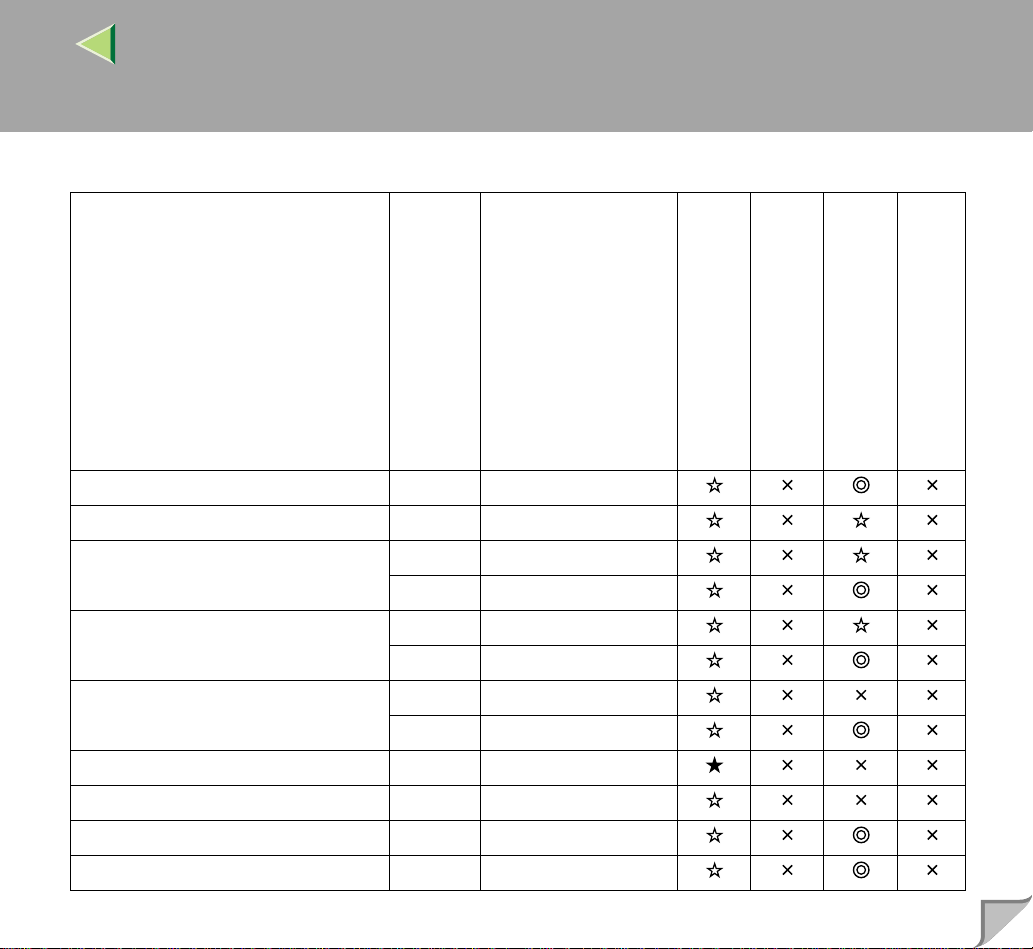
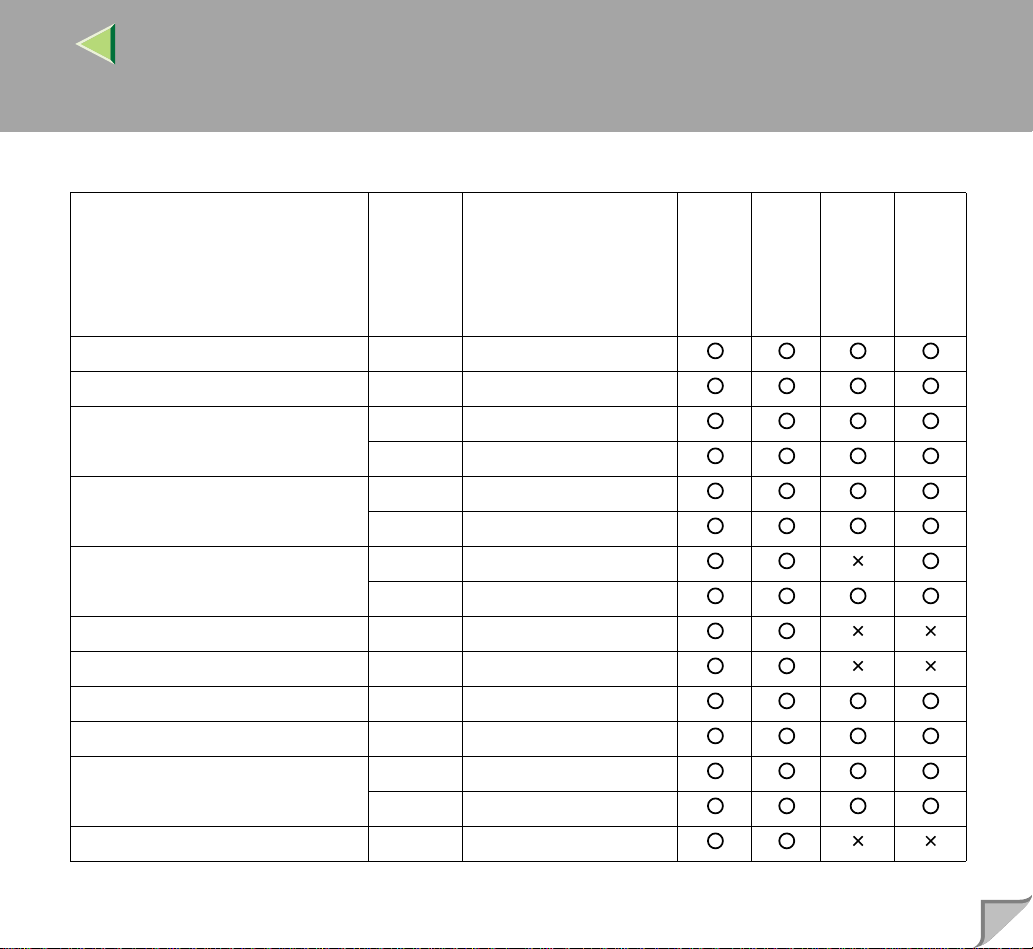
❖❖❖❖ Input Paper Sizes (Metric version)
Operating Instructions Maintenance Guide 2
10
Feed direction
A3 L 297 × 420
B4 JIS L 257 × 364
A4 L 210 × 297
K 297 × 210
B5 JIS L 182 × 257
K 257 × 182
A5 L 148 × 210
K 210 × 148
B6 JIS L 128 × 182
A6 L 105 × 148
Double Letter (DLT, 11" × 17") L 279 × 432
1
Legal (LG, 8
/2" × 14") L 216 × 356
Size (mm)
Bypass tray
Paper Tray (Tray 1)
Paper Feed Unit (Tray 2/3/4)
2000-sheet Large Capacity Tray
Page 11

Operating Instructions Maintenance Guide 2
11
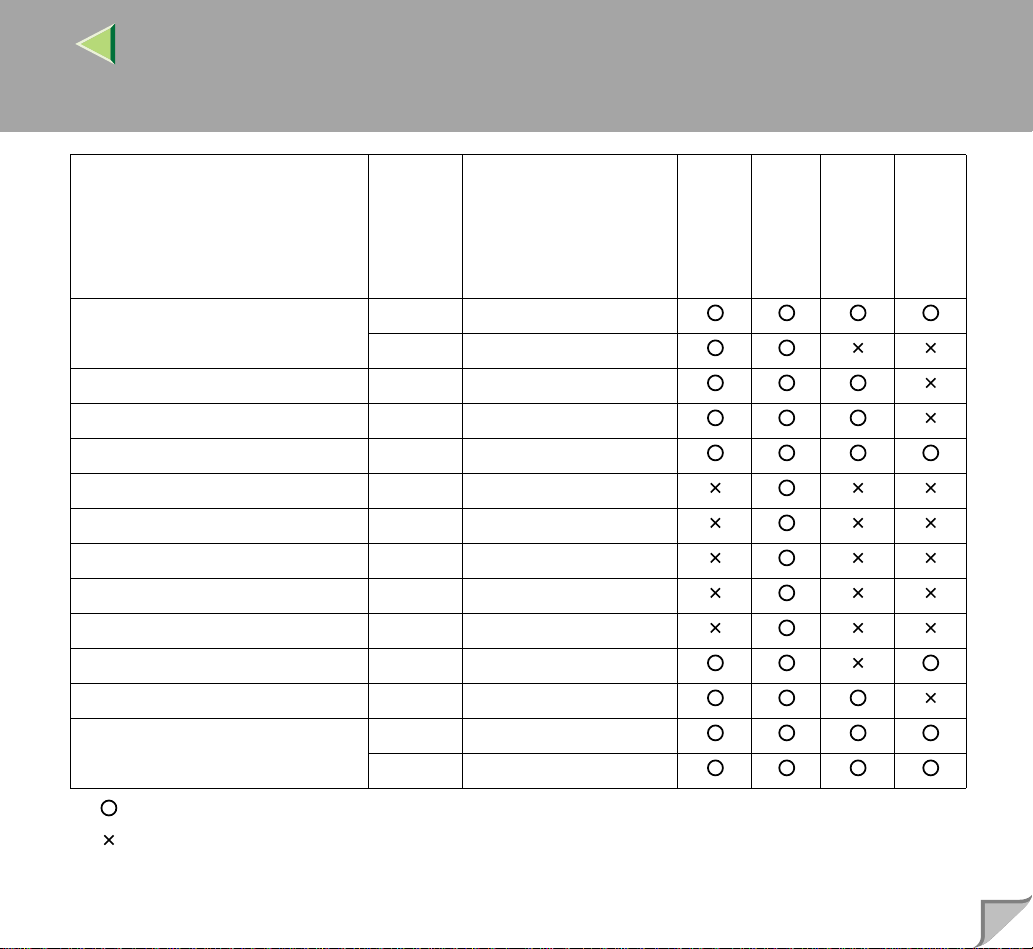
Feed direction
Size (mm)
Letter (LT, 81/2" × 11") L 216 × 279
K 279 × 216
1
Half Letter (HLT, 5
Executive (Exec., 7
/2" × 81/2") L 140 × 216
1
/4" × 101/2") L 184 × 276
K 276 × 184
1
Folio (8
Foolscap (F4, 8
/4" × 13") L 210 × 330
1
/2" × 13") L 216 × 330
F/GL (8" × 13") L 203 × 330
Com#10 Env (4
1
/8" × 91/2") L 104.8 × 241.3
C5 Env (6.38" × 9.02") L 162 × 229
C6 Env (4.49" × 6.38") L 114 × 162
DL Env (4.33" × 8.66") L 110 × 220
Monarch Env (3
7
/8" × 71/2") L 98.4 × 190.5
Bypass tray
Paper Tray (Tray 1)
Paper Feed Unit (Tray 2/3/4)
2000-sheet Large Capacity Tray
Page 12
Operating Instructions Maintenance Guide 2
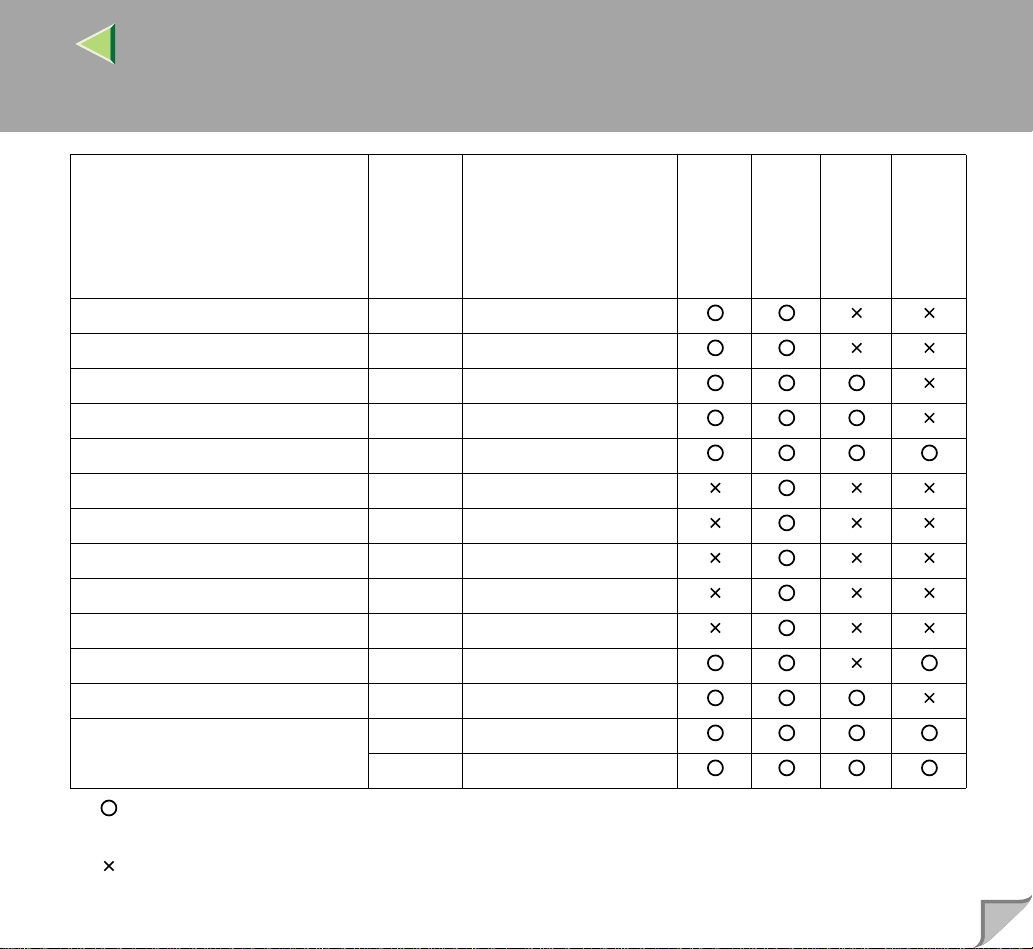
12
Feed direction
Custom Size - 8K (101/2" × 15.35") L 267 × 390
16K (7.68" × 10
1
/2") L 195 × 267
K 267 × 195
Size (mm)
Bypass tray
Paper Tray (Tray 1)
*
Paper Feed Unit (Tray 2/3/4)
2000-sheet Large Capacity Tray
• means that the size is supported and printer select the paper size automatically.
• means that the size is supported but paper size should be selected with the operation panel.
• means that the size is support ed but paper siz e should be set with the operat ion panel as a cus tom
size.
*
•
means that the supported size is approximately 90 - 305 mm in width, and approximately 148 458 mm in length. The s upport ed size may di ffer de pendin g on the p rinter language y ou use. Set the
custom size setting with the operation panel.
• means that the size is not supported.
Page 13
❖❖❖❖ Input Paper Sizes (Inch version)
Operating Instructions Maintenance Guide 2
13
Feed direction
Size (inch)
Double Letter (DLT) L 11" × 17"
Legal (LG) L 8
Letter (LT) L 8
K 11" × 8
Half Letter (HLT) L 5
Executive (Exec.) L 7
K 10
1
/2" × 14"
1
/2" × 11"
1
/2"
1
/2" × 81/2"
1
/4" × 101/2"
1
/2" × 71/4"
A3 L 11.26" × 16.54"
B4 JIS L 10.12" × 14.33"
A4 L 8.26" × 5.83"
K 5.83" × 8.26"
Bypass Tray
Paper Tray (Tray 1)
Paper Feed Unit (Tray 2/3/4)
2000-sheet Large Capacity Tray
Page 14
Operating Instructions Maintenance Guide 2
14
Feed direction
B5 JIS L 7.17" × 10.12"
K 10.12" × 7.17"
A5 L 5.83" × 8.26"
K 8.26" × 5.83"
B6 JIS L 5.04" × 7.17"
A6 L 4.13" × 5.63"
Folio L 8
Foolscap F4 L 8
F/GL L 8" × 13"
Com#10 Env L 4
C5 Env L 6.38" × 9.02"
C6 Env L 4.49" × 6.38"
DL Env L 4.33" × 8.66"
Size (inch)
1
/4" × 13"
1
/2" × 13"
1
/8" × 91/2"
Bypass Tray
Paper Tray (Tray 1)
Paper Feed Unit (Tray 2/3/4)
2000-sheet Large Capacity Tray
Page 15
Operating Instructions Maintenance Guide 2
15
Feed direction
Monarch Env L 37/8" × 71/ 2"
Custom Size - 8K L 101/2" × 15.35"
16K L 7.68" × 10
K 10
Size (inch)
1
1
/2" × 7.68"
/2"
Bypass Tray
Paper Tray (Tray 1)
*
Paper Feed Unit (Tray 2/3/4)
2000-sheet Large Capacity Tray
• means that the size is supported and printer select the paper size automatically.
• means that the size is supported but the paper size should be selected with the operation panel.
• means that the size is supported but the paper size should be set with the operation panel as a
custom si ze.
*
•
means that the supported size is approximately 3.5 - 12 inch in width, and approximately 5.8 18 inch in length. The supported siz e may differ dependi ng on the printe r la nguage you use. Set the
custom size setting with the operation panel.
• means that the size is not supported.
Page 16
Operating Instructions Maintenance Guide 2
❖❖❖❖ Paper weight and number of sheets to be set
16
Supported paper weight
Maximum number of sheets
(plain paper)
*1
Tray 1 60 - 105 g/m2 (16 - 28 lb) 500 (80 g/m2, 20 lb)
Tray 2 60 - 105 g/m
Bypass Tray 52 - 162 g/m
PAPER FEED UNIT Type 3800C (500 × 1) 60 - 105 g/m
PAPER FEED UNIT Type 3800C (500 × 2) 60 - 105 g/m
Paper Bank PS470
60 - 105 g/m
2
(16 - 28 lb) 500 (80 g/m2, 20 lb)
2
(14 - 42 lb) 100 (80 g/m2, 20 lb)
2
(16 - 28 lb) 500 (80 g/m2, 20 lb)
2
(16 - 28 lb) 1000 (80 g/m2, 20 lb)
2
(16 - 28 lb) 2000 (80 g/m2, 20 lb)
(2000-sheet Large Capacity Tray)
2
SR770 (2 Tray Finisher) 60 - 105 g/m
*1
Confirm that the to p of the stack is not higher than the limit mark inside the tray.
(16 - 28 lb) 2000 (80 g/m2, 20 lb)
Page 17
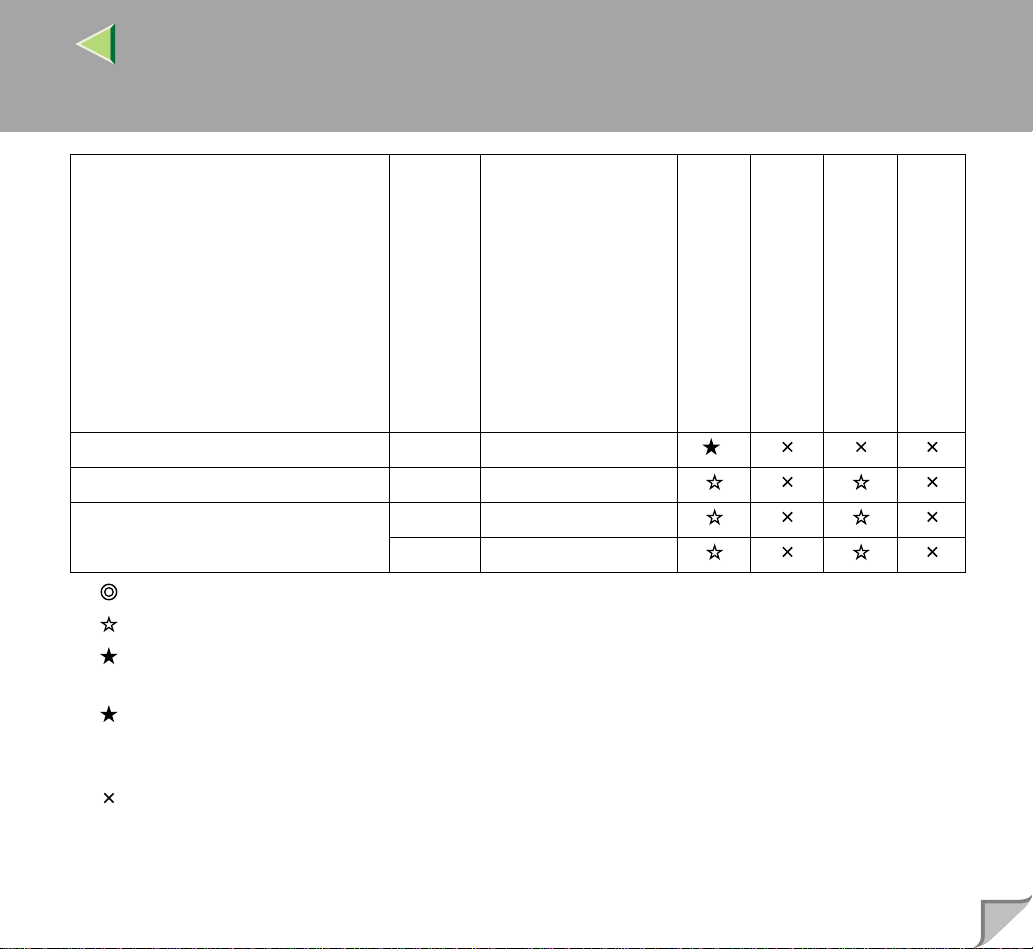
❖❖❖❖ Output Paper Sizes (Metric version)
Operating Instructions Maintenance Guide 2
17
Feed direction
A3 L 297 × 420
B4 JIS L 257 × 364
A4 L 210 × 297
K 297 × 210
B5 JIS L 182 × 257
K 257 × 182
A5 L 148 × 210
K 210 × 148
B6 JIS L 128 × 182
A6 L 105 × 148
Double Letter (DLT, 11" × 17") L 279 × 432
1
Legal (LG, 8
Letter (LT, 8
Half Letter (HLT, 5
/2" × 14") L 216 × 356
1
/2" × 11") L 216 × 279
K 279 × 216
1
/2" × 81/2") L 140 × 216
Size (mm)
Standard Tray
Output Tray
2 Tray Finisher
4-bin Mailbox
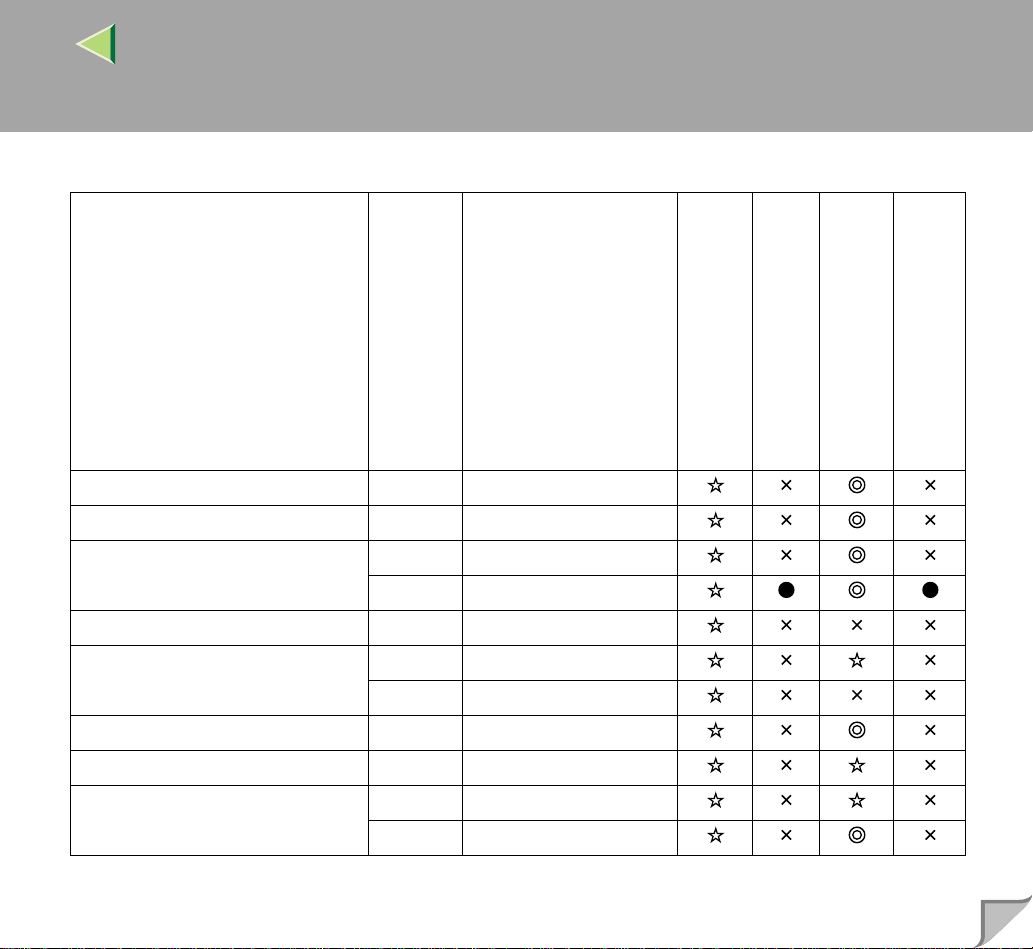
Page 18
Operating Instructions Maintenance Guide 2
18
Feed direction
Size (mm)
Executive (Exec., 71/4" × 101/2") L 184 × 276
K 276 × 184
1
Folio (8
Foolscap (F4, 8
/4" × 13") L 210 × 330
1
/2" × 13") L 216 × 330
F/GL (8" × 13") L 203 × 330
Com#10 Env (4
1
/8" × 91/2") L 104.8 × 241.3
CA Env (6.38" × 9.02" ) L 162 × 229
C6 Env (4.49" × 6.38") L 114 × 162
DL Env (4.33" × 8.66") L 110 × 220
Monarch Env (3
7
/8" × 71/2") L 98.4 × 190.5
Custom Size - -
1
8K (10
16K (7.68" × 10
/2" × 15.35") L 267 × 390
1
/2") L 195 × 267
K 267 × 195
• means that the size is supported.
• means that the size is not supported.
Standard Tray
Output Tray
2 Tray Finisher
4-bin Mailbox
Page 19

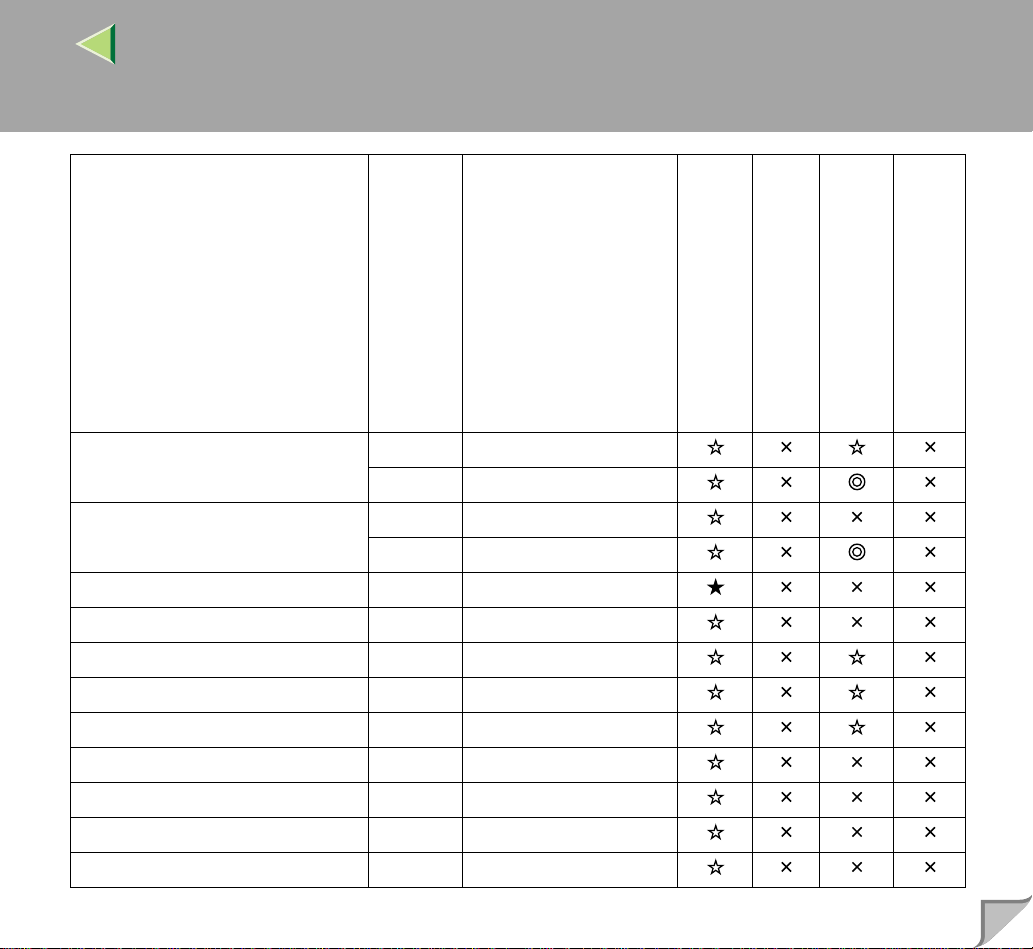
❖❖❖❖ Output Paper Sizes (Inch version)
Operating Instructions Maintenance Guide 2
19
Feed direction
Size (inch)
Double Letter (DLT) L 11" × 17"
Legal (LG) L 8
Letter (LT) L 8
K 11" × 8
Half Letter (HLT) L 5
Executive (Exec.) L 7
K 10
1
/2" × 14"
1
/2" × 11"
1
/2"
1
/2" × 81/2"
1
/4" × 101/2"
1
/2" × 71/4"
A3 L 11.26" × 16.54"
B4 JIS L 10.12" × 14.33"
A4 L 8.26" × 5.83"
K 5.83" × 8.26"
B5 JIS L 7.17" × 10.12"
K 10.12" × 7.17"
A5 L 5.83" × 8.26"
K 8.26" × 5.83"
Standard Tray
Output Tray
2 Tray Finisher
4-bin Mailbox
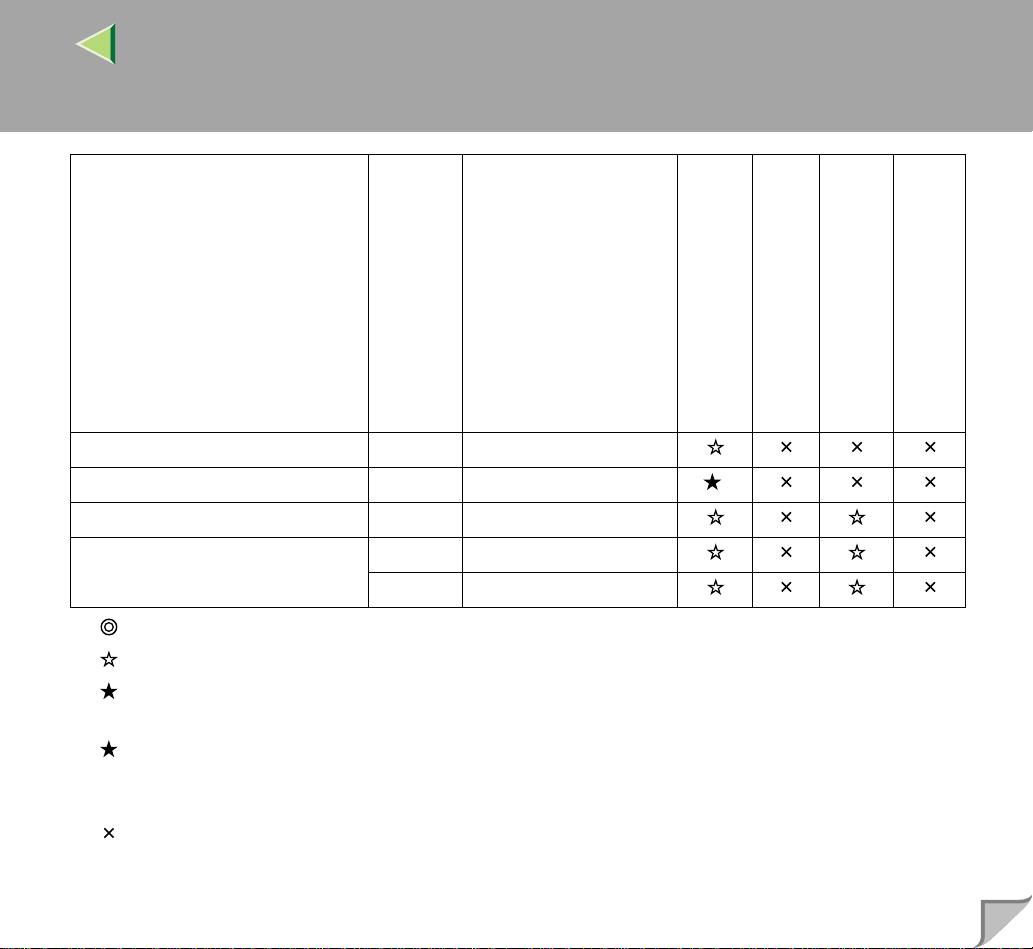
Page 20
Operating Instructions Maintenance Guide 2
20
Feed direction
Size (inch)
Standard Tray
Output Tray
2 Tray Finisher
4-bin Mailbox
B6 JIS L 5.04" × 7.17"
A6 L 4.13" × 5.63"
Folio L 8
Foolscap F4 L 8
1
/4" × 13"
1
/2" × 13"
F/GL L 8" × 13"
Com#10 Env L 4
1
/8" × 91/2"
C6 Env L 4. 49" 6.38"
C5 Env L 6.38" × 9.02"
DL Env L 4.33" × 8.66"
Monarch Env L 3
7
/8" × 71/2"
Custom Size - 8K L 10
16K L 7.68" × 10
K 10
1
/2" × 15.35"
1
1
/2" × 7.68"
/2"
• means that the size is supported and that the paper size should be set with the operation panel.
There is no dial in the tray.
• means that the size is not supported.
Page 21
Operating Instructions Maintenance Guide 2
Loading Paper
Load paper and change the paper size in Tray 1,
Tray 2 and the optional Paper Feed Unit by following the procedures below.
Important
❒ Tray 1 uses 11 × 8
Load only 11 × 8
❒
2000-sheet Large Capacity Tray uses 11 × 81/
K
paper exclusively. Load only 11 × 81/2 paper
at all times.
❒ If you want to load A4 K paper in Tray 1 and
optional 2000-sheet Lar ge Capacity Tray,
contact your sales or service representative.
Reference
❒ See P.9 “Paper Types and Sizes” concerning
paper to be loaded in the Paper Tra y an d optional Paper Feed Unit.
1
/2 K paper exclusively.
1
/2 paper at all times.
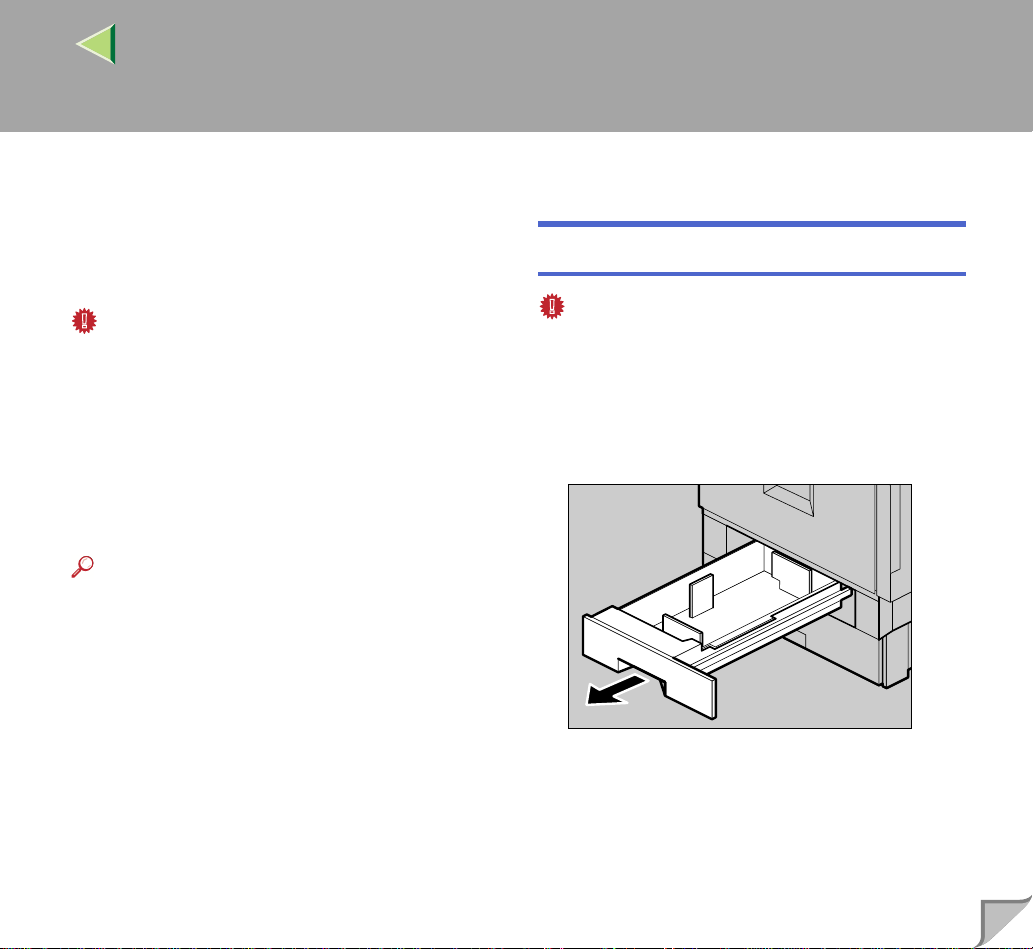
Loading Paper in Tray 1
Important
❒ Tray 1 uses 11 × 8
Load only 11 × 8
❒ If you want to load A4 K paper in Tray 1, con-
2
tact your sales or service representative.
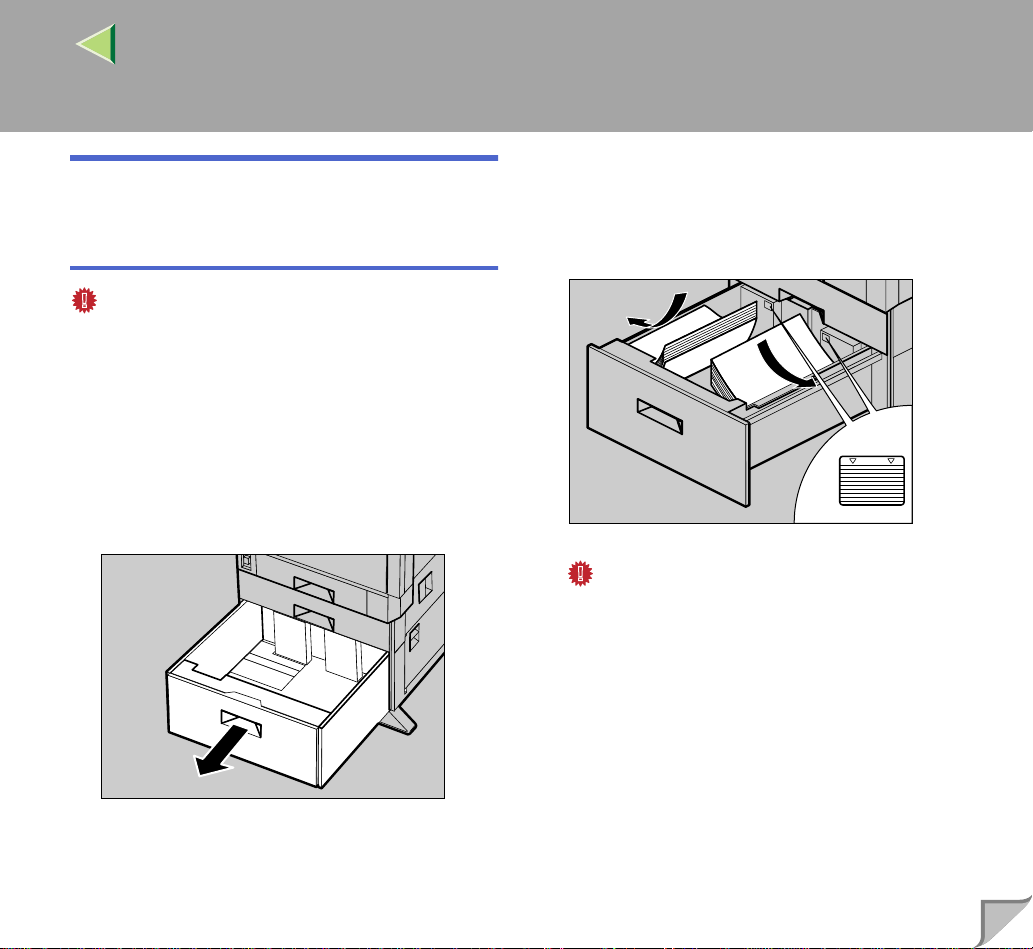
A
Pull out the paper tray slowly un til it stops.
1
/2 K paper exclusively.
1
/2 paper at all times.
21
ZDJH003J
Page 22
Operating Instructions Maintenance Guide 2
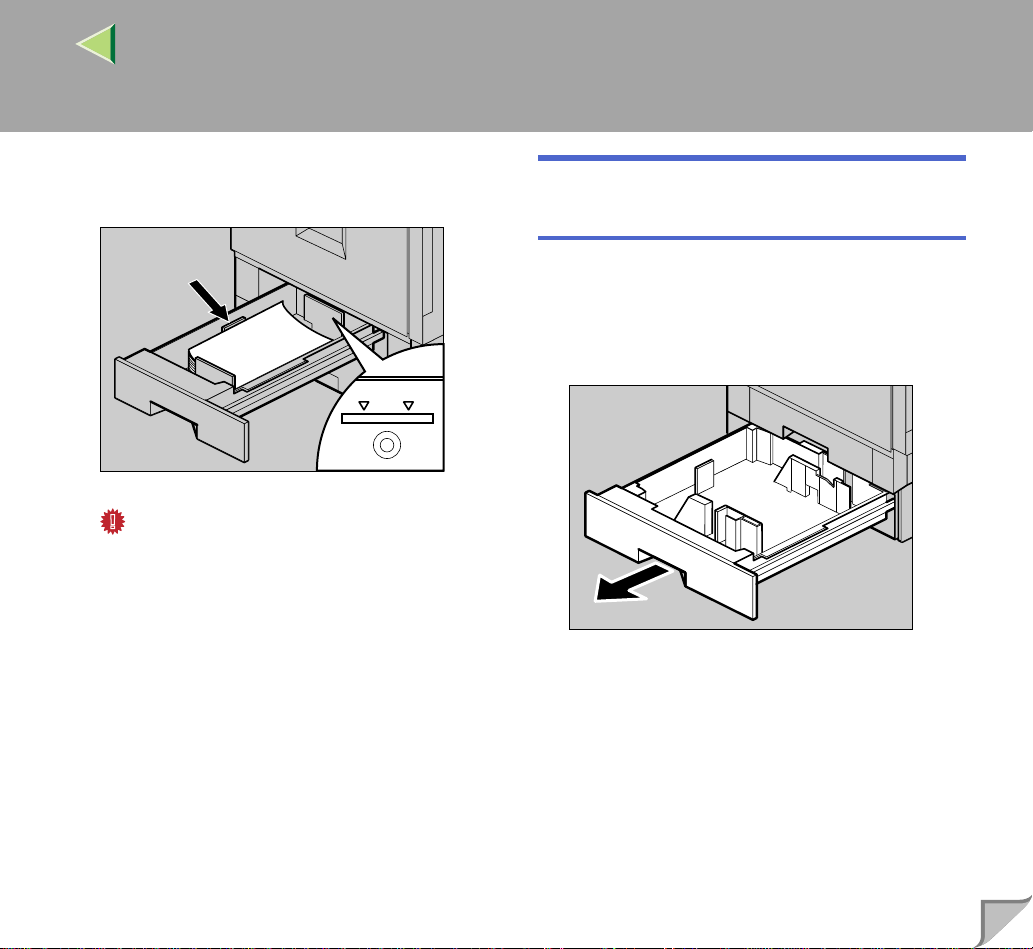
B
Load paper into the tr ay with the prin t side
down.
ZDJY001J
Important
❒ Confirm that the top of the stack is not
higher than the limit mark inside the tray.
C
Carefully slide the paper tray into the
printer until it stops.
Loading Paper in Tray 2 and the Optional Paper Feed Unit
This section descr ibes loading pape r which is different from default size in Tray 2.
A
Pull out the Paper Tray slowly until it
stops.
ZDJH005J
22
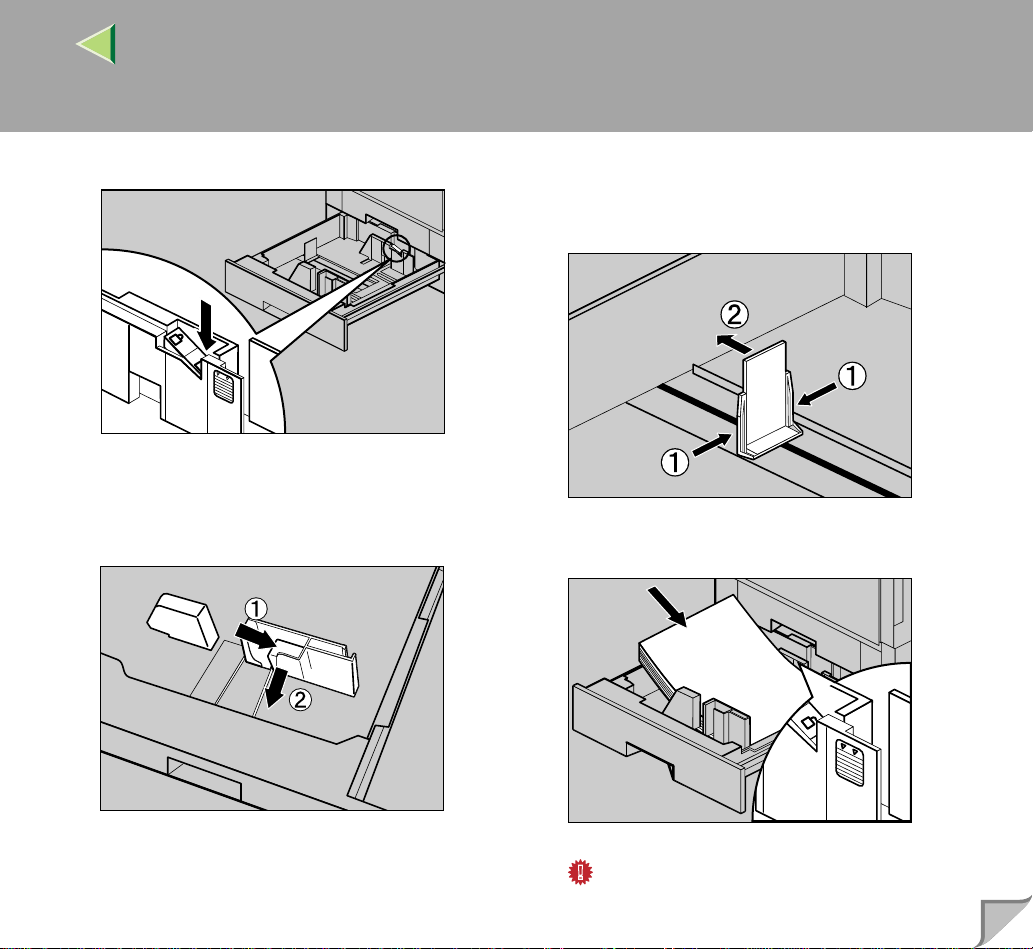
B
Set the paper guide lock to the "unlocked"
Page 23
Operating Instructions Maintenance Guide 2
23
position.
ZDJY003J
C
Pushing the green lever of the side guide
(AAAA), move the side guide tow ard you to
open it (BBBB).
D
Pinching both sides of the end guide (AAAA),
move the end guide in the direction of the
arrow to open it.
ZDJY801J
E
Load paper in the same direction.
ZDJY802J
ZDJY002J
Important
❒ Confirm that the top of the stack is not
higher than the limit mark inside the tray.
Page 24
Operating Instructions Maintenance Guide 2
24
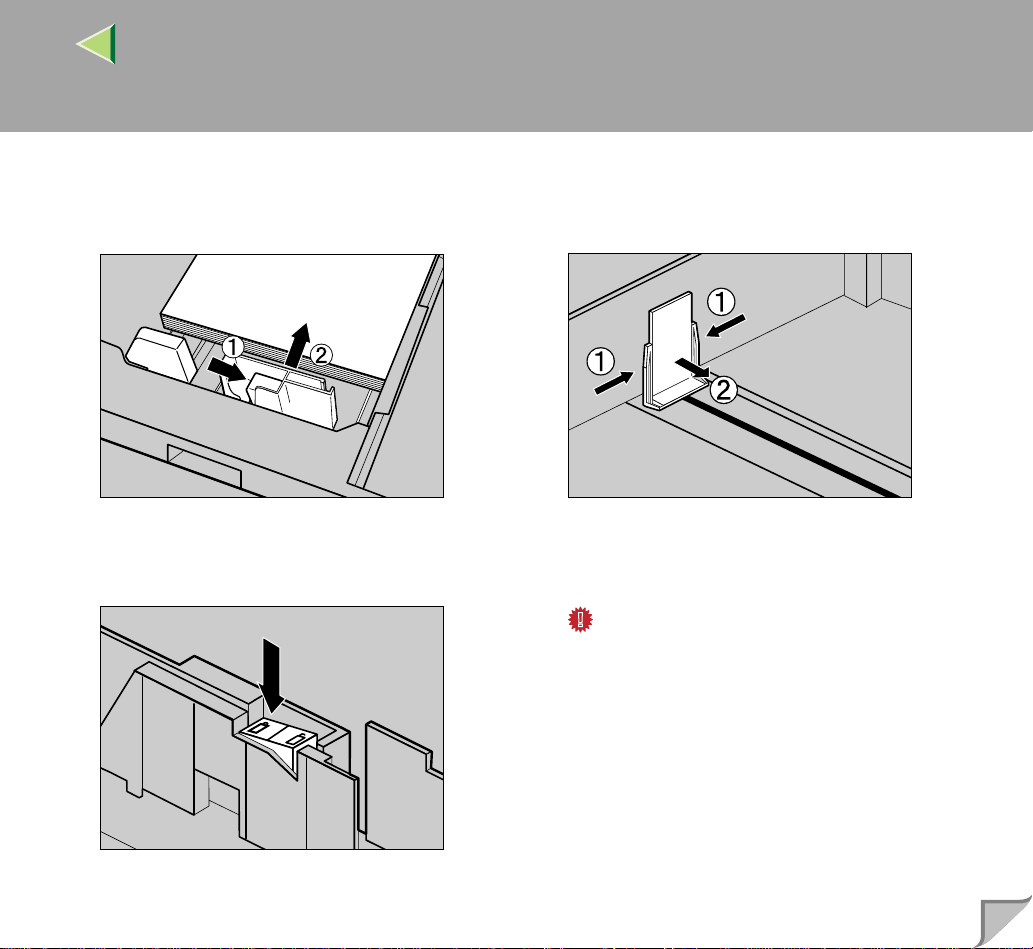
F
Pushing the green lever of the side guide
(AAAA), move the side guide tow ard the paper
stack until it stops (BBBB).
ZDJY006J
G
Make sure the paper is fixed in place, and
then lock the side guide.
H
Pinching both sides of the end guide (AAAA),
move the end guide towar d the pa per st ack
until it stops (BBBB).
ZDJY005J
I
Carefully slide the paper tray into the
printer until it stops.
Important
❒ Do not slide the pap er tr ay i n wi th forc e. If
you do, the front and side guides might
move.
ZDJY007J
Page 25
Operating Instructions Maintenance Guide 2
Loading paper in Paper Bank PS470 (2000-sheet Large Capacity Tray)
Important
❒
2000-sheet Large Capacity Tray uses 11 × 81/
K
paper exclusively. Load only 11 × 81/2 paper
at all times.
❒ If you want to load A4 K paper in the 2000-
sheet Large Capacity Tray, contact your sales
or service representa tiv e.
A
Pull out the Paper Tray slowly until it
stops.
25
B
With the print side down, align all four
sides of two paper stacks, and then load
them next to each other in the tray. Each
side has a limit of 1,000 sheets.
2
ZDJY009J
Important
❒ Align the paper and lo ad th em a gai ns t the
left and right walls, or a paper misfeed
might occur.
❒ Confirm that the top of the stack is not
higher than the limit mark inside the tray.
ZDJY008J
C
Push in the Paper Tray s lowly until it st ops.
Page 26
Operating Instructions Maintenance Guide 2
If you load a paper size that is not selected automatically
A
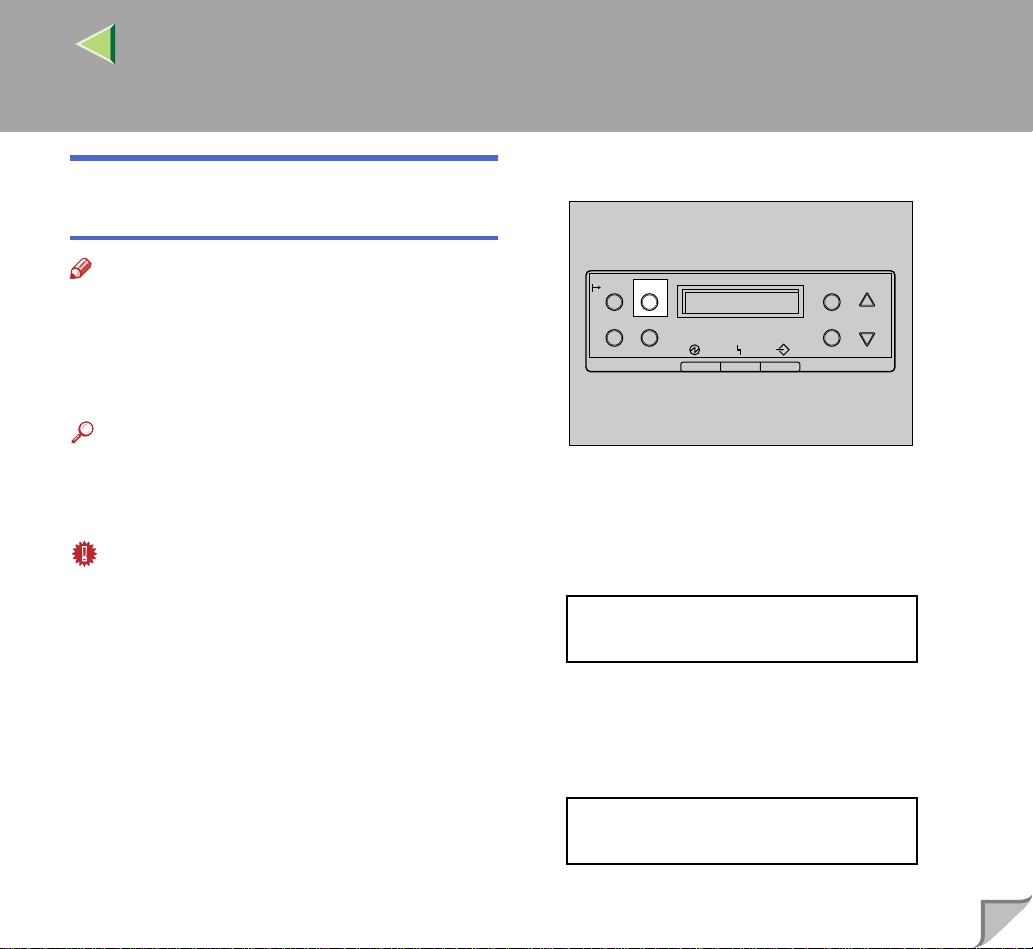
Press {{{{Menu}}}}.
26
Note
❒ Paper sizes that are not selected automatical-
ly are B4 L, A4K, B5L, 7
1
13L, 8
/2 × 13L, 81/4 × 13L, 8K (101/2 ×
15.35)L, 16K (7.68 × 10
7.68)K.
1
/4 × 101/
1
/2)L, 16K (101/2 ×
L, 8 ×
2
Reference
❒ See P.22 “Loading Paper in Tray 2 and the
Optional Paper Feed Unit” for deta ils about
how to load the paper.
Important
❒ Tray 1 uses 11 × 8
Load only 11 × 8
❒ Paper Bank PS 470 uses 11 × 8
exclusively. Load only 11 × 8
times.
❒ If you want to load A4 K paper in Tray 1 and
optional Paper Bank PS470, contact your
sales or service representative.
1
/2 K paper exclusively.
1
/2 paper at all times.
1
/2 K paper
1
/2 paper at all
This section uses Letter A4 L as an example.
On Line
Job Reset
Menu
Form Feed
Power Error Data In
Escape
#
Enter
ZDJS001N
"Menu" appears on the panel display.
B
Press {{{{UUUU}}}} or {{{{TTTT}}}} to display "Paper Input", and then press {{{{Enter}}}}.
Menu:
Paper Input
The paper selection menu is displayed.
C
Press {{{{UUUU}}}} or {{{{TTTT}}}} to display "Tray Paper
Size", and then press {{{{Enter}}}}.
Paper Input:
Tray Paper Size
The paper tray selection menu is displayed.
Page 27

Operating Instructions Maintenance Guide 2
27
D
Press {{{{UUUU}}}} or {{{{TTTT}}}} to display the target paper tray, and then press {{{{Enter}}}}.
Tray Paper Size:
Tray 2
The paper size selection menu is displayed.
E
Press {{{{UUUU}}}} or {{{{TTTT}}}} to display the loaded paper size, and then press {{{{Enter}}}}.
Tray2:
A4 (210 x 297)
After about two seconds, the display is r eturned to the menu.
F
Press {{{{On Line}}}}.
"Ready " appears on the panel display.
Ready
Important
❒ After printing on a paper size that is not se-
lected automatically, if you want to print on
paper that is selected automatically agai n,
reload the p aper, proceed t o step
return the setting to "Auto".
G
Press {{{{Menu}}}}.
On Line
Menu
Job Reset
Form Feed
Power Error Data In
"Menu" appears on the panel display.
H
Press {{{{UUUU}}}} or {{{{TTTT}}}} to display "Paper Input", and then press {{{{Enter}}}}.
Escape
#
Enter
ZDJS001N
, and
G
This completes the change in setting.
Menu:
Paper Input
The paper selection menu is displayed.
Page 28

Operating Instructions Maintenance Guide 2
28
I
Press {{{{UUUU}}}} or {{{{TTTT}}}} to display "Tray Paper
Size", and then press {{{{Enter}}}}.
Paper Input:
Tray Paper Size
The paper tray selection menu is displayed.
J
Press {{{{UUUU}}}} or {{{{TTTT}}}} to display the target paper tray, and then press {{{{Enter}}}}.
Tray Paper Size:
Tray 2
The paper size selection menu is displayed.
K
Press {{{{UUUU}}}} or {{{{TTTT}}}} to display "ppppAuto",
and then press {{{{Enter}}}}.
Tray 2
*Auto
After about two seconds, the display is r eturned to the menu.
L
Press {{{{On Line}}}}.
"Ready " appears on the panel display.
Ready
Changing the paper type
By selecting the paper typ e you want to load, the
printer can execute better printing. You can select from the following paper types.
• Plain Paper, Recycled Paper, Special Paper,
Color Paper, Letterhead Paper, Preprinted Paper, Prepunched Paper, Bond Paper, Card Stock
A
Press {{{{Menu}}}}.
On Line
Job Reset
Menu
Form Feed
Power Error Data In
Escape
#
Enter
ZDJS001N
"Menu" appears on the panel display.
Page 29

Operating Instructions Maintenance Guide 2
29
B
Press {{{{UUUU}}}} or {{{{TTTT}}}} to display "Paper Input", and then press {{{{Enter}}}}.
Menu:
Paper Input
The paper selection menu is displayed.
C
Press {{{{UUUU}}}} or {{{{TTTT}}}} to display "Paper Type",
and then press {{{{Enter}}}}.
Paper Input:
Paper Type
The paper tray selection menu is displayed.
D
Press {{{{UUUU}}}} or {{{{TTTT}}}} to display the target paper tray, and then press {{{{Enter}}}}.
Paper Type:
Tray 2
The paper type selection menu is displayed.
E
Press {{{{UUUU}}}} or {{{{TTTT}}}} to display the loaded paper type, and then press {{{{Enter}}}}.
Tray 2
Recycled Paper
After about two seconds, the display is returned to the menu.
F
Press {{{{On Line}}}}.
"Ready " appears on the panel display.
Ready
Page 30

Operating Instructions Maintenance Guide 2
Load Paper in the Bypass Tray
Besides regular paper, you can load thick paper,
envelopes, OHP transpa ren ci es, and paper that is
longer than A3L onto the Bypass Tra y, which
cannot be loaded in the Paper Trays or Paper
Feed Unit.
Note
❒ Paper sizes supported by the Bypass Tray
are 3.5 - 12 inch in width, and 5.8 - 18 inch in
length.
❒ If you load custom size pape r or special pa-
per, select the paper size with the operation
panel. The RPCS printer driver can select the
paper size with the printer driver properties.
The paper size selected with the printer driver
overrides the one s ele ct ed with the operation
panel. See P.33 “Specifying a custom paper
size for the Bypass Tray”.
❒ If you load thic k paper, OHP t ransparencies,
or envelopes, make the settings for thick paper or OHP transparencies with the operation
panel or printer dri ver. See P.34 “Specifying
a paper type for the Bypass Tray”.
❒ The number of pages that can be loaded in
the Bypass Tray differ s de pen din g on the paper type. Confirm that the top of the stack is
not higher than the limit mark inside the tray.
Limitation
❒ You cannot use the follow ing functions when
printing on paper that is loaded in the Bypass
Tray.
• Duplex Print
• Collate, Job Separation
• Staple/Punch
• Limitless Paper Feed
A
Open the bypass tray.
ZDJH202J
30
Page 31

Operating Instructions Maintenance Guide 2
31
Note
❒ If you load A4 or larger size paper, pull out
the bypass tray extension, an d then flip it
open.
ZDJH203J
B
Slide the side guides outward(AAAA), and then
load paper until it stops with the print side
up (BBBB).
C
Adjust the side guides to the paper width.
ZDJH205J
Important
❒ Confirm that the top of the stack is not
higher than the limit mark inside the tray.
❒ Shuffle the paper befo re lo adi ng t he s tac k
onto the tray so multiple sheets are not fed
in at one time.
ZDJH204J
Page 32

Operating Instructions Maintenance Guide 2
32
D
Set the paper size u sing the operation panel
as follows:
A Press {{{{Menu}}}}.
On Line
Job Reset
Menu
Form Feed
Power Error Data In
Escape
#
Enter
ZDJS001N
"Menu" appears on the panel display
B Press {{{{UUUU}}}} or {{{{TTTT}}}} to "Paper Input"
menu, and then press {{{{Enter}}}}.
The following message appears on the
panel display.
Menu:
Paper Input
C Confirm that "Bypass Size" is dis-
played, and then press {{{{Enter}}}}.
The following message appears on the
panel display.
Paper Input:
Bypass Size
D Press {{{{UUUU}}}} or {{{{TTTT}}}} to display the size and
direction of the paper in th e bypass tray.
Bypass Size
*11 x 17
After about two seconds, the display is returned to the menu.
E Press {{{{On Line}}}}.
"Ready " appears on the panel display.
Ready
Page 33

Operating Instructions Maintenance Guide 2
Specifying a custom paper size for the Bypass Tray
Important
❒ The paper size selected with the printer driver
overrides the one s ele ct ed with the operation
panel. You do not have to make settings with
the operation panel if you already made them
with the printer driver. Howe ver, when pr inting with a printer drive r other than the R PCS
printer driver, you must make the settings using the operation panel. For more information
about the printer driver, see the Help Files.
❒ The printer cannot print from applications that
do not supports custom paper size.
A
Press {{{{Menu}}}}.
On Line
Job Reset
Menu
Form Feed
Power Error Data In
Escape
#
Enter
B
Press {{{{UUUU}}}} or {{{{TTTT}}}} to display "Paper Input", and then press {{{{Enter}}}}.
The following message appears on the panel
display.
Menu:
Paper Input
C
Confirm that "Bypass Size" is displayed,
and then press {{{{Enter}}}}.
The following message appears on the panel
display.
Paper Input:
Bypass Size
D
Press {{{{UUUU}}}} or {{{{TTTT}}}} to display "Custom
Size", and then press {{{{Enter}}}}.
The following message appears on the panel
display.
Bypass Size:
Custom Size
33
ZDJS001N
"Menu" appears on the panel display.
Page 34

Operating Instructions Maintenance Guide 2
E
Press {{{{UUUU}}}} or {{{{TTTT}}}} to set the horizontal value, and then press {{{{Enter}}}}.
The following message appears on the panel
display.
Custom Size:
Vert. 0 "
F
Press {{{{UUUU}}}} or {{{{TTTT}}}} to set the vertical value,
and then press {{{{Enter}}}}.
Custom Size:
Horiz. 0 "
After about two seconds, the display is r eturned to the menu.
G
Press {{{{On Line}}}}.
The following message appears on the panel
display.
Ready
34
Specifying a paper type for the Bypass Tray
By selecting the paper typ e you want to load, the
printer can execute better printing. You can select from the following paper types.
• Plain Paper, Recycled Paper, Special Paper,
Color Paper, Letterhead, Preprinted, Prepunched, Labels, Bond Paper, Card Stock,
OHP Transparencies, Thick Paper, Plain Paper (Duplex), Thick Paper (Duplex)
Important
❒ Be sure to select the paper type when you
load labels, thick paper, or OHP transparencies in the Bypass Tray.
Limitation
❒ You cannot use the follow ing functions when
printing on paper loaded in the Bypass Tray.
• Duplex Print
• Collate, Job Separation
• Staple, Punch
• Limitless Paper Feed
Page 35

Operating Instructions Maintenance Guide 2
35
A
Press {{{{Menu}}}}.
On Line
Menu
Job Reset
Form Feed
Power Error Data In
"Menu" appears on the panel display.
B
Press {{{{UUUU}}}} or {{{{TTTT}}}} to display "Paper Input", and then press {{{{Enter}}}}.
The following message appears on the panel
display.
Escape
#
Enter
ZDJS001N
Menu:
Paper Input
C
Press {{{{UUUU}}}} or {{{{TTTT}}}} to display "Paper Type",
and then press {{{{Enter}}}}.
The following message appears on the panel
display.
Paper Input:
Paper Type
D
Press {{{{UUUU}}}} or {{{{TTTT}}}} to display "Bypass
Tray", and then press {{{{Enter}}}}.
The following message appears on the panel
display.
Paper Type:
Bypass Tray
E
Press {{{{UUUU}}}} or {{{{TTTT}}}} to display th e tar get paper type, and then press {{{{Enter}}}}.
Bypass Tray:
*Thick Paper
After about two seconds, the display is returned to the menu.
Page 36

Operating Instructions Maintenance Guide 2
F
Press {{{{On Line}}}}.
The following message appears on the panel
display.
Ready
36
Page 37

Operating Instructions Maintenance Guide 2
2. Troubleshooting
Error & Status Messages on the Operation Panel
❖❖❖❖ Status Messages
Messages/Second messages Description Solution
Calibrating... The printer is calibrating the color. Wait for a while.
Energy Save Mode In Energy Save Mode Level 2. No action requ ired.
Hex Dump Mode In Hex Dump Mode. No action required.
Loading Toner... The printer is loading the toner. Wait for a while.
Offline The printer is offline and cannot print
data.
Initializing... Please Wait The printer is initializing the develop-
ment unit.
Printing... The printer is doing print job. Wait for a while.
Processing... Print data is being processed. Wait for a while.
Ready The default ready messag e . The
printer is ready to use.
Press {
Wait for a while.
No action required.
On Line
}.
37
Resetting Job... Job is being reset. Wait for a while.
Waiting... The printer is waiting for the next
data to print.
Warming Up... The printer is warming up and not
ready.
Wait for a while.
Wait until the printer signals Ready.
Page 38

Operating Instructions Maintenance Guide 2
❖❖❖❖ Alert Messages
Messages/Second messages Description Solution
38
Add Staples The stapler is out of staples. Job is not
stapled.
Add Toner/Yellow/Magenta/Cyan/
Black
Add Toner Black The printer is out of toner (K). Replace a new toner cartridge (K).
Add Toner Cyan The printer is out of toner (C). Replace a new toner cartridge (C).
Add Toner Magenta The printer is out of toner (M). Replace a new toner cartridge (M).
Add Toner Yellow The printer is out of toner (Y). Replace a new toner cartridge (Y).
The printer is out of the indicated ton-
er(s).
Replace new staples.
See P.79 “Adding Staples”.
Replace a new toner cartridge of the
indicated color(s).
See "Replacing Consumables and
Maintenance Kit" in Maintenance
Guide 1.
See "Replacing Consumables and
Maintenance Kit" in Maintenance
Guide 1.
See "Replacing Consumables and
Maintenance Kit" in Maintenance
Guide 1.
See "Replacing Consumables and
Maintenance Kit" in Maintenance
Guide 1.
See "Replacing Consumables and
Maintenance Kit" in Maintenance
Guide 1.
Page 39

Operating Instructions Maintenance Guide 2
Messages/Second messages Description Solution
39
Call Service: EC Power Off On
/If Error Reoccur Call Service
Change Setting Tray #
/Paper Size: Paper Type:
Close Duplex Unit Cover The cover for the duplex unit is open. Close the cover for the duplex unit.
Close Finisher Front Cover
Close Right Cover The upper right cover (the cover for
Close Finisher Upper Cover The finisher upper cover is open. Close the upper cover for the finisher.
Close Finisher Upper Cover The paper entrance cover for the fin-
Close Front Cover Th e front cover is open. Close the front cover for the printer.
Close Lower Right Cover The right cover for the paper feed ta-
A communication error sent from the
engine to the controller.
The paper size and type setting in the
tray differs from that of actual paper
size and type in the tray.
The front cover for the finisher is open.
the toner cartridge) is open.
isher is open.
ble/large capacity tray is open.
Turn the power switch off and then
on. If the message appears again,
contact your sales or service representative.
Load {paper size and type} pa per with
the selec t ed fe ed direction into the
tray, and then change the paper size
and type with the operat ion pa ne l.
Or press {
the tray with the operational panel.
Or press {
print job.
Close the front cover for finisher.
Close the upper right cover.
Close the upper entrance cover for
the finisher.
Close the right cover for the paper
feed table/large capacity tray.
Form Feed
Job Reset
}, and then select
} to cancel the
Close Mailbox Cover The cover for 4-bin Mailbox is open. Close the cover for the 4-bin Mailbox
tray.
Page 40

Operating Instructions Maintenance Guide 2
Messages/Second messages Description Solution
Close Right Cover The right cover is open. Close the right cover.
40
Close Upper Left Cover The upper left cover (the c over for the
fusing unit) is open.
Driver Setting Error (Memory) The printer identified a download er-
ror.This error may occur when the in-
stalled memory amount is less than
the driver setting.
Duplex Cancelled The setting of Duplex Print has been
cancelled.
Error:Tray 1 Reset The Job
/Then Power OffOn
Error:Tray 1 Form Feed
/Or Job Reset Then Power OffOn
Exceeded Max. Pages (Collate) The printer identified a collation page
Exceeded Max. Stored Files The maximum number of stored file s
There is a problem with the current
specified tray. The job can not be
processed.
The printer identified the failure of
the indicated paper tray. The job is
not printed.
overflow error.
has been exceeded during Sample
Print of Lacked Print.
Close the upper left cover.
Verify that the paper memory size is
specified with tha driver setting.
(a) To print the image correctly, add
memory to the printer. (b) Be sure to
use the correct paper.
Reset the job then turn the printer
Off, and then back On.
Apply Form Feed from other tray or
cancel the job, and then switch your
printer Off then back On. If the error
continues,contact your sales or service representative.
Increase the RAM capacity.
Install the optional hard disk drive.
Delete the stored files.
Page 41

Operating Instructions Maintenance Guide 2
Messages/Second messages Description Solution
41
Exceeded Max. Stored Pages The maximum number of pages has
been exceeded during Sample Print
of Lacked Print
Hardware Problem DIMM The printer identified a DIMM sum
value error.
Hardware Proble m Ethernet The printer identified an ethernet error. Turn the power s witch off and then
Hardware Problem Finisher There is a problem with the finisher. Tu rn the power switch off and then
Hardware Problem HDD The printer identified a HDD Board
error.
Reduce the number of pages to print.
Remove and re-install the DIMM
correctly.
Remove any dust under the DIMM.
If the message appears again, contact
your sales or service representative.
See "Setting Up" in the Setup Guide.
on. If the message appears again,
contact your sales or service representative.
on. If the message appears again,
contact your sales or service representative.
Remove and re-install the HDD
Board correctly.
If the message appears again, contact
your sales or service representative.
See "Setting Up" in the Setup Guide.
Page 42

Operating Instructions Maintenance Guide 2
Messages/Second messages Description Solution
42
Hardware Problem IEEE1394 The printer identified an IEEE1394
Board error.
Remove and re-install the IEEE1394
Board correctly.
Confirm that the IEEE 1394 In-
A
terface Unit Type1045 is attached
to the computer correctly.
Confirm that the IEEE 1394 inter-
B
face cable is connected securely.
Restart the computer.
C
If the message appears again even
after executing above operation,
proceed to the following steps.
Unplug the IEEE 1394 interface
D
cable which is connected to the
printer.
Execute the utility tool for IEEE
E
1394 Interface Unit Type1045
which is stored in the following
path in the CD-ROM labeled
"Printer Drivers and Utilities".
UTILITY\1394
Important
❒ For details about using
the utility tool for IEEE
1394, see the README
file in the same directry in
the CD-ROM.
Page 43

Operating Instructions Maintenance Guide 2
Messages/Second messages Description Solution
43
Hardware Problem IEEE1394 The printer identified an IEEE1394
Board error.
Hardware Problem NV-RAM The printer identified a Memory
Switch(User Account Enhance Unit)
error.
Hardware Problem Option RAM The printer identified an optional
RAM error.
Hardware Problem Parallel I/F There is a problem with the parallel
interface.
Hardware Problem Staple Unit Th ere is misfeed in the finisher or
there is a problem with the staple unit
failure.
If the message appears again, contact
your sales or service representative.
See "Setting Up" in the Setup Guide.
Replace the User Account Enhance
Unit.
Remove and re-install the optional
RAM.
If the message appears again, contact
your sales or service representative.
If you use the parallel I/F, replace the
interface cable that caused the error.
If the message apperars again, contact your sales or service representative.
Remove the misfeed. If the message
appears again, contact your sales or
service representative.
See P.71 “When "Remove Misfeed R:
Finisher" Appears”
See P.77 “Removing Jammed Sta-
ples”
Hardware Problem Tray 1 There is a problem with the paper lift
motor of the Tray 1.
Turn the power switch off and then
on. If the message appears again,
contact your sales or service representative.
Page 44

Operating Instructions Maintenance Guide 2
Messages/Second messages Description Solution
44
Hardware Problem Tray 2 There is a problem with the paper lift
motor of the Tray 2.
Hardware Problem Tray 3 There is a problem with the paper lift
motor of the paper tray 3.
Hardware Problem Tray 4 There is a problem with the paper lift
motor of the paper tray 4.
HDD Full The maximum HDD area size for
form/font has been exceeded.
An HDD overflow error occurred
during Sample Print or Lacked Print.
HDD Not Installed The user tries to print the Lacked
Print data without HDD installed.
I/O Buffer Overflow The max i mum size of the I/O buffer
has been exceeded.
Turn the power switch off and then
on. If the message appears again,
contact your sales or service representative.
Turn the power switch off and then
on. If the message appears again,
contact your sales or service representative.
Turn the power switch off and then
on. If the message appears again,
contact your sales or service representative.
Delete the disused form /font types.
Delete the stored files or reduce the
size of the Sample Print file or
Lacked Print file.
If you use the Locked Print feature,
make sure to install HDD. If the error
continues, contact your sales or service representative.
Increase the size of the I/O buffer
through the I/F Setup.
Invalid Password Try Again The entered password with th e opera-
tion panel is not correct.
Enter the correct password with the
operation panel.
Page 45

Operating Instructions Maintenance Guide 2
Messages/Second messages Description Solution
45
Load Correct Size Paper
/Press # To Continue
Load Paper Tray # The indicated tray is out of paper. #:
Load Paper
/Paper Size: Paper Type:
Menu Protected Cannot Change The menu is protected and the setting
No Files Exist There are no files available for Sam-
The paper size setting in the tray dif-
fers from that of actual paper size in
the tray.
tray number
1:The printer received a request for a
paper type, or paper size not available
in the printer, and Tray Locking is not
applicable.
2:The paper type and size loaded in
the tray which the printer serched us-
ing Tray Locking is Invalid for Du-
plex Print.
cannot be changed.
ple Print job or Locked Print job.
Load {paper size} paper with the selected feed direction into the tray, and
then change the paper size with the
operation panel.
Or press {
tray with the operational panel.
Or press {
print job.
Load paper into the indicated paper
tray.
Change the setting of the indicated
paper input tray, or press {
set
here.
Wait for two seconds until the previous display appears.
Wait for two seconds until the previous display appears.
Form Feed
Job Reset
}. Form Feed is not applicable
}, and select the
} to cancel the
Job Re-
P=07 I=9Fc01234 Power Off On
/If Error Reoccur Call Service
A controller error. The SC number in-
dicates the problem.
Turn the power switch off and then
on. If the message appears again,
contact your sales or service representative.
Page 46

Operating Instructions Maintenance Guide 2
Messages/Second messages Description Solution
46
Paper Inval i d for Duplex:T ra y #
/Change Setting or Form Feed
Punch-hole Chips are Full The Punch Chips is full of punch
Remove MisfeedA:Internal Path
/See Instructions in Front Cover
Remove MisfeedB: Fusing Unit
/See Instructions in Front Cover
Remove MisfeedR: Finisher
/Open Front Cover
The printer detected the setting of the
indicated tray is invalid for Duplex
Tray. #: tray number
chips.
There is a misfeed in the printer. Remove the misfed paper following
There is a misfeed in the fusing unit. Remove the misfed paper following
There is a misfeed in the finisher. Open the finisher cover and remove
Change the setting of the indicated
paper input tray or apply Form Feed
using another t r a y, or press {
}.
set
Remove the punch chips from the
Punch Chips.
See P.82 “Removing Punc h- h ol e
Chips”
the instructions inside the front cover.
For more information, see P.67
“When "Remove Misfeed A: Internal
Path" Appears”.
the instructions inside the front cover.
For more information, see P.68
“When "Remove Misfeed B: Fusing
Unit" Appear s”.
misfeed.
For more information, see P.71
“When "Remove Misfeed R: Finisher" Appears”.
Job Re-
Page 47

Operating Instructions Maintenance Guide 2
Messages/Second messages Description Solution
47
Remove Misfee dW: Mailbox
/Open Mailbox Cover
Remove MisfeedY: Paper Tray
/See Instructions in Front Cover
Remove Misfeed: Duplex Unit
/See Instructions in Front Cover
Remove Misfeed: Dup.Feed Unit
/See Instructions in Front Cover
Remove Paper All Output Trays All output trays are full. Remove paper from all output trays.
Remove Paper Finisher Tray # The indicated finisher shift tray is
There is a misfeed in the output 4-bin
tray.
There is a misfeed in the specified in-
put tray, or the printer is not feeding
paper.
There is a misfeed in the duplex unit. Remove th e misfed paper following
There is a misfeed in the duplex feed
unit.
full. #:finisher shift tray number
Open the mailbox cover and remove
misfeed.
For more information, see P.70
“When "Remove Misfeed W: Mailbox" Appears”.
Remove the misfe d paper following
the instructions inside the front cover.
For more information, see P.74
“When "Remove Misfeed Y: Paper
Tray" Appears”.
the instructions inside the front cover.
For more information, see P.75
“When "Remove Misfeed: Duplex
Unit" Appear s”.
Remove the misfed paper.
See "Removing Misfed Paper in the
Duplex Feed Unit" in Maintenance
Guide 1.
Remove the pa per from the i ndicate d
finisher shift tray.
Remove Paper From Upper Tray The upper tray (output 1-bin tray)is
full.
Remove paper from the upper tray.
Page 48

Operating Instructions Maintenance Guide 2
Messages/Second messages Description Solution
Remove Paper Inside Finisher There is still paper in the finisher. Open the cover for the finisher and
remove paper.
See P.71 “When "Remove Misfeed R:
Finisher" Appears”
48
Remove Paper Inside Finisher A communication error is sen t from
the system unit to the duplex unit.
Remove Paper Mailbox Tray # The output tray # of the optional 4-
bin Mailbox is full. #:mailbox tray
number
Remove Paper St andard Tray The standard output tray is full Remove paper from sta ndard output
Replace Black Dev. Unit(TypeD) It is time to replace the black devel-
opment unit.
Remove and re-install the duplex
unit. If the problem continues, contact your sales or service representative.
Remove paper from the indicated 4bin Mailbox tray.
trays.
Replace a new black development
unit.
Depending on your service contract ,
contact your sales or service representative.
See "Replacing Consumables and
Maintenance Kit" in Maintenance
Guide 1.
Page 49

Operating Instructions Maintenance Guide 2
Messages/Second messages Description Solution
Replace Black PCU (Type F) It is time to replace the black PCU. Replace a new black PCU.
Depending on your service contract ,
contact your sales or service representative.
See "Replacing Consumables and
Maintenance Kit" in Maintenance
Guide 1.
49
Replace Color Dev. Unit(TypeB) It is time to replace the color develop-
ment unit.
Replace Color PCU (Type A) It is time to replace the color PCU. Replace a new color PCU.
Replace a new color development
unit.
Depending on your service contract ,
contact your sales or service representative.
See "Replacing Consumables and
Maintenance Kit" in Maintenance
Guide 1.
Depending on your service contract ,
contact your sales or service representative.
See "Replacing Consumables and
Maintenance Kit" in Maintenance
Guide 1.
Page 50

Operating Instructions Maintenance Guide 2
Messages/Second messages Description Solution
Replace Fuser Oil Unit (TypeG) It is time to replace the fuser oil unit. Replace a new fuser oil unit.
Depending on your service contract ,
contact your sales or service representative.
See "Replacing Consumables and
Maintenance Kit" in Maintenance
Guide 1.
Replace Fusing Unit (Type C) It is time to replace the fusing unit. Peplace a new fusing unit.
Depending on your service contract ,
contact your sales or service representative.
See "Replacing Consumables and
Maintenance Kit" in Maintenance
Guide 1.
Replace Waste Toner (Type E) It is time to replace the waste toner. Replace a new fusing unit.
Depending on your service contract ,
contact your sales or service representative.
See "Replacing Consumables and
Maintenance Kit" in Maintenance
Guide 1.
50
Reset Cyan Toner Correctly The toner cartridge (C) is not set cor-
rectly or is not set, and the color print-
ing is non-applicable.
Set the toner cartridge (C) correctly.
See "Setting Up" in the Setup Guide.
Page 51

Operating Instructions Maintenance Guide 2
Messages/Second messages Description Solution
51
Reset Develop. Unit Correctly
/Yellow/Magenta Cyan/Black
Reset Duplex Unit Correctly The duplex paper feed unit is not set
Reset Finisher Correctly Finisher is not set correctly, or is not
Reset Fuser Oil Unit Correctly The fuser oil unit is not set correctly,
Reset Fusing Unit Correctly There is no fusing unit, or the fusing
Reset Magenta Toner Correctly The toner cartridge (M) is not set cor-
The indicated development unit(s) is/
are not set correctly, or is not set.
correctly or is not set.
set.
or is not set.
unit is not installed correctly.
rectly or is not set, and the color print-
ing is non-applicable.
Set the indicated development unit(s)
correctly. See "Replacing Consuma-
bles and Maintenance Kit" in Maintenance Guide 1.
Remove and re-install the duplex paper feed unit. If the error continues,
contact your sales or service representative.
See "Setting Up" in the Setup Guide.
Set the finisher correctly.
See "Setting Up" in the Setup Guide.
Set the fuse oil unit correctly.
See "Replacing Consumables and
Maintenance Kit" in Maintenance
Guide 1.
Set the fusing unit correctly.
See "Replacing Consumables and
Maintenance Kit" in Maintenance
Guide 1.
Set the toner cartridge (M) correctly.
See "Setting Up" in the Setup Guide.
Page 52

Operating Instructions Maintenance Guide 2
Messages/Second messages Description Solution
52
Reset PCU Correctly
/Yellow/Magenta Cyan/Black
Reset Toner Black The indicated toner cartridge is not
Reset Toner Cyan The indicated toner cartridge is not
Reset Toner Magenta The indicated toner cartridge is not
Reset Toner Yellow The indicated toner cartridge is not
Reset Transfer Unit Correctly The transfer unit is not set correctly,
Reset Tray 1 Correctly The indicated paper input tray is not
The indicated Phot oc o ndu c t or
Unit(s) is/are not set correctly, or is
not set.
set correctly.
set correctly.
set correctly.
set correctly.
or is not set.
set correctly, or is not set.
Set the indicated Photoconductor
Unit(s) correctly.
See "Replacing Consumables and
Maintenance Kit" in Maintenance
Guide 1.
Set the indicated toner cartridge(s)
correctly.
See "Setting Up" in the Setup Guide.
Set the indicated toner cartridge(s)
correctly.
See "Setting Up" in the Setup Guide.
Set the indicated toner cartridge(s)
correctly.
See "Setting Up" in the Setup Guide.
Set the indicated toner cartridge(s)
correctly.
See "Setting Up" in the Setup Guide.
Contact your sales or service representative.
Set the indicated paper input tray correctly.
Reset Tray Correctly The printer detected, when process-
ing a job through Auto Tray Select,
that any of paper input tray is not set
correctly, or is not set.
Set the indicated paper input tray correctly.
Page 53

Operating Instructions Maintenance Guide 2
Messages/Second messages Description Solution
53
Reset Waste Toner Correctly The waste toner bottle is not set cor-
rectly, or is not set.
Reset Yellow Toner Correctly The toner cartridge (Y) is not set cor-
rectly or is not set, and the color print-
ing is non-applicable.
RPCS Graphic Error
RPCS Graphic Error The printer memory is not initialized
RPCS Syntax Error The printer identified a syntax error.
SC XXX-X Power Off On
/If Error Reoccur Call Service
Staple Cancelled
The graphic is not initialize d becaus e
the graphic memory was not reserved.
because the CDC memory was not re-
served via the system call.
This error results from; data trans-
mogrification caused by the transmis-
sion path problem, data interruption,
data transmission from other drivers,
etc.
The Service Code or SC numb er indi-
cates the problem.
The Staple feature has been cancelled.
Set the waste toner bottle correctly.
Set the toner cartridge (Y) correctly.
See "Setting Up" in the Setup Guide.
Replace the installed memory.
Replace the installed memory.
Be sure to use the correct driver.
Turn the power switch off and then
on. If the message appears again,
contact your sales or service representative.
Verify that the paper orientation and
layout is proper ty se t, and make sure
whether your desired settings for the
finisher is selected.
Toner is Almost Empty: Black The printer is almost out of toner (K). Prepare a new toner cartridge (K).
Page 54

Operating Instructions Maintenance Guide 2
Messages/Second messages Description Solution
Toner is Almost Empty: Cyan The printer is almost out of toner (C). Prepare a new toner cartridge (C).
Toner is Almost Empty: Magenta The printer is almost out of toner (M). Prepare a new toner cartridge (M).
Toner is Almost Empty: Yellow The printer is almost out of toner (Y). Prepare a new toner cartridge (Y).
54
Waste Toner is Almost Full (E) The waste toner bottle is almost full
of toner dust.
Prepare a new waste toner bottle or
contact your sales or service representative.
See "Appendix" in the Setup Guide.
Page 55

Operating Instructions Maintenance Guide 2
Printer Does Not Print
Possible Cause Solutions
Is the power on? Confirm that the cable is securely plugged into the power outlet and the printer.
Turn on the power switch.
55
Does the
Does the
Is paper loaded? Load paper into the paper tray or on the bypass tray.
Can you print a configuration
page?
Is the interface cable connecting
the printer to the computer connected securely?
Are you using the correct interface cable?
indicator stay on?
Online
indicator stay red?
Error
Press {
Check the error message on the panel display and take the required action.
See P.9 “Paper and Other Media Supported by This Printer”.
If you cannot print a configuration page, it probably indicates a printer malfunc-
tion. You should contact your sales or service representative.
See "Printing a Configuration Page" in Administrat o r Re fe r e nc e 2.
Connect the interface cable properly. If there are any connectors or screws, confirm that they are fastened securely.
The type of interface cable you should use depends on the computer. Be sure to
use the correct one.
If the cable is damaged or worn, replace it with a new one.
See "Appendix" in Administrator Reference 2.
} so the indicator lights.
On Line
Page 56

Operating Instructions Maintenance Guide 2
Possible Cause Solutions
56
Is the Data In indicator blinking
or lit after starting the print job?
If not blinking or lit, the data is not being sent to the printer.
❖❖❖❖ If the printer is connected to the computer using the interface
cable
Make sure the printer port settings are correct. For a parallel port connection,
port LPT1 or LPT2 should be set.
• Windows 95/98/Me
Click [
A
Click to select the icon of the printer. Next, on the [
B
[
Properties
Click the [
C
Check the [
D
port is selected.
• Windows 2000
Click [
A
Click to select the icon of the printer. Next, on the [
B
[
Properties
Click the [
C
Check the [
D
port is selected.
• Windows NT 4.0
Click [
A
Click to select the icon of the printer. Next, on the [
B
[
Properties
Click the [
C
Check the [
D
port is selected.
], point to [
Start
].
Details
Print to the following port
], point to [
Start
].
] tab.
Port
Print to the following port
], point to [
Start
].
] tab.
Port
Print to the following port
Settings
] tab.
Settings
Settings
], and then click [
] box to confirm that the correct
], and then click [
] box to confirm that the correct
], and then click [
] box to confirm that the correct
Printers
File
Printers
File
Printers
File
] menu, click
] menu, click
] menu, click
].
].
].
Page 57

Operating Instructions Maintenance Guide 2
Possible Cause Solutions
57
Is the Data In indicator blinking
or lit after starting the print job?
When you use IEEE 1394 Interface Unit Type1045
❖❖❖❖ Network Connection
Contact your network ad ministrator.
Confirm that the IEEE 1394 Interface Unit Type1045 is attached to the com-
A
puter correctly.
Confirm that the IEEE 1394 interface cable is connected securely.
B
Restart the computer.
C
If the error occures even after executing above operation, proceed to the following steps.
Unplug the IEEE 1394 interface cable which is connected to the printer.
D
Execute the utility tool for IEEE 1394 Interface Unit Type1045 which is
E
stored in the following path in the CD-ROM labeled "Printer Drivers and Utilities".
UTILITY\1394
Important
❒ For details about using the utility tool for IEEE 1394, see the RE-
ADME file in the same directry in the CD-ROM.
Page 58

Operating Instructions Maintenance Guide 2
Other Printing Problems
Status Possible Causes, Descriptions, and Solutions
Black gradation is not natural. • PCL 5c/PostScript
Select "CMY+K" for Gray Reproduction in the printer driver's [
] dialog box under the [
vanced
• RPCS
Select "CMY+ K " fo r Gr a y Re pr od uc t i o n un d er th e [
] tab in the printer driver's [
ments
Print Quality
Change Use Setting
] tab.
58
Ad-
Image Adjust-
] dialog box.
Color documents are printed in black
and white.
Fine dot pattern does not print. • PCL 5c/PostScript
The printer driver is not set up for color printing.
• PCL 5c/PostScript
Select "Color" for the Color/Black and White under the printer driver's
[
] tab.
Setup
• RPCS
Select "Color" for the Color/Black and White under the printer driver's
[
Print Settings
For more information, see the printer driver's Help file.
Some applications normally print color text as black and white.
Change [
driver's [
• RPCS
Change [
[
Change User Settings
printer driver's dialog box.
For more information, see the printer driver's Help file.
] tab.
Dithering
Print Quality
Dithering
] setting in the Advanced dialog box under the printer
] tab.
] setting under the [
] dialog box under the [
Image Adjustments
Print Quality
] tab in the
] tab in the
Page 59

Operating Instructions Maintenance Guide 2
Status Possible Causes, Descriptions, and Solutions
59
Images are cut off, or excess pages are
printed.
It takes too much time to complete the
print job.
You might be printing on paper smaller than the paper size selected in the
application. Use paper the same size as that selected in the application. If
you cannot load paper of the correct size, use the reduction function to reduce the image, and then print.
See the printer driver's Help file.
Photographs and other data intensive pages take a long time for the printer
to process, so simply wait when printing such data.
Changing the following settings may help to speed up printing.
• PCL 5c
Select "600×600 dpi" for R esolut ion und er the [
printer driver's dialog box.
• PostScript
Select "1200×600 dpi" or "600×600 dpi" for Re solution under the [
] tab in the printer driver's dialog box.
Quality
Select "Post Script(optimize for speed)" for PostScript output format
under the [
• RPCS
Select "1200×600 dpi" or "600×600 dpi" for Resolution under the [
age Adjustments
printer dialog box.
Select "Speed" for Print priority under [
driver's dialog box.
For more information, see the printer driver's Help file.
PostScript
] tab in the printer driver's dialog box.
] tab in the Change Use Settings dialog box in the
Print Quality
Print Quality
] tab in the
Print
Im-
] tab in the printer
The data is so large or complex that it takes time to process it. If the Data
In indicator is blinking, the data processing is being done. Just wait until it
resumes.
If "Warming Up... " appears on the panel display, the printer is now warming up. Wait for a while.
Page 60

Operating Instructions Maintenance Guide 2
Status Possible Causes, Descriptions, and Solutions
60
It takes too much time to resume printing.
Multiple pages are fed through the
printer at once.
Output are not delivered to the selected
tray you require.
Paper misfeeds occur frequently. Check that the side guide of the Paper Tray is locked.
The data is so large or complex that it takes time to process it. If the Data
In indicator is blinking, the data processing is being done. Just wait until it
resumes.
The printer might be set to the Energy Saver mode. In the Energy Saver
mode, the printer has to warm up, and this takes time until printing starts.
To cancel the Energy Saver mode, select "Off" for "Energy Saver 1" in the
System Settings menu.
Paper misfeeds easily when the Paper Feed Roller is dirty. Contact your
sales or service representative to replace the Paper Feed Roller.
When using the bypass tray, the size selected on the display panel might be
different from actual paper size. Select the correct paper size.
See P.9 “Paper and Other Media Supported by This Printer”.
When you are using a Windows operating system, the printer driver set-
tings override those set using the operation panel. Set the desired output
tray using the printer driver.
See the printer driver's Help file.
See P.9 “Paper and Other Media Supported by This Printer”.
The paper size and feed direction of the paper in the Bypass Tray might not
be the same as those you selected with the operation panel. Check the settings on the operation panel, and load paper of the correct paper size and
feed direction.
See P.9 “Paper and Other Media Supported by This Printer”.
Check that the paper guide of the Paper Tray is attached properly.
Page 61

Operating Instructions Maintenance Guide 2
Status Possible Causes, Descriptions, and Solutions
61
Solid areas, lines or text are shiny or
glossy when created as a mixture of cyan, magenta, yellow.
Solid lines are printed as broken lines. • PCL 5c/PostScript
Some parts of the print image are not
clear.
The color of the printout is different from
the color on the computer's display.
• PCL 5c/PostScript
Select "K(Black)" for Gray Reproduction in the printer driver's [
] dialog box under the [
vanced
• RPCS
Select "K(Black)" for Gray Repr oduction under the [
] tab in the printer driver's [
ments
Change the [
printer driver's [
• RPCS
Change the [
[
Change User Settings
printer driver's dialog box.
For more information, see the printer driver's Help file.
Make the image density darker.
To adjust the image density, press {
lect Image Density from the Maintenance menu.
The toner based color settings with the printer driver causes a drastic
change in printout color.
Changing the color settings with the printer driver causes a drastic change
in printout color.
See the printer driver's Help file.
Dithering
Print Quality
Dithering
Ad-
Print Quality
Change Use Setting
] setting in the Advanced dialog box under the
] tab.
] setting under the [
] dialog box, under the [
Menu
] tab.
Image Adjust-
] dialog box.
Image Adjustments
Print Quality
} on the operation panel, and se-
] tab in the
] tab in the
The image is printed in the wrong orientation.
The feed direction you selected and the feed direction selected in Option
Setup of the printer driver might not be the same. Make the proper settings.
Page 62

Operating Instructions Maintenance Guide 2
Status Possible Causes, Descriptions, and Solutions
62
The operation panel error message stays
on after removing the misfed paper.
The print image is not clear. Due to a sudden change in temperature, condensation might appear inside
The print side of the page is a hazy gray. Adjust the image density.
The printed image is different from the
image on the computer.
Open the front cover of the printer, and then close it.
the printer, reducing print quality. If this occurs, when you move the printer
from a cold room to a warmer room, do not use the printer until it acclimatizes to the temperature.
To adjust the image density, press {
the Maintenance menu.
See "Cleaning and Adjusting the Printer" in Maintenance Guide 1.
If paper is curled, correct it.
Curled or folded paper might cause a hazy gray print. Curling often occurs
on postcards, so be sure to correct it before printing.
When you use some functions, such as enlargement and reduction, the layout of the image might be different from that displayed in the computer display.
You might have selected to replace True Type fonts with printer fonts in
the printing process.
To print an image similar to the image on the computer, make the settings
to print out True Type fonts as an image.
See the printer driver's Help file.
}, and select Image Density from
Menu
The printer does not print at 1200dpi,
even if 1200dpi resolution is selected.
Printing at 1200dpi uses much memory. Therefore, depending on the memory capacity, you may not be able to print at 1200dpi. Either add memory
to the printer, or reduce the size of data to be printed.
See "Memory Capacity and Paper Size" in Administrator Reference 2.
Page 63

Operating Instructions Maintenance Guide 2
Status Possible Causes, Descriptions, and Solutions
63
There are color differences in the color
documents.
Press {
See "Cleaning and Adjusting the Printer" in Maintenance Guide 1.
}, and select "Color Regist." from the "Maintenance" menu.
Menu
Note
❒ If the problem cannot be solved, contact your sales or service representative.
Page 64

Operating Instructions Maintenance Guide 2
Removing Misfed Paper
64
If a paper misfeed occurs, an error message appears indicating the location of the misfed paper
on the panel display. This printer has the auto-recovery function, by which misfe d paper is sent to
the Standard Tray or Right Cover. Usually, you
can remove the misfed paper easily with this
function.
Detaching the 2 Tray Finisher
There are times when you might have to detach
the 2 Tray Finisher from the printer to remove
misfed paper. This section describes how to detach the 2 Tray Finisher.
A
Hold the handle at the top of the 2 Tray
Finisher firmly with one hand, pull the 2
Tray Finisher straight out , and let g o when
it stops.
ZDJP201J
The 2 Tray Finisher is detached from the
printer.
Page 65

Operating Instructions Maintenance Guide 2
B
Use both hands to push it straight back in,
and let go when it clicks into place.
ZDJP202J
The 2 Tray Finisher is reattached to the print er.
Important
❒ Attach the 2 Tray Finisher to the printer af-
ter closing the Duplex Reversal Unit.
Opening and Closing the Duplex Reversal Unit
There are times when you might have to detach
the Duplex Reversal Unit to remove misfed paper. This section d escribes how to deta ch the Duplex Reversal Unit.
A
Push up the lock release butto n and keep it
in place.
65
ZDJP203J
Page 66

Operating Instructions Maintenance Guide 2
66
B
Lower the Duplex Reversal Unit slowly until it stops.
ZDJP204J
Important
❒ Open the Duplex Reversal Unit after de-
taching the 2 Tray Finisher from the printer.
Note
❒ You do not have t o rem o ve th e ou t u pt t ra y
even if the 2 Tray Finisher is attached.
The Duplex Reversal Unit is opened.
C
Raise the Duplex Reversal Uni t slowly wi th
both hands, and push it in until it clicks
into place.
ZDJP205J
The Duplex Reversal Unit is closed.
Important
❒ Attach the Duplex Reversal Unit after clos-
ing the upper left cover for the printer.
Page 67

Operating Instructions Maintenance Guide 2
When "Remove Misfeed A: Internal Path" Appears
A
Open the right cover.
B
Move the blue lever up and down to feed
the misfed paper, and then pull out the paper slowly.
ZDJY205J
67
ZDJH206J
C
Close the right cover by pushing the area
labeled "PUSH".
ZDJP708J
Page 68

Operating Instructions Maintenance Guide 2
R
When "Remove Misfeed B: Fusing Unit" Appears
CAUTION:
• The inside of the machine becomes very
hot. Do not touch the parts with a label indicating a "hot surface". Touching a "hot surface" could result in a burn.
A
If the 2 Tray Finisher is installed, detach it
from the printer.
C
If the output tray is attac hed to the printer,
raise it in the dire ction of the arro w (AAAA),
and remove it (BBBB).
68
Reference
❒ ⇒ P.64 “Detaching the 2 Tray Finisher”
B
If the Duplex Unit is instal led, open the Duplex Reversal Unit.
Reference
❒ ⇒ P.65 “Opening and Closing the Dupl ex
Reversal Unit”
ZDJP038J
D
Pull out the upper l eft cove r f or the print er
slowly.
ZDJH047J
Page 69

Operating Instructions Maintenance Guide 2
69
E
Open the upper left cover.
ZDJH048J
F
Turn the blue dial in t he direction of the arrow to feed the misfed paper, and pull out
the paper slowly.
Important
❒ Always turn the blue dial in the direction of
the arrow. If you turn it in the reverse direction, the paper feeds into the printer,
making it difficult for you to take out the paper.
❒ Do not pull out th e misfed paper. U se the
blue dial to feed misfed paper.
G
Close the upper left cove r (AAAA) and push the
handle slowly to the back unti l it cl icks into
place (BBBB).
ZDJH051J
ZDJY206J
Page 70

Operating Instructions Maintenance Guide 2
H
If you removed the output tray in step C,
reattach it to the printer. Insert the hooks
of the output tray into the printer slits, and
lower it toward you.
ZDJH010J
When "Remove Misfeed W: Mailbox" Appears
A
Open the Mailbox Cover slowly (AAAA), pull
out the misfed paper slowly (BBBB).
70
I
If the Duplex Unit is instal led, close the Duplex Reversal Unit.
Reference
❒ ⇒ P.65 “Opening and Closing the Dupl ex
Reversal Unit”
J
If the 2 Tr ay Finisher was in stalled, reattach the 2 Tray Finisher to the printer.
Reference
❒ ⇒ P.64 “Detaching the 2 Tray Finisher”
B
Close the Mailbox Cover.
ZDJY207J
Page 71

Operating Instructions Maintenance Guide 2
When "Remove Misfeed R: Finisher" Appears
Open the top cover (A) and front cover (B) of
the 2 Tray Finisher, and remove the misfed paper.
ZDJP206J
A
Fold the Output Tray.
A Raise it vertically.
B Fold it along the printer body.
71
ZDJP207J
ZDJP208J
Page 72

Operating Instructions Maintenance Guide 2
72
B
Open the top cover for the 2 Tray Finishe r,
and pull out the misfed paper slowly.
ZDJY208J
C
Close the top cover slowly.
D
Open the front cover for the 2 Tray Finisher.
Check to see if there is a mi sfed paper in a reas
A, B, C, and D.
E
Check area A of step D. Lift the lever (AAAA),
and while supporting it with your hand not
to lower, pull out the misfed paper slowly.
ZDJP210J
F
Lower the lever slowly to return it into
place.
ZDJH016J
ZDJP209J
Page 73

Operating Instructions Maintenance Guide 2
73
G
Check areas B and C of step D. Lower the
lever in the direction of the ar rows (AAAA),
and pull out the misfed paper slowly.
ZDJP211J
H
Lift the lever slowly to return i t into place.
I
Check area D of step D. Lift the lever in the
direction of the arrow (AAAA), and pull out the
misfed paper slowly.
ZDJP212J
J
Lower the lever slowly to return it into place.
K
Close the front cover for the 2 Tray Finisher.
If the error message does not clear even after
the misfed paper is removed, detach th e 2
Tray Finisher from the printer to check for the
misfed paper there.
Reference
❒ See P.64 “Detaching the 2 Tray Finisher ”
for details about how to detach/reattach
the 2 Tray Finisher from/to the printer.
Page 74

L
Return the Output Tray back into place.
A Raise the tray.
B Lower it slowly.
Operating Instructions Maintenance Guide 2
When "Remove Misfeed Y: Paper Tray" Appears
A
Open the Lower Right cover for the Paper
Feed Unit, and pull out the misfed paper.
ZDJP085J
ZDJY209J
B
Close the Lower Right cover for the Paper
Feed Unit.
74
ZDJP086J
Page 75

Operating Instructions Maintenance Guide 2
R
When "Remove Misfeed: Duplex Unit" Appears
CAUTION:
• The inside of the machine becomes very
hot. Do not touch the parts with a label indicating a "hot surface". Touching a "hot surface" could result in a burn.
A
If the 2 Tray Finisher is installed, detach it
from the printer.
B
Open the left cover f or the Duplex Reversal
Unit, and remove the misfed paper. Do not
pull the paper out by force.
75
Reference
❒ ⇒ P.64 “Detaching the 2 Tray Finisher”
ZDJY210J
If you cannot remove the paper, proceed to
.
step
C
Page 76

Operating Instructions Maintenance Guide 2
76
C
Push up the lock release button for the Duplex Reversal Unit, and then hol d it in place.
ZDJY211J
D
Lower the Duplex Reversal Unit slowly until it stops, and remove the misfed paper.
E
Raise the Duplex Reversal Unit slowly and
insert until it clicks i nto place. Raise the
left cover, and close it securely by pushing
the area labeled "PUSH".
ZDJH207J
ZDJY212J
Page 77

Operating Instructions Maintenance Guide 2
Removing Jammed Staples
77
When "Add Staples " appears on the panel display, or when the printer doe s not st aple even after it is instructed to, the staples might be
jammed.
Add Staples
A
Open the front cover for the 2 Tray Finisher.
The stapl er is attache d to the pos ition sho wn
in the illustration.
ZDJP216J
B
Remove th e cartri dge b y pulli ng the g reen
knob in the direction of the arrow.
ZDJP217J
Page 78

Operating Instructions Maintenance Guide 2
78
C
Open the face plate of the cartridge to unlock it.
ZDJP227J
D
Remove the jammed staples.
E
Close the face plate of the cartridge until it
clicks into place.
ZDJP229J
F
Slant and insert the cartridge (AAAA), and
push in until it clicks into place (BBBB).
ZDJP228J
ZDJP218J
G
Close the front cover for the 2 Tray Finisher.
Page 79

Adding Staples
Operating Instructions Maintenance Guide 2
79
When "Add Staples " appears on the panel display, add a new staple refill.
Add Staples
A
Open the front cover for the 2 Tray Finisher.
The stapl er is attache d to the pos ition sho wn
in the illustration.
ZDJP216J
B
Remove th e cartri dge b y pulli ng the g reen
knob in the direction of the arrow.
ZDJP217J
Page 80

Operating Instructions Maintenance Guide 2
80
C
Push the areas labele d "PUSH", l ocated on
both sides of the stapler.
ZDJP222J
The case cover at top floats up.
D
Pull the case cover up.
E
Hook your fi nger in the hol e of the empty
refill case to pull it out.
ZDJP224J
F
Insert the new refill c a se in t he direction of
the arrow until it clicks into place.
ZDJP223J
ZDJP225J
Page 81

Operating Instructions Maintenance Guide 2
81
G
Push the case cover do wn until it c licks into
place.
ZDJP230J
H
Pull out the ribbon used for bundling the
staples.
I
Slant and insert the cartridge (AAAA), and
push in until it clicks into place (BBBB).
ZDJP218J
J
Close the front cover for the 2 Tray Finisher.
ZDJP226J
Note
❒ Remove the entire length of the ribbon.
Page 82

Operating Instructions Maintenance Guide 2
Removing Punch- hole Chips
82
When "Punch-hole Chips are Full" appears on
the panel display, the punch waste box is full.
Follow these steps to remove paper chips.
Note
❒ Same message appears when the punch
waste box is not installed correctly.
Punch-hole Chips
are Full
A
Open the front cover for the 2 Tray Finisher.
The punch waste box is attached to the position shown in the illustration.
B
Pull out the punch waste box and remove
the paper chips.
ZDJP220J
C
Re-install the punch waste box.
D
Close the front cover for the 2 Tray Finisher.
ZDJP219J
Page 83

Operating Instructions Maintenance Guide 2
INDEX
A
,
,
5
,
79
,
33
,
34
, 56,
55
57
,
Adding Staples
B
Bypass Tray
Custom Size
Paper Type
D
Data In indicator
Detaching the 2 Tray Finisher
Display panel, messages
E
Energy Star
,
Error
Error indicator
37
37
,
64
L
,
,
,
21
22
,
,
21
,
26
28
30
,
25
,
22
Loading Paper
Optional Paper Feed Unit
Tray 1
Tray 2
Loading paper
Bypass Tray
Paper Bank PS470
paper size
paper type
M
messages
,
37
O
,
55
,
55
,
58
Online indicator
Online key
Opening and Closing the Duplex Reversal Unit
Other Printing Problems
,
83
65
Page 84

P
Operating Instructions Maintenance Guide 2
84
Paper and O ther Media
Paper Size
Paper Type
Printer Does Not Print
,
,
9
9
,
,
R
Remove Misfed Paper
,
,
,
71
70
,
,
,
75
68
67
74
Duplex Unit
Finisher
Fusing Unit
Internal Path
Mailbox
Paper Tray
Removing Jammed Staples
Removing Misfed Paper
Removing Punch-hole Chips
T
Troubleshooting
,
37
55
,
9
,
77
64
,
82
Page 85

Operating Instructions Maintenance Guide 2
85
Copyright © 2001
Page 86

Operating Instructions Maintenance Guide 2
86
UE USA G060-6814
 Loading...