

Page 1

Operating Instructions
Printer Client Reference 1
Read this manual carefully before you use this product and keep it handy for future
reference.
For safety, please follow the instructions in this manual.
Page 2

Introduction
To get maximum versatility from this machine all operators should carefully read and follow the instructions in this manual. Please keep this manual in a handy place near the machine.
Please read the Safety Information in the “Printer Reference” before using this machine. It contains important information related.
Important
Parts of this manual are subject to change without prior notice. In no event will the company be liable
for direct, indirect, special, incidental, or consequential damages as a result of handling or operating
the machine.
Software Version Conventions Used in This Manual
• NetWare 3.x means NetWare 3.12 and 3.2.
• NetWare 4.x means NetWare 4.1, 4.11, 4.12 and IntranetWare.
Trademarks
Macintosh is a registered trademark of Apple Computer, Inc.
Microsoft, Windows, Windows NT are registered trademarks of Microsoft Corporation in the United
States and/or other countries.
NetWare is a registered trademark of Novell, Inc.
PostScript is a registered trademark of Adobe Systems, Incorporated.
PCL is a registered trademark of Hewlett-Packard Company.
Other product names used herein are for identification purposes only and might be trademarks of their
respective companies. We disclaim any and all rights in those marks.
Note
The proper names of the Windows operating systems are as follows:
®
•Microsoft
Windows® 95 operating system
•Microsoft® Windows® 98 operating system
•Microsoft® Windows® Millennium Edition (Windows Me)
®
•Microsoft
Windows® 2000 Professional
•Microsoft® Windows® 2000 Server
•Microsoft® Windows NT® Server operating system Version 4.0
®
•Microsoft
Windows NT® Workstation operating system Version 4.0
Page 3

How to Read This Manual
R
R
Symbols
In this manual, the following symbols are used:
WARNING:
This symbol indicates a potentially hazardous situation which, if instructions
are not followed, could result in death or serious injury.
CAUTION:
This symbol indicates a potentially hazardous situation which, if instructions
are not followed, may result in minor or moderate injury or damage to property.
* The statements above are notes for your safety.
Important
If this instruction is not followed, paper might be misfed, originals might be
damaged, or data might be lost. Be sure to read this.
Preparation
This symbol indicates the prior knowledge or preparations required before operating.
Note
This symbol indicates precautions for operation, or actions to take after misoperation.
Limitation
This symbol indicates numerical limits, functions that cannot be used together,
or conditions in which a particular function cannot be used.
Reference
This symbol indicates a reference.
[]
Keys that appear on the machine's panel display.
Keys and buttons that appear on the computer's display.
{}
Keys built into the machine's operation panel.
Keys on the computer's keyboard.
i
Page 4

TABLE OF CONTENTS
1.Confirming a Network Environment
Windows 95/98/Me Client.......................................................................... 1
Windows 2000 Client................................................................................. 2
Windows NT 4.0 Client.............................................................................. 3
NetWare Client........................................................................................... 4
Macintosh Client........................................................................................ 5
UNIX Client................................................................................................. 6
2.Windows 95/98/Me Configuration
Printing with a Print Server ...................................................................... 7
Printing with a Windows 2000 or Windows NT 4.0 Print Server ................... 7
Printing without Using a Print Server...................................................... 9
Configuring Protocols.................................................................................... 9
Installing Software....................................................................................... 11
Printing with Parallel Connection .......................................................... 15
Installing the Printer Driver.......................................................................... 15
Setting up Options .................................................................................. 17
3.Windows 2000 Configuration
Printing with a Print Server .................................................................... 19
Printing with a Windows 2000 or Windows NT 4.0 Print Server ................. 19
Printing without Using a Print Server.................................................... 21
Configuring the Protocols............................................................................ 21
Installing Software....................................................................................... 23
Printing with a Standard TCP/IP Port.......................................................... 27
Configuring LPR Port Printing..................................................................... 28
Printing with Parallel Connection .......................................................... 30
Installing a Printer Driver............................................................................. 30
Setting up Options .................................................................................. 31
ii
Page 5

4.Windows NT 4.0 Configuration
Printing with a Print Server .................................................................... 33
Printing with a Windows 2000 or Windows NT 4.0 Print Server ................. 33
Printing without Using a Print Server.................................................... 35
Configuring the Protocols............................................................................ 35
Installing Software....................................................................................... 37
Configuring LPR Port Printing..................................................................... 41
Printing with a Parallel Connection ....................................................... 43
Installing a Printer Driver............................................................................. 43
Setting up Options .................................................................................. 44
INDEX........................................................................................................ 46
iii
Page 6

iv
Page 7
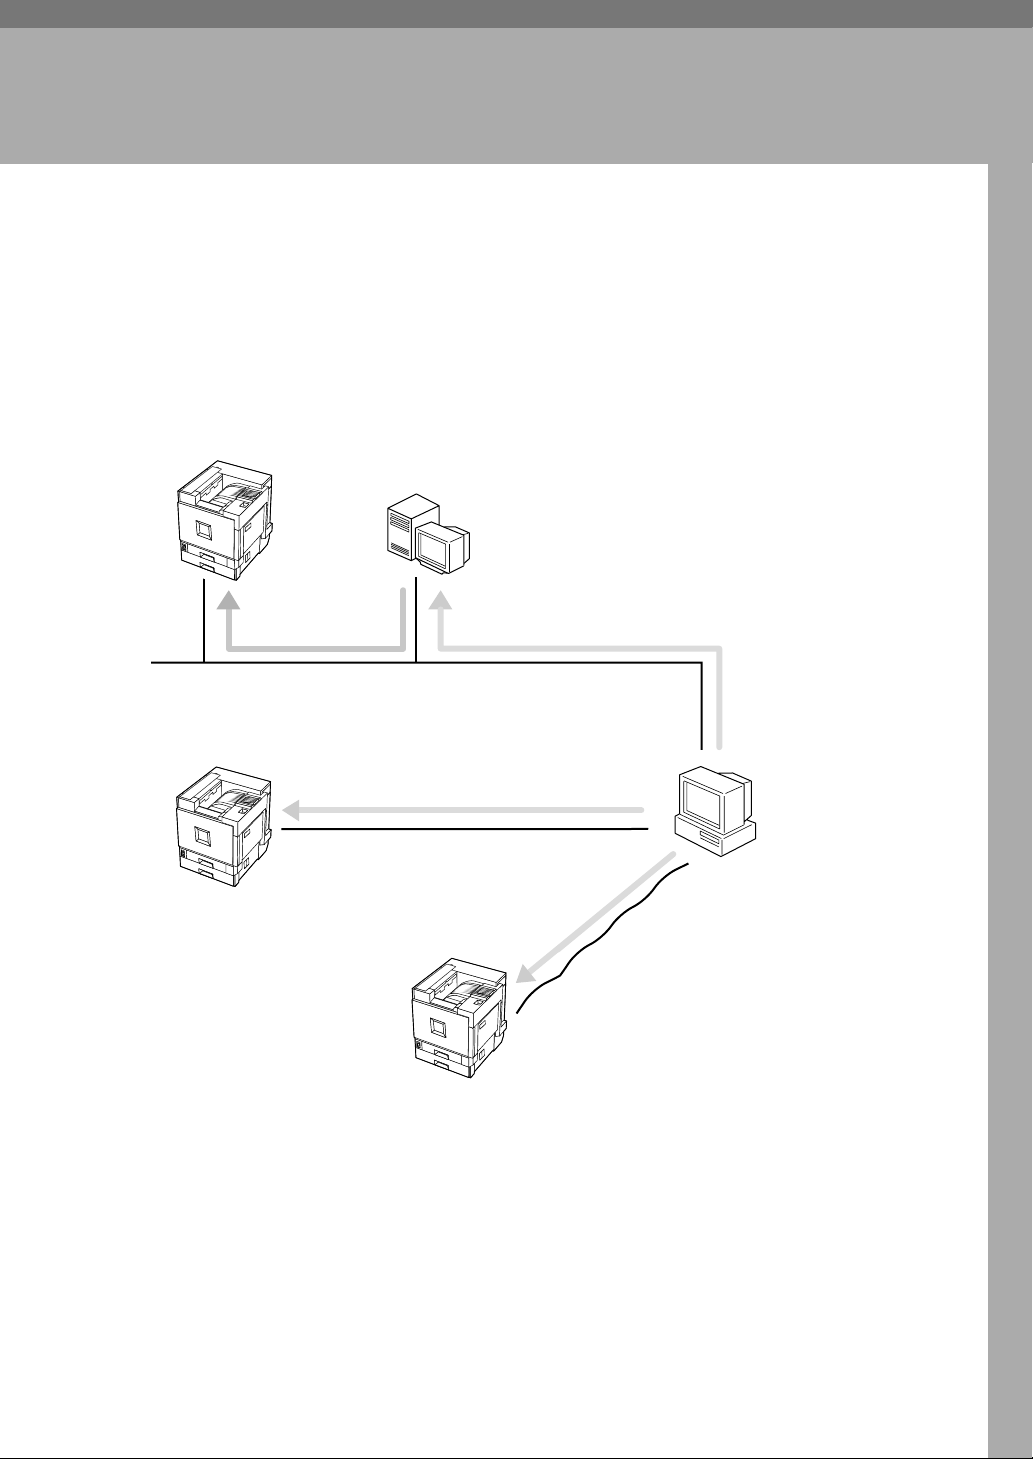
1. Confirming a Network
Environment
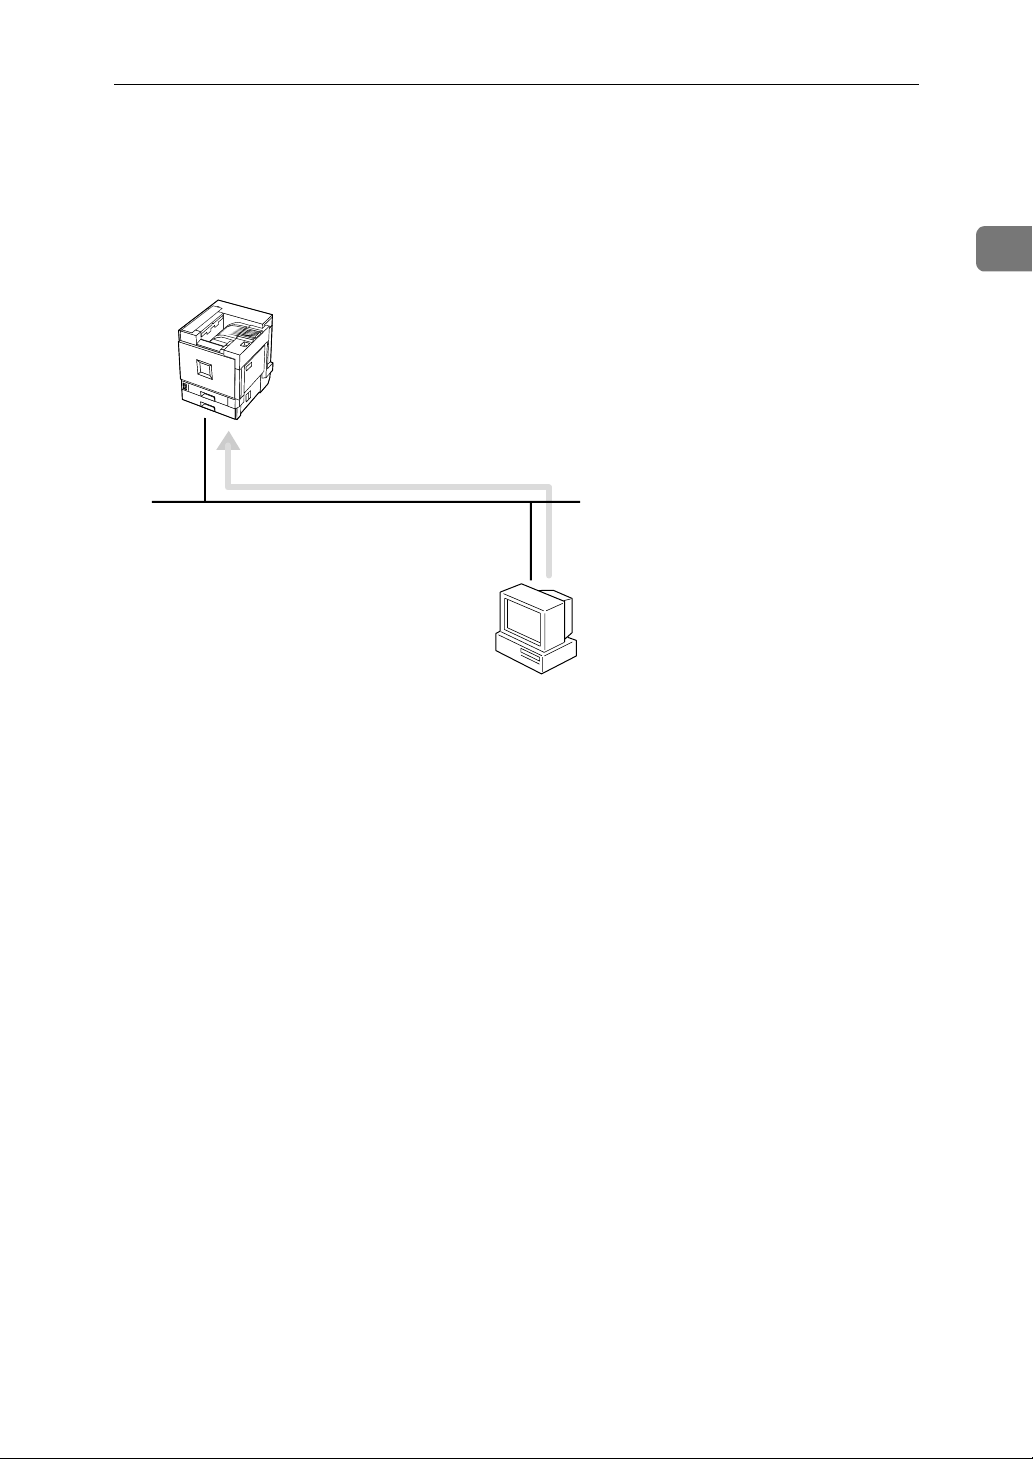
Windows 95/98/Me Client
For details about how to set up the printer as a network printer in a Windows
95/98/Me environment, see P.7 “Windows 95/98/Me Configuration”. There are
three methods for using the printer as a network printer.
❖ Printing with a Print Server
Windows 2000/Windows NT 4.0
Print Server
❖ Printitng without Using a Print Server
SmartNetMonitor for Client
❖ Printing with a Parallel Connection
Windows 95/98/Me
Client
1
Page 8
1
Confirming a Network Environment
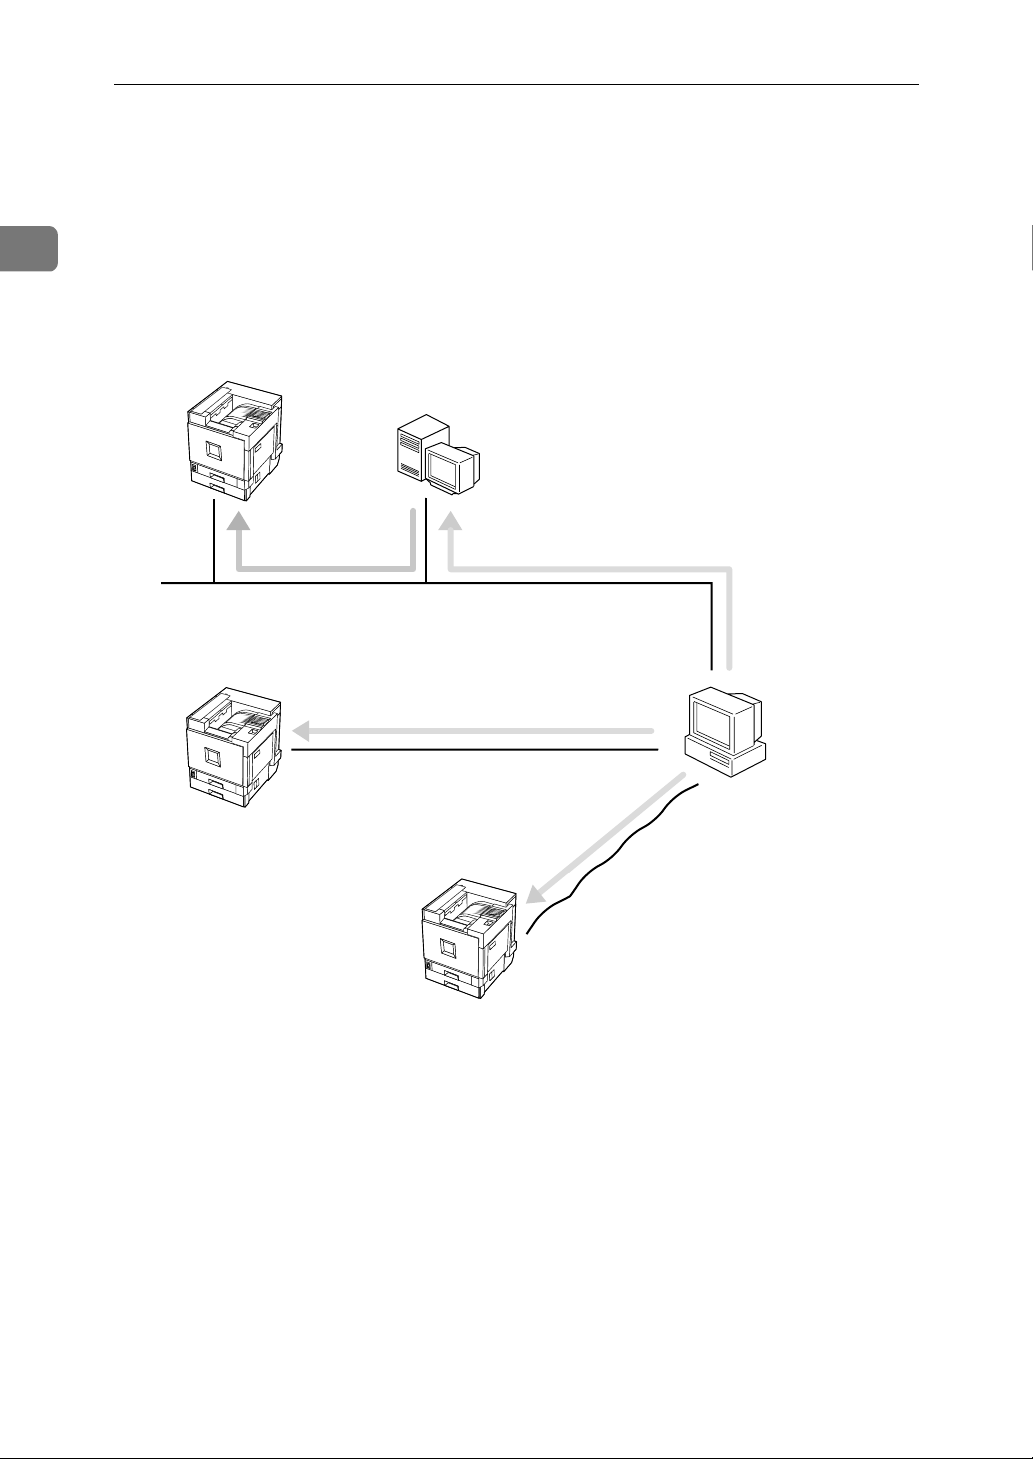
Windows 2000 Client
For details about how to set up the printer as a network printer in a Windows
2000 environment, see P.19 “Windows 2000 Configuration”. There are three methods for using the printer as a network printer.
❖ Printing with a Print Server
Windows 2000/Windows NT 4.0
Print Server
❖ Printing without Using a Print Server
SmartNetMonitor for Client, LPR, Standard TCP/IP
❖ Printing with a Parallel Connection
Windows 2000
Client
2
Page 9
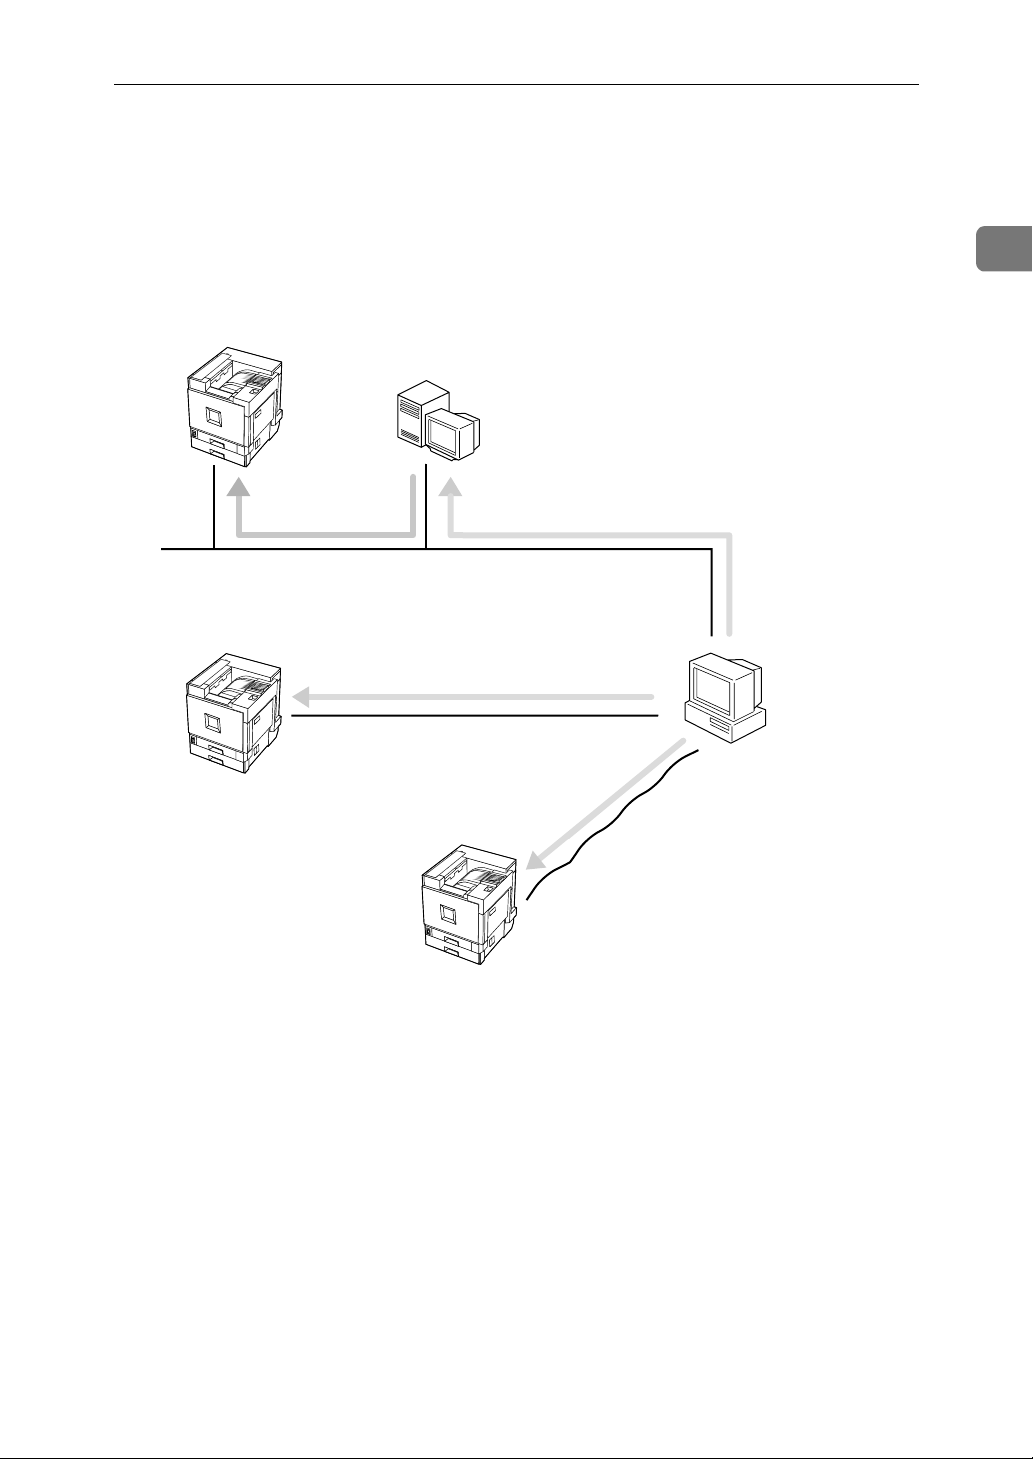
Windows NT 4.0 Client
Windows NT 4.0 Client
For details about how to set up the printer as a network printer in a Windows
NT 4.0 environment, see P.33 “Windows NT 4.0 Configuration”. There are three
methods for using the printer as a network printer.
❖ Printing with a Print Server
Windows 2000/Windows NT 4.0
Print Server
❖ Printing without Using a Print Server
1
SmartNetMonitor for Client,LPR
❖ Printing with a Parallel Connection
Windows NT 4.0
Client
3
Page 10
1
Confirming a Network Environment
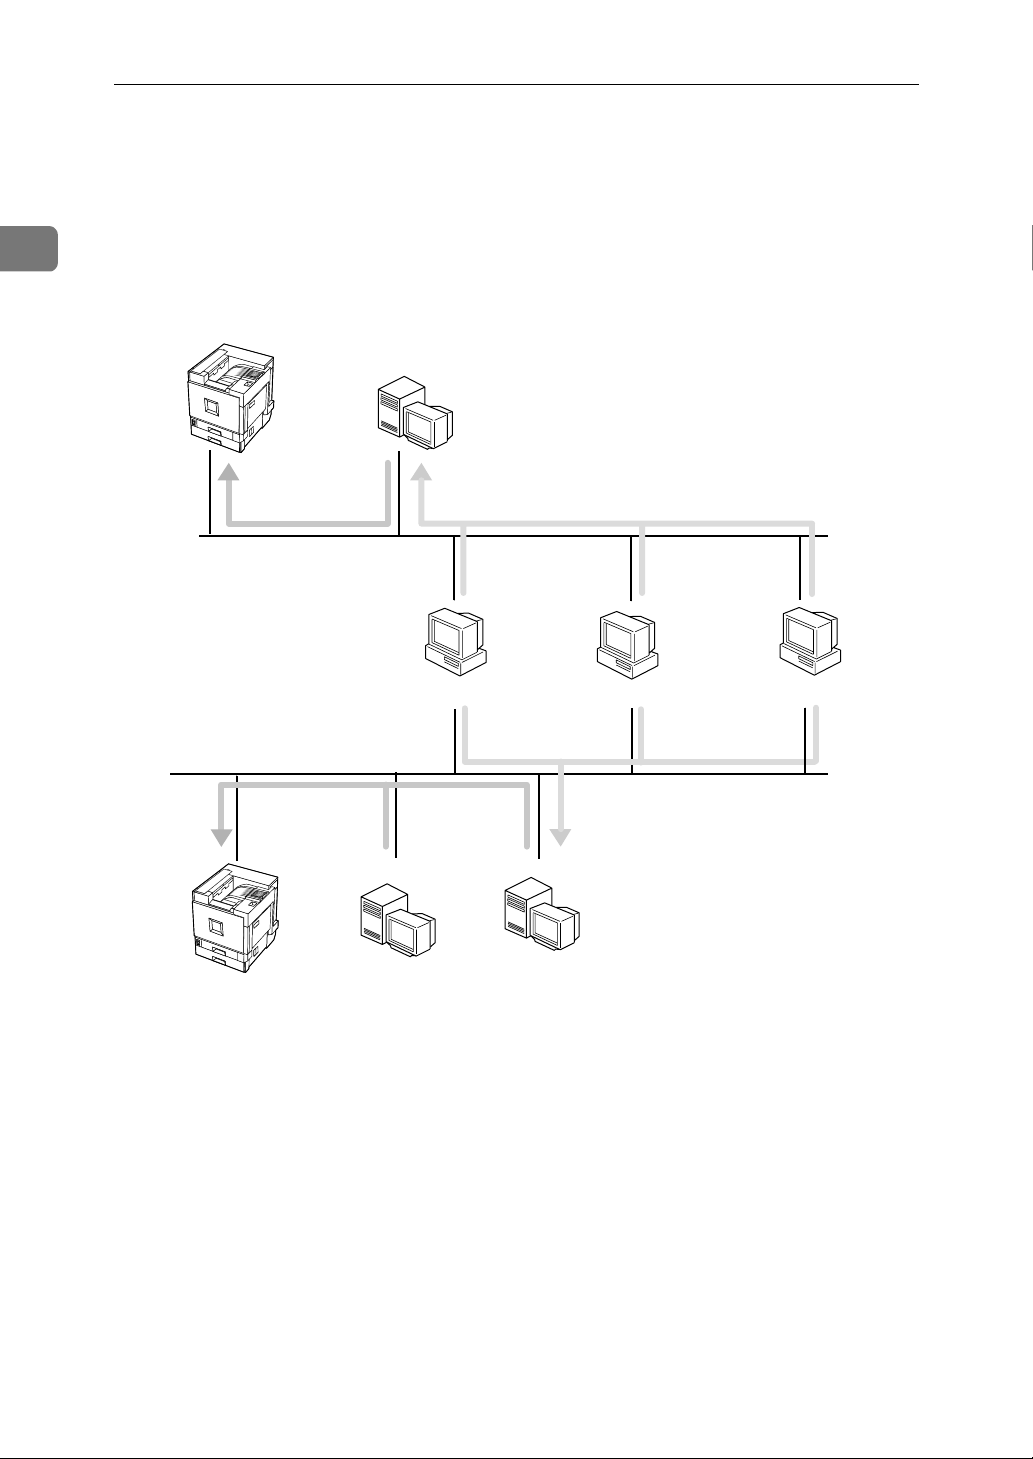
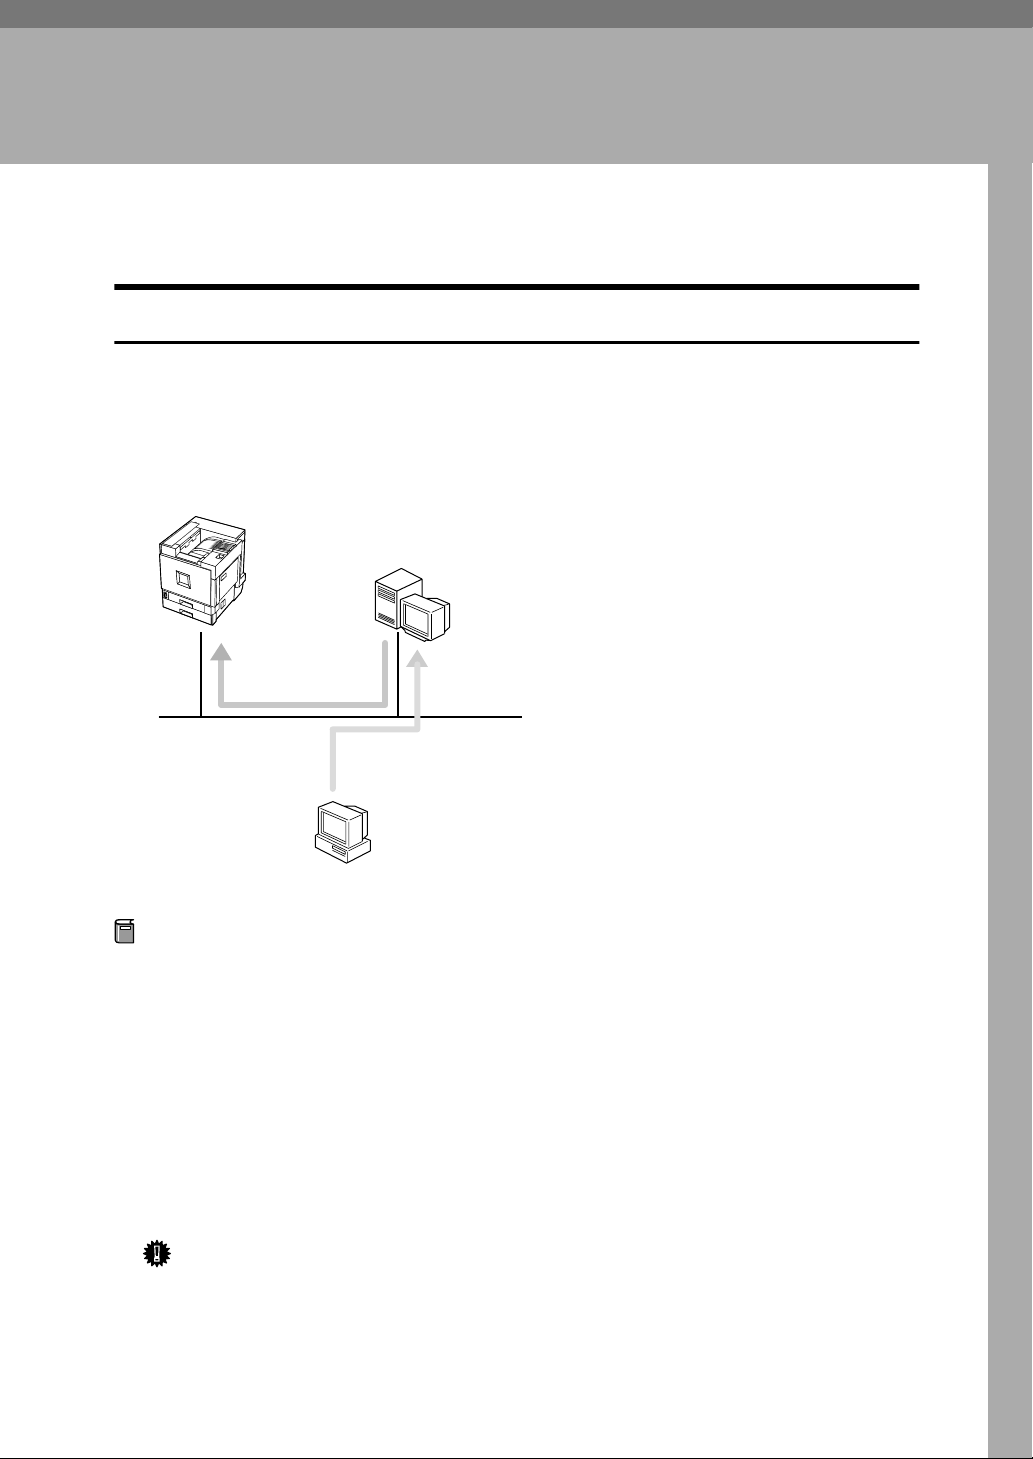
NetWare Client
For details about how to set up the printer as a network printer in a NetWare environment, and how to use the printer as either a print server or a remote printer,
see “NetWare Configuration” in Printer Client Reference 2 included as a PDF file
on the CD-ROM.
Print Server
NetWare
File Server
Windows 95/98/Me
Windows 2000
Windows NT 4.0
Remote Printer
NetWare
Print Server
NetWare
File Server
4
Page 11
Macintosh Client
Macintosh Client
For details about how to set up the printer as a network printer in a Macintosh
environment, see “Macintosh Configuration” in Printer Client Reference 2 includ-
ed as a PDF file on the CD-ROM.
Macintosh Client
1
5
Page 12
1
Confirming a Network Environment
UNIX Client
For details about how to setup the printer as a network printer in a UNIX environment, see the UNIX Supplement included as a PDF file on the CD-ROM.
UNIX Client
6
Page 13
2. Windows 95/98/Me
Configuration
Printing with a Print Server
Printing with a Windows 2000 or Windows NT 4.0 Print Server
This section describes the procedures for setting up a client on a network that
uses Windows 2000 Server, Windows 2000 Professional, Windows NT 4.0 Server
or Windows NT 4.0 Workstation as a print server.
To print from Windows 95/98/Me, you must install the printer driver and
change the printer port to the print server.
Windows 2000
Windows NT 4.0
Print Server
Windows 95/98/Me
Preparation
If you print with a print server, select [Typical] installation.
The PCL 5c and RPCS printer driver can be installed by [Typical] installation.
This section assumes that the client has already been configured to communicate with a Windows 2000 or Windows NT 4.0 print server. Do not begin the
following procedure until the client has been set up and configured correctly.
Close all applications that are running.
A
Insert the CD-ROM into the CD-ROM drive.
B
The installer will start by Auto Run.
Important
❒ Never have two versions of the same printer driver installed on your sys-
tem at the same time. When upgrading to a new version of the printer driver, delete the old version, and then install the new one.
7
Page 14

2
Windows 95/98/Me Configuration
Note
❒ Auto Run might not automatically work with certain OS settings. In this
case, launch "INSTTOOL.EXE" located on the CD-ROM root directory.
Follow the instructions on the screen.
C
Select [Typical] installation, and then click [Next].
D
Follow the instructions on the screen.
E
Click [Add] when the "Select Port" dialog box appears.
F
Select [network printer], and then click [OK].
G
Double-click the computer name you want to use as a print server in the
H
"Browse for Printer" window.
Select the printer you want to use, and then click [OK].
I
After confirming that the location for the selected printer shown, click
J
[Next].
Follow the instructions on the screen.
K
If you use a User Code, configure it.
L
Restart the computer after the installation is complete.
M
Set up the options with the printer driver.
N
Note
❒ The procedure to specify the "User Code" may differ depending on the
printer language.
• RPCS
You can specify the "User Code" when installing the printer driver. You
cannot register or edit the "User Code" from the printer driver dialog
box. To change the "User Code", you must uninstall the printer driver
then register the new "User Code" during the re-install process.
• PCL 5c/PostScript3
You can specify the "User Code" with the printer driver properties after
installing the printer driver. See the Help file for the printer driver.
❒ You must set up the options when the bidirectional transmission is dis-
abled. For more information about the status of the bidirectional transmission, see P.17 “The conditions of the bidirectional transmissions”
Reference
For more information about settings for options, see P.17 “Setting up Op-
tions”.
8
Page 15

Printing without Using a Print Server
Printing without Using a Print Server
Configuring Protocols
Configuring TCP/IP and IPP for Printing
Follow these instructions to configure the printer and Windows 95/98/Me to
use the TCP/IP protocol and IPP.
❖❖❖❖ Configuring the printer
Configure the printer to use the TCP/IP protocol.
• Confirm that the TCP/IP protocol is set to be active. (The factory default is
active.)
• Assign an IP address and make other settings required for using the TCP/
IP protocol.
Reference
For more information about how to make the above settings, see “Config-
uring the printer for the Network” in Administrator Reference 1.
If DHCP is used to assign IP addresses, see Appendix, “When Using DH-
CP” in Administrator Reference 2 included as a PDF file on the CD-ROM.
2
Note
❒ After setting the IP address, use the ping command to confirm that it has
been set correctly.
Click [Start], point to [Programs], and then click [MS-DOS Prompt].
A
Type the following. (Example IP address is 192.168.15.16)
B
C:> ping 192.168.15.16
If the address has been configured correctly, the following message appears.
Reply from 192.168.15.16 : bytes=32 time<10ms TTL=32
If the address has been configured incorrectly, the following message
appears.
Request timed out.
❖❖❖❖ Configuring a Windows 95/98/Me computer
Follow these steps to configure a Windows 95/98/Me computer to use the
TCP/IP protocol.
Open [Control Panel] and double-click the [Network] icon. Confirm that
A
“TCP/IP” is listed in the [The following network components are installed:] box
under the [Configuration] tab.
Note
❒ If the TCP/IP protocol is not installed, click [Add] under the [Configura-
tion] tab and install it. For more information about installing the TCP/
IP protocol, see Windows 95/98/Me Help.
9
Page 16

2
Windows 95/98/Me Configuration
Configure the TCP/IP protocol with the appropriate IP address, subnet
B
mask and other settings.
Confirm with the network administrator that the settings are correct.
Configuring NetBEUI for Printing
Follow these instructions to configure the printer and Windows 95/98/Me to
use the NetBEUI protocol.
❖❖❖❖ Configuring the printer
Configure the printer to use the NetBEUI protocol.
• Confirm that the NetBEUI protocol is set to be active. (The factory default
is active.)
Reference
For more information about how to make the above settings, see “Config-
uring the printer for the Network” in Administrator Reference 1.
❖❖❖❖ Configuring a Windows 95/98/Me computer
Install the NetBEUI protocol on the Windows 95/98/Me computer and set it
as the default protocol.
Open [Control Panel] and double-click the [Network] icon. Confirm that “Net-
A
BEUI” is listed in the [The following network components are installed:] box un-
der the [Configuration] tab.
Note
❒ If the NetBEUI protocol is not installed, click [Add] under the [Configura-
tion] tab and install it. For more information about installing the Net-
BEUI protocol, see Windows 95/98/Me Help.
❒ If “NetBEUI ->Dial-Up Adaptor” is listed in the [The following network
components are installed:] box, select it, and then click [Remove] to remove
the binding.
Set the NetBEUI protocol as the default protocol. Click the [Configuration]
B
tab, select “NetBEUI” in the [The following network components are installed:]
box, and then click [Properties].
Click the [Advanced] tab, select [Set this protocol to be the default protocol], and
C
then click [OK].
Click [OK] to close the [Network] dialog box.
D
When the message to restart appears, click [Yes].
E
10
Page 17

Printing without Using a Print Server
Installing Software
Preparation
Select [Network] installation when you print without using a print server.
[Network] installation installs the PCL 5c and RPCS printer driver and Smart-
NetMonitor for Client. When you print using TCP/IP, NetBEUI or IPP protocol in a Peer-to-Peer Network, you must select this installation.
[Custom] installation allows you to install SmartNetMonitor for Client separately.
Installing by "Network" installation
Close all applications that are running.
A
Insert the CD-ROM into the CD-ROM drive.
B
The installer will start by Auto Run.
Important
❒ Never have two versions of the same printer driver installed on your sys-
tem at the same time. When upgrading to a new version of the printer driver, delete the old version, and then install the new one.
2
Note
❒ Auto Run might not automatically work with certain OS settings. In this
case, launch "INSTTOOL.EXE" located on the CD-ROM root directory.
Follow the instructions on the screen.
C
Select [Network] installation when the selection screen appears.
D
Follow the instructions on the screen.
E
Select a printer you want to use when the [Select Printer] dialog box appears.
F
Click [Add..] when the [Select Port] dialog box appears.
G
Select [SmartNetMonitor for Client], and then click [OK].
H
Available printers will be listed.
11
Page 18

2
Windows 95/98/Me Configuration
Select a printer you want to use.
I
TCP/IP
A Click the printer you want to use, and then click [OK].
Note
❒ Printers that respond to an IP broadcast from the computer will be dis-
played. To print to a printer not listed here, click [Specify Address], and
then type the IP address or host name.
❒ You cannot add an address partially similar to that already used. For ex-
ample, when “192.168.0.2” is already used, “192.168.0.2xx” cannot be
used. Similarly, when “192.168.0.20” is already used, “192.168.0.2” cannot be used.
NetBEUI
A Click [NetBEUI].
A list of printers that can be used by the NetBEUI protocol appears.
B Click the printer you want to use, and then click [OK].
Note
❒ Printers that respond to an broadcast from the computer will be dis-
played. To print to a printer not listed here, click [Specify Address], and
then type the NetBEUI address. Confirm the NetBEUI address on the
network configuration page. For more information about the printing of
configuration page, see “Printing a Configuration Page” in Administrator
Reference 2 included as a PDF file on the CD-ROM.
❒ You cannot print to printers beyond routers.
IPP
A Click [IPP].
The IPP setting dialog box appears.
B In [Printer URL], type “http://(printer's IP address)/printer” as the printer's
IP address.
(Example IP address is 192.168.15.16)
http://192.168.15.16/printer
C As necessary, type the names to distinguish the printer in [IPP Port Name].
Type a name differing from those of any existing port names.
12
If you omit this, the address typed in [Printer URL] will be set as the IPP port
name.
Page 19

Printing without Using a Print Server
D If a proxy server and IPP user name are used, click [Detailed Settings] and
configure the necessary settings.
Note
❒ For more information about these settings, see SmartNetMonitor for
Client Help.
Click [OK].
J
Confirm that the selected port is highlighted, and then click [Next].
K
Click [Finish].
L
Restart the computer after the installation is complete.
M
Set up the options with the printer driver.
N
Reference
For more information about settings for options, see P.17 “Setting up Op-
tions”.
Note
❒ The procedure to specify the "User Code" may differ depending on the
printer language.
• RPCS
You can specify the "User Code" when installing the printer driver. You
cannot register or edit the "User Code" from the printer driver dialog
box. To change the "User Code", you must uninstall the printer driver
then register the new "User Code" during the re-install process.
• PCL 5c/PostScript3
You can specify the "User Code" with the printer driver properties after
installing the printer driver. See the Help file for the printer driver.
2
❒ You must set up the options when the bidirectional transmission is dis-
abled. For more information about the status of the bidirectional transmission, see P.17 “The conditions of the bidirectional transmissions”.
Accessing the Port Settings Dialog Box
This section describes how to access the port settings dialog box to change the
settings of SmartNetMonitor for Client.
Reference
For more information about these settings, see SmartNetMonitor for Client
Help.
Click [Start] on the taskbar, point to [Settings], and then click [Printers].
A
Click to select the icon of the printer you want to use.
B
13
Page 20

2
Windows 95/98/Me Configuration
On the [File] menu, click [Properties].
C
Click the [Details] tab, and then click [Port Settings].
D
The SmartNetMonitor for Client settings dialog box appears.
----Installing SmartNetMonitor for Client individually
Close all applications that are running.
A
Insert the CD-ROM into the CD-ROM drive.
B
The installer will start by Auto Run.
Important
❒ Never have two versions of the same printer driver installed on your sys-
tem at the same time. When upgrading to a new version of the printer driver, delete the old version, and then install the new one.
Note
❒ Auto Run might not automatically work with certain OS settings. In this
case, launch "INSTTOOL.EXE" located on the CD-ROM root directory.
Follow the instructions on the screen.
C
Select [Custom] installation, and then click [Next].
D
Remove the check mark from the RPCS and PCL 5c printer driver.
E
Click to select [SmartNetMonitor for Client], and then click [Install].
F
Click [OK].
G
Follow the instructions on the screen.
H
Note
❒ If you are required to restart the computer after the installation of Smart-
NetMonitor for Admin, restart the computer and continue with necessary
configurations.
14
Page 21

Printing with Parallel Connection
Printing with Parallel Connection
Select [Typical] installation when you use the printer with a parallel connection.
[Typical] installation installs the PCL 5c and RPCS printer driver.
Installing the Printer Driver
Close all applications that are running.
A
Insert the CD-ROM into the CD-ROM drive.
B
The installer will start by Auto Run.
Important
❒ Never have two versions of the same printer driver installed on your sys-
tem at the same time. When upgrading to a new version of the printer driver, delete the old version, and then install the new one.
Note
❒ Auto Run might not automatically work with certain OS settings. In this
case, launch "INSTTOOL.EXE" located on the CD-ROM root directory.
Follow the instructions on the screen.
C
Select [Typical] installation, and then click [Next].
D
Follow the instructions on the screen.
E
Select [LPT1] when the [Select Port] dialog box appears, and then click [Next].
F
2
Click [Finish].
G
If you use a User Code, configure it.
H
Restart the computer after the installation is complete.
I
Set up the options with the printer driver.
J
Reference
For more information about settings for options, see P.17 “Setting up Op-
tions”.
15
Page 22

2
Windows 95/98/Me Configuration
Note
❒ The procedure to specify the "User Code" may differ depending on the
printer language.
• RPCS
You can specify the "User Code" when installing the printer driver. You
cannot register or edit the "User Code" from the printer driver dialog
box. To change the "User Code", you must uninstall the printer driver
then register the new "User Code" during the re-install process.
• PCL 5c/PostScript3
You can specify the "User Code" with the printer driver properties after
installing the printer driver. See the Help file for the printer driver.
❒ You must set up the options when the bidirectional transmission is dis-
abled. For more information about the status of the bidirectional transmission, see P.17 “The conditions of the bidirectional transmissions”.
16
Page 23

Setting up Options
Setting up Options
You must set up the options when the bidirectional transmission is disabled.
Click [Start] on the taskbar, point to [Settings], and then click [Printers].
A
The [Printers] window appears.
Click the icon of the printer you want to use.
B
On the [File] menu, click [Properties].
C
Click the [Accessories] tab.
D
Note
❒ If you use the RPCS printer driver, Click Change Accessories under the
[Printer Configuration] tab to set up options.
Select options you have installed from the [Option] group. And make any
E
settings you require.
Click [OK].
F
2
----The conditions of the bidirectional transmissions
When the bidirectional transmissions is enabled, the information about the paper size and feed direction settings are automatically sent to the printer by the
computer. You can also confirm the printer's condition from your computer.
• The bidirectional transmissions is supported by Windows 95/98/Me, Windows 2000 and Windows NT 4.0.
• If you use the RPCS ptinter driver and the bidirectional transmissions is enabled, on Windows 95/98/Me, the unavailable functions are grayed out in
the [Change Accessories] dialog box of the printer properties. The [Change Ac-
cessories] dialog box is displayed by clicking the [Change Accessories…] button
under the [Printer Configuration] tab.
Note
❒ The RPCS pritner driver supports the bidirectional transmission and update
the printer status automatically.
❒ The PCL 5c printer driver supports the bidirectional transmission, you can
update the printer status manually.
❒ The PostScript3 printer driver does not supports the bidirectional transmis-
sion.
To support the bidirectional transmissions, the following conditions below are
required.
17
Page 24

2
Windows 95/98/Me Configuration
❖❖❖❖ Connecting with the parallel interface cable and the USB exchange cable.
• The computer supports the bidirectional transmissions.
• The Interface cable supports the bidirectional transmissions.
• The printer is connected to the computer using the standard parallel inter-
face cable and the parallel connector.
• On Windows 95/98/Me, the [Enable bi-directional support for this printer] is se-
lected in the [Spool Settings…] under the [Details] tab.
❖❖❖❖ Connecting with the network
• SmartNetMonitor for Client and the TCP/IP protocol are used.
• On Windows 95/98/Me, the [Enable bi-directional support for this printer] is se-
lected in the [Spool Settings…] under the [Details] tab.
• SmartNetMonitor for Client included on the CD-ROM is installed.
18
Page 25

3. Windows 2000
Configuration
Printing with a Print Server
Printing with a Windows 2000 or Windows NT 4.0 Print Server
This section describes the procedures for setting up a client in a network that
uses Windows 2000 Server, Windows 2000 Professional, Windows NT 4.0 Server
or Windows NT 4.0 Workstation as a print server.
To print from Windows 2000, you must install the printer driver and change the
printer port to the print server.
Windows 2000
Windows NT 4.0
Print Server
Windows 2000
Close all applications that are running.
A
Insert the CD-ROM into the CD-ROM drive.
B
The installer will start by Auto Run.
Important
❒ Never have two versions of the same printer driver installed on your sys-
tem at the same time. When upgrading to a new version of the printer driver, delete the old version, and then install the new one.
Note
❒ Auto Run might not automatically work with certain OS settings. In this
case, launch "INSTTOOL.EXE" located on the CD-ROM root directory.
Follow the instructions on the screen.
C
Select [Typical] installation, and then click [Next].
D
19
Page 26

3
Windows 2000 Configuration
Follow the instructions on the screen.
E
Click [Add] when the "Select Port" dialog box appears.
F
Select [network printer], and then click [OK].
G
Double-click the computer name you want to use as a print server in the
H
"Browse for Printer" window.
Select the printer you want to use, and then click [OK].
I
After confirming that the location for the selected printer shown, click
J
[Next].
Follow the instructions on the screen.
K
Note
❒ During installation, the [Digital Signature Not Found] dialog box may appear.
In this case, click [Yes] to continue the installation.
Restart the computer after the installation is complete.
L
Set up the options with the printer driver.
M
Note
❒ You can specify the "User Code" with the printer properties after installing
the printer driver. See the Help file for the printer driver.
Reference
For more information about settings for options, see P.31 “Setting up Op-
tions”.
20
Page 27

Printing without Using a Print Server
Printing without Using a Print Server
Configuring the Protocols
Configuring TCP/IP and IPP for Printing
Follow these instructions to configure the printer and Windows 2000 to use the
TCP/IP protocol and IPP.
❖❖❖❖ Configuring the printer
Configure the printer to use the TCP/IP protocol.
• Confirm that the TCP/IP protocol is set to be active. (The factory default is
active.)
• Assign an IP address and make other settings required for using the TCP/
IP protocol.
Reference
For more information about how to make the above settings, see “Config-
uring the printer for the Network” in Administrator Reference 1.
If DHCP is used to assign IP addresses, see Appendix, “When Using DH-
CP” in Administrator Reference 2 included as a PDF file on the CD-ROM.
Note
❒ After setting the IP address, use the ping command to confirm that it has
been set correctly.
Click [Start], point to [Programs], point to [Accessories], and then click
A
[Command Prompt].
Type the following. (Example IP address is 192.168.15.16)
B
C:> ping 192.168.15.16
If the address has been configured correctly, the following message appears.
Reply from 192.168.15.16 : bytes=32 time<10ms TTL=32
If the address has been configured incorrectly, the following message
appears.
Request timed out.
3
❖❖❖❖ Configuring a Windows 2000 computer
Follow these steps to configure a Windows 2000 computer to use the TCP/IP
protocol.
Click [Start] on the taskbar, point to [Settings], and then click [Network and
A
Dial-up Connections].
Click [Local Area Connection].
B
On the [File] menu, click [Properties].
C
21
Page 28

3
Windows 2000 Configuration
Confirm that “Internet Protocol (TCP/IP)” is selected in the [Components
D
checked are used by this connection:] box under the [General] tab.
Note
❒ If the check box of TCP/IP protocol is not selected, select the box.
❒ If the TCP/IP protocol is not installed, click [Install...] under the [General]
tab and install it. For more information about installing the TCP/IP protocol, see Windows 2000 Help.
Configure the TCP/IP protocols with the appropriate IP address, subnet
E
mask and other settings.
Confirm with the network administrator that the settings are correct.
Configuring NetBEUI for Printing
Follow these instructions to configure the Network Interface Board and Windows 2000 to use the NetBEUI protocol.
❖❖❖❖ Configuring the printer
Configure the printer to use the NetBEUI protocol.
• Confirm that the NetBEUI protocol is set to be active. (The factory default
is active.)
Reference
For more information about how to make the above settings, see “Config-
uring the printer for the Network” in Administrator Reference 1.
❖❖❖❖ Configuring a Windows 2000 computer
Follow these steps to configure a Windows 2000 computer to use the NetBEUI
protocol.
Click [Start] on the taskbar, point to [Settings], and then click [Network and
A
Dial-up Connections].
Click [Local Area Connection].
B
On the [File] menu, click [Properties].
C
Confirm that “NetBEUI Protocol” is selected in the [Components checked are
D
used by this connection:] box under the [General] tab.
Note
❒ If the check box of the NetBEUI protocol is not selected, select the box.
❒ If the NetBEUI protocol is not installed, click [Install...] under the [Gener-
al] tab and install it. For more information about installing the NetBEUI
protocol, see Windows 2000 Help.
22
Page 29

Printing without Using a Print Server
Installing Software
Preparation
Select [Network] installation when you print without using a print server.
[Network] installation installs the PCL 5c and RPCS printer driver and Smart-
NetMonitor for Client. When you print using TCP/IP, NetBEUI or IPP protocol in a Peer-to-Peer Network, you must select this installation.
[Custom] installation allows you to install SmartNetMonitor for Client separately.
Installing by "Network" installation
Close all applications that are running.
A
Insert the CD-ROM into the CD-ROM drive.
B
The installer will start by Auto Run.
Important
❒ Never have two versions of the same printer driver installed on your sys-
tem at the same time. When upgrading to a new version of the printer driver, delete the old version, and then install the new one.
3
Note
❒ Auto Run might not automatically work with certain OS settings. In this
case, launch "INSTTOOL.EXE" located on the CD-ROM root directory.
Follow the instructions on the screen.
C
Select [Network] installation when the selection screen appears.
D
Follow the instructions on the screen.
E
Select a printer you want to use when the [Select Printer] dialog box appears.
F
Click [Add..] when the [Select Port] dialog box appears.
G
Select [SmartNetMonitor for Client], and then click [OK].
H
Available printers will be listed.
23
Page 30

Windows 2000 Configuration
Select a printer you want to use.
I
TCP/IP
A Click the printer you want to use, and then click [OK].
Note
❒ Printers that respond to an IP broadcast from the computer will be dis-
played. To print to a printer not listed here, click [Specify Address], and
then type the IP address or host name.
3
❒ You cannot add an address partially similar to that already used. For ex-
ample, when “192.168.0.2” is already used, “192.168.0.2xx” cannot be
used. Similarly, when “192.168.0.20” is already used, “192.168.0.2” cannot be used.
NetBEUI
A Click [NetBEUI].
A list of printers that can be used by the NetBEUI protocol appears.
B Click the printer you want to use, and then click [OK].
Note
❒ Printers that respond to an broadcast from the computer will be dis-
played. To print to a printer not listed here, click [Specify Address], and
then type the NetBEUI address. Confirm the NetBEUI address on the
network configuration page. For more information about the printing of
configuration page, see “Printing a Configuration Page” in Administrator
Reference 2 included as a PDF file on the CD-ROM.
❒ You cannot print to printers beyond routers.
IPP
24
A Click [IPP].
The IPP setting dialog box appears.
B In [Printer URL], type “http://(printer's IP address)/printer” as the printer's
IP address.
(Example IP address is 192.168.15.16)
http://192.168.15.16/printer
C As necessary, type the names to distinguish the printer in [IPP Port Name].
Type a name differing from those of any existing port names.
If you omit this, the address typed in [Printer URL] will be set as the IPP port
name.
Page 31

Printing without Using a Print Server
D If a proxy server and IPP user name are used, click [Detailed Settings] and
configure the necessary settings.
Note
❒ For more information about these settings, see SmartNetMonitor for
Client Help.
Click [OK].
J
Confirm that the selected port is highlighted, and then click [Next].
K
Click [Finish].
L
Note
❒ During installation, the [Digital Signature Not Found] dialog box may appear.
In this case, click [Yes] to continue the installation.
Restart the computer after the installation is complete.
M
Set up the options with the printer driver.
N
Reference
For more information about settings for options, see P.31 “Setting up Op-
tions”.
3
Note
❒ You can specify the "User Code" with the printer properties after installing
the printer driver. See the Help file for the printer driver.
❒ You must set up the options when the bidirectional transmission is dis-
abled. For more information about the status of the bidirectional transmission, see P.17 “The conditions of the bidirectional transmissions”.
Accessing the Port Settings Dialog Box
This section describes how to access the port settings dialog box to change the
settings of SmartNetMonitor for Client.
Reference
For more information about these settings, see SmartNetMonitor for Client
Help.
Click [Start] on the taskbar, point to [Settings], and click [Printers].
A
Click the icon of the printer you want to use.
B
On the [File] menu, click [Properties].
C
Click the [Details] tab, and then click [Port Settings].
D
The SmartNetMonitor for Client settings dialog box appears.
25
Page 32

3
Windows 2000 Configuration
----Installing SmartNetMonitor for Client individually
Close all applications that are running.
A
Insert the CD-ROM into the CD-ROM drive.
B
The installer will start by Auto Run.
Important
❒ Never have two versions of the same printer driver installed on your sys-
tem at the same time. When upgrading to a new version of the printer driver, delete the old version, and then install the new one.
Note
❒ Auto Run might not automatically work with certain OS settings. In this
case, launch "INSTTOOL.EXE" located on the CD-ROM root directory.
Follow the instructions on the screen.
C
Select [Custom] installation, and then click [Next].
D
Remove the check mark from the RPCS and PCL 5c printer driver.
E
Click to select [SmartNetMonitor for Client], and then click [Install].
F
Click [OK].
G
Follow the instructions on the screen.
H
Note
❒ If you are required to restart the computer after the installation of Smart-
NetMonitor for Admin, restart the computer and continue with necessary
configurations.
26
Page 33

Printing without Using a Print Server
Printing with a Standard TCP/IP Port
Preparation
Select [Typical] installation when you use the printer with Standard TCP/IP
port.
[Typical] installation installs the PCL 5c and RPCS printer driver.
Installing the Printer Driver
Close all applications that are running.
A
Insert the CD-ROM into the CD-ROM drive.
B
The installer will start by Auto Run.
Important
❒ Never have two versions of the same printer driver installed on your sys-
tem at the same time. When upgrading to a new version of the printer driver, delete the old version, and then install the new one.
Note
❒ Auto Run might not automatically work with certain OS settings. In this
case, launch "INSTTOOL.EXE" located on the CD-ROM root directory.
Follow the instructions on the screen.
C
Select [Typical] installation, and then click [Next].
D
Follow the instructions on the screen.
E
Select [Standard TCP/IP] when the "Select Port" dialog box appears, and then
F
click [Next].
Click [Next] in the "Add Standard TCP/IP Printer Port Wizard" window.
G
3
Type the printer name or IP address in the "Printer Name or IP Address"
H
box.
Click [Finish] in the "Add Standard TCP/IP Printer Port Wizard" window.
I
Confirm that the selected port has been displayed in the "Port" box, and
J
then click [Next].
Note
❒ During installation, the [Digital Signature Not Found] dialog box may appear.
In this case, click [Yes] to continue the installation.
27
Page 34

3
Windows 2000 Configuration
Click [Finish].
K
Note
❒ You can specify the "User Code" with the printer properties after installing
the printer driver. See the Help file for the printer driver.
❒ You must set up the options when the bidirectional transmission is dis-
abled. For more information about the status of the bidirectional transmission, see P.17 “The conditions of the bidirectional transmissions”
Restart the computer after the installation is complete.
L
Set up the options with the printer driver.
M
You must set up the options when the bidirectional transmission is dis-
N
abled.
Reference
For more information about the status of the bidirectional transmission,
see P.17 “The conditions of the bidirectional transmissions”.
For more information about settings for options, see P.31 “Setting up Op-
tions”.
Configuring LPR Port Printing
Preparation
Select [Typical] installation when you use the printer with the LPR port.
[Typical] installation installs the PCL 5c and RPCS printer driver.
Installing the Printer Driver
Close all applications that are running.
A
Insert the CD-ROM into the CD-ROM drive.
B
The installer will start by Auto Run.
Important
❒ Never have two versions of the same printer driver installed on your sys-
tem at the same time. When upgrading to a new version of the printer driver, delete the old version, and then install the new one.
Note
❒ Auto Run might not automatically work with certain OS settings. In this
case, launch "INSTTOOL.EXE" located on the CD-ROM root directory.
28
Follow the instructions on the screen.
C
Page 35

Printing without Using a Print Server
Select [Typical] installation, and then click [Next].
D
Follow the instructions on the screen.
E
Select [LPR Port] when the "Select Port" dialog box appears, and then click
F
[Next].
Type the printer's IP address in the "Name or address of server providing
G
lpd" box.
Type "lp" in the "Name of printer or print queue on that server" box, and
H
then click [OK].
Confirm that the selected port has been displayed in the "Port" box, and
I
then click [Next].
Click [Finish].
J
Note
❒ During installation, the [Digital Signature Not Found] dialog box may appear.
In this case, click [Yes] to continue the installation.
3
Restart the computer after the installation is complete.
K
Set up the options with the printer driver.
L
Reference
For more information about settings for options, see P.31 “Setting up Op-
tions”.
Note
❒ You can specify the "User Code" with the printer properties after installing
the printer driver. See the Help file for the printer driver.
❒ You must set up the options when the bidirectional transmission is dis-
abled. For more information about the status of the bidirectional transmission, see P.17 “The conditions of the bidirectional transmissions”.
29
Page 36

3
Windows 2000 Configuration
Printing with Parallel Connection
Preparation
Select [Typical] installation when you use the printer with parallel connection.
[Typical] installation installs the PCL 5c and RPCS printer driver.
Installing a Printer Driver
Close all applications that are running.
A
Insert the CD-ROM into the CD-ROM drive.
B
The installer will start by Auto Run.
Important
❒ Never have two versions of the same printer driver installed on your sys-
tem at the same time. When upgrading to a new version of the printer driver, delete the old version, and then install the new one.
Note
❒ Auto Run might not automatically work with certain OS settings. In this
case, launch "INSTTOOL.EXE" located on the CD-ROM root directory.
Follow the instructions on the screen.
C
Select [Typical] installation, and then click [Next].
D
Follow the instructions on the screen.
E
Select [LPT1] when the [Select Port] dialog box appears, and then click [Next].
F
Click [Finish].
G
Note
❒ During installation, the [Digital Signature Not Found] dialog box may appear.
In this case, click [Yes] to continue the installation.
Restart the computer after the installation is complete.
H
Set up the options with the printer driver.
I
Reference
For more information about settings for options, see P.31
Note
❒ You can specify the "User Code" with the printer properties after installing
the printer driver. See the Help file for the printer driver.
❒ You must set up the options when the bidirectional transmission is dis-
abled. For more information about the status of the bidirectional transmission, see P.17 “The conditions of the bidirectional transmissions”.
“Setting up Options”
.
30
Page 37

Setting up Options
Setting up Options
You must set up the options when the bidirectional transmission is disabled.
Click [Start] on the taskbar, point to [Settings], and then click [Printers].
A
The [Printers] window appears.
Click the icon of the printer you want to use.
B
On the [File] menu, click [Properties].
C
Click the [Accessories] tab.
D
Note
❒ If you use the RPCS printer driver, Click the [Change Accessories] tab.
❒ If you use the PS printer driver, Click the [Device Settings] tab.
Select options you have installed from the [Option] group. And make any
E
settings you require.
Click [OK].
F
----The conditions of the bidirectional transmissions
When the bidirectional transmissions is enabled, the information about the paper size and feed direction settings are automatically sent to the printer by the
computer. You can also confirm the printer's condition from your computer.
• The bidirectional transmissions is supported by Windows 95/98/Me, Windows 2000 and Windows NT 4.0.
• If you use the RPCS ptinter driver and the bidirectional transmissions is enabled, on Windows 2000, the [Change Accessories] tab are grayed out.
Note
❒ The RPCS pritner driver supports the bidirectional transmission and update
the printer status automatically.
3
❒ The PCL 5c printer driver supports the bidirectional transmission, you can
update the printer status manually.
❒ The PostScript3 printer driver does not supports the bidirectional transmis-
sion.
To support the bidirectional transmissions, the following conditions below are
required.
31
Page 38

3
Windows 2000 Configuration
❖❖❖❖ Connecting with the parallel interface cable and the USB exchange cable.
• The computer supports the bidirectional transmissions.
• The Interface cable supports the bidirectional transmissions.
• The printer is connected to the computer using the standard parallel inter-
face cable and the parallel connector.
• On Windows 2000, the [Enable bidirectional support] is selected and [Enable
printer pooling] is not selected under the [ports] tab.
❖❖❖❖ Connecting with the network
• SmartNetMonitor for Client and the TCP/IP protocol are used.
• On Windows 2000, the [Enable bidirectional support] is selected and [Enable
printer pooling] is not selected under the [ports] tab.
• SmartNetMonitor for Client included on the CD-ROM is installed.
32
Page 39

4. Windows NT 4.0
Configuration
Printing with a Print Server
Printing with a Windows 2000 or Windows NT 4.0 Print Server
This section describes the procedures for setting up a client in a network that
uses Windows 2000 Server, Windows 2000 Professional, Windows NT 4.0 Server
or Windows NT 4.0 Workstation as a print server.
To print from Windows NT 4.0, you must install the printer driver and change
the printer port to the print server.
Windows 2000
Windows NT 4.0
Print Server
Windows NT 4.0
Close all applications that are running.
A
Insert the CD-ROM into the CD-ROM drive.
B
The installer will start by Auto Run.
Important
❒ Never have two versions of the same printer driver installed on your sys-
tem at the same time. When upgrading to a new version of the printer driver, delete the old version, and then install the new one.
Note
❒ Auto Run might not automatically work with certain OS settings. In this
case, launch "INSTTOOL.EXE" located on the CD-ROM root directory.
Follow the instructions on the screen.
C
Select [Typical] installation, and then click [Next].
D
33
Page 40

Windows NT 4.0 Configuration
Follow the instructions on the screen.
E
Click [Add] when the "Select Port" dialog box appears.
F
Select [network printer], and then click [OK].
G
Double-click the computer name you want to use as a print server in the
H
"Browse for Printer" window.
Select the printer you want to use, and then click [OK].
I
After confirming that the location for the selected printer shown, click
J
[Next].
Follow the instructions on the screen.
K
4
Restart the computer after the installation is complete.
L
Set up the options with the printer driver.
M
Note
❒ You can specify the "User Code" with the printer properties after installing
the printer driver. See the Help file for the printer driver.
Reference
For more information about settings for options, see P.44 “Setting up Op-
tions”.
34
Page 41

Printing without Using a Print Server
Printing without Using a Print Server
Configuring the Protocols
Configuring TCP/IP and IPP for Printing
Follow these instructions to configure the printer and Windows NT 4.0 to use the
TCP/IP protocol and IPP.
❖❖❖❖ Configuring the printer
Configure the printer to use the TCP/IP protocol.
• Confirm that the TCP/IP protocol is set to be active. (The factory default is
active.)
• Assign an IP address and make other settings required for using the TCP/
IP protocol.
Reference
For more information about how to make the above settings, see “Config-
uring the printer for the Network” in Administrator Reference 1.
If DHCP is used to assign IP addresses, see Appendix, “When Using DH-
CP” in Administrator Reference 2 included as a PDF file on the CD-ROM.
Note
❒ After setting the IP address, use the ping command to confirm that it has
been set correctly.
Click [Start], point to [Programs], and then click [Command Prompt].
A
Type the following. (Example IP address is 192.168.15.16)
B
C:> ping 192.168.15.16
If the address has been configured correctly, the following message appears.
Reply from 192.168.15.16 : bytes=32 time<10ms TTL=32
If the address has been configured incorrectly, the following message
appears.
Request timed out.Request timed out.
4
❖❖❖❖ Configuring a Windows NT 4.0 computer
Follow these steps to configure a Windows NT 4.0 computer to use the TCP/
IP protocol.
Open
A
[Control Panel]
IP Protocol” is listed in the
Note
❒ If the TCP/IP protocol is not installed, click [Add] under the [Protocols]
tab and install it. For more information about installing the TCP/IP protocol, see Windows NT 4.0 Help.
and double-click the
[Network protocols]
[Network]
icon. Confirm that “TCP/
box under the
[Protocols]
tab.
35
Page 42

Windows NT 4.0 Configuration
Configure the TCP/IP protocols with the appropriate IP address, subnet
B
mask and other settings.
Confirm with the network administrator that the settings are correct.
Click the [Services] tab, and confirm that “Microsoft TCP/IP Printing” is
C
installed.
If “Microsoft TCP/IP Printing” is not installed, click [Add] under the [Ser-
vices] tab, and install it. For more information about installing and config-
uring network services, see Windows NT 4.0 Help.
Configuring NetBEUI for Printing
Follow these instructions to configure the printer and Windows NT 4.0 to use the
NetBEUI protocol.
4
❖❖❖❖ Configuring the printer
Configure the printer to use the NetBEUI protocol.
• Confirm that the NetBEUI protocol is set to be active. (The factory default
is active.)
Reference
For more information about how to make the above settings, see “Config-
uring the printer for the Network” in Administrator Reference 1.
❖❖❖❖ Configuring a Windows NT 4.0 computer
Install the NetBEUI protocol on the Windows NT 4.0 computer, and change
the LAN adapter number (Lana Number).
Open
A
[Control Panel]
BEUI Protocol” is listed in the
Note
and double-click the
[Network Protocols]
[Network]
box under the
icon. Confirm that “Net-
[Protocols]
❒ If the NetBEUI protocol is not installed, click [Add...] under the [Proto-
cols] tab, and install it. For more information about installing the Net-
BEUI protocol, see Windows NT 4.0 Help.
Change the Lana Number. Click the [Services] tab, click “NetBIOS Inter-
B
face” in the [Network Services:] box , and click [Properties].
Click the Lana Number corresponding the Nbf protocol of the [Network
C
Route] headline, and click [Edit].
Type “0” as the Lana Number.
D
tab.
36
Note
❒ If the other protocol's Lana Number is configured with “0”, you must
change the Lana Number a number with other than “0”.
Click [OK].
E
Click [Close], and close the [Network] dialog box.
F
After confirming the message to restart, click [Yes].
G
Note
❒ After you change the Lana Number, you must restart the computer.
Page 43

Printing without Using a Print Server
Installing Software
Preparation
Select [Network] installation when you print without using a print server.
[Network] installation installs the PCL 5c and RPCS printer driver and Smart-
NetMonitor for Client. When you print using TCP/IP, NetBEUI or IPP protocol in a Peer-to-Peer Network, you must select this installation.
[Custom] installation allows you to install SmartNetMonitor for Client separately.
Installing by "Network" installation
Close all applications that are running.
A
Insert the CD-ROM into the CD-ROM drive.
B
The installer will start by Auto Run.
Important
❒ Never have two versions of the same printer driver installed on your sys-
tem at the same time. When upgrading to a new version of the printer driver, delete the old version, and then install the new one.
Note
❒ Auto Run might not automatically work with certain OS settings. In this
case, launch "INSTTOOL.EXE" located on the CD-ROM root directory.
Follow the instructions on the screen.
C
Select [Network] installation when the selection screen appears.
D
Follow the instructions on the screen.
E
Select a printer you want to use when the [Select Printer] dialog box appears.
F
Click [Add..] when the [Select Port] dialog box appears.
G
4
Select [SmartNetMonitor for Client], and then click [OK].
H
Available printers will be listed.
37
Page 44

4
Windows NT 4.0 Configuration
Select a printer you want to use.
I
TCP/IP
A Click the printer you want to use, and then click [OK].
Note
❒ Printers that respond to an IP broadcast from the computer will be dis-
played. To print to a printer not listed here, click [Specify Address], and
then type the IP address or host name.
❒ You cannot add an address partially similar to that already used. For ex-
ample, when “192.168.0.2” is already used, “192.168.0.2xx” cannot be
used. Similarly, when “192.168.0.20” is already used, “192.168.0.2” cannot be used.
NetBEUI
A Click [NetBEUI].
A list of printers that can be used by the NetBEUI protocol appears.
B Click the printer you want to use, and then click [OK].
Note
❒ Printers that respond to an broadcast from the computer will be dis-
played. To print to a printer not listed here, click [Specify Address], and
then type the NetBEUI address. Confirm the NetBEUI address on the
network configuration page. For more information about the printing of
configuration page, see “Printing a Configuration Page” in Administrator
Reference 2 included as a PDF file on the CD-ROM.
❒ You cannot print to printers beyond routers.
IPP
A Click [IPP].
The IPP settings dialog box appears.
B In [Printer URL], type “http://(printer's IP address)/printer” as the printer's
IP address.
(Example IP address is 192.168.15.16)
http://192.168.15.16/printer
C As necessary, type the names to distinguish the printer in [IPP Port Name].
Type a name differing from those of any existing port names.
38
If you omit this, the address typed in [Printer URL] will be set as the IPP port
name.
Page 45

Printing without Using a Print Server
D If a proxy server and IPP user name are used, click [Detailed Settings] and
configure the necessary settings.
Note
❒ For more information about these settings, see SmartNetMonitor for
Client online Help.
Click [OK].
J
Confirm that the selected port is highlighted, and then click [Next].
K
Click [Finish].
L
Restart the computer after the installation is complete.
M
Set up the options with the printer driver.
N
Reference
For more information about settings for options, see P.44 “Setting up Op-
tions”.
Note
❒ You can specify the "User Code" with the printer properties after installing
the printer driver. See the Help file for the printer driver.
4
❒ You must set up the options when the bidirectional transmission is dis-
abled. For more information about the status of the bidirectional transmission, see P.44 “The conditions of the bidirectional transmissions”.
Accessing the Port Settings Dialog Box
This section describes how to access the port settings dialog box to change the
settings of SmartNetMonitor for Client.
Reference
For more information about these settings, see SmartNetMonitor for Client
Help.
Click [Start] on the taskbar, point to [Settings], and click [Printers].
A
Click the icon of the printer you want to use.
B
On the [File] menu, click [Properties].
C
Click the [Details] tab and click [Port Settings].
D
The SmartNetMonitor for Client settings dialog box appears.
39
Page 46

4
Windows NT 4.0 Configuration
----Installing SmartNetMonitor for Client individually
Close all applications that are running.
A
Insert the CD-ROM into the CD-ROM drive.
B
The installer will start by Auto Run.
Important
❒ Never have two versions of the same printer driver installed on your sys-
tem at the same time. When upgrading to a new version of the printer driver, delete the old version, and then install the new one.
Note
❒ Auto Run might not automatically work with certain OS settings. In this
case, launch "INSTTOOL.EXE" located on the CD-ROM root directory.
Follow the instructions on the screen.
C
Select [Custom] installation, and then click [Next].
D
Remove the check mark from the RPCS and PCL 5c printer driver.
E
Click to select [SmartNetMonitor for Client], and then click [Install].
F
Click [OK].
G
Follow the instructions on the screen.
H
Note
❒ If you are required to restart the computer after the installation of Smart-
NetMonitor for Admin, restart the computer and continue with necessary
configurations.
40
Page 47

Printing without Using a Print Server
Configuring LPR Port Printing
Preparation
Select [Typical] installation when you use the printer with the LPR port.
[Typical] installation installs the PCL 5c and RPCS printer driver.
Installing the Printer Driver
Close all applications that are running.
A
Insert the CD-ROM into the CD-ROM drive.
B
The installer will start by Auto Run.
Important
❒ Never have two versions of the same printer driver installed on your sys-
tem at the same time. When upgrading to a new version of the printer driver, delete the old version, and then install the new one.
4
Note
❒ Auto Run might not automatically work with certain OS settings. In this
case, launch "INSTTOOL.EXE" located on the CD-ROM root directory.
Follow the instructions on the screen.
C
Select [Typical] installation, and then click [Next].
D
Follow the instructions on the screen.
E
Select [LPR Port] when the "Select Port" dialog box appears, and then click
F
[Next].
Type the printer's IP address in the "Name or address of server providing
G
lpd" box.
Type "lp" in the "Name of printer or print queue on that server" box, and
H
then click [OK].
Confirm that the selected port has been displayed in the "Port" box, and
I
then click [Next].
Click [Finish].
J
Restart the computer after the installation is complete.
K
41
Page 48

4
Windows NT 4.0 Configuration
Set up the options with the printer driver.
L
Reference
For more information about settings for options, see P.44 “Setting up Op-
tions”.
Note
❒ You can specify the "User Code" with the printer properties after installing
the printer driver. See the Help file for the printer driver.
❒ You must set up the options when the bidirectional transmission is dis-
abled. For more information about the status of the bidirectional transmission, see P.44 “The conditions of the bidirectional transmissions”.
42
Page 49

Printing with a Parallel Connection
Printing with a Parallel Connection
Preparation
Select [Typical] installation when you use the printer with parallel connection.
[Typical] installation installs the PCL 5c and RPCS printer driver.
Installing a Printer Driver
Preparation
The target printer must be turned on before starting the installation process.
Close all applications that are running.
A
Insert the CD-ROM into the CD-ROM drive.
B
The installer will start by Auto Run.
Important
❒ Never have two versions of the same printer driver installed on your sys-
tem at the same time. When upgrading to a new version of the printer driver, delete the old version, and then install the new one.
4
Note
❒ Auto Run might not automatically work with certain OS settings. In this
case, launch "INSTTOOL.EXE" located on the CD-ROM root directory.
Follow the instructions on the screen.
C
Select [Typical] installation, and then click [Next].
D
Follow the instructions on the screen.
E
Select [LPT1] when the [Select Port] dialog box appears, and then click [Next].
F
Click [Finish].
G
Restart the computer after the installation is complete.
H
Set up the options with the printer driver.
I
Reference
For more information about settings for options, see P.44 “Setting up Op-
tions”.
Note
❒ You can specify the "User Code" with the printer properties after installing
the printer driver. See the Help file for the printer driver.
❒ You must set up the options when the bidirectional transmission is dis-
abled. For more information about the status of the bidirectional transmission, see P.44 “The conditions of the bidirectional transmissions”.
43
Page 50

4
Windows NT 4.0 Configuration
Setting up Options
You must set up the options when the bidirectional transmission is disabled.
Click [Start] on the taskbar, point to [Settings], and then click [Printers].
A
The [Printers] window appears.
Click the icon of the printer you want to use.
B
On the [File] menu, click [Properties].
C
Click the [Accessories] tab.
D
Note
❒ If you use the RPCS printer driver, Click the [Change Accessories] tab.
Select options you have installed from the [Option] group. And make any
E
settings you require.
Click [OK].
F
----The conditions of the bidirectional transmissions
When the bidirectional transmissions is enabled, the information about the paper size and feed direction settings are automatically sent to the printer by the
computer. You can also confirm the printer's condition from your computer.
• The bidirectional transmissions is supported by Windows 95/98/Me, Windows 2000 and Windows NT 4.0.
• If you use the RPCS ptinter driver and the bidirectional transmissions is enabled, on Windows NT 4.0, the [Change Accessories] tab are grayed out.
Note
❒ The RPCS pritner driver supports the bidirectional transmission and update
the printer status automatically.
❒ The PCL 5c printer driver supports the bidirectional transmission, you can
update the printer status manually.
❒ The PostScript3 printer driver does not supports the bidirectional transmis-
sion.
To support the bidirectional transmissions, the following conditions below are
required.
44
Page 51

Setting up Options
❖❖❖❖ Connecting with the parallel interface cable and the USB exchange cable.
• The computer supports the bidirectional transmissions.
• The Interface cable supports the bidirectional transmissions.
• The printer is connected to the computer using the standard parallel inter-
face cable and the parallel connector.
• On Windows NT 4.0, the [Enable bidirectional support] is selected and [Enable
printer pooling] is not selected under the [ports] tab.
❖❖❖❖ Connecting with the network
• SmartNetMonitor for Client and the TCP/IP protocol are used.
• On Windows NT 4.0, the [Enable bidirectional support] is selected and [Enable
printer pooling] is not selected under the [ports] tab.
• SmartNetMonitor for Client included on the CD-ROM is installed.
4
45
Page 52

INDEX
A
Accessing the Port Settings Dialog Box
,
Windows 2000
Windows 95/98/Me
Windows NT 4.0
25
,
,
39
13
C
configuration
,
,
,
,
,
19
,
28
,
22
,
21
,
21
,
33
41
,
36
,
,
35
35
10
9
9
,
Windows 2000
Windows NT 4.0
Configuring LPR Port Printing
Windows 2000
Windows NT 4.0
Configuring NetBEUI for Printing
Windows 2000
Windows 95/98/Me
Windows NT 4.0
Configuring Protocols
Windows 95/98/Me
Configuring TCP/IP and IPP for Printing
Windows 2000
Windows 95/98/Me
Windows NT 4.0
Configuring the Protocols
Windows 2000
Windows NT 4.0
Confirming a Network Environment
I
Installing by "Network" installation
,
,
,
,
23
,
30
,
26
,
23
,
,
37
,
43
,
40
37
,
11
15
14
11
Windows 2000
Windows 95/98/Me
Windows NT 4.0
Installing, Printer Driver
Windows 2000
Windows 95/98/Me
Windows NT 4.0
installing, SmartNetMonitor for Client
Windows 2000
Windows 95/98/Me
Windows NT 4.0
Installing Software
Windows 2000
Windows NT 4.0
Installing software
Windows 95/98/Me
L
LAN adapter number (Lana Number)
,
36
P
Printing with a Parallel Connection
,
,
,
,
,
19
,
27
21
,
30
43
,
33
,
35
,
7
9
15
Windows NT 4.0
Printing with a Print Server
Windows 2000
Windows 95/98/Me
Windows NT 4.0
Printing with a Standard TCP/IP Port
Windows 2000
Printing without Using a Print Server
Windows 2000
Windows 95/98/Me
Windows NT 4.0
Printing with Parallel Connection
Windows 2000
Windows 95/98/Me
S
Setting up Options
,
Windows 2000
Windows 95/98/Me
Windows NT 4.0
1
T
The conditions of the bidirectional
transmissions
31
,
, 17, 31,
,
44
17
44
W
Windows 2000
Windows 95/98/Me Configuration
Windows NT 4.0
,
19
,
33
,
7
46
UE USA G060
Page 53

Copyright © 2001
Page 54

UE USA G060-6940
 Loading...