

Page 1

Getting Started
FINAL DRAFT
5/2/99
This file contains material copyrighted by EFI.
Ricoh may not use, copy, or distribute this
material except for internal purposes only. Under
no circumstances can Ricoh copy or distribute
this material to anyone outside of Ricoh without
EFI’s written consent.
FIERY 500 COLOR
PRINTING SYSTEM
Page 2

Page 3

Copyright © 1999 Electronics For Imaging, Inc. All rights reserved.
This publication is protected by copyright, and all rights are reserved. No part of it may be reproduced or transmitted in any form or by any means for
any purpose without express prior written consent from Electronics For Imaging, Inc., except as expressly permitted herein. Information in this
document is subject to change without notice and does not represent a commitment on the part of Electronics For Imaging, Inc.
The software described in this publication is furnished under license and may only be used or copied in accordance with the terms of such license.
Patents: 5,867,179; 5,835,788; 5,666,436; 5,553,200; 5,543,940; 5,537,516; 5,517,334; 5,506,946; 5,424,754; 5,343,311; 5,212,546; 4,941,038;
4,837,722; 4,500,919
Trademarks
ColorWise and Rip-While-Print are trademarks registered in the U.S. Patent and Trademark Office. Fiery Driven, the Fiery Driven logo, Starr
Compression, NetWise, and VisualCal are trademarks of Electronics For Imaging, Inc.
Adobe, the Adobe logo, Adobe Illustrator, PostScript, Adobe Photoshop, Adobe Separator, and Adobe PageMaker are trademarks of Adobe Systems
Incorporated, registered in certain jurisdictions. EPS (Encapsulated PostScript) is a trademark of Altsys Corporation. A pple, the Apple logo, AppleShare,
AppleTalk, EtherTalk, LaserWriter, and Macintosh are register ed trademarks, and MultiFinder is a trademark of Apple Computer, Inc. Microsoft, MS,
MS-DOS, and Windows are registered trademarks of Microsoft in the US and other countries. QuarkXPress is a registered trademark of Quark, Inc.
Times, Helvetica, and P alatino are trademar ks of Linotype AG and/or its subsidiaries. IT C Avant Garde, ITC Bookman, ITC Zapf Chancery, and ITC
Zapf Dingbats are registered trademarks of International Typeface Corporation. E thernet is a register ed trademark of Xero x Corporation. N etWare and
Novell are registered trademarks and I nternetwork Packet Ex change (IPX) is a trademark of Nov ell, Inc. UNIX is a registered trademark of UNIX System
Laboratories, a wholly owned subsidiary of Novell, Inc. PANTONE is a registered trademark of Pantone, Inc.
All other terms and product names may be trademarks or registered trademarks of their respective owners, and are hereby acknowledged.
Legal Notices
APPLE COMPUTER, INC. (“APPLE”) MAKES NO WARRANTIES, EXPRESS OR IMPLIED, INCLUDING WITHOUT LIMITATION
THE IMPLIED WARRANTIES OF MERCHANTABILITY AND FITNESS FOR A PARTICULAR PURPOSE, REGARDING THE APPLE
SOFTWARE. APPLE DOES NOT WARRANT, GUARANTEE, OR MAKE ANY REPRESENTATIONS REGARDING THE USE OR THE
RESUL TS OF THE USE OF THE APPLE SOFTWARE IN TERMS OF IT S CORRECTNESS, AC CURACY, RELIABILITY , CURRENTNESS,
OR OTHERWISE. THE ENTIRE RISK AS T O THE RESULT S AND PERFORMANCE OF THE APPLE SOFTWARE IS ASSUMED BY YOU.
THE EXCLUSION OF IMPLIED WARRANTIES IS NO T PERMITTED BY SOME STA TES. THE ABO VE EX CL USION MAY NOT APPLY
TO YOU.
IN NO EVENT WILL APPLE, ITS DIRECTORS, OFFICERS, EMPLOYEES OR AGENTS BE LIABLE TO YOU FOR ANY
CONSEQUENTIAL, INCIDENTAL OR INDIRECT DAMAGES (INCLUDING DAMAGES FOR LOSS OF BUSINESS PROFITS,
BUSINESS INTERRUPTION, LOSS OF BUSINESS INFORMATION, AND THE LIKE) ARISING OUT OF THE USE OR INABILITY T O
USE THE APPLE SOFTWARE EVEN IF APPLE HAS BEEN ADVISED OF THE POSSIBILITY OF SUCH DAMAGES. BECAUSE SOME
STATES DO NOT ALL O W THE EXCL USION OR LIMITA TION OF LIABILITY FOR CONSEQUENTIAL OR INCIDENTAL DAMAGES,
THE ABOVE LIMIT ATIONS MA Y NOT APPLY TO YOU.
the form of the action (whether in contract, tort [including negligence], product liability or otherwise), will be limited to $50.
Restricted Rights Legends
For defense agencies: Restricted Rights Legend. Use, reproduction, or disclosur e is subject to restrictions set forth in subparagraph (c)(1)(ii) of the Rights
in Technical Data and Computer Software clause at 252.227.7013.
For civilian agencies: Restricted Rights Legend. Use, reproduction, or disclosur e is subject to restrictions set forth in subparagraph (a) through (d) of the
commercial Computer Software Restricted Rights clause at 52.227-19 and the limitations set forth in Electronics For Imaging, Inc.’s standard
commercial agreement for this software. Unpublished rights reserved under the copyright laws of the United States.
Apple’s liability to you for actual damages from any cause whatsoever, and r egar dless of
Page 4

Software License Agreement
Before using the Software, please carefully read the following terms and conditions. BY USING THIS SOFTWARE, YOU SIGNIFY THAT YOU
HAVE ACCEPTED THE TERMS OF THIS AGREEMENT. If you cannot or do not accept these terms, you may return the entire package within
ten (10) days to the Distributor or Dealer from which you obtained them for a full refund.
Electronics For Imaging, Inc. grants to you a non-ex clusive, non-transferable license to use the software and accompanying documentation (“Software ”)
included with the Fiery 500 you have purchased, including without limitation the PostScript
®
software provided by Adobe Systems Incorporated.
You may:
a. use the Software solely for your own customary business purposes and solely with Fiery 500;
c. use the trademarks used by Electronics For Imaging to identify the Coded Font Programs and Typefaces reproduced therefrom (“Trademarks”); and
d. assign your rights under this Agreement to a transferee of all of your right, title and interest in and to Fiery 500 provided the transferee agrees to be
bound by all of the terms and conditions of this Agreement.
You may not:
a. make use of the Software, directly or indirectly, to print bitmap images with print resolutions of 600 dots per inch or greater, or to generate fonts or
typefaces for use other than with Fiery 500;
b. make or have made, or permit to be made, any copies of the Software, Coded Font Programs, accompanying documentation or portions thereof,
except as necessary for use with the Fiery 500 unit purchased by you; provided, however, that under no circumstances may you make or have made, or
permit to be made, any copies of that certain portion of the Software which has been included on the Fiery 500 hard disk drive. You may not copy the
documentation;
c. attempt to alter, disassemble, decrypt or reverse engineer the Software, Coded Font Programs or accompanying documentation.
d. rent or lease the Software.
Proprietary Rights
You ackno wledge that the Software, Coded F ont P rograms, Typefaces, Trademarks and accompanying documentation are proprietary to Electronics For
Imaging and its suppliers and that title and other intellectual property rights therein remain with Electronics For Imaging and its suppliers. Except as
stated above, this Agreement does not grant you any right to patents, copyrights, trade secrets, trademarks (whether registered or unregister ed), or any
other rights, franchises or licenses in respect of the Software, Coded Font P rograms, Typefaces, Trademarks or accompanying documentation. You may
not adapt or use any trademark or trade name which is likely to be similar to or confusing with that of Electronics For Imaging or any of its suppliers
or take any other action which impairs or reduces the trademark rights of Electronics For Imaging or its suppliers. The trademarks may only be used to
identify printed output produced by the Coded Font Programs. At the r easonable request of Electronics For Imaging, you must supply samples of any
Typeface identified with a trademark.
Confidentiality
You agree to hold the Software and Coded Font Programs in confidence, disclosing the Software and Coded Font Programs only to authorized users
having a need to use the Software and Coded Font Programs as permitted b y this Agreement and to take all reasonable precautions to prev ent disclosure
to other parties.
Remedies
Unauthorized use, copying or disclosure of the Software, Coded Font Programs, Typefaces, Trademarks or accompanying documentation will result in
automatic termination of this license and will make available to Electronics For Imaging other legal remedies.
Limited Warranty And Disclaimer
Electronics For Imaging warrants that, for a period of ninety (90) days from the date of delivery to you, the Software under normal use will perform
without significant errors that make it unusable. Electronics For Imaging’s entire liability and your exclusive remedy under this warranty (which is subject
to you returning Fiery 500 to Electronics For Imaging or an authorized dealer) will be, at Electronics F or Imaging’s option, to use reasonable commercial
efforts to attempt to correct or work around errors, to replace the Software with functionally equivalent software, or to refund the purchase price and
terminate this Agreement. Some states do not allow limitations on duration of implied warranty, so the above limitation may not apply to you.
Except for the above express limited warranty, Electronics For Imaging makes and you receive no warranties or conditions on the Products, express,
implied, or statutory, and Electronics For Imaging specifically disclaims any implied warranty or condition of merchantability or fitness for a particular
purpose.
For warranty service, please contact your authorized service/support center.
Page 5

EXCEPT FOR THE ABOVE EXPRESS LIMITED WARRANTY, ELECTRONICS FOR IMAGING MAKES AND YOU RECEIVE NO
WARRANTIES OR CONDITIONS ON THE SOFTWARE OR CODED FONT PROGRAMS, EXPRESS, IMPLIED, STATUTORY, OR IN
ANY OTHER PROVISION OF THIS AGREEMENT OR COMMUNICATION WITH YOU, AND ELECTRONICS FOR IMAGING
SPECIFICALLY DISCLAIMS ANY IMPLIED WARRANTY OR CONDITION OF MERCHANTABILITY OR FITNESS FOR A PAR TICULAR
PURPOSE. Electronics For Imaging does not warrant that the operation of the software will be uninterrupted or error free or that the Software will
meet your specific requirements.
Limitation Of Liability
IN NO EVENT WILL ELECTRONICS FOR IMAGING OR ITS SUPPLIERS BE LIABLE FOR ANY DAMAGES, INCLUDING LOSS OF
DATA, LOST PROFITS, COST OF COVER OR OTHER SPECIAL, INCIDENTAL, CONSEQUENTIAL OR INDIRECT DAMAGES
ARISING FROM THE USE OF THE SOFTWARE, CODED FONT PROGRAMS OR ACCOMPANYING DOCUMENTATION, HOWEVER
CAUSED AND ON ANY THEORY OF LIABILITY. THIS LIMITATION WILL APPLY EVEN IF ELECTRONICS FOR IMAGING OR ANY
AUTHORIZED DEALER HAS BEEN ADVISED OF THE POSSIBILITY OF SUCH DAMAGE. YOU ACKNOWLEDGE THAT THE PRICE
OF THE UNIT REFLECTS THIS ALLOCATION OF RISK. BECAUSE SOME STATES/JURISDICTIONS DO NOT ALLOW THE
EXCLUSION OR LIMIT ATION OF LIABILITY FOR CONSEQUENTIAL OR INCIDENTAL DAMAGES, THE ABOVE LIMITATION MAY
NOT APPLY TO YOU.
Export Controls
You agree that you will not export or re-export the Software or Coded Font Programs in any form without the appropriate United States and foreign
government licenses. Your failure to comply with this provision is a material breach of this Agreement.
Government Use
Use, duplication or disclosure of the Software by the United States Government is subject to restrictions as set forth in subdivision (c) (1) (ii) of the
Rights in Technical Data and Computer Software clause at DFARS 252.227-7013 or in subparagraphs (c) (1) and (2) of the Commercial Computer
Software—Restricted Right Clause at 48 CFR 52.227-19, as applicable.
Third Party Beneficiary
You are hereby notified that Adobe Systems Incorporated, a California corporation located at 345 Park Avenue, San Jose, CA 95110-2704 (“Adobe”)
is a third-party beneficiary to this Agreement to the extent that this Agreement contains provisions which relate to your use of the Fonts, the Coded F ont
Programs, the Typefaces and the Trademarks licensed hereby. Such provisions ar e made expressly for the benefit of Adobe and ar e enforceable by A dobe
in addition to Electronics For Imaging.
Page 6

Page 7

Contents
Introduction
About the documentation
Specifications
User software
System requirements
Windows xiv
Macintosh xv
Parallel port xv
IPX (Novell) xv
Conventions
Chapter 1: Connecting the Printer to a Network
Network connections
Ethernet network connections 1-2
Token Ring network connections 1-3
Parallel cable connection
Setting up TCP/IP printing
Setting up the printing environment 1-5
Verifying the TCP/IP network connection 1-5
Setting up TCP/IP clients for printing 1-6
Setting up TCP/IP clients for running Fiery WebTools 1-7
Setting up IPX (Novell) printing 1-8
Tips for experts—IPX networks 1-9
Overview of IPX printing to the Fiery 500 1-9
Configuring a NetWare server for printing 1-10
Using AppleTalk with Macintosh computers on an IPX (Novell) network 1-14
Setting up SMB printing with Windows 95/98 and Windows NT 1-14
xi
xi
xii
xiv
xvi
1-1
1-4
1-4
Page 8

viii Contents
Chapter 2: Using the Operation Panel
Using the operation panel
Activity lights 2-2
Display window 2-2
keys 2-2
Setting up the printer
Top-level menus 2-4
Main setup menus 2-5
Specifying system information
System Setup 2-6
Printer Setup 2-8
PostScript setup 2-9
PCL Setup 2-10
Specifying network information
I/O Port Setup 2-11
Specifying network protocol options
Network Protocol Setup 2-14
Network Services Setup 2-19
Language Setup
Printing a Test page
Printing additional pages
2-1
2-3
2-6
2-11
2-14
2-26
2-27
2-28
Page 9

ix Contents
Chapter 3: Installing Windows Software
General steps for installing Windows software
Setting up PostScript or PCL printing with Windows 95/98
Specifying installed devices 3-3
Completing the Windows 95/98 connection 3-4
Setting up PostScript or PCL printing with Windows NT
Specifying installed devices 3-10
Completing the Windows NT 4.0 connection 3-11
Setting up Fiery WebTools 3-21
Installing additional software for Windows users
PostScript and True T ype fonts 3-23
Adobe Type Manager (Windows 95/98) 3-23
CMYK color reference file 3-24
PANTONE color reference file 3-24
Chapter 4: Installing Macintosh Software
General steps for installing Macintosh software
Installing Macintosh printing software
Installing the Adobe PostScript printer driver 4-1
Setting up the Fiery 500 in the Chooser 4-2
Installing the Fiery 500 ICC printer profile 4-4
Setting up Fiery WebTools 4-5
3-1
3-2
3-8
3-22
4-1
4-1
Installing additional software for Macintosh users
Adobe Type Manager 4-7
CMYK color reference file 4-8
PANTONE color reference file 4-8
Appendix A: Menu Help
Index
4-7
Page 10

Page 11

xi About the documentation
Introduction
This manual describes how to install the user software for the Fiery 500 and set up
printing from Windows and Macintosh computers. For general information on using
the color printer, your computer, your application software, or your network, see the
manuals that accompany those products.
About the documentation
This manual is part of the set of Fiery 500 documentation, which includes the
following manuals for users and system administrators:
•
Quick Installation Guide
•
Printer Reference
optional equipment.
•
Getting Started
Fiery 500. Specifically, it describes installation of PostScript printer drivers, printer
description files, and other software provided on the User Software CD. It also
explains how to connect each user to the network.
• The
User’s Guide
from various computers and workstations, what you need to know about using the
printer in a networked environment, and how to use the software provided.
•
Release Notes
the problems you may encounter.
describes the necessary information on using your printer and its
describes how to install software to enable users to print to the
provides an introduction to desktop color printing, how to print
provide last-minute product information and workarounds for some of
describes the procedures for installing your printer.
Specifications
The Fiery 500 has the following features:
• MIPS R4700, 133 MHz CPU
• 32MB RAM (optional upgrade to 160MB)
• Optional 1.6GB hard disk drive
• Supports AppleTalk, TCP/IP, and IPX protocols simultaneously
• Supports parallel port communication
Page 12

xii Introduction
• Supports thicknet (thick coaxial Ethernet cable or 10Base5) and unshielded twisted
pair (Fast Ethernet 100BaseTX or Ethernet 10BaseT)
N
:
OTE
Thinnet (thin coaxial Ethernet cable or 10Base2) is also supported, but an
external trasnceiver must be prepared by the user.
• Supports Token Ring networking (available as an optional kit)
• Supports PCL5c/5e printing (for Windows computers)
• Supports Adobe PostScript 3
• Includes 136 fonts (117 Adobe Type 1 and 19 TrueType) for PostScript printing and
46 PCL fonts
In addition, two Adobe Multiple Master fonts are included and are used for font
substitution in PDF files.
• Built-in ColorWise™ color management and NetWise™ networking features
• Fiery WebTools
™
User software
The full set of Fiery 500 user software is provided on the User Software CD.
PCL Printer Driver Enables you to print to the Fiery 500 from
Windows computers; also supports all special
Fiery 500 print features, and allows the Fiery 500 to
appear in popular applications’ P rint and P age Setup
dialog boxes.
The Fiery 500 includes 46 built-in PCL fonts. See
Adobe PostScript Printer
Driver
Appendix A of the
Enables you to print to the Fiery 500 from
Windows 95/98, Windows NT 4.0, and Macintosh
computers; supports special Fiery 500 and
PostScript 3 features.
User’s Guide
for a complete list.
Page 13

xiii User software
PostScript Printer Description
files (PPDs)
Files for use with the PostScript printer driver; they
allow the Fiery 500 to appear in popular
applications’ P rint and P age Setup dialog box es. The
Fiery 500 PPDs provide information about the
Fiery 500 and your particular printer model to the
application and printer driver you are using.
PostScript Screen Fonts Screen fonts for the 136 PostScript printer fonts
installed on the Fiery 500 (117 Adobe Type 1 and
19 TrueType). See Appendix A of the
User’s Guide
for a complete list.
Adobe Type Manager (ATM) ATM is provided for both Windows and M acintosh
computers. It enables font sizes to be displayed at
the proper resolution on your monitor.
For Windows computers, ATM enables installation
and use of the 136 PostScript fonts.
For Macintosh computers, ATM provides a better
screen representation of the 136 PostScript fonts.
N
:
OTE
For details on installation and use of ATM,
see the
ATMUserGuide.pdf
file included with the
ATM software.
Color management files ColorSync and ICM color management files that
enable you to maintain consistent color from your
original artwork to the colors displayed on your
monitor to the printed output.
Color reference files Reference pages that you can print to view the range
of colors available on your Fiery 500. For the most
predictable color results, refer to these pages when
defining colors in applications.
Page 14

xiv Introduction
System requirements
To install the Fiery 500 user software on a Windows or Macintosh computer, the
computer must be equipped with a built-in or external CD-ROM drive.
Windows
To print to the Fiery 500, you need:
• A Windows-based computer with an 80486, AMD, or Pentium processor
• Windows 95/98 or Windows NT 4.0
• At least 32MB of RAM
To use Fiery WebTools, you also need:
•
Either
Netscape Communicator v4.06 and later with Java enabled or Microsoft
Internet Explorer v4.x and later with Java enabled
• A monitor that supports 16-bit color at a minimum resolution of 800 x 600
• A TCP/IP enabled network and the IP address or DNS name of the Fiery 500
• Web Services enabled on the Fiery 500
With Microsoft Windows 95/98, you also need:
• IPX/SPX or TCP/IP networking protocol installed
• Adobe PostScript Printer Driver for Windows version 4.2 or later (version 4.2.4 is
included with the user software)
With Microsoft Windows NT 4.0 you also need:
• TCP/IP or AppleTalk networking protocol installed
• Adobe PostScript Printer Driver for Windows NT 4.0 version 5.0 or later (version
5.0.1 is included with the user software)
Page 15

xv System requirements
Macintosh
To print to the Fiery 500, you need:
• A Macintosh computer
• At least 32MB of RAM
• EtherTalk installed
• Apple system software version 7.5 or later
• Adobe PostScript Printer Driver version 8.5 or later (version 8.5.1 is included with
the user software)
To use Fiery WebTools, you also need:
• Netscape Communicator v4.06 and later with Java enabled
• A TCP/IP enabled network and the IP address or DNS name of the Fiery 500
• Web Services enabled on the Fiery 500
Parallel port
To print to the Fiery 500 using the parallel port, you need:
• A Windows-based computer with an 80486, AMD, or Pentium processor
• At least 32MB of RAM
• A parallel cable (not included with the Fiery 500)
The cable should be IEEE-1284 subcompliant and have a male 36-pin mini C
connector on one end, and a 25-pin male D-sub connector on the other.
IPX (Novell)
To use the Fiery 500 with an IPX (Novell) network, you need:
• A Novell server
• Novell NetWare software version 4.x or 3.x
• Support for Ethernet SNAP, Ethernet II, Ethernet 802.3, Ethernet 802.2,
Token Ring SNAP, or Token Ring
Page 16

xvi Introduction
Conventions
Indicates functionality for which a hard disk drive is required.
Page 17

1-1 Network connections
1
Chapter 1: Connecting the Printer to a Network
This chapter describes how to connect your printer to a network. You can connect
the printer to your network with thicknet, twisted pair, or thinnet cable. You can
also connect your printer directly to a PC compatible through the parallel port.
This chapter provides information about:
• Ethernet network connections
• Token Ring network connections (option)
• Parallel cable connection
• Setting up TCP/IP printing
TCP/IP stands for Transmission Control Protocol/Internet Protocol.
• Setting up IPX (Novell) printing
IPX stands for Internet Packet Exchange.
• Setting up SMB printing
SMB stands for Server Message Block.
• AppleTalk (Ethertalk)
After you have connected the printer to the network, follow the setup instructions
in “Main setup menus” on page 2-5.
Network connections
This section describes the types of network connections supported by the printer.
Optional network cards (required for network connections) are available from
your dealer.
Page 18
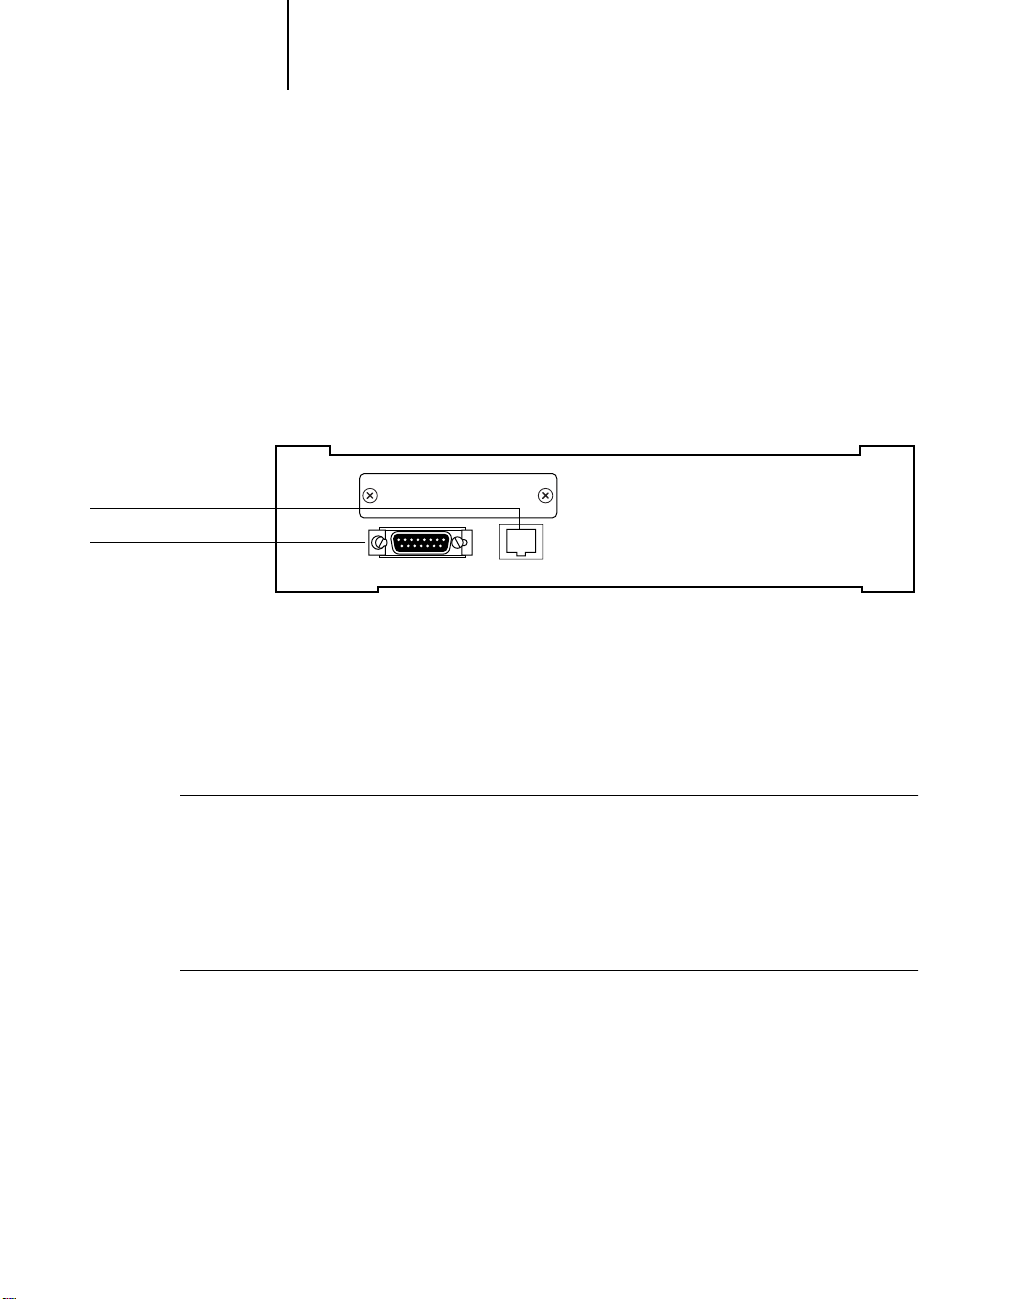
RJ-45 Socket
AUI connector
1-2 Connecting the Printer to a Network
1
Ethernet network connections
• Thicknet (thick coaxial cable or 10 Base-5)
Cable connects directly to the AUI connector (Network Interface Connector
for 10 Base-5) on the printer.
• Twisted pair (Category 5 unshielded twisted pair cable or 100 Base-TX)
Uses 8-pin RJ-45 connector that plugs into the RJ-45 socket (Network
Interface Connector for 10 Base-T/100 Base-TX) on the printer.
Turn off the printer before connecting it to any network device. Only one
OTE
N
:
Ethernet connection should be made to the printer at a time.
Thinnet (thin coaxial Ethernet cable or 10Base2) is also supported, but an
N
:
OTE
external transceiver must be prepared by the user. The external transceiver (media
access unit or MAU) is used to attach to the AUI connector on the printer.
TO
CONNECT A THICKNET CABLE TO THE PRINTER
1. With the printer turned off, connect the thicknet cable connector to the AUI
connector on the back of the printer.
2. Turn on the printer.
TO
CONNECT A TWISTED PAIR CABLE TO THE PRINTER
1. With the printer turned off, connect the RJ-45 cable to the RJ-45 socket on the
back of the printer.
2. Turn on the printer.
:
:
Page 19
1-3 Network connections
1
CONNECT A THINNET CABLE TO THE PRINTER
TO
1. With the printer turned off, connect the MAU transceiver to the A UI connector on
the back of the printer. Secure the connection using the slide latch on the AUI
connector.
2. Connect the thinnet cable to the BNC connector on the transceiver.
3. Turn on the printer.
Token Ring network connections
The printer supports the following types of Token Ring connections:
• Unshielded twisted pair cable (Category 5 unshielded twisted pair cable) that
plugs into the UTP socket on the printer.
• Shielded twisted pair cable (Category 5 shielded twisted pair cable) that plugs
into the DB 9-pin connector on the printer.
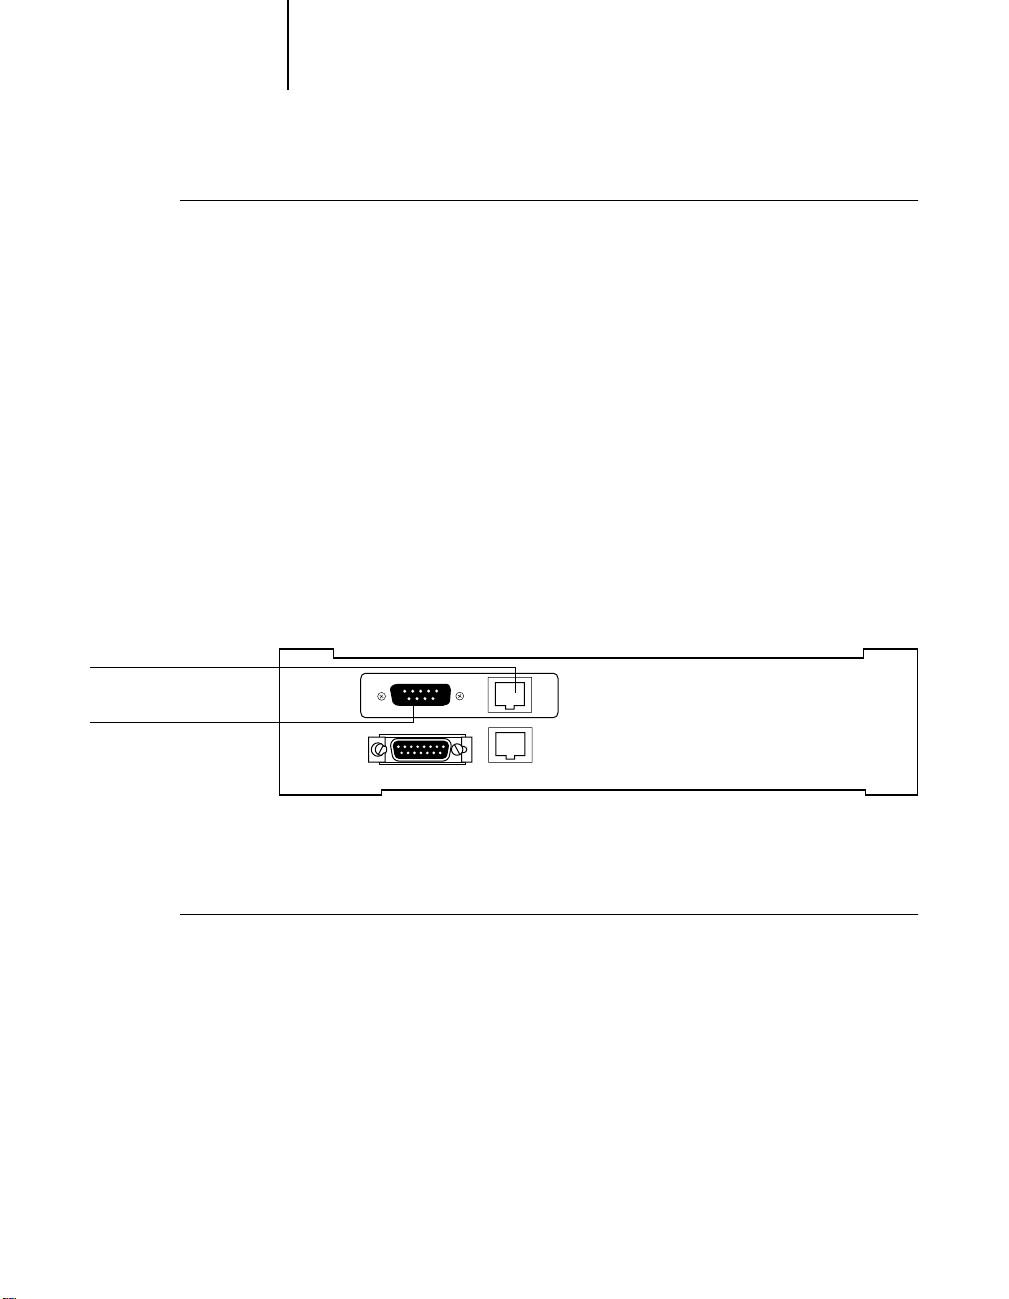
:
RJ type connector for
UTP cable
DB-9 connector for
STP cable
CONNECT
TO
N
:
OTE
When you connect your printer to the Token Ring network, you need an
optional Token Ring Network Card. For details, contact your supplier.
UNSHIELDED TWISTED PAIR) CABLE TO THE PRINTER
UTP (
With the printer turned off, connect the cable from the Token Ring MAU (Media
•
Attachment Unit) to the Token Ring card.
N
OTE
:
A Media Attachment Unit (MAU) is a network hub for a Token Ring
Network.
:
Page 20

1-4 Connecting the Printer to a Network
1
STP (SHIELDED TWISTED PAIR) CABLE TO THE PRINTER:
•
With the printer turned off, connect the STP cable from the Token Ring MAU to
the DB-9 STP connector on the Token Ring card.
Parallel cable connection
In addition to receiving print jobs over the network, the printer can accept print
jobs directly from an IBM compatible computer through its high-speed,
Centronics-compatible parallel port.
The parallel port connection can be used simultaneously with a network
connection.
NOTE: Printing through a serial port is not supported on Macintosh computers.
TO CONNECT A PARALLEL CABLE TO THE PRINTER:
1. With the printer and the computer turned off, attach the Centronics Type C
parallel cable (not included) to the parallel port on the back of the printer.
2. Connect the other end of the cable to the parallel port on the computer.
3. Turn on the printer and turn on the computer.
Setting up TCP/IP printing
TCP/IP provides network services for high-speed local and wide area networks
and heterogeneous environments including PC compatibles, Macintosh
computers, minicomputers, and mainframes running diverse operating systems.
The printer supports the lpr protocol for printing over TCP/IP networks.
Network users submit print jobs to a named printer. Workstations on a TCP/IP
network can print directly to the printer, or can print to a Windows NT 4.0
server.
Before you install the printer on a TCP/IP network, you need to obtain a unique
Internet address (IP address). Contact your network administrator for this
information.
Page 21

1-5 Setting up TCP/IP printing
1
•
•
Setting up the printing environment
To set up printing on a TCP/IP network, the network administrator must follow
these steps:
Specify the appropriate settings in the I/O Port Setup and Network Setup menus.
The administrator can enter a valid IP address for the printer, and the gateway
address and subnet mask if they are used. Alternatively, you can set an Automatic
IP Address. For information on I/O Port Setup and Network Setup see “Setting
up the printer” on page 2-3.
If the site is using NIS (Network Information Services), a superuser must add the
printer name and IP address to the system’s database of network printers.
Add the printer to the network’s IP host table.
This step must be performed on the master NIS (server) machine. After adding
the printer entry, the updated database must be released to network users.
•
For the printer name, specify the print server protocol, the print connection
(queue), and the spool file.
• Activate the printer connection.
Depending on your system, you may restart the printer daemon or tell the printer
to accept print requests.
Verifying the TCP/IP network connection
Before a device on a TCP/IP network can send print jobs to the printer, the
printer must have a valid IP address, and a gateway address and subnet mask, if
applicable. The printer is given these addresses in Network Setup.
The printer is shipped from the factory with an invalid IP address assigned in
Setup. The IP address is used on all T CP/IP networks and must always be assigned
before the printer can be verified across the network.
The Setup also provide options to change the subnet mask and gateway address.
Only some customer sites will require these values to be entered in Setup.
Page 22

1-6 Connecting the Printer to a Network
1
The following procedure enables you to verify that there is a proper connection
between the printer and the network without using the printer driver to print a
test page. Before you begin this procedure, verify that the printer is functioning by
printing a Configuration Page from the printer’s operation panel.
For step by step instructions, see “Printing additional pages” on page 2-28.
Once the printer’s TCP/IP setup is complete, you can verify the availability of the
printer using the ping command from the DOS prompt with Windows 95/98, or
from the Command prompt with Windows NT.
TO VERIFY THE TCP/IP CONNECTION:
•
To see if the printer responds to its address, use the ping command.
Use the format:
ping <IP address>
Use the printer IP address listed on the Configuration Page. After the printer has
been given a hostname by your network administrator , you can also
you gave it:
ping <hostname>
The server should respond with a message such as:
<IP address> is alive.
Some systems will respond with a continuous display of output from the IP
address. To stop the output, type Control-C.
Setting up TCP/IP clients for printing
If the printer is being added to an existing network, each TCP/IP client is already
running TCP/IP client software. This printer supports TCP/IP client software on
PC compatibles and Macintosh computers. With Macintosh computers how ever,
it is easier to use the built-in AppleTalk protocol to communicate directly with the
printer.
ping the name
Page 23

1-7 Setting up TCP/IP printing
1
If the client workstation is a PC running Windows, set up the printer as a
Windows PostScript printer by installing the PostScript printer driver or as a
Windows PCL printer by installing the PCL printer driver, as described in
Chapter 3. For setting up your networking software, see the documentation for
your networking environment.
Setting up TCP/IP clients for running Fiery WebTools
Fiery WebTools software comes pre-installed on the printer. Fiery WebTools
include: W ebS etup , WebSpooler , S tatus, WebDownloader, and WebLink.
NOTE: WebDownloader is available on Windows computers only. WebSpooler is
available only for printers with an optional hard disk drive installed.
When TCP/IP is enabled for the printer in Network Setup, Fiery WebTools are
immediately available to clients that:
• Are connected to a TCP/IP network with a consistent set of IP addresses, one
for the printer and one for each computer connected to the printer
• Have an Internet connection and a Java enabled Web browser
The recommended browsers are:
• for Macintosh computers, Netscape Navigator 4.06 and later,
• for Windows computers, Netscape Communicator 4.06 and later or Microsoft
Internet Explorer 4.x and later.
NOTE: Windows NT 4.0 users must download the Windows NT 4.0 Service
Pack 3 or later in order to run the W ebD ownloader with Netscape Communicator
4.06.
Netscape and Microsoft continue to release fr equent updates to their bro wsers. As
support can not be guaranteed for all versions, use the versions specified above for
best results.
To access Fiery WebTools, enter the IP address or DNS name of the printer as a
URL in the Internet browser. For more information, see the User’s Guide.
Page 24

1-8 Connecting the Printer to a Network
1
Setting up IPX (Novell) printing
The software built into the Fiery 500 supports the following network operating
environments:
• NetWare 4.x—Novell Directory Services (NDS)
• NetWare 3.12—Bindery services
• Servers running NetWare 4.x in bindery emulation mode
The term “bindery server” is used to refer to a Novell file server running NetWare
3.12, or running NetWare 4.x in emulation mode. The term “NDS” is used to
describe components of a NetWare operating system running NetWare 4.x in
native mode.
NetWare clients print to the Fiery 500 through the Novell network server. Server
setup and client network setup are outlined here. Client printing setup is
described in Chapters 3 and 4.
NOTE: Setting up a NetWare environment correctly requires the presence and
active cooperation of the Novell network administrator. You must have
administrator privileges on the network to create new NDS or bindery objects.
The Fiery 500 can accept jobs concurrently from NetWare, Windows NT 4.0,
and AppleShare servers, as well as jobs sent directly from Windows,
Windows NT 4.0. NetW are clients on M acintosh or Windows NT 4.0 computers
can print via the NetWare server.
The Fiery 500 can receive print jobs from NetWare clients over the Ethernet
network topologies. During Fiery 500 setup, you select the frame type or types
that will be used for communication between the Fiery 500 and network servers.
Frame type refers to the format of a communications packet; frame types are
specified in a startup file when the NetWare server (or any other workstation)
loads its network drivers.
Page 25

1-9 Setting up TCP/IP printing
1
•
• A minimum connection to the Fiery 500 consists of a NetWare file server, a
• A single directory tree (for NetWare 4.x) and up to eight bindery servers can be
• The Fiery 500 looks for print jobs on one NetWare print server per bindery server.
• Each print server can store jobs for any queue on the Fiery 500.
Tips for experts—IPX networks
The following information is useful for experienced network administrators.
A Fiery 500 with IPX connections has these characteristics:
Both NetWare 3.12 and NetWare 4.x are supported directly. NetWare 4.x is also
supported through bindery emulation.
NetWare print server, and a NetWare queue.
configured simultaneously.
Overview of IPX printing to the Fiery 500
NetWare file servers support the creation of print queues, which are storage areas
for print jobs. When a client on a remote computer decides to print, the job is
directed to a print queue on the NetWare file server and spooled to the NetWare
server disk, freeing up the client workstation.
The queues on the NetWare server must be named to match the Direct
connection and the Print, and Hold queues on the F iery 500. The N etWare queue
names should be given an extension corresponding to the Fiery 500 queue, as
follows:
_direct
_hold
_print
NOTE: The extension names must be in all lowercase and must be in English. The
Print and Hold queues are enabled only if your printed has an optional hard disk
drive installed.
There is no need to rerun Setup when adding or removing a NetWare queue;
however you should initialize these settings by turning the printer off and on after
a queue is created or removed.
Page 26

1-10 Connecting the Printer to a Network
1
When the Fiery 500 is configured to connect to a NetWare server, it polls the
NetWare server for jobs in each of its queues. If jobs are found, they are
transferred over the network to the matching connection: Print to Print, Hold to
Hold, Direct to Direct. While a job is processed and printed, a r ecord of the job is
being created.
If your printer has an optional hard disk drive, you can access the Job Log
containing these records at any time.
Configuring a NetWare server for printing
The following sections explain how to set up a NetWare file server so that
networked users can print to the Fiery 500 from their workstations, and the
Fiery 500 can obtain print jobs from the NetWare server.
For each NetWare file server that you configure, follow these general steps. More
detail is provided in subsequent sections and in your NetWare documentation.
• Make sure the server is connected to a functioning IPX network.
• Log in as the Supervisor on a PC connected to the NetWare file server.
• For NetWare 4.x installations, set up an NDS connection (see page 1-12).
• For NetWare 4.x in emulation mode, set the bindery context (see page 1-12).
• For NetWare 3.12 and for NetWare 4.x in bindery emulation, set up a file
server, a print server, and a print queue for the Fiery 500 (see page 1-13).
With bindery services, you can route all Fiery 500 print jobs through the same
NetWare file server, or you can configure more than one file server to handle
Fiery 500 jobs.
The functions you perform on the Novell server, on the Fiery 500, and on the
client workstation, are summarized in the following tables. The first table applies
to NDS connections, the second to bindery connections.
Complete the operations in the left column, then the center column, then the
right column.
Page 27

1-11 Setting up TCP/IP printing
1
Configuring an NDS connection
Abbreviations:
FS = file server
PS = print server
PQ = print queue (on the NetWare server)
On NDS FS: On Fiery 500 operation panel: On client workstation:
In NETADMIN:
Create NDS PQs
Create NDS printer
and assign PQs
Create PS and assign
the printer
Configure users of
the PQs
Configuring a bindery connection
On Bindery FS: On Fiery 500 operation panel On client workstation:
In PCONSOLE:
Select NetWare FS
(up to 8)
For each FS:
Configure PS
Configure PQ
Configure users of
the PQ
I/O PORT SETUP
ETHERNET Setup
NETWORK PROTOCOL SETUP
ENABLE NOVELL—(IPX/SPX)
select frame type(s)
NETWORK SERVICES SETUP
ENABLE PSERVER Setup and
ENABLE NDS Setup
Select Root
Browse to select PS
Specify PQ search root
(optional)
Set Polling Interval
I/O PORT SETUP
ETHERNET Setup
NETWORK PROTOCOL SETUP
ENABLE NOVELL—(IPX/SPX)
select frame type(s)
NETWORK SERVICES SETUP
ENABLE PSERVER Setup and
ENABLE BINDERY Setup
Add FS (up to 8)
Set Polling Interval
Install user software
For printing:
Connect client to PQ(s)
that you set up on the
NetWare FS (associated
with the PS selected in
NDS Setup)
Install user software
For printing:
Connect client to PQ(s)
that you set up on the
NetWare FS (associated
with the PS selected in
Bindery Setup)
Page 28

1-12 Connecting the Printer to a Network
1
Setting up an NDS connection
In NDS, all NetWare entities (objects) are organized in a hierarchical tree
structure. Objects have a name, properties, and a context which defines the
location of the object in the directory tree. For the Fiery 500 you are mainly
concerned with defining a printer, a print server object and one or more print
queue objects. Objects are created in NetWare administrator programs such as
PCONSOLE, NETADMIN, or NetWare Administrator.
The top-level tree object is known as the [Root] object. The name of the [Root]
object is also the name of the tree. Below the [Root] are other objects: either
containers (which consist of other objects) or leaf objects (which do not contain
other objects). Access to objects is controlled by rights that are defined as
properties of each object. Rights are established by network administrators.
Setting the NetWare 4.x bindery context
You can connect only one directory tree to the Fiery 500. If you need to connect
additional NetWare 4.x servers, you can do so by using bindery emulation, which
causes the 4.x server to behave like and be accepted as a NetWare 3.12 server.
NOTE: The file server selected must not be in the same tree as that selected in NDS
Setup.
Up to eight bindery servers, whether in native 3.12 mode or in 4.x emulation, can
connect to the Fiery 500.
If your server is using NetWare 3.12, proceed to “Setting up a Fiery 500 print
queue for bindery” on page 1-13.
In order to set up the NetWare 4.x server in bindery emulation mode for printing
to the Fiery 500, the network administrator must do the following:
• Determine the Directory Services path to the container in which the print
server and the print queue for the Fiery 500 will be created.
The container defines the “bindery context” for your network structure.
• Edit the network startup file to set the bindery context.
• Activate the new bindery context.
Page 29

1-13 Setting up TCP/IP printing
1
Setting up a Fiery 500 print queue for bindery
For NetWare 3.12 and for 4.x in emulation, the NetWare print server and print
queue for Fiery 500 are created and configured from NetWare Print Console
(PCONSOLE), a NetWare utility that is stored in NetWare’s PUBLIC directory.
As with NDS, first you create several NetWare entities on a Novell server, then
you select them in Network Setup on the Fiery 500 operation panel.
Setting up NetWare Windows clients for printing
Before setting up client workstations for printing, make sure you perform
Network Setup on the Fiery 500 (see “Setting up the printer” on page 2-3), and
that the settings reflect the entities you created in the NetWare administrator
utilities (see page 1-10).
NOTE: For printing to the Fiery 500, connect all Windows clients to a Novell
NetWare server and permit them to connect to the server or servers on which you
defined a Fiery 500 queue.
After the Novell server and the Fiery 500 have been set up, client setup
consists of:
• Installing the networking protocol, binding it to the network adapter card, and
permitting the client to log in to the NetWare file server.
On Windows 95/98 workstations, both the IPX/SPX-compatible protocol and
the Client for NetWare Networks should be loaded from the Network Control
Panel. On Windows NT 4.0 workstations, Client Service for NetWare should
be installed. Use the CSNW option in Control Panel to set printing options
and specify a preferred NetWare server.
• Setting up the Fiery 500 as a PostScript or PCL printer by installing a
PostScript or PCL printer driver and the Fiery 500 PPD or PDD (PostScript or
PCL printer description file).
• Adding a network port and connecting the workstation to one or more
NetWare queues that have been defined for the Fiery 500.
• Installing other optional client software, such as Color Reference files.
Page 30

1-14 Connecting the Printer to a Network
1
Using AppleTalk with Macintosh computers on an IPX (Novell) network
Macintosh users on an IPX network can print to the printer in two ways:
• Directly, using AppleTalk and bypassing the NetWare server
• Through a NetWare server running NetWare for Macintosh
Since the printer supports both AppleTalk and IPX protocols at the same time, it’ s
not necessary to use the second option. However, a network administrator may
choose to route all print jobs through a server.
NOTE: The printer can be attached to only one NetWare server at a time.
Printing directly to the printer
Due to the layered design of networks, data can be transmitted using more than
one network protocol. When Macintosh computers are connected to an IPX
network, they can continue to transmit data over Ethernet cable using AppleTalk
protocols. If the printer is on the same network, Macintosh computers can see and
print to the printer, provided that AppleTalk is enabled on the Macintosh and in
Network Protocol Setup.
Setting up SMB printing with Windows 95/98
and Windows NT
If you do not have a Novell network, you can print to your printer over your
network via SMB (Server Message Block) printing, also known as WINS
(Windows Internet Naming Service) printing. Check with your network
administrator to determine whether SMB printing is appropriate for your
network environment.
To enable this type of communication you need to setup SMB printing on the
printer, and depending on your network configuration, you may also need to
specify additional settings in your computer’s Network Control Panel.
For example, if your computer and the Fiery 500 are on different subnets, to
establish communication between the devices you need to enable WINS
Resolution, or if a DHCP server is used at your site, DHCP (Dynamic Host
Page 31

1-15 Setting up TCP/IP printing
1
Configuration Protocol) WINS Resolution. These options can be found in the
TCP/IP Properties, WINS Configuration tab of the Network Control Panel. See
the documentation that came with your operating system for details.
The following procedure describes how to set up the printer for printing using
SMB. Specify settings in the SMB Setup menus on the printer’s operation panel.
Instructions on how to specify a network port to print to using the Details tab of
the Printer Properties dialog follow.
NOTE: You need to enable the TCP/IP network connection before you setup the
printer for SMB printing.
TO SET UP SMB PRINTING ON THE PRINTER:
1. From the Ready screen, use the Menu key on the operation panel to access the
Setup Menus.
2. Press the Up Arrow key repeatedly until the NETWORK SERVICE SETUP screen
appears. Press Enter until you see the ENABLE SMB screen.
3. Select Yes and press Enter to enable SMB and display the USE NAME SERVER screen.
4. Select YES to set up printing to an SMB name server of your choice; select NO to
use the printer as the default SMB name server. Press Enter.
If you select YES you will be prompted to enter the IP address of the SMB name
server. If your network has a WINS server, enter this server’s IP address. When
you are finished, press Enter to advance to the
If you select NO you will advance to the SERVER NAME screen.
By default the SMB server name is the name given to the printer in the System
Setup screens.
5. Press Enter to accept this name, or use the arrow keys to enter another name for
your SMB server and then press Enter.
6. Enter a comment in the SERVER COMMENT field.
This comment will appear to the right of the printer’s name when computers and
printers on the network are displayed in list view.
SERVER NAME screen.
Page 32

1-16 Connecting the Printer to a Network
1
7. Press Enter to skip entering a comment, or enter a comment and then press Enter.
8. Enter the domain name of the SMB server you selected in step 3.
The printer is now prepared to accept print jobs over a network using SMB
protocols. See Chapter 3 for instructions on how to print to a network port using
the Details tab of the Printer Properties dialog box.
Page 33

2-1 Using the operation panel
Ch
2
apter 2:
Using the
Operation
Panel
The operation panel on the top of the printer enables you to set options and view
the status of the printer and print jobs. For a graphic overview of options available
from the operation panel of the Fiery 500, see Appendix A, “Menu Help.”
This chapter provides information about:
• Using the operation panel
• Setting up the printer for parallel printing
• Setting up the printer for network printing
• Printing a Test page
• Printing additional pages
• What to do if you have difficulty printing
Using the operation panel
This section describes the functions of the operation panel, illustrated below:
On Line
Menu
Cancel
Enter
Power Error Data In
North American version
European version
Page 34

2-2 Using the Operation Panel
2
Activity lights
The activity lights indicate the status of the printer.
This light: Indicates:
On Line
Data In
Power
Error
On Line indicator—On when the printer is online (ready to accept and
process new jobs), and off when the printer is offline or the power is off
(European version has icon only)
NOTE: When the printer is offline, you cannot print.
Data In indicator—Blinking when receiving, processing or printing data;
(European version has icon only)
Power indicator—On when the printer is on and off when the printer is
off or in Energy Save mode (European version has icon only)
Error indicator—On when the printer requires a service call or operator
intervention (European version has icon only)
Display window
The LCD window on the operation panel displays status and error messages. The
window also displays the menus to specify the printer settings, PCL and
PostScript settings for the printer, settings for the network protocols and other
useful settings. See “Setting up the printer” on page 2-3.
keys
This key: Indicates:
Down arrow—In Setup menus, advances fr om one menu to the previous.
In a fixed-length list, takes you to the next item in the list.When entering
numbers or text, decrements to the next number or character. H old down
the key to decrement rapidly.
Up arrow—In Setup menus, advances from one menu to the next. In a
fixed-length list, takes you to the previous item in the list. When entering
numbers or text, increment to the previous number or character. Hold
down the key to increment rapidly.
Right arrow—When entering numbers or text, advances the cursor.
Page 35

2-3 Setting up the printer
2
Left arrow—When entering numbers or text, backspaces and deletes.
Menu key—Enters the Setup menus. F rom a setup menu option, r eturns
to the previous setup menu.
Enter key—Accepts an option and advances to the next choice.
On Line key—When the printer is in Ready mode, takes the printer
offline.
Cancel key—In Setup menus, exits menus entirely, returning to Ready.
While printing, Cancel stops printing or processing the current job.
Setting up the printer
This section describes how to set up the printer using the operation panel. After
you set up the printer the first time, you may later need to change setup
information. For example, your network may change, or you may decide not to
print a start page when you turn on the printer. To change the setup at any time,
follow the procedures outlined in this section.
To set up the printer, turn on the printer and press the Menu key when the
message READY or ENERGY SAVE MODE appears in the display window.
• To advance through the list of Setup menus, press the Menu key.
NOTE: Before you change the setup, it’s a good idea to print the current
Configuration page, in case you need to restore the original settings later. For
information on printing a Configuration page and other pages, see “Printing a
Test page” on page 2-27.
• To view submenus, press the Up arrow or Down arrow key.
• To accept a displayed option, press the Enter key.
NOTE: Users can set an password for all menu items except CHECK AND PRINT,
PRINTER SETUP items, MAINTENANCE, and SERVICE. When you try to access these
items, an administrator password is requested. Enter the password to continue.
Page 36

2-4 Using the Operation Panel
2
Top-level menus
When the printer is not processing or printing a job, the operation panel displays
READY or ENERGY SAVE MODE. To view the top-level menu items, press the Menu
key. To cycle through these items, press the Up arrow key.
At this screen: You can:
CHECK AND PRINT After you check one copy, print remaining copies or
processed jobs stored on the printer disk. For details,
see the User’s Guide.
NOTE: This option is available only if your
printer has an optional hard disk drive installed.
NOTE: To access this item, an administrator password is
requested. Enter the password to continue.
PRINT PAGES FROM LIST Display the printer’s resident pages. For details, see
page 2-27.
RESETS Return the printer to its factory settings.
SYSTEM SETUP to
PCL SETUP
VISUALCAL Calibrate the printer’s color production. For
COLOR ADJUSTMENT Adjust the density and brightness of toner. For
I/O PORT SETUP to
NETWORK SERVICES SETUP
PANEL LANGUAGE Choose the language for the operation panel and the
Specify information about the printer and to set a
password to limit access to printer setup menus (see
page 2-6 to page 2-26).
NOTE: To access this item, an administrator password is
requested. Enter the password to continue.
information on VisualCal color calibration see the
User’s Guide.
information on Color Adjustment see the User’s
Guide.
Specify information about network options. For
details, see page 2-11.
pages you can print from the operation panel (see
page 2-26).
Page 37

2-5 Setting up the printer
2
At this screen: You can:
MAINTENANCE Perform maintenance tasks such as replacing toner
and adjusting tray position.
NOTE: To access this item, an administrator password is
requested. Enter the password to continue.
SERVICE Perform service on the printer. This menu requires a
special password.
NOTE: To access this item, a password is requested.
Enter the password to continue.
NOTE: After you make changes to the setup options or resets, it will take several
minutes for the printer to reboot, initialize, and calibrate. Wait for the READY
message, before you resume printing or other job functions.
Main setup menus
The following table lists the main setup menus and their functions (for a complete
list of top-level menus, see page 2-4).
Many of the options in the I/O PORT SETUP, NETWORK PROTOCOL SETUP, and
NETWORK SERVICES SETUP menus appear only for networked printers.
Choose: To specify: See:
SYSTEM SETUP System settings for the printer; set or change
the administrator password used to limit
access to the Setup menus.
PRINTER SETUP Printer settings page 2-8
PS SETUP PostScript settings for the printer. page 2-9
PCL SETUP PCL settings for the printer page 2-10
I/O PORT SETUP Settings for the network and/or parallel
connections to the printer
NETWORK PROTOCOL
SETUP
NETWORK SERVICES
SETUP
Settings for the network protocols page 2-14
Settings for the printing services page 2-19
page 2-6
page 2-11
Page 38

2-6 Using the Operation Panel
2
PANEL LANGUAGE The language displayed on the operation
panel and used on pages printed from the
operation panel
page 2-26
Specifying system information
The System and Printer Setup menus enable you to specify information about the
printer.
NOTE: In all the setup descriptions that follow , default values, wher e applicable, are
shown in square brackets.
System Setup
This section describes first-time setup if no password has been set.
SYSTEM SETUP
To advance to the PRINTER NAME screen, press Enter.
PRINTER NAME
printer
Use this option to give the printer a name. The printer name can be up to 16
characters.
PRINT START PAGE
YES/NO [NO]
Use this option to specify whether the printer should print a start page when it
restarts, to verify that it is working properly. The Start page contains such
information as: printer name, enabled network protocols, amount of memory
installed, and options installed on the printer.
PUBLISH PRINTD Q
YES/NO [YES]
This option is available only if your printer has an optional hard disk drive
installed. Use this option to enable recently printed jobs to be stored on the
printer. The Printed queue makes it convenient to reprint those jobs.
Page 39

2-7 Specifying system information
2
JOBS TO SAVE
1-99 [10]
This option appears only if PUBLISH PRINTD Q is set to YES. Use this option to
specify the number of jobs to be stored in the Printed Queue.
ENERGY SAVE MODE
LEVEL 1/LEVEL 2 [LEVEL 1]
Use this option to select the level of energy saved when the printer is in Energy
Save Mode. Level 1 saves the most power, but takes more time to warm up.
Level 2 saves less power, but also takes less time to warm up.
POWER SAVER (M)
0 MIN/30 MIN/60MIN/120 MIN/180 MIN [60 MIN]
Use this option to select the length of time during which there is no printer
activity before the printer switches to Energy Save mode. Full power mode is
automatically restored when the printer receives a network print job or any key on
the operation panel is pressed.
CHANGE PASSWORD
YES/NO [NO]
Use this option to set or change the administrator password for the printer. In
most cases, only the system administrator should have access to this password.
When you select YES in the CHANGE PASSWORD screen, you are prompted to enter
the new password.
NEW PASSWORD
To enter a new password use the up arrow key to scroll through characters and the
right arrow key to move from left to right, from character to character. To delete a
character, use the left arrow key. The password can be any combination of letters
and numbers up to 16 characters. When you are finished, press the Enter key.
VERIFY PASSWORD
To verify a new or existing password, you must enter the password again. If you
make a mistake, you will be prompted to enter the password again.
Page 40

2-8 Using the Operation Panel
2
Printer Setup
The Printer Setup options set the printer’s page description language (PDL),
paper size, and specify the paper used in various trays.
PRINTER SETUP
To advance to the PAGE DESC LANG screen, press Enter.
PAGE DESC LANG
PS/PCL/AUTO [AUTO]
Use this option to select a default page description language for your printer. If
you select AUTO, the printer will automatically detect and interpret the page
description language used by the file.
DEF. PAPER SIZE
8.5 X 11/A4 [8.5 X 11/A4]
Use this option to specify the default paper size to print on. Information pages
from the PRINT PAGES FROM LIST menu (Configuration page, PS or PCL Font list,
and Test page) and pages from the VISUALCAL menu are printed on the default
paper size set here.
NOTE: The default settings for the above and following paper size options are
different for the North American and European versions of the printer. The North
American default is noted first and the European second. For more information
on the paper sizes supported by your printer, see the Printer Reference.
BYPASS TRAY SIZE
[8.5 X 11/A4]
Use this option is specify the default paper size for the Bypass Tray.
SET [*] SIZE
YES/NO [NO]
Use this option to adjust the paper size for each tray that is installed.
TRAY1 [*] SIZE
[8.5 X 13/B4]
This option appears only if you selected YES to SET [*] SIZE. Use this option to
select the paper size for Tray 1.
Page 41

2-9 Specifying system information
2
TRAY2 [*] SIZE
[8.5 X 13/8.5 X 13]
This option appears only if you selected YES to SET [*] SIZE. Use this option to
select the paper size for Tray 2.
TRAY3 [*] SIZE
[8.5 X 13/8.5 X 13]
This option appears only if you selected YES to SET [*] SIZE. Use this option to
select the paper size for Tray 3.
OHP SLIP SHEET
YES/NO [YES]
The OHP Slip Sheet is a sheet of paper placed between printed OHP
transparencies. This printer uses paper in Tray 1 for OHP Slip Sheets even if the
direction and size of the paper loaded in Tray 1 is different from the dir ection and
size of the OHP transparency. Check the direction and size of paper loaded in
Tray 1 before using this option. When there is no paper loaded in Tray 1, OHP
Slip Sheet will not work even if this option is set to YES. In this case, be sure to
remove each OHP transparency immediately after it is printed.
AUTO PAPER EJECT
YES/NO [NO]
If YES is selected and the correct paper size is not loaded in any tray, the print data
will be printed automatically regardless of the paper size.
PostScript setup
The PostScript setup menus enable you to set PostScript printing options.
PS SETUP
To proceed, press Enter.
PRINT TO PS ERR
YES/NO [NO]
Use this option to specify whether to print the portion of a print job processed
before a PostScript error is encountered. Select YES to print the portion of the job
that was processed and a description of the PostScript error, which may help you
troubleshoot the error; select NO to cancel printing when a PostScript error is
encountered.
Page 42

2-10 Using the Operation Panel
2
COVER PAGE
YES/NO [NO]
Use this option to specify whether a Cover (job summary) page will be printed at
the end of each print job. Select YES to print a page with the name of the user who
sent the job, the document name, the number of pages printed, and the status of
the job.
If a PostScript error occurred and PRINT TO PS ERR is set to YES, the error message
will be printed on the Cover page, along with the job status.
PCL Setup
The PCL Setup menus enable you to set PCL printing options PCL jobs sent to
the printer without formatting instructions.
NOTE: PCL is available only when printing from IBM PC or compatible
computers.
PCL SETUP
To proceed, press Enter.
DEF ORIENTATION
LANDSCAPE/PORTRAIT [PORTRAIT]
Use this option to specify the default orientation of the print job on the paper.
Select PORTRAIT to print text across the short dimension on a Portrait orientation
page; LANDSCAPE to print text across the long dimension on a Landscape page.
FORM LENGTH
5-128 [60 LINES]
Use this option to specify the number of lines of text per page to print.
NOTE: Form length varies according to the orientation of the paper.
The next setting and the remaining settings in this section apply to ASCII text
files on a per job basis.
Page 43

2-11 Specifying network information
2
FONT NUMBER
0-45 [0]
Use this option to specify which PCL font to print. For a complete list of av ailable
PCL fonts and their corresponding font numbers see Appendix A of the User’s
Guide.
PITCH (CHAR/IN)
0.44-99.99 [10.00]
This option appears if you chose a fixed-space font in the previous option. Use
this option to specify the pitch, or number of fixed-space, PCL characters per
horizontal inch to print.
FONT SIZE (PT)
4.0-999.75 [12.00]
This option appears if you chose a variable-space font in the FONT NUMBER option.
Use this option to specify the point size of the font to print.
SYMBOL SET=
PC-8, WIN 3.0, ISO-69, ISO-60, ISO-21, ISO-17, ISO-15, ISO-11, ISO-6, ISO-4,
LEGAL, PS TEXT, DESKTOP, WIN-L5, WIN-L2, WIN-L1, PC-8TK, PC 852, PC 850, PC-8DN,
ISO L5, ISO L2, ISO L1, ROMAN-8 [PC-8]
Use this option to specify the PCL Symbol set to print.
A symbol set is a specific set of symbols provided by a font. In general, each set is
designed with a unique application in mind. The PC-8 symbol set, for example,
was designed to support US IBM PC applications.
NOTE: VisualCal color calibration and Color Adjustment screens, which appear
next in the sequence of screens, are described in the User’s Guide.
Specifying network information
I/O Port Setup
The I/O Port Setup menus allow you to specify and set up the printer port type,
including: Ethernet, Token Ring (if an optional Token Ring card is installed), or
parallel port.
Page 44

2-12 Using the Operation Panel
2
I/O PORT
SETUP
To advance to the next screen, press Enter.
Ethernet
ETHERNET
OFF/ON [ON]
Select ON to enable Ethernet network communication.
ETHERNET SPEED
AUTO DETECT/1O TWISTED PAIR/10 AUI/10 AUTO/100 [AUTO DETECT]
Select AUTO DETECT to automatically detect the speed at which data can be
transferred over the Ethernet network, or optionally specify the speed and cabling
of your Ethernet network.
Token Ring (option)
TOKEN RING
ON/OFF [ON]
Select ON to enable Token Ring network communication.Token Ring options
appear only if an optional Token Ring card is installed.
TOKEN RING SPEED
AUTO DETECT/4 M BPS/16 M BPS [AUTO DETECT]
Select AUTO DETECT to automatically detect the speed at which data can be
transferred over the Token Ring network, or optionally specify the speed of your
Token Ring network.
MAX. FRAME SIZE
0.5K/1K/2K/4K [4K]
Use the arrow keys to select a maximum frame size for Token Ring
communication.
NOTE: The Token Ring frame size must be no greater than the frame size used by
any router or Novell file server on the network.
Page 45

2-13 Specifying network information
2
SOURCE ROUTING
ON/OFF [OFF]
Select ON to allow the packet to travel to its destination through routers on the
network. The packet’s source dictates the route that the packet will take.
REQ ALL ROUTE
ON/OFF [OFF]
If source routing is enabled, select ON to allow all routers on the network to
broadcast the presence of the printer, enabling packets from clients on the
network to travel to the printer by any route.
RESP ALL ROUTE
ON/OFF [OFF]
If source routing is enabled and REQ ALL ROUTE is set to OFF, select ON to allow all
routers on the network to broadcast the presence of clients to the printer; limits
packets from clients on the network to travel to the printer to a specific route.
Parallel Port Setup
In addition to receiving print jobs over Ethernet or Token Ring, the printer can
receive print jobs from a computer through the high speed parallel port.
PARALLEL PORT
OFF/ON [ON]
Use this option to enable printing through the parallel port.
I/O TIMEOUT
5-300 SECONDS [15]
If PARALLEL PORT is set to ON, use this option to specify how long the printer waits
without receiving data from the parallel port before deciding that the current job
is complete. During the timeout, the printer cannot receive new jobs through the
parallel port, but it continues to receive network print jobs.
Page 46

2-14 Using the Operation Panel
2
IGNORE EOF
YES/NO [YES]
If PARALLEL PORT is set to ON, use this option to specify that the printer should
ignore end-of-file (EOF) messages in a file. To print PostScript files in binary
format (not ASCII), this option must be set to YES. When this option is set to YES,
the printer uses the value you entered for the parallel port timeout to determine
when it has reached the end of the file.
Specifying network protocol options
Network Protocol Setup
Network Protocol Setup options are used to specify and setup TCP/IP Ethernet,
TCP/IP Token Ring, AppleTalk, and IPX (Novell) network protocols.
NETWORK PROTOCOL
SETUP
Press Enter to proceed.
TCP/IP Setup
TCP/IP-ETHERNET
YES/ NO [NO]
Select YES if you have a TCP/IP network connected to the printer over Ethernet
cabling.
For more information on setting up TCP/IP printing using Ethernet, see
Chapter 1.
ENABLE AUTO IP
YES/NO [NO]
Use this option to enable the automatic assignment of an IP address to the
Fiery 500.
ENABLE DHCP
YES/NO [YES]
This option appears only if you selected YES to ENABLE AUTO IP . U se this option to
use the DHCP protocol to assign the automatic IP address.
Page 47

2-15 Specifying network protocol options
2
ENABLE BOOTP
YES/NO [NO]
This option appears only if you selected NO to ENABLE DHCP. Use this option to
enable the BOOTP protocol to assign the automatic IP address.
ENABLE RARP
YES/NO [NO]
This option appears only if you selected NO to ENABLE DHCP and ENABLE BOOTP. U se
this option to enable the RARP protocol to assign the automatic IP address. If you
select YES to this option, the ETH. SUBNET MASK will appear next.
ETH. IP ADDRESS
[127.000.000.001]
This option appears only if you selected NO to ENABLE AUTO IP. Use the arrow keys
to assign the printer an Ethernet IP address. Press Enter to accept your selection.
ETH. SUBNET MASK
[255.255.255.000]
This option lets you modify the subnet mask for printing with TCP/IP over
Ethernet. The subnet mask is set to 255.255.255.000 by default. If you set the IP
address and you need to set the subnet mask, enter one of the following values:
• 255.000.000.000 if the IP address starts with a number less than 128
• 255.255.000.000 if the IP address starts with a number from 128 through 191
• 255.255.255.000 if the IP address starts with a number greater than 191
Be sure to confirm the subnet mask setting with your network administrator
before proceeding. In some cases the required setting may be different from those
listed.
The following options appear if an optional Token Ring card is installed on the
printer.
TCP/IP-TOKENRING
YES/NO [NO]
Select YES if you have TCP/IP network connected to the printer over Token Ring
cabling.
Page 48

2-16 Using the Operation Panel
2
ENABLE AUTO IP
YES/NO [NO]
Use this option to enable the automatic assignment of an IP address to the
Fiery 500.
ENABLE DHCP
YES/NO [YES]
This option appears only if you selected YES to ENABLE AUTO IP . U se this option to
use the DHCP protocol to assign the automatic IP address.
ENABLE BOOTP
YES/NO [NO]
This option appears only if you selected NO to ENABLE DHCP. Use this option to
enable the BOOTP protocol to assign the automatic IP address.
ENABLE RARP
YES/NO [NO]
This option appears only if you selected NO to ENABLE DHCP and ENABLE BOOTP. U se
this option to enable the RARP protocol to assign the automatic IP address. If you
select YES to this option, the TR. SUBNET MASK will appear next.
T.R. IP ADDRESS
[127.000.000.001]
This option appears only if you selected NO to ENABLE AUTO IP. Use the arrow keys
to assign the printer a Token Ring IP address. Press E nter to accept y our selection.
T.R. SUBNET MASK
[255.255.255.000]
This option lets you modify the subnet mask for printing with TCP/IP over
Token Ring. The subnet mask is set to 255.255.255.0 by default. If you set the IP
address and you need to set the subnet mask, enter one of the following values:
• 255.000.000.000 if the IP address starts with a number less than 128
• 255.255.000.000 if the IP address starts with a number from 128 through 191
• 255.255.255.000 if the IP address starts with a number greater than 191
Page 49

2-17 Specifying network protocol options
2
Be sure to confirm the subnet mask setting with your network administrator
before proceeding. In some cases the required setting may be different from those
listed.
AUTO GATEWAY
YES/NO [NO]
This option appears only if you selected YES to ENABLE AUTO IP for Ethernet and/
or Token Ring. Use this option to automatically assign the gateway address. If you
select NO, you will be asked to enter the gateway address.
NOTE: The following option appears if T CP/IP E thernet or TCP/IP Token Ring is
enabled. It will not appear if you selected YES for AUTO GATEWAY.
GATEWAY ADDRESS
[127.000.000.001]
Use this option to specify the gateway address for printing with TCP/IP. By
default, no gateway address is set. If your TCP/IP network has a gateway and
you plan to print using TCP/IP, you must enter the gateway address.
NOTE: When the printer’s TCP/IP address, gateway, or subnet values are changed
the printer automatically restarts when Setup is exited, in order to initialize the
new values.
AppleTalk Setup
ENABLE APPLETALK
YES/NO [NO]
Select YES if you have an AppleTalk network connected to the printer. You can
enable AppleTalk, TCP/IP, and IPX (Novell) communication simultaneously.
NOTE: The following option is displayed only if ENABLE APPLETALK is set to YES.
APPLETALK ZONE
Use the arrow keys to select the AppleTalk zone in which you want the printer to
appear. If y ou do not select a zone, the printer is assigned to the default A ppleTalk
zone. If your network does not have zones, this option does not appear.
Page 50

2-18 Using the Operation Panel
2
Novell Setup
ENABLE NOVELL
YES/NO [NO]
Select YES if you have an IPX (Novell) network connected to the printer. You can
enable AppleTalk, TCP/IP, and IPX (Novell) communication simultaneously.
The following seven options appear only if you selected YES for ENABLE NOVELL. I f
you select NO, pressing Enter returns you to the NETWORK PROTOCOL setup screen.
NOTE: On the LCD and in the descriptive text, the terms IPX, IPX (Novell), and
NetWare are used somewhat interchangeably. In fact, IPX refers to the network
protocol, NetWare to the network operating system software that uses IPX
protocols; Novell has created and trademarked this network operating system.
For more information on setting up Novell printing see “Setting up IPX (Novell)
printing” on page 1-8.
Novell Frame Types
The next screens enable you to select the Ethernet frame type used for
communication between your NetWare file server (or NetWare file servers if you
connect to more than one) and the printer.
AUTO FRAME TYPE
YES/NO [YES]
Select YES to enable the automatic assignment of a frame type to the printer.
SELECT NOVELL
FRAME TYPES
If you selected NO to AUTO FRAME TYPE, this screen appears. Press the Enter key to
select a Novell frame type.
NOTE: Ethernet frame type screens appear only if the Ethernet port is enabled.
ETHERNET 802.3
YES/NO [NO]
Select YES to enable Ethernet 802.3
Page 51

2-19 Specifying network protocol options
2
ETHERNET 802.2
YES/NO [NO]
Select YES to enable Ethernet 802.2.
ETHERNET II
YES/NO [NO]
Select Yes to enable Ethernet II.
ETHERNET SNAP
YES/NO [NO]
Select YES to enable Ethernet SNAP.
NOTE: Token Ring frame type screens appear only if the Token Ring port is
enabled.
TOKEN RING 802.2
YES/NO [NO]
Select Yes to enable Token Ring 802.2.
TOKEN RING SNAP
YES/NO [NO]
Select Yes to enable Token Ring SNAP.
Network Services Setup
The Network Services Setup menus allow you to establish network services for
your printer. This menu appears only if you selected YES for one or both of ENABLE
NOVELL
and TCP/IP-ETHERNET.
NETWORK SERVICES SETUP
To advance to the ENABLE PSERVER screen, press Enter.
ENABLE PSERVER
YES/NO [NO]
Select YES if you have a Novell network connected to the printer and if you have
already configured a NetWare printer, a print server, and one or more print queue
objects for print jobs. Pserver allows you to enter the names of the Novell objects
that are concerned with printing to the Fiery 500.
Page 52

2-20 Using the Operation Panel
2
Pserver is a program on the printer that services all the Novell print queues that
are assigned to this printer. If you select YES to enable Pserver, you can proceed to
configure NetWare Directory Services (NDS) and/or Bindery services.
NDS Setup
ENABLE NDS
YES/NO [YES]
NetWare Directory Services (NDS) is used with Netware 4.x. Select YES to enable
NDS.
NOTE: The following screen appears only if earlier NDS settings exist.
CHANGE SETTINGS?
YES/NO [NO]
Select YES to specify or change NDS settings.
NDS TREE
Use the up and down arrows to select a tree from the NDS tree list and press
Enter. If you select a tree for which earlier NDS settings exist, the following alert
screen appears:
NEW TREE DELETES
BINDERY SETUP
This alert message warns you that your previous Bindery settings if any will be
deleted.
DEL BIND SETUP?
YES/NO [NO]
Select YES if you wish to delete Bindery settings.
LOGIN TO BROWSE?
YES/NO [NO]
Select YES if a login is required to browse the NDS tree. Navigation trees enable
you to find the login object for the file server on the NDS tree you wish to log in
to. Select NO if a login is not required for browsing.
Page 53

2-21 Specifying network protocol options
2
FIND LOGIN
OBJECT
If you selected YES in the previous screen, you may start to browse. Press Enter.
[CURRENT PATH]
Use the up and down arrows to scroll through options. To display objects below
the level of the selected object, press Enter.
The current path of the previously selected object appears in the top line of the
LCD display. The first item in the scrollable Object list appears in the second line.
Use the arrow keys to browse the NDS objects listed in the display.
The ‘..’ option moves you up one level on the tree; pressing Enter puts the
previous second line object on the top line and displays the next lower level object
on the tree on the second line. When you see the login object in the second line,
press Enter. From any screen, press Enter to accept an object, or Menu to escape.
LOGIN OBJECT:
Use the up and down arrow keys to select a login name and press Enter.
ENTER PASSWORD
Use the arrow keys to enter the password. Press Enter to accept the password.
BROWSE TREE TO
PRINT SERVER
To begin navigating to the Print Server, Press Enter.
[NDS TREE NAME]
The NDS tree name appears in the top line of the LCD display. The first item at a
level below the tree name appears in the second line. Use the arro w keys to bro wse
the NDS objects listed in the display. Press Enter to accept an object.
Page 54

2-22 Using the Operation Panel
2
[CURRENT PATH]
The current path of the previously selected object appears in the top line of the
LCD display. The first item in the list of objects at the next level down appears in
the second line. Use the arrow keys to browse the NDS objects listed in the
display.
After choosing an object, press Enter to display the next lower level objects.
Choose ‘..’ and press Enter to go up the tree. When you see the name of the print
server, press Enter and PRIN T SERVER will appear in the first line indicating that the
listed entry has been chosen.
PRINT SERVER
Use the up and down arrow keys to scroll through the list of available print
servers. After selecting a server, press Enter. If the print server login requires a
password, the ENTER PASSWORD screen appears. If a password is not required, the
PRINT Q SEARCH screen appears.
ENTER PASSWORD
Use the arrow keys to enter the password. Press Enter to accept the password.
PRINT Q SEARCH:
ENTIRE NDS TREE/SUBTREE [ENTIRE NDS TREE]
Press Enter if you want the printer to search the entire NDS tree for the print
queue object. Use the arrow keys to designate a subtree object. The printer will
search for queues below this object. Press Enter.
BROWSE TO PRINT
Q SUBTREE ROOT
This message is displayed if you selected SUBTREE in the previous screen. To
advance to the NDS browse screens, and browse to the print queue root, press
Enter.
Navigate the NDS objects as before. P ress Enter to display objects below the level
of the selected object in the previous screen’s second line.
When you see the print queue subtree object in the second line, press Enter . I n the
next screen, scroll to display “.” in the second line and press Enter to end your
search.
Page 55

2-23 Specifying network protocol options
2
PRINT Q ROOT
The selected object is displayed. Press Enter to accept.
Bindery Setup
The following screens are used for Bindery setup. Be sure that the printer is
connected to the network and that you have already configured one or more
Netware 3.x file servers with a print server and a print queue for print jobs. Note
that you can also configure Netware 4.x servers to run in Bindery emulation
mode, but you cannot add a 4.x server running in emulation mode that is on the
tree you selected in NDS Setup. For more information on setting up printing
using Novell NetWare, see “Configuring a NetWare server for printing” on
page 1-10.
The NetWare server must be running. You need a login name, and a password, if
one has been set.
ENABLE BINDERY
YES/NO [YES]
Use this option to enable bindery emulation services.
NOTE: The following three screens appear only if earlier Bindery settings exist.
BINDERY SETTINGS
VIEW/CHANGE/SKIP/REMOVE FSERVER [VIEW]
Use the up and down arrow keys to scroll through menu options. Select VIEW to
display a list of Novell file servers already connected to the printer. Select CHANGE
to display a list of all available servers in order to add one or change the print
server setting. Select REMOVE FSERVER to display a list of connected servers that you
can disconnect. Select SKIP to skip bindery options and advance to the POLLING
INT.
screen.
CONNECTED SERVERS
If you choose VIEW in the BINDERY SETTINGS screen, use the up and down arrow
keys to view the list of connected servers. Press Enter to skip the remaining
bindery options and proceed to the POLL INT screen.
Page 56

2-24 Using the Operation Panel
2
REMOVE FSERVER
If you choose REMOVE FSERVER in the BINDERY SETTINGS screen, use the up and
down arrow keys to scroll through the connected servers. After selecting a server to
remove, press Enter. The POLL INT screen is displayed next.
AVAILABLE SERVERS
If you choose CHANGE in the BIN D ERY SETTINGS screen, use the up and down arrow
keys to scroll through a list of all available servers. After selecting a server to add or
modify , press Enter. If a password is required to login to the server, the FILE SERVER
LOGIN
screen is displayed.
FILE SERVR LOGIN
Use the up and down arrow keys to scroll thr ough options: Supervisor, Admin, or
Enter Login Name. Press Enter to accept an option.
ENTER LOGIN NAME
This screen is displayed only if Enter Login Name is selected as file server login.
Use the arrow keys to enter the login name. Press Enter to accept the password.
FSERVER PASSWORD
Use the arrow keys to enter the password.
PRINT SERVER
Use the up and down arrow keys to scroll through the list of print servers defined
for the selected file server. After selecting a print server, press Enter. If a password
is required to log in, the PSERVER PASSWORD screen is displayed.
PSERVER PASSWORD
Use the arrow keys to enter the password. Press Enter to accept the password. If
fewer than eight file servers are connected, the Another FS? screen is displayed. If
the maximum number of file servers are connected, the POLL INT (SEC) screen is
displayed.
Page 57

2-25 Specifying network protocol options
2
ANOTHER FS?
YES/NO [NO]
Select YES to redisplay a list of available servers you may connect to. Select NO to
stop adding file servers and display the POLL INT screen. You can connect the
printer to a maximum of eight Novell files servers at once.
Polling interval
POLL INT. (SEC)
1-999 [15]
Use the up and down arrow keys to specify the interval, in seconds, at which the
printer communicates with the Novell server.
NOTE: If you select a short interval, the amount of network traffic increases; this
may slow down other network jobs.
SMB Setup
Server Message Block (SMB) is a point-to-point file sharing and printing
protocol, and the default printing method of most Windows applications. SMB
runs on top of TCP/IP and does not require IPX. When file and printer sharing
for Microsoft clients is enabled, SMB can be run on Windows 95/98 and
Windows NT.
For information on setting up SMB printing from your computer, see “Setting up
SMB printing with Windows 95/98 and Windows NT” on page 1-14.
ENABLE SMB
YES/NO [NO]
Use this option to enable network communication using SMB.
AUTO NETBIOS
YES/NO [NO]
Select YES if you want the printer to search the local segment of your network for
the WINS server and connect automatically. SERVER NAME will appear as the next
setup option.
NOTE: The WINS server or a relay agent must be on the local segment in order to
use the AUTO NETBIOS option.
Page 58

2-26 Using the Operation Panel
2
USE NAME SERVER
YES/NO [NO]
This option appears only if you selected NO to AUTO NETBIOS. Select YES to
designate a specific WINS (Windows Internet Name Server) server as an SMB
server. You will then be prompted to enter this server’s IP address.
NAME SERVER IP
[127.000.000.001]
Use the arrow keys to enter the IP address of the WINS server you wish to use.
SERVER NAME
Use the arrow keys to enter a name for the printer (SMB server).
SERVER COMMENT
Use the arrow keys to enter a comment about the printer (SMB server). This name
will identify the printer in the Windows Network Neighborhood. For example,
“Production use only.” Once set, this comment will appear in the second line of
the LCD when the SERVER COMMENT screen is displayed. When the printer is
selected on a client machine, the server comment will appear under the Details
section of the Server information window.
DOMAIN NAME
Use the arrow keys to enter the domain name or workgroup of the printer (SMB
server).
Language Setup
The PANEL LANGUAGE menus are used to select a language for the operation panel,
pages, and Fiery WebTools.
PANEL LANGUAGE
Press Enter to advance to the panel language screen.
SELECT
ENGLISH/DUTCH/SPANISH/ITALIAN/GERMAN/FRENCH
Select a language for the operation panel. Press Enter, press Menu, and choose
RESTART PRINTER in the RESETS menu.
[ENGLISH]
Page 59

2-27 Printing a Test page
2
Printing a Test page
There are several pages you can print from the operation panel. This section
contains instructions for printing a Test page, and the next section contains
instructions for printing additional pages.
Page: Description:
Configuration
page
Job Log
PCL Font List A list of PCL fonts resident on the printer
PS Font List A list of PostScript fonts resident on the printer
Test page A Test page that enables you to confirm that the printer is properly
You can print a Test page before you set up the Fiery 500 or at other times from
the READY or the ENERGY SAVE MODE screen.
TO PRINT A TEST PAGE:
A page that gives the current device configuration and lists the
selected options for all Setup menus
A list of the most recently printed jobs
For information about using the WebSpooler to view and
manipulate jobs in the Job Log, see the User’s Guide.
NOTE: This option is available only if your printer has an
optional hard disk drive installed.
NOTE:
connected
This page includes samples of color so you can troubleshoot
printing problems as well as such information as: printer name,
enabled network protocols and amount of memory.
1. Turn on the printer and allow it to warm up.
Messages appear on the operation panel as the printer runs through its power-up
tests.
2. From the Ready screen, press the Menu key and then the up arrow key on the
operation panel.
PRINT PAGES FROM LIST
is displayed.
Page 60

2-28 Using the Operation Panel
2
3. Press the Enter key to display the first selection.
4. Press the up and down arrow keys until you see PRINT TEST PAGE and press Enter.
5. Examine the quality of the Test page.
The printer prints a Test page.
The Test page includes a color sample as well as the printer’s name, enabled
network protocols, and memory configurations.
Printing additional pages
In addition to a Test page, you can also print a Configuration page, PostScript
Font list, PCL Font list, or Job Log.
NOTE: You can print the Job Log only if your printer has an optional hard disk
drive installed.
The Configuration page lists information about the printer, the setup, and the
number of printer fonts. It’s a good idea to print a Configuration page before you
make setup changes, in case you need to restore some settings later.
TO PRINT A CONFIGURATION PAGE OR ADDITIONAL PAGES:
1. From the Ready screen, press the Menu key and then the up arrow key on the
operation panel.
The PRINT PAGES FROM LIST screen is displayed.
2. Press the Enter key to display a list of available pages.
3. Press the arrow keys until you see PRINT CONFIGURATION and press Enter.
The printer prints a Configuration page.
4. Or press the arrow keys to display the name of the page you would like to print
and press Enter.
The printer prints the page you selected.
Page 61

3-1 General steps for installing Windows software
3
Chapter 3: Installing Windows Software
This chapter describes installing software and setting up printing from a
Windows-based computer running Windows 95/98 or Windows NT.
See the Chapter 1 for instructions on how to connect the printer to a computer or
to a network.
General steps for installing Windows software
The general steps for installing the Fiery 500’s user software from the CD are:
• Install the PostScript Printer Driver.
• If you want to print using the PCL page description language, install the PCL
printer driver.
• Set up the printer driver to communicate with the Fiery 500 over the network
or through the parallel port.
Instructions for installing PostScript and PCL printer drivers for Windows 95/98
are given below. Instructions for installing PostScript and PCL drivers for
Windows NT 4.0 systems are given later in this chapter.
If you are setting up a printer that will be shared by many users, and you would
like to make the printer drivers available to others, you can exit the installer
program and manually copy the printer drivers and files from the User Software
CD to the location of your choice. Use this method, for example, to copy printer
drivers to a server on your network, or to a floppy disk.
NOTE: Windows 95/98 Plug-n-Play specifies the automatic detection of any new
hardware installed on your computer . If your printer is connected to the computer
via the parallel port and it is powered on when your computer is restarted, a dialog
box indicating new hardware has been detected will appear, prompting you to
install the manufacturer’s software. Install the printer driver for your printer by
selecting Other Location, and navigating to the PostScript or PCL printer driver
directory on the User Software CD. When you hav e installed the printer driver of
your choice, be sure to specify optional devices installed on your printer to enable
features related to their use.
Page 62

3-2 Installing Windows Software
3
Setting up PostScript or PCL printing with
Windows 95/98
To set up the Fiery 500 as a PostScript printer you must install the PostScript
Printer Driver and PPD file for W indows 95/98. T o set up the F iery 500 as a PCL
printer you must install the PCL Printer Driver and PDD file. These files are
included on the User Software CD.
If autorun is enabled on your computer, when the U ser S oftware CD is inserted in
the CD ROM drive the installer runs automatically, allowing you to specify which
files to install on your computer.
NOTE: If autorun is not enabled, you can run the installer by double-clicking the
CD-ROM drive icon in M y Computer, or by double clicking the Setup.exe file in
the installer folder on the User Software CD.
TO INSTALL THE POSTSCRIPT OR PCL PRINTER DRIVER:
1. Insert the User Software CD in your CD-ROM drive.
Follow the instructions on screen.
2. Choose the ‘Typical’, ‘Compact’, or ‘Custom’ installation option.
Choose this: To install:
Typical The Adobe PostScript printer driver and Fiery 500 PPD and the
PCL printer driver and PDD.
Also installs the CMYK/PANTONE color reference files, PS3
fonts, and Adobe Type Manager.
Compact Only the PS printer driver and PPD.
Custom Only the files you select—copies them to your hard disk.
You can select any or all of the following:
PS driver and PPD
PCL driver and PDD
CMYK/PANTONE color reference files
PS3 fonts
Adobe Type Manager
Page 63

3-3 Setting up PostScript or PCL printing with Windows 95/98
3
NOTE: You should restart your computer after installing the PCL driver.
Specifying installed devices
When the printer driver is installed, specify the optional devices installed on your
printer to enable use of options relating to those devices.
TO SPECIFY DEVICES INSTALLED ON THE FIERY 500:
1. From the Windows Start menu, choose Settings>Printers.
2. Select the Fiery 500 PostScript printer icon, or if you are using the PCL driver, the
Fiery 500 PCL printer icon, and choose Properties from the File menu.
3. Click the Device Options>Options tab, and specify the devices installed on the
printer.
PostScript PCL
Tray 2
—Select if optional Tray 2 is installed.
Tray 3—Select if optional Tray 3 is installed.
Disk—Select if an optional hard disk drive is installed.
Page 64

3-4 Installing Windows Software
3
4. Select from the Available Options list and click Add to move the option to the
Installed Options list.
5. Click OK.
Completing the Windows 95/98 connection
To print from Windows 95/98 you need to:
• Set up the Fiery 500 to accept print jobs from your computer.
• Configure a port on each Windows 95/98 computer for the network or
connection type.
Setting up parallel printing with Windows 95/98
The following procedure describes how to prepare the computer for parallel
printing.
TO INSTALL THE PRINTER FOR PARALLEL PORT PRINTING:
1. Click the Start key, select Settings, and click Printers.
2. Select the Fiery 500 printer icon and choose Properties from the File menu.
3. Click the Details tab and make sure the box “Print to the follo wing port:” reads as
follows: LPT 1 (Printer Port) or LPT1 (ECP Printer Port).
4. If you changed the port setting, click Apply.
You are now ready to print from your applications to the Fiery 500 with the
parallel port. To confirm the connection, print a test page.
5. Click the General tab.
6. Click the Print Test Page key to print a test page.
Setting up IPX (Novell) printing with Windows 95/98
Complete the setup for the IPX (Novell) connection as follows:
• Configure the Novell network and file server for handling Fiery 500 print jobs.
The file server should be configured with a print server and print connection for
the Fiery 500. For details, see your NetWare documentation.
Page 65

3-5 Setting up PostScript or PCL printing with Windows 95/98
3
• Prepare the Fiery 500 for IPX printing.
• Set up the IPX connection on the workstation.
NetWare protocols (NWLink IPX/SPX Compatible Transport) and NetWare
client services should already be installed on the Windows NT workstation.
BEFORE YOU BEGIN:
•
Verify the Fiery 500 has been configured for Novell printing in Network Protocol
Setup.
For more information about setting up the printer for IPX (Novell) printing see
“Using the printer with an IPX (Novell) network” on page 1-2.
TO SET UP IPX (NOVELL) PRINTING:
1. Open the Windows Control Panel.
2. Double-click the Network icon.
Make sure that IPX/SPX-compatible Protocol is listed in the Installed Network
Components section. For instructions, see your Windows documentation.
3. Click OK then close the Control Panel.
4. Click the Start key, choose Settings, and then choose Printers.
5. Select the printer icon, and choose Properties from the File menu (or right-click
the printer icon, and left-click Properties).
6. Click the Details tab, and click Add Port.
A list of connection options is displayed.
7. In the Add Port dialog box, specify the netw ork path, or click Br ow se f or a display
of your network environment.
8. If you are using a NetW are file serv er , double-click the icon o f the server y ou want
to use for printing to the Fiery 500.
9. Click the printer icon labeled with the NetWare print queue you will use and
click OK.
Page 66

3-6 Installing Windows Software
3
10. In the Add Port dialog box, verify that the network path is updated, and click
11. Click the General tab in the Properties dialog box, and click Print Test Page.
Apply.
To confirm the connection, you can print a Windows test page.
You are ready to print to the Fiery 500 from Windows applications. When you
select Print, jobs are routed to the print queue on the NetWare file server, and
then sent to the Fiery 500.
Setting up SMB printing for Windows 95/98
If you don’t have a Novell network, you can print via SMB printing (also known
as Windows printing or WINS printing). Printing by this method allows you to
print from your computer to a particular print connection (Hold, Print, or
Direct) on the Fiery 500.
NOTE: The Hold and Print queues are available only if y our printer has a hard disk
drive installed.
To set up printing to a second or third print connection, you must install a new
printer for each connection and repeat the procedure “To set up SMB printing on
Windows 95/98:” on page 3-7. If you install more than one printer, give each a
descriptive name during printer driver installation, such as
Fiery 500-Hold, so you can easily identify printers.
BEFORE YOU BEGIN:
1. Configure the Fiery 500 for SMB printing in Network Service Setup.
For more information, see Chapter 2.
2. Print the Fiery 500 Configuration page.
You need information from the Configuration page to specify settings on your
computer, such as the Server Name and IP address of the WINS Name Server.
3. Save any documents in open programs.
You are prompted to restart Windows after this procedure, so be sure to save any
documents.
Fiery 500-Print or
Page 67

3-7 Setting up PostScript or PCL printing with Windows 95/98
3
4. Prepare your computer for SMB printing.
See “Setting up SMB printing with Windows 95/98 and Windows NT” on
page 1-14.
TO SET UP SMB PRINTING ON WINDOWS 95/98:
1. From the Windows Start menu, choose Settings and click Printers.
2. Select the printer icon, and choose Properties from the File menu.
3. Click the Details tab in the Properties window and click Add Port.
4. In the Add Port dialog box, click Network and click Browse to display your
network environment.
5. Expand the levels to locate your printer and the queue you want to print to.
Page 68

3-8 Installing Windows Software
3
6. Under the printer’s name, select the queue you wish to print to and click OK.
NOTE: If there are several Fiery 500 printers on your network and they have the
same printer name, only one icon will be used to indicate the printer name. You
should assign unique names to each printer on your network.
Three queues will automatically be created when the printer driver is installed.
These queues are represented on the network by the Direct, Print and Hold
printer icons.
NOTE: The Print and Hold queues are only enabled when your printer has an
optional hard disk drive installed.
The printer you are browsing for is the SMB Name S erver . If y ou do not know the
name of the SMB Name Server and SMB printing has been enabled on the
printer, refer to the printer’s Configuration Page for this information.
For instructions on printing a Configuration P age, see “P rinting additional pages”
on page 2-28.
7. In the Add Port dialog box, verify that the network path is correct and click OK.
8. To confirm the connection, click the General tab in the Properties dialog box.
9. Click Print Test Page and click OK.
If the test page prints successfully, you are ready to print from the computer.
Setting up PostScript or PCL printing with
Windows NT
Printing with Windows NT 4.0 begins with installation of the PostScript printer
driver and the Fiery 500 PPD or PCL printer driver and the Fiery 500 PDD, and
finishes by configuring a particular type of connection between the workstation
and the Fiery 500. With this version of software, Fiery 500 files support Intelbased Windows NT 4.0.
Page 69

3-9 Setting up PostScript or PCL printing with Windows NT
3
Adding a printer to a local system requires that you log in to your local
Windows NT workstation (not the network server domain) and that you are a
member of the Administrators group.
If autorun is enabled on your computer, when the U ser S oftware CD is inserted in
the CD-ROM drive, the installer on the User Software CD runs automatically,
allowing you to specify the files to install on your computer.
NOTE: If autorun is not enabled, you can run the installer by double-clicking the
CD-ROM drive icon in M y Computer, or by double clicking the Setup.exe file in
the Installr folder on the User Software CD. If optional devices are installed on
your printer, follow the instructions in the next section as well.
TO INSTALL THE FIERY 500 AS A LOCAL POSTSCRIPT OR PCL PRINTER:
1. Insert the User Software CD in your CD-ROM drive.
Follow the instructions on screen.
2. Choose the ‘Typical’, ‘Compact’, or ‘Custom’ installation option.
Choose this: To install:
Typical The Adobe PostScript printer driver and Fiery 500 PPD and the
PCL printer driver and PDD.
Also installs the CMYK/PANTONE color reference files.
Compact Only the PS printer driver and PPD.
Custom Only the files you select—copies them to your hard disk.
You can select any or all of the following:
PS driver and PPD
PCL driver and PDD
CMYK/PANTONE color reference files
Page 70

3-10 Installing Windows Software
3
Specifying installed devices
When the printer driver is installed, specify the optional devices installed on your
printer to enable use of options relating to those devices.
TO SPECIFY OPTIONS INSTALLED ON THE FIERY 500:
1. Choose Settings>Printers from the Start menu.
2. Select the Fiery 500 PostScript printer icon, or if you are using the PCL driver, the
Fiery 500 PCL printer icon, and choose Properties from the File menu.
3. Click the Device Settings tab, and scroll down to Installable Options.
4. Configure the following options to correspond with the features installed on the
printer:
PostScript
PCL
Tray 2
—Select if optional Tray 2 is installed.
Tray 3—Select if optional Tray 3 is installed.
Disk—Select if an optional hard disk drive is installed.
NOTE: Installed Memory is not an option that you can set from the printer driver.
Any change you make to this setting will have no effect.
Page 71

3-11 Setting up PostScript or PCL printing with Windows NT
3
5. Select the option and then select Installed in the Change … Setting area at the
6. Click OK.
bottom of the dialog box (PostScript) or select the option in the Available
Options list and click Add (PCL).
Completing the Windows NT 4.0 connection
To print from Windows NT 4.0 you need to:
• Set up the Fiery 500 to accept print jobs from your computer.
• Configure a port on each Windows NT computer for the network or
connection type.
Setting up parallel printing on Windows NT
Once you have installed the printer drivers, complete the setup for parallel port
printing as follows:
TO SET UP PARALLEL PRINTING:
1. Click the Start key, choose Settings, and then choose Printers.
2. Double-click the printer icon, and choose Properties from the Printer menu.
In the Ports property sheet, confirm that LPT1 (Local Port) is checked. The
Fiery 500 is ready to accept parallel port print jobs from your computer.
3. Select the General property sheet, and click Print Test Page.
When you select Print, your files are sent over the parallel port connection to the
Fiery 500.
4. Select the Sharing property sheet if you want to share the printer with network
users. Select Shared, and select a share name.
Select the operating system or systems used by your network clients if you want to
install a printer driver that those clients can automatically download when they
connect. Click OK.
5. In the dialog box that appears, navigate to the location of the alternate printer
driver to install.
6. Click OK to exit the Printer Properties dialog box.
Page 72

3-12 Installing Windows Software
3
Setting up IPX (Novell) printing with Windows NT
Complete the setup for the IPX (Novell) connection as follows:
• Configure the Novell network and file server for handling Fiery 500 print jobs.
The file server should be configured with a print server and print connection for
the Fiery 500. For details, see your NetWare documentation.
• Prepare the Fiery 500 for IPX printing.
• Set up the IPX connection on the workstation.
NetWare protocols (NWLink IPX/SPX Compatible Transport) and NetWare
client services should already be installed on the Windows NT workstation.
BEFORE YOU BEGIN:
•
Verify the printer has been configured for Novell printing in Network Protocol
Setup.
For more information about setting up the printer for IPX (Novell) printing see
“Network Protocol Setup” on page 2-14.
TO SET UP IPX (NOVELL) PRINTING FOR WINDOWS NT 4.0:
1. Double-click Network Neighborhood.
2. Double-click NetWare or Compatible Network.
A list of NetWare servers is displayed.
3. Double-click the NetWare Tree or File Server on which the network administrator
defined a print connection for the Fiery 500.
You may have to log in to the file server as a guest to see the print connections.
Page 73

3-13 Setting up PostScript or PCL printing with Windows NT
3
4. Double-click the print connection defined for the Fiery 500.
5. Click Yes.
6. Specify if you print from MS-DOS programs and click Next.
7. In the dialog box displaying lists of manufacturers and printers, click Have Disk.
If the NetWare server does not have a suitable driver for the Fiery 500 you may be
asked if you want to set up the printer on your workstation.
The Add Printer Wizard appears.
If you select Yes, you will need to capture a printer port before continuing.
The Install from Disk dialog box prompts you for the disk.
Page 74

3-14 Installing Windows Software
3
8. Type the name of the CD-ROM drive (for example, D:\), and click Browse. Browse
9. Verify the path is correct, and click OK.
10. In the Printers box, select the Fiery 500 PostScript or PCL file and click Next.
11. Using a maximum of 20 characters, enter a name for the Fiery 500 (or leave the
to the English\Prntdrvr\disk1 folder and click Open.
Make sure “Oemsetup.inf” is selected in the Look in box.
The path is copied to the Install from Disk dialog box.
default name) in the Printer name box, and choose whether you want the
Fiery 500 to be your default printer. Click Next.
N
OTE: Entering more than 20 characters may cause printing problems with some
network applications.
Page 75

3-15 Setting up PostScript or PCL printing with Windows NT
3
12. Indicate whether you want the printer installed as a shared printer. Click Next.
13. Click No in the next dialog box to postpone printing a test page, and click Finish.
If you select Shared, you must also enter a Share N ame for the printer (or leave the
default name) and make selections from the list of operating systems used by
client workstations.
When installation is complete, a new printer window appears, with the name of
the print queue on the NetWare server.
14. Choose Properties from the Printer menu and click the Ports tab.
The NetWare queue you just connected to is listed and checked as a port for the
Fiery 500.
Page 76

3-16 Installing Windows Software
3
15. Click the General tab and click Print Test Page.
The Fiery 500 polls the NetWare server for print jobs in the print connection
defined for the Fiery 500. When you print, your PostScript files are spooled to
that connection and transmitted over the queue “port” to the Fiery 500.
The test page job is listed in the queue window until it is printed.
Setting up TCP/IP and LPR printing with Windows NT
Once you have installed the PostScript or PCL printer driver, complete the setup
for the TCP/IP and lpr connection as follows:
• Prepare the Fiery 500 to accept print jobs using TCP/IP and lpr protocols.
• Configure the workstation for the TCP/IP connection.
Before you continue, ask the system administrator for the IP address assigned to
the Fiery 500, as well as the subnet mask and gateway address, if they are used.
TO PREPARE THE FIERY 500 FOR TCP/IP AND LPR PRINTING:
1. With the Fiery 500 turned off, connect it to the network. Restart the printer.
2. Select NETWORK PROTOCOL SETUP. Enable TCP/IP and enter the appropriate
settings for IP address, subnet mask and gateway address.
For details, see “Network Protocol Setup” on page 2-14.
3. Exit the setup menus.
The TCP/IP Protocol and Microsoft TCP/IP Printing software should already be
installed on the Windows NT workstation.
Page 77

3-17 Setting up PostScript or PCL printing with Windows NT
3
TO SET UP TCP/IP AND LPR PRINTING FOR WINDOWS NT 4.0:
1. Open the Printer Properties dialog box for the Fiery 500. Click Ports to display the
Ports property tab.
2. Click Add Port.
The available port types are displayed.
3. Select LPR Port and click New Port.
If the LPR port is not listed, install the TCP/IP protocols. For details, see your
Windows NT documentation.
4. In the “Add LPR compatible printer” dialog box, enter the IP address of the
Fiery 500.
If your network uses Domain Name Services (DNS), enter the DNS name
assigned to the Fiery 500 instead of the IP address.
Page 78

3-18 Installing Windows Software
3
5. Press Tab and type the internal name of the Fiery 500 in lowercase letters.
6. Click OK.
7. Close the Printer Ports dialog box.
N
OTE: T ype this name exactly as shown; it is r equired for communication with the
printer. The Hold and Print queues are available only if your printer has a hard
disk drive installed.
The name must be one of these:
xjdirect
xjhold
xjprint
The workstation checks the address or DNS name that you entered and notifies
you if it cannot resolve the address.
The Ports property tab shows the new port configuration. You should now print a
test page to verify the connection.
8. Click the General tab and click Print Test Page.
When you print, your files are sent over the LPR Port connection to the
Fiery 500.
9. Click OK to exit the Printer Properties dialog box.
Setting up SMB printing for Windows NT 4.0
If you don’t have a Novell network, you can print via SMB printing (also known
as Windows printing or WINS printing). Printing by this method allows you to
print from your computer to a particular print connection (Hold, Print, or
Direct) on the Fiery 500.
NOTE: The Hold and Print queues are available only if y our printer has a hard disk
drive installed.
To set up printing to a second or third print connection, you must install a new
printer for each connection and repeat the procedure “To set up SMB printing on
Windows NT:” on page 3-19. If you install more than one printer, give each a
descriptive name during printer driver installation, such as Fiery 500-Print or
Fiery 500-Hold, so you can easily identify printers.
Page 79

3-19 Setting up PostScript or PCL printing with Windows NT
3
BEFORE YOU BEGIN:
1. Configure the Fiery 500 for SMB printing in Network Service Setup.
For more information, see Chapter 2.
2. Print the Fiery 500 Configuration page.
You need information from the Configuration page to specify settings on your
computer, such as the Server Name and IP address of the WINS Name Server.
3. Save any documents in open programs.
You are prompted to restart Windows after this procedure, so be sure to save any
documents.
4. Prepare your computer for SMB printing.
See “Setting up SMB printing with Windows 95/98 and Windows NT” on
page 1-14.
TO SET UP SMB PRINTING ON WINDOWS NT:
1. From the Windows NT Start menu, choose Settings, and click Printers.
2. Select the printer icon, and choose Properties from the File menu.
3. Click the Ports tab in the Properties window and click Add Port.
Page 80

3-20 Installing Windows Software
3
4. In the Printer Ports dialog box, select Local Port, and then click New Port.
5. Enter the name of the printer port to print to, for example: \\Fiery500\print and
The Port Name dialog box appears.
then click OK.
Three queues will automatically be created when the printer driver is installed.
These queues are represented on the network by the Direct, Print and Hold
printer icons.
NOTE: The Print and Hold queues are only enabled when your printer has an
optional hard disk drive installed.
The printer you are browsing for is the SMB Name S erver . If y ou do not know the
name of the SMB Name Server and SMB printing has been enabled on the
printer, refer to the printer’s Configuration Page for this information.
For instructions on printing a Configuration P age, see “P rinting additional pages”
on page 2-28.
6. To confirm the connection, click the General tab in the Printer Properties dialog
box.
7. Click Print Test Page and click OK.
If the test page prints successfully, you are ready to print from the computer.
Page 81

3-21 Setting up PostScript or PCL printing with Windows NT
3
Setting up Fiery WebTools
The Fiery WebTools come pre-installed on your printer. Fiery WebTools allow
you to manage your print jobs remotely from the Internet or from your company ’s
intranet. The Fiery 500 has its own home page, from which you are able to select
from a variety of functions including WebSetup, Status, WebSpooler, WebLink,
and W ebD o wnloader.
NOTE: WebSpooler is available only if your printer has a hard disk driver installed.
For information on using the Fiery WebTools, see the User’s Guide.
In order for network users to access and use the Fiery WebTools, you need to set
communication options in Network Protocol Setup on the operation panel. You
also need to prepare each user’s workstation to communicate with the Fiery 500
over the Internet or intranet.
Instructions below apply to IBM PC compatible computers using Token Ring or
Ethernet protocols.
TO SET UP FIERY WEBTOOLS ON THE FIERY 500:
1. From the READY screen, press the Menu key on the printer’s operation panel to
access the printer setup menus.
2. Press the up arrow key until you see NETWORK PROTOCOL SETUP, and press the
Enter key to access the TCP/IP screens.
In the next step you will enable TCP/IP network communication according to
your network type. You will enable Ethernet communication, or if a Token Ring
card is installed on your printer, you will enable Token Ring communication.
3. Use the right arrow ke y to adv ance to the T CP/IP-ETHERNET or T CP/IP-TOKEN RING
screens. Select YES to enable the appropriate communication protocol.
4. Use the arrow keys to advance to the ETH IP ADDRESS or the TR IP ADDRESS
screens. Enter a valid, unique IP Address for the Fiery 500 or select ENABLE
AUTO IP.
Page 82

3-22 Installing Windows Software
3
In order for client workstations to access Fiery WebTools, they must use a web
browser. The recommended browser versions are:
• For Macintosh computers, Netscape Navigator 4.06 and later,
• For Windo ws computers, Netscape Communicator 4.06 and later or Microsoft
Internet Explorer 4.x and later.
NOTE: Note also that Windows NT 4.0 users must download the Windows NT
4.0 Service Pack 3 or later in order to run the WebDownloader with Netscape
Communicator 4.x.
Netscape and Microsoft continue to release fr equent updates to their bro wsers. As
support can not be guaranteed for all versions, use the versions specified above for
best results.
TO SET UP FIERY WEBTOOLS ON EACH CLIENT WORKSTATION:
1. Enable TCP/IP networking.
2. Make sure the workstation has a valid, unique IP address.
3. Make sure the workstation is installed with an Internet browser.
4. Start your Internet browser application.
5. Enter the IP address or DNS name of the printer in the browser’s URL line.
The printer’s home page appears.
Installing additional software for Windows users
Additional software, including Adobe Type Manager (ATM) (for Windows 95/98
only), a PANTONE color reference file, a CMYK reference file, and a Fiery 500
ICM profile (for Windows 95/98 only), is included on the User Software CD.
When a Typical installation is performed on Windows 95/98 or Windows NT
using the installer, all files are automatically installed to a directory on your hard
drive called Fiery 500. When a Compact installation is performed, only the
printer drivers appropriate to your system are installed. You can also select which
Page 83

3-23 Installing additional software for Windows users
3
additional files to install during a Custom installation procedure, or you can copy
the additional files from the User Software CD to a directory of your choice as
they are needed.
Some files, such as fonts, will need to be moved to specific locations; others can be
moved to a directory of your choice.
PostScript and True Type fonts
Regular, bold, italic, and bold italic versions of PostScript Type 1 fonts, as well as
True Type fonts are provided in the PS3 folder on the User Software CD. These
fonts correspond to the PS3 fonts installed on your printer. To use these fonts in
applications and to properly display them on your monitor, you will need to
install them on your computer. For information on installing fonts see the
following section.
For a complete list of fonts included with the printer, see Appendix A of the User’s
Guide.
Adobe Type Manager (Windows 95/98)
Adobe Type Manager (ATM) is included on the User Software CD. This
application can be used to transfer Type 1 fonts to the printer’s RAM or hard disk
drive, or to manage fonts on the printer. M anual downloading of fonts not already
provided on the printer eliminates the need for automatic downloading of fonts
used by a document, which speeds printing. You can also:
• Install the PostScript Type 1 fonts that correspond to those installed on your
printer
• Print using PostScript fonts on non-PostScript printers
• Improve the screen display of PostScript fonts
When a typical installation is performed all the elements needed to install Adobe
ATM for Windows 95/98 are copied to the Fiery 500 directory.
See the instructions provided with ATM for information on how to use the
appropriate version for your system.
Page 84

NOTE: ATM cannot be used to install TrueType fonts, which are also included in the PS3
folder. These fonts can, however, be installed on Windows 98, Windows 95, and Windows
NT 4.0 using the Control Panel>Fonts>File>Install New Font command. For additional
information on installing TrueType fonts on Windows platforms, see the documentation
that came with your system.
CMYK color reference file
The CMYK Color Reference file is used as a reference for graphics applications that allow
you to specify color as CMYK values. These pages are provided as a PostScript file, which
can be printed using a PostScript downloader utility, such as WebDownloader. By
downloading the file to your printer you can see how the colors print on the Fiery 500.
Copy the file from the English\Clrfiles folder on the User Software CD to a folder of your
choice.
For information about color matching using CMYK color reference files, see “Choosing
colors in PostScript applications” in the User’s Guide.
PANTONE color reference file
You can print CMYK representations of PANTONE numbered color swatches and use the
pages as a reference to see how these colors print on your printer. These pages are provided
as a PostScript file, which can be printed using a PostScript downloader utility, such as
WebDownloader. Copy the file from the English\Clrfiles folder on the User Software CD
to a folder of your choice.
For information about color matching using PANTONE color reference files, see
“Choosing colors in PostScript applications” in the User’s Guide.
Page 85

4-1 General steps for installing Macintosh software
4
Chapter 4: Installing Macintosh Software
This chapter describes installing software and setting up printing from a
Macintosh computer. Serial port printing from Macintosh computers is not
supported by the printer. For instructions on how to connect your printer to a
network, see Chapter 1.
General steps for installing Macintosh software
The general steps for installing the Fiery 500’s software from the CD and setting
up printing from a Macintosh computer are:
• Enable Ethernet and AppleTalk from the printer’s operation panel.
• Enable AppleTalk in the Chooser on the Macintosh.
• Install the Adobe PostScript Printer Driver.
• Set up the printer in the Chooser.
• Copy additional color reference files, sample files and font files from the User
Software CD as needed.
Installing Macintosh printing software
To set up the Fiery 500 as a PostScript printer, you must install the PostScript
printer description file (PPD) that corresponds to your printer and the Adobe
PostScript Printer Driver (version 8.5.1 supports PostScript 3) provided on the
User Software CD. Printer drivers provide a way to communicate information on
print jobs between your applications and the Fiery 500 (and any other PostScript
printer connected to your computer).
Installing the Adobe PostScript printer driver
Printer drivers provide your applications with information about your printer,
such as the fonts and paper sizes available. Printer description files give you access
to all printing features of the printer driver and applications.When you use the
Adobe PS Printer installer, the printer description file is installed automatically.
NOTE: To print to the Fiery 500, you need Apple system software version 7.5 or
later
Page 86

4-2 Installing Macintosh Software
4
TO INSTALL THE POSTSCRIPT PRINTER DRIVER:
1. Insert the User Software CD in the CD ROM drive and open the English:Printer
Driver folder.
2. Double-click the Installer icon.
3. Click Yes to acknowledge that your computer needs to be restarted after the
installation.
4. Click Install in the dialog box that appears.
The Adobe PostScript Printer Driver and the PPD that corresponds to your
printer are installed
5. Click Restart in the dialog box informing you that installation is complete and
restart your computer.
N
OTE: If you operate the Fiery 500 in a service department or your organization,
you might want to provide copies of the printer driver, printer description file,
and related documentation to users that will be sending you print jobs. This will
ensure that jobs they create and print to files are properly formatted for printing to
the Fiery 500. Be sure to copy the complete contents of the Adobe PS folder.
Setting up the Fiery 500 in the Chooser
After you install the printer driver and printer description files, you need to set up
the Fiery 500 in the Chooser. This section describes how to set up the Fiery 500
with the Adobe PostScript Printer Driver.
TO SET UP THE PRINTER IN THE CHOOSER:
1. Select Chooser from the Apple menu.
2. Make sure AppleTalk is active.
Page 87

4-3 Installing Macintosh printing software
4
3. Click the Adobe PS Printer icon.
4. Select the correct AppleTalk zone if necessary.
5. Select the name of your Fiery 500 printer.
6. Click Create.
The Adobe PostScript printer driver automatically selects the correct printer
description file for your printer.
7. Click Setup and then Configure to confirm that the options installed on your
printer have been correctly recognized. Click OK to close each of the windows.
8. Close the Chooser.
If your printer has an optional hard disk drive installed, the Direct, Print, and
Hold connections automatically appear in the Chooser. Select Fiery 500_Direct
to print to the direct connection, Fiery 500_Print to print to the Print queue, or
Fiery 500_Hold to print to the Hold queue from the printers list. If your printer
does not have an optional hard disk drive, the printer’s Direct connection will
appear in the list.
The first time you select the printer’s Direct, Print, or Hold queues, you will be
prompted to select a PPD.
Page 88

4-4 Installing Macintosh Software
4
Installing the Fiery 500 ICC printer profile
The Adobe PostScript driver can convert RGB colors of a file to a specified
CMYK device target using ICC (Image Color Control) technology. The color
space target defined by the Fiery 500 ICC, or printer profile, is included on the
User Software CD. This profile is optimized for color conversions sent to a
Fiery 500.
NOTE: Printer profiles selected via ColorSync affect ColorSync-compliant
applications only.
TO INSTALL THE FIERY 500 ICC PRINTER PROFILE:
1. On the User Software CD, double-click to open the English:ColorSync™ Profiles
folder.
2. Double-click the Installer icon.
3. Select ColorSync™ Profiles, and click Install.
4. Specify the locations into which to install each item.
Browse to the System Folder:Preferences:ColorSync™ Profiles folder.
5. Click Install.
6. If prompted, click Quit to close the software installer.
7. Choose Control Panels>ColorSync System Profile from the Apple Menu.
8. Click Set Profile.
9. From the list of ColorSync profiles, select EFIRGB ICC and click Select.
When selected as the ColorSync system profile, EFIRGB ICC sets the optimal
source color space for printing to the Fiery 500. The color space set by the
EFIRGB ICC profile is the same as that set by the EFIRGB setting of the RGB
Source print option. For more information, see the User Guide.
NOTE: The RGB Source print option setting overrides the ColorSync system
profile setting.
10. Close the ColorSync System Profile window.
Page 89

4-5 Installing Macintosh printing software
4
Setting up Fiery WebTools
Fiery WebTools allow you to manage your printer remotely from the Internet or
from your company’s intranet. The printer has its own home page, from which
you are able to select from a variety of functions including WebSetup, Status,
W ebS pooler, and WebLink. F or information on using the Fiery W ebTools, see the
User’s Guide.
NOTE: W ebDownloader is not supported for Macintosh computers. W ebS pooler is
only available if your printer has an optional hard disk drive installed.
In order for network users to access and use the Fiery WebTools, you need to set
communication options in Network Protocol Setup on the operation panel. You
also need to prepare each user’s workstation to communicate with the Fiery 500
over the Internet or intranet.
NOTE: Instructions below apply to Macintosh computers using Ethernet
protocols.
TO SET UP FIERY WEBTOOLS ON THE FIERY 500:
1. From the READY screen, press the Menu key on the printer’s operation panel to
access the printer setup menus.
2. Press the up arrow key until you see NETWORK PROTOCOL SETUP, and press the
Enter key to access the TCP/IP screens.
In the next step you will enable TCP/IP network communication according to
your network type.
3. Use the right arrow key to advance to the TCP/IP-ETHERNET screens . Select YES to
enable the Ethernet communication protocol.
4. Use the arrow keys to advance to the ETH IP ADDRESS screen. Enter a valid, unique
IP Address for the Fiery 500.
Page 90

4-6 Installing Macintosh Software
4
In order for client workstations to access Fiery WebTools, they must use a web
browser. The recommended browser version is Netscape Navigator 4.06 and later
for Macintosh computers.
Netscape continues to release frequent updates to their browser. As support
cannot be guaranteed for all versions, use the version specified above for best
results.
TO SET UP FIERY WEBTOOLS ON EACH CLIENT WORKSTATION:
1. Enable TCP/IP networking.
2. Make sure the workstation has a valid, unique IP address.
3. Make sure the workstation is installed with an Internet browser.
4. Start your Internet browser application.
5. Enter the IP address or DNS name of the printer in the browser’s URL line.
The printer’s home page appears.
Page 91

4-7 Installing additional software for Macintosh users
4
Installing additional software for Macintosh users
Additional software, including Adobe Type Manager (ATM), PostScript screen
fonts, a PANTONE color reference file, and a CMYK reference file are included
on the User Software CD. Copy these files from the Files folder on the User
Software CD to a folder of your choice. Some files, such as fonts, will need to be
moved to specific locations; others can be moved to a folder of your choice.
Adobe Type Manager
Adobe Type Manager (ATM) is included on the User Software CD. This
application can be used to transfer Type 1 fonts to the printer’s RAM or hard disk,
or to manage fonts on the printer. Manual downloading of fonts not already
provided on the printer eliminates the need for automatic downloading of fonts
used by a document, which speeds printing. You can also:
• Print using PostScript fonts on non-PostScript printers
• Improve the screen display of PostScript fonts
The ATM 4.0.2 installer installs both ATM and the Adobe Downloader 5.0.5
utility, which can be used to download PostScript files and non-resident printer
fonts to the printer. You can also use the Adobe Downloader to send the
PANTONE and CMYK color reference files to the printer. See the instructions
provided with the ATM package to install and use ATM for Macintosh.
PostScript and TrueType fonts
In addition to TrueType fonts, regular, bold, italic, and bold italic versions of
PostScript Type 1 fonts are included in the PS3 folder on the User Software CD.
ATM cannot be used to install TrueType fonts. Theses fonts can, however, be
installed by dragging a copy of each from the PS3 fonts folder on the User
Software CD to the System Folder:Fonts folder.
For a complete list of fonts included with the Fiery 500, see Appendix A of the
User’s Guide.
Page 92

CMYK color reference file
The CMYK Color Reference file is used as a reference for graphics applications that allow
you to specify color as CMYK values. This reference page is provided as a PostScript file,
and can be printed using a PostScript downloader utility, such as Adobe Downloader. By
downloading the file to your printer you can see how the colors print on the printer. Copy
this file from the English:Color Reference folder on the User Software CD to a folder of
your choice.
For information about color matching using CMYK color reference files, see “Choosing
colors in PostScript applications” in the User’s Guide.
PANTONE color reference file
You can print CMYK representations of PANTONE numbered color swatches and use the
pages as a reference to see how these colors print on your printer. This reference page is
provided as a P ostScript file, and can be printed using a PostScript downloader utility , such
as Adobe Downloader. Copy this file from the English:Color Reference folder on the User
Software CD to a folder of your choice.
For information about color matching using PANTONE color reference files, see
“Choosing colors in PostScript applications” in the User’s Guide.
Page 93

A-1 Menu Help
A
Appendix A: Menu Help
This appendix is a graphic overview of options available from the operation panel
of the Fiery 500. For a detailed explanation of how to use the keys on the
operation panel, see the first few pages of Chapter 2, “Using the Operation
Panel.”
Page 94

A-2 Menu Help
A
Page 95

A-3 Menu Help
A
Page 96

A-4 Menu Help
A
Page 97

A-5 Menu Help
A
Page 98

A-6 Menu Help
A
Page 99

Index
Symbols
Set 2-8
Tray1 2-8
Tray2 2-9
Tray3 2-9
Numerics
10 Base-2 Ethernet cable 1-2
10 Base-5 Ethernet cable 1-2
10 Base-TX Ethernet cable 1-2
A
Add Port option 3-17
Administrator password, setting 2-7
Adobe Type Manager, see ATM xiii
amount of memory required xiv, xv
Another FS? option 2-25
AppleTalk 4-2
enabling 2-17
installed with Windows NT 4.0 xiv
supported by color server xi
AppleTalk Setup menu 2-17
AppleTalk Zone option 2-17
ATM (Adobe Type Manager) xiii
ATM for Macintosh 4-7
Auto Frame Type option 2-18
Auto Gateway option 2-17
Auto Netbios option 2-25
Auto Paper Eject option 2-9
Available Servers option 2-24
B
Bindery emulation
configuring Netware 3.x file
servers 2-23
configuring Netware 4.x file
servers 2-23
Bindery Settings option 2-23
bindery settings, deleting 2-20
bindery setup, options 2-20
Bypass Tray Size option 2-8
C
cable, color server xii
cables, types supported
See also parallel cable
Change Password option 2-7
Change Settings? option 2-20
Check and Print menu 2-4
CMYK Color Reference file 3-24, 4-8
Color Adjustment menu 2-4
color management files xii, xiii
color reference files xiii, 3-24, 4-8
color server specifications xi
ColorSync color management files xiii
ColorWise color management files xii
Configuration page 3-6, 3-19
Configuration page, printing 2-27
configuring NetWare network
servers 1-10
configuring network clients
NetWare 1-13
Windows NT 1-13
Connected Servers option 2-23
connecting
Windows 95/98 by IPX (Novell) 3-5
Windows 95/98 by parallel port 3-4
Windows NT 4.0 by IPX 3-12
Windows NT 4.0 by parallel
port 3-11
Windows NT 4.0 by TCP/IP 3-16
connecting Macintosh using
AppleTalk 4-2
connecting printer
using parallel cable 1-4, 1-4
using thicknet cable 1-2
Page 100

I-2 Index
using thinnet cable 1-3
using twisted pair cable 1-2
connector 1-4
conventions used xvi
Cover Page option 2-10
D
Def Orientation option 2-10
Def. Paper Size option 2-8
default page orientation, option 2-10
Del Bind Setup? option 2-20
deleting bindery settings 2-20
designating an SMB server 2-26
device name 3-18
DNS (Domain Name Server)
name 3-17, 3-22
DNS name xiv, xv
Domain Name option 2-26
E
EFIRGB ICC 4-4
Enable AppleTalk option 2-17
Enable Auto IP option 2-14, 2-16
enable bindery emulaton mode,
option 2-23
Enable Bindery option 2-23
Enable BOOTP option 2-15, 2-16
Enable DHCP option 2-14, 2-16
Enable NDS option 2-20
Enable Novell option 2-18
Enable Pserver option 2-19
Enable RARP option 2-15, 2-16
Enable SMB option 2-25
Enable TCP/IP option 3-16
Enter Password option 2-21
Enter Passwork option 2-22
Eth. IP Address option 2-15
Eth. Subnet Mask option 2-15
Ethernet 100BaseTX cable xii
Ethernet 10BaseT cable xii
Ethernet 802.2 option 2-19
Ethernet 802.3 option 2-18
Ethernet cable, types supported 1-3
Ethernet frame type
802.2 2-19
802.3 2-18
II 2-19
SNAP 2-19
Ethernet II option 2-19
Ethernet network 1-8
Ethernet option 2-12
Ethernet SNAP option 2-19
Ethernet Speed option 2-12
EtherTalk xv
F
Fast Ethernet 100BaseTX cable xii
Fiery Web T ools
Web Downloader 3-22
Fiery WebTools
language 2-26
setting up 3-21, 4-5
system requirements xiv, xv
version of browser required xiv
File Servr Login option 2-24
Font Number option 2-11
Font Size (PT) option 2-11
fonts
Adobe Type 1 xiii
PostScript Type 1 3-23, 4-7
screen fonts xiii
True Type 3-23, 3-24, 4-7
TrueType xiii
Form Length option 2-10
Fserver Password option 2-24
G
Gateway Address option 2-17
I
I/O Port Setup menu 2-4, 2-11–2-14
I/O Timeout (SEC) option 2-13
ICC printer profile 4-4
 Loading...