

Page 1
FAX Option Type C1500
Transmission
1
Send Settings
2
Reception
3
Operating Instructions
Facsimile Reference
Changing/Confirming Communication Information
4
Fax via Computer
5
Appendix
6
Read this manual carefully before you use this machine and keep it handy for future reference. For safe and correct use, be sure to read the
Safety Information in "About This Machine" before using the machine.
Page 2

Introduction
This manual contains detailed instructions and notes on the operation and use of this machine. For your
safety and benefit, read this manual carefully before using the machine. Keep this manual in a handy
place for quick reference.
Notes
Some illustrations in this manual might be slightly different from the machine.
Certain options might not be available in some countries. For details, please contact your local dealer.
Two kinds of size notation are employed in this manual. With this machine refer to the metric version.
Important
Contents of this manual are subject to change without prior notice. In no event will the company be liable for direct, indirect, special, incidental, or consequential damages as a result of handling or operating the machine.
Trademarks
Microsoft
®
, Windows®, WindowsNT® and Outlook® are registered trademarks or trademarks of Micro-
soft Corporation in the United States and/or other countries.
PowerPC® is a trademark of International Business Machines Corporation in the United States, other
countries, or both.
Adobe® and Acrobat® are registered trademarks of Adobe Systems Incorporated.
Ethernet is a registered trademark of Xerox Corporation.
Other product names used herein are for identification purposes only and might be trademarks of their
respective companies. We disclaim any and all rights to those marks.
Note
The proper names of the Windows operating systems are as follows:
• The product name of Windows
• The product name of Windows
• The product names of Windows
Microsoft
Microsoft® Windows® 2000 Server
Microsoft
• The product names of Windows® XP are as follows:
Microsoft
Microsoft
• The product names of the Windows ServerTM 2003 are as follows:
Microsoft
Microsoft
Microsoft
®
Windows® 2000 Advanced Server
®
Windows® 2000 Professional
®
Windows® XP Professional
®
Windows® XP Home Edition
®
Windows ServerTM 2003 Standard Edition
®
Windows ServerTM 2003 Enterprise Edition
®
Windows ServerTM 2003 Web Edition
• The product names of Windows NT
Microsoft® Windows NT® Server 4.0
Microsoft
®
Windows NT® Workstation 4.0
®
98 is Microsoft® Windows 98.
®
Me is Microsoft® Windows Millennium Edition (Windows Me).
®
2000 are as follows:
®
4.0 are as follows:
Page 3

NOTICE
❖ NOTICE TO USERS (NEW ZEALAND)
• The grant of a Telepermit for any item of terminal equipment indicates
only that Telecom has accepted that the item complies with minimum conditions for connection to its network. It indicates no endorsement of the
product by Telecom, nor does it provide any sort of warranty. Above all, it
provides no assurance that any item will work correctly in all respects with
another item of Telepermitted equipment of a different make or model, nor
does it imply that any product is compatible with all of Telecom's network
services.
• This equipment is not capable, under all operating conditions, of correct
operation at the higher speeds for which it is designed. Telecom will accept
no responsibility should difficulties arise in such circumstances.
• This equipment shall not be set up to make automatic calls to the Telecom
“111” Emergency Service.
• If a charge for local calls is unacceptable, the “Dial” button should NOT be
used for local calls. Only the 7-digits of the local number should be dialled
from your telephone. DO NOT dial the area code digit or the “0” prefix.
• This equipment may not provide for the effective hand-over of a call to an-
other device connected to the same line.
• This device may be subject to ringing or bell tinkle when calls are made
from another device on the same line. If this occurs, the problem SHOULD
NOT be referred to the Telecom Faults Service.
• This equipment should not be used under any circumstances, which may
constitute a nuisance to other Telecom customers. For example, repeated
attempts to make unsolicited sales offers to the same number or group of
numbers, such as when a block of numbers terminate on the same PABX.
• The call log incorporated in this equipment does not record all answered
calls. The call log, therefore may not agree with the Telecom account which
may include calls not shown on the log.
• Not all telephones will respond to incoming ring when connected to the
extension socket.
i
Page 4

Manuals for This Machine
Refer to the manuals that are relevant to what you want to do with the machine.
❖ About This Machine
Be sure to read the Safety Information in this manual before using the machine.
This manual provides an introduction to the functions of the machine. It also
explains the control panel, preparation procedures for using the machine,
how to enter text, and how to install the CD-ROMs provided.
❖ General Settings Guide
Explains User Tools settings, and Address Book procedures such as registering fax numbers, e-mail addresses, and user codes. Also refer to this manual
for explanations on how to connect the machine.
❖ Troubleshooting
Provides a guide to solving common problems, and explains how to replace
paper, print cartridges, and other consumables.
❖ Security Reference
This manual is for administrators of the machine. It explains security functions that the administrators can use to protect data from being tampered, or
prevent the machine from unauthorized use.
Also refer to this manual for the procedures for registering administrators, as
well as setting user and administrator authentication.
❖ Copy Reference
Explains Copier functions and operations. Also refer to this manual for explanations on how to place originals.
❖ Facsimile Reference
Explains Facsimile functions and operations.
❖ Printer Reference
Explains Printer functions and operations.
❖ Scanner Reference
Explains Scanner functions and operations.
❖ Network Guide
Explains how to configure and operate the machine in a network environment, and use the software provided.
This manual covers all models, and includes descriptions of functions and
settings that might not be available on this machine. Images, illustrations, and
information about operating systems that are supported might also differ
slightly from those of this machine.
ii
Page 5

❖ Other manuals
• Quick Reference Copy Guide
• Quick Reference Fax Guide
• Quick Reference Printer Guide
• Quick Reference Scanner Guide
• PostScript3 Supplement
•UNIX Supplement
• Manuals for DeskTopBinder Lite
• DeskTopBinder Lite Setup Guide
• DeskTopBinder Introduction Guide
•Auto Document Link Guide
Note
❒ Manuals provided are specific to machine types.
❒ Adobe Acrobat Reader/Adobe Reader must be installed in order to view the
manuals as PDF files.
❒ For “UNIX Supplement”, please visit our Web site or consult an authorized
dealer.
❒ “PostScript3 Supplement” and “UNIX Supplement” include descriptions of
functions and settings that might not be available on this machine.
❒ The following software products are referred to using general names:
Product name General name
*1
DeskTopBinder Lite
sional
ScanRouter EX Professional
terprise
*1
*1
Optional
and DeskTopBinder Profes-
*1
and ScanRouter EX En-
DeskTopBinder
the ScanRouter delivery software
iii
Page 6

TABLE OF CONTENTS
NOTICE ....................................................................................................................i
Manuals for This Machine .....................................................................................ii
How to Read This Manual .....................................................................................1
Symbols .....................................................................................................................1
Names of Major Options ............................................................................................1
Names of Major Functions .........................................................................................1
Reading the Display...............................................................................................2
Reading the Display Panel and Using Keys...............................................................3
Function List ..........................................................................................................5
1. Transmission
Transmission Modes .............................................................................................9
Selecting Type of Transmission ...............................................................................10
Memory Transmission..............................................................................................11
Sending multiple originals using the exposure glass.............................................14
Parallel Memory Transmission ..............................................................................15
Automatic Redial ...................................................................................................15
Dual Access...........................................................................................................16
Simultaneous Broadcast........................................................................................16
If memory runs out while storing an original..........................................................17
ECM (Error Correction Mode)................................................................................17
Immediate Transmission ..........................................................................................17
Sending multiple originals using the exposure glass.............................................19
IP-Fax Functions ..................................................................................................20
Terminology .............................................................................................................22
Notes on Using IP-Fax .............................................................................................23
Functions Not Available for IP-Fax Transmission ....................................................23
Internet Fax Functions ........................................................................................24
Notes on Using Internet Fax ....................................................................................25
Functions Not Available for E-mail Transmission.....................................................26
Functions Not Available for E-mail Reception..........................................................26
E-mail Subject ..........................................................................................................27
T.37 Full Mode .........................................................................................................28
Placing Originals..................................................................................................29
Acceptable Original Sizes ........................................................................................31
Paper Size and Scanned Area.................................................................................32
If the Machine Cannot Detect the Size of Your Original........................................... 34
Original Sizes Difficult to Detect...............................................................................35
Transmission with Image Rotation ...........................................................................36
Stamp.......................................................................................................................36
Detecting Blank Sheet..............................................................................................38
Scan Settings .......................................................................................................39
Original Type............................................................................................................39
JBIG Transmission ................................................................................................40
Resolution ................................................................................................................40
Image Density (Contrast) .........................................................................................41
Mixing Scan Settings for a Multiple Page Original ...................................................42
iv
Page 7

Specifying a Destination .....................................................................................43
Sending Over a Fax Line .........................................................................................43
Entering a pause ...................................................................................................44
Entering a tone ......................................................................................................44
Sending by IP-Fax....................................................................................................46
Regarding IP-Fax destinations ..............................................................................48
Sending to an E-mail Address..................................................................................49
Bypassing the SMTP server..................................................................................52
Using the Quick Dial Keys........................................................................................54
Specifying a destination using the Quick Dial key.................................................54
Specifying a group of destinations using the Quick Dial key .................................55
Checking the Specified Destination .........................................................................57
Redial .......................................................................................................................58
Programming Destinations in the Address Book .............................................60
Programming Destinations from Check Destination Screen....................................62
Programming Destinations from Redial Screen .......................................................63
Searching for a Destination in the Address Book ............................................64
Search by Name ......................................................................................................64
Search by Destination List .......................................................................................66
Search by Registration Number ...............................................................................68
Search by Fax Number ............................................................................................70
Search by E-mail Address........................................................................................72
Search by IP-Fax Destination ..................................................................................74
Search by LDAP Server ...........................................................................................76
On Hook Dial ........................................................................................................80
Manual Dial ...........................................................................................................82
Memory Storage Report ......................................................................................83
Canceling a Transmission ..................................................................................84
Before the Original Is Scanned ................................................................................84
While the Original Is Being Scanned........................................................................84
While the Original Is Being Transmitted...................................................................85
Before the Transmission Is Started..........................................................................86
2. Send Settings
Sending at a Specific Time (Send Later) ...........................................................89
Sender Settings....................................................................................................91
E-mail Options......................................................................................................94
Entering the Subject.................................................................................................94
Requesting a Reception Notice................................................................................95
Fax Header Print ..................................................................................................97
Label Insertion .....................................................................................................98
Setting SUB Codes for Transmission ..............................................................100
Setting a Password ................................................................................................102
Setting SEP Codes for Reception ....................................................................103
Entering a Password ..............................................................................................105
Two-Sided Transmission (Double-Sided Transmission) ...............................106
v
Page 8

3. Reception
Types of Reception............................................................................................109
Immediate Reception .............................................................................................109
Memory Reception .................................................................................................110
Substitute Reception ..............................................................................................111
Receiving documents unconditionally .................................................................111
Receiving documents according to parameter-specified settings .......................112
Reception Modes ...............................................................................................113
Manual Reception ..................................................................................................113
Auto Reception.......................................................................................................113
Switching the Reception Mode...............................................................................114
Receiving Internet Fax Documents .................................................................. 115
Auto E-mail Reception ...........................................................................................115
Manual E-mail Reception .......................................................................................116
Received Images ...................................................................................................117
Reception Functions .........................................................................................119
Forwarding Received Documents ..........................................................................119
SMTP Reception Using Internet Fax......................................................................120
Routing e-mail received via SMTP ......................................................................121
JBIG Reception ......................................................................................................122
Auto Fax Reception Power-Up...............................................................................123
Printing Options.................................................................................................124
Print Completion Beep ...........................................................................................124
Checkered Mark.....................................................................................................124
Centre Mark ...........................................................................................................125
Reception Time ......................................................................................................125
Image Rotation.......................................................................................................126
Page Separation and Length Reduction ................................................................126
Page Reduction......................................................................................................127
TSI Print (Transmitting Subscriber Identification Print) ..........................................128
If There Is No Paper of the Correct Size ................................................................128
Setting priority trays.............................................................................................129
Just size printing..................................................................................................129
4. Changing/Confirming Communication Information
Printing a List of Files in Memory (Print TX Standby File List) .....................131
Printing a File from Memory .............................................................................133
Checking the Transmission Result (TX File Status).......................................135
Confirming on Display ............................................................................................135
Confirming by Report .............................................................................................136
Confirming by E-mail..............................................................................................137
Confirming by Report and E-mail ...........................................................................137
Communication Result Report (Memory Transmission) ........................................138
Immediate TX Result Report (Immediate Transmission) .......................................138
Communication Failure Report ..............................................................................139
Checking the Reception Result (RX File Status) ............................................140
Confirming on Display ............................................................................................140
Confirming by Report .............................................................................................141
Journal.................................................................................................................141
vi
Page 9

Printing the Journal ...........................................................................................142
Journal ...................................................................................................................143
Transmitting Journal by E-mail...............................................................................145
Journal by e-mail .................................................................................................145
Printing a File Received with Memory Lock.................................................... 146
5. Fax via Computer
Sending Fax Documents from Computers ...................................................... 149
Before Use .............................................................................................................150
Using the Software.................................................................................................151
LAN-Fax Driver....................................................................................................151
Address Book ......................................................................................................151
LAN-Fax Cover Sheet Editor ............................................................................... 152
Auto Run program ...............................................................................................152
Installing Individual Applications ............................................................................153
Setting LAN-Fax Driver Properties.........................................................................154
Setting print properties ........................................................................................154
Making settings for option configuration..............................................................155
Basic Transmission ................................................................................................156
Specifying a destination using a destination list ..................................................157
Specifying a destination using Address Book......................................................157
Specifying a destination by directly entering a fax number,
Internet Fax destination, or IP-Fax destination..................................................158
Specifying Options .................................................................................................159
To send a fax document at a specific time ..........................................................159
To print a sender stamp.......................................................................................160
To attach a cover sheet ....................................................................................... 160
To display preview...............................................................................................160
Saving as files .....................................................................................................160
Checking Transmission Using LAN-Fax Driver......................................................161
Confirming Transmission Results by E-mail ..........................................................162
LAN-Fax Result Report ..........................................................................................163
Printing and Saving ................................................................................................163
Editing Address Book.............................................................................................164
Programming new destinations ...........................................................................164
Editing programmed destinations........................................................................165
Deleting programmed destinations......................................................................166
Using the Machine's Address Book Data in the Destination List of the LAN-Fax
Editing Fax Cover Sheets ......................................................................................167
Creating a cover sheet ........................................................................................167
Attaching a created cover sheet..........................................................................168
Managing Facsimile Functions Using SmartDeviceMonitor for Admin ..................169
LAN-Fax Operation Messages...............................................................................169
Programming Destination Information from Web Browser ...........................170
To Edit Machine Properties Already Programmed .................................................171
To Add New Receiver ............................................................................................172
....166
vii
Page 10

6. Appendix
Programming Frequently Used Functions to User Function Keys ...............173
Specifications.....................................................................................................174
Specifications Required for the Internet Fax Destination Machines.......................176
Maximum Values................................................................................................177
INDEX....................................................................................................... 178
viii
Page 11
How to Read This Manual
Symbols
This manual uses the following symbols:
Indicates important safety notes.
Ignoring these notes could result in serious injury or death. Be sure to read these
notes. They can be found in the “Safety Information” section of About This Machine.
Indicates important safety notes.
Ignoring these notes could result in moderate or minor injury, or damage to the
machine or to property. Be sure to read these notes. They can be found in the
“Safety Information” section of About This Machine.
Indicates points to pay attention to when using the machine, and explanations
of likely causes of paper misfeeds, damage to originals, or loss of data. Be sure
to read these explanations.
Indicates supplementary explanations of the machine's functions, and instructions on resolving user errors.
This symbol is located at the end of sections. It indicates where you can find further relevant information.
[ ]
Indicates the names of keys that appear on the machine's display panel.
{ }
Indicates the names of keys on the machine's control panel.
Names of Major Options
Major options of this machine are referred to as follows in this manual:
• Auto Document Feeder → ADF
• Auto Document Feeder capable of scanning both side of a sheet → ARDF
Names of Major Functions
This machine's major functions are referred to in this manual as follows:
• Internet Fax (by specifying an e-mail address) → Internet Fax
• Internet Fax (by specifying an IPv4 address) → IP-Fax
1
Page 12

Reading the Display
This section explains how to use the keys on the control panel and screen items.
The display guides you through operations, shows messages, machine status,
and destinations registered in the destination lists.
If you press the {Facsimile} or {Clear Modes} key during operation, the standby
screen appears.
Press the {OK} key to complete the settings.
Press the {Escape} key to return to the previous screen.
Note
❒ This machine automatically returns to standby mode if you do not use the
machine for a certain period of time. You can select the period using the Facsimile Auto Reset Timer in System Settings.
❒ To return to the standby screen manually, do one of the following:
• If you have placed the original in the optional ADF or ARDF and have not
pressed the {Start} key, remove the original.
• If you have not placed an original, press the {Clear Modes} key.
• If you are in User Tools mode, press the {User Tools/Counter} key.
Reference
“System Settings”, General Settings Guide
“Fax Features”, General Settings Guide
“Registering Addresses and Users for Facsimile/Scanner Functions”, General Settings Guide
2
Page 13
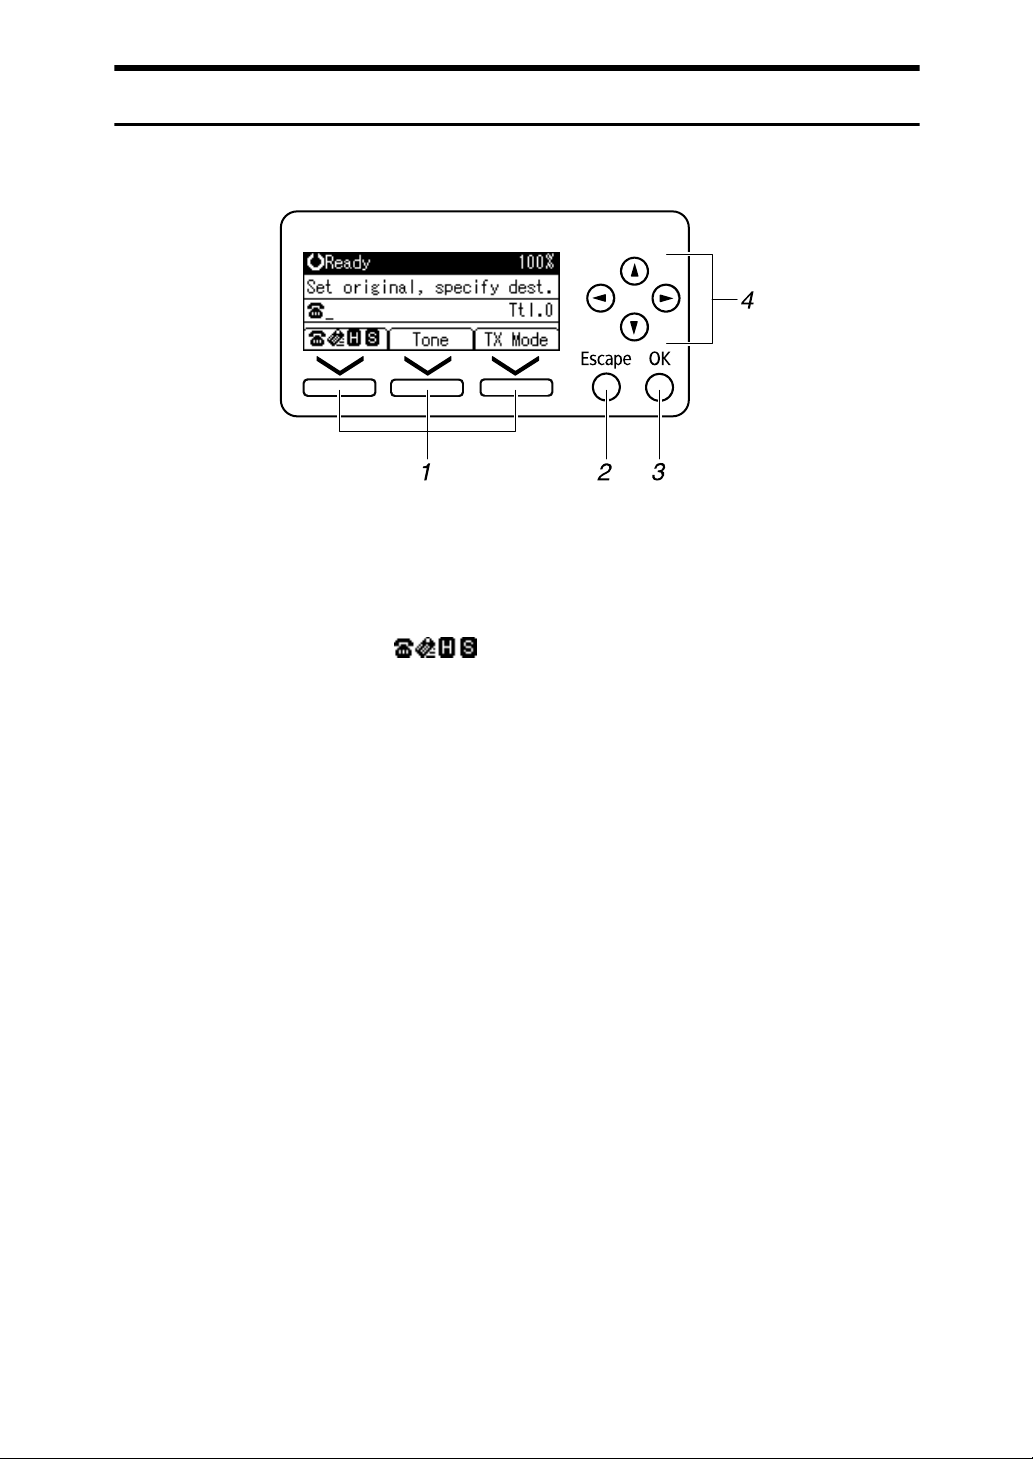
Reading the Display Panel and Using Keys
This section explains screen items and their corresponding keys.
ALT051S
1. Selection keys
Correspond to items at the bottom line on
the display.
Example: The standby display
• When the instruction “Press []”
appears in this manual, press the left
selection key.
• When the instruction “Press [Tone]”
appears in this manual, press the middle selection key.
• When the instruction “Press [TX Mode]”
appears in this manual, press the right
selection key.
2. {Escape} key
Press to cancel an operation or return to
the previous display.
3. {OK} key
Press this to set numeric values, make
settings, or select an entered item.
4. Scroll keys
Press to move the cursor to each direction
one by one.
When {U}, {T}, {V} or {W} appears in
this manual, press the scroll key of the
same direction.
3
Page 14
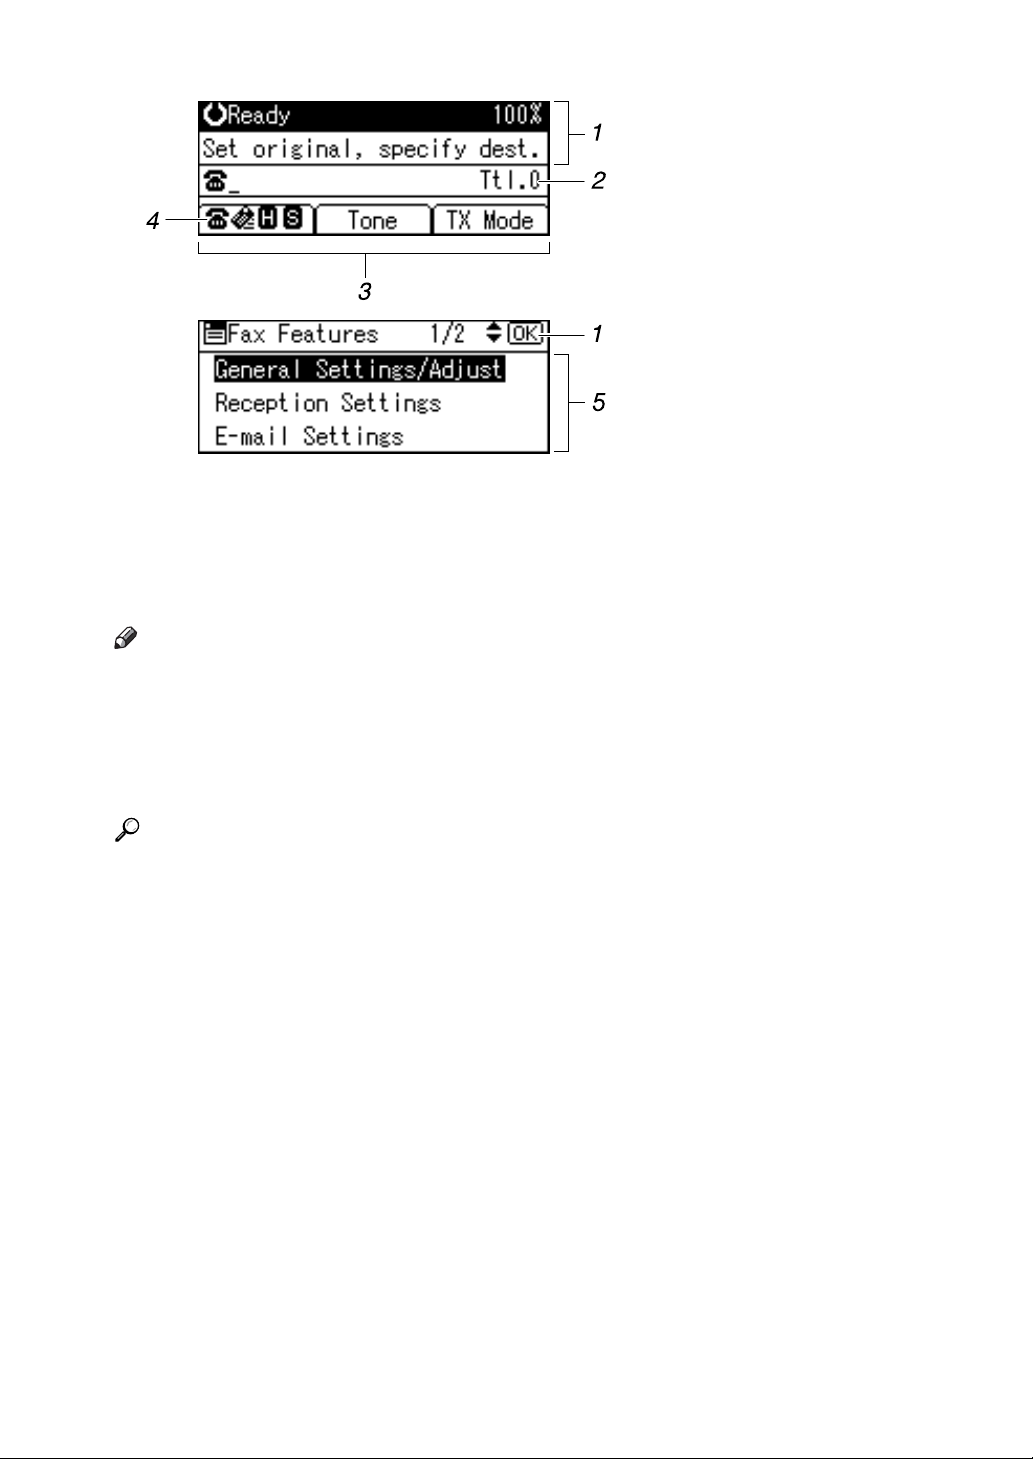
ALT009S
1. Machine status and message
2. Destination entry
3. Selection keys
Note
❒ The display will differ depending on installed optional units.
❒ You can change Internet Fax setting under E-mail Settings in the Fax Features
menu.
❒ You can change IP-Fax settings under IP-Fax Settings in the Fax Features
menu.
Reference
p.9 “Transmission Modes”
p.54 “Specifying a destination using the Quick Dial key”
p.64 “Searching for a Destination in the Address Book”
“Fax Features”, General Settings Guide
“Registering Addresses and Users for Facsimile/Scanner Functions”, General Settings Guide
4. Switches the destination between
fax number, e-mail address and IPFax destination.
5. Selectable items
4
Page 15

Function List
This section explains various items that can be specified in the Fax Features menu.
Click the {User Tools/Counter} key to display the Fax Features menu. For details
about the settings, see “Fax Features”, General Settings Guide.
❖ General Settings/Adjust
Function name Description
Adjust Sound Volume Use this function to adjust the sound volume
during On Hook Mode and Immediate
Transmission.
Program Fax Information Register the information about the sender
that appear on the receiver's fax machine
and faxed document.
On Hook Release Time Use this function to specify a time to cancel
On Hook mode after you transmit using On
Hook dialing.
Set User Function Key Use this function to program frequently
used features to User Function Keys for rapid access.
❖ Reception Settings
Function name Description
Switch Reception Mode
Authorized Reception Specify whether or not unwanted fax mes-
Checkered Mark Use this function to specify whether or not to
Center Mark Specify whether or not a centre mark is to be
Print Reception Time Specify whether or not received date and
FAX Print Colour You can specify the colour for printing the
Specify the method for receiving fax messages.
sages are to be screened out.
print a checkered mark on the first page of
the fax paper.
printed halfway down the left side and at the
top centre of each page received.
time are to be printed at the bottom of received fax messages.
files, lists and reports received under the fax
function.
5
Page 16

❖ E-mail Settings
Function name Description
Internet Fax Settings Specify whether or not transmission function
is used for Internet Fax.
Maximum E-mail Size Make this setting when you want to limit the
size of e-mail messages that are transmitted,
if receivers set a limit on incoming e-mail
size. When this function is set to on, you cannot send large size e-mail that exceeds the set
size.
SMTP RX File Delivery This function is available on systems that al-
low routing of e-mail received via SMTP.
❖ IP-Fax Settings
Function name Description
Enable H.323 Specify whether or not H.323 is used for IP-
Fax transmission.
Enable SIP Specify whether or not SIP is used for IP-Fax
transmission.
H.323 Settings Set the IPv4 address or host name, and alias
telephone number of the gatekeeper.
SIP Settings Set the IPv4 address or host name of the SIP
server and SIP User Name.
Gateway Settings Register, change, or delete the gateway. Reg-
ister to use the gateway without using the
gatekeeper/SIP server.
6
Page 17

❖ Administrator Tools
Function name Description
Print Journal Prints a Journal. Up to 50 latest results of
transmission/delivery can be checked on
this machine.
Print TX Standby File List Prints the TX Standby File List.
Communication Page Count The cumulative sum of Pages sent and Pages
rcvd can be checked.
Memory Lock Switches the Memory Lock on or off.
Forwarding Use this function to transfer the received
documents to those receivers programmed
(fax destination) beforehand.
Folder TX Result Report When a folder is included in the forwarding
destination or the forwarding destination by
special sender, the specified destination will
be notified of the results of forwarding.
Parameter Setting Parameter Settings allow you to customize
various settings to suit your needs. To
change function settings, set the Parameter
Switches.
Program Special Sender Program/Change/Delete Special Senders,
perform initial setup, and print the Special
Sender List. You can set functions for each
sender if Special Senders are preprogrammed.
Program Memory Lock ID Program the ID you enter when you print
documents received in the Memory Lock
mode.
Select Dial / Push Phone Use this function to select a line type.
G3 Analog Line Specify whether the machine is connected to
the telephone network or to a PABX that requires an additional number to dial out.
Menu Protect You can set up user access rights for func-
tions that users other than administrators
can set.
Reference
“Fax Features”, General Settings Guide
7
Page 18

8
Page 19
1. Transmission
This section explains basic transmission operations such as specifying a transmission mode or a destination.
Transmission Modes
There are two types of transmission:
• Memory Transmission
• Immediate Transmission
Important
❒ It is recommended that you call the receiver and confirm with them when
sending important documents.
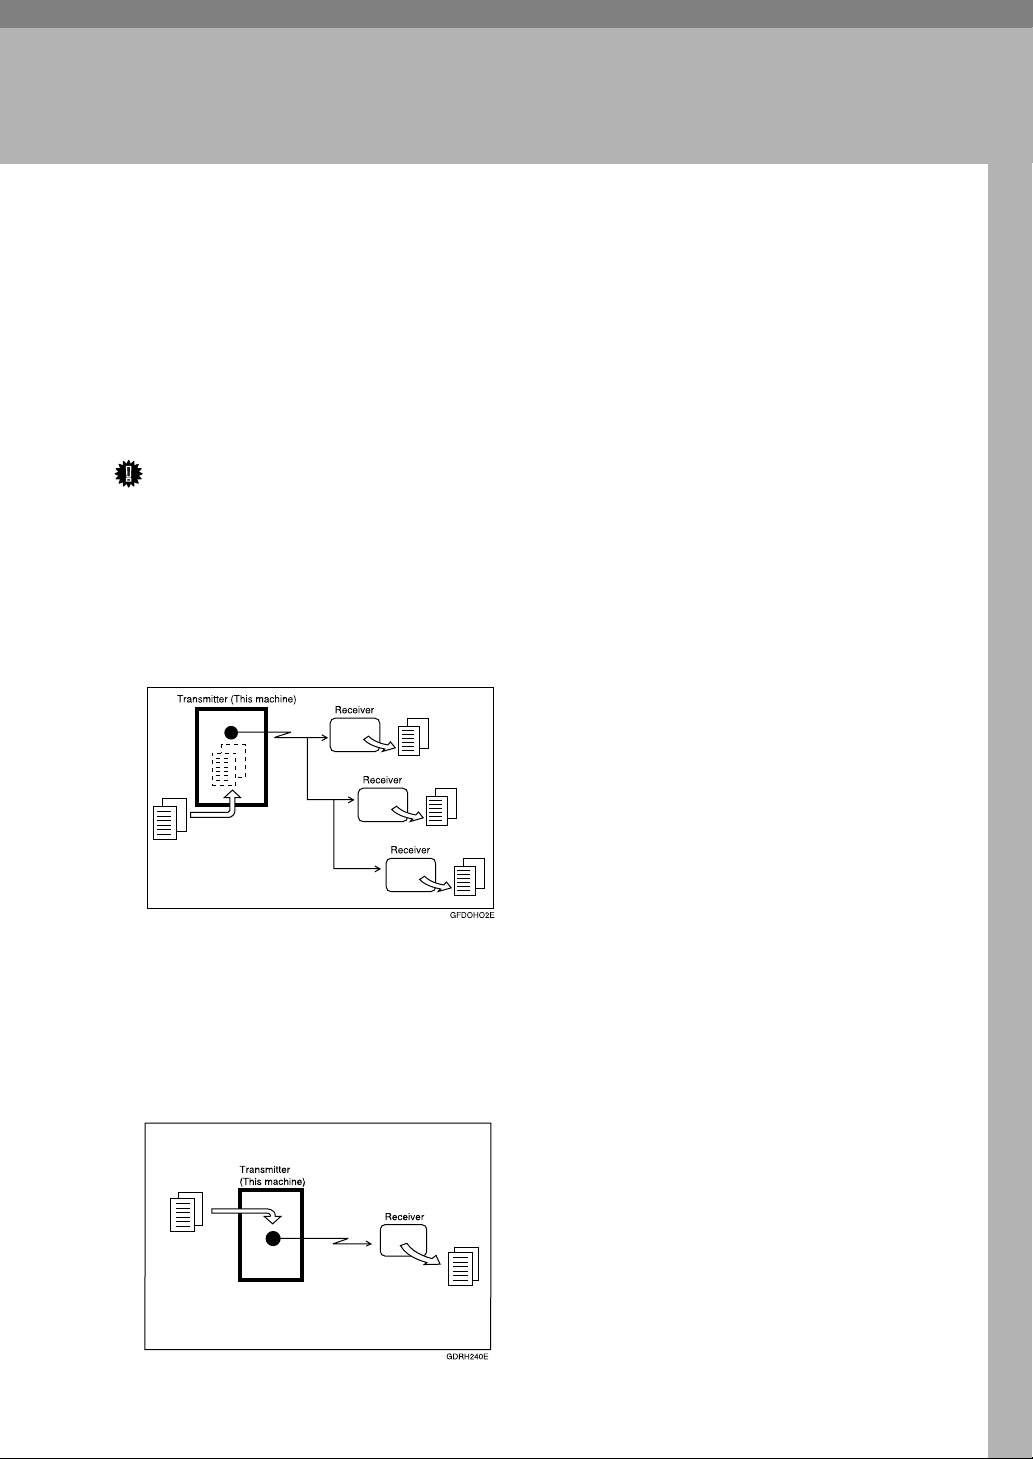
❖ Memory Transmission
Transmission starts automatically after the original is stored in memory. This
is convenient when you are in a hurry and want to take the document away
with you. You can also send the same original to several destinations.
❖ Immediate Transmission
Immediately dials the destination number, and while scanning the original,
sends it. It is very convenient when you want to send an original quickly or
when you want to check the destination you are sending to. When using this
type of transmission, the original is not stored in memory. You can only specify one address.
9
Page 20
1
S
Transmission
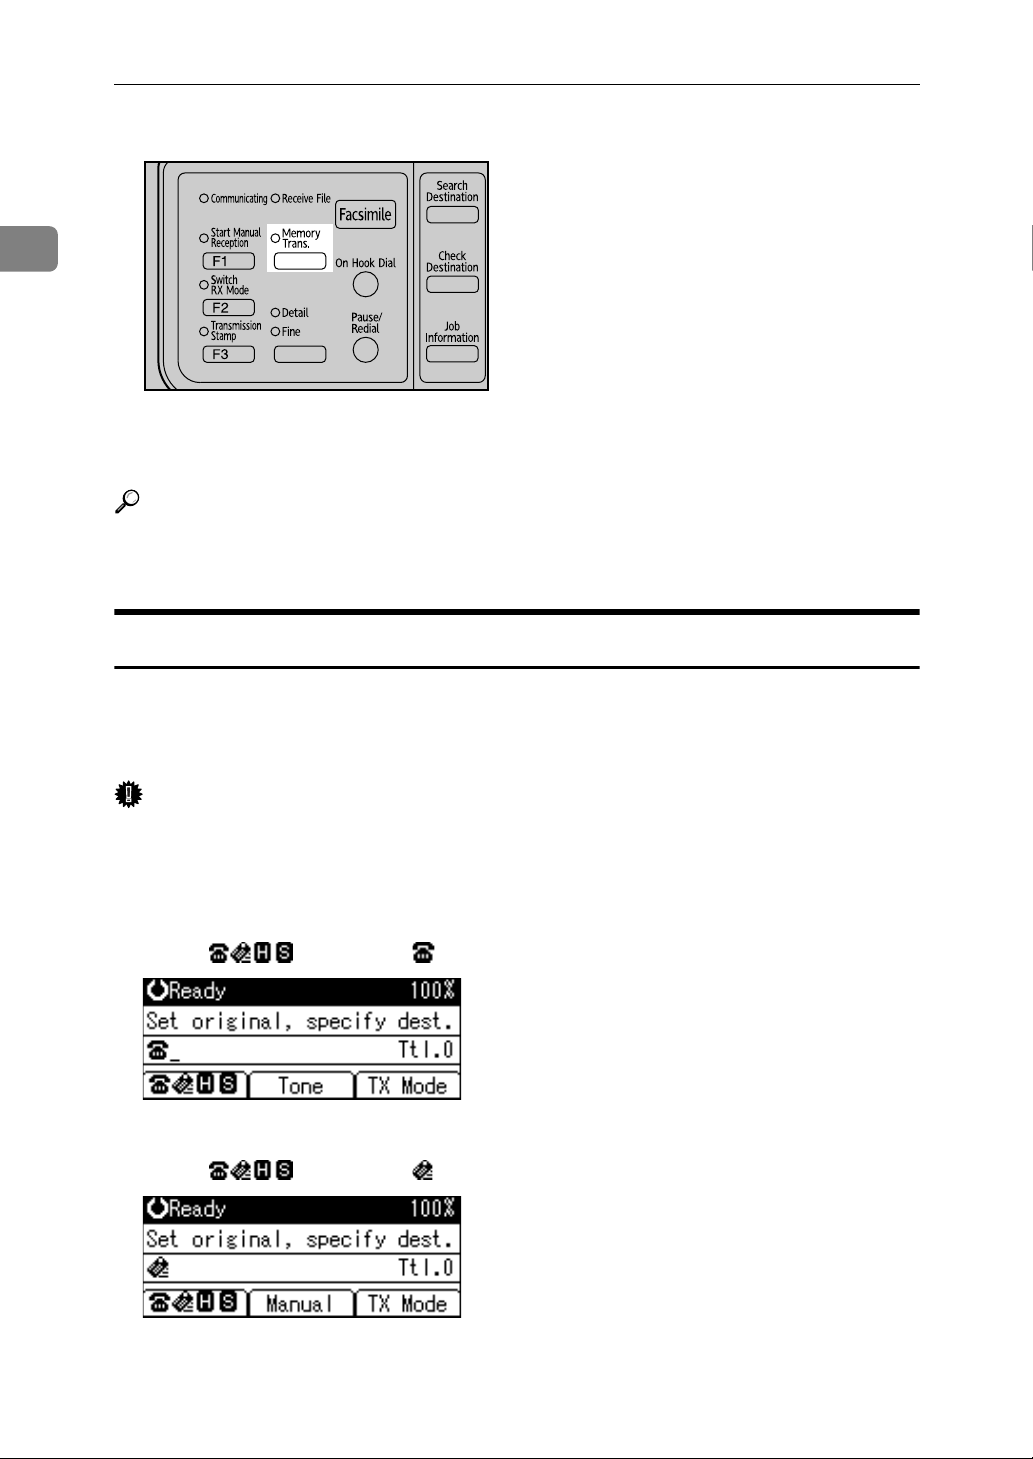
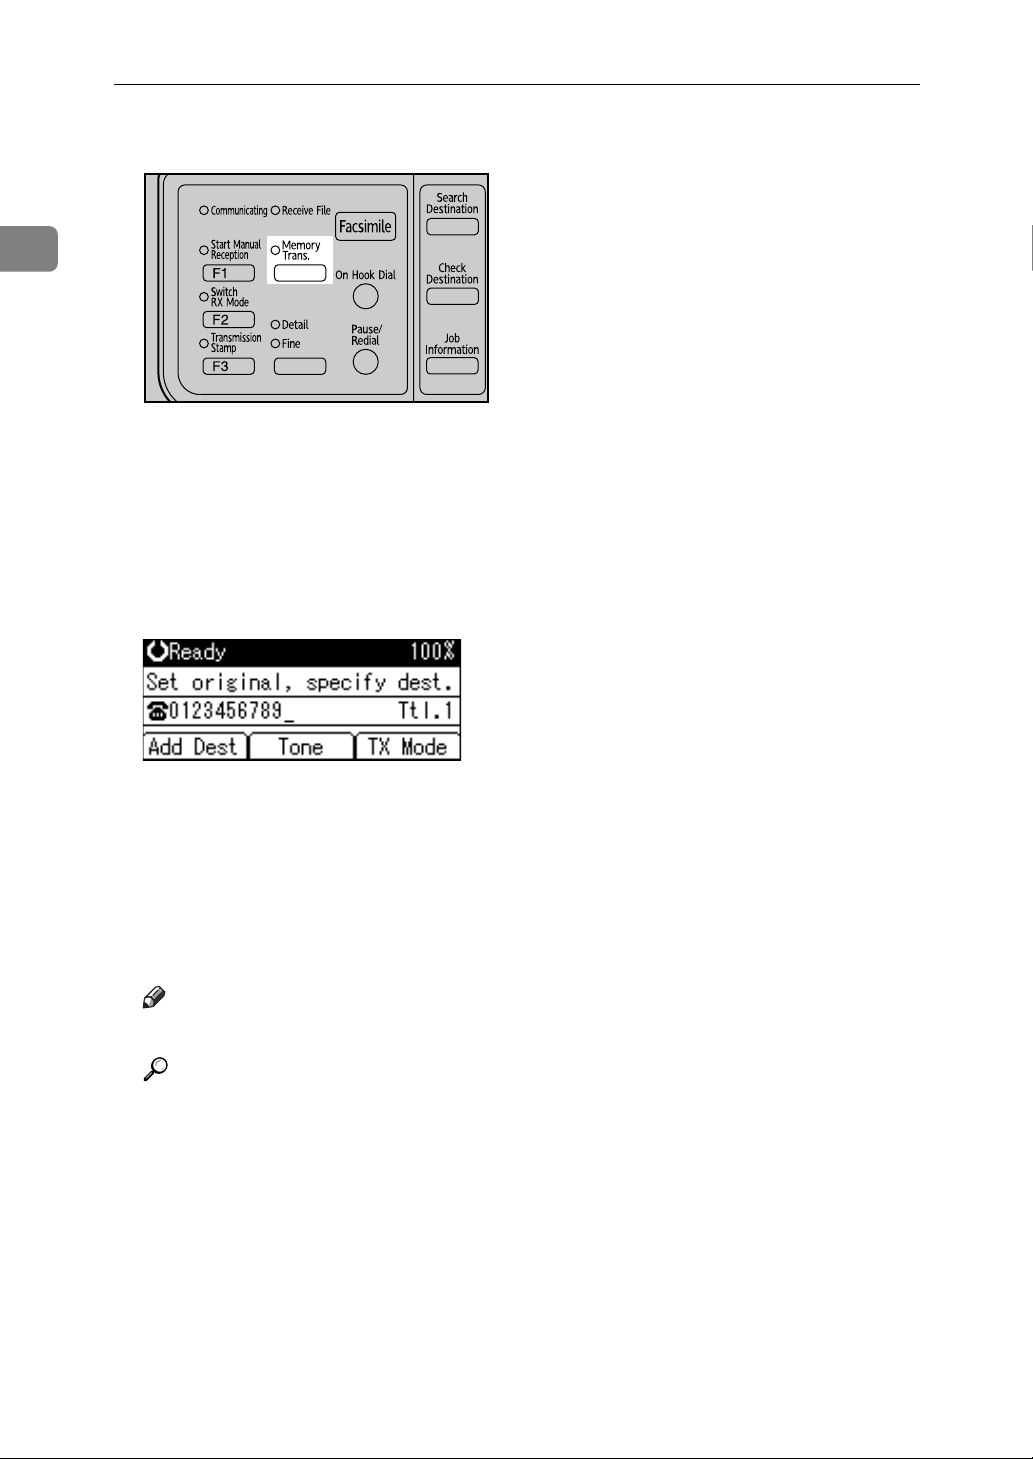
You can change transmission mode by pressing the {Transmission Mode} key.
ALT033
Check the indicator on the operation panel to see which mode is currently active.
If it is not lit, Immediate Transmission mode is set.
Reference
p.15 “Parallel Memory Transmission”
p.16 “Simultaneous Broadcast”
Selecting Type of Transmission
You can select the transmission type: standard fax, IP-Fax, or Internet Fax.
Switch between types of transmission by pressing the selection key displayed on
the standby screen.
Important
❒ To select IP-Fax destinations or Internet Fax destinations, the optional Func-
tion Upgrade Option must be installed. The display differs depending on
whether or not the Function Upgrade Option is installed.
❖ When sending over a fax line
Press [] to display in the destination display column.
❖ When sending to an e-mail address
Press [] to display in the destination display column.
10
Page 21
Transmission Modes
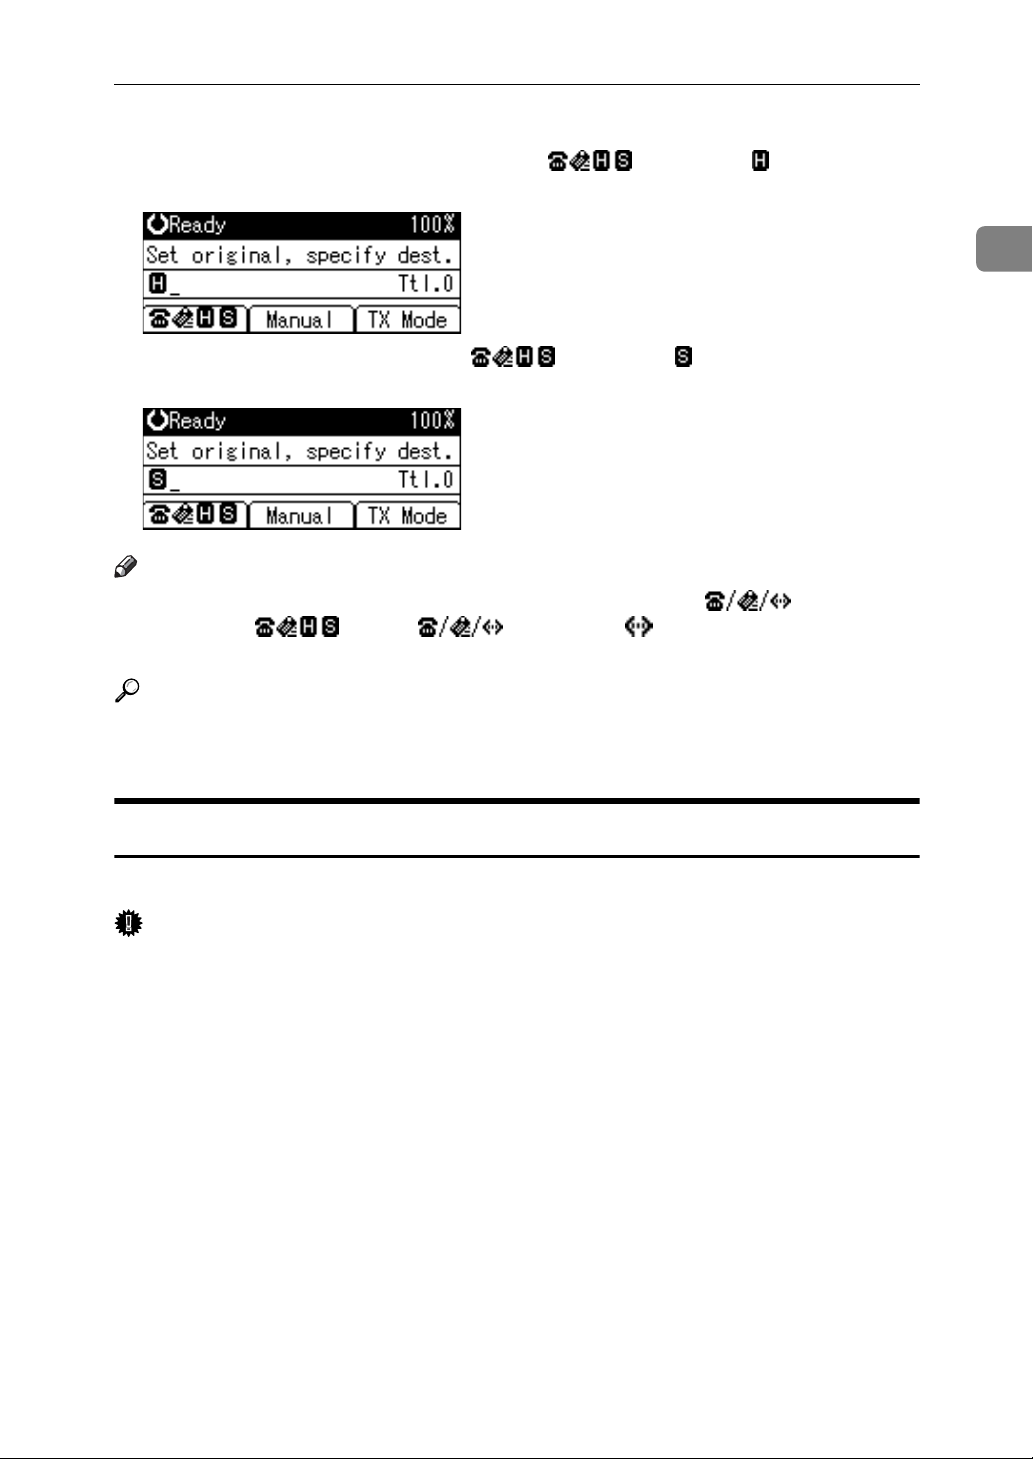
❖ When sending by IP-Fax
When using a gatekeeper server, press [] to display in the destina-
tion display column.
When using a SIP server, press [] to display in the destination dis-
play column.
Note
❒ If either a gatekeeper server or a SIP server is selected, is displayed
in place of . Press [] to display in the destination display
column.
1
Reference
p.20 “IP-Fax Functions”
p.24 “Internet Fax Functions”
Memory Transmission
Memory transmission mode has standard fax, Internet Fax and IP-Fax.
Important
❒ If there is a power failure (the main power switch is turned off) or the machine
is unplugged for about twelve hours, all the documents stored in memory are
deleted. As soon as the main power switch is turned on, the Power Failure Report is printed to help you identify deleted files. Simply turning off the power
by pressing the Operation switch does not delete stored documents. See
“Troubleshooting When Using the Facsimile Function”, Troubleshooting.
❒ If memory is full (0% appears on the top right corner of the display), Memory
Transmission is disabled. Use Immediate Transmission instead.
11
Page 22
1
S
Transmission
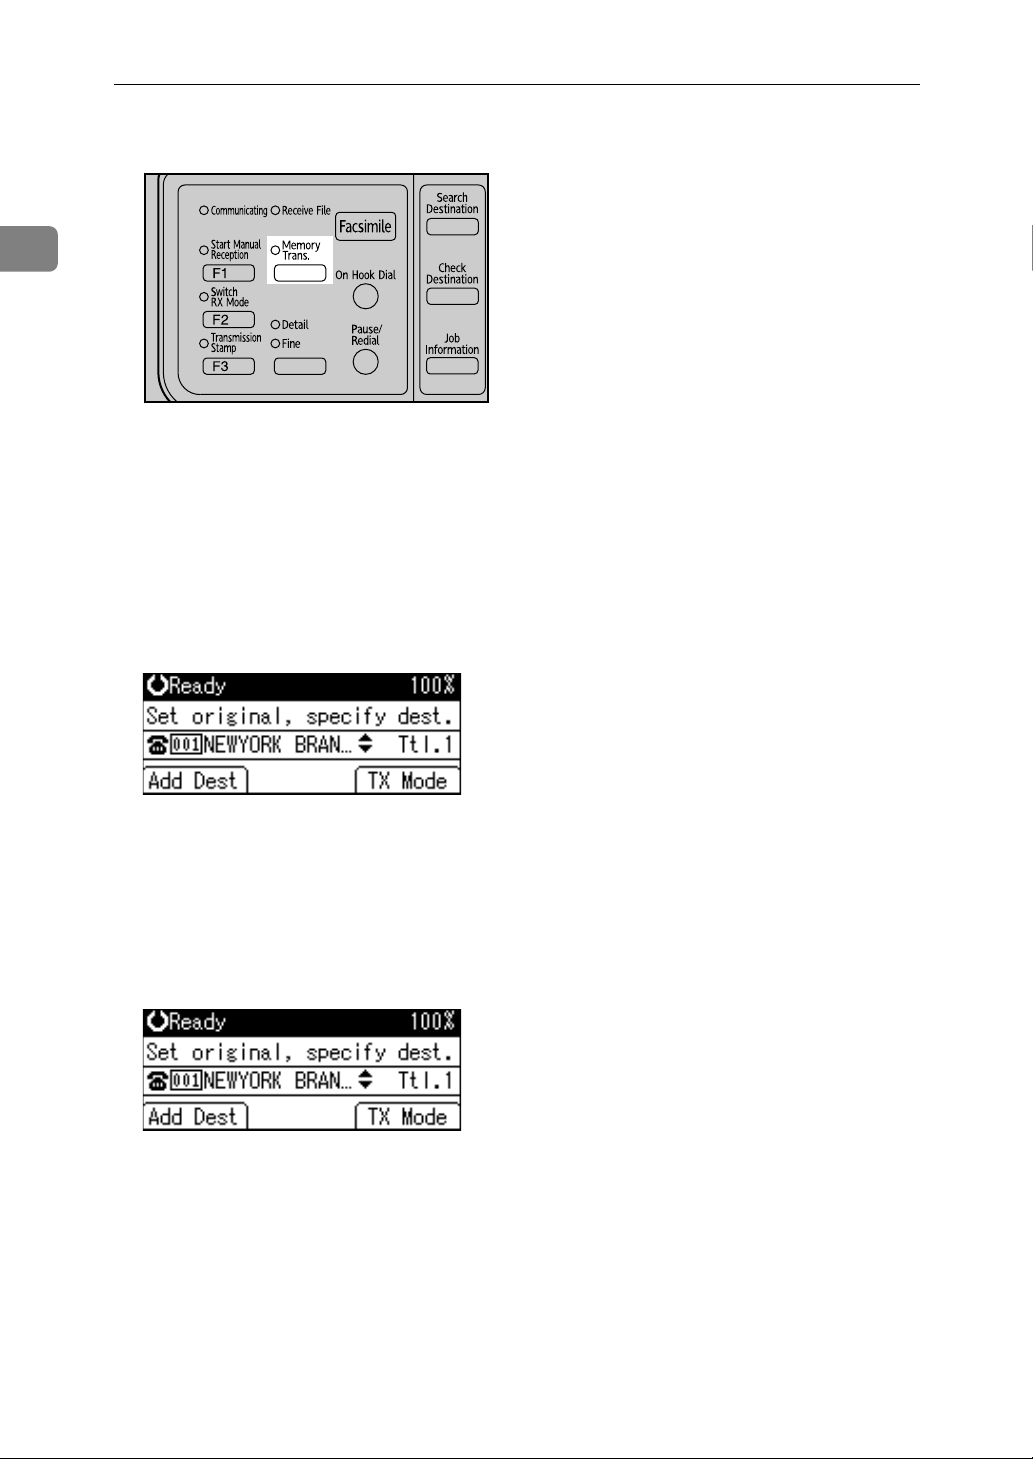
A Make sure that Memory Trans. indicator lights.
ALT033
Normally Memory Transmission mode is selected.
If it is not, Immediate Transmission mode is selected. Press the {Transmission
Mode} key.
B Place the original.
C Make the scan settings you require.
D Using the number keys or a Quick Dial key, specify a destination.
To specify a destination using a Quick Dial key, see “Using the Quick Dial
Keys”.
If you make a mistake, press the {Clear/Stop} key, and then enter the correct
number.
E When sending the same original to several destinations (broadcasting),
press [Add Dest] to specify the destinations.
You do not have to press [Add Dest] when adding a destination using the destination list.
12
Page 23

Transmission Modes
F Specify the next destination.
Pressing [] switches the type of transmission between fax number, e-
mail address, and IP-Fax destination.
A fax number, e-mail address and IP-Fax destination can be specified simultaneously.
G Press the {Start} key.
Note
❒ If the combined total number of programmed destinations exceeds the
maximum value, only Immediate Transmission is possible.
❒ For the maximum number of destinations you can specify per file, see
“Maximum Values”.
❒ For the maximum number of destinations you can specify for all files (in-
cluding files in memory), see “Maximum Values”.
❒ For the maximum number of documents you can store in memory for
Memory Transmission, see “Maximum Values”.
❒ For the maximum number of pages you can store in memory (using A4
Standard <ITU-T q1 Chart>), see “Maximum Values”.
1
Reference
p.39 “Original Type”
p.40 “Resolution”
p.41 “Image Density (Contrast)”
p.43 “Sending Over a Fax Line”
p.46 “Sending by IP-Fax”
p.49 “Sending to an E-mail Address”
p.54 “Using the Quick Dial Keys”
p.58 “Redial”
p.177 “Maximum Values”
“Fax Features”, General Settings Guide
“Troubleshooting When Using the Facsimile Function”, Troubleshooting
13
Page 24
Transmission
Sending multiple originals using the exposure glass
Follow these steps to send multiple originals using the exposure glass.
1
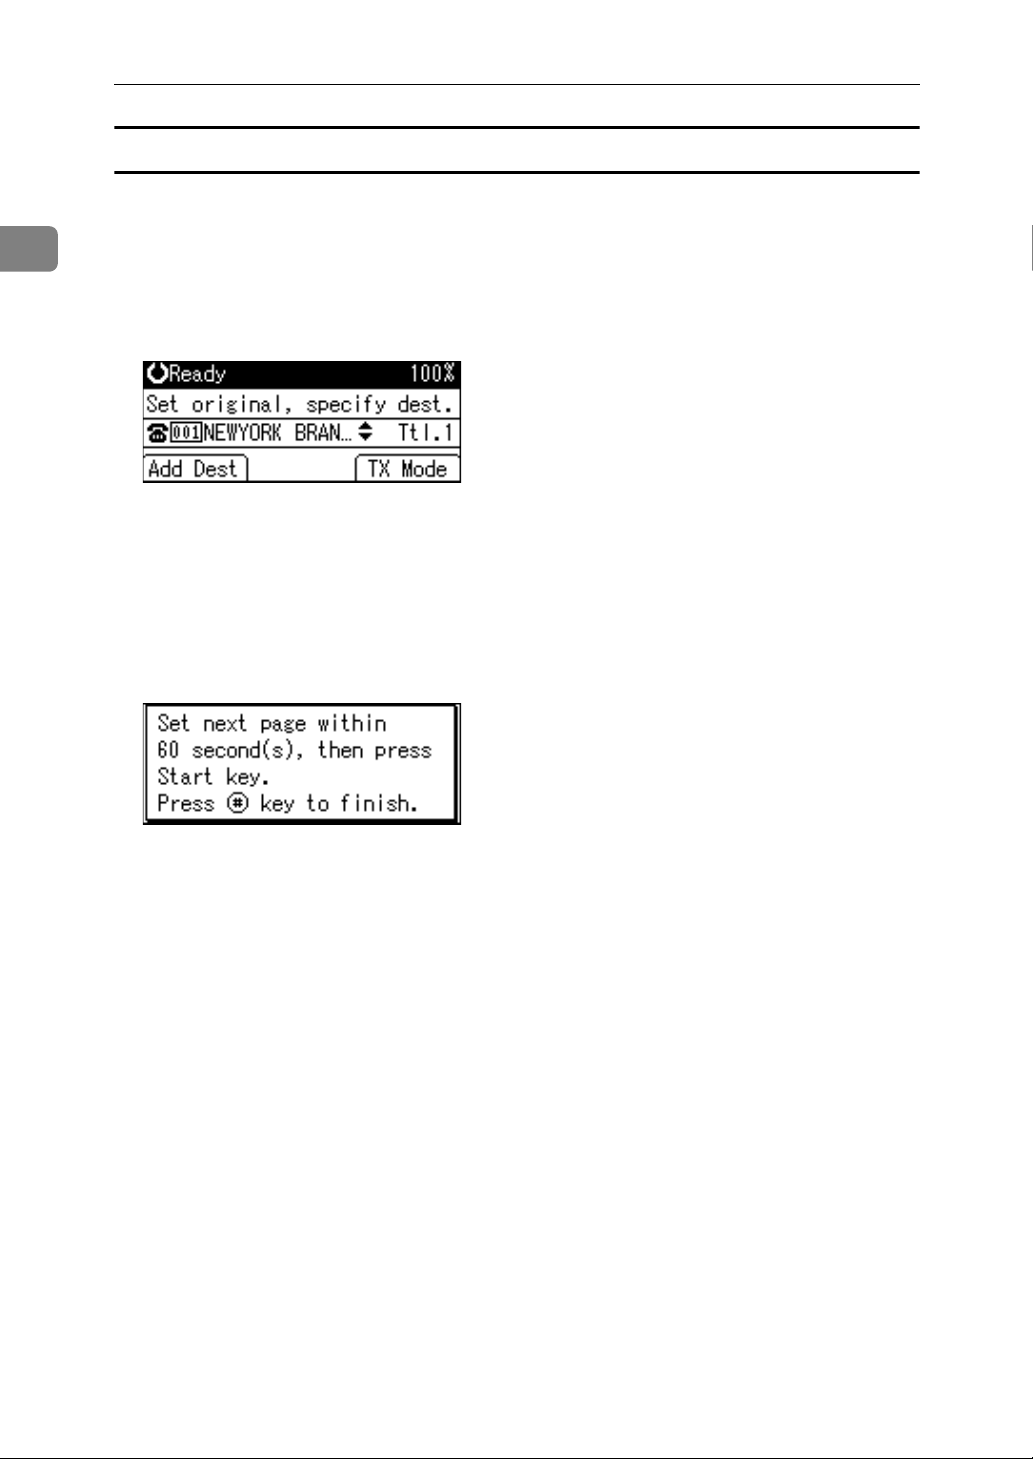
A Make sure that Memory Trans. indicator lights.
B Place the first page of the original face down on the exposure glass.
C Specify a destination.
D Make the scan settings you require.
E Press the {Start} key.
The machine starts scanning.
F Place the next original on the exposure glass within 60 seconds after the ma-
chine has finished scanning the first original.
G Repeat steps
to F for all originals.
D
H Place the last original, and then press the {q} key.
The machine dials the destination and starts transmission.
14
Page 25

Transmission Modes
Parallel Memory Transmission
This function dials while the original is being scanned.
Standard Memory Transmission stores the original in memory, then dials the
destination. However, Parallel Memory Transmission allows you to confirm the
connection status quickly. In addition, this function scans the original faster than
Immediate Transmission. This is useful when you are in a hurry and need to use
the original for another purpose.
Important
❒ Standard Memory Transmission is used instead of Parallel Memory Trans-
mission in the following cases:
• When the line is busy and could not be connected to
•With Send Later
• When you store an original for Memory Transmission while another communication is in progress
• When two or more destinations are specified
• When an original is placed on the exposure glass, and then sent
1
Note
❒ You can turn this function on or off with the User Parameters (switch 07, bit 2)
in the Fax Features menu.
❒ Standard Memory Transmission may be used instead of Parallel Memory
Transmission if there is not enough free memory left.
❒ If you use this function, the Memory Storage Report will not be printed.
❒ If the {Clear/Stop} key is pressed, the original will jam or memory will run out
while Parallel Memory Transmission stops. The Communication Result Report is printed and files are deleted.
❒ When using Parallel Memory Transmission, only the page number is printed
on the header of the fax, the total number of originals is not automatically
printed.
Reference
“Fax Features”, General Settings Guide
Automatic Redial
If a fax document could not be sent because the line was busy or an error occurred during transmission, redial is attempted at five-minute intervals up to
five times.
If redialing fails after four redials, the machine cancels the transmission and
prints a Communication Result Report or Communication Failure Report.
Note
❒ If there are a large number of files stored in memory, documents might not be
sent in the order they were scanned.
15
Page 26

1
Transmission
Dual Access
The machine can scan other documents into memory even while sending a fax
document from memory, receiving a document into memory, or automatically
printing a report. Since the machine starts sending the second document immediately after the current transmission ends, the line is used efficiently.
Note
❒ During Immediate Transmission or when in User Tools mode, the machine
cannot scan an original.
Simultaneous Broadcast
Use this function to send the same original to multiple destinations simultaneously.
To specify multiple destinations, specify the first destination, and then specify
the next destination by pressing [Add Dest].
If you dial several destinations for the same document (broadcasting), the documents are sent in the order in which they were dialed. If the fax document could
not be transmitted, the machine redials that destination after the last destination
specified for broadcasting. For example, if you specify four destinations, A
through D, for broadcasting, and if the lines to destinations A and C are busy,
the machine dials the destinations in the following order: A, B, C, D, A, and C.
To check the transmission progress, print the TX file list.
If you specify a second transmission while broadcasting to several destinations,
faxes are transmitted alternately to each remaining destination in the current
and second broadcast.
For example, if you specify a broadcast to destinations A and B, and then specify
a broadcast to destinations C and D while transmission to destination A is in
progress, the machine sends the faxes in the following order: A, C, B, and then D.
If the previous file and next file are both on standby, these are also sent in the
same order.
Note
❒ To avoid accidentally pressing the wrong Quick Dial key, you can set the ma-
chine so that each time a destination is added using a Quick Dial key, [Add
Dest] must be pressed. Make the setting in User Parameters (switch 17, bit 2)
in the Fax Features menu.
Reference
p.131 “Printing a List of Files in Memory (Print TX Standby File List)”
16
Page 27

Transmission Modes
If memory runs out while storing an original
If you run out of memory while storing an original (free space reaches 0%), the
“
Memory is full. Scanning will be stopped and only scanned page(s)
will be stored.
Note
❒ When this happens, only the scanned pages are sent. If you want to delete the
scanned pages and cancel transmission in this case, contact your service representative.
” message appears. Press [Exit] to transmit stored pages only.
ECM (Error Correction Mode)
If part of a transmission fails because of a line problem, the lost data is automatically resent. You can turn this function on or off with the User Parameters
(switch 01, bit 0).
Important
❒ For this function to work, the other machine must have ECM.
❒ This function is not available with Internet Fax.
1
Note
❒ If you turn ECM off, you cannot use the following functions:
• JBIG Transmission
• Super G3 Communication
Immediate Transmission
Immediate Transmission is possible with standard fax transmission and IP-Fax
transmission.
Important
❒ Internet Fax is executed in only Memory Transmission that starts transmis-
sion automatically after storing documents in memory. If you specify Immediate Transmission in Internet Fax, the “
memory transmission.
and then switch to Memory Transmission.
❒ Group cannot be used for Immediate Transmission. You cannot send the
same document to multiple destinations (broadcasting). If you specify a
group, the “
message appears. When this happens, press [Exit], and then switch to Memory Transmission.
Try again after switching to memory transmission.”
” message appears. When this happens, press [Exit],
Try again after switching to
17
Page 28
1
S
Transmission
A Make sure that Memory Trans. indicator is not lit.
ALT033
If it is lit, Memory Transmission mode is selected. Press the {Transmission
Mode} key.
B Place the original.
C Select the scan settings you require.
D Using the number keys or a Quick Dial key, specify a destination.
To specify a destination using a Quick Dial key, see “Using the Quick Dial
Keys”.
If you make a mistake, press the {Clear/Stop} key, and then enter the correct
number.
E Press the {Start} key.
The machine dials a destination.
Note
❒ Documents are not stored in memory.
Reference
p.39 “Original Type”
p.40 “Resolution”
p.41 “Image Density (Contrast)”
p.43 “Sending Over a Fax Line”
p.46 “Sending by IP-Fax”
p.54 “Using the Quick Dial Keys”
p.58 “Redial”
18
Page 29
Transmission Modes
Sending multiple originals using the exposure glass
Follow these steps to send multiple originals using the exposure glass.
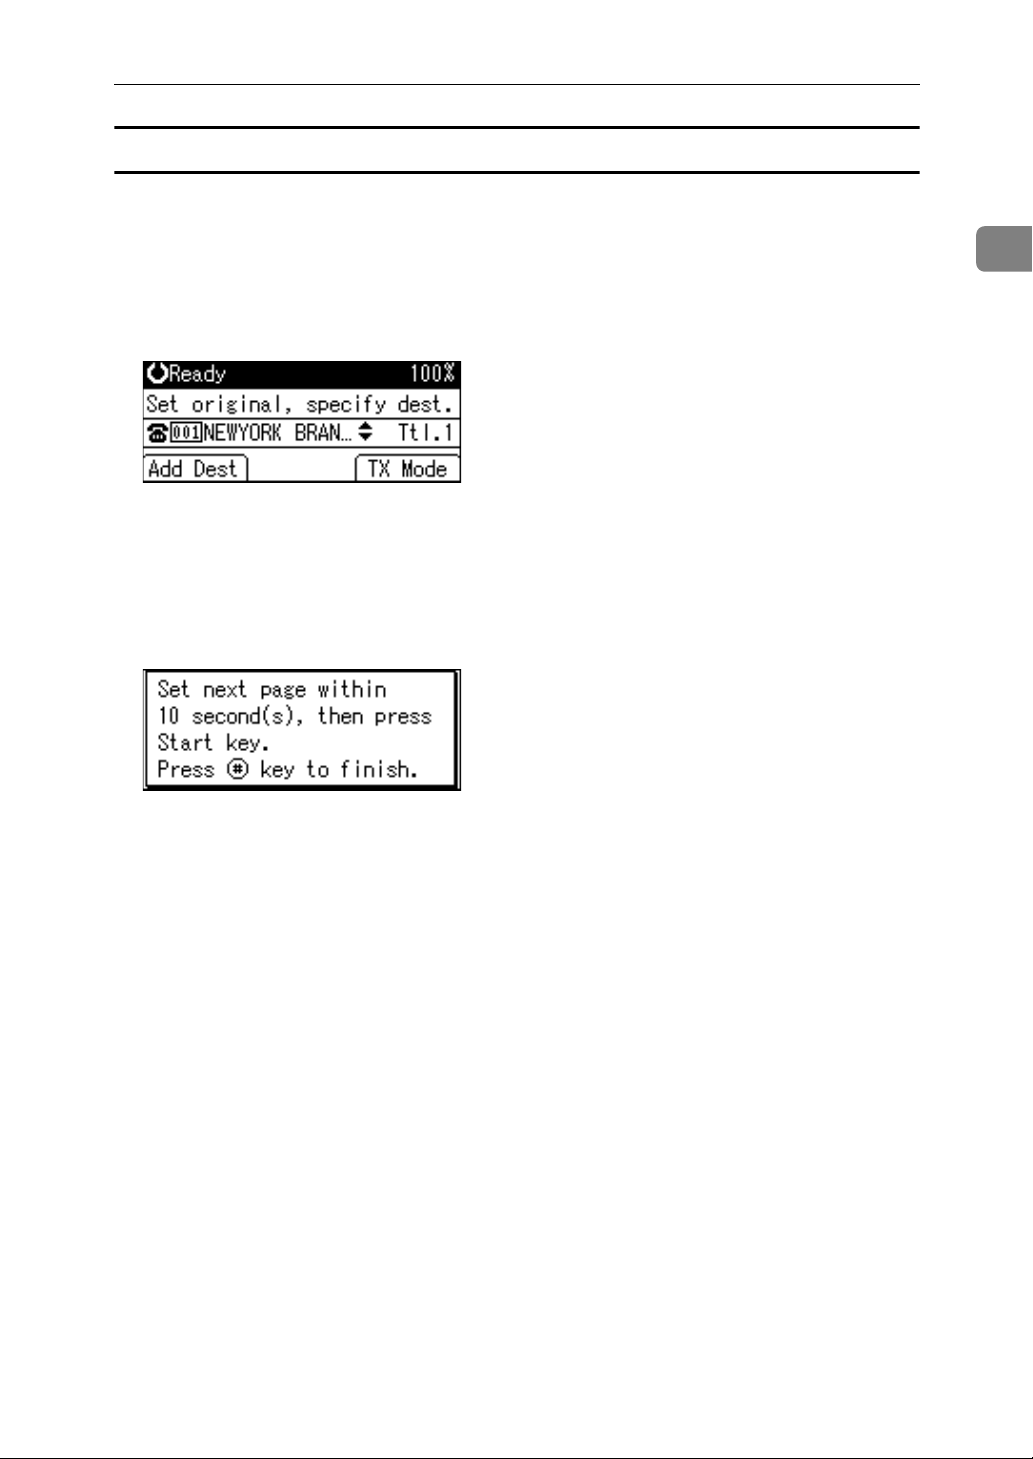
A Make sure that Memory Trans. indicator is not lit.
B Place the first page face down on the exposure glass.
C Specify a destination.
D Make the scan settings you require.
E Press the {Start} key.
F Place the next original on the exposure glass within 10 seconds after the ma-
chine has finished scanning the first original.
1
G Repeat steps
to F for all originals.
D
H Place the last original, and then press the {q} key.
19
Page 30

1
Transmission
IP-Fax Functions
The IP-Fax function sends or receives documents between two facsimiles directly via a TCP/IP network.
This function has the following advantages and is suitable for communication
within the same LAN:
• Reducing communication costs
• Communicating between IP-Faxes at higher speed than by standard fax
IP-Fax uses SIP and H.323 as the network protocol.
Specify an IPv4 address or host name instead of a fax number for sending. When
using a gatekeeper, specify its alias telephone number. When using a SIP server,
you can send by specifying SIP user name. Specify addresses of the gatekeeper
or SIP server (proxy server, register server, redirect server) as appropriate in IPFax Settings in the Fax Features menu.
You can also transmit to a G3 facsimile connected to the public switched telephone network (PSTN) via a gateway (T.38-compliant).
You can receive IP-Faxes in the same manner as standard faxes.
20
Page 31

IP-Fax Functions
1
ALT001S
Important
❒ To use IP-Fax functions, the Function Upgrade Option must be installed.
❒ To use IP-Fax functions, this machine must be connected to a LAN and set up
correctly under IP-Fax Settings in Fax Features.
❒ Before using this function, configure the network in the System Settings menu.
❒ The facsimile function of this machine cannot be used with IPv6.
Note
❒ IP-Fax supported by this machine is ITU-T Recommendation T.38 compliant.
21
Page 32

1
Transmission
Reference
p.109 “Types of Reception”
“Connecting the Machine”, General Settings Guide
“System Settings”, General Settings Guide
“Fax Features”, General Settings Guide
Terminology
The following are words you should know when using IP-Fax:
❖ H.323
A multimedia communication protocol that sends or receives files via one-toone communication over a LAN or the Internet.
❖ SIP
A communication control protocol for Internet telephone that utilizes VoIP
(which converts voice information to IP packets) and is equipped with functions such as creating, modifying, and terminating sessions with one or more
participants.
❖ Gatekeeper (VoIP gatekeeper)
A gatekeeper manages devices connected to an IP network and converts alias
telephone numbers to IPv4 addresses and performs authentication functions.
In addition, a gatekeeper governs band (transmission rate assignment) and
access control.
❖ SIP server
A SIP server mediates connection requests between devices connected to an
IP network and is composed mainly of servers that have the following three
functions:
• Proxy server: Receives SIP requests and forwards them on behalf of the requestor.
• Register server: Receives information about a device's address within an IP
network and registers them in the database.
• Redirect server: Used to inquire the destination address.
❖ Gateway (VoIP gateway)
A gateway connecting a telephone network and IP network, it has functions
such as protocol conversion for connecting these different networks, and also
connects communication devices (telephones, facsimiles, etc.) to a LAN or
other network.
22
Page 33

IP-Fax Functions
Notes on Using IP-Fax
The following are notes about using IP-Fax:
• You may not be able to send to a firewall-protected network.
• You cannot use telephones on a LAN.
• If a power outage lasts about twelve hours, or the machine is disconnected
from the power outlet for about twelve hours, documents stored in the fax
machine's memory are deleted. If any document is deleted, the Power Failure
Report is automatically printed out when the main power switch is turned on.
Use this report to check which documents were deleted. Simply turning off
the power by pressing the Operation switch does not delete stored documents.
See “Troubleshooting When Using the Facsimile Function”, Troubleshooting.
Reference
“Troubleshooting When Using the Facsimile Function”, Troubleshooting
Functions Not Available for IP-Fax Transmission
1
You can use the following functions with standard fax transmission, but not IPFax transmission:
•On hook dial
• Manual dial
23
Page 34

1
Transmission
Internet Fax Functions
This machine converts scanned document images to e-mail format and transmits
the data over the Internet.
The e-mail sent by this machine can be received by another Internet Fax machine.
Instead of dialing the telephone number of the destination you want to send to,
you enter the relevant e-mail address.
You can also print or forward received e-mail messages.
Important
❒ To use Internet Fax functions, the Function Upgrade Option must be installed.
❒ To use Internet Fax functions, this machine must be connected to a LAN and
set up correctly under Internet Fax Settings in Fax Features.
❒ The facsimile function of this machine cannot be used with IPv6.
❒ To send Internet Fax documents, in the Fax Features menu, under E-mail Set-
tings, set [Internet Fax Settings] to [On]. However, documents can still be forwarded or delivered to Internet Fax destinations even if [Off] is selected.
❒ To receive Internet Fax documents, in the System Settings menu, under File
Transfer, set [Fax E-mail Account] to [Receive].
24
ALT002S
Page 35

Internet Fax Functions
Note
❒ The Internet Fax function supported by this machine is compliant with ITU-
T Recommendation T.37.
❒ You can receive e-mail messages with an attached TIFF-F image from computers.
❒ Though Internet Fax documents are normally sent via an SMTP server, you
can also send Internet Fax documents directly to their destinations without
going through an SMTP server. To do this, program “Use SMTP Server” to a
User Function key in advance.
❒ When sending Internet Fax documents, you can specify “Attach Subject” and
“Return Receipt” in [TX Mode].
❒ You can limit the size of transmitted e-mail messages in “E-mail Settings” of
“Fax Features”.
❒ See “Received Images” for how e-mail is actually received by the computer.
❒ For details about how to confirm the transmission result, see “Checking the
Transmission Result (TX File Status)”.
Reference
p.52 “Bypassing the SMTP server”
1
p.95 “Requesting a Reception Notice”
p.94 “Entering the Subject”
p.117 “Received Images”
p.135 “Checking the Transmission Result (TX File Status)”
“Connecting the Machine”, General Settings Guide
“System Settings”, General Settings Guide
“Fax Features”, General Settings Guide
Notes on Using Internet Fax
The following are notes about using Internet Fax:
• When using a Transfer Request by e-mail, documents are sent at A4 size. Documents larger than A4 are reduced to A4 size. If the receiver is in compliance
with the T.37 full mode, documents are sent at the size specified in the Address Book.
• When using Internet Fax transmission, documents are sent at “Detail” resolution, even if you specify “Fine”. To send documents at “Fine”, specify this resolution when registering the destination in the Address Book.
• If a transmission is not successful, this machine usually receives an e-mail error notification. However, e-mail error notifications may not be transmitted
for various reasons. It is recommended that you confirm receipt of important
document by calling the other party.
• The level of security for Internet communications is low. It is recommended
that you use the telephone network for confidential communications.
• Voice communication is not supported over a LAN.
25
Page 36

1
Transmission
• Internet Fax delivery might be delayed due to network congestion. Use Internet Fax transmission that bypasses the SMTP server, a public telephone line
fax, or IP-Fax whenever communication time is a concern.
• If a power outage lasts about twelve hours, or the machine is disconnected
from the power outlet for about twelve hours, documents stored in the fax
machine's memory are deleted. If any document is deleted, the Power Failure
Report is automatically printed out when the main power switch is turned on.
Use this report to check which documents were deleted. Simply turning off
the power by pressing the Operation switch does not delete stored documents.
See “Troubleshooting When Using the Facsimile Function”, Troubleshooting.
• You may not be able to send large files as e-mail, depending on e-mail environment conditions.
• When available memory is low, you may not be able to send Internet Fax documents.
• Because the machine sends documents as e-mail messages with an attached
TIFF-F image, viewer applications are required in order to view documents
when they are received on a computer.
• With a large volume of document, it may take some time before transmission
starts. This is due to the time the machine requires to convert the data in memory.
Reference
p.28 “T.37 Full Mode”
p.32 “Paper Size and Scanned Area”
p.52 “Bypassing the SMTP server”
“Troubleshooting When Using the Facsimile Function”, Troubleshooting
Functions Not Available for E-mail Transmission
The following functions are supported with standard fax transmission, but not
with Internet Faxing.
• Immediate Transmission
• Transmission by SUB Code
•On Hook Dial
• Manual Dial
•JBIG Transmission
• ECM (Error Correction Mode)
Functions Not Available for E-mail Reception
The following functions are supported with standard fax reception, but not with
Internet Faxing.
• Memory Lock Reception
• SEP Code reception
•Authorized Reception
26
Page 37

Internet Fax Functions
E-mail Subject
If you send e-mail without specifying a subject, a subject is automatically inserted. Subjects differ depending on Stamp Sender Name settings.
❖ When Stamp Sender Name is set to on:
From Sender Name(Fax Message NO.xxxx)
❖ When Stamp Sender Name is set to off:
•If Own Fax Number and Own Name are programmed:
From “Own Fax Number”(“Own Name”)(Fax Message NO.xxxx)
• If only Own Fax Number is programmed:
From “Own Fax Number”(Fax Message NO.xxxx)
• If only Own Name is programmed:
From “Own Name”(Fax Message NO.xxxx)
• If neither Own Fax Number nor Own Name are programmed:
Fax Message NO.xxxx
Note
❒ “xxxx” is the document number that appears in the Journal.
1
Reference
p.89 “Send Settings”
27
Page 38

1
Transmission
T.37 Full Mode
This machine is T.37 full mode compatible. T.37 full mode is an international
standard for Internet Fax transmission. (ITU-T Recommendation, RFC2532)
When an Internet Fax communication is made between T.37 full mode compatible machines, the receiver side sends the return receipt (dispatched) in response
to the reception notice request attached to the sent e-mail. This return receipt includes the receiver's reception capability information (compression type, paper
size, and resolution). When the receiver is programmed in the Address Book as
the full mode destination, the sender side automatically registers the received information in the Address Book. This allows you to send a subsequent Internet
Fax document to that receiver based on this information.
❖ Returning a Return Receipt
When e-mail is received, if the sender requests reception notice, the receiver
sends a return receipt that includes the receiving machine's capability (compression type, paper size, and resolution).
❖ Registering the Received Reception Confirmation Contents
When the sender receives the return receipt that includes the receiver's reception capability, the sender checks that the final recipient address sent is programmed in the Address Book. If it is programmed as a full mode destination,
the sender automatically registers the receiver's reception capability. The registered reception capability is updated each time the sender receives new reception capability information. The sender can send documents to the
receiver based on this information.
If the receiver is programmed as the simple mode machine or not programmed in the Address Book, the receiver's reception capability cannot be
registered.
If you know the receiver's reception capability, you can set it manually.
❖ Requesting a Reception Notice
When the receiver's machine supports T.37 full mode and is programmed as
a full mode machine in the Address Book, the machine requests the reception
notice from the receiver. Then, the machine will receive the return receipt
(sent) that includes the receiver's reception capability.
Note
❒ Use Web Image Monitor to manually program a receiver's reception capabil-
ity information.
❒ If you use Internet Fax transmission, you can send documents to multiple
destinations at once. However, if you specify full mode destinations, since
each destination may have a different reception capability, transmission is
done one by one in the specified transmission order.
Reference
p.95 “Requesting a Reception Notice”
p.170 “Programming Destination Information from Web Browser”
28
Page 39

Placing Originals
Placing Originals
Place the original either on the exposure glass or in the optional ADF or ARDF.
For details about how to place originals, see the following:
• Placing originals on the exposure glass
“Placing Originals on the Exposure Glass”, Copy Reference
• Placing originals in the optional ADF or ARDF
“Placing Originals in the ADF or ARDF”, Copy Reference
“Non-compatible originals for the ADF or ARDF”, Copy Reference
Note that [Special Paper] of the copy function cannot be used with the facsimile
function.
Important
❒ If you place A5 size originals on the exposure glass, they are not detected.
Place A5 size originals into the ADF or ARDF.
❒ Do not lift the ADF or ARDF while using it to scan originals.
❖ How to place A4, B4 JIS (Japanese Industrial Standard), A3, 81/2"×11", 81/2"×14", and
11"×17" size originals
1
ALT012S
❖ How to place A5 and B5 JIS size originals
ALT013S
29
Page 40

1
Transmission
Note
❒ To scan multiple originals using the ADF or ARDF, set originals in a stack.
❒ When sending a fax, the image output at the other end depends on the size
and orientation of paper used in the receiver's machine. If the receiver does
not use paper of the same size and orientation as that of the original, the fax
image may be reduced in size, trimmed at both edges, or divided across two
or more sheets. When sending an important original, ask the receiver about
the size and orientation of the paper in their machine.
❒ Documents longer than 800 mm (32") must be sent by memory transmission
(immediate transmission may not be possible).
❒ If an original jams, press the {Clear/Stop} key, and then carefully remove the
original.
❒ Make sure that all ink, correcting fluid etc., has completely dried before plac-
ing your original. If it is still wet, the exposure glass will become marked and
those marks will appear on the received image.
❒ Generally, place A4, 8
you place an A4, 8
1
/2"×11" originals in the landscape orientation (L). If
1
/2"×11" original in the portrait orientation (K), the image
is sent rotated by 90°.
❒ You can send the first page from the exposure glass then the remaining pages
from the ADF or ARDF. You cannot change from the ADF or ARDF to the exposure glass.
❒ When using the Internet Fax function, originals are sent at A4 size. Originals
larger than A4 are reduced to A4 size. If the receiver's machine is compliant
with the T.37 full mode, originals are sent at the size specified in the Address
Book.
❒ Information about this machine is printed at the destination. This information
is printed on the side of the paper that is to your left when placing the documents on the exposure glass or the ADF or ARDF. However, the information
is also printed rotated by 90 degrees if an A4, 8
1
/2"×11" original is placed in
the portrait orientation (K).
❒ For acceptable types of originals, see “Acceptable Original Sizes”, “Paper Size
and Scanned Area”, “If the Machine Cannot Detect the Size of Your Original”,
“Original Sizes Difficult to Detect”, “Stamp” and “Detecting Blank Sheet”.
30
Page 41

Reference
p.14 “Sending multiple originals using the exposure glass”
p.19 “Sending multiple originals using the exposure glass”
p.28 “T.37 Full Mode”
p.31 “Acceptable Original Sizes”
p.32 “Paper Size and Scanned Area”
p.34 “If the Machine Cannot Detect the Size of Your Original”
p.35 “Original Sizes Difficult to Detect”
p.36 “Transmission with Image Rotation”
p.36 “Stamp”
p.38 “Detecting Blank Sheet”
“System Settings”, General Settings Guide
“Placing Originals”, Copy Reference
Acceptable Original Sizes
Placing Originals
1
Where original is set Acceptable original size Maximum
number of
sheets
Exposure glass Up to A3 (297 × 420 mm),
11" × 17" (279 × 432 mm)
ADF or ARDF, onesided document
ARDF, two-sided document
Fax transmission: A5 K to
A3 L (up to 1200 mm long)
1
/2" × 51/2" K to 11" × 17"L
8
Fax transmission: A5 K to
A3 L (up to 432 mm long)
1
/2" × 51/2" K to 11" × 17"L
8
1 ----
30 sheets or 50
sheets for
ARDF
(80 g/m
50 sheets
(80 g/m
2
, 20 lb)
2
, 20 lb)
Paper thickness
2
52-105 g/m
(14-28 lb)
64-105 g/m
(17-28 lb)
2
31
Page 42

1
Transmission
Paper Size and Scanned Area
Important
❒ If you place an original larger than A3, 11"×17" on the exposure glass, only an
A3, 11"×17" area is scanned.
❖ Exposure Glass
❖ ADF or ARDF
ALT010S
❖ Maximum scan area
The following shows the maximum scan area:
• Memory Transmission: 297 × 1200 mm/11" × 47" (W × L) from the ADF or
ARDF
• Immediate Transmission: 297 × 1200 mm/11" × 47" (W × L) from the ADF
or ARDF
• 297 × 432 mm/11" × 17" (W × L) (from the exposure glass)
32
Page 43

Placing Originals
Note
❒ There may be a difference in the size of the image when it is printed at the destination.
❒ Even if an original is correctly placed on the exposure glass or in the ADF or
ARDF, a margin of 3 mm (0.1") around each edge of the original may not be
sent.
❒ If the receiver uses paper of a smaller width than the original, the image is re-
duced to fit that paper.
❒ During Immediate Transmission, the length of the scanning range can be-
come narrower than 1200 mm (47"), depending on the character size as well
as the settings on the destination machine.
❒ The machine detects paper sizes in the following ways:
• When you place an original in the ADF or ARDF, an original wider than
about 264 mm (10.4") is scanned as A3, 11"×17" size.
An original narrower than about 230 mm (9.1") is sent as 8
1
/2"×14" size, and an original narrower than about 264 mm (10.4") is
8
1
/2"×11" or
scanned as B4 JIS.
Originals up to 1200 mm (47.2") in length can be scanned.
• See the following table for sizes the machine can detect when you place an
original on the exposure glass. Because the machine scans custom size documents in a standard size, part of the image may be truncated depending
on the length of the document.
1
❖ Metric Version
❖ Inch Version
× - Unable to auto detect
*1
Normally a length of about 420 mm (16.5") can be scanned; however, it is only possible to specify a scanning size up to 432 mm (17").
33
Page 44

1
Transmission
If the Machine Cannot Detect the Size of Your Original
If the machine cannot detect the original size, the “Cannot detect original
size. Place original again, then press Start key.
If this happens, do the following:
” message appears.
A Press [Exit].
The previous display returns.
B Remove the original and replace it.
C Press the {Start} key.
Note
❒ If you repeat steps A to C twice and the original size is still not detected,
the screen for specifying the original size appears. Select the original size,
and then press the {OK} key.
34
Page 45

Placing Originals
Original Sizes Difficult to Detect
The machine has difficulty detecting the size of the following kinds of originals.
(When this happens, the receiving machine may not select print paper of the correct size.)
• documents placed on the exposure glass of sizes other than those listed in the
following table
• originals with index tabs, tags, or protruding parts
• transparent originals, such as OHP transparencies or translucent paper
• dark originals with dense text or drawings
• originals that contain areas of solid print
• originals that have solid print around their edges
• originals with glossy surfaces
• bound originals of more than 10 mm (0.3") in thickness, such as books.
The following paper sizes are automatically detected in facsimile mode.
❖ Metric Version
1
Size Location of
the original
Exposure glass ×××
ADF or ARDF ×
A3L B4
JISL
A4KLB5
JISL
B5
JISK
A5K
L
1
/2"×
8
11"K
L
8 1/2"×
13"L
- Auto detect
× - Unable to auto detect
❖ Inch Version
Size Location of
the original
Exposure glass ЧЧЧЧЧ
ADF or ARDF ××××
11"×
17"L
1
/2"×
8
14"L
8 1/2"×
11"K
L
5 1/2"×
1
8
/2"
KL
8 "×
13"L
11"×
15"L
10"×
14"L
10"×
8"L
- Auto detect
× - Unable to auto detect
35
Page 46

Transmission
Transmission with Image Rotation
1
Generally, place A4, 81/2"×11" originals in the landscape orientation (L). If you
place an A4, 8
rotated by 90°. Providing the receiver has A4, 8
the document is printed the same size as the original.
Note
❒ This function is unavailable with Immediate Transmission.
1
/2"×11" original in the portrait orientation (K), the image is sent
1
/2"×11" landscape paper (L),
Stamp
When sending a fax document using the ADF or ARDF, the machine can stamp
a circle mark at the bottom of the original.
When sending a two-sided document, the document is marked at the bottom of
the front page and top of the rear page.
Important
❒ The optional ADF or ARDF is required.
❒ Stamp only works when scanning from the ADF or ARDF.
❒ This function must be registered to a User Function key in advance. It is reg-
istered to the User Function key {F3} by default.
A Place the original, and then select the scan settings you require.
B Press the User Function key {F3} to light the indicator.
ALT035S
36
To cancel the stamp, press the User Function key {F3} again to turn off the indicator.
Page 47

Placing Originals
C Specify the destination, and then press the {Start} key.
The Stamp indicator goes out when transmission has been finished for Immediate Transmission or when scanning has been finished for Memory Transmission.
Note
❒ This stamp indicates that the original has been successfully stored in mem-
ory for Memory Transmission, or successfully sent by Immediate Transmission.
❒ When the stamp starts getting lighter, replace the cartridge.
❒ If a multi-page feed or paper jam occurs, the originals are not sent properly
and not stamped. If you find a page that is not stamped, send only that
page again.
❒ A paper jam during Parallel Memory Transmission may cause the trans-
mission to fail even if stamping is performed.
❒ You cannot turn the Stamp function on or off while an original is being
scanned.
Reference
“Fax Features”, General Settings Guide
“Adding Paper and Replacing Print Cartridges”, Troubleshooting
1
37
Page 48

1
Transmission
Detecting Blank Sheet
Upon completion of the first page scanning, an alarm sounds if the page is nearly
blank.
Important
❒ The blank sheet-detecting function works only when an original is scanned
using the ADF or ARDF.
❒ The blank sheet-detecting function is ineffective for second and subsequent
pages.
This function notifies you if an original is placed wrong side down on the scanner. When this happens, a message appears for a few seconds. The message differs depending on number of pages to be scanned and transmission mode.
• When sending a document using Immediate Transmission or when all pages
have been scanned in Memory Transmission:
• When some pages are left unscanned in Parallel Memory Transmission or
Memory Transmission:
Note
❒ Even if a near blank sheet is detected, it is transmitted as normal.
❒ You can turn this function on or off with the User Parameter (switch 11, bit 2).
❒ To cancel scanning if a blank sheet is detected, press the {Cancel/Stop} key.
38
Page 49

Scan Settings
Scan Settings
You may want to send many different types of fax documents. Some of these
may be difficult to reproduce at the receiver's end. However, the machine has
three settings that you can adjust to help you transmit the document with the
best possible image quality.
❖ Original Type:
Text, Photo
❖ Resolution:
Standard, Detail, Fine
❖ Image Density (Contrast):
Manual Image Density (five levels)
Original Type
To optimize image clarity, select the appropriate original type.
The following settings for original types are available:
1
❖ Text
Select Text to send high-contrast black-and-white image originals. Use this
setting when you only want to send clearer text, even if the original contains
text and photographs.
❖ Photo
Select Photo to send an original containing a halftone image, such as a photograph or a colour original.
A Press the {Original Type} key for the type you require.
ALT036S
Press the {Original Type} key to switch between Text and Photo.
Note
❒ If you select Photo, the transmission will take longer than when Text is selected.
❒ If you send a fax document with Photo and the background of the received
image is dirty, reduce the density setting and resend the fax.
39
Page 50

Transmission
Reference
p.41 “Image Density (Contrast)”
1
JBIG Transmission
If you use JBIG (Joint Bi-level Image experts Group) compression, you can send
originals scanned using [Photo] faster than with other compression methods.
Important
❒ This function is not available with the Internet Fax function.
❒ This function requires that the other party's fax machine has both the JBIG
function and ECM function.
Note
❒ If ECM is turned off, JBIG Transmission is unavailable.
Resolution
This section explains how to set the resolution of the original.
Images and text are scanned into the machine by converting them to a sequence
of dots. The density of the dots determines the quality of the image and how long
it takes to transmit. Therefore, images scanned at high resolution have high
quality but transmission takes longer. Conversely, low resolution scanning results in lower quality but the original is sent more quickly. Select the setting that
matches your needs based upon this trade off between speed and image clarity.
❖ Standard (8 x 3.85 lines/mm, 200 x 100 dpi)
Select for originals containing normal size characters.
❖ Detail (8 x 7.7 lines/mm, 200 x 200 dpi)
Select for originals containing small characters or when you require greater
clarity. This resolution is twice as fine as Standard.
❖ Fine (8 x 15.4 lines/mm, 200 x 400 dpi)
Select for originals with fine details or when you require the best possible image clarity. This resolution is four times finer than Standard.
40
Page 51

Scan Settings
A Press the {Resolution} key to switch between resolutions.
ALT037S
The indicators above the key show the current selection.
When both indicators are unlit, Standard is selected.
Note
❒ If the other party's machine does not support the resolution at which you
are sending, this machine automatically switches to a resolution that is
supported. You can check the resolution at which you actually sent by
printing the Journal.
❒ The machine supports reception at both Standard and Detail resolution.
1
❒ When using Internet Fax transmission, documents are sent at “Detail” res-
olution, even if you have specified “Fine”. To send a document at “Fine”,
configure the Full Mode when registering the destinations in the Address
Book.
Reference
p.28 “T.37 Full Mode”
p.142 “Printing the Journal”
Image Density (Contrast)
Adjust the image density for scanning originals.
Use the {Image Density} key to vary the image density within 5 levels.
A Press the {Lighter} or {Darker} key to change the density from five density level.
ALT038S
Each key press moves the indicator one place.
41
Page 52

1
Transmission
Mixing Scan Settings for a Multiple Page Original
When sending an original of several pages, you can select a different image density, resolution, and original type setting for each page.
It is recommended that originals be placed on the exposure glass when mixing
scan settings for a multiple page original.
❖ When placing originals on the exposure glass
A Check which pages you want to scan with different settings.
B Remove the previous page and place the next page that you checked on the
exposure glass.
C Select the image density, resolution, and original type.
You have about 60 seconds (10 seconds for Immediate Transmission) to select density, resolution, and original type. The time remaining is shown on
the display.
Adjust the settings for each page before you press the {Start} key.
❖ When placing originals in the optional ADF or ARDF
A Check which pages you want to scan with different settings.
B Select the density, resolution, and scan type before the page you want to
change the settings for starts being scanned.
Depending on what time the scan settings are adjusted, the settings may
not be reflected in the resulting operation.
42
Page 53

Specifying a Destination
This section explains how to specify a destination.
Specifying a Destination
Fax numbers, IP-Fax destinations, and e-mail addresses can be specified.
Note
❒ The display shows the percentage of free memory space for storing originals.
Since fax numbers, IP-Fax destinations and e-mail addresses are programmed
in separate memory, dialing fax numbers using the number keys does not
change the percentage on the display.
Sending Over a Fax Line
Enter numbers directly using the number keys on the right side of the control
panel.
A Press [] to switch the destination to fax number.
B Enter the fax number using the number keys.
1
To specify a destination using a Quick Dial key, see “Using the Quick Dial Keys”.
If you make a mistake, press the {Clear/Stop} key, and then enter again.
C Press the {Start} key.
The machine starts to scan the original and stores it in memory. When scanning ends, the Communicating indicator lights and transmission starts.
Note
❒ You can insert pauses and tones in a fax number.
❒ For the maximum number of digits for a destination, see “Maximum Values”.
Reference
p.44 “Entering a pause”
p.44 “Entering a tone”
p.54 “Using the Quick Dial Keys”
p.177 “Maximum Values”
43
Page 54

1
Transmission
Entering a pause
Press the {Pause/Redial} key when dialing or storing a number to insert a pause
of about two seconds.
ALT039S
Note
❒ If you press the {Pause/Redial} key at the first digit, the Redial screen appears.
❒ A pause is shown as a “-” on the display.
❒ You can also program numbers including pauses in the destination list.
Entering a tone
This function allows a machine connected to a pulse dialing line to send tonal
signals (for example if you want to use a special service on a tone dialing line).
When you press [Tone], the machine dials the number using tonal signals.
This section explains how to use the tone function with On Hook Dial as an example.
A Press the {On Hook Dial} key.
ALT040S
44
Page 55

Specifying a Destination
B Enter the fax number using the number keys.
C Press [Tone].
D Enter the number you want to tone dial using the number keys.
1
E Press the {Start} key.
The machine starts to scan the original and stores it in memory. When scanning ends, the Communicating indicator lights and transmission starts.
Note
❒ Certain services may be unavailable even when using the Tone function.
❒ A tone is shown as a “T” on the display and the next numbers are dialed
using tonal signals.
45
Page 56

1
Transmission
Sending by IP-Fax
This section explains how to specify a destination using IP-Fax transmission.
When using IP-Fax transmission, specify the IP-Fax destination (IPv4 address,
host name, or alias telephone number) in place of the fax number.
Important
❒ To use IP-Fax functions, the Function Upgrade Option must be installed.
A Press [] to switch the destination to IP-Fax destination.
When using a gatekeeper server, select .
When using a SIP server, select .
B Press [Manual].
C Enter the IP-Fax destination, and then press the {OK} key.
To specify a destination using a Quick Dial key, see “Using the Quick Dial
Keys”.
If you enter an incorrect character, press the {Clear/Stop} key. Then, re-enter
the characters correctly.
To change the IP-Fax destination after pressing the {OK} key, press [EditDest],
re-enter an IP-Fax destination, and then press the {OK} key.
46
Page 57

D To add a destination, press [Add Dest].
E Specify the next destination.
Specifying a Destination
1
To add another destination, repeat steps
and E.
D
F Press the {Start} key.
The machine starts to scan the original and stores it in memory. When scanning ends, the Communicating indicator lights and transmission starts.
Note
❒ Depending on security settings, [Manual] may not appear, and you may be
unable to enter the IP-Fax destination.
❒ For a list of gateways (T.38-compliant), gatekeepers, or SIP servers that are
certified as operable with this machine, contact your local reseller or service representative.
❒ Methods of entering a destination vary depending on the network settings
made by the administrator. Ask the machine administrator for details. For
details about entering the IP-Fax destination, see “Regarding IP-Fax destinations”.
❒ To avoid accidentally pressing the wrong Quick Dial key, you can set the
machine so that each time a destination is added using a Quick Dial key,
[Add Dest] must be pressed. Make the setting in User Parameters (switch 17,
bit 2) in the Fax Features menu.
❒ For the maximum number of digits for a destination, see “Maximum Values”.
Reference
p.20 “IP-Fax Functions”
p.48 “Regarding IP-Fax destinations”
p.54 “Using the Quick Dial Keys”
p.177 “Maximum Values”
“Entering Text”, About This Machine
“Fax Features”, General Settings Guide
47
Page 58

1
Transmission
Regarding IP-Fax destinations
Depending on the network to which this machine is connected or this machine's
configuration, enter the IP-Fax destination as follows:
❖ When not using a gatekeeper/SIP server
• From IP-Fax to IP-Fax
Specify the IPv4 address or host name of the receiving machine.
Example: 192.168.1.10 (IPv4 address)
Example: IPFAX1 (host name)
• From IP-Fax to G3 fax
Specify the G3 fax telephone number of the receiving machine.
Example: 0312345678
❖ When using a gatekeeper server
• From IP-Fax to IP-Fax
Specify the alias telephone number of the receiving machine.
Example: 0311119999 (alias telephone number)
• From IP-Fax to G3 fax
Specify the G3 fax telephone number of the receiving machine.
Example: 0312345678
❖ When using a SIP server
• From IP-Fax to IP-Fax
Specify the SIP user name of the receiving machine.
Example: ABC (SIP user name)
• From IP-Fax to G3 fax
Specify the G3 fax telephone number of the receiving machine.
Example: 0312345678
48
Page 59

Specifying a Destination
Note
❒ To send to a G3 fax via a gateway connected to a public telephone line, you
must specify it’s the receiver’s machine telephone number. For example, if the
receiver’s fax number is “0312345678”, specify “5678”. To send from an IPFax to G3 fax without using gatekeeper or SIP server, you must register the
gateway also.
❒ When you specify a destination with IP-Fax, depending on the receiver's net-
work configuration, you may need to specify the IPv4 address and port
number of the receiving machine. For example, if the receiver's IPv4 address
is “192.168.1.10” and the port number is “2100”, specify “192.168.1.10:2100”.
Ask the network administrator for details.
❒ When you specify a host name, depending on the receiver's network config-
uration, you may need to specify the host name and port number of the receiving machine. For example, if the receiver's host name is “IPFAX1”and the
port number is “2100”, specify “IPFAX1:2100”. Ask the network administrator for details.
❒ An alias telephone number is a number that is registered in the gatekeeper,
and is available only in the network to which the gatekeeper is connected.
❒ Pay attention to the number of telephone number digits set in the gateway/IPv4
address conversion table to avoid transmission error.
1
Sending to an E-mail Address
This section explains how to specify an e-mail address as a destination.
When using Internet Fax transmission, specify the e-mail address in place of the
fax number.
Important
❒ To use Internet Fax functions, the Function Upgrade Option must be installed.
❒ In the destination list, register senders, specify their e-mail addresses, and set
the User Name as [Sender] in advance.
❒ Internet Fax is executed in only Memory Transmission that starts transmis-
sion automatically after storing documents in memory. If you specify Immediate Transmission in Internet Fax, the “
memory transmission.” message appears. When this happens, press [Exit],
and then switch to Memory Transmission.
Try again after switching to
49
Page 60

1
Transmission
A Press [] to switch the destination to e-mail address.
B Press [Manual].
C Enter the e-mail address destination and then press the {OK} key.
To specify a destination using a Quick Dial key, see “Using the Quick Dial
Keys”.
If you enter an incorrect character, press the {Clear/Stop} key. Then, re-enter
the characters correctly.
To change the e-mail address after pressing the {OK} key, press [EditDest], reenter an e-mail address, and then press the {OK} key.
D To add a destination, press [Add Dest].
50
Page 61

E Specify the next destination.
Specifying a Destination
1
To add another destination, repeat steps
and E.
D
F Specify the sender.
For details about specifying senders, see “Sender Settings”.
G Press the {Start} key.
The machine starts to scan the original and stores it in memory. When scanning ends, the Communicating indicator lights and transmission starts.
Note
❒ Depending on security settings, [Manual] may not appear, and you may be
unable to enter the e-mail address.
❒ For details about canceling a transmission, see “Canceling a Transmission”.
❒ To avoid accidentally pressing the wrong Quick Dial key, you can set the
machine so that each time a destination is added using a Quick Dial key,
[Add Dest] must be pressed. Make the setting in User Parameters (switch 17,
bit 2) in the Fax Features menu.
❒ For the maximum number of digits for a destination, see “Maximum Values”.
❒ If “Auto Specify Sender Name” is set to “On”, the sender is automatically
specified and you can omit the procedure for specifying a sender. If “On”
is selected, the specified e-mail address is printed at “From:”. If no e-mail
address is specified for the sender, or if the specified e-mail address is not
programmed in the destination list, Internet Fax documents cannot be
sent.
Reference
p.24 “Internet Fax Functions”
p.54 “Using the Quick Dial Keys”
p.84 “Canceling a Transmission”
p.91 “Sender Settings”
p.177 “Maximum Values”
“Entering Text”, About This Machine
“System Settings”, General Settings Guide
“Fax Features”, General Settings Guide
“Registering Addresses and Users for Facsimile/Scanner Functions”, General Settings Guide
51
Page 62

1
Transmission
Bypassing the SMTP server
You can send Internet Fax documents directly to their destinations without going through the SMTP server.
Important
❒ This function must be registered to a User Function key in advance.
❒ To use this function, the following settings must be made. For details about
these settings, see “System Settings”, General Settings Guide and “Special
Operations under Windows”, Network Guide.
• In “System Settings”, “SMTP” in “E-mail Communication Port”, set the
port number to “25”.
• To specify the host name of the other party as the domain part of the e-mail
address, program the host name of the other party on the DNS server.
❒ If the other party's IPv4 address is not registered on the DNS server, specify
the IPv4 address at the domain part of the e-mail address.
❒ To use this function, the other party's fax machine must be:
• compatible with Internet Fax
• connected to the same LAN as this machine
• have its reception protocol set to SMTP
❒ SMTP authentication set on the other party's fax machine is disabled when In-
ternet Fax is transmitted using this function.
❒ If an Internet Fax is transmitted from the other party using this function, even
if reception is not successful, an Error Mail Notification is not sent to the sender.
❒ When an Internet Fax is transmitted using this function, even if transmission
is not successful, the error e-mail is not sent from the server.
❒ When using this function, you cannot send Internet Fax documents to the ad-
ministrator's e-mail address programmed on this machine.
You can send Internet Fax documents directly to their destinations without going through the SMTP server. Internet Faxes are normally transmitted via the
SMTP server. However, with this feature the domain part of the destination's email address is read as the SMTP server's address and transmissions bypass the
SMTP server. Since this reduces load on the server, you can send faxes without
having to take server to destination transfer time into account.
There are two ways of specifying a destination, as follows:
❖ Specify the other party's host name
Specify a destination's e-mail address by adding the other party's host name
to the domain part of the e-mail address. Specify the address to the right of @
as follows: “host name”, “. (dot)”, and “domain name”.
xxxx@host name of the other party.domain name
Example: The other party's e-mail address is “abc@defcompany.com” and the
host name is “HOST”; abc@HOST.defcompany.com
52
Page 63

Specifying a Destination
❖ Specify the other party's IPv4 address
Specify a destination's e-mail address by changing the domain part of the email address to the other party's IPv4 address.
xxxx@[the other party's IPv4 address]
Example: The other party's e-mail address is “abc@defcompany.com” and the
IPv4 address is “192.168.1.10”; abc@[192.168.1.10]
Follow these steps to bypass the SMTP server.
A Press the User Function key registered to this function to turn off the indicator.
1
ALT041S
Note
❒ When you specify destinations directly using the number keys, you can
specify whether or not to use the SMTP server for each destination.
❒ When you select destinations in the destination list, the SMTP server set-
ting specified in the Address Book is enabled.
❒ To send Internet Fax documents from a computer, use the LAN-Fax Driver
to specify whether or not to bypass the SMTP server. When sending with
the [Use device address] check box selected, the SMTP server setting specified on this machine is enabled.
Reference
p.149 “Sending Fax Documents from Computers”
“System Settings”, General Settings Guide
“Fax Features”, General Settings Guide
“Registering Addresses and Users for Facsimile/Scanner Functions”, General Settings Guide
“Special Operations under Windows”, Network Guide
53
Page 64

1
Transmission
Using the Quick Dial Keys
You can specify a destination simply by pressing the Quick Dial key to which the
destination's number is registered.
When a Quick Dial key is pressed, the destination it is registered to appears on
the screen.
Pressing [] switches the destination list between fax number, e-mail ad-
dress, and IP-Fax destination.
Important
❒ In the destination list, program an individual fax number, IP-Fax destination,
e-mail address and/or groups of destinations.
Specifying a destination using the Quick Dial key
A Press [] to switch the destination between fax number, e-mail ad-
dress, and IP-Fax destination.
B Press the Quick Dial key in which the destination's number is programmed.
Flip the Quick Dial Flip Plate down to access Quick Dial keys 01 through 16,
flip up to access keys 17 through 32.
The destination's name is shown on the display.
If you make a mistake, press the {Clear/Stop} key and try again.
To select more destinations, repeat steps
C Press the {Start} key.
54
ALT042S
and B.
A
Page 65

Specifying a Destination
Note
❒ Destinations programmed in groups can be checked with “Group Destina-
tion List” in “System Settings”.
❒ You do not have to press [Add Dest] when adding a destination using the
Quick Dial keys.
Reference
“System Settings”, General Settings Guide
“Registering Addresses and Users for Facsimile/Scanner Functions”, General Settings Guide
Specifying a group of destinations using the Quick Dial key
If you program multiple destinations into a Group, you can send documents to
all destinations in that Group using just a few keystrokes. Destinations programmed in a group are indicated by .
Important
❒ In the destination list, program an individual fax number, IP-Fax destination,
e-mail address and/or groups of destinations.
❒ Group destination can be used only for Memory Transmission; it cannot be
used for Immediate Transmission. If you specify Immediate Transmission for
a Group destination, the “
mission.
switch to Memory Transmission.
❒ The total number of destinations programmed in multiple groups should not
exceed the maximum number of destinations you can specify for one file. For
details, see “Maximum Values”.
” message appears. When this happens, press [Exit], and then
Try again after switching to memory trans-
1
A Press [] to switch the destination between fax number, e-mail ad-
dress, and IP-Fax destination.
B Press the Quick Dial key in which the Group is programmed.
If you make a mistake, press the {Clear/Stop} key and try again.
To select more groups, repeat steps
and B.
A
C Press the {Start} key.
55
Page 66

1
Transmission
Note
❒ Destinations programmed in groups can be checked using “Group Desti-
nation List” in “System Settings”.
❒ If a destination where a fax number, e-mail address, or IP-Fax destination
is not programmed is included in the specified group, the confirmation
message appears. Press [Select] to specify destinations where the fax
number, the e-mail address, or IP-Fax destination is programmed. Press
[Cancel] to change the destination. You can select the priority order used to
specify an alternative destination if there is no destination of the specified
type. Make this setting with User Parameters (switch 32, bit 0) in the Fax
Features menu.
❒ To cancel any destination(s) among the group, press the {Check Destination}
key and display the desired destination using {U} or {T}. Then, press the
{Clear/Stop} key.
Reference
p.57 “Checking the Specified Destination”
p.177 “Maximum Values”
“System Settings”, General Settings Guide
“Fax Features”, General Settings Guide
“Registering Addresses and Users for Facsimile/Scanner Functions”, General Settings Guide
56
Page 67

Specifying a Destination
Checking the Specified Destination
This section explains how to check the specified destinations.
If you specified a destination from the destination list, you can display names,
fax numbers, e-mail addresses, or IP-Fax destinations. If a group is specified as
the destination, you can display the fax numbers, e-mail addresses, or IP-Fax
destinations of the group.
A Make sure the destination name appears on the display.
B Press the {Check Destination} key.
1
ALT034S
C If you specified more than one destination, display them one by one using
{U} or {T}.
D Press the {OK} key when confirmation is complete.
The display returns to that of step
Note
❒ If you specified a group using the Quick Dial keys, the group icon appears
to the right of the destination name by pressing the {Check Destination} key.
❒ When you specify a destination using the number keys, [Program] appears
on the screen by pressing the {Check Destination} key. Press [Program] to
register a selected destination in the destination list.
Reference
p.62 “Programming Destinations from Check Destination Screen”
.
A
57
Page 68

1
Transmission
Redial
The machine stores the latest destinations specified for each transmission method. This function saves time when you are sending to the same destination repeatedly, as you do not have to enter the destination again.
Important
❒ The following kinds of destinations are not stored:
• Destinations specified using the destination list
• Destinations specified as a group destination
• Destinations dialed using the external telephone
• Destinations dialed by Redial (regarded as already stored in memory)
• Second and later destinations broadcasted to
• Destinations specified in the LAN-Fax Driver on the computer
❒ To redial a fax number, do not dial any numbers before you press the
{Pause/Redial} key. If you press the {Pause/Redial} key after entering numbers
using the number keys, a pause is entered instead.
A Place the original, and then select the scan settings you require.
B Press the {Pause/Redial} key.
ALT039S
C Select the destination you want to redial to using {U} or {T}, and then
press the {OK} key.
D Press the {Start} key.
58
Page 69

Specifying a Destination
Note
❒ You can specify Internet Fax and IP-Fax destinations using the Redial func-
tion. Select this function before pressing [Manual].
❒ When you press [Program], you can register a selected recipient in the des-
tination list.
❒ For the maximum number of redials the machine can store, see “Maximum
Values”.
Reference
p.62 “Programming Destinations from Check Destination Screen”
p.177 “Maximum Values”
1
59
Page 70

Transmission
Programming Destinations in the Address Book
1
You can program fax numbers, e-mail addresses, IP-Fax destinations, and folder
destinations using Address Book Management in Administrator Tools in the
System Settings menu.
A Press the {User Tools/Counter} key.
ALT049S
B Select [System Settings] using {U} or {T}, and then press the {OK} key.
C Select [Administrator Tools] using {U} or {T}, and then press the {OK} key.
D Select [Address Book Management] using {U} or {T}, and then press the {OK}
key.
60
Page 71

Programming Destinations in the Address Book
E Select [Program/Change] using {U} or {T}, and then press the {OK} key.
For the procedure to follow, see “Registering Addresses and Users for Facsimile/Scanner Functions”, General Settings Guide.
Note
❒ You can also register programmed fax numbers, e-mail addresses, IP-Fax
destinations, and folder destinations in a Group.
❒ When you press the {Facsimile} key to show the facsimile initial display af-
ter changing the contents of the Address Book, the “
updated. The selected dest./functions have been cancelled.”
message appears. Press [Exit] to bring up the facsimile's initial display.
❒ You can register in the Address Book using Web Image Monitor or Smart-
DeviceMonitor for Admin. For details about installation, see “Monitoring
and Configuring the Printer”, Network Guide, or, for information about
the Address Book, see the relevant Help.
Settings have been
1
Reference
“System Settings”, General Settings Guide
“Registering Addresses and Users for Facsimile/Scanner Functions”, General Settings Guide
“Monitoring and Configuring the Printer”, Network Guide
61
Page 72

1
Transmission
Programming Destinations from Check Destination Screen
This section explains how to register a directly entered fax number, e-mail address, or IP-Fax destination to the Address Book using the Check Destination
screen.
If [Program] appears on the screen, it is possible to register a destination displayed on the check destination screen to the Address Book.
A On the check destination screen, select the destination you want to register
to the Address Book.
B Press [Program].
For details about registering destinations, see “Registering Addresses and
Users for Facsimile/Scanner Functions”, General Settings Guide.
C Make the settings, and then press the {OK} key.
The screen returns to that of step
Note
❒ Depending on security settings, [Program] may not appear, and you may be
unable to register the destination.
❒ When you press the {Facsimile} key after changing the contents of the Ad-
dress Book, the “
dest./functions have been cancelled.
it]. The standby display appears.
Reference
p.57 “Checking the Specified Destination”
“Registering Addresses and Users for Facsimile/Scanner Functions”, General Settings Guide
Settings have been updated. The selected
.
A
” message appears. Press [Ex-
62
Page 73

Programming Destinations in the Address Book
Programming Destinations from Redial Screen
This section explains how to register a directly entered fax number, e-mail address, or IP-Fax destination to the Address Book using the Redial screen.
If [Program] appears on the screen, it is possible to register a destination displayed on the Redial screen to the Address Book.
A On the Redial screen, select the destination you want to register to the Ad-
dress Book.
B Press [Program].
For details about registering destinations, see “Registering Addresses and
Users for Facsimile/Scanner Functions”, General Settings Guide.
1
C Make the settings, and then press the {OK} key.
The screen returns to that of step
Note
❒ Depending on security settings, [Program] may not appear, and you may be
unable to register the destination.
❒ When you press the {Facsimile} key after changing the contents of the Ad-
dress Book, the “
dest./functions have been cancelled.
it]. The standby display appears.
Reference
p.58 “Redial”
“Registering Addresses and Users for Facsimile/Scanner Functions”, General Settings Guide
Settings have been updated. The selected
.
A
” message appears. Press [Ex-
63
Page 74

Transmission
Searching for a Destination in the Address Book
1
Use this function to search for a destination registered in the destination list or
on the LDAP server.
Important
❒ To search for a destination from an LDAP server, the LDAP server must be
registered in advance. For details about registering LDAP servers, see “System Settings”, General Settings Guide.
Note
❒ The search returns destinations that partially match the entered name.
❒ A warning message appears if the search returns more than the maximum
number of destinations you can search for at a time. Press [Exit] and change
the destination name to view fewer destinations.
❒ Although one user can program multiple e-mail addresses, only one address
can be retrieved by the search. The address retrieved by the search depends
on the searching method supported by the LDAP server. However, the address programmed first is normally retrieved.
Reference
p.177 “Maximum Values”
“System Settings”, General Settings Guide
Search by Name
Follow these steps to search for a destination registered in the Address Book by
name.
Important
❒ If [LDAP Search] is set to [Off] in Administrator Tools, in the System Settings
menu, the display for selecting either [Search Address Book] or [Search LDAP]
does not appear.
A Press [] to switch the destination to fax number, e-mail address, or
IP-Fax destination.
64
Page 75

Searching for a Destination in the Address Book
B Press the {Search Destination} key.
ALT043S
C Select [Search Address Book] using {U} or {T}, and then press the {OK} key.
1
D Select [Search by Name] using {U} or {T}, and then press the {OK} key.
E Enter the destination name you want to search for, and then press the {OK}
key.
Depending on the type of characters to enter, press the {Shift} key to switch
the mode.
If you enter the wrong destination name, before pressing the {OK} key, press
the {Clear/Stop} key, and then enter the destination name again.
F Confirm the characters you entered, and then press the {OK} key.
When the search is finished, the results appear.
65
Page 76

1
Transmission
G Select a destination using {U} or {T}, and then press {V} to specify it (put
a tick against it).
Multiple destinations can be selected.
Press {W} to deselect a destination.
H Press the {OK} key.
Note
❒ If no destination matches the specified text, the “Specified destination
is not programmed.” message appears. Press [Exit] to return to the dis-
play of step
❒ You cannot specify destinations twice. If you try, the “
has already been programmed.
to the standby screen.
❒ Press [Add Dest] to specify other destinations.
.
D
This destination
” message appears. Press [Exit] to return
Reference
“Entering Text”, About This Machine
Search by Destination List
Follow these steps to search for a destination registered in the Address Book using the destination list.
Important
❒ If [LDAP Search] is set to [Off] in Administrator Tools, in the System Settings
menu, the display for selecting either [Search Address Book] or [Search LDAP]
does not appear.
A Press [] to switch the destination to fax number, e-mail address, or
IP-Fax destination.
66
Page 77

Searching for a Destination in the Address Book
B Press the {Search Destination} key.
ALT043S
C Select [Search Address Book] using {U} or {T}, and then press the {OK} key.
1
D Select [Display Destination List] using {U} or {T}, and then press the {OK} key.
Destinations appear in registration number order.
E Select a destination using {U} or {T}, and then press {V} to specify it (put
a tick against it).
Multiple destinations can be selected.
Press {W} to deselect a destination.
F Press the {OK} key.
Note
❒ You cannot specify destinations twice. If you try, the “This destination
has already been programmed.” message appears. Press [Exit] to return
to the standby screen.
❒ Press [Add Dest] to specify other destinations.
67
Page 78

1
Transmission
Search by Registration Number
Follow these steps to search for a destination by specifying a registration
number stored in the destination list.
Important
❒ If [LDAP Search] is set to [Off] in Administrator Tools, in the System Settings
menu, the display for selecting either [Search Address Book] or [Search LDAP]
does not appear.
A Press [] to switch the destination to fax number, e-mail address, or
IP-Fax destination.
B Press the {Search Destination} key.
ALT043S
C Select [Search Address Book] using {U} or {T}, and then press the {OK} key.
D Select [Search by Registration No.] using {U} or {T}, and then press the {OK}
key.
68
Page 79

Searching for a Destination in the Address Book
E Enter the three-digit registration number using the number keys, and then
press the {OK} key.
If you enter the wrong registration number, before pressing the {OK} key,
press the {Clear/Stop} key, and then enter the registration number again.
When the search is finished, the results appear.
F Press {V} to select a destination, and press the {OK} key.
To deselect a destination, before pressing the {OK} key, press {W}.
1
Note
❒ If no destination matches the specified text, the “Specified destination
is not programmed.” message appears. Press [Exit] to return to the dis-
play of step
❒ You cannot specify destinations twice. If you try, the “
has already been programmed.” message appears. Press [Exit] to return
to the standby screen.
❒ Press [Add Dest] to specify other destinations.
.
D
This destination
69
Page 80

1
Transmission
Search by Fax Number
Follow these steps to search for a destination registered in the Address Book by
fax number.
Important
❒ If [LDAP Search] is set to [Off] in Administrator Tools, in the System Settings
menu, the display for selecting either [Search Address Book] or [Search LDAP]
does not appear.
A Press [] to switch the destination to fax number.
B Press the {Search Destination} key.
ALT043S
C Select [Search Address Book] using {U} or {T}, and then press the {OK} key.
D Select [Search Fax Destination] using {U} or {T}, and then press the {OK} key.
If [Search Fax Destination] does not appear, press the {Escape} key to return to
step
70
, and then switch the destination to fax number.
A
Page 81

Searching for a Destination in the Address Book
E Enter the number you want to search for, and then press the {OK} key.
If you enter the wrong number, before pressing the {OK} key, press the
{Clear/Stop} key, and then enter the number again.
F Confirm the numbers you entered, and then press the {OK} key.
When the search is finished, the results appear.
G Select a destination using {U} or {T}, and then press {V} to specify it (put
a tick against it).
1
Multiple destinations can be selected.
Press {W} to deselect a destination.
H Press the {OK} key.
Note
❒ If no destination matches the specified text, the “Specified destination
is not programmed.” message appears. Press [Exit] to return to the dis-
play of step
❒ You cannot specify destinations twice. If you try, the “
has already been programmed.
to the standby screen.
❒ Press [Add Dest] to specify other destinations.
.
D
This destination
” message appears. Press [Exit] to return
71
Page 82

1
Transmission
Search by E-mail Address
Follow these steps to search for a destination registered in the destination list by
e-mail address.
Important
❒ If [LDAP Search] is set to [Off] in Administrator Tools, in the System Settings
menu, the display for selecting either [Search Address Book] or [Search LDAP]
does not appear.
A Press [] to switch the destination to e-mail address.
B Press the {Search Destination} key.
ALT043S
C Select [Search Address Book] using {U} or {T}, and then press the {OK} key.
D Select [Search by E-mail Address] using {U} or {T}, and then press the {OK}
key.
If [Search by E-mail Address] does not appear, press the {Escape} key to return
to step
72
, and then switch the destination to e-mail address.
A
Page 83

Searching for a Destination in the Address Book
E Enter the e-mail address you want to search for, and then press the {OK}
key.
If you enter the wrong e-mail address, before pressing the {OK} key, press the
{Clear/Stop} key, and then enter the e-mail address again.
F Confirm the e-mail address you entered, and then press the {OK} key.
When the search is finished, the results appear.
G Select a destination using {U} or {T}, and then press {V} to specify it (put
a tick against it).
1
Multiple destinations can be selected.
Press {W} to deselect a destination.
H Press the {OK} key.
Note
❒ If no destination matches the specified text, the “Specified destination
is not programmed.
play of step
❒ You cannot specify destinations twice. If you try, the “
has already been programmed.
to the standby screen.
❒ Press [Add Dest] to specify other destinations.
.
D
” message appears. Press [Exit] to return to the dis-
This destination
” message appears. Press [Exit] to return
73
Page 84

1
Transmission
Search by IP-Fax Destination
Follow these steps to search for a destination registered in the Address Book by
IP-Fax destination.
Important
❒ If [LDAP Search] is set to [Off] in Administrator Tools, in the System Settings
menu, the display for selecting either [Search Address Book] or [Search LDAP]
does not appear.
A Press [] to switch the destination to IP-Fax destination.
B Press the {Search Destination} key.
ALT043S
C Select [Search Address Book] using {U} or {T}, and then press the {OK} key.
D Select [Search Fax Destination] using {U} or {T}, and then press the {OK} key.
If [Search Fax Destination] does not appear, press the {Escape} key to return to
step
74
, and then switch the destination to IP-Fax destination.
A
Page 85

Searching for a Destination in the Address Book
E Press [IP].
The Search IP-Fax Destination screen appears.
F Enter the IP-Fax destination you want to search for, and then press the {OK}
key.
If you enter the wrong destination, before pressing the {OK} key, press the
{Clear/Stop} key, and then enter the destination again.
G Confirm the IP-Fax destination you entered, and then press the {OK} key.
1
When the search is finished, the results appear.
H Select a destination using {U} or {T}, and then press {V} to specify it (put
a tick against it).
Multiple destinations can be selected.
Press {W} to deselect a destination.
I Press the {OK} key.
Note
❒ If no destination matches the specified text, the “Specified destination
is not programmed.” message appears. Press [Exit] to return to the dis-
play of step
❒ You cannot specify destinations twice. If you try, the “
has already been programmed.
to the standby screen.
❒ Press [Add Dest] to specify other destinations.
.
D
This destination
” message appears. Press [Exit] to return
75
Page 86

1
Transmission
Search by LDAP Server
Follow these steps to search for a destination registered in the Address Book using the LDAP server.
Important
❒ This function is not available if [LDAP Search] is set to [Off] under Administra-
tor Tools, in the System Settings menu.
A Press the {Search Destination} key.
ALT043S
B Select [Search LDAP] using {U} or {T}, and then press the {OK} key.
C Select [Select Server] using {U} or {T}, and then press the {OK} key.
D If more than one server is programmed, select the server you want to search
using {U} or {T}, and then press the {OK} key.
76
The screen returns to that of step
.
C
Page 87

Searching for a Destination in the Address Book
E Select [Advanced Search] using {U} or {T}, and then press the {OK} key.
F Select a search condition using {U} or {T}, and then press the {OK} key.
Conditions (Name, E-mail Address, Fax Number, Company Name, and Department Name) are those programmed in the LDAP server.
G Enter a partial string, and then press the {OK} key.
1
Depending on the type of characters you need to enter, press the {Shift} key
to switch between modes.
To search for an IP-Fax destination, press [IP] on the Search Fax Destination
screen.
77
Page 88

1
Transmission
H Select the search criteria using the scroll keys, and then press the {OK} key.
The meanings of the search criteria are as follows:
• [Include]: Search for strings that include the specified character.
Example: When searching for “ABC”, enter “A”, “B”, or “C”.
• [Exclude]: Search for strings that do not include the specified character.
Example: When searching for “ABC”, enter “D”.
• [First Word]: Search for strings that start with the specified character.
Example: When searching for “ABC”, enter “A”.
• [Last Word]: Search for strings that end with the specified character.
Example: When searching for “ABC”, enter “C”.
• [Exact Match]: Search for strings that fully match the specified character.
Example: When searching for “ABC”, enter “ABC”.
• [Fuzzy Search]: Perform a fuzzy search (according to the searching method
supported by the LDAP server).
I Press the {Escape} key.
The screen returns to that of step
.
E
J Press [Search].
When the search is finished, the search result appears.
K Select a destination using {U} or {T}, and then press {V} to specify it (put
a tick against it).
Multiple destinations can be selected.
Press the {Check Destination} key to display details about the selected destination.
Press {W} to deselect a destination.
L Press the {OK} key.
78
Page 89

Searching for a Destination in the Address Book
Note
❒ You can add one additional search condition for LDAP servers by specify-
ing the Search Options under Program/Change/Delete LDAP Server under System Settings. For details about setting Search Options, see “System
Settings”, General Settings Guide.
❒ The string you enter in the [Name] condition field in step
first or last name, depending on the administrator's setting. For example,
to search for the name “John Smith”, ask the system administrator whether
you should enter “John” or “Smith”.
Reference
“Entering Text”, About This Machine
“System Settings”, General Settings Guide
is read as the
F
1
79
Page 90

1
Transmission
On Hook Dial
The On Hook Dial function allows you to dial while listening to the tone from
the internal speaker. You can send a fax checking the connection.
Important
❒ This function is not available for Internet Fax and IP-Fax.
A Place the original, and then select the scan settings you require.
B Press the {On Hook Dial} key.
ALT040S
You will hear a low tone from the internal speaker.
If you want to cancel this operation, press the {On Hook Dial} key again.
C Dial.
To specify a destination using a Quick Dial key, see “Using the Quick Dial
Keys”.
The machine immediately dials the destination.
If you make a mistake, press the {On Hook Dial} or {Clear Modes} key, and then
try again.
D When the line is connected and you hear a high-pitched tone, press the
{Start} key.
The transmission starts.
If you want to cancel a transmission, press the {Clear/Stop} key, and then re-
move the originals.
After transmission, the standby display appears.
80
Page 91

On Hook Dial
Note
❒ This function is unavailable in some countries.
❒ Press {U} or {T} to adjust the volume of the on-hook sound in eight incre-
ments. At the maximum volume level, U changes to |. Similarly, at the
minimum level, T changes to {. The volume can also be preprogrammed
in the Fax Features menu.
❒ If you have an external telephone on the fax machine, you can speak with
the other party when you hear a voice. If you hear a voice before pressing
the {Start} key, pick up the external telephone and tell the receiver you
want to send a fax document (ask them to switch to facsimile mode).
❒ For details about On Hook Release Time, see “Fax Features”, General Set-
tings Guide.
Reference
p.54 “Using the Quick Dial Keys”
“Fax Features”, General Settings Guide
1
81
Page 92

1
Transmission
Manual Dial
Pick up the handset of the external telephone and dial. When the line is connected and you hear a high-pitched tone, press the {Start} key to send your fax document. If, on the other hand, you hear a voice at the other end, continue
conversation as normal.
Important
❒ This function is not available for Internet Fax and IP-Fax.
❒ If Immediate TX Result Report (Immediate Transmission) is printed, the re-
sult of a transmission with Manual Dial is not mentioned in the report.
A Place the original, and then select the scan settings you require.
B Pick up the handset.
You will hear a dial tone.
C Dial.
To specify a destination using a Quick Dial key, see “Using the Quick Dial Keys”.
The machine immediately dials the destination.
If you make a mistake, replace the handset, and then try again from step
.
B
D When the line is connected and you hear a high-pitched tone, press the
{Start} key to send your fax document.
If you hear a voice, tell the receiver that you want to send them a fax document (ask them to switch to facsimile mode).
The transmission starts.
E Replace the handset.
If you want to cancel a transmission, press the {Clear/Stop} key, and then remove the originals.
After transmission, the standby display appears.
Note
❒ When the operation switch is off, even if the main power switch is on, you
cannot operate this machine using only the handset of the external telephone. You must first press the operation switch to turn on the machine.
Reference
p.54 “Using the Quick Dial Keys”
82
Page 93

Memory Storage Report
Memory Storage Report
This report is printed after an original is stored in memory. It helps you review
the contents and the destinations of stored originals.
Important
❒ If you use Parallel Memory Transmission, the Memory Storage Report is not
printed.
Note
❒ You can turn this report on and off with the User Parameters (switch 03, bit 2)
in the Fax Features menu.
❒ Even if the machine is set up not to print this report, it is still printed if an orig-
inal could not be stored.
❒ You can select whether to include part of the original image on the report with
the User Parameters (switch 04, bit 7) in the Fax Features menu.
❒ You can select whether to display a destination with the User Parameters
(switch 04, bit 4) in the Fax Features menu.
❒ You can select whether to display a sender name with the User Parameters
(switch 04, bit 5) in the Fax Features menu.
1
Reference
“Fax Features”, General Settings Guide
83
Page 94

Transmission
Canceling a Transmission
This section explains how to cancel a fax transmission.
1
Important
❒ Remember that the Communicating indicator turns off almost immediately
when an Internet fax is being sent.
Before the Original Is Scanned
Use this procedure to cancel a transmission before pressing the {Start} key.
A Press the {Clear Modes} key.
ALT044S
Note
❒ When originals are placed into the ADF or ARDF, you can cancel transmis-
sion simply by removing them.
While the Original Is Being Scanned
Use this procedure to cancel a transmission after pressing the {Start} key.
A Press the {Clear/Stop} key.
ALT050S
The machine stops scanning.
Note
84
❒ Scanning may be completed while you are performing the cancel operation.
Page 95

Canceling a Transmission
While the Original Is Being Transmitted
Follow these steps to cancel a transmission while the Communicating indicator
is lit.
A Press the {Clear/Stop} key.
ALT050S
B Select the file you want to cancel using {U} or {T}, and then press [Stop TX].
1
C Press [Delete].
To cancel stopping transmission, press [No].
The standby display appears.
Note
❒ If you cancel a document while it is being sent, the transmission is halted
as soon as you finish the cancellation procedure. However, some pages of
the document may already have been sent and received at the other end.
❒ If the transmission finishes while you are carrying out this procedure, it
will not be canceled.
❒ If multiple destinations were specified, only one destination number appears.
85
Page 96

1
Transmission
Before the Transmission Is Started
Use this procedure to cancel a transmission after the original is scanned.
This function is useful to cancel a transmission when you notice a mistake in destination or with the originals after storing. To cancel Memory Transmission,
search for the file to be canceled among the files stored in memory, and then delete it.
You can cancel transmission of a file while the file is being sent, stored in memory, or fails to transmit. All the scanned data is deleted from memory.
Important
❒ This function is unavailable with Immediate Transmission.
A Press the {Job Information} key.
ALT046S
B Select [Stop Communication] using {U} or {T}, and then press the {OK} key.
C Select the file you want to cancel using {U} or {T}, and then press [Stop TX].
86
Page 97

D Press [Delete].
Canceling a Transmission
1
To cancel another file, repeat from step
To cancel stopping transmission, press [No].
.
B
E Press the {Escape} key.
The standby display appears.
Note
❒ If you cancel a transmission while the file is being sent, some pages of your
file may have already been sent and is received at the other end.
❒ If the transmission finishes while you are carrying out this procedure,
transmission cannot be canceled.
❒ If multiple destinations were specified, only the number of destinations for
unsent documents appears.
❒ If multiple destinations were specified, only one destination number appears.
87
Page 98

1
Transmission
88
Page 99

2. Send Settings
This section explains the features of [TX Mode], which you can use to apply various transmission functions.
Sending at a Specific Time (Send Later)
Using this function, you can instruct the machine to delay transmission of your
fax document until a specified later time. This allows you to take advantage of
off-peak telephone charges without having to be by the machine at the time.
Important
❒ If the machine is switched off for about twelve hours, all fax documents
stored in memory are lost. If documents are lost for this reason, a Power Failure Report is automatically printed when the operation switch is turned on.
Use this report to identify lost documents. For details, see “Troubleshooting
When Using the Facsimile Function”, Troubleshooting.
❒ This function is unavailable with Immediate Transmission. If you specify Im-
mediate Transmission for this function, the “
to memory transmission.” message appears. When this happens, press
[Exit], and then switch to Memory Transmission.
Try again after switching
A Place the original, and then select the scan settings you require.
B Press [TX Mode].
C Select [Send Later] using {U} or {T}, and then press the {OK} key.
D Select [Send at specified time] using {U} or {T}, and then press the {OK} key.
To cancel the setting, select [Off], and then press the {OK} key. The display returns to that of step
.
C
89
Page 100

Send Settings
E Enter the time (24 hour format) using the number keys, and then press the
{OK} key.
2
When entering numbers smaller than 10, add a zero at the beginning.
If you make a mistake, press the {Clear/Stop} key before pressing the {OK}
key, and then try again.
To cancel Send Later, press the {Escape} key. The display returns to that of
step
.
C
F Press the {Escape} key.
The standby display appears.
To check the settings, press [TX Mode].
G Specify a destination, and then press the {Start} key.
Note
❒ You can specify a time within 24 hours of the current time.
❒ If the current time shown is not correct, change it.
Reference
p.84 “Canceling a Transmission”
“System Settings”, General Settings Guide
“Fax Features”, General Settings Guide
“Troubleshooting When Using the Facsimile Function”, Troubleshooting
90
 Loading...