

Page 1

Operating Instructions
Printer Reference
Read This First
Trademarks.............................................................................................................4
Safety Information .................................................................................................5
ENERGY STAR Program .....................................................................................11
Positions of RWARNING and RCAUTION labels ............................................12
Manuals for This Printer......................................................................................14
How to Read This Manual ...................................................................................15
Guide to the Printer
Exterior .................................................................................................................16
Back ......................................................................................................................17
Inside.....................................................................................................................18
Control Panel........................................................................................................19
Setting Up
Where to Put the Printer......................................................................................21
Space Required for Installation ................................................................................22
Installing the Toner bottle...................................................................................24
Loading Paper ......................................................................................................28
Loading paper into Standard paper tray................................................................... 28
Loading Paper in the Large Capacity Tray (LCT) ....................................................30
Turning the Power On .........................................................................................32
Selecting the Display Language.........................................................................34
Test Printing .........................................................................................................36
G1267203_v1.00 EN USA G126-7207 Copyright © 2005 1
Page 2

Connecting the Machine
Connecting to the Ethernet Interface.................................................................38
Reading the LED Lamps ..........................................................................................39
Connecting the Machine to the host using the parallel cable .........................40
Connecting the machine to the host using a USB cable (optional) ................ 42
Configuration
Ethernet Configuration........................................................................................43
IEEE 802.11b (Wireless LAN) Configuration .....................................................47
Installing the Printer Driver
Quick Install..........................................................................................................52
Install the Operating Instructions.......................................................................54
Paper and Other Media
Paper and Other Media Supported by This Printer...........................................55
Paper Recommendations....................................................................................59
Loading Paper..........................................................................................................59
Storing Paper ...........................................................................................................59
Types of Paper and Other Media .............................................................................59
Paper not supported.................................................................................................61
Print Area .................................................................................................................61
Loading Paper ......................................................................................................63
Loading Paper in Tray 1 (Tandem Tray) ..................................................................63
Loading Paper in Tray 2 and 3.................................................................................66
Loading Paper in the Large Capacity Tray (LCT) ....................................................71
Setting Paper on the Bypass Tray ...........................................................................72
Loading Paper in the Interposer (optional)...............................................................78
Replacing Consumables
Replacing the Toner bottle..................................................................................80
Replacing Toner.......................................................................................................81
Cleaning the Printer
Cautions to Take When Cleaning .......................................................................84
Adjusting the Printer
Adjusting Tray Registration................................................................................85
Troubleshooting
Error & Status Messages on the Display Panel ................................................88
Call-light Lit or Blinking ......................................................................................95
2
Page 3

When the Machine does Not Print......................................................................96
Checking the port connection...................................................................................96
Other Printing Problems .....................................................................................99
Additional Troubleshooting ..............................................................................106
Removing Misfed Paper ....................................................................................108
Remove Misfeed B-F: Internal ...............................................................................108
Remove Misfeed A, U: Internal ..............................................................................113
Remove Misfeed Q: Interposer ..............................................................................115
Remove Misfeed R: Finisher..................................................................................118
Adding Staples...................................................................................................121
Removing Jammed Staples ..............................................................................125
When the Staple Waste Box is Full ..................................................................128
Removing Punch Waste ....................................................................................129
Appendix
Moving and Transporting the Printer............................................................... 130
Disposal ..............................................................................................................131
Consumables .....................................................................................................132
Toner bottles ..........................................................................................................132
Specification.......................................................................................................133
Mainframe ..............................................................................................................133
Options...................................................................................................................135
3
Page 4

Read This First
Trademarks
Microsoft, Windows and Windows NT are registered trademarks of Microsoft
Corporation in the United States and/or other countries.
IPS-PRINT Printer Language Emulation Copyright© 1999-2000 Oak Technology, Inc., All rights reserved.
Other product names used herein are for identification purposes only and might
be trademarks of their respective companies. We disclaim any and all rights to
those marks.
The proper names of the Windows operating systems are as follows:
•Microsoft
•Microsoft
•Microsoft
• The product names of Windows
Microsoft
Microsoft
Microsoft
• The product names of Windows
Microsoft
Microsoft
• The product names of Windows Server
Microsoft
Microsoft
Microsoft
• The product names of Windows NT
Microsoft
Microsoft
®
Windows® 95 operating system
®
Windows® 98 operating system
®
Windows® Millennium Edition (Windows Me)
®
®
Windows® 2000 Advanced Server
®
Windows® 2000 Server
®
Windows® 2000 Professional
®
Windows® XP Professional
®
Windows® XP Home Edition
®
Windows ServerTM 2003 Standard Edition
®
Windows ServerTM 2003 Enterprise Edition
®
Windows ServerTM 2003 Web Edition
®
Windows NT® Server 4.0
®
Windows NT® Workstation 4.0
2000 are as follows:
®
XP are as follows:
TM
2003 are as follows:
®
4.0 are as follows:
G1267203_v1.00 Copyright © 2005 4
Page 5
Read This First
Safety Information
When using your printer, the following safety precautions should always be followed.
In this manual, the following important symbols are used:
Indicates a potentially hazardous situation which, if instructions are not followed, could result in
death or serious injury.
Indicates a potentially hazardous situation which, if instructions are not followed, may result in
minor or moderate injury or damage to property.
5
Page 6

Read This First
• Confirm the wall outlet is near the machine and freely accessible, so
that in the event of emergency, it can be unplugged easily.
• Only connect the machine to the power source described in the manual.
• Avoid multi-wiring.
• Do not damage, break or make any modifications to the power cord.
Do not place heavy objects on it, pull it hard or bend it more than necessary. These actions could cause an electric shock or fire.
• Do not incinerate spilled toner or used toner. Toner dust is flammable
and might ignite when exposed to an open flame.
• Disposal should take place at an authorized dealer or an appropriate
collection site.
• If you dispose of the used toner bottles yourself, dispose of them according to local regulations.
• Do not store toner, used toner, or toner containers in a place with an
open flame. The toner might ignite and cause burns or a fire.
• Plug and unplug the power cable with dry hands, or an electric shock
could occur.
• Do not risk electric shock by handling the power cord or plug with wet
hands.
• Do not remove any covers or screws other than those specified in this
manual. Some parts of the machine are at a high voltage and could
give you an electric shock. Also, if the machine has laser systems, direct (or indirect) reflected eye contact with the laser beam may cause
serious eye damage. When the machine needs to be checked, adjusted, or repaired, contact your service representative.
• Do not take apart or attempt any modifications to this machine. There
is a risk of fire, electric shock, explosion or loss of sight. If the machine has laser systems, there is a risk of serious eye damage.
• Enclosed set of power cord is only for the use with this product and
should not be used with any other electronic equipment or appliances. Do not use any other power cord with this product. They could
cause electric shock or fire.
• Keep the machine away from flammable liquids, gases, and aerosols.
A fire or an electric shock might occur.
6
Page 7

Read This First
• If smoke is coming out, there is a strange smell, or anything looks unusual, immediately turn off the power switch of the machine, such as
the main power switch, and then unplug the machine from the outlet.
Otherwise, it could cause an electric shock or fire. Next, contact your
sales or service representative. Do not use the machine if it is malfunctioning or not operating normally. If foreign objects, such as metal, liquid, etc. falls inside the machine, immediately turn off the power
switch of the machine, such as the main power switch, unplug the machine from the wall outlet, and then contact your sales or service representative. Otherwise, it could cause an electric shock or fire.
7
Page 8

Read This First
• Do not handle the plug with wet hands. Doing so might cause an electrical
shock.
• Keep the machine in an area that is within optimum environmental conditions. Operating the machine in an environment that is outside the recommended ranges of humidity and temperature can cause an electrical fire
hazard. Keep the area around the socket free of dust. Accumulated dust
can become an electrical fire hazard.
• Place the machine on a strong and level surface. Otherwise, it might fall and
injure someone.
• If you use the machine in a confined space, ensure there is continuous air
circulation.
• Keep toner (used or unused) and the toner bottle out of reach of children.
• If toner or used toner is inhaled, gargle with plenty of water and move into
a fresh air environment. Consult a doctor if necessary.
• If your skin comes into contact with toner or used toner, wash the affected
area thoroughly with soap and water.
• If toner or used toner gets into your eyes, flush immediately with large
amounts of water. Consult a doctor if necessary.
• If toner or used toner is swallowed, dilute by drinking a large amount of water. Consult a doctor if necessary
• Avoid getting toner on your clothes or skin when removing a paper jam or
replacing toner. If your skin comes into contact with toner, wash the affected
area thoroughly with soap and water.
• If toner gets on your clothing, wash with cold water. Hot water will set the
toner into the fabric and may make removing the stain impossible.
• Do not pull out the paper tray forcefully. If you do, the tray might fall and
cause an injury.
8
Page 9

Read This First
• Before installing options, the machine should be turned off and unplugged
for at least an hour. Components inside the machine become very hot, and
can cause a burn if touched.
• Before moving the machine, unplug the power cable from the outlet. If the
cable is unplugged abruptly, it could become damaged. Damaged plugs or
cables can cause an electrical or fire hazard.
• The printer weighs about 185 kg (407.9 lb.). When lifting the machine, use
the inset grips on both sides. Otherwise the printer could break or cause injury if dropped. When moving the machine, contact your sales or service
representive.
• Do not touch the inside of the controller board compartment. Doing so may
cause a malfunction or a burn.
• The inside of this printer becomes very hot. Do not touch parts labelled “v”
(indicating a hot surface). Touching these parts will result in burns.
• When you pull out the plug from the socket, grip the plug, not the cord, to
avoid damaging the cord and causing a fire or an electric shock.
• Do not push or pull the call-light when installed to the printer. Doing so may
result in damage or malfunction of the call-light or the printer.
• Keep the machine away from flammable liquids, gases, and aerosols. A fire
or an electric shock might occur.
• Do not use aluminum foil, carbon paper, or similar conductive paper to
avoid a fire or machine failure.
• If the machine is going to be unused for a long time, such as during holidays, unplug the power cable from the outlet.
❒ When moving from a cold to warm location, or if the local temperature rises
suddenly, condensation may occur inside. If this occurs, leave the machine
unused for at least one hour to let it acclimatize.
❒ Extreme temperature rise inside the machine may cause malfunctions. Do not
place anything in the immediate area of the exhaust and intake vents.
❒ Always keep all covers closed.
❒ During printing, do not open the cover of any parts, and do not move the print-
er.
❒ Do not pull out the paper tray during printing. Printing will stop and paper will
jam.
❒ Prevent foreign objects, such as paper clips, etc., from falling inside the print-
er.
9
Page 10

Read This First
❒ During printing, do not switch the power off and do not unplug the power ca-
ble. Sudden power interruptions can cause malfunctions.
❒ While printing, protect the printer from external shocks, such as arranging pa-
pers on top of the printer.
❒ Depending on temperature and humidity, during printing a while steam may
come from the printing paper when it leaves the printer.
❒ The paper exit and nearby parts may become hot during printing. This is nor-
mal and no reason for concern.
❒ Voltage must not fluctuate more than 10%.
10
Page 11
Read This First
ENERGY STAR Program
As an ENERGY STAR Partner, we have determined that this machine model meets the ENERGY STAR Guidelines for energy efficiency.
The ENERGY STAR Guidelines intend to establish an international energy-saving system for
developing and introducing energy-efficient office equipment to deal with environmental issues,
such as global warming.
When a product meets the ENERGY STAR Guidelines for energy efficiency, the Partner shall
place the ENERGY STAR logo onto the machine model.
This product was designed to reduce the environmental impact associated with office equipment by means of energy-saving features, such as Low-power mode.
❖ Low-power Mode (Energy Saver mode)
This printer automatically lowers its power consumption 60 minutes after the
last operation has been completed. For more information about how to configure Energy Saver mode, see “Making Printer Settings with Control Panel”,
Software Guide as a HTML file on the CD-ROM.
❖ Specifications
Energy Saver mode Power Consumption 50 W or less
Default Time 60 minutes
- Recycled Paper
In accordance with the ENERGY STAR Program, we recommend use of recycled paper which is environment friendly. Please contact your sales representative for recommended paper.
11
Page 12
Read This First
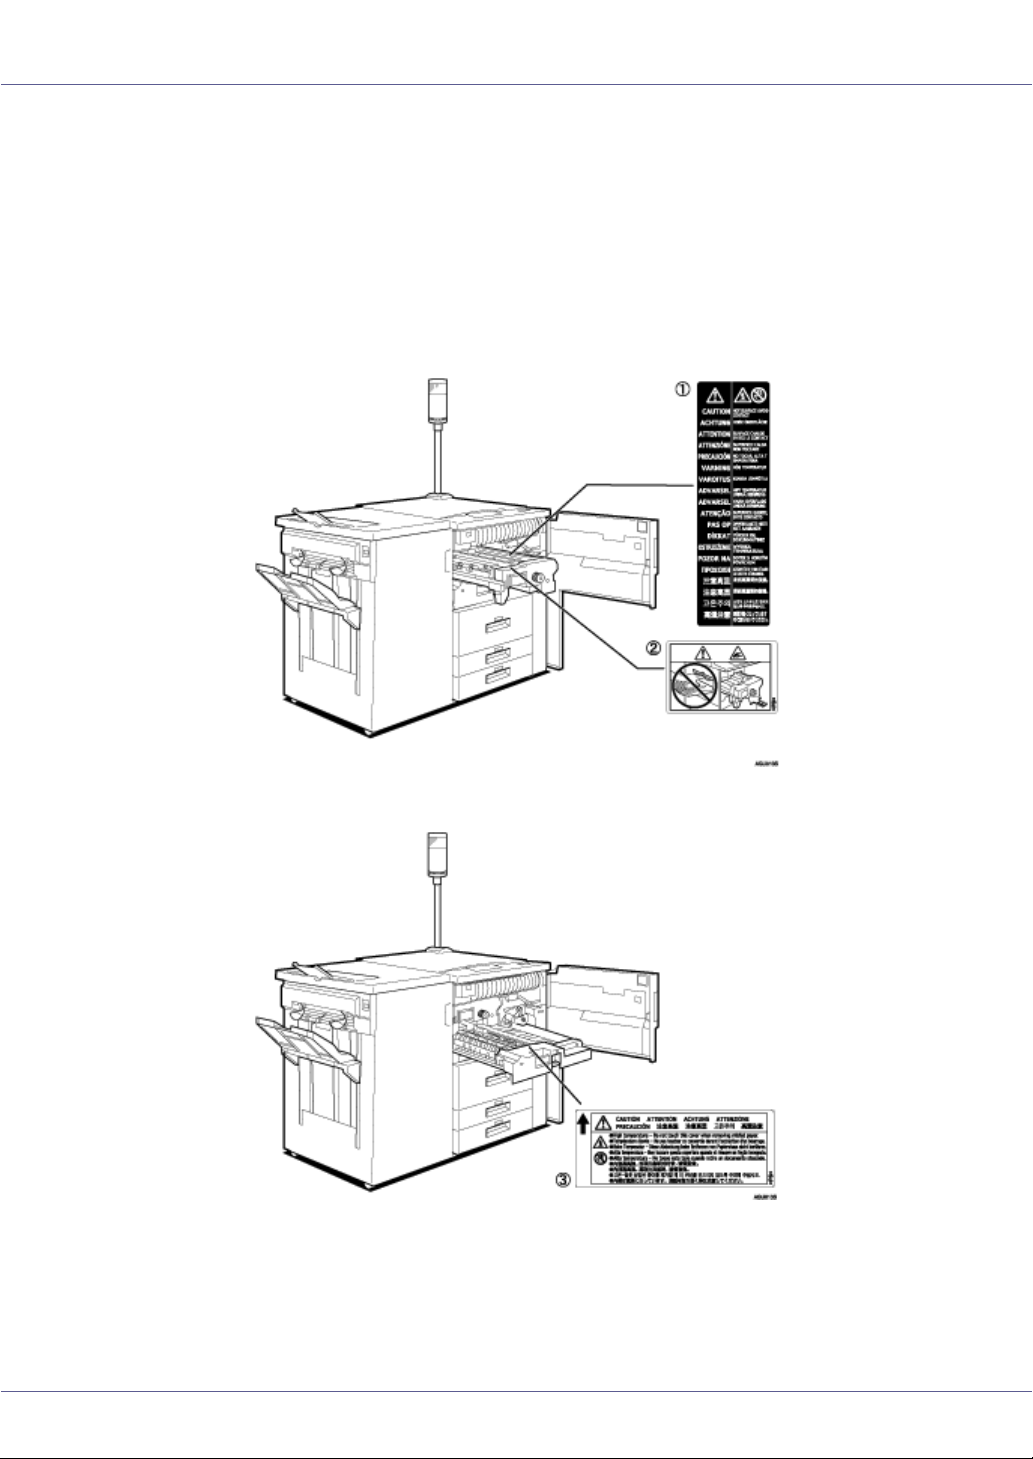
Positions of RWARNING and RCAUTION
labels
This machine has labels for RWARNING and RCAUTION at the positions
shown below. For safety, please follow the instructions and handle the machine
as indicated.
12
Page 13
Read This First
A The inside of this printer becomes very hot. Do not touch parts with this label
(indicating a hot surface). Touching these parts will result in burns.
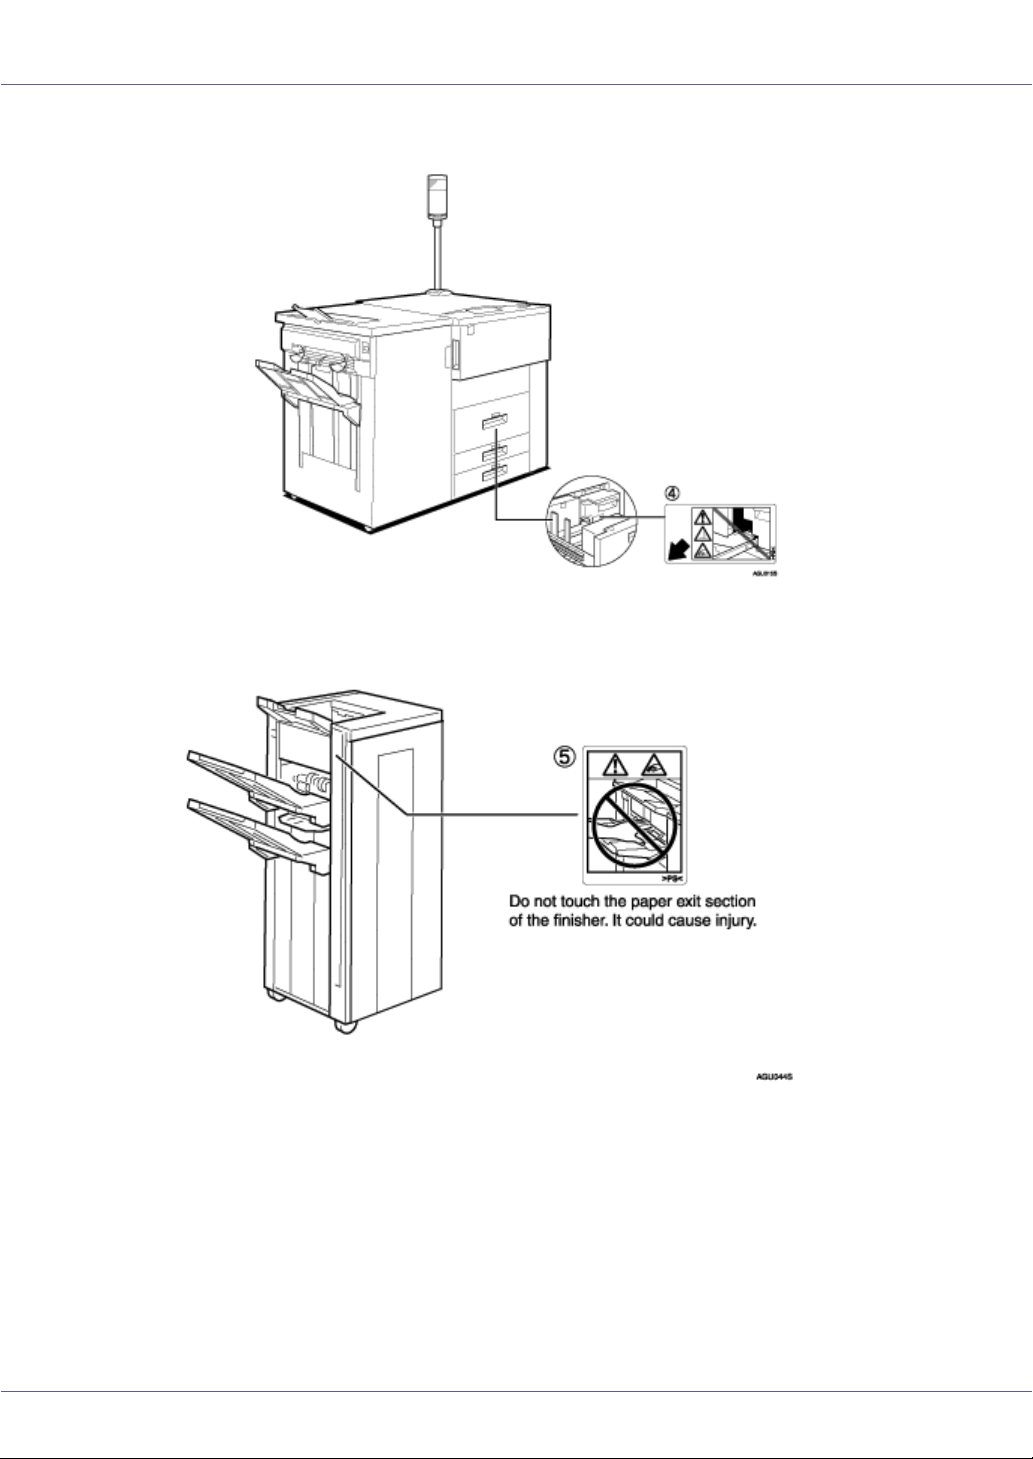
B Do not touch this section of the finisher. It could cause injury.
C The inside of this printer becomes very hot. Do not touch parts with this label
(indicating a hot surface). Touching these parts will result in burns.
D The inside of this printer becomes very hot. Do not touch parts with this label
(indicating a hot surface). Touching these parts will result in burns.
E Do not touch this section of the finisher. It could cause injury.
13
Page 14

Read This First
Manuals for This Printer
For particular functions, see the relevant parts of the manual.
❒ A web browser is required for the HTML user manuals. For details about
HTML user manuals, See p.54 “
❖ Printer Reference (This manual)
Provides information about printer setup, options, and dealing with paper
jams and error messages.
❖ Software Guide (HTML)
Provides basic information about installing the printer driver and software, using the printer in a network environment, configuration, and setup.
Also, provides information about configuring and monitoring printer status using software and a Web browser.
Install the Operating Instructions”
14
Page 15

Read This First
How to Read This Manual
The following set of symbols is used in this manual.
A potentially hazardous situation that might result in death or serious injury if you
misuse the machine without following the instructions under this symbol. Be sure
to read these instructions, all of which are described in the Safety Information
section.
A potentially hazardous situation that might result in minor or moderate injury or
property damage that does not involve personal injury when you misuse the machine without following the instructions under this symbol. Be sure to read these
instructions, all of which are described in the Safety Information section.
* The statements above are notes for your safety.
If this instruction is not followed, paper might misfeed, originals be damaged, or
data be lost. Be sure to read this.
Information or preparations required prior to operating.
Precautions for operation, or actions to take after abnormal operation.
Numerical limits, functions that cannot be used together, or conditions in which
a particular function cannot be used.
This symbol indicates a reference.
Keys that appear on the machine's display.
Keys and buttons that appear on the computer's display.
Keys built into the machine's control panel.
Keys on the computer's keyboard.
15
Page 16
Guide to the Printer
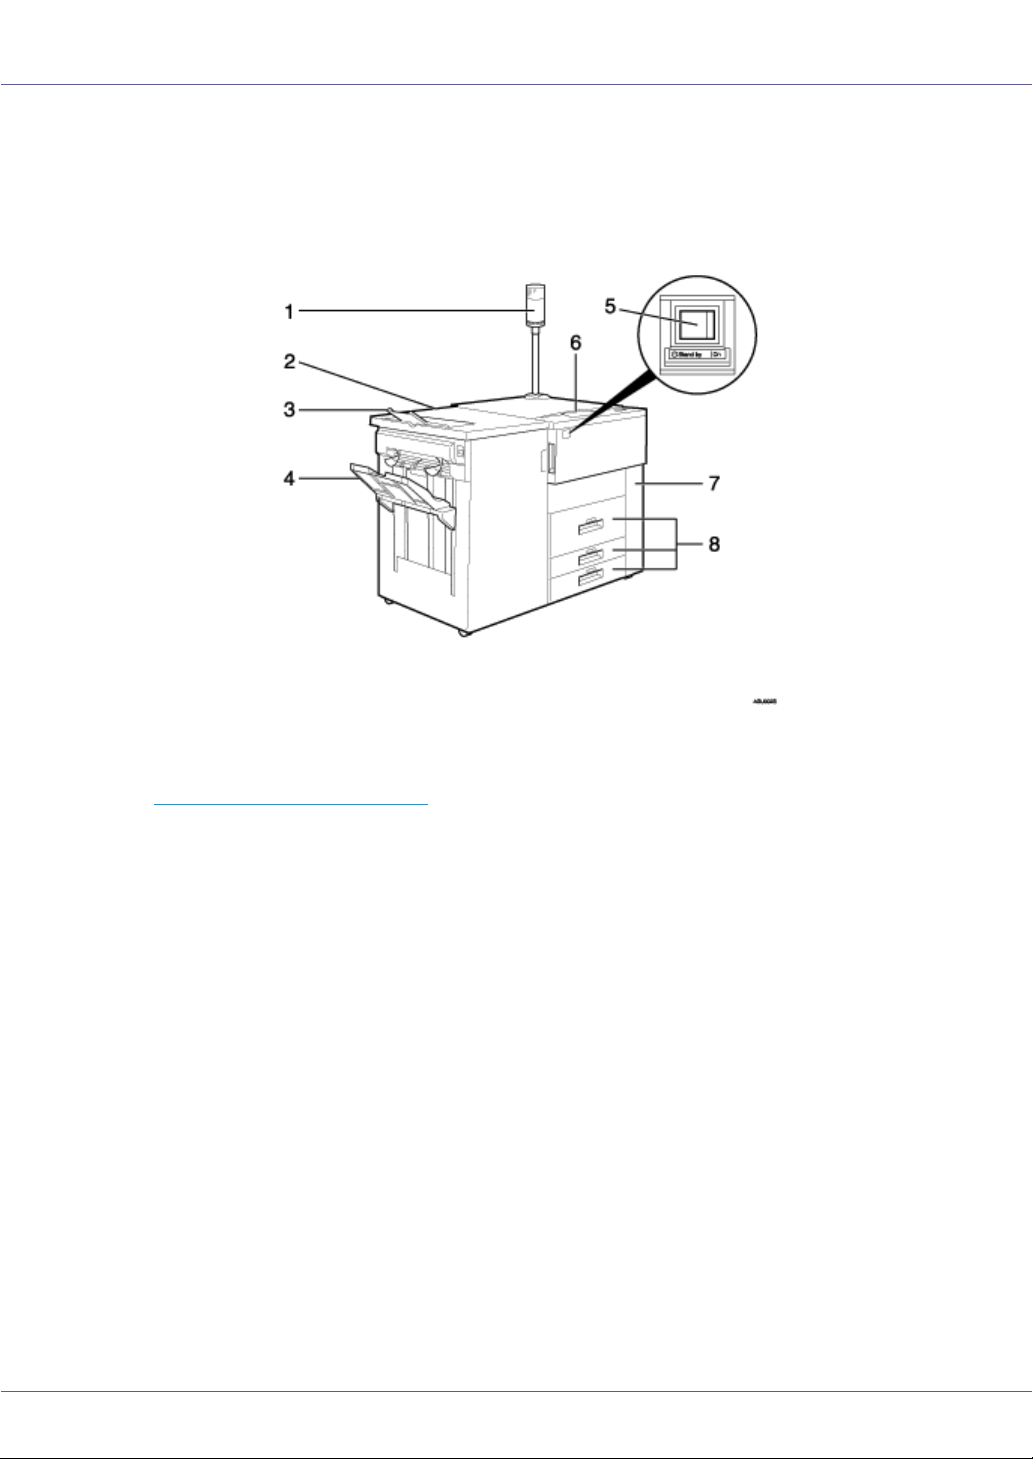
Exterior
1. Call- light
Notifies you of errors during printing, such as paper jam and out of paper. For details,
see p.95 “
Call-light Lit or Blinking”
2. Finisher (optional)
Carries out finishing processes, such as stapling and punching.
The illustration might be slightly different depending on the finisher.
3. Finisher Shift Tray
Collects printed sheets and punched documents.
4. Finisher Shift Tray
Collects printed sheets and stapled and punched documents.
5. Power Switch
Use to switches power to the printer to on/standby, and enter/leave Stand by mode.
6. Control Panel
Contains keys for the printer operation and a panel display that shows the printer status.
7. Front Cover
Open this cover to remove misfed paper or replace the toner bottle.
8. Paper tray (trays 1 to 3)
Load paper here.
G1267203_v1.00 Copyright © 2005 16
Page 17
Guide to the Printer
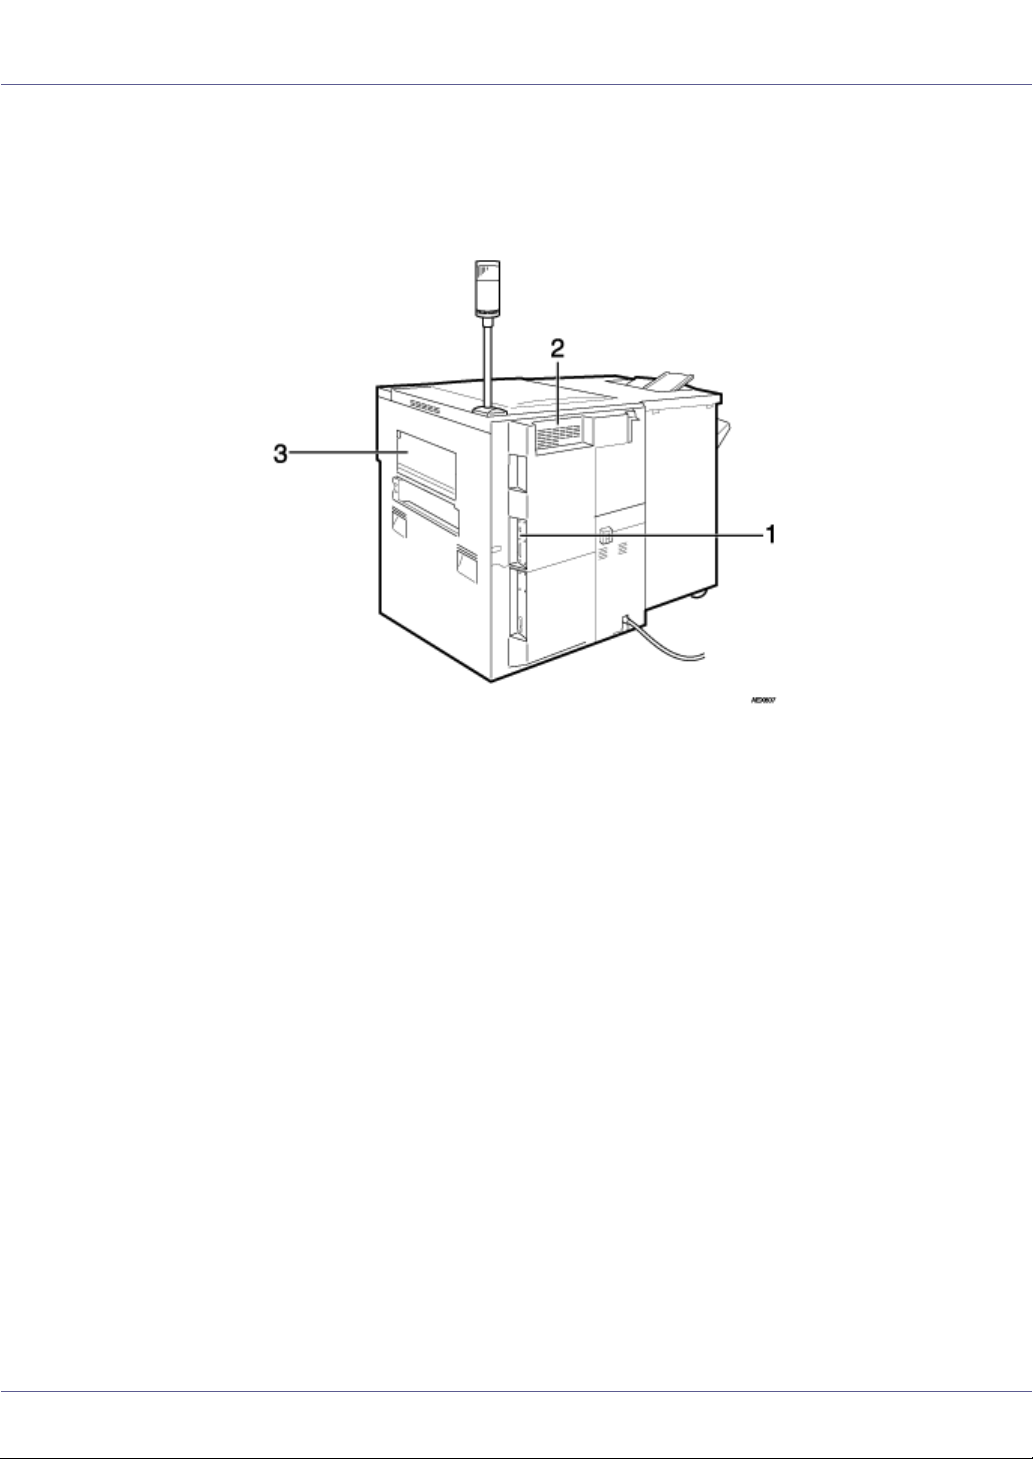
Back
1. Controller Board
Attach the interface cable, network interface cable or the USB interface cable (optional)
here.
2. Ventilation
Prevent overheating. Place no objects against or near these holes.
3. Bypass tray
Use for printing onto OHP transparencies, label paper (adhesive labels), translucent paper, postcards, and custom size paper.
17
Page 18
Guide to the Printer
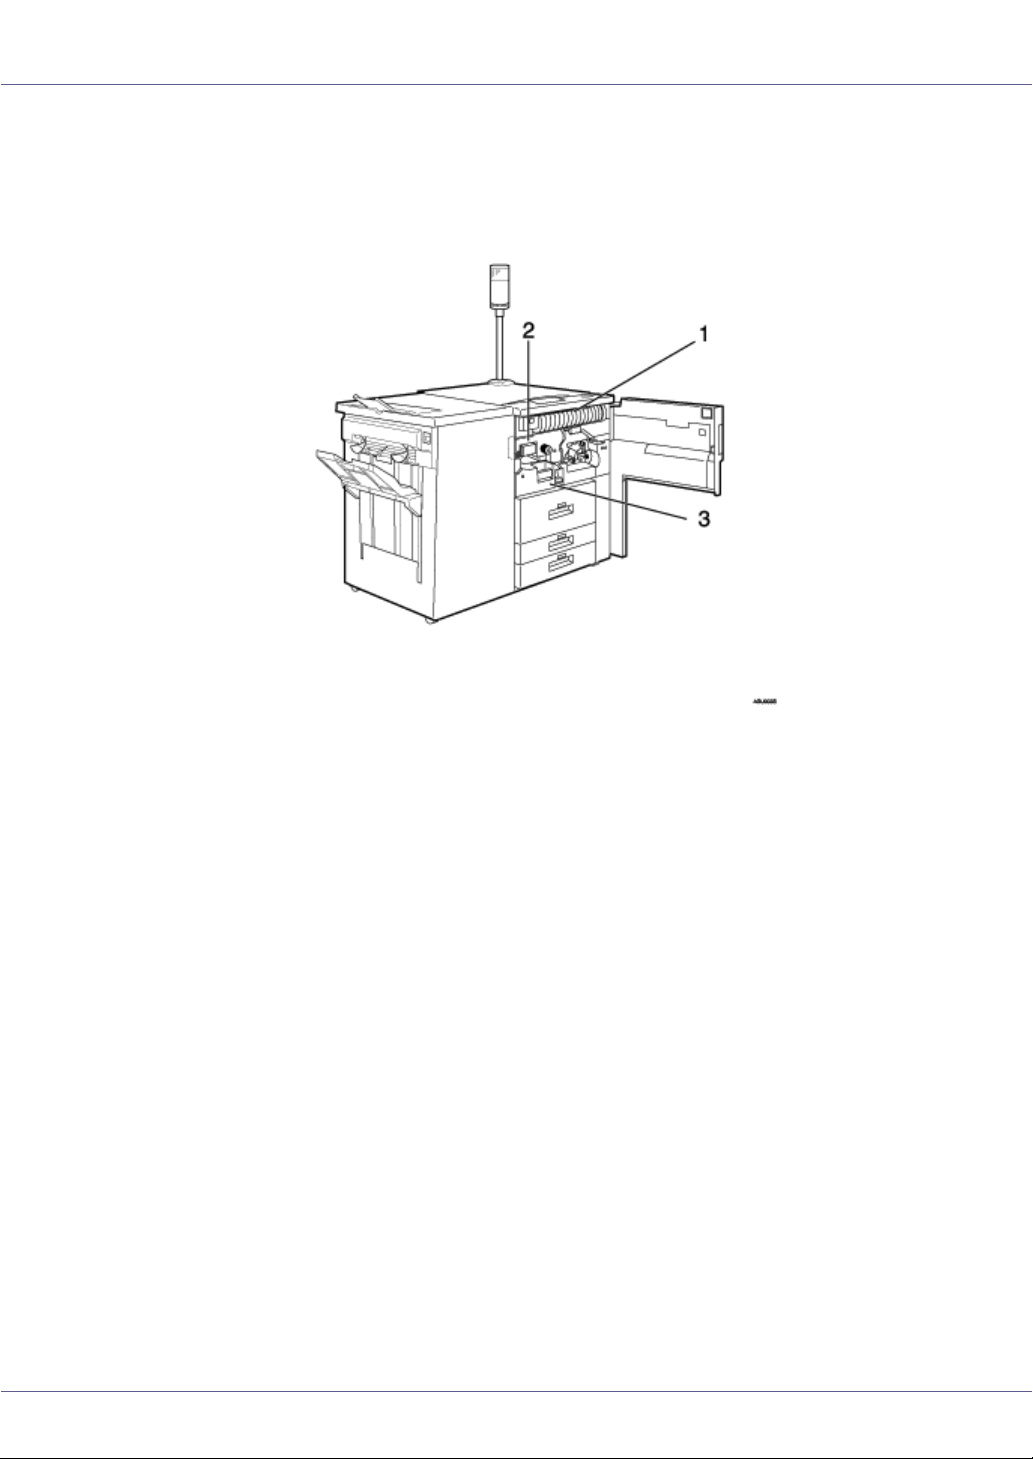
Inside
1. Toner bottle
When the message to add toner appears on the panel display, a new toner bottle is required.
2. Fusing Unit
Fuses the image onto paper.
When [Replace Fusing Unit] message appears on the panel display, replace the fusing
unit.
For details about replacing this unit, contact your sales or service representative.
3. Duplex Unit
For printing on both sides of paper.
18
Page 19
Guide to the Printer
Control Panel
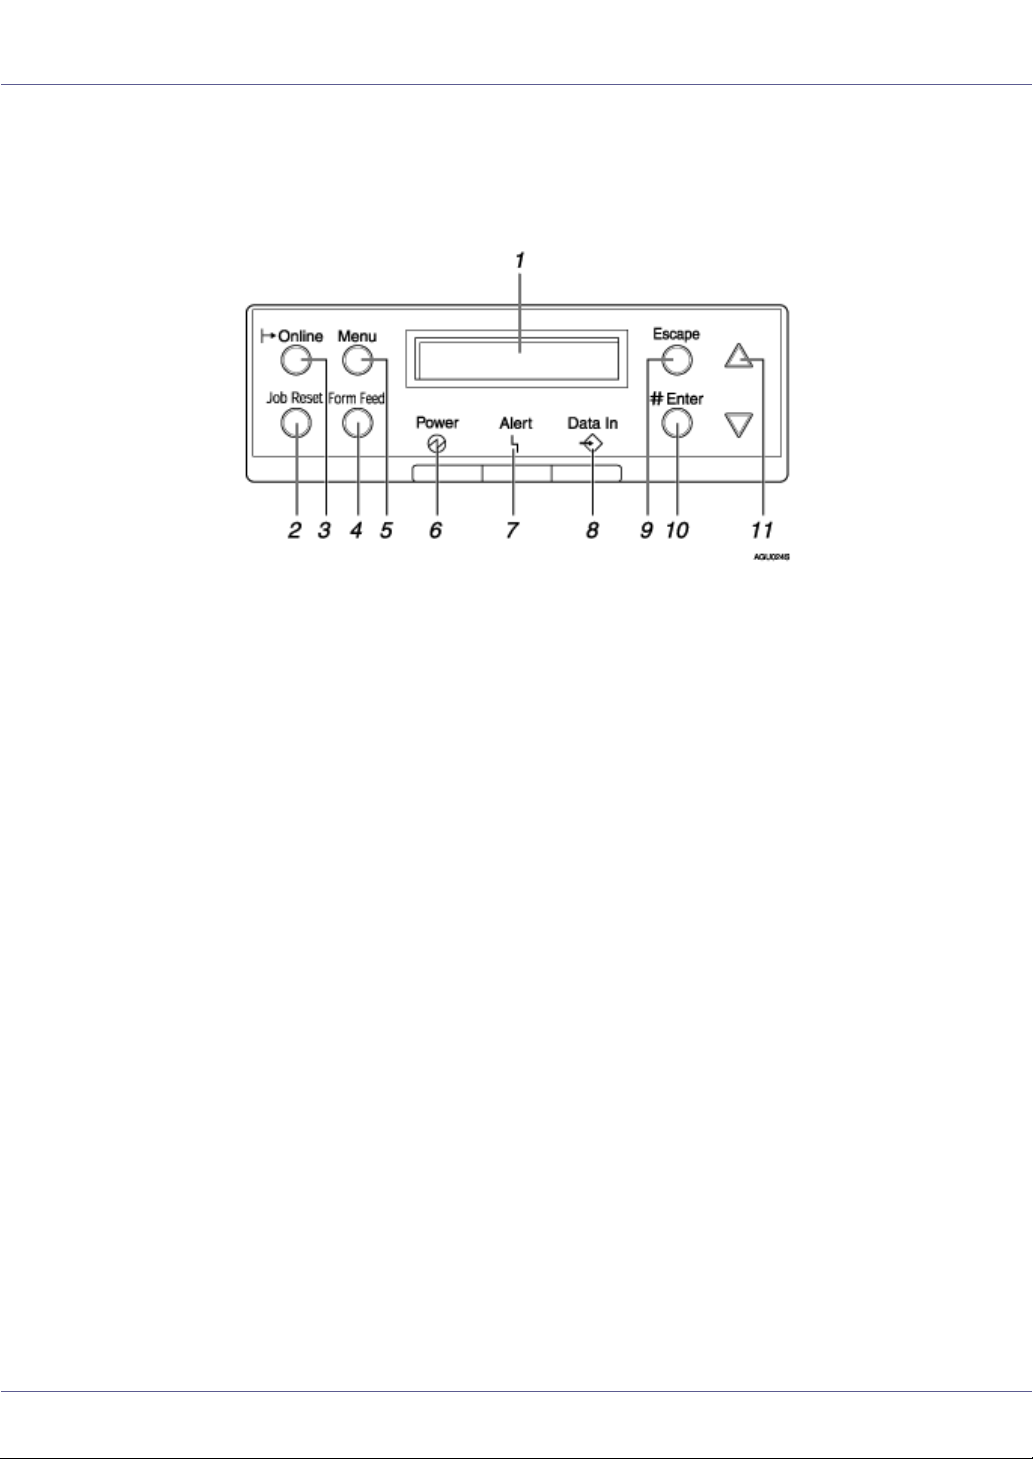
1. Display
Shows the current status of the printer and error messages.
2. {Job Reset} key
When the printer is online, press this key to cancel any ongoing print job.
3. Online Indicator/{Online} key
Indicates whether this machine is online or offline. Pressing the key switches the machine between online and offline.
If online, the machine is ready to receive data, and the lamp is lit.
If offline, the machine is not ready to receive data, and the lamp is unlit.
Pressing the {Online} key during any settings returns the machine to the default screen.
4. {Form Feed} key
When the printer is offline, press this to print all data left in the printer's input buffer.
You can use this to force the printer to print data received in the online status when the
paper size or type does not match the actually set size or type.
5. {Menu} key
Press this key to make and check the current printer settings.
6. Power indicator
Is lit while the printer power is on.
Is unlit when the power is turned Stand by or while the printer is in Energy Saver mode.
7. Error indicator
Blinks or lights whenever a printer error occurs.
When this light is lit in red, take action based on the message displayed on the control
panel.
8. Data In indicator
Blinks while the printer is receiving data. Is lit if there is data to be printed.
19
Page 20

Guide to the Printer
9. {Escape} key
Press this key to return to the previous condition on the display.
10. {# Enter} key
Used to confirm or apply settings to proceed to the subsequent steps.
11. {U} {T} keys
Use to increase or decrease displayed values when making settings. Keep pressed to
quicken scrolling, and increase or decrease values displayed in increments of 10.
20
Page 21

Setting Up
Where to Put the Printer
• Confirm the wall outlet is near the machine and freely accessible, so
that in the event of emergency, it can be unplugged easily.
• Only connect the machine to the power source described in the manual.
• Avoid multi-wiring.
• Do not damage, break or make any modifications to the power cord.
Do not place heavy objects on it, pull it hard or bend it more than necessary. These actions could cause an electric shock or fire.
• Enclosed set of power cord is only for the use with this product and
should not be used with any other electronic equipment or appliances. Do not use any other power cord with this product. They could
cause electric shock or fire.
• Do not handle the plug with wet hands. Doing so might cause an electrical
shock.
• Keep the machine in an area that is within optimum environmental conditions. Operating the machine in an environment that is outside the recommended ranges of humidity and temperature can cause an electrical fire
hazard. Keep the area around the socket free of dust. Accumulated dust
can become an electrical fire hazard.
• Place the machine on a strong and level surface. Otherwise, it might fall and
injure someone.
• If you use the machine in a confined space, ensure there is continuous air
circulation.
G1267203_v1.00 Copyright © 2005 21
Page 22
Setting Up
Space Required for Installation
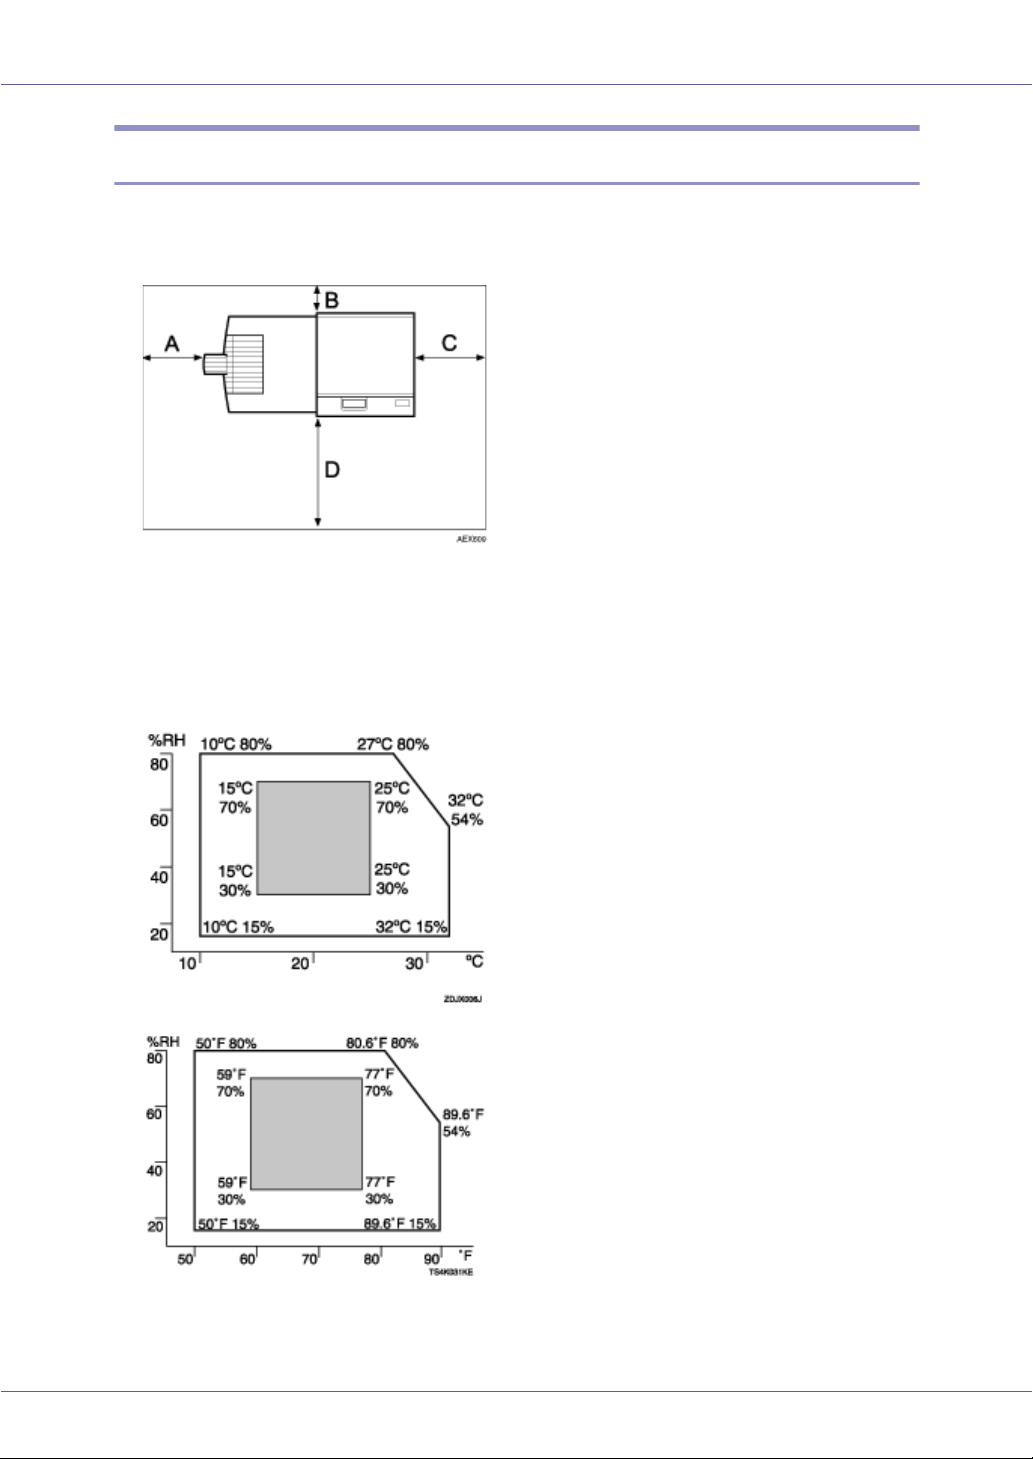
• Ensure there is adequate space around the printer. This space is necessary
to operate the printer. The recommended (or minimum) space requirements
are as follows:
A: 10 cm (4 inches) or more
B: 5 cm (2 inches) or more
C: 4 cm (1.6 inches) or more
D: 70 cm (27.6 inches) or more
• Permissible and recommended temperature and humidity ranges are as follows:
• The machine must be level within 5 mm, 0.2” from both front to rear and left
to right.
22
Page 23

Setting Up
• To avoid possible build-up of ozone, locate this machine in a large well venti-
3
lated room that has an air turnover of more than 30 m
/hr/person.
• When you use this machine for the long time in a confined space that has poor
ventilation, you may detect an odd smell. To keep the workplace comfortable,
we recommend you keep it well ventilated.
• Do not place the machine in areas that are exposed to:
• direct sunlight or strong light
• dust and airborne particulates
• corrosive gases
• humidity
• extreme temperatures (hot or cold)
• air conditioner or humidifier stream
• frequent strong vibration
• EMF from nearby electronic equipment
23
Page 24
Setting Up
Installing the Toner bottle
• Do not incinerate spilled toner or used toner. Toner dust is flammable
and might ignite when exposed to an open flame.
• Disposal should take place at an authorized dealer or an appropriate
collection site.
• If you dispose of the used toner bottles yourself, dispose of them according to local regulations.
• Do not store toner, used toner, or toner containers in a place with an
open flame. The toner might ignite and cause burns or a fire.
• Keep toner (used or unused) and the toner bottle out of reach of children.
• If toner or used toner is inhaled, gargle with plenty of water and move into
a fresh air environment. Consult a doctor if necessary.
• If your skin comes into contact with toner or used toner, wash the affected
area thoroughly with soap and water.
• If toner or used toner gets into your eyes, flush immediately with large
amounts of water. Consult a doctor if necessary.
• If toner or used toner is swallowed, dilute by drinking a large amount of water. Consult a doctor if necessary
• Avoid getting toner on your clothes or skin when removing a paper jam or
replacing toner. If your skin comes into contact with toner, wash the affected
area thoroughly with soap and water.
• If toner gets on your clothing, wash with cold water. Hot water will set the
toner into the fabric and may make removing the stain impossible.
❒ Do not expose the toner bottle to light for a long time. If you do, toner becomes
damaged and print quality might be reduced.
❒ Our products are engineered to meet the highest standards of quality and
functionality. When purchasing expendable supplies, we recommend using
only those provided by an authorized dealer.
❒ The toner bottles supplied with the printer allow you to print about 43,000 pag-
es. These numbers were obtained from printing A4 K 5% charts, but the actual number of pages will vary depending on paper type, size, contents, and
print settings.
24
Page 25
Setting Up
❒ Toner bottles are not covered by warranty. However, if there is problem, con-
tact the store where they were purchased.
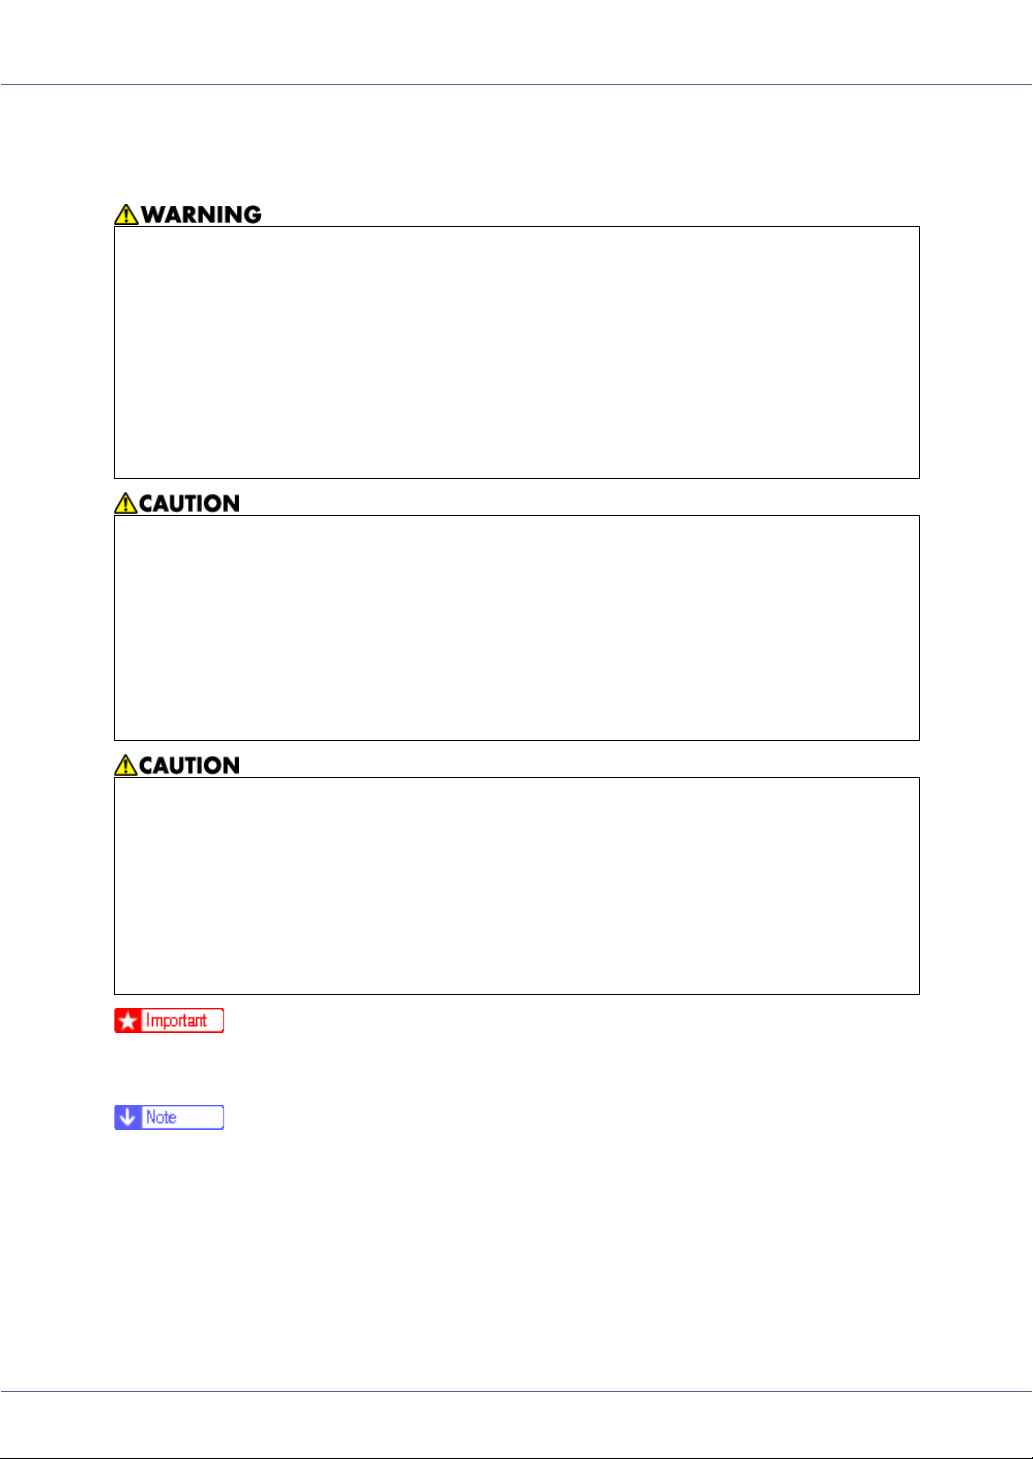
A Open the front cover of the machine.
B Take the new toner bottle from the box.
C Keeping the outer cap in place, hold the bottle horizontally, and then
shake it five or six times.
25
Page 26
Setting Up
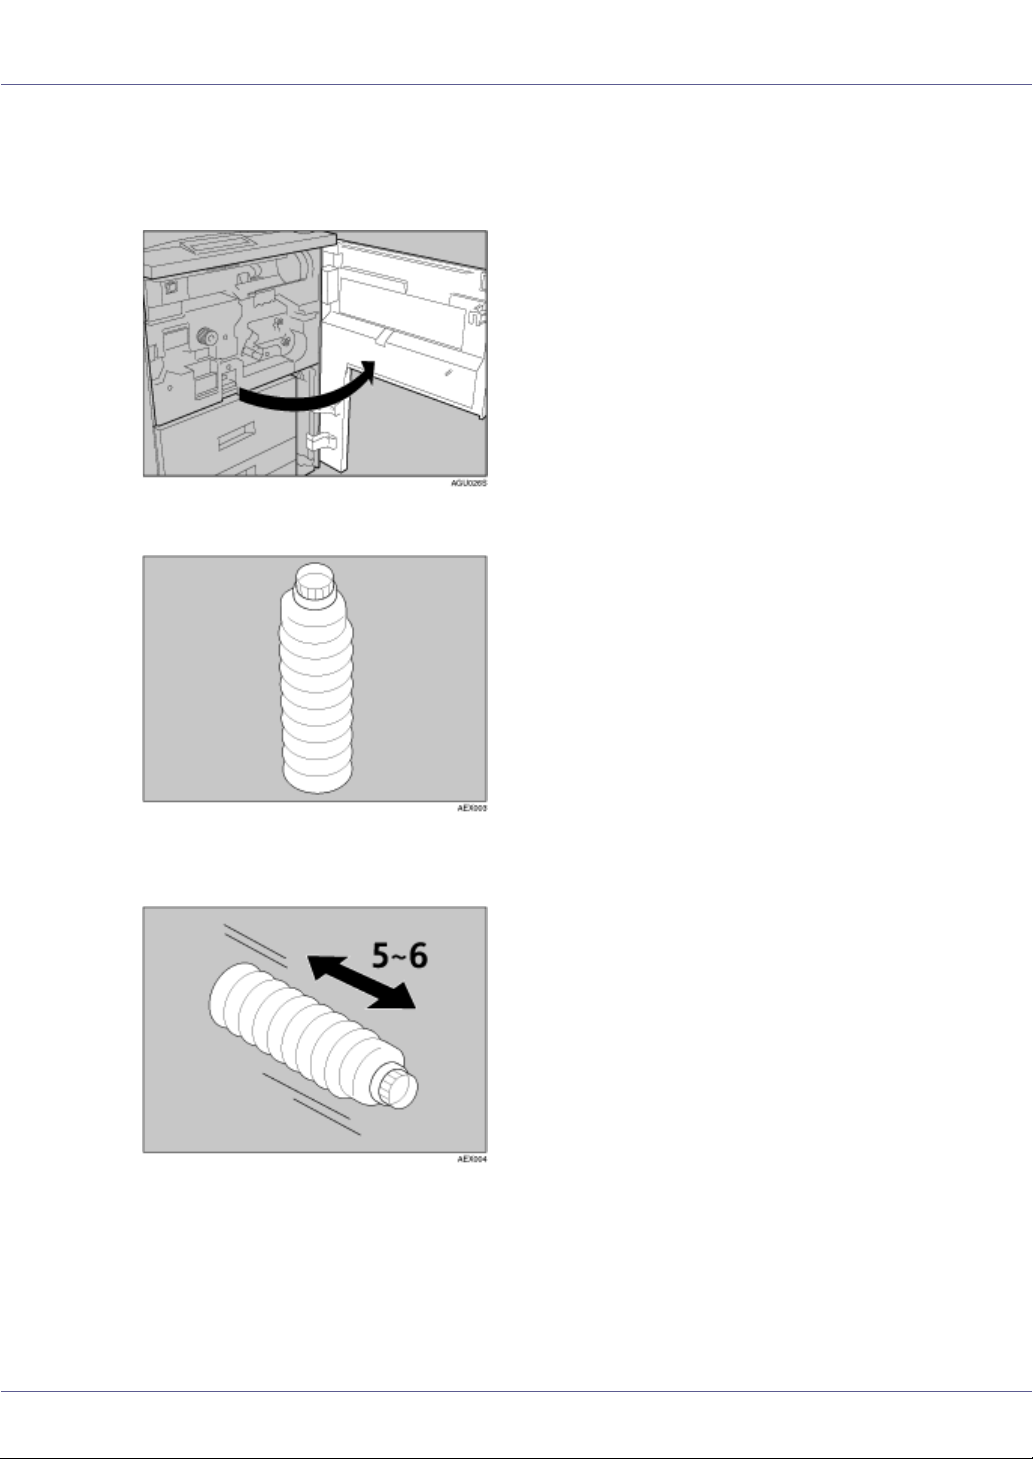
D Remove the outer cap.
❒ Do not remove the inner cap.
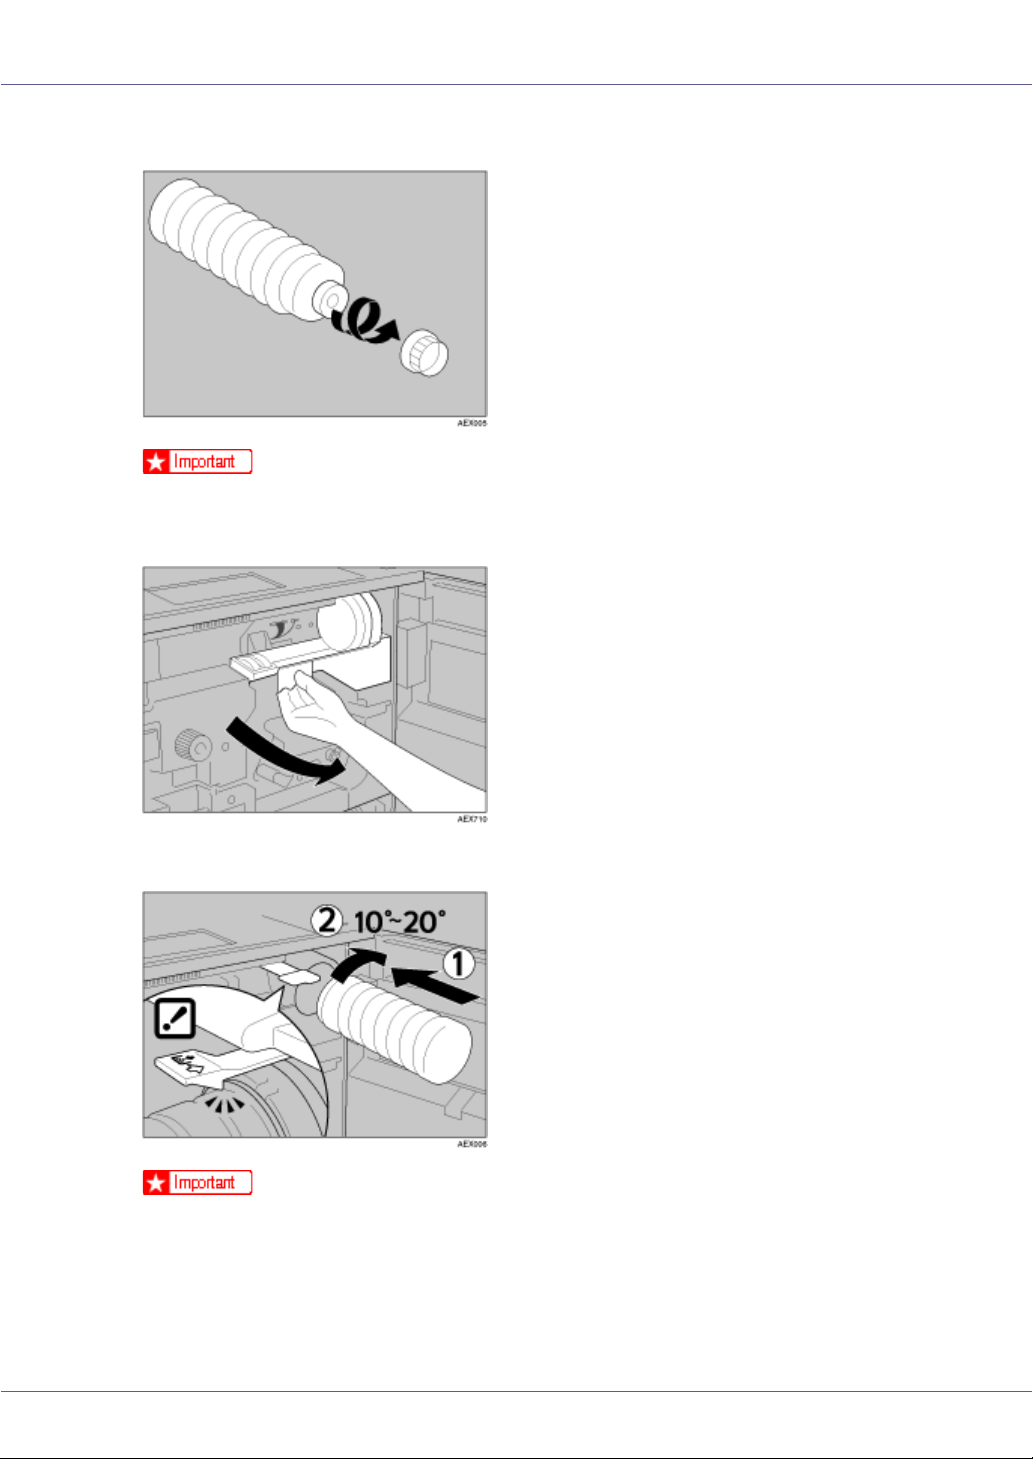
E Pull the lever out toward you, until it is at 90°.
F Insert the toner bottle. Push it in until the green lever clicks.
❒ If the toner bottle does not click into position, pull it slightly back toward you,
rotate it 10-20° to the right, and then re-insert.
❒ Do not insert and remove the toner bottle more than necessary, as toner
spills may result.
26
Page 27

Setting Up
G Return the lever under the toner bottle to its original position.
H Close the front cover of the machine.
27
Page 28
Setting Up
Loading Paper
Loading paper into the paper trays.
Loading paper into Standard paper tray.
The paper trays are set by the manufacturer to accommodate the following types
of paper:
❖ Default settings
• Tray 1: 11”×81/2”K
1
•Tray 2: 8
•Tray 3: 8
For details about usable types of paper, see p.63 “Loading Paper”.
Loading Paper in Tray 1 (Tandem Tray)
/2”×13”L
1
/2”×13”L
A Pull out the paper tray until it stops.
B Square the paper, and then load it in the tray.
28
Page 29
Setting Up
❒ When stacking paper on the right side of the tray, align the right edge of the
stack with the right edge of the tray. When stacking paper on the left side
of the tray, align the left edge of the stack with the left edge of the tray.
❒ Do not stack paper higher than the limit mark inside the tray.
❒ Fan the paper before loading.
❒ Straighten curled or warped paper before loading.
❒ Ensure framed and other types of preprinted paper are correctly loaded.
C Gently push in the paper tray until it stops.
Loading Paper in Tray 2 and 3
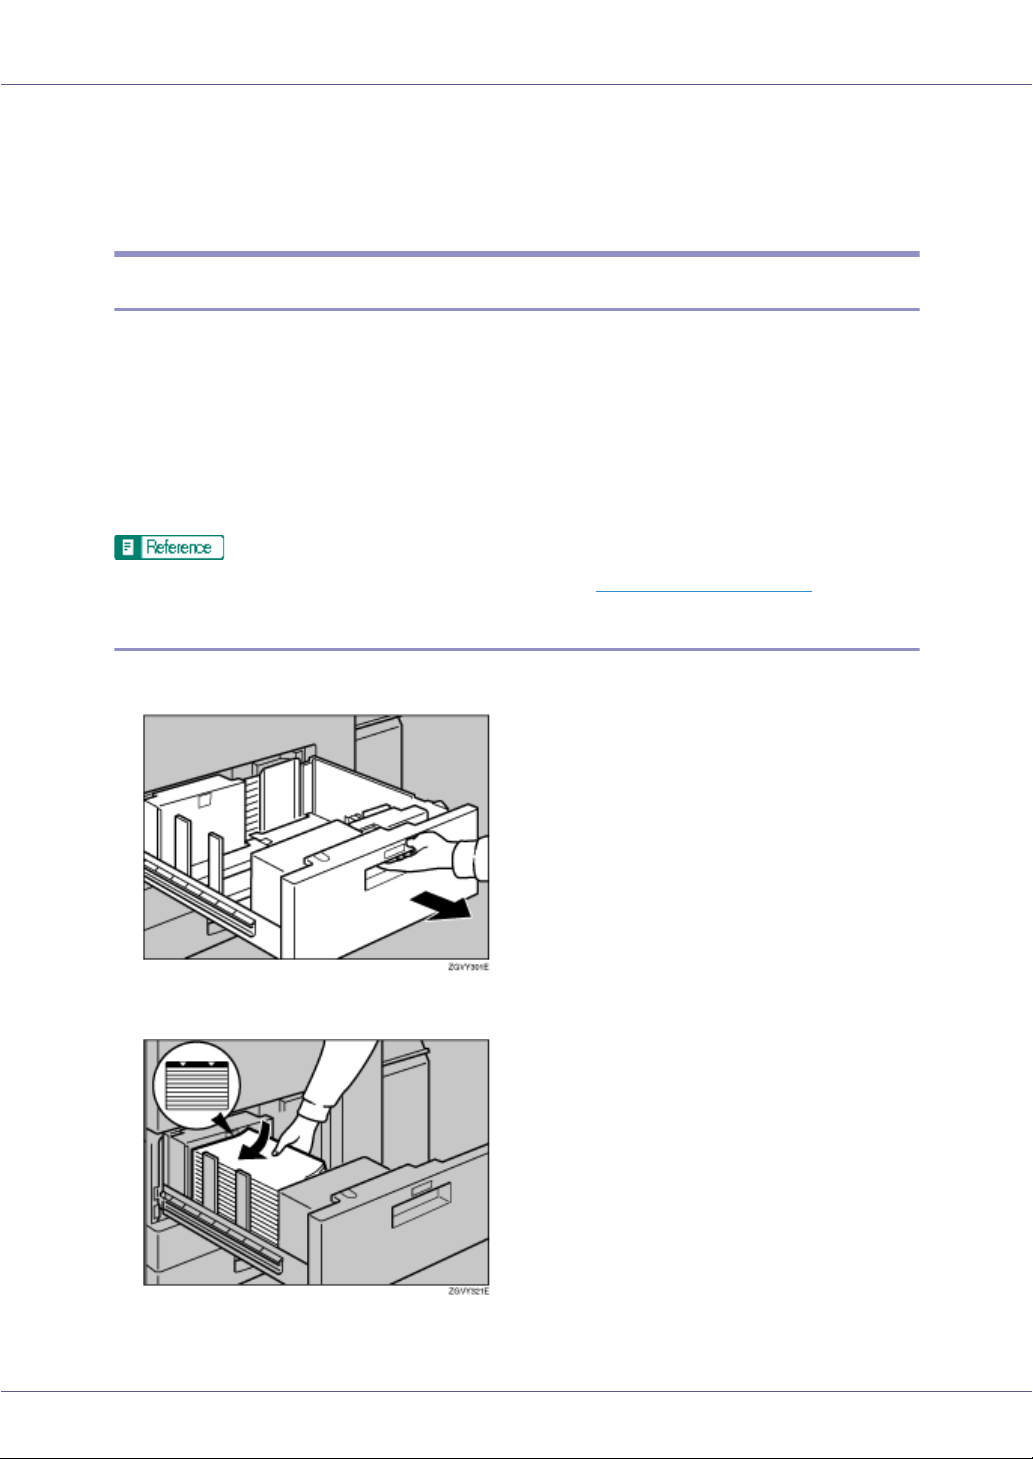
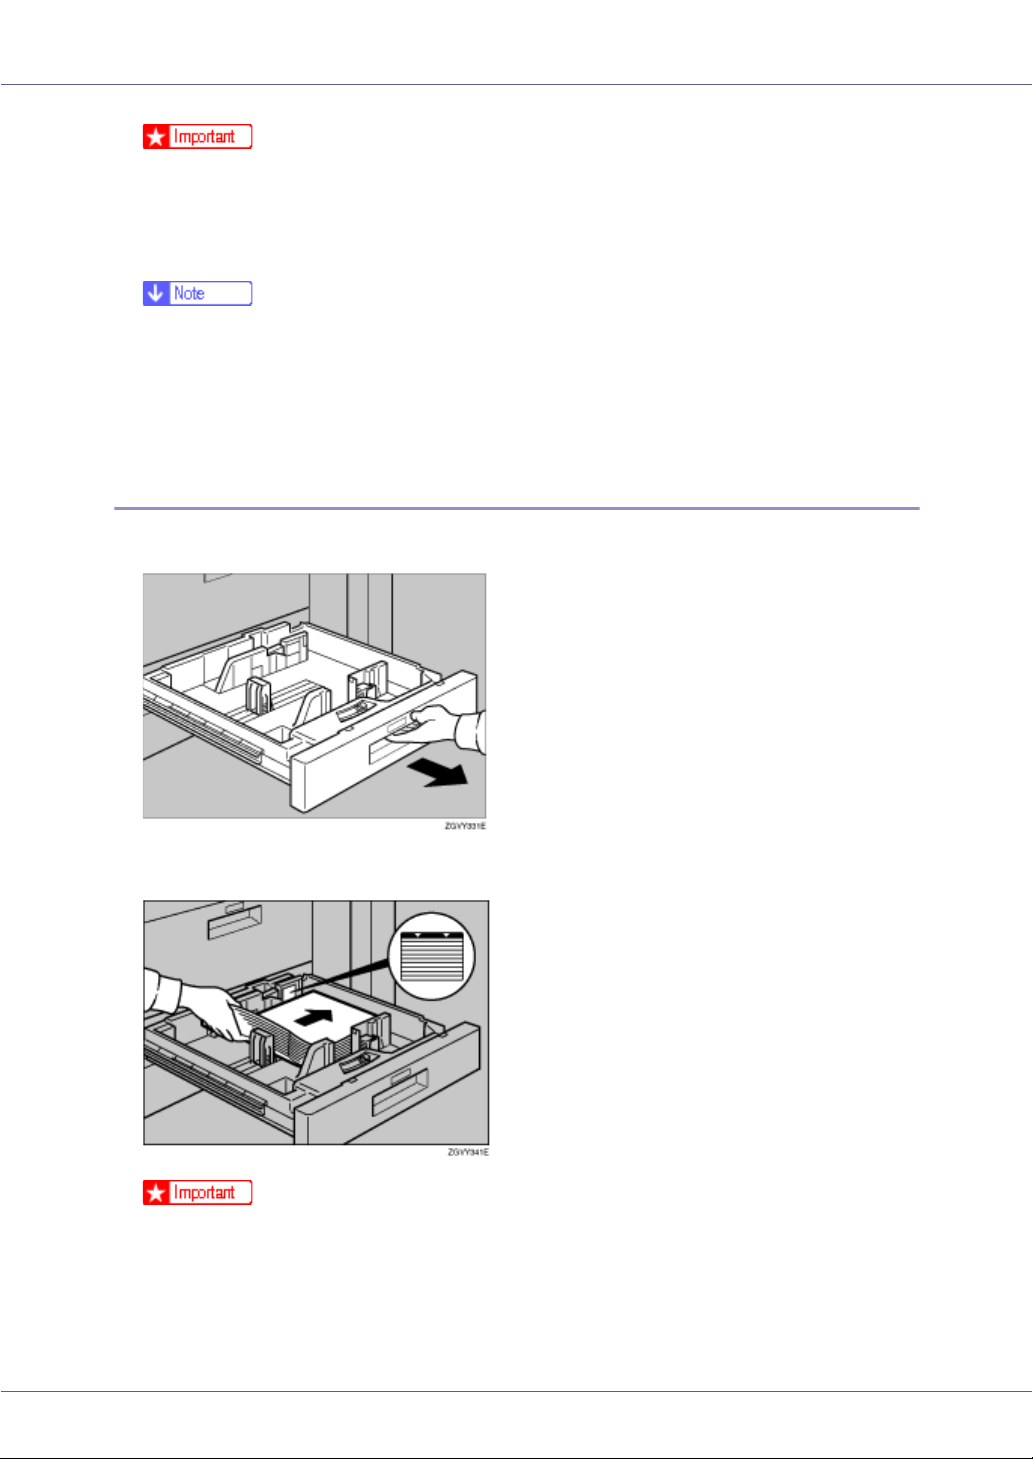
A Pull out the paper tray until it stops.
B Square the paper, and then load it in the tray.
❒ When stacking paper on the left side of the tray, align the left edge of the
stack with the left edge of the tray.
❒ Do not stack paper higher than the limit mark inside the tray.
29
Page 30
Setting Up
❒ Fan the paper before loading.
❒ Straighten curled or warped paper before loading.
❒ Ensure framed and other types of preprinted paper are correctly loaded.
C Gently push in the paper tray until it stops.
Loading Paper in the Large Capacity Tray (LCT)
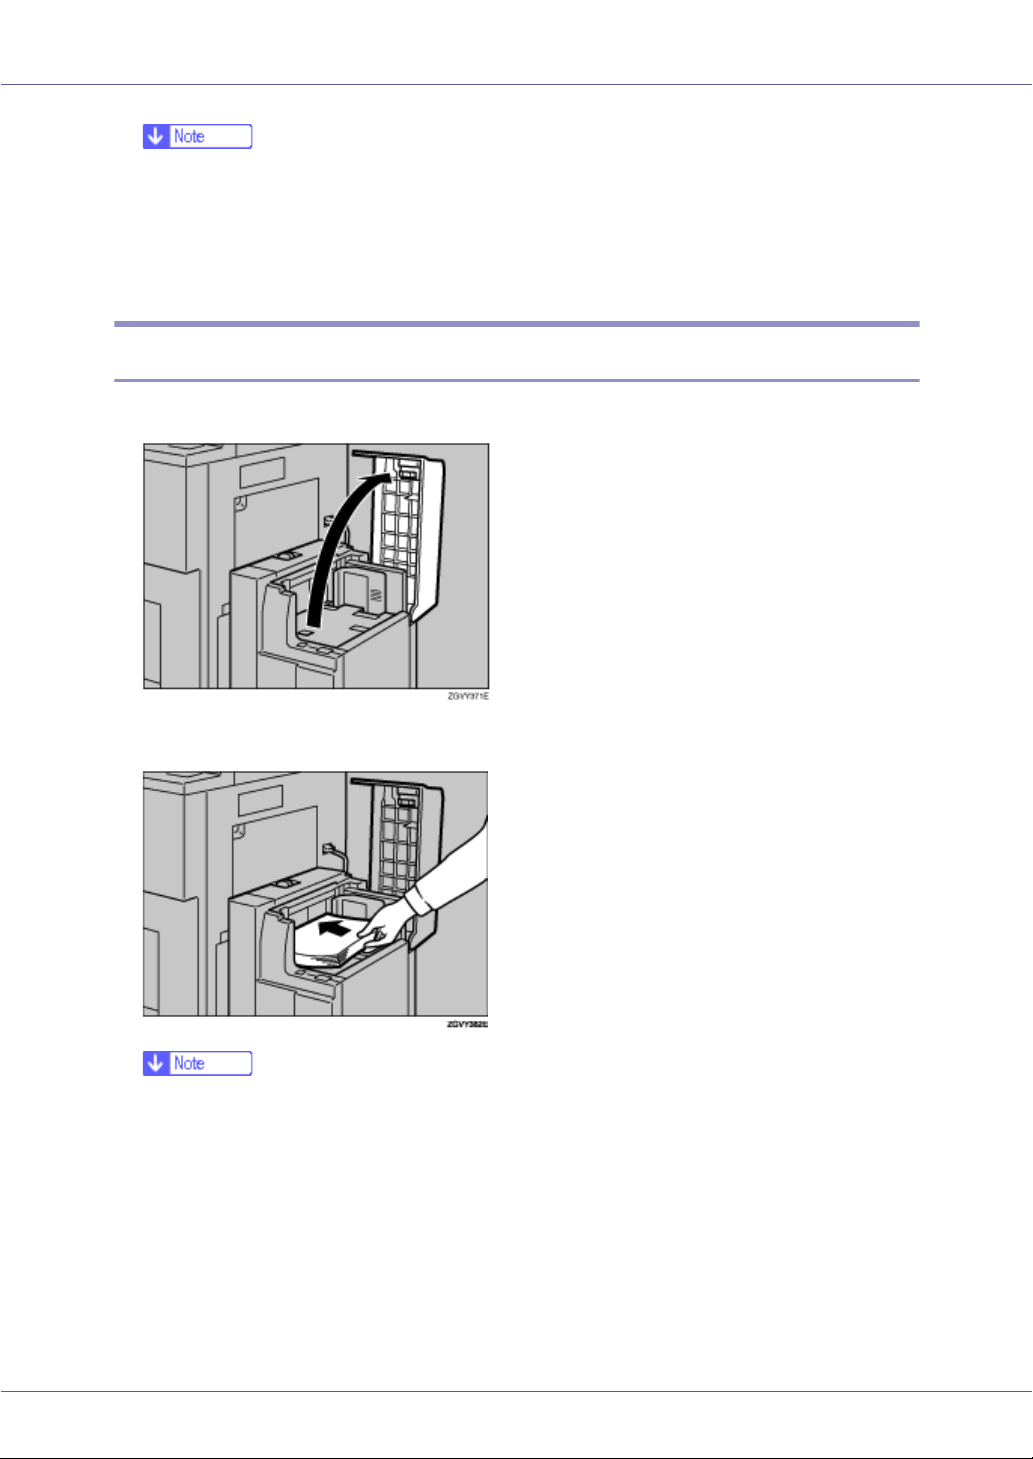
A Open the top cover of the large capacity tray (LCT).
B Load paper by aligning it with the left wall of the tray's interior.
❒ You can load up to 500 sheets (60-105 g/m2, 16-28 lb.) of plain paper into
the tray.
C Press the {Down} key.
30
Page 31

Setting Up
The key blinks as the bottom plate moves down.
D Load paper by repeating steps
❒ The tray can hold up to 4,000 sheets.
and C.
B
E Close the top cover of the large capacity tray (LCT).
❒ When stacking paper on the left side of the tray, align the left edge of the
stack with the left edge of the tray.
31
Page 32

Setting Up
Turning the Power On
• Plug and unplug the power cable with dry hands, or an electric shock
could occur.
❖ Power Switch
• Power Switch (front left)
Setting this switch to cStand by unlit the power lamp on the control panel.
The machine is then in stand by mode.
❒ This machine automatically enters Energy Saver mode if you do not use it for
a certain period.
A Open the switch cover and make sure the power is set to cStand by.
❒ Make sure the power cable is plugged securely into the wall outlet.
❒ Turn the power Stand by when plugging and unplugging the power plug.
B Open the switch cover and turn the power to On.
The power indicator on the control panel lights up.
32
Page 33

Setting Up
❒ Do not switch to standby immediately after turning on the power switch.
Doing so may result in damage to the hard disk or memory, leading to malfunction.
33
Page 34

Setting Up
Selecting the Display Language
Select a language using the procedure described here.
A message about selecting the language will appear on the display. If you want
to use the display in English, the following procedures are unnecessary.
❒ The default setting is English.
A Press the {Menu} key.
The [Menu] screen appears.
B Press the {U} or {T} key to display [Language].
Menu:
Language
C Press the {# Enter} key.
The following message appears on the display:
Language:
*English
D Press the {U} or {T} key until the language you want to select appears.
34
Page 35

Setting Up
E Press the {# Enter} key. Wait for two seconds.
The [Menu] screen appears.
F Press the {Online} key.
The initial screen appears.
Ready
35
Page 36

Setting Up
Test Printing
The following explains the procedure for test printing of the configuration page.
Make a test print to verify the printer is working normally. Test printing checks
printer performance only; it does not test the connection to the computer.
A Press the {Menu} key.
The [Menu] screen appears on the display.
B Press the {U} or {T} key to display [List/Test Print], and then press the {#
Enter} key.
Menu:
List/Test Print
The menu for selecting the contents to be test printed appears.
C Press the {U} or {T} key to display [Config. Page], and then press the {#
Enter} key.
List/Test Print
Config. Page
The following message appears and the configuration page is printed.
Printing...
❒ If printing is not normal, check to see if an error message appears on the
display. If there is an error message, see p.88 “
Troubleshooting”.
D Check the options.
36
Page 37

Setting Up
❒ For details about the configuration page, see “Interpreting the Configura-
tion Page”, Software Guide.
E Press the {Online} key.
The initial screen appears.
Ready
37
Page 38

Connecting the Machine
Connecting to the Ethernet Interface
Prepare the hub and other network devices before connecting the 10 BASE-T or
100 BASE-TX cable to the machine's Ethernet port.
The network interface board supports 10BASE-T or 100BASE-TX connections.
❒ Before connecting, ground yourself to by touching a metal object.
A Set the machine to Standby mode.
B A core for the Ethernet cable is supplied with this machine. Make a loop
at the end of theEthernet cable.
C Connect the Ethernet interface cable to the 10BASE-T/100BASE-TX port.
D Connect the other end of the cable to the printer's network, such as a
hub connector.
For details about network environment settings, see Software Guide.
E Turn on the power switch.
G1267203_v1.00 Copyright © 2005 38
Page 39

Connecting the Machine
Reading the LED Lamps
1. Indicator (green)
Stays lit when the machine is properly connected to the network.
2. Indicator (yellow)
Lit if 100 BASE-TX is operating. Unlit if 10 BASE-T is operating.
39
Page 40

Connecting the Machine
Connecting the Machine to the host using
the parallel cable
Connect the machine to the host computer using the parallel port.
The machine's parallel interface is a standard bidirectional interface. It requires
a standard IEEE 1284 compliant 36-pin parallel cable and a parallel port on the
host computer. Make sure you purchase the correct cable for the machine and
your computer.
❒ A parallel cable is not supplied.
❒ Do not use a parallel cable longer than 2.5 meters (8.2 feet).
❒ Rating voltage of the interface connector: max. DC 5V
Follow the procedure below to connect the machine to the host computer using
a parallel cable.
❒ Before connecting the machine and a computer, make sure the machine is not
operating, and then turn Stand by the power switches of both the machine and
computer.
❒ Be sure to use an approved interface cable. Non-standard cables may cause
radio interference.
A Turn to Stand by the power switches of the machine and computer.
B Clip the ferrite core around the printer end of the cable, close to the con-
nector.
❒ Make sure it is clipped in the right place
C Fit one tie wrap snugly around the center of the ferrite core to prevent
the core coming loose.
40
Page 41

Connecting the Machine
D Fit the other tie wrap snugly around the end of the ferrite core to prevent
the core moving along the cable
❒ Fasten the tie wrap tightly.
❒ Cut off excess tie wrap using scissors.
E Fit the other tie wrap snugly around the end of the ferrite core to prevent
the core moving along the cable.
F Plug the cable into the connector on the machine’s interface and the
other end of the cable into the connector on the computer’s interface.
The machine and the computer are now connected. Next, install the printer
driver. For details, see “Preparation for Printing”, Software Guide.
41
Page 42

Connecting the Machine
Connecting the machine to the host using
a USB cable (optional)
❒ The optional USB 2.0 interface board is supported by Windows 98
SE/Me/2000/XP, Windows Server 2003, Mac OS 9.x, and Mac OS X Classic
mode.
• For Windows 98 SE/Me:
Be sure to install USB Printing Support. If USB 2.0 is used with Windows
98 SE/Me, only a speed equal to that of USB 1.1 is possible.
•For Mac OS:
Mac OS supports only the standard USB port. If USB 2.0 is used with a
Mac OS, only a speed equal to that of USB 1.1 is possible.
A Connect the USB 2.0 interface cable to the USB port on the right side of
the machine's back cover.
B Connect the opposite end's flat connector to devices such as your com-
puter's USB interface, or a USB hub.
The machine and the computer are now connected. Next, the “Plug and Play”
screen appears. For details, see “Preparation for Printing”, Software Guide.
42
Page 43

Configuration
Ethernet Configuration
Make the following network settings according to the network interface you are
using.
When connecting the machine to a network using an Ethernet cable or the optional extended wireless LAN board, use the control panel to make the necessary settings according to your network environment.
You can use SmartDeviceMonitor for Admin or a Web browser to make IP address-related settings in a TCP/IPcapable environment.
Setting Name Value
DHCP On
IP Address
Subnet Mask
*1
011.022.033.044
*1
000.000.000.000
Gateway Ad-
*1
dress
Frame Type
(NW)
Active Protocol TCP/IP Active
Ethernet Speed
*2
LAN Type Ethernet
*1
If DHCP is in use, the IP address, subnet mask, and gateway address are all set automatically.
*2
Make this setting only when necessary. See Software Guide.
000.000.000.000
Auto Select
NetWare Active
SMB Active
AppleTalk Active
Auto Select
A Press the {Menu} key.
G1267203_v1.00 Copyright © 2005 43
Page 44

Configuration
The [Menu] screen appears on the display.
B Press the {U} or {T} key to display [Host Interface] menu, and then press
the {# Enter} key.
Menu:
Host Interface
The interface setting menu appears.
C Press the {U} or {T} key to display [Network Setup], and then press the {#
Enter} key.
The network setup menu appears.
D Press the {U} or {T} key to display [Active Protocol], and then press the
{# Enter} key.
The active protocol menu appears.
E Press the {U} or {T} key to select Active Protocol, and then press the
{# Enter} key.
Active Protocol:
TCP/IP
The following example explains activating TCP/IP:
F Press the {U} or {T} key to select [Active] or [Not Active], and then press
the {# Enter} key.
TCP/IP:
*Active
About two seconds after the settings are made, the screen returns to the active protocol menu. To disable the setting, select [Not Active], and then press
the {# Enter} key.
G Repeat above steps for any other protocols that need to be set.
H Press the {Escape} key. The screen returns to the network setup menu.
The network setup menu appears.
❒ Enable TCP/IP to use the Pure IP environment of NetWare 5/5.1, NetWare
6/6.5.
I To use TCP/IP, you must assign an IP address to the printer. Press the
{U} or {T} key to display [IP Address], and then press the {# Enter} key.
When DHCP is “On”, you cannot make settings for the following items:
44
Page 45

Configuration
• IP Address
• Subnet Mask
• Gateway Address
The current IP address appears on the display.
❒ To obtain the IP address for the printer, contact your network administrator.
J Press the {U} or {T} key to enter the leftmost entry field of the IP ad-
dress, and then press the {# Enter} key.
IP Address:
192.022.033.044
❒ The value changes in increment of 10 if the {U} or {T} key is held down.
❒ If you do not need to adjust the value, then press the {# Enter} key. The
screen changes, and the next field can then be entered.
❒ Do not set “011.022.033.044” as the IP address.
K Press the {# Enter} key.
The screen changes, and the next field can then be entered.
IP Address:
192.168.000.010
L Repeat the procedure, and then press the {# Enter} key.
To display the previous field, press the {Escape} key.
M To use TCP/IP, assign [Subnet Mask] and [Gateway Address] following the
same procedure for entering the IP address.
N Press the {U} or {T} key to display [DHCP], and then press the {# Enter}
key.
Network Setup:
DHCP
O Press the {U} or {T} key to display On, and then press the {# Enter} key.
DHCP:
*On
After about two seconds, the display returns to the network setup menu.
45
Page 46

Configuration
P If you use NetWare, select the frame type for NetWare.
Select one of the items below if necessary.
• Auto Select (Default)
• Ethernet II
• Ethernet 802.2
• Ethernet 802.3
• Ethernet SNAP
❒ Usually, use the default setting (“Auto Select”). When you first select “Auto
Select”, the frame type detected by the printer is adopted. If your network
can use more than two frame types, the printer may fail to select the correct
frame type if “Auto Select” is selected. If this happens, select the appropriate frame type.
Q Press the {U} or {T} key to display [Frame Type (NW)], and then press the
{# Enter} key.
Network Setup:
Frame Type (NW)
The current setting appears on the display.
R Press the {U} or {T} key to display the frame type you want to use, and
then press the {# Enter} key.
Frame Type (NW):
*Auto Select
About two seconds after the settings are made, the screen returns to the network setup menu.
S Press the {Online} key.
The initial screen appears.
Ready
T Print a configuration page to confirm the settings made.
For details about printing the configuration page, see p.36 “Test Printing”.
46
Page 47

Configuration
IEEE 802.11b (Wireless LAN) Configuration
Configure the printer to use IEEE 802.11b (Wireless LAN). The following table
shows the control panel settings and their default values. These items appear in
the [Host Interface] menu.
Setting Name Default Value
Comm. Mode 802.11 Ad hoc
Channel Inch version
(1-11) 11
Metric version
(1-13) 13
Trans. Speed Auto Select
SSID blank (ASSID)
WEP Setting Not Active
❒ To use IEEE 802.11b (Wireless LAN), select [IEEE 802.11b] for [LAN Type] in
[Network Setup] in the [Host Interface] menu, and then set [IP Address], [Subnet
Mask], [Gateway Address], [DHCP], [Frame Type (NW)] and [Active Protocol] under
the [Network Setup] menu. For details about setting items under “Configuring
the Printer for the Network”, see Software Guide.
❒ The 802.11b interface unit cannot be used simultaneously with a standard
ethernet interface.
A Press the {Menu} key.
The [Menu] screen appears on the display.
47
Page 48

Configuration
B Press the {U} or {T} key to display [Host Interface], and then press the {#
Enter} key.
Menu:
Host Interface
C Press the {U} or {T} key to display [IEEE 802.11b] , and then press the {#
Enter} key.
The 802.11b setting menu appears.
D Press the {U} or {T} key to display [Comm. Mode], and then press the {#
Enter} key.
The comm. mode setting menu appears.
E Press the {U} or {T} key to select the transmission mode of IEEE
802.11b, and then press the {# Enter} key.
Comm. Mode:
*802.11 Ad hoc
After two seconds after the settings are made, the screen returns to the IEEE
802.11b setting menu.
F If [802.11 Ad hoc] or [Ad hoc] is selected for [Comm. Mode], set the channel to
use for transmission.
❒ Confirm with the network administrator for the channel you want to use.
❒ To use an IEEE 802.11b card for which the SSID (Network Name) setting
is not necessary, select [Ad hoc].
G Press the {U} or {T} key to display [Channel], and then press the {# Enter}
key.
The channel in current use appears on the display.
H Press the {U} or {T} key to enter the channel, and then press the {# En-
ter} key.
Channel:
(1-11) 11
I Repeat above step to set [Trans. Speed].
J If [Infrastructure] or [802.11 Ad hoc] is selected for [Comm. Mode], set the SSID
to use for transmission. Press the {U} or {T} key to display [SSID], and
then press the {# Enter} key.
48
Page 49

Configuration
Confirm with the network administrator concerning the SSID you want to use.
IEEE 802.11b:
SSID
The SSID menu appears on the display.
SSID:
View
If you select [View], you can confirm the SSID when set. If the SSID is not entered, the [SSID not entered] message appears, and the screen returns to [IEEE
802.11b].
K Press the {U} or {T} key to display [Enter ID], and then press the {# Enter}
key.
The following message appears on the display.
SSID [ 0]
k
The value in brackets at the upper right is the number of characters entered.
L Press the {U} or {T} key to select characters, and then press the {# En-
ter} key.
SSID [ 1]
A
You can now enter the next character.
M Continue entering the key.
The characters that can be used are ASCII 0x20-0x7e (32 bytes).
To display the previous character, press the {Escape} key.
N After entering the key, press the {# Enter} key twice.
After the settings are made, the screen returns to the IEEE 802.11b setting
menu.
O When using a WEP key on a network, activate the WEP setting to be
used for communication along with WEP.
Confirm with the network administrator concerning the WEP Key to use.
P Press the {U} or {T} key to display [WEP Setting], and then press the {#
Enter} key.
49
Page 50

Configuration
The wep setting menu appears.
WEP Setting:
*Not Active
Q Press the {U} or {T} key to display [Active], and then press the {# Enter}
key.
The wep setting menu appears on the display.
Change WEP Key:
Yes (HEX)
❒ If the WEP setting is [Active], you must enter the WEP key.
❒ If you have entered the WEP key and changed the setting, press the {U}
or {T} key to display [No], and then press the {# Enter} key.
R Press the {U} or {T} key to display [Yes (HEX)] when inputting a hexadec-
imal WEP key or [Yes (ASCII)] when inputting an ASCII WEP key. Then
press the {# Enter} key.
The wep key menu appears.
WEP Key: [ 0]
k
The value in brackets at the upper right is the number of characters entered.
S Press the {U} or {T} key to select characters, and then press the {# En-
ter} key.
You can now enter the next character.
Continue entering.
❒ When using 64 bit WEP, up to 10 characters can be used for hexadecimal
and up to five characters for ASCII. When using 128 bit WEP, up to 26
characters can be used for hexadecimal and up to 13 characters for ASCII.
❒ The number of characters that can be entered is limited to 10 or 26 for
hexadecimal and 5 or 13 for ASCII. If you try to enter too many characters,
the following message appears:
• hexadecimal
Error: Enter 10
or 26 characters
50
Page 51

Configuration
• ASCII
Error: Enter 5
or 13 characters
❒ For ASCII character strings, lower and upper case letters are differentiated.
❒ To display the previous character, press the {Escape} key.
T After entering the key, press the {# Enter} key.
After the settings are made, the screen returns to the IEEE 802.11b setting
menu.
U Press the {Online} key.
The initial screen appears.
V Print a configuration page to confirm the settings.
For details about printing the configuration page, see p.36 “Test Printing”.
51
Page 52

Installing the Printer Driver
Quick Install
Windows 95/98/Me/2000/XP, Windows Server 2003, and Windows NT 4.0 users
can easily install this software using the CD-ROM provided.
Using Quick Install, the PCL printer driver and/or RPCS printer driver and SmartDeviceMonitor for Client is installed under the network environment, and TCP/IP
port is set.
❒ To install printer driver under Windows 2000/XP Professional, Windows Serv-
er 2003, and Windows NT 4.0, you must have an account that has Manage
Printers permission. Log on as an Administrator.
❒ Quick Install is not available when using this printer under USB connection. If
you connect using USB, see Software Guide.
A Quit all applications currently running.
B Insert the CD-ROM into the CD-ROM drive.
The installer starts.
Auto Run may not work under certain operating system settings. If this is the
case, launch “Setup.exe” on the CD-ROM root directory.
C Select an interface language, and then click [OK].
The default interface language is English.
D Click [Quick Install].
The software license agreement appears in the [License Agreement] dialog box.
G1267203_v1.00 Copyright © 2005 52
Page 53

Installing the Printer Driver
E After reading the agreement, click [I accept the agreement], and then click
[Next].
F Select the printer model you want to use in the [Select Printer] dialog box.
❒ For network connection via TCP/IP, select the printer whose IP address is
displayed in [Connect To].
❒ For parallel connection, select the printer whose printer port is displayed in
[Connect To].
G Click [Install].
The printer driver installation starts.
H Click [Finish]
A message about restarting the computer may appear. Restart the computer
to complete installation.
I Click [Exit] in the first dialog box of the installer, and then take out the
CD-ROM.
❒ To stop installation of the selected software, click [Cancel] before installa-
tion is complete. Restart the computer, and then reinstall the other software
or printer drivers.
❒ Auto Run may not work under certain operating system settings. If this is
the case, launch “Setup.exe” on the CD-ROM root directory.
❒ Select a printer to whose IP address is displayed in [Connect To] to install
SmartDeviceMonitor for Client when using TCP/IP.
Quick Install is not available unless you have enabled bidirectional communication between the printer and computer via parallel connection. See “Install SmartDeviceMonitor for Client from the CD-ROM provided.”, Software
Guide, for details about bidirectional communication between the printer
and the computer.
53
Page 54

Installing the Printer Driver
Install the Operating Instructions
The CD-ROM provided with the printer contains an HTML Operating Instructions
Manual. Follow the procedure below to install it.
❒ System Requirements :
• Windows 95/98/Me, Windows 2000/XP, Windows Server 2003, or Windows NT4.0.
•800 × 600 or higher monitor resolution.
❒ Web Browsers :
• Microsoft Internet Explorer 4.01 SP2 or higher.
• Netscape 6.2 or higher.
❒ If you are using Internet Explorer 3.02 or earlier, or Netscape Navigator 4.05
or earlier as your Web browser, a simpler version of the Operating Instructions
Manual is displayed.
A Quit all applications currently running.
B Insert the CD-ROM into the CD-ROM drive.
The installer starts.
Auto Run may not work under certain operating system setting. If this is the
case, launch “Setup.exe” on the CD-ROM root directory.
C Select an interface language, and then click [OK].
D Click [Install manuals].
E Follow the instructions on the screen to complete the installation.
F Click [Finish] when the installation is completed.
G Click [Exit].
❒ Auto Run may not work under certain operating system setting. If this is the
case, copy all data on the CD-ROM root directory to your hard disk drive,
and then launch “Setup.exe” to start the installation.
❒ To uninstall the Operating Instructions Manual, select [Programs] in the
[Start] menu, select your printer driver, and then click [Uninstall]. You can
uninstall each Manual Guide separately.
❒ If you are using an incompatible Web browser and the simpler version of
the Operating Instructions Manual does not display correctly, open the folder “MANUAL\R_MANUAL\US_ENG\ (PRTMAN or SOFTWARE) \unv\” on
the CD-ROM. Double-click on “index.htm”.
54
Page 55

Paper and Other Media
Paper and Other Media Supported by This
Printer
This section describes the paper size, feed direction, and the maximum loads of
paper that can be loaded into each paper tray in this printer.
❒ The following symbols and terminology are used to represent the feed direc-
tion.
In this manual On the display Paper feed direction
L←(Feed direction)
K←(Feed direction)
A4 (210 × 297)
1
(8
/2 × 51/2)
1
/2×11)
Letter (8
A5 (210 × 148)
Short-edge feed direction
Long-edge feed direction
❒ Be careful of the paper feed direction. Direction is determined by each paper
size.
❖ Input Paper Sizes (Metric version)
Feed direction
A3 L 297 × 420
B4 JIS L 257 × 364
A4 L 210 × 297
K 297 × 210
B5 JIS L 182 × 257
Size (mm)
Bypass Tray
Tray1
Tray2/3
Interposer
LCT
K 257 × 182
A5 L 148 × 210
K 210 × 148
B6 L 128 × 182
A6 L 105 × 148
11 × 17 L 279 × 432
1
Legal (LG, 8
Letter (LT, 8
G1267203_v1.00 Copyright © 2005 55
/2 × 14)
1
/2 × 11)
L 216 × 356
L 216 × 279
K 279 × 216
Page 56

Paper and Other Media
Feed direction
51/2 × 81/
1
8
Executive (Exec., 7
10
Folio (8
Foolscap (F4, 8
F/GL (8 × 13) L 203 × 330
Custom Size
8K (10
16K (7.68 × 10
/2 × 51/
1
/2)
1
2
2
1
/4 × 13)
1
/2 × 15.35)
1
/2)
1
/4 ×
/2 × 13)
L 140 × 216
K 216 × 140
L 184 × 276
K 276 × 184
L 210 × 330
L 216 × 330
L 267 × 390
L 195 × 267
K 267 × 195
Size (mm)
Bypass Tray
Tray1
Tray2/3
Interposer
•
The size is supported and indicated on the tray dial. Be sure to set the paper size dial to match the actual size of the paper loaded in the tray.
•
The size is supported but not indicated on the tray dial. You should set the
tray dial to “p”, and select the paper size using the control panel.
•
The size is supported but the paper size should be set using the control
panel. There is no dial on the tray.
•
The size is supported when the option is attached.
•
The size is not supported.
LCT
❖ Input Paper Sizes (Inch version)
Feed direction
11 × 17 L 11 × 17
Legal (LG) L
Size (inch)
1
/2 × 14
8
Bypass Tray
Tray1
Tray2/3
Interposer
LCT
56
Page 57

Paper and Other Media
Letter (LT) L
K
51/2× 81/
81/2× 51/
2
2
L
K
Executive (Exec.) L
K
Feed direction
Size (inch)
1
/2× 11
8
11 × 8
1
/2× 81/
5
1
/2× 51/
8
1
/4× 101/
7
1
/2× 71/
10
1
/
2
2
2
2
4
A3 L 11.26 × 16.54
B4 JIS L 10.12 × 14.33
A4 L 8.26 × 5.83
K 5.83 × 8.26
B5 JIS L 7.17 × 10.12
K 10.12 × 7.17
A5 L 5.83 × 8.26
K 8.26 × 5.83
B6 L 5.06 × 7.17
Bypass Tray
Tray1
Tray2/3
Interposer
LCT
A6 L 4.13 × 5.63
Folio L
Foolscap F4 L
1
/4 × 13
8
1
/2 × 13
8
F/GL L 8 × 13
Custom Size
8K L
16K L
K
1
/2× 15.35
10
7.68 × 10
1
/2× 7.68
10
1
/
2
•
The size is supported and indicated on the tray dial. Be sure to set the paper size dial to match the actual size of the paper loaded in the tray.
•
The size is supported but not indicated on the tray dial. You should set the
tray dial to “p”, and select the paper size using the control panel.
•
57
Page 58

Paper and Other Media
The size is supported but the paper size should be set using the control
panel. There is no dial on the tray.
•
The size is supported when the option is attached.
•
The size is not supported.
❖ Paper weight and number of sheets to be set
Maximum number of
sheets (plain paper)
3100 (1550×2)(80 g/m2,
20 lb.)
550 (80 g/m2, 20 lb.)
100 (80 g/m
For other kind of papers.
2
, 20 lb.)
Tray 1
Tray 2, Tray 3
Bypass Tray
Supported paper weight
2
52.3 - 127.9 g/m
lb.)
52.3 - 129.7 g/m
lb.)
52.3 - 157 g/m
lb.)
For thick paper: 105 - 216
2
(42 - 57 lb.)
g/m
(14 - 34
2
(14 - 34
2
(14 - 42
❒ Check that the top of the stack is not higher than the limit mark inside the
tray.
❖ Paper size not supported by both side printing
The following paper sizes cannot be printed on both sides:
•B6L
58
Page 59

Paper and Other Media
Paper Recommendations
Loading Paper
❒ Do not use ink-jet printer paper because it may stick to the fusing unit and
cause a paper misfeed.
❒ When printing on OHP transparencies that have a print side, load them print
side down on the bypass tray. Not taking this precaution may cause them to
stick to the fusing unit and cause misfeeds.
❒ Set the paper as described below.
• Tray 1: Print side down
• Bypass Tray: Print side up
• Tray 2, Tray 3: Print side down
❒ Print quality cannot be guaranteed if other than the recommended paper is
used. For details about recommended paper, contact your sales or service
representative.
❒ Do not use paper that has already been printed onto by other printers.
Storing Paper
• Paper should always be stored properly. Improperly stored paper can result
in poor print quality, paper misfeeds, or printer damage. Recommendations
are as follows:
• Avoid storing paper in humid areas.
• Avoid exposing paper to direct sunlight.
• Store on a flat surface.
• Keep paper in the package in which the paper came.
Types of Paper and Other Media
Plain Paper
Paper thickness
Printer setup Press [Paper Input] menu, [Paper Type], and then [Plain Paper].
60 - 105 g/m
❒ The paper type selected using the printer driver overrides that
selected using the control panel.
2
(16 - 28 lb.)
Printer driver setup Click [Plain] or [Plain & Recycled] in the [Type:] list.
59
Page 60

Paper and Other Media
Enabled paper feeding tray Any input tray can be used.
Number of sheets that can
be set
• Tray 1: 1550×2
• Tray 2, Tray 3: 550
• Bypass Tray: 100
❒ Make sure paper is not stacked higher than the upper limit
mark (T) inside the tray. Make sure paper is not stacked higher
than the paper guides inside the bypass tray.
Both-side printing Possible
Additional cautions
When printing on 91 - 105 g/m
er than when printing on paper of 60 - 91 g/m
2
paper, print speed is slightly slow-
2
.
Thick Paper
Paper thickness
105 - 127.9 g/m
105 - 216 g/m
Printer setup Press [Paper Input] menu, [Paper Type] and then [Thick Paper] on the
control panel.
❒ The paper type selected using the printer driver overrides that
selected using the control panel.
2
(28 - 34 lb.) (Tray 1-3)
2
(28 - 57 lb.) (Bypass Tray)
Printer driver setup Click [Thick] in the [Type:] list.
Enabled paper feeding tray Any input tray can be used.
Number of sheets that can
be set
Make sure paper is not stacked higher than the upper limit mark
(T) inside the tray. Make sure paper is not stacked higher than the
paper guides inside the bypass tray.
Both-side printing
105 - 127.9 g/m
2
(28 - 34 lb.): possible
Additional cautions Print speed is slightly slower than when using plain paper.
OHP transparencies
Printer setup Press [Paper Input] menu, [Paper Type], and then [Transparency] on
the control panel.
❒ The paper type selected using the printer driver overrides that
selected using the control panel.
Printer driver setup Click [Transparency] in the [Type:] list.
Enabled paper feeding tray Bypass tray
60
Page 61

Paper and Other Media
Number of sheets that can
be set
Both-sided printing Not possible
Additional cautions • Print speed for OHP transparencies is slower than for plain pa-
One
❒ Load only one OHP transparency at the same time onto the by-
pass tray.
per.
• Due to switching modes, the machine will be on standby for
thirty or forty seconds after the job was received.
Paper not supported
This printer has difficulty printing on or feeding through certain types of paper.
Do not use paper that is
• designed for an ink-jet printer
• bent, folded, or creased
• curled or twisted
•torn
•wrinkled
•damp
• envelopes
• dry enough to emit static electricity
• already been printed onto (except preprinted letterheads).
Malfunctions are especially likely when using paper printed on by other than
a laser printer (e.g. monochrome or color copiers, ink-jet printers, etc.)
• Non-standard paper, such as thermal paper, aluminum foil, carbon paper or
conductive paper
• is heavier or lighter than the limitation
• embossed, perforated, has holes, windows, or cutouts
• label paper with areas of glue or whose base paper is exposed
• stapled, or has paper clips attached
Print Area
The following shows the print area possible with this printer. Be sure to set the
print margins correctly using the application.
61
Page 62

Paper and Other Media
❖ Paper
A Print area
B Feed direction
C Approx. 5 mm (0.2 inches)
D Approx. 4 mm (0.16 inches)
❒ Print area may vary depending on the paper size, printer language, and
printer driver settings.
62
Page 63

Paper and Other Media
Loading Paper
❒ You can change the paper size in tray 2 and 3. See p.67 “Changing the Paper
Size”.
For details about usable types of paper, see p.64 “Specifying the paper type”.
Loading Paper in Tray 1 (Tandem Tray)
❒ When no paper remains in the right stack of Tray 1 , the left stack is automat-
ically shifted to the right. While the paper is being moved, a message is displayed instructing you to wait. Do not pull out the tray during this time.
❒ You can load paper even while printing from tray 1. During printing, you can
pull out the left half of the tray.
A Pull out the paper tray until it stops.
B Square the paper, and then load it in the tray.
(whole tray pulled fully out)
63
Page 64

Paper and Other Media
❒ For the right stack, align the right edge of the print paper to the right edge
of the tray. For the left stack, align the left edge of the print paper to the left
edge of the tray.
(left half of tray pulled fully out)
❒ Do not stack paper higher than the limit mark inside the tray.
❒ For the left stack, align the left edge of the print paper with the left edge of
the tray.
❒ Shuffle the paper before loading.
❒ Straighten curled or warped paper before loading.
❒ Ensure framed and other types of preprinted paper are correctly loaded.
Specifying the paper type
When you load translucent paper or postcards, set the paper type accordingly.
❒ For OHP transparencies, only the bypass tray can be used.
❒ Paper type setting can also be set using the printer driver. When this is done,
no action is required here.
❒ The paper type selected using the printer driver overrides that selected using
the control panel.
❒ When you do not wish to use the printer driver, make the setting using the
control panel.
For printer driver settings, see the printer driver Help.
64
Page 65

Paper and Other Media
A Press the {Menu} key.
The [Menu] screen appears on the display.
B Press the {U} or {T} key to display [Paper Input], and then press the {#
Enter} key .
Menu:
Paper Input
The paper type selection menu appears.
C Press the {U} or {T} key to display [Paper Type], and then press the {# En-
ter} key .
The paper tray selection menu appears.
D Press the {U} or {T} key to display the target paper tray, and then press
the {# Enter} key .
Paper Type:
Tray 2
The paper type selection menu appears.
E Press the {U} or {T} key to display the target paper tray, and then press
the {# Enter} key .
Tray 2:
*Recycled Paper
After about two seconds, the display returns to the menu.
65
Page 66

Paper and Other Media
F Press the {Online} key.
The initial screen appears.
❒ The setting made here is valid until the next setting is made. After printing
on OHP transparencies or thick paper, reset it to the original setting for the
next user.
Loading Paper in Tray 2 and 3
A Pull out the paper tray until it stops.
B Square the paper, and then load it in the tray.
66
Page 67

Paper and Other Media
❒ Do not stack paper higher than the limit mark inside the tray.
❒ For the left stack, align the left edge of the print paper with the left edge of
the tray.
❒ Fan the paper before loading.
❒ Straighten curled or warped paper before loading.
❒ Ensure framed and other types of preprinted paper are correctly loaded.
C Gently push the paper tray in until it stops.
Changing the Paper Size
A Make sure the paper tray is not being used. Then pull the paper tray fully
out.
Remove the paper in the tray.
B Press the lock button. Adjust the side fences and back fence to the new
paper size while pushing the release lever.
67
Page 68

Paper and Other Media
C Square the paper and load it in the paper tray. Press the lock button.
❒ Do not stack paper higher than the limit mark inside the tray.
❒ For the left stack, align the left edge of the print paper with the left edge of
the tray.
❒ Adjust the side fences to the paper width to eliminate any gap, and then
press the lock button to set them.
❒ Fan the paper before loading.
❒ Straighten curled or warped paper before loading.
❒ Ensure framed and other types of preprinted paper are correctly loaded.
D Set the paper size selector knob inside the tray to the new size.
E Gently push the paper tray until it stops.
F Check the paper size displayed on the display panel.
Specifying custom size paper
To use a paper size that are not indicated on the selector knob, slide the selector
to the leftmost position “ * ”.
• Vertical: 139.7 - 297.0 mm (5.5 - 11.7 inches)
68
Page 69

Paper and Other Media
• Horizontal: 139.7 - 432.0 mm (5.5 - 17.0 inches)
❒ If the Paper Tray is set to Auto Tray Switching, the size selected using the
control panel overrides that selected using the printer driver. If the Paper Tray
is set to Tray #, size selected using the printer driver overrides that selected
using the control panel.
A Set the paper size selector knob to the “p” mark on the left.
B Press the {Menu} key.
The [Menu] screen appears.
C Press the {U} or {T} key to display [Paper Input], and then press the {#
Enter} key.
Menu:
Paper Input
The paper selection menu appears.
D Press the {U} or {T} key to display [Tray Paper Size], and then press the
{# Enter} key.
The paper tray selection menu appears.
69
Page 70

Paper and Other Media
E Press the {U} or {T} key to display the target paper tray, and then press
the {# Enter} key.
Tray Paper Size:
Tray 2
The paper size selection menu appears.
F Press the {U} or {T} key to display [Custom Size], and then press the {#
Enter} key.
G Press the {U} or {T} key to set horizontal value, and then press the {#
Enter} key.
Custom Size:
Horiz. 11.00 ”
Pressing the {T} or {U} key increases or decreases the value in increments
of 0.01 inch. Pressing and holding increases or decreases in increments of
0.1 inch. Holding continuously increases or decreases in increments of 1 inch.
The screen for entering the length appears.
H Press the {U} or {T} key to set the vertical value, and then press the {#
Enter} key.
Custom Size:
Vert. 8.50 ”
After about two seconds, the display returns to the menu.
I Press the {Online} key.
The initial screen appears.
Specifying the paper type
When you load translucent paper or thick paper, set the paper type. For details
about paper type, see p.64 “
Specifying the paper type”.
70
Page 71

Paper and Other Media
Loading Paper in the Large Capacity Tray (LCT)
A Open the top cover of the large capacity tray (LCT).
B Load the paper in the tray aligning it with the left edge.
C Press the {Down} key.
The key blinks while the bottom plate is moving down.
D Load paper by repeating steps
❒ The tray can hold up to 4,000 sheets.
and C.
B
E Close the top cover of the large capacity tray (LCT).
71
Page 72

Paper and Other Media
❒ For the left stack, align the left edge of the print paper with the left edge of
the tray.
Specifying the paper type
When you load translucent paper or thick paper, set the paper type. For details
about paper type, see p.64 “
Specifying the paper type”.
Setting Paper on the Bypass Tray
This section gives instructions for setting paper on the bypass tray. Use the bypass tray to print onto OHP transparencies, labels, thick paper, and envelopes
that cannot be loaded in the paper tray.
❒ When loading letterhead paper, pay attention to its orientation.
❒ Paper within the following dimensions can be set in the bypass tray:
• Vertical: 100.0 - 305.0 mm (3.9 in. - 12.0 in.)
• Horizontal: 139.7 - 458.0 mm (5.5 in. - 18.0 in.)
❒ With the RPCS or PostScript 3, when you load the paper onto the bypass tray,
load it according to the orientation set on the machine.
❒ With the RPDL, when you load the paper onto the bypass tray, load it in the
long-edge feed direction.
❒ Select or set the paper size using the control panel or the printer driver. When
loading custom size paper, see p.75 “
❒ When loading OHP transparencies or thick paper in the bypass tray, make the
paper setting using the control panel or printer driver.
❒ The number of sheets that can be loaded in the bypass tray depends on the
paper type.
❒ The following functions are disabled when printing from the bypass tray:
•printing
• Auto Tray Switching
• Rotating Collate
• Staple (when the optional unit is installed)
• Punch (when the optional unit is installed)
❒ Be sure to set the paper size using the printer driver when printing data from
the computer. The paper size set using the printer driver has priority over the
size set using the display panel.
Specifying custom size paper”.
❒ Be sure to set paper print side up on the bypass tray.
72
Page 73

Paper and Other Media
Specifying standard size paper for the Bypass Tray
A Open the bypass tray.
B Adjust the paper guides to the paper size.
❒ If the paper guides are not flush against the paper, skewed images or pa-
per misfeeds might occur.
C Gently insert paper face up into the bypass tray.
1. Extender
2. Paper guides
❒ Do not stack paper over the limit mark, otherwise a skewed image or mis-
feeds might occur.
❒ Open out the extender to support paper sizes larger than A4 L, 8
L.
❒ Fan the paper before loading.
1
/2”×11”
❒ When setting an OHP transparency, make sure that its front and back
sides are properly positioned.
73
Page 74

Paper and Other Media
❒ Select paper type when printing onto OHP transparencies or thick paper
(over 105 g/m
2
). For details, see p.76 “Specifying the paper type”.
D Press the {Menu} key.
The [Menu] screen appears.
❒ Paper size can also be set using the printer driver. When this is done, no
further action is required.
❒ The paper size selected using the printer driver overrides that selected us-
ing the control panel.
❒ When the printer driver is not used, make settings using the display panel.
For printer driver settings, see the printer driver Help.
For details about setting custom paper, see p.75 “
paper”.
Specifying custom size
E Press the {U} or {T} key to display [Paper Input], and then press the {#
Enter} key.
Menu:
Paper Input
The paper selection menu appears.
F Check [Bypass Size] appears, and then press the {# Enter} key
The paper size selection menu appears.
G Press the {U} or {T} key to display the size and orientation of the paper
in the bypass tray.
Bypass Size:
*11 x 8 1/2
After about two seconds, the display returns to the menu.
74
Page 75

Paper and Other Media
H Press the {Online} key.
The initial screen appears.
❒ When you load thick paper, OHP transparencies , or postcards, set the pa-
per type. For details about paper type, see p.76 “
type”.
Specifying custom size paper
Specifying the paper
When you load custom size paper onto the bypass tray, set the paper size using
the control panel.
❒ Custom size settings set using the printer driver override those set using the
machine's display panel.
A Press the {Menu} key.
The [Menu] screen appears.
B Press the {U} or {T} key to display [Paper Input], and then press the {#
Enter} key.
Menu:
Paper Input
75
Page 76

Paper and Other Media
The paper selection menu appears.
C Check [Bypass Size] appears, and then press the {# Enter} key
The paper size selection menu appears.
D Press the {U} or {T} key to display [Custom Size], and then press the {#
Enter} key.
The custom size menu appears.
Custom Size:
Horiz. 5.50 ”
E Press the {U} or {T} key to set the horizontal value, and then press the
{# Enter} key.
❒ Pressing the {U} or {T} key increases or decreases the value in incre-
ments of 0.01 inch. Pressing and holding increases or decreases in increments of 0.1 inch. Holding continuously increases or decreases in
increments of 1 inch.
The screen for entering the vertical value appears.
F Press the {U} or {T} key to set the vertical value, and then press the {#
Enter} key.
Custom Size:
Vert. 11.69 ”
After about two seconds, the display returns to the menu.
G Press the {Online} key.
The initial screen appears.
Specifying the paper type
When you load OHP transparencies, translucent paper, or postcards, set the paper type.
❒ We recommend loading OHP transparencies in the L direction.
❒ We recommend loading OHP transparencies in the long-edge feed direction.
Paper type can also be set using the printer driver. When this is done, no action is required .
❒ The paper type selected using the printer driver overrides that selected using
the control panel.
❒ When the printer driver is not used, make settings using the display panel.
76
Page 77

Paper and Other Media
For printer driver settings, see the printer driver Help.
A Press the {Menu} key.
The [Menu] screen appears on the display.
B Press the {U} or {T} key to display [Paper Input], and then press the {#
Enter} key .
Menu:
Paper Input
The paper selection menu appears.
C Press the {U} or {T} key to display [Paper Type], and then press the {# En-
ter} key.
The paper tray selection menu appears.
D Press the {U} or {T} key to display [Bypass Tray], and then press the {#
Enter} key.
The paper type selection menu appears.
E Press the {U} or {T} key to display the type of paper you have loaded,
and then press the {# Enter} key .
Bypass Tray:
Thick Paper
After about two seconds, the display returns to the menu.
77
Page 78

Paper and Other Media
F Press the {Online} key.
The initial screen appears.
❒ The setting made here is valid until the next setting is made. After printing
on OHP transparencies or thick paper, reset it to the original setting for the
next user.
Loading Paper in the Interposer (optional)
❒ Load paper printed side down.
❒ Load paper in the interposer in the same orientation as paper in the paper
tray.
❒ Staple and punching location is on the left side of the paper, when you are fac-
ing the machine.
❒ Do not place anything on top of or leave documents on the sensor. Obstruct-
ing the sensor can lead to the paper size not being correctly detected or paper
jams.
A Load the paper.
❒ Do not stack paper higher than the limit mark inside the tray.
78
Page 79

Paper and Other Media
❒ Straighten curled or warped paper before loading.
❒ Fan the paper before loading.
❒ Straighten curled or warped paper before loading.
B Adjust the paper guides to the paper size.
79
Page 80

Replacing Consumables
Replacing the Toner bottle
• Do not incinerate spilled toner or used toner. Toner dust is flammable
and might ignite when exposed to an open flame.
• Disposal should take place at an authorized dealer or an appropriate
collection site.
• If you dispose of the used toner bottles yourself, dispose of them according to local regulations.
• Do not store toner, used toner, or toner containers in a place with an
open flame. The toner might ignite and cause burns or a fire.
• Keep toner (used or unused) and the toner bottle out of reach of children.
• If toner or used toner is inhaled, gargle with plenty of water and move
into a fresh air environment. Consult a doctor if necessary.
• If your skin comes into contact with toner or used toner, wash the affected area thoroughly with soap and water.
• If toner or used toner gets into your eyes, flush immediately with large
amounts of water. Consult a doctor if necessary.
• If toner or used toner is swallowed, dilute by drinking a large amount of water. Consult a doctor if necessary
• Avoid getting toner on your clothes or skin when removing a paper jam or
replacing toner. If your skin comes into contact with toner, wash the affected
area thoroughly with soap and water.
• If toner gets on your clothing, wash with cold water. Hot water will set the
toner into the fabric and may make removing the stain impossible.
❒ Use recommended toner bottles. Using different types of toner bottles can re-
sult in malfunction. For recommended toners, see p.132 “
❒ Replacement should be done while the power switch is set to ON. If it is set
to standby, the settings are cancelled and printing cannot resume. Also, toner
refill may not be recognized, and the [Add Toner] display may appear again.
❒ Be sure to refill the toner only when instruction to do so appears on the dis-
play.
Toner bottles”.
G1267203_v1.00 Copyright © 2005 80
Page 81

Replacing Consumables
❒ Approximately 1,000 sheets can be printed after the message [Toner is almost
empty] appears. However, prints may become increasingly faded, so replace
the toner bottle as soon as possible.
❒ When the toner is empty, [Add Toner] appears and printing is no longer possi-
ble.
Replacing Toner
A Open the front cover of the machine.
B Pull out the lever under the toner bottle toward you 90°.
C Raise the green lever, and then gently pull out the toner bottle.
81
Page 82

Replacing Consumables
D Hold the new bottle horizontally, and then shake it five or six times with-
out removing the outer cap.
E Remove the outer cap.
❒ Do not remove the inner cap.
F Place the toner bottle in position, then push it in until the green lever
clicks.
❒ Avoid inserting and removing the toner bottle repeatedly. Toner spills may
occur.
82
Page 83

Replacing Consumables
G Return the lever under the toner bottle to its original position.
H Close the front cover of the machine.
83
Page 84

Cleaning the Printer
Cautions to Take When Cleaning
• Do not remove any covers or screws other than those specified in this
manual. Some parts of the machine are at a high voltage and could
give you an electric shock. Also, if the machine has laser systems, direct (or indirect) reflected eye contact with the laser beam may cause
serious eye damage. When the machine needs to be checked, adjusted, or repaired, contact your service representative.
• Do not take apart or attempt any modifications to this machine. There
is a risk of fire, electric shock, explosion or loss of sight. If the machine has laser systems, there is a risk of serious eye damage.
Clean the printer periodically to maintain fine printing.
Dry wipe the exterior with a soft cloth. If dry wiping is not enough, wipe with a
soft, moist cloth that is wrung out well. If you still cannot remove, use a neutral
detergent, and then wipe over with a well-wrung wet cloth, dry wipe, and let it dry.
❒ To avoid deformation, discoloration, or cracking of surfaces and components,
do not use volatile chemicals, such as benzine and thinner, or spray insecticide near the printer.
❒ If there is dust or grime inside the printer, wipe with a clean, dry cloth.
❒ You must disconnect the plug from the wall outlet at least once a year. Clean
away any dust and grime from and around the plug and outlet before reconnecting. Accumulated dust and grime pose a fire hazard.
G1267203_v1.00 Copyright © 2005 84
Page 85

Adjusting the Printer
Adjusting Tray Registration
You can adjust the registration of each tray. Vertical adjustment is used for all
trays. Normally, you need not update the registration.
The following procedure describes how to adjust tray 2. The same procedure applies to other trays.
A Press the {Menu} key.
The [Menu] screen appears.
B Press the {U} or {T} key to display [Maintenance], and then press the {#
Enter} key .
Menu:
Maintenance
The maintenance menu appears.
C Press the {U} or {T} key to display [Registration], and then press the {#
Enter} key .
The registration menu appears.
D Print the test sheet to preview the settings. Confirm that [Prt. Test Sheet]
is displayed, and then press the {# Enter} key.
A screen prompting you to select the tray to be adjusted appears.
E Press the {U} or {T} key to select the tray to adjust, and then press the
{# Enter} key.
Prt. Test Sheet:
Tray 2
G1267203_v1.00 Copyright © 2005 85
Page 86

Adjusting the Printer
Confirm the position of the image on the test sheet, and then adjust the registration value.
F Press the {Escape} key.
G Press the {U} or {T} key to display [Adjustment], and then press the {#
Enter} key.
H Press the {U} or {T} key to display the adjusting value, and then press
the {# Enter} key.
Adjustment:
Horiz:All Trays
Adjustment:
Vert.: Tray 2
I Press the {U} or {T} key to set the registration value (mm).
Vert.: Tray 2:
(-9.0 +9.0) 0.0
86
Page 87

Adjusting the Printer
Increase the value to shift the print area in the positive direction, and decrease
to shift in the negative direction.
❒ Pressing the {U} or {T} key increases or decreases the value in incre-
ments of 1.0 mm.
J Press the {# Enter} key.
K Press the {Escape} key.
The display returns to the print area [Adjustment] menu.
Registration:
Adjustment
L Press the {U} or {T} key to display [Prt. Test Sheet], and then press the {#
Enter} key.
Confirm the adjustment result.
M Print the test sheet.
N Press the {Online} key.
The initial screen appears.
87
Page 88

Troubleshooting
Error & Status Messages on the Display
Panel
This section describes the main messages that appear on the panel display. If a
message that is not described here, follow its instructions.
❒ Before turning the power Stand by.
Message Status
Ready This is the default ready message. The machine is ready for use.
No action is required.
Processing... The machine is printing. Wait a while.
Waiting... The machine is waiting for the next data to print. Wait a while.
Offline The machine is offline. To start printing, switch the machine online
by pressing {Offline} on the display panel.
Warming up... The machine is preparing the development unit. Wait a while.
Energy Save Mode In Energy Saver Mode Level 2.
No action required.
Resetting Job... The machine is resetting the print job. Wait until [Ready] appears
on the display panel.
Setting change
in process
Hex Dump Mode In Hex Dump Mode mode, the machine receives data in hexadec-
The machine is setting changing settings. Wait a while.
imal format. Turn off the machine after printing, and then turn back
on.
❖ Message (in alphabetical order)
Messages/Second messages
Add staples The printer is out of staple. Add staples, cancel punch mode or
Add staples
(Booklet)
Causes Solutions
cancel the job.
See p.121 “
Both staplers of the Booklet Finisher is out of staple.
Add staples to the both staplers of
the Booklet Finisher.
See p.121 “
Alternatively, cancel staple mode using {Form Feed}, or cancel the job.
Adding Staples”.
Adding Staples”.
G1267203_v1.00 Copyright © 2005 88
Page 89

Troubleshooting
Messages/Second messages
Add staples
(Booklet: Back)
Add staples
(Booklet: Front)
Add Toner The printer is out of toner. Replace the toner bottle.
Call Service: EC
Power Off On
Call Service if
error reoccurs
Cannot check
Signal in Ad hoc
Causes Solutions
The back stapler of the
Booklet Finisher is out of
staples.
The front stapler of the
Booklet Finisher is out of
staples.
A communication error
was sent from the engine
to the controller.
An attempt to check the radio signal was made while
the communication mode
was set to [802.11 Ad hoc] in
the Maintenance menu.
Add staples to the back stapler of the
Booklet Finisher.
See p.121 “
Alternatively, cancel staple mode using {Form Feed}, or cancel the job.
Add staples to the front stapler of the
Booklet Finisher.
See p.121 “
Alternatively, cancel staple mode using {Form Feed}, or cancel the job.
See p.81 “
Turn the power switch to Standby,
and then to ON. If the message appears again, call your service provider.
To check the radio signal , select Infrastructure in the communication
mode settings.
Adding Staples”.
Adding Staples”.
Replacing Toner”.
Cannot duplex
Tray #
Cannot select
same Tray for:
Change Setting
Tray#
Change Setting
Tray#
Paper Size:
Paper Type:
The selected tray is set to
1 sided tray when duplex
mode is set.
Cannot print because
main sheets and designation sheets are set to the
same tray.
The printer detected that
the user-specified paper
type is not the same as the
paper type specified in the
driver.
The printer detected that
the actual paper type and
size are not the same as
the paper tray size and paper type setting.
Cancel duplex mode. Alternatively,
select another tray using {Form
Feed}, or cancel the job.
Press the {Reset} key.
Cancel the job and change the setting for the Main sheet tray and designation sheet tray, and then try
printing the job again.
Load the indicated tray with the correct paper, or change the paper type
using the Paper Type menu on the
operation panel. Alternatively, select
another tray using {Form Feed}, or
cancel the job.
Load the indicated tray with the correct paper, or change the paper
type/size using the dial or using the
Paper Input menu on the operation
panel. Alternatively, select another
tray using {Form Feed}, or cancel the
job
89
Page 90

Troubleshooting
Messages/Second messages
Close Finisher
Front Cover
Close
Front Cover
DHCP assigned
Cannot change
Empty Punch
Receptacle
Error: Tray #
Form Feed
Error: Enter 10
or 26 characters
Causes Solutions
The finisher front cover is
open.
The front cover is open. Close the front cover.
An attempt to change the
IP address, subnet mask
or gateway address was
made while [DHCP] was
set to [On].
Punch hole receptacle is
full.
There is a problem with
the tray.
The entered number of
characters for the WEP
Key (ASCII entry) is incorrect.
Close the finisher front cover.
Make the change after setting [DHCP]
to [Off].
For details, see “Setting Printer”,
Software Guide.
Remove the punch-hole chips from
the punch receptacle.
Alternatively, disable the punch settings.
See p.129 “
Waste”.
Turn the power switch to Standby,
and then to ON. If the message appears again, call your service provider.
Enter the correct WEP key.
See p.47 “
LAN) Configuration”.
Removing Punch
IEEE 802.11b (Wireless
Error: Enter 5
or 13 characters
Error:Tray #
Form Feed
Hardware Problem
Ethernet
Hardware Problem
Finisher
Hardware Problem
Fin. Shift Tray
The entered number of
characters for the WEP
Key (ASCII entry) is incorrect.
The selected tray is out of
order.
The printer detected an
ethernet error.
Finisher is not functioning. Turn the power switch to Standby,
The Finisher Shift Tray
has a problem when using
shift.
Enter the correct WEP key.
See p.47 “
LAN) Configuration”.
Select another tray using {Form
Feed}, or after cancelling the job, turn
Stand by and then turn on the power
switch. If the error appears again,
call your service provider.
Turn the power switch to standby,
and then ON. If the message appears again, call your service provider.
and then to ON. If the message appears again, call your service provider.
Call your service provider.
IEEE 802.11b (Wireless
90
Page 91

Troubleshooting
Messages/Second messages
Hardware Problem
HDD
Hardware Problem
Interposer
Hardware Problem
LCT
Hardware Problem
Parallel I/F
Hardware Problem
Printer font
Hardware Problem
Staple Unit
Causes Solutions
The printer identified an
HDD Board error.
The interposer has a motor problem..
LCT has a problem with
the transfer motor.
The printer identified an
parallel interface error.
Problems with the font file
for the print module.
The Staple Unit is not
functioning.
Call your service provider.
Turn the power switch to standby,
and then ON. If the message appears again, call your service provider.
Turn the power switch standby, and
then ON. If the message is displayed
again, call your service provider.
Turn the power switch to Standby,
and then to ON.
Also, check the correct interface cable being used.
If the message appears again, call
your service provider.
It is necessary to replace the print
module.
Call your service provider.
Hardware Problem
USB
Hardware Problem
Wireless Board
Invalid Password
Try again
Load Paper
or Form Feed
Load Paper
or Form Feed
Paper Size:
Paper Type:
Menu Protected
Cannot change
The printer identified a
USB I/F Board error.
Access to the IEEE
802.11b board is possible,
but an error was detected.
The invalid password was
entered and Locked Print
is incorrect.
No paper remaining in the
indicated tray.
The printer detected that
the actual paper type and
size in all trays are not the
same as the paper tray
size and paper type setting
when Auto Paper Select
mode is selected.
The operation panel has
been digitally locked, and
settings cannot be
changed.
Turn the power switch to standby,
and then ON. If the message appears again, call your service provider.
Check the board is installed correctly. If the message appears again, call
your service provider.
Enter the correct password.
Load the indicated tray with the paper or select another tray using
{Form Feed}, or cancel the job.
Load the tray with the correct paper
or change the paper type/size using
the dial or using the Paper Input
menu on the operation panel. Alternatively, select another tray using
{Form Feed}, or cancel the job.
The printer displays this alert message for 2 seconds before returning
to the previous panel display screen.
91
Page 92

Troubleshooting
Messages/Second messages
No Files exist There are no files avail-
Open Front Cover
Reset B2 Lever
P=XX I=XXXXXXXX
Power Off On
Call Service if
error reoccurs
RC Gate
connection error
Remove Misfeed
A,U: Internal
Remove Misfeed
B-F: Internal
Causes Solutions
able for Sample Print or
Locked Print.
B2 lever is not set correctly Open the front cover, then reset the
Controller error. The SC
number indicates the problem.
Cannot communicate with
Remote Communication
Gate.
Paper is jammed in the
specified input paper tray
or LCT.
Paper is jammed in the internal paper feed path.
You can identify the files unavailable
for printing from the error list.
B2 lever correctly.
Turn the power switch to standby,
and then ON. If the message appears again, call your service provider. Report the error code that
appears.
Call your service provider.
Open the front or LCT cover, and
then remove jammed paper.
See p.113 “
Internal”.
Open the front cover and remove
jammed paper.
See p.108 “
ternal”.
Remove Misfeed A, U:
Remove Misfeed B-F: In-
Remove Misfeed
Q: Interposer
Remove Misfeed
R: Finisher
Remove Paper
from Duplex Unit
Remove Paper
Finisher Tray #
Remove Paper
Finisher Tray 2
Remove Paper
Fin. Upper Tray
Paper is jammed in the Interposer.
Paper is jammed in the finisher.
Paper left in Duplex Unit. Open Duplex unit cover and remove
Finisher Tray # is full of paper.
Cannot output to Finisher
Tray 2 because paper stapled at center and normal
paper is mixed. (Booklet)
Finisher Upper tray is full
of paper.
Remove paper from the Interposer,
and then reload paper.
See p.115 “
terposer”.
Open the finisher cover and remove
jammed paper.
See p.118 “
isher”.
paper.
Remove paper.
Remove paper.
Remove paper.
Remove Misfeed Q: In-
Remove Misfeed R: Fin-
92
Page 93

Troubleshooting
Messages/Second messages
Remove Paper
inside Finisher
Remove Paper
inside Finisher
Replace Charger It is time to replace the
Replace Cleaning
Felt soon
Replace
Development Unit
Replace Fusing
Unit
Replace PCU It is time to replace the
Causes Solutions
Paper left in Finisher. Open Finisher cover and remove pa-
Paper left in Finisher.
(Booklet)
Charger.
Cleaning felt is almost
worn out.
It is time to replace the Development Unit.
It is time to replace the
Fusing Unit.
Photoconductor Unit.
per.
See p.118 “
isher”.
Open Finisher cover and remove paper.
See p.118 “
isher”.
Call your service provider as soon as
possible.
Call your service provider as soon as
possible.
Call your service provider as soon as
possible.
You can still print even if this message appears , but to ensure a good
standard of printing, call your service
provider as soon as possible.
Call your service provider as soon as
possible.
Remove Misfeed R: Fin-
Remove Misfeed R: Fin-
Replace Transfer
Belt
Replace Waste
Toner
Reset Tray #
or Form Feed
Reset Tray #
or Form Feed
Load Paper
Paper Type:
SC XXX-X
Power Off On
Call Service if
error reoccurs
SD authenticatn.
failed
It is time to replace the
Transfer Belt.
It is time to replace the
waste toner.
The indicated paper input
tray is not set correctly, or
is not set.
There is a problem with
the tray.
The Service Code or SC
number indicates the problem.
Authentication from the
SD card has failed.
Call your service provider as soon as
possible.
Call your service provider.
Set the indicated paper input tray
correctly.
Load the tray with the correct paper
or change the paper type/size using
the dial or via the Paper Input menu
on the operation panel. Alternatively,
select another tray using {Form
Feed}, or cancel the job.
Turn the power switch to Standby,
and then to ON.
If the message appears again, call
your service provider. Report the error code that appears.
Turn the power switch to standby,
and then ON. If the message is displayed again, call your service provider.
93
Page 94

Troubleshooting
Messages/Second messages
SSID not entered Wireless LAN's SSID is
Supply order
failed
Suspend/Resume
was pressed
Toner is almost
empty
Waste Toner is
almost full
Causes Solutions
not entered.
Call for supply order has
failed.
The Suspend/Resume
button on the finisher was
pressed.
The printer is almost out of
toner.
Waste toner bottle is almost full.
Enter the SSID of the wireless LAN.
See “Setting the Printer”, Software
Guide.
Call your service provider.
Press the button again to resume
printing.
Prepare a new toner bottle.
You can print until [Add Toner] appears.
For details about numbers of pages
you can print after the message appears,
see p.81 “
Call your service provider.
Replacing Toner”.
94
Page 95

Troubleshooting
Call-light Lit or Blinking
• Do not push or pull the call-light when installed to the printer. Doing so may
result in damage or malfunction of the call-light or the printer.
The Call-light notifies the user by light and buzzer when there is a paper jams or
no paper is left.
The colors of the lamp and their meanings are as follows:
The Lamp Status (Buzzer) Meanings
Green light (No buzzer) Printing
Red light (Buzzer) Error occurred
(Example)
• Paper jam
• Out of paper
• Out of toner
• Memory overflow
Read the message on the control panel and take appropriate action.
Red light (no buzzer) Warning
(Example)
• Toner level low
• Waste toner bottle is almost full
Read the message on the control panel and take appropriate action.
• Use the lever to adjust the volume.
• Push the lever to switch the buzzer on/off.
95
Page 96

Troubleshooting
When the Machine does Not Print
If the printing does not start even with printing instructions, check the following.
Possible Cause Solutions
Is the power on? Check the power cord is securely plugged into both pow-
er outlet and machine.
Turn on the power switch.
Is the machine online? If not, press [Online] on the display panel.
Does the printer function status indicator remain red?
Is the paper set? Set the paper in the paper tray or on the bypass tray
Can you print a configuration page? If you cannot print a configuration page, there maybe a
Is the interface cable connected securely to the machine and computer?
Are you using the correct interface
cable?
Is the signal status satisfactory when
using wireless LAN ?
If so, check the error message on the display panel and
take appropriate action.
See p.55 “
machine malfunction. Contact your sales or service representative.
See for printing a configuration page.
Connect the interface cable securely. If it has a fastener,
fasten that too.
The type of interface cable you should use depends on
the computer. Be sure to use the correct one. If the cable
is damaged or worn, replace it.
When using wireless LAN in ad hoc mode or 802.11b ad
hoc mode, move the machine to a location where radio
waves can pass or remove objects that might cause interference.
When using wireless LAN in infrastructure mode, check
signal status using the [Maintenance]menu on the control
panel. If signal quality is poor, move the machine to a location where radio waves can pass or remove objects
that might cause interference.
Paper and Other Media”.
Is the Call-light blinking or lit? If a Call-light is installed, it notifies you of any errors that
occur during printing via its light. Check if the Call-light is
blinking or lit, and solve any errors. See p.95 “
Lit or Blinking”.
Call-light
If the problem cannot be resolved, contact your sales or service representative.
Checking the port connection
When the printer is directly connected via computer cable and the data-in indicator does not flash or light up, port connection should be configured as follows:
• For parallel connection, set port LPT1 or LPT2.
• For a USB connection, set port USB00 (n)
*1
.
96
Page 97

Troubleshooting
*1
(n) is the number of printers connected.
Windows 95/98/Me
A Click the [Start] button, point to [Settings], and then click [Printers].
B Click the icon of the machine. On the [File] menu, click [Properties].
C Click the [Details] tab.
D In the [Print to the following port:] list, confirm the correct port is selected.
Windows 2000
A Click the [Start] button, point to [Settings], and then click [Printers].
B Click the icon of the machine. On the [File] menu, click [Properties].
C Click the [Ports] tab.
D In the [Print to the following port(s)] list, confirm the correct port is selected.
Windows XP Professional, Windows Server 2003
A Click the [Start] button, and then click [Printers and Faxes].
B Click the icon of the machine. On the [File] menu, click [Properties].
C Click the [Ports] tab.
D In the [Print to the following port(s)] list, confirm the correct port is selected.
Windows XP Home Edition
A Click the [Start] button, click [Control Panel].
B Click the [Printers and Other Hardware].
C Click the [Printers and Faxes].
D Click the icon of the machine. On the [File] menu, click [Properties].
E Click the [Ports] tab.
F In the [Print to the following port(s)] list, confirm the correct port is selected.
97
Page 98

Troubleshooting
Windows NT 4.0
A Click the [Start] button, point to [Settings], and then click [Printers].
B Click the icon of the machine. On the [File] menu, click [Properties].
C Click the [Ports] tab.
D In the [Print to the following port(s)] list, confirm the correct port is selected.
98
Page 99

Troubleshooting
Other Printing Problems
If the printed image is differs from the computer's instructions, check the following:
Problem Causes and Solutions
Toner smears appear on
the print side of the page.
The printed image differs
from the image on the computer's display.
Strange characters appears on the print image.
Images are cut off, or excess is printed.
The paper setting may not be correct. For example, although you
are using thick paper, the setting for thick paper may not be set.
• Check the paper settings.
See p.28 “
• Check the printer driver's paper settings.
See the printer driver Help.
Check that the paper is not curled or bent. 11 × 17 sized paper
curls easily. Flatten paper before loading.
See p.59 “
With certain functions, such as enlargement and reduction, image
layout may differ to that on the computer display.
You may have selected to replace True Type fonts instead of machine fonts in the printing process.
To print an image similar to that of the computer display, set True
Type fonts to print as an image.
See the printer driver Help.
You may have not have selected a proper emulation. Select [Print-
er Lang.] in the [System] menu.
You may be using paper smaller than the size selected in the application. Use the same size paper as that selected in the application. If you cannot load paper of the correct size, use the reduction
function to reduce the image, and then print.
See the printer driver Help.
Loading Paper”
Paper Recommendations”.
Photo images are coarse. Some applications reduce print resolution.
Fine dot pattern does not
print.
Solid lines are printed as
broken lines.
Make the following settings using the printer driver:
• On the RPCS printer driver's [Print Quality] tab, open the
[Change User Settings] dialog box, and then on the [Image Adjustments] tab, change the [Dithering] setting.
❒ To enable [Change User Settings...], select the [User Settings]
check box.
See the printer driver Help.
Make the following settings using the printer driver:
• On the RPCS printer driver's [Print Quality] tab, open the
[Change User Settings] dialog box, and then on the [Image Adjustments] tab, change the [Dithering] setting.
99
Page 100

Troubleshooting
Problem Causes and Solutions
Areas of image are missing
or blurred.
The whole print out is
blurred.
Paper is damp. Use paper that has been stored properly.
See p.59 “
Toner is almost empty. When the [Add Toner] or [Toner is almost
empty] message appears on the display panel, replace the toner
bottle.
See p.81 “
Due to a sudden temperature change, condensation may appear
inside the printer, reducing print quality. If this happens, do not use
the printer until it acclimatizes.
Paper is damp. Use paper that has been stored properly.
See p.59 “
If you select [Toner Saving] on the [Print Quality] tab in the printer
properties dialog box, printing is generally less dense.
See printer driver Help.
Toner is almost empty.
When the [Add Toner] or [Toner is almost empty] message appears
on the display panel, replace the toner bottle.
See p.81 “
Due to a sudden temperature change, condensation may appear
inside the printer, reducing print quality. If this happens, do not use
the printer until it acclimatizes.
Paper Recommendations”.
Replacing Toner”.
Paper Recommendations”.
Replacing Toner”.
White streaks appear Toner is almost empty.
When the [Add Toner] or [Toner is almost empty] message appears
on the display panel, replace the toner bottle.
See p.81 “
The backs of printed sheets
are blemished.
Ink smears if rubbed. Paper settings may not be correct. For example, although thick
When removing a jammed sheet, the inside of the printer may
have become dirtied. Print several sheets until they come out
clean.
If document size is larger than paper size, e.g. A4 document on
B5 paper, the back of the next printed sheet may be dirtied.
paper is used, the setting for thick paper may not be made.
• Check the printer's paper settings.
• Check the printer driver's paper settings.
The fusing unit is deteriorated or damaged. Replace the unit. Contact your service representative.
Replacing Toner”.
See p.59 “
See the printer driver Help.
Paper Recommendations”.
100
 Loading...