

Printer/Scanner Unit
Sending Scan Files by E-mail
1
Sending Scan Files to Folders
2
Type 7500
Operating Instructions
Scanner Reference
Storing Files Using the Scanner Function
3
Delivering Scan Files
4
Scanning Originals with the Network TWAIN Scanner
5
Various Scan Settings
6
Appendix
7
Read this manual carefully before you use this machine and keep it handy for future reference. For safe and correct use, be sure to read the
Safety Information in "About This Machine" before using the machine.

Introduction
This manual contains detailed instructions and notes on the operation and use of this machine. For your
safety and benefit, read this manual carefully before using the machine. Keep this manual in a handy
place for quick reference.
Important
Contents of this manual are subject to change without prior notice. In no event will the company be liable for direct, indirect, special, incidental, or consequential damages as a result of handling or operating the machine.
Do not copy or print any item for which reproduction is prohibited by law.
Copying or printing the following items is generally prohibited by local law:
bank notes, revenue stamps, bonds, stock certificates, bank drafts, checks, passports, driver's licenses.
The preceding list is meant as a guide only and is not inclusive. We assume no responsibility for its
completeness or accuracy. If you have any questions concerning the legality of copying or printing certain items, consult with your legal advisor.
Two kinds of size notation are employed in this manual. With this machine refer to the inch version.
Some illustrations in this manual might be slightly different from the machine.
Certain options might not be available in some countries. For details, please contact your local dealer.
Trademarks
• Adobe
• Pentium
®
, PostScript®, and Acrobat® are trademarks of Adobe Systems Incorporated.
®
is a registered trademark of Intel Corporation.
•NetWare® is a registered trademark of Novell, inc.
•Microsoft
®
, Windows®, and Windows NT® are registered trademarks of Microsoft Corporation.
• Other product names used herein are for identification purposes only and might be trademarks of
their respective companies. We disclaim any and all rights to those marks.
• The product name of Windows
• The product name of Windows
®
95 is Microsoft® Windows® 95.
®
98 is Microsoft® Windows® 98.
• The product name of Windows® Me is Microsoft® Windows® Millennium Edition (Windows Me).
• The product names of Windows
Microsoft
Microsoft® Windows® 2000 Server
Microsoft
®
Windows® 2000 Professional
®
Windows® 2000 Advanced Server
®
2000 are as follows:
• The product names of Windows® XP are as follows:
Microsoft® Windows® XP Home Edition
Microsoft
• The product names of Windows Server
Microsoft
Microsoft® Windows ServerTM 2003 Enterprise Edition
Microsoft
• The product names of Windows NT
Microsoft® Windows NT® Workstation 4.0
Microsoft
®
Windows® XP Professional
TM
®
Windows ServerTM 2003 Standard Edition
®
Windows ServerTM 2003 Web Edition
®
Windows NT® Server 4.0
2003 are as follows:
®
4.0 are as follows:

Manual for This Machine
Refer to the manuals that are relevant to what you want to do with the machine.
❖ About This Machine
Be sure to read the Safety Information in this manual before using the machine.
This manual provides an introduction to the functions of the machine. It also
explains the control panel, preparation procedures for using the machine,
how to enter text, and how to install the CD-ROMs provided.
❖ General Settings Guide
Explains User Tools settings, and Address Book procedures such as registering e-mail addresses, and user codes. Also refer to this manual for explanations on how to connect the machine.
❖ Troubleshooting
Provides a guide to solving common problems, and explains how to replace
paper, toner, staples, and other consumables.
❖ Security Reference
This manual is for administrators of the machine. It explains security functions that the administrators can use to protect data from being tampered, or
prevent the machine from unauthorized use.
Also refer to this manual for the procedures for registering administrators, as
well as setting user and administrator authentication.
❖ Copy/ Document Server Reference
Explains Copier and Document Server functions and operations. Also refer to
this manual for explanations on how to place originals.
❖ Printer Reference
Explains Printer functions and operations.
❖ Scanner Reference
Explains Scanner functions and operations.
❖ Network Guide
Explains how to configure and operate the machine in a network environment, and use the software provided.
This manual covers all models, and includes descriptions of functions and
settings that might not be available on this machine. Images, illustrations, and
information about operating systems that are supported might also differ
slightly from those of this machine.
❖ Other manuals
• Manuals for This Machine
•Safety Information
• Quick Reference Copy Guide
• Quick Reference Printer Guide
i

• Quick Reference Scanner Guide
• PostScript3 Supplement
•UNIX Supplement
• Manuals for DeskTopBinder Lite
• DeskTopBinder Lite Setup Guide
• DeskTopBinder Introduction Guide
•Auto Document Link Guide
Note
❒ Manuals provided are specific to machine types.
❒ Adobe Acrobat Reader/Adobe Reader must be installed in order to view the
manuals as PDF files.
❒ For "UNIX Supplement", please visit our Web site or consult an authorized
dealer.
❒ "PostScript3 Supplement" and "UNIX Supplement" include descriptions of
functions and settings that might not be available on this machine.
❒ The following software products are referred to using general names:
Product name General name
DeskTopBinder Lite and DeskTopBinder Professional
ScanRouter EX Professional
EX Enterprise
*
Optional
*
*
*
and ScanRouter
DeskTopBinder
the ScanRouter delivery software
ii

TABLE OF CONTENTS
Manual for This Machine ........................................................................................i
How to Read This Manual ..................................................................................... 1
Symbols ..................................................................................................................... 1
About the Scanner Functions...............................................................................2
Display Panel..........................................................................................................3
Simplified Display.......................................................................................................3
Confirmation Displays ................................................................................................4
Scanner Features...................................................................................................8
1. Sending Scan Files by E-mail
Before Sending Scan Files by E-mail.................................................................11
Outline of Sending Scan Files by E-mail..................................................................11
Preparation for Sending by E-mail ...........................................................................12
Registering E-mail Addresses in the Address Book................................................. 12
E-mail Screen........................................................................................................... 13
Basic Operation for Sending Scan Files by E-mail...........................................14
Switching to the E-mail Screen .......................................................................... 17
Specifying E-mail Destinations .......................................................................... 18
Selecting the Destination from the Machine’s Address Book...................................18
Entering an E-mail Address Manually ......................................................................22
Selecting Destinations by Searching an LDAP Server............................................. 23
Registering a Directly-Entered Destination in the Address Book.............................25
Specifying the E-mail Sender .............................................................................27
Selecting a Sender from the List ..............................................................................27
Using a Registration Number to Specify a Sender Name ........................................ 28
Selecting the Sender by Searching the Machine’s Address Book ...........................28
Specifying the E-mail Subject.............................................................................31
Specifying the E-mail Message ..........................................................................32
Selecting a Message from the List ...........................................................................32
Manual Entry of a Message .....................................................................................33
Simultaneous Storage and Sending by E-mail ................................................. 34
Sending the URL by E-mail......................................................................................35
2. Sending Scan Files to Folders
Before Sending Files by Scan to Folder............................................................ 37
Outline of Sending Scan Files by Scan to Folder.....................................................37
Preparation for Sending by Scan to Folder ..............................................................39
Registering Destination Folders in the Address Book..............................................40
Scan to Folder Screen .............................................................................................41
Basic Operations When Using Scan to Folder..................................................42
Switching to the Scan to Folder Screen ............................................................44
Specifying Scan to Folder Destinations ............................................................45
Selecting the Destination from the Machine’s Address Book...................................45
Sending Files to a Shared Network Folder ..............................................................49
Sending Files to an FTP Server ...............................................................................52
Sending Files to an NDS Tree or NetWare Server ..................................................54
Registering the Path to the Selected Destination in the Address Book ...................57
Simultaneous Storage and Sending by Scan to Folder ................................... 59
iii

3. Storing Files Using the Scanner Function
Before Storing Files.............................................................................................61
Outline of File Storage under the Scanner Function ................................................61
Basic Operation for Storing Scan Files .............................................................63
Specifying File Information for a Stored File ....................................................65
Specifying a User Name ..........................................................................................65
Specifying a File Name ............................................................................................ 66
Specifying a Password.............................................................................................67
Displaying the List of Stored Files.....................................................................68
List of Stored Files ...................................................................................................68
Searching the List of Stored Files ............................................................................69
Checking Stored Files .........................................................................................71
Checking a Stored File Selected from the List .........................................................71
Checking Stored Files from a Client Computer........................................................72
Sending a Stored File ..........................................................................................74
Sending Stored Files................................................................................................74
Managing Stored Files.........................................................................................76
Deleting a Stored File...............................................................................................76
Changing Data for a Stored File...............................................................................77
4. Delivering Scan Files
Before Delivering Files ........................................................................................81
Outline of Scan File Delivery....................................................................................81
Preparing to Deliver a File........................................................................................82
Installing DeskTopBinder Lite from the Supplied CD-ROM ..................................... 83
Network Delivery Scanner Screen ...........................................................................84
Basic Operation for Delivering Files..................................................................85
Switching to the Network Delivery Scanner Screen.........................................88
Specifying Delivery Destinations .......................................................................89
Selecting Destinations Registered in the Delivery Server’s Address Book ..............89
Specifying the Sender .........................................................................................93
Selecting a Sender from the Sender List in the Delivery Server’s Destination List....93
Selecting the Sender by Entering the Registration Number.....................................94
Selecting a Sender by Searching the Delivery Server’s Destination List ................. 95
Specifying the Subject of the E-mail to Be Transmitted via the Delivery Server..... 97
Simultaneous Storage and Delivery...................................................................98
5. Scanning Originals with the Network TWAIN Scanner
Before Using the Network TWAIN Scanner ....................................................... 99
Outline of the Network TWAIN Scanner................................................................. 100
Preparing to Use the Network TWAIN Scanner ..................................................... 101
Installing the TWAIN Driver from the Supplied CD-ROM.......................................102
Basic Network TWAIN Scanner Operation ...................................................... 103
iv

6. Various Scan Settings
Scan Settings .....................................................................................................105
Items for Specifying Scan Settings..................................................................106
Scan Type ..............................................................................................................106
Resolution ..............................................................................................................106
Scan Size ...............................................................................................................106
Edit .........................................................................................................................114
Adjusting Image Density ...................................................................................115
Setting of Original Feed Type...........................................................................116
Original Orientation ................................................................................................116
Original Settings.....................................................................................................118
Batch, SADF ..........................................................................................................120
Divide .....................................................................................................................121
Scanning Multiple Pages of Originals as One File ......................................... 123
Setting File Type and File Name.......................................................................125
Setting File Type ....................................................................................................125
Setting File Name...................................................................................................126
Security Settings to PDF Files ...............................................................................128
Programs ............................................................................................................132
Registering Frequently Used Setting .....................................................................132
Recalling a Registered Content .............................................................................133
Changing a Registered Program............................................................................134
Deleting a Program ................................................................................................135
Changing the Registered Program Name ..............................................................135
Registering Initial Values for Initial Display ............................................................ 136
Scan Settings When Using Twain Scanner.....................................................137
Setting Original Orientation on the TWAIN Scanner ..............................................137
When Scanning Originals of Mixed Sizes Using TWAIN Scanner .........................138
7. Appendix
Relationship between Resolution and File Size..............................................139
When Using E-mail, Folder Sending, Storing or Network Delivery Function .........139
When Using as a TWAIN Scanner.........................................................................140
Relationship between File Type Specified for Scanning and File Types
for Sending E-mail and Folder........................................................................142
Software Supplied on CD-ROM ........................................................................143
Quick Install............................................................................................................143
TWAIN Driver ......................................................................................................... 143
DeskTopBinder Lite................................................................................................144
Values of Various Set Items for Transmission/Storage/Delivery Function .... 146
Transmission Function ........................................................................................... 146
Storage Function....................................................................................................148
Network Delivery Function .....................................................................................149
Specifications.....................................................................................................150
INDEX....................................................................................................... 151
v

vi
How to Read This Manual
Symbols
This manual uses the following symbols:
Indicates important safety notes.
Ignoring these notes could result in serious injury or death. Be sure to read these
notes. They can be found in the "Safety Information" section of About This Machine.
Indicates important safety notes.
Ignoring these notes could result in moderate or minor injury, or damage to the
machine or to property. Be sure to read these notes. They can be found in the
"Safety Information" section of About This Machine.
Indicates points to pay attention to when using the machine, and explanations
of likely causes of paper misfeeds, damage to originals, or loss of data. Be sure
to read these explanations.
Indicates supplementary explanations of the machine’s functions, and instructions on resolving user errors.
This symbol is located at the end of sections. It indicates where you can find further relevant information.
[ ]
Indicates the names of keys that appear on the machine’s display panel.
{ }
Indicates the names of keys on the machine’s control panel.
1

About the Scanner Functions
This section describes functions you can use in the scanner mode.
For details about each function, see respective chapters.
❖ Sending scanned files
There are several methods you can use to send captured data as files to computers.
• Sending scan files by e-mail
For details, see chapter 1 "Sending Scan Files by E-mail".
• Sending scan files to a shared folder
For details, see chapter 2 "Sending Scan Files to Folders".
• Sending scan files to an FTP server
For details, see chapter 2 "Sending Scan Files to Folders".
• Sending scan files to a NetWare server
For details, see chapter 2 "Sending Scan Files to Folders".
• Delivering scan files using the delivery server
For details, see chapter 4 "Delivering Scan Files".
❖ Scanning originals using the TWAIN driver
Use the TWAIN driver to specify the machine where originals will be scanned
from a client computer. For details, see chapter 5 "Scanning Originals with the
Network TWAIN Scanner".
❖ Storing files
You can store scan files on the machine's hard disk. Stored files can be sent
later. For details, see chapter 3 "Storing Files Using the Scanner Function".
Note
❒ When the Copy Data Security Unit is installed, if you scan an original that
was printed using the data security for copying function, the machine beeps
and an entirely gray page is sent or stored. You can use the log file to check
who scanned the confidential original. For details about the data security for
copying function, consult the administrator.
Reference
p.11 “Sending Scan Files by E-mail”
p.37 “Sending Scan Files to Folders”
p.81 “Delivering Scan Files”
p.99 “Scanning Originals with the Network TWAIN Scanner”
p.61 “Storing Files Using the Scanner Function”
2
Display Panel
This section explains the simplified display and three confirmation screens:
Check Modes, Preview, and Transmission File Status.
You can find explanations about the E-mail screen, Scan to Folder screen, List of
Stored Files screen, or Network Delivery Scanner screen in this manual. For details, see "E-mail Screen", "Scan to Folder Screen", "List of Stored Files", and "Network Delivery Scanner Screen".
Reference
p.13 “E-mail Screen”
p.41 “Scan to Folder Screen”
p.68 “List of Stored Files”
p.84 “Network Delivery Scanner Screen”
Simplified Display
This section explains how to switch to the simplified display.
When you press {Simplified Display}, the screen changes from the initial display
to the simplified display.
Letters and keys are displayed at a larger size, making operations easier.
ANP057S
❖ Example of Simplified Display
1. [Key Color]
Press to change the key color and increase the brightness of the display panel.
AMW005S
This does not apply to the initial scanner
screen.
3
Note
❒ To return to the initial screen, press {Simplified Display} again.
❒ Certain keys do not appear on the simplified display.
Confirmation Displays
This section explains three confirmation displays: Check Modes, Preview and
Transmission File Status.
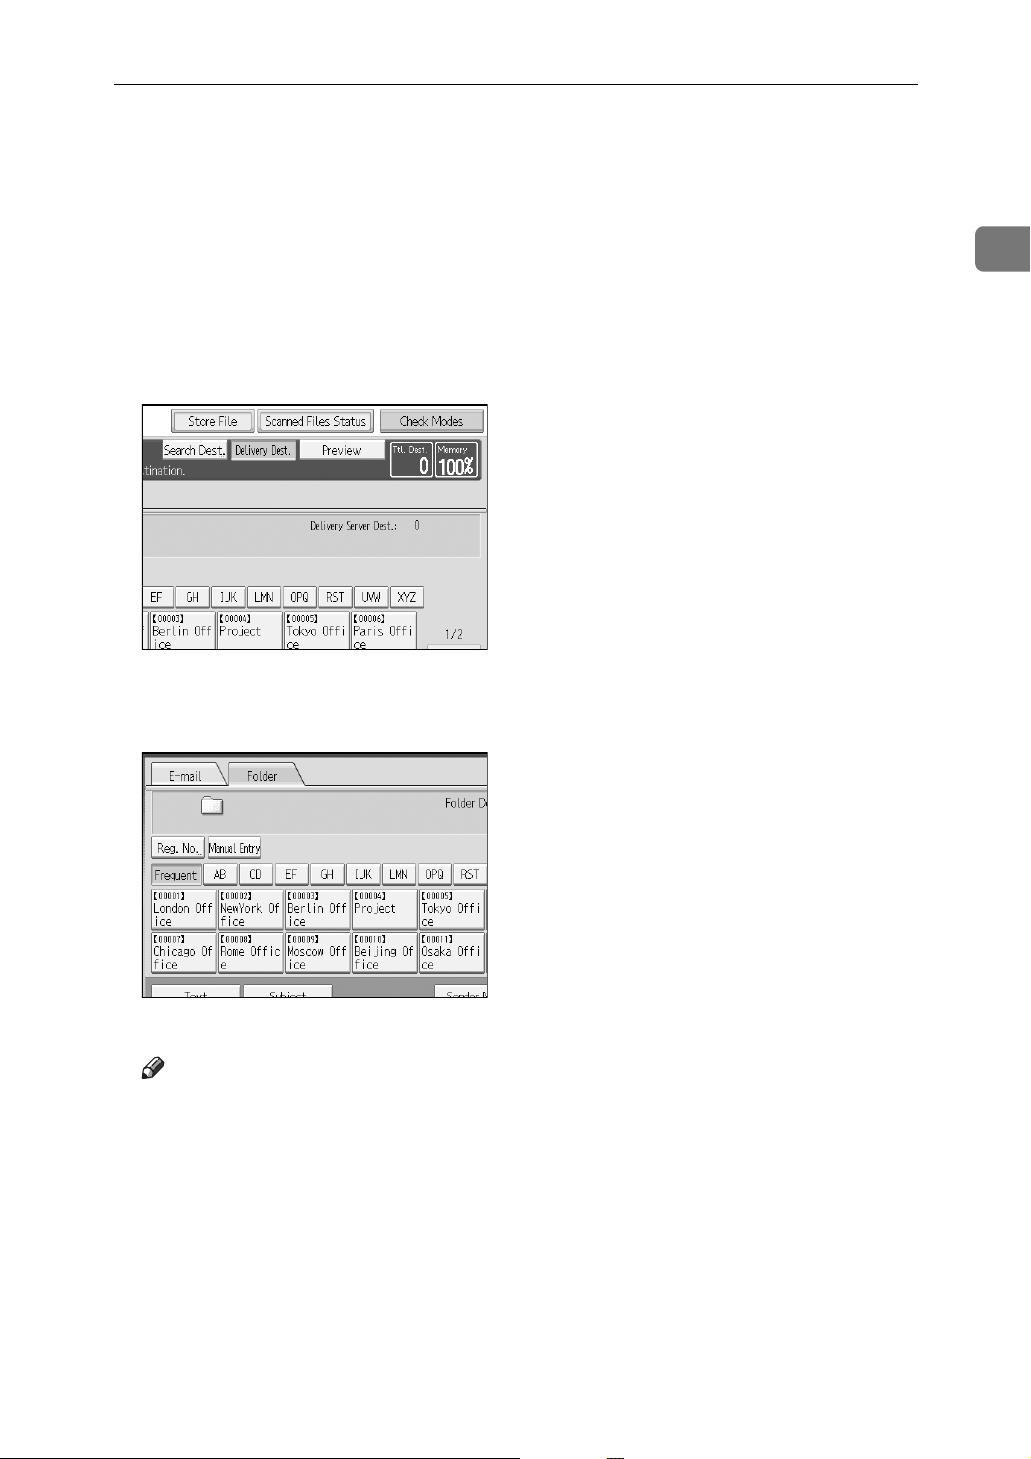
Check Modes
This section explains items that are displayed and how to display the Check
Modes screen.
Use the Check Modes screen to check scanning and transmission settings.
Pressing [Check Modes] switches the screen from the initial scanner screen to the
Check Modes screen.
❖ Check Modes
1. Original
Displays Scan Settings, Original Feed
Type, and other scanning settings.
2. Transmission function icon
Displays the icon of the transmission
function in use.
4
AMW002S
3. Sender and Destination
Displays the sender and transmission or
delivery destinations.
4. Send
Displays transmission settings such as
Sender and Subject.

Preview
This section explains items that are displayed and how to display the Preview
screen.
Use the Preview screen to check that of originals have been scanned correctly.
You can display the Preview screen when sending files by e-mail or Scan to Folder, delivering files, or simultaneously sending and delivering files.
To display the Preview screen, press [Preview], and then start scanning while
[Preview] is still selected.
❖ Preview
AMW006S
1. [Zoom Out] and [Zoom In]
Press to reduce or enlarge the displayed
preview.
2. [←][→][↑][↓]
Press to shift the displayed area.
3. [Cancel TX]
Press to close a preview and interrupt a
transmission.
4. [Continue TX]
Press to close a preview and continue a
transmission.
Note
5. Display File
Displays a file's name and size.
6. Display Page
Displays the number of the currently displayed page, total number of pages, page
size, and color mode.
7. [Switch]
Press to change the page of the selected
file that is displayed.
8. Display Position
Displays the position of an image when
enlarged.
❒ Preview is not available if a file is stored using [Store Only].
❒ Preview is not available when sending a stored file.
❒ You can view a stored file using the Preview screen displayed from the list of
stored files. For details about viewing a stored file, see "Checking a Stored File
Selected from the List".
5
❒ Preview might not be displayed if scanning failed or the image file is corrupt-
ed. If this is the case, scan the original again.
Reference
p.71 “Checking a Stored File Selected from the List”
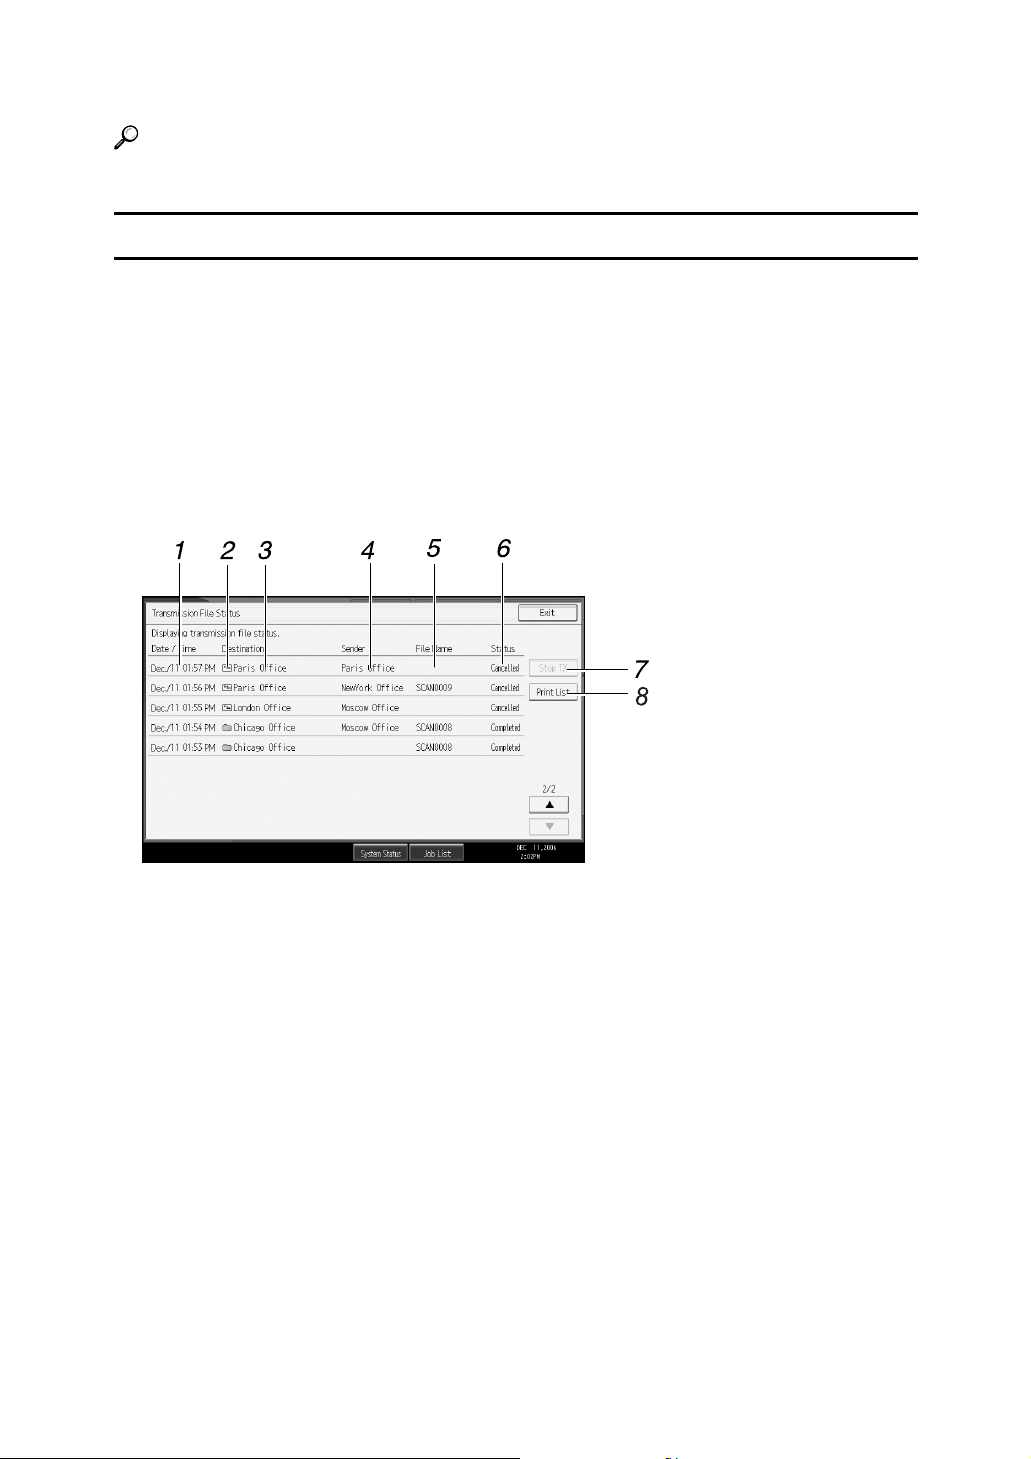
Transmission File Status
This section explains items that are displayed and how to display the Transmission File Status screen.
Use the Transmission File Status screen to check e-mail transmission, Scan to
Folder, and delivery results.
Press [Scanned Files Status] to display the Transmission File Status screen.
Up to 9 transmission or delivery results are displayed at the same time. Press [U]
or [T] to switch between results.
❖ Transmission File Status
1. Date/Time
Displays the time and date transmission
was specified by this machine or the time
and date when Completed, Error, or Cancelled was confirmed.
2. Transmission function icon
Displays the icon of the transmission
function used.
3. Destination
Displays the transmission destination.
If you have selected multiple destina-
tions, the first selected destination is displayed.
4. Sender
Displays the sender name.
6
AMW007S
5. File Name
Displays the stored file name of files that
are simultaneously sent and stored, or of
stored files that are sent.
6. Status
Displays one of the following transmission statuses: Completed, Sending...,
Waiting..., Error, or Cancelled.
7. [Stop TX]
To cancel transmission, select a file
whose status is [Waiting...], and then press
[Stop TX].
8. [Print List]
Press to print transmission results.

Note
❒ You cannot check scanner function transmission results by pressing [Job List]
at the bottom of the screen. To check transmission results, press [Scanned Files
Status], and then display the Transmission File Status screen.
❒ Depending on security settings, some transmission results might not be dis-
played.
7

Scanner Features
This section explains Scanner Features settings.
To display the Scanner Features screen, press {User Tools / Counter}. For detailed
setting method, see General Settings Guide.
❖ General Settings
Items Description
Switch Title Sets index to use when the list of destinations of this
machine is displayed.
Update Delivery Server Destination List
Search Destination Specify the default search destination list from the ma-
TWAIN Standby Time Select the machine's response if a client computer tries
Destination List Display Priority 1 Select the default destination list from the machine's
Destination List Display Priority 2 Select whether to prioritize the e-mail destination list
Print & Delete Scanner Journal Specify the machine's response of the maximum num-
Print Scanner Journal Allows you to print the scanner journal. The scanner
Delete Scanner Journal Allows you to delete the scanner journal without
Allows you to update the delivery server's destination
list by pressing [Update Delivery Server Destination List].
To use this function, under [System Settings], set [Deliv-
ery Option] to [On].
chine's address book or the LDAP server. To search
through an LDAP server, under [System Settings], register the LDAP server, and then set [LDAP Search] to
[On].
to use the TWAIN scanner while scanning is in
progress.
destination list or from the Destination List managed
by the delivery server.
or the folder destination list.
ber of scanner journals is exceeded.
journal is then deleted.
printing it.
❖ Scan Settings
8
Items Description
Wait Time for Next Orig.: Exposure
Glass
Wait Time for Next Original(s):
SADF
Set which operation the machine performs while waiting for additional originals after scanning from the exposure glass.
Sets the operation of this machine on the queue for additional originals after scanning the originals with Automatic Document Feeder (ADF). This function is not
available unless ADF is installed.

❖ Send Settings
Items Description
Compression (Black & White) Specify a compression method for files scanned in
black and white.
Compression (Gray Scale) specify a compression method for files scanned in
gray scale.
Max. E-mail Size Select whether or not to limit the size of e-mail that has
attachments.
Divide & Send E-mail Select whether or not to divide files that exceed the
size specified in [Max. E-mail Size] and send them as
multiple e-mails.
E-mail Information Language Select the language in which document information
such as the title, date, and administrator's name is
sent.
No. of Digits for Single Page Files Set the number of digits in serial numbers used for sin-
gle-page file names.
Stored File E-mail Method Sets the default for whether to attach a file or send
URL Link when sending stored files by e-mail.
❖ Initial Settings
Items Description
Menu Protect Set the default access level for functions whose set-
tings can be changed by users other than the administrator.
9

10
1. Sending Scan Files by E-mail
You can attach scan files to e-mails and send them via connections such as LAN
and the Internet.
Before Sending Scan Files by E-mail
This section explains the necessary preparations and the procedure for sending
scan files by e-mail.
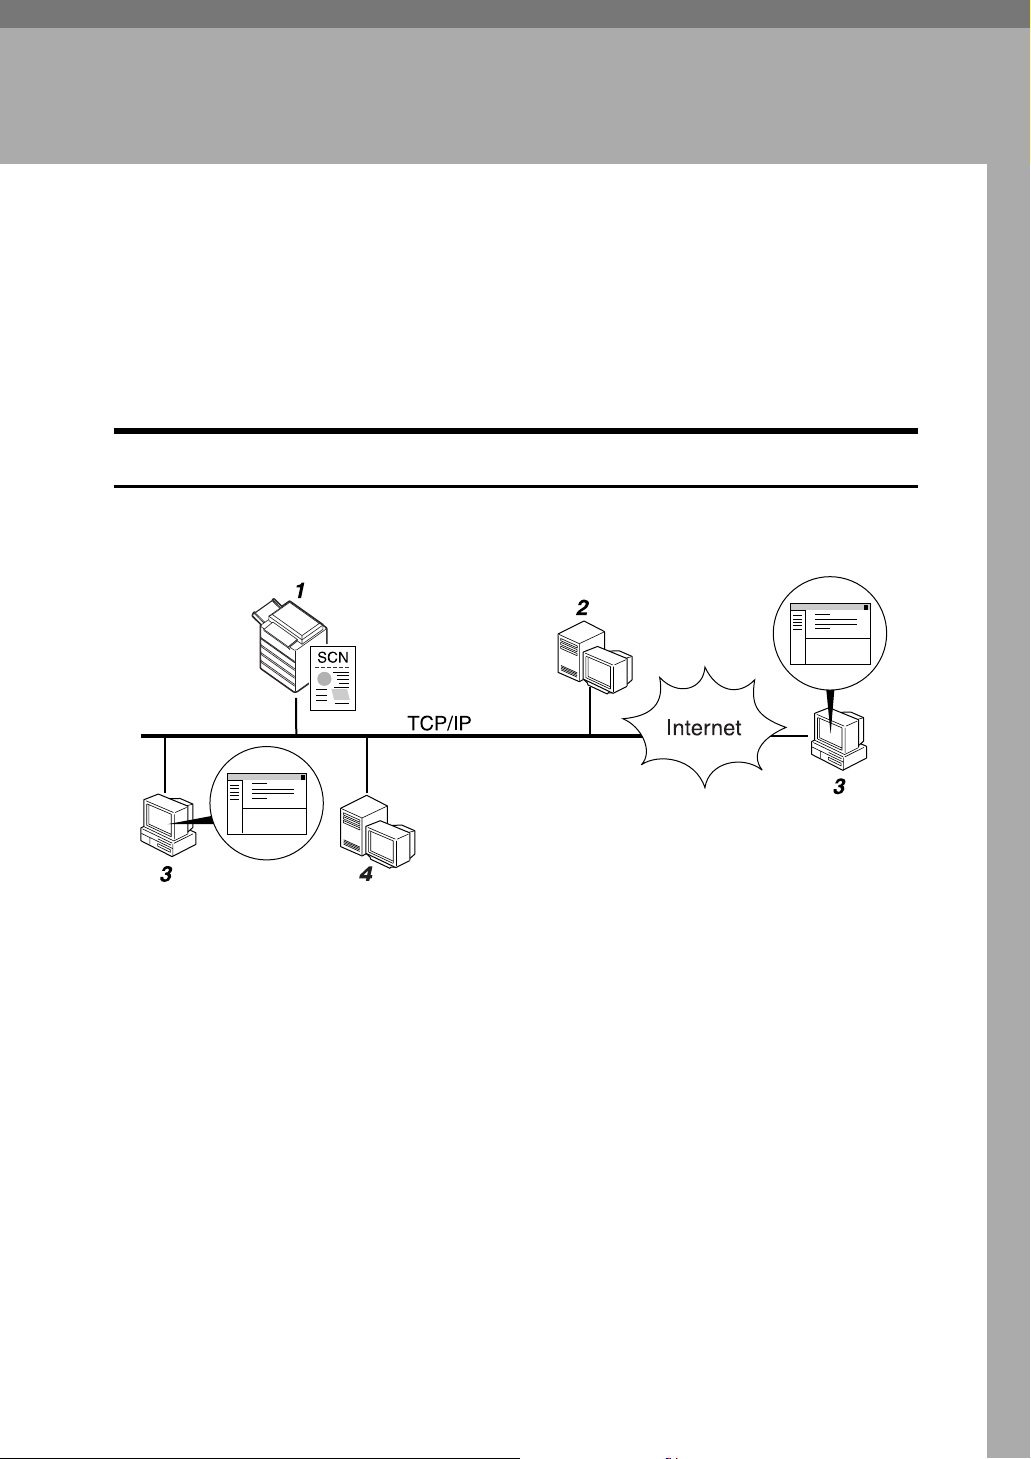
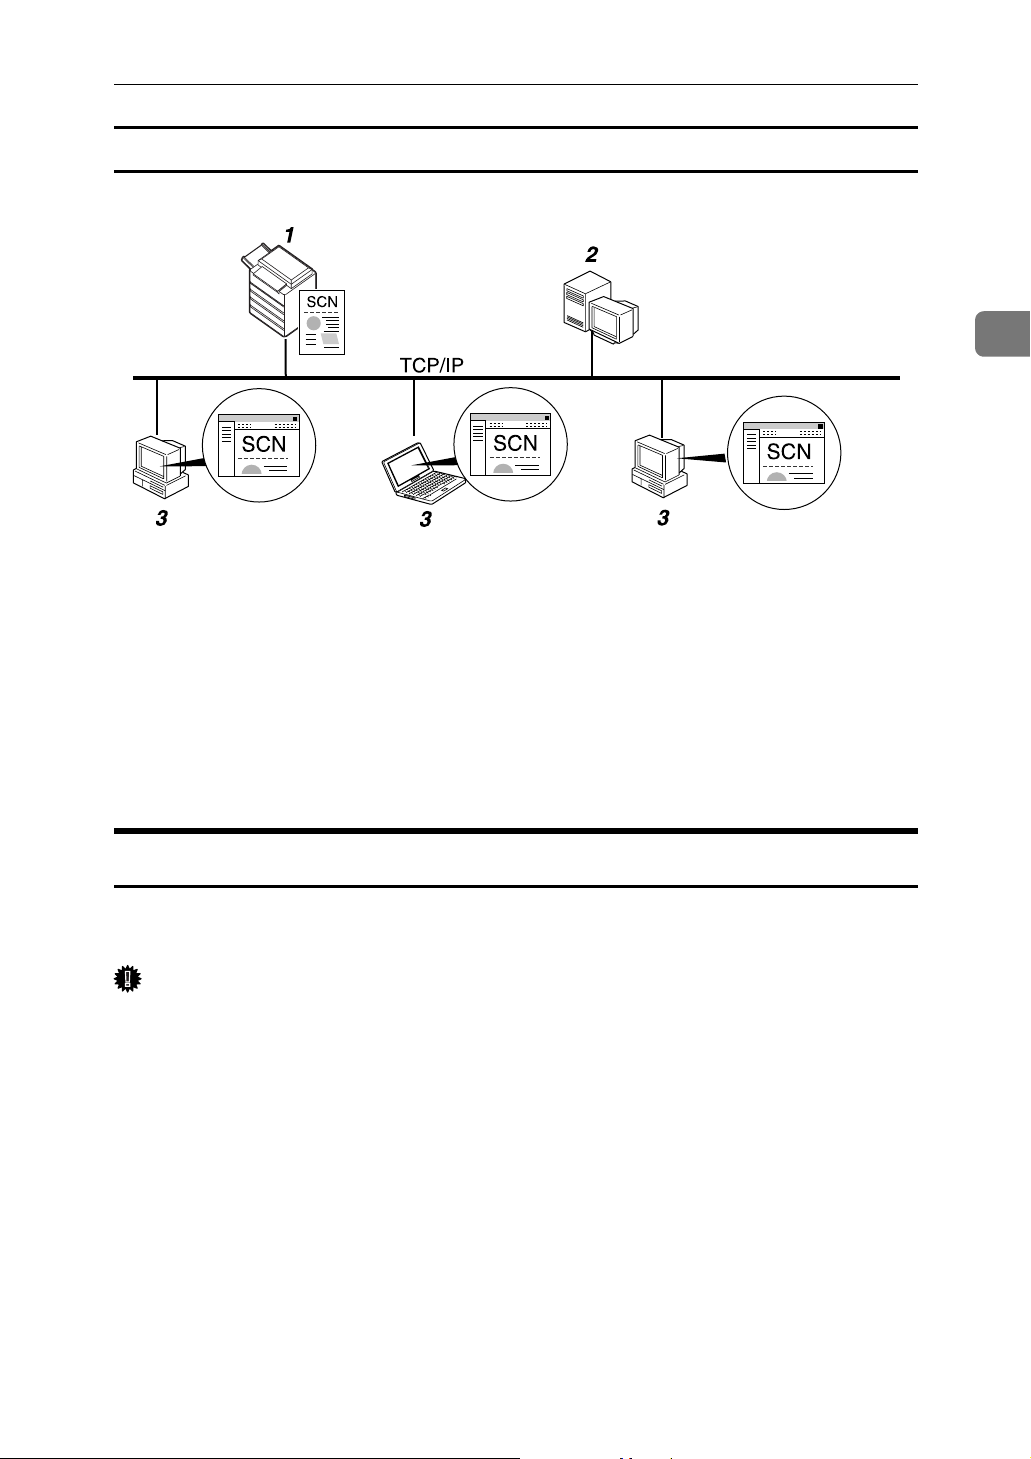
Outline of Sending Scan Files by E-mail
This section outlines the function for sending scan files by e-mail.
1. This machine
A scan file can be attached to an e-mail
and sent to a mail server.
2. SMTP server
You need to have an access to an e-mail
server that supports SMTP (Simple Mail
Transfer Protocol), to send scan files by email. However, it is not essential to have
an e-mail server inside the LAN where
this machine belongs. It transfers a received e-mail to a specified destination
through a LAN or the Internet.
ZZZ508S
3. Client computer
Use e-mail client software to receive email messages and scan file attachments
that are generated by this machine.
4. LDAP Server
Use this server for administering e-mail
accounts, searching the network, and authenticating the computers that access
the machine. Using the LDAP server, you
can search for destinations from the machine.
11

1
Sending Scan Files by E-mail
Preparation for Sending by E-mail
This section explains the preparation and settings for sending scan files by email.
A Connect the machine to the network.
Connect the machine to the network using an Ethernet cable or IEEE 1394 cable, or wireless LAN (IEEE 802.11b).
B Make the necessary network setting in [System Settings].
If you have connected the machine to the network using an Ethernet cable,
make the following settings. For details, see General Settings Guide.
• Specify the machine’s IPv4 address and subnet mask.
• Specify the IPv4 gateway address.
•In [Effective Protocol], enable [IPv4].
• Specify the SMTP server.
C If necessary, change settings in [Send Settings] under [Scanner Features].
Note
❒ To connect the machine to the network using an IEEE 1394 cable or wire-
less LAN (IEEE 802.11b), an extended 1394 board or extended wireless
LAN board is required respectively. For details, see Network Guide.
❒ Items to set up in [System Settings] vary depending on the network environ-
ment. For more information about network settings, see General Settings
Guide.
❒ For more information about [Scanner Features], see General Settings Guide.
Registering E-mail Addresses in the Address Book
You can register frequently used e-mail addresses in the address book.
Register e-mail addresses in [Address Book Management] under [Administrator
Tools] from [System Settings]. Addresses can also be registered as groups.
Note
❒ For details about registering e-mail addresses in the address book, see Gener-
al Settings Guide.
❒ You can also register e-mail addresses in the address book using Web Image
Monitor or SmartDeviceMonitor for Admin. For details about how to install
these applications, see Network Guide. For details about registering addresses in the address book, see Help of respective applications.
❒ Depending on the machine type, you may not be able to use the machine
when it is updating the address book using CSV files (retrieved using SmartDeviceMonitor for Admin) that contain user codes.
12
Before Sending Scan Files by E-mail
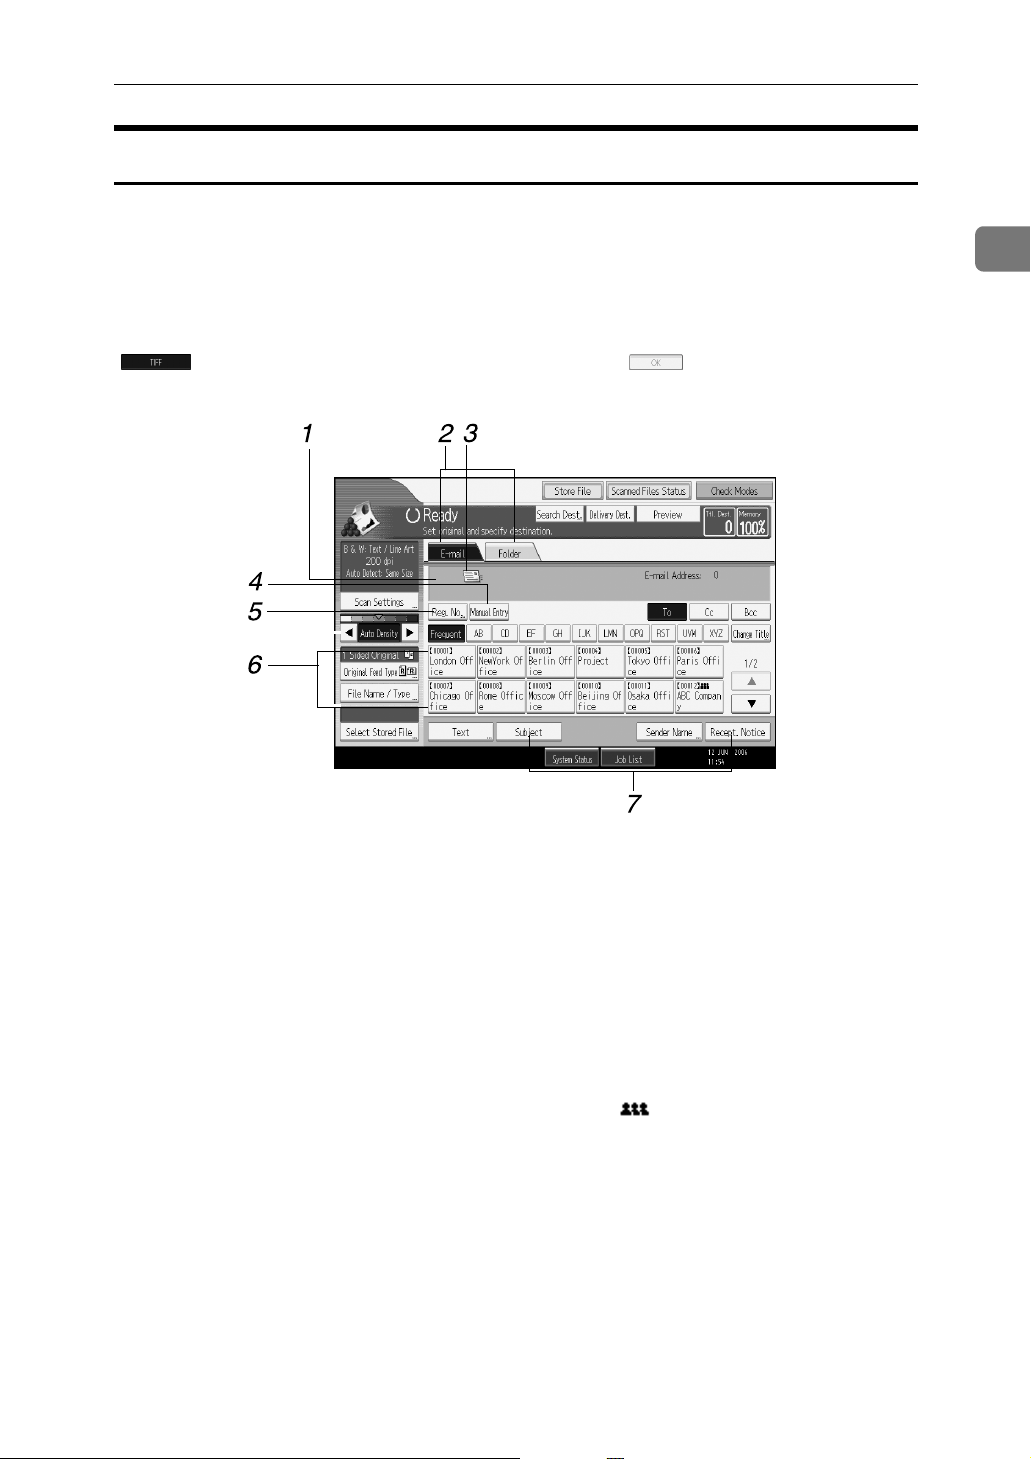
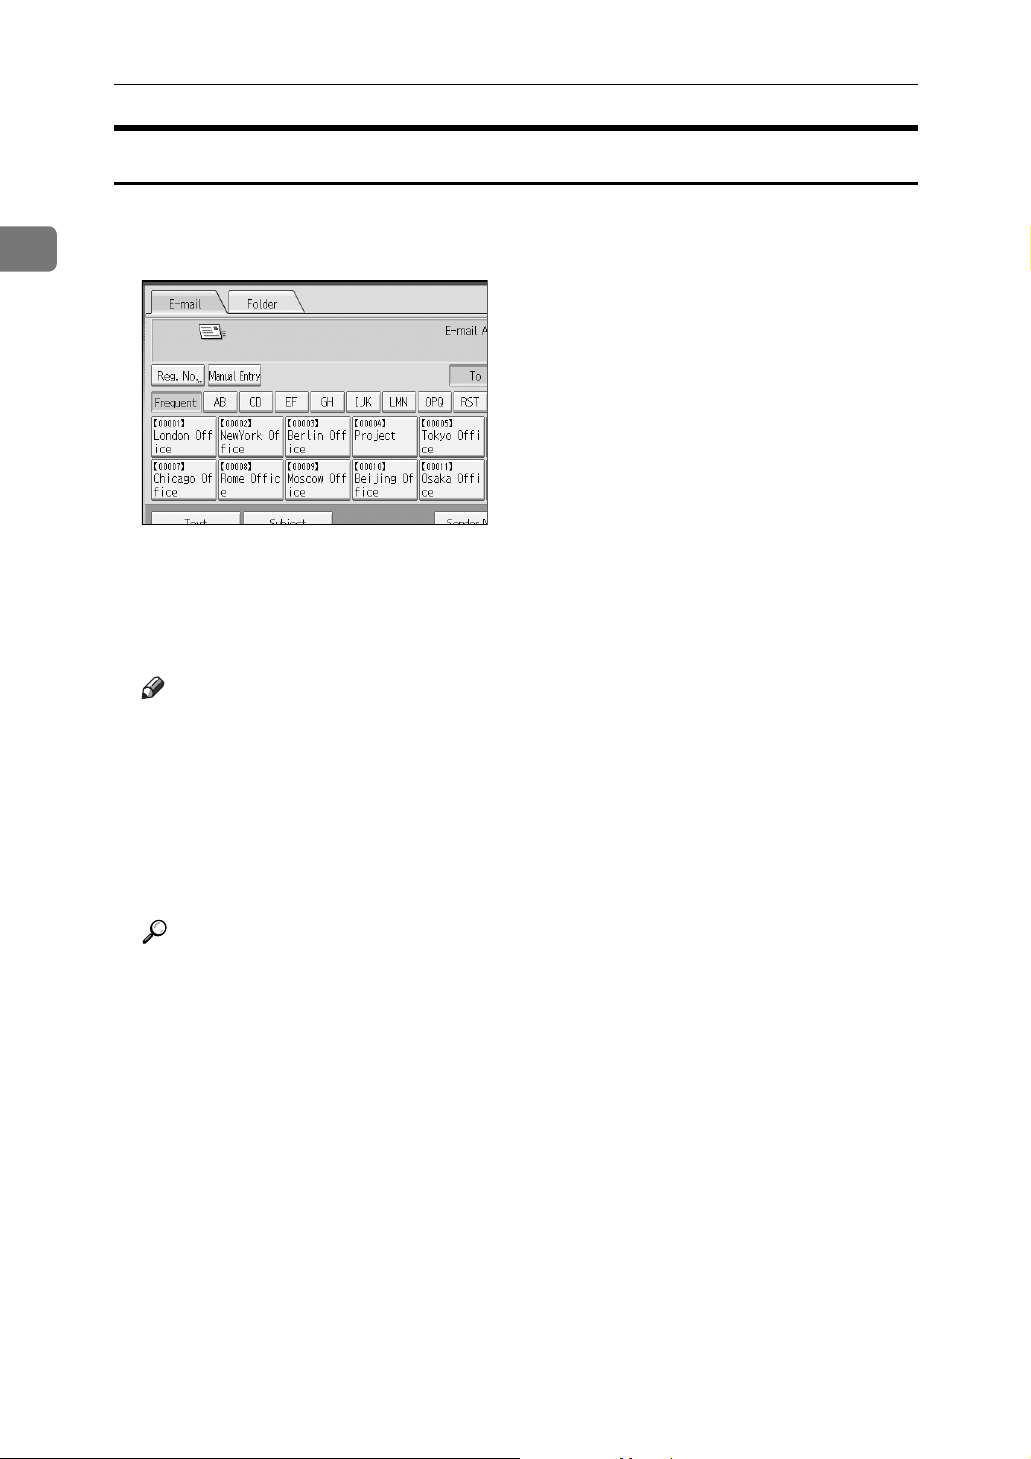
E-mail Screen
This section explains the screen layout when sending scan files by e-mail.
The function items displayed serve as selector keys. You can select or specify an
item by pressing it.
When you select or specify an item on the display panel, it is highlighted like
[]. Keys that cannot be selected appear like [].
1
1. Destination field
The specified destination appears. If
more than one destination has been specified, press [U] or [T] to scroll through the
destinations.
2. E-mail / Folder
Press these tabs to switch between the Email screen and Scan to Folder screen.
Switch the screen also when sending the
same files by both e-mail and Scan to
Folder.
3. E-mail icon
Indicates that the E-mail screen is displayed. Displays the destinations registered in the delivery server or this machine.
4. [Manual Entry]
To specify destinations not registered in
the address book, press this key, and then
enter the e-mail addresses using the soft
keyboard that appears.
ALQ006S
5. [Reg. No.]
Press this key to specify the destination
using a 5-digit registration number.
6. Destination List
The list of destinations registered in the
machine appears. If all of the destinations
cannot be displayed, press [U]or [T] to
switch the screen.
Group destinations are denoted by this
symbol ( ).
7. [Text][Subject][Sender Name][Recept.
Notice]
Enter the message and specify the subject, sender, and whether or not to use
Message Disposition Notification.
13
Sending Scan Files by E-mail
Basic Operation for Sending Scan Files by E-mail
1
This section describes the basic operation for sending scan files by e-mail.
A Make sure that no previous settings remain.
If a previous setting remains, press {Clear Modes}.
B If the network delivery scanner screen or Scan to Folder screen appears,
switch to the E-mail screen.
For details, see "Switching to the E-mail Screen".
C Place originals.
D If necessary, press [Scan Settings] to specify scanner settings such as resolu-
tion and scan size.
For details, see "Various Scan Settings".
E If necessary, specify the scanning density.
For details, see "Adjusting Image Density".
F If necessary, press [Original Feed Type] to specify settings such as original
side and orientation.
For details, see "Setting of Original Feed Type".
14

Basic Operation for Sending Scan Files by E-mail
G If necessary, press [File Name / Type] to specify settings such as file name and
file format.
For details, see "Setting File Type and File Name".
H Specify the destination.
You can specify multiple destinations.
For details, see "Specifying E-mail Destinations".
I If necessary, press [Text] to enter the e-mail message.
For details, see "Specifying the E-mail Message"
J If necessary, press [Subject] to specify the e-mail subject.
For details, see "Specifying the E-mail Subject".
K To specify the e-mail sender, press [Sender Name].
For details, see "Specifying the E-mail Sender".
L To use Message Disposition Notification, press [Recept. Notice].
If you select [Recept. Notice], the selected e-mail sender will receive e-mail notification when the e-mail recipient has opened the e-mail.
M Press {Start}.
If you are scanning batches, place the next originals.
Note
❒ If you have selected two or more destinations, the destinations can be
made to appear one by one by pressing [U] or [T] next to the destination
field.
❒ To cancel a selected destination, display the destination in the destination
field, and then press {Clear / Stop}. You can cancel a destination selected
from the address book by pressing the selected destination again.
1
❒ In [System Settings], you can specify the administrator’s e-mail address as
the default sender name. This lets you send e-mail without entering anything for [Sender Name]. For details, see General Settings Guide.
❒ Depending on the security setting, the logged-on user may be specified as
[Sender Name].
❒ To use Message Disposition Notification, log on to the machine as a user
and specify the sender. Note, however, that the [Recept. Notice] notification
e-mail may not be transmitted if the e-mail software of the recipient does
not support Message Disposition Notification.
❒ By pressing {Check Modes}, you can switch from the initial scanner screen
to the Check Modes screen so you can check the settings. For details, see
"Check Modes".
❒ If you press [Preview], and then scan a document, the Preview screen ap-
pears. For details, see "Preview".
❒ To cancel scanning, press {Clear / Stop}.
15

1
Sending Scan Files by E-mail
❒ You can also store a scan file and simultaneously send it by e-mail. For de-
tails, see "Simultaneous Storage and Sending by E-mail".
Reference
p.17 “Switching to the E-mail Screen”
p.105 “Various Scan Settings”
p.115 “Adjusting Image Density”
p.116 “Setting of Original Feed Type”
p.125 “Setting File Type and File Name”
p.18 “Specifying E-mail Destinations”
p.32 “Specifying the E-mail Message”
p.31 “Specifying the E-mail Subject”
p.27 “Specifying the E-mail Sender”
p.4 “Check Modes”
p.5 “Preview”
p.34 “Simultaneous Storage and Sending by E-mail”
16
Switching to the E-mail Screen
Switching to the E-mail Screen
This section explains how to switch the screen to the E-mail screen.
If the Scan to Folder screen is being displayed, press [E-mail] to switch to the Email screen.
If the network delivery scanner screen is being displayed, switch to the E-mail
screen as follows:
A Press [Delivery Dest.].
1
The E-mail screen or Scan to Folder screen appears.
B If the Scan to Folder screen appears, press [E-mail].
The E-mail screen appears.
Note
❒ You cannot switch from the network delivery scanner screen while deliv-
ery destinations are being specified. To clear the specified destination, display the destination in the destination field of the network delivery
scanner screen, and then press {Clear / Stop}.
17
1
Sending Scan Files by E-mail
Specifying E-mail Destinations
This section explains how to specify e-mail destinations.
You can specify e-mail destinations by any of the following methods:
• Select the destination from the machine’s address book
• Enter the e-mail address directly
• Search the LDAP server for the destination and select it
Before you select destinations, make sure you have selected [To]. If necessary,
press [Cc] or [Bcc], and then select destinations.
Selecting the Destination from the Machine’s Address Book
This section explains how to select the destination from the machine’s address
book.
Important
❒ To use this function, you must register the destinations in [System Settings] in
advance. For details, see General Settings Guide.
You can use the following methods to select destinations registered in the machine's address book:
• Select a destination from the list
• Select a destination by entering the registration number
• Select a destination by searching the machine's address book
Selecting a destination from the list
Select the destination from the destination list.
A In the destination list, press the key including the destination name.
The key of the selected destination is highlighted, and the destination appears
in the destination field at the top of the screen.
18
Specifying E-mail Destinations
If the target destination does not appear, take one of the following steps:
• Display the destination by selecting its initial letter from the title
• Display the destination by pressing [U] or [T]
Note
❒ Depending on the security setting, some destinations may not appear in
the destination list.
Selecting destinations by entering the registration numbers
Select the destination from the machine’s address book using its registration
number.
A Press [Reg. No.].
B Using the number keys, enter the five-digit registration number assigned
to the required destination folder.
If the entered number is less than five digits, press {q} after the last number.
Example: To enter 00003 Press {3}, and then press {q}.
1
C Press [OK].
By pressing [Change], you can change the selected destination.
19
1
Sending Scan Files by E-mail
Searching the machine’s address book for the destination and selecting it
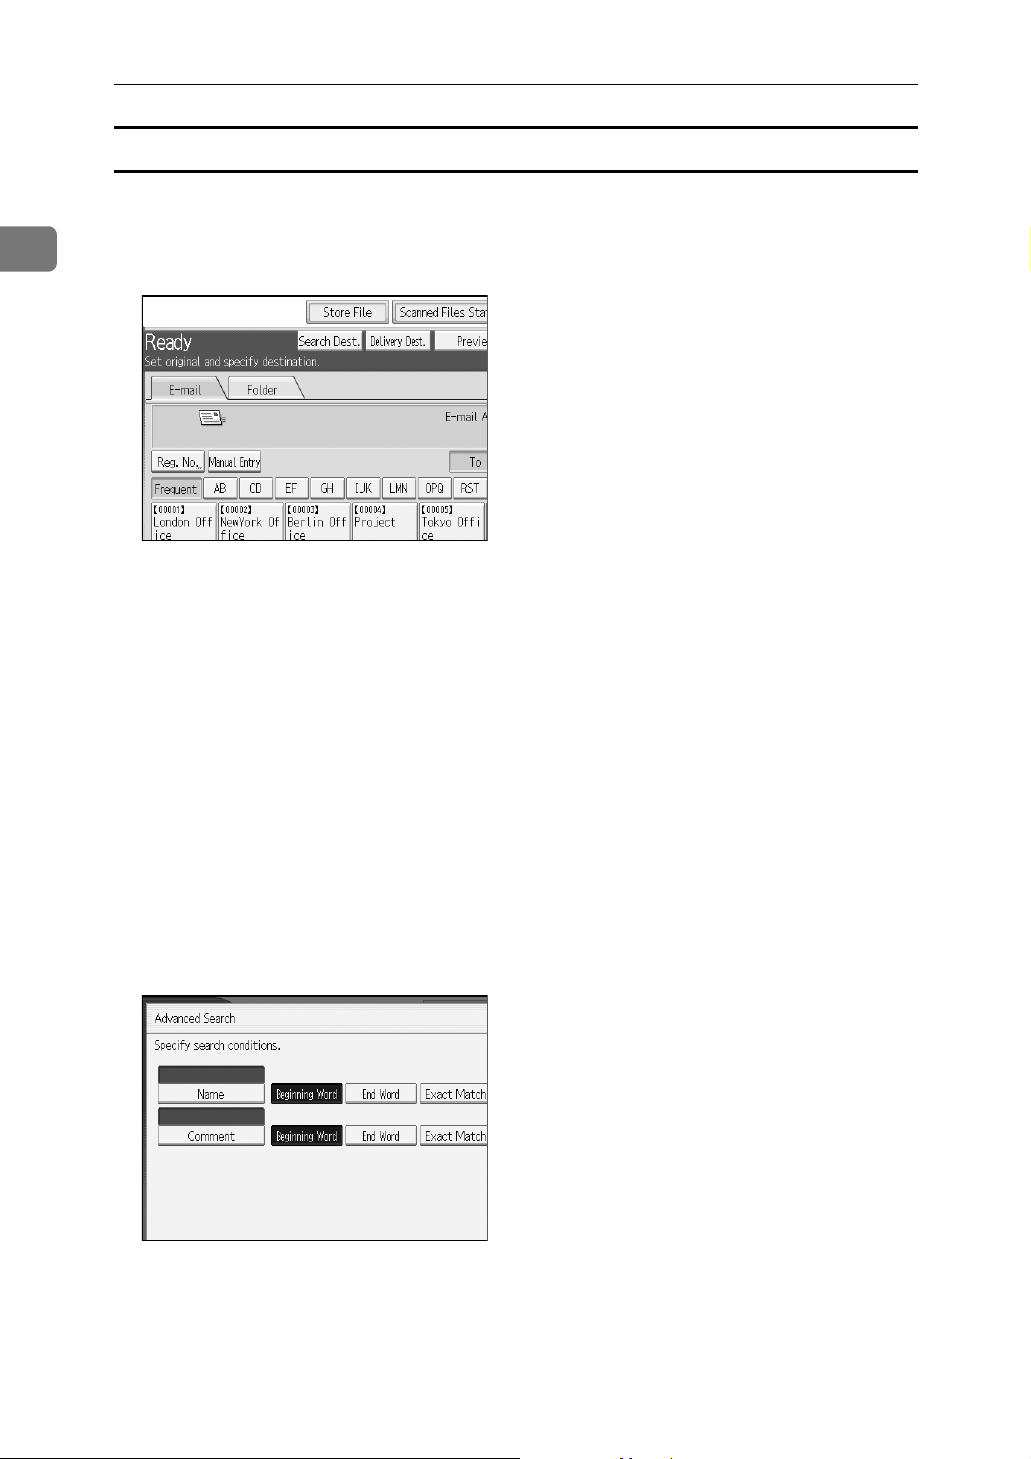
This section explains how to search the machine’s address book for the destination and select it.
A Press [Search Dest.].
B To search by name, press [Name].
To search by e-mail address, press [E-mail Address].
The soft keyboard appears so you can enter the name or e-mail address.
You can also search by combining [Name] and [E-mail Address].
C Enter part of the destination name.
To search by e-mail address, enter part of the address.
D Press [OK].
E If necessary, press [Advanced Search], and then specify the detailed search
criteria.
By pressing [Advanced Search], you can search using criteria such as [Name], [E-
mail Address], and [Folder Name]. You can also search by combining the [Begin-
ning Word] or [End Word] criteria with the other criteria.
The illustrated screen is an example. The items that actually appear on the
screen may differ.
F Press [Start Search].
Destinations that match the search criteria are displayed.
20

G Select a destination.
H Select [To], [Cc], or [Bcc].
Specifying E-mail Destinations
I Press [OK].
Note
❒ If [LDAP Search] is set to [On] in [System Settings], check that [Address Book]
in the upper part on the screen has been selected before executing the
search.
❒ Search criteria that appear in [Advanced Search], such as [Name], [E-mail Ad-
dress], and [Folder Name], are registered in the machine’s address book. For
details, see General Setting Guide.
❒ By pressing [Details], you can view details about the selected destinations.
❒ Up to 100 destinations can be displayed as search results.
❒ By pressing [Advanced Search], the following criteria appear:
• [Beginning Word]: The names which start with the entered character or char-
acters are targeted.
For example, to search for "ABC", enter "A".
• [End Word]: The names which end with the entered character or characters
are targeted.
For example, to search for "ABC", enter "C".
• [Exact Match]: The names which correspond to an entered character or char-
acters are targeted.
For example, to search for "ABC", enter "ABC".
• [Include one Word]: The names which contain an entered character or char-
acters are targeted.
For example, to search for "ABC", enter "A", "B", or "C".
• [Exclude Words]: The names which do not contain an entered character or
characters are targeted.
For example, to search for "ABC", enter "D".
1
21
Sending Scan Files by E-mail
Entering an E-mail Address Manually
This section explains how to enter an e-mail address manually.
1
A Press [Manual Entry].
The soft keyboard appears so you can enter the e-mail address.
B Enter the e-mail address.
C Press [OK].
Note
❒ Depending on the security settings, [Manual Entry] may not be displayed.
❒ To change a registered destination e-mail address, press [Edit] to the left of
the destination field to display the soft keyboard, use the soft keyboard to
enter the new address, and then click [OK].
❒ The e-mail address that is entered directly can be registered in the ma-
chine’s address book. For details, see "Registering a Directly-Entered Destination in the Address Book".
22
Reference
p.25 “Registering a Directly-Entered Destination in the Address Book”

Specifying E-mail Destinations
Selecting Destinations by Searching an LDAP Server
By accessing an LDAP server, you can search for destinations and select them.
Important
❒ To use this function, an LDAP server must be connected to the network. In
addition, under [System Settings], the server must be registered and [LDAP
Search] must be set to [On]. For details, see General Settings Guide.
A Press [Search Dest.].
B Select the LDAP server that appears next to [Address Book].
Register the LDAP server in advance in [System Settings].
1
If authentication is required to access the selected server, the authentication
screen appears. To authenticate, enter the user name and password.
C To search by name, press [Name].
To search by e-mail address, press [E-mail Address].
The soft keyboard appears so you can enter the name or e-mail address.
You can also search by combining [Name] and [E-mail Address]. If you search
by [Name], whether the search is based on surname or first name depends on
how the administrator has configured searching.
D Enter part of the destination name.
To search by e-mail address, enter part of the destination address.
E Press [OK].
23

1
Sending Scan Files by E-mail
F If necessary, press [Advanced Search], and then specify the detailed search
criteria.
By pressing [Advanced Search], you can search using criteria such as [Name], [E-
mail Address], [Company Name], [Department Name], and [Search Options]. You can
also search by combining the [Beginning Word] or [End Word] criteria with the
other criteria.
The illustrated screen is an example. The items that actually appear on the
screen may differ.
G Press [Start Search].
Destinations that match the search criteria are displayed.
H Select the destination.
I Select [To], [Cc], or [Bcc].
J Press [OK].
Note
❒ The [Fax Destination], [Company Name], [Department Name], and [Search Op-
tions] search criteria that appear in [Advanced Search] are registered in the
LDAP server. [Search Options] can be registered in [System Settings]. For details, see General Settings Guide.
❒ By pressing [Details], you can view details about the selected destinations.
❒ Up to 100 destinations can be displayed as search results.
❒ If an e-mail address returned by the LDAP server is too long, it will be im-
possible to specify it as the destination. For details about the number of
characters that can be specified, see "Sending E-mail".
❒ It is possible for more than one e-mail address to be registered for a desti-
nation. However, only one e-mail address per destination will appear in
the search results. It depends on the LDAP server which e-mail address
will be displayed. Usually, it is the e-mail address registered first.
❒ By pressing [Advanced Search], the following criteria appear:
• [Beginning Word]: The names which start with the entered character or char-
acters are targeted.
For example, to search for "ABC", enter "A".
24

Specifying E-mail Destinations
• [End Word]: The names which end with the entered character or characters
are targeted.
For example, to search for "ABC", enter "C".
• [Exact Match]: The names which correspond to an entered character or char-
acters are targeted.
For example, to search for "ABC", enter "ABC".
• [Include one Word]: The names which contain an entered character or char-
acters are targeted.
For example, to search for "ABC", enter "A", "B", or "C".
• [Exclude Words]: The names which do not contain an entered character or
characters are targeted.
For example, to search for "ABC", enter "D".
• [Fuzzy Search]: a vague search (The function of this vague search depends
on the system supported by the LDAP server.)
Reference
p.146 “Sending E-mail”
Registering a Directly-Entered Destination in the Address Book
1
This section explains how to register a directly-entered destination in the machine’s address book. You can also register a destination selected from the LDAP
server.
A In the destination field, display the destination you want to register.
B Press [Prg. Dest.].
25

1
Sending Scan Files by E-mail
C Press [Names], and then specify the name and other information to be regis-
tered.
For details about specifying the information to be registered, see General Settings Guide.
D Press [OK].
Note
❒ Depending on the security setting, [Prg. Dest.] may not appear. In such case,
you cannot complete the registration.
❒ To register in the machine’s address book a destination searched for and
selected from the LDAP server, display the destination, and then press
[Prg. Dest.].
26

Specifying the E-mail Sender
Specifying the E-mail Sender
This section explains how to specify the e-mail sender.
To send e-mail, you must specify the name of the sender.
You can specify the e-mail sender by any of the following methods:
• Select the sender from the machine’s sender list
• Select the sender by entering the registration number
• Select the sender by searching the machine’s address book
Note
❒ Senders must be registered in advance under [System Settings]. For details, see
General Settings Guide.
❒ In [System Settings], you can specify the administrator’s e-mail address as the
default sender name. This lets you send e-mail without entering anything for
[Sender Name]. For detail, see General Settings Guide.
❒ Depending on the security setting, the logged-on user may be specified as
[Sender Name].
1
❒ When a protection code has been set, a screen for entering the protection code
appears after selecting the sender. Enter the protection code, and then press
[OK]. If the protection code you entered is correct, the sender name is displayed.
Selecting a Sender from the List
This section explains how to select the sender from the machine’s sender list.
A Press [Sender Name].
B Select the sender.
C Press [OK].
27

Sending Scan Files by E-mail
Using a Registration Number to Specify a Sender Name
Select the sender from the destination list according to the registration number.
1
A Press [Sender Name].
B Press [Registration No.].
C Using the number keys, enter the five-digit registration number assigned
to the required destination folder.
If the entered number is less than five digits, press {q} after the last number.
Example: To enter 00006
Press {6}, and then press {q}.
D Press [OK] twice.
By pressing [Change], you can change the selected destination.
Selecting the Sender by Searching the Machine’s Address Book
This section explains how to select the sender by searching the machine’s address book.
A Press [Sender Name].
B Press [Search].
28

Specifying the E-mail Sender
C To search by name, press [Name].
To search by e-mail address, press [E-mail Address].
The soft keyboard appears so you can specify a name or e-mail address to
search by.
You can also search by combining [Name] and [E-mail Address].
D Enter the part of the sender’s name you want to search for.
To search by e-mail address, enter part of the address.
E Press [OK].
F If necessary, press [Advanced Search], and then specify the detailed search
criteria.
By pressing [Advanced Search], you can search using criteria such as [Name], [E-
mail Address], and [Folder Name].
You can also search by combining the [Beginning Word] or [End Word] criteria
with the other criteria.
1
The illustrated screen is an example. The items that actually appear on the
screen may differ.
G Press [Start Search].
Destinations that match the search criteria are displayed.
H Select the sender.
I Press [OK].
Note
❒ If [LDAP Search] is set to [On] in [System Settings], check that [Address Book] in
the upper part on the screen has been selected before executing the search.
❒ Search criteria that appear in [Advanced Search], such as [Name], [E-mail Ad-
dress], and [Folder Name], are registered in the machine’s address book. For
details, see General Setting Guide.
❒ By pressing [Details], you can view details about the selected sender.
❒ By pressing [Advanced Search], the following criteria appear:
• [Beginning Word]: The names which start with the entered character or char-
acters are targeted.
For example, to search for "ABC", enter "A".
29

1
Sending Scan Files by E-mail
• [End Word]: The names which end with the entered character or characters
are targeted.
For example, to search for "ABC", enter "C".
• [Exact Match]: The names which correspond to an entered character or char-
acters are targeted.
For example, to search for "ABC", enter "ABC".
• [Include one Word]: The names which contain an entered character or char-
acters are targeted.
For example, to search for "ABC", enter "A", "B", or "C".
• [Exclude Words]: The names which do not contain an entered character or
characters are targeted.
For example, to search for "ABC", enter "D".
30

Specifying the E-mail Subject
This section explains how to specify the e-mail subject.
Specifying the E-mail Subject
A Press [Subject].
The soft keyboard appears.
B Enter the subject.
C Press [OK].
1
31

1
Sending Scan Files by E-mail
Specifying the E-mail Message
This section explains how to specify the e-mail message.
The message can be created in the following ways:
• Select the e-mail message from the list
• Enter the message directly
Selecting a Message from the List
You can select a message from the list.
Important
❒ The messages that can be selected from the list must be registered in [System
Settings] in advance.
A Press [Text].
B Select a message.
C Press [OK].
32

Manual Entry of a Message
You can enter the message manually.
Specifying the E-mail Message
A Press [Text].
B Press [Manual Entry].
The soft keyboard appears so you can enter the message.
C Enter the message.
D Press [OK] twice.
1
33

Sending Scan Files by E-mail
Simultaneous Storage and Sending by E-mail
This section explains how to store a file and simultaneously send it by e-mail.
1
A Press [Store File].
B Make sure [Send & Store] is selected.
C If necessary, specify file data, such as [User Name], [File Name], and [Password].
For details, see " Specifying File Information for a Store File".
D Press [OK].
E Specify the setting for sending the file by e-mail, and then send the file.
For details about sending a file by e-mail, see "Basic Operation for Sending
Scan Files by E-mail".
34
Note
❒ If you simultaneously store scan files and send them by e-mail, the files
cannot be retransmitted from the E-mail screen. To retransmit the files, select the file on the screen for selecting stored files, and then send them. For
details, see "Sending a Stored File".
Reference
p.65 “Specifying File Information for a Stored File”
p.14 “Basic Operation for Sending Scan Files by E-mail”
p.74 “Sending a Stored File”

Simultaneous Storage and Sending by E-mail
Sending the URL by E-mail
This section explains how to send the URL of the stored file by e-mail.
Important
❒ To send the URL of the stored file by e-mail without sending the file itself, you
must specify the setting in [Scanner Features]. For details, see General Settings
Guide.
You can send the URL when you send a stored file by e-mail, and when you store
a file and simultaneously send it by e-mail.
With the transmitted URL, the recipient can view, download, or delete the file
indicated by the URL over the network using Web Image Monitor. Even if you
cannot send a file by e-mail because of network limitations, you can still send the
URL of the file.
A In [Scanner Features], select [Send URL Link] under [Stored File E-mail Method].
For details about specifying the setting, see General Settings Guide.
B Send a stored file by e-mail. Alternatively, store a file and simultaneously
send it by e-mail.
For details about sending a stored file by e-mail, see "Sending a Stored File".
For details about storing a file and simultaneously sending it by e-mail, see
"Simultaneous Storage and Sending by E-mail".
An e-mail such as the one shown below will be sent to the destination.
1
C In the e-mail destination, click the URL.
Web Image Monitor starts.
D View, delete, or download the file over the network using Web Image
Monitor.
Note
❒ It is recommended that you use Web Image Monitor on the same network
environment. For details about settings for using Web Image Monitor, see
Network Guide.
❒ Depending on the environment, even if you click the URL in the file sent
by e-mail, the browser may not start and you may not be able to view the
file. If this happens, click the same URL again, or manually enter the URL
in the browser's address bar.
35

1
Sending Scan Files by E-mail
❒ For details about the functions for displaying and downloading stored files
using Web Image Monitor, see Network Guide.
❒ To display details about the functions for managing stored files using Web
Image Monitor, click [Help] on the upper right of each Web browser's window.
❒ You can send the URL by e-mail and simultaneously send it by Scan to
Folder. In this case, the file is sent to the Scan to Folder destination, not the
URL.
36

2. Sending Scan Files to Folders
Using the Scan to Folder function, you can send scan files over the network to
shared folders, FTP server folders, or NetWare folders.
Before Sending Files by Scan to Folder
This section describes the preparations and procedure for sending files by Scan
to Folder.
Outline of Sending Scan Files by Scan to Folder
This section outlines the function for sending scan files by Scan to Folder.
Sending files to shared folders
1. This machine
You can send scan files to shared network folders. To send scan files to shared
network folders, use the SMB protocol.
ZZZ509S
2. Computer with a shared folder
To use this function, it is necessary to create a shared folder in advance. You can
specify a shared folder to save scan files.
3. Client computer
You can also browse scanned files saved
to a shared folder from a client computer.
37

2
Sending Scan Files to Folders
Sending files to an FTP server
ZZZ510S
1. This machine
You can send scan files to FTP server
folders. To send scan files to FTP server
folders, use the FTP protocol.
2. FTP server
The FTP server is a server that provides
file transfer services among computers
on the same network. Transferred files
are stored on this server. It is essential to
have the FTP server inside the
LAN/WAN where this machine belongs.
It is not possible to access an FTP server
via a proxy server.
3. Client computer
You can browse scanned files saved to an
FTP server from a client computer. You
need to have an FTP client program on
the computer to connect to an FTP server.
38
Sending files to a NetWare server
Before Sending Files by Scan to Folder
2
ZZZ511S
1. This machine
You can send scan files to NetWare folders. To send scan files to NetWare folders, use the NCP protocol.
3. Client computer
To download files, a computer must be
running the NetWare client and be
logged onto the server.
2. NetWare Server
You can use this server to share files over
the network via NetWare. By sending image data to the server, files can be stored
on the server.
Preparation for Sending by Scan to Folder
This section describes the preparations and settings for sending scan files by
Scan to Folder.
Important
❒ Files can be sent to shared folders on client computers.
❒ Files can also be sent to FTP servers if any exist on the network. Files can also
be sent to FTP servers if any exist on the network.
❒ Files can also be sent to NetWare servers if any exist on the network.
A Connect the machine to the network.
Connect the machine to the network using an Ethernet or IEEE 1394 cable, or
wireless LAN (IEEE 802.11b).
B Make the necessary network settings in [System Settings].
If you have connected the machine to the network using an Ethernet cable,
make the following settings. For details, see General Settings Guide.
• Specify the machine’s IPv4 address and subnet mask.
• Specify the IPv4 gateway address.
39

2
Sending Scan Files to Folders
•In [Effective Protocol], enable [IPv4].
• To send files to shared folders, enable [SMB] in [Effective Protocol]. To send
files to NetWare folders, enable [NetWare] in [Effective Protocol].
C If necessary, change settings in [Send Settings] under [Scanner Features].
Note
❒ To connect the machine to the network using an IEEE 1394 cable or wire-
less LAN (IEEE 802.11b), an extended 1394 board or extended wireless
LAN board is required respectively. For details, see Network Guide.
❒ Items to set up in [System Settings] vary depending on the network environ-
ment. For more information about network settings, see General Settings
Guide.
❒ For details about [Scanner Features], see General Settings Guide.
❒ Sending files using SMB is available only under a NetBIOS over TCP/IP
environment. Sending files using SMB is not available under a NetBEUI
environment.
❒ Even when settings made with the control panel, Web Image Monitor, Tel-
net, or other methods do not permit the use of SMB and FTP, sending files
is still possible.
Registering Destination Folders in the Address Book
You can register the addresses of frequently-used destination folders in the address book. Register the folder addresses in [Address Book Management] under
[Administrator Tools] from [System Settings]. These addresses can also be registered
as groups.
Note
❒ For details about registering the address of a destination folder in the address
book, see General Settings Guide.
❒ You can register entries in the address book using Web Image Monitor or
SmartDeviceMonitor for Admin. For details about installing SmartDeviceMonitor for Admin, see "Monitoring and Configuring the Printer", Network
Guide. For details about registering addresses, see each application’s Help.
❒ Depending on the machine type, you may not be able to use the machine
when it is updating the address book using CSV files (retrieved using SmartDeviceMonitor for Admin) that contain user codes.
40

Before Sending Files by Scan to Folder
Scan to Folder Screen
This section describes the screen layout when sending scan files by Scan to Folder.
The function items displayed serve as selector keys. You can select or specify an
item by pressing it. When you select or specify an item on the display panel, it is
highlighted like []. Keys that cannot be selected appear like [].
2
1. Destination field
The specified destination appears. If more
than one destination has been specified, press
[U]
or [T] to scroll through the destinations.
2. E-mail/ Folder
Press to switch between the Scan to Folder screen and E-mail screen
Also switch the screen when sending a
file simultaneously by both Scan to Folder and e-mail.
3. Scan to Folder icon
Shows that the Scan to Folder screen is
displayed.
4. [Manual Entry]
To specify destinations not registered in
the address book, press this button to display the soft keyboard, and then enter the
address of the destination folder.
ALQ007S
5. [Reg. No.]
Press to specify a destination using a fivedigit registration number.
6. Destination List
The list of destinations registered in the
machine appears.
If all of the destinations cannot be dis-
[U]
played, press
Group destinations are denoted by this
symbol ( ).
or [T] to switch the screen.
7. [Text][Subject][Sender Name][Recept.
Notice]
You can enter the message and specify the
subject, sender, and whether or not to use
Message Disposition Notification. The entries will be used for e-mail transmission
when sending files simultaneously by
Scan to Folder and e-mail. For details, see
"Sending Scan Files by E-mail".
Reference
p.11 “Sending Scan Files by E-mail”
41

Sending Scan Files to Folders
Basic Operations When Using Scan to Folder
This section describes the basic operations involved in using Scan to Folder.
A Make sure that no previous settings remain.
If a previous setting remains, press {Clear Modes}.
2
B If the network delivery scanner screen or E-mail screen appears, switch to
the Scan to Folder screen.
For details, see "Switching to the Scan to Folder Screen".
C Place originals.
D If necessary, press [Scan Settings] to specify scanner settings such as resolu-
tion and scan size.
For details, see "Various Scan Settings".
E If necessary, specify the scanning density.
For details, see "Adjusting Image Density".
F If necessary, press [Original Feed Type] to specify settings such as original
side and orientation.
For details, see "Setting of Original Feed Type".
G If necessary, press [File Name / Type] to specify settings such as file name and
file format.
For details, see "Setting File Type and File Name".
42

Basic Operations When Using Scan to Folder
H Specify the destination.
You can specify multiple destinations.
For details, see "Specifying Scan to Folder Destinations".
I Press {Start}.
If you are scanning batches, place the next originals.
Note
❒ If you have selected more than one destination, you can press [U] or [T]
next to the destination field to scroll through the destinations.
❒ To cancel a selected destination, display the destination in the destination
field, and then press {Clear / Stop}. You can cancel a destination selected
from the address book by pressing the selected destination again.
❒ By pressing {Check Modes}, you can switch from the initial scanner screen
to the Check Modes screen so you can check the settings. For details, see
"Check Modes".
❒ If you press [Preview], and then scan a document, the Preview screen ap-
pears. For details, see "Preview".
❒ To cancel scanning, press {Clear / Stop}.
❒ You can also store a file and simultaneously send it by Scan to Folder. For
details, see "Simultaneous Storage and Sending by Scan to Folder".
Reference
p.44 “Switching to the Scan to Folder Screen”
p.105 “Various Scan Settings”
p.115 “Adjusting Image Density”
p.116 “Setting of Original Feed Type”
p.125 “Setting File Type and File Name”
2
p.45 “Specifying Scan to Folder Destinations”
p.4 “Check Modes”
p.5 “Preview”
p.59 “Simultaneous Storage and Sending by Scan to Folder”
43

2
Sending Scan Files to Folders
Switching to the Scan to Folder Screen
This section explains how to switch to the Scan to Folder screen.
If the E-mail screen is being displayed, press [Folder] to switch to the Scan to
Folder screen.
If the network delivery scanner screen is being displayed, switch to the Scan to
Folder screen as follows:
A Press [Delivery Dest.].
The E-mail screen or Scan to Folder screen appears.
B If the E-mail screen appears, press [Folder].
The Scan to Folder screen appears.
Note
❒ You cannot switch from the network delivery scanner screen while deliv-
ery destinations are being specified. To clear the specified destination, display the destination in the destination field of the network delivery
scanner screen, and then press {Clear / Stop}.
44

Specifying Scan to Folder Destinations
Specifying Scan to Folder Destinations
This section explains how to specify Scan to Folder destinations.
You can send a file by Scan to Folder by any of the following methods:
• Select a destination registered in the machine’s address book
• Send a file to a shared network folder
• Send a file to an FTP server
• Send a file to an NDS tree or a NetWare server
Selecting the Destination from the Machine’s Address Book
This section explains how to select the destination from the machine’s address
book.
Important
❒ To use this function, you must register the destinations in [System Settings] in
advance.
2
You can select a destination registered in the machine’s address book by any of
the following methods:
• Select the destination from the destination list
• Select the destination by entering its registration number
• Select the destination by searching the machine’s address book
Note
❒ If you have specified the address protection cord for accessing the address
book, the screen for entering the address protection cord appears.
❒ Depending on the security setting, some destinations may not appear in the
destination list.
45

2
Sending Scan Files to Folders
Selecting a destination registered in the destination list
Select the destination from the destination list.
A In the destination list, press the key including the destination name.
The key of the selected destination is highlighted, and the destination appears
in the destination field at the top of the screen.
If the target destination does not appear, take one of the following steps:
• Display the destination by selecting its initial letter from the title
• Display the destination by pressing [U] or [T]
Note
❒ Depending on the security setting, some destinations may not appear in
the destination list.
Selecting destinations by entering the registration numbers
Select the destination from the machine’s address book using its registration
number.
A Press [Reg. No.].
B Enter the five-digit registration number that has been assigned to a desti-
nation folder using the number keys.
If the entered number is less than five digits, press {q} after the last number.
46
Example: To enter 00004
Press {4}, and then press {q}.

Specifying Scan to Folder Destinations
C Press [OK].
By pressing [Change], you can change the selected destination.
Searching the machine’s address book for the destination and selecting it
This section explains how to search the machine’s address book for the destination and select it.
A Press [Search Dest.].
2
B To search by name, press [Name].
To search by path, press [Folder].
The soft keyboard appears so you can enter the name or path.
You can also search by combining [Name] and [Folder Name].
C Enter part of the destination name.
To search by path, enter part of the path.
D Press [OK].
47

2
Sending Scan Files to Folders
E
If necessary, press [Advanced Search], and then specify the detailed search criteria.
By pressing [Advanced Search], you can search using criteria such as [Name], [E-
mail Address], and [Folder Name].
You can also search by combining the [Beginning Word] or [End Word] criteria
with the other criteria.
The illustrated screen is an example. The items that actually appear on the
screen may differ.
F Press [Start Search].
Destinations that match the search criterion are displayed.
G Select the destination folder.
H Press [OK].
Note
❒ Search criteria that appear in [Advanced Search], such as [Name], [E-mail Ad-
dress], and [Folder], are registered in the machine’s address book. For de-
tails, see General Setting Guide.
❒ By pressing [Details], you can view details about the selected destinations.
❒ Up to 100 destinations can be displayed as search results.
❒ By pressing [Advanced Search], the following criteria appear:
• [Beginning Word]: The names which start with the entered character or char-
acters are targeted.
For example, to search for "ABC", enter "A".
• [End Word]: The names which end with the entered character or characters
are targeted.
For example, to search for "ABC", enter "C".
• [Exact Match]: The names which correspond to an entered character or char-
acters are targeted.
For example, to search for "ABC", enter "ABC".
• [Include one Word]: The names which contain an entered character or char-
acters are targeted.
For example, to search for "ABC", enter "A", "B", or "C".
• [Exclude Words]: The names which do not contain an entered character or
characters are targeted.
For example, to search for "ABC", enter "D".
48

Specifying Scan to Folder Destinations
Sending Files to a Shared Network Folder
This section explains how to specify the destination when sending files to a
shared network folder.
Important
❒ The shared folder must have been created on the client computer in advance.
❒ Depending on the operating system of the client computer, access to the
shared folder may require authentication.
You can send a file to a shared folder over the network by any of the following
methods:
• Enter the path to the destination directly
• Specify the path by browsing the network for the destination
Entering the path to the destination manually
You can enter the path to the destination folder manually.
2
A Press [Manual Entry].
B Press [SMB].
C Press [Manual Entry] on the right side of the path field.
The soft keyboard appears.
D Enter the path for the folder.
The following is an example of a path where the folder name is "user" and the
computer name is "desk01": \\desk01\user.
Instead of specifying the destination using its path, you can also use its IPv4
address.
E Press [OK].
49

2
Sending Scan Files to Folders
F Depending on the destination setting, enter the user name for logging on
to the client computer.
Press [Manual Entry] to the right of the user name field to display the soft keyboard.
G Depending on the destination setting, enter the password for logging on to
the client computer.
Press [Manual Entry] for the password to display the soft keyboard.
H Press [Connection Test].
A connection test is performed to check whether the specified shared folder
exists.
I Check the connection test result, and then press [Exit].
J Press [OK].
Note
❒ If authentication is required to access the folder, the login screen appears.
Enter the user name and password.
❒ If you change the protocol after entering the path name, user name, or
password, a confirmation message appears.
❒ IPv4 address entry is supported by Windows98/Me/2000/XP, Windows
NT4.0, and Windows Server 2003.
❒ Computer and shared folder names containing more than 12 characters
cannot be displayed.
❒ To change the path for the folder that has been entered, press [Change] on
the left side of the destination field. Enter the correct path for the folder,
and then press [OK].
❒ The connection test may take time.
❒ You may not be able to press [Connection Test] right after pressing [Cancel]
during a connection test.
❒ Even if the connection test was successful, the machine may fail to transfer
the file if you do not have write privileges for the file or there is not enough
free hard disk space.
❒ You can register the path to the destination in the machine’s address book.
For details, see "Registering the Path to the Selected Destination in the Address Book".
50
Reference
p.57 “Registering the Path to the Selected Destination in the Address
Book”

Specifying Scan to Folder Destinations
Specifying the path by browsing the network for destinations
You can browse computers on the network for the destination folder, and then
specify the path.
A Press [Manual Entry].
B Press [SMB].
C Press [Browse Network] under the path name field.
2
Domains or workgroups on the network appear.
D Select the domain or workgroup in which the destination folder is located.
E Select the client computer that has the destination folder.
If you cannot find the computer you are looking for, press [Up One Level] and
browse that level.
If authentication is required to access the selected computer, the authentication screen appears. To authenticate, enter the user name and password.
F Select the destination folder.
When the selected folder has sub-folders, the sub-folders list appears.
If you cannot find the destination folder, press [Up One Level], and then search
for the folder at that level.
51

2
Sending Scan Files to Folders
G Press [OK] twice.
Note
❒ If authentication is required to access the folder, the login screen appears.
Enter the user name and password.
❒ If you change the protocol after entering the path name, user name, or
password, a confirmation message appears.
❒ Computer and shared folder names containing more than 12 characters
cannot be displayed.
❒ Up to 100 computers or shared folders can be displayed.
❒ The machine may fail to transfer the file if you do not have the write priv-
ileges for the shared folder or there is not enough free hard disk space.
❒ You can register the path to the destination in the machine’s address book.
For details, see "Registering the Path to the Selected Destination in the Address Book".
Reference
p.57 “Registering the Path to the Selected Destination in the Address
Book”
Sending Files to an FTP Server
This section explains how to specify destinations when sending files to an FTP
server.
Entering the path to an FTP server manually
You can enter the path to an FTP server manually.
A Press [Manual Entry].
B Press [FTP].
C Press [Manual Entry] on the right side of the server name field.
The soft keyboard appears.
52

Specifying Scan to Folder Destinations
D Enter a server name.
Instead of specifying the destination using its path, you can also use its IPv4
address.
E Press [Manual Entry] on the right side of the path field.
F Enter the path for the folder.
The following is an example of a path where the folder name is "user" and the
subfolder name is "lib": user\lib.
G Press [OK].
H Enter the user name according to the setting at the destination.
Press [Manual Entry] to the right of the user name field to display the soft keyboard.
I Enter the password according to the setting at the destination.
Press [Manual Entry] next to the password field to make the soft keyboard appear.
J To change the port number which is set in [System Settings], press [Change]
on the right side of the port number field. Enter a port number using the
number keys, and then press {q}.
2
K Press [Connection Test].
A connection test is performed to check whether the specified folder exists.
L Check the connection test result, and then press [Exit].
M Press [OK].
Note
❒ If you change the protocol after entering the path name, user name, or
password, a confirmation message appears.
❒ The connection test may take time.
❒ You may not be able to press [Connection Test] right after pressing [Cancel]
during a connection test.
❒ To change the registered path to a destination folder, press [Edit] to the left
of the destination field to display the soft keyboard, enter the new path,
and then click [OK].
❒ You can register the path to the destination in the machine’s address book.
For details, see "Registering the Path to the Selected Destination in the Address Book".
❒ The machine may fail to transfer the file if you do not have write privileges
for the folder or there is not enough free hard disk space.
Reference
p.57 “Registering the Path to the Selected Destination in the Address
Book”
53

2
Sending Scan Files to Folders
Sending Files to an NDS Tree or NetWare Server
This section explains how to specify destinations when sending files to an NDS
tree or NetWare server.
You can send a file to an NDS tree or NetWare server by any of the following
methods:
• Enter the path to the NDS tree or NetWare server directly
• Specify the path by browsing the NDS tree or NetWare server for the destination
Reference
p.45 “Selecting the Destination from the Machine’s Address Book”
Entering the path to an NDS tree or NetWare server manually
You can enter the path to an NDS tree or NetWare server manually.
A Press [Manual Entry].
B Press [NCP].
C Select the connection type. Press [NDS] to specify the folder in the NDS tree.
Press [Bindery] to specify the folder on the NetWare server.
D Press [Manual Entry] on the right side of the path field.
The soft keyboard appears.
54

Specifying Scan to Folder Destinations
E Enter the path for the folder.
If you set the connection type to [NDS], the NDS tree name is "tree", the name
of the context including the volume is "context", the volume name is "volume", and the folder name is "folder", the path will be \\tree\volume.context\folder".
If you set the connection type to [Bindery], the NetWare server name is "server", the volume name is "volume", and the folder name is "folder", the path
will be "\\server\volume\folder".
F Press [OK].
G Enter the user name for logging on to the NDS tree or NetWare server.
Press [Manual Entry] to the right of the user name field. The soft keyboard appears.
If you press [NDS] for [Connection Type], enter the user name, and then enter
the name of the context containing the user object. If the user name is "user"
and the name of the Context is "context", the user name will be "user.context".
H If a password is specified for the log on user, enter it.
Press [Manual Entry] to the right of the password field. The soft keyboard appears.
2
I Press [Connection Test].
A connection test is performed to check whether the specified share folder exists.
J Check the connection test result, and then press [Exit].
K Press [OK].
Note
❒ If you change the protocol after entering the path name, user name, or
password, a confirmation message appears.
❒ To change a registered path to a destination folder, press [Edit] to the left to
the destination field to display the soft keyboard, enter the correct path to
the folder, and then press [OK].
❒ You can connect only to folders that you have the read privileges for.
❒ The connection test may take time.
❒ You may not be able to press [Connection Test] right after pressing [Cancel]
during a connection test.
❒ Even if the connection test was successful, the machine may fail to transfer
the file if you do not have write privileges for the file or there is not enough
free hard disk space.
❒ You can register the path to the destination in the machine’s address book.
For details, see "Registering the Path to the Selected Destination in the Address Book".
55

Sending Scan Files to Folders
Reference
p.57 “Registering the Path to the Selected Destination in the Address
Book”
Specifying the path to a destination folder in an NDS tree or on a NetWare server by browsing the network
2
You can browse the network and specify the path to a destination folder in an
NDS tree or on a NetWare server.
A Press [Manual Entry].
B Press [NCP].
C Select the connection type. Press [NDS] to browse the NDS tree. Press [Bind-
ery] to browse the NetWare server.
D Press [Browse Network] under the path name field.
If you selected [NDS] under [Connection Type], the NDS tree list appears.
If you selected [Bindery] under [Connection Type], the NetWare server list appears.
E Search for the destination folder in the NDS tree or NetWare server.
If you cannot find the destination folder, press [Up One Level], and then search
for the folder at that level.
F Select the destination folder.
G Press [OK] twice.
Note
❒ If you change the protocol after entering the path name, user name, or
password, a confirmation message appears.
❒ Only folders that you have the read privileges for are displayed.
❒ If the language used for the NDS tree or by the NetWare server differs from
that used by the machine, file names in the NDS tree or on the NetWare
server might appear garbled.
❒ Up to 100 items can be displayed.
56

Specifying Scan to Folder Destinations
❒ If the selected NDS tree or NetWare server requires authentication, a login
screen appears. Enter a user name and password for logging on to the NDS
tree or NetWare server. If you log on to the NDS tree, enter a user name,
and then enter the name of the context containing the user object. If the
user name is "user" and the name of the Context is "context", the user name
will be "user.context".
❒ The machine may fail to transfer the file if you do not have write privileges
for the folder or there is not enough free hard disk space.
❒ You can register the path to the destination in the machine’s address book.
For details, see "Registering the Path to the Selected Destination in the Address Book".
Reference
p.57 “Registering the Path to the Selected Destination in the Address
Book”
Registering the Path to the Selected Destination in the Address Book
This section explains how to register folder paths you have entered manually or
specified by browsing the network to the machine's address book.
2
A In the destination field, display the destination you want to register.
B Press [Prg. Dest.].
57

Sending Scan Files to Folders
C Press [Names], and then specify the name and other information to be regis-
tered.
For details about specifying the information to be registered, see General Settings Guide.
D Press [OK].
2
Note
❒ Depending on the security setting, [Prg. Dest.] may not appear.
58

Simultaneous Storage and Sending by Scan to Folder
Simultaneous Storage and Sending by
Scan to Folder
This section explains how to store a file and simultaneously send it by Scan to
Folder.
A Press [Store File].
B Make sure that [Send & Store] is selected.
C If necessary, specify file data, such as [User Name], [File Name], and [Password].
For details, see "Specifying File Information for a Stored File".
D Press [OK].
E Specify the setting for sending the file by Scan to Folder, and then send the
file.
For details about sending a file by Scan to Folder, see "Basic Operations When
Using Scan to Folder".
2
Note
❒ Depending on the security setting, [Access Privileges] may appear instead
of [User Name]. For details about specifying [Access Privileges], consult the
administrator.
❒ If you simultaneously store scan files and send them by Scan to Folder, the
files cannot be retransmitted from the Scan to Folder screen. To retransmit
the files, select the files on the Select Stored File screen, and then send
them. For details, see "Sending a Stored File".
Reference
p.65 “Specifying File Information for a Stored File”
p.42 “Basic Operations When Using Scan to Folder”
p.74 “Sending a Stored File”
59

2
Sending Scan Files to Folders
60

3. Storing Files Using the Scanner Function
Using the scanner function, you can store scan files in the machine and then send
the stored files by e-mail or Scan to Folder.
Before Storing Files
This section outlines file storage under the scanner function and provides related cautions.
Outline of File Storage under the Scanner Function
This section outlines storing files under the scanner function.
Important
❒ You can specify a password for each stored file. Files that are not password-
protected can be accessed by other users on the same local area network using
DeskTopBinder. It is recommended that you protect stored files from unauthorized access by specifying passwords.
❒ Scan file stored in the machine may be lost if some kind of failure occurs. We
advise against using the hard disk to store important files. The supplier shall
not be responsible for any damage that may result from the loss of files. For
long-term storage of files, we recommend the use of DeskTopBinder. For details, contact your local dealer.
1. This Machine
You can store scan files on the machine’s
hard disk. The stored files can be sent by
e-mail, Scan to Folder, or the network delivery scanner.
ZZZ512S
2. Client Computer
Using DeskTopBinder, you can, over the
network, view, copy, or delete files stored
in the machine. Using Web Image Monitor, you can, over the network, view,
download, or delete files stored in the machine. For details about DeskTopBinder
Lite, see DeskTopBinder Lite–related
manuals. For details about Web Image
Monitor, see Web Image Monitor Help.
61

3
Storing Files Using the Scanner Function
Note
❒ Stored files will be deleted after a set period. For details about specifying the
period, see General Settings Guide.
❒ Files stored under the scanner function cannot be printed from the machine’s
control panel. Print the files from a client computer after receiving them on
the computer.
❒ You can also store a file and simultaneously send it by e-mail or Scan to Fold-
er, or store it and simultaneously deliver it. For details, see "Simultaneous
Storage and Sending by E-mail", "Simultaneous Storage and Sending by Scan
to Folder", and "Simultaneous Storage and Delivery".
Reference
p.34 “Simultaneous Storage and Sending by E-mail”
p.59 “Simultaneous Storage and Sending by Scan to Folder”
p.98 “Simultaneous Storage and Delivery”
62

Basic Operation for Storing Scan Files
Basic Operation for Storing Scan Files
This section describes the basic operation for storing scan files.
A Make sure that no previous settings remain.
If a previous setting remains, press {Clear Modes}.
B Place originals.
C If necessary, press [Scan Settings] to specify scanner settings such as resolu-
tion and scan size.
For details, see "Various Scan Settings".
3
D If necessary, specify the scanning density.
For details, see "Adjusting Image Density".
E If necessary, press [Original Feed Type] to specify settings such as original
side and orientation.
For details, see "Setting of Original Feed Type".
F Press [Store File].
G Press [Store Only].
H If necessary, specify file information, such as [User Name], [File Name], and
[Password].
For details, see "Specifying File Information for a Stored File".
63

3
Storing Files Using the Scanner Function
I Press [OK].
J Press {Start}.
If you are scanning batches, place the next originals.
Note
❒ Depending on the security setting, [Access Privileges] may appear instead
of [User Name]. For details about specifying [Access Privileges], consult the
administrator.
❒ By pressing [Send & Store], you can simultaneously store scan files and send
them. For details, see "Simultaneous Storage and Sending by E-mail", "Simultaneous Storage and Sending by Scan to Folder", and "Simultaneous
Storage and Delivery".
❒ If a destination or sender has been selected, you cannot press [Store Only].
❒ To cancel scanning, press {Clear / Stop}.
Reference
p.105 “Various Scan Settings”
p.115 “Adjusting Image Density”
p.116 “Setting of Original Feed Type”
p.65 “Specifying File Information for a Stored File”
p.34 “Simultaneous Storage and Sending by E-mail”
p.59 “Simultaneous Storage and Sending by Scan to Folder”
p.98 “Simultaneous Storage and Delivery”
64

Specifying File Information for a Stored File
Specifying File Information for a Stored File
You can specify data for a stored file, such as user name, file name, and password.
By specifying data for a stored file, you can search for the file by user name or
file name, or protect the file with a password to prevent other people from accessing the file.
Specifying a User Name
You can specify a user name for the stored file.
A Press [Store File].
3
The Store File screen appears.
B Press [User Name].
A list of user names appears.
C Press the user name you want to specify.
The user names shown here are names that were registered on the [Adminis-
trator Tools] tab in [System Settings]. To specify a name not shown here, press
[Manual Entry], and then enter the user name.
D Press [OK] twice.
Note
❒ Depending on the security setting, [Access Privileges] may appear instead
of [User Name]. For details about specifying [Access Privileges], consult the
administrator.
65

3
Storing Files Using the Scanner Function
Specifying a File Name
This section explains how to change the name of a stored file.
A stored file is allocated a name starting with "SCAN" followed by a 4-digit
number.
• Example: SCAN0001
You can change this file name.
A Press [Store File].
The Store File screen appears.
B Press [File Name].
The soft keyboard appears.
C Change the file name.
D Press [OK] twice.
Note
❒ For details about entering the text, see About This Machine.
66

Specifying File Information for a Stored File
Specifying a Password
You can specify a password for the stored file.
Important
❒ Do not forget the password. If you forget it, consult the system administrator
of the machine.
By specifying a password, you can ensure that only the people who know the
password can view the file.
A Press [Store File].
3
The Store File screen appears.
B Press [Password].
C Using the number keys, enter a four to eight-digit number.
D Press [OK].
E Enter the same number again using the number keys.
F Press [OK] twice.
67

3
Storing Files Using the Scanner Function
Displaying the List of Stored Files
This section describes the list of stored files.
Using the list of stored files, you can delete stored files or change the file data.
List of Stored Files
This section describes how the list of stored files is displayed.
To display the list of stored files, press [Select Stored File] on the initial scanner
screen.
The list of stored files appears as follows:
The function items displayed serve as selector keys. You can select or specify an
item by pressing it. When you select or specify an item on the display panel, it is
highlighted like []. Keys that cannot be selected appear like [].
1. Keys for searching for files
Press to switch to the screens for searching for a file by user name or file name, or
to the screen for displaying all files.
2. List/ Thumbnails
You can select whether to display stored
files as a list or as thumbnails.
3. [Send]
Press this to deliver or send a stored file
by e-mail or Scan to Folder.
68
ALQ008S
4. [Manage / Delete File]
Press this to delete stored files or change
the file data.
5. Keys for sorting files
Press to sort the files using the selected
item. Select the same item once more for
a reverse sort. However, the files cannot
be sorted in reverse delivery.
6. [Details]
Press this to display details about the selected file.

Displaying the List of Stored Files
7. [Preview]
Press this to display a preview of the selected file. For Detail, see "Checking a
Stored File Selected from the List".
Note
❒ Depending on the security setting, some files may not appear in the list.
❒ Files stored under functions other than the scanner function do not appear on
this screen.
Reference
p.71 “Checking a Stored File Selected from the List”
8. List of stored files
Displays the list of stored files.
If the selected file does not appear, press
[U] or [T] to scroll the screen. If a password has been specified for a file, a key
icon appears to the left of the user name
for the file.
Searching the List of Stored Files
You can search for files from the stored files using the user name or file name.
You can search the list of stored files by either of the following methods:
• Search by user name
• Search by file name
3
Searching by user name
You can search for a stored file by its user name.
A Press [Select Stored File].
B Press [User Name].
C Select the user name to be used for the search.
The user names shown here are names that were registered on the [Adminis-
trator Tools] tab in [System Settings]. To change a user name not shown here,
press [Manual Entry], and then enter the user name.
D Press [OK].
The search begins, and then files belonging to the specified user appear.
69

3
Storing Files Using the Scanner Function
Searching by file name
You can search for a stored file by its file name.
A Press [Select Stored File].
B Press [File Name].
The soft keyboard appears.
C Enter the file name.
For information about how to enter characters, see General Settings Guide.
D Press [OK].
The search starts, and files whose name starts with the entered string appear.
70

Checking Stored Files
Checking Stored Files
You can display the Preview screen and check a stored file on the machine or
from the client computer.
Checking a Stored File Selected from the List
This section explains how to preview a file selected from the list of stored files.
A Press [Select Stored File].
The list of stored files appears.
For details about the list of stored files, see "List of Stored Files".
B From the list of stored files, select the file you want to check.
You can select more than one file.
C Press [Preview].
A preview of the selected stored file appears.
Reference
p.68 “List of Stored Files”
3
71

3
Storing Files Using the Scanner Function
Stored File Preview Screen
AMW014S
1. [Zoom Out], [Zoom In]
In previewing, you can reduce or enlarge
the file image.
2. [←][→][↑][↓]
You can scroll the preview screen.
3. [Switch]
You can switch to a preview of another
page.
4. [Switch]
You can switch to a preview of another
file.
5. Display File
The name and size of the selected file appear.
6. Display Page
The page number of the previewed page,
total number of pages, page size, and color mode appear.
7. Display Position
When the preview is enlarged, the location of the part of the page displayed on
the preview screen is indicated.
Checking Stored Files from a Client Computer
Using DeskTopBinder Lite or Web Image Monitor, you can also display the list
of files stored in the machine on a client computer.
Important
❒ To view stored files from a client computer, the IPv4 address of the machine
must be specified.
You can also check files stored under the copier, Document Server, and printer
functions. The screen used to illustrate the procedure is an example. Depending
on the machine model or operating environment, the items that appear on the
actual screen may differ.
72

Checking Stored Files
Displaying the List of Stored Files with DeskTopBinder Lite
Using DeskTopBinder Lite, you can display the list of files stored in the machine
on a client computer.
The stored files will appear in the DeskTopBinder Lite window as follows:
The illustration is an example. The items that actually appear may be different.
Note
❒ You can also transfer the stored files to the client computer.
❒ For details about DeskTopBinder, see the DeskTopBinder-related manuals.
❒ For details about installing DeskTopBinder Lite, see "Installing DeskTop-
Binder Lite from the Supplied CD-ROM".
Reference
p.83 “Installing DeskTopBinder Lite from the Supplied CD-ROM”
Using Web Image Monitor to Display Stored Files
The stored files are displayed and can be checked also on a client computer using
Web Image Monitor.
The stored files will appear in the Web Image Monitor window as follows:
3
When you enter http:// (machine IPv4 address)/ in the address bar of the Web
browser on a client computer, the top page of Web Image Monitor appears.
Note
❒ You can also download the stored files.
❒ It is recommended that you use Web Image Monitor only within your local
area network.
❒ For details about displaying or downloading stored files using Web Image
Monitor, see General Settings Guide.
❒ For details about making settings for using Web Image Monitor, see Network
Guide.
❒ For details about functions for managing stored files using Web Image Mon-
itor, click [Help] on the upper-right corner of the displayed screen.
73

3
Storing Files Using the Scanner Function
Sending a Stored File
You can either send the selected file or the URL of the file location.
This section mainly explains how to select the files you want to send by e-mail
or Scan to Folder, or deliver using the network delivery scanner. For details
about operating procedures for individual functions, see the appropriate chapters.
Sending Stored Files
This section explains how to send a stored file.
A Press [Select Stored File].
The list of stored files appears.
B Select the file you want to send.
To select more than one file, repeat this step.
If you select more than one file, the files are sent or delivered in the selected
order.
By pressing [Queue], you can send the selected files one by one.
C Press [OK].
The E-mail screen, Scan to Folder screen, or network delivery scanner screen
appears.
D If necessary, switch the screen.
E Specify the settings for sending files by e-mail or Scan to Folder, or using
the network delivery scanner.
For details about how to send a file by e-mail or Scan to Folder, or how to deliver a file, see "Basic Operation for Sending Files by E-mail", "Basic Operations When Using Scan to Folder", or "Basic Operation for Delivering Files".
74

Sending a Stored File
F Press {Start}.
The selected files are sent by e-mail or Scan to Folder, or using the network
delivery scanner.
Note
❒ If you choose a file protected by a password, a screen to enter the password
appears. To select the file, enter the correct password, and then press [OK].
❒ When you send a stored file by e-mail, either the file can be attached to the
e-mail or the URL of the file location can be sent. This setting must be made
in advance in [Scanner Features]. For details, see General Settings Guide.
Reference
p.14 “Basic Operation for Sending Scan Files by E-mail”
p.42 “Basic Operations When Using Scan to Folder”
p.85 “Basic Operation for Delivering Files”
3
75

3
Storing Files Using the Scanner Function
Managing Stored Files
This section explains how to delete stored files and how to change the data for
stored files.
Deleting a Stored File
This section explains how to delete a stored file.
A Press [Select Stored File].
The list of stored files appears.
B Press [Manage / Delete File].
The [Manage / Delete File] screen appears.
C Select the file you want to delete.
D Press [Delete File].
A confirmation message about deleting the file appears.
E Press [Yes].
Note
❒ Files waiting for delivery cannot be deleted.
❒ You can also delete files stored in the machine by accessing the machine
from a client computer using Web Image Monitor or DeskTopBinder. For
detail about Web Image Monitor, see Web Image Monitor Help. For details
76
about DeskTopBinder, see the manuals supplied with DeskTopBinder.

Managing Stored Files
Changing Data for a Stored File
You can change data for a stored file, such as [User Name], [File Name], and [Pass-
word].
Note
❒ Information for files waiting for delivery cannot be changed.
Changing a user name
You can change the user name for a stored file.
A Press [Select Stored File].
The list of stored files appears.
B Press [Manage / Delete File].
3
C Select the file containing the file information you want to change.
If you select a password-protected file, a screen for entering the password appears. Enter the password, and then press [OK].
D Press [Change User Name].
E Enter a new user name.
The user names shown here are names that were registered on the [Adminis-
trator Tools] tab in [System Settings]. To change a user name not shown here,
press [Manual Entry], and then enter the user name.
77

3
Storing Files Using the Scanner Function
F Press [OK].
G Make sure that the user name was changed as necessary, and press [Exit].
Note
❒ Using Web Image Monitor or DeskTopBinder, you can also change the
user name of a file stored in the machine from the client computer. For details about Web Image Monitor, see Web Image Monitor Help. For details
about DeskTopBinder, see the manuals supplied with DeskTopBinder.
❒ Depending on the security setting, [Change Access Priv.] may appear in-
stead of [Change User Name]. For details about specifying [Change Access
Priv.], consult the administrator.
Changing a file name
You can change the file name of a stored file.
A Press [Select Stored File].
The list of stored files appears.
B Press [Manage / Delete File].
C Select the file containing the file information you want to change.
If you select a password-protected file, a screen for entering the password appears. Enter the password, and then press [OK].
D Press [Change File Name].
78

Managing Stored Files
E Change the file name.
F Press [OK].
G Make sure that the file information was changed as necessary, and press
[Exit].
Note
❒ For information about how to enter characters, see General Settings Guide.
❒ Using Web Image Monitor or DeskTopBinder, you can also change the
name of a file stored in the machine from the client computer. For details
about Web Image Monitor, see Web Image Monitor Help. For details about
DeskTopBinder, see the manuals supplied with DeskTopBinder.
Changing a password
Enter the password for accessing the stored file.
Important
❒ Be sure not to forget the password. If you forget it, consult the system admin-
istrator of the machine.
3
A Press [Select Stored File].
The list of stored files appears.
B Press [Manage / Delete File].
C Select the file containing the file information you want to change.
If you select a password-protected file, a screen for entering the password appears. Enter the password, and then press [OK].
D Press [Change Password].
E Using the number keys, enter a new four to eight-digit password.
F Press [OK].
G Enter the same number again using the number keys.
79

3
Storing Files Using the Scanner Function
H Press [OK].
Note
❒ Using Web Image Monitor or DeskTopBinder, you can also change the
password of a file stored in the machine from the client computer. For details about Web Image Monitor, see Web Image Monitor Help. For details
about DeskTopBinder, see the manuals supplied with DeskTopBinder.
80

4. Delivering Scan Files
Using the ScanRouter delivery software, you can deliver by various methods
scan files produced by the machine.
Before Delivering Files
This section describes the necessary preparations and the procedure for using
the network delivery scanner.
Important
❒ To use the network delivery scanner function, you need a delivery server on
which the optional the ScanRouter delivery software is installed. You also
need to register data about destinations and senders in the delivery server.
Outline of Scan File Delivery
This section outlines the function for delivering files using the network delivery scanner.
1. This machine
You can send scan files to the delivery
server.
2. Delivery server
Install the ScanRouter delivery software
on this computer to use it as the delivery
server.
After receiving a scan file, the delivery
server delivers the file according to the
setting specified for the destination. The
delivery settings are as follows:
• Storing the file in an in-tray
• Delivering the file by e-mail
ZZZ513S
• Storing the file in a selected folder
For details about the ScanRouter delivery
software, see the manuals supplied with
the ScanRouter delivery software.
3. Client Computer
How to check a file from the client computer depends on the delivery method.
For example, you can check a file by one
of the following methods:
• Use DeskTopBinder to view a file delivered to the in-tray
• Use e-mail software to receive e-mail
with an attached file
• Browse a folder for a stored file
81

4
Delivering Scan Files
Preparing to Deliver a File
This section describes the preparations and settings for delivering scan files.
Important
❒ To use the network delivery scanner, you need a delivery server on which an
application such as the optional the ScanRouter delivery software is installed.
For details about the ScanRouter delivery software, see the manuals supplied
with the ScanRouter delivery software.
❒ To view files delivered to an in-tray, DeskTopBinder must be installed on the
client computer.
A Connect the machine to the network.
Connect the machine to the network using an Ethernet cable or IEEE 1394 cable, or wireless LAN (IEEE 802.11b).
B Make the necessary network settings in [System Settings].
If you have connected the machine to the network using an Ethernet cable,
make the following settings. For details, see General Settings Guide.
• Specify the machine’s IPv4 address and subnet mask
•In [Effective Protocol], enable [IPv4]
•Set [Delivery Option] to [On]
C If necessary, change settings in [Send Settings] under [Scanner Features].
D Using the ScanRouter delivery software, register this machine as an I/O de-
vice. In addition, specify register destinations and specify such settings as
the delivery type and sender.
For details, see the manuals supplied with the ScanRouter delivery software.
Note
❒ To connect the machine to the network using an IEEE 1394 cable or wire-
less LAN (IEEE 802.11b), an extended 1394 board or extended wireless
LAN board is required respectively. For details, see Network Guide.
❒ Items to set up in [System Settings] vary depending on the network environ-
ment. For details about the network settings, see General Settings Guide.
❒ For details about installing DeskTopBinder Lite, see "Installing DeskTop-
Binder Lite from the Supplied CD-ROM".
Reference
p.83 “Installing DeskTopBinder Lite from the Supplied CD-ROM”
82

Before Delivering Files
Installing DeskTopBinder Lite from the Supplied CD-ROM
This section explains how to install DeskTopBinder Lite on a client computer
from the supplied "Scanner/PostScript
To view or receive files delivered to the in-trays, you must install DeskTopBinder Lite on the client computer.
®
Drivers and Utilities" CD-ROM.
A Make sure Windows is running on the client computer, and then insert the
"Scanner/PostScript
drive.
The installer is automatically started and the [Scanner/PostScript
Utilities] dialog box appears.
®
Drivers and Utilities" CD-ROM into the CD-ROM
®
Drivers and
B Click [DeskTopBinder Lite].
The [DeskTopBinder Lite Setup] dialog box appears.
For the subsequent installation steps, see the Setup Guide displayed from the
[DeskTopBinder Lite Setup] dialog box.
Note
❒ Before you start the installation, check the system requirements for Desk-
TopBinder Lite. For details, see "Software Supplied on CD-ROM".
❒ You can install the software using the auto-run program. For details about
the auto-run program, see "Quick Install".
4
Reference
p.143 “Software Supplied on CD-ROM”
p.143 “Quick Install”
83

4
Delivering Scan Files
Network Delivery Scanner Screen
This section describes the screen layout when using the network delivery scanner.
The function items displayed serve as selector keys. You can select or specify an
item by pressing it. When you select or specify an item on the display panel, it is
highlighted like []. Keys that cannot be selected appear like [].
1. Destination Field
The specified destination appears. If
more than one destination has been specified, press [U] or [T] to scroll through the
destinations.
2. Network delivery scanner icon
Indicates that the network delivery scanner screen is displayed.
3. [Reg. No.]
Press this key to specify the destination
using a 3-digit registration number.
4. [Manual Entry]
To send a file by e-mail via the delivery
server to a destination not registered in
the delivery server’s Destination List,
press this key to display the soft keyboard. Then use the soft keyboard to enter the e-mail address. For details about
how to send a file by e-mail via the delivery server, see the ScanRouter delivery
software manual.
84
ALQ009S
5. Destination List
The list of destinations registered in the
delivery server appears. If all of the destinations cannot be displayed, press [U] or
[U] to switch the screen. Group destinations are denoted by this symbol ( ).
6. [Subject][Sender Name][Recept. No-
tice]
Specify the subject, sender, and whether
or not to enable Message Disposition Notification for the file to be transmitted.

Basic Operation for Delivering Files
Basic Operation for Delivering Files
This section describes the basic operation for delivering scan files using the network delivery scanner.
Important
❒ You must register destinations and senders in advance using the ScanRouter
delivery software installed on the delivery server.
A Make sure that no previous settings remain.
If a previous setting remains, press {Clear Modes}.
B If the E-mail screen or Scan to Folder screen appears, switch to the network
delivery scanner screen.
For details, see "Switching to the Network Delivery Scanner Screen".
4
C Place originals.
D If necessary, press [Scan Settings] to specify scanner settings such as resolu-
tion and scan size.
For details, see "Various Scan Settings".
E If necessary, specify the scanning density.
For details, see "Adjusting Image Density".
F If necessary, press [Original Feed Type] to specify settings such as original
side and orientation.
For details, see "Setting of Original Feed Type".
85

Delivering Scan Files
G Specify the destination.
You can specify multiple destinations.
For details, see "Specifying Delivery Destinations".
H If necessary, press [Subject] to specify the e-mail subject.
For details, see "Specifying the Subject of the E-mail to Be Transmitted via the
Delivery Server".
I If necessary, press [Sender Name] to specify the sender.
If you specify the sender, data about the sender will be attached to the delivered file. Select the sender from those registered in the delivery server. For details, see "Specifying the Sender".
4
J Press {Start}.
If you are scanning batches, place the next originals.
Note
❒
By pressing [Manual Entry] on the network delivery scanner screen, you can
send a file by e-mail via the delivery server’s network. For details about entering the e-mail address directly, see "Entering an E-mail Address Manually".
❒ If you have selected more than one destination, press [U] or [T] next to the
destination field to scroll through the destinations.
❒ To cancel a selected destination, display the destination in the destination
field, and then press {Clear / Stop}. You can cancel a destination selected
from the address book by pressing the selected destination again.
❒ You can use the Message Disposition Notification function when sending
e-mail via delivery server. An e-mail is sent to the sender selected in step
9, notifying him/her that the recipient has read his/her e-mail. To specify
this setting, press [Recept. Notice].
❒ To enable Message Disposition Notification, you must specify the Scan-
Router delivery software setting for sending e-mail by SMTP. For details
about specifying this setting, see the ScanRouter delivery software manual. Note, however, that if the e-mail software used at the destination does
not support Message Disposition Notification, e-mail notification that the
e-mail has been opened may not be sent.
❒ Register the sender’s e-mail address using the ScanRouter delivery soft-
ware in advance.
❒ By pressing {Check Modes}, you can switch from the initial scanner screen
to the Check Modes screen so you can check the settings. For details, see
"Check Modes".
❒ If you press [Preview], and then scan a document, the Preview screen ap-
pears. For details, see "Preview"
❒ To cancel scanning, press {Clear / Stop}.
86
❒ You can also store a scan file and simultaneously deliver it. For details, see
"Simultaneous Storage and Delivery".

Basic Operation for Delivering Files
Reference
p.88 “Switching to the Network Delivery Scanner Screen”
p.105 “Various Scan Settings”
p.115 “Adjusting Image Density”
p.116 “Setting of Original Feed Type”
p.89 “Specifying Delivery Destinations”
p.97 “Specifying the Subject of the E-mail to Be Transmitted via the Delivery Server”
p.93 “Specifying the Sender”
p.22 “Entering an E-mail Address Manually”
p.5 “Preview”
p.4 “Check Modes”
p.98 “Simultaneous Storage and Delivery”
4
87

4
Delivering Scan Files
Switching to the Network Delivery Scanner Screen
This section explains how to switch the screen to the network delivery scanner
screen.
If the E-mail screen or Scan to Folder screen is being displayed, switch to the network delivery scanner screen.
A Press [Delivery Dest.].
The network delivery scanner screen appears.
Note
❒ You cannot switch from the E-mail screen or Scan to Folder screen while
destinations or senders are being specified. To clear a specified destination,
display the destination in the destination field of the E-mail screen or Scan
to Folder screen, and then press {Clear / Stop}.
88

Specifying Delivery Destinations
Specifying Delivery Destinations
This section explains how to specify delivery destinations.
Selecting Destinations Registered in the Delivery Server’s Address Book
This section explains how to select destinations registered in the delivery server’s address book
You can select a delivery destination registered in Destination List of the delivery server by any of the following methods:
• Select the destination from the delivery destination list
• Select the destination by entering the registration number
• Select the destination by searching in the delivery server
Selecting a destination from the Destination List
4
From the destination list, select a destination.
A In the destination list, press the key including the destination name.
The selected destination is highlighted and also is displayed in the destination field at the top of the screen.
Destinations are registered in the delivery server under captions. The destination list is updated automatically.
Note
❒ If the target destination does not appear, press [U] or [T] to scroll through
the destinations until it does.
❒ Depending on the security setting, some destinations may not appear in
the destination list.
89

4
Delivering Scan Files
Selecting destinations by entering their registration numbers
Select a destination by entering its Short ID number (registered using the ScanRouter delivery software). For details about how to set Short IDs, see the manuals supplied with the ScanRouter delivery software.
A Press [Reg. No.].
B Using the number keys, enter the three-digit registration number, and then
press {q}.
You can also enter a registration number of fewer than three digits.
Example: To enter 009
Press {9}, and then press {q}.
C Press [OK].
By pressing [Change], you can change the selected destination.
Note
❒ To cancel a selected destination, press [U] or [T] next to the destination
field to scroll through the destinations until the one you want to cancel appears, and then press {Clear / Stop}.
90

Specifying Delivery Destinations
Selecting destinations by searching the delivery server’s Destination List
In the delivery server’s Destination List, you can search for destinations and select them.
A Press [Search Dest.].
B To search by name, press [Name].
To search by comment, press [Comment].
The soft keyboard appears so you can enter the name or comment.
You can also search by combining [Name] and [Comment].
4
C Enter part of the destination name.
To search by comment, enter part of the comment.
D Press [OK].
E If necessary, press [Advanced Search], and then specify the detailed search
criteria.
By pressing [Advanced Search], you can search by [Name] and [Comment]. You
can also search by combining the [Beginning Word] or [End Word] criteria with
the other criteria.
F Press [Start Search].
Destinations that match the search criteria are displayed.
G Select the destination.
91

Delivering Scan Files
H Press [OK].
Note
❒ The Comment search function searches for destinations by comment infor-
mation, which is a registration item required by the ScanRouter delivery
software.
❒ By pressing [Details], you can view details about the selected destinations.
❒ Up to 100 destinations can be displayed as search results.
❒ By pressing [Advanced Search], the following criteria appear:
• [Beginning Word]: The names which start with the entered character or char-
acters are targeted.
For example, to search for "ABC", enter "A".
4
• [End Word]: The names which end with the entered character or characters
are targeted.
For example, to search for "ABC", enter "C".
• [Exact Match]: The names which correspond to an entered character or char-
acters are targeted.
For example, to search for "ABC", enter "ABC".
• [Include one Word]: The names which contain an entered character or char-
acters are targeted.
For example, to search for "ABC", enter "A", "B", or "C".
• [Exclude Words]: The names which do not contain an entered character or
characters are targeted.
For example, to search for "ABC", enter "D".
92
 Loading...