

Page 1
For safe and correct use of this machine,
please be sure to read the Safety Information
in this manual before you use it.
Page 2

Safety Information .................................................. ii
For safe and correct use of this machine,
please be sure to read the Safety Information
in this manual before you use it.
Control Panel Functions ........................................... 1
Changing the Display Language ................................ 4
About the Software ................................................. 5
System Requirements ............................................. 6
Installing the Software ............................................ 7
Removing Software ................................................. 9
Viewing the User’s Guide ....................................... 10
English
i
Page 3
Safety Information
When using this machine, the following safety precautions should always be followed.
Safety During Operation
In this manual, the following important symbols are used:
WARNING:
Indicates a potentially hazardous situation which, if instructions are
not followed, could result in death or serious injury.
CAUTION:
Indicates a potentially hazardous situation which, if instructions are not
followed, may result in minor or moderate injury or damage to property.
WARNING:
• Connect the power cord directly into a wall outlet and never use an
extension cord.
• Disconnect the power plug (by pulling the plug, not the cable) if the power
cable or plug becomes frayed or otherwise damaged.
• To avoid hazardous electric shock or laser radiation exposure, do not
remove any covers or screws other than those specified in this manual.
• Turn off the power and disconnect the power plug (by pulling the plug, not
the cable) if any of the following occurs:
•You spill something into the machine.
•You suspect that your machine needs service or repair.
•The external housing of your machine has been damaged.
• Do not incinerate spilled toner or used toner. Toner dust might ignite when
exposed to an open flame.
• Disposal can take place at our authorized dealer.
•Dispose of the used toner bottle in accordance with the local
regulations.
ii
Page 4
CAUTION:
• Protect the machine from dampness or wet weather, such as rain and snow.
• Unplug the power cord from the wall outlet before you move the machine. While moving the
machine, you should take care that the power cord will not be damaged under the machine.
• When you disconnect the power plug from the wall outlet, always pull the plug (not the
cable).
• Do not allow paper clips, staples, or other small metallic objects to fall inside the machine.
• Keep toner (used or unused) and toner bottle out of the reach of children.
• Be careful not to cut yourself on any sharp edges when you reach inside the product to
remove misfed sheets of paper or masters.
• For environmental reasons, do not dispose of the machine or expended supply waste at
household waste collection points. Disposal can take place at an authorized dealer.
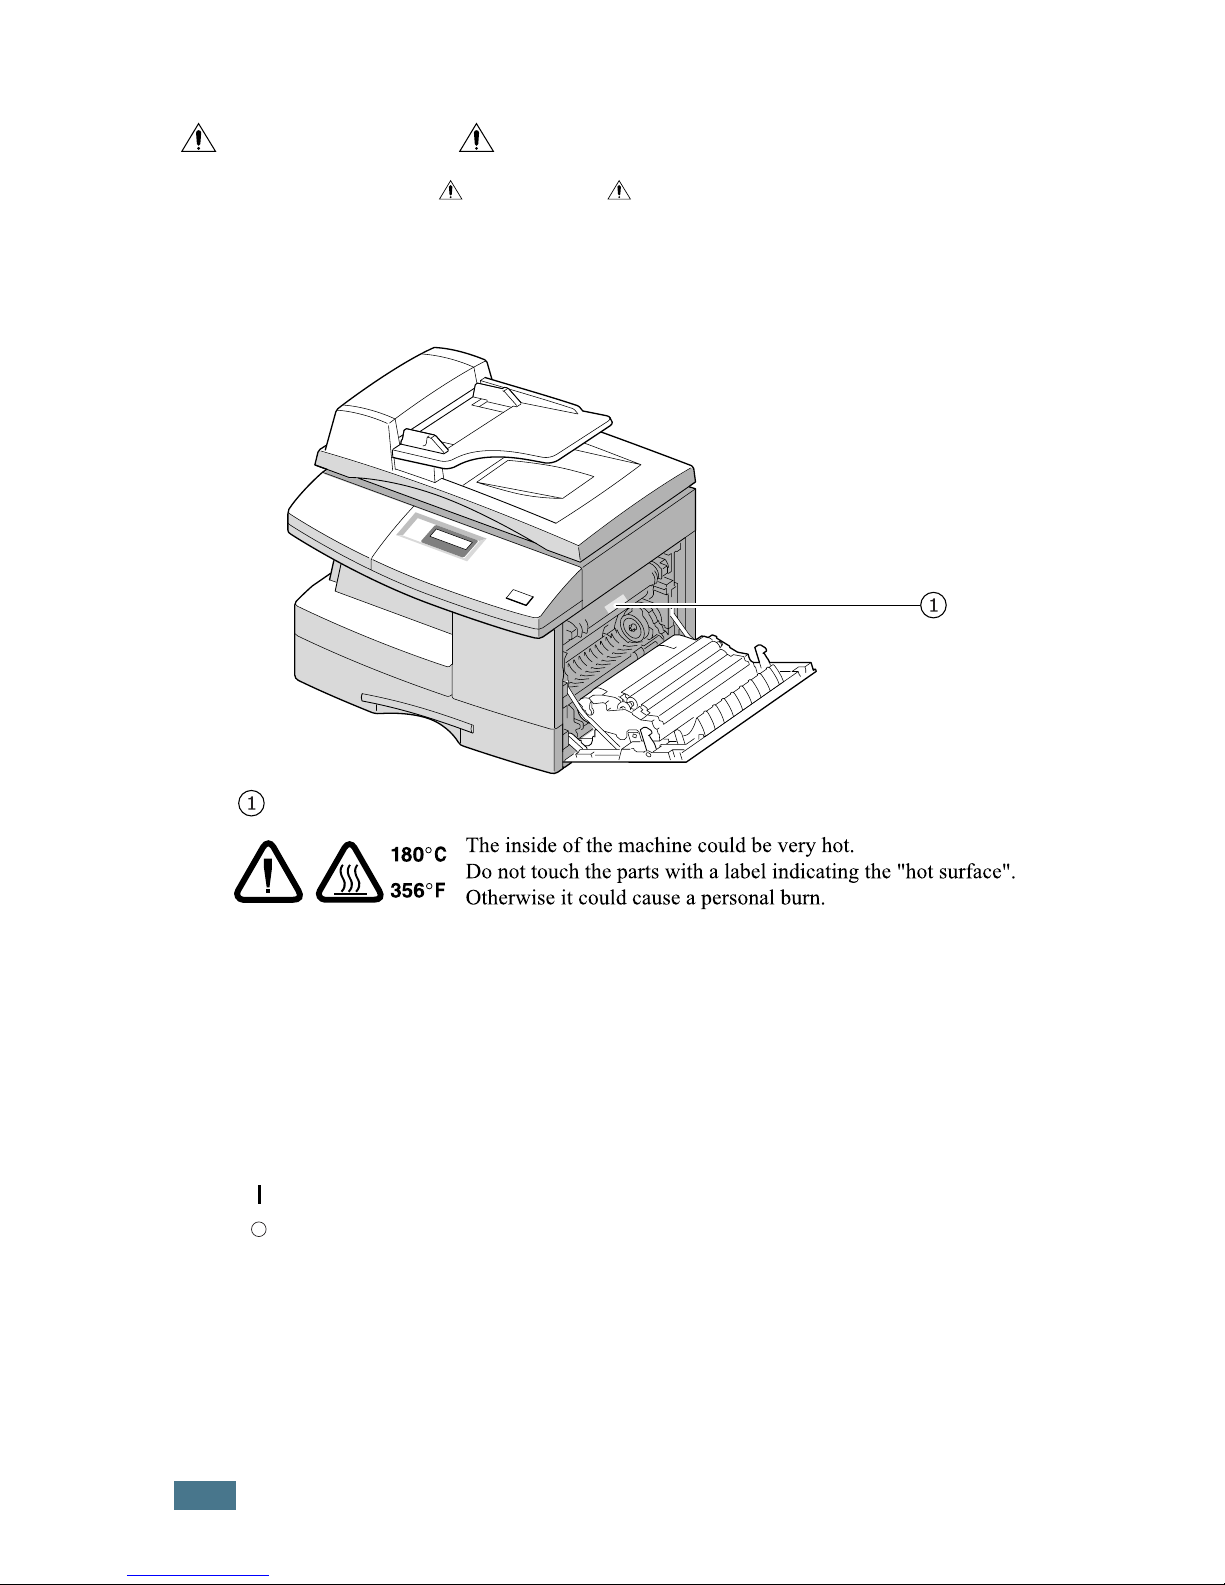
• The inside of the machine could be very hot. Do not touch the parts with a label indicating the
“hot surface”. Otherwise, an injury might occur.
Power Supply
The socket-outlet shall be in stalled near the product and shall be easily accessible.
Ozone Safety (if applicable)
Some product (see specification in the Operating Instructions) generates ozone during
operation.
Normally, the ozone level is safe for operators. If ozone odor may appear, ventilate the room.
English
For Fax or Telephone
Do not use this product near water, for example, near a bathtub, wash bowl, kitchen sink or
laundry tub, in a wet basement or near a swimming pool. Avoid using a telephone during an
electrical storm. There may be a remote risk of electric shock from lightning. Do not use a
telephone in the vicinity of a gas leak to report the leak.
Laser Safety:
For North America
CDRH Regulations
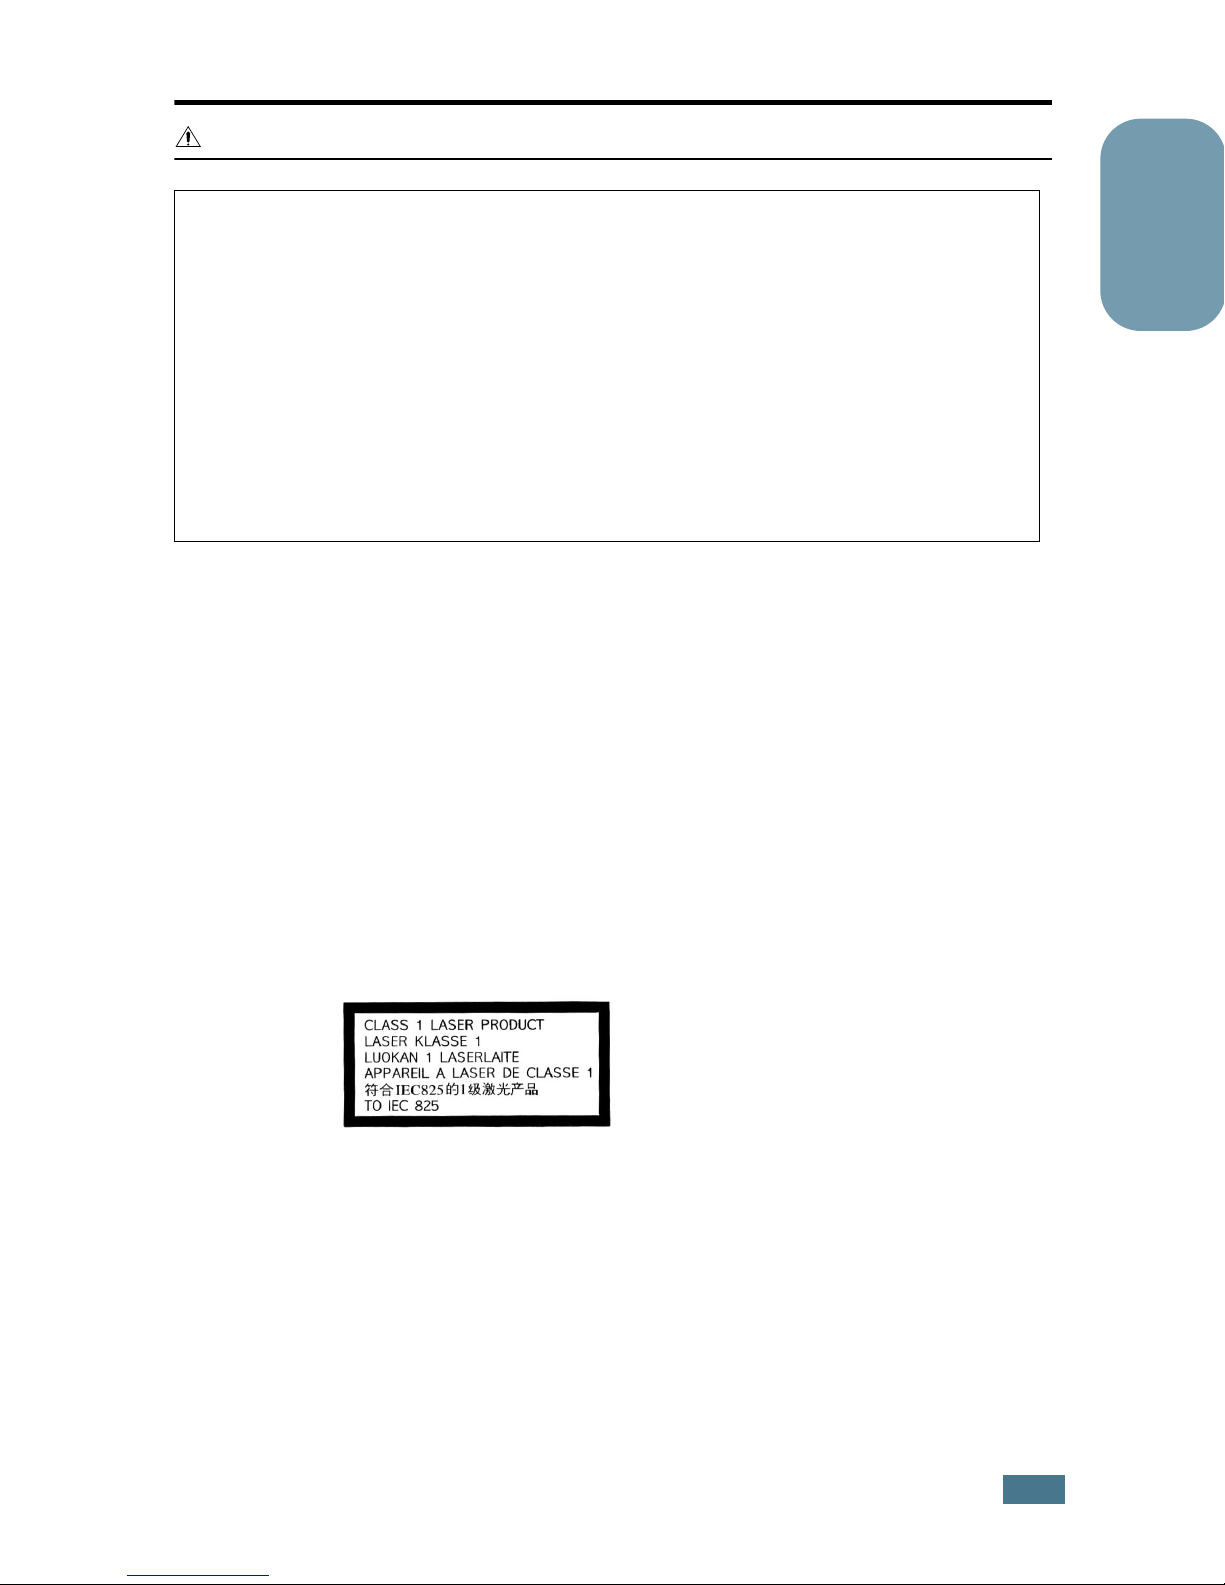
This equipment complies with requirements of 21 CFR subchapter J for class 1 laser products.
This equipment contains a 5 milliwatt, 760–800 nanometer wavelength, GaAIAs laser diode.
This equipment does not emit hazardous radiation, since the beam is totally enclosed during
all customer modes of operation and maintenance.
Caution:
Use of controls or adjustment or performance of procedures other than those specified in this
manual might result in hazardous radiation exposure.
iii
Page 5
Positions of Labels and Hallmarks for
WARNING and CAUTION Labels
This machine has labels for WARNING and CAUTION at the positions shown below. For
safety, please follow the instructions and handle the machine as indicated.
In accordance with IEC 60417, this machine uses the following symbols for the main power
switch:
means POWER ON.
means POWER OFF.
iv
Page 6
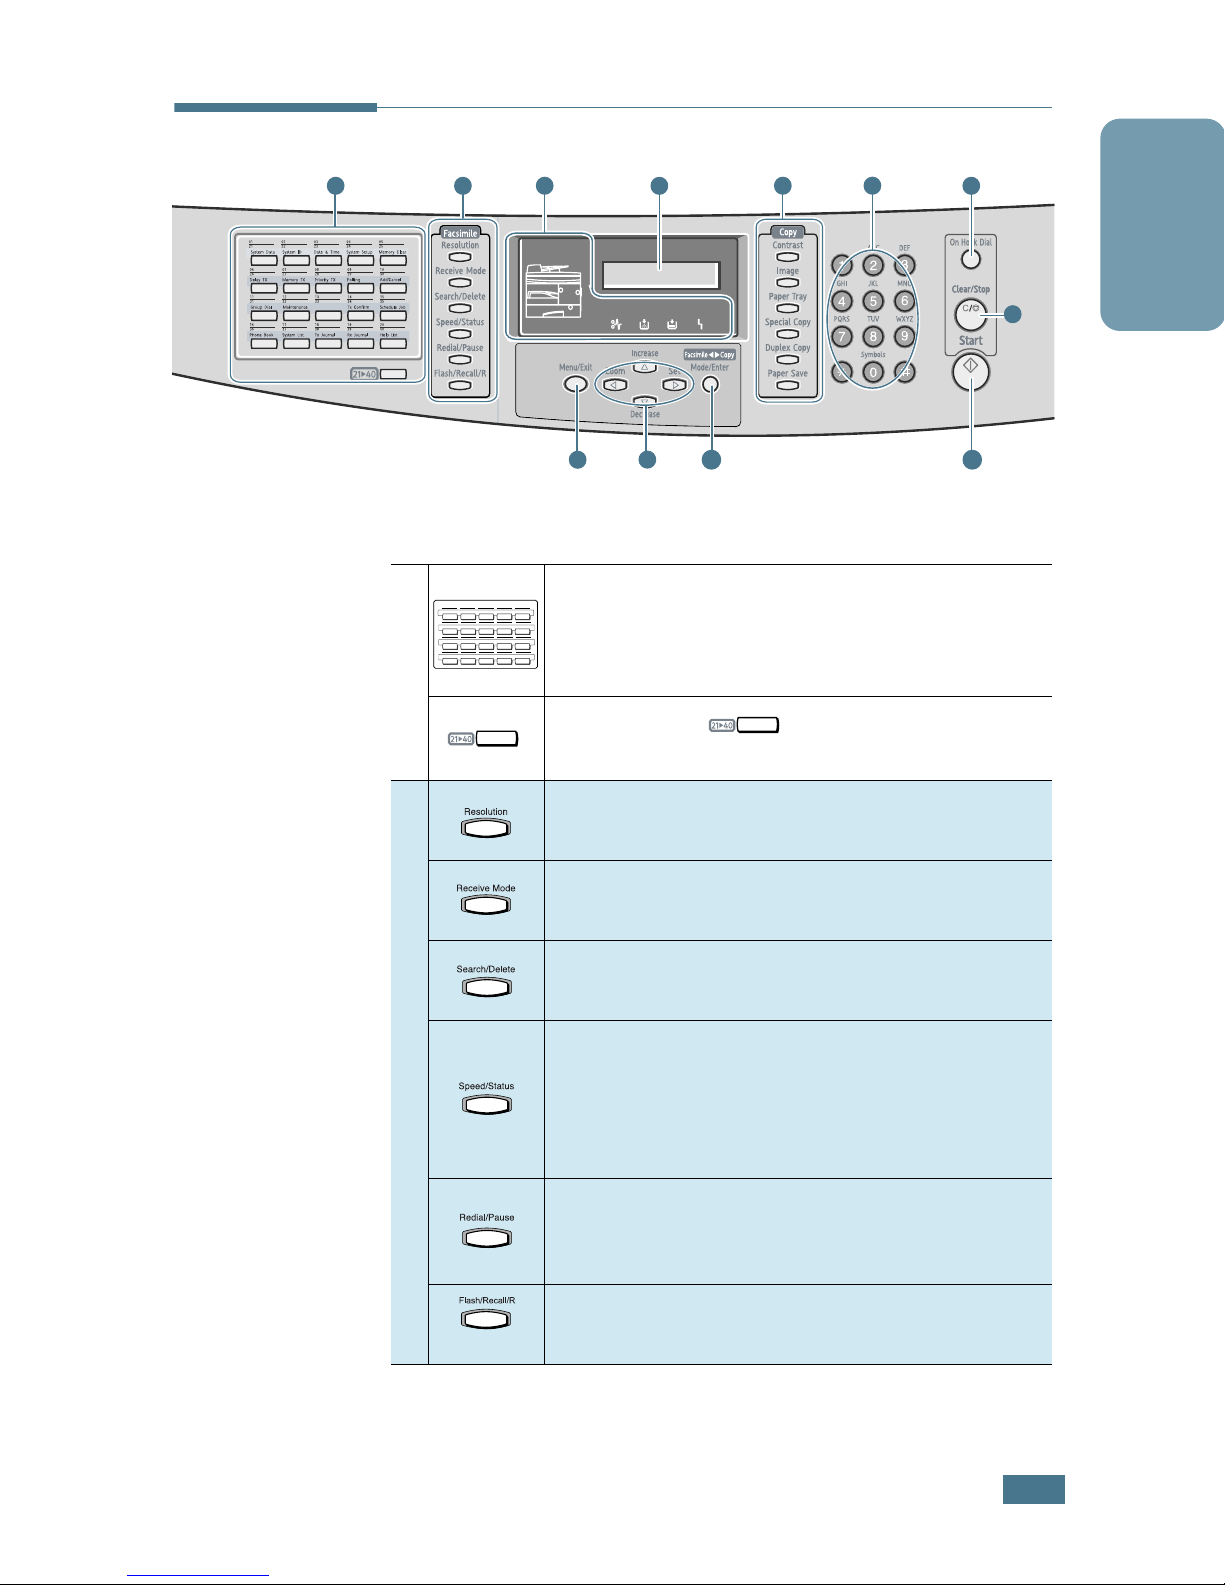
Control Panel Functions
English
1
2
01
02220323042405
21
System Data
System ID Date & Time System Setup Memory Clear
06
260727082809291030
Delay TX Memory TX Priority TX Polling
113112321333143415
Group Dial
Maintenance
163617371838193920
System ListPhone Book Tx Journal Rx Journal
1
3
8
Used to store frequently dialled fax numbers
25
and dial them with the touch of one button. Also
Add/Cancel
35
Schedule JobTx Confirm
use in conjunction with the
40
Help List
4
9
10
to access the corresponding menu function.
5
6
Menu/Exit
7
12
11
button
Allows you to one-touch buttons to the
locations 21 through 40.
2
F
a
c
s
m
e
Adjusts the resolution of the current fax job
documents.
Used to choose the receive mode. The selected
mode is displayed in Standby mode.
Used to search for a number in the memory.
Also used to delete digits in editing mode.
Used to store frequently dialed fax numbers and
dial them using the associated 2-digit speed dial
i
number. Also used to alternately display
alternately the currently active job and any
i
pending jobs.
l
Redials the last number in Standby mode or
inserts a pause into a fax number in the edit
mode.
Used to perform a hook-switch operation, such
as call waiting.
1
Page 7
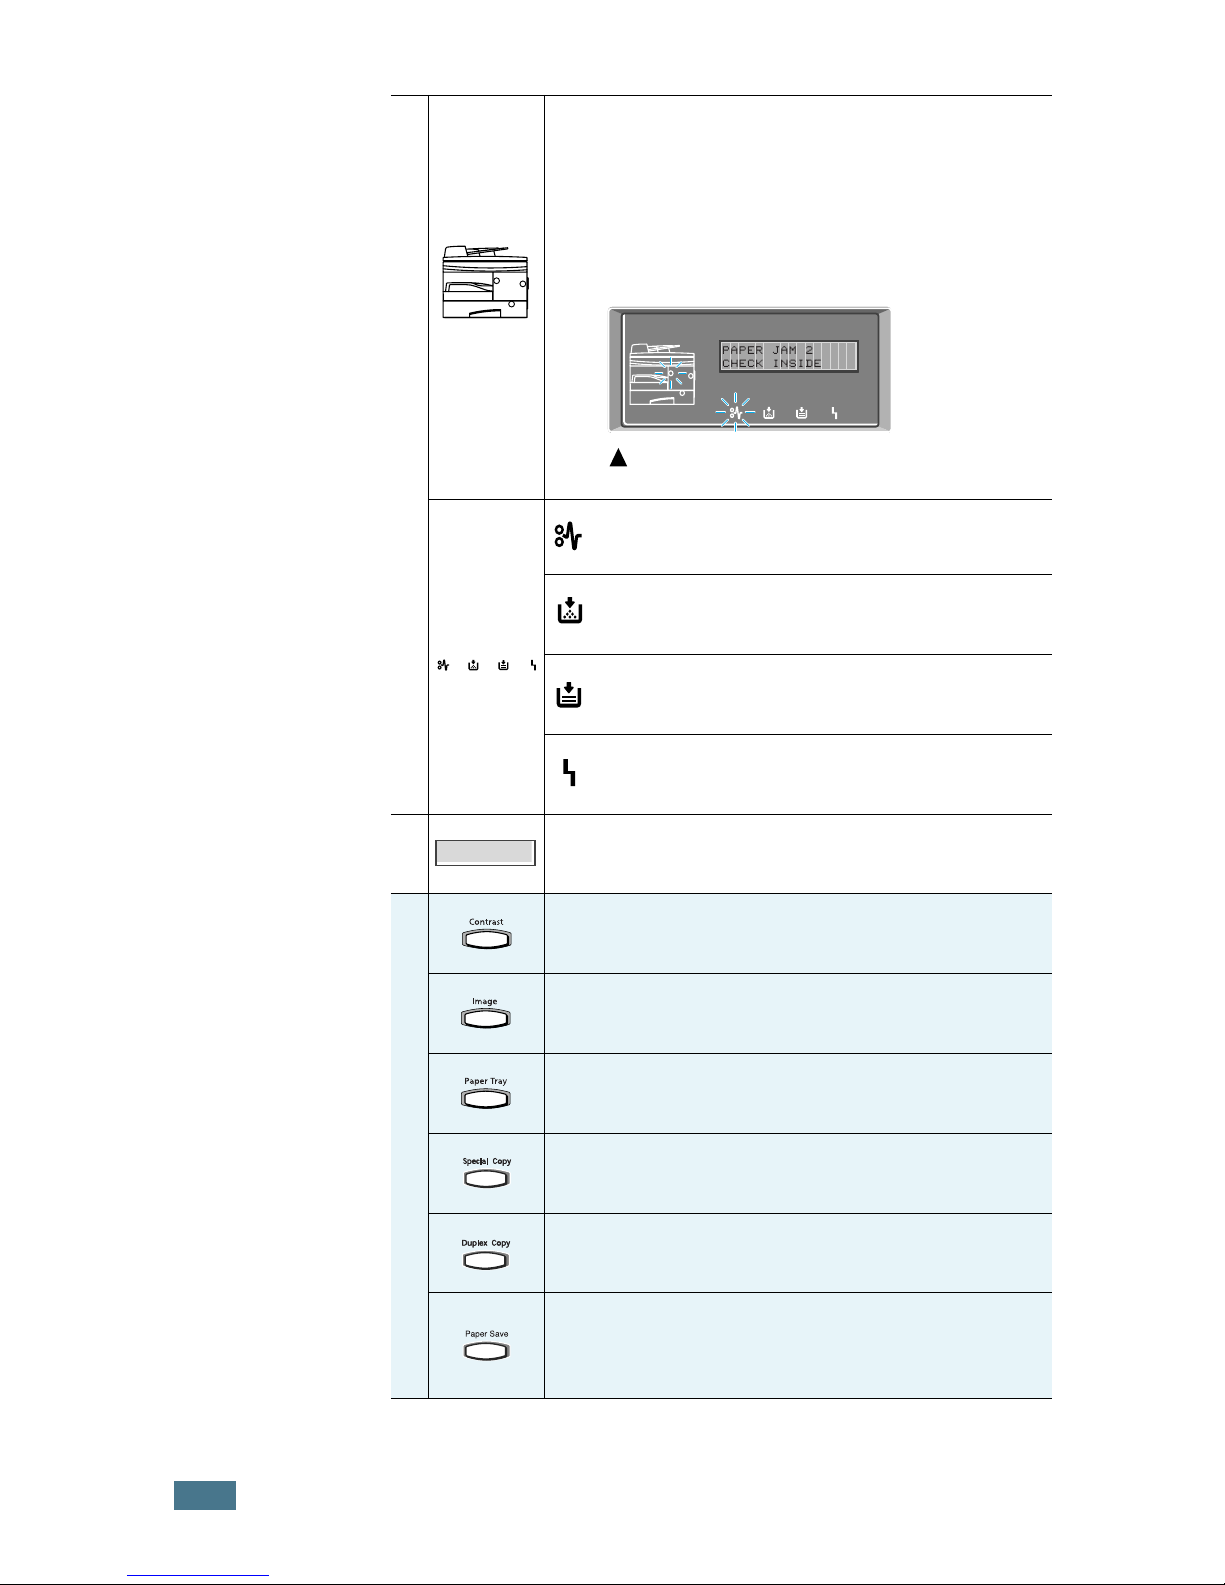
(status map)
When an error occurs, the lamp in the
corresponding location on the Status map turns
on, as well as the error indicator, and the error
message appears on the display so that you can
locate the error.
For details on the meaning of
error messages,refer to the products
Operating Instruction.
3
(Error
indicators)
4
ex) The paper is jammed in the exit area.
Turns on when a paper jam occurs.
Turns on when the toner or drum has
almost run out.
Turns on when the input tray you are using
is empty.
Turns on when an error occurs on the
system.
Displays the current status and prompts during
operation.
Used to adjust the contrast of the current copy
or fax job.
Used to select the text type for the current copy
job or fax job.
5
C
o
p
y
2
Used to specify the paper tray you want to use
in Fax or Copy mode.
Used to set up special copy features, such as
AutoFit, Clone, and Collation.
The current copy job will use both sides of the
paper when printed.
Allows you to save paper by printing 2 pages on
a single sheet of paper (available in the Copy
mode only).
Page 8
6
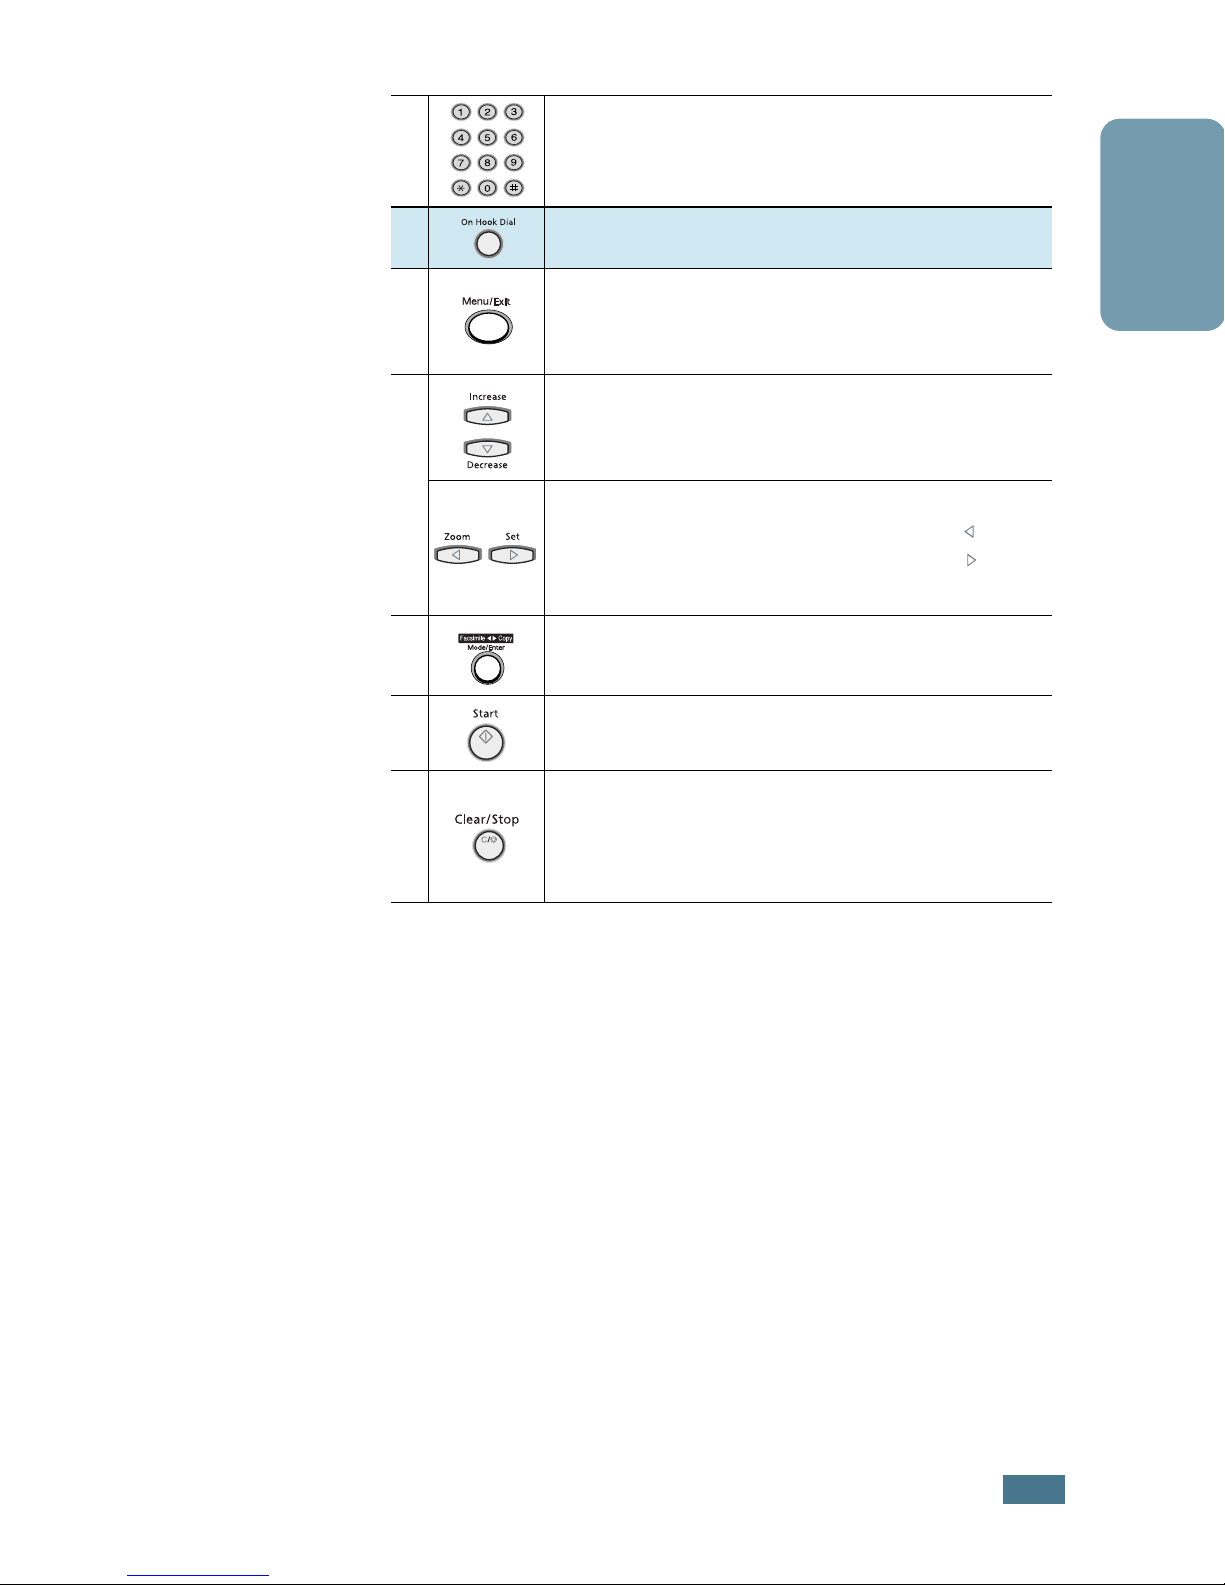
Used to dial a number or enter alphanumeric
characters.
English
7
8
9
10
11
12
Engages the telephone line.
Enters the menu functions in conjunction with
the one-touch buttons. Also backs you up to the
previous menu level or exits the menu.
Scrolls though the menu items. When you set
the copy size or the copy page number, they can
be used to change the number.
*
Scrolls though the options available for the
selected menu item. In the Copy mode,
allows you to change the zoom rate and to
change the number of copies.
Selects the mode to activate: FAX or COPY. Also,
confirms the selection on the display.
Used to start a job.
Used to stop an operation at any time.
Also, used to clear/cancel the copy options such
as the zoom rate and multi copy pages in Copy
mode.
* Navigation buttons
3
Page 9

Changing the Display Language
To change the language that is displayed on the LCD display,
take the following steps:
1
Press
touch dial keypad.
2
Press
line of the display. The current setting appears on the
bottom line of the display.
3
Press
display.
4
Press
5
To return to Standby mode, press
Menu/Exit
or
or
Mode/Enter
until “SELECT LANGUAGE” appears on the top
until you see the language you want on the
and then
to save the selection.
System Setup
Clear/Stop
from the one-
.
4
Page 10

About the Software
You must install software using the supplied CD-ROM after you
have set up your machine and connected it to your computer.
The CD-ROM includes:
• The software for this machine
• Operating Instructions
• Adobe Acrobat Reader
The CD-ROM provides you with the following software:
MFP Driver
To use your machine as a printer and scanner in Windows, you
must install the MFP driver. For information about installing the
MFP driver in Windows, see page .7.
Remote Control Panel
It is automatically installed when you install the MFP driver. For
information about using the program, refer to the Facsimile
Refernce.
English
5
Page 11

System Requirements
Before you begin, ensure that your system meets the minimum
requirements.
Supported Operating System
Windows 95 OSR2/Windows 98/Windows 98 SE/Windows Me/
Windows NT 4 Workstation or Server with Service Pack 3/
Windows 2000 Professional or Advanced Server/Windows XP
Home edition or Professional.
Minimal Requirements
• Disk space: 120 MB for installation
• Memory: 64 MB
• CPU: Pentium II 233 or higher
• Required software: Internet Explorer 4.01.
Recommended
• Disk space: 220 MB for installation
• Memory: 128 MB
• CPU: Pentium II 400 or higher
• Required software: Internet Explorer 5.5
N
OTES
:
• For Windows NT/2000/XP, the system administrator should
install the software.
• Windows 95 versions prior to OSR2 are not recommended due to
incompatibility with OLE/COM libraries.
6
Page 12
Installing the Software
N
OTES
:
• Cancel the “New Hardware Found” window when your computer
boots up.
• Make sure that your machine is plugged in and connected to
your computer’s parallel port or USB port
software
USB connection.
1
Insert the supplied CD-ROM into your CD-ROM drive.
The CD-ROM should automatically run and an installation
window appears.
. Windows 95 and Windows NT 4.0 do not support the
before installing
English
If the installation window does not appear, click
then
Run
. Type
letter of your drive and click
N
OTE
:
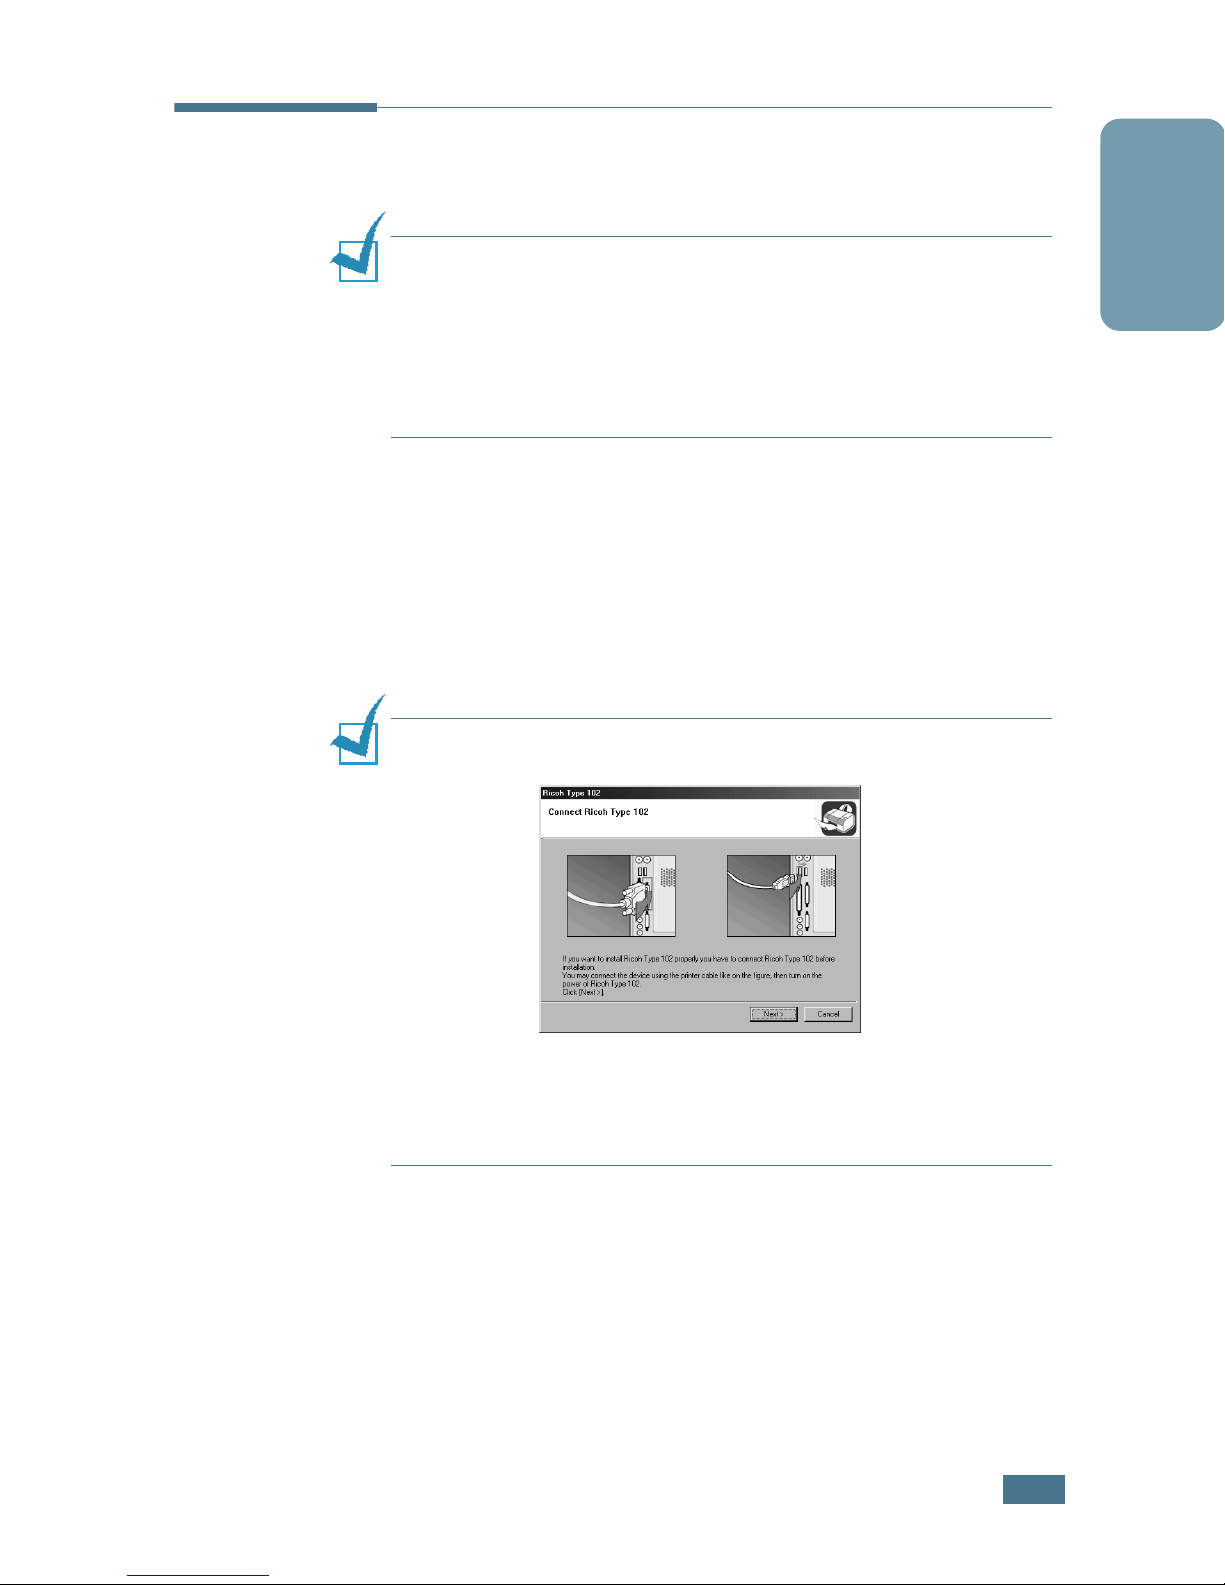
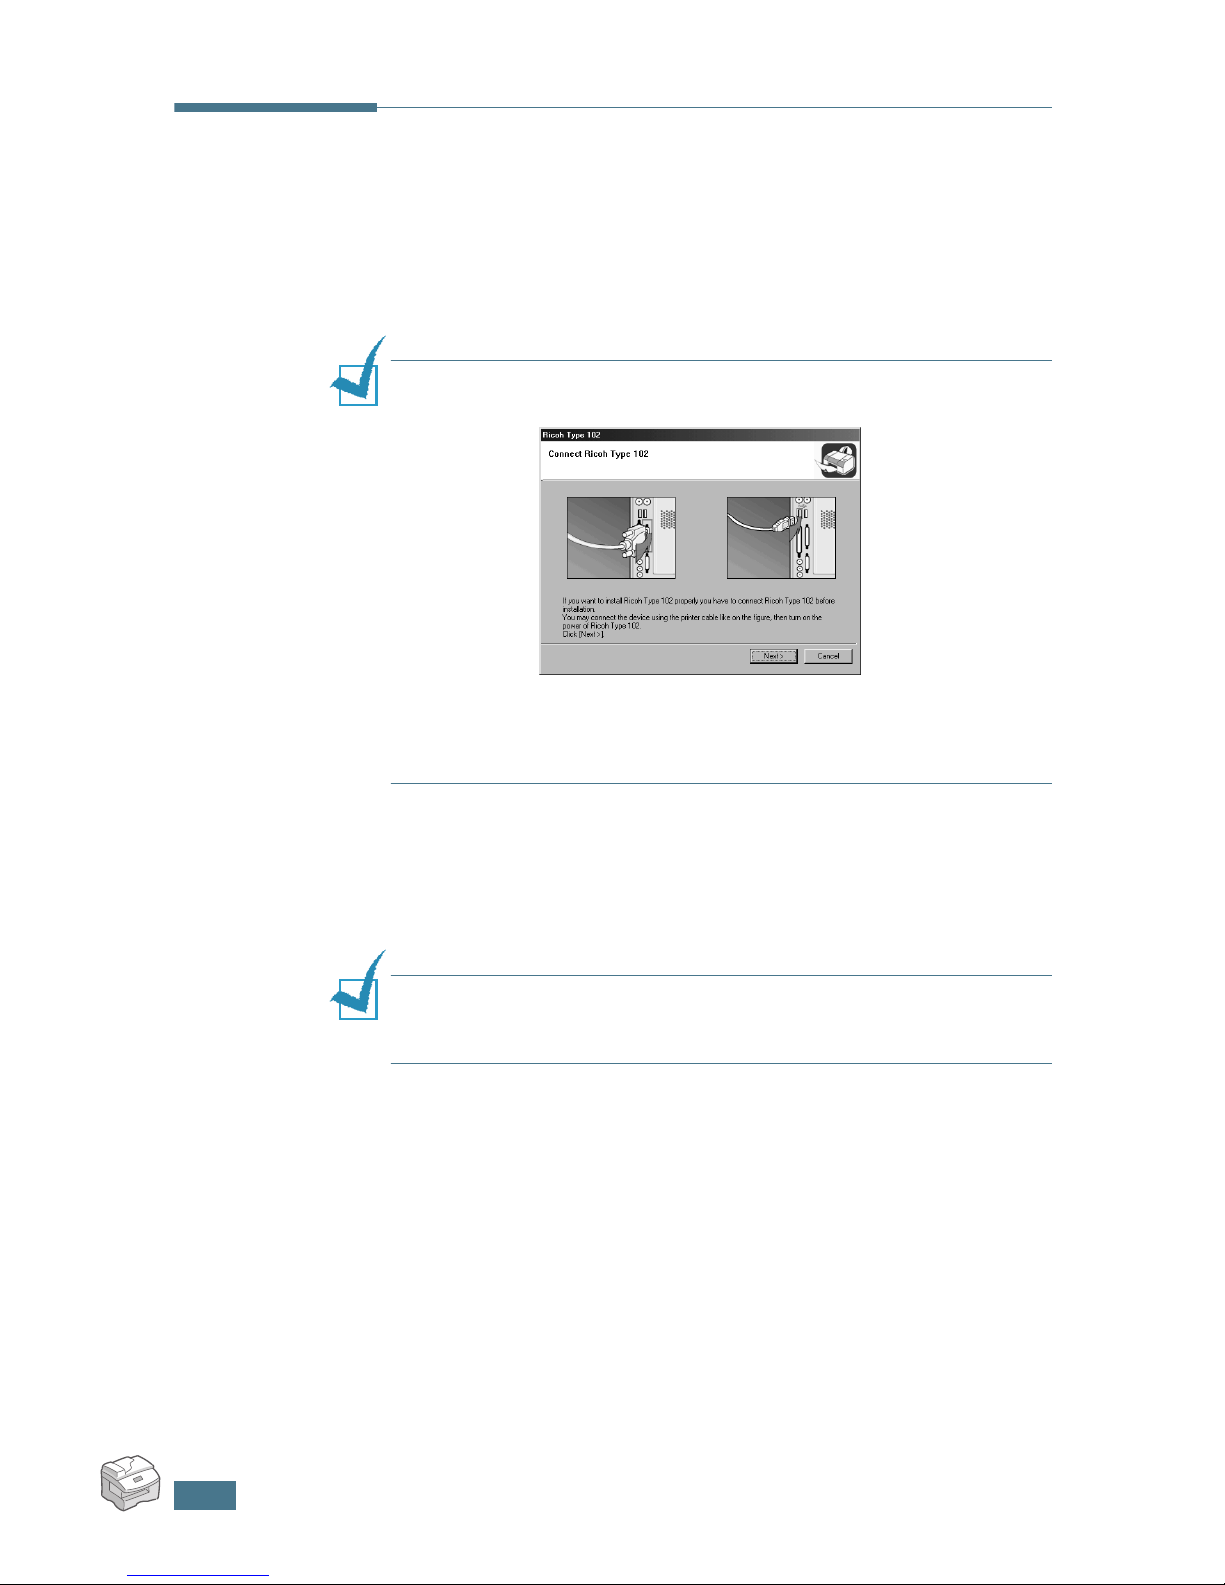
If your machine is not connected to the computer, the
following window will appear.
• After connecting the machine, click
• If you want to skip the connection status, click Next, and No to
the following screen. Then the installation will start and the test
page will not be printed at the end of the installation.
X:\Setup.exe
OK
, replacing “X” with the
.
Next
.
Start
and
7
Page 13
2
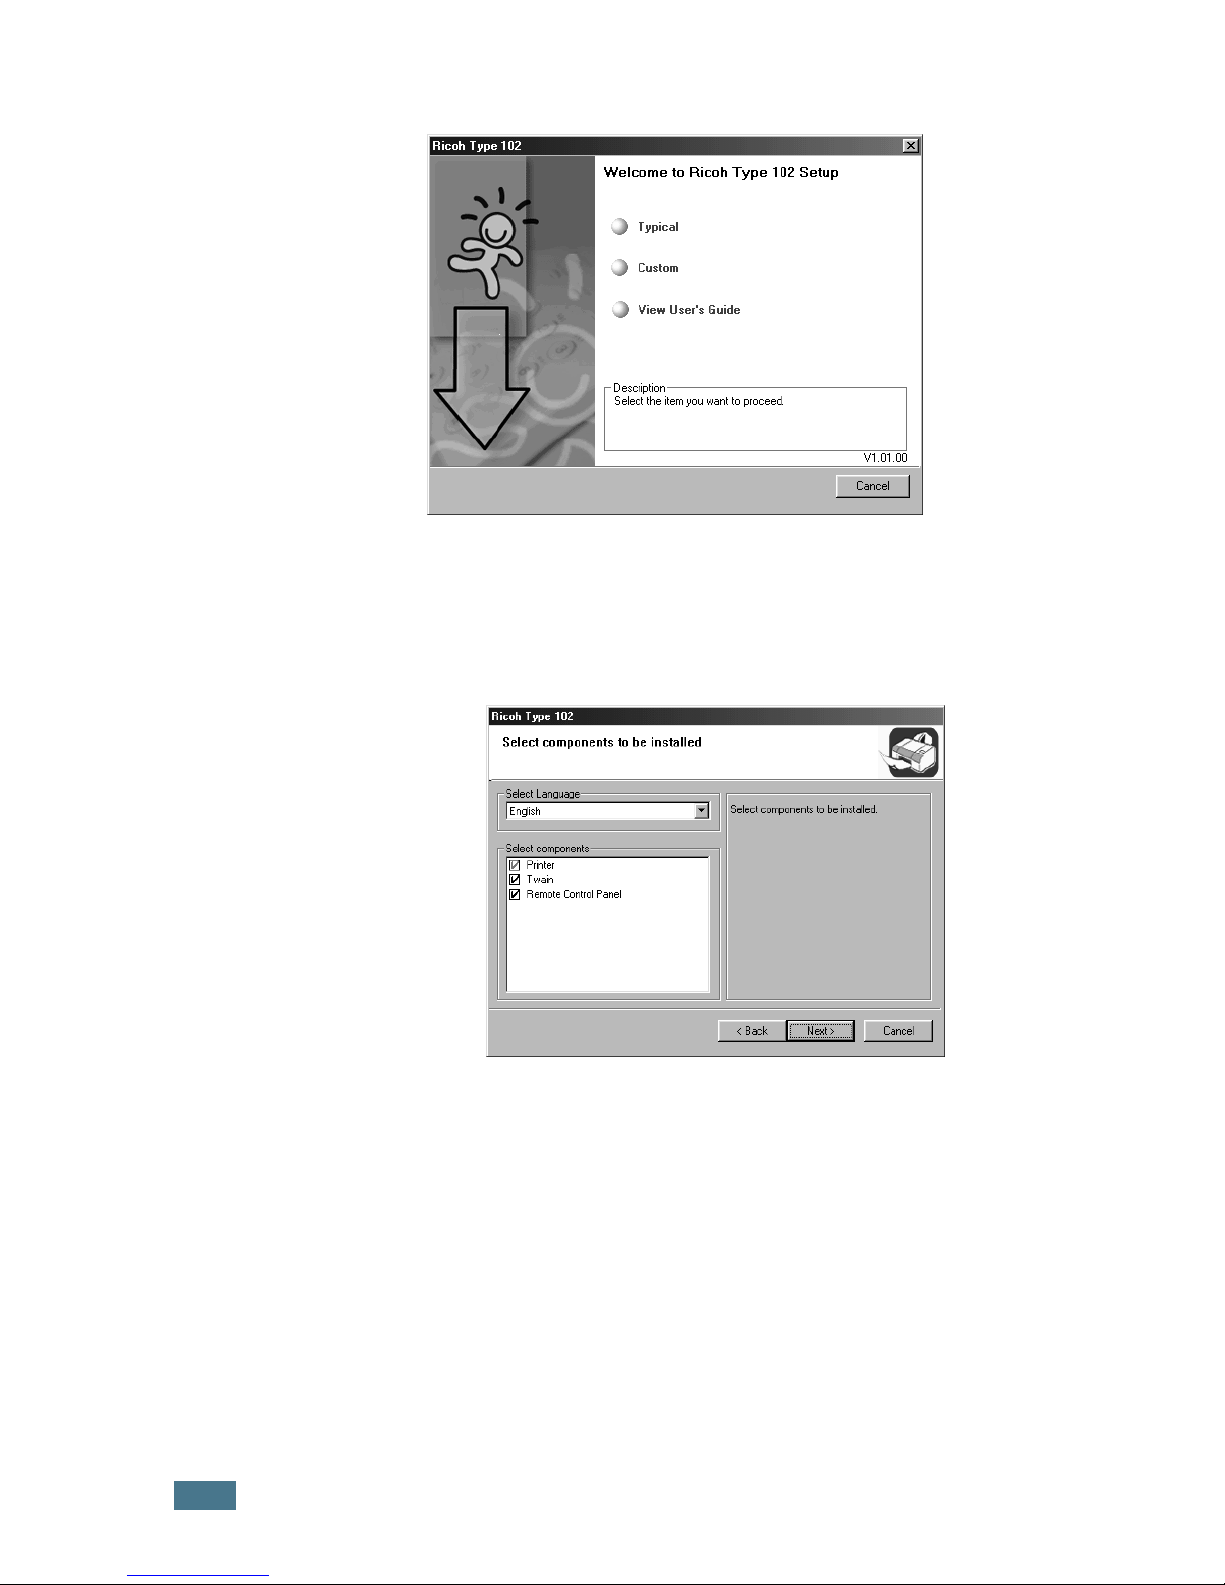
Choose the installation type.
•
Typical
such as printer driver, Twain driver, Remote Control Panel.
This is recommeded for most users.
•
Custom
software and the components you want to install. After
selecting the language and the component(s), click
: Installs the common software for your printer,
: Allows you to choose the language of the
Next
.
3
4
5
8
View User’s Guide: Allows you to view this User’s Guide.
•
If your computer doesn’t have Adobe Acrobat, click on this
option and it will automatically install Adobe Acrobat for you.
After the installation is finished, the window asking you to
print a test page appears. If you choose to print a test
page, select the check box and click
When the test page prints out correctly, click Yes.
If not, click No to reprint it.
Click Finish.
Next
.
Page 14

Removing Software
Uninstall is required if you are upgrading the software or if your
installation fails. You can uninstall all software of this machine,
using the CD-ROM or uninstall the desired item using the
Windows unInstallShield.
1
You can select Start
Maintenance.
Otherwise, insert the supplied CD-ROM into your CD-ROM
drive.
The CD-ROM should automatically run and an installation
window appears.
If the installation window does not appear, click Start and
then Run. Type X:\Setup.exe, replacing “X” with the
letter of your drive and click OK.
2
Click Remove.
→
Programs
→
Ricoh Type 102
→
English
Then you will see a component list so that you can remove
any of them individually.
If you want to uninstall the printer driver, check Printer.
If you want to uninstall the Twain driver, check Twain.
If you want to uninstall the Remote Control Panel, check
Remote Control Panel.
3
After selecting items you wish to remove, click Next.
4
When your computer asks you to confirm your selection,
click Yes.
The selected driver and all of its components are removed
from your computer.
5
When the uninstallation is done, click Finish.
9
Page 15
Viewing the User’s Guide
The following User’s Guide, which is in Adobe Acrobat PDF
format, come with your machine in the supplied CD-ROM.
1
Place the CD-ROM in the CD-ROM drive.
N
OTE
:
If your machine is not connected to the computer, the
following window will appear.
• After connecting the machine, click Next.
• If you want to skip the connection status, click Next, and No to
the following screen.
2
Select View User’s Guide.
Adobe Acrobat automatically runs and then the User’s
Guide opens.
N
OTE
:
If your computer doesn’t have Adobe Acrobat, selecting
the View User’s Guide option automatically installs Adobe
Acrobat for you. After installing is complete, repeats step 1 and 2.
10
Page 16

B174-8601
 Loading...