

Page 1

A224 COPIER
SERVICE MANUAL
The A224 copier is based on the A193 copier.
Only the differences from the base copier are described
in the following pages. Therefore, this document should
be treated as an insert version of the base copier’s
service manual, although it has a separate binder. It
should always be used together with the base copier’s
service manual.
Page 2

IMPORTANT SAFETY NOTICES
+
PREVENTION OF PHYSICAL INJURY
1. Before disassembling or assembling parts of the copier and peripherals,
make sure that the copier power cord is unplugged.
2. The wall outlet should be near the copier and easily accessible.
3. Note that some components of the copier and the paper tray unit are
supplied with electrical voltage even if the main switch is turned off.
4. If any adjustment or operation check has to be made with exterior
covers off or open while the main switch is turned on, keep hands away
from electrified or mechanically driven components.
5. If the Start key is pressed before the copier completes the warm-up
period (the Start key starts blinking red and green alternatively), keep
hands away from the mechanical and the electrical components as the
copier starts making copies as soon as the warm-up period is
completed.
6. The inside and the metal parts of the fusing unit become extremely hot
while the copier is operating. Be careful to avoid touching those
components with your bare hands.
HEALTH SAFETY CONDITIONS
1. Never operate the copier without the ozone filters installed.
2. Always replace the ozone filters with the specified ones at the specified
intervals.
3. Toner and developer are non-toxic, but if you get either of them in your
eyes by accident, it may cause temporary eye discomfort. Try to remove
with eye drops or flush with water as first aid. If unsuccessful, get
medical attention.
OBSERVANCE OF ELECTRICAL SAFETY STANDARDS
1. The copier and its peripherals must be installed and maintained by a
customer service representative who has completed the training course
on those models.
2. The RAM board on the system control board has a lithium battery which
can explode if replaced incorrectly. Replace the battery only with an
identical one. The manufacturer recommends replacing the entire RAM
board. Do not recharge or burn this battery. Used batteries must be
handled in accordance with local regulations.
Page 3
SAFETY AND ECOLOGICAL NOTES FOR DISPOSAL
1. Do not incinerate toner bottles or used toner. Toner dust may ignite
suddenly when exposed to an open flame.
2. Dispose of used toner, developer, and organic photoconductors in
accordance with local regulations. (These are non-toxic supplies.)
3. Dispose of replaced parts in accordance with local regulations.
4. When keeping used lithium batteries in order to dispose of them later,
do not put more than 100 batteries per sealed box. Storing larger
numbers or not sealing them apart may lead to chemical reactions and
heat build-up.
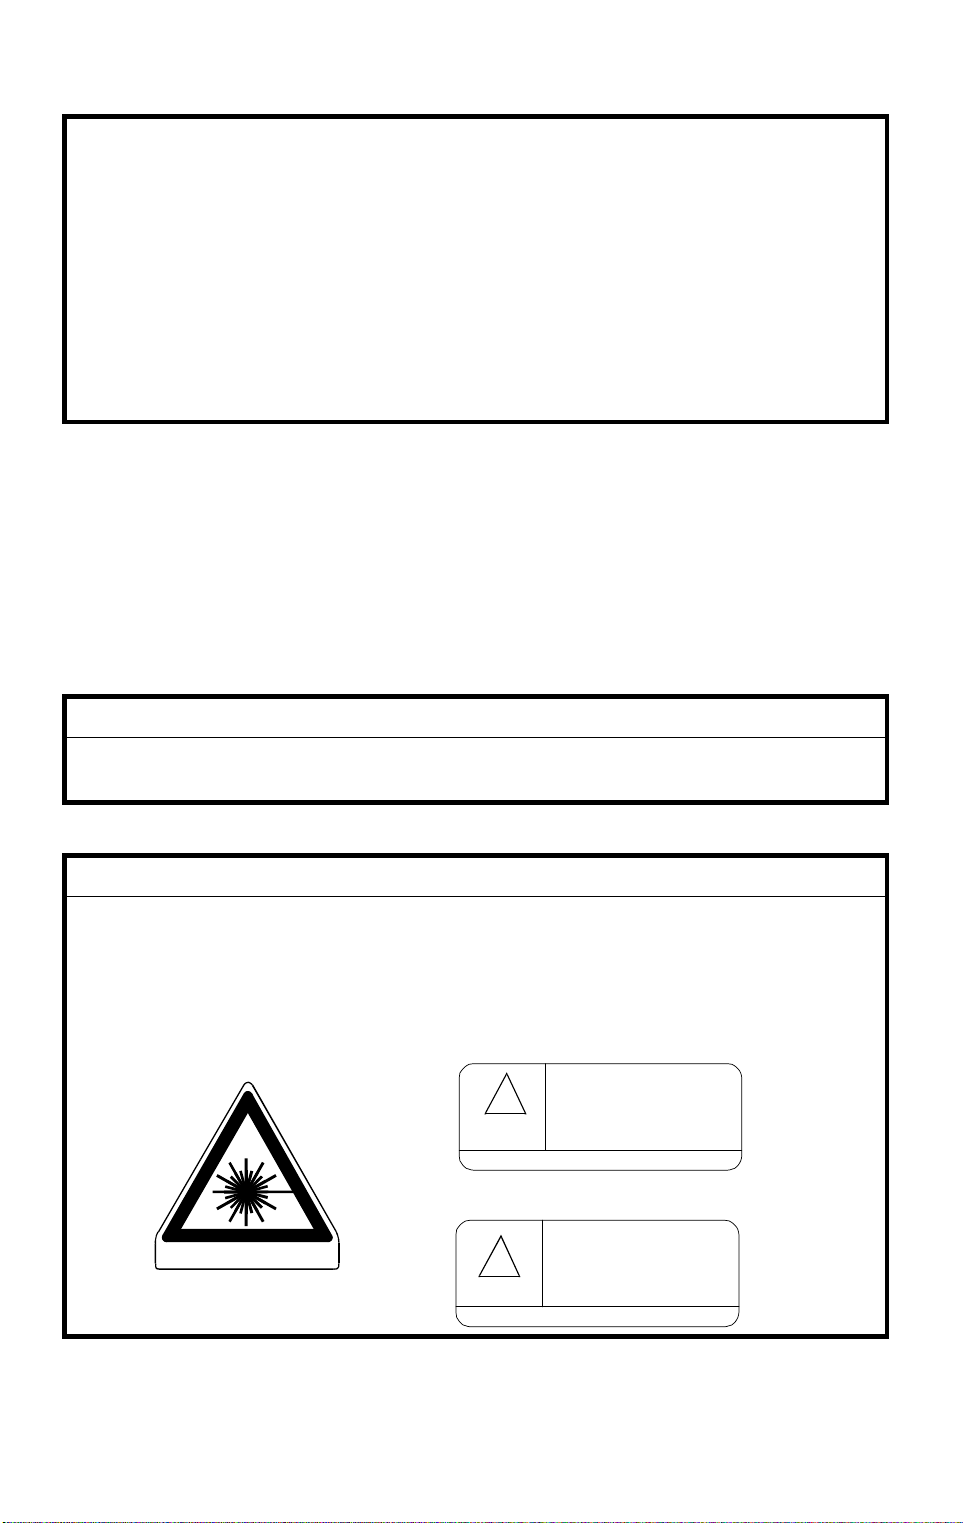
LASER SAFETY
The Center for Devices and Radiological Health (CDRH) prohibits the repair
of laser-based optical units in the field. The optical housing unit can only be
repaired in a factory or at a location with the requisite equipment. The laser
subsystem is replaceable in the field by a qualified Customer Engineer. The
laser chassis is not repairable in the field. Customer engineers are therefore
directed to return all chassis and laser subsystems to the factory or service
depot when replacement of the optical subsystem is required.
WARNING
+
Use of controls, or adjustment, or performance of procedures other than
those specified in this manual may result in hazardous radiation exposure.
WARNING FOR LASER UNIT
+
WARNING: Turn off the main switch before attempting any of the
procedures in the Laser Unit section. Laser beams can
seriously damage your eyes.
CAUTION MARKING:
INVISIBLE LASER RADIATION
WHEN OPEN.
!
AVOID DIRECT EXPOSURE TO
BEAM.
>PS<
INVISIBLE LASER RADIATION
WHEN DISCONNECT OPTICAL
FIBER CABLE.
AVOID DIRECT EXPOSURE TO
BEAM.
>PS<
>PS<
DANGER
!
DANGER
Page 4

25 April 1997 SPECIFICATIONS
1. SPECIFICATIONS
Items A193 A224
Configuration: Desktop As for A193
Copy Process: Dry electrostatic transfer syst em As for A193
Originals: Sheet/Book As for A193
Original Size: Maximum:
A3/11" x 17"
Minimum:
A5/8.5" x 5.5" sideways
(paper tray)
A6/5.5" x 8.5" lengthwise
(by-pass feed)
Copy Paper Weight: Paper tray:
60 ~ 90 g/m
By-pass:
60 ~ 157 g/m
Reproducti on R at i os: 5 Enlargeme nt a nd 7 R eduction
(5E7R)
Zoom: 25% to 400% in 1% st eps Non-memor y copy:
Power Source: 120V/ 60 Hz: more than 12A
(for North America)
220V ~ 240V/50 Hz:
more than 7A (for Europe)
220V ~ 240V/60 Hz:
mo re than 7A (for Asia)
Dimensio ns (W x D x H): 550 x 580 x 652 mm
(21.7" x 22.9" x 25.7")
Measurem ent conditions
1) With by-pass feed table
closed
2) Without all opt i ons
Weight: Less than 57 kg (126 lb) Less than 58 kg (128 lb)
Warm-up Time:
Less than 30 s (20°C, 68°F):
115V machine
Less than 35 s (20°C, 68°F):
230V machine
2
, 16 ~ 24 lb
2
, 16 ~ 24 lb
Non-memory copy:
5E6R (25% is excluded)
Memory copy:
Letter: 5E7R
Others: 5E6R (25% is
excluded; it can be in cluded
with an SP mode)
50% to 400% in 1% ste ps
Memory copy:
Letter: 25% to 400%
Others: 50% to 400% in 1%
steps (down to 25% can be
included with an SP mode)
Less than 40 s (20°C, 68°F):
115V/230V machine
As for A193
As for A193
As for A193
As for A193
A224
Copier
1
Page 5

SPECIFICATIONS 25 April 1997
Items A193 A224
First Copy Time Less than 9.8 s
(from 1st paper tr ay to
face-down co py t ra y)
Less than 8.8 s
(from 1st paper tr ay to
face-up copy tray)
Less than 9.8 s
(from 1st paper tr ay t o
face-down cop y tray)
Less than 8.8 s
(from 1st paper tr ay t o
f ace-up copy tray)
Less than 9.5 s
(from LCT to face-down copy
tray)
Copy Number Input: Ten-key pad, 1 to 99 (count up
or count down )
As for A193
Manual Image Density: 7 steps As for A193
Automatic Reset: 60s is the standard setting; it
can be changed with a UP
As for A193
mode.
Auto Shut Off 15 min. is the standard setting;
it can be changed with a UP
mode.
30 min. is the standard setting;
it can be changed with a UP
mode.
Copy Paper Capacity: Paper Tray: 250 sheets
Option Paper Tray Unit: 500
sheets x 2
By-pass:
As for A193
100 sheets (≤A4, LT )
10 sheets (>A4, LT )
1 sheet (non-standard)
Toner Repl eni shment: Cartridge e xchange
(216 g/cartridge)
As for A193
Toner Yield : 8 k copies (A4 si dew ays, 6% full
black, 1 to 1 copying, ADS
As for A193
mode)
Optional Equ i pm ent: -Platen cove r
-ADF
-ARDF
-Paper tray un i t
-1-bin sorter
-Finisher
-4 MB memory
-8 MB memory
-Key counter
-Tray heater
-Optical anti-condensation
heater
Copy Tray Capacity face-down mode: 500 sheets
face-up mod e: 1 00 sheets
-Platen cover
-ADF
-ARDF
-Paper tray unit
-1-bin sorter
-Finisher
-LCT
-Key counter
-Tray heater
-Optical anti- condensation
heater
-Drum heater
As for A193
2
Page 6

25 April 1997 SPECIFICATIONS
Power Consumption:
- A193 -
Mainframe Onl y Full System
120 V 220 V ~ 240 V 120 V 220 V ~ 240 V
Maximum Less than 1.1 kW Less than 850 W Less than 1.2 kW Less than 1 kW
Copying Approx. 470 W Approx. 500 W Approx. 500 W Approx. 530 W
Warm-up Approx. 1.0 kW Approx. 750 W Approx. 1.0 kW Approx. 750 W
Stand-by Approx. 130 W Approx. 130 W Approx. 140 W Approx. 140 W
Auto Shut-off Approx. 2.0 W Approx. 2.2 W Approx. 2.2 W Approx. 2.4 W
- A224 -
Mainframe Onl y Full System
120 V 220 V ~ 240 V 120 V 220 V ~ 240 V
Maximum Less than 1.1 kW Less than 850 W Less than 1.2 kW Less than 1 kW
Copying Approx. 570 W Approx. 570 W Approx. 600 W Approx. 600 W
Warm-up Approx. 1.0 kW Approx. 750 W Approx. 1.0 kW Approx. 750 W
Stand-by Approx. 130 W Approx. 130 W Approx. 140 W Approx. 140 W
Auto Shut-off Approx. 2.0 W Less than 2.0 W Approx. 2.2 W Approx. 2.4 W
A224
Copier
Noise Emission:
- A193 -
Mainframe Onl y Full System
1. Sound Power Level
Copying 61.5 dB (A) 64.5 dB (A)
Stand-by 30.0 dB (A) 30.0 dB (A)
2. Sound Pressure Level at the Operation Position
Copying 47.5 dB (A) 52.0 dB (A)
Stand-by 17.5 dB (A) 17.5 dB (A)
- A224 -
Mainframe Onl y Full System
1. Sound Power Level
Copying 62.5 dB (A) 66.0 dB (A)
Stand-by 40.0 dB (A) 40.0 dB (A)
2. Sound Pressure Level at the Operation Position
Copying 47.5 dB (A) 52.0 dB (A)
Stand-by 17.5 dB (A) 17.5 dB (A)
3
Page 7

SPECIFICATIONS 25 April 1997
Copying Speed in Multicopy Mode:
- A193 -
A4 sidew ays/
11" x 8.5"
Non-memory copy mode 15 9 10
Memory cop y mode 20 11 12
A3/11" x 17" B4/8.5" x 14"
- A224 -
A4 sidew ays/
11" x 8.5"
Non-memory copy mode 20 11 13
Memory cop y mode 25 13 15
A3/11" x 17" B4/8.5" x 14"
Memory Capacity:
- A193 -
Standard (4 MB) Optional 4 MB Optional 8 MB
Multi-page duplex copy x O O
Sort, Rotate Sort A4, LT O O O
B4, LG x O O
A3, DLT x O O
Number of pages A4, 6% 35 99 99
ITU-T #4 15 45 75
x: Not available O: Available
- A224 -
Standard 12 MB (4 MB + 8 MB)
Multi-page duplex copy O
Sort, Rotate Sort A4, LT O
B4, LG O
A3, DLT O
Number of pages A4, 6% 99
ITU-T #4 75
x: Not available O: Available
4
Page 8

25 April 1997 MACHINE CONFIGURATION
2. MACHINE CONFIGURATION
I
H
B
CA
D
E
G
F
A224V501.wmf
Version Item
Copy Copier A193 A224 D
ADF (Option) A628 B
ARDF (Option) A661 C
Platen Cover (Option) A645
Paper Tray Unit (Option) G697 F
Duplex Unit G694 (Option) Standard
1-bin Sorter (Option) A629 H
Finisher (Option) A666 G
LCT N/A A667(Option) E
Memory 4 MB A642-01 (Option) N/A
Memory 8 MB A642-02 (Option) Standard
Fax Fax Controller (Option) A693 A804
Telephon e (Option) H160 A
ISDN (Option) A644
HDD (Option) A641
Memory Card (Option) H130-54
Function Card (Option) H130-52
Page Memory (Option) A640
Printer Printer Control ler (Option) A643-00 (115V)
A643-01 (230V)
PS (Option) A643-02
HDD (Option) A643-03
Machine Code
A193 A224
A805-00 (115V)
A805-01 (230V)
No.
A224
Copier
5
Page 9

ELECTRICAL COMPONENT DESCRIPTIONS 25 April 1997
3. ELECTRICAL COMPONENT DESCRIPTIONS
Refer to the electrical component layout and the point-to-point diagram on the
waterproof paper in the pocket for the locations of these components.
Symbol
Printed Circuit Boards
PCB1 54
PCB2 50 Lamp Stabilizer Provides dc power for the exposure lamp.
PCB3 58
PCB4 61 LD Unit Controls the laser diode.
PCB5 63
PCB6 51
PCB7 5 5 IOCSS Controls the mechanical par t s of the p rinter.
PCB8 52
PCB9 53
PCB10 62
Motors
M1 45 Main Drives the main body com ponents.
M2 37
M3 47
M4 49 Po l ygonal Mirror Tur ns t he polygonal mir ror.
M5 38
M6 35 Ex haust Fan Removes heat from aro und the fusing unit.
M7 46
Index
No.
Description Note
High Voltage Supply
Board
PSU Provides dc powe r to th e system and ac
Operation Pan e l Controls th e to uch panel displa y and LED
SBU Contains the CCD, and outputs a video
BICU Controls all copi er functions both di r ect l y or
MSU Compr esses the image data, st ores the data,
Polygon Motor Driver
(A224 only)
Scanner Drive Drives the 1st and 2nd scanners (d c st epper
Transport Vac uum
Fan
Toner Supply Rotates the toner bottle to supply toner to
Fusing Unit Fan
(A224 only)
Supplies high voltage to the drum charge
roller, devel opment roller , tra n sf er roller, and
discharge br ush.
power to the fusing lamp.
matrix, and monitors the key matrix.
signal to the BICU b oar d.
through othe r co ntrol boards.
and applies the image editing.
Drives the polygon motor.
motor).
Aids paper transportation from the transfer
roller to the fusing u n it.
the toner supply unit.
Removes heat from around the fusing unit.
Sensors
S1 33 Upper Exit Detects misf eeds.
S2 31 Lower Exi t Detects misf eeds.
S3 28 Left Vertical D oor Cuts the +5 and +24 Vdc power lin es.
S4 27
S5 17
Left Door Detects whether the left door is open or
closed.
Relay Detects the leading edge of paper fr om the
paper tray and d upl ex unit to determ ine the
stop timing of the paper feed clutch and
duplex feed motor. Also detects misfeeds.
6
Page 10

25 April 1997 ELECTRICAL COMPONENT DESCRIPTIONS
Symbol
S6 10 PCU Detects when a new PCU is installed.
S7 29 Fusin g Exi t Detects misf eeds.
S8 9
S9 —-
S10 15
S11 16
S12 13
S13 12
S14 59 Humidity Monitors the humidity around the PCU.
S15 4
S16 5
S17 6
S18 3
S19 1
S20 23
Index
No.
Description Note
Charge Roller H.P Informs the CPU w hen the drum charge
roller is at home position.
Upper Tray Paper
End (A193 only)
Lower Tray Paper
End
By-pass Feed Paper
End
Registrati on Detects the leading edge of the copy pap er
By-pass Feed Paper
Width
Original Width Detects the width of the original. This is one
Original Length-1 D etects the leng th of the original. This i s one
Original Length-2 D etects the leng th of the original. This i s one
Platen Cover Infor m s t he C P U w het her the platen cover is
Scanner H.P. Informs t he C P U w hen the 1st and 2nd
Toner Densi t y (TD) D etects the amou nt of toner inside the
Informs the CPU w hen the upper paper tr ay
runs out of pape r.
Informs the CPU when the lower paper tray
runs out of pape r.
Informs the CPU w hen there is no paper in
the by-pass tray.
to determin e th e stop timing of the pap er
feed clutch, and detects misfe eds.
Detects the wi dt h of the paper in the by-pass
feed table.
of the APS (Auto Paper Select) sen sors.
of the APS (Auto Paper Select) sen sors.
of the APS (Auto Paper Select) sen sors.
up or down (related to APS/ARE functions).
ARE: Auto Reduce and Enlarge
scanners are at th e hom e position.
development unit .
A224
Copier
Switches
SW1 20 AC Supplies power to the copier.
SW2 32 Main Supplies power to operate the machine.
SW3 14 Right Vertical Guide Cuts the +5 and +24 Vdc power lines.
SW4 —-
SW5 19
SW6 26
Magnetic Clutches
MC1 36
MC2 42 Up per R el ay Drives the upper relay rol l er s.
MC3 43 Lower Relay Drives the lower relay rollers.
Upper Paper Size
(A193 only)
Lower Paper Size Determines what size of paper is in the lower
Front Door Safety Cuts the +5VLD and +24V dc power lines
Charge Roller Contact Controls the touch and release movem ent of
Determines what size of paper is in the
upper paper tray.
paper tray.
and detects whet her the front cove r is open
or not.
the drum ch arge roller.
7
Page 11

ELECTRICAL COMPONENT DESCRIPTIONS 25 April 1997
Symbol
MC4 41
MC5 —MC6 44 Low er Paper Feed Starts paper feed fr om t he l ow er paper tray.
MC7 40 Registration Drives the registration rollers.
MC8 39
Solenoids
SOL1 48
Lamps
L1 60
L2 2 Scanner Applies lig ht to the original for exposure.
L3 8 Fusing Provides heat to the hot roller.
Heaters
H1 18
H2 34
H3 11
Index
No.
Description Note
By-pass Feed Starts paper feed from the by-pass fee d
table.
Upper Paper Feed
(A193 only)
Development Drives the dev el opment roller .
Junction Gate Moves the junction gate to direct copies to
Quenching Neutral i zes any charge remai ning on the
Tray (option) Tur ns on when the main sw itch is off to keep
Anti-condensation
(option)
Drum (option ) Keeps the drum warm to prevent
Starts paper fee d fr om t he upper paper tray.
the face-up or fa ce-down copy tray .
drum surfa ce af t er cl eaning.
paper in the pa per tray dry. Tray heaters are
also available for the optional paper feed unit.
Turns on when t he main switch is of f to
prevent moisture from accumulating.
condensati on on the drum.
Thermistors
TH1 24
TH2 21 Fusing Monitors the temperature of the hot roller.
TH3 22
Thermofuses
TF1 7
Counters
CO1 25
CO2 —-
Charge Roller Monitors the temperature of the drum charge
roller.
Fusing Edge (A224
only)
Fusing Provides back-u p overheat protecti on in the
Total Keeps tr ack of the total number of copies
Key
(option)
Monitors th e te mperature for the fr ont edge
of the hot roller .
fusing unit.
made.
Used for contro l of authorized use . Th e
copier will not operate until it is installed.
8
Page 12

25 April 1997 DRIVE LAYOUT
Symbol
Others
LSD1 30
NF 56
CB 57
DRIVE LAYOUT
4.
Index
No.
1
Description Note
Laser
Synchronization
Detector
Noise Filter
(230V machine only)
Circuit Breaker
(230V machine only)
Detects the laser beam at the sta rt of the
main scan.
Removes electrical noise from the AC input
line.
Guards against voltage surg es i n t he AC
input line.
23
A224
Copier
9
8
7
1. Scanner Drive Motor
2. Development Clutch
3. Charge Roller Contact
4. Main Motor
5. Registration Clutch
6
5
6. Lower Paper Feed Clutch
7. Lower Relay Clutch
8. Upper Relay Clutch
9. By-pass Feed Clutch
4
A224V502.wmf
9
Page 13

COPY PROCESS 25 April 1997
5. COPY PROCESS
5.1 OVERVIEW
Pow er
Pack
- 90 V
-1750 V
7
1
28
3
6
5
+ 15 µA
- 140 V
4
A224V503.wmf
- 600V
Pow er Pack
- 1.8 kV (Front Side)
- 2.1 kV (Rear Side)
The separation (discharge brush) voltage has been changed.
10
A224V500.wmf
Page 14

25 April 1997 MAIN SCAN MAGNIFICATION/REDUCTION
6. MAIN SCAN MAGNIFICATION/REDUCTION
The specification of the reproduction ratios in the memory mode (binary
picture processing mode) has been changed to 5 enlargement and 6
reduction. This is because the higher copy speed of this model causes poor
copy quality at a reproduction ration of 25%.
Reproduction ratios of 48% ~ 400% are achieved for main and sub scan
magnifications in the same way as for the A193 copier, and for reproduction
ratios of 25% ~ 47%, it is done by changing the scanner speed and deleting
every other line.
A224
Copier
11
Page 15

LASER EXPOSURE 25 April 1997
7. LASER EXPOSURE
7.1 OVERVIEW
The strength of the beam is 0.6 mW on the drum surface (10 mW output from
the LDDR board) at a wavelength of 780 nm.
The polygon motor speeds have been changed as follows:
Resolution (dpi ) Modes Motor Speed (rpm) Data Freq uency (MHz)
400 dpi Copy and Fax 17952.8 11.750
600 dpi Printer 26926.1 26.438
391.16 dpi Fax (image rotation) 18240.0 11.674
406.4 dpi Fax (mm printing ) 17556.0 11.674
The polygon mirror motor and motor driver are separated to prevent the laser
unit from being heated by the motor driver. Also, the laser unit has a polygon
motor cover and shield glass to reduce the noise from the polygon motor.
7.2 OPTICAL PATH
[I]
[B]
[C]
[D]
[B]
[I]
The shield glass has been added.
[A]: LD Unit
[F]
[D]
[F]: 1st Mirror
[G]
G]
[E]
[H]
[A]
[E]
[H]
A224D501.wmf
[B]: Polygon Mirror
[C]: Cylindrical Lens
[D]: Shield Glass
[E]: F - Theta Mirror
[G]: BTL
[H]: 2nd Mirror
[I]: Laser Syncronization Detector
12
Page 16

25 April 1997 PAPER FEED
8. PAPER FEED
8.1 OVERVIEW
A224
Copier
A224D503.wmf
This machine has a duplex unit as a standard component, so the following
parts have been deleted.
1. Upper Paper Feed Rollers
3. Upper Paper End Sensor and
Feeler
2. Upper Paper Feed Clutch
4. Upper Paper Size Sensor
13
Page 17

PAPER SEPARATION AND TRANSPORT 25 April 1997
8.2 DRIVE MECHANISM
[B]
[A]
A224D502.wmf
Drive transfers to the upper relay clutch [A] through the gear [B] instead of
the paper feed clutch.
9. PAPER SEPARATION AND TRANSPORT
The voltage for the discharge brush has been changed.
-1.8 kV (feeding from a paper tray)
•
-2.1 kV (second side of duplex copies, feeding from the duplex unit)
•
14
Page 18

25 April 1997 IMAGE FUSING
10. IMAGE FUSING
10.1 OVERVIEW
12
11
10
1
A224
Copier
2
3, 4
5
6
7
9
8
A224D506.wmf
Two new parts; fusing edge thermistor and antistatic brush have been added.
The fusing edge thermistor is for over heat prevention at the end of the hot
roller. The antistatic brush is for prevention of off-set fusing image.
1. Fusing thermofuse
2. Hot roller
3. Fusing thermistor
4. Fusing edge thermistor
5. Lower entrance guide
6. Pressure roller
7. Pressure lever
8. Antistatic brush
9. Cleaning roller
10. Pressure spring
11. Hot roller strippers
12. Fusing lamp
15
Page 19

IMAGE FUSING 25 April 1997
10.2 PRESSURE ROLLER
[A]
[C]
[D]
[B]
[D]
[B]
A224D207.wmf
The pressure of the pressure roller can be changed in the same way as for
the A193 machine. It is done by adjusting the position of the pressure springs
[A]. In this machine, the fusing pressure can also be adjusted with the lever
handle [B] (this is a finer adjustment than the pressure springs). The user can
do this when printing on a thicker medium, such as an envelope.
The lever shaft [C] contacts the pressure lever [D]. When the lever handle
rotates down, the shaft lowers the pressure lever. At this time, the pressure of
the pressure roller is decreased. The upper position of the lever is normal.
16
Page 20

25 April 1997 IMAGE FUSING
10.3 FUSING UNIT FAN
[A]
A224
Copier
A224D505.wmf
The fusing unit fan [A] has been added below the fusing unit. The fusing unit
fan is necessary because the wattage of the fusing lamp is higher than in the
A193 machine, as a result of the higher copy speed.
The fusing unit fan turns on if the charge roller thermistor detects a
temperature in the machine of over 43°C when the main motor starts to rotate
or at any time that the main motor is rotating.
The fusing unit fan stops either when the main motor stops or when the
temperature in the machine falls below 40°C.
17
Page 21

IMAGE FUSING 25 April 1997
10.4 FUSING TEMPERATURE CONTROL AND OVERHEAT
PROTECTION
[B]
[A]
A224D504.wmf
The fusing control type can be either phase control or on-off control,
depending on an SP mode setting.
The fusing edge thermistor [A] has been added. It measures the temperature
at the end of the hot roller. This is because this machine has a higher copy
speed and more power is supplied to the fusing lamp. So, when making a
multi-copy run with A4 size paper, the temperature at the ends of the hot
roller is higher than at the middle.
Usually, the fusing temperature is controlled using the fusing thermistor [B]
(at the middle). However, if the temperature at the end of the hot roller
becomes greater than 230° C, the fusing lamp turns off until the temperature
at the middle of the hot roller has fallen by 5°C.
18
Page 22

25 April 1997 ENERGY SAVER MODES
11. ENERGY SAVER MODES
Basically, the function and performance of the energy saver mode in all
machine configurations, except the copier configuration for the 230V
machine, are the same as for the A193 machine. The following are the items
which have been changed.
1. Fusing temperature in the energy saver level 2
80°C (230V machine)
2. The recovery time from energy saver level 2
30 s (230V machine)
3. When the auto shut-off timer runs out in the copier configuration (230V
machine only)
When the auto shut-off timer runs out, the machine enters auto shut off
mode and the
ac switch
turns off automatically. This function can be
disabled with SP 5-948. If this function is disabled, the main switch turns
off when the timer runs out.
NOTE:
This function is necessary to meet new BAM regulations in
Germany (enforced from January, 1999). The new BAM
regulation requires low power consumption in the auto-shut off
mode (less than 2 W).
A224
Copier
4. Power consumption in the copier configuration
Mode AC Switch
Energy
Saver
Level 1
Energy
Saver
Level 2
Auto
Shut-off
Mode
(SP5-948
enabled)
Off (230V )
On (115V )
Main
Switch
On On On
On On On
On (230V )
Off (115V )
Energy
Saver LED
Off Off Off
Fusing
Lamp
165°C
140°C
(115 V)
80°C
(230 V)
System
+5V
On
On
Note
The machine returns
to standby mode if
the DF is lifted or an
original is placed in
the ADF or ARDF.
The machine returns
to standby mode
only if either the
main switch or ac
switch is turned on.
19
Page 23

SERVICE PROGRAM MODE TABLE 9 May 1997
12. SERVICE PROGRAM MODE TABLE
12.1 MAIN SP MODE TABLE
NOTE:
Class
1 and 2
1-001 *
1-002 *
1) A “#” mark after the mode number means that this SP mode is
only used for the A193 machine.
2) A “##” mark after the mode number means that this SP mode is
only used for the A224 machine.
3) In the Function column, comments are in italics.
4) In the Settings column, the default value is in bold letters.
5) An asterisk ( * ) after the mode number means that this mode is
stored in the NVRAM. If the RAM is reset, all these SP modes will
return to their factory settings.
Mode No.
Class 3
1
2
1 #
2
Leading Edge
Registrati on
(Normal
copying, and
duplex 1st
side)
Leading Edge
Registrati on
(Duplex: 2nd
side)
Side-to-Side
Registrati on
(1st paper
feed)
Side-to-Side
Registrati on
(2nd paper
feed)
Adjusts the prin ting leading edge
registration us i ng t he Trimming Area
Pattern (SP5- 902, No.10).
Use the
The specificat i on i s 3 ±2 mm. See
“Replacement and Adjustment - C opy
Image Adjustm ent s” for details.
Adjusts the prin ting leading edge
registration us i ng t he Trimming Area
Pattern (SP5- 902, No.10).
Use the
The specificat i on i s 3 ±2 mm. See
“Replacement and Adjustment - C opy
Image Adjustm ent s” for details.
Adjusts the printing side-to-side
registration from the 1st paper feed
station using the Trimming Area Pattern
(SP5-902, No.10).
Use the
The specification is
“Replacement and Adjustment - C opy
Image Adjustm ent s” for details.
Adjusts the printing side-to-side
registration from the 2nd paper fe ed
station using the Trimming Area Pattern
(SP5-902, No.10).
Use the
The specificat i on i s 2
•/∗
•/∗
•/∗
•/∗
Function Settings
key to toggle between + and -.
key to toggle between + and -.
key to toggle between + and -.
2
1.5 mm. See
±
key to toggle between + and -.
±
1.5 mm
.
+9 ~ -9
0.1 mm/s t ep
+ 0.0 mm
+12.5 ~ -12.5
0.1 mm/s t ep
+ 0.0 mm
+9 ~ -9
0.1 mm/s t ep
+ 0.0 mm
+9 ~ -9
1 mm/step
+ 0.0 mm
20
Page 24

9 May 1997 SERVICE PROGRAM MODE TABLE
Mode No.
Class
1 and 2
1-002 *
Class 3
3
4
5
Side-to-Side
Registration
(3rd paper
feed: Option
PFU tray 1)
Side-to-Side
Registrati on
(4th paper
feed: Option
PFU tray 2)
Side-to-Side
Registrati on
(By-pass feed )
Adjusts the printing side-to-side
registration from the 3rd pape r feed
station using the Trimming Area Pattern
(SP5-902, No.10).
Use the
•/∗
The specificat i on i s 2 ±1.5 mm
Adjusts the printing side-to-side
registration from the 4th paper f eed
station using the Trimming Area Pattern
(SP5-902, No.10).
Use the
•/∗
The specificat i on i s 2 ±1.5 mm
Adjusts the printing side-to-side
registration from the by-pass fe ed t abl e
using the Trimm i ng Ar ea Pat t er n
(SP5-902, No.10).
Use the
•/∗
Function Settings
+9 ~ -9
1 mm/step
+ 0.0 mm
key to toggle between + and -.
.
+9 ~ -9
0.1 mm/s t ep
+ 0.0 mm
key to toggle between + and -.
.
+9 ~ -9
0.1 mm/s t ep
+ 0.0 mm
key to toggle between + and -.
The specificat i on i s 2 ±1.5 mm.
1-003 *
1-006 *
6
7 ##
1
2
3 ##
Side-to-Side
Registrati on
(Duplex)
Side-to-Side
Registrati on
(LCT)
Paper Feed
Timing
(Paper Feed
Trays)
Paper Feed
Timing
(By-pass)
Paper Feed
Timing
(LCT)
Double copy
registration
Adjusts the printing side-to-side
registration from the duplex tray using the
Trimming Area Patt er n (SP5 -902, No.10).
Use the
The specificat i on i s 2
Adjusts the printing side-to-side
registration from the LCT using the
Trimming Area Patt er n (SP5 -902, No.10).
Use the
The specificat i on i s 2 ±1.5 mm
Adjusts the relay clutch timing (or
transport motor timing when us ing the
LCT) at registration. The relay clutch
timing (trans por t motor timing) deter mines
the amount of paper buckle at
registration. (A l arger setting le ads to
more buckling.)
Adjusts the position of the second copy
from the center line in double copy m ode.
Use the
•/∗
key to toggle between + and -.
±
1.5 mm
•/∗
key to toggle between + and -.
.
.
•/∗
key to toggle between + and -.
+9 ~ -9
0.1 mm/s t ep
+ 0.0 mm
+9 ~ -9
0.1 mm/s t ep
+ 0.0 mm
0 ~ 10
1 mm/step
7 mm
0 ~ 10
1 mm/step
8 mm
0 ~ 10
1 mm/step
7 mm
+9 ~ -9
1 mm/step
+ 0 mm
See “Replacement and Adjustment Copy Image Adjus tm ents” for details .
Displays the pa per w i dt h sensor data for
the by-pass feed table.
1-007 *
By-pass Feed
Paper Size
Display
A224
Copier
21
Page 25

SERVICE PROGRAM MODE TABLE 9 May 1997
Mode No.
Class
1 and 2
1-104 *
1-105 *
1-106
1-901
1-902
Class 3
1
2
Fusing
Temperature
Control
Fusing
Temperature
Adjustment
(Operation)
Fusing
Temperature
Adjustment
(Energy Save r
Level 2)
Fusing
Temperature
Display
Auto Restart
Interval
Fusing
Control
Frequency
Display
Selects the fusing temperature control
mode.
Adjusts the fusing temperature in the
operation mode.
Adjusts the fusing temperature in the
energy saver le vel 2 m ode.
With a lower val ue, the machine take s
more time to reach the ready condi tion.
Displays the fusing temperature.
Press the key to exit the display.
Do not change the value.
Displays the fusing control frequency
which is detected by the zero cross si gnal
generator.
Around “50" equals 50 Hz. Around ”60"
Function Settings
0: On/Off
1: Phase
100 ~ 200
1°C/step
180°C
0 ~ 165
1°C/step
140°C (115V
machine)
0°C
(A193 - 230V
machine)
80°C
(A224 - 230V
machine)
equals 60 Hz.
Envelope
Feeding
1-903 *
Adjusts the by-pass feed clutch on ti m e
when the paper is f ed by the registration
roller.
The by-pass feed cl utch turns on agai n
0 ~ 10
1 mm/step
3 mm
after paper buckl i ng to help the
registration r ol l er to feed thick paper.
2-001 *
2-101 *
Charge Roller
Bias
Adjustment
Leading Edge
Erase Margin
1
(Printing)
Trailing Edge
Erase Margin
2
(Printing)
Adjusts the voltage applied to the charge
roller.
Do not change the value.
Adjusts the leading edge erase ma rgin. 0 ~ 9
The specificat i on i s 3 ±2 mm. See
“Replacement and Adjustment - C opy
Image Adjustm ent s” for details.
Adjusts the trailing edge erase margin. 0 ~ 9
The specificat i on i s 2 ±2 mm. See
“Replacement and Adjustment - C opy
-1000 ~ -2500
1 V/step
- 1750 V
1 mm/step
3.0 mm
1 mm/step
2.0 mm
Image Adjustm ent s” for details.
22
Page 26

9 May 1997 SERVICE PROGRAM MODE TABLE
Mode No.
Class
1 and 2
2-101 *
2-103 *
2-106*
2-201 *
Class 3
3
4
Left Side
Edge Erase
Margin
(Printing)
Right Side
Edge Erase
Margin
(Printing)
LD Power
Adjustment
ID Adjustment
for a Test
Pattern
Development
Bias
Adjustment
Adjusts the left si de erase margin. 0 ~ 9
The specificat i on i s 2 ±1.5 mm. See
“Replacement and Adjustment - C opy
Image Adjustm ent s” for details.
Adjusts the right side erase margin. 0 ~ 9
The specificat i on i s 2 ±1.5 mm. See
“Replacement and Adjustment - C opy
Image Adjustm ent s” for details.
Adjusts the LD power. -128 ~ +127
Do not change the value.
Adjusts the image density level for black
pixels on test patt er n pr i nt out s (made with
SP5-902).
Adjusts the development bias during
copying.
This can be adjusted as a tempora ry
Function Settings
1 mm/step
2.0 mm
1 mm/step
2.0 mm
1 µW/step
- 103
0 ~ 255
1/step
255
-500 ~ -700
1 V/step
- 600 V
measure if faint copies appear due to a n
aging drum.
0: 50 copies
1: 20 copies
0: -2
µΑ
1: 0 µA
2: +2 µA
3: +4 µA
2-213*
2-220 *
Number of
Copies After
Toner Near
End Detection
VT Display Displays the TD se nsor output voltage .
Selects the number of copies after toner
near-end has been detected.
Press the key to exit the display.
Transfer
Current
1
Adjustment
(Paper Tray)
Adjusts the current applied to the transfer
roller during pr i nt i ng from the paper tr ay.
If the user uses thicker paper, the current
may have to be inc re ased to ensure
sufficient transfer of toner.
Adjusts the current applied to the transfer
roller during pr i nt i ng from the by-pass
feed table.
If the user uses thicker paper, the current
may have to be inc re ased to ensure
0: -2
µΑ
1: 0 µA
2: +2 µA
3: +4 µA
2-301 *
2
Transfer
Current
Adjustment
(By-pass
Feed Table)
sufficient transfer of toner.
3
Transfer
Current
Adjustment
(Duplex)
Adjusts the current applied to the transfer
roller during pr i nt i ng from the duplex t ray.
If the user uses thicker paper, the current
may have to be inc re ased to ensure
0: -2
µΑ
1: 0 µA
2: +2 µA
3: +4 µA
sufficient transfer of toner.
4
Transfer
Current
Adjustment
(Cleaning)
Adjusts the current applied to the transfer
roller during r ol l er cleaning.
If toner remai n s on the roller after
cleaning, inc rease the current .
-10 ~ 0
1 µA/step
- 4 µA
A224
Copier
23
Page 27

SERVICE PROGRAM MODE TABLE 9 May 1997
Mode No.
Class
1 and 2
2-801
Class 3
TD Sensor
Initial Setting
Performs the TD sensor initial setting.
This SP mode controls the voltage
applied to the TD sensor to make the TD
sensor output ab out 2. 0 V.
Function Settings
0: No
1: Yes
After installing a new PCU, the machine
performs this function automatically.
Do not use this SP mode.
2-901*
2-902*
2-903* 1
Separation
Voltage
Adjustment
1
(Front side leading edg e)
Separation
Voltage
Adjustment
2
(Front side other ar eas)
Separation
Voltage
Adjustment
(Rear side leading edg e)
3
Separation
Voltage
Adjustment
(Rear side other ar eas)
4
FCI
Smoothing
(Letter Mode)
LD PWM
Laser Pulse
Positioning
(Independent
Pixels)
Adjusts the discharge brush voltage at the
leading edge on the front side.
Increase if the pa per i s get t i ng w r apped
around the drum.
Adjusts the discharge brush voltage on
the front side exc ept at the leading edge.
Adjusts the discharge brush voltage at the
leading edge on the rear side.
For the rear side in duplex mode, higher
voltage is needed. The paper has more
static on it, and there is toner on one side
of the paper.
Adjusts the discharge voltage on the rear
side except at the leading edge.
Selects whether the FC I sm oot hi ng
function to remove jagged edges is
enabled or disabled (this adjustment does
not affect fax mode)
Selects the laser pul se positioning type
that is used for independent black or gray
pixels (white pi xel s to left and right) .
Item 3 is not used.
-1000 ~ -4000
(A193)
-1200~-4000
(A224)
1 V/step
- 1800 V
-1000 ~ -4000
(A193)
-1200~-4000
(A224)
1 V/step
- 1800 V
-1000 ~ -4000
(A193)
-1200~-4000
(A224)
1 V/step
- 2500 V
(A193)
- 2100V
(A224)
-1000 ~ -4000
(A193)
-1200~-4000
(A224)
1 V/step
- 2500 V
(A193)
- 2100V
(A224)
0: No
(Disabled)
1: Yes
(Enabled)
0: Center
1: Right
2: Left
3:
Concentrated
24
Page 28

9 May 1997 SERVICE PROGRAM MODE TABLE
Mode No.
Class
1 and 2
2-903*
2-904*
2-905
2-907*
Class 3
LD PWM
Laser Pulse
2
Positioning
(Left Edge)
LD PWM
Laser Pulse
Positioning
3
(Right Edge)
LD PWM
Laser Pulse
Positioning
4
(Continuous)
ID Adjustment
- Binary
Processing
1
Mode
(Independent
pixel)
ID Adjustment
- Binary
2
Processing
Mode
(Left Edge)
ID Adjustment
- Binary
3
Processing
Mode
(Right Edge)
ID Adjustment
- Binary
4
Processing
Mode
(Continuous)
The threshol d value for binary picture mode is se t wi t h SP 4-418. The SP2-904
settings determine how black t he bl ack pixels are.
Gradation
Type
Laser Pulse
Positioning
Selects the laser pul se positioning type
that is used for the the leftmost pixel of a
series of black or gr ay pi xels.
Item 3 is not used.
Selects the laser pul se positioning type
that is used for the rightmost pixel of a
series of black or gr ay pi xels.
Item 3 is not used.
Selects the laser pul se positioning type
that is used for pixels in the middle of a
series of black or gr ay pi xels.
Item 3 is not used.
Density of independent black or gray
pixels in bina ry processing mode ( w hi t e
pixels to left and right).
Density of the left m ost pi xel of a series of
black or gray pixels in binary pro cessing
mode.
Density of the right m o st pixel of a series
of black or gray pixels in binary
processing m ode.
Density of pixel s in t he m i ddle of a series
of black or gray pixels in binary
processing m ode.
This is for the desi gner’s test purposes.
Do not change the value.
Selects the laser pul se position type that
is used for test patt er n printouts (print ed
with SP5-902).
Item 3 is not used.
Function Settings
0: Center
1: Right
2: Left
3:
Concentrated
0: Center
1: Right
2: Left
3:
Concentrated
0: Center
1: Right
2: Left
3:
Concentrated
0 ~ 255
1/step
128
0 ~ 255
1/step
128
0 ~ 255
1/step
255
0 ~ 255
1 / step
255
0: Center
1: Left
2: Right
3:
Concentrated
A224
Copier
25
Page 29

SERVICE PROGRAM MODE TABLE 9 May 1997
Mode No.
Class
1 and 2
Class 3
Forced Toner
Supply
Forces the toner bot t l e to supply toner to
the toner supply unit for 1.5 minutes.
Function Settings
0: No
1: Yes
Toner supply finishes automa tically after
2-908
1.5 minutes. Thi s process is not normally
needed in the fiel d for this model , as the
machine can handle most cases wh er e
toner runs shor t tem porarily.
0: No
1: Yes
0: No
1: Yes
0: Darker
1: Dark
2: Normal
(A224)
3: Light
(A193)
4: Lighter
2-909
2-910
2-911*
Forced
Charge Roller
Cleaning
Forced
Transfer
Roller
Cleaning
Image Densi ty
Selection
Forces charge roller cleaning.
After selecting “ 1", pr ess Enter or to
to stop.
start this feature. Pre ss
Forces transfer roller cleaning.
After selecting “ 1", pr ess Enter or to
to stop.
start this feature. Pre ss
Selects the humi di t y coefficients for
determining V
sensor initial set t i ng output.
TREF
and VTE from the TD
This setting can b e adj usted by the key
operator to make image density l i ghter or
darker (see Replacement and Adjustment
- Image Density Adj ustment by Key
Operator).
Corrects the cha rge roller temperature. -5 ~ +5
Do not use this SP mod e unnecessarily
(i.e., unless it is impossible to cure dirty
backgrouund by any other means).
Selects whether or not the TD sensor
initial setting process is performed
automatically at installation.
1 (25V)/ step
0 (A193)
2 (A224)
0: No
1: Yes
Select “No” if the PCU detection
2-912*
2-913*
Charge Roller
Temperature
Correction
Auto TD
Sensor Initial
Setting Mode
mechanism has a problem. However,
usually do not use this SP mode.
1 ~ 4
1/Step
2
2-916*
Printer γ Table
(GAVD)
Selection
Selects the printer γ table (GAVD) type.
This SP mode is only effective in the
grayscale processing mode.
A larger value gives a darker image.
Displays the hu m i di t y sensor output data
in hex code as %Rh.
Displays the TD sensor control val ue
(V
factory. The mac h in e normally uses t hi s
value, unless SP 2 -9 99 i s changed away
from 0.
), which was adjusted in the
CONT
2-980
2-995* 1
Humidity
Sensor Output
Display
TD Sensor
Control Value
Display
(Factory)
26
Page 30

9 May 1997 SERVICE PROGRAM MODE TABLE
Mode No.
Class
1 and 2
Class 3
2-995* 2
Factory
V
CONT
Counter
Displays what the total counter value was
when the TD sensor control value was
adjusted in the fact or y.
When V
CONT
Function Settings
is adjusted at the factory,
the counter is automatically set at
“9999999".
80 ~ 170
1/step
140 (A193)
120 (A224)
2-996*
TD Sensor
Control Value
Setting
1
Inputs the TD senso r control value
CONT
)
voltage is out of
CONT
(V
If the V
specification after replaci ng t he I O C SS
board, adjust V
using this SP mode.
CONT
After changing thi s value, SP2-999 should
be set at “1". See ”Re pl acement and
Adjustment - IOCSS Board".
2-997*
2-998*
Manual
2
V
Counter
TD Sensor
Control Value
1
Display
(Installation)
Installation
2
V
Counter
Printer Main
Scan
Magnification
CONT
CONT
Displays what the total counter value was
when the TD sensor control value was
adjusted in the fi el d.
Displays the TD sensor control val ue
(V
) which was adjusted at
CONT
installation. The machine uses this value
only if SP 2-999 is set to 2.
Displays what the total counter value was
when the TD sensor control value was
adjusted at machine installat i on.
Adjusts the magnification in the main scan
direction for th e pr i nter.
Use the
•/∗
key to toggle between + and -.
- 0.5 ~ + 0.5
0.1%/step
0.0 %
The specification is ± 1%. See
“Replacement and Adjustment - C opy
Image Adjustm ent s” for details.
0: Factory
1: Manual
2: Installation
Never select 2.
2-999*
TD Sensor
Control Value
Selection
Selects the TD sensor control voltage
If the V
value is out of spec i fication
CONT
after replacing the IOC SS board, this
value should be changed to “1" after
inputting the correct value with SP 2-996.
See ”Replacement and Adjustment IOCSS Board".
4-008 *
Main Scan
Magnification
(Scanning)
Adjusts the magnification in the main scan
direction for scanning.
Use the
•/∗
key to toggle between + and -.
- 1.0 ~ + 1.0
0.5 %/st ep
+ 0.0 %
See “Replacement and Adjustment Copy Image Adjus tm ents” for details .
A224
Copier
27
Page 31

SERVICE PROGRAM MODE TABLE 9 May 1997
Mode No.
Class
1 and 2
4-010 *
Class 3
Leading Edge
Registrati on
(Scanning)
Adjusts the leading edge registr at i on f or
scanning.
(-): The image moves in the direction of
the leading edge
Use the
•/∗
Function Settings
- 2.0 ~ + 9.0
0.5 mm/s t ep
+ 0.0 mm
key to toggle between + and -.
See “Replacement and Adjustment Copy Image Adjus tm ents” for details .
Side-to-side
Registration
(Scanning)
4-011 *
Adjusts the side - t o-side re gi strati on for
scanning.
(-): The image d i sappears at the left s ide.
(+): The image appears.
Use the
•/∗
key to toggle between + and -.
- 6.0 ~ + 6.0
0.1 mm/s t ep
+ 0.0 mm
See “Replacement and Adjustment Copy Image Adjus tm ents” for details .
Leading Edge
Erase Margin
1
(Scanning)
Adjusts the leading edge margin f or
scanning.
Do not adjust this u nl ess the user wishes
0.0 ~ 9.0
0.1 mm/s t ep
1.0 mm
to have a scanner m argin that is greater
than the printer m argin.
4-012 *
4-013
Trailing Edge
2
Erase Margin
(Scanning)
Left Side
3
Erase Margin
(Scanning)
Right Side
4
Erase Margin
(Scanning)
Scanner Free
Run
Adjusts the trailing edge margin for
scanning.
See the comment for SP 4- 012-1.
Adjusts the left side margin for scanning. 0.0 ~ 9.0
See the comment for SP 4- 012-1.
Adjusts the righ t side margin for scanning. 0.0 ~ 9.0
See the comment for SP 4- 012-1.
Performs a scanner free run with the
exposure lamp on.
After selecting “ 1", pr ess Enter or
twice to start this feature. Press
to
0.0 ~ 9.0
0.1 mm/s t ep
1.0 mm
0.1 mm/s t ep
1.0 mm
0.1 mm/s t ep
1.0 mm
0: No
1: Yes
stop.
White Plate
Scanning
1
Start Position
Adjusts the scan ning start positio n on t he
white plate for aut o shading.
The default is 6 m m fr om th e l eading
- 3.0 ~ + 6.0
0.5 mm/s t ep
0 mm
edge. The setting specifies how f ar
scanning star ts from the default posi t i on.
4-015*
2
White Plate
Scanning
Area
Adjusts the width of the area on the white
plate (in the sub scan direction) that is
scanned for auto shading.
The default is 5 m m (f or 41 - 400%
- 3.0 ~ + 6.0
0.5 mm/s t ep
0 mm
reproduction r at i os) or 6.5 mm (25 - 40% ).
The current setting specifies the
difference from these defaults.
28
Page 32

9 May 1997 SERVICE PROGRAM MODE TABLE
Mode No.
Class
1 and 2
4-101*
Class 3
Sub Scan
Magnifica tion
(Scanning:
Book Mode)
Adjusts the magni f i cation in the sub scan
direction for scanning.
If this value is cha nged, the scanner
motor speed is changed.
Use the
•/∗
Function Settings
- 1.0 ~ + 1.0
0.5 %/st ep
+ 0.0 %
key to toggle between + and -.
See “Replacement and Adjustment Copy Image Adjus tm ents” for details .
4-301
4-303 *
APS and
Platen/DF
Sensor Output
Display
APS Small
Size Original
Detection
Displays the status of the APS sensors
and platen/DF cover sensor.
See “APS and Platen/DF Sensor Output
Display” after the SP mode table.
Selects whether or not the copier
determines th at the o riginal is A5 size
when the APS sensor does not de te ct the
size.
If “A5 lengthwise” is selected, paper sizes
0: No
(Not detected)
1: Yes
(A5
lengthwise)
that cannot be detected by the APS
sensors are regarded as A5 lengthwise.
If “Not detected” i s sel ected, “Origin a l
size” will be displayed.
Japanese version only.
Do not change the value
Japanese version only.
Do not change the value
Selects whether binary picture processing
or grayscale processing mode i s done.
.
.
For example, if binary processing mode is
selected, all image processing is handled
using binary p i ct ur e pr ocessing mode .
Note that memory copying always uses
0: No
(Grayscale
processing)
1: Yes
(Binary
processing)
4-401*
4-402*
4-403*
Binary
Processing
Mode
(Neg./Pos.)
Binary
Processing
Mode
(Marker Mode)
Gradation
Processing
Mode for
One-to-one
Copying
binary pictur e pr ocessing, regar dl ess of
this setting.
4-406*
4-407* 1
Marker
Detection
MTF Filter
Selection in
Letter Mode
(25% ~ 64%)
Japanese version only.
Do not change the value
Selects the MTF filter level for Letter
mode. A stronger fi l ter gives sharper l i nes.
.
For how to adjust, refer to “Detailed
Descriptions - Filtering and Main Scan
Magnification/Reduction”.
0 ~ 11
1/step
4
Never select “1".
A224
Copier
29
Page 33

SERVICE PROGRAM MODE TABLE 9 May 1997
Mode No.
Class
1 and 2
Class 3
2
MTF Filter
Selection in
Letter Mode
(65% ~ 154%)
Selects the MTF filter level for Letter
mode. A stronger fi l ter gives sharper l i nes.
For how to adjust, refer to “Detailed
Descriptions - Filtering and Main Scan
Function Settings
0 ~ 11
1/step
7
Magnification/Reduction”.
Never select “1".
MTF Filter
Selection in
Letter Mode
3
(155% ~2 56%)
Selects the MTF filter level for Letter
mode. A stronger fi l ter gives sharper l i nes.
For how to adjust, refer to “Detailed
Descriptions - Filtering and Main Scan
0 ~ 11
1/step
3
Magnification/Reduction”.
Never select “1".
4
MTF Filter
Selection in
Letter Mode
(257% ~
400%)
Selects the MTF filter level for Letter
mode. A stronger fi l ter gives sharper l i nes.
For how to adjust, refer to “Detailed
Descriptions - Filtering and Main Scan
Magnification/Reduction”.
0 ~ 11
1/step
10
Never select “1".
4-407*
5
Smoothing
Filter
Selection in
Photo Mode
Selects the smoot hi ng filter level for Phot o
mode. A stronger fi l ter gives a smoother
image.
For how to adjust, refer to “Detailed
0 ~ 8
1/step
3
Descriptions - Filtering and Main Scan
Magnification/Reduction”.
Never select “1".
0 ~ 11
1/step
2
6
MTF Filter
Selection in
Letter/Photo
Mode
Selects the MTF filter level for
Letter/Photo mode . A stro nger filter gives
sharper lines.
For how to adjust, refer to “Detailed
Descriptions - Filtering and Main Scan
Magnification/Reduction”.
Never select “1".
MTF Filter
7
Selection in
Marker Mode
MTF Filter
Selection in
Letter Mode Binary picture
8
mode
(25% ~ 83 %)
Japanese version only.
Selects the MTF filter level for Letter
mode (binary pi ct ur e mode). A stronge r
filter gives sha rper lines.
For how to adjust, refer to “Detailed
Descriptions - Filtering and Main Scan
Magnification/Reduction”.
0 ~ 11
1/step
0
Never select “1".
30
Page 34

9 May 1997 SERVICE PROGRAM MODE TABLE
Mode No.
Class
1 and 2
4-407* 9
Class 3
MTF Filter
Selection in
Letter Mode Binary picture
mode
(84% ~ 400 %)
Selects the MTF filter level for Letter
mode (binary pi ct ur e mode). A stronge r
filter gives sha rper lines.
For how to adjust, refer to “Detailed
Descriptions - Filtering and Main Scan
Magnification/Reduction”.
Function Settings
0 ~ 11
1/step
4
Never select “1".
4-410*
4-412*
AGC Default
Setting
Video Data
Path
Not used - 5 ~ 2
Do not change the value.
Selects one of the following video data outputs, which will
be used for printing.
0. Normal video processing
1. After auto shading processing
2. After MTF proce ssi ng
3. After gamma correction
4. Data straight through (no video processing)
1/step
0
Do not change the value.
IPU Test
Pattern Print
4-417
Prints the test pattern f or the IPU or selects one of the
following video data outputs for printing.
0. No Print
1. Grayscale 1
2. Grayscale 2
3. Vertical Bands
4. Vert i cal Line - 1 do t
5. Vert i cal Line - 2 do t
6. Grid Pattern
Change to the cop y m ode display by pres si ng the
“Interrupt” key, th en pr i nt the test pattern.
4-418*
4-419*
Threshold
1
Level in Le t ter
Mode
Threshold
Level in
2
Letter/Photo
Mode
Threshold
Level for
1
Marker Mode
(Main scan
magnification)
Threshold
Level for
2
Marker Mode
(Sub scan
magnification)
Selects the threshold level for Letter
Mode
- Binary picture processing mode
Selects the threshold level for
Letter/Photo Mode -
Binary picture
processing m ode
Japanese version only.
0 ~ 255
1/step
48
0 ~ 255
1/step
240
A224
Copier
31
Page 35

SERVICE PROGRAM MODE TABLE 9 May 1997
Mode No.
Class
1 and 2
4-421*
4-902
4-904*
Class 3
1
2
Dither Pattern
Selection
(Grayscale
Mode/Photo
Mode)
Dither Pattern
Selection
(Binary
Picture/Photo
Mode)
Exposure
Lamp On
SBU Gain
Adjustment
Selects the dit her pattern used in
grayscale processing mode.
A greater number of lines gives a more
detailed copy. If the value is changed, the
UP mode setting is also changed.
Selects the dit her pattern used in binary
picture process i ng m o de.
A greater number of lines gives a more
detailed copy. If the value is changed, the
UP mode setting is also changed.
Turns on the exposure lamp.
To turn off the expos ur e l am p , sel ect “0".
Adjusts the coeffi ci ent of the D/A
converter for th e st andard AGC gain curv e
Do not adjust this value.
performing the m emory all clear
Function Settings
0: 180-line
1: 140-line
2: 95-line
0: 140-line
1: 95-line
2: 70-line
0: No (Off)
1: Yes (On)
0 ~ 255
1/step
However, after
30
(SP5-801), use it to re- i nput the previous
value.
0 ~ 255
1/step
30
4-905*
SBU DC
Count
Adjustment
Adjusts the coeffi ci ent of the D/A
converter for th e AG C gai n curve for dc
count.
Do not adjust this value.
However, after
performing the m emory all clear
(SP5-801), use it to re- i nput the previous
value.
4-906*
SBU
Reference
Value
Adjustment
Adjusts the coeffi ci ent of the D/A
converter for th e AG C gai n curve for
scanning the whi t e pl at e.
Do not adjust this value.
However, after
0 ~ 255
1/step
147
performing the m emory all clear
(SP5-801), use it to re- i nput the previous
value.
SBU Offset
Value
Adjustment
4-907*
Adjusts the coeffi ci ent of the D/A
converter for the offset (Z/C) for the
analog image dat a processing
Do not adjust this value.
However, after
0 ~ 255
1/step
180
performing the m emory all clear
(SP5-801), use it to re- i nput the previous
value.
0: Normal
operation
1: Start the
adjustment
4-908*
SBU Auto
Adjustment
Performs the auto scanner adjustment.
Using this SP mode after replacing the
white plate or the memory on the BICU
board. See “Replacement and Adjustment
- Standard White L evel” for details on how
to do this.
4-909*
EDU Test
Mode
Japanese version only.
Do not change the value.
32
Page 36

9 May 1997 SERVICE PROGRAM MODE TABLE
Mode No.
Class
1 and 2
4-910*
Class 3
Scanner
Motor Control
Method
Selects the scan ner m otor control method.
If “1" is selected, th e cur rent for the
scanner motor will be reduced and jitter
Function Settings
0: Normal
1: Special
copy image problems will be alleviated.
However, copy speed will be reduced.
4-912*
4-913*
White Level
1
Value Display
(Current)
White Level
2
Value Display
(Factory)
Shading
Interval Time
in DF Mode
Displays the current white level value.
Displays the white level value for the
white plate scanned at the factory.
Adjusts the interval for shading
processing in D F m ode.
Light and heat may affect the scanner
0 ~ 60
1 s/step
30 s
response. If copy quality indica t es t hat
white level is drifting during a DF copy
job, reduce this setting.
4-914 Mirroring Test
4-915*
4-998*
Image Data
Through Mode
MTF Filter
Selection in
Letter Mode -
1
Binary Picture
Mode for
Notch1
MTF Filter
Selection in
Letter Mode -
2
Binary Picture
Mode for
Notch 2
MTF Filter
Selection in
Letter Mode -
3
Binary Picture
Mode for
Notch 3
These SP modes are for designer use.
Do not change the values.
Selects the MTF filter level for Letter
mode (binary picture mode) at notch 1
image density level. A stronger filt er gi ves
a sharper line.
Never select 1.
Selects the MTF filter level for Letter
mode (binary picture mode) at notch 2
image density level. A stronger filt er gi ves
a sharper line.
Never select 1.
Selects the MTF filter level for Letter
mode (binary picture mode) at notch 3
image density level. A stronger filt er gi ves
a sharper line.
Never select 1.
0 ~ 11
1/step
0
0 ~ 11
1/step
0
0 ~ 11
1/step
9
A224
Copier
33
Page 37

SERVICE PROGRAM MODE TABLE 9 May 1997
Mode No.
Class
1 and 2
4-998*
4-999*
Class 3
4
5
6
7
1
2
3
MTF Filter
Selection in
Letter Mode Binary Picture
Mode for
Notch 4
MTF Filter
Selection in
Letter Mode Binary Picture
Mode for
Notch 5
MTF Filter
Selection in
Letter Mode Binary Picture
Mode for
Notch 6
MTF Filter
Selection in
Letter Mode Binary Picture
Mode for
Notch 7
Threshold
Level in Le t ter
Mode - Binary
Pictur e M od e
for Notch 1
Threshold
Level in Le t ter
Mode - Binary
Pictur e M od e
for Notch 2
Threshold
Level in Le t ter
Mode - Binary
Pictur e M od e
for Notch 3
Selects the MTF filter level for Letter
mode (binary picture mode) at notch 4
image density level. A stronger filt er gi ves
a sharper line.
Never select 1.
Selects the MTF filter level for Letter
mode (binary picture mode) at notch 5
image density level. A stronger filt er gi ves
a sharper line.
Never select 1.
Selects the MTF filter level for Letter
mode (binary picture mode) at notch 6
image density level. A stronger filt er gi ves
a sharper line.
Never select 1.
Selects the MTF filter level for Letter
mode (binary picture mode) at notch 7
image density level. A stronger filt er gi ves
a sharper line.
Never select 1.
Selects the threshold level for Letter
mode (binary picture mode) at notch 1
image density level.
Selects the threshold level for Letter
mode (binary picture mode) at notch 2
image density level.
Selects the threshold level for Letter
mode (binary picture mode) at notch 3
image density level.
Function Settings
0 ~ 11
1/step
9
0 ~ 11
1/step
2
0 ~ 11
1/step
2
0 ~ 11
1/step
2
0 ~ 255
1/step
45
0 ~ 255
1/step
50
0 ~ 255
1/step
40
34
Page 38

9 May 1997 SERVICE PROGRAM MODE TABLE
Mode No.
Class
1 and 2
4-999*
5-001*
5-103*
5-104 *
Class 3
4
5
6
7
Threshold
Level in Le t ter
Mode - Binary
Pictur e M od e
for Notch 4
Threshold
Level in Le t ter
Mode - Binary
Pictur e M od e
for Notch 5
Threshold
Level in Le t ter
Mode - Binary
Pictur e M od e
for Notch 6
Threshold
Level in Le t ter
Mode - Binary
Pictur e M od e
for Notch 7
All IndicatorsOnTurns on all indicators on the operat i on
Selects the threshold level for Letter
mode (binary picture mode) at notch 4
image density level.
Selects the threshold level for Letter
mode (binary picture mode) at notch 5
image density level.
Selects the threshold level for Letter
mode (binary picture mode) at notch 6
image density level.
Selects the threshold level for Letter
mode (binary picture mode) at notch 7
image density level.
panel.
Press to check.
Press
Auto Paper
Tray Shift
A3/11"x17"
Double Count
Selects whether auto paper tray shift is
done or not.
Specifies whether the counter is dou bl ed
for A3/11"x17" pa per .
If “YES” is selected, the total counter
(mechanical counter) and the current user
Function Settings
0 ~ 255
1/step
45
0 ~ 255
1/step
30
0 ~ 255
1/step
30
0 ~ 255
1/step
30
to exit this SP mode.
0: No
1: Yes
No
Yes
code counter counts up twice when
A3/11"x17" paper is used.
5-106 *
5-113*
5-116*
ADS Level
Selection
Option
Counter Type
Total Counter
Up Timing
Selects the image density level that is
used in ADS mode.
Selects the opti onal counter type.
When the optio nal key counter is
installed, this value should be set at “1".
The values ”2","3", and “4" are used
for the Japanese version only.
Determines whether the total counter
counts up at paper fee d-in or at paper exit.
1 ~ 7
1 notch/ step
4
0: No counter
1: Key Counter
2: Key Card
3: Coin Lock 1
4: Coin Lock 2
0: Feed-in
1: Exit
A224
Copier
35
Page 39

SERVICE PROGRAM MODE TABLE 9 May 1997
Mode No.
Class
1 and 2
Class 3
1
User Code
Mode
(Copier)
Selects whether the user code function is
enabled in copy mode or not.
If this value is changed, the UP mode
Function Settings
0: No
1: Yes
setting is also changed.
0: No
1: Yes
5-401*
2
User Code
Mode
(Fax)
Selects whether the user code function is
enabled in facsi mile mode or not .
If this value is changed, the UP mode
setting is also changed.
3
User Code
Mode
(Printer)
Selects whether the user code function is
enabled in printer mode or not.
If this value is changed, the UP mode
0: No
1: Yes
setting is also changed.
PM Alarm
Interval
1
Sets the PM interval, wit h an alarm. The
Auto Service Call feature of the fax option
also refers to this setting.
0 ~ 255
1k copies/step
100 k copies
When the setting is “0", this function is
5-501 *
5-504*
5-507*
5-508*
5-801
PM Alarm Selects whether the PM alarm is enabled
2
PM Alarm
3
(Original)
PM Alarm
(Jam Alarm)
PM Alarm
1
(Copy Size)
PM Alarm
2
(Staple)
PM Alarm
3
(Toner End)
CE Call
1
(Jam Lev el 1)
CE Call
2
(Jam Lev el 2)
CE Call
3
(Door Open)
Memory All
Clear
disabled.
or not. If this is “0", the Auto Service Call
feature of the fax o pt i on i s also disabled.
Japanese version only.
Do not change the value.
Japanese version only.
Do not change the value.
Japanese version only.
Do not change the value.
Japanese version only.
Do not change the value.
Resets all software counters. Also,
returns all modes and adjustments to the
default setting s.
See the “MEMORY ALL C LEAR” section
for how to use this SP mode correctly.
Normally, this SP mode should not be
0: No
1: Yes
used.
It is used only after replacing the NVRAM,
or when the copier malfunctions due to a
damaged NVRAM.
36
Page 40

9 May 1997 SERVICE PROGRAM MODE TABLE
Mode No.
Class
1 and 2
5-802
5-803
5-804
5-808*
5-810
5-812 *
Class 3
1
2
3
Free Run Performs a free run for both the scanner
and the printer.
To perform the free run, press 1 then
twice. Press
press
Input Check Displays the signals rece ived from
sensors and swit ches.
See the “INPUT CHECK” section for
details.
Press
Output Check Turns on the electrical components
individuall y fo r t est pur poses.
See the “OUTPUT CHECK” section for
details.
Display
Language
(115V
machines)
Display
Language
(230V
machines Standard)
Display
Language
(230V
machines Option)
SC Code
Reset
Service
Telephone
Number
Selects the display language for 115V
machines.
Selects the standard display language for
230V machines.
Selects the opti on display language for
230V machines.
Resets Type A service call conditions.
After performing this SP mode, turn the
machine main switch off and on. See
“Troubleshoot i ng - Se rv ice C al l
Conditions” fo r how to use this mode .
Use this to input the t el ephone number of
the service repr esentative (this i s
displayed when a service call condition
occurs).
to exit the program.
Press the “•/#” key if you need to input a
Function Settings
0: No
1: Yes
to stop.
0: English
1: French
2: Spanish
0: English
1: German
2: Dutch
3: French
4: Italian
5: Spanish
0: English
1: German
2: Dutch
3: Swedish
4: Norwegian
5: Danish
0: No
1: Yes
pause ().
key to delete the
Press the
telephone number.
5-816*
5-817
CSS Function
1 CE Start Call
CE Finish Call
2
Japanese version only.
Do not change the value.
Japanese version only.
Do not change the value.
A224
Copier
37
Page 41

SERVICE PROGRAM MODE TABLE 9 May 1997
Mode No.
Class
1 and 2
5-901
5-902
Class 3
Printer Free
Run
Test Pattern
Printouts
Performs the printer free run.
To perform the free run, press 1 then
twice. Press
press
Prints the test pattern.
See the “TEST PATTERN PRINTING”
section for how to pri nt a test pattern.
Change to the cop y m ode display by
Function Settings
0: No
1: Yes
to stop.
pressing the “In te rr upt” key, then prin t ou t
the tes t pattern.
5-903*
LCD Contrast
Adjustment
Adjusts the contr ast fo r t he LC D on the
operation pan el .
Use the “Zoom” ( + or -) key to change the
1 ~ 7
1/step
3
contrast.
5-904*
5-905*
Auto Shut-off
Mode Timer
Setting
CSS 25H Off
Detection
Exhaust Fan
Control Timer
Setting
Inputs the auto shut - of f m ode timer. 0 ~ 120
If “0" is selected, th e tim er function is
disabled.
Japanese version only.
Do not change the value.
Inputs the exhaust fan control timer in t h e
energy saver mode
This time is for e nt ering the exhaust fan
1 min/st ep
15 (A193)
30 (A224)
30 ~ 120
1 s / step
30
motor control mode after the fusing lamp
5-906*
off or the main motor turns off. Until this
timer expires, th e exhaust fan stays on.
Then the fan turn s of f an d on i n
accordance wit h the fan control mode
algorithm.
Brand Name
and Product
Name Setting
5-907
Selects the brand name and the pro duct
name for the Plug and Pl ay f unction of
Windows 95.
The brand name and the product name
for the Plug and Play fun ct ion are
registered in the NVRAM. If the NVRAM
is defective, the se names should b e
registered agai n after replacing the
NVRAM.
Press down the “Ph ot o mode” key and
the
key at the same time to register
the setting.
0: No
1: Yes
5-911*
APS A4/LT
Sideways
Priority
Specifies whether the machine sel ects LT
sideways paper if the original is A4.
If “Yes” is selected, LT sideways is
selected automatically when t he APS
sensors detect an A4 sideways original.
This fe ature doe s not work in reverse (A 4
sideways pape r is not selected for an LT
sideways original).
38
Page 42

9 May 1997 SERVICE PROGRAM MODE TABLE
Mode No.
Class
1 and 2
5-912*
Class 3
1
PCU Alarm
Interval
Inputs the PCU alarm i nt erval.
When the machi ne reaches the value,
“Change Photoconductor Unit” will be
Function Settings
1 ~ 255
1 k / Step
45 k
displayed on the LC D t o i nf orm the user.
5-913
5-930*
PCU Alarm
2
Mode
User Program
(UP) Mode
Data Reset
Fax
Forwarding
Mode
Selects whether the PC U al ar m fun ct i on
is performed or not .
Resets the UP mode data to the defaul ts ,
except for the user codes, counters for
each user code, and restricted access
features.
Selects whether the fax mode application
key is accepted or not i n th e SC condition.
When an SC condition occurs while
incoming data has been stored in the SAF
memory, change the value to “1" to
0: No
1: Yes
0: No
1: Yes
0: No
1: Yes
access fax mode. Then forward the
incoming data to another fax machine by
using the fax mode bit switches.
0: No
1: Yes
5-932
Program
Download
Downloads the syst em program from a
ROM board to the Fl ash Memory on the
BICU board. (Copier mode software only)
See “Service Tables - Program
Download” for details.
This SP can be operated w hen the ROM
.
0: Yes
1: No
5-940*
Image
Rota tion Mode
board is installed in the machine
Selects whether the image rotation
function is performed or not.
If there is a proble m wit h t he MSU, image
rotation may lead to abnor m al copies. I f
so, disable image rotation while waiting
for new parts.
0: Back side
1: Front side
0: MH
1: MR
2: MMR
0: No
1: Yes
5-941*
5-942*
Duplex Blank
Page
Image
Compression
Method
Charge Roller
H.P Detection
Selects whether the blank page is made
on the front side or back side when
duplex copy mode is selected.
Selects the ima ge compression met h od
for memory mode copying.
Selects whether the charge roller h om e
position is detected or not.
Do not use in the field, except in the
following case.
5-943*
5-944*
APS Mode Selects whether th e APS mo de is
If the power goes off during TD sensor
initialization, the charge roller is in contact
with the PCU, so the PCU cannot be
removed. Set SP 5-943 to 1, and the
roller goes back to home positio n.
selected as power-up default or not.
0: No
1: Yes
A224
Copier
39
Page 43

SERVICE PROGRAM MODE TABLE 9 May 1997
Mode No.
Class
1 and 2
5-945*
5-946*
Class 3
Memory Copy
Priority
Auto Shut-off
Mode
Disabling
when there is
paper in the
1-bin sorter
Selects whether or not the memory copy
mode is selected when the main switch is
turned on.
Selects whether the auto shut-off mode is
disabled or no t when there is paper in the
1-bin sorter.
When the machi ne enters the auto sh ut off mode while t her e i s paper in the 1-bin
sorter, the sorter paper indicator will go
Function Settings
0: No
1: Yes
0: No
1: Yes
off. If this is not acceptable, this SP mode
should be set at “1"
0: No (50% 400%)
1: Yes (25% 400%)
0: No (115V
Machine)
1: Yes (230V
machine)
5-947*
##
5-948*
##
Use of 25%
Reduction
Ratio in the
Photo and
Letter/Photo
Modes
AC Switch
Auto Shut Off
Determines wh ether a reduction ra tio of
25% can be used in the Photo and
Letter/Photo modes (binary pictu re mode).
Selects whether the ac switch auto
shut-off mode or not.
If at “1", the ac switch turns off
automatically when entering the auto shut
off mode.
5-991*
5-992
6-006 *
6-007*
VRAM Data
Download
System
Parameter
and Data List
Printing
ADF Side-to
1
Side
Registration
ADF Leading
2
Edge
Registration
ADF Trailing
3
Erase Margin
ADF
Sub-scan
Magnification
This SP mode is only used by the
designer.
Do not change the value.
Prints the machine status history d at a l i st .
See the “SYSTEM PARAMETER AND
DATA LISTS” section for how to print the
lists.
Adjusts the printing side-to-side
registration in the AD F m ode.
Use the
Adjusts the leading edge registr at i on i n
the ADF mode.
Use the
Adjusts the trailing edge erase margin in
ADF mode.
Use the
Adjusts the magni f i cation in the sub-s can
direction for ADF mode.
Use the
•/∗
key to toggle between + and -.
•/∗
key to toggle between + and -.
•/∗
key to toggle between + and -.
•/∗
key to toggle between + and -.
0: Off
1: On
0: No Print
1: SP mode
2: UP mode
3: Log data
-1.5 ~ +1.5
0.5 mm/step
+ 0.0 mm
-10 ~ +10
0.5 mm/step
+ 6.0 mm
-3.0 ~ +3.0
0.1 mm/step
+ 0.0 mm
- 4.0 ~ + 4.0
0.1 %/st ep
0.0 %
See “Replacement and Adjustment Copy Image Adjus tm ents” for details .
0: No
1: Yes
6-009
ADF Free Run Perform s an ADF free run.
To perform the free run, press 1 then
twice. Press
press
to stop.
40
Page 44

9 May 1997 SERVICE PROGRAM MODE TABLE
Mode No.
Class
1 and 2
6-010*
6-901
Class 3
Stamp
Position
Adjustment
ADF Original
Sensor Output
Display
Adjusts the stamp position in the
sub-scan direction in facsimile mode.
Displays the stat us of the original sensor
for the ADF and paper si ze.
See “DF APS Original Sensor Output
Function Settings
- 10 ~ + 10
1 mm/step
0 mm
Display” after the SP mode table.
0: Or iginal
1: Copy paper
size +
magnifica tion
6-902*
ADF Original
Scanning
Method
Selects the orig i nal scanning metho d i n
ADF mode.
A224
Copier
6-903*
6-904*
6-905*
6-906*
6-910
6-911
Original
Non-waiting
Start
Original
Scanning
Interval
ARDF Skew
Correction
ARDF Original
Buckle
Adjustment
ADF and
Printer Free
Run
Binding Hole
Range
Selects whether original non-waiting start
is performed or not .
If the user often feed s originals that sl i p,
and the leadin g edge is catching up wit h
the trailing edge of the previous page, set
this SP mode to No.
Adjusts the interval between originals in
original non-waiting start mode.
This SP mode is only effective when SP
6-903 is set at “1".
A224 only:
If the user wishes to use the
ARDF at the highest copy speed possible,
set SW1 on the ARDF mai n board to ’EX’,
and change SP 6-904 to - 85.
Selects whether the skew correcti on i s
done or not when the AR D F f eeds the
rear side of the original.
Adjusts the amount of original buckle at
the ARDF registr at i on r ol l er when the
ARDF starts to feed the rear side original.
This SP mode is only effective when SP
6-905 is at “0.”
Performs both an ADF an d pr i nt er fr ee
run .
To perform the free run, press 1 then
twice. Press
press
Selects the range for which binding holes
in originals ar e i gnored
to stop.
An original jam may occur when an
original with binding holes is fed, because
these holes are de t ected by t he sensors.
However, if using this SP mode, this can
be avoided. For example, when this value
is set at “12", the machine ignore s bi nding
holes within 12 mm of the leading edge
of the original.
0: No
1: Yes
30 ~ 50 (A193)
-110 ~ +110
(A224)
1 mm/step
40 mm (A193)
0 mm (A224)
0: Yes
1: No
10 ~ 40
1 mm/step
15 mm
0: No
1: Yes
0 ~ 20
1 mm/step
12 mm
41
Page 45

SERVICE PROGRAM MODE TABLE 9 May 1997
Mode No.
Class
1 and 2
7-001
Class 3
Total
Operation
Displays the tot al operation time (t ot al
drum rotatio n time).
Function Settings
Time Display
Total Original
1
Counter
Displays the tot al num ber of scanned
originals (copy + fax modes).
(Copy + Fax)
7-002*
Total Original
2
Counter
Displays the tot al num ber of scanned
originals (copy mode only).
(Copy
Total Original
3
Counter
Displays the tot al num ber of scanned
originals (fax mode only).
(Fax)
Displays the tot al num ber of copies (all
modes).
1
Total Copy
Counter
(All Modes)
7-003*
Total Copy
2
Counter
(Copy mode )
Total Copy
3
Counter
Displays the tot al num ber of copies (co py
mode only).
Displays the tot al num ber of copies (fax
mode only).
(Fax mode)
4
Total Copy
Counter
Displays the tot al num ber of copies
(printer mode only).
(Printer mode)
7-004*
CE Counter
Reset
Total Copies
1
by Paper Size
Japanese version only.
Do not change the value.
Displays the tot al num ber of copies by
paper size.
(A3)
Total Copies
2
by Paper Size
(B4)
Total Copies
3
by Paper Size
(A4)
7-101*
Total Copies
4
by Paper Size
(B5)
Total Copies
5
by Paper Size
(11" x 17")
Total Copies
6
by Paper Size
(8
“ x 14")
1/2
Total Copies
7
by Paper Size
(8
“ x 11")
1/2
42
Page 46

9 May 1997 SERVICE PROGRAM MODE TABLE
Mode No.
Class
1 and 2
7-101*
Class 3
8
9
Total Copies
by Paper Size
(8
1/2
“ x 5
1/2
”)
Total Copies
by Paper Size
Displays the tot al num ber of copies by
paper size.
Function Settings
(Other Size)
7-201*
Total Number
of Scans
Total Paper
Tray Counte r
1
(1st paper
Displays the tot al num ber of scanned
originals.
Displays the tot al num ber of copies fed
from each paper fe ed tray.
tray)
Total Paper
Tray Counte r
2
(2nd paper
tray)
Total Paper
Tray Counte r
3
(3rd paper
7-204*
tray)
Total Paper
Tray Counte r
4
(4th paper
tray)
Total Paper
5
Tray Counte r
(By-pass feed )
Total Paper
6
Tray Counte r
(Duplex tra y)
Total Paper
7 ##
Tray Counte r
(LCT)
7-205*
ADF Total
Counter
Displays the tot al num ber of original s f ed
by the ADF.
A224
Copier
43
Page 47

SERVICE PROGRAM MODE TABLE 9 May 1997
Mode No.
Class
1 and 2
7-301*
Class 3
1
2
3
4
5
6
7
8
Total Copies
by
Reproduction
Ratio (2 5% ~
49%)
Total Copies
by
Reproduction
Ratio (5 0% ~
99%)
Total Copies
by
Reproduction
Ratio (F ul l
size)
Total Copies
by
Reproduction
Ratio (1 01% ~
200%)
Total Copies
by
Reproduction
Ratio (2 01% ~
400%)
Total Copies
by
Reproduction
Ratio (Direct
Mag.)
Total Copies
by
Reproduction
Ratio (Direct
Size Mag.)
Total Copies
by
Reproduction
Ratio (Size
Mag.)
Displays the tot al num ber of copies by
reproduction r at i o.
Function Settings
44
Page 48

9 May 1997 SERVICE PROGRAM MODE TABLE
Mode No.
Class
1 and 2
7-303*
7-304*
7-401*
7-501*
7-502*
Class 3
1 ~ 23
24
25
26
27
1
2
3
4
5
6
7
Total Copies
by Image
Editing Mode
Total Copies
by Image
Editing Mode
(Memory Sort)
Total Copies
by Image
Editing Mode
(Combine)
Total Copies
by Image
Editing Mode
(Repeat Copy )
Total Copies
by Image
Editing Mode
(Erase Copy)
Total Copies
by Copy Mode
(Overlay)
Total Copies
by Copy Mode
(Letter)
Total Copies
by Copy Mode
(Letter/Photo)
Total Copies
by Copy Mode
(Photo)
Total Copies
by Copy Mode
(Duplex)
Total Copies
by Copy Mode
(ADF)
Total Copies
by Copy Mode
(Double-co py)
Total SC
Counter
Total Jam
Counter
(Copies +
Original)
Total Copy
Jam Counter
Japanese version only.
Displays the tot al num ber of copies by
image editing mode.
Displays the tot al num ber of copies by
copy mode.
Displays the tot al num ber of service ca l l s
that have occurred.
Displays the tot al num ber of copy jams
and original jams.
Displays the tot al num ber of copy jams .
Function Settings
A224
Copier
45
Page 49

SERVICE PROGRAM MODE TABLE 9 May 1997
Mode No.
Class
1 and 2
7-503*
Class 3
1
Total Original
Jam Counter
Total Jams by
Location
Displays the tot al num ber of original ja m s.
Displays the tot al copy paper jam
counters by location.
Function Settings
(A Jams)
Total Jams by
2
Location
(B Jams)
Total Jams by
3
Location
(C Jams)
Total Jams by
4
Location
(D Jams)
Total Jams by
5
Location
(R Jams)
Total Jams by
6 ##
Location
(U Jams)
Total Jams by
7
Location
7-504*
(W Jams)
Total Jams by
8
Location
(Y Jams)
Total Jams by
9
Location
(Z Jams)
Total Jams by
Location
10
(1st Paper
Tray)
Total Jams by
Location
11
(2nd Paper
Tray)
Total Jams by
Location
12
(3rd Paper
Tray)
Total Jams by
Location
13
(4th Paper
Tray)
46
Page 50

9 May 1997 SERVICE PROGRAM MODE TABLE
Mode No.
Class
1 and 2
7-504*
7-801
7-803*
7-804
Class 3
14
15 ##
1
2
3
4
5
6
7
8
9
Total Jams by
Location
(By-pass
Feed)
Total Jams by
Location
(Duplex Tray )
ROM/CPU
Version
(IOCSS)
ROM/CPU
Version
(BiCU)
ROM/CPU
Version
(Edit)
ROM/CPU
Version
(Duplex)
ROM/CPU
Version
(Fax Control)
ROM/CPU
Version
(Printer
Control)
ROM/CPU
Version
(ANITA)
ROM/CPU
Version
(Scanner
Control)
ROM/CPU
Version
(Stapler)
PM Counter
Display
PM Counter
Reset
Displays the tot al copy paper jam
counters by location.
Displays the ROM version.
NOTE:
Class 3 nos, 3, 7, and 8 are used only
for the Japan ese version.
Displays the PM cou nt er a fter th e l ast PM .
Resets the PM counter.
Press down the “Ph ot o mode” key and
the
key at the same time to reset the
Function Settings
0: No
1: Yes
counter.
0: No
1: Yes
7-807
SC/Jam
Counter Rese t
Resets the SC and jam counters.
Press down the “Ph ot o mode” key and
the
key at the same time to reset the
counter.
A224
Copier
47
Page 51

SERVICE PROGRAM MODE TABLE 9 May 1997
Mode No.
Class
1 and 2
7-808
7-810
7-901*
7-902
7-903*
7-904
7-905*
7-906
7-907
7-908
7-909
7-991
Class 3
Resets
Counters
(except for the
total counter)
User Code
Number Reset
SC History
Display
SC History
Clear
Copy Jam
History Display
Copy Jam
History Clear
Original Jam
History Display
Original Jam
History Clear
Timer Counter
Clear
PCU Counter
Display
PCU Counter
Clear
Timer Counter
Display
Resets the counters except for the
following counters:
1. Total counter (SP7-003)
2. PCU counter (SP7-908)
3. Timer counter (SP7-991)
Press down the “Ph ot o mode” key and
the
counter.
Resets the user code numbers.
Press down the “Ph ot o mode” key and
the
counter.
Displays the SC codes that have occurred.
Clears the SC histor y.
Press down the “Ph ot o mode” key and
the
data.
Displays the co py j am s that have
occurred.
Clears the copy jam hi story.
Press down the “Ph ot o mode” key and
the
data.
Displays the ori gi nal jams that have
occurred.
Clears the original jam history.
Press down the “Ph ot o mode” key and
the
data.
Clears the timer counter.
Press down the “Ph ot o mode” key and
the
counter.
Displays the nu m ber of copies that have
been made using the current PCU.
Japanese version only
Do not use.
Displays the time since the last time that
the main switch was turned on.
key at the same time to reset the
key at the same time to reset the
key at the same time to reset the
key at the same time to reset the
key at the same time to reset the
key at the same time to reset the
Function Settings
0: No
1: Yes
0: No
1: Yes
0: No
1: Yes
0: No
1: Yes
0: No
1: Yes
0: No
1: Yes
0: No
1: Yes
48
Page 52

9 May 1997 SERVICE PROGRAM MODE TABLE
12.1.1 Input Check (SP5-803)
A224M500.wmf
1. Access SP mode 5-803.
2. Select the number which will access the switch or sensor you wish to
check (see the following table).
3. Check the status of the sensor or switch.
4. If you wish to check the signal during a copy cycle, select the required
copy modes, then press the Start key. After that, re-enter the SP mode to
check the next signal.
A224
Copier
5. The reading (“0" or ”1") will be displayed. The meaning of the display is
as follows.
Number Description
1 Front Door Safety Switch - +24V Closed Opened
2 Front Door Safety Switch - LD5V Closed Opened
3 Right Vertical Guide Switch Closed Opened
4 Left Vertical Door Sensor Closed Opened
5 Left Door Sensor Closed Opened
6
7
8
9
10
11
12
13
14
Fusing Exit Sensor Paper not
detected
Upper Exit Senso r Paper not
detected
Lower Exit Sensor Paper not
detected
Registrati on Sensor Paper not
detected
Upper Relay Sensor Paper not
detected
Charge Roller H. P. Sensor Not home
position
(Off)
By-pass Feed Pa per End Sensor Paper not
detected
Upper Tray Paper End Sensor -A193 only- Paper not
detected
Lower Tray Paper End Sensor Paper not
detected
Reading
01
Paper detected
Paper detected
Paper detected
Paper detected
Paper detected
At home
position
(On)
Paper
detected
Paper
detected
Paper
detected
49
Page 53

SERVICE PROGRAM MODE TABLE 9 May 1997
Number Description
Reading
01
15 Upper Paper Size Sensor -A193 onl y- See Table 1
16 Lower Paper Size Sensor See Table 1
17 Main Motor Lock Not locked Locked
18
PCU ensor PCU not
detected
PCU detected
19 Not used
20
21
22
23
24
25
26
27
28
Upper Paper End Sensor
(Optional Paper Tray Unit)
Lower Paper End Sensor
(Optional Paper Tray Unit)
Upper Relay Sensor
(Optional Paper Tray Unit)
Lower Relay Sensor
(Optional Paper Tray Unit)
Upper Paper Size Sensor
(Optional Paper Tray Unit)
Lower Paper Size Senso r
(Optional Paper Tray Unit)
Paper not
detected
Paper not
detected
Paper not
detected
Paper not
detected
See Table 1
See Table 1
Paper detected
Paper detected
Paper detected
Paper detected
29 Tray Cover Switch (Opti onal Paper Tray Unit) Closed Opened
30 Paper Tray Unit Set (Optional Paper Tray Unit) Not connected Connected
31 Main Motor Lock (Optional Paper Tray Unit) Not locked Locked
32
33
Upper Tray Upp er Li m i t Sen sor
(Optional Paper Tray Unit)
Lower Tray Upper Limit Sensor
(Optional Paper Tray Unit)
Paper not at
high position
Paper not at
high position
Paper at high
position
Paper at high
position
34 Not used
35
36
37
Duplex Entrance Sensor
(Optional Duplex Unit)
Paper not
detected
Paper detected
38 Inverter Unit Set (Optional Duplex Unit) Not connected Connected
39 Duplex Unit Set (Optional D uplex Unit) Not connected Connected
40 Not used
41
42
43
1-bin Vertical Guide Door Switch
(Optional 1-bin Sorter)
Closed Opened
44 1-bin Sorter Unit Set (Optio nal 1-bin Sorter) Not connect ed Connected
45
1-bin Sorter Paper Sensor Paper not
detected
Paper detected
46 Finisher Set (Optional Finisher Unit) Not connected Connected
47 Not used
48
Feed Cover Open Sensor
(Optional ADF and ARDF)
Closed Opened
50
Page 54

9 May 1997 SERVICE PROGRAM MODE TABLE
Number Description
49
50 DF Position Sensor (Optional AD F and ARDF) DF closed DF opened
51
52 ADF Set (Optional ADF) Not connected Connected
53 Not used
54
55
56 ARDF Set (Optional ARDF) Not connected Connected
57
58 Not used
59
60 Polygonal Mirror Mot or Lock Not lo cked Locked
61 Not used
62 Fusing Unit Set Not connected Connected
63 Main Switch Off On
64 BiCU Connection Not connected Connected
65 Not used
66 Total Counter Connec tion Not connected Connected
67 Not used
68 Key Counter Connectio n Not connected Connected
69 Not used
70 LCIT Set (Optional LCIT) Not connected Connected
71
72
73
74
75
76
77
78 Not used
79
Original Set Sensor (Optional ADF and AD RF ) Paper not
detected
Registration Sensor (Optional ADF and ARDF) Paper not
detected
ARDF Reverse Table Sensor (Optional ARDF) Paper not
deteted
LCIT Unit Set Sensor
(Optional LC I T ) -A224 only-
LCIT Cover Sensor
(Optional LC I T ) -A224 only-
LCIT Paper Size Sensor
(Optional LC I T ) -A224 only-
LCIT Upper Limit Sensor
(Optional LC I T ) -A224 only-
LCIT Lower Limit Sensor
(Optional LC I T ) -A224 only-
LCIT Tray Down Switch
(Optional LI C T ) -A224 only-
LCIT Paper Near End Level
(Optional LC I T ) -A224 only-
LCIT closed LCIT opened
Cover closed Cover opened
A4 11" x 8.5"
Shift tray not
at upper limit
position
Shift tray not
at lower limit
position
Switch is not
pressed
See Table 2
Reading
01
Paper detected
Paper detected
Paper detected
Shift tray is at
upper limit
position
Shift tray is at
lower limit
position
Switch is
pressed
A224
Copier
51
Page 55

SERVICE PROGRAM MODE TABLE 9 May 1997
Table 1: Paper Size Data (No. 15, 16, 27, and 28)
SW No. 1 432
A224M502.wmf
Number SW 1SW 2SW 3SW 4
SP
Value
Paper Size
00000—00011A3, F(8
“ x 13")
1/2
0 0 1 1 3 A4 Sideways
15,16,27,28
0 1 0 1 5 A4 Lengthwise
0 1 1 1 7 A5 Sideways, 11" x 17"
101111B4, 8
1/2
“ x 14"
1 1 0 0 12 * (Asterisk)
1 1 0 1 13 B5 Sideways, 11" x 8
1 1 1 1 15 B5 Lengthwise, 8
1/2
1/2
“ x 11"
1: Pushed
Table 2: LCT Paper Near End Level (No.77)
SP value 000 001 025 050 075 100
Level Paper end Near-end 25% full 50% full 75% full Full
“
52
Page 56

9 May 1997 SERVICE PROGRAM MODE TABLE
12.1.2 Output Check (SP5-804)
A224M501.wmf
A224
Copier
CAUTION:
To prevent mechanical or electrical damage, do not keep an
electrical component on for a long time.
1. Access SP mode 5-804.
2. Select the SP number that corresponds to the component you wish to
check (see the following table), then press
3. Press “1", then press
to check that component.
.
4. Exit the SP mode to interrupt the test.
5. If you wish to check another component, re-enter the SP mode.
- Output check table -
No. Description No. Description
1 Junction Gate Solenoid 14 Transport Fan
2 Registration Soleno id 15 Fusing Unit Fan -A224 only 3 Upper Relay Clutch 16 Not used
4 Lower Relay Clutch 17
5 Charge Roller Contac t Cl ut ch 18
By-pass Feed Clut ch
6
Upper Paper Feed Clutch
7
-A193 onlyLower Paper Feed C l ut ch
8
Development Clutch
9
Toner Bottle Drive Motor
10
Main Motor (Forward)
11
Main Motor (Reverse)
12
Exhaust Fan
13
Upper Paper Feed Clutch
19
(Optional Paper Tray Unit)
Lower Paper Feed Clutch
20
(Optional Paper Tray Unit)
Upper Relay Clutch
21
(Optional Paper Tray Unit)
Lower Relay Clutch
22
(Optional Paper Tray Unit)
Main Motor
23
(Optional Paper Tray Unit)
Upper Paper Lift Motor (Up)
24
(Optional Paper Tray Unit)
Lower Paper Lift Motor (Up)
25
(Optional Paper Tray Unit)
Upper Paper Lift Motor (Down)
26
(Optional Paper Tray Unit)
53
Page 57

SERVICE PROGRAM MODE TABLE 9 May 1997
No. Description No. Description
Lower Paper Lift Mot or (Down)
27
(Optional Paper Tr ay U nit )
28 Not used 45
Duplex Juncti on Gate Solenoid
29
(Optional Duplex Unit)
Not used
30
31 48
32 49 Not used
1-bin Junctio n Gate Solenoid
33
(Optional 1-bin Sorter)
1-bin Transport Motor
34
(Optional 1-bin So rter )
1-bin Paper indic at or
35
(Optional 1-bin Sorter)
36 Not used 53 Polygonal Mirror Motor
37 54 Not used
DF Feed Motor
38
(Optional ADF and ARDF)
DF Feed Motor (Power Down)
39
(Optional ADF and ARDF)
DF Pick-up Solenoid
40
(Optional ADF and ARDF)
Stamper Solenoid (Optional ADF
41
and ARDF)
DF Paper Feed Clutch (Optional
42
ADF and ARDF)
43 Not used 60 Not used
Not used
44
ARDF Junction Gate Solenoid
46
(Optional ARDF)
ARDF Transport Mo to r (F oward)
47
(Optional ARDF)
ARDF Transport Mo to r (R everse)
(Optional ARDF)
50
51
52
LCIT Paper Feed Motor
55
(Optional LCIT)
LCIT Transport Mo tor
56
(Optional LCIT)
LCIT Tray Lift Mo to r ( up)
57
(Optional LCIT)
LCIT Tray Lift Mo to r ( dow n)
58
(Optional LCIT)
Tray Down LED (Optional LCIT)
59
54
Page 58

9 May 1997 PREVENTIVE MAINTENANCE SCHEDULE
13. PREVENTIVE MAINTENANCE SCHEDULE
13.1 PM TABLE
NOTE:
Symbol key: C: Clean, R: Replace, L: Lubricate, I: Inspect
SCANNER/OPTICS
Reflector C C C Optics cloth
1st Mirror C C C Optics cloth
2nd Mirror C C C Optics cloth
3rd Mirror C C C Optics cloth
Scanner Guide R ai l s C C C Do not use alcohol.
Platen Sheet Cover
Exposure Glass C C C Dry cloth or al cohol
Toner Shield Glass C C C Optics cloth
APS Sensor C C C Dry cloth or alcohol
AROUND THE DRUM
Transfer Rol l er R R R To clean, use a blower brush .
Quenching Lamp C C C Dry cloth
Discharge Brush R R R
The amounts mentioned as the PM interval indicate the number of
prints.
A224 EM 100K 200K 300K NOTE
Replace the pla te n sheet, if
CI I I
necessary.
Dry cloth or alcohol
A224
Copier
PAPER FEED
Registration Roller C C C Clean with water or alcohol.
Paper Feed Roller
(By-pass feed table)
Registration Mylar C C C Clean with water or alcohol.
Relay Rollers I I I Clean/replace if necessary
Paper Feed Guides C C C Clean with water or alcohol.
Paper Feed Rollers R R R
Bottom Plate Pad C C C Clean with water or al cohol.
Bottom Plate Pad
(By-pass feed )
FUSING UNIT
Fusing Entrance and
Exit Guide Plates
Hot Roller R R R
Pressure Roller R R R
Fusing The rmi stors I I I Clean if necessary
Cleaning Roller C C C Clean with water or alcohol.
Cleaning Roller
Bushings
CCCC
CCC
CCC
CCC
Clean with water or alcohol.
Clean with water or alcohol.
Clean with water or alcohol.
Alcohol
55
Page 59

PREVENTIVE MAINTENANCE SCHEDULE 9 May 1997
A224 EM 100K 200K 300K NOTE
Hot Roller Strippers R R R
Cleaning Roller
Discharge Brush
OTHERS
Drive Belts I I I Replace if necessary
EM 200K 400K 600K 800K NOTE
LCT
Paper Feed Roller C R R R R Dry or damp cloth
Transport Rol le r C Dry or damp cloth
Bottom plate pad C Dry or damp clot h
RRR
56
Page 60

9 May 1997 REPLACEMENT AND ADJUSTMENT
14. REPLACEMENT AND ADJUSTMENT
14.1 LASER UNIT
WARNING
+
Turn off the main switch and unplug the machine before attempting
any of the procedures in this section. Laser beams can seriously
damage your eyes.
- CAUTION DECALS -
Three caution decals and the optical fiber cable [A] are located in the laser
section as shown below.
!
DANGER
INVISIBLE LASER RADIATION
WHEN OPEN.
AVOID DIRECT EXPOSURE TO
BEAM.
>PS<
>PS<
A224
Copier
!
DANGER
[A]
A224R506
A224R505.wmf
INVISIBLE LASER RADIATION
WHEN DISCONNECT OPTICAL
FIBER CABLE.
AVOID DIRECT EXPOSURE TO
BEAM.
>PS<
57
Page 61

REPLACEMENT AND ADJUSTMENT 9 May 1997
14.2 LASER UNIT/MAIN SCAN SYNCHRONIZATION
DETECTOR
[C]
[B]
[A]
A224R512.wmf
WARNING
+
Turn off the main switch and unplug the machine before attempting
any of the procedures in this section. Laser beams can seriously
damage your eyes.
1. Remove the copy tray.
2. Disconnect the harness [A] from the polygon motor driver [B].
3. Remove the main scan syncronization detector [C].
4. Remove the laser unit (4 screws and 1 connector).
58
Page 62

9 May 1997 REPLACEMENT AND ADJUSTMENT
14.3 POLYGON MIRROR MOTOR
[A]
A224
Copier
[B]
A224R501.wmf
1. Remove the laser unit (see Laser Unit/Main Scan Syncronization
Detector).
2. Remove the polygon motor cover [A] (3 screws).
3. Remove the polygon motor [B] (4 screws, 1 connector).
NOTE:
When reinstalling the polygon motor, the securing order should be as
shown below. Otherwise, the polygon motor board may be bent.
3
1
A224R510.wmf
2
4
59
Page 63

REPLACEMENT AND ADJUSTMENT 9 May 1997
14.4 POLYGON MOTOR DRIVER
[B]
[A]
[C]
A224R502.wmf
1. Remove the copy tray.
2. Disconnect two harnesses [A] from the polygon motor driver [B].
3. Remove the polygon motor driver bracket [C] (1 screw).
4. Remove the polygon motor driver [B] (3 screws).
60
Page 64

9 May 1997 REPLACEMENT AND ADJUSTMENT
14.5 FUSING THERMISTOR/FUSING EDGE THERMISTOR
[C]
[A]
[B]
A224R511.wmf
A224
Copier
1. Pull out the fusing unit (1 screw).
2. Remove the upper cover [A] (1 screw).
3. Remove the fusing thermistor [B] (1 screw, 1 connector).
4. Remove the fusing edge thermistor [C] (1 screw, 1 connector).
61
Page 65

REPLACEMENT AND ADJUSTMENT 9 May 1997
14.6 FUSING UNIT FAN
[C]
[A]
[B]
A224R503.wmf
[F]
[D]
[E]
A224R504.wmf
1. Remove the front cover and rear cover.
2. Remove the PCU, transfer roller unit, fusing unit, duplex inverter unit,
duplex unit, paper feed tray, and inner cover.
3. Remove the PSU.
4. Disconnect the fusing unit fan harness [A] and unclamp this harness from
the harness clamps.
5. Cut the clamp [B].
NOTE:
Take care not to cut the harnesses.
6. Remove the duplex entrance guide [C].
7. Remove the total counter [D] (1 connector).
8. Remove the fusing unit fan bracket [E] (3 screws).
9. Remove the fusing unit fan [F] (2 screws, 1 connector).
62
Page 66

9 May 1997 SERVICE CALL CONDITIONS
15. SERVICE CALL CONDITIONS
15.1 SUMMARY
There are 3 levels of service call conditions.
Level Definition
To prevent the machine from be i ng damaged, the SC ca n onl y be
NOTE:
A
B
C
1) If the problem concerns electrical circuit boards, first disconnect
then reconnect the connectors before replacing the PCBs.
2) If the problem concerns a motor lock, first check the mechanical
load before replacing motors or sensors.
3) To reset a Level A SC, enter SP 5-810 (SC code reset) and select
“1". Then hold down the Photo mode key and the
same time for at least 3 seconds (this does not require the main
switch to be turned off and on).
4) When a Level A or B SC occurs while in an SP mode, the display
does not indicate the SC number. If this occurs, check the SC
number after leaving the SP mode.
reset by a service representative (see the note below).
The copier cannot be operated at al l.
The SC can be reset by turning the main switch off and on if the SC
was caused b y a sensor error.
The copier can be operated as us ual except for the unit rel ated to
the service call.
key at the
A224
Copier
63
Page 67

SC CODE DESCRIPTIONS 9 May 1997
16. SC CODE DESCRIPTIONS
SC101: Xenon lamp error (A193/A224)
- Definition - [B]
The standard white level was not detected properly when scanning the white
plate.
- Possible cause Xenon lamp defective
•
Xenon lamp harness defective
•
SBU board defective
•
SBU harness defective
•
SC120: Scanner home position error 1 (A193/A224)
-Definition- [B]
The scanner home position sensor does not detect the off condition during
initialization or copying.
- Possible causes Scanner home position sensor defective
•
Scanner drive motor defective
•
IOSCC board defective
•
Scanner home position sensor harness defective
•
SC121: Scanner home position error 2 (A193/A224)
-Definition- [B]
The scanner home position sensor does not detect the on condition during
initialization or copying.
- Possible causes Scanner home position sensor defective
•
Scanner drive motor defective
•
IOCSS board defective
•
Scanner home position sensor harness defective
•
64
Page 68

9 May 1997 SC CODE DESCRIPTIONS
SC122: Scanner home position error 3 (A193/A224)
-Definition- [B]
The scanner home position sensor detects the on condition while the scanner
is returning to the home position.
- Possible causes Scanner home position sensor defective
•
Scanner drive motor defective
•
IOCSS board defective
•
Scanner home position sensor harness defective
•
SC123: Scanner home position error 4 (A193/A224)
-Definition- [B]
The scanner home position sensor does not detect the on condition after the
scanner returns to the home position.
A224
Copier
- Possible causes Scanner home position sensor defective
•
Scanner drive motor defective
•
IOCSS board defective
•
Scanner home position senor harness defective
•
SC192: Automatic SBU adjustment error (A193/A224)
-Definition- [B]
An error is detected during automatic SBU adjustment.
- Possible cause SBU defective
•
BiCU board defective
•
Lamp regulator defective
•
Exposure lamp deective
•
Dirty white plate
•
65
Page 69

SC CODE DESCRIPTIONS 9 May 1997
SC302: Charge roller current leak (A193/A224)
-Definition- [B]
A charge roller current leak signal is detected.
- Possible causes Charge roller damaged
•
Charge high voltage supply board defective
•
Poor connection of the PCU
•
SC306: Charge roller home position error (A193/A224)
-Definition- [B]
The charge roller home position sensor does not detect the on condition.
- Possible causes Charge roller home position sensor defective
•
Charge roller contact clutch defective
•
SC320: Polygon motor error (A193/A224)
-Definition- [B]
The polygon motor does not reach its operating speed within 10 seconds
after the polygon motor on signal, or the lock signal is not detected for more
than 40 ms continuously during operation.
- Possible causes Polygon motor defective
•
Poor connection of the interface harness which connects the polygon
•
motor driver and the IOCSS board
IOCSS board defective
•
SC321: No laser start signal (F-GATE error) (A193/A224)
NOTE:
This SC code is only for copy mode.
- Definition- [B]
The CPU does not detect the laser start signal (F-GATE) after the copy paper
reaches the registration sensor.
- Possible causes BiCU board defective
•
MSU board defective
•
66
Page 70

9 May 1997 SC CODE DESCRIPTIONS
SC322: Laser synchronization error (A193/A224)
-Definition- [B]
The laser synchronization signal cannot be detected by the main scan
synchroniziation detector board for more than 5 consecutive 100 ms intervals.
- Possible causes Poor connection of the interface harness which connects the laser
•
synchronization detector board and the BiCU board
Laser synchronization detector board out of position
•
Laser synchronization detector board defective
•
BiCU board defective
•
SC324: LD drive current over (A193/A224)
-Definition- [B]
The LD drive board applies more than 100 mA to the LD.
A224
Copier
- Possible causes LD unit defective (not enough power, due to aging)
•
Poor connection of the interface harness which connects the LD unit and
•
the BiCU board
Temperature around the LD unit is too high
•
SC390: TD sensor error 1 (A193/A224)
-Definition- [B]
The TD sensor outputs less than 0.5V, 20 s after the TD sensor initial setting
has been performed.
- Possible causes TD sensor abnormal
•
Poor connection of the PCU
•
SC391: Development bias leak (A193/A224)
-Definition- [B]
A development bias leak signal is detected.
- Possible causes Poor connection of the PCU
•
High voltage supply board defective
•
67
Page 71

SC CODE DESCRIPTIONS 9 May 1997
SC393: TD sensor error 2 (A193/A224)
-Definition- [B]
TD sensor output voltage falls out of the adjustment range (2.0 ± 0.2 V) after
the TD sensor initial setting has been finished.
- Possible causes TD sensor abnormal
•
Poor connection of the PCU
•
SC401: Transfer roller leak error 1 (A193/A224)
SC402: Transfer roller leak error 2 (A193/A224)
-Definition- [B]
A transfer roller current leak signal is detected.
- Possible causes High voltage supply board defective
•
Poor connection of the PCU
•
Transfer roller damaged
•
SC411: Separation bias error (A193/A224)
-Definition- [B]
A separation bias leak signal is detected.
- Possible causes High voltage supply board defective
•
Poor connection of the PCU
•
Discharge brush defective
•
SC500: Main motor lock (A193/A224)
-Definition- [B]
A main motor lock signal is detected for more than 5 seconds or the lock
signal is not detected for more than 500 ms during rotation.
- Possible causes Too much load on the drive mechanism
•
Main motor defective
•
68
Page 72

9 May 1997 SC CODE DESCRIPTIONS
SC503: Upper tray lift motor malfunction (optional paper tray unit only)
(A193/A224)
SC504: Lower tray lift motor malfunction (optional paper tray unit only)
(A193/A224)
-Definition- [C]
The paper upper limit sensor is not activated after the tray lift motor has been
on for 10 seconds.
- Possible causes Upper limit sensor defective
•
Tray lift motor defective
•
IOCSS board defective
•
SC506: Paper tray unit main motor lock (optional paper tray unit
only) (A193/A224)
-Definition- [C]
A224
Copier
A main motor lock signal is detected for more than 5 seconds or the lock
signal is not detected for more than 5 seconds during rotation.
- Possible causes Paper tray unit main motor defective
•
Too much load on the drive mechanism
•
SC542: Fusing temperature warm-up err or (A193/A224)
-Definition- [A]
The fusing temperature does not reach the fusing standby temperature within
50 seconds after the main switch is turned on.
- Possible causes Fusing thermistor defective or out of position
•
Fusing lamp open
•
Fusing thermofuse open
•
Power supply board defective
•
Poor connection of the fusing unit
•
69
Page 73

SC CODE DESCRIPTIONS 9 May 1997
SC543: Fusing overheat error (A193/A224)
-Definition- [A]
A fusing temperature of over 231°C is detected for 1 second by the fusing
thermistor.
- Possible causes Fusing thermistor defective
•
Power supply board defective
•
SC544: Fusing low temperature error (A193/A224)
-Definition- [A]
A fusing temperature of below 100°C is detected for 1 second by the fusing
thermistor.
- Possible causes Fusing thermistor defective
•
Power supply board defective
•
SC546: Fusing ready temperature malfunction (A193/A224)
-Definition- [A]
The fusing temperature goes 10 °C below or 10 °C over the stand-by
temperature after warm-up is completed.
- Possible causes Thermistor defective
•
Poor connection of the fusing unit
•
Power supply board defective
•
SC547: Zero cross signal malfunction (A193/A224)
-Definition- [A]
Zero cross signals are not detected within a certain period.
- Possible causes Power supply board defective
•
IOCSS defective
•
BICU defective
•
70
Page 74

9 May 1997 SC CODE DESCRIPTIONS
SC548: Fusing edge temperature error 1 (A224)
- Definition - [A]
A fusing temperature of over 251°C is detected for 3 seconds by the fusing
edge thermistor.
- Possible causes Fusing edge thermistor defective
•
PSU defective
•
SC549: Fusing edge temperature error 2 (A224)
- Definition - [A]
A fusing temperature of below 100°C is detected for 1 second by the fusing
edge thermistor.
- Possible causes Fusing edge thermistor defective
•
PSU defective
•
Poor connenction of the fusing unit
•
A224
Copier
SC610: Communication error between IOCSS and duplex unit
(A193/A224)
-Definition- [B]
The IOCSS board cannot communicate with the duplex unit properly.
- Possible causes Poor connection of the duplex unit
•
IOCSS board defective
•
Duplex control board defective
•
SC681: Fax option version error (A224)
- Definition - [C]
The machine detected that a A639 fax unit is installed.
- Possible causes Installing an A639 fax unit in an A224 machine.
•
Downloading the software for the A639 fax unit to the A224 machine.
•
71
Page 75

SC CODE DESCRIPTIONS 9 May 1997
SC682: Printer option version error (A224)
- Definition - [C]
The machine detected that a A643 printer controller is installed.
- Possible causes Installing an A643 printer controller in an A224 machine.
•
Downloading the software for the A643 printer controller to the A224
•
machine.
SC691: Communication error between BICU and fax controller
(A193/A224)
-Definition- [B]
The BiCU board cannot communicate with the fax controller properly.
- Possible causes Poor connection of the interface harness which connects the BiCU board
•
and the fax controller
BICU board defective
•
Fax controller defective
•
SC692: Communication error between BiCU and printer controller
(A193/A224)
-Definition- [B]
The BICU board cannot communicate with the printer controller properly.
- Possible causes Poor connection of the interface harness which connects the BICU board
•
and the mother board.
Poor connection between the mother board and the printer controller
•
BICU board defective
•
Printer controller defective
•
Mother board defective
•
72
Page 76

9 May 1997 SC CODE DESCRIPTIONS
SC696: Communication error between finisher and BiCU board
(A193/A224)
- Definition - [B]
The BiCU board cannot communicate with the finisher properly.
- Possible causes Poor connection of the interface cable for the finisher.
•
BiCU board defective
•
Finisher drive board defective
•
SC700: Finisher feed out error (A193/A224)
- Defenition - [B]
1. The stack height sensor does not detect the on condition within 12
seconds after the shift tray lift motor is turned on so that the shit tray
keeps moving up.
2. The stack height sensor does not detect the off condition within 5
seconds after the shift tray lift motor is turned on so that the shift tray
keeps moving down.
3. The shift tray position sensor does not detect the on condition within 1.25
seconds after the shift motor is turned on.
A224
Copier
- Possible causes Shift tray lift motor defective
•
Shift motor defective
•
Finisher drive board defective
•
73
Page 77

SC CODE DESCRIPTIONS 9 May 1997
SC701: Finisher inverter error (A193/A224)
- Defenition - [B]
1. The jogger H.P sensor does not detect the off condition within 3 seconds
after the jogger motor is turned on.
2. The jogger H.P sensor does not detect the on condition within 576 pulses
(about 80 mm) after the jogger motor is turned on.
3. The Feed belt H.P sensor does not detect the off condition within 3
seconds after the feed-out motor is turned on.
4. The Feed belt H.P sensor does not detect the on condition within 2059
pulses (about 700 mm) after the feed-out motor is turned on.
- Possible causes Jogger motor defective
•
Feed-out motor defective
•
Finisher drive board defective
•
SC702: Finisher staple error (A193/A224)
- Defenition - [B]
The staple home position sensor does not detect the on condition within
0.485 seconds after the staple motor on signal.
- Posible causes Staple motor defective
•
Finisher drive board defective
•
SC900: Total counter error (A193/A224)
-Definition- [C]
The total counter is not working properly.
- Possible causes Total counter defective
•
IOCSS board defective
•
74
Page 78

9 May 1997 SC CODE DESCRIPTIONS
SC920: MSU connection error (A193/A224)
-Definition- [B]
The MSU set signal is not detected
- Possible cause Poor connection between the BICU board and the MSU
•
BICU board defective
•
MSU defective
•
SC921: MSU hardware error (A193/A224)
-Definition- [B]
The hardware of the MSU is defective
- Possible cause MSU defective
•
BICU defective
•
Front door safety switch does not work properly
•
A224
Copier
SC980: Program loading error (A193/A224)
-Definition- [C]
The program cannot load properly.
- Possible cause Poor connection between the BICU and the ROM board
•
BICU board defective
•
ROM board or the program defective
•
SC981: NVRAM clear error (A193/A224)
-Definition- [C]
The data stored in the NVRAM is not cleared properly when the Memory All
Clear is performed.
- Possible cause NVRAM defective
•
75
Page 79

SC CODE DESCRIPTIONS 9 May 1997
SC990: Communication error between BICU and IOCSS board
(A193/A224)
-Definition- [B]
The BiCU board cannot communicate with the IOCSS board properly.
- Possible cause Poor connection between the BiCU board and the IOCSS board
•
BiCU board defective
•
IOCSS board defective
•
SC999: Program version error (A193/A224)
- Definition - [C]
Downloading the incorrect type of main software
- Possible cases Downloading the main software for the A224 machine to the A193
•
machine or the opposite case.
76
Page 80

ELECTRICAL COMPONENT LAYOUT
Copier (A224)
27
26
25
24
30
29
28
31
32
33
23
34
22
21
1
20
19
2
18
3
4
5
6
7
8
9
10
11
12
13
14
15
16
A224s502.wmf
17
Page 81

48
47
49
35
36
37
38
39
40
41
42
43
46
45
A224s501.wmf
44
Page 82

62
61
63
60
59
50
51
52
53
54
55
56
67
A224s500.wmf
68
Page 83

Copier
Symbol Index No. Description P to P (2/2 )
Printed Circuit Boards
PCB1 54 High Voltage Supply Board K17
PCB2 50 Lamp Stabilizer M16
PCB3 58 PSU C7
PCB4 61 LD Unit E5
PCB5 63 Operation Panel F1
PCB6 51 SBU H1
PCB7 55 IOCSS I14
PCB8 52 BICU H12
PCB9 53 MSU I6
PCB10 62 Polygon Motor Driver (A224 only) E3
Motors
M1 45 Main I17
M2 37 Scanner Drive N17
M3 47 Transport Vacuum Fan O17
M4 49 Polygonal Mirror D4
M5 38 Toner Supply F17
M6 35 Exhaust Fan D17
M7 46 Fusing Unit Fan (A2 24 only) P11
Sensors
S1 33 Upper Exit B17
S2 31 Lower Exit B17
S3 28 Left Vertical Door B17
S4 27 Left Door C17
S5 17 Relay C17
S6 10 PCU C17
S7 29 Fusing Exit D17
S8 9 Charge Roller H.P D17
S9 —- Upper Tray Paper End (A193 only) E17
S10 15 Lower Tray Paper End E17
S11 16 By-pass Feed Paper End F17
S12 13 Registration G17
S13 12 By-pass Feed Paper Wi dt h G17
S14 59 Humidity C11
S15 4 Origin al Width L17
S16 5 Original Length-1 L17
S17 6 Original Length-2 L17
S18 3 Platen Cover M17
S19 1 Scanner H.P. M17
S20 23 Toner Density (TD) H17
Switches
SW1 20 AC B6
Page 84

Symbol Index No. Description P to P (2/2 )
SW2 32 Main D2
SW3 14 Right Vertical Guide H17
SW4 —- Upper Paper Size (A193 only) N17
SW5 19 Lower Paper Size O17
SW6 26 Front Door Safety D11
Magnetic Clutches
MC1 36 Charge Roller C ont act E17
MC2 42 Upper Relay E17
MC3 43 Lower Relay I17
MC4 41 By-pass Feed F17
MC5 —- Upper Paper Feed (A193 only) I17
MC6 44 Lower Paper Feed I17
MC7 40 Registration F17
MC8 39 Development J17
Solenoids
SOL1 48 Junction Gate B17
Lamps
L1 60 Quenching E17
L2 2 Scanner M17
L3 8 Fusing B7
Heaters
H1 18 Tray (option) C3
H2 34 Anti-condensation (option) C3
H3 11 Drum (option) C3
Thermistors
TH1 24 Charge Roller H17
TH2 21 Fusing B6
TH3 22 Fusing Edge (A224 only) B6
Thermofuses
TF1 7 Fusing B7
Counters
CO1 25 Total I17
CO2 —- Key
(option)
Others
LSD1 30 Laser Synchronization D et ector D4
NF 56 Noise Filter
(230V machine only)
CB 57 Circuit Breaker
(230V machine only)
G17
C10
B8
Page 85

12
34 5 6 7 8 9 10
11 12
13
14
15 16
17
18
A193 and A224
Point to Point Diagram
A
(1/2)
B
C
D
E
F
G
H
J
K
L
M
N
O
P
Q
I
Switch (SW2)
Operation
(PCB5)
Panel
SBU
(PCB6)
+5V
E
GND
F
Tray Heater
(Option)
Anti-condensation
Heater
(Option)
Main
Polygonal Mirror
-16
-14
-12
-10
GND
OPDATA [ 5]
GND
OPCLK
-12V
/BEEP [ 5]
+5V
+5V
/OP-KEY [ 5]
/OP-LED
+5VE
<
CN310
-1
ts
-3
-5
-7
-9
t
-11
-13
-15
-2
t
-4
-6
+5VE
(BICU-Mother Board)
>
PIN NAME PI N NAME
1GND11GND
2 < /VIDEO 1 2 TXD2 >
3GND13<RXD2
4/FGATE>14 GND
5/OE2>15TXD3>
6/OE3>16<RXD3
7N.C.17GND
8GND18 /BD>
9 /RTS > 19 N. C.
10 < /CTS 20 /WRSYNC >
Mother Board
Controller
<>
H1
H2
Laser Syncronization
Detector
(LSD)
Motor
M4
(SBU)
<CN301>
PIN NAME PIN NAME
1 < /OPBSYNC 26 < AD0
2 /RDSYNC > 27 GND
3 GND 28 AGC0 >
4/CLK0>29AGC1>
5GND30GND
6 /WTGT > 31 AGC2 >
7 /PWIND > 32 AGC3 >
8 /AEMODE > 33 GND
9GND34+12
10 DAD 1 > 35 +12
11 GND 36 +12
12 DACLK > 37 +12
13 GND 38 +12
14 DALD > 39 +12
15 GND 40 GND
16 < AD7 41 -12V
17 < AD6 42 -12V
18 GND 43 -12V
19 < AD5 44 GND
20 < AD4 45 +5V
21 GND 46 +5V
22 < AD3 47 +5V
23 < AD2 48 +5V
24 GND 49 +5V
25 < AD1 50 +5V
CN304
Printer
(Op)
See 2/2
Signal Table
AC Line
DC Line
Pulse Signal
Signal Direction
s
Active High
t
[]
[A]
Active Low
Voltage
Analog Signal
AC SW
(SW1)
A
C
D
B
-1
-5
-3
-7
-2
-6
PSU(PCB3)
H
F
E
G
LD Unit (PCB4)
<CN311>
(BICU - ROM Board)
PIN NAME PIN NAME PIN NAME PI N NAME
1 GND 21 A12 > 41 < D14 > 61 < /SLEEP
2 < D3 > 22 A7 > 42 < D15 > 62 NC
3<D4>23A6>43/CE2>63 NC
4 < D5 > 24 A5 > 44 NC 64 NC
5 < D6 > 25 A4 > 45 NC 65 < D8 >
6 < D7 > 26 A3 > 46 NC 66 < D9 >
7 /CE1 > 27 A2 > 47 A17 > 67 < D10 >
8 A10 > 28 A1 > 48 A18 > 68 NC
9 /OE> 29 A0> 49 A19> 69 GND
10 A11 > 30 < D0 > 50 A20 > 70 GND
11 A9 > 31 < D1 > 5 1 A2 1 >
12 A8 > 32 < D2 > 52 +5V
13 A13 > 33 NC 53 VPP2
14 A14 > 34 GND 54 A22 >
15 /WE > 35 GND 55 A23 >
16 /BSY > 36 GN D 56 < /WP
17 +5V 37 NC 57 < /BYTE
18 VPP1 38 < D11 > 58 NC
19 A16 > 39 < D12 > 59 NC
20 A15 > 40 < D13 > 60 < /EXCARD
MSU(PCB9)
<
CN303
>
(BICU - MSU)
PIN NAME PIN NAME
1GND31GND
2GND32GND
3/MWCLK>33 GND
4 /MWLGT > 34 GND
5 /MWLSYC > 35 /MWFGT >
6MOD>36GND
7GND37GND
8 < / MRCLK 38 GND
9 < /MRLGT 39 /WRSY N C >
10 < /MRLSYC 40 < /MRFGT
11 < MID 41 GND
12 GND 42 GND
13 A7(N,C) 43 A6(N,C)
14 A5(N,C) 44 A4 >
15 A3 > 45 A2 >
16 A1 > 46 A0 >
17 GND 47 GND
18 < D15 > 48 < D14 >
19 < D13 > 49 < D12 >
20 < D11 > 50 < D10 >
21 < D9 > 51 < D8 >
22 /RD > 52 /HWR >
23 CS50 > 53 /CS51 >
24 /RESET > 54 < /MDTCT
Fax
Unit
(Op)
25 GND 55 GND
26 +5V 56 +5V
27 +5V 57 +5V
28 +5V 58 +5V
29 GND 59 GND
30 GND 60 GND
See 2/2
Circuit Breaker
(230V machine only)
(CF1)
PSU
(PCB3)
Duplex Unit (Option for A193)
5V
S2
S3
/DUPK0[ 5]
CGND
/TRG[ 5]
24V
24V
GND
5V
GND
RESET[ 5]
TXD[ 5]
RXD[ 5]
SET[ 5]
Duplex Turn
Sensor
Duplex Exit
Sensor
5V
GND
SVRH [A]
t
Duplex Entrance Sensor
Duplex Junction Gate Sol
Duplex Transport
24V
Motor
M1
M2
Duplex Feed
Motor
Noise Filter
(230V machine only)
(NF 1)
(BICU - IOCSS)
<CN308>
PIN NAME PIN NAME PIN NAME PIN NAME
1 -12V 21 < FUTMP 41 +12V 61 GND
2 -12V 22 < PP-C 42 BDTCT 62 < CHTMP
3 +5VE 23 < PP-B 43 +12V 63 GND
4 +5VS 24 < HUM 44 +5V 64 < PP-TP
5 S1 > 25 < PP-D 45 +5V 65 GND
6 S3> 26 GND 46 S2> 66 <TSENS
7 A0 > 27 GND 47 +5V 67 GND
8 A2> 28 MA1> 48 A1> 68 GND
9 A3> 29 MA2> 49 +5V 69 GND
10 < D9 > 30 MA4 > 50 < D8 > 70 MA3 >
11 < D10 > 31 MA5 > 51 +5V 71 GND
12 < D12 > 32 MA7 > 52 < D11 > 72 MA6 >
13 < D13 > 33 MA8 > 53 +5V 73 GND
14 < D15 > 34 MA10 > 54 < D14 > 74 MA9 >
15 /RD > 35 MB1 > 55 +5V 75 GND
16 /RST, 10B> 36 MB2 > 56 /HWR > 76 GND
17 < /INT 1 37 MB3 > 57 +5V 77 GND
18 CLKP > 38 MB4 > 58 < / INT2 78 +24V
19 GND 39 /RTRG > 59 GN D 79 +24V
20 GND 40 < SN-ON 60 GND 80 BDTCT
-1
A
-2
/A
-3
/B
-4
B
-5
24V
-6
24V
-1
A
-2
/A
-3
/B
-4
B
-5
24V
-6
Humidity Sensor
SOL1
Front Door
Safety SW
(SW6)
S1
-1
-2
-3
-4
-5
-6
-7
-8
-4
-5
-6
-7
-8
-9
S14
/ACDET
Zero cross [ 5]
Fusing Heat Trigger [ 5]
Fusing Heat Relay [ 24]
24V.S
ENGOFF
5VE
BICU (PCB8)
Paper Tray Unit
Option
ADF
(Option)
ARDF
(Option)
Finisher
(Option)
LCT
(Option for A224)
t
t
t
t
t
24V
24V.S
5V
LD5V.S
s
t
(Ver. 2)
Gate Sol
S1
A
B
C
D
E
F
G
H
I
J
K
L
M
N
O
P
Q
-1
t
-2
-3
-4
-5
-1
-2
-3
-4
-5
-6
-7
-8
-1
-2
-3
-1
-2
-3
-4
-1
-2
CN120
-3
-6
-1
-2
-4
-5
-1
-2
-3
-4
-5
-6
-7
IOCSS
(PCB7)
-14 /TRG [ 24]
t
-13 24V
t
-1 /NEW [ 5]
-2 GND
-3 24V
t
-4 /TRG [ 24]
-5 GND
-6 EXIT 3 [ 5]
-7 +5V
-8 GND
-9 CONT [ 5]
-10 +5V
-11 24V
-12 /TRG [ 24]
-13 24V
-14 /TRG [ 24]
-1 GND
-2 F1PE [ 5]
-3 +5V
-4 GND
-5 F2PE [ 5]
-6 +5V
-1 24V.S2
-2 /TRG [ 24]
-1 24V
-2 /TRG [ 24]
-1 24V
-2 /TRG [ 24]
-1 /MPS1 [ 5]
-2 /MPS2 [ 5]
-3 /MPS3 [ 5]
-4 /MPS4 [ 5]
-5 GND
-1 /TRG [ 24]
-2 24V
-3 CNTOK [ 5]
-4 GND
-1 24V
-2 24V.S2
-1 GND
-2 VTH [A]
-3 TSENS [A]
-4 +5V
-5 CONTL [ 5]
-1 24V
-2 /TRG [ 24]
-1 24V.S2
-2 /TRG [ 24]
-1 24V
-2 /TRG [ 24]tt
-1 24V
-2 /TRG [ 24]
-1 24V
-2 /TRG [ 24]
-1 Direction [ 5]
-2 Motor Start [ 5]
-3 +5V
-4 Motor Ready [ 5]
-5 24VS
-6 24VS
-7 GND
-8 GND
-9 +5V
-10 GND
-1 Charge Roller [ 5]
-2 Development [ 5]
-3 F.B C [A]
-4 F.B B [A]
-5 Trans Roller (+)[ 5]
-6 Trans Roller (-)[ 5]
-7 F.B T [A]
-8 Discharge [ 5]
-9 F.B D [A]
-10 24V.S
-11 +5V
-12 GND
-1 GND
-2 /F1 [ 5]
-3 /F2 [ 5]
-4 +5V
-5 /ON [ 5]
-A1 GND
-A2 /L1 [ 5]
-A3 /L2 [ 5]
-A4 +5V
-A5 /ON [ 5]
-A6 GND
-A7 /W1 [ 5]
-A8 /W2 [ 5]
-A9 +5V
-A10 /ON [ 5]
-B2 /ON
-B3 GND
-B4 /TRG [ 5]
-B5 GND
-B6 AKS0 [ 5]
-B7 +5V
-B8 GND
-B9 HPS [ 5]
-B10 +5V
-1 +24V
-2 +24V
-3 A [ 24]
-4 /A [ 24]
-5 B [ 24]
-6 /B [ 24]
-1 PS4 [ 5]
-2 PS3 [ 5]
-3 GND
-4 PS2 [ 5]
-5 PS1 [ 5]
-6 PS4 [ 5]
-7 PS3 [ 5]
-8 GND
-9 PS2 [ 5]
-10 PS1 [ 5]
-1 24V
-2 /TRG [ 24]
-1 Junction Gate Sol [ 5]
-2 Motor Speed [ 5]
-3 Motor Start [ 5]
-4 Paper Indicator1 [ 5]
-5 Paper Indicator2 [ 5]
-6 Paper Detect [ 5]
-7 DOOR SW [ 5]
-8 Sorter Set [ 5]
-9 24V
-10 24V
-11 GND
-12 GND
-13 5V
-14 GND
t
t
t
t
s
s
t
t
t
t
t
t
t
t
t
s
t
t
t
s
t
t
t
t
t
t
t
t
t
t
t
s
t
t
t
t
t
t
t
t
t
t
t
t
t
s
t
s
s
t
B
D
t
t
s
PCB2
t
t
s
s
s
s
t
Junction Gate C1
SOL1
Upper Exit Sensor
S1
Lower Exit Sensor
S2
Left Vertical
S3
Door Sensor
S4
Left Door Sensor
Relay Sensor
S5
A
C
S6
PCU Sensor
M6
Exhaust Fan
Fusing Exit
S7
Sensor
Charge Roller
S8
H.P Sensor
Charge Roller
MC1
Contact Cl
Quenching Lamp
L1
Upper Tray Paper
S9
End Sensor(A193 only)
Lower Tray Paper
S10
End Sensor
MC2
Upper Relay Cl
Registration Cl
MC7
By-pass Feed Cl
MC4
TonerSupply Motor
M5
By-pass Feed
S11
Paper End Sensor
Registration
S12
Sensor
By-pass Feed
Paper Width
S13
Sensor
C02
Charge Roller
TH1
Thermistor
TD Sensor
S20
Upper Paper Feed Cl
MC5
(A193 only)
Lower Relay Cl
MC3
MC6
Lower Paper Feed Cl
CO1
TotalCounter
MC8
Development Cl
M1
Main Motor
S16
S17
S15
L2
S18
S19
M2
SW4
Lower Paper
SW5
Size Sensor
Transport
M3
Vacuum Fan
Sorter Transport Motor
-1
-2
-4
-5
-6
-7
Key Counter (Op)
Right Vertical
Guide SW (SW3)
High Voltage
Supply Board
Original Length
Sensor 1
(230V machine only)
Original Length
Sensor 2
Original Width
Sensor
Scanner Lamp
Lamp Stabilizer
Platen Cover
Sensor
Scanner H.P
Sensor
Scanner Drive
Motor
Upper Paper
Size Sensor (A193 only)
M1
Sorter Paper
Indicator (PCB2)
PCB2
-1
-2
Sorter Vertical Guide
Door SW (SW1)
-1
SOL1
-2
Sorter Junction
1 bin Sorter (Op)
Sorter Pape Sensor
12
34 5 6 7 8 9 10
11 12
13
14
15 16
17
18
Page 86

12
345 6 7 8 9 10
A193 and A224
A
Point to Point Diagram
(2/2)
B
C
D
E
Table 1 (BICU - FCU)
BICU
CN304
NAME NAME
+24V
1
+24V
2
+12V
3
-12V
4
TXD 1 >
5
< RXD 2
6
GND
7
/AWCLK >
8
GND
9
/AWLGT >
10
/AWLSYC >
11
/AWFGT >
12
GND
13
/AWKS 0 >
14
/AWKS 1 >
15
/AWKD 0 >
16
/AWKD 1 >
17
/AWKD 2 >
18
/AWKD 3 >
19
/AWKD 4 >
20
/AWKD 5 >
21
/AWKD 6 >
22
/AWKD 7 >
23
GND
24
< /ARCLK
25
FCU
CN501
50
49
48
47
46
45
44
43
42
41
40
39
38
37
36
35
34
33
32
31
30
29
28
27
26
BICU
CN304
26
27
28
29
30
31
32
33
34
35
36
37
38
39
40
41
42
43
44
45
46
47
48
49
50
GND
< /ARLGT
< /ARLSYC
< /ARFGT
/WRSYNC >
/FSYNC >
GND
< /ARKS 0
< /ARKS 1
< /ARKS 2
< /ARKS 3
< /ARKS 4
< /ARKS 5
< /ARKS 6
< /ARKS 7
/OE 1 >
GND
< /OP-LED
< /RTRG
/OP-KEY >
/SW-ON >
/SN-ON >
< EX-FCU
+5VE
+5VE
FCU
CN501
25
24
23
22
21
20
19
18
17
16
15
14
13
12
11
10
13
14
BICU
See
Table 1
11 12
FCU
9
8
7
6
5
4
3
2
1
See
Table 2
Function
Upgrade
Card
See
Table 3
Page
Memory
Card
See
Table 4
SAF/HDD
I/F
See
Table 5
CIG4
See
Table 6
DIU
(RS232C)
15 16
+24V
1
COM3
2
RSEL(US-Not used)
3
Not used
4
s
DOSW [ 5] (US - Not used)
5
6
7
8
9
10
11
12
13
14
15
5
4
3
2
1
1
2
1
2
1
2
3
4
s
CMLSW [ 5]
s
OHDISW [ 5]
COM1
t
EXTDI [ 5]
t
HOOK1 [ 5]
t
HOOK0 [ 5]
EXRING
COM2
Not used
TRXD (Tx/Rx Signal)
CSEL1 (US - Not used)
CSEL0 (US - Not used)
GSSW [ 5] (US - Not used)
s
+5VE (US - Not used)
+5VEE (US - Not used)
+5V
COM1
MONSP
COM1
COM1
COM1
+5V
+5V
NCU
18
A
B
17
15
14
13
12
11
10
9
8
7
6
5
4
3
2
1
1
2
3
4
5
C
PSU
Speaker
HDD
I/F
D
E
Table 2 (Function Upgrade Card - FCU)
FCU
1
2
3
4
5
6
7
8
9
10
11
12
13
14
15
16
17
18
19
20
21
22
23
24
25
26
27
28
29
30
31
32
33
34
NAME
COM1
< CPD 3 >
< CPD 4 >
< CPD 5 >
< CPD 6 >
< CPD 7 >
/CROMCSO >
CPA 10 >
/MRD >
CPA 11 >
CPA 9 >
CPA 8 >
CPA 13 >
CPA 14 >
/MWRL >
< BSY
+5V
+12VP
CPA 16 >
CPA 15 >
CPA 12 >
CPA 7 >
CPA 6 >
CPA 5 >
CPA 4 >
CPA 3 >
CPA 2 >
CPA 1 >
CPA 0 >
<CPD0>
< CPD 1 >
< CPD 2 >
RTCCS >
COM 1
CN502
F
G
H
FCU
CN502
35
36
37
38
39
40
41
42
43
44
45
46
47
48
49
50
51
52
53
54
55
56
57
58
59
60
61
62
63
64
65
66
67
68
NAME
COM1
< CD1
< CPD 11 >
< CPD 12 >
< CPD 13 >
< CPD 14 >
< CPD 15 >
/CRAMCSO >
N.C
< /FROMCS >
N.C
CPA 17 >
CPA 18 >
CPA 19 >
CPA 20 >
< RAMCS
+5V
+12VP
N.C
N.C
< /WP
< /BYTE
N.C
/MWRH >
/EXCARD >
< /SLEEP
/VPCNT0 >
< /VPCNT1
< /CSCNT
< CPD 8 >
< CPD 9 >
< CPD 10 >
< CD2
COM 1
Table 3 (Page Memory Card - FCU)
FCU
1
2
3
4
5
6
7
8
9
10
11
12
13
14
15
16
17
18
19
20
21
22
23
24
25
26
27
28
29
30
31
32
33
34
NAME
COM1
< DMD 3 >
< DMD 4 >
< DMD 5 >
< DMD 6 >
< DMD 7 >
/RAS 4 >
N.C
/DMRD >
N.C
DMA 9 >
DMA 8 >
N.C
N.C
/DMWR >
N.C
+5V
N.C
N.C
N.C
N.C
DMA 7 >
DMA 6 >
DMA 5 >
DMA 4 >
DMA 3 >
DMA 2 >
DMA 1 >
DMA 0 >
< DMD 0 >
< DMD 1 >
< DMD 2 >
N.C
COM 1
CN503
FCU
CN503
35
36
37
38
39
40
41
42
43
44
45
46
47
48
49
50
51
52
53
54
55
56
57
58
59
60
61
62
63
64
65
66
67
68
NAME
COM 1
<CD1
< DMD 11 >
< DMD 12 >
< DMD 13 >
< DMD 14 >
< DMD 15 >
/RAS5 >
N.C
N.C
N.C
N.C
N.C
N.C
N.C
N.C
+5V
N.C
N.C
N.C
/DCAS 1 >
/DCAS 0 >
N.C
N.C
N.C
N.C
N.C
N.C
N.C
< DMD 8 >
< DMD 9 >
< DMD 10 >
<CD2
COM 1
I
Motor Board
Table 4 (SAF/HDD interface - FCU)
FCU
1
2
3
4
5
6
7
8
9
10
11
12
13
14
15
16
17
18
19
20
21
22
23
24
25
26
27
28
29
30
31
32
33
34
35
36
37
38
39
40
41
42
43
44
NAME
COM 1
< CPD 0 >
< CPD 2 >
< CPD 4 >
< CPD 6 >
< CPD 8 >
< CPD 10 >
< CPD 12 >
+5V
< CPD 10 >
< DMD 15 >
/MWRL >
CPA 1 >
CPA 3 >
+5V
CPA 6 >
< DMD 14 >
CPA 9 >
CPA 11 >
CPA 12 >
CPA 14 >
/FROMCS >
RTCCS >
+12V
DMD 13 >
< DMD 2 >
< /EXCARD
< DMD 5 >
< DMD 7 >
< DMD 8 >
< DMD 10 >
+5VD
/CAS0 >
/DMMRD >
< DMD 12 >
/DMIORD >
+5V
DMA 1 >
DMA 3 >
DMA 5 >
DMA 7 >
DMA 9 >
HDDACK >
COM 1
CN504
FCU
CN504
45
46
47
48
49
50
51
52
53
54
55
56
57
58
59
60
61
62
63
64
65
66
67
68
69
70
71
72
73
74
75
76
77
78
79
80
81
82
83
84
85
86
87
88
NAME
COM 1
< CPD 1 >
< CPD 3 >
< CPD 5 >
< CPD 7 >
< CPD 9 >
< CPD 11 >
< CPD 13 >
< CPD 14 >
/MRD >
/MWRH >
COM 1
CPA 2 >
CPA 4 >
CPA 5 >
CPA 7 >
CPA 8 >
CPA 10 >
COM 1
CPA 13 >
CPA 15 >
/SRAMCS >
< /INTHDD
< DMD 0 >
< DMD 1 >
< DMD 3 >
< DMD 4 >
< DMD 6 >
COM 1
< DMD 9 >
< DMD 11 >
/RAS 0 >
/CAS 1 >
/DMMWR >
/HDCS >
/RESET >
/DMIOWR >
DMA 2 >
DMA 4 >
DMA 6 >
DMA 8 >
DMA 10 >
DMA 11 >
COM 1
Table 5 (CIG4 - FCU)
FCU
1
2
3
4
5
6
7
8
9
10
11
12
13
14
15
16
17
18
19
20
NAME
VTXMD >
< VRXMDM
COM3
-12V
/G4CS >
/RESET >
COM3
< /INTG4
< /CWAIT
/CODCCS >
CPA 14 >
CPA 13 >
CPA 12 >
CPA 10 >
CPA 9 >
CPA 8 >
CPA 7 >
CPA 6 >
CPA 5 >
CPA 4 >
CN505
FCU
CN505
21
22
23
24
25
26
27
28
29
30
31
32
33
34
35
36
37
38
39
40
NAME
CPA 3 >
CPA 2 >
CPA 1 >
CPA 0 >
COM 3
< CPD 7 >
< CPD 6 >
< CPD 5 >
< CPD 4 >
< CPD 3 >
< CPD 2 >
< CPD 1 >
< CPD 0 >
/MWRL >
N.C
/MRD >
COM 3
+24V
COM 3
+24V
Table 6 (DIU (RS232C) - FCU)
FCU
CN506
1
2
3
4
5
6
7
8
9
10
11
12
NAME
< CPD 0 >
<CPA0>
< CPD 1 >
<CPA1>
< CPD 2 >
<CPA2>
< CPD 3 >
<CPA3>
< CPD 4 >
N.C
< CPD 5 >
/IORD >
CN506
FCU
13
14
15
16
17
18
19
20
21
22
23
24
NAME
< CPD 6 >
/IOWR >
< CPD 7 >
/RST232 >
< IOIT2
/R232CS >
N.C
N.C
+5V
N.C
COM 1
N.C
F
G
H
I
CN304
See
See
Table 7
Table 10
J4
SIMM
J1 and J2
See
Table 11
See
Table 9
Hard
Disk
Driver
J
Parallel
Port
K
Printer Controller
Serial
Port
L
M
See
Table 8
See
Table 14
J9
J2
Enhancement Unit
Printer
See
Table 15
J10
J3
See
Table 13
Local Talk
See
Table 12
Network
I/F Board
Table 7
(Parallel Porl - Printer Controller)
PIN
1
2
3
4
5
6
7
8
9
10
11
12
13
14
15
16
17
18
19~30
31
32
33
34
35
36
Table 8
(Serial Porl - Printer Controller)
PIN
2
3
4
6
20
NAME
< /STROBE
<DATABIT0>
<DATABIT1>
<DATABIT2>
<DATABIT3>
<DATABIT4>
<DATABIT5>
<DATABIT6>
<DATABIT7>
/ACKNLG >
BUSY >
PE >
SLCK >
< /AUTO FEED XT
NC
GND
GND
NC
GND
< /INIT
/ERROR >
GND
NC
NC
< /SLCT IN
NAME
STXD >
< SRXD
+10V >
< SDSR
SDTR >
Table 9
(Hard Disk Driver - Printer Controller)
PIN
NAME
CPURST >
1
GND
2
<DATA7 >
3
<DATA8 >
4
<DATA6 >
5
<DATA9 >
6
<DATA5 >
7
<DATA10>
8
<DATA4 >
9
<DATA11>
10
<DATA3 >
11
<DATA12>
12
<DATA2 >
13
<DATA13>
14
<DATA1 >
15
<DATA14>
16
<DATA0 >
17
<DATA15>
18
19
20
21
22
23
24
25
Table 10
(Motor Board - Printer Controller)
A6~10
B1~3
B6~10
PIN
A1
A2
A3
A4
A5
B4
B5
GND
NC
NC
GND
< / IOWR
GND
< /IORD
NAME
< / EBD
/ CVDO >
< / EVSYNC
< / ESTS
ECMD >
< / ESBSY
/ ECBSY >
+5V
NC
GND
PIN
26
27
28
29
30
31
32
33
34
35
36
37
38
39
41
42
44
47
48
49
50
CHRDY (5V)
< HDDINT
ADDRESS 3 >
ADDRESS 2 >
ADDRESS 4 >
/ HDDCS0 >
/ HDDCS1 >
NAME
GND
GND
NC
GND
NC
NC
NC
+5V
+5V
NC
NC
NC
NC
NC
J
K
L
M
Table 11
(SIMM - Printer Controller)
N
PIN PINNAME NAME
1
GND
2
<DATA0>
3
<DATA16>
4
<DATA1>
5
<DATA17>
6
<DATA2>
7
<DATA18>
8
<DATA3>
9
<DATA19>
10
+5V
11
12
O
13
14
15
16
17
18
19
20
21
22
23
P
24
25
26
27
28
29
30
31
32
33
34
35
36
Q
NC
ADDRESS 0 >
ADDRESS 1 >
ADDRESS 2 >
ADDRESS 3 >
ADDRESS 4 >
ADDRESS 5 >
ADDRESS 6 >
ADDRESS 10>
<DATA4>
<DATA40>
<DATA5>
<DATA21>
<DATA6>
<DATA22>
<DATA7>
<DATA23>
ADDRESS 7 >
NC
+5V
ADDRESS 8 >
ADDRESS 9 >
RAS 3 >
RAS 2 >
NC
NC
12
37
38
39
40
41
42
43
44
45
46
47
48
49
50
51
52
53
54
55
56
57
58
59
60
61
62
63
64
65
66
67
68
69
70
71
72
NC
NC
GND
CAS 0 >
CAS 2 >
CAS 3 >
CAS 1 >
RAS 0 >
RAS 1 >
NC
/WE >
NC
<DATA8 >
<DATA24>
<DATA9 >
<DATA25>
<DATA10>
<DATA26>
<DATA11>
<DATA27>
<DATA12>
<DATA28>
+5V
<DATA29>
<DATA13>
<DATA30>
<DATA14>
<DATA31>
<DATA15>
NC
NC
NC
NC
NC
NC
GND
Table 12
(Network I/F Board - Printer Controller)
PIN PINNAME NAME
1
NC
2
+5V
3
GND
4
<DATA0 >
5
<DATA1 >
6
<DATA2 >
7
<DATA3 >
8
<DATA4 >
9
<DATA5 >
10
<DATA6 >
11
<DATA7 >
12
<DATA8 >
13
<DATA9 >
14
<DATA10>
15
16
17
18
19
20
21
22
23
24
25
26
Table 13
(Local Talk - Printer Enhancement Unit)
PIN
1
2
3
4
5
6
7
8
+5V
+5V
<DATA11>
<DATA12>
<DATA13>
<DATA14>
<DATA15>
GND
ADDRESS 0 >
ADDRESS 1 >
ADDRESS 2 >
ADDRESS 3 >
NAME
GND
< HSK
TXD- >
GND
< RXD-
TXD+ >
NC
< RXD+
27
28
29
30
31
32
33
34
35
36
37
38
39
40
41
42
43
44
45
46
47
48
49
50
51
52
ADDRESS 4 >
ADDRESS 5 >
ADDRESS 6 >
ADDRESS 7 >
ADDRESS 8 >
ADDRESS 9 >
ADDRESS 10 >
ADDRESS 11 >
ADDRESS 12 >
ADDRESS 13 >
ADDRESS 14 >
ADDRESS 15 >
GND
GND
< / XNICID
< / NICINT
/ PNTIRQ >
/ BHE >
< / NICREQ
/ NICACK >
/ IOWR >
/ NICCS >
/ IORD >
< / RDY
CPURST >
CLK2 >
Table 14
(Printer Enhancement Unit - Printer Controller)
PIN PIN
NAME NAME
< DATA16 >
A1
A2
A3
A4
A5
A6
A7
A8
A9
A10
A11
A12
A13
A14
A15
A16
A17
A18
A19
A20
A21
A22
A23
A24
A25
A26
A27
A28
A29
A30
A31
A32
< DATA19 >
< DATA22 >
< DATA25 >
GND
< ADDRESS 0
< ADDRESS 3
< ADDRESS 6
+5V
< ADDRESS 10
< ADDRESS 13
< ADDRESS 16
< ADDRESS 17
< ADDRESS 20
< ADDRESS 23
GND
< ADDRESS 27
< ADDRESS 30
GND
< /BLAST
+5V
/ARAMWR >
AMA 1 >
AMA 4 >
AMA 7 >
AMA 10 >
/ACAS 1 >
+5V
+5V
/ARAS 2 >
/ARAS 5 >
+5V
B1
B2
B3
B4
B5
B6
B7
B8
B9
B10
B11
B12
B13
B14
B15
B16
B17
B18
B19
B20
B21
B22
B23
B24
B25
B26
B27
B28
B29
B30
B31
B32
345 6 7 8 9 10
< DATA17 >
< DATA20 >
< DATA23 >
+5V
< SCCCS
< ADDRESS 1
< ADDRESS 4
< ADDRESS 7
GND
< ADDRESS 11
< ADDRESS 14
+5V
< ADDRESS 18
< ADDRESS 21
< ADDRESS 24
< ADDRESS 25
< ADDRESS 28
< ADDRESS 31
< /ALE
< /W/R
GND
/ARAMOE >
AMA 2 >
AMA 5 >
AMA 8 >
< ALE
ACAS 2 >
GND
/ARAS 0 >
/ARAS 3 >
/ARAS 6 >
GND
11 12
PIN
C1
C2
C3
C4
C5
C6
C7
C8
C9
C10
C11
C12
C13
C14
C15
C16
C17
C18
C19
C20
C21
C22
C23
C24
C25
C26
C27
C28
C29
C30
C31
C32
NAME
< DATA18 >
< DATA21 >
< DATA24 >
GND
< /ROMCS 1
< ADDRESS 2
< ADDRESS 5
< ADDRESS 8
< ADDRESS 9
< ADDRESS 12
< ADDRESS 15
GND
< ADDRESS 19
< ADDRESS 22
+5V
< ADDRESS 26
< ADDRESS 29
GND
< /DEN
< CPURST
+5V
AMA 0 >
AMA 3 >
AMA 6 >
AMA 9 >
/ACAS 0 >
/ACAS 3 >
GND
/ARAS 1 >
/ARAS 4 >
+5V
GND
Table 15
(Printer Enhancement Unit - Printer Controller)
PIN PIN
NAME NAME
<DATA0 >
A1
<DATA3 >
A2
GND
A3
<DATA7 >
A4
GND
A5
<DATA11>
A6
GND
A7
<DATA15>
A8
GND
A9
<DATA28>
A10
<DATA31>
A11
+5V
A12
< /D5BACK
A13
+5V
A14
+5V
A15
+5V
A16
GND
A17
< CLK 2
A18
+5V
A19
< /IOWR
A20
+5V
A21
< DMA 1
A22
< DMA 4
A23
< DMA 7
A24
< DMA 10
A25
GND
A26
< /DCAS 2
A27
GND
A28
< /DRAS 2
A29
< /DRAS 5
A30
< /DRAS 8
A31
+5V
A32
13
14
15 16
<DATA1 >
B1
<DATA4 >
B2
<DATA5 >
B3
<DATA8 >
B4
<DATA9 >
B5
<DATA12
B6
<DATA13>
B7
B8
<DATA26>
B9
<DATA29>
B10
B11
B12
B13
B14
B15
B16
B17
B18
B19
< /DRAMOE
B20
B21
< DMA 2
B22
< DMA 5
B23
< DMA 8
B24
< DMA 11
B25
< /DCAS 0
B26
< /DCAS 3
B27
< /DRAS 0
B28
< /DRAS 3
B29
< /DRAS 6
B30
< /DRAS 9
B31
B32
+5V
GND
GND
/SCCREQ >
GND
/SOO1INT >
GND
+5V
GND
+5V
+5V
GND
PIN
C1
C2
C3
C4
C5
C6
C7
C8
C9
C10
C11
C12
C13
C14
C15
C16
C17
C18
C19
C20
C21
C22
C23
C24
C25
C26
C27
C28
C29
C30
C31
C32
NAME
<DATA2 >
GND
<DATA6 >
+5V
<DATA10>
GND
<DATA14>
GND
<DATA27>
<DATA30>
+5V
< /D5BREQ
NC
GND
/SCCINT >
GND
< /RDY
GND
< /IORD
< /ORAMWR
< DMA 0
< DMA 3
< DMA 6
< DMA 9
GND
< /DCAS 1
+5V
< /DRAS 1
< /DRAS 4
< /DRAS 7
+5V
GND
17
N
O
P
Q
18
 Loading...