

Page 1

RICOH LENS
A16 24-85mm F3.5-5.5
Instruction Manual
The serial number may be found on the bottom of the lens.
Page 2

2
Package Contents
Before using your Ricoh lens, confirm that the package contains the items
listed below.
Camera unit
The serial number may be found on the bottom.
Connector cap
Comes attached to the camera unit.
Soft case
Lens cap
Comes attached to the camera unit.
Instruction manual
(this manual)
Warranty
Page 3

Introduction
To use this lens, you need to attach it to a compatible camera body.
Refer to the Camera Body User Guide for details about how to operate shooting and
playback functions and change settings and to read important precautions for use.
This instruction manual will explain functions and operating procedures that are
available only when this camera unit is used with a compatible camera body. See also
the GXR Camera Body User Guide.
To make the best use of this product’s functions, read this manual thoroughly before
use. Please keep this manual handy for ease of reference.
Ricoh Co., Ltd.
3
Page 4

4
Safety precautions Read all safety precautions thoroughly to ensure safe use.
Test shots Take test shots to ensure that the camera is working properly
Copyright Reproduction or alteration of copyrighted documents, magazines,
Exemption from liability Ricoh Co., Ltd. assumes no liability for failure to record or display
Warranty The warranty supplied with this product is only valid within the
Radio interference Operating this product in the vicinity of other electronic
before taking photos on important occasions.
and other materials, other than for personal, home, or other
similarly limited purposes, without the consent of the copyright
holder, is prohibited.
images as a result of product malfunction.
country of purchase. The manufacturer assumes no responsibility
for servicing the product in other countries or bearing any
expense thereby incurred.
equipment may adversely affect both the camera and the other
device. Interference is particularly likely if the camera is used
in close proximity to a radio or television. This can be resolved
by moving the camera as far as possible from the other device,
reorienting the radio or television antenna, or plugging the radio
or television into a different outlet.
Page 5

© 2011 RICOH CO., LTD. All rights reserved. This publication may not be reproduced in whole or in part without
Ricoh’s express written permission. Ricoh reserves the right to change the contents of this document at any time
without prior notice.
Every effort has been made to ensure the accuracy of the information in this document. Should you nevertheless
notice any errors or omissions, we would be grateful if you would notify us at the address listed on the back cover
of this booklet.
5
Page 6

6
Safety Precautions
Warning Symbols
Various symbols are used throughout this instruction manual and on the
product to prevent physical harm to you or other people and damage to
property. The symbols and their meanings are explained below.
Danger
Warning
Caution
This symbol indicates matters that may lead to imminent risk of
death or serious injury if ignored or incorrectly handled.
This symbol indicates matters that may lead to death or serious
injury if ignored or incorrectly handled.
This symbol indicates matters that may lead to injury or physical
damage if ignored or incorrectly handled.
Page 7

Sample Warnings
The symbol alerts you to actions that must be performed.
The symbol alerts you to prohibited actions.
The symbol may be combined with other symbols to indicate that a specific action
is prohibited.
Examples
= Do not touch = Do not disassemble
Observe the following precautions to ensure safe use of this unit.
Danger
Do not attempt to disassemble, repair or alter the equipment yourself. The highvoltage circuitry in the equipment poses significant electrical hazard.
7
Page 8

8
Warning
Keep the equipment out of the reach of children.
Do not touch the internal components of the equipment if they become exposed as
a result of being dropped or damaged. The high-voltage circuitry in the equipment
could lead to an electric shock. Remove the battery as soon as possible, being careful
to avoid electric shocks or burns. Take the equipment to your nearest dealer or service
center if it is damaged.
Do not use the equipment in wet areas as this could result in fire or electric shock.
Do not use the equipment near flammable gases, gasoline, benzene, thinner or
similar substances to avoid the risk of explosion, fire or burns.
•
Do not use the equipment in locations where usage is restricted or prohibited as
this may lead to disasters or accidents.
Page 9

Caution
Do not allow the equipment to get wet. In addition, do not operate it with wet hands.
Both pose the risk of electric shock.
Safety Precautions
for Accessories
When using optional products, carefully read the instructions
provided with the product before using that product.
9
Page 10

10
Table of Contents
Package Contents ................................................................................................................. 2
Introduction ............................................................................................................................ 3
Safety Precautions ................................................................................................................ 6
Names of Parts ....................................................................................................15
Upgrading the Product .....................................................................................
Updating the firmware .....................................................................................................16
Shooting ...............................................................................................................18
Level Indicator .....................................................................................................................18
Macro Functions..................................................................................................................18
Built-in Flash .........................................................................................................................18
Mode P: Program Shift ......................................................................................................19
M: Manual Exposure Mode .............................................................................................. 21
Addition of Scene Modes.................................................................................................21
16
Page 11

Enlarging pictures ..............................................................................................................22
Addition of new target shift function..........................................................................23
Registering Functions to the Up-down Dial .............................................................24
Addition of Supported Sizes for Auto Resize Zoom ............................................... 24
Playback Mode ....................................................................................................24
Camera Unit Information Display .................................................................................24
Settings ................................................................................................................25
[Picture Quality/Size] .........................................................................................................25
Photographs ...............................................................................................................26
Movies ...........................................................................................................................27
[Auto Bracket] ......................................................................................................................28
[Interval Shooting] .............................................................................................................28
[Noise Reduction] ...............................................................................................................29
[White Balance] ...................................................................................................................29
[ISO Setting] ..........................................................................................................................30
11
Page 12

12
[Focus Assist] ........................................................................................................................31
[Dynamic Range Compensation] ..................................................................................32
[Shutter Speed Auto Shift] ..............................................................................................33
Key Custom Settings Tab Menu .......................................................................34
[Reg. My Settings] ...............................................................................................................34
[ADJ. Lever Settings] ..........................................................................................................34
[Shutter Button Confirmation] .......................................................................................35
[Set Fn1/Fn2 Buttons]........................................................................................................35
[ADJ. Direct ISO Control] ..................................................................................................36
[Delete My Settings] ..........................................................................................................37
[Restore Defaults] ...............................................................................................................37
Page 13

Setup Menu .........................................................................................................38
[ISO Step Setting] ................................................................................................................ 38
[ISO Auto-High Settings] ..................................................................................................38
[Sleep Mode] [Auto Power Off] .....................................................................................38
[Level Setting] ......................................................................................................................39
[Level (Tilt) Calibration] ....................................................................................................39
[Digital Zoom Image] Setting .........................................................................................39
[Target Zoom Play] .............................................................................................................40
[Spot AF Area Setting] ....................................................................................................... 40
[Zoom Display Release] ....................................................................................................40
[Focus assist selection]......................................................................................................41
[Keep shooting conditions] ............................................................................................. 41
[White Saturation Display] ..............................................................................................42
[Copyright notice] ..............................................................................................................42
[Firmware Version] .............................................................................................................. 42
13
Page 14

14
Specifications ......................................................................................................43
Internal Memory/Memory Card Capacity ..................................................................49
Appendices ..........................................................................................................52
Optional Accessories .........................................................................................................52
Precautions for Use ............................................................................................................54
Equipment Care and Storage .........................................................................................56
Warranty and Servicing ....................................................................................................58
Page 15

Names of Parts
1 Connector
2 Ring cap
3 Lens
1 2 3
15
Page 16

16
Upgrading the Product
Updating the firmware
When you first attach the camera unit to the camera body, the version
update function will start automatically if the firmware of the camera body
need to be updated. In such case, update the firmware of the camera body
using the following procedure.
If the firmware version is already up to date, the version update function
will not start and you can use the lens right away.
1 Check that the camera is turned off and attach the lens mount unit to
the camera body.
• For details about how to attach the camera unit, refer to the Camera Body
User Guide.
Page 17

2 Turn on the camera body.
• A confirmation message about updating the firmware appears.
3 Press the Fn1/Fn2 buttons to select [Yes] and then press the MENU/
OK button.
• The firmware update begins and the following messages appear on the
picture display.
[Checking rewrite file]
[Rewriting program]
The camera restarts and the firmware version will be displayed, and then
the update will be completed.
Note --------------------------------------------------------------------------------------
• To confirm the firmware version, with the camera off, keep the 6 (Play)
button pressed for more than 1 second while holding the – button
pressed down. The firmware version will appear for about 20 seconds.
• For the latest information on firmware updates, see the Ricoh Web site
(http://www.ricoh.com/r_dc/).
17
Page 18

18
Shooting
Level Indicator
In addition to the horizontal direction, tilt (front-back direction) can also be
checked.
Macro Functions
The Macro Shooting, Macro Target, Auto Macro, and Minimum Shooting
Distance Display during Macro Shooting functions are not available.
Built-in Flash
If the built-in flash is used, vignetting will occur in the bottom portion of
the image. Use the external flash (GF-1) for flash photography.
Page 19

Mode P: Program Shift
The diagram on the following page gives estimates of the shift range for
various combinations of aperture values and shutter speeds. The actual
values may vary depending on EV (exposure value).
In these examples, the flash mode is set to [Flash Off], and the ISO setting is
set to [ISO 200].
19
Page 20

20
: Wide
Ev5
Ev6
Ev4
Ev3
Ev2
Ev1
Ev0
Ev-1
Ev-2
8
9
7
6
5
4
3
2
1
0
F16
F22
F11
F8.0
F5.6
F4.0
F2.8
F2.0
F1.4
F1.0
-1 0 1 2 3 4 5 6
7 8 9
10 11 12
2-24-38 1 1/2 1/4 1/8 1/15 1/30 1/60
1/125 1/250 1/500
1/1000 1/2000 1/4000
Ev8Ev7 Ev9 Ev10 Ev11 Ev12 Ev13 Ev14 Ev15 Ev16 Ev17 Ev18 Ev19
F22.0
F3.5
: Tele
Page 21

M: Manual Exposure Mode
You can select between B (Bulb) and T (Time) for the shutter speed.
With B, the image is exposed while the shutter release button is pressed
and exposure ends when the button is released. With T, exposure starts
when the shutter release button is pressed and ends when it is pressed
again. In either mode, the camera stops shooting compulsorily once 180
sec. has elapsed.
[Auto] and [Auto-Hi] of the ISO setting can also be used.
Note --------------------------------------------------------------------------------------
B and T can both be operated using the optional cable switch (CA-1).
Addition of Scene Modes
[Miniaturize], [High Contrast B&W], [Soft Focus], [Cross Process], and [Toy
Camera] have been added to Scene Mode.
Vignetting can be set in [Cross Process] and [Toy Camera].
21
Page 22

22
Caution ----------------------------------------------------------------------------------
Depending on the firmware version that was being used, the setting
for vignetting may be reset to the default when the firmware version is
updated.
Enlarging pictures
Pressing and holding down the MENU/OK button enlarges and displays the
center. Pressing and holding down the MENU/OK button again enlarges
the center and displays the enlarged part over the entire screen. Pressing
and holding the MENU/OK button again returns to normal display. When
focusing manually, press the shutter button halfway to return to normal
display.
You can set the display magnification by pressing and holding down the t
(Self-timer) button or by selecting [Magnification Ratio] from the shooting
menu. Select from [2 ×], [4 ×], or [8 ×] using the +/- buttons, and then press
the MENU/OK button.
When moving the target or focusing manually, press the direction keys (+//Fn1/Fn2) to move the magnified area.
Page 23

Note --------------------------------------------------------------------------------------
• The display returns to the normal display when the following is operated
in Enlarged View mode:
• exposure compensation is executed
• the Direct button is operated
• If AE Lock is turned on before the entire image is enlarged, AE will
continue to run during Enlarged View, and pictures will be captured at
the locked AE settings.
• You can register [Enlrg Part] and [Enlrg All] to the [Set Fn1/Fn2 Button] in
the Key Custom Settings menu.
Addition of new target shift function
Pressing the ADJ. lever displays target shift and enables selecting the
tracking target.
Pressing the d button during target shift returns the target to the center of
the image. Pressing the d button again cancels target shift.
23
Page 24

24
Registering Functions to the Up-down Dial
You can switch between modes using the Up-down dial when Flash mode
and Self-timer are set to on.
Addition of Supported Sizes for Auto Resize Zoom
Auto resize zoom supports all aspect ratios.
Playback Mode
Camera Unit Information Display
You can switch the page by pressing the ! and " buttons. Camera unit
information and copyright information are displayed on the second page.
Page 25

Settings
[Picture Quality/Size]
The [RAW only] option has been added. This option does not
simultaneously save a JPEG copy.
The following picture quality, image size and aspect ratio options are
available for the [Picture Quality/Size] setting.
A photograph‘s file size will depend on the combination of picture quality
and image size used. When recording movies, you can select the [Movie
Size].
25
Page 26

26
Photographs
Item Aspect ratio Compression Image size (pixels)
RAW 16:9 *
L (Large) 16:9 *
M (Middle) 16:9 *
2
FINE/NORMAL/VGA *14928 × 2768
4:3 FINE/NORMAL/VGA *14352 × 3264
3:2 *
1:1 *
2
3
2
FINE/NORMAL/VGA *14928 × 3264
FINE/NORMAL/VGA *13264 × 3264
FINE/NORMAL 4928 × 2768
4:3 FINE/NORMAL 4352 × 3264
3:2 *
1:1 *
2
3
2
FINE/NORMAL 4928 × 3264
FINE/NORMAL 3264 × 3264
FINE/NORMAL 3456 × 1944
4:3 FINE/NORMAL 3072 × 2304
3:2 *
1:1 *
2
3
FINE/NORMAL 3456 × 2304
FINE/NORMAL 2304 × 2304
Page 27
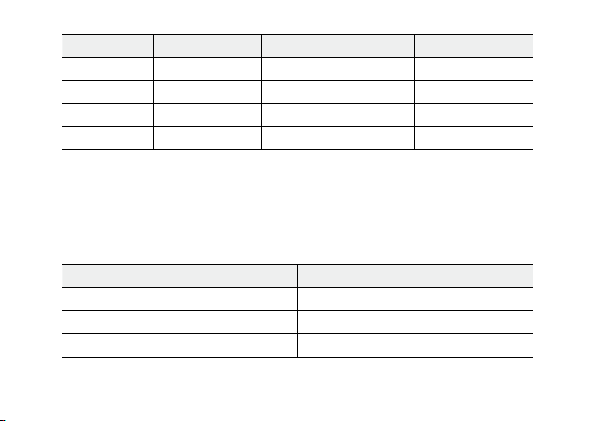
Item Aspect ratio Compression Image size (pixels)
5M 4:3 FINE 2592 × 1944
3M 4:3 FINE 2048 × 1536
1M 4:3 FINE 1280 × 960
VGA 4:3 FINE 640 × 480
*1 When [RAW] is selected, this is the setting used for the JPEG copy.
*2 Depending on the area photographed, black bands may appear on the top and bottom
of the picture display.
*3 Depending on the area photographed, black bands may appear at the right and left sides
of the picture display.
Movies
Item Movie size
HD1280 1280 × 720
VGA640 640 × 480
QVGA320 320 × 240
27
Page 28

28
[Auto Bracket]
[ISO-BKT] can be selected. With the value set for the ISO sensitivity setting
in the shooting menu as the standard, 3 images can be shot with differing
ISO settings; one at -1/3EV of the standard (set) value, one at the standard
(set) value, and one at +1/3EV of the standard (set) value.
Caution ----------------------------------------------------------------------------------
Since shooting is performed within the ISO sensitivity range that can be set,
the bracketing range may not be 1/3EV or an image may be shot with the
same settings, depending on the [ISO Setting].
[Interval Shooting]
The number of shots to be taken can be set. When this is set, the “remaining
number of shots” is displayed during shooting.
The shooting interval can be set to a minimum of 2 seconds, and the
number of shots to be taken can be set to a maximum of 99 shots.
Page 29

[Noise Reduction]
Perform noise reduction from [Off], [Auto], [Weak], [Strong], or [MAX]. The
time required to record images varies with the option selected.
Caution ----------------------------------------------------------------------------------
You cannot use this function when [Portrait], [Sports], [Miniaturize], [High
Contrast B&W], [Soft Focus], [Cross Process], [Toy Camera], or [Skew Correct
Mode] is selected in the scene modes.
[White Balance]
You can select [Incandescent Lamp1] or [Incandescent Lamp2].
Using [Incandescent Lamp2] will leave a slightly redder tint compared to
[Incandescent Lamp1].
Note --------------------------------------------------------------------------------------
• When [Incandescent Lamp2] is selected, images will be shot with the
same color shades as with the [Incandescent] setting described in the
Camera Body User Guide.
29
Page 30

30
• If the flash (GF-1) is fired using DISP. in [Manual], the white balance will be
set to the metering results calculated when the flash went off.
[ISO Setting]
[Auto], [Auto-Hi], [ISO-LO], [ISO 200] to [ISO 3200] can be selected.
Note --------------------------------------------------------------------------------------
• [ISO-LO] is equivalent to ISO 100. However, the dynamic range gets
narrower and the higher brightness levels make whiteout more likely to
occur.
• When [Auto] is selected and the flash is used, the sensitivity used will gain
up to ISO 800 equivalent.
• The step setting for ISO can be selected in [ISO Step Setting] (
the setup menu.
• When [Auto] is selected and the flash is not used, the minimum and
maximum values for the ISO sensitivity will be ISO 200 and ISO 400.
GP. 38) in
Page 31

[Focus Assist]
The shape outlines and contrast of the images shown on the picture display
are intensified, making it easier to adjust the focus.
Note --------------------------------------------------------------------------------------
• When focusing manually, the intensification of the shape outline or
contrast will be released by pressing the shutter button halfway.
• You can select the display method for Focus Assist from [Focus assist
selection] in the setup menu. (GP. 41)
31
Page 32
32
[Dynamic Range Compensation]
The camera captures a wide range of tones from dark to bright. The
intensity can be selected from [Off], [Weak], [Medium], or [Strong].
Caution ----------------------------------------------------------------------------------
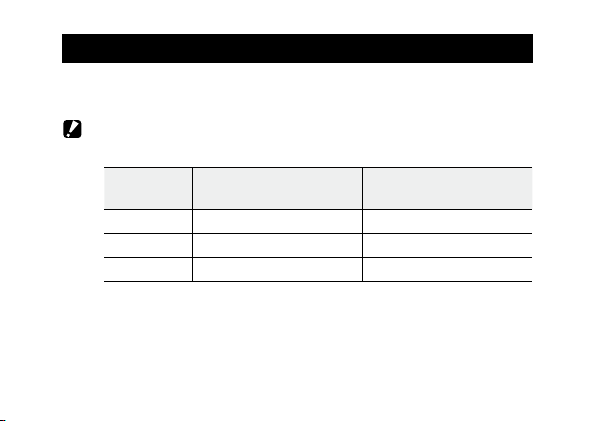
• Available ISO settings are limited in dynamic range compensation mode.
ISO Step Setting
1/3EV
Weak ISO 400 to ISO 2000 ISO 400 to ISO 1600
Medium ISO 500 to ISO 1600 ISO 800 to ISO 1600
Strong ISO 640 to ISO 1250 ISO 800
• If [Strong] is selected, more noise are likely to occur in images.
• If using the digital zoom, Dynamic Range Compensation has no effect.
• The desired effect may not be achieved if the scene is too bright or too
dark.
ISO Step Setting
1EV
Page 33

Note --------------------------------------------------------------------------------------
• Setting [Multi] for Exposure Metering is recommended when using the
dynamic range compensation function.
• Dynamic range compensation can be applied to a RAW image.
[Shutter Speed Auto Shift]
When the [Shutter Speed Auto Shift] setting in the shooting menu is set to
[On] while the mode dial is set to “S”, the camera will automatically adjust
the shutter speed to obtain the best exposure when it cannot be obtained
using the shutter speed that was set manually.
Note --------------------------------------------------------------------------------------
The [Shutter Speed Auto Shift] setting will not appear when the mode dial is
set to a mode other than “S”.
33
Page 34

34
Key Custom Settings Tab Menu
[Reg. My Settings]
You can select from any of My Settings Box [1] to [6] and Card [1] to [6] for
the save location.
[Spot AF Area Setting] in the setup menu and the zoom position can also
be registered. When [Zoom Position] in [Edit My Settings] is selected,
settings can be edited.
[ADJ. Lever Settings]
You can set the [Aspect Ratio] function in [ADJ. Lever Setting 1] to [ADJ.
Lever Setting 4].
If you set the Aspect Ratio function, and press the ADJ. Lever button,
will appear, allowing you to set the aspect ratio.
Page 35

[Shutter Button Confirmation]
When [ADJ./DIRECT] is set, pressing the shutter release button halfway
down will finalize settings in ADJ. mode and on the DIRECT screen, and you
will be able to shoot pictures. When [ADJ.] is set, the ADJ. mode settings
will be finalized, enabling you to shoot pictures. When [DIRECT] is set, the
DIRECT screen settings will be finalized, enabling you to shoot pictures.
After you finish shooting pictures, the system will return to the Monitoring
screen.
[Set Fn1/Fn2 Buttons]
[Enlrg Display], [Focus Assist], [Aspect Ratio], and [Dynamic Range
Compensation] functions are added.
35
Page 36

36
[ADJ. Direct ISO Control]
When [ADJ. Direct ISO Control] is set to [On], you can push the ADJ. lever
sideways when shooting is possible to change the ISO setting. The default
setting is [Off].
Note --------------------------------------------------------------------------------------
• The ADJ. lever can be used to adjust sensitivity while the shutter button
is pressed halfway in program shift and aperture priority modes (in
program shift mode, sensitivity can be adjusted even after the shutter
button is released, as long as shutter speed and aperture are displayed).
Note that once sensitivity has been adjusted in this manner, [Auto] and
[Auto-Hi] can not be re-selected.
• In manual exposure mode, you cannot use the ADJ. lever to change the
ISO setting.
Page 37

[Delete My Settings]
The settings registered to [My Settings Box] in [Reg. My Settings], to [Card],
and to [MY1], [MY2], and [MY3] on the Mode dial return to their defaults.
[Restore Defaults]
The key custom settings will be reset.
Note --------------------------------------------------------------------------------------
Settings set in [Reg. My Settings] will not be reset.
37
Page 38

38
Setup Menu
[ISO Step Setting]
The [ISO Setting] in the shooting settings menu can be set in intervals of
[1EV] or [1/3EV ].
[ISO Auto-High Settings]
You can set the upper limits for the ISO setting and the shutter speed for
switching the ISO setting when [ISO Setting] is set to [Auto-Hi].
[Sleep Mode] [Auto Power Off]
You can set the time allowed to elapse before the camera enters [Sleep
Mode] or activates [Auto Power Off] from a range of 1 minute to 30
minutes.
Page 39
[Level Setting]
[Off], [Level + Tilt], [Level], [Level + Sound], and [Sound] can be selected.
[Level (Tilt) Calibration]
Register the current perspective as the standard.
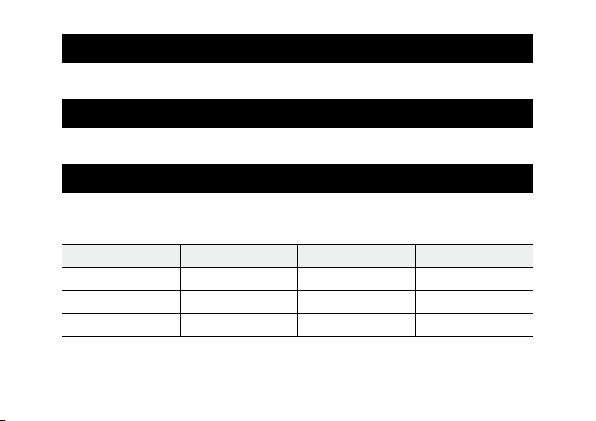
[Digital Zoom Image] Setting
The size of the recorded image varies depending on the auto resize zoom,
as follows.
Zoom ratio Image size (pixels) Zoom ratio Image size (pixels)
Approx. 1.0 ×
Approx. 1.4 ×
Approx. 1.7 ×
L Approx. 2.1 × 3M
M Approx. 3.4 × 1M
5M Approx. 6.8 × VGA
39
Page 40

40
[Target Zoom Play]
With Enlarged Display in playback mode, you can zoom in on the image
centered at the position to which the camera was shifted by target shift
during shooting.
[Spot AF Area Setting]
You can select the AF area for when [Focus] in the shooting settings menu
is set to [Spot AF]. [Normal] or [Pinpoint] can be selected. The AF area for
[Pinpoint] is smaller than the AF area for [Normal].
[Zoom Display Release]
You can select whether to maintain or cancel the enlarged view after
shooting pictures in Enlarged View mode. Selecting [Off] maintains
Enlarged View mode and [On] cancels it after pictures are shot.
Page 41

[Focus assist selection]
When [Focus Assist] is set to [On] in the shooting menu, you can select
[MODE1] or [MODE2].
MODE1: Shape outlines for subjects/objects in focus are enhanced.
MODE2: The picture display switches to black and white, and the area in
focus glows in white.
[Keep shooting conditions]
When this is set to [On], if you continue to press the shutter release button
halfway after shooting without releasing the shutter, the focus, aperture,
shutter speed, ISO, and white balance settings are retained.
Caution ----------------------------------------------------------------------------------
• The shooting conditions are not retained in the following cases.
• [Movie] and [Skew Correct Mode] of scene mode
• Interval shooting
• Continuous mode
• Self-timer
41
Page 42

42
• When set to [On], [Multi-P AUTO] of [White Balance] operates as [Auto]
and [Dynamic Range Compensation] is invalid.
[White Saturation Display]
When set to [On], the white saturation areas of the image flash when
displayed in White Saturation of playback mode.
[Copyright notice]
Enter the copyright information to write this information into the Exif data
of the image.
Note --------------------------------------------------------------------------------------
The recorded copyright information can be checked in the details +
histogram display of the playback screen.
[Firmware Version]
The firmware version of the camera is displayed. If a firmware update file is
saved on a memory card, the firmware can be updated.
Page 43
Specifications
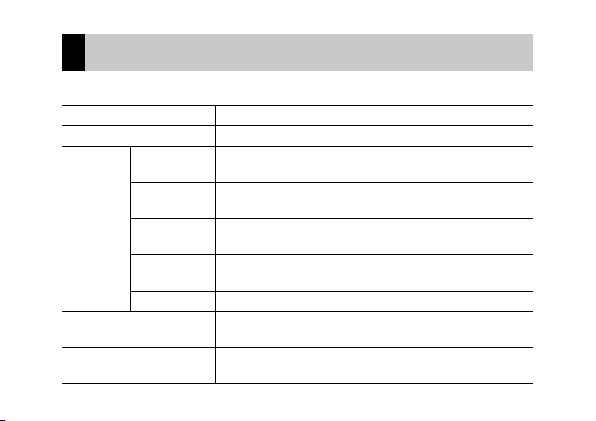
Specifications are given for the camera unit mounted on a GXR body.
Effective pixels Approximately 16.2 million
Image sensor 23.6 mm × 15.7 mm CMOS (total pixels: approx. 16.5 million)
Lens Focal length 15.7 mm to 55.5 mm (35-mm format equivalent: 24 mm to
Aperture
(f-number)
Focus range
(from lens)
Construction 11 elements in 9 groups (3 aspherical lens elements with 6
Filter diameter 55 mm
Zoom 4.0 × digital zoom (photographs), 3.6 × digital zoom (movies);
Focus mode Contrast AF-based multi and spot AF; MF; Snap; ∞ (focus lock
85 mm)
f/3.5 – f/5.5
Approx. 25 cm – ∞ (telephoto end)
surfaces)
approx. 6.8 × auto resize zoom (VGA)
and AF-assist)
43
Page 44

44
Shutter
speed
Exposure
control
ISO sensitivity
(Standard Output Sensitivity)
Photographs 1/3200 – 180 s, B (Bulb), T (Time) (upper and lower limits vary
Movies 1/2000 – 1/30 s
Metering TTL-CCD metering in multi (256-segment), center-weighted,
Mode Program AE, aperture priority AE, manual exposure, shutter
Exposure
compensation
Exposure link
range (Auto
shooting
mode, Centerweighted light
metering)
according to shooting and flash mode)
and spot modes with autoexposure lock
priority AE, move target function
Manual (-4.0 to +4.0 EV in increments 1/3 EV or 1/2 EV), auto
bracketing (-2.0 to +2.0 EV in increments 1/3 EV or 1/2 EV)
Wide angle: 3.2 – 16.8 EV
Telephoto: 3.6 – 18.1 EV
(Exposure range for auto ISO calculated using values for
ISO 100.)
Note: At 6.0 EV or lower, each drop of 1.0 EV is associated with
a 0.25 EV drop in brightness. Brightness drops by no more
than -1.0 EV.
Auto, Auto-Hi, ISO-LO, ISO 200, ISO 250, ISO 320, ISO 400, ISO
500, ISO 640, ISO 800, ISO 1000, ISO 1250, ISO 1600, ISO 2000,
ISO 2500, ISO 3200
Page 45

White balance mode Auto, Multi-P AUTO, Outdoors, Cloudy, Incandescent Lamp1,
Flash
(with GF-1)
Shooting mode Auto Shooting Mode, Program Shift Mode, Aperture Priority
Continuous
mode
Flash output
adjustment
Flash Mode Red-eye reduction, Flash On, Slow sync, Manual
Timing Front/rear curtain sync
Number of
pictures shot
in Continuous
(Picture Size:
RAW)
Number of
pictures shot
in M-Cont Plus
(1 set)
Incandescent Lamp2, Fluorescent Lamp, Manual, Detail; white
balance bracketing
TTL flash, manual flash, ambient light automatic
Mode, Shutter Speed Priority, Manual Exposure Mode, scene
mode (Movie, Portrait, Sports, Landscape, Nightscape, Skew
Correct Mode, Miniaturize, High Contrast B&W, Soft Focus,
Cross Process, Toy Camera), My Settings
Noise Reduction off: 3 pictures
Noise Reduction on: 2 pictures
HI (1280 × 856) : 30 pictures (30 Frames/Sec)
LO (4928 × 3264) : 14 pictures (2.5 Frames/Sec)
45
Page 46

46
Compression *
Image size
(pixels)
File size
(approx.)
1
Photographs 4928 × 2768, 4352 × 3264, 4928 × 3264, 3264 × 3264,
FINE, NORMAL, RAW (DNG) *
3456 × 1944, 3072 × 2304, 3456 × 2304, 2304 × 2304,
2592 × 1944, 2048 × 1536, 1280 × 960, 640 × 480
2
Movies 1280 × 720, 640 × 480, 320 × 240
RAW 16:9 NORMAL: 23,445 KB/frame, FINE: 25,703 KB/frame,
VGA: 20,508 KB/frame, RAW only: 20,332 KB/frame
4:3 NORMAL: 24,443 KB/frame, FINE: 26,795 KB/frame,
VGA: 21,405 KB/frame, RAW only: 21,181 KB/frame
3:2 NORMAL: 27,603 KB/frame, FINE: 30,265 KB/frame,
VGA: 24,139 KB/frame, RAW only: 23,937 KB/frame
1:1 NORMAL: 18,383 KB/frame, FINE: 20,147 KB/frame,
VGA: 16,105 KB/frame, RAW only: 15,929 KB/frame
L 16:9 NORMAL: 2,901 KB/frame, FINE: 4,999 KB/frame
4:3 NORMAL: 3,041 KB/frame, FINE: 5,226 KB/frame
3:2 NORMAL: 3,415 KB/frame, FINE: 5,889 KB/frame
1:1 NORMAL: 2,288 KB/frame, FINE: 3,927 KB/frame
Page 47

File size
(approx.)
File size
(approx.)
Battery life
(based on CIPA standard)
Dimensions (W × H × D)
M 16:9 NORMAL: 1,481 KB/frame, FINE: 2,514 KB/frame
5M 4:3 FINE: 2,293 KB/frame
3M 4:3 FINE: 1,479 KB/frame
1M 4:3 FINE: 818 KB/frame
VGA 4:3 FINE: 202 KB/frame
4:3 NORMAL: 1,579 KB/frame, FINE: 2,668 KB/frame
3:2 NORMAL: 1,749 KB/frame, FINE: 2,974 KB/frame
1:1 NORMAL: 1,192 KB/frame, FINE: 2,008 KB/frame
3
DB-90: approx. 400 shots *
Camera unit only:
71.4 mm (w) × 70.5 mm (h) × 93.3 mm (d) (Based on CIPA guide
line)
When mounted on the camera body:
113.9 mm (w) × 74.7 mm (h) × 98.5 mm (d) (Based on CIPA guide
line)
(Based on CIPA guide line)
47
Page 48
48
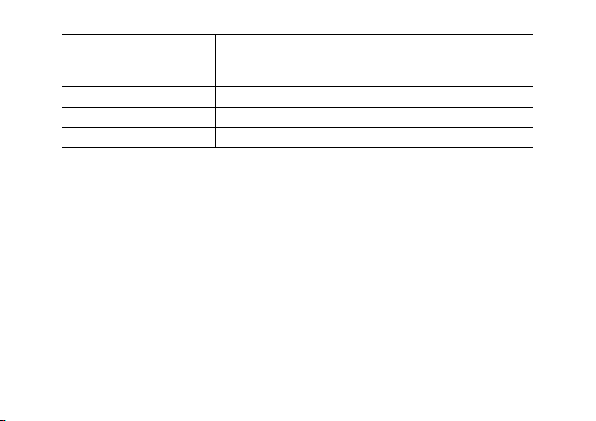
Weight (approx.) Camera unit only: 350 g
Operating temperature 0 °C to 40 °C
Operating humidity 90 % or less
Storage temperature –20 °C to 60 °C
*1 The options available vary with image size.
*2 A JPEG file is also recorded (the JPEG file may be a FINE- or NORMAL-quality file with
the dimensions as the RAW file or a VGA file 640 × 480 pixels in size). RAW files use the
standard DNG format promoted by Adobe Systems, Inc.
*3 For reference only; actual number of shots varies greatly according to how camera is
used. We recommend that you carry spare batteries when in use for extended periods.
When mounted on the camera body: 550 g (Including the
battery and SD memory card)
Page 49
Internal Memory/Memory Card Capacity
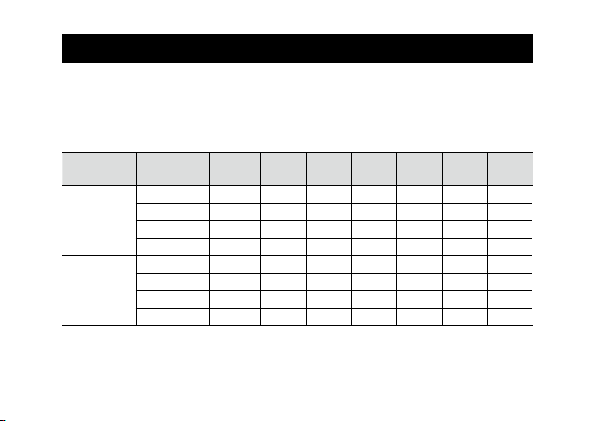
The following values are given as a reference of the storage capacity of the
internal memory and memory cards of various sizes, by picture quality and
image size, when using the FINE picture quality.
Photographs
Compression Image size
RAW *
FINE
L
FINE
(pixels)
4928 × 2768 3 37 76 150 306 614 1233
4352 × 3264
4928 × 3264
3264 × 3264
4928 × 2768 16 179 365 718 1468 2941 5900
4352 × 3264
4928 × 3264
3264 × 3264
Internal
1 GB 2 GB 4 GB 8 GB 16 GB 32 GB
memory
3 36 73 144 294 589 1182
2 31 64 127 260 522 1047
4 47 97 191 391 784 1573
15 172 349 685 1401 2807 5632
14 152 310 609 1245 2495 5006
21 228 465 914 1868 3743 7510
49
Page 50
50
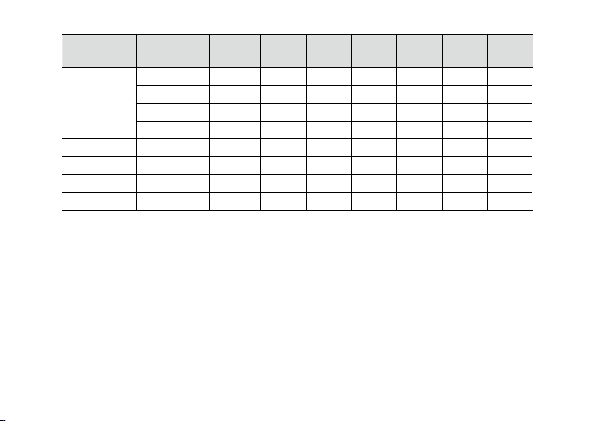
Compression Image size
M
FINE
5M/FINE 2592 × 1944 34 373 758 1490 3045 6101 12238
3M/FINE 2048 × 1536 53 581 1182 2321 4744 9503 19063
1M/FINE 1280 × 960 96 1059 2118 4160 8505 17039 34181
VGA/FINE 640 × 480 368 4028 7681 15082 30828 61759 123888
* When [RAW] is selected, this is the compression used for the JPEG copy.
(pixels)
3456 × 1944
3072 × 2304
3456 × 2304
2304 × 2304
Internal
1 GB 2 GB 4 GB 8 GB 16 GB 32 GB
memory
32 357 723 1419 2902 5814 11662
30 337 683 1341 2741 5491 11014
27 302 614 1206 2466 4941 9913
41 447 903 1774 3627 7267 14578
Page 51
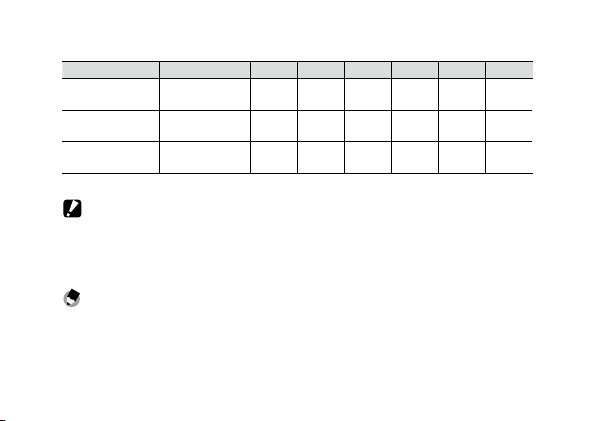
Movies
Image size (pixels) Internal memory 1 GB 2 GB 4 GB 8 GB 16 GB 32 GB
1280 × 720
30 frames/second
640 × 480
30 frames/second
320 × 240
30 frames/second
16sec. 3min.
49sec. 8min.
1min.
59sec.
3sec.
55sec.
21min.
39sec.
6min.
14sec.
18min.
8sec.
44min.
2sec.
12min.
14sec.
35min.
38sec.
86min.
28sec.
25min.
1sec.
72min.
50sec.
176min.
44sec.
50min.
7sec.
145min.
54sec.
354min.
3sec.
100min.
33sec.
292min.
41sec.
710min.
13sec.
Caution ----------------------------------------------------------------------------------
The maximum uninterrupted recording size for a single movie is 4 GB. The
maximum recording time is around 15 minutes at 1280 × 720 size, around 46
minutes at 640 × 480 size, and around 90 minutes at 320 × 240 size.
Note --------------------------------------------------------------------------------------
When recording movies with the movie size set to 1280 × 720, using SD/
SDHC memory cards with a speed class of 6 or more is recommended.
51
Page 52
52
Appendices
Optional Accessories
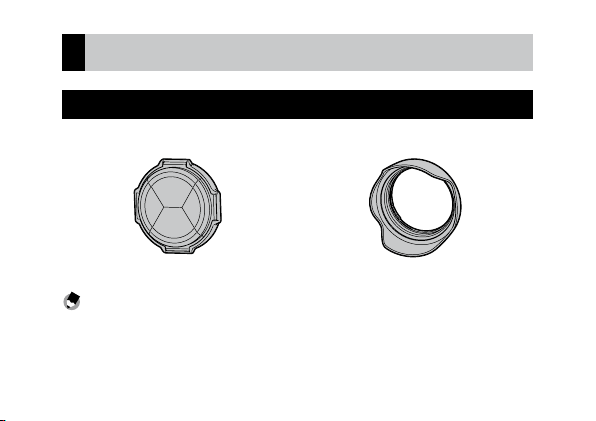
The camera unit can be used with the items (sold separately) listed below.
Les cap (LC-3) Lens hood (LH-2)
Note --------------------------------------------------------------------------------------
• Before using an optional accessory, see the documentation that came
with the product.
• For the latest information on optional accessories, visit the Ricoh website
(http://www.ricoh.com/r_dc/).
Page 53
Caution ----------------------------------------------------------------------------------
121
2
The lens cap (LC-3) and lens hood (LH-2) cannot be used together.
If the lens hood (LH-2) is attached when the lens cap (LC-3) is already
attached, the lens cap may break.
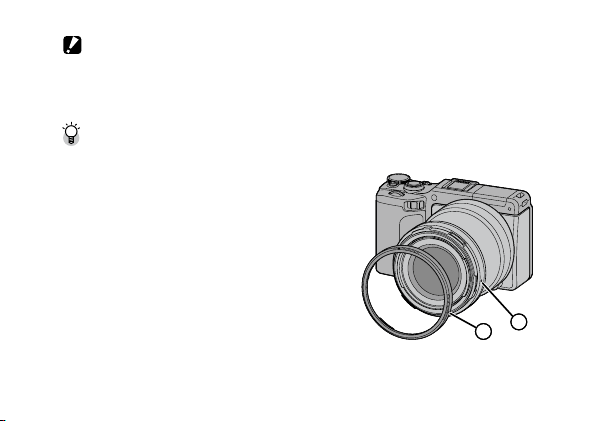
Removing/attaching the ring cap -------------------------------------------------
Remove the ring cap when using the optional ring cap (LC-3).
Removing the ring cap
Turn the ring cap counterclockwise while the
camera is turned off and remove from the
camera unit.
Attaching the ring cap
With the camera turned off, align the
marking on the ring cap (2) with the
marking on the camera unit (1) and turn
the ring cap clockwise until it clicks.
53
Page 54

54
Precautions for Use
• The warranty supplied with this product is only valid within the country of purchase.
• Should the product fail or malfunction while out of the country, the manufacturer
assumes no responsibility for servicing the product locally or bearing any
expenditure incurred thereby.
• Do not drop the equipment or subject it to physical shocks.
• When carrying the equipment, be careful that it does not strike other objects.
Particular care is required to protect the lens.
• When attaching a filter or lens hood, be careful not to apply excessive force.
• Abrupt changes in temperature may cause condensation, resulting in visible
condensation inside which can lead to the malfunction of the equipment. This
can be avoided by placing the equipment in a plastic bag to slow the temperature
change, and removing it only after the air in the bag has reached the same
temperature its surroundings.
• Keep the equipment dry and avoid handling it with wet hands. Failure to observe
these precautions could result in malfunction of the equipment or electric shock.
• Keep the connector clean.
Page 55

Tip: Avoiding Condensation --------------------------------------------------------
Condensation is particularly likely to occur if you move to an area with a
sharply different temperature, if humidity is high, in a cold room after the
heater has come on, or where the camera is exposed to cold air from an air
conditioner or other device.
55
Page 56

56
Equipment Care and Storage
Caring for the Equipment
• Photographs can be affected by fingerprints and other foreign matter on the
lens. Avoid touching the lens with your fingers. Remove dust or lint with a
blower from a camera supply store, or gently clean the lens with a soft, dry
cloth. Be especially careful around the barrel.
Clean the equipment thoroughly after using it at the beach or handling
•
cosmetics. Do not expose the equipment to volatile substances such as
thinner, benzene, or pesticides. Failure to observe this precaution could result
in damage to the equipment or its finish.
In the unlikely event of malfunction, visit a Ricoh Repair Center.
•
This equipment is a high precision device. Do not disassemble.
•
Page 57

Storage
• Do not store the camera where it will be exposed to: extreme heat or
humidity; large changes in temperature or humidity; dust, dirt, or sand; severe
vibration; prolonged contact with chemicals, including mothballs and other
insect repellent, or with vinyl or rubber products; strong magnetic fields (for
example, in the vicinity of a monitor, transformer, or magnet).
• When storing, place the product in a camera case, etc. that does not collect
dirt or fluff to prevent dirt or dust from attaching itself to the camera.
In addition, when carrying the camera, do not place the camera directly into a
pocket, etc., in order to prevent dirt and dust from getting on the camera.
57
Page 58

58
Warranty and Servicing
1. This product is backed by a limited warranty. During the warranty period
mentioned in the Warranty supplied with your equipment, any defective
parts will be repaired free of charge. In the event of equipment malfunction,
contact the dealer from which you purchased the equipment or your nearest
Ricoh Repair Center. Please note that you will not be reimbursed for the cost of
bringing the equipment to the Ricoh Repair Center.
2. This warranty does not cover any damage resulting from:
1 failure to follow the instructions in the instruction manual;
2 repair, modification or overhaul not conducted by an authorized service
center listed in the instruction manual;
3 fire, natural disaster, act of God, lightning, abnormal voltage, etc.;
4 improper storage (noted in the “Camera Body User Guide”), leaking
of battery and other fluids, mold, or otherwise insufficient care of the
equipment.
5 submergence in water (flooding), exposure to alcohol or other beverages,
infiltration of sand or mud, physical shock, dropping of the equipment, or
pressure on the equipment, and other unnatural causes.
Page 59

3. After the warranty period has passed, you will be liable for all repair fees,
including those incurred at an authorized service center.
4. You will be liable for all repair fees, even within the warranty period, if the
warranty card is not attached or if the distributor’s name or the purchase date
have been changed or are not indicated on the card.
5. Expenses for overhaul and thorough inspection by special request of the
customer will be charged to the customer, whether or not they are incurred
during the warranty period.
6. Any consequential damages arising from failure of the equipment, such as
expenses incurred in taking pictures or loss of expected profit, will not be
reimbursed whether they occur during the warranty period or not.
7. The warranty is only valid in the country in which the equipment was
purchased.
* The above provisions refer to repairs offered free of charge, and do not limit
your legal rights.
* The intention of the above provisions is also described in the warranty card
provided with this equipment.
59
Page 60

60
8. Parts essential to the servicing of the equipment (that is, components required
to maintain the functions and quality of the equipment) will be available for a
period of five years after the equipment is discontinued.
9. Please note that if the equipment is seriously damaged by flooding,
submergence, infiltration of sand or mud, violent shocks or dropping, it may
not be repairable, and restoration to its original condition may be impossible.
Notes -------------------------------------------------------------------------------------
• Before sending the camera in for repair, check the camera body and read
the instruction manual again to ensure proper operation.
• Some repairs require a significant amount of time to complete.
• When sending the equipment to a service center, please include a note
which describes the defective part and the problem as precisely as
possible.
• Remove all accessories not related to the problem before sending the
camera to the service center.
Page 61

61
Page 62
62
Telephone Support Numbers in Europe
UK (from within the UK) 0203 026 2290
(from outside the UK) +44 203 026 2290
Deutschland (innerhalb Deutschlands) 06331 268 438
(außerhalb Deutschlands) +49 6331 268 438
France (à partir de la France) 0800 88 18 70
(en dehors de la France) +33 1 60 60 19 94
Italia (dall'Italia) 02 4032 6427
(dall'estero) +39 02 4032 6427
España (desde España) 911 230396
(desde fuera de España) +34 911 230396
Belgique (en dehors de la Belgique) +32 2 8088300 (Français)
(van buiten België) +32 505 51082 (Vlaams)
Nederland (van buiten Nederland) +31 208081108
http://www.service.ricohpmmc.com/
Page 63
PHOTO STYLE Website for Ricoh Digital Camera Users
PHOTO STYLE offers useful information to make photos and photography
more enjoyable for Ricoh digital camera users.
Basic Knowledge
Easy explanations on the mechanisms and functions of digital cameras
Photo-technique
Useful photography techniques organized by subject
Photographers Gallery
Photos taken by professional photographers
Photo contest
A collection of brilliant photos gathered from around the world
Access the following URL:
http://www.ricoh.com/r_dc/photostyle/
63
Page 64
If You Encounter a Problem with This Product
Ricoh offices
RICOH COMPANY, LTD.
RICOH AMERICAS CORPORATION
RICOH INTERNATIONAL B.V. (EPMMC)
RICOH ASIA PACIFIC OPERATIONS
LIMITED
Ricoh Company, Ltd.
Ricoh Building, 8-13-1, Ginza, Chuo-ku, Tokyo
104-8222, Japan
2011 December
EN USA GB GB AE AE
Printed in China
3-2-3, Shin-Yokohama Kouhoku-ku, Yokohama City, Kanagawa 222-8530,
Japan
http://www.ricoh.com/r_dc
5 Dedrick Place, West Caldwell, New Jersey 07006, U.S.A.
1–800–22RICOH
http://www.ricoh-usa.com/
Oberrather Str. 6, 40472 Düsseldorf, GERMANY
(innerhalb Deutschlands) 06331 268 438
(außerhalb Deutschlands) +49 6331 268 438
http://www.ricohpmmc.com/
21/F, One Kowloon, 1 Wang Yuen Street, Kowloon Bay, Hong Kong
*L455 2971A*
 Loading...