

Ricoh 2020D - Aficio B/W Laser, 412421K1 - Aficio 2016 B/W Laser, Aficio 2016, Aficio 2020 Copy Reference Manual

2016/2020/2020D
Operating Instructions
Copy Reference
Placing Originals
Copying
Troubleshooting
User Tools (Copier Features)
Remarks
Specifications
Read this manual carefully before you use this machine and keep it handy for future reference. For safe and correct use, be sure to read the Safety
Information in this manual before using the machine.

Introduction
This manual contains detailed instructions and notes on the operation and use of this machine. For your
safety and benefit, read this manual carefully before using the machine. Keep this manual in a handy
place for quick reference.
Important
Contents of this manual are subject to change without prior notice. In no event will the company be liable for direct, indirect, special, incidental, or consequential damages as a result of handling or operating the machine.
Notes
Some illustrations in this manual might be slightly different from the machine.
Certain options might not be available in some countries. For details, please contact your local dealer.
Laser Safety:
This machine is considered a class 1 laser device, safe for office/EDP use. The machine contains a 5milliwatt, 760-800 nanometer wavelength, GaAIAs laser diode. Direct (or indirect reflected ) eye contact
with the laser beam might cause serious eye damage. Safety precautions and interlock mechanisms
have been designed to prevent any possible laser beam exposure to the operator.
The following label is attached on the back side of the machine.
Caution
Use of controls or adjustment or performance of procedures other than those specified in this manual
might result in hazardous radiation exposure.
Notes:
The model names of the machines do not appear in the following pages. Check the type of your machine before reading this manual. (For details, see P.6 “Machine Types”.)
• Type 1: Aficio 2016
• Type 2: Aficio 2020
• Type 3: Aficio 2020D
Certain types might not be available in some countries. For details, please contact your local dealer.
Two kinds of size notation are employed in this manual. With this machine refer to the metric version.
For good copy quality, Ricoh recommends that you use genuine Ricoh toner.
Ricoh shall not be responsible for any damage or expense that might result from the use of parts other
than genuine Ricoh parts with your Ricoh office products.
Power Source
220 - 240V, 50/60Hz, 7A or more
Please be sure to connect the power cord to a power source as above. For details about power source,
see P.59 “Power Connection”.

Manuals for This Machine
The following manuals describe the operational procedures of this machine. For
particular functions, see the relevant parts of the manual.
Note
❒ Manuals provided are specific to machine type.
❒ Adobe Acrobat Reader is necessary to view the manuals as a PDF file.
❒ Three CD-ROMs are provided:
• CD-ROM 1 "Operating Instructions for Printer/Scanner"
• CD-ROM 2 "Scanner Driver & Document Management Utilities"
• CD-ROM 3 "Operating Instructions for General Settings and Facsimile"
❖❖❖❖ General Settings Guide (PDF file - CD-ROM3)
Provides an overview of the machine and describes System Settings (paper
trays, Key Operator Tools, etc.), and troubleshooting.
Refer to this manual for Address Book procedures such as registering fax
numbers, e-mail addresses, and user codes.
❖❖❖❖ Network Guide (PDF file - CD-ROM1)
Describes procedures for configuring the machine and computers in a network environment.
❖❖❖❖ Copy Reference (this manual)
Describes operations, functions, and troubleshooting for the machine's copier
function.
❖❖❖❖ Facsimile Reference <Basic Features>
Describes operations, functions, and troubleshooting for the machine's facsimile function.
❖❖❖❖ Facsimile Reference <Advanced Features> (PDF file - CD-ROM3)
Describes advanced functions and settings for key operators.
❖❖❖❖ Printer Reference 1
Describes system settings and operations for the machine's printer function.
❖❖❖❖ Printer Reference 2 (PDF file - CD-ROM1)
Describes operations, functions, and troubleshooting for the machine's printer function.
❖❖❖❖ Scanner Reference (PDF file - CD-ROM1)
Describes operations, functions, and troubleshooting for the machine's scanner function.
i

❖❖❖❖ Manuals for DeskTopBinder Lite
DeskTopBinder Lite is a utility included on the CD-ROM labeled "Scanner
Driver & Document Management Utilities".
• DeskTopBinder Lite Setup Guide (PDF file - CD-ROM2)
Describes installation of, and the operating environment for DeskTopBinder Lite in detail. This guide can be displayed from the [Setup] dialog
box when DeskTopBinder Lite is installed.
• DeskTopBinder Lite Introduction Guide (PDF file - CD-ROM2)
Describes operations of DeskTopBinder Lite and provides an overview of
its functions. This guide is added to the [Start] menu when DeskTopBinder
Lite is installed.
• Auto Document Link Guide (PDF file - CD-ROM2)
Describes operations and functions of Auto Document Link installed with
DeskTopBinder Lite. This guide is added to the [Start] menu when DeskTopBinder Lite is installed.
❖❖❖❖ Manuals for ScanRouter V2 Lite
ScanRouter V2 Lite is a utility included on the CD-ROM labeled "Scanner
Driver & Document Management Utilities".
• ScanRouter V2 Lite Setup Guide (PDF file - CD-ROM2)
Describes installation of, settings, and the operating environment for ScanRouter V2 Lite in detail. This guide can be displayed from the [
log box when ScanRouter V2 Lite is installed.
• ScanRouter V2 Lite Management Guide (PDF file - CD-ROM2)
Describes delivery server management and operations, and provides an
overview of ScanRouter V2 Lite functions. This guide is added to the [Start]
menu when ScanRouter V2 Lite is installed.
Setup
] dia-
❖❖❖❖ Other manuals
• PostScript3 Supplement (PDF file - CD-ROM1)
• Unix Supplement (Available from an authorized dealer, or as a PDF file on
ii
our Web site.)

TABLE OF CONTENTS
Manuals for This Machine......................................................................................i
Notice......................................................................................................................1
How to Read This Manual .....................................................................................2
Names of Major Options ............................................................................................2
Safety Information .................................................................................................3
Safety During Operation.............................................................................................3
Positions of Labels and Hallmarks for RRRRWARNING and RRRRCAUTION Labels .5
Machine Types .......................................................................................................6
Control Panel..........................................................................................................7
Display .......................................................................................................................9
Reading the Display and Using Keys.........................................................................9
Turning On the Power .........................................................................................11
Turning On the Main Power .....................................................................................11
Turning On the Power..............................................................................................11
Turning Off the Power..............................................................................................12
Turning Off the Main Power .....................................................................................12
Saving Energy..........................................................................................................13
1. Placing Originals
Originals ...............................................................................................................15
Sizes and Weights of Recommended Originals.......................................................15
Sizes Detectable with Auto Paper Select.................................................................16
Missing Image Area .................................................................................................17
Placing Originals..................................................................................................18
Original Orientation ..................................................................................................18
Placing Originals on the Exposure Glass.................................................................18
Placing Originals in the ADF or ARDF .....................................................................19
2. Copying
Basic Procedure...................................................................................................21
Copying from the Bypass Tray...........................................................................22
Copier Functions .................................................................................................26
Adjusting Image Density ..........................................................................................26
Selecting Original Type Setting................................................................................26
Selecting Copy Paper ..............................................................................................26
Preset Reduce/Enlarge............................................................................................27
Zoom ........................................................................................................................28
Auto Reduce/Enlarge ...............................................................................................29
Sort...........................................................................................................................30
Duplex (Type 3 only) ................................................................................................31
One-Sided Combine.................................................................................................33
Two-Sided Combine (Type 3 only)...........................................................................35
Series Copies...........................................................................................................37
iii

3. Troubleshooting
If Your Machine Does Not Operate As You Want..............................................39
When a Message Is Displayed.................................................................................39
If You Cannot Make Clear Copies.......................................................................40
If You Cannot Make Copies As You Want .........................................................41
When Memory Is Full ...............................................................................................42
BBBB Loading Paper.................................................................................................43
Loading Paper..........................................................................................................43
Orientation-Fixed Paper or Two-Sided Paper..........................................................44
DDDD Adding Toner...................................................................................................47
Handling Toner.........................................................................................................47
Toner Storage ..........................................................................................................47
Used Toner ..............................................................................................................47
Removing Toner...................................................................................................48
Inserting Toner.....................................................................................................49
4. User Tools (Copier Features)
Accessing User Tools (Copier Features)........................................................... 51
Changing Default Settings .......................................................................................51
Quitting User Tools ..................................................................................................52
Settings You Can Change with User Tools .......................................................53
APS/ Auto R/E Priority ............................................................................................53
Auto Tray Switching .................................................................................................53
Original Type Setting ...............................................................................................53
Duplex Mode Priority................................................................................................54
Orientation................................................................................................................54
Max. Number of Sets ...............................................................................................54
Original Count Display .............................................................................................54
Reproduction Ratio ..................................................................................................54
Preset R/E Priority ...................................................................................................55
Duplex Margin ..........................................................................................................55
Rotate Sort ...............................................................................................................55
Rotate Sort:Auto Continue .......................................................................................55
Letterhead Setting....................................................................................................55
5. Remarks
Do's and Don'ts....................................................................................................57
Where to Put Your Machine................................................................................58
Machine Environment ..............................................................................................58
Moving......................................................................................................................59
Power Connection....................................................................................................59
Access to the Machine.............................................................................................60
Maintaining Your Machine ..................................................................................61
Cleaning the Exposure Glass...................................................................................61
Cleaning the Exposure Glass Cover........................................................................61
Cleaning the ADF or ARDF......................................................................................61
iv

6. Specifications
Combination Chart...............................................................................................63
Supplementary Information ................................................................................64
INDEX......................................................................................................... 67
v

vi

Notice
Important
Do not copy any item for which copying is prohibited by law.
Copying the following items is generally prohibited by local law:
bank notes, revenue stamps, bonds, stock certificates, bank drafts, checks, passports, and driver's licenses.
Notice To Wireless LAN Interface (optional) Users
Notice to Users in EEA Countries
This product complies with the essential requirements and provisions of Directive 1999/5/EC of the European Parliament and of the Council of 9 March 1999
on radio equipment and telecommunications terminal equipment and the mutual recognition of their conformity.
The CE Declaration of Conformity is available on the Internet at URL:
http://www.ricoh.co.jp/fax/ce_doc/
This product is only for use in EEA or other authorized countries. Outdoor use
of this product in Belgium, France, Germany, Italy, or the Netherlands is prohibited.
1

How to Read This Manual
R
R
Symbols
The following set of symbols is used in this manual.
WARNING:
This symbol indicates a potentially hazardous situation that might result in
death or serious injury when you misuse the machine without following the instructions under this symbol. Be sure to read the instructions, all of which are described in the Safety Information section.
CAUTION:
This symbol indicates a potentially hazardous situation that might result in minor or moderate injury or property damage that does not involve personal injury
when you misuse the machine without following the instructions under this
symbol. Be sure to read the instructions, all of which are described in the Safety
Information section.
* The statements above are notes for your safety.
Important
If this instruction is not followed, paper might be misfed, originals might be
damaged, or data might be lost. Be sure to read this.
Preparation
This symbol indicates information or preparations required prior to operating.
Note
This symbol indicates precautions for operation, or actions to take after abnormal operation.
Limitation
This symbol indicates numerical limits, functions that cannot be used together,
or conditions in which a particular function cannot be used.
Reference
This symbol indicates a reference.
[]
Keys that appear on the machine's display panel.
{}
Keys built into the machine's control panel.
Names of Major Options
Major options of this machine are referred to as follows in this manual:
• Auto Document Feeder → ADF
• Auto Document Feeder capable of scanning both sides of a sheet → ARDF
2

Safety Information
R
R
When using this machine, the following safety precautions should always be followed.
Safety During Operation
In this manual, the following important symbols are used:
WARNING:
CAUTION:
Indicates a potentially hazardous situation which, if instructions
are not followed, could result in death or serious injury.
Indicates a potentially hazardous situation which, if instructions are not
followed, may result in minor or moderate injury or damage to property.
R WARNING:
• Disconnect the power plug (by pulling the plug, not the cable) if the
power cable or plug becomes frayed or otherwise damaged.
•
To avoid hazardous electric shock or laser radiation exposure, do not
remove any covers or screws other than those specified in this manual.
• Turn off the power and disconnect the power plug (by pulling the plug,
not the cable) if any of the following occurs:
• You spill something into the machine.
• You suspect that your machine needs service or repair.
• The external housing of your machine has been damaged.
• Do not incinerate spilled toner or used toner. Toner dust might ignite
when exposed to an open flame.
•
Disposal can take place at our authorized dealer.
•
Dispose of the used toner bottle in accordance with the local regulations.
• Connect the machine only to the power source described on the inside
front cover of this manual. Connect the power cord directly into a wall
outlet and do not use an extension cord.
•
Do not damage, break or make any modifications to the power cord.
Do not place heavy objects on it. Do not pull it hard nor bend it more
than necessary. These actions could cause an electric shock or fire.
3

R CAUTION:
• Protect the machine from dampness or wet weather, such as rain and snow.
• Unplug the power cord from the wall outlet before you move the machine.
While moving the machine, you should take care that the power cord will not
be damaged under the machine.
• When you disconnect the power plug from the wall outlet, always pull the
plug (not the cable).
• Do not allow paper clips, staples, or other small metallic objects to fall inside
the machine.
• Keep toner (used or unused) and toner bottle out of the reach of children.
• For environmental reasons, do not dispose of the machine or expended
supply waste at household waste collection points. Disposal can take place
at an authorized dealer.
• The inside of the machine could be very hot. Do not touch the parts with a
label indicating the “hot surface”. Otherwise, an injury might occur.
• Keep the machine away from humidity and dust. Otherwise a fire or an electric shock might occur.
• Do not place the machine on an unstable or tilted surface. If it topples over,
an injury might occur.
• Before moving the machine, be sure to pull all four handles fully out. If not,
an injury might occur. After moving the machine, return the four handles to
their original positions.
• When the optional paper tray unit is installed, do not push the upper part of
the main unit horizontally. An injury might occur if the paper tray unit becomes detached from the main unit.
• If you use the machine in a confined space, make sure there is a continuous
air turnover.
4
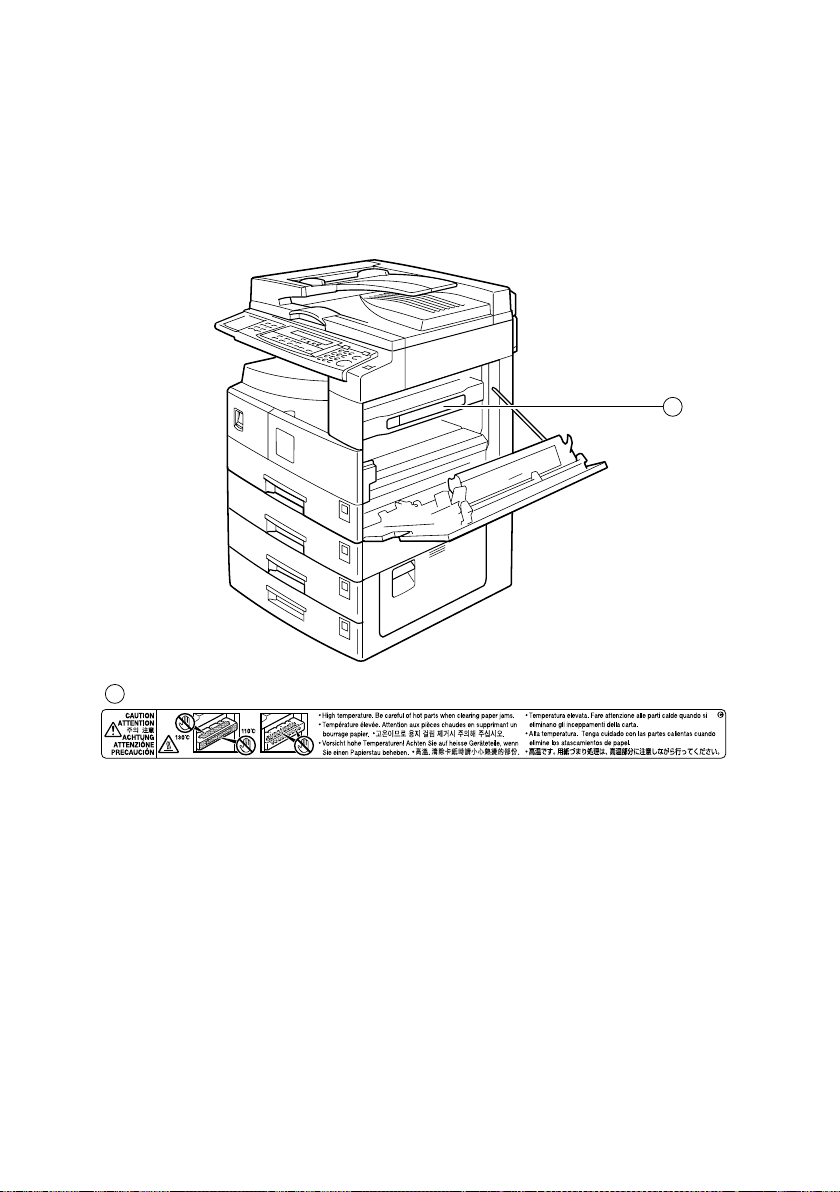
Positions of Labels and Hallmarks for
RRRRWARNING and RRRRCAUTION Labels
This machine has labels for R WARNING and RCAUTION at the positions
shown below. For safety, please follow the instructions and handle the machine
as indicated.
1
1
AAI029S
5

Machine Types
This machine comes in three models which vary by copy speed. To make sure
which model you have, see the inside front cover of this manual.
Type 1
Copy Speed 16 copies/minute
Duplex unit ——
(A4K, 8
1
/2" × 11"K)
*1
Type 2
20 copies/minute
(A4K, 81/2" × 11"K)
❍: Can be used with this type.
—: Cannot be used with this type.
*1
18 copies/minute (feeding from Optional Paper Tray Unit)
*1
Type 3
20 copies/minute
(A4K, 81/2" × 11"K)
❍
6
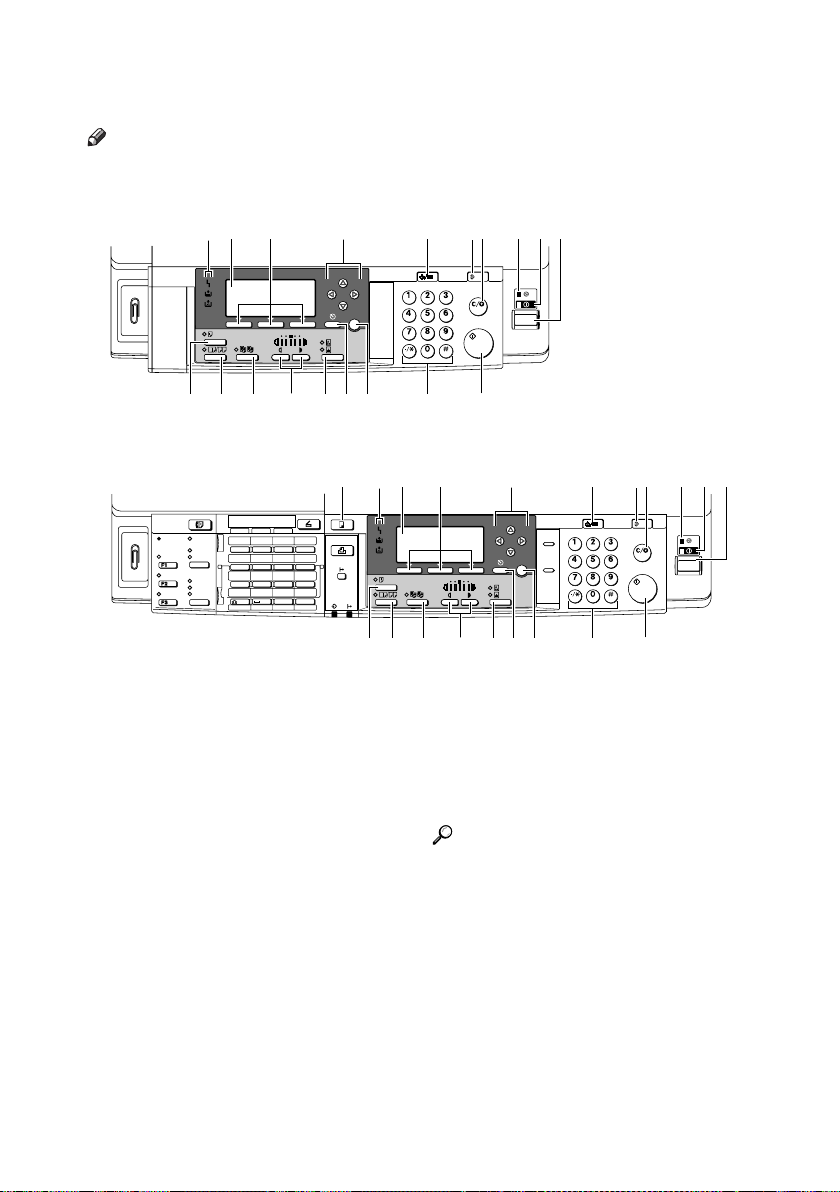
Control Panel
On Hook Dial
Note
❒ These illustrations show Type 3.
❖❖❖❖ Copier only
2 3 4 5 6 78 9 1011
OK
13
14 1512
❖❖❖❖ Options fully installed
Search
Destination
Receive File
Immediate
Trans.
Memory
Trans.
Standard
Detail
Fine
Destination
01 02 03 04
ABC DEF GHI JKL
05 06 07 08
MNO PQR STU VWX
09 10 11 12
@.
YZ
13 14 15 16
Communicating
Start Manual
Reception
Switch
RX Mode
Transmission
Stamp
Check
Job
Information
_
_
_
- &@.
SymbolsSpaceShift
16 1718 2019
AAI002S
21 3 4 5 6 78 9 1011
On Hook Dial
OK
Pause/
Redial
1.
{{{{Copy}}}} key
Press to activate the copier function.
2.
Indicators
Display errors and machine status.
• h: Error indicator
See “Control Panel”, General Settings
Guide.
• D: Add Toner indicator
See p.47 “D Adding Toner”.
• B: Load Paper indicator
See p.43 “B Loading Paper”.
3.
Display
Displays operation status and messages.
4.
Selection keys
Correspond to items on the display. Press
to select the corresponding item.
15 1613 14 17 18 19 2012
5.
Scroll keys
AAI001S
Press to select an item.
{{{{UUUU}}}}: scroll upward
{{{{TTTT}}}}: scroll downward
{{{{VVVV}}}}: scroll right
{{{{WWWW}}}}: scroll left
Reference
See p.9 “Reading the Display and
Using Keys”.
6.
{{{{User Tools/Counter}}}} key
Press to change default or operation parameters according to requirement.
7.
{{{{Clear Modes}}}} key
Press to clear the current settings.
8.
{{{{Clear/Stop}}}} key
Clear: clears an entered numeric value.
Stop: stops copying.
7

9.
Main power indicator
Lights when the main power switch is
turned on.
Reference
p.11 “Turning On the Power”
10.
On indicator
Lights when the operation switch is on.
Reference
p.11 “Turning On the Power”
11.
Operation switch
Press to turn the power on. The On indicator lights. To turn the power off, press
again.
Note
❒ This key is inactivate during scanning
or while setting defaults.
12. {
{Duplex}}}} key (Type 3 only)
{{
Makes two-sided copies.
Reference
See p.31 “Duplex (Type 3 only)”.
13.
{{{{Combine/Series}}}} key
Press to make combine or series copies.
17.
{{{{Cancel}}}} key
Press to cancel an operation or return to
the previous display.
18.
{{{{OK}}}} key
Press to set a selected item or entered numeric value.
19.
Number keys
Press to enter numeric values.
20.
{{{{Start}}}} key
Press to start scanning or sending.
Reference
p.33 “One-Sided Combine”
p.35 “Two-Sided Combine (Type 3
only)”
p.37 “Series Copies”
14.
{{{{Sort}}}} key
Automatically sorts copies.
15.
{{{{Lighter}}}} and {{{{Darker}}}}
Press to change the image density setting.
Select the image density in five increments, Lighter to Darker.
16.
{{{{Original Type}}}} key
Press to select the original type registered
Original Type 1 (Text)
with [
2 (Photo)
lected, the corresponding indicator
lights.
]. When the original type is se-
] or [
8
Original Type
Display
4
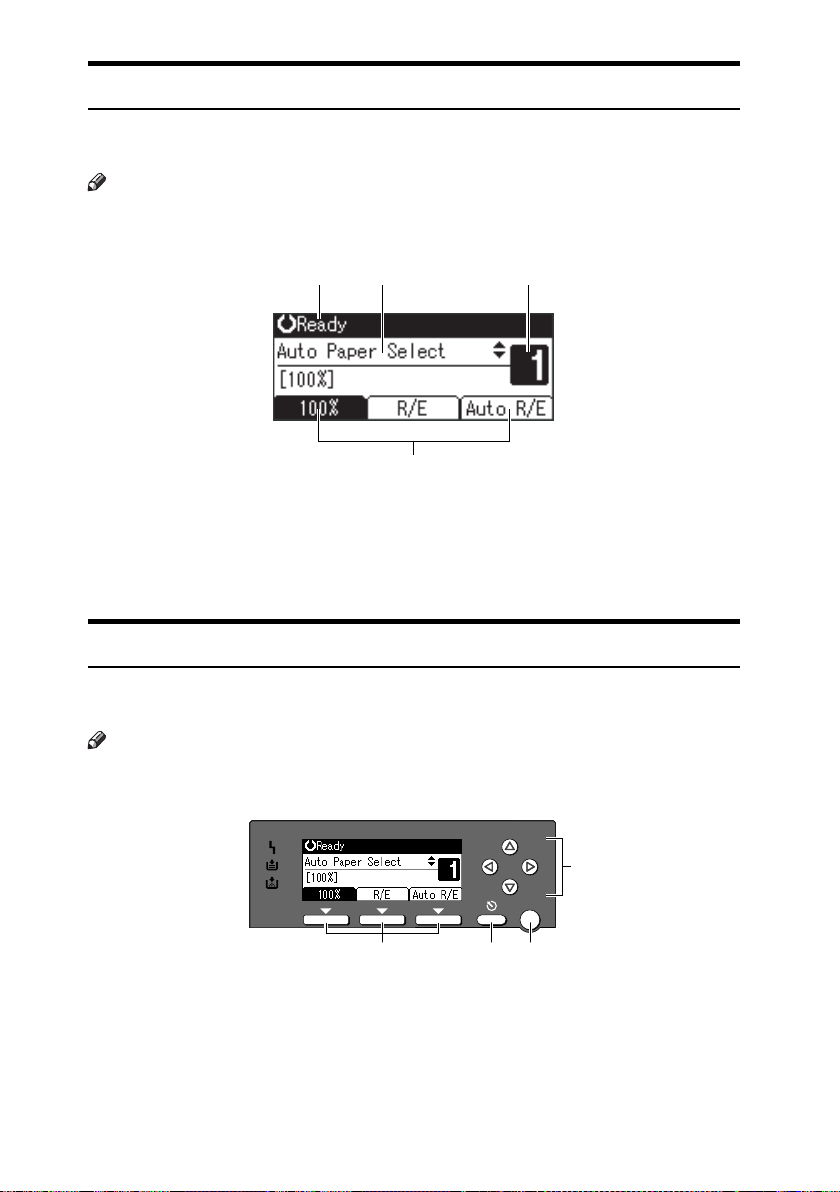
This section explains how to read the display and use the Selection key for the
initial copy display.
Note
❒ The copy display is set as the default screen when the machine is turned on.
❖❖❖❖ Initial copy display
1 32
AAX024S
1.
Operational status or messages
2.
Messages and the selected tray
appear here. Currently selected
4
3.
Number of copies set.
4.
Reduce/Enlarge ratio function for
non-fixed ratios.
AAI024S
items appear in brackets.
Reading the Display and Using Keys
This section explains how to read the display and use the selection key for the
initial copy display.
Note
❒ The copy display is set as the default screen when the machine is turned on.
OK
1 2 3
1.
Selection keys
Correspond to items at the bottom line on
the display.
Example: initial copy display
• When the instruction “press [100%]”
appears in this manual, press the left
selection key.
• When the instruction “press [R/E]” ap-
pears in this manual, press the centre
selection key.
• When the instruction “press [Auto
R/E]” appears in this manual, press the
right selection key.
AAI015S
9

2.
{{{{Cancel}}}} key
Press to cancel an operation or return to
the previous display.
3.
{{{{OK}}}} key
Press to set a selected item or entered numeric value.
4.
Scroll keys
Press to move the cursor to each direction
one by one.
When {{{{UUUU}}}},{{{{TTTT}}}},{{{{VVVV}}}}, or {{{{WWWW}}}} key appears
in this manual, press the scroll key of the
same direction.
10

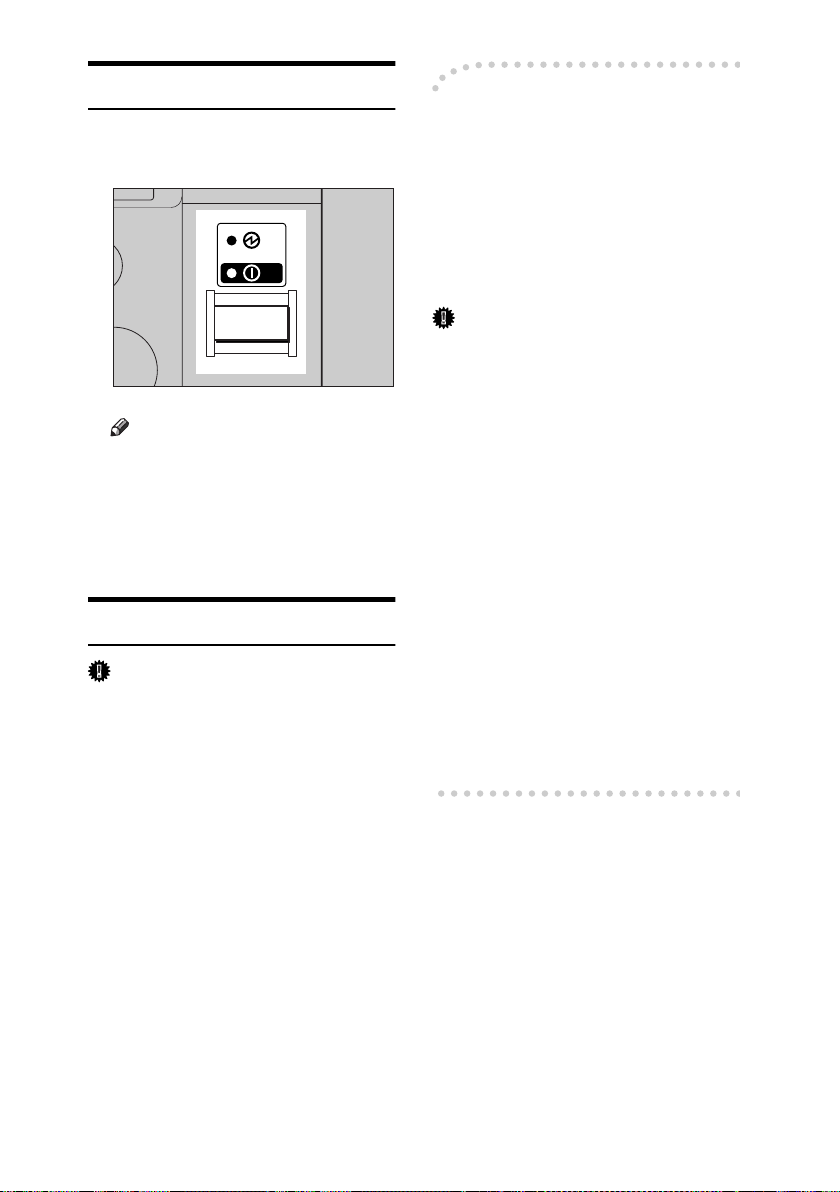
Turning On the Power
This machine has two power switches.
❖❖❖❖ Operation switch (right side of the
control panel)
Press to activate the machine.
When the machine has finished
warming up, you can operate the
machine.
❖❖❖❖ Main power switch (left side of the ma-
chine)
Turning off this switch makes the
main power indicator on the right
side of the control panel go off.
When this is done, machine power
is completely off.
When the fax unit (optional) is installed, fax files in memory may be
lost if you turn this switch off. Use
this switch only when necessary.
Note
❒ This machine automatically enters
Energy Saver mode or turns itself
off if you do not use it for a while.
See General Settings Guide.
Turning On the Main Power
Important
❒ Do not turn off the main power
switch immediately after turning it on. Doing so may result in
damage to the memory, leading
to malfunctions.
Turning On the Power
Press the operation switch.
AAAA
The On indicator goes on.
Note
❒ If the power does not come on
when the operation switch is
pressed, check the main power
sw itch is on. If it is off, turn it on.
ZENH080E
Make sure the power cord is firm-
AAAA
ly plugged into the wall outlet.
Turn on the main power switch.
BBBB
The main power indicator goes on.
AAI027S
11
Turning Off the Power
Press the operation switch.
AAAA
The On indicator goes off.
ZENH080E
Note
❒ Even if you press the operation
switch, the indicator does not
go out, but blinks in the following cases:
• During communication with
external equipment.
Turning Off the Main Power
Important
❒ Do not turn off the main power
switch when the On indicator is lit
or blinking. Doing so may result in
damage to the memory.
❒ Make sure 100% is shown as avail-
able memory on the initial scanner
display before turning off the main
power switch.
❒ Be sure to turn off the main power
switch before pulling out the power plug. Not doing this may result
in damage to the memory.
----When the fax unit (optional) is
installed
When the main power switch is
turned off while using the fax function, waiting fax and print jobs may
be canceled, and incoming fax documents not received. If you have to
turn off this switch for some reason,
keep the following points in mind:
Important
❒ Make sure 100% is shown as avail-
able memory on the display before
turning off the main power switch
or unplugging the power cord. Fax
files in memory are deleted an
hour after you turn off the main
power switch or unplug the power
cord. See ”Turning Off the Main
Power/In Case of a Power Failure”, Facsimile Reference <Advanced
Features>.
❒ If the On indicator does not go out,
but blinks in dial-in mode even if
you press the operation switch,
check the explanations below and
turn off the main power switch.
• the computer is not controlling
the machine.
• the machine is not receiving a
fax.
12
Be sure the On indicator is not lit.
AAAA
Turn off the main power switch.
BBBB
The main power indicator goes out.

Saving Energy
----Auto Off / Low Power
The machine automatically turns itself off when the job is finished, after
a certain period of time has elapsed.
This function is called “Auto Off”.
Note
❒ You can change the Auto Off time.
See General Settings Guide.
❒ The Auto Off Timer function will
not operate in the following cases:
• When a warning message appears
• When the service call message
appears
• When paper is jammed
• When the cover is open
• When the “
sage appears
• When toner is being replenished
• When the User Tools screen is
displayed
• When fixed warm-up is in
progress
• When the facsimile, printer, or
other functions are active
• When operations are suspended during printing
• When the On-hook dialing
function is in use
• When a receiver is being registered in the Address Book or
group dial list
• When the Data In indicator is on
or blinking
Add Toner
” mes-
13

14
1. Placing Originals
Originals
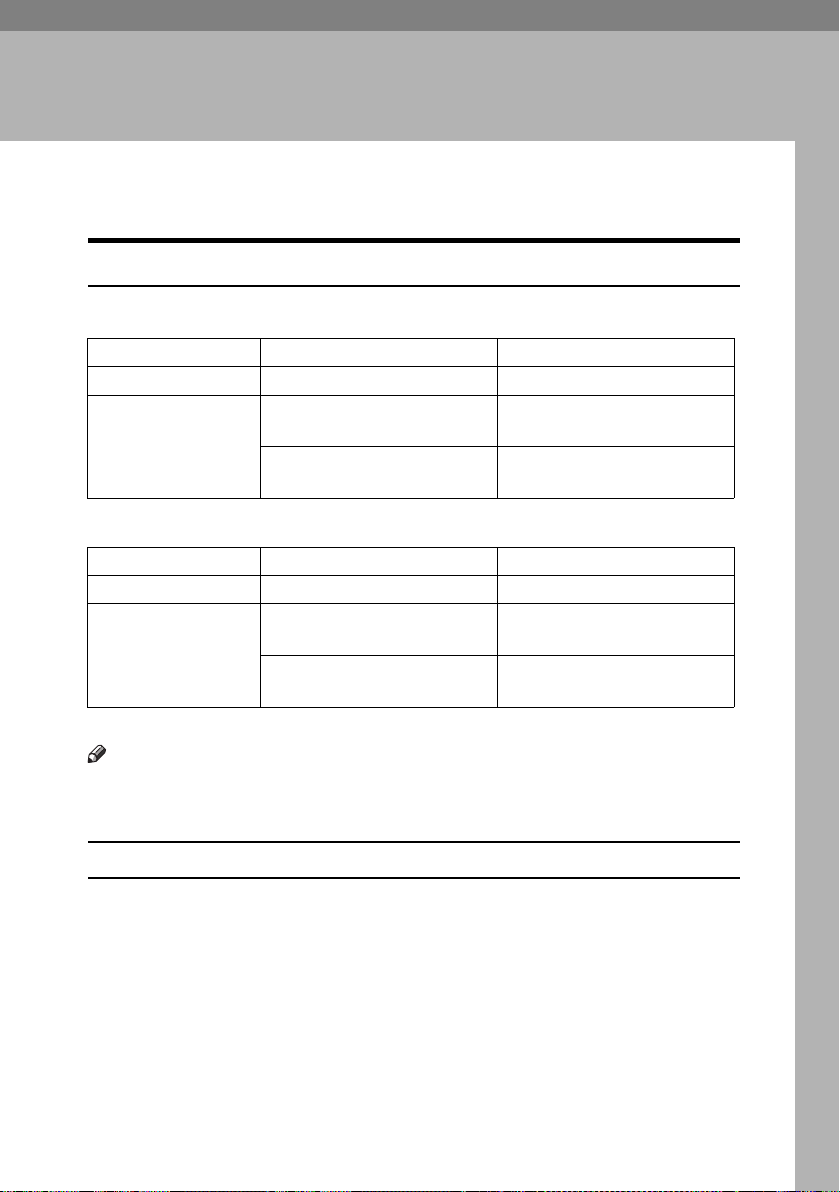
Sizes and Weights of Recommended Originals
❖❖❖❖ Metric version
Original location Original size Original weight
Exposure glass Up to A3 --
ADF or ARDF One-sided originals:
A3L – A5
Two-sided originals:
A3L – A5
KL
KL
*1
40–128 g/m
52–105 g/m
❖❖❖❖ Inch version
Original location Original size Original weight
Exposure glass Up to 11" × 17" --
ADF or ARDF One-sided originals:
11" × 17"L – 5
Two-sided originals
11" × 17"L – 5
*1
The optional ARDF is required.
1
/2" × 81/2"
1
/2" × 81/2"
KL
*1
:
KL
11–34 lb.
14–28 lb.
Note
❒ About 30 originals can be placed in the ADF.
❒ About 50 originals can be placed in the ARDF.
2
2 *1
*1
Non-compatible originals for the ADF or ARDF
Placing the following types of originals in the ADF or ARDF can cause paper
misfeeds or result in damage to the originals. Place these originals on the exposure glass instead.
• Originals other than those specified on p.15 “Sizes and Weights of Recommended Originals”
• Stapled or clipped originals
• Perforated or torn originals
• Curled, folded, or creased originals
• Pasted originals
15

Placing Originals
• Originals with any kind of coating, such as thermal fax paper, art paper, aluminum foil, carbon paper, or conductive paper
• Originals with perforated lines
• Originals with indexes, tags, or other projecting parts
1
• Sticky originals such as translucent paper
• Thin, highly flexible originals
• Thick originals such as postcards
• Bound originals such as books
• Transparent originals such as OHP transparencies or translucent paper
Note
❒ The original might become dirty if it is written with a pencil or a similar
tool.
Sizes Detectable with Auto Paper Select
❖❖❖❖ Metric version
Size A3
Original location
Exposure glass
ADF or ARDF
B4 JIS
L
*1
KL
A4
L
❍❍❍× ❍ × ❍
❍❍❍❍❍❍❍
B5 JIS
L
*1
B5 JIS
K
*1
LK
A5
8
13"
1
/2" ×
L
❍ : Detectable size × : Undetectable size
*1
JIS: Japanese Industrial Standard
❖❖❖❖ Inch version
Size 11" × 17"
Original location
Exposure glass
ADF or ARDF
L
❍❍❍❍ ×
❍❍ × ❍❍
❍ : Detectable size × : Undetectable size
16
1
/2" × 14"L81/2" × 13"L81/2" × 11"
8
L
K
51/2" × 81/2"
L
K
 Loading...