

Ricoh 403080 - Aficio SP 4100N-KP B/W Laser Printer, Aficio SP 4110N-KP, Aficio SP C420DN-KP, Aficio SP C420DN, Aficio SP4210N Quick Setup Manual
Page 1

Quick Setup Guide
Page 2

Thank you for choosing a Ricoh HotSpot Printer providing you with a unique combination of
hardware and embedded software. HotSpot Printers harness the Internet to deliver a secure,
integrated solution for printing from any computer (on any platform [PC, Mac or Linux]), mobile
phone or wireless handheld devices. With no need for driver downloads or software installation.
We have made it simple and aordable for you to provide printing services for anyone you choose
to make aware of your PrintSpot.
This Quick Setup Guide is intended to ensure you will have your Ricoh HotSpot Printer up and
running in 3 easy steps.
Step 1: Unpack and connect your Ricoh HotSpot Printer
Step 2: Test your Ricoh HotSpot Printer
Step 3: Register your Ricoh HotSpot Printer
Step 4 (optional): Personalise your PrintSpot Portal
Important Technical Requirements
HotSpot Printer does not have the ability to navigate any type of internet authentication
requirements, no matter how simple they may be. Clear, unfettered access to the internet is required
using HTTP and HTTPS on ports 80 and 443 for both inbound and outbound communication.
Please communicate these requirements to your IT Department or Internet Service Provider (ISP) so
that they can arrange the appropriate connections for your Ricoh HotSpot Printer.
If you require further assistance during the initial setup of your Ricoh HotSpot printer or any other
of its normal operations please contact your local Ricoh supplier, whose telephone number will
normally be displayed on the printer unit.
HotSpot Printer Quick Setup Guide
Page 3

HotSpot Printer Quick Setup Guide
Step 1: Unpack and connect your Ricoh HotSpot Printer
1a) Please review the Printer Quick Setup Guide for basic instructions for unpacking and setting up
your printer.
1b) Insert the Keypad USB plug into the appropriate connector on the rear side of the printer.
1c) Position the Keypad
Keypad placement – Colour Model Acio SP C420DN
Keypad placement – Black and White Model Acio SP4210N
The left side of the keypad should be aligned with the printer’s left
side edge. The bottom of the keypad should be positioned on the
control panel as shown making sure that the back of the keypad does
not interfere with the opening of the Top Exit Tray. Use the Velcro tape
to permanently x the keypad to the printer unit.
The left side of the keypad should be aligned with the printer’s left
side edge. The bottom of the keypad should be 2cms above the
printers LCD screen. Use the Velcro tape to permanently x the
keypad to the printer unit.
X
X
Keypad Connector
Page 4
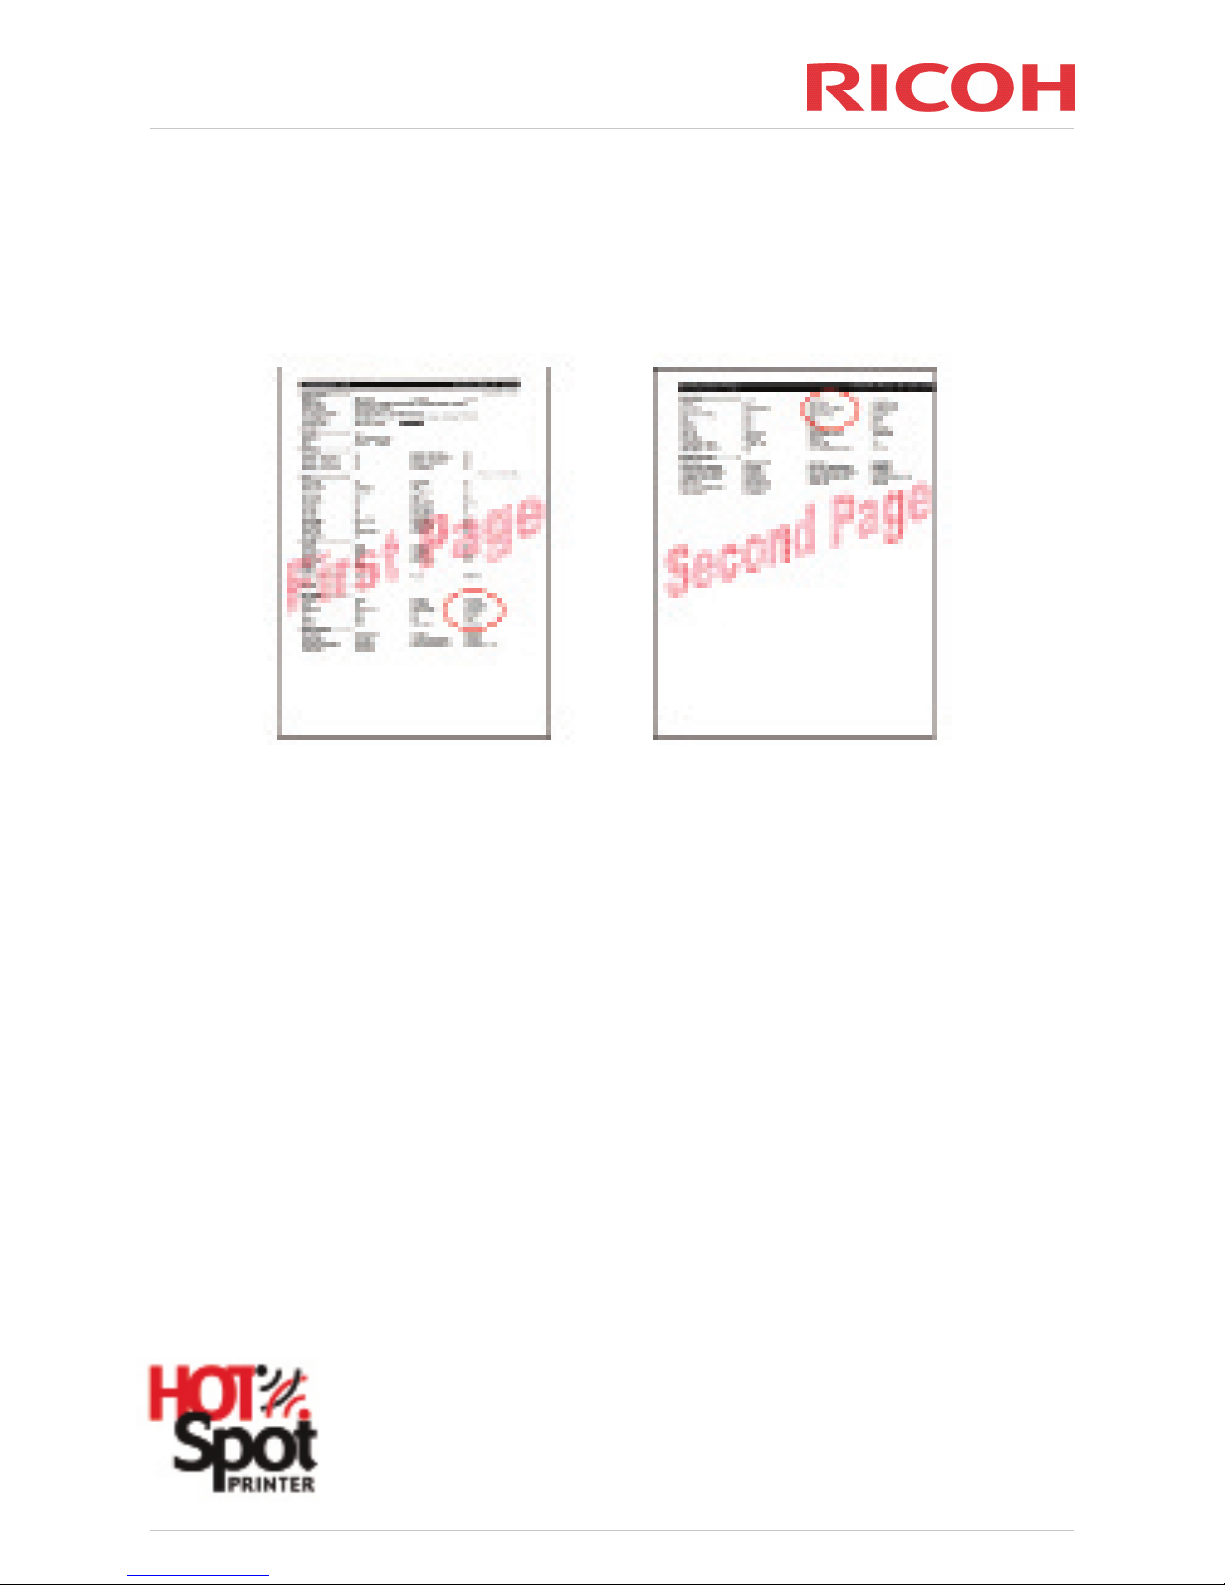
1d) After the printer is connected to your Local Area Network (LAN) and powered on, print a
conguration page by pressing Menu button, scrolling the down arrow until List/Test Print
appears, selecting by pressing Enter, then scroll down until Cong.Page appears and press
Enter. Look for the IPv4 Address on the printed Conguration Page. It may appear on the rst
or second page depending on your printer model (see circled areas).
1e) Locate the Unit Number or Printer ID, which appears at the top of the page. This is the printer’s
Serial Number, which you will need to have available for the next step, Step 3.
Step 2: Test your Ricoh HotSpot Printer
2a) Submit print jobs to PrintSpot using either the URL and/or email address that is clearly
displayed on the printer unit.
2b) After receiving conrmation (in a web browser window if submitting via internet or an email
notication when submitting via email), follow the instructions on the keypad to retrieve your
test jobs. NOTE: it may take several minutes for the printer to receive the jobs from PrintSpot
depending on the size of the document submitted.
HotSpot Printer Quick Setup Guide
Page 5

Step 3: Register your Ricoh HotSpot Printer
The HotSpot Printer registration service is available online 24/7. To register a new printer open your
web browser and go to:-
http://printeron.net/register
Please follow the online registration prompts, although please note that:-
During the registration you will be required to enter the Printer Machine ID. This is the
“Unit Number” (i.e. Serial Number) located at the top of the conguration page that you noted
during step 1e.
The User Login and Password details are located on the Software License that came packaged with
Ricoh HotSpot Printer.
Step 4 (optional): Personalise your PrintSpot Portal
Using your web browser go to http://www.printeron.net/administrators/
Click on the Hospitality link and go to the management pages. Then, log in with your administrator
login and password credentials that are included within your HotSpot printer pack.
Once you are logged in you can update your printer settings, add more printers, download or
upgrade your print release software, add or remove service administrators and update your contact
information.
HotSpot Printer Quick Setup Guide
Page 6

Troubleshooting section
No.
1
2
Issue
Service is not
running, i.e.,
default printer
display
message does
not read: [For
Print
Release,
Press OK]
Cannot print
Action
• Perform the following steps to restart the service:
1. Turn printer power OFF.
2. Disconnect the USB keypad cable (from rear of printer).
3. Turn printer power ON.
4. Wait approx. 90 seconds after [Ready] is displayed on printer LCD.
5. Turn printer power OFF.
6. Reconnect the USB keypad cable.
7. Turn printer power ON.
8. Wait approx. 90 seconds after [Ready] is displayed on printer LCD. The
message [Print Release Press OK] should appear on the LCD.
9. To determine service status, go to No. 2.
• To check service status press the [?] key on the HotSpot keypad.
The printer LCD will display one of the following messages:
- [ PrinterOn x.x LicenseValid]. Indicates that Mobile Printing Service
application is working properly.
- [ PrinterOn x.x InternetDown]. This indicates that the printer cannot
get proper connection to the Mobile Printing Service Server. Please check
printer network settings (IPv4, DHCP, DNS, etc.). Also see No. 3, below.
- [ PrinterOn x.x NoLicense]. This indicates that the application cannot
get a valid license from the Mobile Printing Service Server. Please check
printer’s network settings (IPv4, DHCP, DNS, etc.).Please check that the
printer’s time and date are set correctly. See No. 4.
HotSpot Printer Quick Setup Guide
Page 7

No.3 Issue
Service
status reads:
[PrinterOn x.x
InternetDown]
(Note: To check
service status,
press [?] on
HotSpot keypad)
Action
• Conrm that there is Internet connectivity from another device (e.g.,
computer, laptop, etc.) by using the same Ethernet cable and physical port
connection.
• Conrm that there are no authentication requirements for accessing the
Internet (e.g., username/password, “click here to connect” messages, etc.
• Ping or HTTP the HotSpot Printer’s IPv4 Address. For the IPv4 Address, print
a Conguration Page from the device control panel (as featured in section 1d).
• Contact your IT department or ISP (Internet Service Provider) to conrm that
the TCP/IP settings used by the HotSpot Printer are valid.
• Has DHCP been disabled? If so, static DNS values must be entered.
About DHCP
The HotSpot Printer’s default DHCP setting is “On”, in order for the DHCP
Server to automatically assign an IP Address, Subnet Mask, Gateway Address
and DNS Address. If, for example, the printer is turned o and moved to a new
location, with DHCP set to “On,” as shown below, the correct network settings
are automatically assigned.
The problem arises when the printer settings are changed to DHCP “O” and an
IP Address is manually assigned. If DHCP is “O,” then the IP Address, Subnet
Mask, Gateway Address and DNS Address must be manually set. If any of these
addresses are set incorrectly or omitted, then the printer will not be able to
communicate with the PrinterOn Server and vice versa. This typically results in
an “Internet Down” error message on the printer’s LCD Panel. With the Internet
Down error, users are able to submit jobs to the PrinterOn Server, receive their
release code but, the job never downloads to the Printer because the printer can’t
communicate over the Internet.
Setting Name
Auto-Obtain (DHCP)
IPv4 Address
Subnet Mask
Gateway Address
Value
On
011.022.033.044
000.000.000.000
000.000.000.000
HotSpot Printer Quick Setup Guide
Page 8

No.
3
Action
To correct the problem, proceed as follows:
Step 1: From the printer’s control panel, assign IP Address, Subnet Mask,
Gateway Address values. Note: Reboot the printer by turning the power
o for at least ve seconds.
Reference: For more information, refer to the printer’s Hardware Guide >
Conguration, located on the printer Manual included with the printer.
Step 2: From Web Image Monitor, change the DNS Server values to match
those entered via the printer’s control panel. Important: Assign both
primary and back-up DNS Addresses.
a. Make sure you have Internet access on an unrestricted network line.
b. Open your Web browser
c. Go to: http://PrinterIPAddress.
d. Enter login credentials. Defaults:
• Login User Name: admin
• Password: leave blank
e. Click [Login].
f. Click [Conguration] link, left sidebar.
g. Under Network, click [IPv4].
h. Under Details, click [Specify] button
adjacent to [Auto Obtain (DHCP)].
Important: If the DNS server is set
to [Specify], enter the values for the
Primary (DNS Server1) and
Secondary (DNS Server2) servers.
i. Click [OK] to save changes.
Step 3: Reboot the printer. This step is critical, as the changes will not take
eect until after the device is reset.
a. Turn printer OFF.
b. Turn printer ON. Approx. 90 seconds after [Ready] appears in the display,
the message [For Print Release, Press OK] appears. You’re ready to print.
Issue
Service
status reads:
[PrinterOn x.x
InternetDown]
Cont.
Service status
reads: [Printer
On x.xInternet
Down]
HotSpot Printer Quick Setup Guide
Page 9

No.
4
5
Issue
Service
status reads:
[Printer On x.x
NoLicense]
Job is sent and
release code
received, but
document does
not print.
Action
• This indicates that the Mobile Printing Service application running on the
printer cannot get a valid license from the PrinterOn Server. Please check
printer network settings (IPv4, DHCP, DNS etc.). Also check that the time
and date are set correctly. To do so, proceed as follows:
1. At printer control panel, press [Menu].
2. Select [Maintenance], and press [OK].
3. Select [Timer Settings], and press [OK].
4. Select [Set Date], and press [OK].
5. If necessary, enter correct month, day, year, and press [OK].
6. Select [Set Time], and press [OK].
7. If necessary, enter correct hour, minute, second, and press [OK].
8. Press [Menu] to exit.
Note: Steps may vary slightly, based on printer model.
• To check service status, press [?] on Hot-Spot keypad.
• If the license status reads [PrinterOn x.x LicenseValid], but you still cannot
release a print job, there are other possible issues:
1. Firewall, authentication and/or redirection is preventing HTTP/HTTPS
communication.
2. A change has occurred in the TCP/IP environment. Turn the printer OFF/
ON to restart the HotSpot Service.
3. Make sure that you are not entering the tracking number instead of the
release code.
HotSpot Printer Quick Setup Guide
Page 10

No.
6
7
8
9
10
Issue
Unavailable
printer features
A Web page
will not print
Cannot reprint
a job (via the
[Menu] key on
the HotSpot
keypad)
Trying to open
PrinterOn Web
Page, but
screen reads
[Service oine]
Trying to open
PrinterOn Web
Page, but
screen reads
[The page you
request could
not be found.]
Action
• When the printer is accessed via the Mobile Printing Service, envelope
printing, custom paper sizes, special paper types, and other advanced printer
driver features are not supported. However, advanced driver features are
available when the printer is being utilised as a standard network printer.
• Interactive Web sites that generate URLs based on user input, such as
mapquest.com and amazon.com, often contain long URLs that aren’t entirely
visible in the Web browser. When pasting the URL into the File or URL eld,
make sure you have copied the entire URL in order for the page to print.
• You have attempted to reprint more than ve (5) copies, the maximum
number available for reprint, and/or 20 minutes has elapsed since the rst
print was released. After 20 minutes, the reprint function times out and the
le is erased from the printer’s hard disk drive.
• You have entered the URL (www.printeron.net/ricoh/xxxxx) using a valid
printer ID (xxxxx), but the unit is not yet registered. Register the printer and
try again.
Reference: Step 3 in this Quick Setup Guide.
• You have entered a URL using a non-existent printer ID (xxxxx). Re-enter
URL with correct ID.
• You typed the URL in upper case. Re-enter URL using all lower-case letters.
HotSpot Printer Quick Setup Guide
Page 11

No.11 Issue
Trying to
remove an
administrator,
but screen
reads [Unable
to remove the
user. The user
is a super
administrator
of the site]
Action
Super Administrators are members of Ricoh’s manufacturing and technical
support departments that require login privileges for troubleshooting purposes.
As such, a Super Administrator cannot be removed.
HotSpot Printer Quick Setup Guide
 Loading...