

Ricoh 3532, 4532, 2045 Operating Instructions Manual

Printer/Scanner Unit
Type 2045
Operating Instructions
Printer Reference 1
Getting Started
1
Preparing to Print
2
For safe and proper operation, read the Safety Information in the General Setting Guide
before you use it.

Printer/Scanner Unit Type 2045 Operating Instructions Printer Reference 1
Printed in Japan
EN USA B548-8617

Introduction
This manual describes detailed instructions on the operation and notes about the use of this machine.
To get maximum versatility from this machine all operators are requested to read this manual carefully
and follow the instructions. Please keep this manual in a handy place near the machine.
Important
Contents of this manual are subject to change without prior notice. In no event will the company be liable for direct, indirect, special, incidental, or consequential damages as a result of handling or operating the machine.
Warning:
Use of controls or adjustment or performance of procedures other than those specified in this manual
might result in hazardous radiation exposure.
Trademarks
®
Microsoft
, Windows® and Windows NT® are registered trademarks of Microsoft Corporation in the
United States and/or other countries.
®
Adobe
, PostScript®, Acrobat®, PageMaker® and Adobe Type Manager are registered trademarks of
Adobe Systems Incorporated.
®
is a registered trademark of Hewlett-Packard Company.
PCL
AppleTalk, Apple, Macintosh and Mac are registered trademarks of Apple Computer, Incorporated.
©
IPS-PRINT™ Printer Language Emulation Copyright
2000, Oak Technology, Inc., All Rights Re-
served.
UNIX is a registered trademark in the United States and other countries, licensed exclusively through
X/Open Company Limited.
Bluetooth is a Trademark of the Bluetooth SIG, Inc. (Special Interest Group) and licensed to RICOH
company limited.
Copyright © 2001 Bluetooth SIG, Inc.
The Bluetooth Trademarks are owned by Bluetooth SIG, Inc. USA
®
Ethernet
is a registered trademark of Xerox Corporation.
Other product names used herein are for identification purposes only and might be trademarks of their
respective companies. We disclaim any and all rights in those marks.
The proper names of the Windows operating systems are as follows:
®
• The product name of Windows
95 is Microsoft® Windows® 95
• The product name of Windows® 98 is Microsoft® Windows® 98
• The product name of Windows® Me is Microsoft® Windows® Millennium Edition (Windows Me)
®
• The product name of Windows
®
Microsoft
Microsoft
Windows® XP Professional
®
Windows® XP Home Edition
• The product name of Windows
®
Microsoft
Microsoft
Microsoft
Windows® 2000 Advanced Server
®
Windows® 2000 Server
®
Windows® 2000 Professional
XP are as follows:
®
2000 are as follows:
• The product name of Windows® NT are as follows:
®
Microsoft
Microsoft
Windows NT® Server 4.0
®
Windows NT® Workstation 4.0
Notes:
Some illustrations in this manual might be slightly different from the machine.
Certain options might not be available in some countries. For details, please contact your local dealer.

Note to users in the United States of America
Notice:
This equipment has been tested and found to comply with the limits for a Class B digital device, pursuant to
Part 15 of the FCC Rules. These limits are designed to provide reasonable protection against harmful interference in a residential installation. This equipment generates, uses and can radiate radio frequency energy
and, if not installed and used in accordance with the instructions, may cause harmful interference to radio
communications.
However, there is no guarantee that interference will not occur in a particular installation. If this equipment
does cause harmful interference to radio or television reception, which can be determined by turning the
equipment off and on, the user is encouraged to try to correct the interference by one more of the following
measures:
Reorient or relocate the receiving antenna.
Increase the separation between the equipment and receiver.
Connect the equipment into an outlet on a circuit different from that to which the receiver is con-
nected.
Consult the dealer or an experienced radio/TV technician for help.
Caution
Changes or modifications not expressly approved by the party responsible for compliance could void the user’s authority to operate the equipment.
Caution (in case of IEEE1284 environment) :
Properly shielded and grounded cables and connectors must be used for connections to host computer
(and/or peripheral) in order to meet FCC emission limits.
Use a commercially available shielded cable.
Caution (in case of 100BaseTX environment):
Network interface cable with ferrite core must be used for RF interference suppression.
Use a commercially available cable after attaching the ferrite core provided.
Caution (in case of IEEE1394 environment) :
Use the cable provided with the machine.
Caution (in case of USB2.0 environment) :
Use a commercially available shielded USB cable.
Declaration of Conformity
Product Name: Printer Controller
Model Number: Printer/Scanner Unit Type 2045
Responsible party: Ricoh Corporation
Address: 5 Dedrick Place, West Caldwell, NJ 07006
Telephone number: 973-882-2000
This device complies with part 15 of FCC Rules.
Operation is subject to the following two conditions:
1. This device may not cause harmful interference, and
2. this device must accept any interference received,
including interference that may cause undesired operation.
Copyright © 2002

Manuals for This Machine
The following manuals describe the operational procedures of this machine. For
particular functions, see the relevant parts of the manual.
Note
❒ Manuals provided are specific to machine type.
❒ Adobe Acrobat Reader is necessary to view the manuals as a PDF file.
❒ Two CD-ROMs are provided:
• CD-ROM 1“Operating Instructions for Printer/Scanner”
• CD-ROM 2“Scanner Driver & Document Management Utilities”
❖❖❖❖ General Settings Guide
Provides an overview of the machine.
It also describes System Settings (such as paper trays and user codes settings),
Document Server functions, and troubleshooting.
❖❖❖❖ Network Guide (PDF file - CD-ROM1)
Describes procedures for configuring the machine and computers in a network environment.
❖❖❖❖ Copy Reference
Describes operations, functions, and troubleshooting for the machine’s copier
function.
❖❖❖❖ Facsimile Reference <Basic Features>
Describes operations, functions, and troubleshooting for the machine’s facsimile function.
❖❖❖❖ Facsimile Reference<Advanced Features>
Describes advanced functions and settings for key operators.
❖❖❖❖ Printer Reference 1 (this manual)
Describes system settings and operations for the machine’s printer function.
❖❖❖❖ Printer Reference 2 (PDF file - CD-ROM1)
Describes operations, functions, and troubleshooting for the machine’s printer function.
❖❖❖❖ Scanner Reference (PDF file - CD-ROM1)
Describes operations, functions, and troubleshooting for the machine’s scanner function.
i

❖❖❖❖ Manuals for DeskTopBinder V2 Lite
DeskTopBinder V2 Lite is a utility included on the CD-ROM labeled “Scanner
Driver & Document Management Utilities”.
• DeskTopBinder V2 Lite Setup Guide (PDF file - CD-ROM2)
Describes installation of, and the operating environment for DeskTopBinder V2 Lite in detail. This guide can be displayed from the [Setup] dialog box when DeskTopBinder V2 Lite is installed.
• DeskTopBinder V2 Lite Introduction Guide (PDF file - CD-ROM2)
Describes operations of DeskTopBinder V2 Lite and provides an overview
of its functions. This guide is added to the [Start] menu when DeskTopBinder V2 Lite is installed.
• Auto Document Link Guide (PDF file - CD-ROM2)
Describes operations and functions of Auto Document Link installed with
DeskTopBinder V2 Lite. This guide is added to the [Start] menu when
DeskTopBinder V2 Lite is installed.
❖❖❖❖ Manuals for ScanRouter V2 Lite
ScanRouter V2 Lite is a utility included on the CD-ROM labeled “Scanner
Driver & Document Management Utilities”.
• ScanRouter V2 Lite Setup Guide (PDF file - CD-ROM2)
Describes installation of, settings, and the operating environment for ScanRouter V2 Lite in detail. This guide can be displayed from the [Setup] dialog box when ScanRouter V2 Lite is installed.
• ScanRouter V2 Lite Management Guide (PDF file - CD-ROM2)
Describes delivery server management and operations, and provides an
overview of ScanRouter V2 Lite functions. This guide is added to the [Start]
menu when ScanRouter V2 Lite is installed.
❖❖❖❖ Other manuals
• PS3 Supplement (PDF file - CD-ROM1)
• Unix Supplement (Available from an authorized dealer, or as a PDF file on
our Web site.)
ii

TABLE OF CONTENTS
Manuals for This Machine......................................................................................i
How to Read This Manual .....................................................................................1
1. Getting Started
Control Panel..........................................................................................................3
Display Panel ............................................................................................................. 4
2. Preparing to Print
Preparing the Printer .............................................................................................8
Connecting the Machine ............................................................................................ 8
Setting Paper on the Bypass Tray ........................................................................... 10
Installing the Software......................................................................................... 14
Auto Run ..................................................................................................................14
Quick Install..............................................................................................................15
Installing the PCL 6/5e and RPCS™ Printer Driver .................................................17
Setting Up Options - PCL 6/5e and RPCS ...............................................................21
Installing the PostScript 3 Printer Driver .................................................................. 22
Mac OS - Installing the PostScript 3 Printer Driver and Utilities...............................28
Mac OS X - Installing the PostScript 3 Printer Driver...............................................30
Installing the Printer Driver Using USB .................................................................... 31
Installing the Printer Driver Using IEEE 1394 .......................................................... 33
Installing SmartNetMonitor for Client/Admin ............................................................36
Installing Agfa Monotype Font Manager 2000 ......................................................... 37
Using Adobe PageMaker Version 6.0, 6.5, or 7.0 .................................................... 38
Software and Utilities Included on the CD-ROM...............................................39
Printer Drivers .......................................................................................................... 39
Software and Utilities ...............................................................................................40
INDEX......................................................................................................... 42
iii

iv

How to Read This Manual
R
R
Symbols
In this manual, the following symbols are used:
WARNING:
This symbol indicates a potentially hazardous situation which, if instructions
are not followed, could result in death or serious injury.
CAUTION:
This symbol indicates a potentially hazardous situation which, if instructions
are not followed, may result in minor or moderate injury or damage to property.
* The statements above are notes for your safety.
Important
If this instruction is not followed, paper might misfeed, originals might be damaged, or data might be lost. Be sure to read this.
Preparation
This symbol indicates prior knowledge or preparations is required before operation.
Note
This symbol indicates precautions for operation, or actions to take after mal-operation.
Limitation
This symbol indicates numerical limits, functions that cannot be used together,
or conditions in which a particular function cannot be used.
Reference
This symbol indicates a reference.
[]
Keys and buttons that appear on the computer's display.
Keys that appear on the machine's display panel.
{}
Keys built into the machine's control panel.
Keys on the computer's keyboard.
1

2

Control Panel
1. Getting Started
1. Shows errors and machine status.
m: Data In indicator
The Data In indicator shows the status of
data reception from a computer.
• This indicator blinks when data is being received.
• This indicator lights when there is
data remaining to be printed.
See "Multi-Access", General Settings
Guide.
L: Service call indicator
x: Misfeed indicator
M: Cover indicator
d: Add Staple indicator
D: Add Toner indicator
B: Load Paper indicator
See "Control Panel", General Settings
Guide.
2. {
{User Tools/Counter}}}} key
{{
• User Tools
Press to change default and conditions to your requirements.
• Counter
Press to display or print the total number of copies made.
ZHWS011N
3. Display panel
Shows operation status, error messages,
and function menus. p.4 “Display Panel”
4. {
{Energy Saver}}}} key
{{
Press to switch to and from Energy Saver
mode.
Note
❒ This key is ineffective during system
setting (User Tools) operations.
5. Main power indicator
This indicator lights when the main power switch is turned on.
Important
❒ Do not turn off the main power
switch while the On indicator is lit
or blinking. Doing so may damage
the hard disk.
6. On indicator
This indicator lights when the operation
switch is turned on.
7. Operation switch
Press this switch to turn the power on
(the On indicator goes on). To turn the
power off, press this switch again (the On
indicator goes off).
3

Getting Started
1
{{{{Clear/Stop}}}} key
8.
Deletes one character or digit.
9. {
{#}}}} key
{{
Press to enter a value.
10. Number keys
Press to enter a value for various settings.
11. Function keys
Press the appropriate key to choose any
of the following functions:
• Copy
• Document Server
• Facsimile
• Printer
• Scanner
12. Function status indicator
These show the status of the above functions:
• Yellow: the function is selected.
• Green: the function is active.
• Red: the function has been interrupt-
ed.
Display Panel
This section describes configuration using the control panel when the printer
function is selected.
Note
❒ The machine switches to offline when you make settings, even if previously
online. After you complete the setting, the machine gose back online automatically.
❒ If you make a setting when the machine is offline, it will stay offline after-
ward.
❒ The function items displayed serve as selector keys. You can select or specify
an item by lightly pressing them.
❒ When you select or specify an item on the display panel, it becomes highlight-
ed.
❒ Keys dimmed (for example, ) cannot be used.
OK
4
Control Panel
1
2
3
4
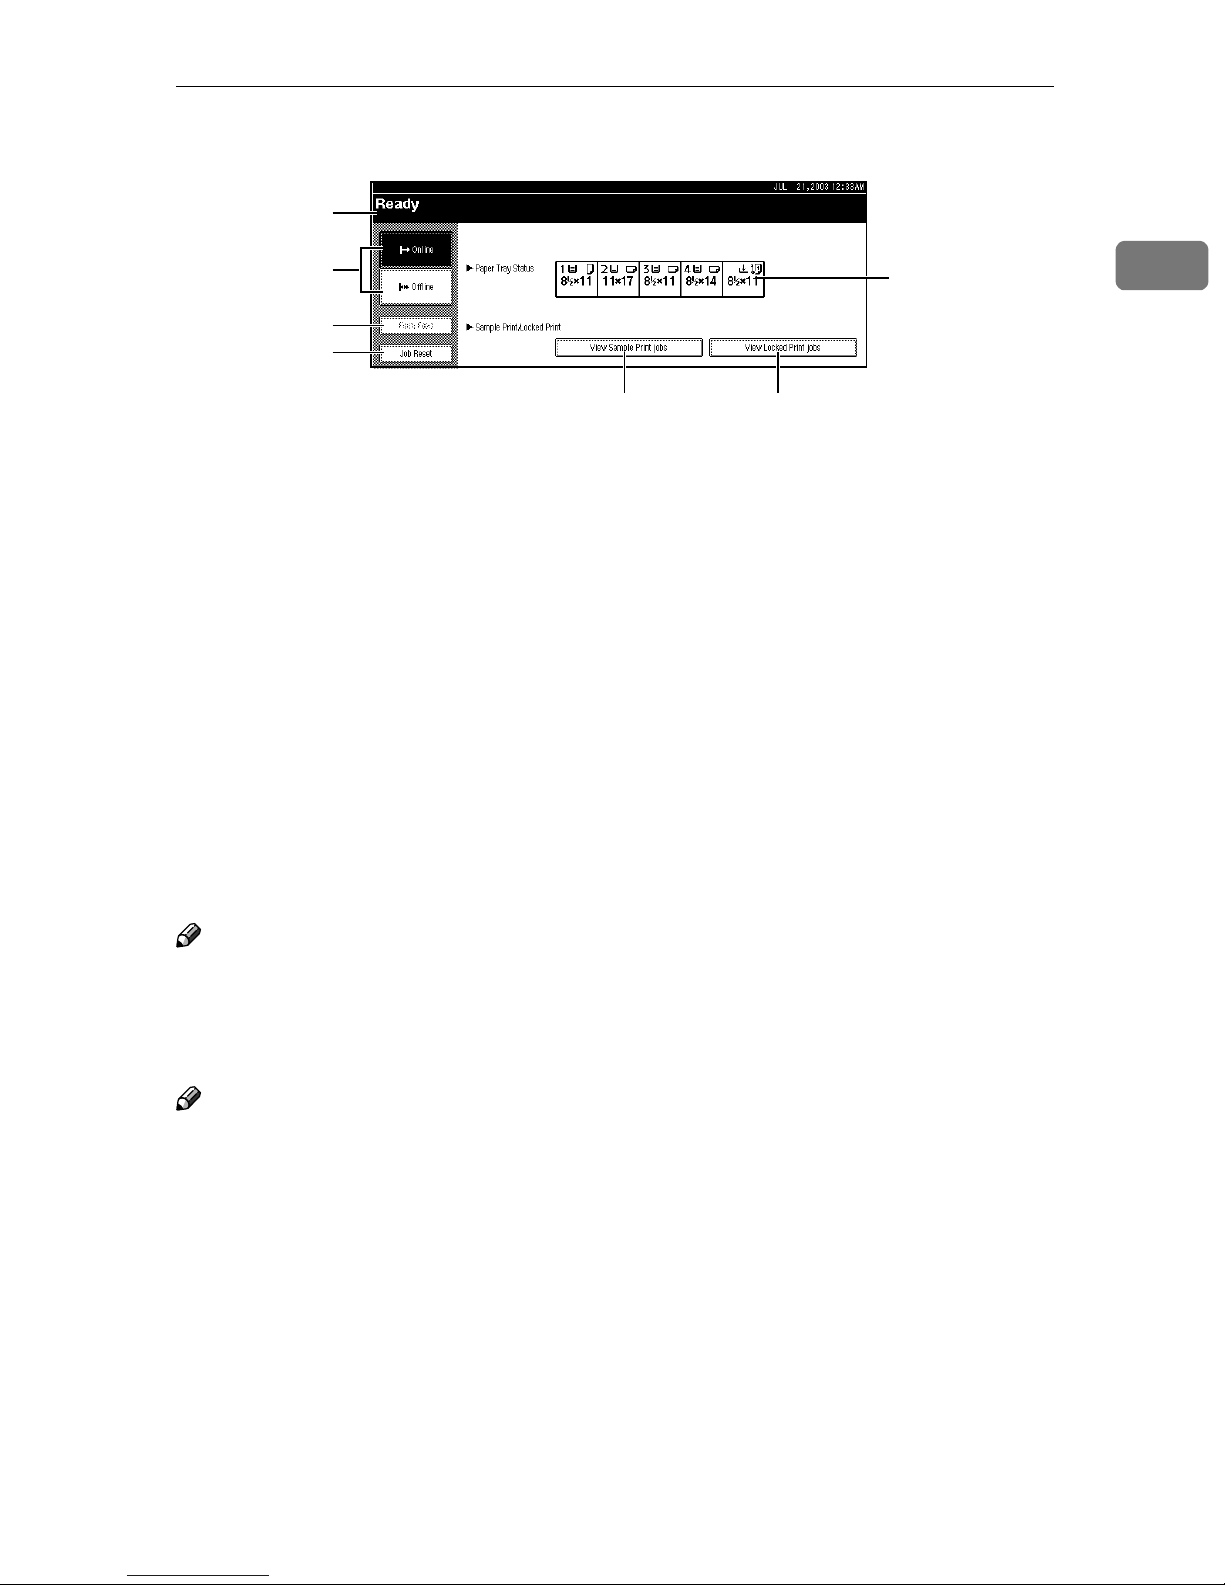
1. Operational status or messages
Displays current machine status, such as
"Online", "Offline", and "Printing". Information about the print job (user ID and
document name) appears in this section.
2.
[Online] key/[Offline] key
By pressing these keys, the machine
switches between online and offline.
When the machine is online, it can receive data from the computer.
When the machine is offline, it cannot receive data from the computer.
3.
[Form Feed] key
Press this key to print all the data left in
the machine's input buffer.
Note
❒ When the machine is online, the status
appears dimly.
❒ This function is not available with the
RPCS
TM
printer language.
7
5
4.
[Job Reset] key
Press this key to cancel the current print
job.
If you press it when the machine is offline
and Hex Dump is selected, Hex Dump is
canceled. See "Printer Features Parameters", Printer Reference 2.
5.
[View Sample Print jobs] key
Press this key to print or change the number of remaining sets of Sample Print jobs
sent from a computer.
6.
[View Locked Print jobs] key
Press this key to print the Locked Print
jobs sent from a computer.
7.
[Paper Tray Status] key
The paper tray settings appear.
6
ZGWH030N
1
Note
❒ When the power is turned on, the copier display is shown. This is a factory
default. This initial setting can be changed. See “User Tools (System Settings)”, General Settings Guide.
❒ If the machine cannot be switched offline, change the system setting of [Signal
Control] to “Printer priority”. For details about the setting, see “User Tools
(System Settings)”, General Settings Guide.
5

1
Getting Started
6

2. Preparing to Print
This section gives instructions for connecting the machine and computer, configuring the machine and installing software.
❖❖❖❖ When operating the machine with a parallel connection, USB connection, or SCSI
print (IEEE 1394) connection.
Connect the machine and the computer with a parallel cable, a USB cable,
A
or an IEEE 1394 (SCSI print) cable.
Reference
For more information, see p.8 “Connecting the Machine”.
Install a printer driver from the CD-ROM.
B
Reference
For more information, see p.14 “Installing the Software”.
❖❖❖❖ When operating the machine under a network environment
Configure the network using the machine's control panel.
A
Reference
For more information, see "Network Configuration", Network Guide.
Install a printer driver and other utilities from the CD-ROM.
B
Reference
For more information, see p.14 “Installing the Software”.
Note
❒ "Network environment" describes a situation where the machine is connected
to a computer via Ethernet, wireless LAN, or IEEE 1394 (IP over 1394) interface.
❒ The optional IEEE 1394 board for SCSI print connection and the optional USB
2.0 board for USB connection cannot be both installed in the machine.
7
Preparing to Print
Preparing the Printer
2
Connecting the Machine
Reference
For information about connection
using an Ethernet and wireless
LAN interface, see "Confirming
the Connection", Network Guide.
For information about connection
using Bluetooth
that comes with optional Bluetooth
interface unit.
Requirements
Before using this machine, make sure
all environmental and electrical requirements are met. Connect the machine to the host computer using the
parallel port, network interface unit,
or both.
TM
, see the manual
Note
❒ Do not use a parallel cable that is
longer than 3 meters (10 feet).
❒ Rating voltage of the interface con-
nector: Max. DC 5V
Follow the procedures below to connect the machine to the host computer
using a parallel cable.
Important
❒ Before connecting the machine and
a computer using an interface cable, make sure that the machine is
not operating, and then turn off the
main power switches of the machine and computer.
❒ Be sure to use the designated inter-
face cable. Other cables may cause
radio interference.
Turn off the main power switch.
AAAA
Make sure all cables, connectors, and
electrical outlets necessary to attach
the machine to the host computer or
network are present.
Connecting the Machine to the Host
Using the Parallel Cable/SCSI Print (IEEE
1394) Cable
Connect the machine to the host computer using the parallel port or optional IEEE 1394 interface board. This
machine does not come with a parallel cable to connect the machine to the
host computer.
The machine's parallel interface is a
standard bidirectional interface. It requires a standard IEEE 1284 compliant 36-pin parallel cable and a parallel
port on the host computer. Make sure
to purchase the appropriate cable for
the machine and your computer.
Important
❒ Before turning off the main
power switch, see “Turning Off
the Power”, General Settings
Guide.
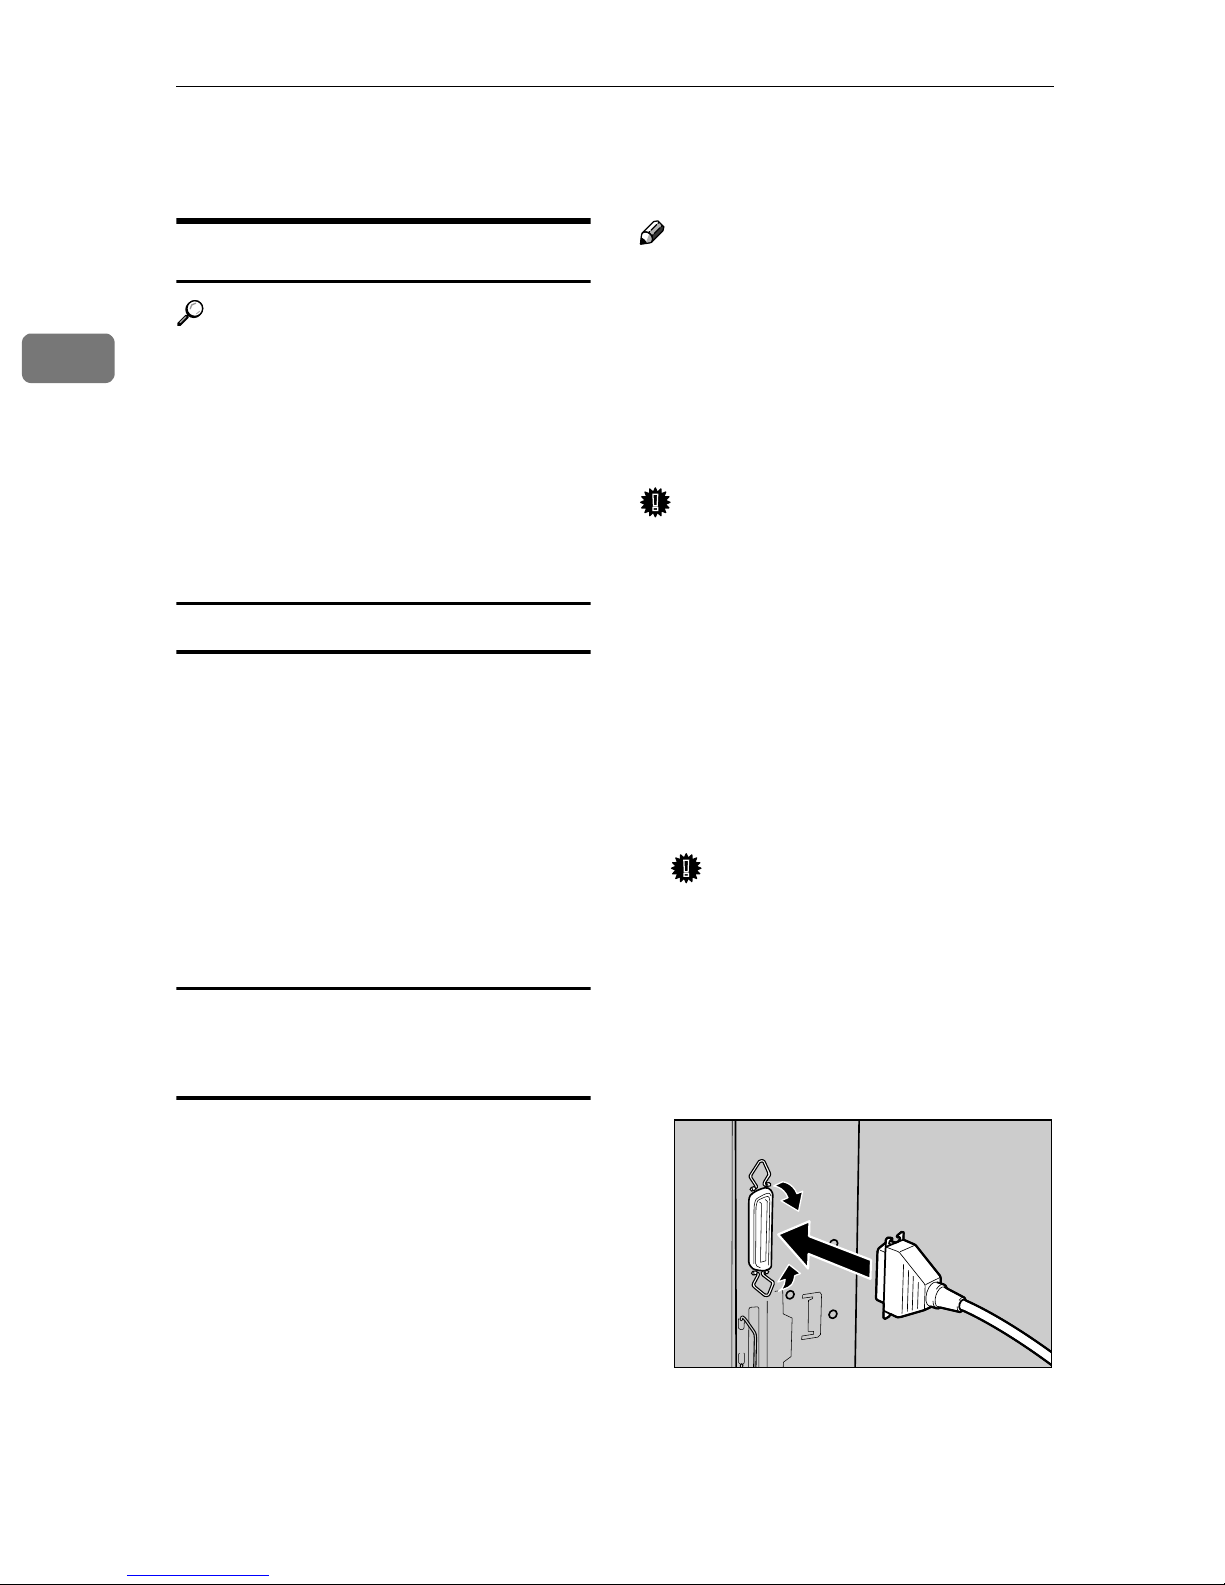
Plug the cable into the port.
BBBB
❖❖❖❖ Parallel Connection
ZHZH010J
8
 Loading...