

Page 1
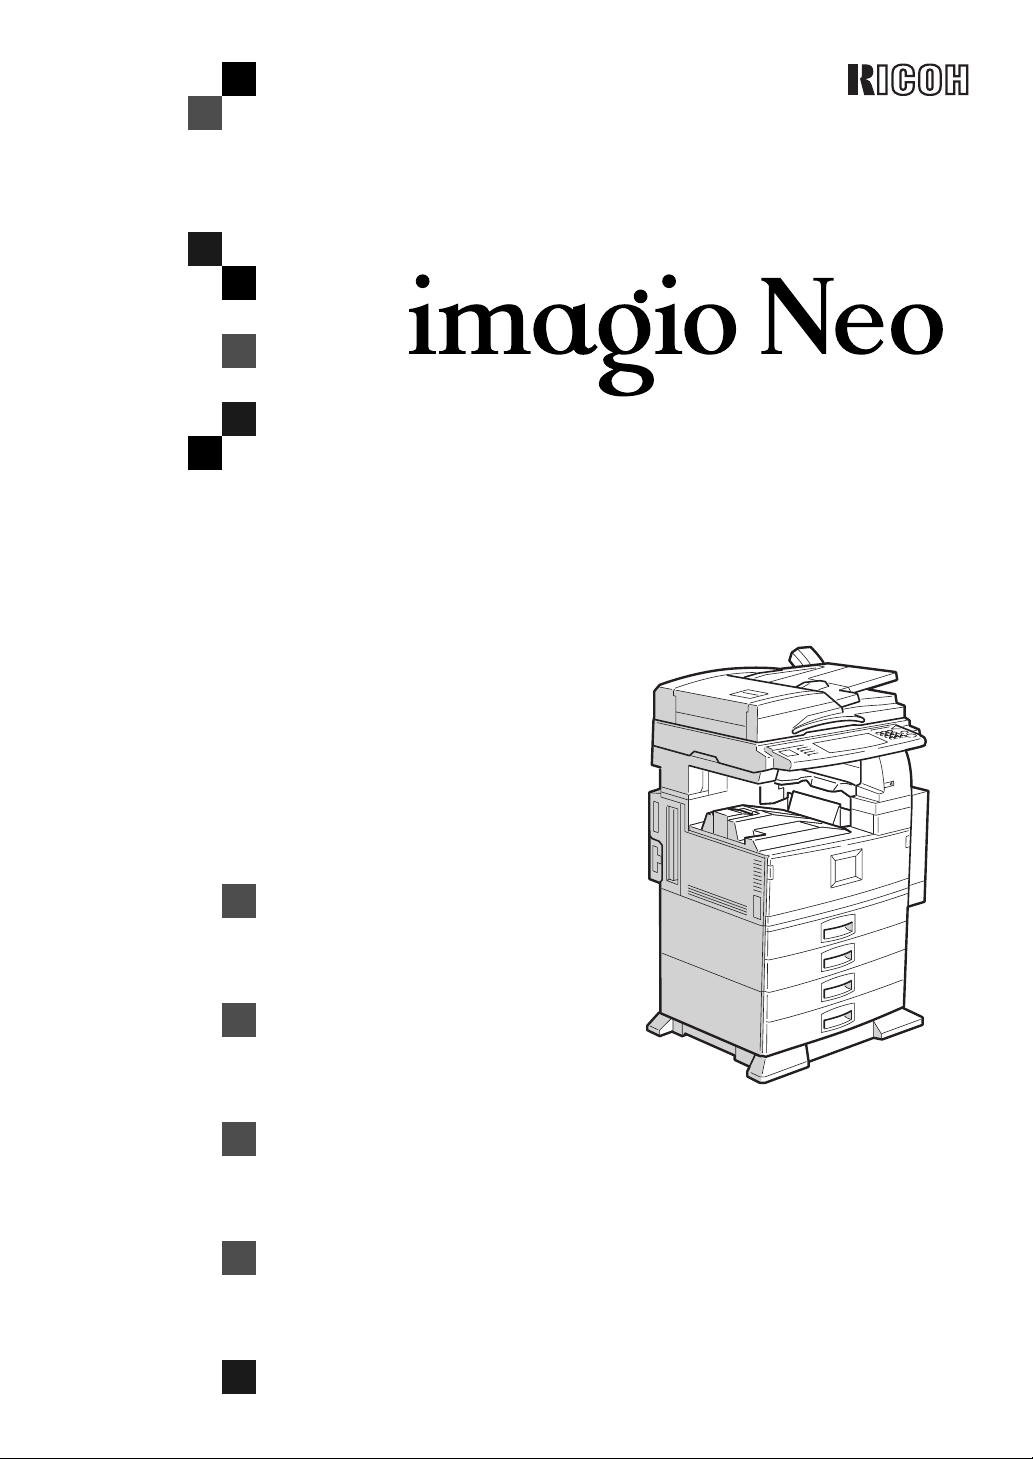
350/450 Series
Operating Instructions
Security Reference
For safety, please read this manual carefully before you use this product and keep it
handy for future reference.
Page 2

Introduction
This manual contains detailed instructions on the operation and maintenance of this machine. To get
maximum versatility from this machine all operators should carefully read and follow the instructions in
this manual. Please keep this manual in a handy place near the machine.
Please read the Safety Information in the Copy Reference manual before using this machine. It contains important information related to USER SAFETY and PREVENTING EQUIPMENT PROBLEMS.
Important
Parts of this manual are subject to change without prior notice. In no event will the company be liable
for direct, indirect, special, incidental, or consequential damages as a result of handling or operating
the machine.
Warning:
Use of controls or adjustment or performance of procedures other than those specified in this manual
might result in hazardous radiation exposure.
Trademarks
®
Microsoft
, Windows® and Windows NT® are registered trademarks of Microsoft Corporation in the
United States and/or other countries.
AppleTalk, Apple, Macintosh, Mac and TrueType are registered trademarks of Apple Computer, Incorporated.
Other product names used herein are for identification purposes only and might be trademarks of their
respective companies. We disclaim any and all rights in those marks.
Some illustrations in this manual might be slightly different from the machine.
Certain options might not be available in some countries. For details, please contact your local dealer.
Page 3

TABLE OF CONTENTS
ISO15408 Security Capability.................................................................... 1
1.Security Settings
Operating Conditions................................................................................. 3
Operating Environment .................................................................................. 3
Key Operator Settings.................................................................................... 4
User Settings.................................................................................................. 5
Security Functions of This Machine......................................................... 6
Protection of Documents Temporarily Saved in the Memory of This Machine
Scanning the Original in Copier, Scanner or Document Server Mode ........... 8
Canceling a Transmission While the Original is Being Scanned (Facsimile)
Canceling a Print Job ................................................................................... 11
Resetting this machine................................................................................. 11
.... 8
....... 8
Protecting Documents Stored in the Document Server ....................... 12
Scanning in Document Server mode ........................................................... 13
Scanning in Copy mode ............................................................................... 20
Scanning in Scanner Mode .......................................................................... 24
Storing from Printer Driver ........................................................................... 31
Scanning in Facsimile Mode ........................................................................ 44
Sending a Stored File................................................................................... 49
Printing Stored Documents .......................................................................... 53
Locked Print.............................................................................................. 56
Printing a Locked Print File .......................................................................... 56
Deleting Locked Print Files .......................................................................... 57
Personal Boxes......................................................................................... 59
Printing Personal Box Messages ................................................................. 59
Key Operator Tools (for Administrator) ................................................. 61
Programming/Changing Key Operator Code ............................................... 62
Display Password with Stored File............................................................... 62
Delivery Server IP Address .......................................................................... 63
Programing/Editing Personal Boxes ............................................................ 63
Cautions When Using Security Modes................................................... 67
Key Operator Settings.................................................................................. 67
User Settings................................................................................................ 67
INDEX......................................................................................................... 68
i
Page 4

ii
Page 5
ISO15408 Security Capability
The security mode of imagio Neo 350/450 series are compliant with ISO/IEC
15408 (level:EAL3) standards. Users requiring security control must use this machine in security mode.
Unauthorized copying and access through customer networks reduces document security. Confidential documents should be protected using security
modes.
To enable security modes, contact an engineer through your sales or service representative.
Refer to the version of software in the following table to see if the products you
are using are certified models or not. Contact your sales or service representative
to check which version of software is installed on the machine.
Certified Version
System/Copy 5.23 Printer Application 3.02
NIB 1.79 Scanner Application 2.24
Net File Application 2.19
Fax Application 5.21.0 FCU Dver 07.00.00
Remote Fax Application
5.20.1
1
Page 6

2
Page 7
Security Settings
Operating Conditions
This machine has two modes: normal,
and security-enhanced mode. “Security Functions of This Machine” are
available only in security mode.
Security modes operate on the
premise that the machine is used under the following conditions:
Operating Environment
• This machine is used normally (i.e.
it is not damaged, modified or
lacking components).
• When connected to a network, this
machine is protected from unauthorized access and attacks such as
packet wiretapping.
• The machine is managed by a person
who has carefully read and understood the operating instructions for
this machine and can ensure maintenance and safe operation by general
users.
In General Office
• The machine is located in a room
and connected to a telephone line
or an internal network.
• Entry is restricted so that unauthorized persons cannot use this machine.
• A firewall prevents unauthorized
external access.
In Public Facilities
• The machine is monitored by facility
personnel.
• The machine is connected to telephone line but not to a network.
Document Server mode is disabled.
Note
Customer engineers dispatched from
❒
Ricoh Company, Ltd. and affiliated
companies are instructed to maintain
user information security. Key operators can ask customer engineers to observe the maintenance procedure.
Ricoh Company, Ltd. and affiliated
❒
companies manage the CSS centers
(or Ricoh service centers ) that provide maintenance services via telephone lines.
❒ CSS centers (or Ricoh service cen-
ters) manage each user's information very carefully.
3
Page 8
Security Settings
Key Operator Settings
• The machine is not protected from
illegal operations using networks
such as wiretapping. Users need to
take general measures to prevent
unauthorized access to user networks.
• This machine is not protected from
physical attacks such as removing
or exchanging the hardware incorrectly. Users need to take general
measures to prevent physical attacks.
• After relocating the machine or
power outage, check the following
to ensure machine security:
• "Security" is displayed on the
control panel.
• The Key Operator Code is pro-
grammed using an eight-digit
number.
• [
All Initial Settings
the applicable range of the Key
Operator Code.
• [
• Use the display to check the securi-
ty modes are working properly.
When the machine is operating in
security modes, the date/time and
“Security” are alternately displayed in the top right-hand corner of the display. For details
about how to operate this machine
in security modes, ask your sales
or service representative.
] is selected under [
OFF
Password with Stored File
] is selected for
Display
].
Note
❒ When choosing a Key Operator
Code, do not use multiple repetitions of the same number such
as “00000000”or sequences such
as “12345678”. These kinds of
codes can be guessed easily. Using such codes will reduce security.
Reference
See "Key Operator Code", "Key
Operator Tools 1/2" in the System Settings manual.
• To view a password for a document stored in the document server, press [
Stored File
Make sure to select [
viewing the password.
If [ON] is left selected after viewing
the password, security is not guaranteed.
Note
❒ When choosing a password for
the Personal Box, do not use
multiple repetitions of the same
number such as “0000”or sequences such as “1234”. These
kinds of codes can be guessed
easily. Using such codes will reduce security.
Reference
See "Display Password with
Stored File", "Key Operator
Tools 2/2" in the System Settings manual.
Display Password with
], and then select [ON].
] after
OFF
• Program a Key Operator Code to
prevent unauthorized persons
from making or changing User
Tools settings. Program the Key
Operator Code using 8 digits with
the number keys, and then select
[
All Initial Settings
].
4
Page 9

User Settings
• Enter passwords discreetly. If you
note a password on paper, keep it
hidden from other people.
• Register a user name for a document stored in the document server to identify creator or type, but
not to protect the document from
other people.
• When the machine is operating in
security modes, the date/time and
“Security” are alternately displayed in the top right-hand corner of the display. For details
about how to operate this machine
in security modes, ask your sales
or service representative.
Operating Conditions
Note
❒ When choosing a password for a
document stored in the document
server or the locked print, do not
use multiple repetitions of the
same number such as “0000”or sequences such as “1234”. These
kinds of passwords can be guessed
easily. Using such codes will reduce security.
5
Page 10

Security Settings
Security Functions of This Machine
This machine provides the following
security functions:
❖❖❖❖ Protection of documents temporarily
saved in memory (in Copier, Facsimile, Printer, Scanner and Document
Server modes)
Deleted data is not reused. It is not
available to other users.
If you push {{{{
stopped copy process, you can delete temporarily saved documents
scanned in Copier, Facsimile or
Scanner mode and data sent to the
printer (this machine).
Clear Modes
❖❖❖❖ Protection of documents stored in the
document server
You can attach a password to a
document stored in the document
server. Printing, delivery and fax
transmission of documents is not
possible unless the password is entered. Your documents are thereby
protected from unauthorized access.
Note
❒
If you enter a password incorrectly, an error message will appear:”Password entered is not
correct”. Press
ter the password again. When the
machine is operating in security
modes, if you enter an incorrect
password three times consecutively, document access will be
denied. You will be unable to access the document even if you
subsequently enter the password
correctly. Once document access
is refused, even if you subsequently enter the correct password, the message “Password
entered is not correct” will appear. To release the lock, turn off
the main power switch, and then
turn it on to re-enter.
, and then en-
Exit
[
]
6
}}}} key in
❖❖❖❖ Protection of documents printed with
the Locked Print function (Printer
mode)
When using Locked Print, printing
is not possible unless a password is
entered using the control panel.
Your documents are safe from being viewed by other people.
Note
❒
If you enter a password incorrectly, an error message will appear:”Password entered is not
correct”. Press
enter the password again. When
the machine is operating in security modes, if you enter an incorrect password three times
consecutively, document access
will be denied. You will be unable to access the document
even if you subsequently enter
the password correctly. Once
document access is refused,
even if you subsequently enter
the correct password, the message “Password entered is not
correct” will appear. Turning
off the main power switch will
delete the document awaiting
printing. To release the lock,
you have to send the print job
from your computer again.
Exit
[
, and then
]
Page 11

Security Functions of This Machine
❖❖❖❖ Protection of received documents
stored in a Personal Box (Facsimile
mode)
Printing documents stored in a
Personal Box is not possible unless
a password is entered using the
control panel. Your documents are
safe from being viewed by other
people.
Note
❒
If you enter a password incorrectly, an error message will appear:”Password entered is not
correct”. Press
enter the password again. When
the machine is operating in security modes, if you enter an incorrect password three times
consecutively, personal box access will be denied. You will be
unable to access the box even if
you subsequently enter the
password correctly. Once document access is refused, even if
you subsequently enter the correct password, the message
“Password entered is not correct” will appear. To release the
lock, turn off the main power
switch, and then turn it on to reenter.
Exit
[
, and then
]
❖❖❖❖ Protection from unauthorized tele-
phone line access
Protection from unauthorized telephone line access Only faxes and
CSS/Ricoh service cent communications are accepted. Dial-up and
other forms of telephone line access are barred.
Reference
"Using CSS (CUSTOMER SUPPORT SYSTEM)" in the Copy
Reference
❖❖❖❖ Key Operator Tools
You can program a Key Operator
Code so that only authorized operators can change security settings.
7
Page 12
Security Settings
Protection of Documents Temporarily Saved in the Memory of This Machine
Documents scanned in Copier, Facsimile or Scanner mode or data sent
from a printer driver for printing are
temporarily saved in memory. You
can delete documents or data to avoid
unauthorized printing.
Completing a process correctly, Used
image data in the process will not
printing in next operation (copying,
printing, facsimile transmit , scanning).
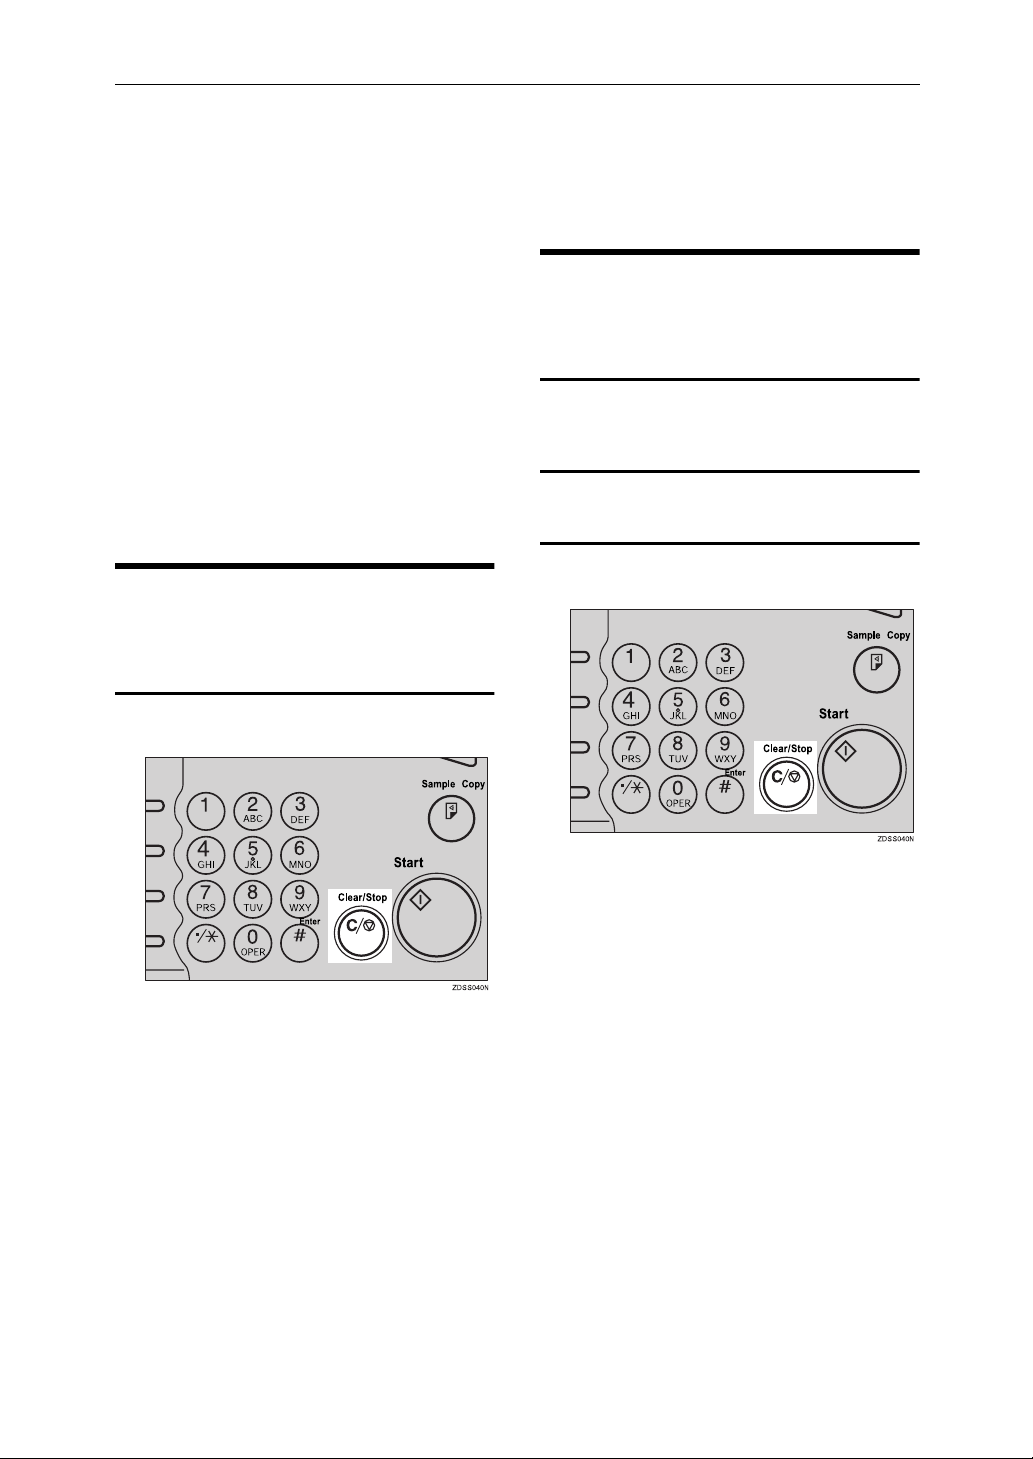
Canceling a Transmission While the Original is Being Scanned (Facsimile)
Canceling a transmission after pressing the {{{{
Canceling a transmission using the
[
Change/Stop TX File]
Start
}}}} key.
Scanning the Original in Copier, Scanner or Document Server Mode
Press the {{{{
AAAA
The machine will stop storing the
original and the data will not be
sent.
Press [
BBBB
Stop
Clear/Stop
].
}}}} key.
Press the {{{{
AAAA
The machine will stop storing the
original and the data will not be
sent.
Clear/Stop
}}}} key.
8
Page 13
Protection of Documents Temporarily Saved in the Memory of This Machine
Canceling a Transmission While the Message is Being Sent
Use this procedure to cancel a transmission after the original has been
scanned.
Limitation
❒ If transmission finishes while you
are carrying out this procedure, it
will not be canceled.
Note
❒ If you cancel a message while it is
being sent, transmission is halted
as soon as you finish this procedure. However, some pages of
your message may have already
been sent and will be received at
the other end.
Select the file you want to cancel.
BBBB
CCCC
Press
Stop Transmission
[
.
]
Reference
For details, see "Canceling a Memory Transmission" in the Facsimile
Reference <Basic Features>
Press
AAAA
The list of programed files being
transmitted or a waiting transmission is displayed.
Change/Stop TX File
[
.
]
Note
❒ To cancel another file, repeat
Exit
[
and C.
B
.
]
steps
Press
DDDD
The machine will return to standby
mode.
9
Page 14

Security Settings
Canceling a transmission using the
{{{{Clear/Stop}}}} key
Press the
AAAA
Select the file you want to cancel.
BBBB
{{{{
Clear/Stop
key.
}}}}
Press [
DDDD
The machine will return to standby
mode.
Exit
].
Press [
CCCC
❒ To cancel another file, repeat
Stop Transmission
Note
steps
and C.
B
].
10
Page 15
Protection of Documents Temporarily Saved in the Memory of This Machine
Canceling a Print Job
Press the {{{{
AAAA
chine's control panel.
Press [
BBBB
panel.
A message appears on the display
panel indicating that the print job
is being canceled.
Important
❒ This procedure cancels the print
job that is being processed by
the machine. In some cases, the
machine may already be processing data for the next print
job following the one currently
being output. In this case, the
next print job is also canceled
when you press [
❒ When the machine is being
shared by multiple computers,
be careful not to accidentally
cancel someone else's print job.
Printer
Job Reset
}}}} key on the ma-
] on the display
Job Reset
Resetting this machine
When this machine stops by jam, proceed this process.
Press the {{{{
AAAA
machine's control panel.
].
Clear Modes
}}}} key on the
Note
❒ You cannot stop printing data
that has already been processed
internally by the machine. Because of this, printing may continue for a few pages after you
press [
❒ A print job that contains a large
volume of data may take considerable time to stop.
Because of memory overflow, print
❒
que will delete automatically.
Job Reset
].
11
Page 16

Security Settings
Protecting Documents Stored in the Document Server
You can attach a password to a document stored in the document server.
Printing, delivery and fax transmission of documents is not possible unless the password is entered. Your
documents are thereby protected
from unauthorized access.
Note
❒ Once you have entered a correct
password, the desired document is
selected (highlighted). When a job
is finished but the document is left
selected, people without the password can also print or delete it.
When you have finished printing
or deleting a document, make sure
to press the key of that document
again, or the [Clear/Stop] key to unselect the document. If you have
selected several documents, make
sure you press the [Clear Modes
key to deselect them.
❒ Frequently check the display panel
to see whether the machine is in security mode or not. When the machine is operating in security
mode, the date/time and “Securi-
ty” appear alternately in the top
right-hand corner of the display.
For details about how to operate
this machine in security mode, ask
your sales or service representative.
❒ If you enter a password incorrect-
ly, an error message will appear:”Password entered is not
correct”. Press [Exit], and then enter the password again. When the
machine is operating in security
modes, if you enter an incorrect
password three times consecutively, document access will be denied.
You will be unable to access the
document even if you subsequently enter the password correctly.
Once document access is refused,
even if you subsequently enter the
correct password, the message
“Password entered is not correct”
will appear. To release the lock,
turn off the main power switch,
and then turn it on to re-enter.
However, access attempts for other documents are still accepted.
]
❒ Once you have entered an incor-
rect password, it takes longer
(more than one minute) than usual
before the machine is ready for operation after power on.
12
Page 17
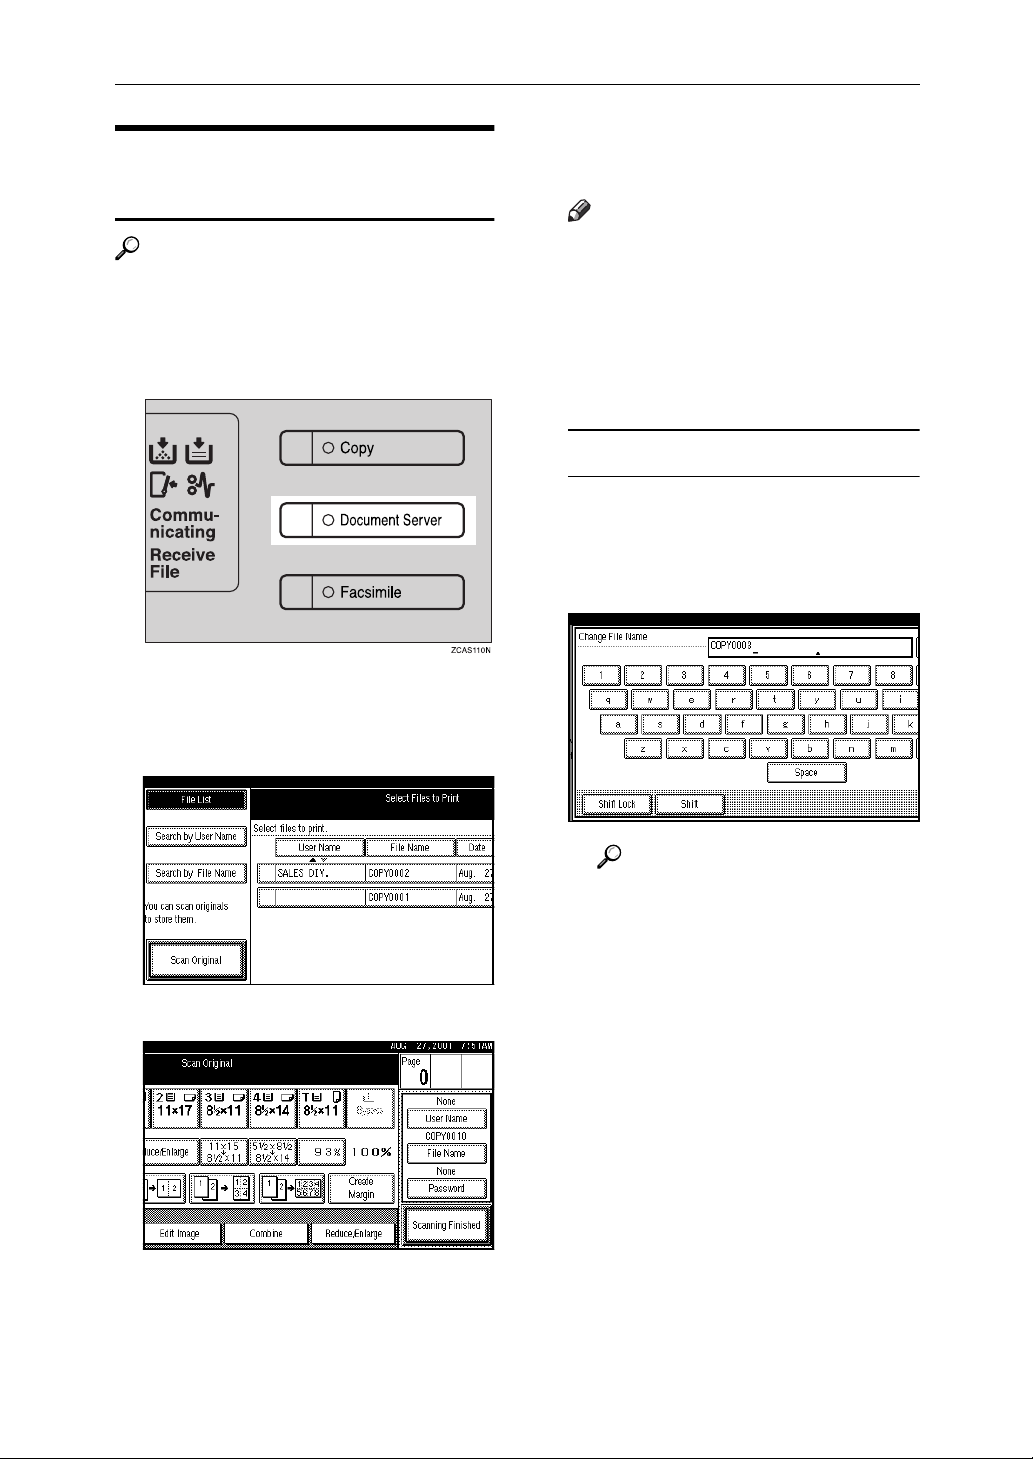
Scanning in Document Server mode
Reference
For details, see "Scanning in Document Server mode" in the Copy
Reference manual.
Press the {{{{
AAAA
Document Server
}}}} key.
Protecting Documents Stored in the Document Server
Enter a file name, user name, or
CCCC
password if necessary.
Note
❒ If you do not wish to register a
file name, go to step
❒ If you do not register a file
name, it is stored automatically.
❒ The security is not guaranteed if
no password is entered.
.
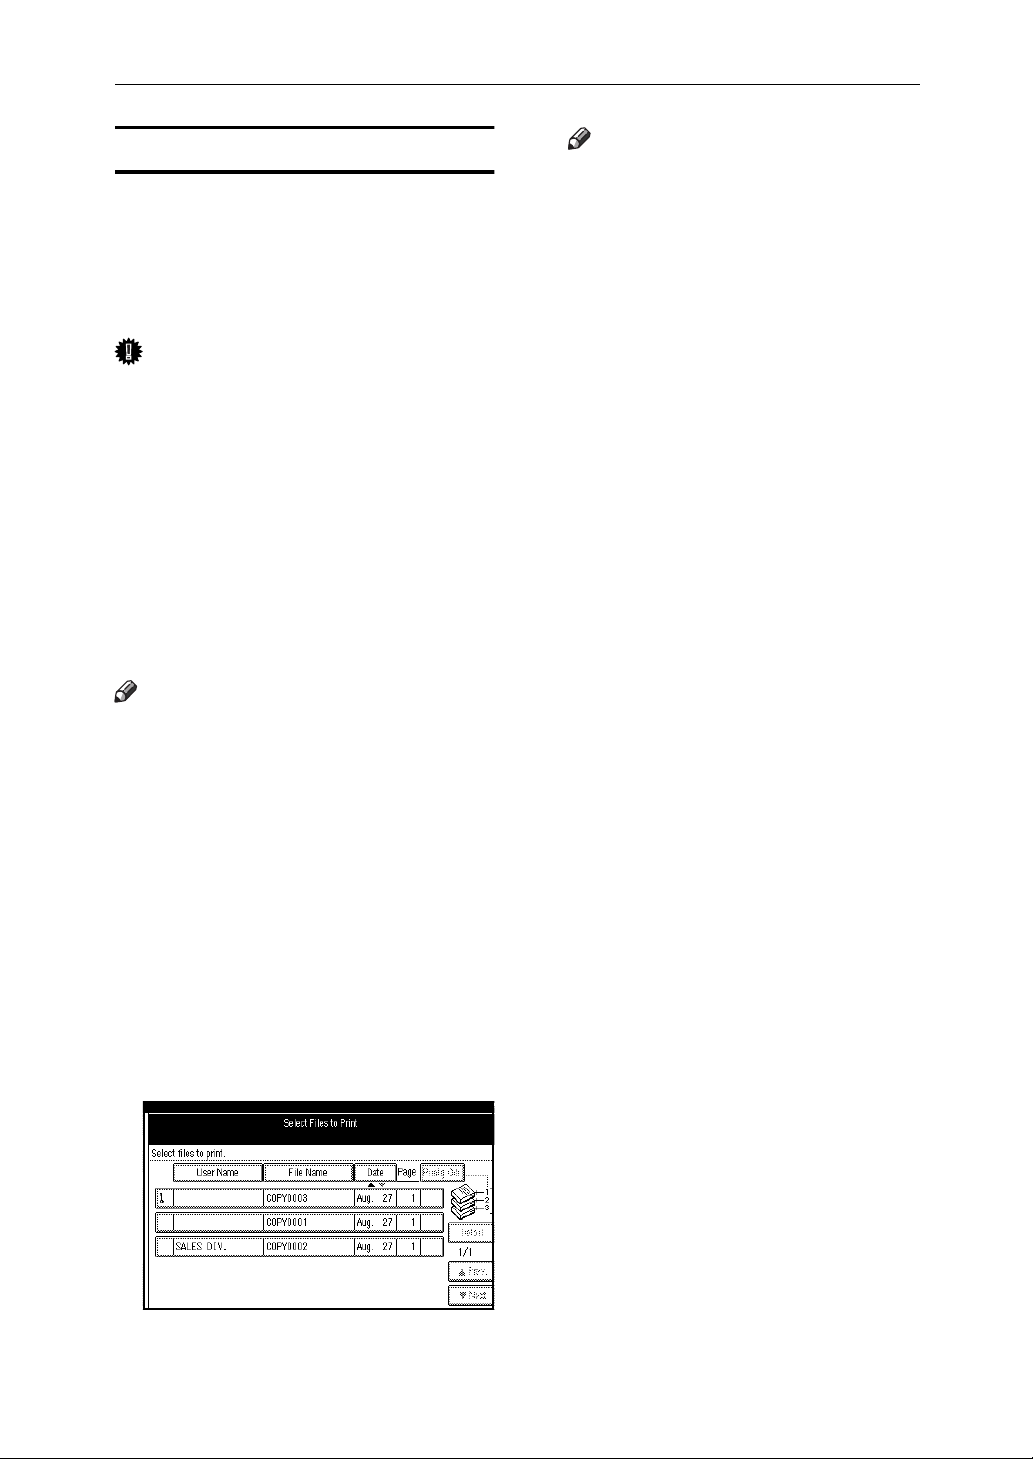
D
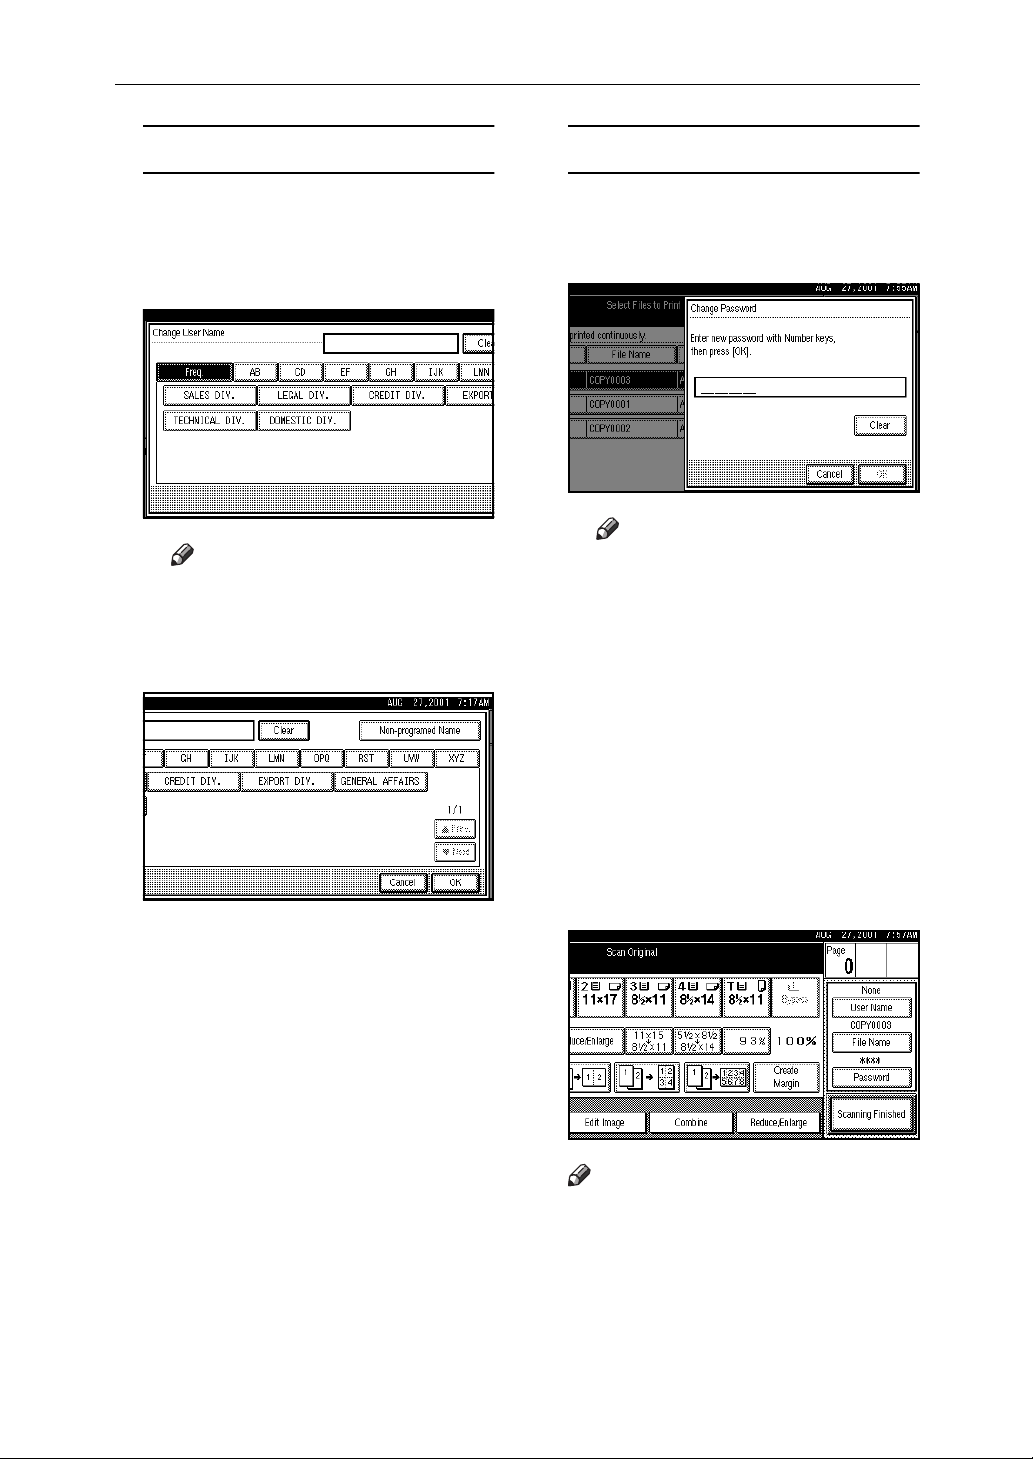
To set the file name
The "Select Files to Print" display
appears.
Press the
BBBB
The "Scan Original" display appears.
Scan Original
[
.
]
A Press the
B Enter the new file name using
the letter keys on the display
panel.
Reference
For information about how
to input characters, see the
System Settings manual.
C Press the
File Name
[
.
[OK]
.
]
13
Page 18
Security Settings
To set the user name
A Press the [User Name] .
B Enter the new user name using
the letter keys on the display
panel.
Note
❒ If you want to enter non-reg-
istered name, press the [Non-
registered Name], then enter
the new user name.
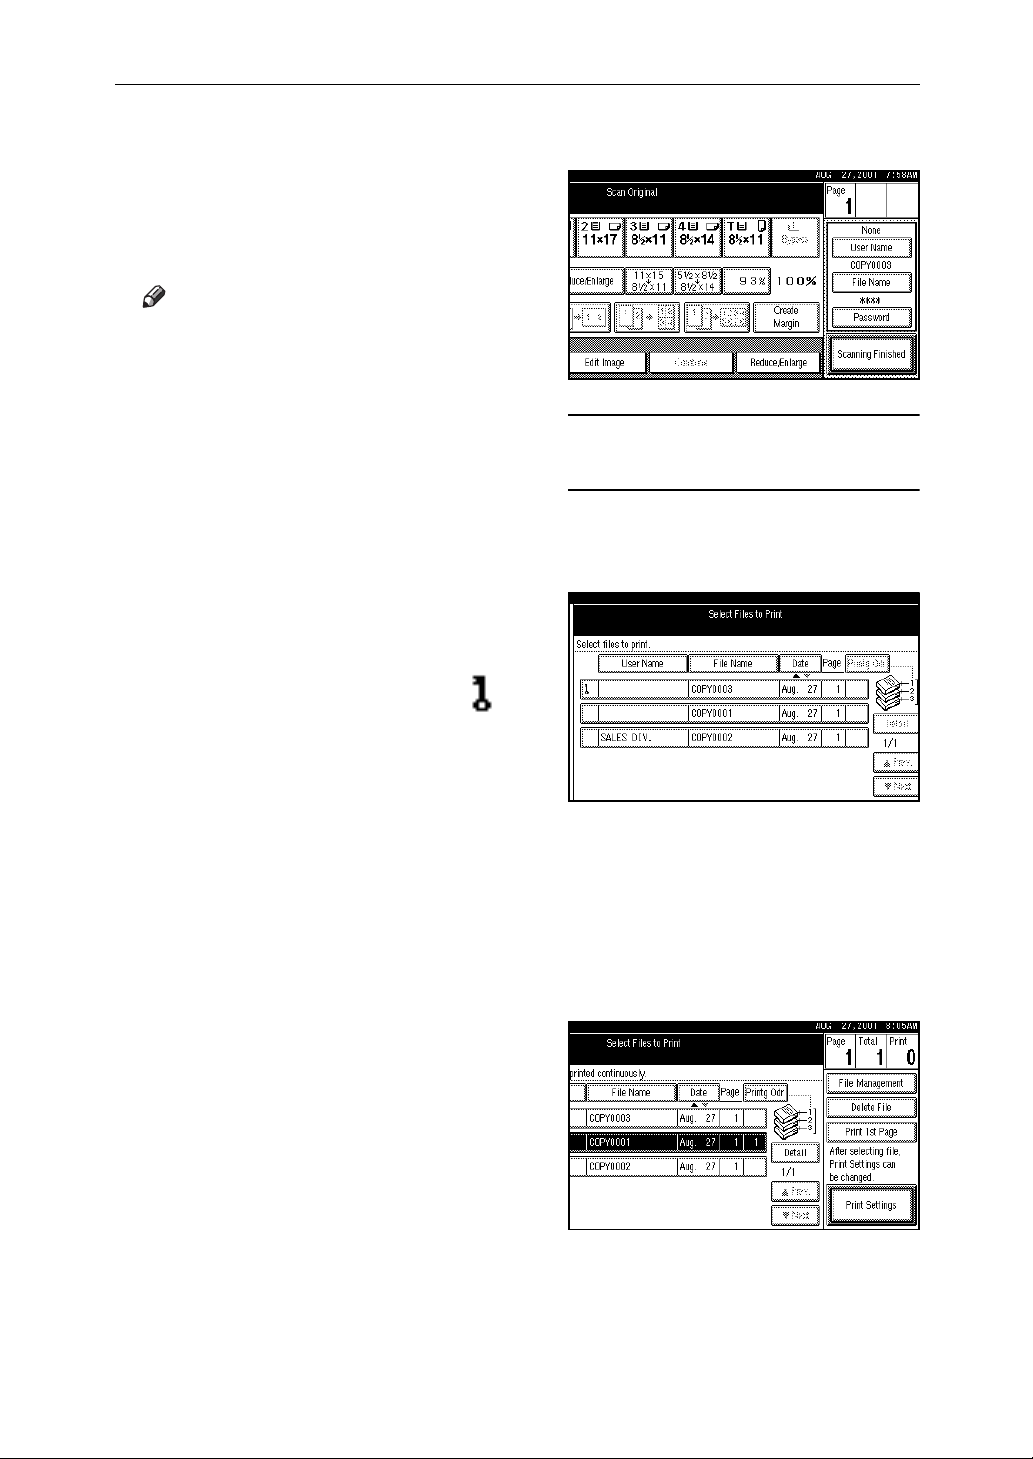
To set the password
A Press the [Password] .
B Enter the password using the
number keys (4 digits).
Note
❒ To change the number en-
tered, press the [Clear] or
{{{{Clear/Stop}}}} key and enter a
new number.
❒ The security is not guaran-
teed if no password is entered.
C Press the [OK] .
C Press the [OK] or {{{{#}}}} key.
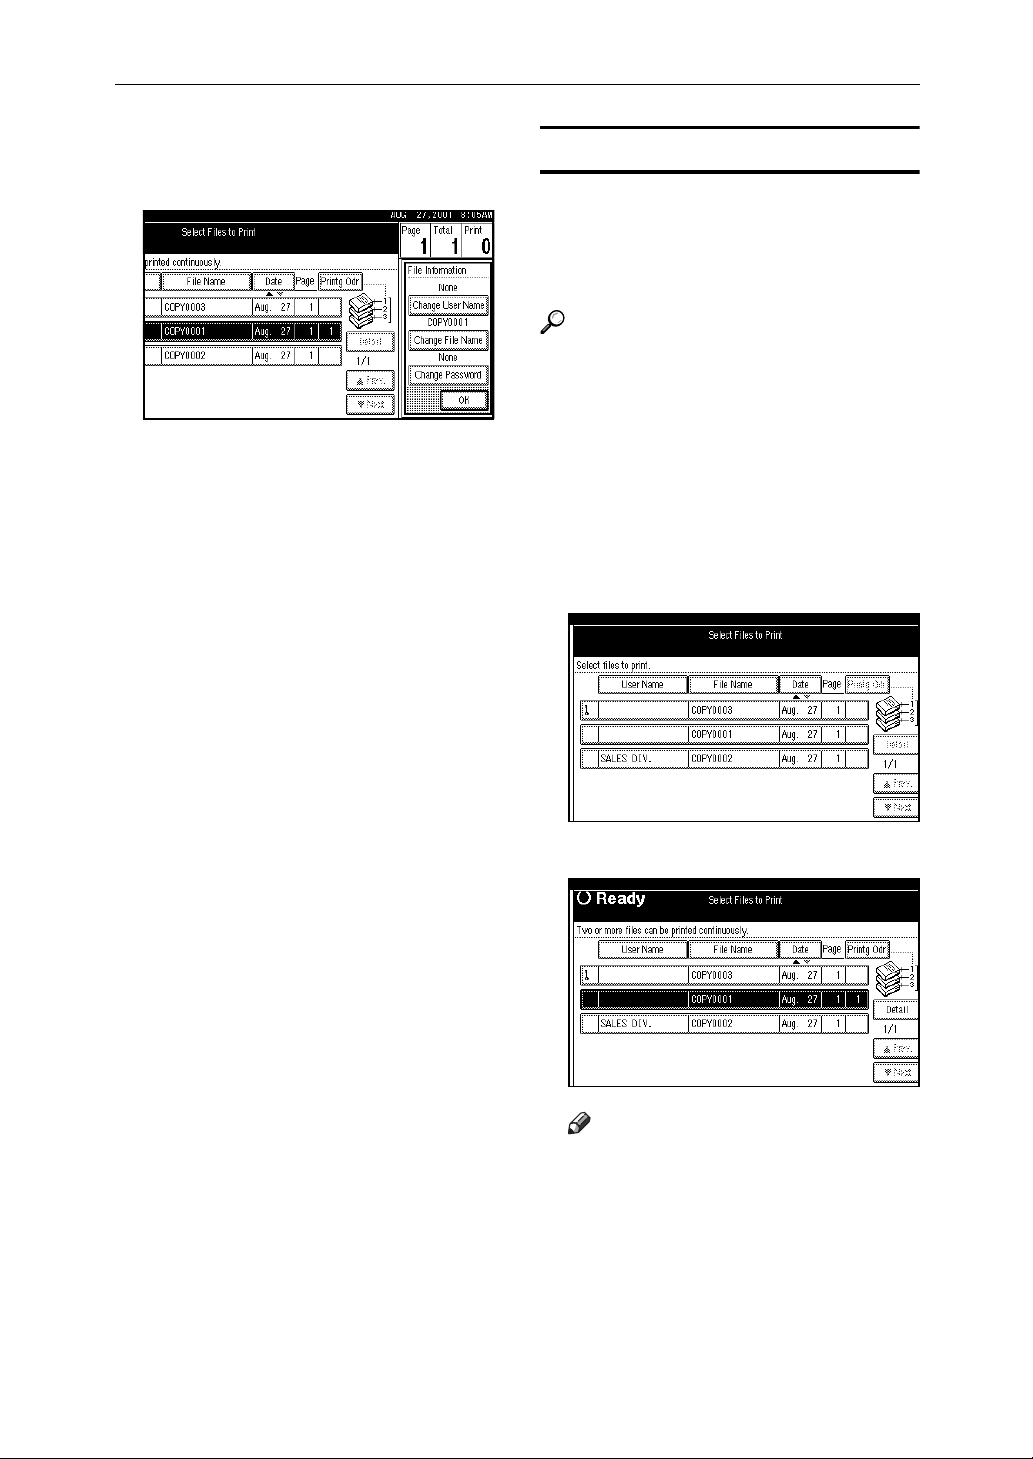
Set your originals either on the
DDDD
exposure glass or into the document feeder.
Make any desired settings.
EEEE
Note
Press the [
❒
cancel the file name, password, or
print settings and return to the
"Select Files to Print" display.
Scanning Finished
] to
14
Page 19
Protecting Documents Stored in the Document Server
Press the {{{{Start}}}} key.
FFFF
The document is saved in the Document Server. The saved documents are displayed on the "Select
Files to Print " display.
Note
❒ If you have set your originals on
the exposure glass, press the
Scanning Finished] after all orig-
[
inals have been scanned. The
"Select Files to Print" display appears.
To stop scanning, press the
❒
key.
❒ To resume the paused scanning
job, press the [Resume] in the
confirmation dialog box. To delete the saved images and cancel
the job, press the [Cancel] .
❒ When storing a password,
appears on the left side of the
file name.
{{{{Clear/Stop}}}}
Press the [Scanning Finished] .
GGGG
To change the file name, user
name, or password
A Press the line of the document
whose file name, user name, or
password you want to change.
B If you select a document which
requires a password, the "Input the Password" window appears. Input the password
using the number keys, then
press the [OK] .
C Press the [File Management] .
15
Page 20
Security Settings
D Press the [Change User Name],
[Change File Name], or [Change
Password].
E Enter the new file name, user
name, or password using the
letter keys or number keys.
F Press the [OK] .
Printing Saved Documents
You can print any of the documents
saved in the Documents Server.
Follow these steps to select a document and print it out.
Reference
For details, see "Printing Saved
Document" in the Copy Reference
manual.
Press the {{{{Document Server}}}} key.
AAAA
The "Select Files to Print" display
appears.
Press the line for the document
BBBB
you want to print.
16
The selected line is highlighted.
Note
❒ If you cannot choose the desired
document by its name, you can
print the first page to check the
contents. Press the line for the
desired document, and press
the [Print 1st Page] followed by
the {{{{Start}}}} key.
Page 21
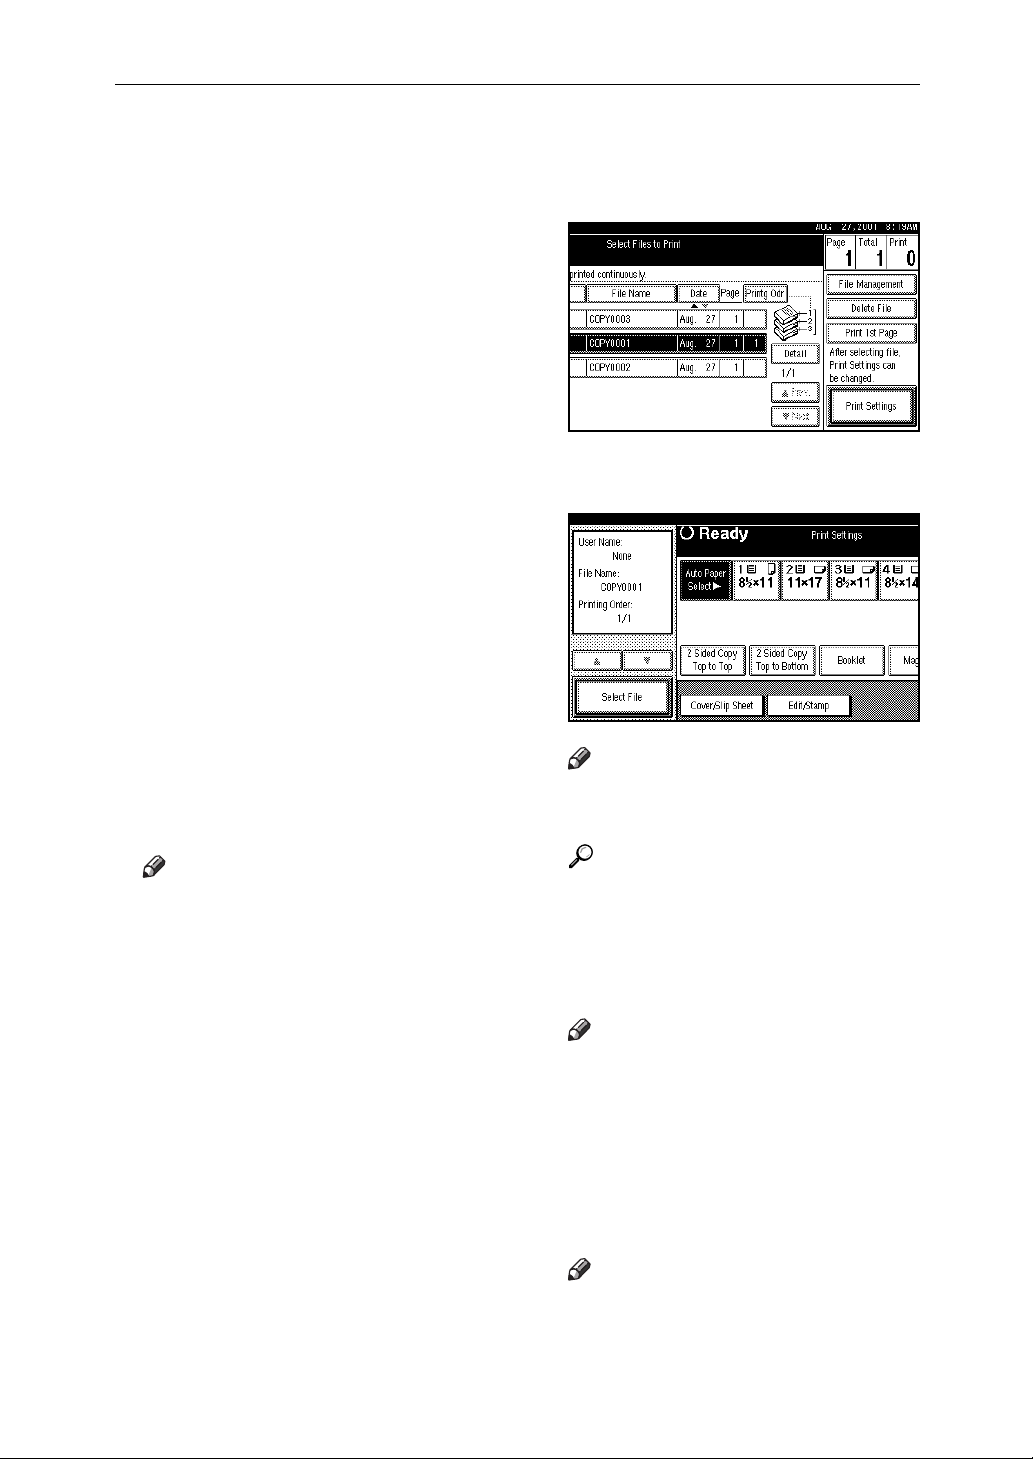
Protecting Documents Stored in the Document Server
❒ If you select a document which
requires a password, the “Input
the Password” window appears. Enter your password using the number keys, then press
the [OK] .
❒ If you enter an incorrect pass-
word for a document three
times consecutively, document
access is refused. Turn off the
main power switch, and then
turn it on to re-enter correctly.
However, access attempts for
other documents are still accepted.
❒ To delete the value entered,
press the [Clear] or {{{{Clear/Stop}}}}
key. To cancel a selected document, press the [Cancel] .
To print more than one docu-
CCCC
ment, repeat step
desired documents in the order
you want to print them out.
The selected order is shown in the
priority column next to the selected document(s).
to select the
BBBB
If you need to change any of the
DDDD
print settings, press the [Print Set-
tings] .
The "Print Settings" display appears.
Note
Press the [
❒
the “Select Files to Print” display.
Select File
] to return to
Note
❒ Press the {{{{Clear Modes}}}} key to
cancel all the settings.
Reference
For details, see the explanations
of each function in this manual.
Enter the required number of
EEEE
prints using the number keys.
Note
❒ Up to 999 can be entered.
❒ To change the value entered,
press the {{{{Clear/Stop}}}} key and
enter new value.
Press the {{{{Start}}}} key.
FFFF
The machine starts printing.
Note
❒ To pause the print job, press the
{{{{Clear/Stop}}}} key. In the confirmation dialog box, press the
[Resume] to resume it, or press
the [Cancel] to cancel it.
17
Page 22
Security Settings
Deleting Saved Documents
You should delete any of the saved
documents using the control panel of
the machine.
This section describes how to delete
saved documents.
Important
❒ You can save up to 3,000 docu-
ments in the Document Server. No
more documents can be saved,
when there are 3,000 documents in
the Document Server. You should
delete unnecessary documents.
❒ You can set the timer to delete the
documents stored in the Document Server with the User Tools.
⇒ “Delete All Files” in the System
Settings manual.
Note
❒ You can delete all the saved docu-
ments at a time with the User
Tools. ⇒ “Delete All Files” in the
System Settings manual.
Follow these steps to delete saved
documents.
Press the {{{{
AAAA
The “Select Files to Print” display
appears.
Select a document you want to de-
BBBB
lete by pressing the name of it.
The selected name is highlighted.
Document Server
}}}} key.
Note
❒ You can search the document
you desire by the file name or
the user name. .
❒ You can sort the files in order of
User Name
[
. Press the key you want to
Date
[
]
sort by.
Restrictions on entries are as follows:
❒
• User name: up to 16 characters
• File name: up to 16 characters
❒ If you cannot choose the desired
document by its name, you can
print the first page to check the
contents. Press the line for the
desired document, and press
the
Print 1st Page
[
by the {{{{
❒ Press the selected line again to
cancel the print job.
❒ If you select a document which
requires a password, the “Input
the Password” window appears. Enter your password using the number keys, and press
the
❒ If you enter an incorrect pass-
word for a document three
times consecutively, document
access is refused. Turn off the
main power switch, and then
turn it on to re-enter correctly.
However, access attempts for
other documents are still accepted.
[OK]
Start
key.
File Name
], [
}}}} key.
key followed
]
, or
]
18
❒ To delete the value entered,
press the
key. To cancel a selected document, press the
[
Clear
or {{{{
]
Cancel
[
Clear/Stop
key.
]
}}}}
Page 23

Repeat step BBBB if you want to select
CCCC
more than one document.
Press the [Delete File] key.
DDDD
A confirmation dialog box appears.
Press the [Delete] key to delete it.
EEEE
Protecting Documents Stored in the Document Server
Note
❒ To cancel the delete operation,
press the [Do not Delete] key.
19
Page 24

Security Settings
Scanning in Copy mode
Reference
For details, see "Scanning in Copy
Server mode" in the Copy Reference manual.
Press the {{{{
AAAA
Copy display appears.
Press the
BBBB
}}}} key.
Copy
Store File
[
.
]
Note
Restrictions on entries are as follows:
❒
• User name: up to 16 characters
• File name: up to 16 characters
• Password: 4-digit number
❒ The security is not guaranteed if
no password is entered.
Set your originals.
DDDD
Make the scanning settings for
EEEE
the original.
Reference
For details, see the explanations
of each function in the Copy
Reference manual.
20
Enter a file name, user name, or
CCCC
password if necessary.
Press the {{{{
FFFF
Note
❒ To stop scanning, press the
{{{{
Clear/Stop
❒ To resume the paused scanning
job, press the
confirmation dialog box. To delete the saved images and cancel
the job, press the
Start
}}}} key.
}}}} key.
Resume
[
Cancel
[
in the
]
]
.
Page 25

Protecting Documents Stored in the Document Server
Printing Saved Documents
You can print any of the documents
saved in the Document Server.
Follow these steps to select a document and print it out.
Reference
For details, see "Printing Saved
Document Server mode" in the
Copy Reference manual.
Press the {{{{
AAAA
The "Select Files to Print" display
appears.
Press the line for the document
BBBB
you want to print.
Document Server
}}}} key.
Note
❒ If you cannot choose the desired
document by its name, you can
print the first page to check the
contents. Press the line for the
desired document, and press
the
Print 1st Page
[
the {{{{
❒ If you select a document which
requires a password, the "Input
the Password" window appears. Enter your password using the number keys, then press
the
❒ If you enter an incorrect pass-
word for a document three
times consecutively, document
access is refused. Turn off the
main power switch, and then
turn it on to re-enter correctly.
However, access attempts for
other documents are still accepted.
Start
[OK]
}}}} key.
.
followed by
]
The selected line is highlighted.
❒ To delete the value entered,
press the
key. To cancel a selected document, press the
To print more than one docu-
CCCC
ment, repeat step
desired documents in the order
you want to print them out.
The selected order is shown in the
priority column next to the selected document(s).
Note
❒ Press the {{{{
cancel all the settings.
[
or {{{{
Clear
]
Cancel
[
to select the
BBBB
Clear Modes
Clear/Stop
.
]
}}}} key to
}}}}
21
Page 26

Security Settings
If you need to change any of the
DDDD
print settings, press the [Print Set-
tings].
The "Print Settings" display appears.
Press the {{{{Start}}}} key.
FFFF
The machine starts printing.
Note
❒ To pause the print job, press the
{{{{Clear/Stop}}}} key. In the confirmation dialog box, press the
[Resume] key to resume it, or
press the [Cancel] to cancel it.
Note
❒ The print settings of the docu-
ment you select first are applied
to the merged documents.
Reference
For details, see the explanations
of each function in the Copy
Reference manual.
Enter the required number of
EEEE
prints using the number keys.
Note
❒ Up to 999 can be entered.
❒ To change the value entered,
press the {{{{Clear/Stop}}}} key and
enter new value.
22
Page 27

Protecting Documents Stored in the Document Server
Deleting Saved Documents
You should delete any of the saved
documents using the control panel of
the machine.
This section describes how to delete
saved documents.
Important
❒ You can save up to 3,000 docu-
ments in the Document Server. No
more documents can be saved,
when there are 3,000 documents in
the Document Server. You should
delete unnecessary documents.
❒ You can set the timer to delete the
documents stored in the Document Server with the User Tools.
⇒ “Delete All Files” in the System
Settings manual.
Note
❒ You can delete all the saved docu-
ments at a time with the User
Tools. ⇒ “Delete All Files” in the
System Settings manual.
Follow these steps to delete saved
documents.
Press the {{{{
AAAA
The “Select Files to Print” display
appears.
Select a document you want to de-
BBBB
lete by pressing the name of it.
The selected name is highlighted.
Document Server
}}}} key.
Note
❒ You can search the document
you desire by the file name or
the user name.
❒ You can sort the files in order of
User Name
[
. Press the key you want to
Date
[
]
sort by.
Restrictions on entries are as follows:
❒
• User name: up to 16 characters
• File name: up to 16 characters
❒ If you cannot choose the desired
document by its name, you can
print the first page to check the
contents. Press the line for the
desired document, and press
the
Print 1st Page
[
by the {{{{
❒ Press the selected line again to
cancel the print job.
❒ If you select a document which
requires a password, the “Input
the Password” window appears. Enter your password using the number keys, and press
the
❒ If you enter an incorrect pass-
word for a document three
times consecutively, document
access is refused. Turn off the
main power switch, and then
turn it on to re-enter correctly.
However, access attempts for
other documents are still accepted.
[OK]
Start
key.
File Name
], [
}}}} key.
key followed
]
, or
]
❒ To delete the value entered,
press the
key. To cancel a selected document, press the
[
Clear
or {{{{
]
Cancel
[
Clear/Stop
key.
]
}}}}
23
Page 28

Security Settings
Repeat step
CCCC
if you want to select
BBBB
more than one document.
Press the [Delete File] key.
DDDD
A confirmation dialog box appears.
Press the [Delete] key to delete it.
EEEE
Note
❒ To cancel the delete operation,
press the [Do not Delete] key.
Scanning in Scanner Mode
Scan documents and store them in the
Document Server.
Reference
For details, see "Storing Scan Data
in the Document Server" in the
Scanner Reference manual.
Press the {{{{Scanner}}}} key.
AAAA
Screen
Contrast
The scanner function screen appears.
Note
❒ If the network TWAIN scanner
screen is displayed, press [Can-
cel]. This screen is displayed if
"Function Priority" in the Scanner Initial Setup is set to network TWAIN scanner mode.
User Tools/Counter
Copy
Document Server
Facsimile
Printer
Scanner
E
24
Set the original in the machine, and
BBBB
adjust the settings for original size
and orientation if required.
Page 29

Set the scan settings.
CCCC
Note
❒ If no scan settings are specified,
the initial Scanner Settings as
set with the [Scan Settings] tab
under [Scanner Initial Setup] will
become active.
Protecting Documents Stored in the Document Server
Temporarily changing the scan
settings
A Press [Scan Settings].
The scan settings screen appears.
B Select the desired resolution,
original size, and other items.
Calling up stored scan settings
A Press [Recall Program].
The user program recall screen
appears.
B Select a user program of scan
settings.
C Press [OK].
The selected user program settings become active
For details on how to set and
program scan settings, see
“Making Scanner Settings
<Scanner Features : Basic Settings>” in the Scanner Reference manual.
When using the network delivery
DDDD
scanner function, make the settings for storing scan data files.
When not using the network delivery scanner function, this step is
not required. Go to step
A Press [Store File].
.
E
The screen for setting scan data
store parameters appears.
B Select the desired settings.
• To store and deliver scan data, press [Store & Transmit].
• To only store scan data, press
Store Only].
[
25
Page 30

Security Settings
Enter the desired information.
EEEE
This screen appears when the network delivery scanner function is
not used.
This screen appears when the network delivery scanner function is
used.
Specifying the user name
A Press [User Name].
The user name selection screen
appears.
B Select the user name.
C Enter the desired user name
and press [OK].
The display returns to the user
name change screen.
Reference
For information about how
to input characters, see the
System Settings manual.
D Press [OK].
The user name is set.
26
The user names shown here are
names that were programmed
in System Settings under the administrator tab. Select a user
name and go to step D. To enter
a user name not shown here,
press [Non-programed Name] and
go to step C.
Page 31

Protecting Documents Stored in the Document Server
Specifying a file name
Note
❒ Scan data files are automatically
named SCAN0001, SCAN0002,
etc. If desired, you can change
the file name.
❒ You can use the same file name
for different files.
A Press [File Name].
The file name entry screen appears.
B Enter the desired file name.
Reference
For information about how
to input characters, see the
System Settings manual.
C Press [OK].
The new file name is set.
Specifying a password
A Press [Password].
The password entry screen appears.
B Enter a password consisting of
four numbers.
C Press [OK].
The password is set.
Note
The security is not guaranteed
❒
if no password is entered.
Important
❒ Take care not to forget the
password. If you have forgotten the password, contact
the system administrator.
To use the network delivery scan-
FFFF
ner function, press [OK].
The display returns to the scanner
function screen.
When not using the network delivery scanner function, this step is
not required. Go to step
.
G
27
Page 32

Security Settings
Press the {{{{Start}}}} key.
GGGG
The original is scanned and the resulting data is stored as a file in the
Document Server.
When there is another page to scan,
set the original and then press the
{{{{
}}}}
key. When there are no more
Start
pages, press the
Note
❒ If [Store & Transmit] was selected
in step
delivered and stored at the
same time.
❒ To abort the scanning process,
press the {{{{Stop}}}} key or press
Stop] on the display. If the pro-
[
cess is canceled after original
pages have already been
scanned, a message appears,
asking whether already
scanned data is to be delivered
or stored. Specify the desired
action.
{{{{#}}}}
key.
, the scan data will be
D
Deleting Stored Files
Reference
For details, see "Deleting Stored
Files" in the Scanner Reference
manual.
Display the list of stored files.
AAAA
From the list of stored files, press
BBBB
Manage/Delete File].
[
Note
❒ If the " Delivery Option" in
Scanner Initial Setup is set to
"No", this step is not required.
Go to step
❒ If the " Delivery Option" in
Scanner Initial Setup is set to
"Yes", up to 30 files can be deleted in one operation. Select the
files before pressing [Manage/De-
lete File], and then go to step D.
.
C
28
Select the file to be deleted.
CCCC
Note
❒ When you select a password
protected file, the password entry screen appears. After you
have entered the correct password and pressed [OK], the file
will be selected.
Page 33

Protecting Documents Stored in the Document Server
❒ If you enter an incorrect pass-
word for a document three
times consecutively, document
access is refused. Turn off the
main power switch, and then
turn it on to re-enter correctly.
However, access attempts for
other documents are still accepted.
❒ Enter Password 4-digit number.
Press [Delete File]
DDDD
Delivering Stored Files
To deliver a scan data file stored in
the Document Server, proceed as follows.
Limitation
❒ To deliver scan data files, a deliv-
ery server is necessary.
❒ If the " Delivery Option" in Scanner
Initial Setup is set to "No", delivery
is not possible.
Reference
For details, see "Delivering Stored
Files" in the Scanner Copy Reference manual.
Display the list of stored files.
AAAA
Select the file for delivery.
BBBB
A confirmation message appears.
Press [Delete].
EEEE
The file is deleted.
Note
❒ When multiple files are select-
ed, the total number of files to
be deleted is displayed.
Press [Exit].
FFFF
The display returns to the scanner
function screen.
Note
❒ When you select a password
protected file, the password entry screen appears. After you
have entered the correct password and pressed [OK], the file
will be selected.
If you enter an incorrect pass-
❒
word for a document three times
consecutively, document access is
refused. Turn off the main power
switch, and then turn it on to reenter correctly. However, access
attempts for other documents are
still accepted.
❒ Enter Password 4-digit number.
29
Page 34

Security Settings
To select multiple files, repeat
CCCC
step
❒ If you select [Display Selection],
Press [OK].
DDDD
The file names are shown in [Select
Stored File], and the machine is in
standby condition for delivery.
.
BBBB
Note
the selected files only will be
shown in the order of delivery.
Descending sort is not possible
in this case.
Specify the destination and send-
EEEE
er information, and press the
{{{{Start}}}} key.
The selected file(s) are delivered.
30
Page 35

Protecting Documents Stored in the Document Server
Storing from Printer Driver
Storing Documents
Reference
For details about installing, see
Help for the printer driver.
Limitation
❒ Documents are not saved in the
following cases:
• When sending the 31st document if there are 30 Sample
Print/Locked Print documents
already stored.
• When a document of more than
1,000 pages is sent.
When using other functions
(copying or scanning). This reduces the page-sending limit.
When Using RPCS Printer Driver
(Standard) on Windows
Connect the machine to the computer, and then install the RPCS printer
driver. For details about connecting,
see p.9 "Connecting the Machine",
Printer Reference 1. For details about
installing, see p.21 "Installing the
RPCS Printer Driver", Printer Reference 1. For details about network configuration, contact your network
administrator.
Making Settings
Access the
AAAA
log box. For details about accessing the
box, see p.5 "RPCS - Accessing the
Printer Properties", Printer Reference 2.
Printer Properties
[
Printer Properties
[
dia-
]
dialog
]
Click the
BBBB
In the
CCCC
Document Server
When a message appears, click
DDDD
.
[OK]
Print Setting
[
Job type:
[
]
.
]
tab.
]
list, click
[
Send to
31
Page 36

Security Settings
If you want to register a user
EEEE
name, file name or password,
click [Details…]. You can skip
these entries completely or partially. If you want to skip completely, proceed to step
Enter a user name, file name or
FFFF
password, and then click [OK].
.
HHHH
Make other print settings if nec-
HHHH
essary.
Limitation
❒ Some print functions cannot be
selected when sending a document to the Document Server.
For details, see ⇒ p.33 “Set-
tings”.
Click [OK].
IIII
The print settings dialog box closes.
Note
Restrictions on entries are as follows:
❒
• User name: up to 16 characters
• File name: up to 16 characters
• Password: 4-digit number
❒ The security is not guaranteed if
no password is entered.
Important
❒ Do not forget the password.
Without it printing is not possible. A confirmation message appears.
Enter the same password as in
GGGG
step
, and then click [OK].
FFFF
32
Page 37

Protecting Documents Stored in the Document Server
Settings
To use Document Server, make necessary settings in the following dialog
boxes:
Reference
For details about accessing the
Printer Properties
[
dialog box or
]
making other settings, see p.5
"RPCS? - Accessing the Printer
Properties", Printer Reference 2 or
Help for the printer driver.
❖❖❖❖ [Setup] tab
A
Job type:
[
]
To use Document Server, click
Send to Document Server
[
Job type:
[
B
Job Type Details
[
Click
Job Type Details
[
list.
]
Details…
[
]
]
]
to display the
dialog box.
in the
]
E
[
Password:
]
To prevent other people from
printing or deleting saved documents, enter a password using a
4-digit number.
Note
❒
The security is not guaranteed if no password is entered.
Note
❒
You can register a user name,
file name and password in
the
Job Type Details
[
dialog
]
box. Documents can be saved
in Document Server even
without registering them.
C
User name:
[
]
Enter a user name using up to
16 characters.
Note
❒
The user name entered is displayed in the printer's Document Server list.
D
[
File name:
]
Enter a file name using up to 16
characters.
Note
❒
The file name entered is displayed in the printer's Document Server list.
33
Page 38

Security Settings
❖❖❖❖ Functions that can be selected when sending a document to the Document Server
Some functions of the RPCS printer driver are unavailable while sending a
document to Document Server. You can select these functions using the machine's control panel when printing saved documents.
Functions Selecting on the RPCS printer
driver
Print functions Paper tray unavailable
Paper type unavailable
Paper output tray unavailable
Original orientation available
Original size available (Custom size paper
is unavailable.)
Printout paper size available (Custom size paper
is unavailable.)
Copies unavailable
(Job type) (
Print quality Document type available
User settings available
Basic functions Reduce/Enlarge available
Cover sheet unavailable
Slip sheet unavailable
Centering available
Edit Layout/Poster unavailable
Duplex/Booklet unavailable
Watermark unavailable
Binding margins unavailable
Finishing Collate unavailable
Staple unavailable
Punch unavailable
Misc. Rotate by 180 degrees unavailable
Do not print blank pages available
Emulate after print available
Send to Document Server
[
)
]
34
Note
❒
You cannot select custom size paper as the original or printout paper size.
❒
Use to send and print individual spreadsheet-created sheets. Functions do
not permit whole file handling.
Page 39

When Using PostScript 3 Printer Driver
(Optional) on Windows
Protecting Documents Stored in the Document Server
Make other print settings if nec-
FFFF
essary.
Connect the machine to the computer,
and then install the PostScript 3 printer
driver. For details about connecting, see
p.9 "Connecting the Machine", Printer
Reference 1. For details about installing,
see p.25 "Installing the PostScript 3
Printer Driver", Printer Reference 1. For
details about network configuration,
contact your network administrator.
Making settings
Access the [
AAAA
log box.
For details about accessing the
[
Printer Properties
p.9 "PostScript 3 - Setting Up for
Printing", Printer Reference 2.
Click the [
BBBB
If a user ID is not displayed in
CCCC
[
User ID:
Printer Properties
Store/History
].
] dialog box, see
] tab.
] dia-
Limitation
❒ Some print functions cannot be
selected when sending a document to Document Server. For
details, see ⇒ p.36 “Settings”.
Click [OK].
GGGG
The [
Printer Properties
closes.
] dialog box
In the [
DDDD
ment Server.
Enter a file name and password,
EEEE
and then click [OK].
❒ You can print even without en-
❒
❒ The security is not guaranteed if
❒
Job type:
Note
tering a file name and password.
Restrictions on entries are as follows:
• User ID: 8 characters
• File name: up to 16 characters
• Password: 4-digit number (fixed)
no password is entered.
Important
Do not forget the password. Without it printing is not possible.
] list, click [
]
Docu-
35
Page 40

Security Settings
Settings
To use Document Server, make necessary settings in the following dialog
box.
Important
❒ You cannot use Document Server
with PageMaker 6.0J or 6.5J.
Reference
For details about accessing the
Printer Properties
[
dialog box or
]
making other settings, see p.9
"PostScript 3 - Setting Up for Printing", Printer Reference 2 or Help
for the printer driver.
[Store/History] tab
❖❖❖❖
A
User ID:
[
]
To register a document creator,
enter a user ID using up to eight
characters.
D
[
Password:
]
To prevent other people from
printing or deleting saved documents, enter a password using a
4-digit number.
Note
❒ The security is not guaran-
teed if no password is entered.
Note
❒ If your user ID is the same as
that used by other people,
searching for documents by
user ID may be ineffective.
❒ The user ID entered is dis-
played in the printer's Document Server list.
B
Job type:
[
]
To use Document Server, click
Document Server
[
list.
type:
]
C
File name:
[
]
in the
]
Enter a file name using up to 16
characters.
Note
❒ The file name entered is dis-
played in the printer's Document Server list.
Job
[
36
Page 41

Protecting Documents Stored in the Document Server
❖❖❖❖ Functions that can be selected when sending a document to the Document Server
Some functions of the PostScript 3 printer driver are unavailable while sending a document to Document Server. You can select these functions on the
machine's control panel when printing saved documents.
Functions Selecting on the Post-
Script 3 printer driver
Paper Paper size available
Orientation (*) available
Order available
Paper source
Output tray available
Paper type available
Graphics Resolution available
Special settings Negative available
Mirror image available
Layout available
Reduce/Enlarge available
Device options Auto tray switch unavailable
Collate unavailable
Print mode unavailable
Staple unavailable
Punch available
PostScript PostScript output format available
Watermark Selecting watermark available
Printing watermark available
available (The bypass
tray is unavailable.)
Important
❒
When landscape orientation is selected (*), duplex, staple and punch functions do not work. Select portrait orientation.
Note
❒
Use to send and print individual spreadsheet-created sheets. Functions do
not permit whole file handling.
37
Page 42

Security Settings
When Using Macintosh
Connect the machine to the computer, and then install the PostScript 3
printer driver. For details about connecting, see p.9 "Connecting the Machine", Printer Reference 1. For details
about installing, see p.34 "Macintosh Installing the PostScript 3 Printer
Driver", Printer Reference 1. For details about network configuration,
contact your network administrator.
Making settings
Access the [
AAAA
log box.
For details about accessing the
[
Printer Properties
p.9 "PostScript 3 - Setting Up for
Printing", Printer Reference 2.
Printer Properties
] dialog box, see
] dia-
Important
❒ Do not forget the password.
Without it printing is not possible.
Make other print settings if nec-
FFFF
essary.
Limitation
❒ Some print functions cannot be
selected when sending a document to Document Server. For
details, see ⇒ p.39 “Settings”.
GGGG
Click [
] to start printing.
Print
In the list, click [
BBBB
Enter a user ID in [
CCCC
Note
❒ Enter User ID using up to 8
characters.
In the [
DDDD
ment Server
Enter a file name and password,
EEEE
and then click [OK].
❒ You can print even without en-
❒ Restrictions on entries are as fol-
Job type:
].
Note
tering a file name and password.
lows:
• File name: up to 16 characters
• Password: 4-digit number
(fixed)
Store/History
User ID:
] list, click [
] .
] .
Docu-
38
❒ The security is not guaranteed if
no password is entered.
Page 43

Protecting Documents Stored in the Document Server
Settings
To use Document Server, make necessary settings in the following dialog
box.
Important
❒ You cannot use Document Server
with PageMaker 6.0J or 6.5J.
Reference
For details about accessing the
Printer Properties
[
dialog box or
]
making other settings, see p.9
"PostScript 3 - Setting Up for Printing", Printer Reference 2 or Help
for the printer driver.
[Store/History] menu
❖❖❖❖
A
Store/History
[
B
User ID:
[
menu
]
]
E
[
Password:
]
To prevent other people from
printing or deleting saved documents, enter a password using a
4-digit number.
Note
❒ The security is not guaran-
teed if no password is entered.
Note
❒ If your user ID is the same as
that used by other people,
searching for documents by
user ID may be ineffective.
❒ The user ID entered is dis-
played in the printer's Document Server list.
C
Job type:
[
]
To use Document Server, click
Document Server
[
list.
type:
]
D
File name:
[
]
in the
]
Enter a file name using up to 16
characters.
Note
❒ The file name entered is dis-
played in the printer's Document Server list.
Job
[
39
Page 44

Security Settings
❖❖❖❖ Functions that can be selected when sending a document to the Document Server
Some functions of the PostScript 3 printer driver are unavailable while sending a document to Document Server. You can select these functions on the
machine's control panel when printing saved documents.
Function
General settings Copies available
Page available
Paper source All sheets
First sheet
Background Printing Job type available
Time available
Cover sheet Cover sheet available
Tray for cover sheet available
Color settings Color available
Printer profile available
Layout Page/Sheet available
Orientation available
Frame border available
Duplex available
Selecting on the PostScript 3 printer driver
available (The bypass
tray is unavailable.)
available (The bypass
tray is unavailable.)
40
Errors PostScript error available
Load paper available
Saving files Save as type available
PostScript level available
Format available
Font data available
Printer functions Collate unavailable
Print mode unavailable
Paper type available
Bin available
Staple unavailable
Punch available
Note
❒
Use to send and print individual spreadsheet-created sheets. Functions do
not permit whole file handling.
Page 45

Protecting Documents Stored in the Document Server
Managing Saved Documents
By using the machine as a network printer with TCP/IP protocol, you can check or delete
documents saved in Document Server from a Ridoc Desk 2000 / Lt networked computer.
You can control printing from the computer as well as from the control panel.
Note
For details about operating Ridoc Desk 2000 / Lt, see Help for Ridoc Desk 2000 / Lt.
❒
Printing Saved Documents
Document Server allows you to print documents sent from a computer. Register a file
name, user name or user ID (according to operating system or printer driver) as follows.
Operating system Description
Windows RPCS (standard) Click the
Multi-tab
[
Print Settings
[
tom Setting
then click
the
box. In the
al og box, enter a fil e name and
user name.
PostScript 3 (optional) Click the
and then enter a user ID.
Macintosh Click the
and then enter a user ID.
Setup
[
]
is selected) or the
]
tab (when
]
is selected), and
]
Details…
[
Job Type Details
[
Job Type Details
[
Store/History
[
Store/History
[
tab (when
Cus-
[
to display
]
dialog
]
tab,
]
menu,
]
]
di-
Important
❒ Do not attempt to interrupt data being sent to the Document Server. If you ac-
cidentally interrupt sending, delete the sent document using the control panel
of the machine. For details about deleting, see Copy Reference.
No more than 200 documents can be stored in the server. Even if fewer than 200
❒
documents are saved, when a document of more than 1,000 pages is saved or
memory is full, no more can be stored. Stored documents include the following:
• Documents scanned from document feeder or exposure glass saved in
Document Server
❒ Delete unnecessary documents whenever possible. For details about deleting,
see Copy Reference.
Note
If you enter an incorrect password for a document three times consecutively, docu-
❒
ment access is refused. Turn off the main power switch, and then turn it on to re-enter
correctly. However, access attempts for other documents are still accepted.
❒ Enter Password using 4-digit number.
41
Page 46

Security Settings
Deleting Saved Documents
You should delete any of the saved documents using the control panel of the machine.
This section describes how to delete saved documents.
Important
❒ You can save up to 3,000 documents in the Document Server. No more docu-
ments can be saved, when there are 3,000 documents in the Document Server.
You should delete unnecessary documents.
❒ You can set the timer to delete the documents stored in the Document Server
with the User Tools. ⇒ “Delete All Files” in the System Settings manual.
Note
❒ You can delete all the saved documents at a time with the User Tools. ⇒ “De-
lete All Files” in the System Settings manual.
Follow these steps to delete saved documents.
Press the {{{{
AAAA
The “Select Files to Print” display appears.
Select a document you want to delete by pressing the name of it.
BBBB
The selected name is highlighted.
Note
❒ You can search the document you desire by the file name or the user name.
❒ You can sort the files in order of
key you want to sort by.
❒ If you cannot choose the desired document by its name, you can print the
first page to check the contents. Press the line for the desired document,
and press the
❒ Press the selected line again to cancel the print job.
Document Server
Print 1st Page
[
}}}} key.
User Name
[
key followed by the {{{{
]
File Name
], [
Start
, or
]
}}}} key.
Date
[
. Press the
]
42
❒ If you select a document which requires a password, the “Input the Pass-
word” window appears. Enter your password using the number keys, and
press the
{{{{
Clear/Stop
key. To delete the value entered, press the
[OK]
}}}} key. To cancel a selected document, press the
Cancel
[
Clear
[
]
]
key.
or
Page 47

Protecting Documents Stored in the Document Server
❒ If you enter an incorrect password for a document three times consecutive-
ly, document access is refused. Turn off the main power switch, and then
turn it on to re-enter correctly. However, access attempts for other documents are still accepted.
❒ Enter Password using 4-digit number.
Repeat step BBBB if you want to select more than one document.
CCCC
Press the [Delete File] key.
DDDD
A confirmation dialog box appears.
Press the [Delete] key to delete it.
EEEE
Note
❒ To cancel the delete operation, press the [Do not Delete] key.
43
Page 48

Security Settings
Scanning in Facsimile Mode
Reference
For details, see "Storing a Document" in the Facsimile Reference
<Advanced Features>manual.
Make sure that the machine is in
AAAA
Facsimile mode and the standby
display is shown.
If the standby display is not
shown, press the {{{{
Place your original and select any
BBBB
scan settings you require.
Press
CCCC
Store File
[
Facsimile
.
]
}}}} key.
Select
ments.
When
“pppppppppp” is
shown.
Set the user name, file name and
EEEE
password if necessary.
❒ If you are not going to set the
❒ You cannot change multiple
Store only
[
Store only
[
Note
user name, file name, or password, go to step F.
documents at once.
to store docu-
]
is selected,
]
Select
DDDD
only
Select
documents after stored.
Store & Transmit
[
.
]
Store & Transmit
[
or
Store
]
[
to send
]
❒ The security is not guaranteed if
no password is entered.
Programing a User Name
Note
❒ Set user names from those that
are programed in the user code.
Set the user codes in the System
Settings manual.
A Press
File Info. Setting
[
.
]
44
Page 49

Protecting Documents Stored in the Document Server
B Press [User Name].
The User Name Change menu is
shown.
C Press the user name to be pro-
gramed.
Setting a File Name
A Press [File Info. Setting].
B Press the [File Name] .
The File Name Change menu is
shown.
The user names that are programed in the user code are
shown.
Note
❒ To set an unprogrammed
user name, press [Non-pro-
gramed Name] and enter the
name. User names that are
entered by pressing the [Non-
programed Name] are Not Pro-
gramed.
D Press [OK].
The specified user name is
shown.
E Press [OK].
C Enter the file name.
Reference
For information about how
to input characters, see the
System Settings manual.
D Press [OK].
The changed file name is
shown.
E Press [OK].
45
Page 50

Security Settings
Setting a Password
A Press [File Info. Setting].
B Press [Password].
The Password Setting menu is
shown.
D Press [OK].
pppp is shown.
E Press [OK].
Press [OK].
FFFF
If you have selected the [Store &
GGGG
Transmit] , specify the receiver.
Note
❒ If you have selected [Store only],
go to step H.
Press the {{{{Start}}}} key.
HHHH
C Enter a password using the
number keys.
Note
❒ If you make an error, press
the {{{{Clear/Stop}}}} key or [Clear],
and then reenter your password.
Enter Password 4-digit number.
❒
❒ The security is not guaran-
teed if no password is entered.
46
Page 51

File Manage
Reference
For details, see "File Manage" in
the Facsimile Reference <Advanced Features>
Protecting Documents Stored in the Document Server
Press the document to be changed.
DDDD
Press
AAAA
The Sub Transmission menu is
shown.
Press
BBBB
Sub TX Mode
[
Select Stored File
[
.
]
.
]
Changing a File Name
A Press
B Press
and reenter the file name.
Change File Name
[
Backspace
[
Reference
For information about how
to input characters, see the
System Settings manual.
or
]
.
]
Delete All
[
]
CCCC
Select
Manage/Delete File
[
.
]
C Press
[OK]
.
47
Page 52

Security Settings
Changing a User Name
A Press [Change User Name].
B Press [Clear].
The user name is deleted.
C Press the new user name.
Note
To set an unprogrammed user
❒
name, press the
Name]
, and then enter the name.
❒ User names that are entered
by pressing the [Non-pro-
gramed Name] are not pro-
gramed into the user code.
[Non-programed
Changing the Password
A Press [Change Password].
B Enter a new password using
the number keys.
C Press [OK].
Press [OK].
EEEE
The initial display is shown.
Delete File
Use this feature to delete your stored
documents.
Reference
For details, see "Delete File" in the
Facsimile Reference <Advanced
Features>
Press [Sub TX Mode].
AAAA
48
Reference
For information about how
to input characters, see the
System Settings manual.
D Press [OK].
Page 53

Press [Select Stored File].
BBBB
Select [Manage/Delete File].
CCCC
Press the document you want to
DDDD
delete.
Press [Delete File].
EEEE
Protecting Documents Stored in the Document Server
Sending a Stored File
Use this feature to send documents
that are stored in the Document Server. You can specify and send multiple
documents, and also send them with
scanned originals all at once.
You can also print the stored originals
with [Print File].
Limitation
Only the documents that are stored
❒
using the fax feature can be sent or
printed by pressing the
key. Documents stored using the
copy feature or printer feature can be
printed by pressing the
Server
}}}}
key. ⇒ "Document Server" in
the Copy Reference manual
• Free Polling transmission
• ID Polling transmission
• Personal ID Polling transmission
• Immediate transmission
• Batch transmission
• On-hook Dial
• Manual Dial
{{{{
Facsimile
{{{{
Document
}}}}
Press [Delete].
FFFF
Note
❒ If you want to cancel the dele-
tion of a document, press [Do not
Delete.].
Press [OK].
GGGG
Press [OK].
HHHH
The initial display is shown.
Note
❒ You can specify a maximum of 30
documents at one time.
❒ The machine can send a total of 400
pages in one operation. With the
optional Expansion Memory, it can
send a maximum of 1000 pages.
❒ The specified documents are sent
with the scan settings of when they
were stored.
❒ The stored documents are given
"File Names", such as "FAX001"
and "FAX002", automatically.
However, you can change the file
names. ⇒ p.47 “File Manage”
You can attach "User Names" to the
❒
stored documents.
Manage”
⇒
p.47 “File
49
Page 54

Security Settings
Reference
For details, see "Sending a Stored
File" in the Facsimile Reference
<Advanced Features>
Press [Sub TX Mode].
AAAA
The Sub TX Mode menu is shown.
Select [Select Stored File].
BBBB
Select the documents to be sent.
CCCC
Note
❒ When multiple documents are
selected, they are sent in the order of selection.
❒ Press the [TX Order] key to ar-
range the order of the documents to be sent.
Press the
❒
documents in alphabetical order.
❒ Press the [User Name] key to
place the documents in order by
the programed user name.
File Name
[
key to place the
]
❒ Press the [Date] key to place the
documents in order by the programed date.
Specifying Documents from the
"File List"
A Press
play the documents to be sent.
B Select the file name.
UUUU Prev.
[
or
]
TTTT Next
[
to dis-
]
50
Page 55

Protecting Documents Stored in the Document Server
Specifying Documents from the
"File Name"
A Press the [Search by File Name]
key.
B Enter the name of the docu-
ment to be sent.
Specifying Documents from the
"User Name"
A Press the [Search by User Name]
key.
B Press or select the user name of
the document to be sent.
Note
❒ The file name is searched by
partial matching.
Reference
For information about how
to input characters, see the
System Settings manual.
C Press [OK].
D Select the file name.
Note
To search by entering the user
❒
name, press [
Name
] and enter the user name.
Non-programed
The user name is searched by
partial matching.
Reference
For information about how
to input characters, see the
System Settings manual.
C Press [OK].
D Select the file name.
51
Page 56

Security Settings
If you select a document with a
DDDD
password, enter the password.
If the document does not have a
password, proceed to step F.
Note
If you enter an incorrect pass-
❒
word for a document three times
consecutively, document access is
refused. Turn off the main power
switch, and then turn it on to reenter correctly. However, access
attempts for other documents are
still accepted.
❒ Enter Password 4-digit number.
Press [OK].
EEEE
When you want to add your origi-
FFFF
nals to the stored documents and
send them all at once, press [RRRR
Origi. + Stored File] or
Origi.].
When sending only the stored documents, go to step G.
Note
❒ When the [RRRR Origi. + Stored File
key is pressed, the machine
sends in the order of "Originals"
to "Stored Files". When the
Stored file + RRRR Origi.] key is
[
pressed, the machine sends in
the order of "Stored Files" to
"Originals".
❒ The added originals are not
stored.
Stored file + RRRR
[
]
52
Press [OK].
GGGG
Note
❒ To add an original to the stored
documents, place the original
and select any scan settings you
require.
Dial and press the {{{{Start}}}} key.
HHHH
Page 57

Printing Stored Documents
Use this feature to print the documents stored in the document server.
Limitation
❒ Only the documents that are
stored using the fax feature can be
printed. Documents stored using
the fax feature are shown with an
"F" in front. To print documents
that are stored using the copy feature or printer feature, press the
{{{{
Document Server
Copy Reference and Printer reference for details.
Reference
For details, see "Printing Stored
Documents" in the Facsimile Reference <Advanced Features>
Press
AAAA
Sub TX Mode
[
}}}} key. See the
.
]
Protecting Documents Stored in the Document Server
Select the document to be printed.
CCCC
Note
Press
❒
uments in alphabetical order.
❒ Press
documents in order by the programed user name.
❒ Press
ments in order by the programed date.
❒ To see details of the selected
document, press the
return to the standby menu,
press the
File Name
[
User Name
[
Date
[
to place the doc-
]
to place the
]
to place the docu-
]
Detail
[
File List
[
.
]
. To
]
The Sub Transmission Mode menu
is shown.
BBBB
Press
Select Stored File
[
.
]
53
Page 58

Security Settings
Selecting a Document from "File
List"
A Press [UUUU Prev.] or [TTTT Next] to dis-
play the document to be sent.
B Select the file name.
Specifying a Document from the
"File Name"
A Press [Search by File Name].
B Enter the file name to be sent.
Specifying a Document from the
"User Name"
A Press [Search by User Name].
B Press the user name of the doc-
ument to be sent.
Note
❒ The file name is searched by
partial matching.
Reference
For information about how
to input characters, see the
System Settings manual.
C Press [OK].
D Select the file name.
Note
❒ To search by entering the
user name, press the [Non-
programed Name] , and then
enter the user name. The user
name is searched by partial
matching.
Reference
For information about how
to input characters, see the
System Settings manual.
C Press [OK].
D Select the file name.
If you select a document with a
DDDD
password, enter the password.
If the document does not have a
password, proceed to step
Press [OK].
EEEE
F
.
54
Page 59

Press [Print File] or [Print 1st Page].
FFFF
Protecting Documents Stored in the Document Server
When the [Print File] is pressed, the
machine prints all the pages. When
the [Print 1st Page] is pressed, the
machine prints only the first page.
Note
❒ To print both sides, press [Print 2
Sided].
Press the {{{{Start}}}} key.
GGGG
Note
❒ When only the first page is
printed, the file name is printed
at the top of the paper.
To cancel printing, press [
❒
Cancel
----
Controlling documents saved
in the Document Server from a
computer
The documents saved in the Document Server can be viewed and controlled from a network computer
with Ridoc Desk 2000 or Ridoc Desk
2000 / Lt installed.
The following operations are available from the computer:
• Displaying documents (Easy Viewer)
• Displaying document properties
(Properties)
].
• Deleting documents (Delete)
• Copying documents to a computer
(Copy)
• Printing documents (Print from
Document Server)
• Sending documents by fax (Fax
from Document Server)
• Exporting documents as files
(Export Document)
For details about the Ridoc Desk 2000 / Lt,
see operating instructions and Help for the
Ridoc Desk 2000 / Lt .
Settings made in System Settings enable you to send documents to the delivery server or to automatically save
documents in the Document Server.
For more information, see the Scanner Reference.
Note
❒ When using Ridoc Desk 2000 or
Ridoc Desk 2000 / Lt, the password you entered for a specific
document will be valid until you
close the application. To access to
use your computer, make sure to
close applications after finishing
your job.
55
Page 60

Security Settings
Locked Print
Use this function for privacy when
printing confidential documents on a
shared network. Data is not printed
but stored in the machine. When using Locked Print, printing is not possible unless a password is entered
using the control panel. Your confidential documents are safe from being viewed by other people.
Printing a Locked Print File
Reference
For details, see "Printing a Locked
Print File" in the Printer Reference
manual
Note
❒ If you enter an incorrect password
for a document three times consecutively, document access is refused. Turn off the main power
switch, and then turn it on to re-enter correctly. However, access attempts for other documents are
still accepted.
If you turn off the main power switch,
❒
the document will be deleted.
❒ Once you have entered an incor-
rect password, it takes longer
(more than one minute) than usual
before the machine is ready for operation after power on.
BBBB
Click
in the application's
[OK]
print dialog box to start printing.
The locked print job is sent to the
machine.
On the machine's control panel,
CCCC
press the {{{{
Printer
}}}} key to display
the Printer Screen.
User Tools/Counter
Copy
Document Server
Facsimile
Printer
Scanner
]
DDDD
Screen
Contrast
Press
View Locked Print jobs
[
A list of the locked print files
stored in the machine is displayed.
ZCAS030E
.
56
Configure the locked print in the
AAAA
properties of the printer driver.
Reference
For details on configuring the
RPCS™ printer driver, see the
corresponding Help files.
The date and time when the job
was sent from the computer, as
well as the User ID is displayed.
Page 61

Select the file you want to print
EEEE
by pressing on it.
Locked Print
Deleting Locked Print Files
Note
❒ Only one file can be selected at a
time.
Press [Print].
FFFF
The password screen is displayed.
Note
If you enter an incorrect pass-
❒
word for a document three times
consecutively, document access is
refused. Turn off the main power
switch, and then turn it on to reenter correctly. However, access
attempts for other documents are
still accepted.
❒ Enter Password 4-digit number.
Reference
For details, see "Deleting Locked
Print Files" in the Printer Reference
manual
Press the {{{{Printer}}}} key to display
AAAA
the Printer Screen.
Screen
Contrast
Press [View Locked Print jobs].
BBBB
User Tools/Counter
Copy
Document Server
Facsimile
Printer
Scanner
ZCAS030E
Enter the password using the
GGGG
number keys and press [OK].
The print confirmation screen is
displayed.
Note
❒ A confirmation screen will ap-
pear when the password has
not been entered correctly.
Press [OK] to enter the password
again.
Press [Yes].
HHHH
The locked file is printed.
Note
❒ Press [No] to cancel printing.
❒ If printing is stopped by press-
ing [Job Reset] after printing has
started, the file will be deleted.
A list of the files stored in the machine is displayed.
Select the file you want to delete
CCCC
by pressing on it.
Note
❒ Only one file can be selected at a
time.
57
Page 62

Security Settings
Press [Delete].
DDDD
The password screen is displayed.
Note
❒ If you enter an incorrect pass-
word for a document three
times consecutively, document
access is refused. Turn off the
main power switch, and then
turn it on to re-enter correctly.
However, access attempts for
other documents are still accepted.
❒ Enter Password 4-digit number.
Enter the password using the
EEEE
number keys and press [OK].
The delete confirmation screen is
displayed.
Press [OK].
FFFF
After the file has been deleted, the
screen returns to the file list screen.
Note
❒ If you do not want to delete the
file, press [No].
58
Page 63

Personal Boxes
Personal Boxes
Use this function to receive private
documents utilizing this machine like
a post-office box. Printing received
documents in a Personal Box is not
possible unless a password is entered
using the control panel. Your documents are thereby safe from being
viewed by other people.
Printing Personal Box Messages
Note
❒ If you enter an incorrect password
for a document three times consecutively, document access is refused. Turn off the main power
switch, and then turn it on to re-enter correctly. However, access attempts for other documents are
still accepted.
❒ Once you have entered an incor-
rect password, it takes longer
(more than one minute) than usual
before the machine is ready for operation after power on.
❒ Personal Box messages will be de-
leted when all the messages in that
Personal Box have been printed.
Note that if you interrupt printing,
messages already printed will be
left in the box.
Press
AAAA
The Information menu is shown.
Select
BBBB
Enter a box you want to print.
CCCC
Information
[
Print Personal Box File
[
.
]
.
]
Reference
For details, see "Printing Personal
Box Messages" in the Facsimile
Reference manual
59
Page 64

Security Settings
When password is required
A Enter a password.
B Press [OK].
Note
❒ If you make a mistake, press
the {{{{Clear/Stop}}}} key or [Clear]
and try again.
Press the {{{{Start}}}} key.
DDDD
The received messages are printed.
Note
❒ To stop printing, press [Stop
Printing]. The display will return
to step C.
Press [Exit].
EEEE
Note
❒ If there are messages in other
Personal Boxes, the display will
return to step C. Repeat from
step C to print another file.
Press [Exit].
FFFF
The initial display is shown.
60
Page 65

Key Operator Tools (for Administrator)
Key Operator Tools (for Administrator)
Key Operator Tools include security
settings. You can program a Key Operator Code to prevent unauthorized
persons from changing User Tools
settings or finding a password. Make
sure you enter a Key Operator Code
using an eight-digit number to ensure
security.
With User Tools, the following security settings can be made:
• Programming a Key Operator Code
• Displaying a password with a stored
file
• Programming the IP address of a
delivery server
• Programming and editing Personal
Boxes
The display that appears when
----
a Key Operator Code has
been programmed
When Key Operator Code is programed
and turned on, users have to enter a
programed Key Operator Code to operate the User Tools and Key Operator
Tools. This prevents unauthorized people from changing registrations.
❒ When you set the Key Operator
Code active, enter a code with the
number keys and select [Partial] or
All Initial Settings] to limit access.
[
The factory default is set to "Partial". Make sure you enter a Key
Operator Code using an eight-digit number to ensure security.
• Selecting [Partial]
Only the Key Operator Tools
are protected with a Key Operator Code.
• Selecting [All Initial Settings
The key Operator Tools and
User Tools are protected with a
Key Operator Code.
Press the
A
If you have selected [All Initial Set-
tings], go to step C.
Select [Key Operator Code].
B
Enter 8 digit Key Operator Code
C
with the number Keys.
User Tools/Counter
{{{{
]
key.
}}}}
Note
You can change the Key Operator
❒
Code on or off with "System Settings".
61
Page 66

Security Settings
Programming/Changing Key Operator Code
Reference
For details, see "Key Operator Tool
1/2" in the System Settings manual
Press {{{{
AAAA
Press
BBBB
Press Key Operator Tools.
CCCC
Press
DDDD
Operator Code.
Select
EEEE
press
User Tools/Counter
System Settings
[
to enter an 8-digit Key
[ON]
All Initial Settings
[
.
[ON]
}}}} key.
.
]
, and then
]
Display Password with Stored File
Press the {{{{
AAAA
Press
BBBB
Select
CCCC
Press
DDDD
.
File
]
If you forget the password, press
EEEE
. And if you make sure the
[ON]
password, press
Note
❒ It is necessary to return setting
OFF
[
word.
Press
FFFF
Press
GGGG
User Tools/Counter
OFF
[
.
]
.
]
System Settings
[
Key Operator Tools
[
Display Password with Stored
[
after making sure pass-
]
.
[OK]
.
Exit
[
]
.
]
}}}} key.
Note
❒ Make sure you select
Settings
Key Operator Code to ensure
security.
Press
FFFF
Press {{{{
GGGG
when programming a
]
.
Exit
[
]
User Tools/Counter
All Initial
[
}}}} key .
Press the {{{{
HHHH
User Tools/Counter
}}}} key.
62
Page 67

Key Operator Tools (for Administrator)
Delivery Server IP Address
Press the {{{{
AAAA
Press [
BBBB
Select [
CCCC
Press [←←←←] or [→→→→] to move between
DDDD
each group of three numbers.
Note
❒ If you make a mistake, press the
[
Clear
number.
Press [OK].
EEEE
Press [
FFFF
Press the {{{{
GGGG
User Tools/Counter
System Settings
Delivery Server IP Address
] and enter the correct
].
Exit
User Tools/Counter
].
}}}} key.
}}}} key.
Programing/Editing Personal Boxes
Press the {{{{
AAAA
Press [
].
BBBB
Select [
CCCC
Select [
DDDD
Select a box to program.
EEEE
User Tools/Counter
Facsimile Features
Key Operator Tools
Box Setting
].
}}}} key.
].
].
If you program a new box, press
"pNot Programed".
Note
❒ If you change a box already pro-
gramed, press it and go to step
I.
❒ The security is not guaranteed if
no password is entered.
❒ Enter the password using up to
eight characters.
63
Page 68

Security Settings
Press [Personal Box].
FFFF
Enter a Box Name.
GGGG
Reference
For information about how to
input characters, see the System
Settings manual.
Press [OK].
HHHH
Enter a Box Code.
IIII
Specify any settings you require.
JJJJ
If you do not program [Password]
or [Receiver], go to step K.
Programing a Password
A Press [Password].
B Enter a password.
Note
❒ If you enter an incorrect
password for a document
three times consecutively,
document access is refused.
Turn off the main power
switch, and then turn it on to
re-enter correctly. However,
access attempts for other
documents are still accepted.
64
Note
❒ To change the Box Code, press
the {{{{Clear/Stop}}}} key or [Clear]
and try again. To change Box
Name, press [Box Name] and re-
peat step G.
❒ If you make a mistake, press the
{{{{Clear/Stop}}}} key or [Clear] and
try again.
❒ Enter Password using 4-digit
number.
❒ If you make a mistake, press
the {{{{Clear/Stop}}}} key or [Clear]
and try again.
C Press [OK].
Page 69

Key Operator Tools (for Administrator)
Programing a Receiver
A Press [Receiver].
B Select a destination with the
Quick Dial Table.
Note
❒ If the desired destination is
not shown, press [UUUU Prev.] or
[TTTT Next].
C Press [OK].
Press [OK].
KKKK
A box mode is shown next to box.
Deleting Personal Boxes
Limitation
❒ If the messages are programed in
the box, you cannot delete it.
Press the {{{{User Tools/Counter}}}} key.
AAAA
Press [Facsimile Features].
BBBB
Select [Key Operator Tools].
CCCC
Select [Box Setting].
DDDD
Press [Delete].
EEEE
Press [Exit].
LLLL
Press the {{{{User Tools/Counter}}}} key.
MMMM
The initial display is shown.
65
Page 70

Security Settings
Select a box you want to delete.
FFFF
Note
❒ When selecting a file set with a
password, the password input
screen is displayed. Enter the
password using the number
keys and press [OK].
❒ If you enter an incorrect num-
ber, press {{{{Clear}}}} or the
{{{{Clear/Stop}}}} key to delete the entered numbers. Press [Cancel] to
cancel file selection.
Press [Delete].
GGGG
A box is deleted and "pNot Programed" is shown.
Note
❒ To cancel deleting a Special
Sender, press [Do not Delete] and
the display will return to step F.
Press [Exit].
HHHH
Press the {{{{User Tools/Counter}}}} key.
IIII
The initial display is shown.
66
Page 71

Cautions When Using Security Modes
Cautions When Using Security Modes
When using security modes, note the following:
Key Operator Settings
• Contact your sales or service representative to check which version of
software is installed on the machine.
• When using security modes, remote management with Ridoc
Document Router is not possible.
• You can use a User Code to manage operating conditions but not to
protect confidential documents
from being viewed by other people.
Reference
See "User Code" in the System
Settings manual.
• When specifying a delivery server
IP address, make sure to enter the
correct address. Delivery function
assures security for documents
stored in the document server using a registered password.
User Settings
• Make sure you finish all settings
before beginning fax transmissions
or scanning originals.
Reference
See "Delivery Server IP Address", "File Transfer" in the
System Settings manual.
67
Page 72

INDEX
C
Canceling a Facsimile Transmission
While the Original is Being Scanned
Canceling a Print Job
Canceling a Transmission While the
Message is Being Sent
Cautions When Using Security Modes
67
,
11
,
9
D
Delete File
Deleting Locked Print Files
Deleting Personal Boxes
Delivery Server IP Address
Display Password with Stored File
Document Server
,
Deleting
Printing
48
, 18, 23,
, 16,
21
42
,
65
,
,
57
63
,
F
File Manage
,
47
I
In General Office
In Public Facilities
,
,
3
3
K
Key Operator Settings
Key Operator Tools (for Administrator)
61
, 4,
67
L
Locked Print
,
56
M
Making Settings
,
35
,
31
38
,
41
Macintosh
,
PS3
RPCS
Managing Saved Documents
O
Operating Conditions
Operating Environment
,
3
,
3
62
,
,
8
,
P
62
,
59
,
12
,
,
,
41
53
56
,
59
,
Personal Boxes
Printing a Locked Print File
Printing Personal Box Messages
Printing Saved Documents
Printing Stored Documents
Programing/Editing Personal Boxes
Programming/Changing Key Operator
,
Code
Protecting Documents Stored in the
Document Server
Protection of Documents Temporarily
Saved in the Memory of This Machine
8
R
Resetting this machine
,
11
S
,
,
31
,
49
20
,
,
,
,
,
44
24
8
,
31
Scanning in Copy mode
Scanning in Document Server mode
Scanning in Facsimile Mode
Scanning in Scanner Mode
Scanning the Original in Copier, Scanner
or Document Server Mode
Security Functions of This Machine
Sending a Stored File
Settings
,
36
,
,
33
,
39
28
29
Macintosh
,
PS3
RPCS
Stored file
Deleting
Deliver
Storing Documents
Storing from Printer Driver
U
User Settings
, 5,
67
W
When Using Macintosh
When Using PostScript 3 Printer Driver
(Optional) on Windows
When Using RPCS Printer Driver
(Standard) on Windows
,
,
,
38
35
31
63
,
13
6
68
B004
Page 73

Copyright © 2002
Page 74

RICOH COMPANY, LTD.
15-5, Minami Aoyama 1-chome,
Minato-ku, Tokyo 107-8544, Japan
Phone: +81-(0)3-3479-3111
350/450 Series Operating Instructions Security
UE USA
B004-8505
 Loading...