

Page 1
WINE PEGS
INSTALLATION INSTRUCTIONS
JANUARY 2020
for flat, heavy, and textured panels
Page 2
METHOD 1
PANEL INSTALLATION WITH HANGER BOLTS
The hanger bolt panel installation method requires wood framing and
is therefore most suitable for new constructions and remodels. It can still
be installed in any room as long as you can spot the wood framing inside
the walls.
STEP 1
A
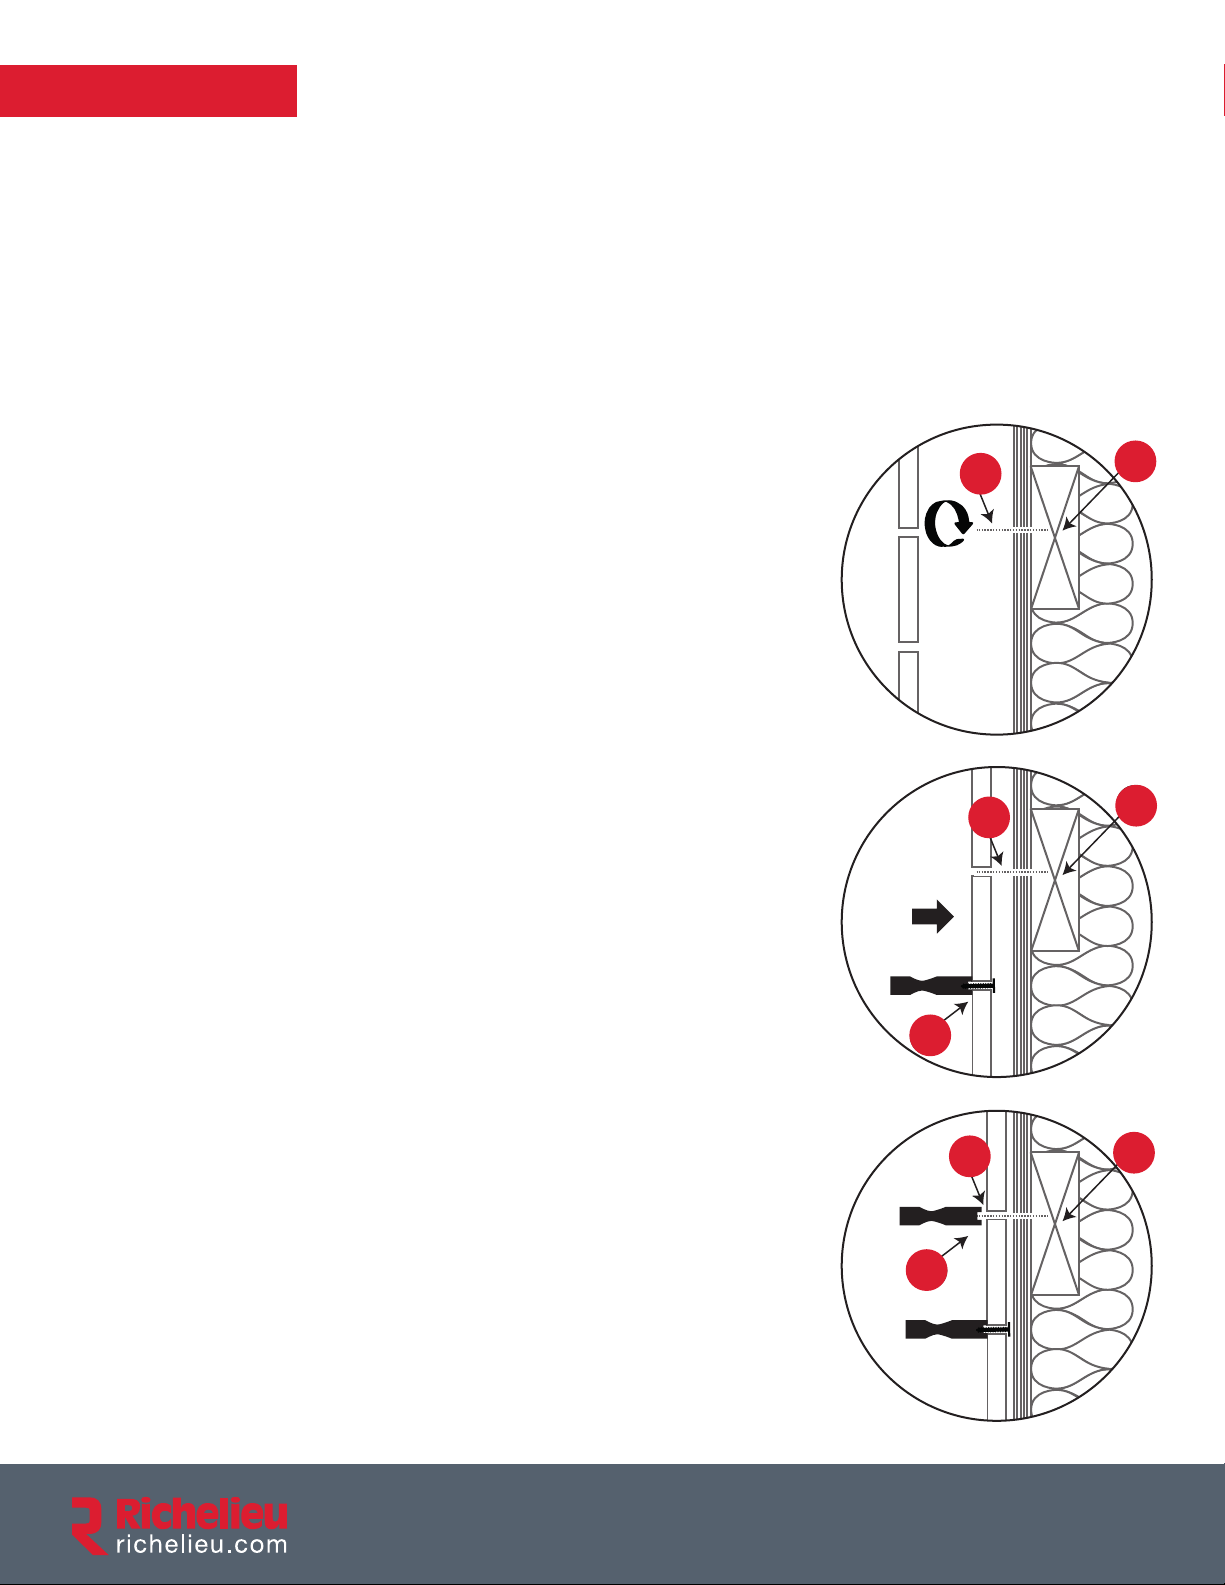
Screw hanger bolts (B) into the solid wood
reinforcement (A) and pre-drill the holes in the
decorative panel according to the layout of your
wine pegs (see online technical datasheet).
B
B
A
STEP 2
Flat decorative panel installation:
Assemble the wine pegs on the decorative panel using
the 1 19/32” (40 mm) JC-B connector bolts (G) that are
in the kits and suspend the panel on the wall from your
hanger bolts (B). Continue to step 3.
Heavy and/or textured decorative panel installation:
Continue with installation method 3, see page 4.
STEP 3
Secure the decorative panel by screwing the remaining
wine pegs onto the hanger bolts (B). To ensure safety,
make sure that the thread (F) that goes out to screw the
wine pegs is always at least 3/4” (19 mm) and no longer
than 1” (25 mm).
F
G
G
G
F
A
A
B
B
B
B
B
B
F
A
A
A
A
Hardware and accessories required
for installation are sold separately. See page 5 (B).
Page 3
METHOD 2
FLAT PANEL INSTALLATION WITH Z-CLIPS
The Z-clip assembly method requires wood framing and is therefore
more suitable for remodels or new constructions. It can still be installed
in any room as long as the Z-clips are screwed into the wood frames
to ensure strength and safety.
STEP 1
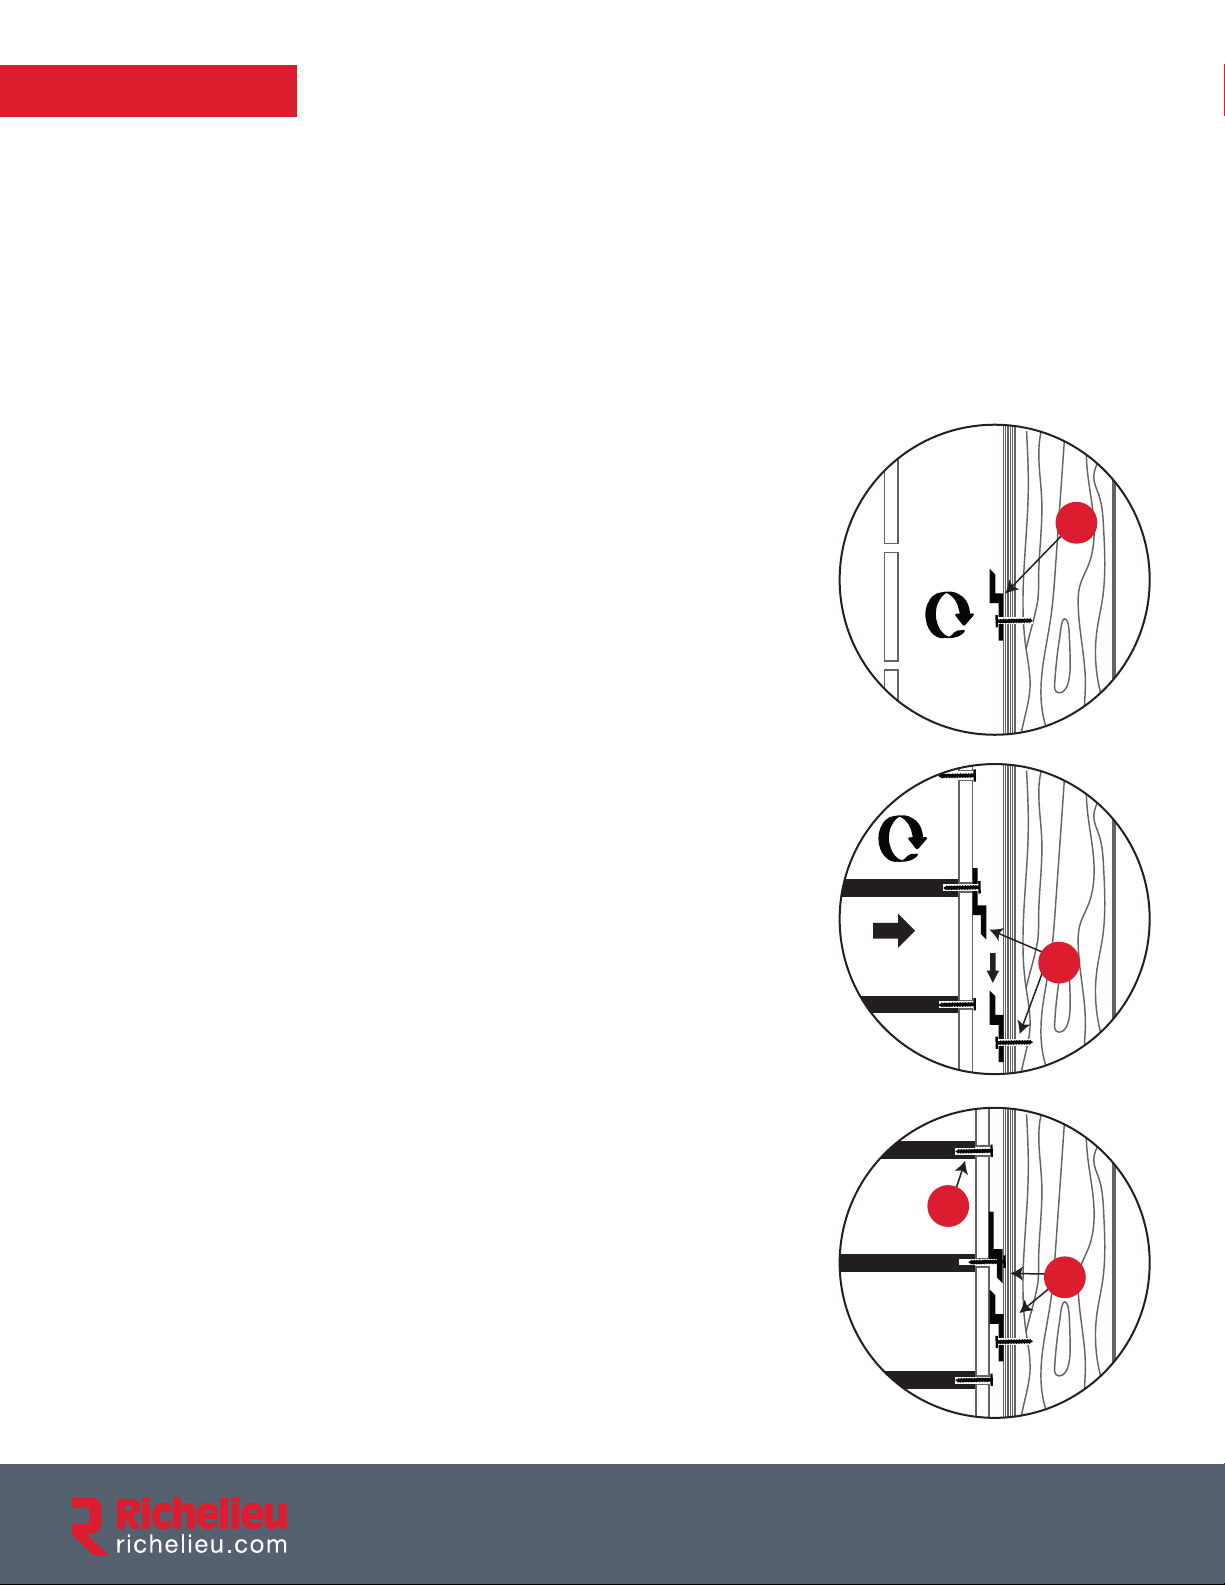
Pre-drill your Z-clip moldings (D). Install one half
of the Z-clip molding onto the wall, making sure to
screw into the wood frame. Pre-drill the holes in your
decorative panel according to the layout of your wine
pegs (see online technical datasheet).
D
D
STEP 2
Flat decorative panel installation:
Screw the other half of the Z-clip molding (D)
onto the back of your decorative panel
and install all your wine pegs.
Continue to step 3.
Heavy and/or textured decorative panel installation:
Continue with installation method 3, see page 4.
STEP 3
Install the assembled decorative panel to the wall by
clipping the two Z–clip moldings (D) together. To ensure
safety, make sure that the thread (F) that goes out to
screw the wine pegs is always at least 3/4” (19 mm)
and no longer than 1” (25 mm).
D
D
D
F
F
F
D
D
D
Hardware and accessories required
for installation are sold separately. See page 5 (D).
Page 4
C
C
Plywood
Plywood
3/4"
Plywood
C
C
METHOD 3
TEXTURED PANEL INSTALLATION WITH SPACERS
The spacer assembly method is suitable for textured or heavy panels.
It is not recommended for Leggero wine pegs.
STEP 1
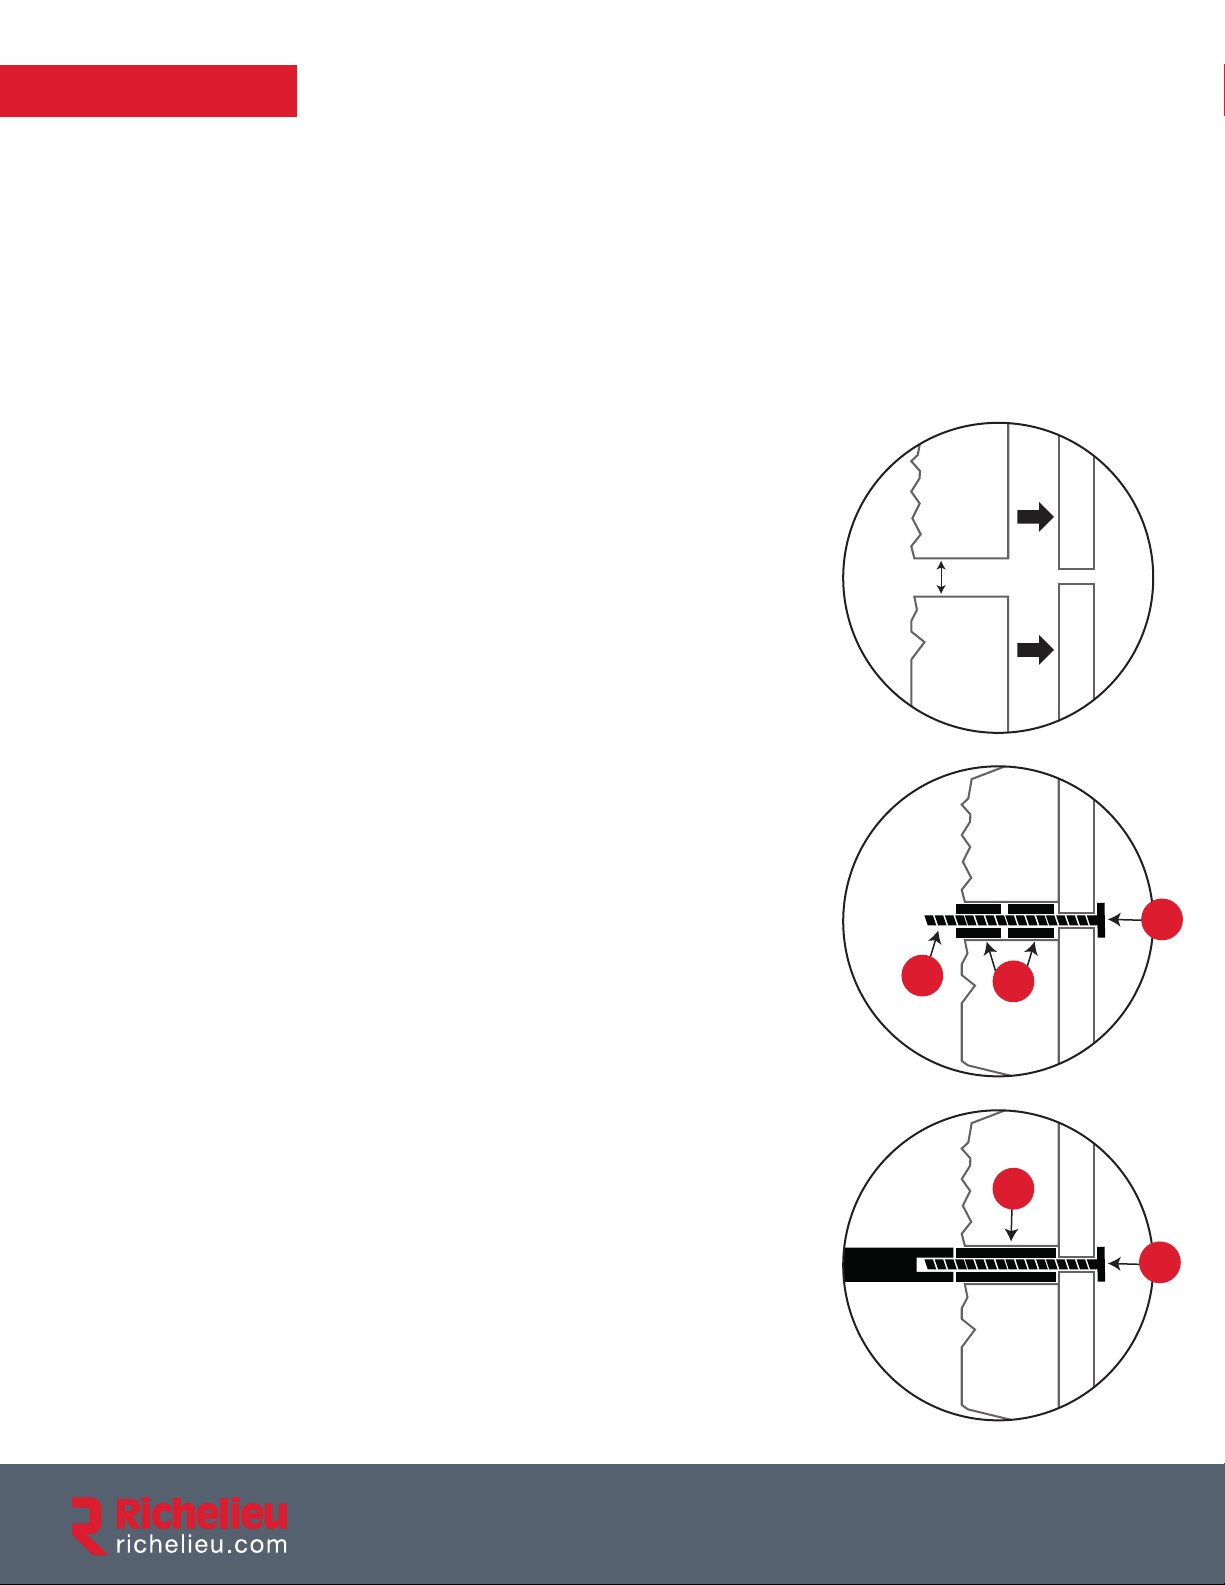
Pre-drill 3/4” (19 mm) diameter holes in the heavy and/
or textured decorative panel according to the layout
of your wine pegs (see online technical datasheet).
Glue it to another panel made of plywood that
is also pre-drilled.
STEP 2
Install the spacers (E) into the heavy and/or textured
decorative panel using JCB-B 1 31/32” (50 mm),
2 3/8” (60 mm), or 2 3/4” (70 mm) (C) depending on the
thickness of the panel. (Sentence cut off/missing.
Install additional spacers as needed depending on the
depth of the decorative panel. To ensure safety, make
sure that the thread (F) that goes out to screw the wine
pegs is always at least 3/4” (19 mm) and no longer than
1” (25 mm).
STEP 3
Install the wine pegs on the JCB-B screw.
Refer to method 1 or method 2 to install the panels
to the wall.
C
F
F
F
E
E
E
E
E
E
C
Hardware and accessories required
for installation are sold separately. See page 5 (C, E).
Page 5
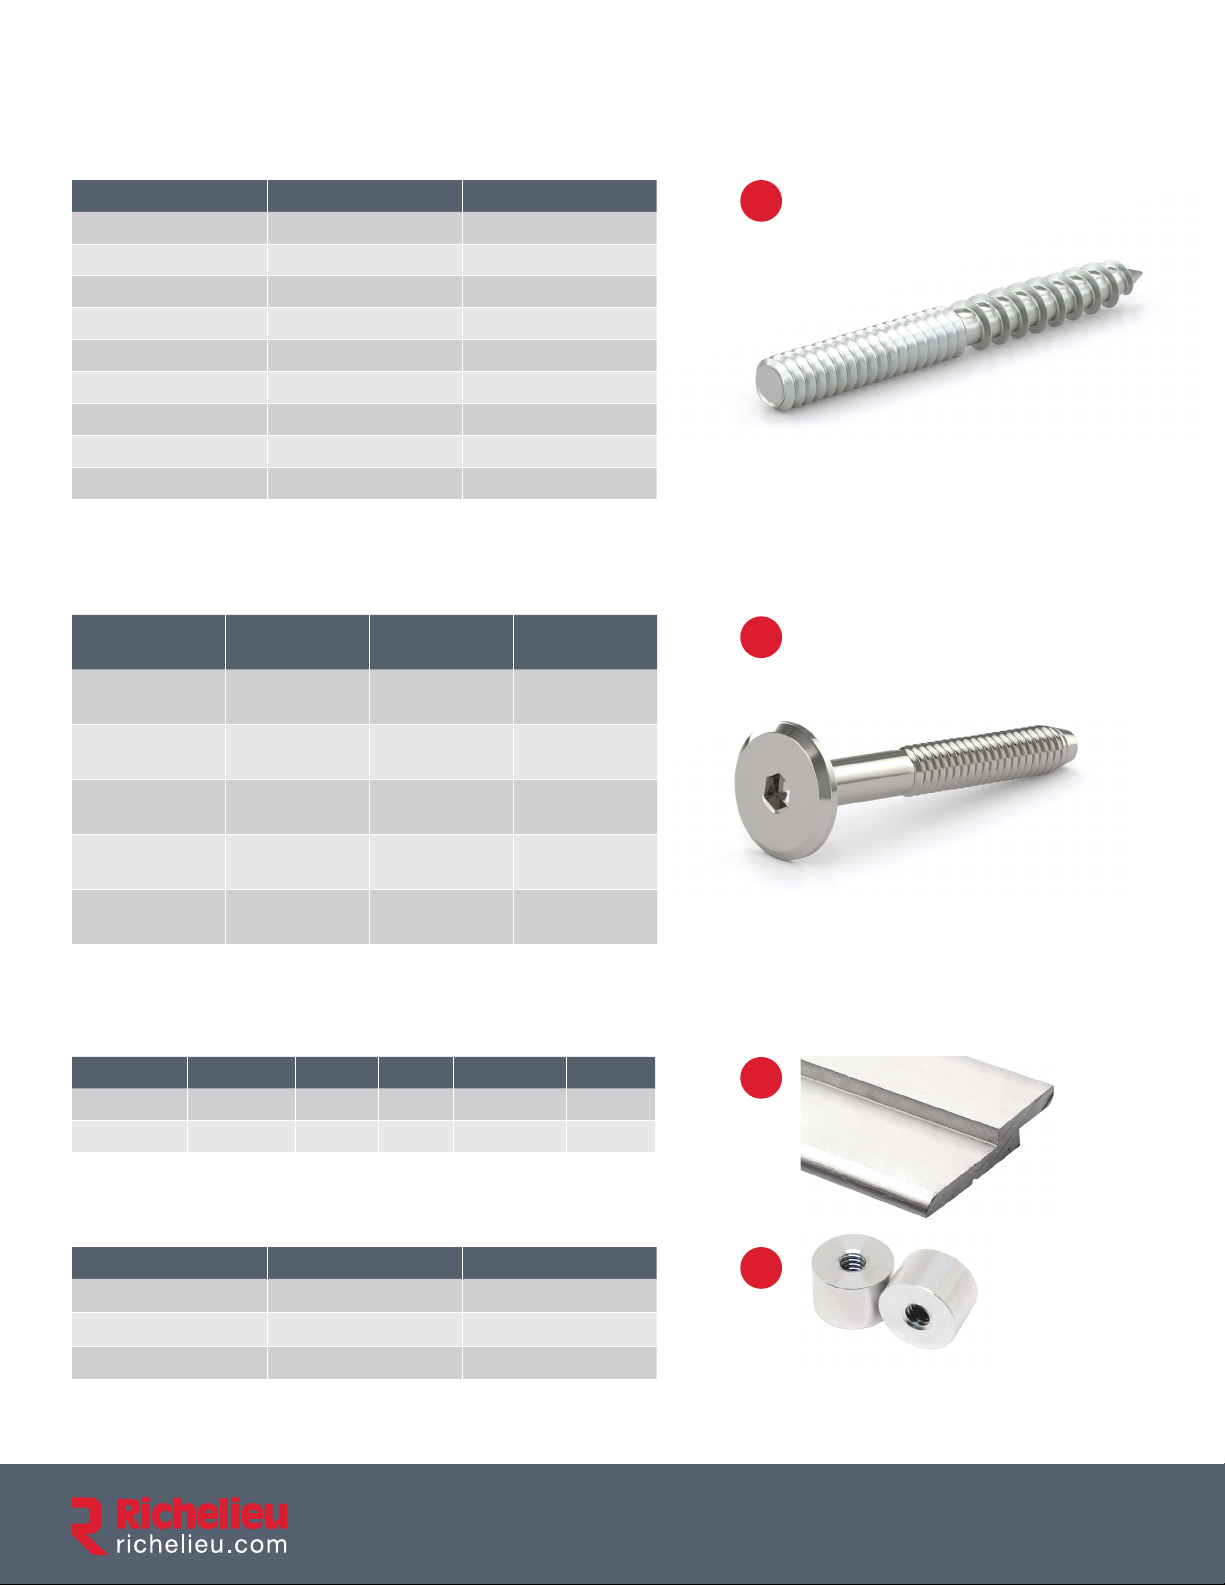
REQUIRED HARDWARE AND ACCESSORIES
HANGER BOLTS
No. Length Qty/Box
HZ14112 1 1/2” (38 mm) 3000
HZ14112VP 1 1/2” (38 mm 25
HZ14134 1 3/4” (44 mm) 2000
HZ14134VP 1 3/4” (44 mm) 25
HZ142 2” (51 mm) 2000
HZ142VP 2” (51 mm) 25
HZ14212 2 1/2” (64 mm) 1500
HZ14212VP 2 1/2” (64 mm) 25
HZ143 3” (76 mm) 1200
Use with hanger bolt drivers
JCB-B BOLTS
No. Length
*JCBB0103C2 1 5/8” (40 mm)
JCBB0105C2 2” (50 mm)
CPJCBB0105C2 2” (50 mm)
JCBB0107C2 2 3/8” (60 mm)
JCBB0109C2 2 3/4” (70 mm)
*Already included in our kits
Total Panel
Thickness
1/2” to 3/4”
(12.5 to 19 mm)
1” to 1 1/4”
(25 to 31 mm)
1” to 1 1/4”
(25 to 31 mm)
1 3/8” to 1 5/8”
(35 to 40 mm)
1 5/8” to 2”
(41 to 50 mm)
Qty/Box
1
1
100
1
1
B
Screw size : 1/4” (6.35 mm)
C
Screw size : 1/4” (6.35 mm)
Z-SHAPED MOLDINGS
No. Length Height Width Thickness
318708D10 8’ (2.44 m) 1 3/8” 1/4” 1/8” 1
318712D10 12’ (3.66 m) 1 3/8” 1/4” 1/8” 1
WINE PEG SPACERS
No. Length Qty/Box
WPS3810 3/8” (9.5 mm) 100
WPS1210 1/2” (12 mm) 75
WPS0110 1” (25 mm) 35
Qty/Box
D
E
Diameter : 3/4” (19 mm)
 Loading...