

•
After reading this manual, store it in a safe place near the
balance, so you can review it as needed.
IMPORTANT
Rice Lake TS Series
Tuning Fork Stainless Steel Electronic Balance
Operation Manual
To ensure safe and proper use of the balance, please read this
manual carefully.
•
109050


Contents
Contents ............................................................... i
Safety Precautions ............................................... 1
1BHow to Read this Manual ..................................... 6
42BNotational conventions ........................................... 6
1.0 How to Begin .............................................. 7
3B1.1 Checking Supplied Items .............................. 8
4B1.2 Names and Functions of Component Parts .. 9
1.3 Workings of Operation Keys ....................... 11
6B1.4 How to See Displayed Signs ...................... 12
7B1.5 Assembling and Installing the Balance ........ 14
Assembling the balance .................................... 14
2.0 Basic Operation ........................................ 17
8B2.1 Powering On/Off the Balance and Checking
Operation ......................................................... 18
9B2.2 Weighing by Placing a Sample in a Container
47BPreparing measurement equipment .................. 33
48BMeasurement .................................................... 34
49BUsing a liquid medium other than water ............ 36
50BGravimeter measurement data output ............... 36
18B3.6 Weighing an Animal .................................... 38
19B3.7 Adding Multiple Measurements .................. 39
51BAddition function setting.................................... 40
52BWeighing with addition function ......................... 41
20B3.8 Judging “Above” and “Below” (Limit Function)
................................................................... 42
70B How to judge ................................................. 42
71B Judgment criteria and limit value setting ........ 43
72B Detailed function setting ................................ 43
53BLimit function setting ......................................... 44
(Tare) ................................................................. 19
10B2.3 Weighing an Added Sample ....................... 20
11B2.4 Displaying the Sum of the Container and the
Sample ............................................................. 21
12B2.5 Function Setting Basics .............................. 22
3.0 Various Measuring Methods ...................... 24
13B3.1 Weighing (Weighing Machine) ..................... 25
14B3.2 Counting Parts Count .................................... 26
69BDisplaying average sample weight .................... 27
15B3.3 Measuring Percentage ................................ 28
44BSetting a reference weight by weighing an actual
sample .......................................................... 28
45BSetting a reference weight by entering a value .. 29
16B3.4 Obtaining Weight Multiplied by Coefficient .. 31
54BJudging by absolute values ............................... 45
55BJudging by deviation values .............................. 47
4.0 Adjusting the Scale ................................... 50
21B4.1 How to Calibrate ........................................ 51
22B4.2 Testing the Balance .................................... 53
5.0 Function Setting ....................................... 54
23B5-1 Using Two Expression Units by Switching
Them ................................................................ 55
5.2 Minimum Readability Setting ...................... 56
25B5.3 Saving Container (Tare) Weight ................... 57
26B5.4 Power Setting ............................................. 58
56BAuto Power Off ................................................. 58
57BAuto Backlight Off ............................................. 59
27B5.5 ID No. Setting ............................................. 59
17B3.5 Measuring Specific Gravity ......................... 32
46BMeasurement procedures for specific gravity .... 33
RL-TS Series Operation Manual i
28B5.6 Improving the Stability of the Balance............. 62

© 2011 Rice Lake Weighing Systems. All rights reserved.
July 2011
6.0 Input/Output to/from External Devices ....... 64
29B6.1 Outputting to a Printer ................................ 65
58BConnecting a printer ......................................... 65
59BPrinting span adjustment and span test results . 65
Printing measurement results ............................ 66
30B6.2 Connecting to External Devices via RS-232C
Interface ........................................................... 67
61BConnector pin numbers and functions .............. 67
62BSample connection with a PC ........................... 68
63BInterface specifications...................................... 69
31B6.3 Communication Data and Commands ....... 70
64BOutput data ...................................................... 70
77B Data format ...................................................... 71
Meanings of data ........................................... 71
7.0 Troubleshooting ........................................ 78
32B7.1 Error Messages .......................................... 79
33B7.2 Troubleshooting .......................................... 80
34B7.3 Initializing .................................................... 83
35B7.4 Maintenance ............................................... 85
67BFor heavy dirt .................................................... 85
68BHow to take care of the balance ....................... 85
Appendixes ....................................................... 86
36BAppendix 1 Function Setting List ..................... 86
37BAppendix 2 Measurement Mode List ............... 90
38BAppendix 3 Printing in Compliance with
ISO/GLP/GMP .................................................. 91
39BAppendix 4 Specifications ............................... 94
83B Basic specifications ....................................... 94
65BInput commands ............................................... 74
66BResponse ......................................................... 76
84B Functional specifications ................................ 94
85B Minimum Display by Unit of Measurement ..... 95
40BAppendix 5 Conversion Table Units ................. 98
TS Series Limited Warranty ................................ 99
ii RL-TS Series Operation Manual
Printed in the United States of America.
Specifications subject to change without notice.
Safety Precautions
Before using the balance, please read this manual carefully.
The nature of dangers and damages that may result in the event of improper operation are indicated under
the following categories:
Danger
This symbol indicates improper handling that may cause death or severe damage including serious injury.
The urgency alerted for danger is high.
This symbol indicates improper handling that may cause death or severe damage including serious injury.
This symbol indicates improper handling that may cause physical injury or damage to property only.
The following symbols give instructions that you need to follow:
To prevent danger to humans and damage to property, be sure to follow the following instructions:
RL-TS Series Operation Manual 1
Indicates a “prohibited” action.
Indicates a “mandatory” action that must be executed
without fail.
Indicates actions that require caution.
e, contact our
oing so could result i n an
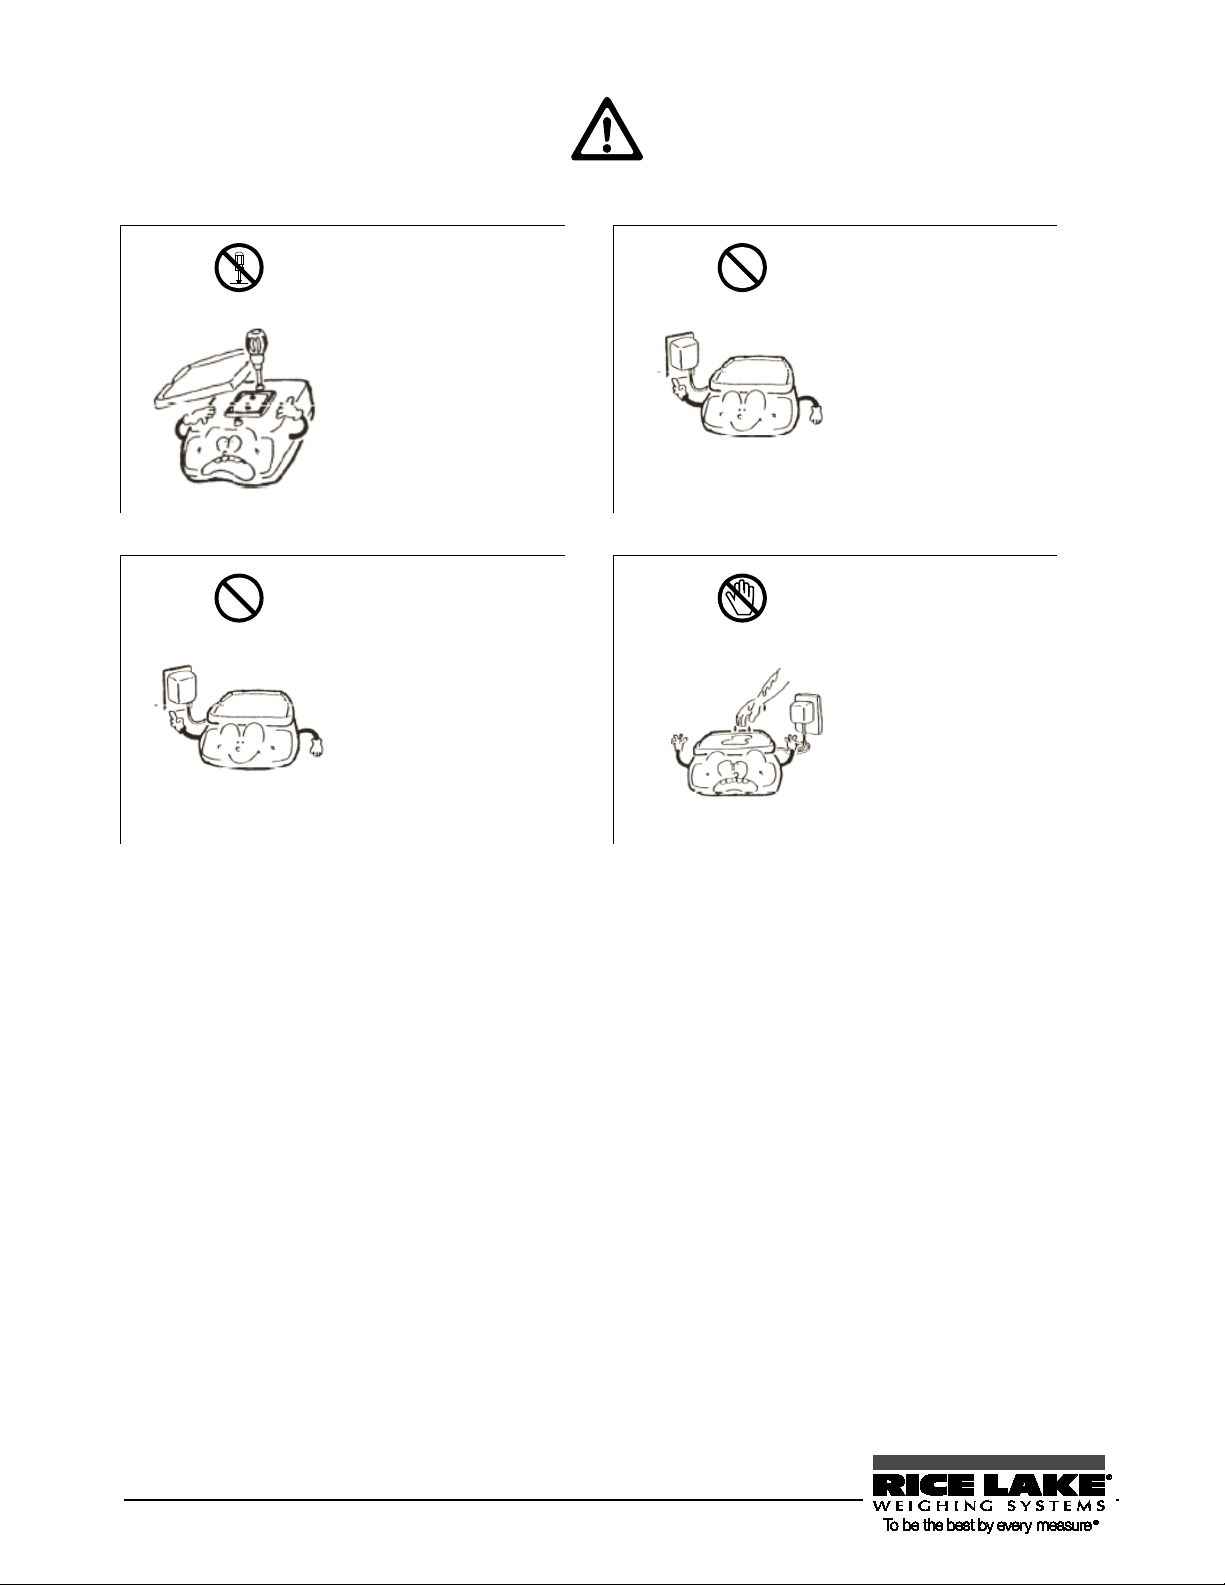
Danger
Do not disassemble or
modify the unit.
Doing so could cause
accidents such as injury,
electrical shock, and fire,
or malfunction. For
inspection and adjustment
of the balanc
Sales Office or Technical
Service Division.
Only use the specified
power source.
Use of other types of
power sources may result
in heat generation, fire, or
malfunction of the
balance.
Only use the dedicated
AC adapter.
Use of other types of AC
adapters may result in
heat generation, fire, or
malfunction of the
balance.
Do not touch the AC
adapter with wet hands.
D
electrical shock, which
may cause an accident
with injury or death.
2 RL-TS Series Operation Manual
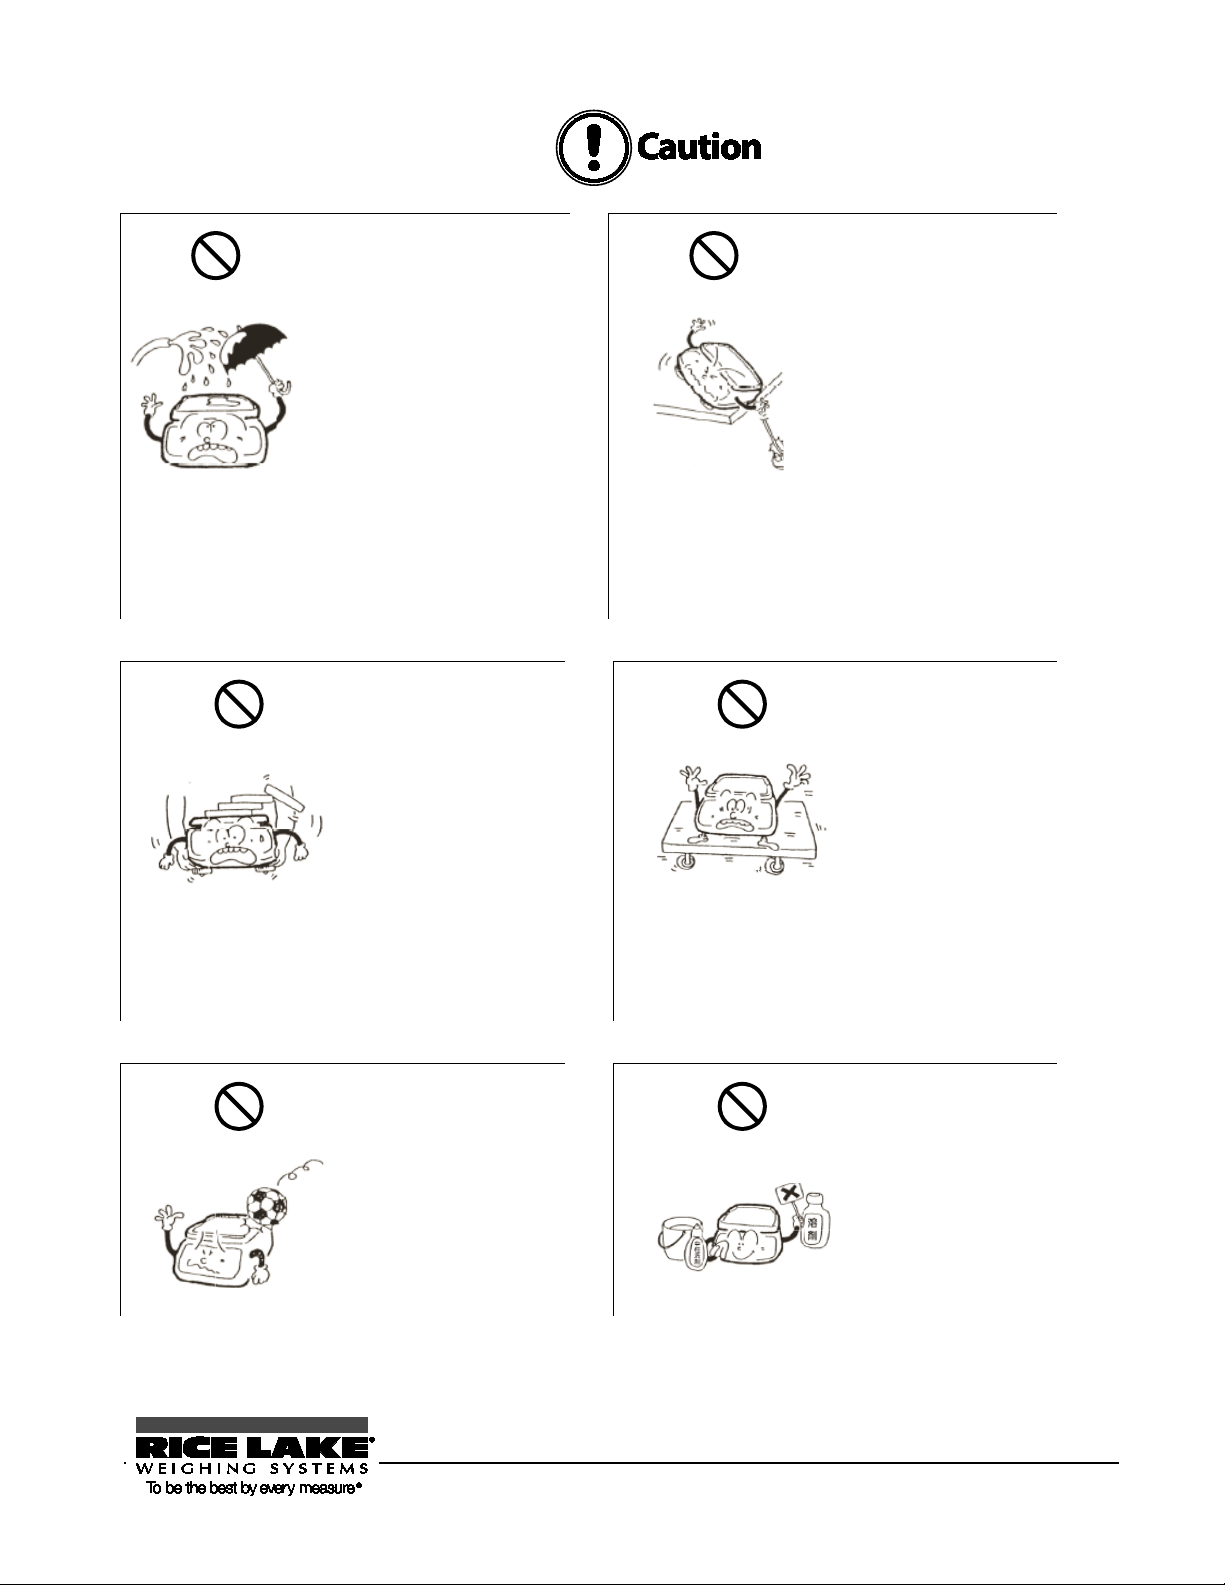
rendered impossible i n a lo cat i on
environment.
body may trip on the cab le,
impossible.
Avoid applying excess
Do not use volatile
distorted. To clean the unit
When the balance is not
waterproof and dustproof, do
not expose the balance to
rain, water, dust, or such
other environment.
Even though the balance is
waterproofed and dustproofed,
water and dust may enter the
unit if the connector ca p to the
underfloor weigher hole is
detached.
Accurate measurement may be
where the balance is subjected
to rain or water, or in a dusty
Do not lay the AC adapter
cable on the surface of a
passage.
Some
causing the balance to fall,
thereby causing injury and/or
damage to the balance.
Do not move the
balance when a sample
is loaded.
The loaded sample may
fall off the pan and cause
an injury and/or damage
to the sample and
surrounding objects.
Do not place the
balance on an unstable
base or use the
balance in a location
where it may be
subjected to vibration.
The loaded sample may
fall off the pan and cause
an injury and/or damage
to the sample and
surrounding objects.
Accurate measurement
may be rendered
RL-TS Series Operation Manual 3
force or impact to the
balance.
To prevent breakage or
malfunction, place the
sample to be measured
on the balance carefully.
solvents for cleaning.
The body may be
of stains, use a piece of
dry cloth or cloth soaked
in a small quantity of
neutral detergent.
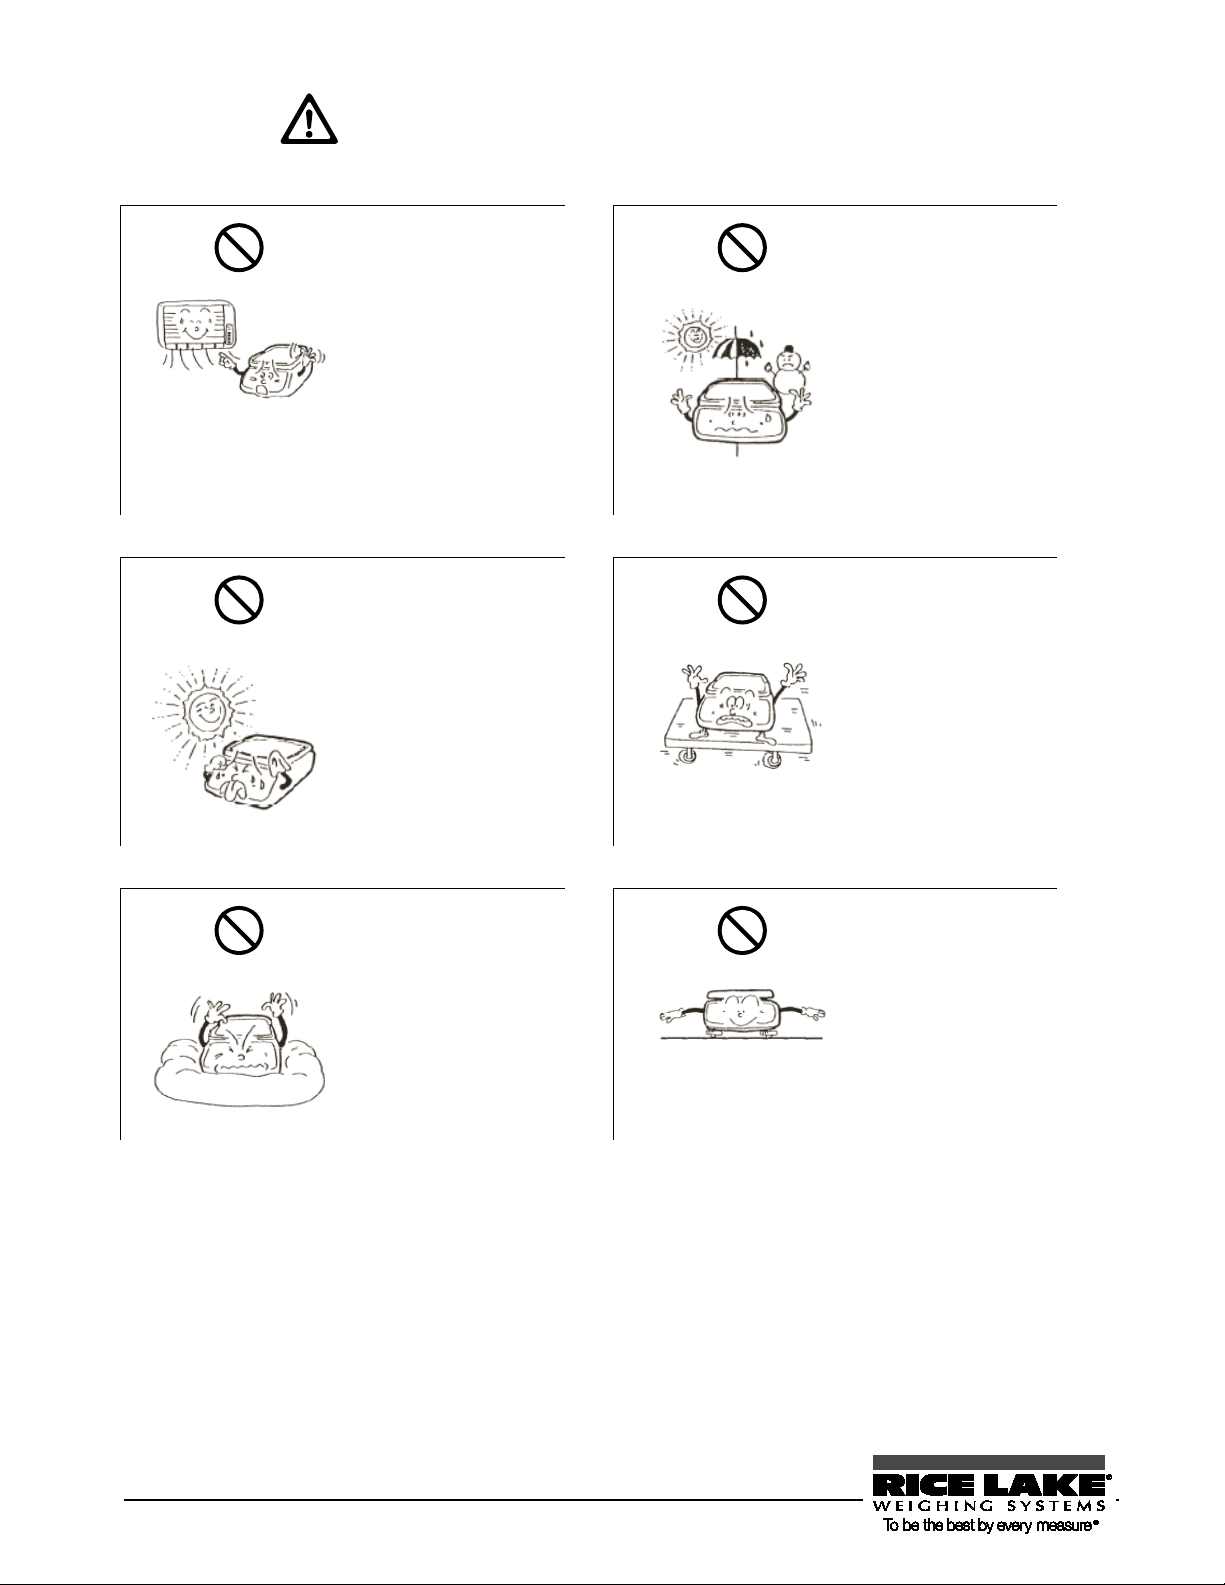
lower relative humidity.
Soft floor:
Tilted surface:
When the balance is tilted,
Do not use the balance in the following places:
Location where it may
be subject to air from
an air-conditioning unit:
Extreme changes in the
ambient temperature may
result in inaccurate
measurements.
Location where it may
be subjected to abrupt
changes in ambient
temperature or
humidity:
Accurate measurement
may be rendered
impossible. Use the
balance in an ambient
temperature range of 0°C
to 40°C and with 80% or
Location where it is
subject to direct
sunlight:
An internal temperature
increase in the balance
may lead to inaccurate
measurement.
Unstable base or
location where it may
be subjected to
vibration:
In addition to failing to
measure the sample
accurately, the loaded
sample may fall off the
pan and cause an injury.
When loaded with a
sample, the balance may
tip or move, preventing
accurate measurements
from being conducted.
an error may be caused,
preventing accurate
measurement from being
conducted. Place the
balance on a level
surface.
4 RL-TS Series Operation Manual
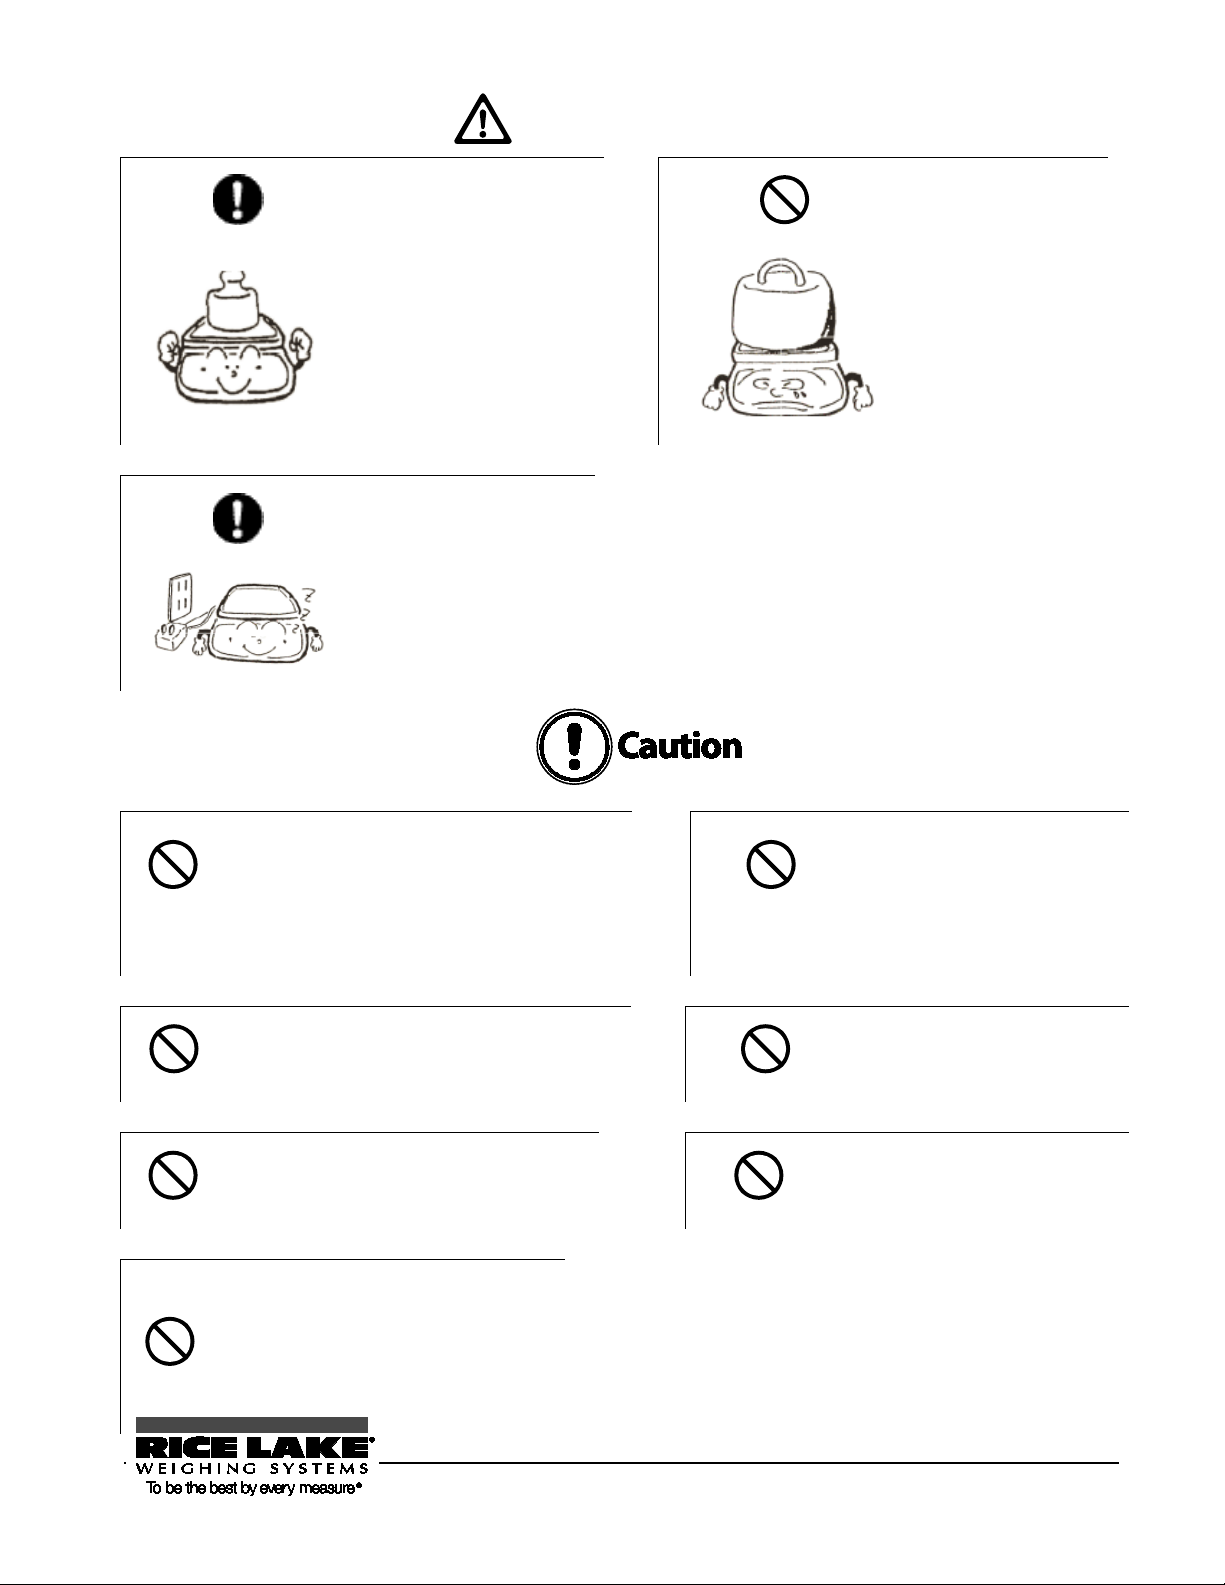
Never disassemble or modify the batteries.
cause the balance to fail or igni te.
Do not put the batteries into a fire.
Do not mix old and new batteries, or batteries
If the balance is not going to be used
Do not use batteries that leak.
Respect the following:
Be sure to calibrate the
balance after installation or
relocation.
Measurement values may
contain errors. To maintain
accurate measurement, be
sure to calibrate the balance.
Do not leave the balance
overloaded. (When it is
overloaded, o-Err is
displayed.)
To prevent breakage or
malfunction, remove the
sample placed on the
balance immediately.
If the balance is to be
unused for an extended
period of time, unplug the
AC adapter.
To conserve power and to
prevent deterioration, unplug
it.
(battery handling)
Take care to ensure you insert batteries with
the positive and negative poles correctly
inserted, and be careful about short circuits.
Such mishandling could damage the batteries, or
They may explode.
of different types or manufacturers.
Dispose of batteries in accordance with
local regulations.
for a long time, store it with the
batteries removed.
Observe the precautions printed on the
batteries or rechargeable batteries.
RL-TS Series Operation Manual 5
This chapter gives introductory information such as
turn the power on and off. For your first use of the
This chapter gives basic instructions for how to
procedures for setting the
This chapter describes how to use various measuring
methods available for the balance, such as parts
The balance needs adjustment depending on where
This chapter describes how to set various functions
This chapter describes printing to printers and how to
This chapter describes how to troubleshoot problems
occurring with the balance, including actions
Required data including the specifications of the
Relevant pages can be searched for through indexed
The balance
Refers to a TS series product.
Measure
Refers to measuring a sample by placing it on the pan. Other
[Function] key
The names of the operation keys provided on the front of the main unit
“Func”
The messages shown on the display are expressed in quotation marks
Press the key.
Refers to giving a light press of the key.
Press and hold the key.
Refers to holding down the operation key and releasing the finger after
1BHow to Read this Manual
This manual comprises the following chapters:
Chapter 1 How to Begin
Chapter 2 Basic Operation
Chapter 3 Various Measuring
methods
Chapter 4 Adjusting the Balance
Chapter 5 Setting the Functions
Chapter 6 Input/Output to/from
External Devices
Chapter 7 Troubleshooting
how to assemble and install the balance, and how to
balance, be sure to read this chapter.
weigh objects. The
function capabilities used to set various functions are
also described.
counting and percentage weighing.
and when it is used. This chapter describes how to
calibrate and test the balance.
of the balance, such as setting units and minimum
readability.
input and output to/from RS-232C devices in detail.
Appendixes
Index for Terms
42BNotational conventions
In this manual, the following notation is used.
expressions such as “weigh” and “measure weight” may also be used.
are expressed in brackets [ ].
“ ”.
an intended display is obtained.
required for errors, and trouble remedies.
balance is described.
terms.
6 RL-TS Series Operation Manual

1.0 How to Begin
This chapter describes the operations required before using the balance, starting from assembling the main
unit to turning the power switch on and off.
Before your first use of the balance, be sure to read this chapter.
This chapter includes:
Checking Supplied Items
Names and Functions of Component Parts
Workings of Operation Keys
How to Read Displayed Signs
Assembling and Installing the Balance
RL-TS Series Operation Manual 7
3B1. 1 Checking Supplied Items
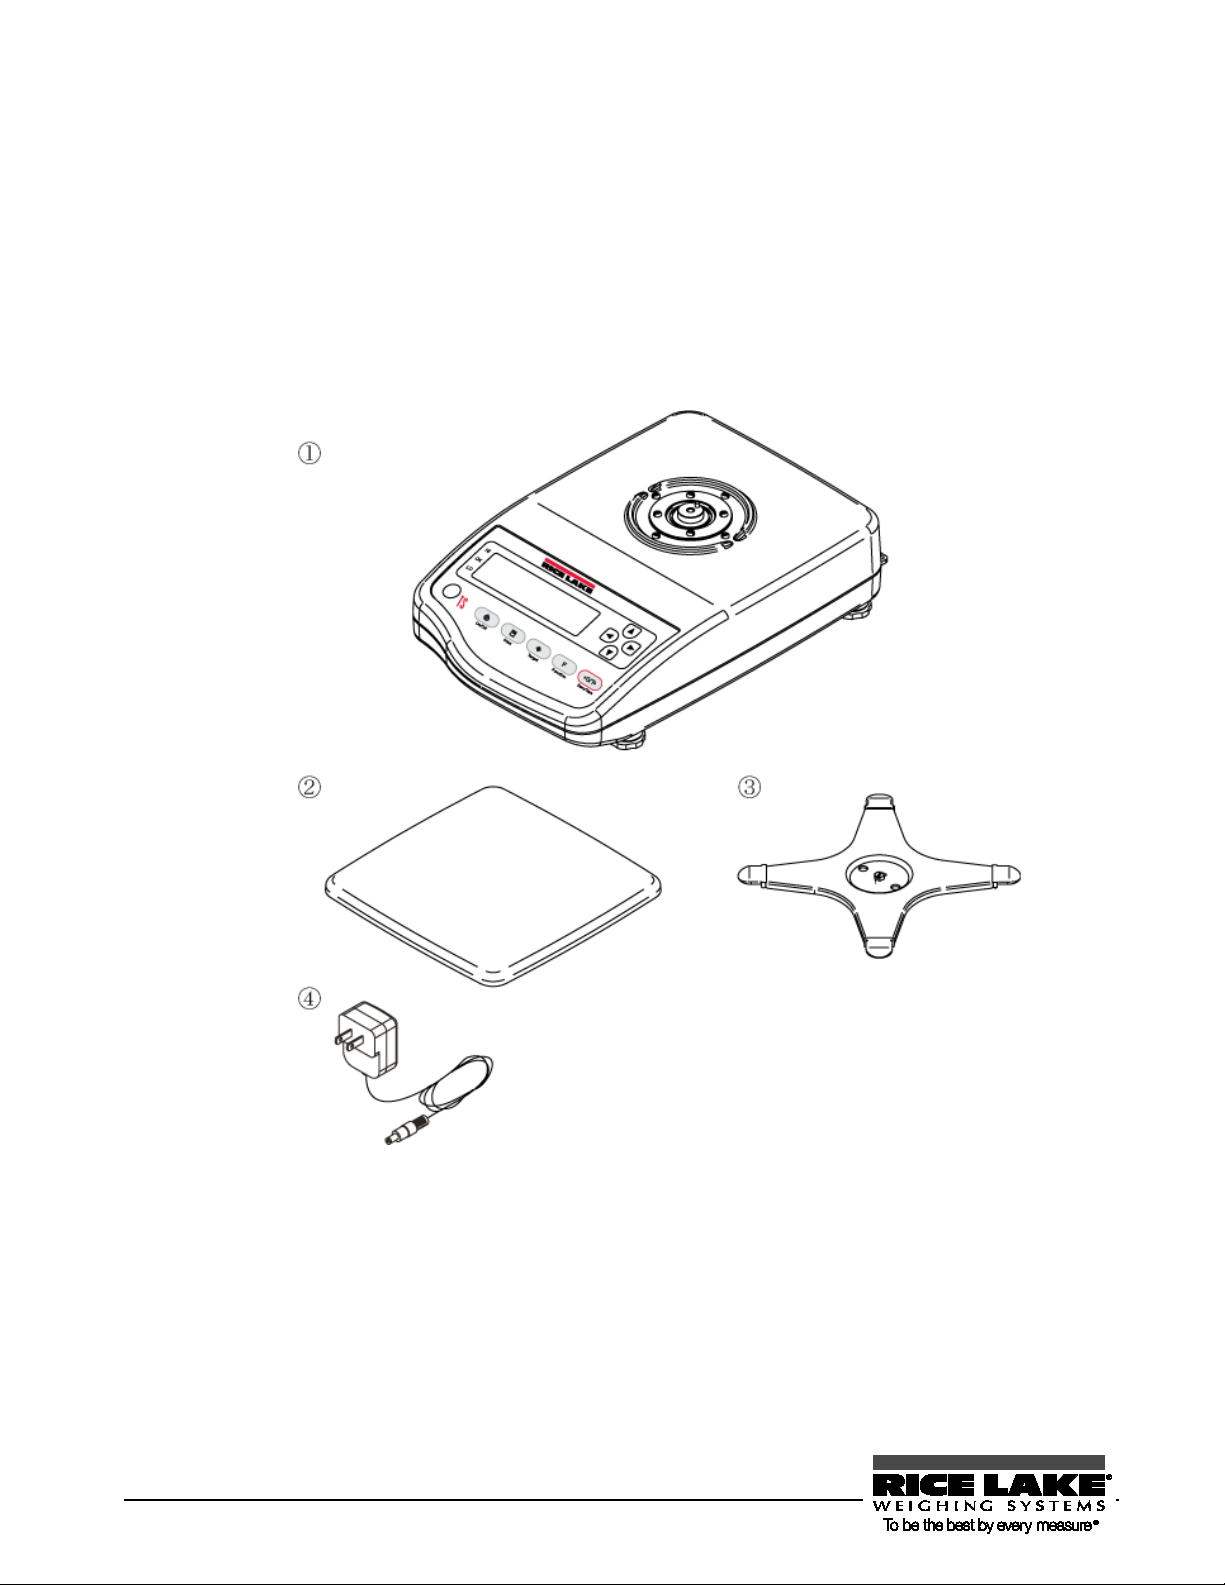
The following items are contained in the box.
In the unlikely event of problems such as missing or broken items, please contact the retailer from whom
the balance was purchased or our Sales Office (See the Appendix at the end of this manual).
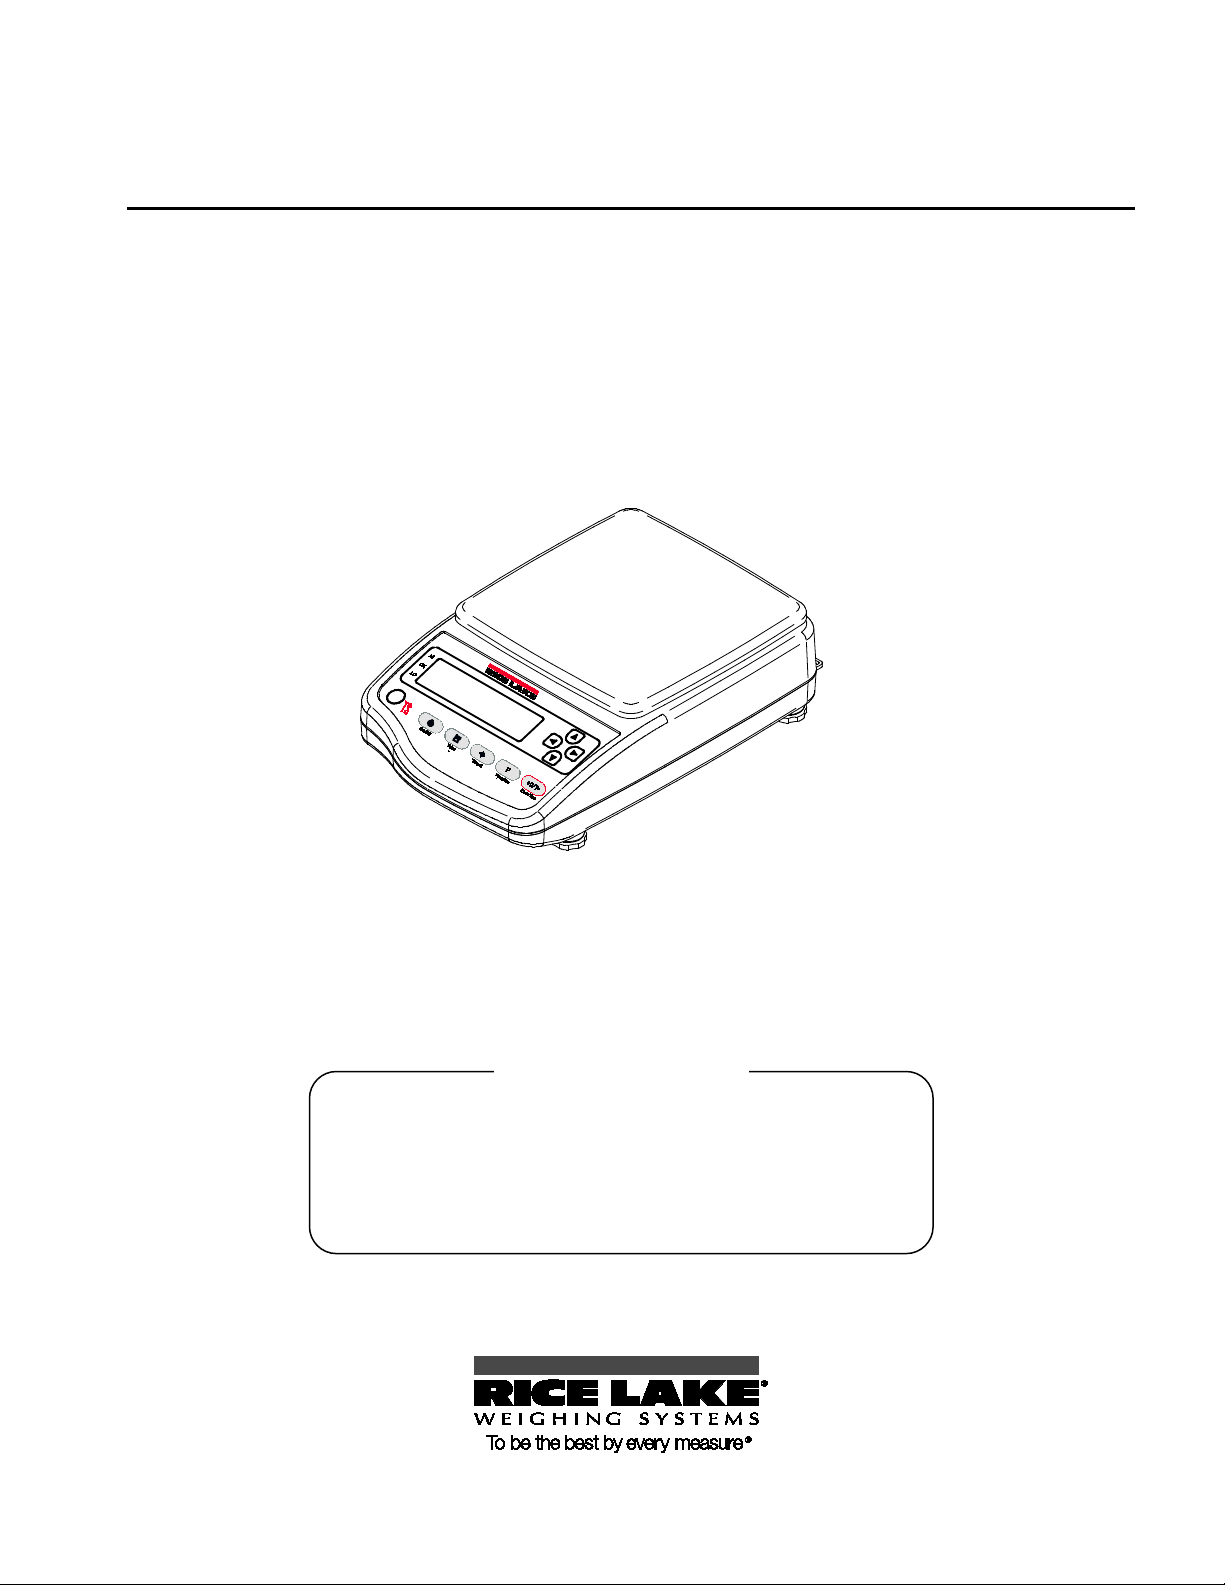
TS main unit
Pan
Pan base
AC adapter
8 RL-TS Series Operation Manual
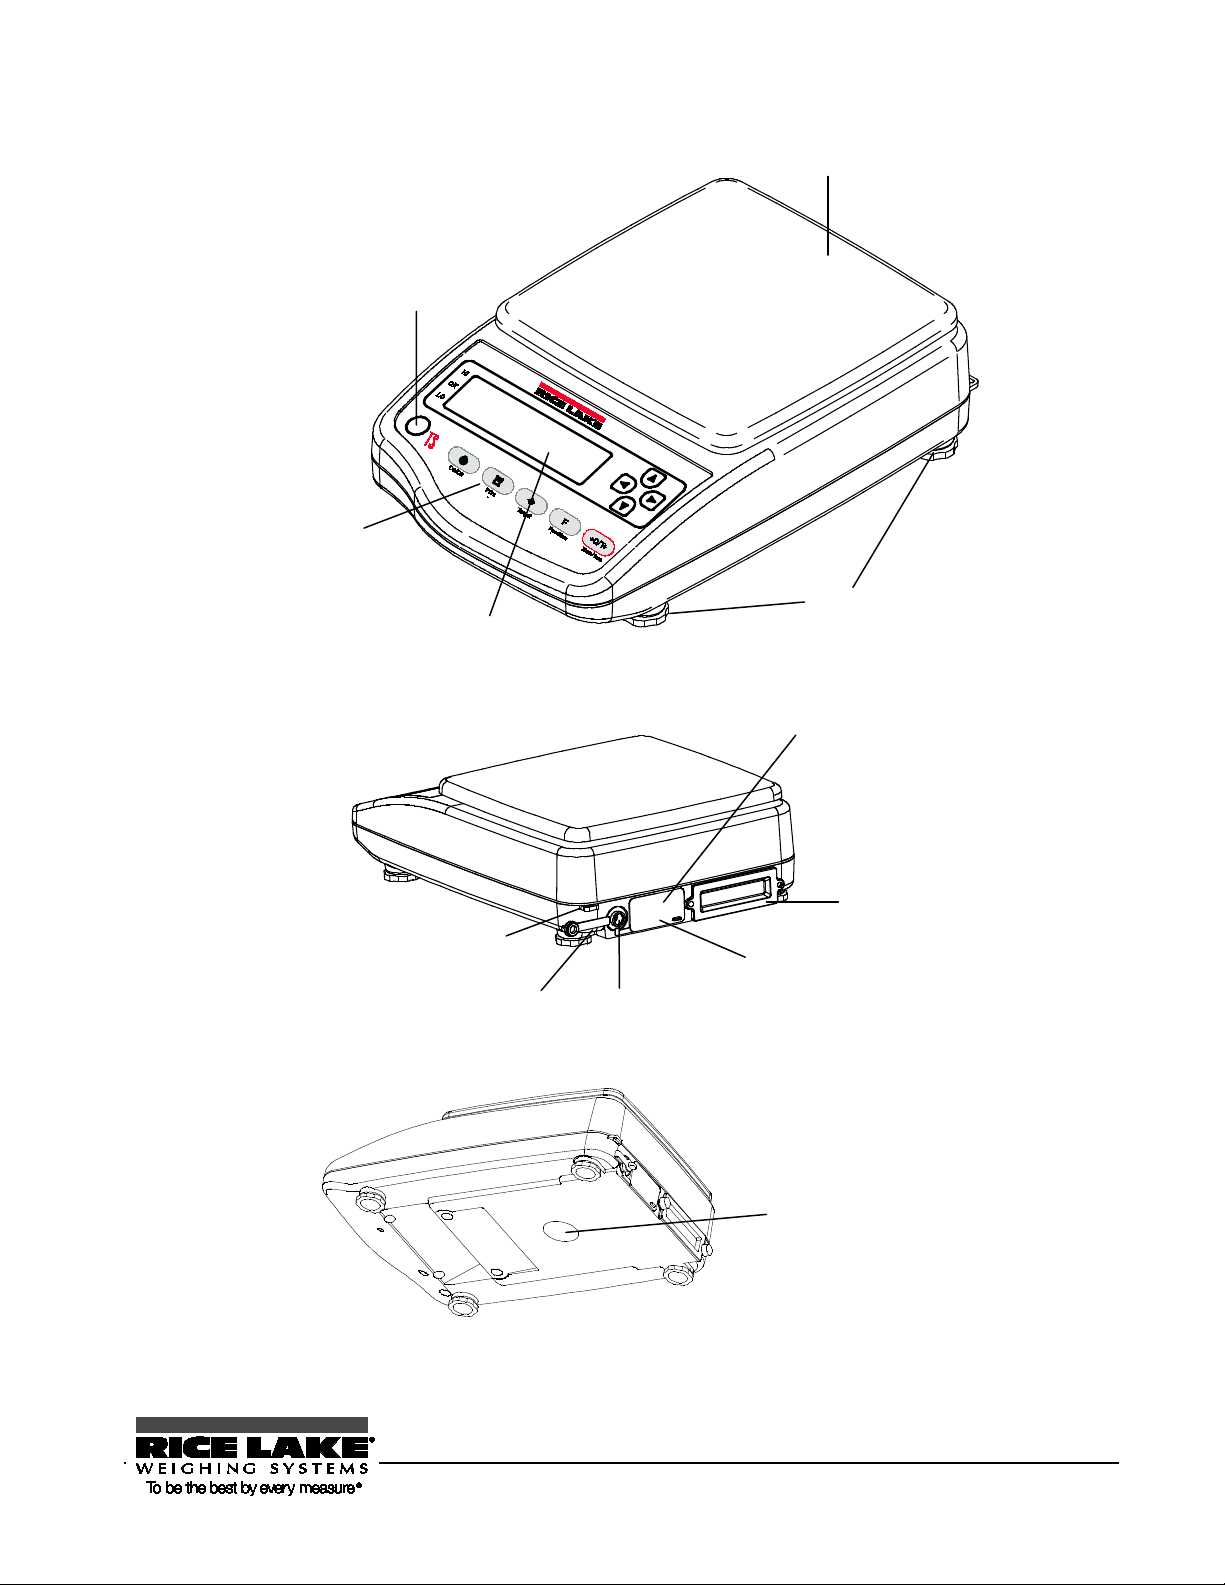
Pan
Level
Indicates the inclination
of the balance.
Display
Operation Keys
Refer to “Workings of
Operation Keys” (P.
Adjusters (feet)
Use to adjust the inclination of the
unit by turning them right or left.
D-SUB9 pin (under cover)
Use to connect the balance to an RS232C
connector
Cover
Remove when using options.
Anti-theft hole
Connector
cover
AC adapter jack
Use to connect the power cord.
AC adapter jack cap
Underfloor weigher hole cover
(Rubber cap)
For hanging measurement, use the underfloor
weigher fixture option (Ref
Specific Gravity” (P.2
4B1. 2 Names and Functions of Component Parts
5)
printer or other external device.
er to “Measuring
8)).
RL-TS Series Operation Manual 9
- When not using the balance, be sure to attach the AC adapter
jack cap, connector cover, and the rubber cap and the cover on
terproofing and dustproofing functions do not
pack option, and the limit
e panel surface (display,
the bottom to prevent water and dust from entering the unit.
- Note that the wa
work in the following situations:
- When the cable is connected to the D-SUB 9 P.
- When the buzzer option, the fullcontact output option are used
- Do not scratch or make a hole in th
operation keys). Water and dust may enter the unit.
10 RL-TS Series Operation Manual
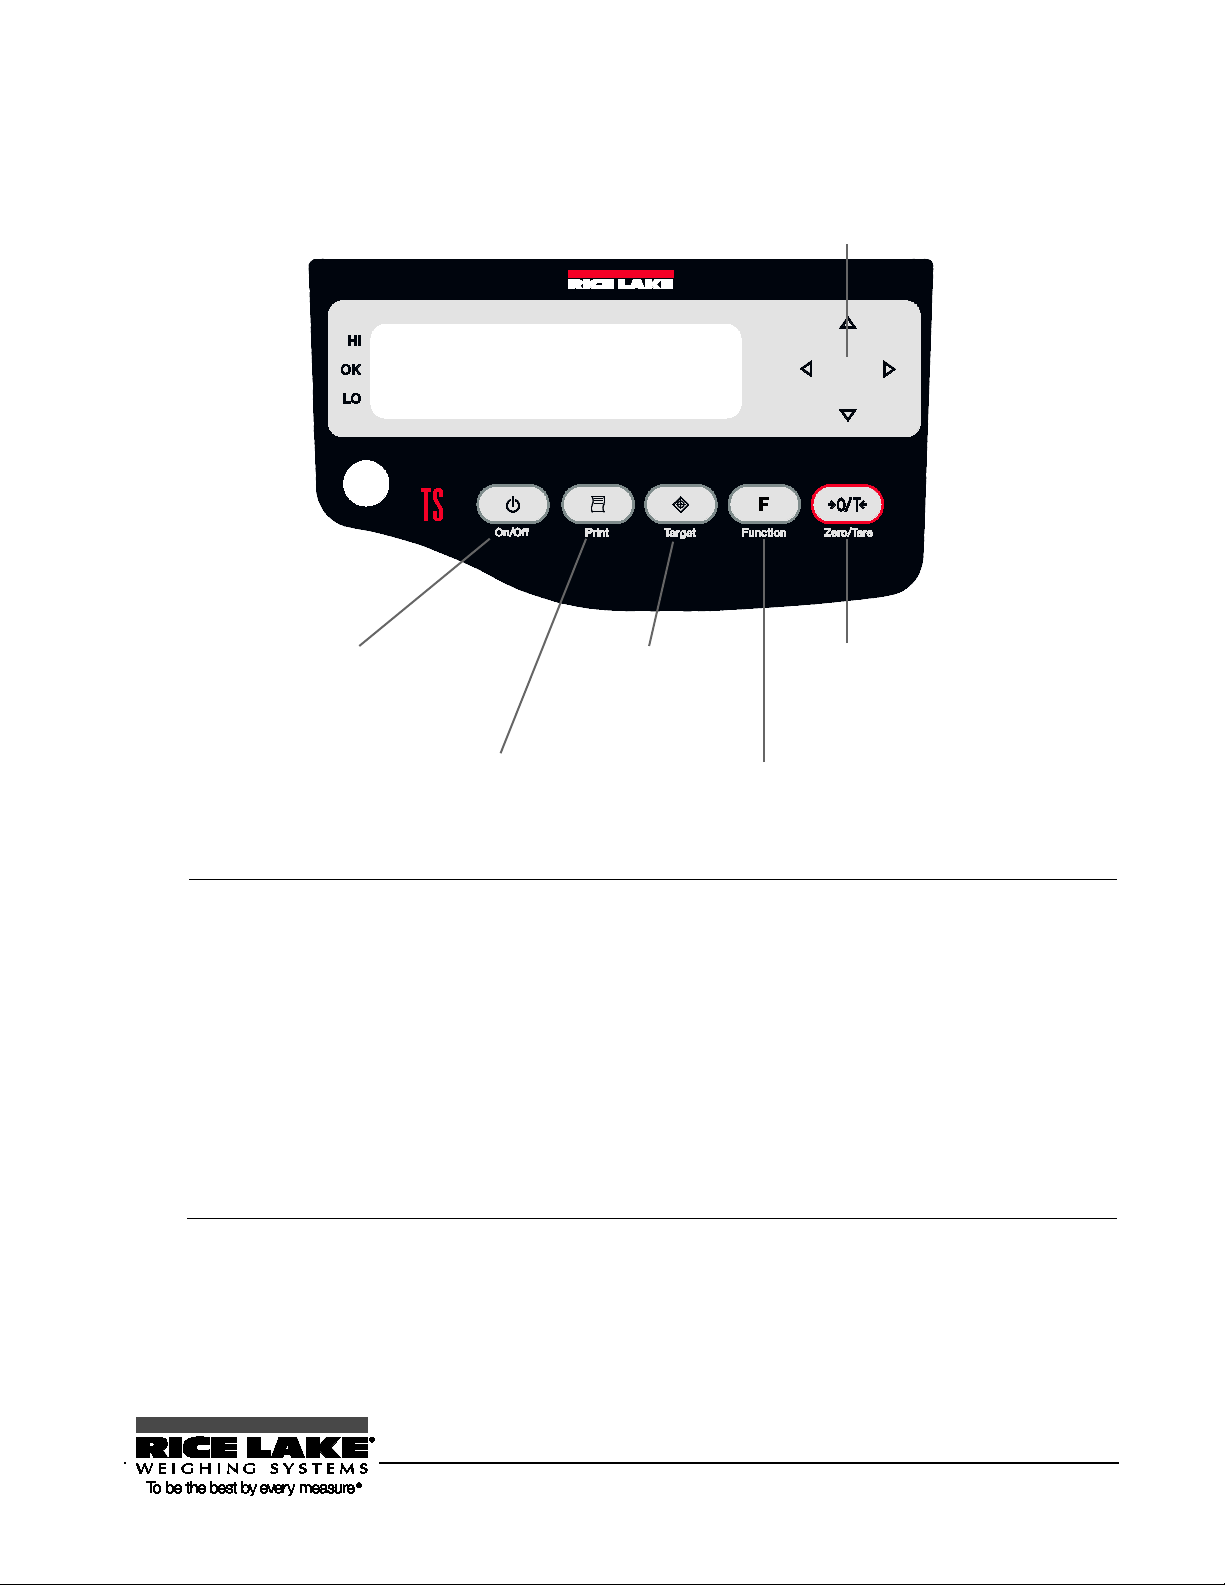
How to press the keys
saves settings when pressed shortly (short press).
Reference
Direction key: Use to set the
function setting, etc.
[Zero/Tare] key: Use to zero a
readout or to sel
[Function] key: Use to switch
measurement modes and to call
a function.
[Target] key: Use to
start settings.
[Print] key: Use for printing
or other purposes.
[On/Off] key: Use to power
1. 3 Workings of Operation Keys
The operation keys are provided on the front of the main unit. Use these keys to operate and set the balance.
on/off the main unit.
ect a function.
In some operation keys, executed functions depend on how they are pressed.
For example, the [Target] key
When pressed and held, the key inputs settings (press and hold).
In this manual, how keys are pressed is expressed as follows:
- Press: Give a light press of the key and then release the finger.
- Press and hold: Hold the key down and release the finger after the
appropriate display is obtained.
- Continuously press and hold: Hold down the key for three seconds or
longer.
Pressing a key can sound the buzzer or change buzzer sound tones (Refer to
“Appendix 1: Function Setting List” P.
X86X).
RL-TS Series Operation Manual 11

Indicates that settings are being saved. Blinks when adjusting the
6B1. 4 How to See Displayed Signs
Each of the signs displayed on the front of the main unit has the following meanings:
Displayed sign Description
Stable state indicator (Indicates that readout is stable.)
Lights up when the limit function is used.
Indicates that the addition function is enabled when the balance is in
addition mode.
Minus.
zero-point and when waiting for tare range setting to stabilize.
Zero-point.
Bar graph. Shows gross weight using the rate to the weighing capacity.
Displayed in 2-point bar graph.
Displayed when the balance is powered by batteries. Remaining battery
time is indicated in three levels. When this indicator blinks, the batteries
are dead.
Indicates that gross weight is being displayed.
Indicates that data is being output.
12 RL-TS Series Operation Manual
Indicates that the balance is in animal weighing mode.
Lights up when a tare range is set.
The response speed in animal weighing mode is indicated with the
(Upper)
(Upper)
(Lower)
(Upper)
Lights up when sum totals are displayed (shared use together with other
readout units) when the addition function is used.
Indicates that the balance is in parts counting mode.
Indicates that the balance is in unit covering mode.
Indicates the unit momme.
Indicates that the balance is in percentage weighing mode.
Indicates that an ID number is being displayed or entered.
Indicates that actual water temperature (unit: °C) is being entered.
Indicates that a specific gravity (unit: none) is being displayed.
3
Indicates that the density of a medium (unit: g/cm
) is being entered.
Indicates that midair weight has been saved in gravimeter mode.
Indicates that a weight value is being held in animal weighing mode.
position to which points.
Fast = fine/Normal = middle/Slow = weak
RL-TS Series Operation Manual 13

Attach the pan base.
Place the pan base by aligning it to the projections
Attach the pan.
Place the pan on the pan base.
Connect the power cord.
Connect the jack provided on the rear of the main unit to
Align the hole of the pan
base to the projection of
7B1. 5 Assembling and Installing the Balance
Assembling the balance
Assemble the main unit with the following steps:
1
2
the main unit.
Fix the pan base by
turning the screw.
provided on the main unit and then fix it by turning the
screws using a tool such as a coin.
Attach the pan base by aligning it to the projections on
the main unit.
Do not overtighten the screws. Fix it by turning the
screws using a tool such as a coin.
3
14 RL-TS Series Operation Manual
a power receptacle using the AC adapter.

at the shortest position and make adjustments little by
Making adjustments using the other adjuster located on the other side as a pair
Use the balance in a horizontal position.
By using the level provided on the front of the main unit and the adjuster provided on
the bottom, the inclination of the main unit can be corrected and checked.
- Start with the adjuster
little.
while observing the level helps to level the balance.
- After the air bubble in the level is within the circle, push the four corners of
the balance to check that there is no play.
RL-TS Series Operation Manual 15

16 RL-TS Series Operation Manual

2.0 Basic Operation
This chapter describes how to use basic measuring functions that are used daily.
This chapter includes:
Powering On/Off the Balance and Checking Operation
Weighing by Placing a Sample in a Container (Tare)
Weighing an Added Sample
Displaying the Sum of the Container and the Sample
Function Setting Basics
RL-TS Series Operation Manual 17
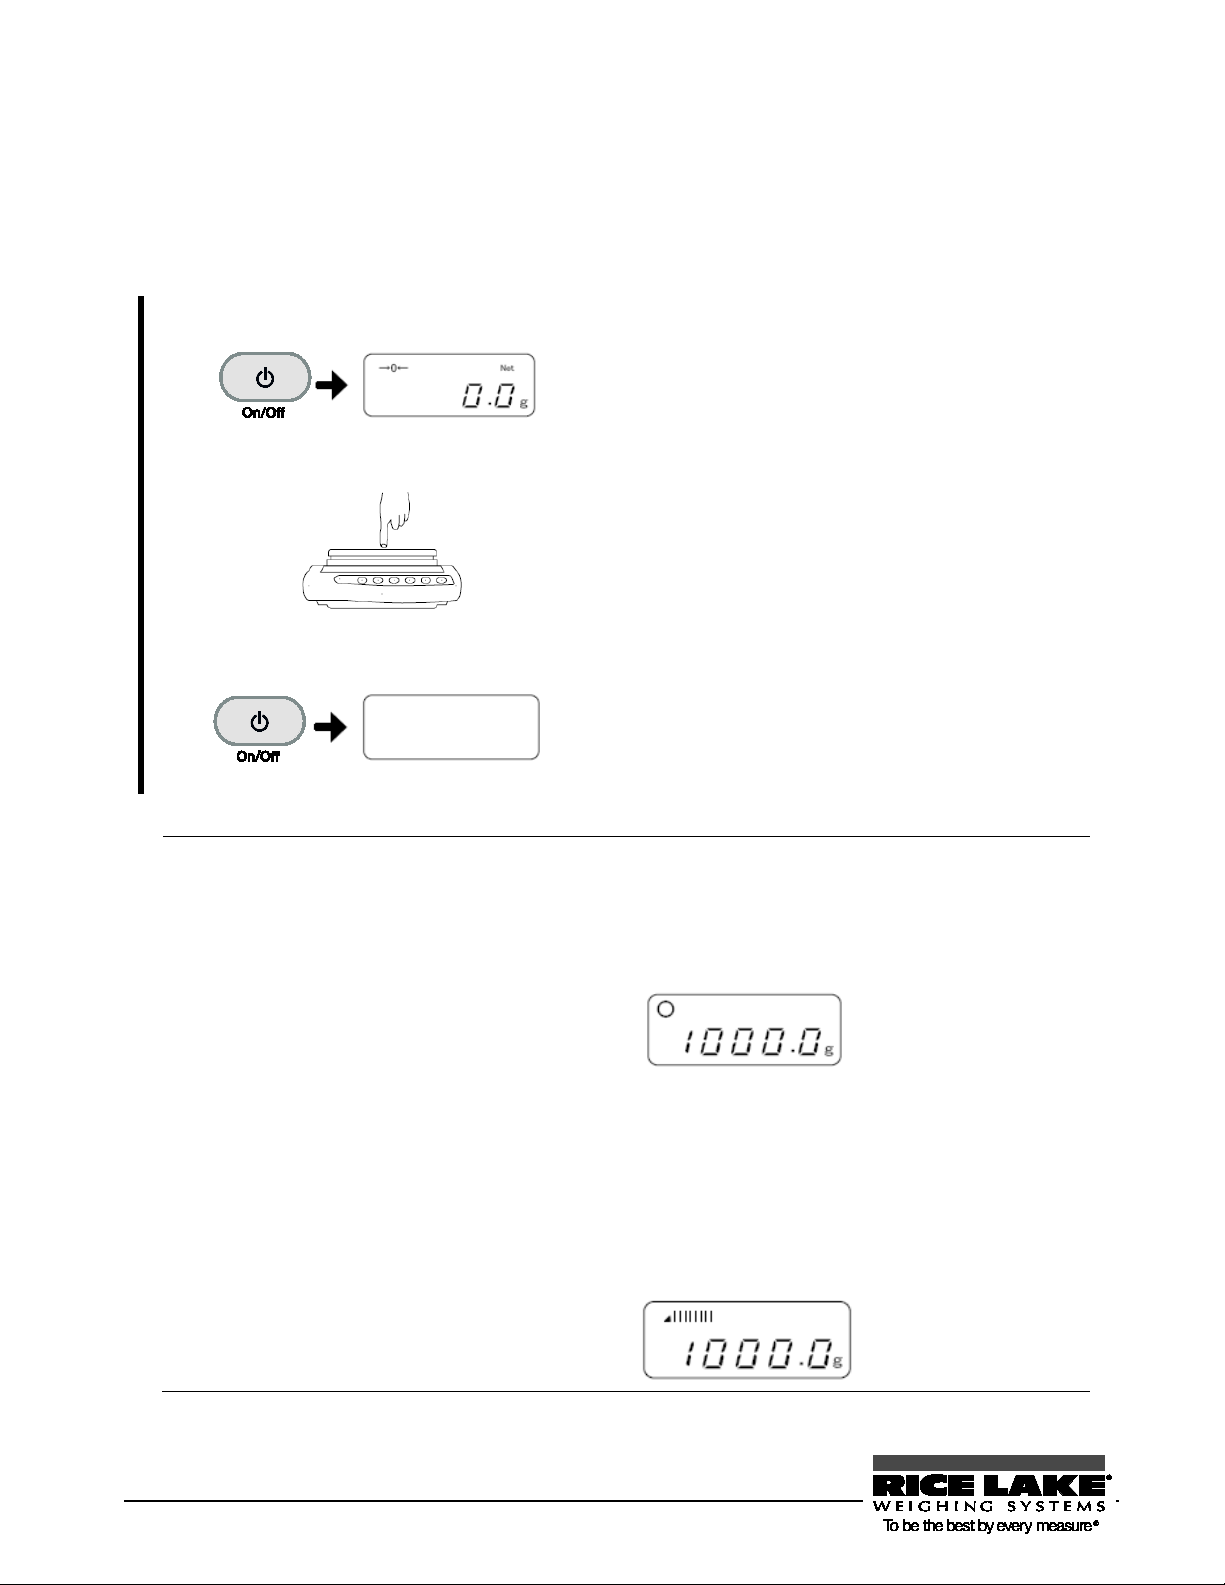
Turn the power on.
Press the [On/Off] key.
Check operation.
Push the pan using your finger to check that the
Turn the power off.
Press the [On/Off] key again.
- The status of the balance obtained when the power is turned on is the
measuring mode that was used before the power was turned off. For
example, if the power is turned off in parts counting mode, the balance is
The bar graph is displayed in the display. This graph shows the current
he weighing capacity. The closer to the right
Reference
8B2.1 Powering On/Off the Balance and Checking Operation
Turning the power of the balance on and off
1
2
3
Check that the AC adapter is connected. Zero is
shown in the display after all indicators light up.
display readout changes.
Also check that zero is given in the display after
the finger is released.
The display lights out.
started up in parts counting mode when the power is turned on.
- When the balance is stable, “” is shown in the display.
If the balance is not stable, this “” lights out. The balance may be under
an external influence such as wind and vibration.
Changing settings by referring to “Section
the Balance
X” ( P. X62X) can improve stability.
weighted state as a ratio to t
side of the bar, the closer the weight is to the weighing capacity.
X5-6 Improving the Stability of
18 RL-TS Series Operation Manual
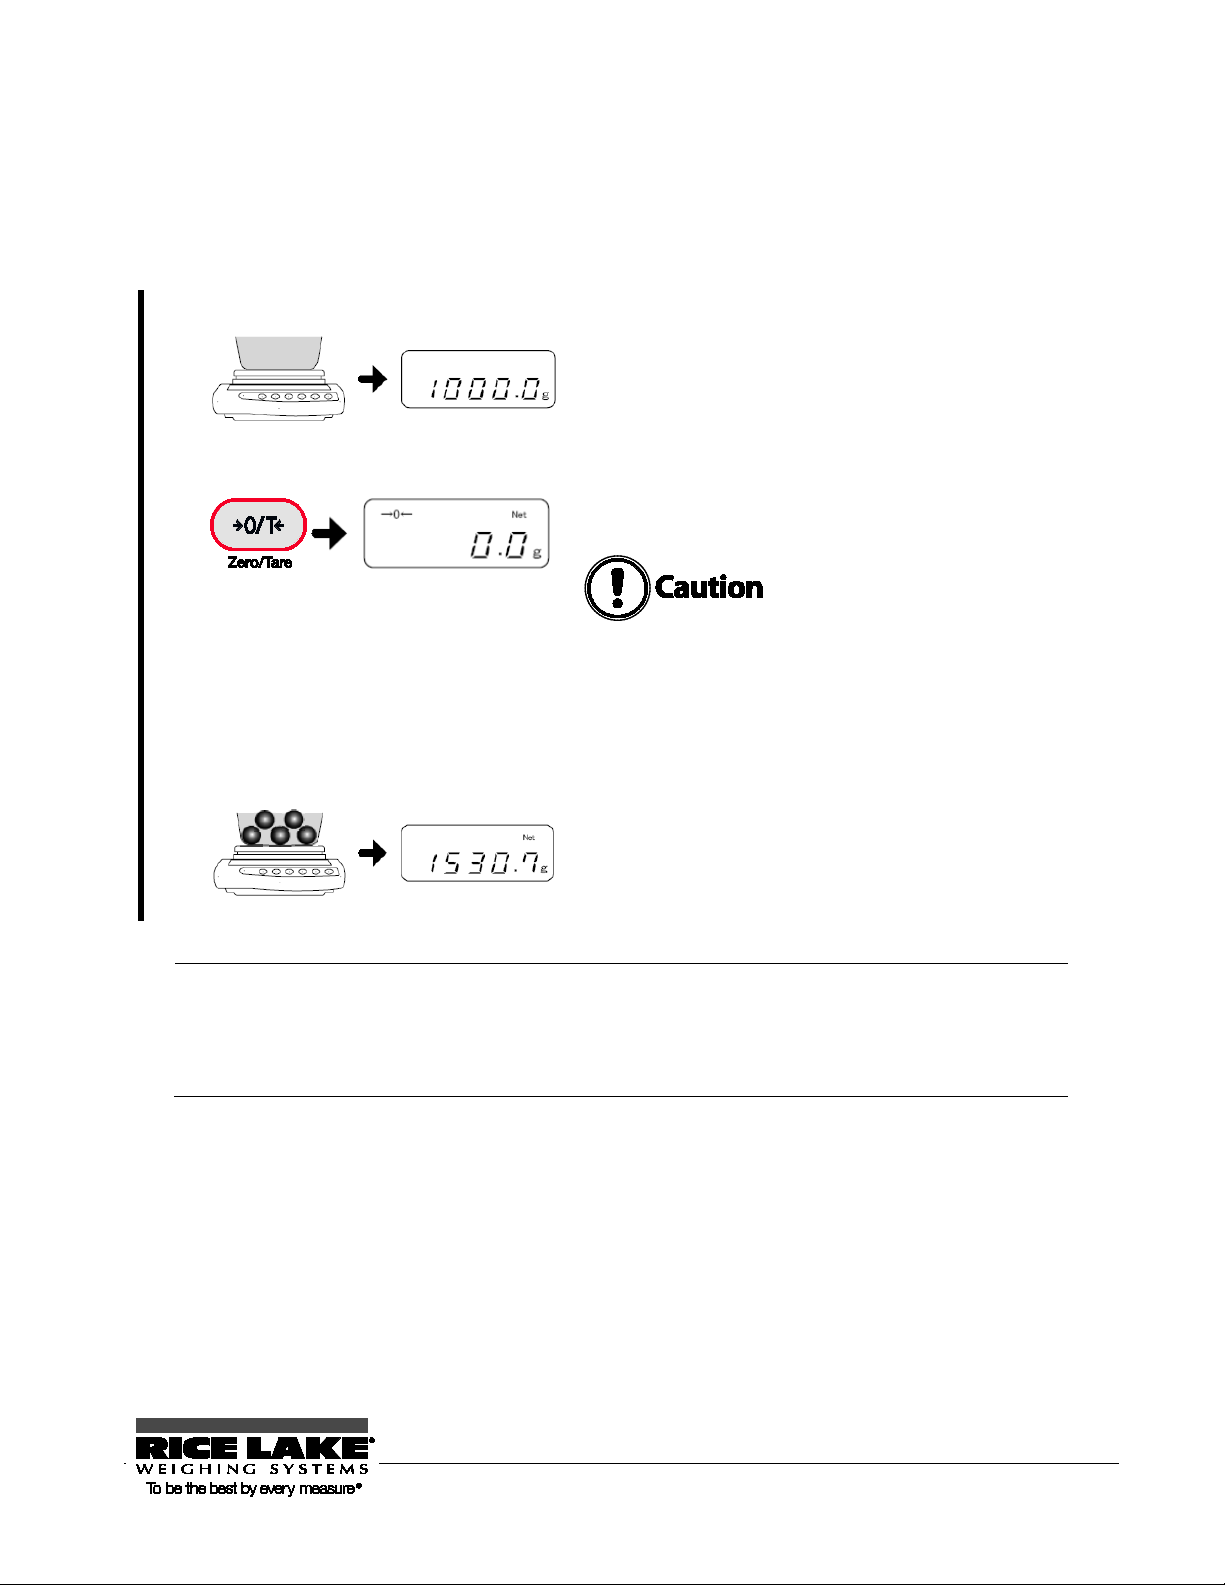
Place the container on the pan.
The weight of the container is displayed.
Set the tare.
Press the [Zero/Tare] key.
Place the sample in the container.
The weight of only the sample is displayed.
When a tare range is set, the weighable range is reduced by the weight of the
Reference
9B2.2 Weighing by Placing a Sample in a Container (Tare)
When measuring weight with the sample in a container (tare), only the sample is weighed by subtracting the
weight of the container. This is called “tare.
1
2
3
The readout becomes zero, and “→ 0 ←” and
“Net” are displayed (tare range setting).
When “Net” is not displayed even though the
[Zero/Tare] key is pressed, zero-point
adjustment is being executed, not tare range
setting.
tare.
Weighable range = original weighing capacity – pan weight
RL-TS Series Operation Manual 19
Place the sample.
The weight of the placed sample is displayed.
Set the tare.
Press the [Zero/Tare] key.
Place the additional sample.
The weight of only the added sample is displayed.
10B2.3 Weighing an Added Sample
Place an additional sample. Only the added weight is measured.
1
2
3
The readout becomes zero (tare range setting).
20 RL-TS Series Operation Manual
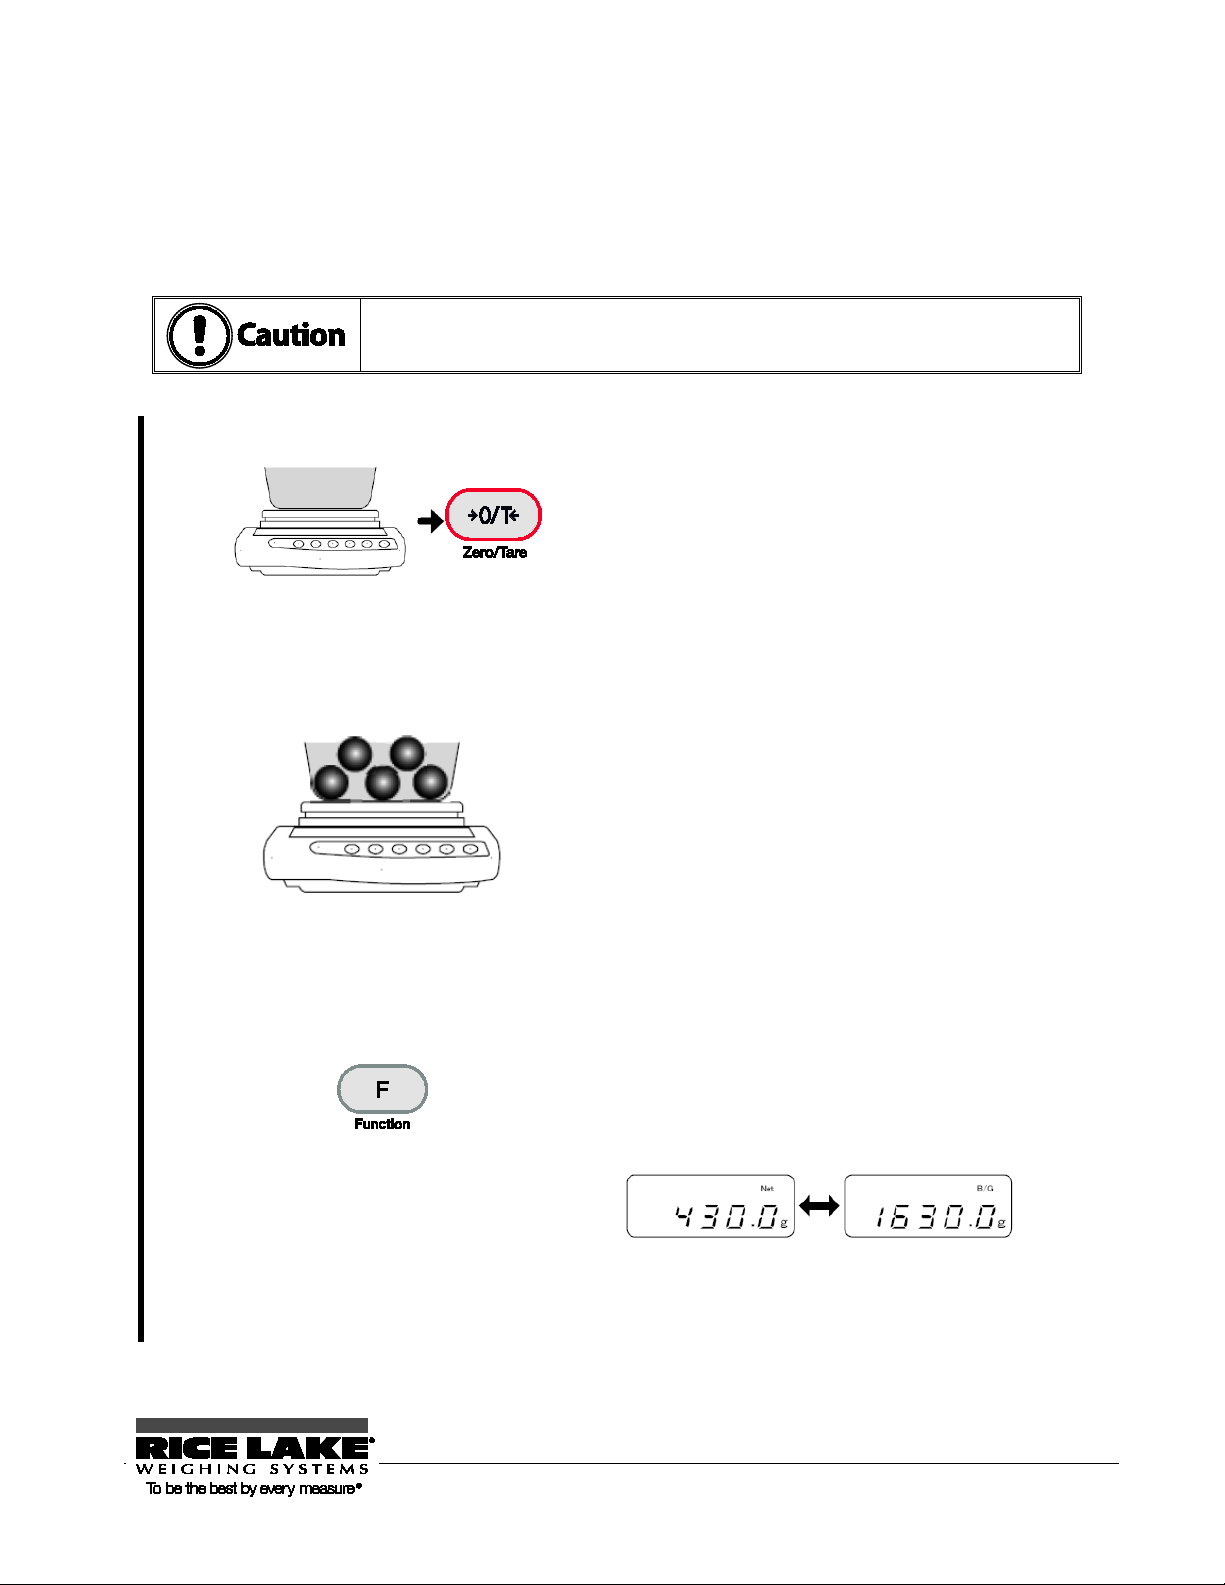
A gross weight can only be displayed when the balance functions as a weighing
Place the container and then set the tare.
Place the container and press the [Zero/Tare] key.
Place the sample.
The weight of only the sample is displayed (net readout).
Display the sum (gross readout).
Press the [Function] key.
11B2.4 Displaying the Sum of the Container and the Sample
The sum weight of the sample and the container is displayed (gross weight readout).
machine. For more information on weighing machine mode, refer to “Weighing” (P. X25X).
1
2
3
The tare range is set and the readout becomes zero.
The sum weight of the container and the sample is
displayed (gross readout). When a gross weight is
displayed, “B/G” lights up.
Pressing the [Function] key toggles the display between
gross and net.
RL-TS Series Operation Manual 21
[Function] key
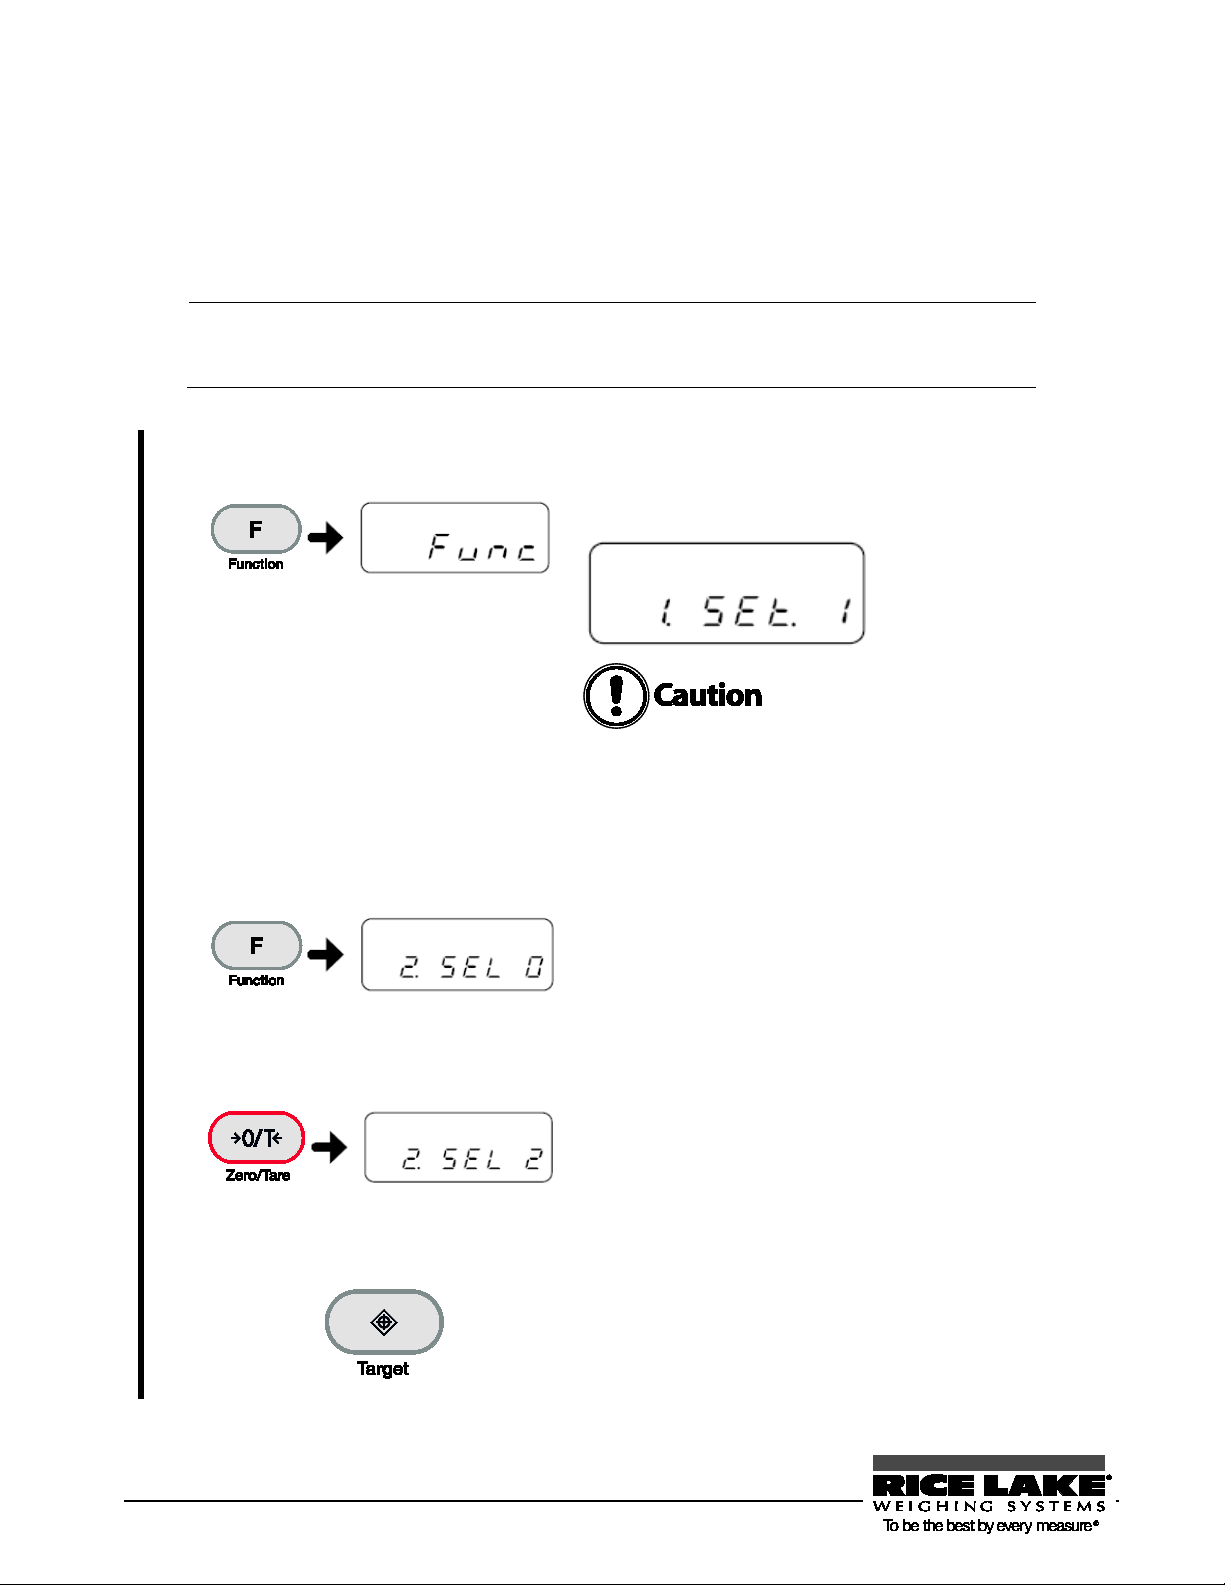
Pressing the [Print] key when a function is being set can cancel the setting
Set to the function setting mode.
Hold down the [Function] key and release the
Select a setting item.
By pressing the [Function] key, select an item to
Reference
12B2.5 Function Setting Basics
To set the settings of the balance, use the function keys.
This section describes the basic operations of function setting
1
and return to measurement mode.
finger after display has changed to “Func.”
The first function item is displayed.
After display changes,
release the finger.
Keeping the [Function] key held down will
switch the balance to another mode. If this
happens, press the [Print] key to cancel the
setting and redo the setting from the beginning.
2
Select a setting.
3
Save the setting.
4
be set.
Example: By pressing the [Function] key once,
select “2.SEL” (additional function). The first
setting “2.SEL 0” is displayed.
Pressing the [Zero/Tare] key selects a setting.
Pressing the key toggles the settings in turn.
After the last setting is displayed, the next
setting displayed is the first one.
Example: By pressing the [Zero/Tare] key twice,
select “2.SEL 2.”
Press the [Target] key to complete the setting.
The display returns to showing the sample’s
normal weight.
To cancel, press the [Print] key.
22 RL-TS Series Operation Manual
Reference
Reference
For the items and settings settable by the function capability, refer to “Appendix 1:
Function Setting List” (P.
X86X).
To initialize the function setting, refer to “Section 7-3: Initializing” (P.
X83X).
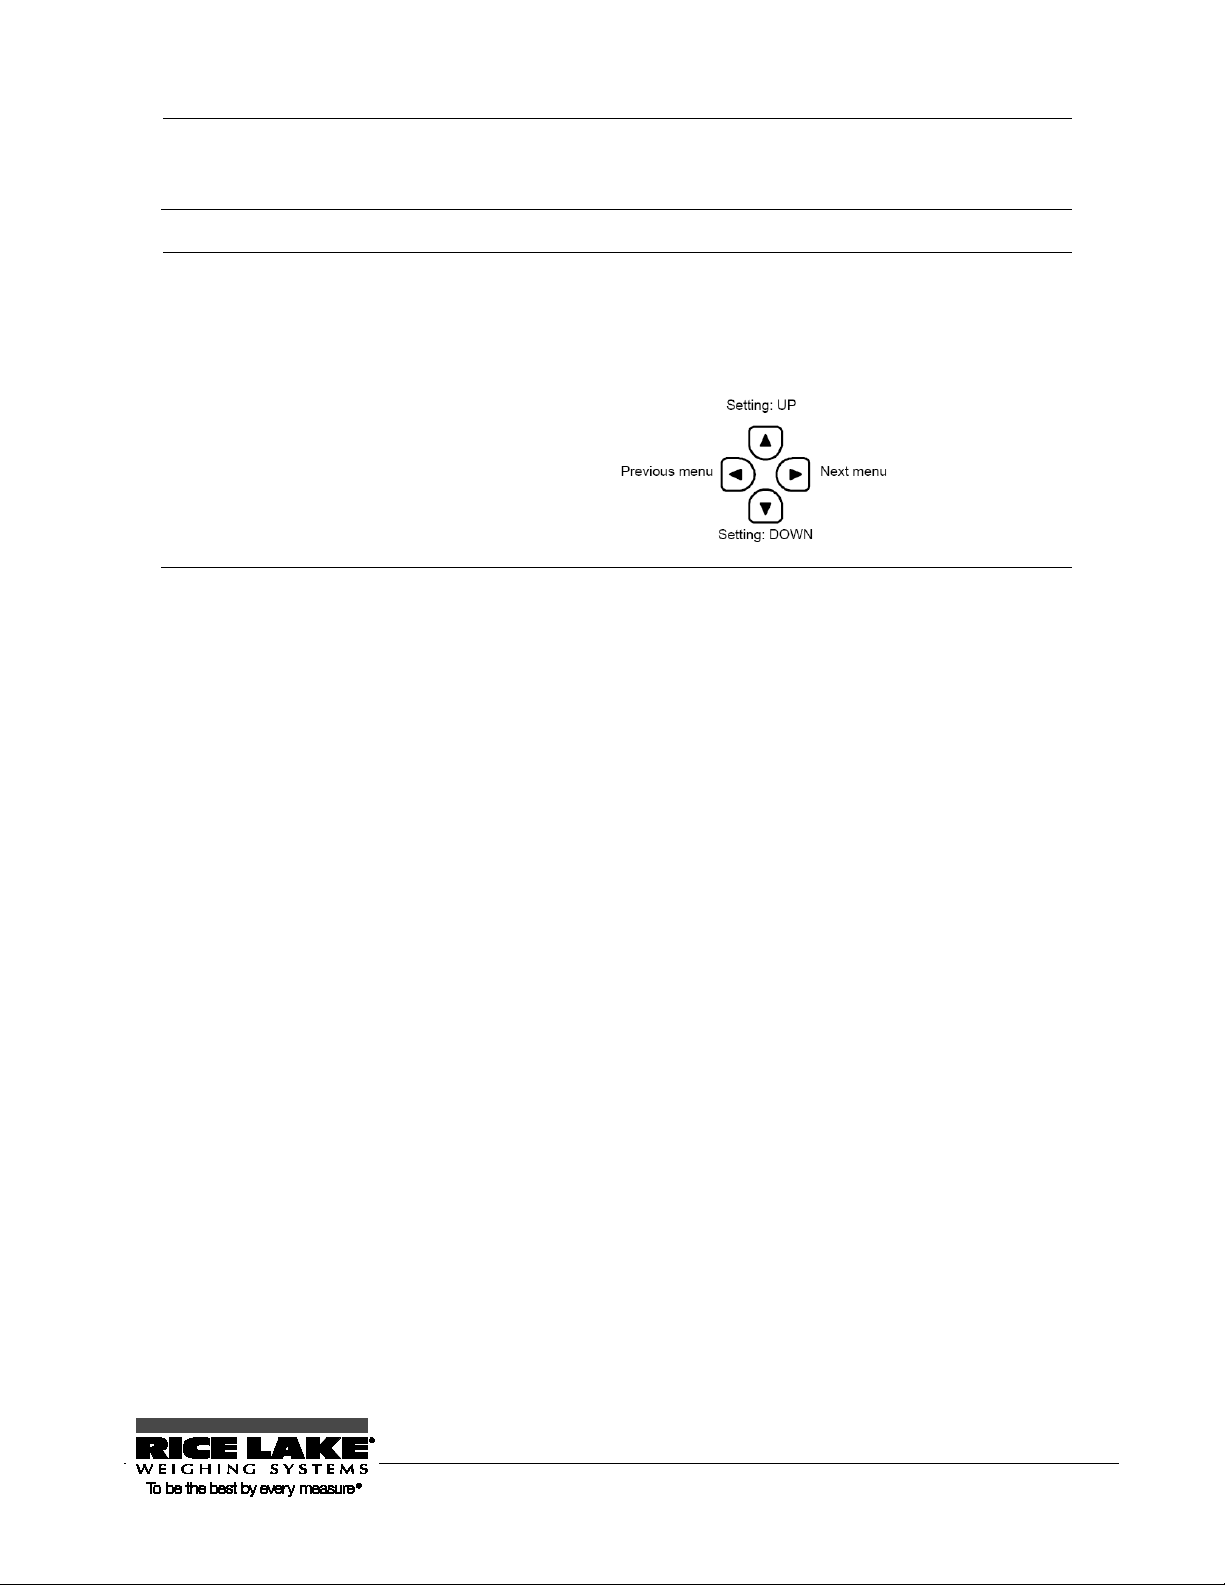
Function setting is possible with the direction keys.
After switching to the function setting mode with step 1, use the direction (arrow)
keys to change setting items and settings.
To complete the setting, press the [Target] key.
RL-TS Series Operation Manual 23

3.0 Various Measuring Methods
In addition to weighing, the balance has the following measuring modes: parts counting,
percentage weighing, unit converting, gravimeter, and animal weighing.
This chapter includes:
Weighing (Weighing Machine)
Counting Parts Count
Measuring Percentage
Obtaining Weight Multiplied by Coefficient
Measuring Specific Gravity
Weighing an Animal
Adding Multiple Measurements
Evaluating “More” and “Less” (Limit Function)
RL-TS Series Operation Manual 24
Set to the function setting mode.
Press and hold the [Function] key. After “
” is
13B3.1 Weighing (Weighing Machine)
By default, the balance is set to “weighing machine” mode. To return to weighing machine mode from other
weighing modes, use the following operation:
Func
1
(Refer to “Section 2-5: Function Setting
Basics (P.
X22X).)
displayed, release the finger.
“1.SEt” is displayed.
2
3
Select “Weighing Machine.”
Press the [Zero/Tare] key several times to select
“1.SEt 1.”
Press the [Target] key.
The setting is saved and the display returns to showing the
sample’s normal weight.
RL-TS Series Operation Manual 25
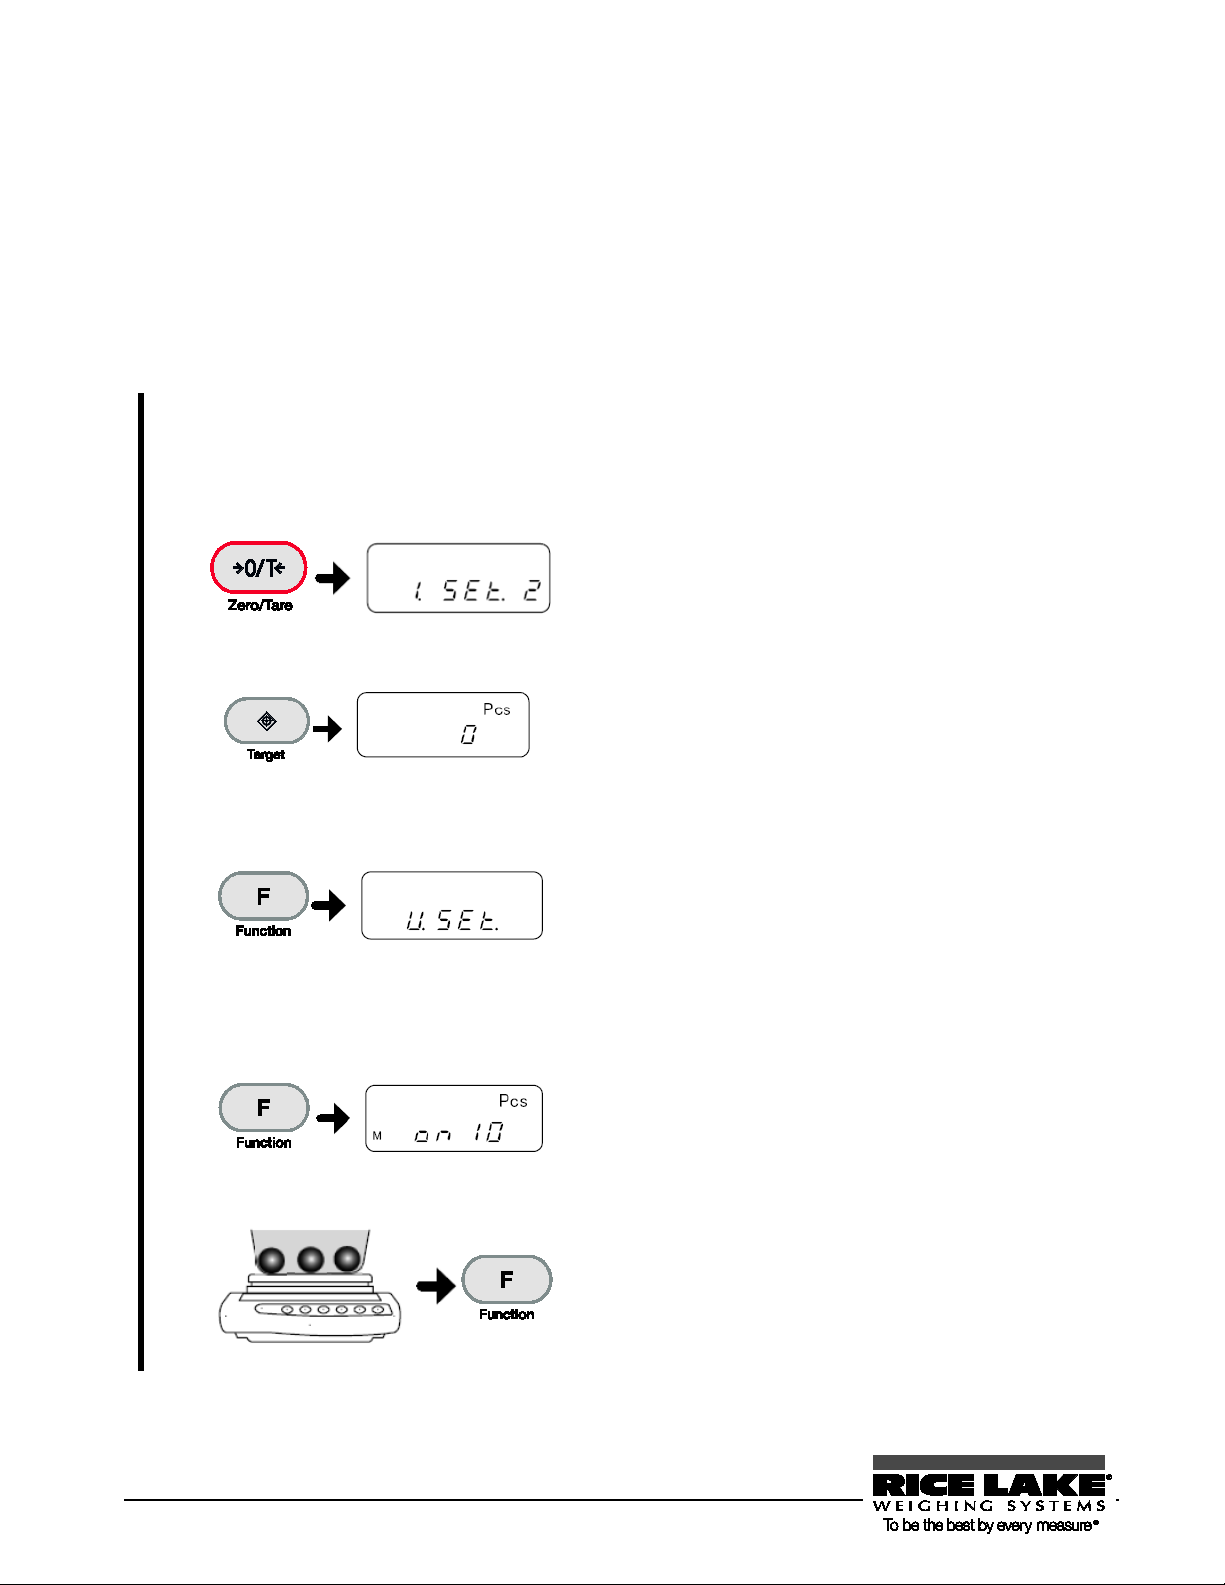
Set to the function setting mode.
Press and hold the [Function] key. After “
” is
Select the number of samples.
Each press of the [Zero/Tare] key can select the sample
Weigh the samples.
Place the set number of samples on the pan and then press
Reference
14B3.2 Counting Parts Count
The balance saves sample weight (unit weight) using the automatic memory update method (simplified SCS
method) to count the number of samples.
First, place a set number of samples. Next, place an appropriate number of additional samples, up to three
times the set number. Then, the balance will automatically update the average sample weight. Repeating
this step allows accurate counting.
Func
1
(Refer to “Section 2-5: Function Setting
Basics (P.
X22X).)
displayed, release the finger.
2
3
4
5
Select “Parts Counting.”
Save the weighing mode.
Start sampling.
<Press and hold>
Press the [Zero/Tare] key several times to select “1.SEt
2.”
Press the [Target] key.
The “parts counting” mode is set, displaying “Pcs.”
Press and hold the [Function] key. After “U.SEt” is
displayed, release the finger.
The “on 10 Pcs” display indicates using ten samples.
Pressing the [Print] key during sampling can cancel the
sampling.
count between 5, 10, 30, and 100.
If the samples vary considerably in size or are lightweight,
set a greater number of samples.
6
26 RL-TS Series Operation Manual
the [Function] key.
The displayed sample quantity (Example: “on 10 Pcs”)
blinks.”
 Loading...