

Page 1
•
After reading this manual, store it in a safe place near the
balance, so you can review it as needed.
IMPORTANT
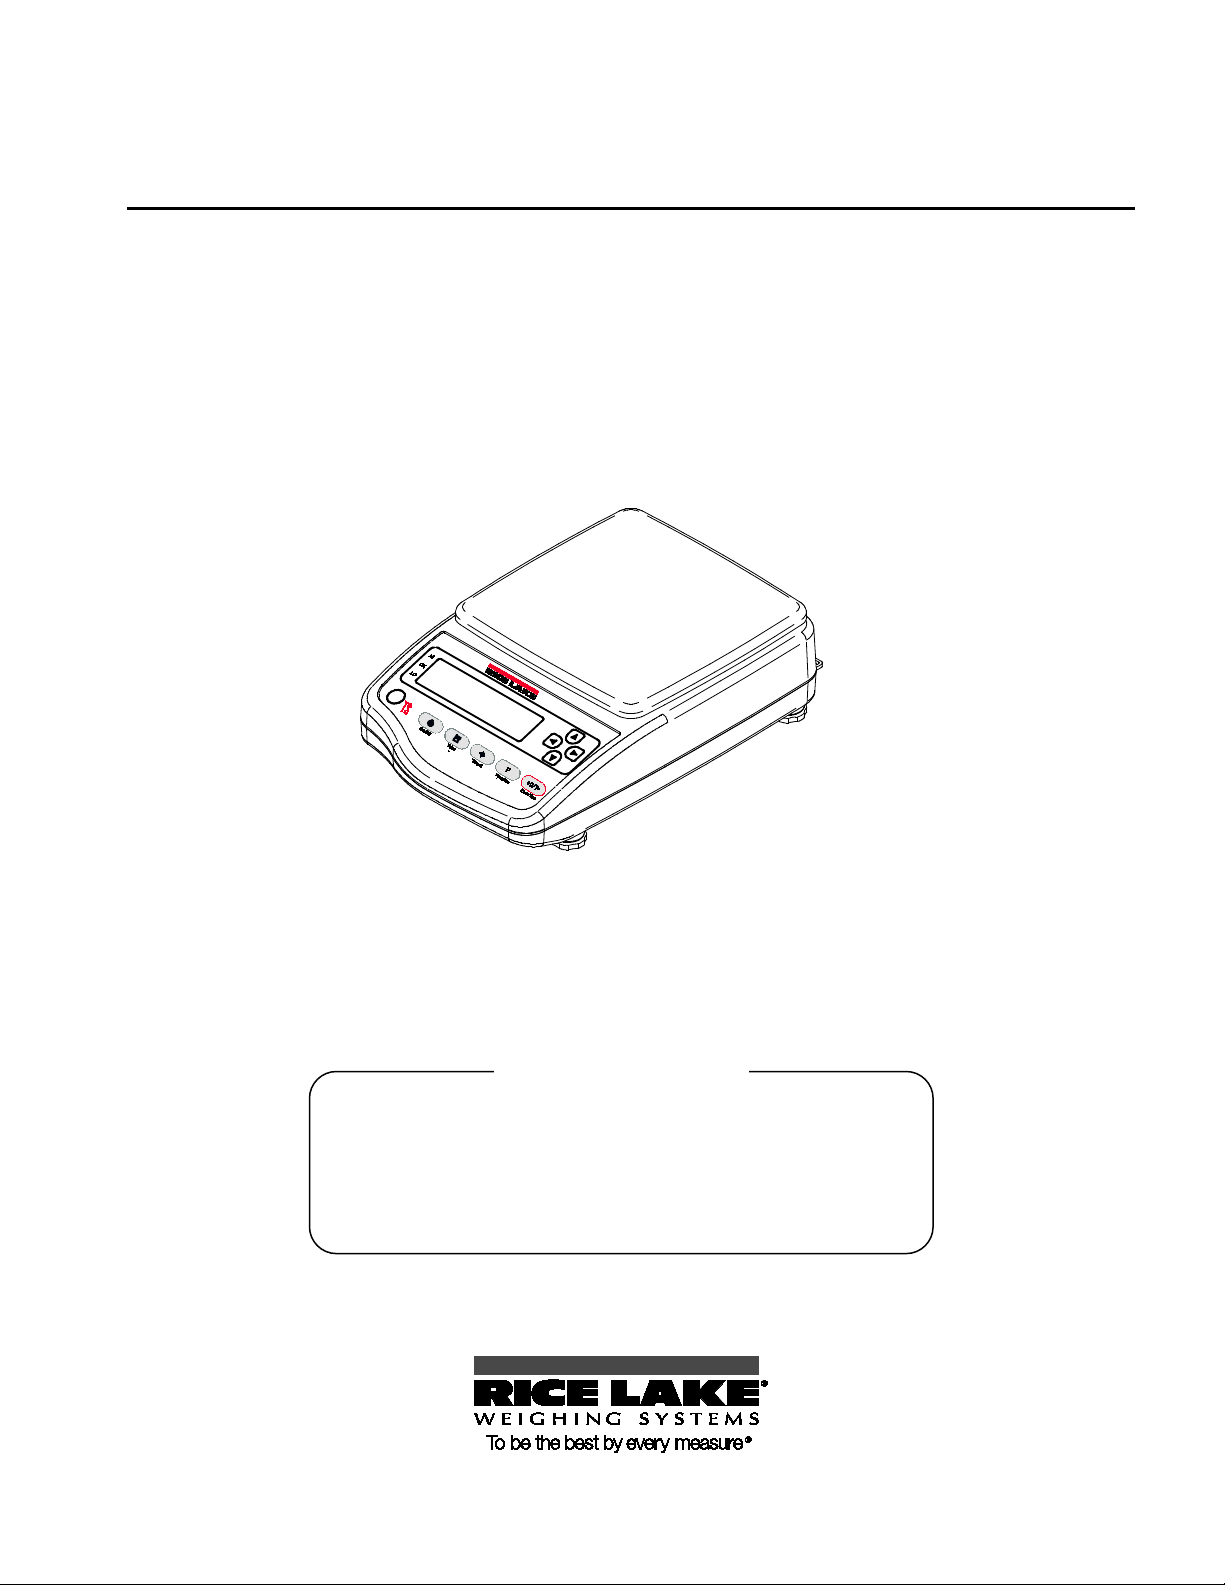
Rice Lake TS Series
Tuning Fork Stainless Steel Electronic Balance
Operation Manual
To ensure safe and proper use of the balance, please read this
manual carefully.
•
109050
Page 2

Page 3

Contents
Contents ............................................................... i
Safety Precautions ............................................... 1
1BHow to Read this Manual ..................................... 6
42BNotational conventions ........................................... 6
1.0 How to Begin .............................................. 7
3B1.1 Checking Supplied Items .............................. 8
4B1.2 Names and Functions of Component Parts .. 9
1.3 Workings of Operation Keys ....................... 11
6B1.4 How to See Displayed Signs ...................... 12
7B1.5 Assembling and Installing the Balance ........ 14
Assembling the balance .................................... 14
2.0 Basic Operation ........................................ 17
8B2.1 Powering On/Off the Balance and Checking
Operation ......................................................... 18
9B2.2 Weighing by Placing a Sample in a Container
47BPreparing measurement equipment .................. 33
48BMeasurement .................................................... 34
49BUsing a liquid medium other than water ............ 36
50BGravimeter measurement data output ............... 36
18B3.6 Weighing an Animal .................................... 38
19B3.7 Adding Multiple Measurements .................. 39
51BAddition function setting.................................... 40
52BWeighing with addition function ......................... 41
20B3.8 Judging “Above” and “Below” (Limit Function)
................................................................... 42
70B How to judge ................................................. 42
71B Judgment criteria and limit value setting ........ 43
72B Detailed function setting ................................ 43
53BLimit function setting ......................................... 44
(Tare) ................................................................. 19
10B2.3 Weighing an Added Sample ....................... 20
11B2.4 Displaying the Sum of the Container and the
Sample ............................................................. 21
12B2.5 Function Setting Basics .............................. 22
3.0 Various Measuring Methods ...................... 24
13B3.1 Weighing (Weighing Machine) ..................... 25
14B3.2 Counting Parts Count .................................... 26
69BDisplaying average sample weight .................... 27
15B3.3 Measuring Percentage ................................ 28
44BSetting a reference weight by weighing an actual
sample .......................................................... 28
45BSetting a reference weight by entering a value .. 29
16B3.4 Obtaining Weight Multiplied by Coefficient .. 31
54BJudging by absolute values ............................... 45
55BJudging by deviation values .............................. 47
4.0 Adjusting the Scale ................................... 50
21B4.1 How to Calibrate ........................................ 51
22B4.2 Testing the Balance .................................... 53
5.0 Function Setting ....................................... 54
23B5-1 Using Two Expression Units by Switching
Them ................................................................ 55
5.2 Minimum Readability Setting ...................... 56
25B5.3 Saving Container (Tare) Weight ................... 57
26B5.4 Power Setting ............................................. 58
56BAuto Power Off ................................................. 58
57BAuto Backlight Off ............................................. 59
27B5.5 ID No. Setting ............................................. 59
17B3.5 Measuring Specific Gravity ......................... 32
46BMeasurement procedures for specific gravity .... 33
RL-TS Series Operation Manual i
28B5.6 Improving the Stability of the Balance............. 62
Page 4

© 2011 Rice Lake Weighing Systems. All rights reserved.
July 2011
6.0 Input/Output to/from External Devices ....... 64
29B6.1 Outputting to a Printer ................................ 65
58BConnecting a printer ......................................... 65
59BPrinting span adjustment and span test results . 65
Printing measurement results ............................ 66
30B6.2 Connecting to External Devices via RS-232C
Interface ........................................................... 67
61BConnector pin numbers and functions .............. 67
62BSample connection with a PC ........................... 68
63BInterface specifications...................................... 69
31B6.3 Communication Data and Commands ....... 70
64BOutput data ...................................................... 70
77B Data format ...................................................... 71
Meanings of data ........................................... 71
7.0 Troubleshooting ........................................ 78
32B7.1 Error Messages .......................................... 79
33B7.2 Troubleshooting .......................................... 80
34B7.3 Initializing .................................................... 83
35B7.4 Maintenance ............................................... 85
67BFor heavy dirt .................................................... 85
68BHow to take care of the balance ....................... 85
Appendixes ....................................................... 86
36BAppendix 1 Function Setting List ..................... 86
37BAppendix 2 Measurement Mode List ............... 90
38BAppendix 3 Printing in Compliance with
ISO/GLP/GMP .................................................. 91
39BAppendix 4 Specifications ............................... 94
83B Basic specifications ....................................... 94
65BInput commands ............................................... 74
66BResponse ......................................................... 76
84B Functional specifications ................................ 94
85B Minimum Display by Unit of Measurement ..... 95
40BAppendix 5 Conversion Table Units ................. 98
TS Series Limited Warranty ................................ 99
ii RL-TS Series Operation Manual
Printed in the United States of America.
Specifications subject to change without notice.
Page 5
Safety Precautions
Before using the balance, please read this manual carefully.
The nature of dangers and damages that may result in the event of improper operation are indicated under
the following categories:
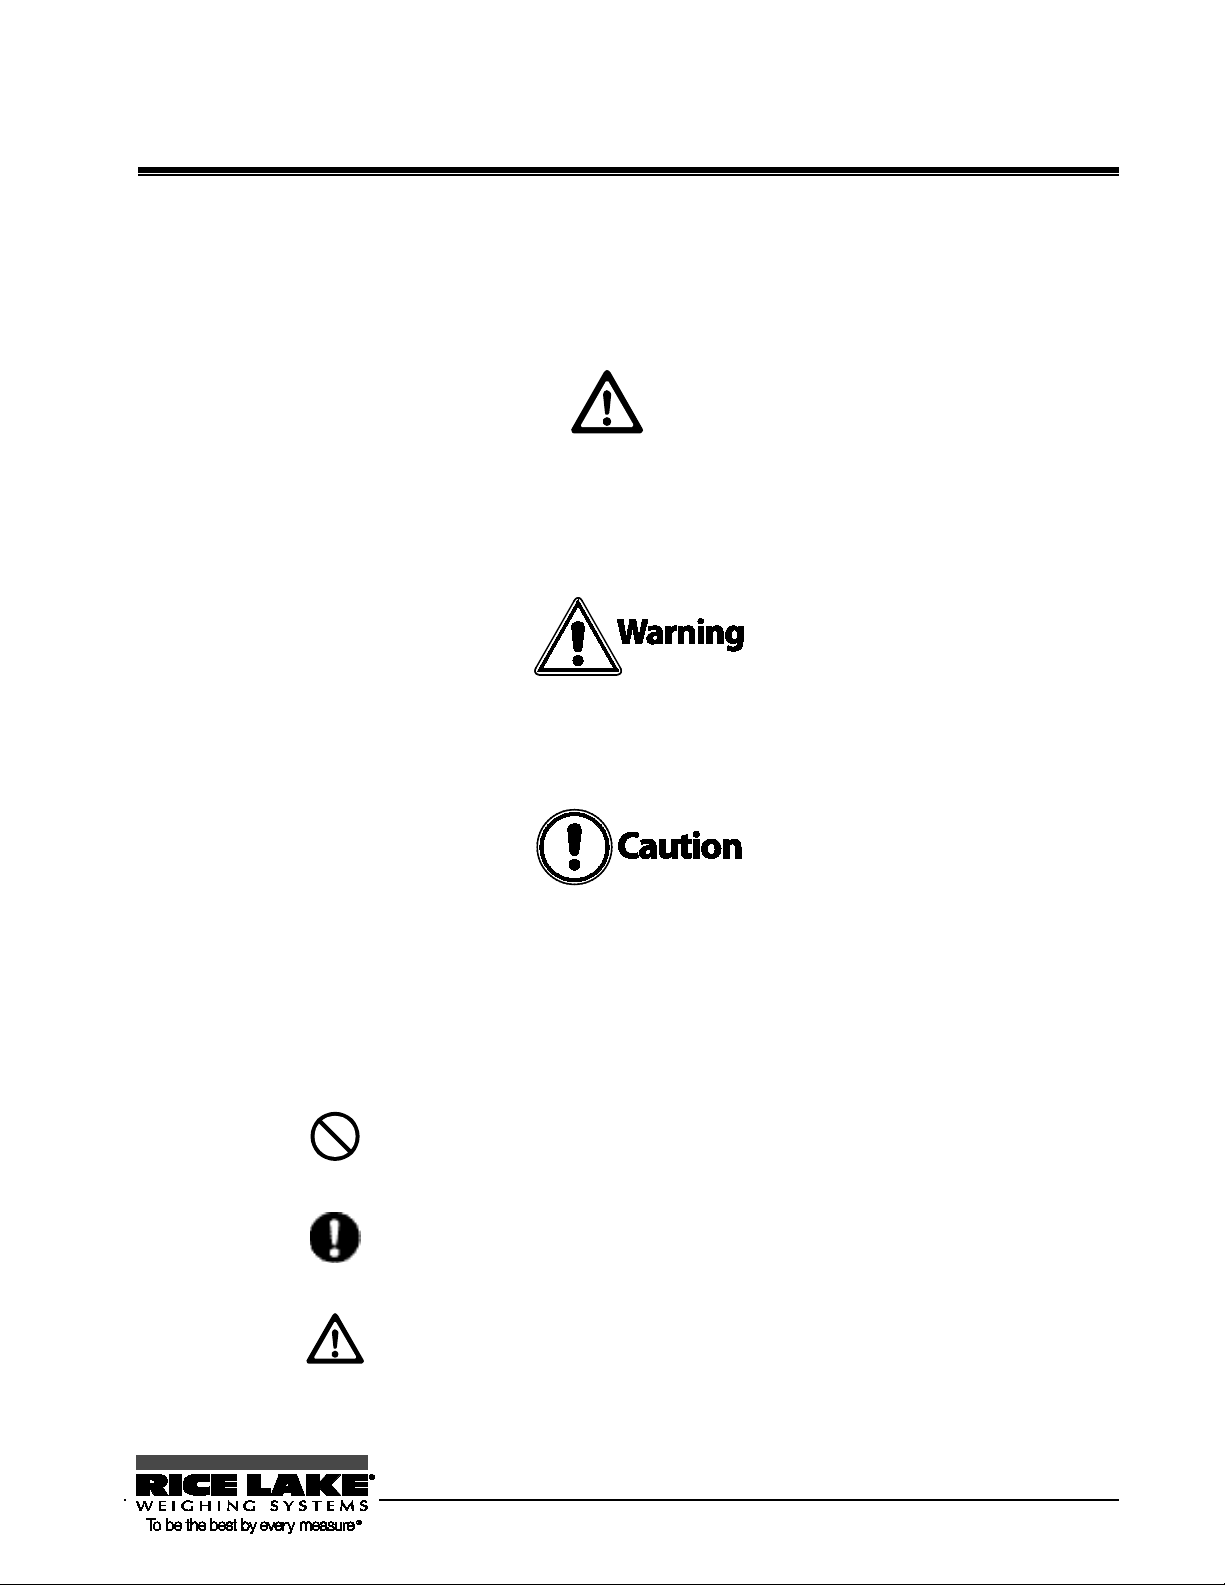
Danger
This symbol indicates improper handling that may cause death or severe damage including serious injury.
The urgency alerted for danger is high.
This symbol indicates improper handling that may cause death or severe damage including serious injury.
This symbol indicates improper handling that may cause physical injury or damage to property only.
The following symbols give instructions that you need to follow:
To prevent danger to humans and damage to property, be sure to follow the following instructions:
RL-TS Series Operation Manual 1
Indicates a “prohibited” action.
Indicates a “mandatory” action that must be executed
without fail.
Indicates actions that require caution.
Page 6
e, contact our
oing so could result i n an
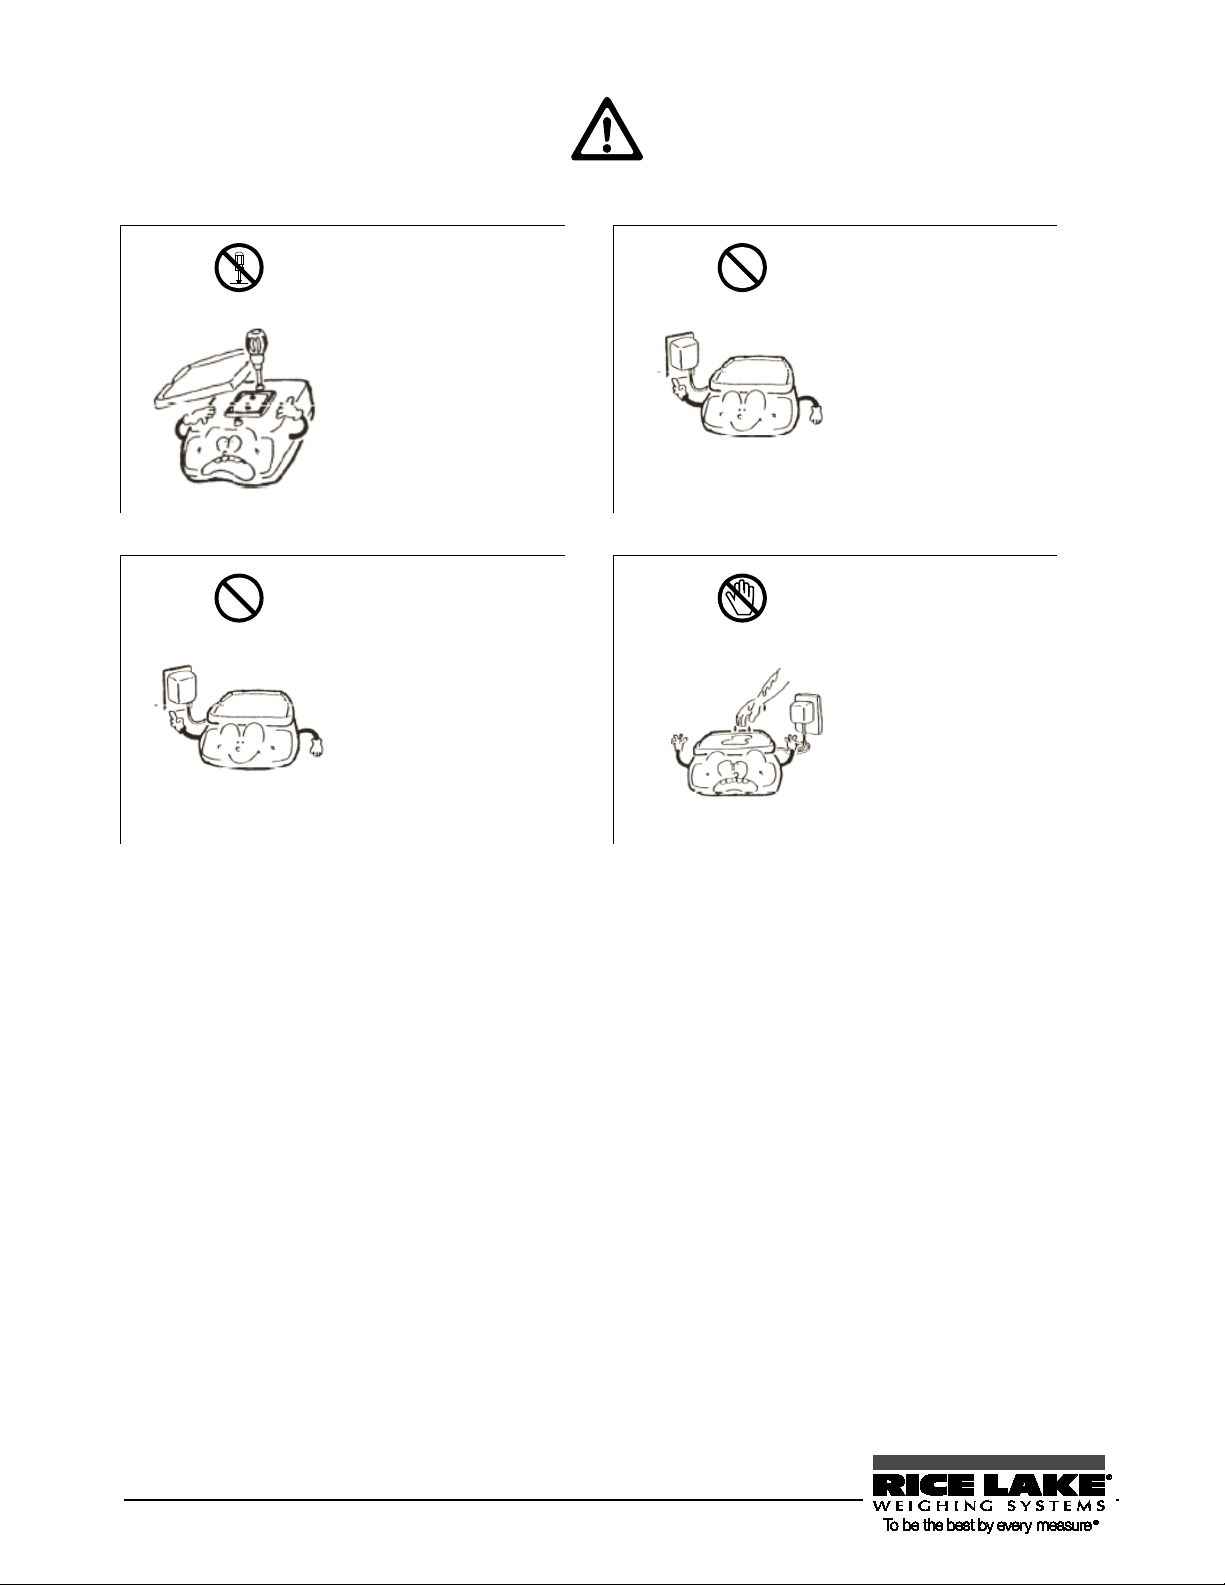
Danger
Do not disassemble or
modify the unit.
Doing so could cause
accidents such as injury,
electrical shock, and fire,
or malfunction. For
inspection and adjustment
of the balanc
Sales Office or Technical
Service Division.
Only use the specified
power source.
Use of other types of
power sources may result
in heat generation, fire, or
malfunction of the
balance.
Only use the dedicated
AC adapter.
Use of other types of AC
adapters may result in
heat generation, fire, or
malfunction of the
balance.
Do not touch the AC
adapter with wet hands.
D
electrical shock, which
may cause an accident
with injury or death.
2 RL-TS Series Operation Manual
Page 7
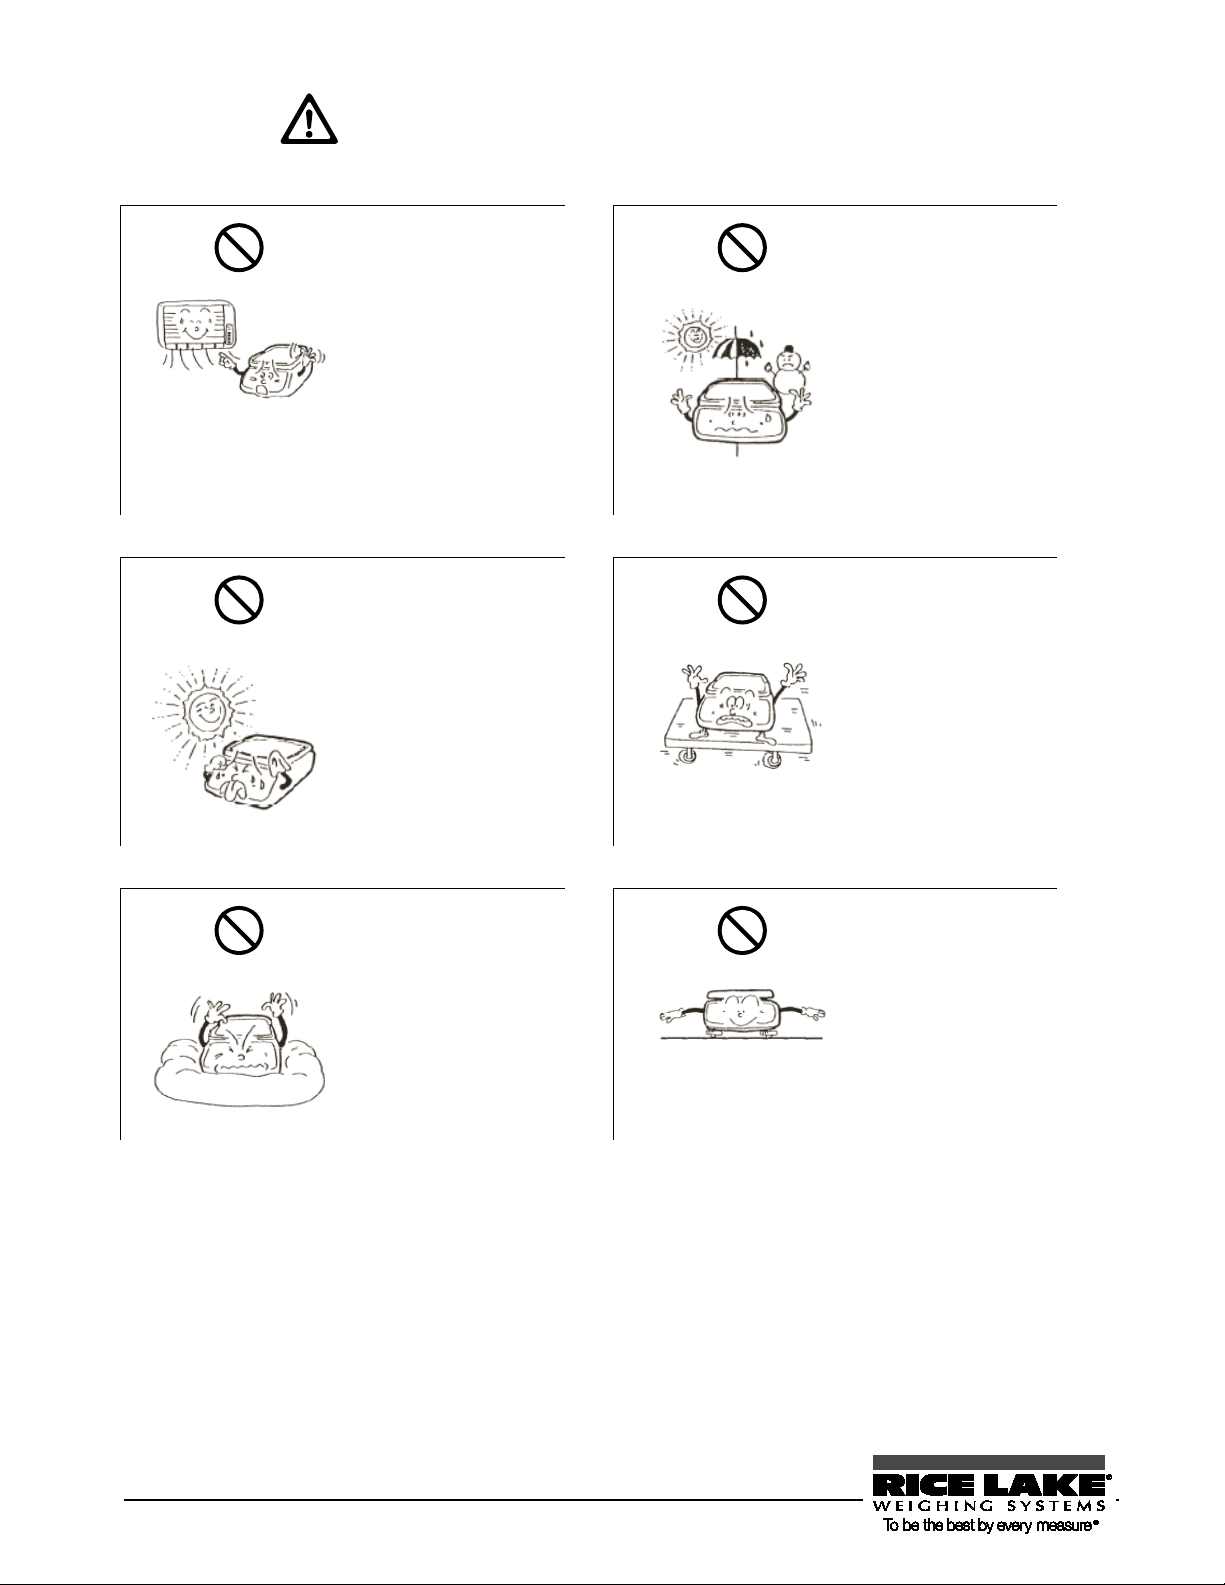
rendered impossible i n a lo cat i on
environment.
body may trip on the cab le,
impossible.
Avoid applying excess
Do not use volatile
distorted. To clean the unit
When the balance is not
waterproof and dustproof, do
not expose the balance to
rain, water, dust, or such
other environment.
Even though the balance is
waterproofed and dustproofed,
water and dust may enter the
unit if the connector ca p to the
underfloor weigher hole is
detached.
Accurate measurement may be
where the balance is subjected
to rain or water, or in a dusty
Do not lay the AC adapter
cable on the surface of a
passage.
Some
causing the balance to fall,
thereby causing injury and/or
damage to the balance.
Do not move the
balance when a sample
is loaded.
The loaded sample may
fall off the pan and cause
an injury and/or damage
to the sample and
surrounding objects.
Do not place the
balance on an unstable
base or use the
balance in a location
where it may be
subjected to vibration.
The loaded sample may
fall off the pan and cause
an injury and/or damage
to the sample and
surrounding objects.
Accurate measurement
may be rendered
RL-TS Series Operation Manual 3
force or impact to the
balance.
To prevent breakage or
malfunction, place the
sample to be measured
on the balance carefully.
solvents for cleaning.
The body may be
of stains, use a piece of
dry cloth or cloth soaked
in a small quantity of
neutral detergent.
Page 8
lower relative humidity.
Soft floor:
Tilted surface:
When the balance is tilted,
Do not use the balance in the following places:
Location where it may
be subject to air from
an air-conditioning unit:
Extreme changes in the
ambient temperature may
result in inaccurate
measurements.
Location where it may
be subjected to abrupt
changes in ambient
temperature or
humidity:
Accurate measurement
may be rendered
impossible. Use the
balance in an ambient
temperature range of 0°C
to 40°C and with 80% or
Location where it is
subject to direct
sunlight:
An internal temperature
increase in the balance
may lead to inaccurate
measurement.
Unstable base or
location where it may
be subjected to
vibration:
In addition to failing to
measure the sample
accurately, the loaded
sample may fall off the
pan and cause an injury.
When loaded with a
sample, the balance may
tip or move, preventing
accurate measurements
from being conducted.
an error may be caused,
preventing accurate
measurement from being
conducted. Place the
balance on a level
surface.
4 RL-TS Series Operation Manual
Page 9
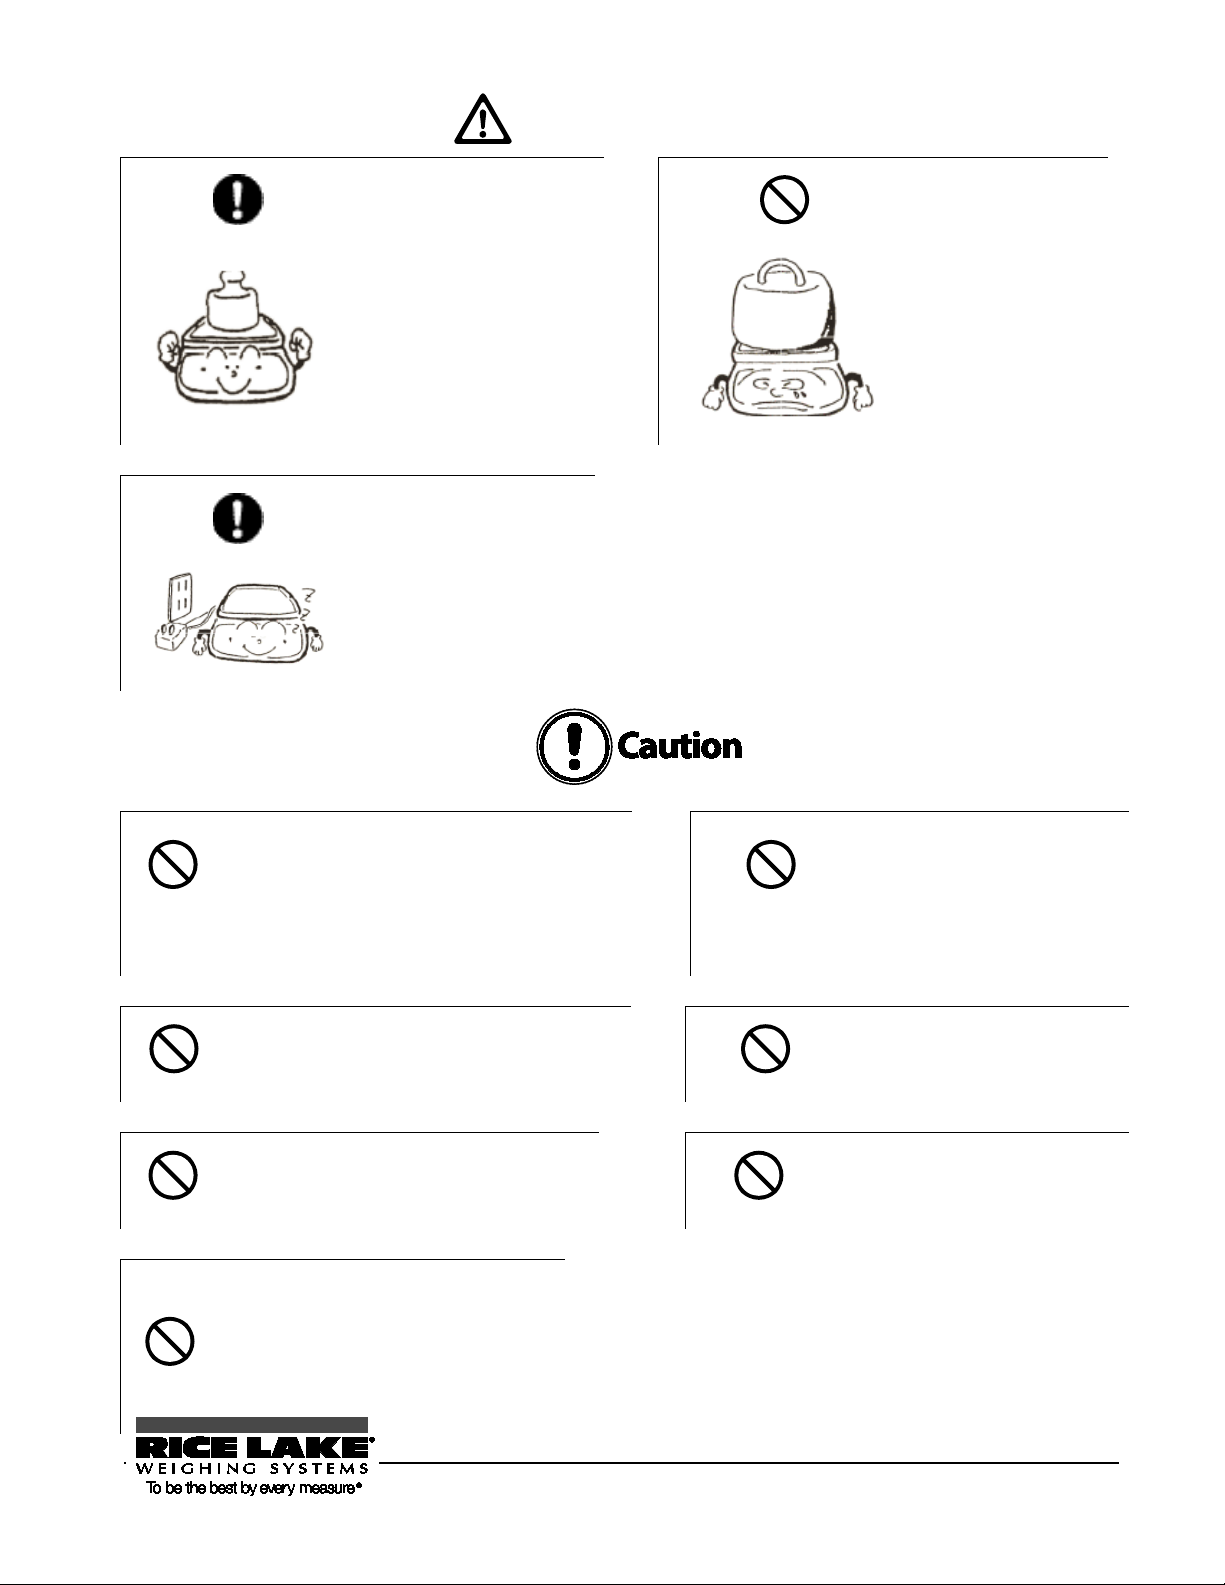
Never disassemble or modify the batteries.
cause the balance to fail or igni te.
Do not put the batteries into a fire.
Do not mix old and new batteries, or batteries
If the balance is not going to be used
Do not use batteries that leak.
Respect the following:
Be sure to calibrate the
balance after installation or
relocation.
Measurement values may
contain errors. To maintain
accurate measurement, be
sure to calibrate the balance.
Do not leave the balance
overloaded. (When it is
overloaded, o-Err is
displayed.)
To prevent breakage or
malfunction, remove the
sample placed on the
balance immediately.
If the balance is to be
unused for an extended
period of time, unplug the
AC adapter.
To conserve power and to
prevent deterioration, unplug
it.
(battery handling)
Take care to ensure you insert batteries with
the positive and negative poles correctly
inserted, and be careful about short circuits.
Such mishandling could damage the batteries, or
They may explode.
of different types or manufacturers.
Dispose of batteries in accordance with
local regulations.
for a long time, store it with the
batteries removed.
Observe the precautions printed on the
batteries or rechargeable batteries.
RL-TS Series Operation Manual 5
Page 10
This chapter gives introductory information such as
turn the power on and off. For your first use of the
This chapter gives basic instructions for how to
procedures for setting the
This chapter describes how to use various measuring
methods available for the balance, such as parts
The balance needs adjustment depending on where
This chapter describes how to set various functions
This chapter describes printing to printers and how to
This chapter describes how to troubleshoot problems
occurring with the balance, including actions
Required data including the specifications of the
Relevant pages can be searched for through indexed
The balance
Refers to a TS series product.
Measure
Refers to measuring a sample by placing it on the pan. Other
[Function] key
The names of the operation keys provided on the front of the main unit
“Func”
The messages shown on the display are expressed in quotation marks
Press the key.
Refers to giving a light press of the key.
Press and hold the key.
Refers to holding down the operation key and releasing the finger after
1BHow to Read this Manual
This manual comprises the following chapters:
Chapter 1 How to Begin
Chapter 2 Basic Operation
Chapter 3 Various Measuring
methods
Chapter 4 Adjusting the Balance
Chapter 5 Setting the Functions
Chapter 6 Input/Output to/from
External Devices
Chapter 7 Troubleshooting
how to assemble and install the balance, and how to
balance, be sure to read this chapter.
weigh objects. The
function capabilities used to set various functions are
also described.
counting and percentage weighing.
and when it is used. This chapter describes how to
calibrate and test the balance.
of the balance, such as setting units and minimum
readability.
input and output to/from RS-232C devices in detail.
Appendixes
Index for Terms
42BNotational conventions
In this manual, the following notation is used.
expressions such as “weigh” and “measure weight” may also be used.
are expressed in brackets [ ].
“ ”.
an intended display is obtained.
required for errors, and trouble remedies.
balance is described.
terms.
6 RL-TS Series Operation Manual
Page 11

1.0 How to Begin
This chapter describes the operations required before using the balance, starting from assembling the main
unit to turning the power switch on and off.
Before your first use of the balance, be sure to read this chapter.
This chapter includes:
Checking Supplied Items
Names and Functions of Component Parts
Workings of Operation Keys
How to Read Displayed Signs
Assembling and Installing the Balance
RL-TS Series Operation Manual 7
Page 12
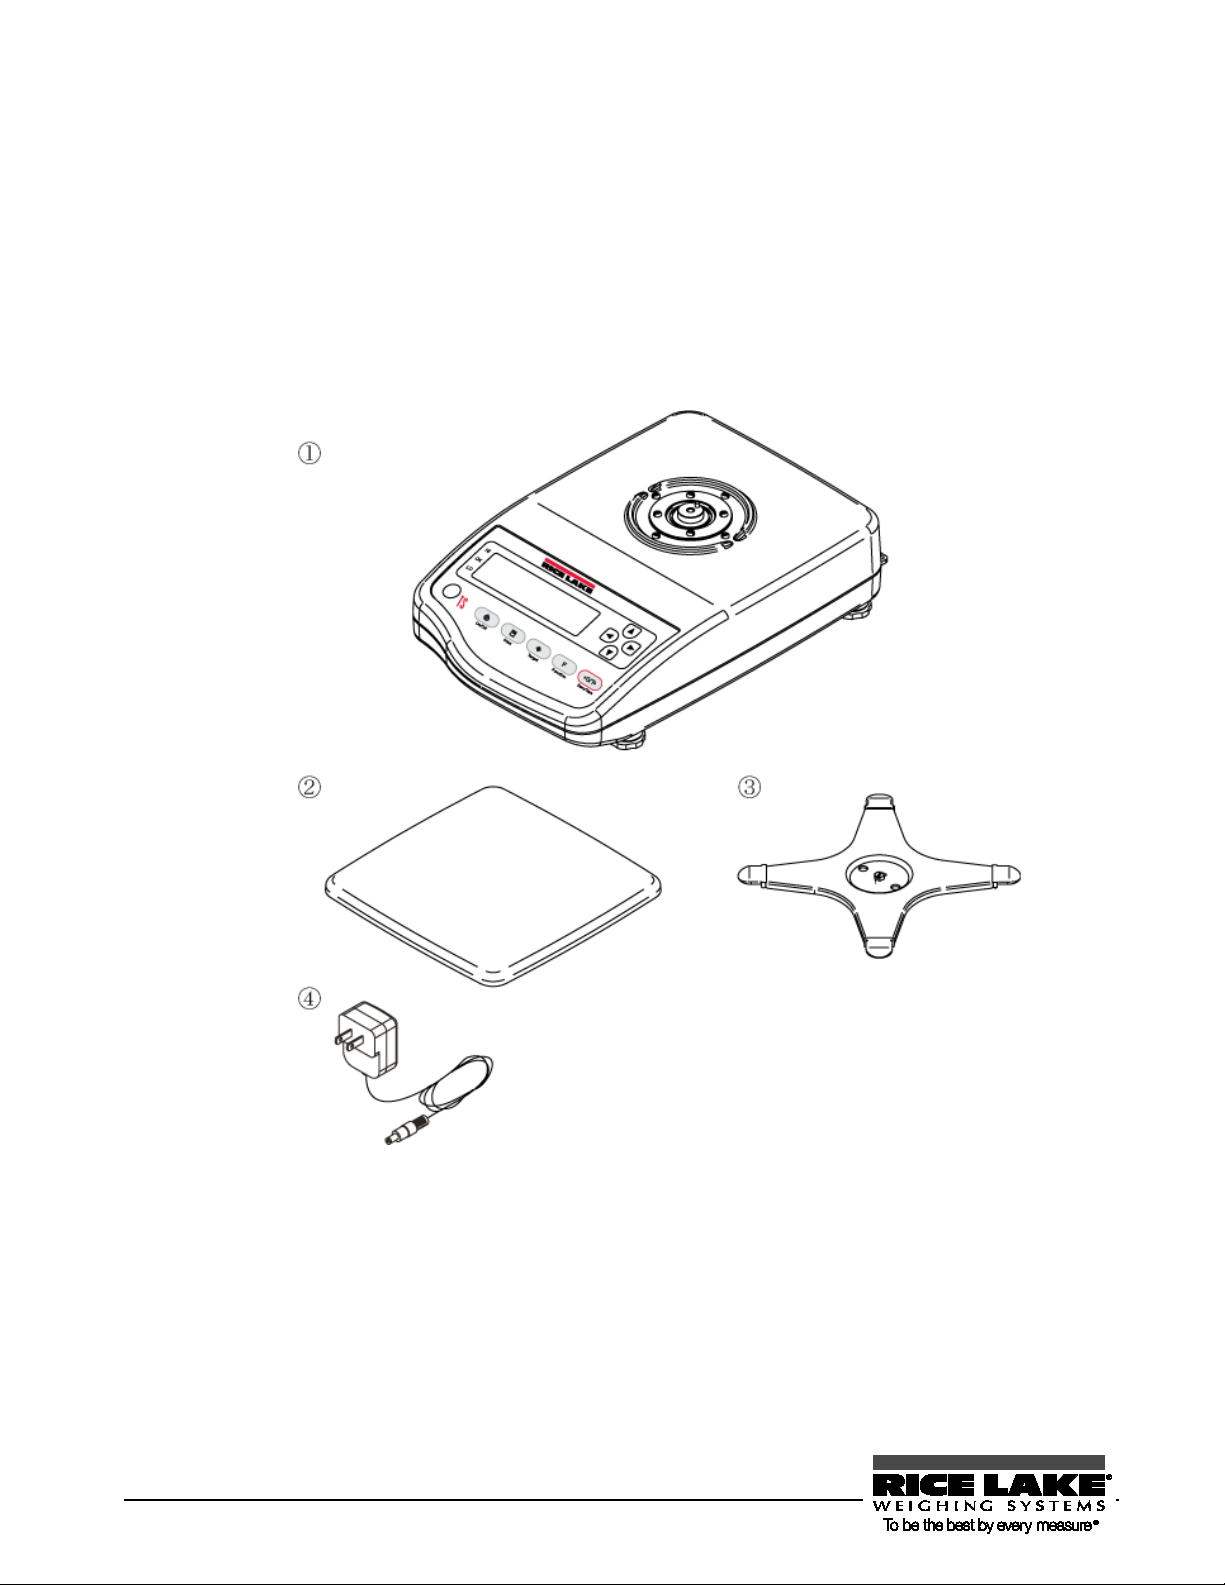
3B1. 1 Checking Supplied Items
The following items are contained in the box.
In the unlikely event of problems such as missing or broken items, please contact the retailer from whom
the balance was purchased or our Sales Office (See the Appendix at the end of this manual).
TS main unit
Pan
Pan base
AC adapter
8 RL-TS Series Operation Manual
Page 13
Pan
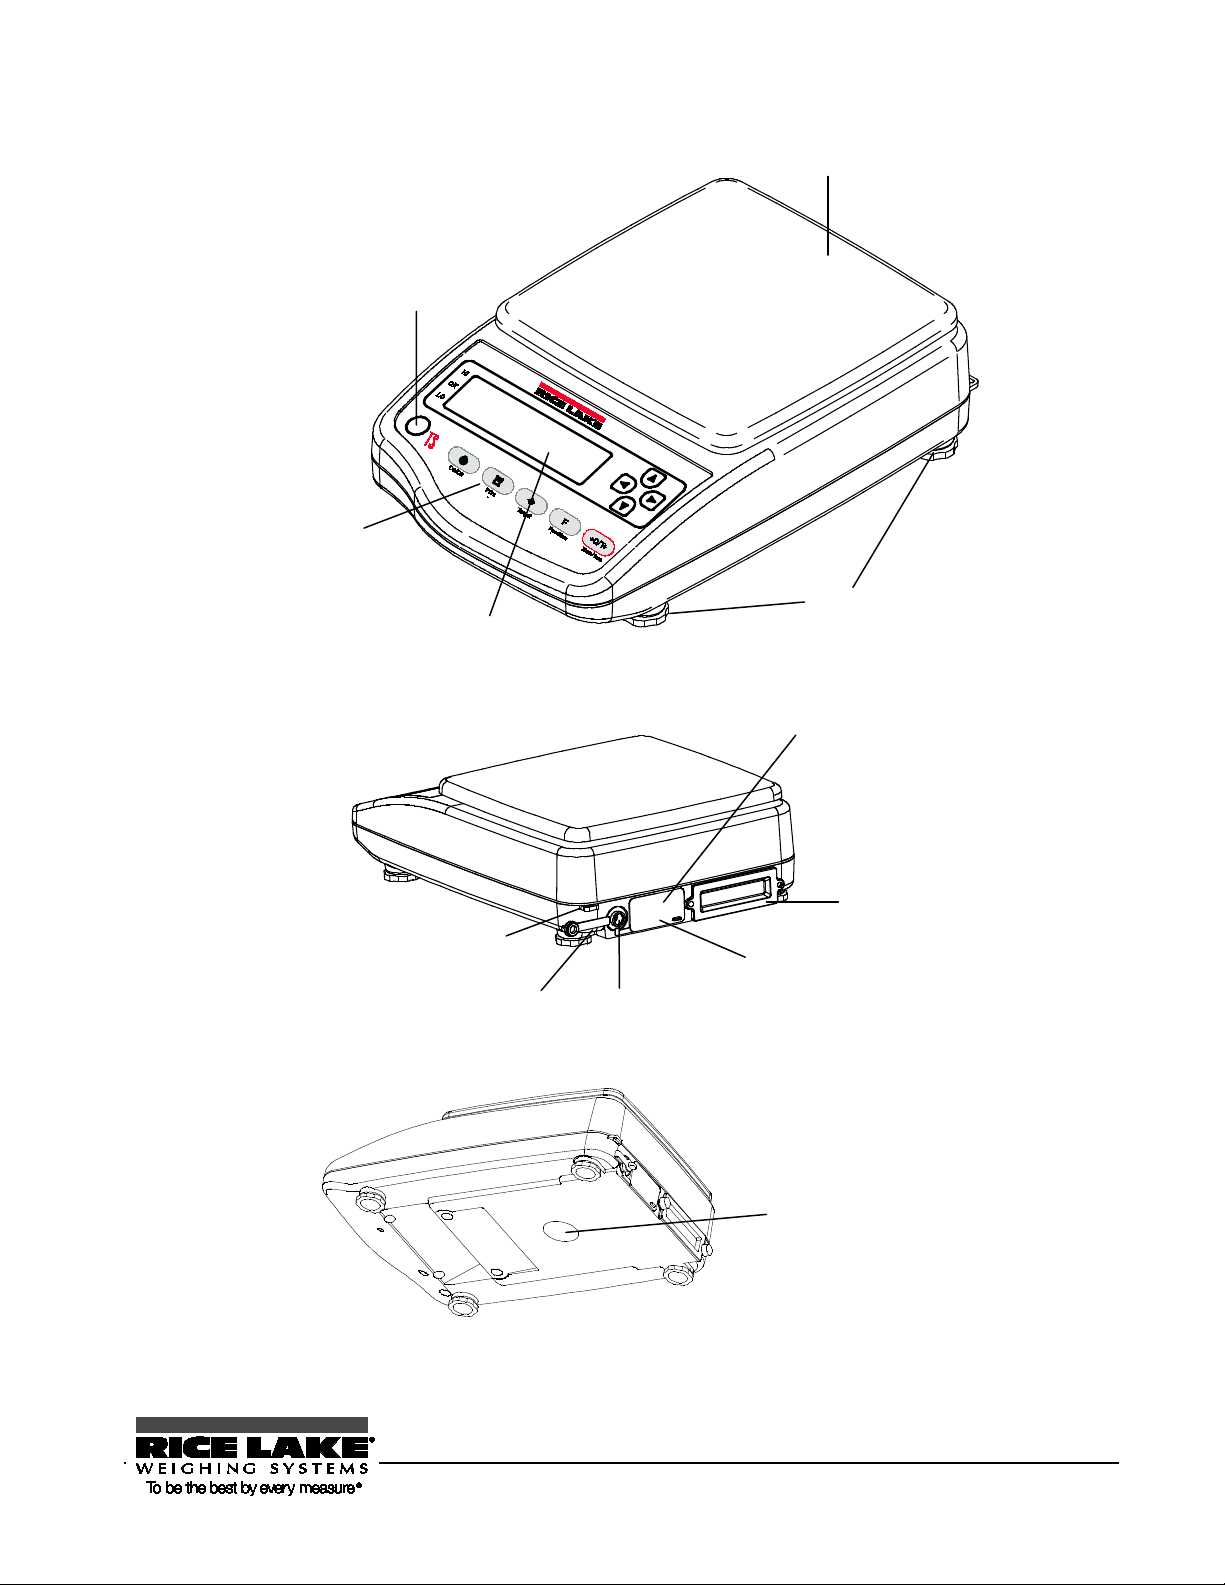
Level
Indicates the inclination
of the balance.
Display
Operation Keys
Refer to “Workings of
Operation Keys” (P.
Adjusters (feet)
Use to adjust the inclination of the
unit by turning them right or left.
D-SUB9 pin (under cover)
Use to connect the balance to an RS232C
connector
Cover
Remove when using options.
Anti-theft hole
Connector
cover
AC adapter jack
Use to connect the power cord.
AC adapter jack cap
Underfloor weigher hole cover
(Rubber cap)
For hanging measurement, use the underfloor
weigher fixture option (Ref
Specific Gravity” (P.2
4B1. 2 Names and Functions of Component Parts
5)
printer or other external device.
er to “Measuring
8)).
RL-TS Series Operation Manual 9
Page 14
- When not using the balance, be sure to attach the AC adapter
jack cap, connector cover, and the rubber cap and the cover on
terproofing and dustproofing functions do not
pack option, and the limit
e panel surface (display,
the bottom to prevent water and dust from entering the unit.
- Note that the wa
work in the following situations:
- When the cable is connected to the D-SUB 9 P.
- When the buzzer option, the fullcontact output option are used
- Do not scratch or make a hole in th
operation keys). Water and dust may enter the unit.
10 RL-TS Series Operation Manual
Page 15
How to press the keys
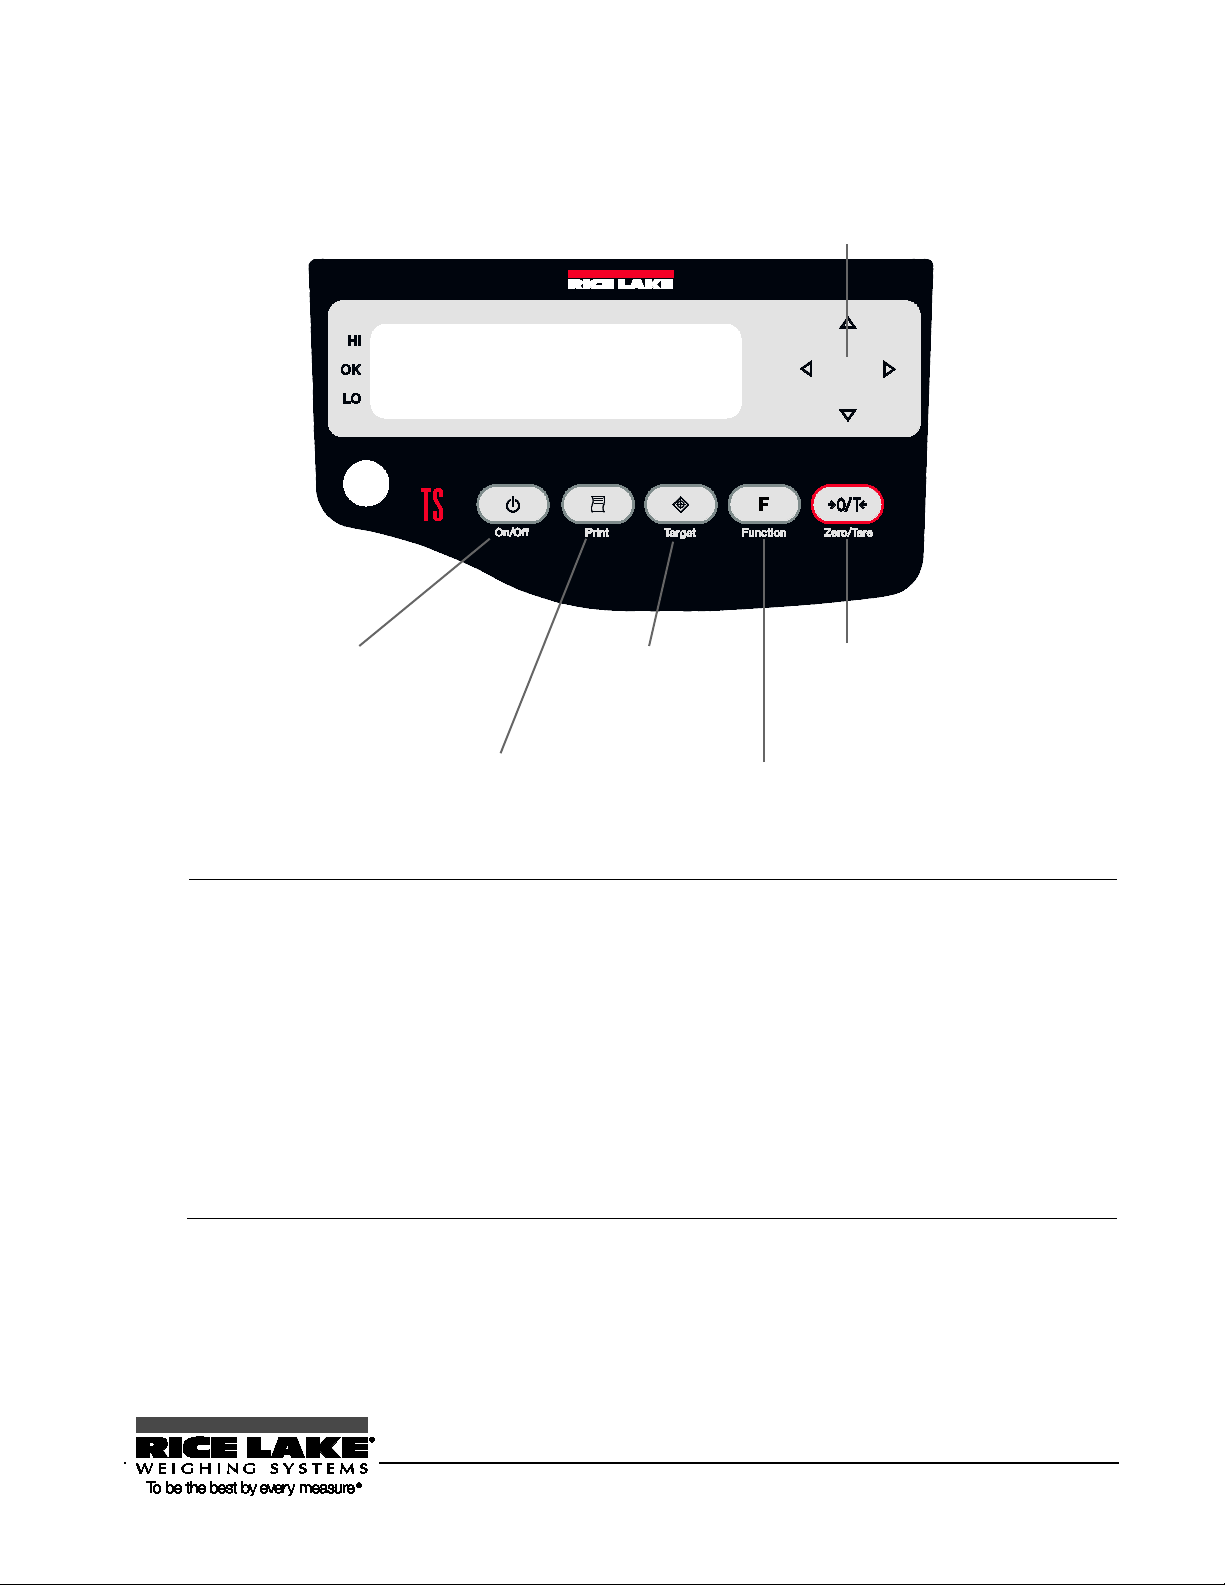
saves settings when pressed shortly (short press).
Reference
Direction key: Use to set the
function setting, etc.
[Zero/Tare] key: Use to zero a
readout or to sel
[Function] key: Use to switch
measurement modes and to call
a function.
[Target] key: Use to
start settings.
[Print] key: Use for printing
or other purposes.
[On/Off] key: Use to power
1. 3 Workings of Operation Keys
The operation keys are provided on the front of the main unit. Use these keys to operate and set the balance.
on/off the main unit.
ect a function.
In some operation keys, executed functions depend on how they are pressed.
For example, the [Target] key
When pressed and held, the key inputs settings (press and hold).
In this manual, how keys are pressed is expressed as follows:
- Press: Give a light press of the key and then release the finger.
- Press and hold: Hold the key down and release the finger after the
appropriate display is obtained.
- Continuously press and hold: Hold down the key for three seconds or
longer.
Pressing a key can sound the buzzer or change buzzer sound tones (Refer to
“Appendix 1: Function Setting List” P.
X86X).
RL-TS Series Operation Manual 11
Page 16

Indicates that settings are being saved. Blinks when adjusting the
6B1. 4 How to See Displayed Signs
Each of the signs displayed on the front of the main unit has the following meanings:
Displayed sign Description
Stable state indicator (Indicates that readout is stable.)
Lights up when the limit function is used.
Indicates that the addition function is enabled when the balance is in
addition mode.
Minus.
zero-point and when waiting for tare range setting to stabilize.
Zero-point.
Bar graph. Shows gross weight using the rate to the weighing capacity.
Displayed in 2-point bar graph.
Displayed when the balance is powered by batteries. Remaining battery
time is indicated in three levels. When this indicator blinks, the batteries
are dead.
Indicates that gross weight is being displayed.
Indicates that data is being output.
12 RL-TS Series Operation Manual
Indicates that the balance is in animal weighing mode.
Lights up when a tare range is set.
Page 17
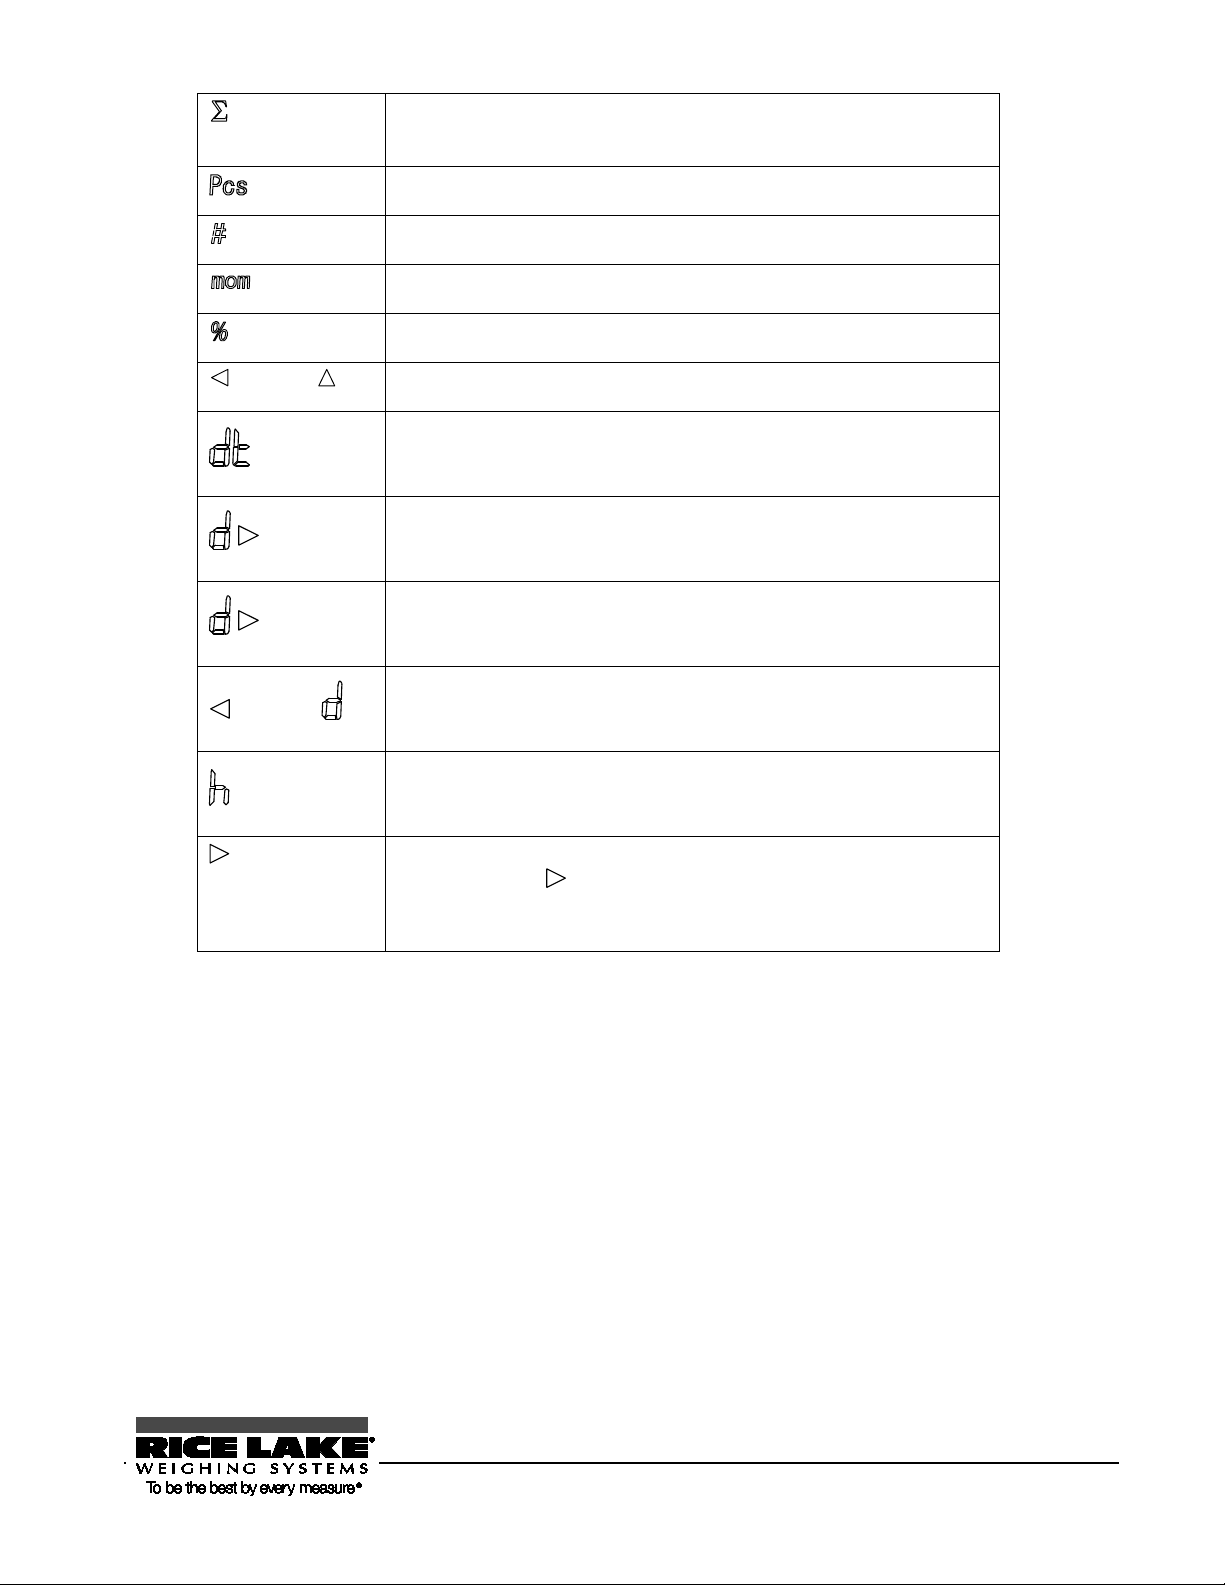
The response speed in animal weighing mode is indicated with the
(Upper)
(Upper)
(Lower)
(Upper)
Lights up when sum totals are displayed (shared use together with other
readout units) when the addition function is used.
Indicates that the balance is in parts counting mode.
Indicates that the balance is in unit covering mode.
Indicates the unit momme.
Indicates that the balance is in percentage weighing mode.
Indicates that an ID number is being displayed or entered.
Indicates that actual water temperature (unit: °C) is being entered.
Indicates that a specific gravity (unit: none) is being displayed.
3
Indicates that the density of a medium (unit: g/cm
) is being entered.
Indicates that midair weight has been saved in gravimeter mode.
Indicates that a weight value is being held in animal weighing mode.
position to which points.
Fast = fine/Normal = middle/Slow = weak
RL-TS Series Operation Manual 13
Page 18

Attach the pan base.
Place the pan base by aligning it to the projections
Attach the pan.
Place the pan on the pan base.
Connect the power cord.
Connect the jack provided on the rear of the main unit to
Align the hole of the pan
base to the projection of
7B1. 5 Assembling and Installing the Balance
Assembling the balance
Assemble the main unit with the following steps:
1
2
the main unit.
Fix the pan base by
turning the screw.
provided on the main unit and then fix it by turning the
screws using a tool such as a coin.
Attach the pan base by aligning it to the projections on
the main unit.
Do not overtighten the screws. Fix it by turning the
screws using a tool such as a coin.
3
14 RL-TS Series Operation Manual
a power receptacle using the AC adapter.
Page 19

at the shortest position and make adjustments little by
Making adjustments using the other adjuster located on the other side as a pair
Use the balance in a horizontal position.
By using the level provided on the front of the main unit and the adjuster provided on
the bottom, the inclination of the main unit can be corrected and checked.
- Start with the adjuster
little.
while observing the level helps to level the balance.
- After the air bubble in the level is within the circle, push the four corners of
the balance to check that there is no play.
RL-TS Series Operation Manual 15
Page 20

16 RL-TS Series Operation Manual
Page 21

2.0 Basic Operation
This chapter describes how to use basic measuring functions that are used daily.
This chapter includes:
Powering On/Off the Balance and Checking Operation
Weighing by Placing a Sample in a Container (Tare)
Weighing an Added Sample
Displaying the Sum of the Container and the Sample
Function Setting Basics
RL-TS Series Operation Manual 17
Page 22
Turn the power on.
Press the [On/Off] key.
Check operation.
Push the pan using your finger to check that the
Turn the power off.
Press the [On/Off] key again.
- The status of the balance obtained when the power is turned on is the
measuring mode that was used before the power was turned off. For
example, if the power is turned off in parts counting mode, the balance is
The bar graph is displayed in the display. This graph shows the current
he weighing capacity. The closer to the right
Reference
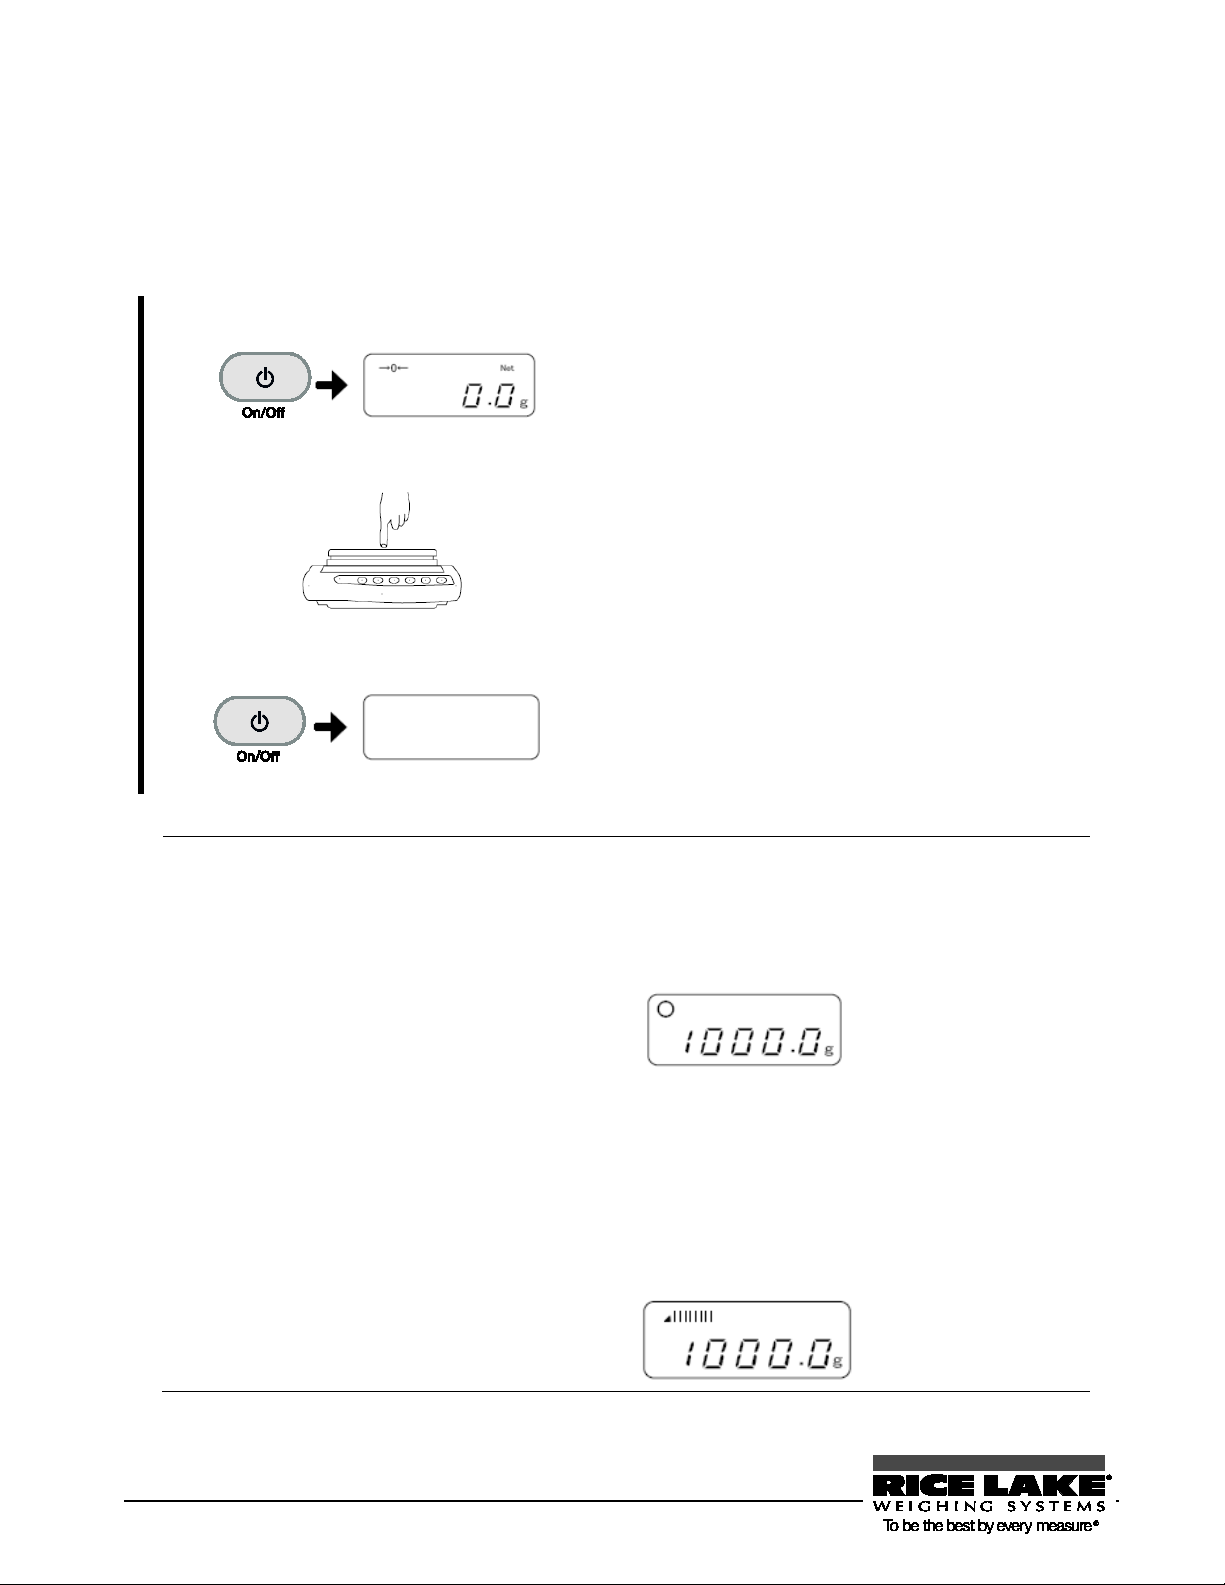
8B2.1 Powering On/Off the Balance and Checking Operation
Turning the power of the balance on and off
1
2
3
Check that the AC adapter is connected. Zero is
shown in the display after all indicators light up.
display readout changes.
Also check that zero is given in the display after
the finger is released.
The display lights out.
started up in parts counting mode when the power is turned on.
- When the balance is stable, “” is shown in the display.
If the balance is not stable, this “” lights out. The balance may be under
an external influence such as wind and vibration.
Changing settings by referring to “Section
the Balance
X” ( P. X62X) can improve stability.
weighted state as a ratio to t
side of the bar, the closer the weight is to the weighing capacity.
X5-6 Improving the Stability of
18 RL-TS Series Operation Manual
Page 23
Place the container on the pan.
The weight of the container is displayed.
Set the tare.
Press the [Zero/Tare] key.
Place the sample in the container.
The weight of only the sample is displayed.
When a tare range is set, the weighable range is reduced by the weight of the
Reference
9B2.2 Weighing by Placing a Sample in a Container (Tare)
When measuring weight with the sample in a container (tare), only the sample is weighed by subtracting the
weight of the container. This is called “tare.
1
2
3
The readout becomes zero, and “→ 0 ←” and
“Net” are displayed (tare range setting).
When “Net” is not displayed even though the
[Zero/Tare] key is pressed, zero-point
adjustment is being executed, not tare range
setting.
tare.
Weighable range = original weighing capacity – pan weight
RL-TS Series Operation Manual 19
Page 24
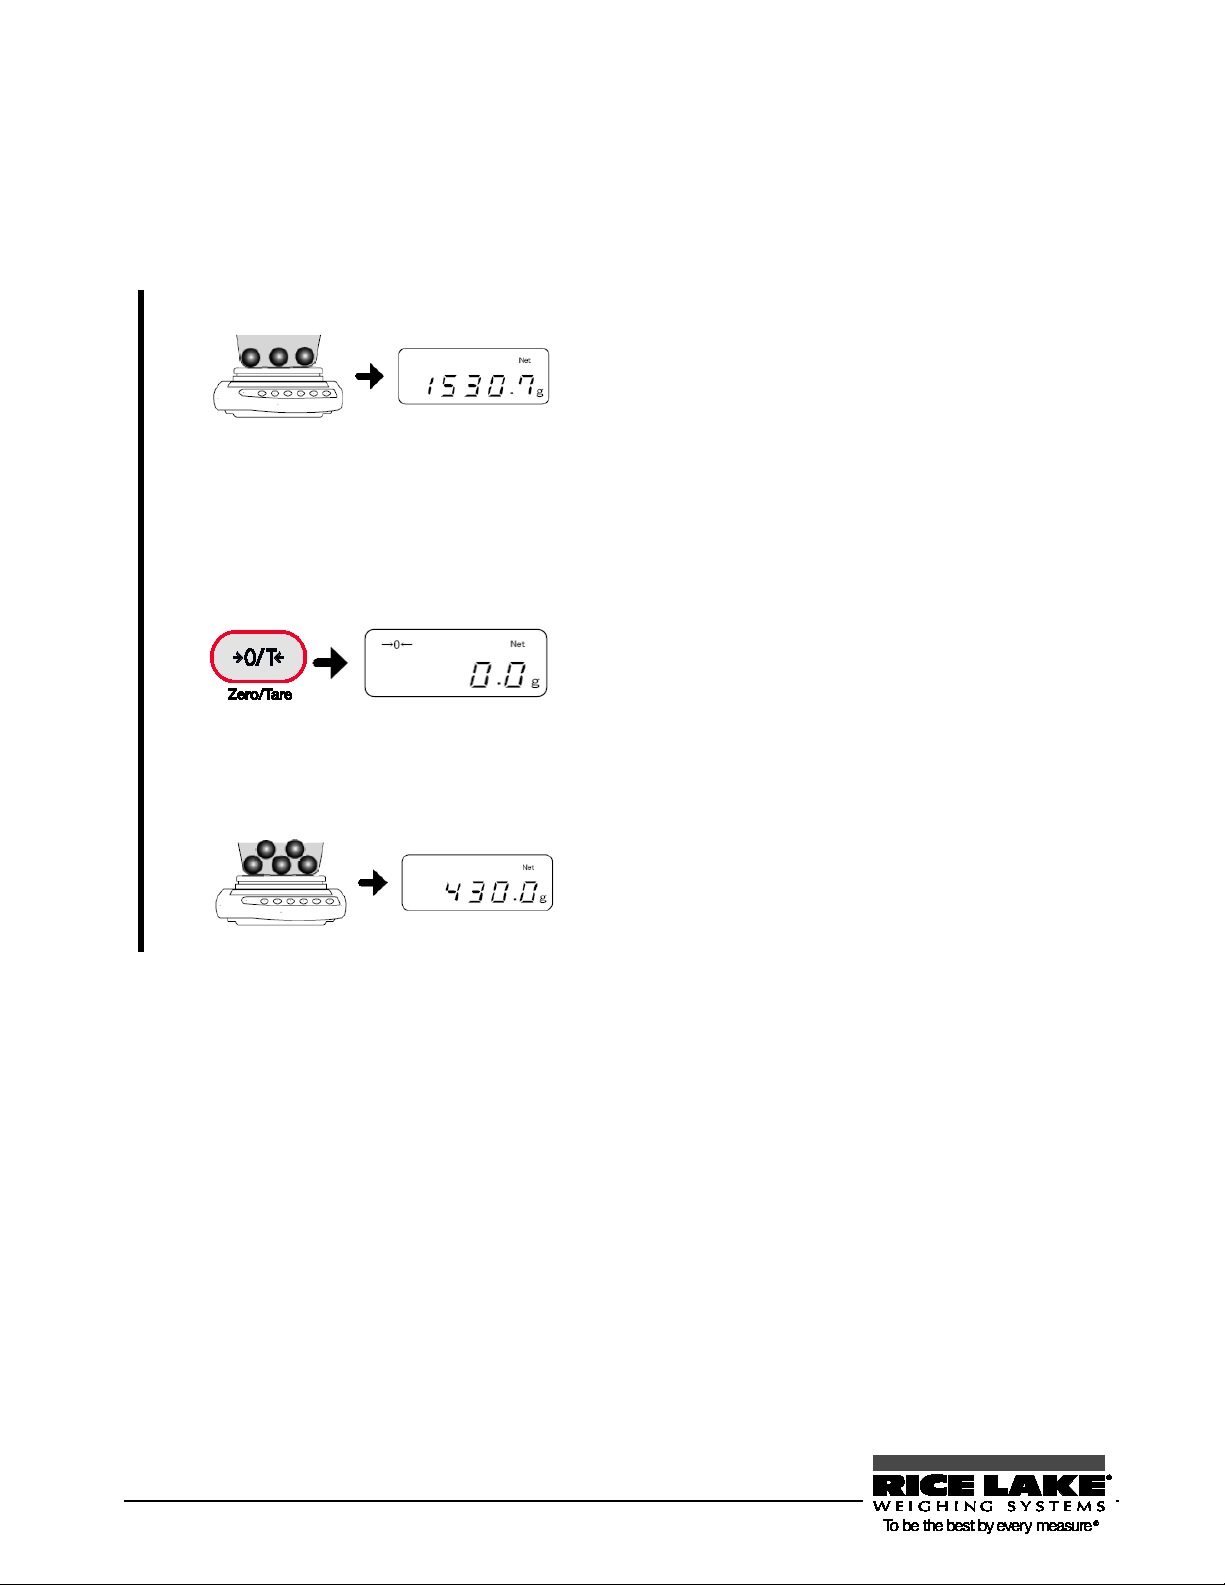
Place the sample.
The weight of the placed sample is displayed.
Set the tare.
Press the [Zero/Tare] key.
Place the additional sample.
The weight of only the added sample is displayed.
10B2.3 Weighing an Added Sample
Place an additional sample. Only the added weight is measured.
1
2
3
The readout becomes zero (tare range setting).
20 RL-TS Series Operation Manual
Page 25
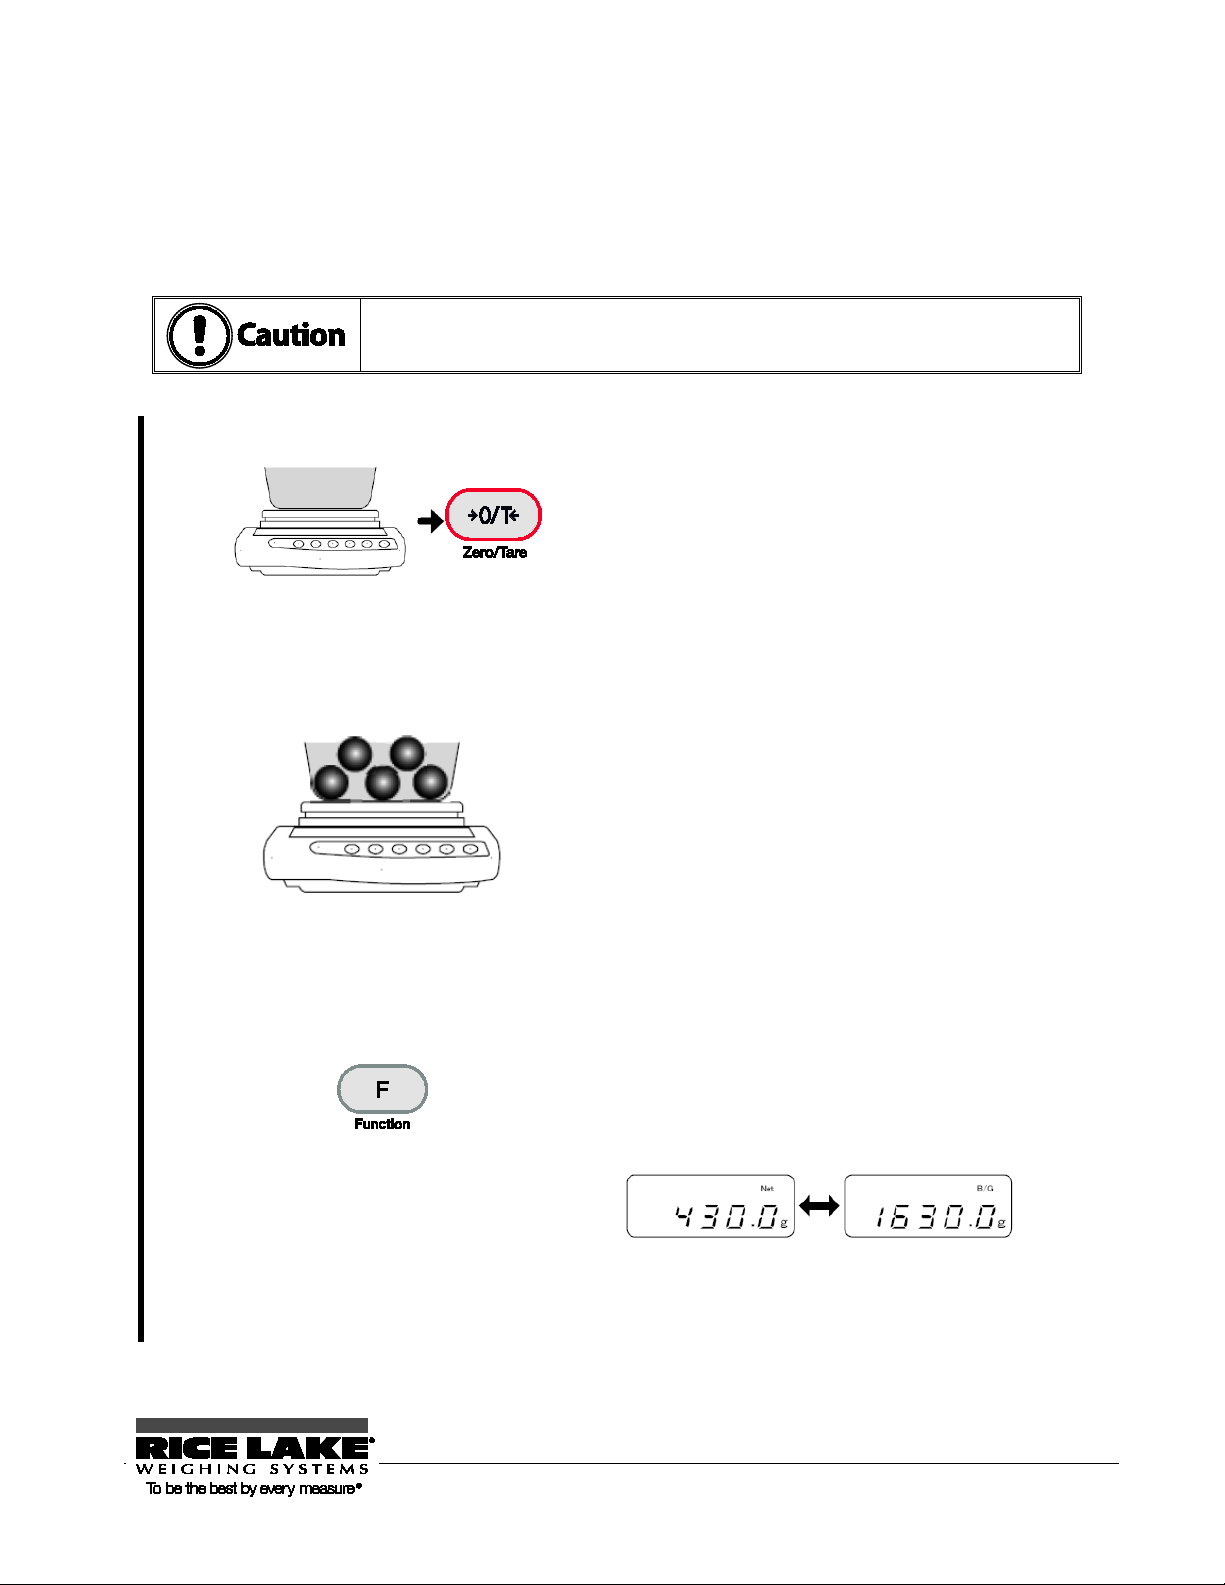
A gross weight can only be displayed when the balance functions as a weighing
Place the container and then set the tare.
Place the container and press the [Zero/Tare] key.
Place the sample.
The weight of only the sample is displayed (net readout).
Display the sum (gross readout).
Press the [Function] key.
11B2.4 Displaying the Sum of the Container and the Sample
The sum weight of the sample and the container is displayed (gross weight readout).
machine. For more information on weighing machine mode, refer to “Weighing” (P. X25X).
1
2
3
The tare range is set and the readout becomes zero.
The sum weight of the container and the sample is
displayed (gross readout). When a gross weight is
displayed, “B/G” lights up.
Pressing the [Function] key toggles the display between
gross and net.
RL-TS Series Operation Manual 21
[Function] key
Page 26
Pressing the [Print] key when a function is being set can cancel the setting
Set to the function setting mode.
Hold down the [Function] key and release the
Select a setting item.
By pressing the [Function] key, select an item to
Reference
12B2.5 Function Setting Basics
To set the settings of the balance, use the function keys.
This section describes the basic operations of function setting
1
and return to measurement mode.
finger after display has changed to “Func.”
The first function item is displayed.
After display changes,
release the finger.
Keeping the [Function] key held down will
switch the balance to another mode. If this
happens, press the [Print] key to cancel the
setting and redo the setting from the beginning.
2
Select a setting.
3
Save the setting.
4
be set.
Example: By pressing the [Function] key once,
select “2.SEL” (additional function). The first
setting “2.SEL 0” is displayed.
Pressing the [Zero/Tare] key selects a setting.
Pressing the key toggles the settings in turn.
After the last setting is displayed, the next
setting displayed is the first one.
Example: By pressing the [Zero/Tare] key twice,
select “2.SEL 2.”
Press the [Target] key to complete the setting.
The display returns to showing the sample’s
normal weight.
To cancel, press the [Print] key.
22 RL-TS Series Operation Manual
Page 27
Reference
Reference
For the items and settings settable by the function capability, refer to “Appendix 1:
Function Setting List” (P.
X86X).
To initialize the function setting, refer to “Section 7-3: Initializing” (P.
X83X).
Function setting is possible with the direction keys.
After switching to the function setting mode with step 1, use the direction (arrow)
keys to change setting items and settings.
To complete the setting, press the [Target] key.
RL-TS Series Operation Manual 23
Page 28

3.0 Various Measuring Methods
In addition to weighing, the balance has the following measuring modes: parts counting,
percentage weighing, unit converting, gravimeter, and animal weighing.
This chapter includes:
Weighing (Weighing Machine)
Counting Parts Count
Measuring Percentage
Obtaining Weight Multiplied by Coefficient
Measuring Specific Gravity
Weighing an Animal
Adding Multiple Measurements
Evaluating “More” and “Less” (Limit Function)
RL-TS Series Operation Manual 24
Page 29
Set to the function setting mode.
Press and hold the [Function] key. After “
” is
13B3.1 Weighing (Weighing Machine)
By default, the balance is set to “weighing machine” mode. To return to weighing machine mode from other
weighing modes, use the following operation:
Func
1
(Refer to “Section 2-5: Function Setting
Basics (P.
X22X).)
displayed, release the finger.
“1.SEt” is displayed.
2
3
Select “Weighing Machine.”
Press the [Zero/Tare] key several times to select
“1.SEt 1.”
Press the [Target] key.
The setting is saved and the display returns to showing the
sample’s normal weight.
RL-TS Series Operation Manual 25
Page 30
Set to the function setting mode.
Press and hold the [Function] key. After “
” is
Select the number of samples.
Each press of the [Zero/Tare] key can select the sample
Weigh the samples.
Place the set number of samples on the pan and then press
Reference
14B3.2 Counting Parts Count
The balance saves sample weight (unit weight) using the automatic memory update method (simplified SCS
method) to count the number of samples.
First, place a set number of samples. Next, place an appropriate number of additional samples, up to three
times the set number. Then, the balance will automatically update the average sample weight. Repeating
this step allows accurate counting.
Func
1
(Refer to “Section 2-5: Function Setting
Basics (P.
X22X).)
displayed, release the finger.
2
3
4
5
Select “Parts Counting.”
Save the weighing mode.
Start sampling.
<Press and hold>
Press the [Zero/Tare] key several times to select “1.SEt
2.”
Press the [Target] key.
The “parts counting” mode is set, displaying “Pcs.”
Press and hold the [Function] key. After “U.SEt” is
displayed, release the finger.
The “on 10 Pcs” display indicates using ten samples.
Pressing the [Print] key during sampling can cancel the
sampling.
count between 5, 10, 30, and 100.
If the samples vary considerably in size or are lightweight,
set a greater number of samples.
6
26 RL-TS Series Operation Manual
the [Function] key.
The displayed sample quantity (Example: “on 10 Pcs”)
blinks.”
Page 31

Put additional samples.
Put additional samples. The number of additional samples is
Finish sampling.
Press the [Function] key.
Place samples to count them.
参 考
ase the number of samples to increase counting
7
8
9
up to three times the set number of samples.
For example, if “10 Pcs” is set, add 30 or less samples.
A blip sound reports you that added samples have been
measured.
Repeating this sample addition step can improve the
resolution of parts counting.
The average sample weight is saved and the balance returns
to measurement mode.
69BDisplaying average sample weight
When weighing in parts counting mode, pressing the [Function] key can display average sample weight.
Pressing the [Function] key toggles the display between number of samples, average sample weight, and
total weight.
- The “Sub” display indicates that you added more than three times as many samples as
the set number. Decrease the number of additional samples. Starting from a small
number of samples, gradually incre
accuracy.
- The “Add” display indicates that the number of added samples is too small. Increase
the number of additional samples.
- Even when these indications are displayed, sampling is possible. In this case, however,
counting accuracy is low.
- [L - Err] is displayed to indicate that the average sample weight is smaller than the
weighable unit weight (Refer to “Appendix 4: Specifications” (P.
Pressing the [Function] key toggles the display between
number of samples, average sample weight, and total weight.
X94X)).
RL-TS Series Operation Manual 27
Page 32

Set to the function setting mode.
Press and hold the [Function] key. After “
” is displayed,
Select “Percentage Weighing.”
Start measuring the reference weight.
Press and hold the [Function] key. After “
” is displayed,
Weigh.
The display indicates the percentage of the sample with respect
15B3.3 Measuring Percentage
With respect to the reference sample weight, the weight of a sample is shown in percentage.
A reference sample weight can be set by weighing an actual sample (setting a reference weight by weighing
an actual sample) or entering a value (setting a reference weight by entering a value).
44BSetting a reference weight by weighing an actual sample
1
2
(Refer to “Section 2-5: Function Setting Basics
X22X).)
(P.
release the finger.
Press the [Zero/Tare] key several times to select “1.SEt 3.”
3
4
5
Save the weighing mode.
<Press and hold>
Save the reference weight.
Press the [Target] key.
The “percent weighing” mode is set, displaying “%.”
release the finger.
The previously-saved reference sample weight blinks.
Put the reference sample on the balance and then press the
[Function] key.
The reference weight is saved.
6
28 RL-TS Series Operation Manual
to the reference sample weight.
Pressing the [Function] key toggles the display between
percentage weight and total weight.
Page 33

45BSetting a reference weight by entering a value
Set to the function setting mode.
Press and hold the [Function] key. After “Func” is
1
2
(Refer to “Section 2-5: Function Setting Basics
X22X).)
(P.
Select “Percentage Weighing.”
displayed, release the finger.
Press the [Zero/Tare] key several times to select “1.SEt
3.”
3
4
5
6
Save the weighing mode.
Start setting the reference weight.
<Press and hold>
Enter a reference weight.
Save the value.
Press the [Target] key.
The “percent weighing” mode is set, displaying “%.”
Press and hold the [Function] key. After “P SEt” is
displayed, release the finger.
The previously-saved reference sample weight blinks.
Set the reference value with the following steps:
1. Press the [Zero/Tare] key.
The digit furthest to the right side of the value
blinks..
2. Select a number by pressing the [Zero/Tare] key.
Pressing the key toggles the number between 0 and
9, and decimal point.
3. Pres sing the [Function] key selects the number and
the next digit blinks.
Set the reference weight by repeating steps 2 and 3.
Pressing the [Print] key can cancel the setting.
Press the [Target] key to save the reference weight.
RL-TS Series Operation Manual 29
Page 34

Weigh.
The display indicates the percentage of the sample with
Min. Indication
Range of Reference Weight
0.01%
is impossible. For more information on the weight limit in percentage weighing, refer to “Appendix 4:
Reference
7
respect to the reference sample weight.
Pressing the [Function] key toggles the display between
percentage weight and total weight.
The minimum unit is automatically set based on the saved reference weight.
1%
0.1%
- The “L-Err” display indicates that the reference weight is below the lower weight limit where weighing
Specifications” (P. X94X).
Lower weight limit ≤ Reference weight < Lower weight limit × 10
Lower weight limit × 10 ≤ Reference weight < Lower weight limit ×
100
Lower weight limit × 100 ≤ Reference weight
30 RL-TS Series Operation Manual
Page 35

Set to the function setting mode.
Press and hold the [Function] key. After “
” is
Select “Unit Converting.”
Press the [Zero/Tare] key several times to select “1. SEt
Save the weighing mode.
Press the [Target] key.
Enter a coefficient.
Set a coefficient with the following steps:
16B3.4 Obtaining Weight Multiplied by Coefficient
Measured weight is multiplied by a set coefficient, and the result can be displayed.
For example, if “2.35” is set for the coefficient, and the weight of the sample is “2,000 g,” the given readout
is “4,700.”
(Example) Sample (2,000 g) × Coefficient (2.35) → Readout (4700)
Func
1
(Refer to “Section 2-5: Function Setting Basics
X22X).)
(P.
displayed, release the finger.
2
3
Set to the coefficient setting mode.
4
<Press and hold>
5
4.”
The “unit converting” mode is set, displaying “#.”
Press and hold the [Function] key. After “C. SEt” is
displayed, release the finger.
The previously-saved coefficient is displayed.
1. Press the [Zero/Tare] key.
The digit furthest to the right side of the value
blinks.
2. Select a number by pressing the [Zero/Tare] key.
Pressing the key toggles the number between 0 and
9, and decimal point.
3. Pressing the [Function] key selects the number and
the next digit blinks.
Set the coefficient by repeating steps 2 and 3.
Pressing the [Print] key can cancel the setting.
RL-TS Series Operation Manual 31
Page 36

Save the coefficient.
Press the [Target] key.
Weigh.
The weight of the sample is multiplied by the coefficient,
Reference
6
7
17B
The increment of the minimum readability is automatically set to 1, 2, or 5
depending on the entered coefficient.
and the result is displayed.
32 RL-TS Series Operation Manual
Page 37

3.5 Measuring Specific Gravity
Using smaller size samples may result in inaccurate measurements. Use as large a
Reference
The specific gravity of a sample is measured using the underfloor weigher function.
The “TS underfloor weigher fixture option” is required (Refer to “XAppendix 4
Specifications
X” (P. X94X).
46BMeasurement procedures for specific gravity
Measure specific gravity with the following steps:
1. Preparing measurement equipment
2. Setting water temperature or the specific gravity of the liquid medium
3. Measuring the weight of the sample in the air
4. Correcting errors due to the cage
5. Measuring the weight of the sample in water
6. Displaying a specific gravity value
47BPreparing measurement equipment
Prepare the following equipment and sample:
sample as possible.
To measure specific gravity correctly, set the water temperature. Measure the in-container
water temperature beforehand.
RL-TS Series Operation Manual 33
Page 38

Set to the function setting mode.
Select “Gravimeter.”
Press the [Zero/Tare] key several times to select “1.SEt 5.”
Save the weighing mode.
Press the [Target] key.
Set to the water temperature setting mode.
Press and hold the [Zero/Tare] key.
Set the in-container water temperature.
Set the water temperature with the following steps:
Reference
48BMeasurement
1
2
3
4
(Refer to “Section 2-5: Function Setting Basics
X22X).)
(P.
Press and hold the [Function] key. After “Func” is displayed,
release the finger.
The “gravimeter” mode is set, displaying “d.”
<Press and hold>
5
Set the water temperature starting from a higher-order digit.
1. Press the [Zero/Tare] key.
Zero blinks in the rightmost digit.
2. Select a number by pressing the [Zero/Tare] key.
Pressing the key toggles the number between 0 and 9,
and decimal point.
3. Pressing the [Function] key shifts the blinking digit to
the left, and the next lower-order digit blinks.
Set the water temperature by repeating steps 2 and 3.
- If using a liquid medium other than water, select the
medium by referring to P.
- For a liquid medium other than water, set the density.
- The value set is held even after the power is turned off.
- The acceptable range of water temperature is 0 to
99.9°C.
- Pressing the [Print] key can cancel the setting.
X36X.
34 RL-TS Series Operation Manual
Page 39

Save the water temperature.
Press the [Target] key.
Hang only the cage to zero the weight
Hang only the cage on the underfloor weigher fixture.
Measure the weight of the sample.
Place the sample on the cage.
Set the liquid container.
Set the container with water under the balance and submerge
Place the sample on the cage.
Put the sample on the cage and submerge the entire volume.
] key to return to showing the sample’s normal
Reference
6
7
8
readout.
Press the [Zero/Tare] key.
The readout becomes zero.
After the weight display is stable, press the [Target] key to save
the weight of the sample in the air.
When the weight is saved, “◄” is displayed in the lower left of
the display.
Measuring a sample by placing it on the pan is also allowed.
9
10
only the cage (do not place the sample).
Press the [Zero/Tare] key to zero the readout.
This is to remove any residual error due to the cage.
After the weight display is stable, press the [Target] key.
The measured specific gravity value is displayed.
Do not allow the cage to touch the liquid container.
Press the [Target
weight.
RL-TS Series Operation Manual 35
Page 40

Set to the function setting mode.
Press and hold the [Function] key. After
Set to the medium select mode.
Press the [Function] key.
Select “Not water.”
Select “1” (Not water) by pressing the
49BUsing a liquid medium other than water
1
(Refer to “Section 2-5: Function Setting
Basics (P.
X22X).)
“Func” is displayed, release the finger.
2
3
4
Select “Gravimeter.”
Press the [Zero/Tare] key several times to select
“1.SEt 5.”
“1 1.Nd” is displayed.
[Zero/Tare] key and then press the [Target] key.
Now, the specific gravity in a medium other
than water can be measured.
Measure specific gravity using the steps
described in “Measurement” (P. X34X). In step
5, set the density of the used liquid medium
instead of water temperature. - The acceptable
range of liquid density is 0.0001 to 9.999 g/cm
3
.
50BGravimeter measurement data output
Measured specific gravity data is output to a printer as follows depending on settings:
- Before measurement
Irrespective of the setting made in the function setting “61. o.c.” (output control), pressing the [Print] key
outputs data (irrespective of whether data is stable or unstable).
- While specific gravity is displayed
Output contents and methods can be changed by the function setting “12. d.o.” (output data select) and “13.
A.o.” (auto output).
- Output format
If [1] (specific gravity, weight, and actual water temperature or density of media) is set in the function setting
“12. d.o.” (output data select), all data is output (See the figures below).
If [0] (specific gravity only) is set in the function setting “12. d.o” (output data select), only the first and second
line values shown in the figures below are output.
If any statistical calculation is made for the printer, the values in the second line shown in the figures below will
be printed being prefixed by a serial number.
Set language for printing by the function setting “E3.P.F.” (language for printing) (1 = English/2 = Japanese).
Gravimeter measurement data output samples
36 RL-TS Series Operation Manual
Page 41

RL-TS Series Operation Manual 37
Page 42

”
By changing minimum readability, a stability detection range can be also changed
Set to the function setting mode.
Press the [Zero/Tare] key several times to select
Press the [Target] key.
Place the sample animal.
When weight variations fit within the set range, the value is
Fast (quiet)
Slow (wild)
Reference
18B3.6 Weighing an Animal
The balance can accurately weigh animals and other samples that move during measurement.
Even if animals and other such moving samples move during measurement, if weight variations fit within a
set value range, the measured value is held (fixed) and displayed.
1
(Refer to “Section 2-5: Function Setting Basics
X22X).)
(P.
Select “Animal Weighing.”
2
Save the weighing mode.
3
A weight variation range for value holding can be set with “16.Ud.
with a combined use of “16.Ud” (Refer to “Section 5-2: Minimum Readability
Setting” (P.
X56X)).
Press and hold the [Function] key. After “Func” is
displayed, release the finger.
“1.SEt 6.”
The “animal weighing” mode is set, displaying “ .”
Set the response speed according to the
4
animal move.
5
38 RL-TS Series Operation Manual
Set the response speed using the [Target] key.
The response speed is indicated with the position to which
the pointer located in the right side of the display points.
Middle (in-between)
held. Holding the readout is reported with “ ” shown in
the display.
When automatic tare range setting is ON, a tare range is
automatically set after the animal is removed and weight
variations fit within a set range. When automatic tare range
setting is OFF, a held value is displayed until the [Zero/Tare]
key is pressed.
Page 43

- If the animal moves too much, the value may not be held.
- The measurement unit used in animal weighing is “g” only.
- In animal weighing, because stability detection ranges are wide, errors may
occur compared to actual weight.
19B
RL-TS Series Operation Manual 39
Page 44

Set to the function setting mode.
Select cumulate or net addition.
Press the [Function] key. After “
” is displayed,
Finish setting.
Press the [Target] key.
Reference
Reference
3.7 Adding Multiple Measurements
Multiple samples are weighed consecutively and the sum is displayed.
The weighing method can be selected from reloading samples (cumulate function) or without replacing
samples (net addition function).
51BAddition function setting
1
(Refer to “Section 2-5: Function Setting
Basics (P. 22).)
Select Addition Function.
The addition function can be used in the following weighing modes: weighing machine,
parts counting, percentage weighing, and unit converting.
2
Press and hold the [Function] key. After “Func” is
displayed, release the finger.
Press the [Function] key several times to select
“2.SEL.”
Press the [Zero/Tare] key to select “2.SEL 1.”
When using both the cumulate and limit functions
together, select “2.SEt 3.”
For more information on the limit function, refer to
“Section 3-8: Judging “Above” and “Below”” (P.
X42X).
3
4
40 RL-TS Series Operation Manual
2.C.A d.
press the [Zero/Tare] key to set the value.
1: Cumulate function
2: Net addition function
The addition function is set.
Page 45

Place the first sample.
After an asterisk (*) is displayed, press the [Target] key.
Place another sample (cumulative).
After an asterisk (*) is displayed, press the [Target] key.
Display the cumulative weight.
Press the [Function] key twice.
Reference
Reference
52BWeighing with addition function
1
The measured value is saved and a sigma [Σ] sign is displayed
for several seconds.
2
3
Place additional samples (net addition).
<Press twice>
The measured value is saved, and a [Σ] sign and the
cumulative weight are displayed for several seconds.
Repeat this operation to weigh all the samples to be summed.
After unloading the previous sample, check that the display
indicates “0,” and place the next sample.
Cumulating weight is also possible as follows: Press the
[Zero/Tare] key without unloading the balance and then place
next samples.
A [Σ] sign and the cumulative weight are displayed.
RL-TS Series Operation Manual 41
- Pressing the [Zero/Tare] key when a cumulative weight is displayed clears the
cumulative weight.
- You can add samples when an asterisk (*) is displayed.
- When “t - Err” is displayed by pressing the [Target] key, it indicates that you put
additional samples on twice or that you unloaded some samples.
- The function setting “H. tA” can be used for turning ON/OFF the function to wait for
stabilization upon additions (Refer to “Appendix 1: Function Setting List” (P.
X86X)).
Page 46

, the point to be set is for only the lower limit that judges
Above the
upper limit
Appropr iate
range
Below the
lower limit
When one point (lower
limit) is set
Lower limit ≤ Wei ght
Weight < Lower limit
and
upper limits) are set
Upper limit < Weight
Lower limit ≤ Wei ght
Weight < Lower limit
N/A
Below the lower limit
Appropriate range (graph readout depends on the
Above the upper limit
Reference
Reference
20B3.8 Judging “Above” and “Below” (Limit Function)
By setting values in the balance, you can judge whether measured values fit within set ranges.
The limit function can be used in the following weighing modes: weighing machine, parts
counting, percentage weighing, and unit converting.
70B How to judge
Set lower and upper limits. The judgment result is indicated by “◄” telling you that the measured value
is below (below lower limit), appropriate, or above (above upper limit).
When two points (lower
For the case of one point setting
“appropriate” and “below.”
Judgment results can be also displayed in graph form.
Set the function setting “・A.LG.” to “•” (2-point bar graph )(Refer to “Appendix 1: Function Setting List”
X86X)).
( P.
Bar graph display is possible only for “two point setting.”
42 RL-TS Series Operation Manual
Page 47

Range to Cover
0: Detect when the limit is exceeded by more than five divisions.
Judge by
1: Judge by absolute values.
Buzzer for OK
0: The buzzer is not beeped for rank OK.
71B Judgment criteria and limit value setting
A limit value can be judged with any of the following criteria:
- Absolute value: Values (limit values) including upper and lower values are set. Based on these values,
measurements are judged.
- Deviation value: A reference value is set. Measurements are judged by specifying an upper limit or a lower
limit range with respect to this reference weight.
A limit value can be entered in the following two ways:
- Putting actual samples on the balance: By weighing a sample on the balance, save the weight.
- Entering values: Set a value using the keys.
72B Detailed function setting
In the function setting function, the limit function can be set in detail.
When the function setting “2.SEL” is “2” or “3,” pressing the [Function] key can set the following: Set
these items as required.
Condition
Point Scale
Buzzer for LO
Buzzer for HI
21.Co.
1: Always judge.
2: Judge only when the balance is stable.
22.Li.
1: Detect both when the limit is exceeded and when it is not reached.
23.Pi.
1: 1-point scale (OK and LO are judged.)
2: Upper and lower limits are set (HI, OK and LO are judged).
24.tP.
2: Judge by deviation values.
25.b.1
0: The buzzer is not beeped for rank LO.
1: The buzzer is beeped for rank LO.
26.b.2
1: The buzzer is beeped for rank OK.
27.b.3
0: The buzzer is not beeped for rank HI.
1: The buzzer is beeped for rank HI.
- Separate limit values can be saved for each weighing mode. However, limit
values of both absolute and deviation values cannot be saved in the same
weighing mode.
- Limit values can be set only in measurement mode display (Cannot be set in
other mode display such as when a cumulative value is displayed).
- Before setting limit values, as required, adjust the zero-point or set a tare range.
- If the limit value entries are not lined up in the order of magnitude, three “◄”
will be lit. Enter the values again.
RL-TS Series Operation Manual 43
Page 48

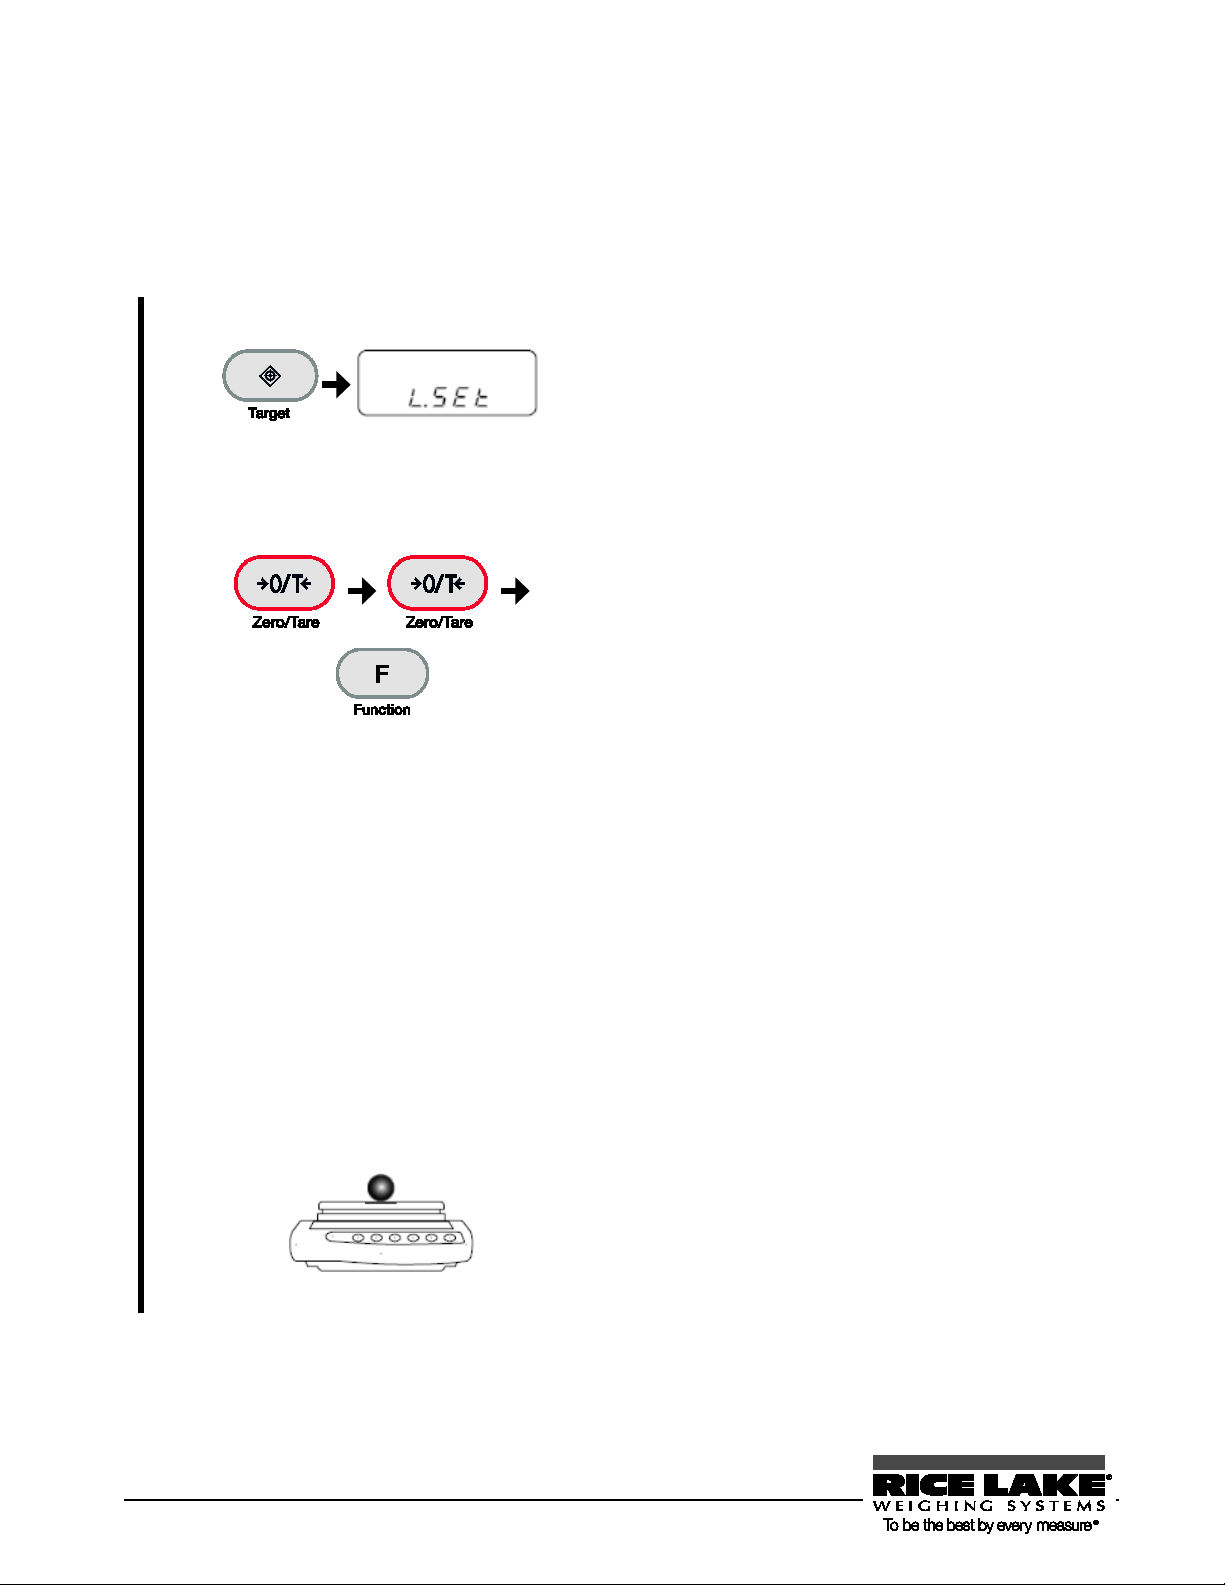
Set to the function setting mode.
Press and hold the [Function] key. After
Set the judgment condition.
Press the [Function] key several times to select
53BLimit function setting
First, set the limit function. Then, set limit values.
1
(Refer to “Section 2-5: Function Setting Basics
X22X).)
(P.
“Func” is displayed, release the finger.
2
3
4
Select Limit Function.
Set the judgment range to cover.
Press the [Function] key several times to select
“2.SEL.”
Press the [Zero/Tare] key to select “2.SEL
2.”
When using both the cumulate and limit
functions together, select “2.SEt 3..”
“21.Co.”
Press the [Zero/Tare] key to select the judgment
condition.
1: Always judge (even when the balance is
unstable).
2: Judge only when the balance is stable.
Press the [Function] key several times to select
“22.Li.”
Press the [Zero/Tare] key to select the judgment
range to cover.
0: Detect when the limit is exceeded by more
than five divisions.
1: Detect both when the limit is exceeded
and when it is not reached.
Set the point scale to be set.
5
Set the judgment method.
6
44 RL-TS Series Operation Manual
Press the [Function] key several times to select
“23.Pi .”
Press the [Zero/Tare] key to select the point
scale to be set.
1: 1-point scale (OK and LO are judged.)
2: Upper and lower limits are set (HI, OK
and LO are judged).
Press the [Function] key several times to select
“24.tP.”
Press the [Zero/Tare] key to select the judgment
method.
1: Judge by absolute values.
2: Judge by deviation values.
Page 49

7
Save the setting.
Press the [Target] key.
Set to the mode of using actual samples.
Press and hold the [Target] key. After “
”
Weigh the lower limit sample.
Place the sample serving as the lower limit and
Weigh the upper limit sample.
Place the sample serving as the upper limit
Weigh.
Place a judgment target sample on the pan.
Then, set the values for judgment (limit values) to perform measurement.
54BJudging by absolute values
The function setting for absolute value judgment is “24.tP. 1.”
73B Judging by absolute values using the method of placing actual samples on the balance
Set upper and lower limits by weighing samples.
Check that the limit function is set for judging by absolute values (Refer to the previous section “Limit
function setting”).
1
2
3
<Press and hold>
L.SEt
is displayed, release the finger.
then press the [Function] key.
For the case of one point setting, this operation
completes the setting saving. Go to step 4.
For the case of two point setting, “H.SEt” is
displayed.
weight on the pan and then press the [Function]
key.
The judgment value is saved and then the
balance goes back to normal display.
4
RL-TS Series Operation Manual 45
The OK, LO, or HI result judged from the upper
and lower limit values is displayed with the “◄”
indication.
Page 50
Set to the mode of entering values.
Press and hold the [Target] key. After “
”
Enter the lower limit value.
Enter the lower limit value with the following
74B Judging by absolute values using the method of entering values
Set upper and lower limits by entering values using the keys.
Check that the limit function is set for judging by absolute values (Refer to the previous section “Limit function
setting”).
L.SEt
1
<Press and hold>
is displayed, release the finger.
2
Enter the upper limit value.
3
Weigh.
4
steps:
1. Press the [Zero/Tare] key.
Zero blinks in the right end.
2. Select a number by pressing the
[Zero/Tare] key.
Pressing the key toggles the number
between 0 and 9, and decimal point.
3. Pressing the [Function] key shifts the
blinking digit to the left, and the next
lower-order digit blinks.
4. Press the [Target] key to save the value.
For the case of one point setting, this operation
completes the setting saving. Go to step 4.
For the case of two point setting, “H.SEt” is
displayed.
Enter the upper limit value by using the same
operation as with step 2.
The judgment value is saved and then the
balance goes back to normal display.
Place a judgment target sample on the pan.
The OK, LO, or HI result judged from the upper
and lower limit values is displayed with the “◄”
indication.
46 RL-TS Series Operation Manual
Page 51

Set to the mode of using actual samples.
Weigh the lower limit sample.
Place the sample serving as the lower limit and
Weigh the upper limit sample.
Place the sample serving as the upper limit
Weigh.
The OK, LO, or HI result judged from the upper and
55BJudging by deviation values
The function setting for deviation value judgment is “24.Tp.2.”
75B Judging by deviation values using the method of placing actual samples on the balance
Set a reference, upper limit, and lower limit values by weighing samples.
Check that the limit function is set for judging by deviation values (refer to the previous section “Limit
function setting”).
Press and hold the [Target] key. After “r.SEt”
1
<Press and hold>
is displayed, release the finger.
2
3
4
5
Weigh the reference weight sample.
Place the sample serving as the reference value
and then press the [Function] key.
then press the [Function] key.
For the case of one point setting, this operation
completes the setting saving. Go to step 5.
For the case of two point setting, “H.SEt” is
displayed.
weight on the pan and then press the [Function]
key.
The judgment value is saved and then the
balance goes back to normal display.
Place a judgment target sample on the pan.
RL-TS Series Operation Manual 47
lower limit values is displayed with the “◄” indication.
Page 52

Set to the mode of entering values.
Press and hold the [Target] key. After “
”
Enter the reference value.
Enter the reference value with the following
Enter the lower limit value.
Enter the lower limit value by using the same
Enter the upper limit value.
Enter the upper limit value by using the same
76B Judging by deviation values using the method of entering values
Set a reference, upper limit, and lower limit values by entering values using the keys.
Check that the limit function is set for judging by deviation values (Refer to the previous section “Limit
function setting”).
For making judgments by deviation values using the method of entering values, the lower and upper limit
values to be entered are their differences with respect to the reference weight.
For example, when a judgment is made with an upper limit of 1,050 g and a lower limit of 900 g, enter a
reference weight of 1000 g, an upper limit of 50 g, and a lower limit of -100 g.
r.SEt
1
<Press and hold>
is displayed, release the finger.
2
3
4
steps:
1. Press the [Zero/Tare] key.
Zero blinks in the right end.
2. Select a number by pressing the [Zero/Tare]
key.
Pressing the key toggles the number between 0
and 9, and decimal point.
3. Pressing the [Function] key shifts the blinking
digit to the left, and the next lower-order digit
blinks.
4. Press the [Target] key to save the value.
operation as with step 2.
For the case of one point setting, this operation
completes the setting saving. Go to step 5.
For the case of two point setting, “H.SEt” is
displayed.
operation as with step 2.
The judgment value is saved and then the
balance goes back to normal display.
48 RL-TS Series Operation Manual
Page 53

The OK, LO, or HI result judged from the upper and
5
Weigh.
Place a judgment target sample on the pan.
lower limit values is displayed with the “◄” indication.
RL-TS Series Operation Manual 49
Page 54

4.0 Adjusting the Scale
Calibrate the balance using weights.
This chapter includes:
How to Calibrate
Testing the Balance
RL-TS Series Operation Manual 50
Page 55

21B4.1 How to Calibrate
Set to the function setting mode.
Press and hold the [Function] key. After “Func” is displayed,
Set to the span adjustment mode.
Start span adjustment.
Start zero-point adjustment.
Reference
To calibrate a balance is called span adjustment. Be sure to perform span adjustment for highly accurate
measurements.
An electronic balance is influenced by the acceleration of gravity. For this reason, you should calibrate your
balance every time you relocate it. You should also calibrate it after a long time of use or when it does not
indicate correct values.
1
2
(Refer to “Section 2-5: Function Setting
Basics (P. 22
To adjust the span, wait at least 15 minutes after the balance is powered on.
Use a weight for calibration that is equivalent to the weighing capacity.
Pl
ease contact us if you wish inquire about or place an order for calibration weights.
).)
release the finger.
Press the [Function] key several times to select “7. CA.”
Press the [Zero/Tare] key several times to select “7.CA.3.”
Save the setting.
3
4
<Press and hold>
5
RL-TS Series Operation Manual 51
Press the [Target] key.
The balance goes back to normal display.
Keep holding down the [Function] key until “CAL” is
displayed.
Releasing the finger changes the display to the blinking of “on
0,” starting zero-point adjustment.
Page 56

Place the weight on the pan.
After zero-point adjustment finishes and the display changes to
Reference
6
7
8
Span adjustment starts.
Span adjustment finishes.
- Pressing any other key than the [Function] key cancels adjustment.
- The “1 - Err” display indicates that you used a weight weighing less than 50% of the
weighing capacity.
- The “2 - Err” display indicates that an error over 1.0% was detected, or the balance failed.
For more information, refer to “Section 7-2: Troubleshooting” (P.
“on F.S.,” place the weight on the pan.
Adjustment starts.
After display changes to the blinking of “on F.S.” span
adjustment starts.
After span adjustment finishes, “End” is displayed.
The balance goes back to normal display.
X80X).
52 RL-TS Series Operation Manual
Page 57

22B4.2 Testing the Balance
ity or heavier. To calibrate more
Reference
The amount of offset with respect to the reference weight can be checked. This is called “span test.”
Performing a span test will not calibrate the balance.
Use a weight for calibration that weighs 50% of the weighing capac
accurately, use a weight that is equivalent to the weighing capacity.
Please contact us if you wish inquire about or place an order for calibration weights.
1
2
3
4
Set to the function setting mode.
(Refer to “Section 2-5: Function Setting
Basics (P.
Set to the span test mode.
Save the setting.
Start span test.
X22X).)
Press and hold the [Function] key. After “Func” is
displayed, release the finger.
Press the [Function] key several times to select “7.CA.”
Press the [Zero/Tare] key several times to select “7.CA 4.”
Press the [Target] key.
The balance goes back to normal display.
Keep holding down the [Function] key until “tESt” is
displayed.
After zero-point testing (“on 0” blinks), the display changes
to “on F.S.”
<Press and hold>
Place the weight on the pan.
5
The error is displayed.
6
RL-TS Series Operation Manual 53
After “on F.S.” is displayed, place the weight on the pan.
The test starts.
The display first indicates “dIFF” and then the weight error
of the balance.
A weight error is as follows:
Weight error = True value – Current weight
When a weight error is more than “0”, the displayed weight is
less than the actual weight.
Press any key to return to normal display.
Page 58

5.0 Function Setting
Set the functions of the balance.
This chapter includes:
Using Two Expression Units by Switching Them
Minimum Readability Setting
Saving Container (Tare) Weight
Power Setting
ID No. Setting
Improving the Stability of the Balance
54 RL-TS Series Operation Manual
Page 59

Set to the function setting mode.
Press and hold the [Function] key. After
Set unit A.
Press the [Function] key several times to select
Reference
Reference
23B5-1 Using Two Expression Units by Switching Them
You can set two units (unit A and unit B) and switch between the units.
1
2
3
4
(Refer to “Section 2-5: Function Setting
Basics (P.
Set unit B.
Save the setting.
Unit B can be used only in weighing machine mode. Unit A can be used in all measurement
modes.
For more information on selectable units, refer to “Appendix 1: Function Setting List” (P.
X22X).)
“Func” is displayed, release the finger.
“bl.uR.”
Select unit from the following numbers by
pressing the [Zero/Tare] key.
1: g/2: kg/4: ct (carat), etc.
When setting only the unit A, press the [Target]
key in this step to save the setting.
Press the [Function] key several times to select
“b3.ub.”
Select unit from the following numbers by
pressing the [Zero/Tare] key.
1: g/2: kg/4: ct (carat), etc.
Unit B can be used only in weighing machine
mode.
Press the [Target] key.
The balance goes back to normal display.
X86X).
How to switch between unit A and unit B
5
RL-TS Series Operation Manual 55
Pressing the [Function] key during measurement
switches between unit A and unit B.
Page 60

Set to the function setting mode.
Press and hold the [Function] key. After “
” is
Save the setting.
Press the [Target] key.
You can also set the same unit for unit A and unit B, and set different minimum readability, so that unit
Setting
Reference
5.2 Minimum Readability Setting
Use this function to set the minimum readability. The larger the minimum readability becomes, the less the
balance is affected by external influences. In addition, it takes less time for the balance reading to become
stable.
Each unit has different minimum readability.
Func
1
(Refer to “Section 2-5: Function Setting
Basics (P.
X22X).)
displayed, release the finger.
Select the minimum readability.
2
3
Minimum readability example
To set the minimum readability of unit B, select “b4.d.b” in step 2.
A and unit B can be used to switch the minimum readability.
Press the [Function] key several times to select
“b2.d.A.”
Select from 1 through 5 by pressing the [Zero/Tare] key.
The balance goes back to normal display.
value
g kg ct mom g kg ct mom g kg ct mom
1 0.01 0.00001 0.05 0.005 0.1 0.0001 0.5 0.05 1 0.001 5 0.5
2 0.02 0.00002 0.1 0.01 0.2 0.0002 1 0.1 2 0.002 10 1
3 0.05 0.00005 0.2 0.02 0.5 0.0005 2 0.2 5 0.005 10 2
4 0.1 0.0001 0.5 0.05 1 0.001 5 0.5 10 0.01 10 5
5 0.2 0.0002 1 0.1 2 0.002 10 1 10 0.02 10 10
56 RL-TS Series Operation Manual
TS-220~820 TS-2200~8200 TS-15K
Page 61

25B5.3 Saving Container (Tare) Weight
Set the tare saving.
Press the [Function] key several times to select
Save the setting.
Press the [Target] key.
Save the tare weight.
Place the container (tare) to be saved for weight
Use this function to set a tare range when the balance is powered on using the latest saved tare weight. Use
this function when you turn the balance on or off with a sample and tare put on the pan.
1
2
3
Set to the function setting mode.
(Refer to “Section 2-5: Function Setting
Basics (P.
X22X).)
Leaving the balance loaded with a substance and tare for a long period may result in a larger
error in weighing. You should set the tare range regularly.
Press and hold the [Function] key. After
“Func” is displayed, release the finger.
“J.tA.N.”
Select “1” by pressing the [Zero/Tare] key.
The balance goes back to normal display.
4
RL-TS Series Operation Manual 57
and then measure the tare.
The saved tare weight is updated every time a
tare range is set.
Page 62

: Function
Press the [Function] key several times to select
The auto power off function does not work under the following conditions:
Reference
26B5.4 Power Setting
56BAuto Power Off
This function, which is only available when the balance is operated by batteries, turns off the balance
automatically if left untouched for about five minutes.
1
2
3
Set to the function setting mode.
(Refer to “Section 2-5
Setting Basics (P. X22X).)
Set the auto power off.
Save the setting.
- Function settings, time or date, or the interval function are set.
- An object is placed on the pan, and display is not stable.
- The balance is operated on the AC adapter.
To use the balance again after it is powered off, start from turning the power on.
Press and hold the [Function] key. After “Func” is
displayed, release the finger.
“9.A.P.”
Select “1” by pressing the [Zero/Tare] key.
Press the [Target] key.
The balance goes back to normal display.
58 RL-TS Series Operation Manual
Page 63

Set to the function setting mode.
The auto backlight off function does not work under the following conditions:
Reference
57BAuto Backlight Off
This function automatically turns off the backlight if the balance is left untouched in measurement mode for about
three minutes.
Press and hold the [Function] key. After “Func” is
1
(Refer to “Section 2-5: Function Setting
Basics (P.
X22X).)
displayed, release the finger.
Set the auto backlight off.
2
Save the setting.
3
27B
Press the [Function] key several times to select “A.A.b.”
Select “1” by pressing the [Zero/Tare] key.
Press the [Target] key.
The balance goes back to normal display.
- Function settings are set.
- An object is placed on the pan, and display is not stable.
Placing an object on the pan or pressing any key turns the backlight on again automatically.
RL-TS Series Operation Manual 59
Page 64

Set to the function 2 setting mode.
Press the [Function] key while pressing the [Zero/Tare] key.
Set the ID number.
Select “1” by pressing the [Zero/Tare] key.
Enter the ID number.
Enter the ID number with the following steps:
5.5 ID No. Setting
Results of successfully completed span adjustments and span tests can be printed by ISO/GLP/GMP
compliant devices. Set the ID numbers printed together at this printing.
In situations such as when the same model is used, you can assign numbers that allow you to control them
easily.
When an ID number is set, the “◄” and “” indicators located in the upper left of the display light up.
You can use up to six digits in an ID number. The characters that you can use are as follows:
Space (blank), 0 to 9, A to F, -
1
+
2
Set to the ID number setting mode.
3
4
Release the fingers when “Func 2” is displayed.
The function 2 setting mode is set, displaying
“1. 1d0.”
Press the [Function] key.
1. Press the [Zero/Tare] key.
The leftmost digit blinks.
2. Select a character by pressing the [Zero/Tare] key.
Pressing the key toggles between space, 0 to 9, A to F, and
– (minus).
3. Pressing the [Function] key blinks the next digit.
Set the ID number by repeating steps 2 and 3.
60 RL-TS Series Operation Manual
Page 65

Save the ID number.
Press the [Target] key.
5
Display changes to “ ”
Pressing the [Target] key again returns the balance to normal
display.
RL-TS Series Operation Manual 61
Page 66

In each of the functions, if wind and vibration influences are small, select 1 or 2. Set 3 to 5 for great
Select each function.
Press the [Function] key several times to select the functions
Select a setting.
Press the [Zero/Tare] key to select the setting values of each
Reference
28B5.6 Improving the Stability of the Balance
When the balance is stable, “” is lit in the upper left of the display.
When displayed values flicker and stabilized display blinks, it indicates that the balance is influenced by
wind or vibration. In these situations, making a setting change can improve stability.
As greater values are set in the function setting of “stability judgment (4.5.d),” “response speed
(5.Re.),” and “minimum readability setting (b2.d.A, b4.d.b),” stability will be improved more.
Relationship between each function setting and wind/vibration influences
1
2
Wind/vibration
influences
Small
Big
Set to the function setting mode.
(Refer to “Section 2-5: Function Setting
Basics (P.
X22X).)
influences.
Stability judgment Response speed
1 1 1
2 2 2
3 3 3
4 4 4
5 5
Minimum readability
setting
Press and hold the [Function] key. After “Func” is
displayed, release the finger.
(See the above table).
4.5.d. = Stability judgment
5.r.E.= Response speed
b2.d.A = Minimum readability setting (A)
b4.d.b = Minimum readability setting (B)
3
62 RL-TS Series Operation Manual
function (see the above table).
Page 67

Save the setting.
Press the [Target] key.
4
The balance goes back to normal display.
RL-TS Series Operation Manual 63
Page 68

6.0 Input/Output to/from External Devices
Balance data can be output to a printer and be input and output to/from external devices via the
RS-232C interface.
This chapter includes:
Outputting to a Printer
Connecting to External Devices via RS-232C Interface
Communication Data and Commands
RL-TS Series Operation Manual 64
Page 69

Set to the function setting mode.
Press and hold the [Function] key. After
Press the [Function] key several times to select
Reference
29B6.1 Outputting to a Printer
By connecting a printer to the balance, span adjustment and span test results and measurement results can be
printed in ISO/GLP/GMP compliant form.
58BConnecting a printer
For printing examples, refer to “Appendix 3: Printing in Compliance with ISO/GLP/GMP”
(P.
X91X).
By using the D-SUB9P cable, connect the RS-232C connector of the balance to a printer.
The printers that can be connected to the balance are CSP-160 and CSP-240.
For the printer, the following setting is required. Set the following by referring to the operation manual of
the printer.
- Set the printing function (printing control) to “balance control.”
- Make the baud rate and other communication settings compatible with the settings made in the balance.
59BPrinting span adjustment and span test results
1
(Refer to “Section 2-5: Function Setting
Basics (P.
X22X).)
The date and time data set in the printer is also printed. Before printing, set the date and
time in the printer.
“Func” is displayed, release the finger.
2
3
Save the setting.
4
RL-TS Series Operation Manual 65
Press the [Function] key several times to select
“E.GLP.”
Select “1” by pressing the [Zero/Tare] key.
“E1.C.o.”
Select “1” by pressing the [Zero/Tare] key.
Press the [Target] key.
The balance goes back to normal display.
Page 70

Perform span adjustment or span test.
After span adjustment or test is successfully
Set to the function setting mode.
Save the setting.
Press the [Target] key.
5
Printing measurement results
1
(Refer to “Section 2-5: Function Setting
Basics (P.
X22X).)
2
completed, the printer executes printing.
While the data is being printed, the balance may
seem to not be moving, but wait until printing is
completed.
No printing is executed if span adjustment or
test is not successfully completed.
Do not press any keys on the printer during
printing.
Press and hold the [Function] key. After “Func” is displayed,
release the finger.
Press the [Function] key several times to select “E.GLP.”
Select “1” by pressing the [Zero/Tare] key.
3
4
Print. Pressing and holding the [Print] key prints the header.
5
Press the [Function] key several times to select “E2.od.”
Select “1” by pressing the [Zero/Tare] key.
The balance goes back to normal display.
- Pressing the [Print] key at any time during measurements
prints result data.
- After the measurement is completed, press and hold the
[Print] key. The footer is printed.
Do not press any keys on the printer during printing.
66 RL-TS Series Operation Manual
Page 71

30B6.2 Connecting to External Devices via RS-232C Interface
The balance inputs and outputs from and to external devices such as a PC via the RS-232C interface.
The RS-232C interface equipped on the balance is a D-SUB9P type. The connection with external devices
is established with the following specifications:
Disconnect the AC adapter of the balance before connecting external devices.
61BConnector pin numbers and functions
The RS-232C connector equipped on the balance has the following pin alignment:
Pin number Signal name Input/Output Function & Remarks
1 - - -
2 RXD Input Receiving data
3 TXD Output Transmitting data
4 DTR Output HIGH (When the balance is powered ON)
5 GND - Signal ground
6 - - -
7 - - -
8 - - -
9 EXT.TA R E Input External tare range setting
RL-TS Series Operation Manual 67
Page 72

Reference
You can set a tare range or adjust the zero-point from an external device by connecting a
contact or a transistor switch between the pin for externally setting a tare range (Pin 9) to the
pin for signal ground (Pin 5). In this case, allow at least 400 ms for connection (ON) time
(Maximum voltage when the balance is turned OFF: 15 V, sink current when it is turned ON:
20 mA.)
62BSample connection with a PC
Use the following examples as a guide to connect the balance to external devices using the cable.
- Sample connection with a PC/AT compatible machine
68 RL-TS Series Operation Manual
Page 73

digit numeric
63BInterface specifications
Transmission system Serial transmission, Start-stop synchronization
Transmission rate 1200/2400/4800/9600/19200 bps
Transmission codes ASCII codes (8/7 bits)
Signal level Compliant with EIA RS-232C
HIGH level (data logic 0): +5 to +15 V
LOW level (data logic 1): -5 to -15 V
Bit configuration Start bit: One bit
Data bits: 8/7 bits
(“7 bit” can be specified only for the extended 7-digit numeric
format.)
Parity bit: 0/1 bit
Stop bits: 2/1 bit
(“1 bit” can be specified only for the extended 7-
format.)
Parity bit None/Odd/Even
RL-TS Series Operation Manual 69
Page 74

Set to the function setting mode.
Press and hold the [Function] key. After
Press the [Function] key several times to select
Save the setting.
Press the [Target] key.
31B6.3 Communication Data and Commands
The RS-232C interface exchanges data with external devices as follows:
64BOutput data
The three formats of “6-digit numeric,” “7-digit numeric,” and “extended 7-digit numeric” formats are available.
Select a format with the following operation:
1
2
3
(Refer to “Section 2-5: Function Setting
Basics (P.
X22X).)
“Func” is displayed, release the finger.
“6.1.F.”
Press the [Zero/Tare] key to select a format.
1 = 6-digit numeric format
2 = 7-digit numeric format
3 = Extended 7-digit numeric format
The balance goes back to normal display.
70 RL-TS Series Operation Manual
Page 75

- Decimal point (floating)
- A space heading a numeric value
77B Data format
- 6-digit numeric format
Consists of 14 characters including terminators (CR = 0DH/LF = 0AH).
1 2 3 4 5 6 7 8 9 10 11 12 13 14
P1 D1 D2 D3 D4 D5 D6 D7 U1 U2 S1 S2 CR LF
- 7-digit numeric format
Consists of 15 characters including terminators (CR = 0DH/LF = 0AH). A parity bit can be
appended.
1 2 3 4 5 6 7 8 9 10 11 12 13 14 15
P1 D1 D2 D3 D4 D5 D6 D7 D8 U1 U2 S1 S2 CR LF
- Extended 7-digit numeric format
This is an extended version of the 7-digit numeric format and is different from the 7-digit numeric
format in that:
- the data length can be seven bits rather than eight bits, and
- the stop bit length can be one bit rather than two bits.
- If you select Japanese (katakana) for printed language, the data length is automatically set to eight
bits.
B
Meanings of data
[P1] (one character)
Indicates the polarity of data.
P1 Code Description
+ 2BH Zero or positive data
- 2DH Negative data
[D1 to D7 (or D8)] (seven or eight characters)
Numeric data is stored.
D1~D7(D8) Code Description
0~9 30H~39H 0 to 9 (numeric)
⋅ 2EH
- Omitted when numeric data does not contain decimal places. In this case, a
space is output to the least significant digit.
SP (Space) 20H
- When numeric data does not contain decimal places, a space rather than a
decimal point is output to the least significant digit.
RL-TS Series Operation Manual 71
Page 76

U1
U2
Code
Meaning
Balance indicator
(SP)
G
20H
47H
gram
g K G
4BH
47H
Kilogram
kg C T
43H
54H
carat
CT O Z
4FH
5AH
ounce
L B
4CH
42H
pound
O T
4FH
54H
troy ounce
D W
44H
57H
pennyweight
G R
4BH
52H
Grain
Bottom right grain
T L 54H
4CH
tael (Hong Kong)
T L
54H
4CH
tael (Singapore, Malaysia)
Top right
T L 54H
4CH
tael (Taiwan)
Middle right
M
O
4DH
4FH
momme
mom t o
74H
6FH
tola
P C
50H
43H
Pieces
Pcs
(SP)
%
20H
25H
Percentage
%
(SP)
#
20H
23H
Computation results, numbers, etc.
#
S1
Code
Description
Remarks
L
4CH
Below (LO)
1- or 2-point scale
G
47H
Appropriate (OK)
H 48H
Above (HI)
T 54H
Cumulative value
Data type
U
55H
Unit weight
(SP)
20H
No judgment result or no data type specified
d 64H
Gross
* -If headed with no data, the numeric value is headed by 0 (30H) by factory default setting. Using the
function setting, it can be headed by “SP” (20H).
-When expression units are changed or switched to display of parts counting, percentage weighing, or
unit converting, the decimal place is changed (Refer to “ Sample communication formats” (P. 70)).
[U1, U2] (two characters)
Indicates the unit used to show numeric data.
[S1] (one character)
Indicates the judgment result when the limit function is used.
72 RL-TS Series Operation Manual
Page 77

[S2] (one character)
Indicates the status.
S2 Code Description
S 53H Data stable *1
U 55H Data unstable *1
E 45H Data error *2 (Indicates that data other than S2 is invalid.)
(SP) 20H No status specified
*1: This value is independent of data if the data is independent of whether the weighing condition is
stable or not, such as cumulative values and unit weights.
*2: When “o --Err” or “u --Err” is displayed
Sample communication formats
- 6-digit numeric format
3000.1 g/No data type specified/Data stable
1 2 3 4 5 6 7 8 9 10 11 12 13 14
+ 0 3 0 0 0 . 1 (SP) G (SP) S CR LF
+800.05 mom/Gross/Data unstable
1 2 3 4 5 6 7 8 9 10 11 12 13 14
- 0 8 0 0 . 0 5 M O d U CR LF
250 pcs./Cumulative value/Data stable
1 2 3 4 5 6 7 8 9 10 11 12 13 14
+ 0 0 0 2 5 0 (SP) P C T S CR LF
- 7-digit numeric format
3000.1 g/No data type specified/Data stable
1 2 3 4 5 6 7 8 9 10 11 12 13 14 15
+ 0 0 3 0 0 0 . 1 (SP) G (SP) S CR LF
+800.05 mom/Gross/Data unstable
1 2 3 4 5 6 7 8 9 10 11 12 13 14 15
- 0 0 8 0 0 . 0 5 M O d U CR LF
250 pcs./Cumulative value/Data stable
1 2 3 4 5 6 7 8 9 10 11 12 13 14 15
+ 0 0 0 0 2 5 0 (SP) P C T S CR LF
RL-TS Series Operation Manual 73
Page 78

After you have sent an input command, do not send another command to the
65BInput commands
An input command is to control the balance from an external device. The following four input commands
are supported:
(1) Tare range command (2) Set output control command (3) Set measurement mode command (4) Span
adjustment/test command
79B Procedure for transmission
(1) An input command is sent from an external device to the balance.
The full-duplex transmission system allows you to send an input command at any time independently of the
data transmit timing of the balance.
(2) Upon successful completion of an input command, the balance will send out either a normal
completion response or the result data requested by the command, to the external device.
- If the operation has not resulted in successful completion, or if the command is invalid (in error), the
balance will transmit an error response.
- When the balance is in normal display mode, it usually sends a response to a command within one
second after it is received. For a tare range command and a span adjustment/test command, a response
is sent after the command is completely processed.
- If the balance receives a tare range command when the tare range setting (Function setting: H.tr) is
set so that the display is reset to “0” when the balance is stabilized (waiting for tare range setting to be
stable), or if the balance receives an input command that takes a long time, the balance sends a
response after the command is completely processed.
- If the balance receives a command when you are setting a function, when the balance is under span
adjustment, or the balance is busy for other reasons, the command is executed after that operation is
completed.
balance until the external device receives a response from the balance.
80B Sample input commands
Sent command Description
T(SP)(CR)(LF) Set tare range (adjust to zero-point).
01(CR)(LF) Set to continuous output.
08(CR)(LF) Output data (once immediately).
81B Command form
An input command consists of 4 characters including terminators (CR/LF).
C1 C2 CR LF
82B
74 RL-TS Series Operation Manual
Page 79
Command format
(1) Tare range (zero-point adjustment) command
C1 C2 Code (C1) Code (C2) Description Va l u e Response
A00: Successful completion
- Tare range setting
T (SP) 54H 20H
- Zero-point
adjustment
(2) Set output control command
C1 C2 Code (C1) Code (C2) Description
O 0 4FH -{}-30H Stop output.
O 1 4FH 31H Output continuously at all times.
O 2 4FH 32H
O 3 4FH 33H
O 4 4FH 34H
O 5 4FH 35H
Output continuously if stable (Stop output if
unstable).
Output once when the [Print] key is pressed
(whether the balance is stable or unstable).
Output once when the balance is stable. Output
when a sample is lifted to cause the display to
indicate a value below zero, and then another
sample is placed to make the balance stable.
Output once when the balance is stable. Stop
output when unstable. Output once when the
balance is stabilized again (the output includes
zero) even if it is not reloaded.
None
E01: Command error
E04: A tare range (zero-point
adjustment) cannot be set
(Range violation, weight error,
etc.).
Response
A00: Successful
completion
E01: Command
error
Output once when the balance is stable. Output
O 6 4FH 36H
O 7 4FH 37H
O 8 4FH 38H Output once immediately.
O 9 4FH 39H Output once after stabilized.
- Commands O0 to O7 have the same workings as the output control set by the function setting.
- Commands O8 and O9 are used to request data from the balance.
- Once executed, O0 to O7 commands are held. However, the status is reset to the function setting when the
balance is turned on again.
RL-TS Series Operation Manual 75
continuously when unstable. Output is stopped
after a single output when the balance is stable
even if it is not reloaded.
Output once when the [Print] key is pressed if
the balance is stable.
Page 80

- When either an O8 or O9 command is executed, it returns to the state of “O0”.
(3) Set measurement mode command
C1 C2 Code (C1) Code (C2) Description Response
M 1 4DH 31H Set to Mode 1
A00: Successful completion
M 2 4DH 32H Set to Mode 2
E01: Command error
M 3 4DH 33H Set to Mode 3
E02: Error
M 4 4DH 34H Set to Mode 4
* The measurement mode to be activated by the above mode settings 1 to 4 depends on the weighing mode
currently in use.
- Relationship between weighing mode and mode setting
Mode
Mode 1
Weighing
machine
Weight
measuring
Mode 2 Gross weight
Mode 3
Mode 4
Cumulative
weight*1
Display in
unit B*2
Parts
counting
Weight
measuring
Parts
counting
Cumulative
count*1
Average unit
weight
Percentage
weighing
Weight
measuring
Percentage
measuring
Cumulative
percent*1
Unit
converting
Weight
measuring
Coefficient
multiplying
Cumulative
sum*1
Gravimeter
Animal
weighing
Error Error
Error Error
Error Error
Error Error Error Error
*1: Mode 3 (M3) can be specified only when the addition function is to be used. If the addition function is not
enabled, it results in an error.
*2: If a unit is NOT specified for unit B, the balance is set for the weight measuring mode. When you specify a
mode that is not supported by the current Weighing Mode, an error is returned from the balance.
(4) Span adjustment/test command
C1 C2 Code (C1) Code (C2) Description Response
C 0 43H 30H
C 3 43H 33H
Disables command
inputs.*1
Span adjustment with
external weight
A00: Successful completion
E01: Command error
E02: Operation is disabled.
E03: Cancelled by operation
C 4 43H 34H
Span test with external
weight
E04: Abnormal completion
*1: A span adjustment and test commands will also be disabled.
* This command takes time because the balance sends back a response after an appropriate operation is
completed.
* If set to “[Cal] key disabled” (0) in the function setting “7.CA.,” a span adjustment and test command does
not work.
66BResponse
Upon receiving an input command, the balance sends out a response.
76 RL-TS Series Operation Manual
Page 81
format, use the function setting
Reference
You can select the response format of either the [“A00”/“Exx”] format or the [ACK/NAK] format.
In the explanation of “input commands” in the previous section, the [“A00”/“Exx”] format responses are
described.
- [“A00”/“Exx”] format
Consists of five characters including terminators. For more information on A1 to A3, see the
“Response” fields in the previous section.
A1 A2 A3 CR LF
- [ACK/NAK] format
Consists of one character without a terminator. “Successful completion” (ACK) or “Abnormal
completion” (NAK) is returned.
Response Code Meaning
ACK 06H Successful completion
NAK 15H - Command error (when an errant command is received)
- Numeric format error
- Processing interrupted
- Processing terminated abnormally
- Other errors
To switch between [“A00”/“Exx”] format and [ACK/NAK]
“67.R5.”.
1: [“A00”/“Exx”] format
2: [ACK/NAK] format
RL-TS Series Operation Manual 77
Page 82

7. 0 Troubleshooting
This chapter describes troubleshooting including error messages and remedies.
This chapter includes:
Error Messages
Troubleshooting
Initializing
Maintenance
78 RL-TS Series Operation Manual
Page 83

The weight of the sample is over the
have failed. Contact our Sales Office or Technical
value load exceeded the lower
The pan or the pan base may not be properly set.
The reference weight used during span
An error over 1.0% was detected in span
For span adjustment with an external weight, check
than the weight are placed. Then, execute span
32B7. 1 Error Messages
Message Cause Remedy
-
weighing capacity.
- The number of digits in the addition result
or calculation result went over the number
that can be displayed.
The minus-
limit.
- Unload the sample to weigh it in some portioned-out
measurements.
- Replace the tare with a lighter one.
- If the error message does not disappear even when
nothing is placed on the pan, mechanical parts may
Service Division.
- First, clear the addition result. Then execute addition
again.
- The coefficient used in unit converting is too small.
Set a greater coefficient.
-
Check them, paying attention to whether they are in
contact with an external object.
- If the error message does not disappear even if the
pan and the pan base are properly set, mechanical
parts may have failed. Contact our Sales Office or
Technical Service Division.
adjustment with an external weight is far
less than 50% of the weighing capacity.
adjustment with an external weight, or the
balance failed.
RL-TS Series Operation Manual 79
For span adjustment with an external weight, use a
weight that weighs as close to the weighing capacity as
possible.
that a correct weight is placed and that no objects other
adjustment again.
Page 84
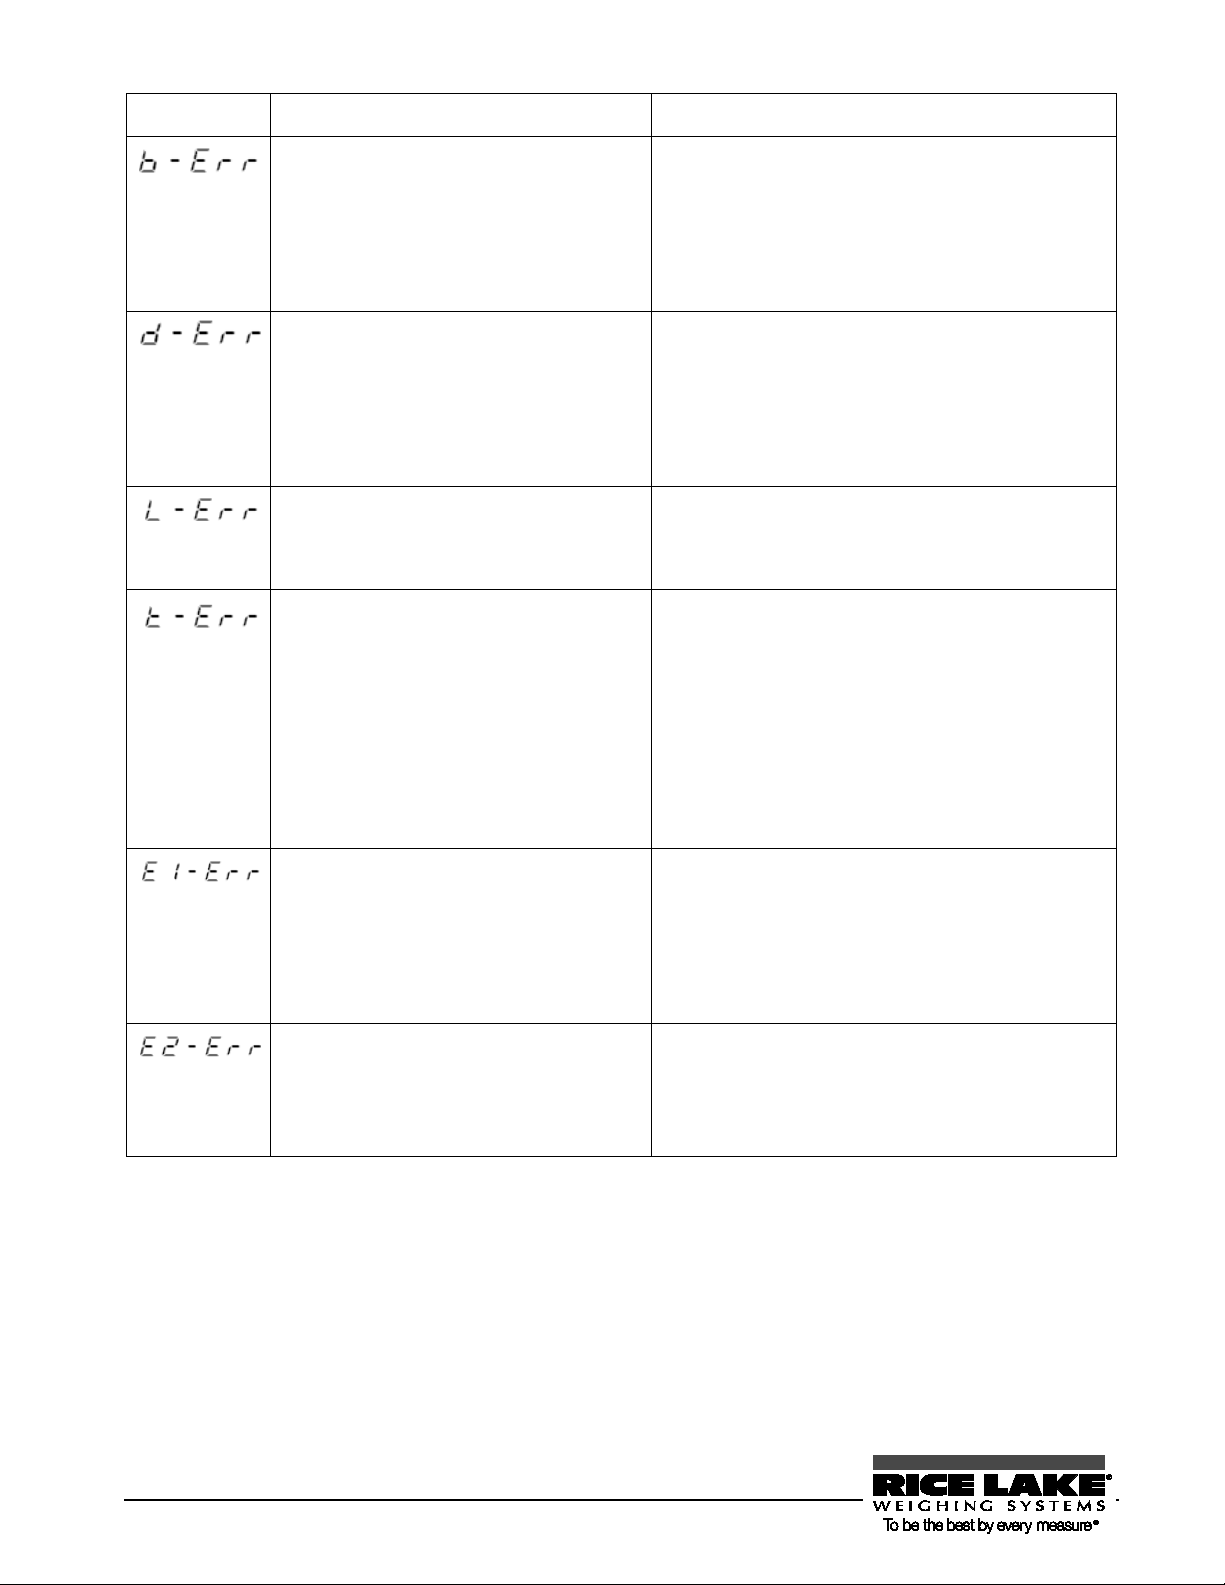
The balance is influenced by static
The balance is influenced by static
ht at a
Because the balance is unstable,
Message Cause Remedy
electricity or noise.
electricity or noise.
The weight of a sample is too lig
sampling during parts counting, or reference
weight saving during percentage weighing.
- At addition operation, you placed
additional samples on twice.
- At addition operation, you unloaded some
samples or you pressed the key without
adding samples.
- Unplug the AC adapter from the receptacle and then
turn the power on again.
- If this error occurs again, electric components may
have failed. Contact our Sales Office or Technical
Service Division.
- Unplug the AC adapter from the receptacle and then
turn the power on again.
- If this error occurs again, electric components may
have failed. Contact our Sales Office or Technical
Service Division.
Use a heavier sample by referring to the Specifications
(P.
X94X) to check the minimum unit weight and the
percentage weighing weight limit.
- After setting the display to “0” (by unloading the
previous sample), place the next sample to continue
addition operation.
- Addition operation is impossible when 0 or a
negative value is displayed. Place a sample to
continue addition operation.
No inputs are sent from the weight sensor. - Unplug the AC adapter from the receptacle and then
initialization cannot be completed.
33B
turn the power on again.
- If this error occurs again, the sensor may have failed.
Contact our Sales Office or Technical Service
Division.
The balance may be affected by an external influence
such as wind and vibration. Relocate the balance by
referring to the section “Do not use the balance in the
following places” (P. v).
80 RL-TS Series Operation Manual
Page 85

7. 2 Troubleshooting
components of the balance, or the AC
t the root cause of the
model AC
Contact our Sales Office or Technical
an external influence such as
Increase the setting values of relevant
Improving the Stability of the Balance”
Weight indication contains an
The display error is caused
has been relocated to another
the balance is not kept
Weight indication contains an
The balance may have been
such as wind and vibration
Problem Cause Remedy
Nothing is displayed even when
the balance is powered on.
Display flickers. The balance may be affected by
error.
The AC adapter is not connected. - Check that the AC adapter is connected.
The batteries are exhausted. Replace the batteries.
wind and vibration.
because the balance has not been
used for a long period of time or
- If nothing is displayed even if the AC
adapter is properly connected, the electric
adapter may have failed. Replace the AC
adapter to tes
problem, if you have a same-
adapter that operates properly at hand.
-
Service Division.
functions by referring to “Section 5-6:
(P. X62X).
Perform span adjustment.
error even after calibrated.
RL-TS Series Operation Manual 81
location.
The adjusters are not settled, and
horizontal.
The tare weight is set or not. Unload the sample from the pan and then
affected by an external influence
during calibration.
Check that the balance is kept horizontal.
zero the readout by pressing the [Zero/Tare]
key to continue measurement.
The balance may be affected by an external
influence such as wind and vibration. Take
remedial actions or relocate the balance by
referring to the section “Do not use the
balance in the following places” (P. v). Then
calibrate again.
Page 86

The weight used for calibration
The display does not move with
(When the [Zero/Tare] key is
pressed, during a sampling in
an external influence such as
the balance is operated on
the balance is left unused with no
auto power off function if it
Problem Cause Remedy
Use the same weight during calibration and
is slightly different in mass from
checking.
the weight used for checking.
the M sign flashing.
parts counting mode, etc.)
The icon blinks when the balance
is operated on batteries.
The display is turned off when
batteries.
The balance may be affected by
The balance may be affected by an external
influence such as wind and vibration. Take
wind and vibration.
remedial actions or relocate the balance by
referring to the section “Do not use the
balance in the following places” (P. v).
The batteries are exhausted. Replace the batteries.
The display was turned off by the
The auto power off function is activated if
auto power off function.
measurement taken for approximately five
minutes.
Disable the
interferes with your use of the balance.
82 RL-TS Series Operation Manual
Page 87

Make the balance compatible in
device by referring to their operation
Communication conditions
t our Sales
The current settings of the
Problem Cause Remedy
No outputs
Intended output function settings
are not established.
disagree with the external device.
communication conditions with the external
manuals.
Check outputs with the following methods:
Initialize the function settings by referring to
“Section 7-3: Initializing (P.
X83X) or Function
Setting List.
Then, set to a communication condition of
1,200 bps, 8-bit data, 2-bit stop bit, and no
parity by referring to the operation manual of
the external device.
Now, output is done once after stabilization,
after the [P] key is pressed. Check output by
pressing the [P] key.
Wrong cable connection To connect the balance to a general-use PC,
a cross cable is required (Refer to “Section
6-2: Connecting to External Devices via
RS-232C Interface” (P.
X67X)).
balance are unknown.
34B
Arrange it yourself or contac
Office.
The cable is disconnected or not
Check for proper cable connection.
properly connected.
You can initialize the balance (“Section 7-3:
Initializing” (P.
X83X)).
RL-TS Series Operation Manual 83
Page 88

Set to the function 2 setting mode.
Press the [Function] key while pressing the [Zero/Tare] key.
All function settings are initialized, discarding all data including ID numbers,
7.3 Initializing
The settings of the balance can be initialized with the following steps:
1
+
Release the fingers when “Func2” is displayed.
The function 2 setting mode is set, displaying “1.1d0.”
2
3
Set the function initialization.
Save the setting.
limit values, data of parts counting, percentage weighing, unit converting, and
gravimeter.
Restoring the current status will be impossible. Before initializing the balance,
record necessary function settings in a memo or otherwise.
Select by pressing the [Function] key.
Select “1” by pressing the [Zero/Tare] key.
Press the [Target] key.
The balance goes back to normal display.
84 RL-TS Series Operation Manual
Page 89

Diaphragm
Bottom ventilation holes
Pan base
35B7. 4 Maintenance
When taking care of the balance, be careful of the following:
67BFor heavy dirt
If the balance is very dirty, disassemble and clean it.
The parts that you can remove are only the pan and the pan base.
Removing parts other than the pan and the pan base damages the waterproof function
of the balance, resulting in possible failure.
68BHow to take care of the balance
To clean the main unit, use a piece of dry soft cloth.
If the unit is very dirty, use a cloth soaked in a small quantity of neutral detergent or cleaning solvent. If the
unit is extremely dirty, wash it with water and dry it well with a dry cloth.
When washing the main unit with water, do not submerge it in water.
Check that the power cap, the RS232 connector cap, and the battery case are tightly
attached.
Do not scratch the diaphragm and the bottom ventilation hole using a sharp object,
hard brush, or other such hazardous tools.
RL-TS Series Operation Manual 85
Page 90

Appendixes
The appendixes provide data including each type of data for the balance.
This chapter includes:
Function Setting List
Measurement Mode List
Printing in Compliance with ISO/GLP/GMP
Specifications
36B
RL-TS Series Operation Manual 86
Page 91

Appendix 1 Function Setting List
Additional
Animal we ighing s elected
Cumulate
selected
(Cont inued on ne xt page .)
(Select output data)
(Auto output)
(Auto tare setting)
(Output a hold value)
(Weight var iation range of ho ld)
Animal-o nly response speed
Additio nal func tio n di sab led
Cumulate function selected
Limit function selected
Cumulate function + Limit function
(Condition)
(Range to cover)
(Point scale)
(Judge by)
(Buzzer when LO is
judged)
(Buzzer when OK is
judged)
(Buzzer when HI is
judged)
(How to indicate
results)
(Addition operation)
Water
Not water
Only a specific gravity value
Specific gravity, weight, actual water temperature or
medium density
Output disabled
Auto output once after a specific gravity measurement
OFF
ON
OFF
ON (
20 times t he minimu m readab ility
50 times t he minimu m readab ility
100 times the mini mum reada bility
Fast
Midd le
Slo w
Always judge (even when t he balance is unst able)
Judge only when th e balance is stable
unstable)
Detect when the limit is exceeded by more than five divisions
Detect both when the limit is exceeded and when it is not reached
1-point scale (OK/LO are judged)
Upper and lower limits (HI/OK/LO are judged)
Judge by absolute value
Judge by deviation value
Buzzer not beeped for rank LO
Buzzer beeped for rank LO
Buzzer not beeped for rank OK
Buzzer beeped for rank OK
Buzzer not beeped for rank HI
Buzzer beeped for rank HIK
HI/OK/LO
2
Cumulate
Net add itio n
Limit function” or
selected
Auto-zero
Stability judgment
Response speed
Interface
When 1, 2, or 3 is
selected in “”
When 3 is selected in
“”
When 1, 2, or 3 is
selected in “”
When 2, o r 3 is
selected in “”
Disa bled
Enable
Wide (Mild)
Narrow (Strict)
Measurement by consecutive weighings
Fast
Slo w
Stop input /output
Numeric 6
Numeric 7
E
(Outp ut control)
(Baud rate)
(Parity)
(Data length)
(Stop bit)
(Unused high order
dig its)
(Response
command s)
* Select “1” or ”2” if using a supported printer.
Stop out put.
Output c ontinuously at a ll times.
Output continuously if stable (stop output if unstable).
Output once whe n the [Print] ke y is pressed (whet her the balance is
stable or unstable).
Output once when the balance is stable.
Output when a sample is
then another sample is pla ced to make the balance stable.
Output once when the balance is stable.
Stop output when unstable. Output once when the balance is stabilized again even if it
is not rel
Output once when the balance is stable.
Output continuously when unstable. Output is stopped after a single output when the
balance is sta ble even if i t is not rel oaded.
1200 bps
2400 bps
4800 bps
9600 bps
19200 bps
None
Odd
Even
7 bit
8 bit
1 bit
2 bit
Embed 0 (30H)
Embed space (20H)
A00, Exx
ACK, NA K
A st ar ( ) denotes an initial value.
A st ar () denotes an initial value.
A st ar ( ) denotes an initial value.
(Cont inued on ne xt page .)
Span
Bar graph
Auto power off
Auto backlight off
Unit setting
Minimum readability
Unit setting
Minimum readability
ISO/GLP/GMP compliance
(Un it A)
(Un it A)
(Un it B)
(Un it B)
When 1 is selected in
CAL operation disabled
Span ad justment with ext ernal w eight
Span te st with ext ernal w eight
Not displayed
Disp layed
Disable (for continuous use)
Enable ( The po
by batteries
Disable (for continuous use)
Enable (The backlight goes off if the balance is not used for about three minutes.)
g (gram)
kg (kilogram)
ct (carat)
oz (ounce)
lb (pound)
ozt (troy ounce)
dwt (p enny we ight)
GN (grain)
tl (tael
tl
tl R ight midd le (tae l (Taiw an) )
mom ( mom me)
to (tola)
None
g (gram)
kg (kilogram)
ct (carat)
oz (ounce)
lb (pound)
ozt (troy ounce)
dwt (penny weig
GN (grain)
tl (tael (Hong Kong))
tl
tl R ight midd le (tae l (Taiw an) )
mom ( mom me)
to (tola)
Fine
Rough
Fine
Rough
Disa bled
Enabled
(Outputting calibration
results)
(Measurem ent data in
compliance with GLP)
(Language for
pr
Disa bled
Enabled
Disa bled
Enabled
English
Japanese (katakana)
Set tare range
Store tare
Buzzer control
Backlight control
“0” is displayed immediately after the key is pressed.
Reset the display to “0” when the balance is stabilized.
Disa bled
Enabled
Off
On (Beeps when a value is confirmed, wrong operation
Beeps w hen the ke y is press ed in add ition t o the bee ping sit uations in 1.
(Buzzer tone)
* When “1” or ”2” is selected
Low
Midd le
Hig h
Off
On
On when the balance is powered by the AC adapter.
Off when powered by batteries.
xtended numeric 7-dig it fo rma t
“
“Cumulate function
+ Limit function”
“
function” or
“Cumulate function
+ Lim it fu nction”
d
-digit format
-digit format
wer is turned off five minutes later.) * Enabled only when the ba lance is powered
in “ ”
(Hong Kong))
Upper right (tael (Singapore, Malaysia))
Upper right (tael (Singapore, Malaysia))
ht)
Auto output once aft er weight hold)
is made, etc.)
lifted to cause the display to indicate a value below 0, and
oaded (the output includes zero).
-point ba r grap h (Available o nly for 2 -point sc ale)
(not judge when th e balance i s
RL-TS Series Operation Manual 87
inting)
Page 92

88 RL-TS Series Operation Manual
Page 93

RL-TS Series Operation Manual 89
Page 94
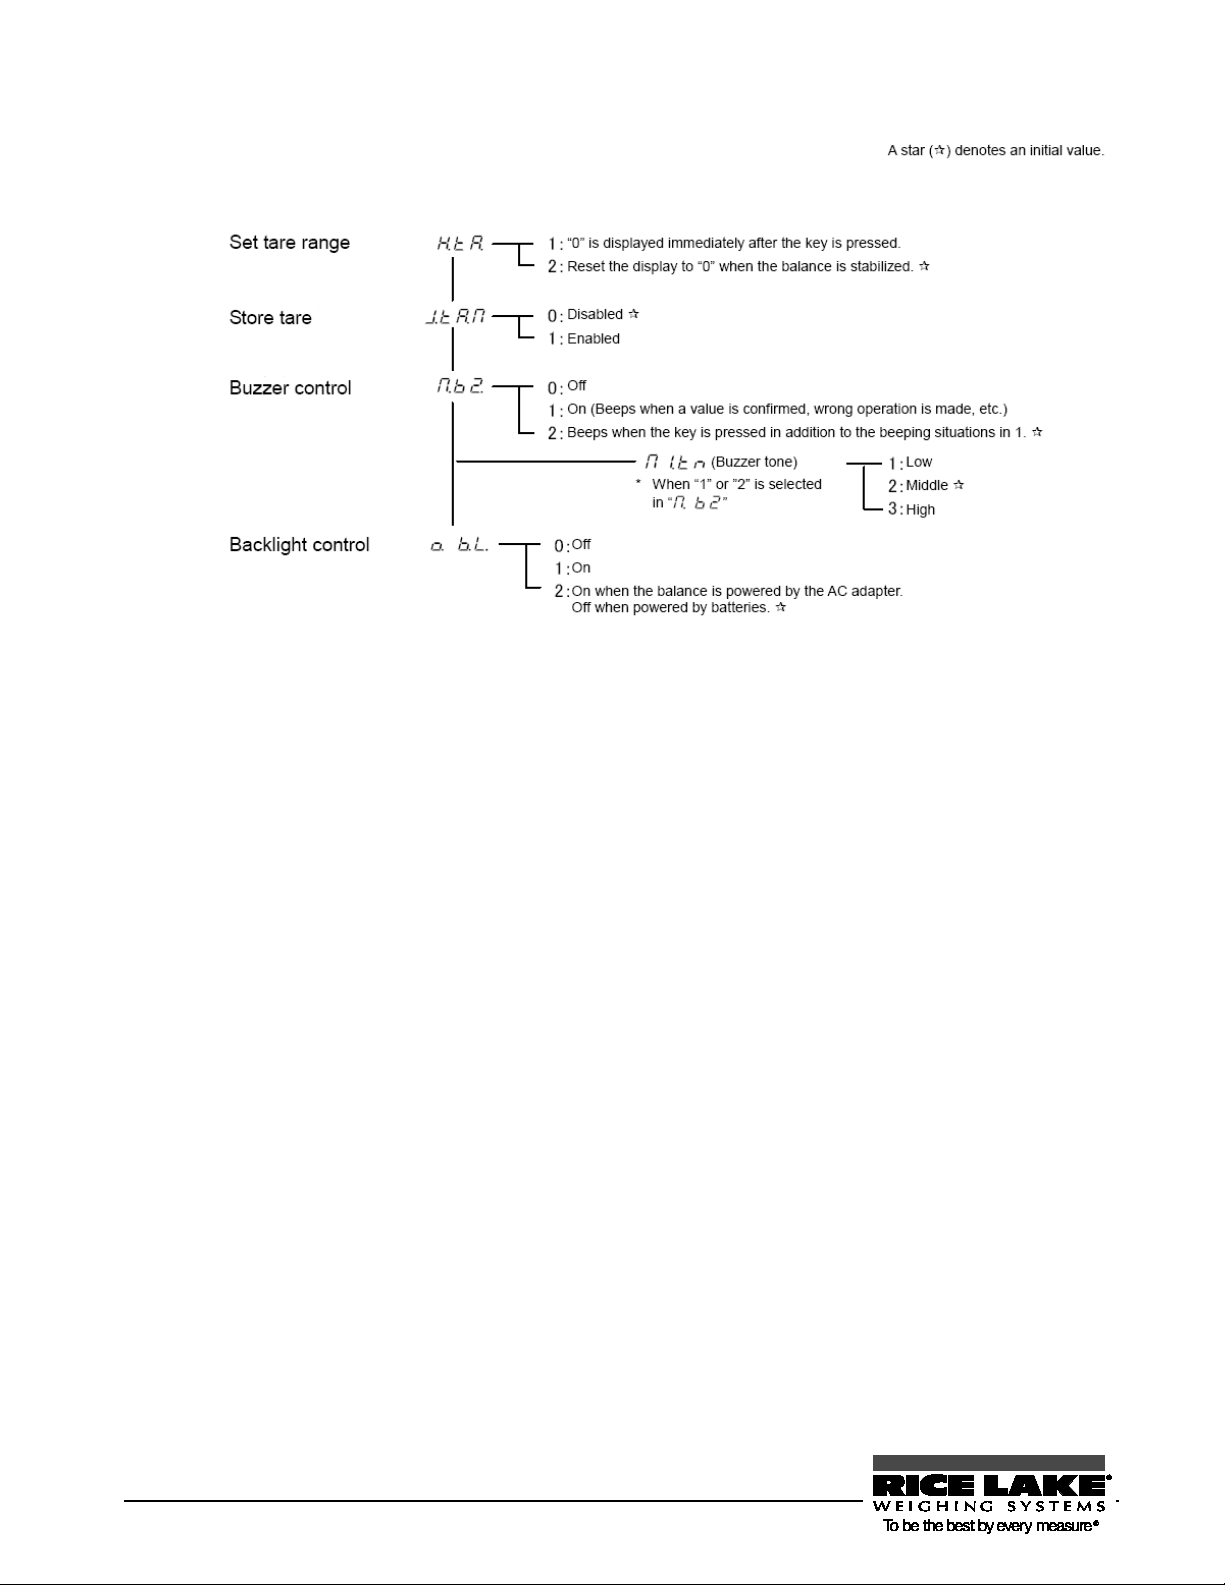
37B
90 RL-TS Series Operation Manual
Page 95

Appendix 2 Measurement Mode List
Weighing mode
Displayed functions switched at each [Function] key
press
Additional function
usable in each function
Switching
Displayed
Displayed
2
Gross weight
Unit A
B/G
×
×
Weight
Displayed only when unit B
weight
value
addition function is selected
1
Parts counting
Pcs
Cumulative
count
Cumulative
value
Displayed only when
addition function is selected
Average unit
weight
Weight
measuring
Percentage
percent
value
addition function is selected
Weight
measuring
Coefficient
multiplying
Cumulative
sum
Cumulative
value
Displayed only when
addition function is selected
Weight
gravity
Unit for weight fixed with g
enabled
In each weighing mode, pressing the [Function] key can toggle the function displayed. Displayable functions
differ between modes. The additional functions usable concurrently in each function also differ.
Remarks
Weighing
machine
Parts counting
Percentage
weighing
order
1
3
4
2
3
4
1
2
3
1
function
Weight
measuring
measuring
Cumulative
measuring
Cumulative
Unit used
Unit A
Unit B
Unit A
Pcs
Unit A Pcs
Unit A
%
%
Unit A
#
sign
Σ
Σ
Σ
Addition Limit
× ×
Cumulative
× ×
× ×
Cumulative
× ×
is selected
Displayed only when
×
×
Displayed only when
×
Unit converting
Gravimeter 1
Animal
weighing
2
3
1
measuring
Measurement
of specific
Weight
measuring
* For more information on unit A and unit B, refer to “Section 5-1: Using Two Expression Units by Switching Them”
(P.
X55X).
38B
RL-TS Series Operation Manual 91
#
Unit A
g
g
Σ
× ×
× ×
× ×
×
Unit for weight fixed to g
Holding function always
Page 96

Appendix 3 Printing in Compliance with ISO/GLP/GMP
Span adjustment with external weight
Span test with external weight
92 RL-TS Series Operation Manual
Page 97

Measurement data: Header
Measurement data: Footer
The date and time shown in printing examples are printed only when the dedicated
printer is used.
RL-TS Series Operation Manual 93
Page 98

Weighing
39BAppendix 4 Specifications
83B Basic specifications
Gram (g) Parts counting Percentage
Model
capacity
Minimum
readability (d)
Minimum unit
weight (g)
TS-220 220
TS-320 320
0.01 0.01 1 φ140 mm
TS-620 620
TS-820 820
TS-2200 2200
TS-3200 3200
0.1 0.1 10
TS-6200 6200
TS-8200 8200
TS-15K 15000 1 1 100
84B Functional specifications
Weighing system Tuning fork system
Dimension of pan
Weight limit (g)
190 × 190 mm
Weighing mode
Weighing machine/Parts counting/Percentage weighing/Unit
converting/Gravimeter (Measuring specific gravity of a solid)/Animal weighing
Function
Cumulate function/Net addition/Limit (3-point scale judgment with upper and
lower limit setting, absolute/deviation value judgment)/Unit
converting/ISO/GLP/GMP compliant/Tare storing/Minimum readability
switching/Unit weight showing/Gross weight showing/Auto backlight off/Auto
power off/Built-in buzzer
Display LCD (with backlight)
The LCD 7-segment can display up to six digits (six digits for a weight). The
segment is max. 18 mm high.
Can display a bar graph of up to 20 bars, and various messages.
Tare range
The weight of the tare actually placed on the balance is set as a weight by just
pressing the [Zero/Tare] key (Whether to wait for the balance to stabilize is
selectable).
Zero tracking Can be disabled by setting.
Display when
“o-ERR” is displayed when the weighing capacity is exceeded by 9 divisions.
overloaded
94 RL-TS Series Operation Manual
Page 99

Output RS-232C compliant output is equipped as standard.
SUB9P is RS422 (Cannot be used
The optional battery unit does not include batteries (use four AA
Reference
D-SUB9P male (RS-232C output, port for external tare range setting,
bi-directional)
Span adjustment
Power Dedicated AC Adapter: 6VDC/100 to 120VAC or 6VDC/230VAC
Outside dimensions 310 mm (depth) × 208 mm (width) × 87 mm (height)
Weight of the
main unit
Operating
temperature/
humidity
Options TS buzzer option/TS limit contact output option/TS full-pack option/TS RS422
Span adjustment/test with external weights (Weights used are at least 50% of the
weighing capacity)
* Only the unit g can be used for span adjustment.
TS-220 to TS-820: Approximately 2 kg
TS-2200 to TS-15K: Approximately 2.5 kg
Temperature: 0 to +40°C, Humidity: 80%rh or less (No condensation allowed)
option (D-SUB9P)/External RS-USB converter/Direct start option/TS optional
battery unit/TS underfloor weigher fixture option
When using options, be careful of the following:
- When using the RS422 option, D-
together with RS232C).
- Optional battery unit, limit contact output option, buzzer, and full-pack
option cannot be used together.
-
batteries).
85B
RL-TS Series Operation Manual 95
Page 100

Minimum Display by Unit of Measurement
Model
Unit_of
measuremant
TS-
220
TS-
320
TS-
620
TS-
820
TS-
2200
TS-
3200
TS-
6200
TS-
8200
g
kg
(ct)
(oz)
(lb)
(ozt)
(dwt)
Bottom right
grain
(Hong Kong)
220 320 620 820 2200 3200 6200 8200
0.01 0.01 0.01 0.01 0.1 0.1 0.1 0.1
0.22 0.32 0.62 0.82 2.2 3.2 6.2 8.2
0.00001 0.00001 0.00001 0.00001
1100 1600 3100 4100 11000 16000 31000 41000
0.05 0.05 0.05 0.05 0.5 0.5 0.5 0.5
7.7 11 21 28 77 110 210 280
0.0005 0.0005 0.0005 0.0005 0.005 0.005 0.005 0.005
0.48 0.7 1.3 1.8 4.8 7.0 13 18
0.00005 0.00005 0.00005 0.00005
7 10 19 26 70 100 190 260
0.0005 0.0005 0.0005 0.0005 0.005 0.005 0.005 0.005
140 200 390 520 1400 2000 3900 5200
0.01 0.01 0.01 0.01 0.1 0.1 0.1 0.1
3300 4900 9500 12000 33000 49000 95000 120000
0.2 0.2 0.2 0.2 2 2 2 2
5.8 8.5 16 21 58 85 160 210
0.0005 0.0005 0.0005 0.0005 0.005 0.005 0.005 0.005
0.0001 0.0001 0.0001 0.0001
0.0005 0.0005 0.0005 0.0005
(Singapore,
Malaysia)
(Taiwan)
mom (momme)
(to)
5.8 8.4 16 21 58 84 160 210
0.0005 0.0005 0.0005 0.0005 0.005 0.005 0.005 0.005
5.8 8.5 16 21 58 85 160 210
0.0005 0.0005 0.0005 0.0005 0.005 0.005 0.005 0.005
58 85 160 210 580 850 1600 2100
0.005 0.005 0.005 0.005 0.05 0.05 0.05 0.05
18 27 53 70 180 270 530 700
0.001 0.001 0.001 0.001 0.01 0.01 0.01 0.01
* The view of the table
96 RL-TS Series Operation Manual
 Loading...