

Page 1

Rice Lake TA Series
IMPORTANT
• To ensure safe and proper use of the balance, please read this
so you can review it as needed.
Tuning Fork Analytical Balances
Operation Manual
manual carefully.
• After reading this manual, store it in a safe place near the balance,
107398
Page 2

PREFACE
Thank you for purchasing an RL-TA Series electronic balance.
The RL-TA Series is a new balance equipped with a high-precision tuning fork sensor mechanism. It
windshield is made of antistatic plastic, helping to reduce its weight, and the balance is equipped with a variety
of functions such as parts counting, percentage weighing, gravimeter and limit functions that are helpful in
weighing fixed amounts. This multifunctional balance employs a user-friendly program, and the keys are
arranged in a way that makes the balance easy to operate. In addition, the fluorescent display is eye-friendly,
and the balance’s high-speed and stable performan ce improves your work efficiency.
Check for the following accessories before use.
If any items are found to be missing or damaged, immediately contact the retailer or our Sales Division.
(1) Main Unit (2) Pan Base (3) Pan
(4) AC adapter
2 RL-TA Series Operation Manual
Page 3

Contents
PREFACE ............................................................ 2
Contents ................................................................ i
1 Precautions Relating to Use .......................... 1
2 Names of Component Parts .......................... 5
2.1 Main Unit ................................................. 5
2.2 Operation Keys........................................ 6
2.3 Displayed Signs ....................................... 7
3 Installation of the Balance ............................. 8
4 Basic Operation ............................................ 9
4.1 Power On/Off .......................................... 9
4.2 Weighing ................................................. 9
4.3 Zero Adjustment ...................................... 9
4.4 Tare (pan) ................................................ 9
4.5 Set a Gross Weight ............................... 10
4.6 Single-touch Response Setting ............. 10
4.7 Data Output .......................................... 11
4.8 Hanging Measurement .......................... 11
5 Function 1 .................................................. 13
5.1 Setting and Check ................................. 13
5.2 Description of Function 1 ....................... 14
5.3 Specific Gravity Setting.......................... 17
5.4 Limit/Addition Functions ........................ 17
5.5 Interface ................................................ 18
6 Function 2 .................................................. 19
6.1 Calling and Setting ................................ 19
6.2 Description of Function 2 ....................... 19
7 Weighing and Measurement Modes ............ 20
7.1 Weighing and Measurement Modes ...... 20
7.2 Weighing Machine ................................. 20
8 Parts Counting............................................ 21
9 Percentage Weighing .................................. 23
9.1 Set a reference weight by weighing an
actual sample ........................................ 23
9.2 Set a reference weight by entering a
value ..................................................... 24
10 Unit Converting ........................................... 25
11 Gravimeter .................................................. 27
11.1 Measurement procedures for specific
gravity ................................................... 27
11.2 Entering water temperature or the
specific gravity of the media .................. 29
11.3 Gravimeter measurement data output ... 30
12 Addition Function ........................................ 31
12.1 Cumulate Function ................................ 31
12.2 Net Addition Function ........................... 32
13 Limit Function ............................................. 34
13.1 Setting the Limit Function ..................... 34
13.2 Judgment and Saving ........................... 34
13.3 Display of Judgment Results ................. 34
13.4 Judge by Absolute Values ..................... 35
13.5 Judge by Deviation Values .................... 38
13.6 Bar Graph for the 2-point Scale ............ 42
14 Calibration and Span Test for the Balance ... 43
14.1 Span Adjustment with Built-In Weights . 43
14.2 Span Adjustment with External Weight . 43
14.3 Span Test with Built-In Weights ............ 44
14.4 Span Test with External Weight ............ 44
14.5 Calibration of Built-In Weights ............... 45
14.6 Entry of Weight Error ............................. 47
14.7 Advice CAL and Full-automatic Span
Adjustment ........................................... 48
14.8 Auto Repeatability Measurement (ARM) 48
15 Date and Time Setup .................................. 49
15.1 Time Setup ........................................... 49
15.2 Date Setup............................................ 50
16 Various Functions ....................................... 51
16.1 Auto-Zero (Zero Tracking) ..................... 51
16.2 Auto Backlight OFF ............................... 51
16.3 Auto Power Off ..................................... 51
16.4 Set Unit ................................................. 52
16.5 Minimum Readability Setting ................. 52
16.6 Date Display .......................................... 52
16.7 Time Stamp Output .............................. 52
RL-TA Series Operation Manual i
Page 4

16.8 Save Tare Weight Function .................... 53
© 2011 Rice Lake Weighing Systems. All rights reserved.
16.9 Direct Start ............................................ 53
16.10 Interval Output Function ......................... 54
16.11 Input of ID No. ....................................... 55
17 Input/Output Functions ............................... 56
17.1 RS232C Output ..................................... 56
17.2 Type of Communication Texts ............... 59
17.3 Output Data ........................................... 59
17.4 Input Commands ................................... 62
17.5 Special Format Output ........................... 68
18 Use Printers ................................................ 70
18.1 Setting up the Printer ............................. 70
18.2 Outputting calibration results ................. 70
18.3 Output of Measurement Data in
Compliance with ISO/GLP/GMP ............ 70
19 Output in Compliance with ISO/GLP/GMP
72
20 Removing the Windshield Door ................... 76
20.1 Removing the Windshield Door .............. 76
20.2 Caring for the balance............................ 77
21 Operate on Batteries ................................... 78
22 Troubleshooting .......................................... 79
23 Specifications ............................................. 80
23.1 Basic Specifications ............................... 80
23.2 Weighing Capacity and Minimum
Readability by Unit ................................. 81
24 Unit Conversion Table ................................. 82
TA Series Limited Warranty ................................ 83
Specifications subject to change without notice.
ii RL-TA Series Operation Manual
Printed in the United States of America.
July 2011
Page 5

1 Precautions Relating to Use
This is a category to indicate improper handling that may
cause physical injury or severe damage to property. Be
sure to follow the directions for safe use to avoid serious
consequences.
Recommended
This term indicates steps that the user should take to ensure
the quality and reliability of the balance.
Meanings of Symbols
Each symbol is accompanied by an instruction.
Example
Prohibitive Symbol
Example
Do Not Use
Do Not Deviate
Do Not
This Section “Precautions Relating to Use” sets forth precautionary notes that the user should observe in
order to prevent physical injury to the user and/or damage to property.
The nature of problems that may result in the event of improper operation, and consequential effects on the
quality and performance of the balance, are indicated under the two categories of “Caution” and
“Recommended,” and explained using symbols.
Mandatory Symbol
Disassemble
Indicates a “mandatory” action that should
be executed without fail.
Indicates a “prohibited” action that must not
be executed.
Do not disassemble or modify the unit.
• Could cause malfunction.
• In case of malfunction do not disassemble the unit.
Contact our Technical Service Division.
Check Level
from Ratings
RL-TA Series Operation Manual 1
Only AC power should be used.
Only use the dedicated AC adapter.
• Use of other types of power or adapters may result
in heat generation or malfunction of the balance.
Page 6

Do Not Move
落下禁止
Do Not Drop
Do Not Leave
Do Not Touch
Do Not Expose
Do Not Expose
Do Not Use
Do not move the balance when a sample
is loaded.
• The loaded sample may fall off the pan and cause
an injury.
Afloat
with Wet Hand
Do not pla ce the balance on an unstable base
or use the balance in a location where it may be
subjected to shock.
• The loaded sample may fall off the pan.
• Accurate measurement may be rendered
impossible.
Do not lay the AC adapter cable in the path
of traffic.
• Somebody may trip on the cable, causing the
balance to fall off, thereby causing injury and/or
damage to the balance.
Do not use the balance with its adjusters
(feet) lifted.
• The balance will become unstable, preventing
accurate measurement.
Do not touch the AC adapter or the balance
with wet hands.
• Could result in an electrical shock.
to Water
to Dust
Do not ex p o se the balance to rain or water.
• Could cause an electrical shock or short circuit.
• The balance will corrode and malfunction.
Do not use the balance in a dusty environment.
• Could cause an explosion or fire.
• Could cause a short circuit or interfere with the
balance’s electrical conductivity, causing it to
malfunction.
2 RL-TA Series Operation Manual
Page 7

o
Err
Recommended
Calibrate
Do Not Apply
Do Not Overload
Do Not Use
Do Not Use
Unplug Adapter
Balance
Calibrate the balance after installation
or relocation.
• Measurement values may contain errors,
preventing accurate measurement from being
conducted.
Force
Avoid applying excess force or impact to
the balance.
• Place the sample to be measured on the balance
carefully to prevent breakage or malfunction.
Do not use the balance in a location were it
may be subjected to abrupt changes in ambient
temperature or humidity.
• Accurate measurement may be rendered
impossible.
• Use the balance in an ambient temperature range
of 5°C to 35°C and with 80% or lower relative
humidity.
Do not leave the balance overloaded. (When it
-
is overloaded, (
• Take down the loaded sample immediately to
prevent breakage or malfunction.
) is displayed.)
RL-TA Series Operation Manual 3
Do not use the balance in a location where it is
subject to direct sunlight.
• The indications would be illegible.
• An internal temperature increase in the balance
may lead to inaccurate measurement.
If the balance is to be unused for an extended
period of time, unplug the adapter.
• This conserves power and prevents deterioration.
Page 8

Do Not Use
Do Not Use
Check Level
Do Not Use
Do not use volatile solvents for cleaning.
• The body may be distorted.
• To clean the unit of stains, use a piece of dry cloth
or cloth soaked in a small quantity of neutral
detergent.
Do not use the balance in a location where it
may be subject to air from an air-conditioning
unit.
• Extreme changes in the ambient temperature may
result in inaccurate measurements.
Do not use the balance on a soft floor.
• When loaded with a sample, the balance may tip or
move, preventing accurate measurements from
being conducted.
Do not use the balance when it is out of level.
• When the balance is out of level, an error may be
caused, preventing accurate measurement from
being conducted.
Place the balance on a level surface.
4 RL-TA Series Operation Manual
Page 9

2 Names of Component Parts
RS-232C connector
(D
Connector for peripheral
devices
(DIN8P)
*
AC adapter connector
Adjuster
Fixed leg
Cover of hanging
hook
Battery case
powered drive system
2.1 Main Unit
(Adjustable leg)
-SUB9P)
Replace the connector cap
when not using AC power.
(Batteryis an optional extra.)
RL-TA Series Operation Manual 5
Page 10
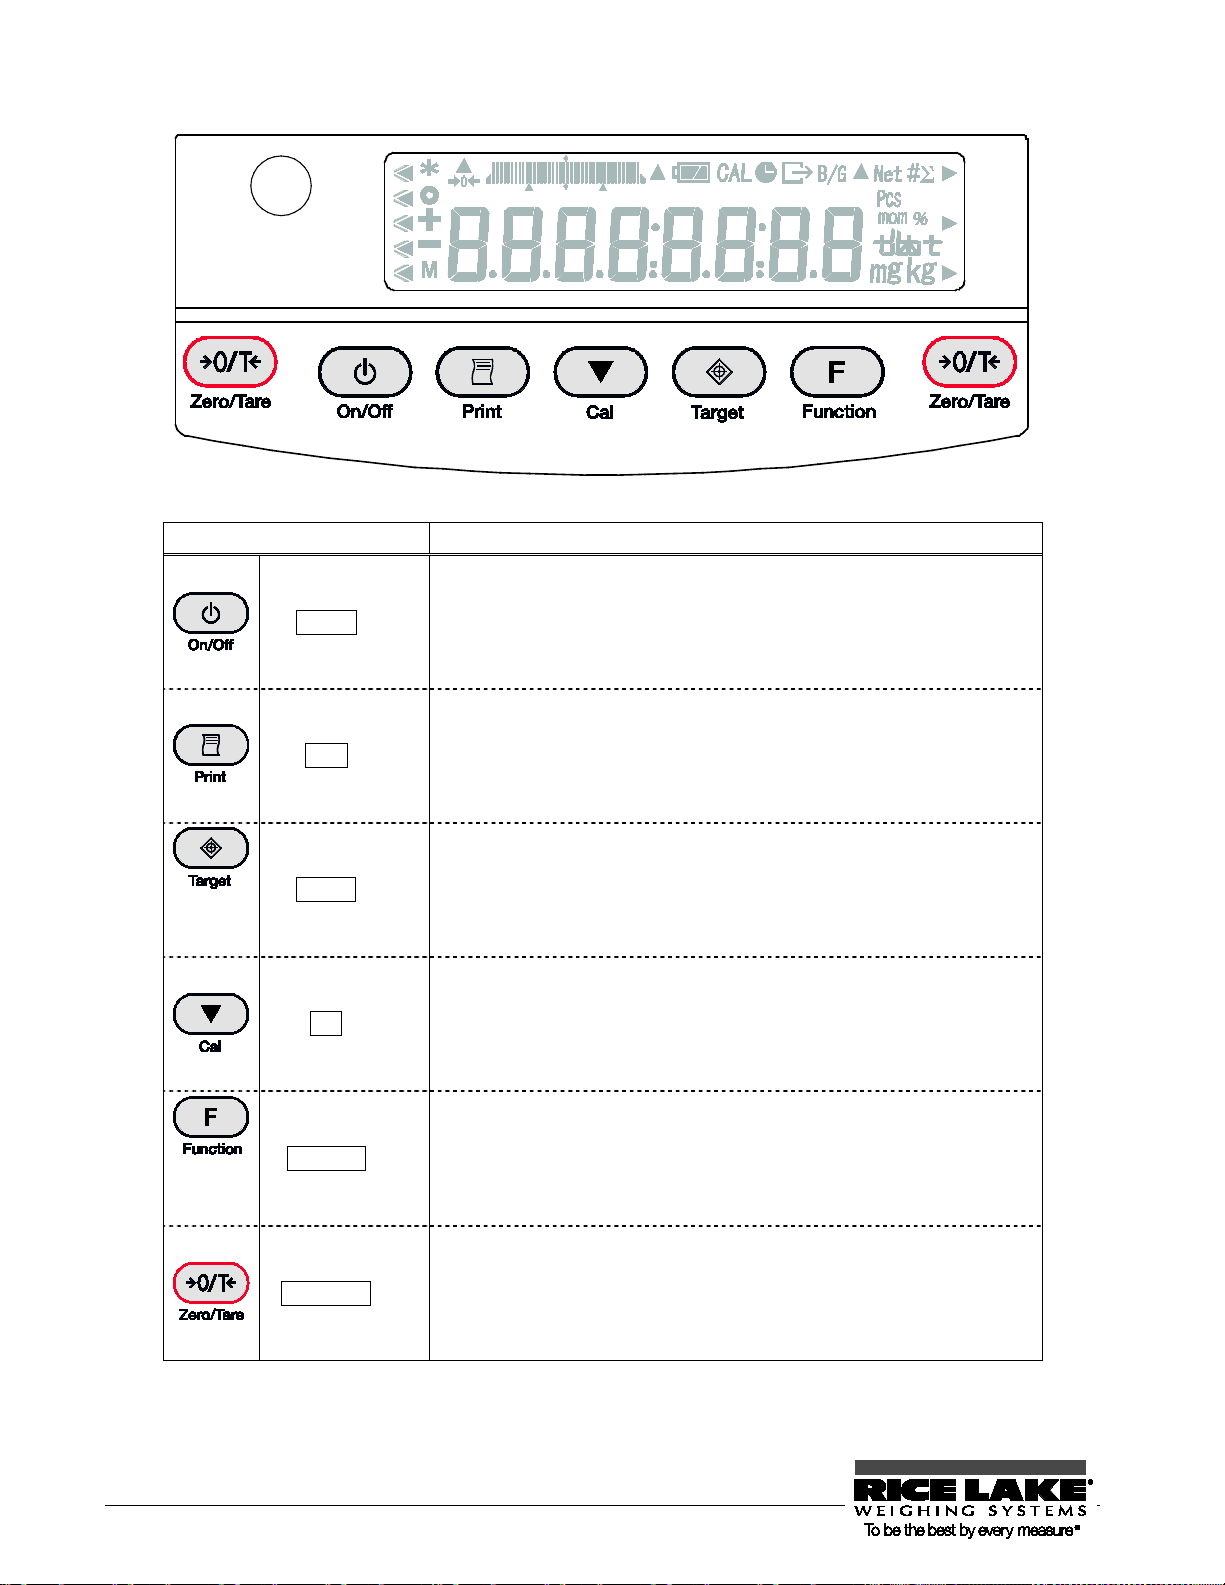
2.2 Operation Keys
Operation key Function
On/Off key
Print key
Target key
Cal key
Function key
Zero/Tare key
Turns the balance on or off.
Starts output.
Pauses the setting and input operation.
[Short press] Toggles the response mode.
[Short press] Stores the settings.
[Continuous press] Inputs the settings.
[Short press] Switches to the span adjustment and span
test modes.
[Continuous press] Starts automatically repeatable
measurements.
[Short press] Toggles the weighing modes.
[Short press] Used to enter numerical values.
[Short press] Used to select a function to set.
[Continuous press] Calls functions.
[Short press] Used for zero-setting or sets the display to
zero by tare range.
[Short press] Used to enter numerical values.
[Short press] Used to select a function.
6 RL-TA Series Operation Manual
Page 11

2.3 Displayed Signs
○
▲, ►
2.3.1 Displayed signs
Display Description
*
+
-
M
→0←
Battery indicator. This is displayed when the balance is powered by
CAL
B/G
Net
Displays the judgment results when the (five-point) limit function is enabled.
Displayed when the balance is in standby mode.
Indicates that the addition function is enabled for accepting an additional load.
Indication of stable balance (If this light is off, the balance is unstable.)
Sign for sample addition when parts counting is performed
Minus
Display of set values from memory (If it is flashing, the value is being saved.)
Zero-point
Bar graph (Refer to Hints on page 44).
batteries. As the gets weaker, the sign is changed into [
(Refer to “Section 21: Operate on Batteries” on page 81).
Displayed when calibration and Ad vice CA L are enable d.
Lights up when date/time is being set or displayed.
Blinks during interval output.
Displayed when data is output in compliance with ISO/GLP/GMP.
Gross weight
Tare sign
] or [ ].
RL-TA Series Operation Manual 7
#
Σ
Pcs
mom
%
mg
Unit converting
Displays a sum total.
Parts counting
Momme
Percentage weighing
Displays the selected unit.
Milligram, gram
Displayed according to the function.
Page 12

3 Installation of the Balance
After the balance has been moved, open the windshield door to allow it to
warm up.
AC adapter connector
1. Attach the pan base and pan.
Attach the pan base and pan to the main unit as shown in the figure.
2. Level the Balance.
Turn the adjustable feet so that the air bubble in the level gauge is within the circle.
3. Connect the AC adapter.
Connect the AC adapter to the balance.
(Refer to “Section 21, Operate on Batteries” on page 81 if the Batteries option is employed.)
adapt to the ambient temperature for stable m easurement.
In addition, allow five minutes after turning on the power for the balance to
8 RL-TA Series Operation Manual
Page 13
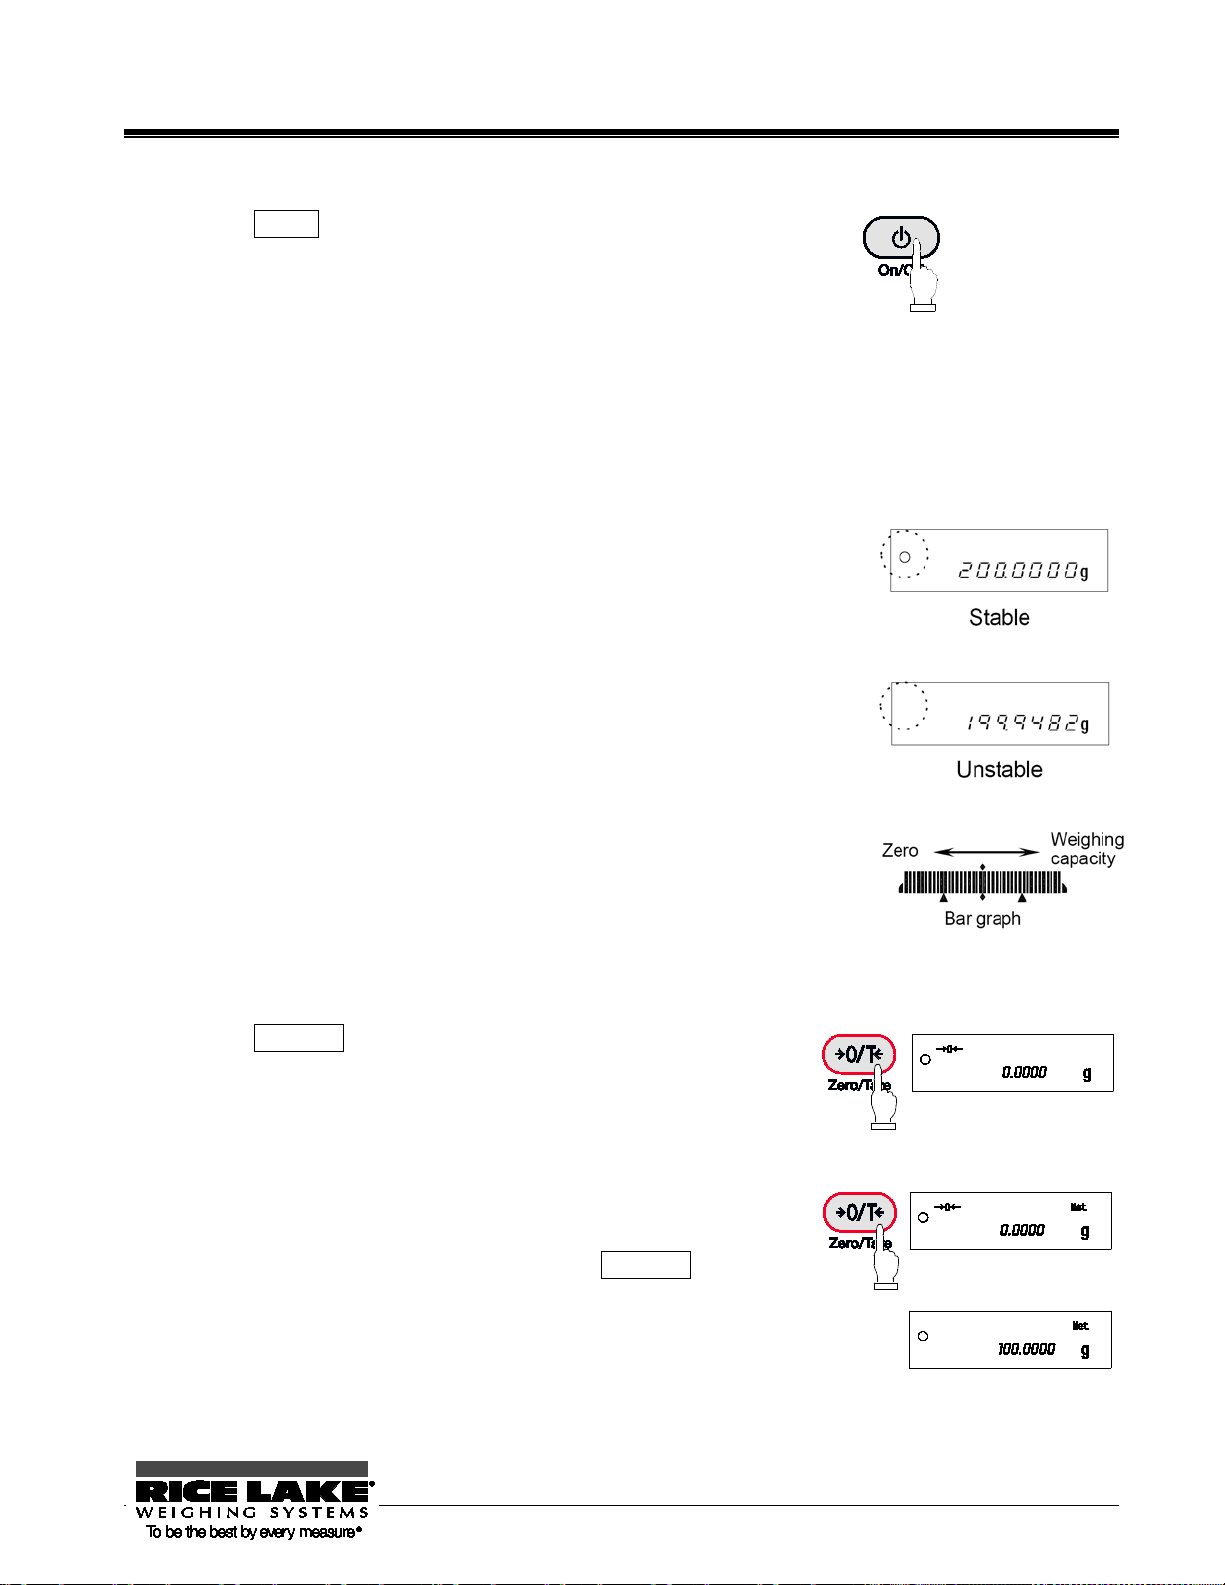
4 Basic Operation
4.1 Power On/Off
Press the On/Off key to turn the power on and off.
The * sign is displayed when the balance is powered by the AC adapter
and is in standby mode.
The balance will start in the mode it was in when last turned off. For example, if you turn off the balance in
the parts counting mode, it will start in that mode when it is next turned on.
(Refer to “Section 5.2: Description of Functions 1” on page 16 for details of the weighing modes.)
4.2 Weighing
Place a sample on the balance and close the windshield door.
A circle will be displayed after the measurement has stabilized.
Read the measurement while the circle is displayed.
The circle will not be displayed or will flicker if the balance is
subject to disturbance such as vibration. Take appropriate
measures to stabilize the balance.
The bar graph indicates the current load in relation to the
balance’s weighing capacity. As the load approaches the
weighing capacity, the bar extends towards the right.
When the weight of an object exceeds the balance’s weighing capacity, [o
- Err] is displayed.
If the pan is removed and the zero-point falls below the original zero-point,
[u - Err] is displayed.
4.3 Zero Adjustment
Press the Zero/Tare key.
Wait until the display becomes stable (the M sign flashes), and set
the display to “0”.
While the zero point is accurately maintained, the [→0←] sign is
displayed.
4.4 Tare (pan)
Place the tare (pan) on the balance and press the Zero/Tare key.
When the display becomes stable, “0” is display ed.
(Continued on next page.)
RL-TA Series Operation Manual 9
Page 14

This operation is called “Tare” and “Net” is displayed while the weight of the pan is being set.
After the weight of the pan has been set, if a sample is placed in the container the balance will display the
weight (net weight).
* When a tare range is set, the weighing capacity is reduced accordingly.
Weighing capacity = original weighing capacity – pan weig ht
Even after the weight of the pan has been set and the display is set to “0,” the value indicated by the bar
graph includes the pan weight.
4.5 Set a Gross Weight
Press the Function key while the weight of the pan is being set.
The gross w ei gh t , which is the sum of the pan weight and the weight
of the sample put in it, is displayed.
The B/G sign is displayed while the gross weight is being displayed.
Pressing the Function key will toggle the display between net
weight and gross weight. (Unit B, net weight, is also displayed if it
has been selected.)
A gross weight can only be displayed when the balance functions as a weighing machine.
1.
2. When a gross weight is displayed, you cannot set a tare range. You can only adjust the
zero-point.
4.6 Single-touch Response Setting
This function allows you to switch the response of the balance with a single touch of the Set button.
The balance will be subject to different levels of vibration depending on where it is placed. Adjusting the
balance’s response according to the magnitude of vibration reduces the variation in its display and the time
required for the display to stabilize.
Pressing the Target key once displays the current settings ([
Pressing the Target key again toggles the display between [ → →FASt].
After the balance settings have been completed, the display automatically returns to the weighing mode.
This function corresponds to the settings [S. rE. *] and [6. ENU. *] of Function 1,
and the settings in Function 1 are also changed at the same time.
(Continued on next page.)
] etc.).
10 RL-TA Series Operation Manual
Page 15
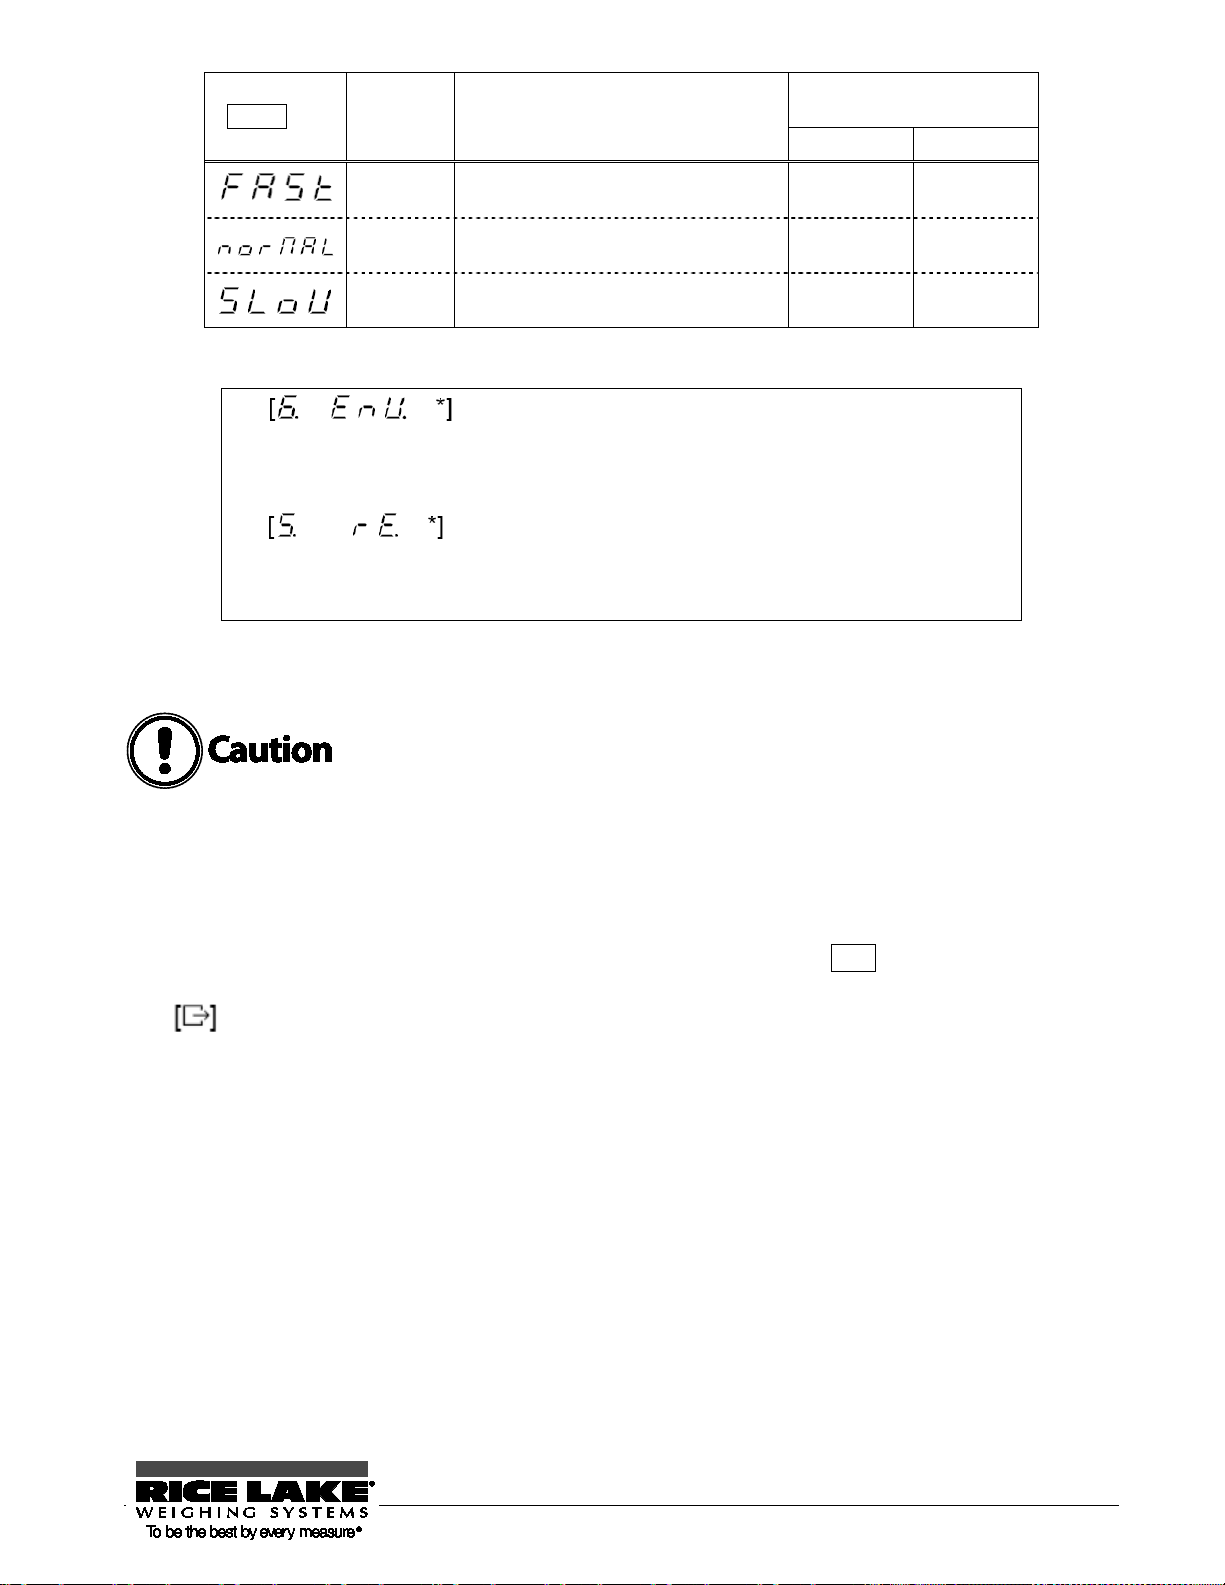
Target key Meanings Description
Corresponding settings in
Function 1
6. EnU. 5. rE.
FAST
NORMAL
SLOW
The balance responds quickly but it
is easily affected by vibration
The balance’s response is
somewhere between fast and slow
The balance responds slowly but is
not easily affected by vibration
0 1
0 3
1 3
(Refer to “Section 5: Function 1” on page 15 for further information on Function 1.)
In , [0] indicates a fast response. Use this setting when the
balance is subject to a low level of vibration.
[1] indicates a slow response. Use this setting when the balance
is subject to a high level of vibration.
In [
, [1] indicates the fastest response. Use this setting when
the balance is subject to a low level of vibration. As the number
approaches [5], the balance’s response becomes slower but it is
also less affected by vibration.
* To adjust the response more finely, use Function 1.
This function is unavailable when the gravimeter or addition function is enabled.
4.7 Data Output
Measured data and GLP data can be output to a personal computer, printer, or similar device via the
built-in RS-232C interface. In the factory default setting, pressing the Print key once will output the
current measured value when the measurement becomes stable.
is displayed while the data is being output.
Refer to “Section 5.5: Interface” on page 20 for further information on the output settings.
4.8 Hanging Measurement
The balance is equipped with a hanging hook to suspend a hanging pan for weighing. Perform hanging
measurements when weighing electromagnetic, electrostatic, or high-temperature samples that cannot be
accurately weighed on the normal pan.
Remove the pan and gently tilt the balance backward.
Take care that the door does not fall off.
(Continued on next page.)
RL-TA Series Operation Manual 11
Page 16
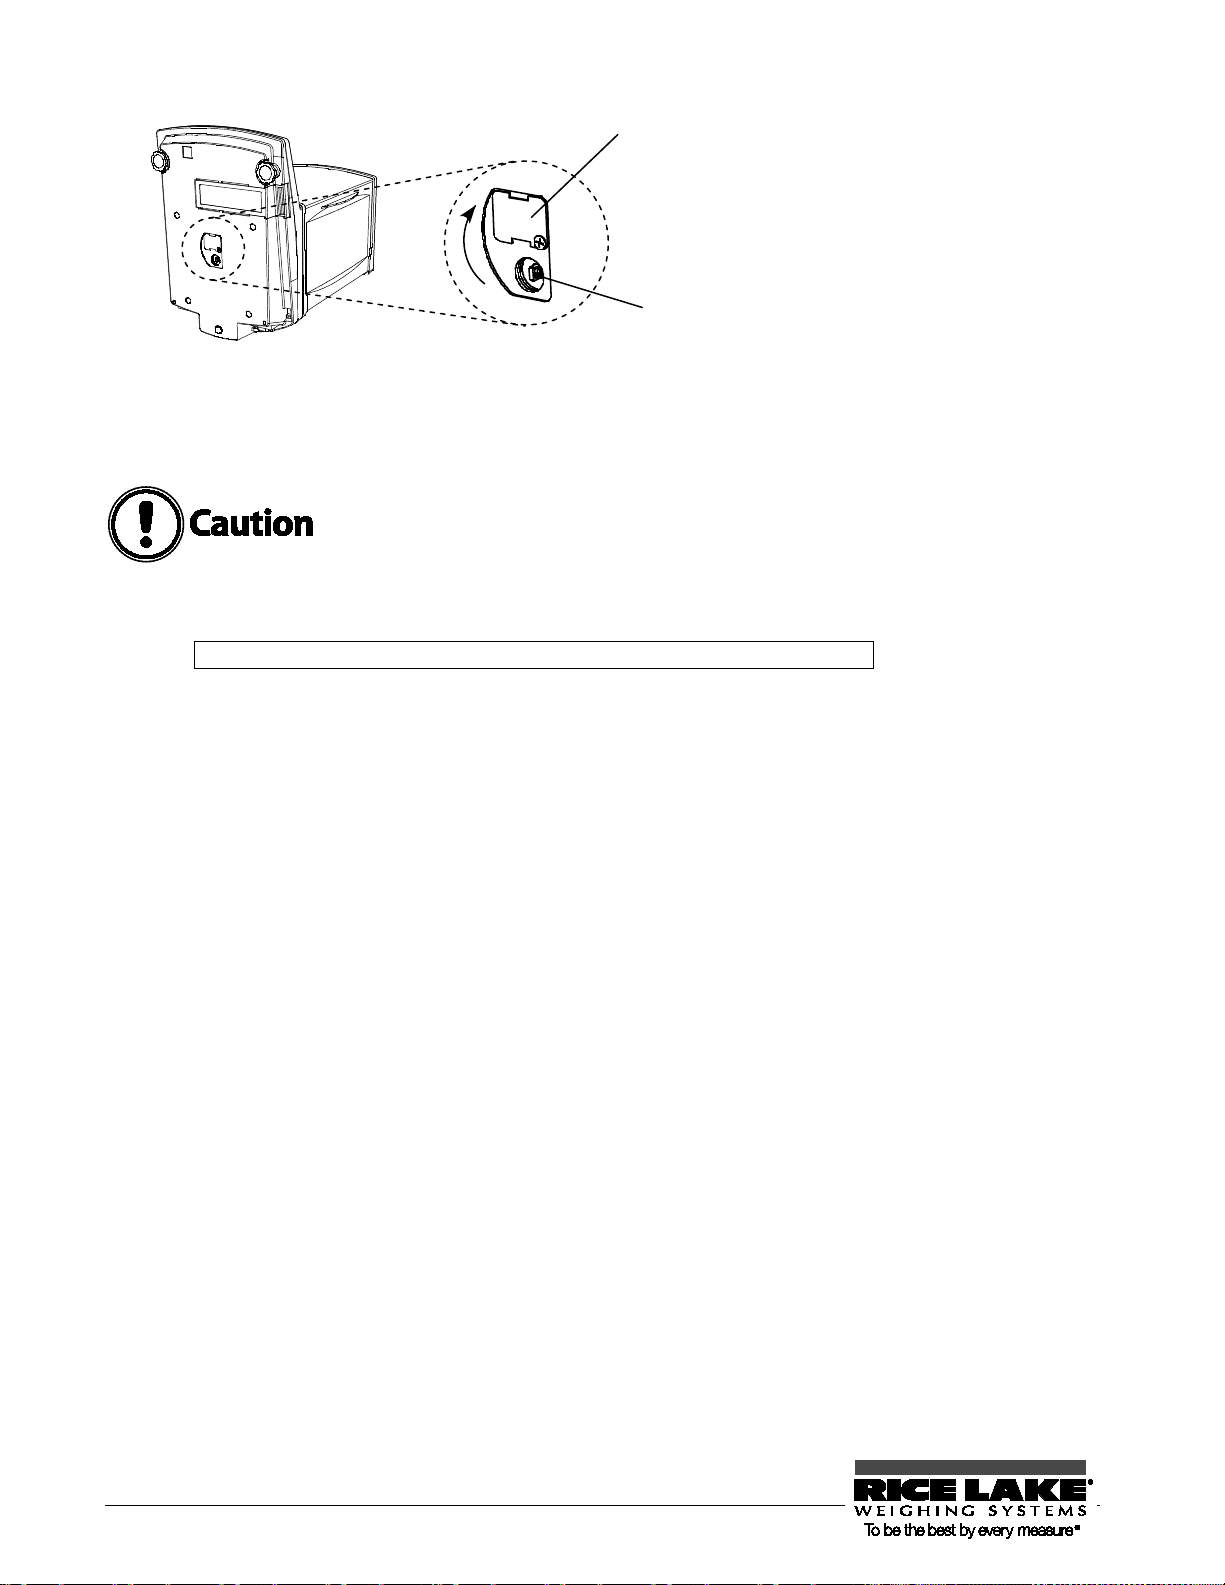
Hook for hanging
measurements
Loosen the sc rew and tur n the
cover 90°.
to secure the cover.
Then tighten the screw
1. Tools (hanging pan etc.) suspended from the hook are regarded as a tare (pan). Weights equal to the
weighing capacity cannot be measured.
Measurable weight = Weighing capacity – Total weight of tools suspended
2. Be sure to close the cover of the hanging hook when not in use to prevent dust from entering the
balance.
12 RL-TA Series Operation Manual
Page 17

5 Function 1
5.1 Setting and Check
1. Call Function 1.
Press and hold the Function key for a few seconds.
When the display is changed to [Func] , release the key.
The display switches to the Function 1 setting screen and the
first setting item [1. Set. 1] is displayed.
(Refer to “Section 5.2: Description of Function 1” on page 16).
2. Select the next setting it em.
Every time you press the Function key, you are moved one
item forward.
3. Change settings.
Pressing the Zero/Tare key toggles the right-hand value.
Choose the appropriate setting.
4. Complete the setting of fu n ctions.
Press the Target key, or press the Function key several times
until the balance enters measurement mode.
The setting of functions is completed, and the balance goes
back into measurement mode.
The setting values of Function 1 are stored after the power is turned off. Therefore, you do
not need to reenter the settings the next time the balance is used unless you wish to change
them.
RL-TA Series Operation Manual 13
Page 18

5.2 Description of Function 1
Contents of Function 1 (1/3)
A star () denotes a factory setting.
14 RL-TA Series Operation Manual
Page 19

A star () denotes a factory setting.
RL-TA Series Operation Manual 15
Page 20

A star () denotes a factory setting.
16 RL-TA Series Operation Manual
Page 21

5.3 Specific Gravity Setting
5.4 Limit/Addition Functions
RL-TA Series Operation Manual 17
Page 22

5.5 Interface
A star () denotes a factory setting.
The data output interval is 0.1 to one second for continuous output. (The interval varies with the measurement
conditions, etc.)
18 RL-TA Series Operation Manual
Page 23
6 Function 2
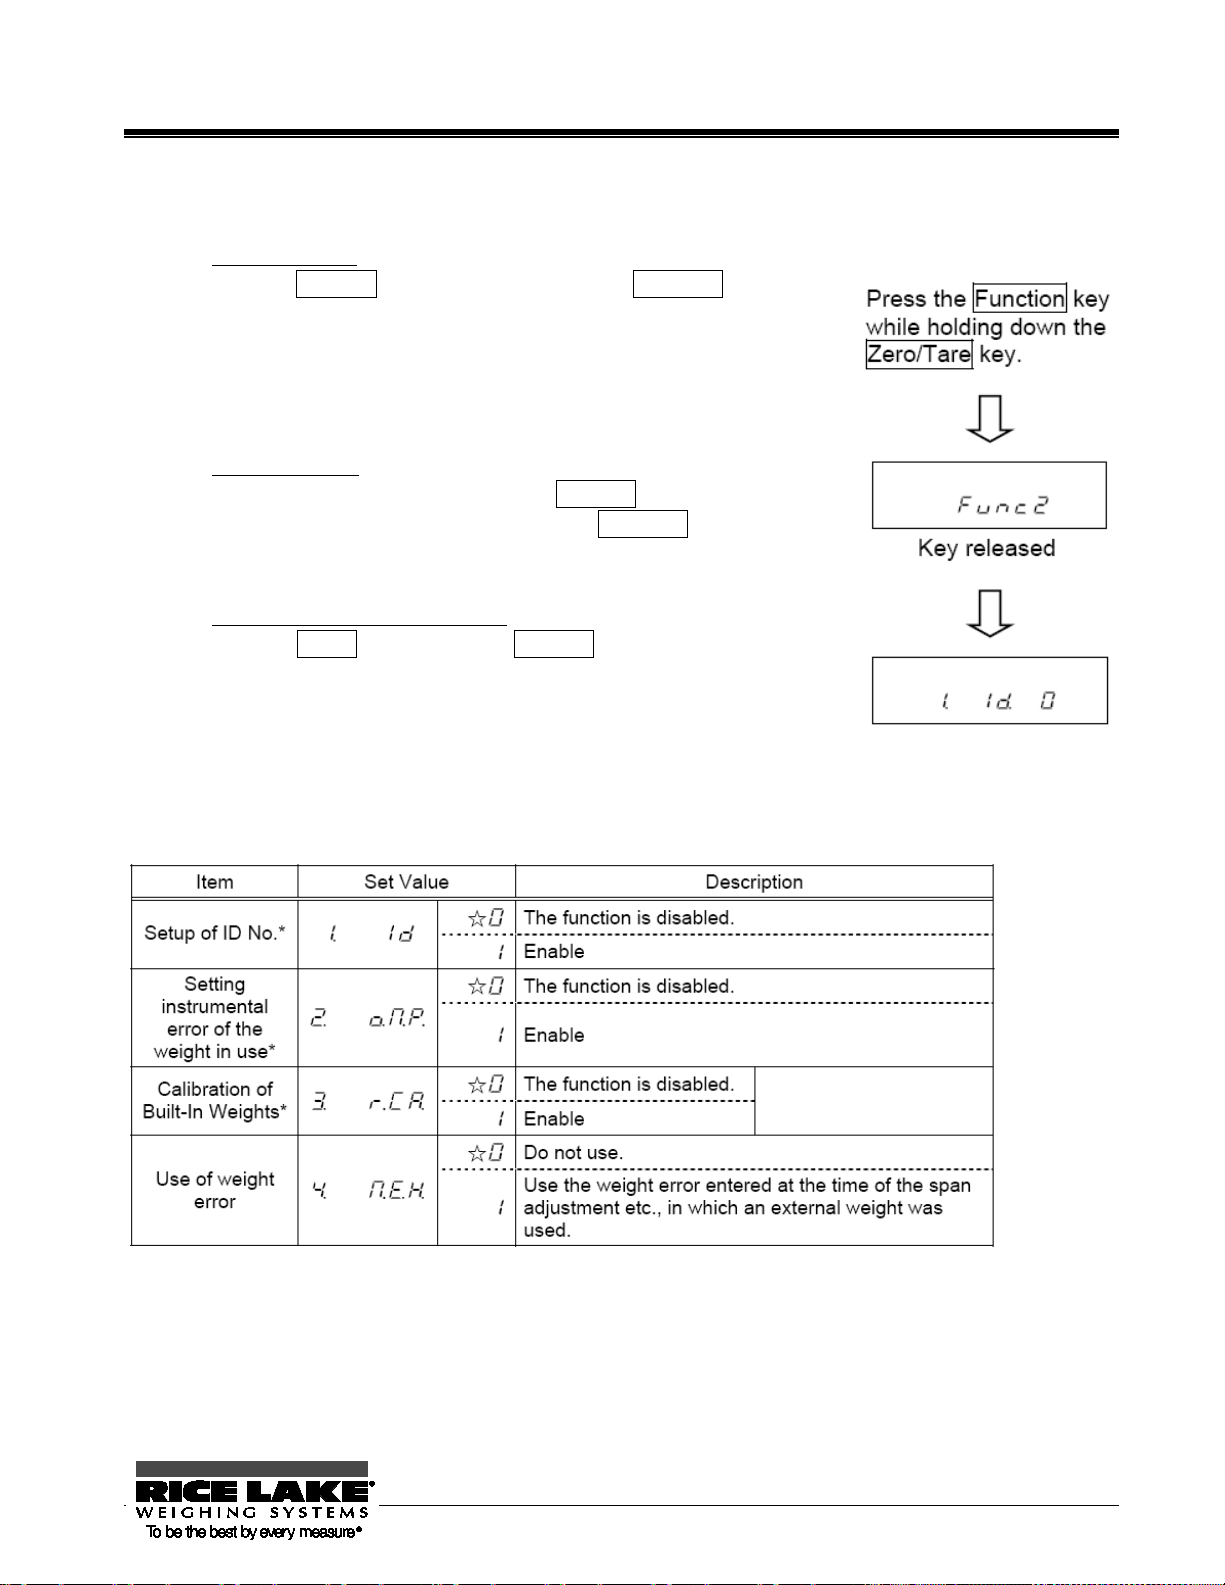
6.1 Calling and Setting
1. Call Function 2.
Press the Function key while holding down the Zero/Tare key.
When [Func2] is displayed, release the key.
The display is changed to [1. 1d 0].
2. Change settings.
Select setting items to change with the Function key.
Change the setting in the right end with the Zero/Tare key.
3. Complete the setting of fu n ctions.
Press the Target key, or press the Function key several times until the
balance enters measurement mode.
The setting of Function 2 is completed, and the balance goes back into
the measurement mode.
6.2 Description of Function 2
A star () denotes a factory setting.
The setting values for the items marked by an asterisk (*) are reset to factory defaults every time you call it.
RL-TA Series Operation Manual 19
Page 24

7 Weighing and Measurement Modes
You can select from one of five weighing modes: weighing machine, parts counting, percentage weighing, unit
converting, and gravimeter. In addition, the balance is equipped with addition and limit functions as additional
functions. All the weighing modes except gravimeter support the additional functions (the addition function and
the limit function) depending on the display unit.
7.1 Weighing and Measurement Modes
When you select a weighing mode and additional functions, you can weigh samples in different ways as
shown below. Every time you press the Function key, the measurement mode is switched.
Weighing Mode
Weighing
machine
Parts counting
Percentage
weighing
Unit converting
Gravimeter
(Solid/Liquid)
Unit A Weight measuring
Unit A B/G Gross weight
Unit B Weight measuring
Unit A Σ
Pcs Counting
Pcs Σ
Unit A Pcs Average unit weight
Unit A Weight measuring
% Percent measuring
% Σ
Unit A Weight measuring
# Coefficient multiplying
# Σ
Unit A Weight measuring
g (Fixed)
Measurement Mode Additional Functions
Unit Function Addition Limit
× ×
× ×
Cumulative weight Display
Cumulative count Display
× ×
× ×
Cumulative percent Display
× ×
Cumulative sum Display
× ×
Measurement of
specific gravity
× ×
×
×
×
×
The or × signs indicate whether the additional functions are available or not.
(: Measurement and display are available. ×: Neither support measurement nor display is available.
Display: The addition value is displayed.)
You can select [g], [mom], or another unit for Unit A and Unit B.
7.2 Weighing Machine
The weighing machine function only supports [g], [kg], and other units of weight. Pressing the Function
key displays the gross weight (refer to page 12).
Other units of weight can also be selected for Unit B.
Pressing the Function key t oggles t he display b etween (N et) Weight of Unit A ⇒ Gr oss weight ⇒ (Net)
Weight of Unit A.
20 RL-TA Series Operation Manual
Page 25
8 Parts Counting
When a specified number of samples are put on the balance, the balance divides the total weight of the samples
by the number of samples to obtain the average sample weight. The balance stores the average sample weight
based on the number of samples initially set. Additional samples, up to three times the initial number, can be
added and the balance will automatically update the average sample weight. This mechanism allows accurate
counting.
* Select
[1. Set 2] (Parts Counting) in Function 1.
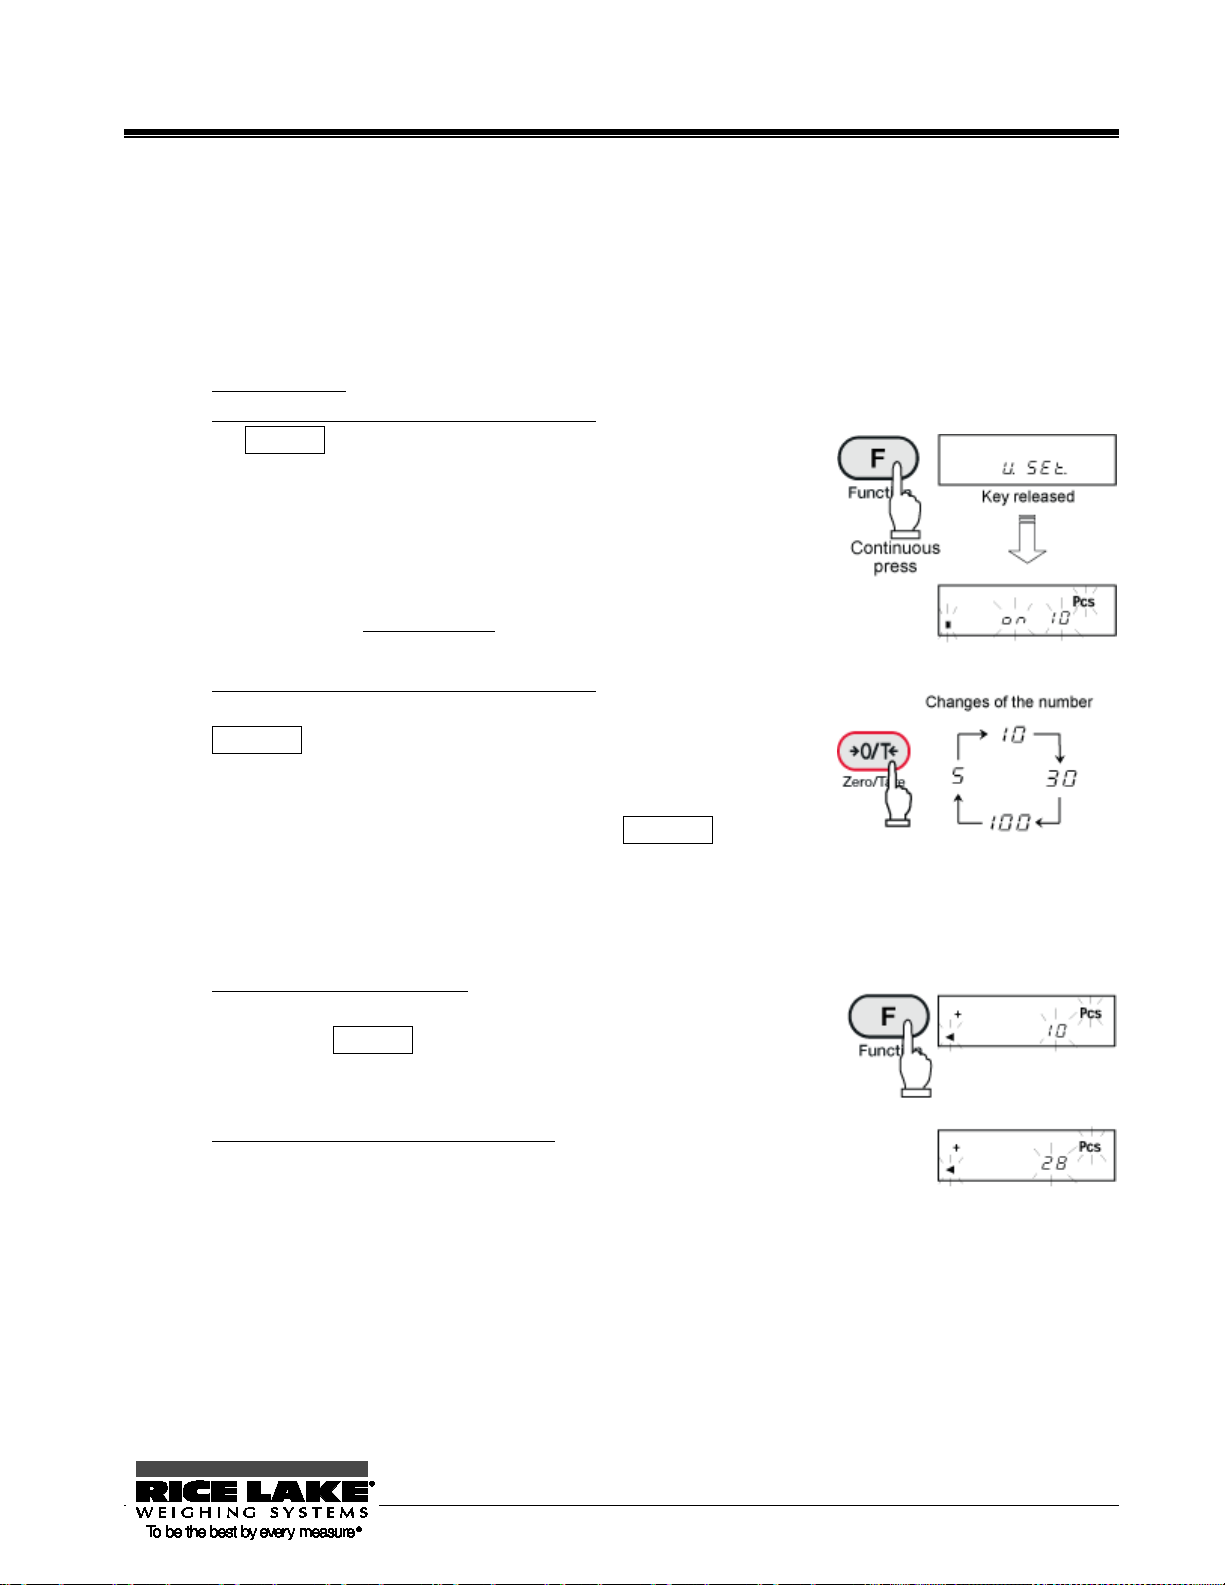
1. Start sampling.
Make sure that the [Pcs] sign is displayed and press and hold
the Function key for a few seconds.
(This operation may be performed with a container placed on
the balance.)
When the display indicates [U. SEt],
release the key.
The display then blinks [on 10].
This indicates to put 10 samples on the balance.
2. Change the number of samples as required.
The number of samples can be changed by pressing the
Zero/Tare key.
If the samples vary considerably in size or are lightweight, or if
more accurate counting is required, press the Zero/Tare key to
sufficiently increase the number of samples.
If you do not need to change the number, skip this step.
3. Put a sample on the balance.
Put as many samples as displayed in [on **] on the balance
and press the Function key.
The display then blinks [10
Pcs
].
4. Put additional samples on the balance.
Add up to three times the displayed number of samples and
wait until the display stabilizes again. The [+] sign is
displayed and the memory is updated.
Every time the [+] sign is displayed, you may add more samples.
(Continued on next page.)
RL-TA Series Operation Manual 21
Page 26

Repeating this operation will improve the resolution of parts counting for more accurate
measurements.
5. Finish sampling.
Press the Function key to finish updating the memory.
The average sample weight is saved and the balance returns to
measurement mode.
6. Counting the number of samples.
After the average sample weight has been saved, the number of
samples put on the balance will be displayed.
Pressing the Function key toggles the display between number
of samples, average sample weight, and total weight.
☆ Hints ☆
1. The [Sub] di spla y that may be shown during a memory update of average unit weight indicates that you
added more than three times as many samples as the displayed number and thus the counting accuracy is
low. Do not add too many samples at a time. Gradually increase the number of samples to increase
counting accuracy.
2. If a sample is lightweight the balance may display [Add] during a memory update of average sample
weight. This indicates that the number of samples is too small and the counting accuracy is low. [Add]
display is turned off to improve the counting accuracy.
3. When these indications are displayed, you can press the Function key to store the average unit weight. In
this case, however, counting accuracy is low, and a counting error may be caused.
4. When [L -- Err] ma y b e displayed to indicate that the average unit weight is too small for the balance to
count the samples. ([L -- Err] will be displayed until a key is pressed.)
For more information on the minimum unit weight supported by the parts counting function, refer to
“Section 23: Specifications” on page 83.
5. Pressing the Print key during sampling cancels the sampling.
6. The average sample weight will be stored even after the power is turned off. If you want to count
different types of samples, perform sampling again.
22 RL-TA Series Operation Manual
Page 27

9 Percentage Weighing
The weight of a referenc e sample is saved as 100% . W hen a sample is placed on the b alance, the balance
indicates the percentage of that sample with respect to the reference sample weight.
A reference sample weight can be set by weighing an actual sample or entering a value.
* Select [1. Set. 3] (Percentage Weighing) in Function 1.
9.1 Set a reference weight by weighing an actual sample
You can make the display indicate the weight percentage (%) of a sample with respect to a reference
sample weight.
1. Start sampling.
Make sure that the [%] sign is displayed and press and hold the
Function key for a few seconds.
(This operation may be performed with a container placed on
the balance.)
The display then blinks [P. SEt].
The previously-saved reference sample weight blinks.
2. Put a sample on the balance.
Put the reference sample on the balance.
3. Save the reference weight.
Press the Function key.
4. Put a sample to weigh on the balance.
The display indicates the percentage of the sample weight with
respect to the saved reference sample weight.
The minimum unit is automatically selected, depending on the saved reference weight.
Min. Indication Range of Reference Weight
L -- Err
1%
0.1%
0.01%
Reference weight < Lower weight limit
Lower weight limit ≤ Ref erenc e weight < Lower weight lim it × 10
Lower weight limit × 10 ≤ Reference weight < Lower weight limit × 100
Lower weight limit × 100 ≤ Reference weight
You cannot set a value below the lower weight limit as a reference weight.
* The lower weight limit depends on the model. For more information, refer to Section 23: Specifications
on page 83.
RL-TA Series Operation Manual 23
Page 28

9.2 Set a reference weight by entering a value
You can enter a reference weight in the balance, and then make the display indicate the weight percentage
(%) of a sample with respect to the reference.
1. Displaying a reference sample weight.
Make sure that the [%] sign is displayed and press and hold the
Function key for a few seconds.
(This operation may be performed with a container placed on
the balance.)
The display then blinks [P. SEt].
The previously saved reference sample weight blinks.
2. Enter a reference weight.
Press the Zero/Tare key.
The digit farthest to the right blinks.
3. Select a number.
Press the Zero/Tare key.
Pressing the key changes the displayed number as shown
on the right.
4. Select digit places to specify a reference weight.
Pressing the Function key shifts the blinking digit to the left,
allowing you to set a higher-order digit.
If the digit furthest to the left is blinking, pressing the key
makes the digit furthest to the right blink.
5. Save the reference weight.
Press the Target key.*
(* Pressing the Print key cancels the setting of a reference
sample weight.)
6. Put a sample to weigh on the balance.
Put a sample to weigh on the balance.
The display indicates the weight percentage (%) of the sample
with respect to the reference.
Pressing the Function key toggles the display between
percentage weight and total weight.
24 RL-TA Series Operation Manual
Page 29

10 Unit Converting
The function to convert units multiplies the weight of a sample on the balance by the saved coeff icient, and
displays the result.
* Select [1 Set . 4] (Unit Converting) in Function 1.
1. Displaying the coefficient setting.
Make sure that the [#] sign is displayed and press and hold the
Function key for a few seconds.
(This operation may be performed with a container placed on
the balance.)
The display then blinks [C. SEt].
The previously-saved reference sample weight blinks.
2. Enter a coefficient.
Press the Zero/Tare key.
The digit furthest to the right blinks.
3. Changing numbers.
Pressing the Zero/Tare key changes the number as
shown on the right.
4. Select digit places to specify a coefficient.
Pressing the Function key shifts the blinking digit to the left,
allowing you to set a higher-order digit.
After a number is set, the minus sign [M] blinks. Pressi ng the
key again makes the digit furthest to the right blink.
5. Save the coefficient.
Press the Target key.*
(* Pressing the Print key cancels the setting
of a reference sample weight.)
6. Put a sample to weigh on the balance.
Put a sample to weigh on the balance.
The weight of the sample is multiplied by the coefficient, and
the result is displayed.
(Continued on next page.)
RL-TA Series Operation Manual 25
Page 30

For example, Displayed value (250.0000)
= Coefficient (2.5) x Sample (100.0000 g)
The increment of the minimum readability is automatically set to 1, 2, or 5 depending on the entered
coefficient.
26 RL-TA Series Operation Manual
Page 31

11 Gravimeter
This manual describes the procedure s for measuring the specific gravity of a solid by hanging it
gravity measurement kit.
A sample’s specific gravity can be measured by using the balance as a gravimeter. Hang the sample from the
balance using an optional hooking device. You may need to use a net, cage, string, or container to hang the
sample from the balance.
from the balance. If you are using the optional specific gravity kit or are measuring the
specific gravity of a liquid, refer to the operation manual that comes with the opt ional specific
11.1 Measurement procedures for specific gravity
1. Preparation for specific gravity measurements.
Put the balance on a pedestal and attach the hanging hook.
Hang a cage or the like that is used for holding the sample.
As the sample weight is also measured in water, prepare a
container with water whose size is enough to put the entire
cage into the water.
In gravimeter mode, [] is displayed.
2. Measure the water temperature in the container and enter
the value into the balance.
Press and hold the Zero/Tare key to enter the temperature
setting mode and then enter the water temperature (for a ny
media other than water, enter the specific gravity value of
the media). (Refer to the descriptions on page 31 for the
procedures to enter the value.)
The value entered is held even after the power is turned off.
3. Reset the display to “0”.
Press the Zero/Tare key with only the cage hung to reset the
display to “0”.
(Continued on next page.)
RL-TA Series Operation Manual 27
Page 32

4. Measure the weight of the sample in the air.
Put a sample in a cage or on a pan, and measure the weight
of the sample in air. After the weight display is stable,
press the Target key to enter the weight. Then, []
blinks in the display for a few seconds and the measured
weight is displayed. When the weight is entered, [] is
displayed in the lower left of the display.
5. Submerge only the hanging cage and set to “0”.
Before the measurement in water, submerge only the cage
and press the Zero/Tare key.
This is for removing any residual error due to the hanging
cage.
* Pressing the Print key interrupts the measurement.
6. Measure the weight of the sample in water.
Put the sample on the hanging cage and submerge the entire
volume.
Be careful that the cage does not touch the bottom of the
container.
After the weight display is stable, press the Target key to
enter the weight.
7. Displaying specific gravity
When the weight is saved, the resulting specific gravity will
be displayed.
Pressing the Function key toggles the display between the
specific gravity and volume of the sample.
8. Return to weight display.
You press the Target key while a specific gravity va lue is
displayed.
The display returns to showing the sample’s normal weight.
☆ Hints ☆
Measurements with smaller size samples may result in some variations in the measured specific gravity
values. In particular, any sample whose specific gravity is larger tends to show more variation.
Use as large a sample as possible for obtaining more stable measurements.
28 RL-TA Series Operation Manual
Page 33

11.2 Entering water temperature or the specific gravity of the media
This is for entering correction data for the liquid media to be used for the measurement. Enter water
temperat ure if the media is water. Otherwise, enter the specific gravity value of the liquid. Use Function
1 [11.NEd. *] for selecting the media as follows:
1. Call the mode to enter a correction value.
Press and hold the Zero/Tare key to enter the temperature
setting mode and then enter the water temperature (for an y
media other than water, enter the specific gravity value of
the media).
If the media is water, [dt] is displayed on the right side of
the display. Otherwise, [
2. Begin entering a value.
Press the Zero/Tare key.
The [0] indication blinks.
3. Enter the value.
Change the value u sing the Zero/Tare key. Pressing the
key changes the value as shown on the right.
Press the Function key to enter a higher-order digit.
4. Save the value.
Upon completing the entry, press the Target key to r eturn to
the weight display mode.
d►] will be indicated in s t ea d.
◄
The acceptable range of numeric entry is specified as follows:
Media Input Data Range
Water Water temperature
Any liquid other than water Specific gravity 0.0001 to 9.9999
0.0 to 99.9°C
If any value outside the above specified range is entered, either the minimum or the maximum value within
the range will be set.
The value set is held even after the power is turned off.
RL-TA Series Operation Manual 29
Page 34

11.3 Gravimeter measurement data output
(Specific gravity of solid)
コタイヒジュウ
2.414
ジュウリョウ
30.0023 g
バイタイヒジュウ
1.325
タイセキ/cm3
10.2198
DENSITY SOLID
2.414
SAMPLE WEIGHT
30.0023 g
DENSITY MED.LIQ
1.325
VOLUME/cm3
10.2198
(Specific gravity of liquid)
DENSITY LIQUID
1.2351
エキタイヒジュウ
1.2351
(Specific gravity of solid)
DENSITY SOLID
2.751
SAMPLE WEIGHT
21.4705 g
TEMPERATURE NOW
15.0 c
コタイヒジュウ
2.751
ジュウリョウ
21.4705 g
ジツスイオン
15.0 c
(1) Output before gravim eter m easurement
With t he gravimeter function, the operation is with the “Pressing the Print key outputs the data” mode,
regardless of the setting by [71. o.c. *].
(2) Output while specific gravity is displayed
[12. dod] is used for selecting the output contents.
The output method can also be selected by [13. A.o.].
(3) Output (prin t) format
When “specific gravity, weight, and actual water temperature or density of media” are all selected in [12.
dod], …. If ”specific gravity only” is selected, only the first and second line values will be outpu t.
In addition, if any statistical calculation is made for the printer, the values in the second line will be printed
being prefixed by a serial number.
Language selection between English and Japanese for printing is made by the GLP function [E3. P.F]
of Function 1.
When water is selected
English Japanese ( Katak ana)
When other than water is selected
English Japanese ( Katak ana)
When the specific gravity of a liquid is select ed
English Japanese ( Katak ana)
(Sample weight)
(Actual temperature)
(Sample weight)
(Specific gravity of medium)
(Volume)
30 RL-TA Series Operation Manual
Page 35

12 Addition Function
The addition func tion adds up the weights of samples put on the ba lance, allowing you to find the cumulative
weight. Except for the gravimeter function, all other functions, i.e., weighing machine, parts counting,
percentage weighing, and unit con verting functions support the addition function.
12.1 Cumulate Function
With the cumulate function, a cumulative weight can be obtained while samples are reloaded.
Select [2. SEL 1 or 3] and [26. Ad. N 1] in Function 1.
1. Reset the display to 0.
Press the Zero/Tare key.
2. Put samples on the balance, and obtain the weight.
Put samples to weigh on the balance. When the asterisk (*)
sign is displayed, you can put additional samples on.
When
weight is a dded, and the cumulative weight is displayed with a
[Σ] sign for several seconds.
3. Put another sample on the balance.
Unload the balance, check that the display indicates “0”, and
put different samples on.
4. Read the weight.
When is displayed, press the Target key.
After the cumulative weight is displayed with a [Σ] sign,
the weight of the sample on the balance will be displayed.
5. Display the cumulative weight.
Press the Function key several times.
The cumulative weight is displayed with a [Σ] sign.
6. Clear the cumulative weight.
Press the Zero/Tare key with the cumulative weight displayed.
Pressing the Function key returns the display to the weight
of the sample on the balance.
(Continued on next page.)
is displayed, press the Target key. The displayed
RL-TA Series Operation Manual 31
Page 36

Obtain a total weight without reloading the balance
Press the Zero/Tare key in step 3 without unloading the balance. This will reset the
display to “0”.
Put additional samples on, and press the Target key. Then, the weight is cumulated
.
1. Put additional samples on when the display indicates “0”.
2. When [t - Err] is displayed when you press the Target key, it indicates that you put additional
samples on twice, that you unloaded some samples, or that you pressed the key without adding
samples.
3. You can add samples when an asterisk (*) is displayed.
4. The [J. tA.] display with Function 1 can be used for turning ON/OFF the function to wait for
stabilization upon additions.
12.2 Net Addition Function
The net addition function automatically performs tare range after an addition, so additions can be
performed without having to replace samples.
Function 1 is [2. SEL 1] and [26 Ad. N 2].
1. Reset the display to “0”.
Press the Zero/Tare key.
2. Put samples on the balance, and obtain the weight.
Put samples to weigh on the balance. When the asterisk (*)
sign is displayed, you can put additional samples on.
When
is displayed, press the Target key. The
displayed weight is added, and the cumulative
weight is displayed with a [Σ] sign for several seconds.
3. The balance automatically sets tare range.
The balance automatically sets the tare range.
4. Put additional samples on the balance to obtain the weight.
When is displayed after adding the sample, press
Target key.
the
The displayed value is added, and the cumulative weight
is displayed with a [Σ] sign for several seconds.
(Continued on next page.)
32 RL-TA Series Operation Manual
Page 37

5. Display the cumulative weight.
Pressing the Function key several times displays
the cumulative weight with a [Σ] sign.
6. Clear the cumulative weight.
Press the Zero/Tare key with the cumulative weight displayed.
* The cumulative weight will be cleared when “zero
adjustment” or “tare range” is performed while
the weight of the sample on the balance is displayed.
Press the Function key to return to the weight display mode.
1. When [t - Err] is displayed when you press the Target key, it indicates that you put additional
samples on twice, that you unloaded some samples, or that you pressed the key without adding
samples.
2. You can add samples when an asterisk (*) is displayed.
RL-TA Series Operation Manual 33
Page 38

13 Limit Function
The limit function judges a measured weight based on the limit values stored in the balance. The limit
function can be set by selecting [2. SEL *] or [2] or [3] in Function 1.
The limit judgment result will be indi cat e d by the [] symbol. The number of judgment points can be set
from one to four.
13.1 Setting the Limit Function
Make the settings of the limit function in Function 1.
While the limit function provides various setting items, carefully read Section 5.4: Limit/Addition
Functions, on page 19, before actually performing the settings.
13.2 Judgment and Saving
A limit value can be judged in the following two ways. Select an appropriate one in Function 1.
(1) Judge by absolute values ........................ Specify an upper weight limit or a lower weight limit directly.
(2) Judge by deviation values ...................... Specify an upper limit or a lower limit with respect to a
reference weight.
A limit value can be stored in the following two ways. They can be used in combination with either of
the above judgment methods.
(1) Put actual samples on the balance .......... Put an actual sample on the balance, and save the weight as a
limit value.
(2) Enter values ............................................ Enter a limit value using the keys.
Once a limit value is entered, it is held after the balance is turned off.
You can set separate limit values for the weighing machine, parts counting, percentage weighing,
and unit converting functions.
When you enter a limit value, it is treated differently between the two judgment methods. (Refer
to Caution 9 on page 43.)
13.3 Display of Judgment Results
When one or two points are set, the [] symbol indicates one of the three judgment points in the left of the
display.
Judgment
Result
Above the upper
limit
Appropriate range
Below the lower
limit
34 RL-TA Series Operation Manual
When one point
(lower limit) is set
N/A Upper limit < Weight
Lower limit
≤ Weight
Weight
< Lower limit
When two points (lower
and upper limits) are set
Lower limit ≤ Weight
≤ Upper limit
Weight < Lower limit
Page 39

When 3- or 4-points are set, triangles [] are displayed in four or five levels according to the judgment
result.
Judgment Result (3- or 4-point setting)
Rank 5
(4-point setting)
Rank 4
Rank 3
Rank 2
Rank 1 Weight < First point
Second point ≤ Weight < Third point
First point ≤ Weight < Second point
Fourth point ≤ Weight
Third point ≤ Weight < Fourth point
The [<] sign stays on in the range where the [] sign is displayed depending on the number of points set.
13.4 Judge by Absolute Values
13.4.1 Set two limit values by putting actual samples on the balance − Judge by Absolute Values −
1. Start the limit function.
Press and hold the Target key for a few seconds.
When the display indicates [L. SEt], release the
key.
The currently saved lower limit is displayed.
2. Put the lower limit sample on the balance.
Put the lower limit sample on the pan.
3. Save the lower limit.
Press the Function key.
When a lower limit is saved, the value is displayed
for a while.
(When one point is set, the setting is completed.)
4. Set an upper limit.
The display then indicates [H. SEt], and you can now set an upper limit.
The currently saved upper limit is displayed.
5. Put the upper limit sample on the balance.
Put the upper limit sample on the pan.
6. Save the upper limit.
Press the Function key.
(Continued on next page.)
RL-TA Series Operation Manual 35
Page 40

When an upper limit is saved, that value is displayed for a
while. Then the balance returns to measurement mode.
13.4.2 Set two limit values by entering values
1. Switch to the setting screen of limit values.
Press the Target key for a few seconds.
When [L. SEt] is displayed, release the key.
The currently saved lower limit is displayed.
2. Enter a numerical value.
Press and hold the Zero/Tare key.
The digit fu rthest to the right blinks.
3. Select a number.
Press the Zero/Tare key.
Pressing the key changes the number as
shown on the right.
4. Select a digit to enter a value
Press the Function key.
The blinking digit shifts to the left, allowing you to set a
higher-order digit.
After a number is set, the minus sign [M] blinks.
Pressing the key again makes the digit furthest
to the right blink.
5. Save the lower limit.
Press the Target key.
The entered lower limit value is displayed.
The next item will be then displayed.
(Continued on next page.)
36 RL-TA Series Operation Manual
Page 41

(When one point is set, the setting is completed.)
6. Setting an upper limit
[H. SEt] is automatically displayed and the currently
saved upper limit blinks.
Set an upper limit in the same way as step 4 above.
After the upper limit is set, press the Target key.
RL-TA Series Operation Manual 37
Page 42

13.5 Judge by Deviation Values
13.5.1 Set two limit values by putting actual samples on the balance − Judge by Deviation Values −
1. Start limit value setting.
Press and hold the Target key for a few seconds.
When [r.SEt] is displayed, release the key.
The current reference value blinks.
2. Enter a reference weight.
Put a sample that provides a reference weight on
the balance, and press the Function key.
When a reference weight is saved, the value is
displayed. The next item will then be displayed.
3. Enter a lower limit value.
The display first indicates [L. SEt], and then the
current lower limit blinks. Put a sample that
provides a lower limit on the balance, and press
the Function key.
The error between the lower limit value and the
reference weight is displayed. Then, you can set
an upper limit.
4. Enter an upper limit value.
The display first indicates [H. SEt], and then the
current upper limit blinks. Put a sample that
provides an upper limit on the balance, and press
the Function key.
The error between the upper limit value and the
reference weight
the setting of a lower limit. Then the balance
returns to measurement mode.
(Continued on next page.)
is displayed in the same way as
38 RL-TA Series Operation Manual
Page 43

13.5.2 Set two limit values by entering values − Judge by Deviation Values −
1. Start limit value setting.
Press and hold the Target key for a few seconds.
When [r.SEt] is displayed, release the key.
The current reference value blinks.
2. Switch to the value input screen.
Press the Zero/Tare key.
A [] blinks in the right end of the display.
3. Enter a reference weight.
Perform the same procedures as given in step s 3
in Section 13.4.2, “Set two limit values by
and 4
entering values” on page 32 to enter a reference
weight.
After the reference weight is entered, press the
Target key to save it.
4. Enter a lower limit value.
Repeat step 3 abov e to set a lowe r limit.
When you have entered the lower limit value,
press the Target key to save the value.
(When one point is set, the balance returns to
measurement mode.)
For making judgments by deviation values, enter the errors between the reference weight and the
upper and lower limits.
(Continued on next page.)
RL-TA Series Operation Manual 39
Page 44

For example:
When a judgment is made with a reference weight of 100.0000 g, a lower limit of 97.0000 g and an
upper limit of 105.0000 g with a 2-point setting, enter the limit values as shown below:
Reference Weight Lower Limit Upper Limit
Absolute weight 100.0000 g 97.0000 g 105.0000 g
Input Data 100.0000 g -3.0000 g 5.0000 g
5. Enter an upper limit value.
Set an upper limit in the same way as in step 3 above.
When you have entered the upper limit, press the Target key.
1. The initial limit values are all zero.
2. You can set separate limit values for the weighing machine, parts counting, percentage weighing, and
unit converting functions. However, absolute values and deviation values are saved in the same
storage area. So if you switch between absolute values and deviation values, limit values are deleted.
3. When the balance is not in measurement mode, you cannot set limit values by key operation. When a
cumulative sum is being displayed, for example, you cannot set limit values.
4. Before you set limit values, adjust the zero-point or set a tare range as required. (You can adjust the
zero-point or set a tare range in sampling for parts counting or weight percent measuring.)
5. You can check limit values by pressing the Target key.
The lower limit is displayed after the display indicates [L. SEt], and the upper limit is displayed
after [H. SEt].
When you set three or four points, saved limit values are displayed as [L1. SEt] - [L3 SEt] or
[L4 SEt] rather than [L. SEt] or [H. SEt].
6. When you made a mistake in an operation, press the Print key.
As the operation will be cancelled, start the operation from the beginning.
7. If you press the Function key when a value is blinking in the display, the weight of the sample on the
balance is set as an actual sample weight. If you press the Zero/Tare key here, you can now enter a
limit value.
8. If the limit value entries are not lined up in the order of magnitude, five triangles [] will be lit
regardless of the number of judgment points. Check the values and enter them again.
9. When you enter a limit value, it is treated differently between the two judgment methods.
To judge by absolute values, enter limit values directly. On the other hand, to judge by deviation
values, you have to specify a range with respect to a reference weight.
(Continued on next page.)
40 RL-TA Series Operation Manual
Page 45

(Example)
Judgment by absolute values
100.0000 g
97.0000 g
105.0000 g
To set a lower limit of 97.0000 g and an upper limit of 105.0000 g with respect to a reference weight
of 100.0000 g, enter the limit values as shown below:
Reference Weight Lower Limit Upper Limit
Absolute weight 100.0000 g 97.0000 g 105.0000 g
Judgment by deviation values 100.0000 g -3.0000 g 5.0000 g
RL-TA Series Operation Manual 41
Page 46

13.6 Bar Graph for the 2-point Scale
You can set two points for the limit function, and display a bar graph to indicate the result in a range
specified by the two points.
Except for the gravimeter function, all other functions, i.e., weighing machine, parts counting, percentage
weighing, and unit converting functions can support this function.
You can put actual samples on the balance or enter values to set upper and lower limits.
You can also judge by absolute values or deviation values.
A bar graph is displayed in one of the following ways:
Bar graph Weight range Description
Upper limit < Weight
Lower limit ≤ Weight
≤ Upper limit
Weight < Lower limit
The whole bar graph is
displayed.
A bar graph to indicate the
judgment result is
displayed.
The bar graph is not
displayed.
1. When the lower limit is the same as the upper limit, no bar graph will be displayed.
2. When a 2-point bar graph is being displayed, a normal bar graph to indicate the rate of a weight to the
weighing capacity is not displayed.
3. When a 2-point bar graph is being displayed, the limit function does not work.
☆ Hints ☆
Different bar graph frames are used depending on whether the balance is in the measurement mode or in
the 2-point bar graph display mode, as shown below:
Bar graph frame Balance condition
Measurement mode
2-point bar graph
42 RL-TA Series Operation Manual
Page 47

14 Calibration and Span Test for the Balance
Span Adjustment
An electronic balance, which is influenced by the acceleration of gravity, indicates different values depending
on the location it is used. For this reason, you should calibrate your balance every time you relocate it. You
should also calibrate it after a long time of no use or when it does not indicate correct values.
To calibrate a balance is called span adjustment, which is required for highly accurate measurements.
Span Test
The span test is used to check the amount of offset in the span of the balance with resp ect to the reference
weight. Performing this function will not calibrate the balance.
* To adjust the span or perform a span test, wait at least five minutes after the power is turned on.
14.1 Span Adjustment with Built-In Weights
1. Press the Cal key.
[Aut. CAL] is displayed.
2. When [
The built-in weight unit starts to operate, and the balance will automatically start span adjustment.
The display changes in the order of [Aut. CAL]→[CH. 0]→[CH. F.S.]→[buSY]→[End].
When span adjustment is completed, the display returns to normal.
PuSH C
] is displayed, press the Cal key again.
14.2 Span Adjustment with External Weight
1. Press the Cal key.
[CAL EHt] is displayed.
NOTE: If CAL is pressed for too long, ArN will be displayed (see Section 14.8).
2. When [
The display first indicates [CAL EHt]→[on 0], and the balance starts adjusting the zero-point.
(If a weight error is used, the corresponding weight error entered will be displayed for about two
seconds.)
PuSH C
] is displayed, press the Cal key again.
RL-TA Series Operation Manual 43
Page 48

3. When [
The balance starts adjusting the weighing capacity.
The display indicates [buSY]→[End] in sequence. When span
adjustment is completed, the balance goes back to the normal display.
on F.S.
] is displayed, put a weight on the pan.
14.3 Span Test with Built-In Weights
1. Press the Cal key.
[t. int] is displayed.
2. When [
The built-in weight unit starts to operate, and the balance will automatically start span test.
The display changes in the order of [t.Int]→[t.0]→ [ t.F.5]→ [dIFF]→ [Weight error].
Pressing any key returns the display to measurement mode.
PuSH C
] is displayed, press the Cal key again.
14.4 Span Test with External Weight
1. Press the Cal key.
[t. Eht] is displayed.
2. When [
The display first indicates [t. EHt]→[on 0], and the balance starts testing the zero-point.
(If a weight error is used, the corresponding weight error entered will be displayed for a few
seconds.)
3. When [
The balance starts a weighing capacity point test.
The display first indicates [dIFF] and then an error.
When you press a key, the balance goes back into the measurement
mode.
* After [dIFF] is completed, the definition of a weight error is as follows:
Weight error = True value – Current weight
In other words, when a weight error is more than “0”, the displayed weight
is less than the actual weight.
PuSH C
on F.S.
] is displayed, press the Cal key again.
] is displayed, put a weight on the pan.
44 RL-TA Series Operation Manual
Page 49

14.5 Calibration of Built-In Weights
This function allows you to calibrate the built-in weight using external weights. You should perform this
operation when the balance has been subjected to a strong impact.
RL-TA Series Operation Manual 45
Page 50

(Pressing any key while an error message is displayed returns the display to
measurement mode.)
* When one of these messages is displayed, calibration will not be performed.
Check that you are using a proper weight, and start span adjustment or a span test again. If span adjustment
with a proper weight results in the same error message, contact our Marketing Division or Technical Service
Division.
4. With the GLP-compatible output selected,
is displayed if span adjustment is performed,
and “Weight error” is displayed if a span test is performed while the data is being output.
While the data is being output, the balance may seem to not be moving but this does not mean it has
malfunctioned. Wait until the output is completed. (Refer to Section 18: “Using a Printer” on page 73.)
46 RL-TA Series Operation Manual
Page 51

14.6 Entry of Weight Error
By entering the weight error of an external reference weight to be used in span adjustment or span test, a
more accurate calibration can be performed. Enter the weight error obtained from the following equation:
(Weight errors are entered in the unit of mg.)
Weight Error = Actual Weight - Nominal Value
Example: For a 100 g weight, a weight error may be = 100.00012 - 100
= 0.00012 = +0.12 mg
1. Select [2. o.NP. 1] in Function 2.
2. Display the weight error.
When you only want to check the current weight
error, press the Function key.
[3. r.CA. 0] for the next item.
3. Start entering the weight error.
Press the Zero/Tare key.
The leftmost digit blinks first.
4. Enter a numerical values.
Pressing the Zero/Tare key allows you to change the
blinking value.
Pressing the Function key makes a higher-order dig it blin k .
After a number is set, the minus sign [M] blinks. Pressing
the key again makes the digit furthest to the right blink.
Pressing the Print key returns the display to Step 2.
5. Save the weight error
Press the Target key.
([3. r.CA.0] shown on the next page is displayed [refe r to page 47].)
Press the Target key to return the display to measurement mode.
Using a saved weight error
For using the weight error entered, set to Function 2 to [4. N.E.H. 1].
RL-TA Series Operation Manual 47
Page 52

☆ Hints ☆
If more than one weight is used in combination, enter the total error of the weights to be used.
The range of the weight error should be within ±100.00 mg. If any value outside the range is entered, it
will result in the display of [r - Err]. When [r - Err] is displayed, press any key to return the display
to Step 2
.
14.7 Advice CAL and Full-automatic Span Adjustment
When Advice CAL determines that a certain amount of time has elapsed or that the temperature has
changed since t he previous span adjustment, the “CAL” sign flashes, indicating that the balance needs to
be calibrated. Perform a span adjustment immediately when the “CAL” sign begins flashing.
To use this function, set Function 1 to [E. AdC 1].
“Full-automatic span adjustment” is available only with the HTR series.
This function automatically performs a span adjustment with built-in weights when “Advice CAL”
determines that the balance needs to be calibra ted , causing the “CAL” sig n to flash .
The span adjustment using built-in weights will be performed about 10 minutes after the [CAL] sign
begins flashing, once the balance has stabilized with no load.
“Full-automatic span adjustment” can be performed only when [8. CA. 1] (span adjustment with built-in
weights) is enabled.
14.8 Auto Repeatability Measurement (ARM)
This is a function to calculate a standard deviation by loading and unloading the built-in weight and
repeating span adjustment 10 times. Stable measurement can be performed by adjusting the response
through the single-touch response setting function.
Press and hold the Cal key for a few seconds. When
[ArN] is displayed, release the key.
After a while, the display switches to [Cnt. 1] and the
measurement starts. As the repeatability measurement
proceeds, the number of measurements displayed in
[Cnt. *] increases accordingly until it reaches [10].
When the measurement is completed, the standard deviation, for example, [0.000073g], is displayed.
Pressing any key returns the display to measurement mode.
To cancel the measurement, press the Print key.
Refer to page 12 for setting the single-touch response.
48 RL-TA Series Operation Manual
Page 53

15 Date and Time Setup
15.1 Time Setup
Set the time in Hour-Minute-Second format on a 24-hour basis.
1. Display the time.
Press the Function key for a few seconds. When
the display switches from [Func] to [d - SEt],
release the key.
Press the Function key one time.
[t INE] is displayed, and then the clock time is displayed.
2. Set the time.
Press the Target key. You can change a blinking digit.
Use the Zero/Tare key to change the blinking digit.
Use the Function key to blink the next digit to the right.
If you press the Function key when the rightmost digit is blinking,
the leftmost dig i t blinks.
When you press the Print key before saving a time, the original time is displayed.
3. Save the time.
Press the Target key.
The date is displayed. Press the Function key to exit the setting screen.
RL-TA Series Operation Manual 49
Page 54

15.2 Date Setup
The last two digits of the year are displayed. You can change the date format in Function 1.
1. Display the date.
Performing step 1 of Section 15.1 to display [d - SEt].
(If this operation is performed after Section 15.1,
skip this step 2
Press the Function key to display the clock time and press the Function key again.
The display automatically indicates a date after indicating [dAtE].
2. Set a date.
Press the Target key. You can change a blinking digit.
Use the Zero/Tare key to change the blinking digit.
Use the Function key to blink the next digit to the right.
If you press the Function key when the rightmost digit is blinking,
the leftmost dig i t blinks.
When you press the Print key before saving a date, the original date is displayed.
3. Save the date.
Press the Target key.
.)
50 RL-TA Series Operation Manual
Page 55

16 Various Functions
16.1 Auto-Zero (Zero Tracking)
This is a function to automatically adjust even a slight deviation of the zero-point caused by the
environment in which the balance is used. In [3. A.O *] of Function 1, the adjustment level can be set.
[1] is the lowest setting. The degree of adjustment will increase as the setting increases. Selecting [O]
disables this function.
16.2 Auto Backlight OFF
This function turns off t he backlight if the balance is left untouched in measurement mode for about three
minutes.
To use the Auto Backlight OFF function, enable it in Function 1 [A. A.b. 1].
When the backl ight goes off in Auto Backlight OFF mode, touching the balance or pressing any key turns
it back on again.
Under the following conditions, the Auto Backlight OFF function will not work eve n if [A. A.b. 1] is
enabled.
1. During the setting of Function 1, Function 2, the time or date, or the interval function.
2. An object is put on the pan, and the display is not stable.
16.3 Auto Power Off
This fu nction turns off the backlight when the balance is left untouched in measurement mode for about
five minutes. This function is only available when the balance is operated by batteries, and is used to
extend the battery lifetime.
To use this function, enable it in Function 1 [9. A.P. 1].
[9. A.P. 1] does not work under the following conditions:
1. You are setting Function 1, Function 2, time or date, or the interval function.
2. An object is put on the pan, and the display is not stable.
3. The balance is operated on the AC adapter.
RL-TA Series Operation Manual 51
Page 56

16.4 Set Unit
This is a function to allow you to select two units (unit A and unit B) and switch between the units.
Which unit to display can be set in Function 1. You can also set the same unit for unit A and unit B.
Pressing the Function key switches the unit between unit A and unit B.
To use unit B, select the weighing machine function in Function 1 [1. Set 1]. Un it A can be used in all
the measurement types of the balance.
16.5 Minimum Readability Setting
This function changes the minimum readability. The increment of the minimum readability changes in
the order of 1, 2, and 5. T he larger the minimum readability becomes, the less the balance is affected by
disturbance. In addition, it takes less time for the balance reading to become stable.
You can also set the same unit for unit A and unit B in “Section 16.3, Auto Power Off” and switch the
minimum readability between unit A and unit B.
For example, when grams are used the minimum readability is as follows:
Function 1
Setting
values
C2. d.A
C4. d.b
1
2
3
4
5
Minimum
Readability
0.0001 g
0.0002 g
0.0005 g
0.001 g
0.002 g
16.6 Date Display
This is a function to set the date format to be displayed in the balance or output to a printer.
Set date format in Function 1 [F. dAtE *]:
16.7 Time Stamp Output
This is a function to output measurement data with the current time. You should set the time before this
function is used.
To use this function, enable it in Function 1 [G. t.o. 1].
52 RL-TA Series Operation Manual
Page 57

16.8 Save Tare Weight Function
This is a function to use the latest tare weight when the On/Off key is pressed to turn on the balance. Use
this function when you turn the balance on or off with a sample and tare put on the pan.
To use this function, enable it in Function 1 [J. tArE 1]. The s a ve d tar e w eigh t i s u p d at e d e very time a
tare range is set.
Leaving the balance loaded with a substance and tare for a long period may result in a larger error in
weighing. You should set the tare range regularly.
16.9 Direct Start
This is a function to turn on the balance automatically when it is connected to the AC power. You can use
this function when the balance is used in conjunction with other devices. To use this function, enable it in
Function 1 [L. d.St. 1].
RL-TA Series Operation Manual 53
Page 58

16.10 Interval Output Function
This function outputs data at regular intervals. Intervals can be set in hours, minutes, or seconds. To use
the interval output function, select [61. o.c. A] or [61. o.c. b]
1. Call the interval function.
Press and hold the Target key for a few seconds. When
[Int. UAL] is displayed, release the key for a few
seconds.
The display indicates an interval with the leftmost digit
blinking.
2. Set an interval.
Press the Zero/Tare key to change the value of the
blinking value.
Function key to blink the next digit to the right.
If you press the Function key while the rightmost digit is
blinking, the leftmost digit blinks.
Pressing the Print key cancels the entered
value and returns the display to measurement
mode.
3. Save the settings, and go back to measurement mode.
Press the Target key.
in Function 1.
1. The output stops while Function 1 or 2 are displayed.
2. [6 - Err] is displayed if the interval is set to “0”. Set another interval.
(Press any key to delete the error message.)
* The current time can be output with the measurement data. To output the time with the measurement
data, refer to 16.7: “Time Stamp Output” on page 54.
54 RL-TA Series Operation Manual
Page 59

16.11 Input of ID No.
An ID number is used when data is printed in compliance with ISO/GLP/GMP. Set an ID number when
you print data.
When an ID number is displayed, two triangles, [] and [] are displayed in the upper left part of the
display.
You can use up to six digits in an ID number. You can use [_] (blank) → [0-9] → [A-F] → [ - ], which
are displayed in this order.
1. Select [1. 1d 1] in Function 2.
Press the Function key to display the ID number.
2. Display an ID number.
The current ID number is displayed.*1
3. Start to enter an ID number.
Press the Zero/Tare key.
The leftmost digit blinks first.
4. Enter an ID number.
Press the Zero/Tare key to change the
blinking value.
Function key to blink the next digit to the right. If
you press the Function key when the rightmost
digit is blinking, the leftmost digit blinks.
(Pressing the Print key returns the display to Step 2.)
5. Save the ID number.
Press the Target key.
(The display switches to the next item
[2. o.N.P.0].)
Pressing the Target key again returns the display
to measurement mode.
* If you only want to check the ID number, hold the Function key.
The display switches to the next item [2. o.N.P.0].
RL-TA Series Operation Manual 55
Page 60

17 Input/Output Functions
1 2 3 4 5
6 7 8 9
D-SUB9Pオス・コネクタ:リアパネル
D-SUB9P Male Connector: Rear Panel
17.1 RS232C Output
17.1.1 Connector pin numbers and functions
Pin No. Signal Name Input/Output Function & Remarks
1 - - 2 RXD Input Receiving data
3 TXD Output Transmitting data
4 DTR Output HIGH (When the balance is powered ON)
5 GND - Signal ground
6 - - 7 - - 8 - - 9 - - -
Be sure to disconnect the AC adapter from the power outlet before plugging or unplugging the connector.
56 RL-TA Series Operation Manual
Page 61

17.1.2 Connecting between the balance and a PC
はかり
D-SUB9P
IBM-PC/AT 互換機
D-SUB9P
TXD
RXD
GND
DCD
RTS
CTS
DSR
DTR
RXD
TXD
GND
3
2
5
1
7
8
6
4
2
3
5
Balance
IBM-PC/AT compatible machine
PC9801
D-SUB25P
TXD
RXD
GND
DCD
RTS
CTS
DSR
DTR
RXD
TXD
GND
5
3 2 5
20 7 8 6 4
D-SUB9P
2
3
Balance
Sample connection with an IBM-PC/AT compatible machine
Sample wire connection with PC9801
RL-TA Series Operation Manual 57
Page 62

17.1.3 Interface specifications
Logic “1”
Logic “0”
Data bit
Start bit
Parity bit
Stop bit
(1) Transmission system Serial transmission, Start-stop synchronization
(2) Transmission rate 1200/2400/4800/9600/19200 bps
(3) Transmission codes ASCII codes (8/7 bits)
(4) Signal level Compliant with EIA RS-232C.
HIGH level (data logic 0) +5 to +15 V
Low level (data logic 1) -5 to -15 V
(5) Bit configuration Start bit one bit
Data bits 8/7 bits
(“7 bit” can be specified only for the extended 7-digit numeric format.)
Parity bit 0/1 bit
Stop bits 2/1 bit
(“one bit” can be specified only for the extended 7-digit numeric format.)
(6) Parity bit None/Odd/Even
LSB MSB
(1) (2) (3) (4) (5) (6) (7) (8) (9) (10) (11) (12)
(eight bits)
(May be omitted)
(for two
bits)
58 RL-TA Series Operation Manual
Page 63

17.2 Type of Communication Texts
This interface function uses the following three types of communication texts:
(1) Output data Data, such as weight values, that is output from the balance to an external unit
(2) Input commands Commands to control the balance from an external unit
(3) Response Response that is output from the balance to an input command
Caution
1. All of these communication texts can be used for RS232C output.
2. Only output data (1) can be used for a peripheral output unit.
17.3 Output Data
You can select one from the following three formats in Function 1:
17.3.1 Data format
(1) 7-digit numeric format
Consists of 15 characters including terminators (CR=0DH, LF=0AH). A parity bit can be appended.
1 2 3 4 5 6 7 8 9 10 11 12 13 14 15
P1 D1 D2 D3 D4 D5 D6 D7 D8 U1 U2 S1 S2 CR LF
(2) Extended 7-digit numeric format
Consists of 15 characters including terminators (CR, LF). A parity bit can be appended.
This is a n ext e nde d ver s ion o f t he 7 -digit numeric format. T he extended version is different from the
7-digit numeric fo rmat in that:
the data length can be seven bits rather th an eight bits, and
the stop bit length can be one bit rather than two bits.
The extended version is the same as the normal 7-digit format in other bits. However, if yo u select
Japanese (katakana) for [E3. P.F.] (printed language) in Function 1, the data length is automatically
set to eight bits.
17.3.2 Polarity (P1: 1 character)
P1 ASCII code Description
+ 2BH When data is zeto or positive.
- 2DH When data is negative.
RL-TA Series Operation Manual 59
Page 64

17.3.3 Numeric data
6-digit numeric format: (D1-D7: seven characters)
7-digit numeric format: (D1-D8: eight characters)
D1 to D7(D8) ASCII code Description
0 – 9 30H to 39H Digits 0 – 9
* Decimal point (floating)
●
SP (Space) 20H
2EH
* Omitted when numeric data does not contain decimal
places. In this case, space is output to the least
significant digit.
* A space heading a numeric value
* When numeric data does not contain decimal places,
space rather than a decimal point is output to the least
significant digit.
*1
*1 A numeric value is headed by 0 (30H) by factory default setting. You can change the function setting
so that it is headed by space (20H) rather than “0”.
17.3.4 Unit (U1, U2: 2 characters)
U1 U2 ASCII code Unit Balance indicators
M G 4DH 47H milligram mg
(SP) G 20H 47H gram g
C T 43H 54H carat
O Z 4FH 5AH ounce
L B 4CH 42H pound
O T 4FH 54H troy ounce
D W 44H 57H pennyweight
G R 4BH 52H Grain GN
T L 54H 4CH tael (Hong Kong)
T L 54H 4CH tael (Singapore, Malaysia) ►Top right
T L 54H 4CH tael (Taiwan) ► Bottom right
M O 4DH 4FH momme mom
t o 74H 6FH tola
P C 50H 43H parts counting Pcs
(SP) % 20H 25H percenta ge weig hi ng %
(SP) # 20H 23H
Coefficient computation
result
#
60 RL-TA Series Operation Manual
Page 65

17.3.5 Judgment result when the limit function is enabled (S1: 1 character)
S1
ASCII Code
Description
L
4CH
Too little (LO)
4
34H
Rank 4
d
64H
Gross
1- or 2-point scale G 47H Proper (OK)
H 48H Too much (HI)
1 31H Rank 1
2 32H Rank 2
3 33H Rank 3
5 35H Rank 5
T 54H Cumulative value
U 55H Unit weight
(SP) 20H No judgment result or no data type specified
3- or 4-point scale
Data type
17.3.6 Status (S2:1 character)
S2 ASCII Code Description
S 53H Data stable *
U 55H Data unstable *
E 45H
(SP) 20H No status specified
Data error (Indicates that data other than S2 is invalid.)
([o - Err], [u - Err])
* Data that is independent of whether the weighing condition is stable or not, such as cumulative values
and unit weights, is independent of whether S2 is S or U when it is output.
17.3.7 Output data other than measurement data
The following data is accompanied by our proprietary printer control commands prior to and after the data
when output.
(1) Interval output
When each interval output is started or stopped, a header and a footer are output.
Header
‘
-’ is output for 15 characters and terminators (CR=0DH, LF=0AH).
1 2 3 4 5 6 7 8 9 10 11 12 13 14 15
- - - - - - - - - - - - - - -
Footer
Two linefeeds are inserted.
(Continued on next page.)
RL-TA Series Operation Manual 61
Page 66

Time output
When the time stamp function is enabled, the time is output one line above the output data.
1 2 3 4 5 6 7 8 9 10
h h : m m : s s CR LF
* hh: hour (00-23), mm: minute (00-59), ss: second (00-59)
17.4 Input Commands
The following eight input commands are supported:
(1) Tare range command (5) Request time output command
(2) Set output control command (6) Set interval command
(3) Set measurement mode command (7) Span adjustment/test command
(4) Request date output command (8) Setting limit values
17.4.1 Procedure for transmission
(1) An input command is sent from an external device.
The ful l-duplex transmission system allows you to send an input command at any time independently
of the data transmit timing of the balance.
(2) Upon successful completion of an input command, the balance will send out either a normal
completion response or the data requested by the command. If the operation has not resulted in
normal completion, or if the received input command is invalid (in error), the balance will transmit an
error response.
When the balance is in normal display mode, it usually sends a response to an input command within
one second after it is received.
However, if the balance receives a tare range command when the Set Tare function is set so that the
display is reset to “0” when the balance is stabilized after the Zero/Tare key is pressed, or if it receives
an input command that takes a long time, it sends a response after the command is completely
processed.
If the balance receives an input command when you are setting a function, when it is under span
adjustment, or it is busy for other reasons, it sends a response after that operation is completed.
1) Commands to which a response is sent back after a specified operation is executed:
Tare range command, span adjustment/test command
2) Commands to which a response is sent back immediately or in one second after they are received:
Commands other than those specified in (1) above
3) Once you have sent an input command from an external device, do not send another input command
to the balance until the external device receives a response to the command from the balance.
62 RL-TA Series Operation Manual
Page 67

17.4.2 Response
You can select the response format of either the [A00/Exx format] or the [ACK/NAK format] in Functi on
1.
(1) [A00/Exx format]
Consists of five characters including terminators (CR, LF).
1 2 3 4 5
A1 A2 A3 CR LF
(2) ACK/NAK format
Consists of one character (Does not contain a terminator).
1
A1
Response types
A1 ASCII code Meaning
ACK 06H Successful completion
* Command error
(when an errant command is received)
NAK 15H
* Numeric format error
* Proces s ing inter rupted
* Proces s ing terminated abnormally
* Other errors
* The following descriptions and tables assume that the [A00/Exx format] is selected as the response
format.
Think of A00 as ACK, and E00 as NAK.
RL-TA Series Operation Manual 63
Page 68

17.4.3 Command format
C1
C2
ASCII code
Description
Value
Response
C1
C2
ASCII code
Description
Response
O 0 4FH
30H
O 1 4FH
31H
unstable)
(whether the balance is stable or unstable).
make the balance stable.
if the balance is stable.
O 8 4FH
38H
O 9 4FH
39H
Output once after stabilized
Interval function
time elapses.)
(1) Tare range (zero-setting) comma nd
Set Tare
T (SP) 54H 20H
Range
Adjust the
zero-point
(2) Set output control command
Stop output
Output continuously at all times
O 2 4FH 32H
O 3 4FH 33H
O 4 4FH 34H
O 5 4FH 35H
O 6 4FH 36H
O 7 4FH 37H
Output continuously if stable (Stop output if
Output once when the Print key is pressed
Output once when the balance is stable.
Output when a substance is lifted to cause
the display to indicate a value below zero,
and then another substance is put on to
Output once when the balance is stable.
Stop output when unstable. Output once
when the balance is stabilized again (the
output includes zero) even if it is not
reloaded.
Output once when the balance is stable.
Output continuousl y when unstable. Output
is stopped after a single output w hen the
balance is stable even if it is not reloaded.
Output once when the Print key is pressed
A00: Successful completion
E01: Command error
None
E04: A tare range cannot be set or
the zero-point cannot be
adjusted (because of a range
violation or a weight error).
A00: Successful
completion
E01: Command
error
E02: Interval
time error
(only with
OA or OB)
O A 4FH 41H
O B 4FH 42H
* Commands O0 to O7 control output in the same way as the settings in Function 1.
* Commands O8 and O9 are used to request data from the balance.
* Once executed, O0 to O7, OA, or OB commands is held until the next command is input. However,
output control is reset to the function setting when the balance is turned on again.
* When command OA or OB is input, the balance initiates the interval function, and when the same
command is input again, it terminates the function.
* When either an O8 or O9 command is executed, it returns to the state of “O0”.
64 RL-TA Series Operation Manual
Output once immediatel y
(Output once each time the output time
elapses.)
Interval function
(Output once if stable each time the output
Page 69

17.4.4 Set measurement mode command
Command Main Body
setting
machine
weighing
meter
character
character
first
character
M 1 4DH 31H Set to Mode 1
M 2 4DH 32H Set to Mode 2
M 3 4DH 33H Set to Mode 3
M 4 4DH 34H Set to Mode 4
second
character
ASCII code
Description Value Response
A00: Successful
None
completion
E01: Command error
E02: (error)
* The measurement mode to be activated by the above mode settings 1 to 4 depends on the weighing mode
currently in use.
Mode
Mode 1
Mode 2 Gross weight Parts counting
Mode 3
Mode 4
Weighing
Weight
measuring
Cumulative
*1
weight
Display in unit
B
*2
Parts counting
Weight
measuring
Cumulative
count*1
Average unit
weight
Percentage
Weight
measuring
Percent
measuring
Cumulative
percent*1
(Error) (Error) (Error)
Unit converting
Weight
measuring
Coefficient
multiplying
Cumulative
sum*1
Gravi-
(Error)
(Error)
(Error)
*1 Mode 3 (M3) can be specified only when the addition function is to be used. If the addition function is
not enabled, it results in an error.
*2 If a unit is not specified for unit B, the balance is set for the weight measuring mode.
When you specify a mode that is not supported by the current Weighing Mode, an error is returned from
the balance.
17.4.5 Request date or time output command
Command Main Body
first
D D 44H 44H Date output request
D T 44H 54H Time output request
second
ASCII code
Description Value Response
(1) Date format
DATE:yyyy.mm.dd(CR)(LF) English
ヒヅケ:yyyy.mm.dd(CR)(LF) Japanese (Katakana)
(2) Time data
TIME:(SP)(SP)(SP)(SP)(SP)hh:mm(CR)(LF) English
ジコク:(SP)(SP)(SP)(SP)(SP)hh:mm(CR)(LF) Japanese (Katakana)
None
A00: Successful
completion
E01: Command error
RL-TA Series Operation Manual 65
Page 70

17.4.6 Setting intervals
Command Main Body
character
character
first
character
I A 49H 41H
second
character
ASCII code
Description Value Response
A00: Successful
Interval time
setup
Interval time
E01: Command error
E02: Interval time error
Insert a comma between the entries for hours, minutes, and seconds; e.g., IA, hh, mm, ss.
17.4.7 Span adjustment/test command
Command Main Body
first
C 0 43H 30H
C 1 43H 31H
C 2 43H 32H
C 3 43H 33H
C 4 43H 34H
second
ASCII code
Description Value Response
Disables Cal key and
command inputs.
Span adjustment
with built-in weig hts
Span test with
built-in weights
Span adjustment
with external weight
Span test with
external weight
*1*2
*3
*3
None
completion
A00: Successful
completion
E01: Command
error
E02: Operation is
disabled.
E03: Cancelled by
operation
E04: Abnormal
completion
66 RL-TA Series Operation Manual
Page 71

17.4.8 Setting limit values
Command Main Body
first
character
L A 4CH 41H
L B 4CH 42H
L C 4CH 43H Reference value
L D 4CH 44H Third setting point
L E 4CH 45H Forth setting point
second
character
ASCII code
Description Value Response
First setting
point/lower limit
Second setting
point/upper limit
Limit
values
A00: Successful
completion
E01:Command error
E02:Set value error
1. Insert a comma between command entries and limit values; e.g., LA, nnn.
2. Enter numerical values only. You do not need to enter units.
3. In weighing machine mode, the unit set in Unit A is applied to the entered value. For example, when
“LA, 20.00” is transmitted, it is recognized as 20.00 g if gram is selected in Unit A, and 20.00 ct if
carat is selected in Unit A.
4. The units used for parts counting, percentage weighing, and unit converting are PCS, %, and #
respectively.
17.4.9 Sample input commands
T(SP)(CR)(LF) Set tare range or adjust to zero-point.
O1(CR)(LF) Set the balance to continuous output.
O8(CR)(LF) Output data (once immed iately).
IA,01,30,00(CR)(LF) Set an interval of 01 hrs: 30 min: 00 sec.
OA(CR)(LF) Start the interval function.
DD(CR)(LF) Output the date.
DT(CR)(LF) Output the time.
LA,80.5(CR)(LF) Set the first setting point to 80.5. (The unit varies depending on the weighing
mode.)
RL-TA Series Operation Manual 67
Page 72

17.5 Special Format Output
Unit
Output
ASCII code
mg
mg
(6DH) (67H) (20H)
g
g
(67H) (20H) (20H)
carat
ct
(63H) (74H) (20H)
ounce
oz
(6FH) (7AH) (20H)
pound
lb
(6CH) (62H) (20H)
troy ounce
ozt
(6FH) (7AH) (74H)
penny weight
dwt
(64H) (77H) (74H)
grain
GN
(47H) (4EH) (20H)
tael(Hong Kong)
tlh
(74H) (6CH) (68H)
tael(SG)
tls
(74H) (6CH) (73H)
tael(Taiwan)
tlt
(74H) (6CH) (74H)
momme
mom
(6DH) (6FH) (6DH)
tola
tol
(74H) (6FH) (6CH)
parts counting
pcs
(70H) (63H) (73H)
percentage weighing
%
(25H) (20H) (20H)
unit converting
#
(23H) (20H) (20H)
(**H) : ASCII code
17.5.1 Special format 1
This output format is applied when [7. 1.F. 41] is selected in Function 1.
1 2 3 4 5 6 7 8 9 10 11 12 13 14 15 16
P1 SP D1 D2 D3 D4 D5 D6 D7 D8 SP U1 U2 U3 CR LF
error
Set value
Space
Measurement data (incl udi ng deci ma l point)
Space
Unit Terminator
P1 (One character): Set value error Polarity plus/zero: [+] (2BH), Minus: [-] (2DH)
SP (One character): Space [ ] (20H)
D1~D8 (Eight character): Measurement data,
numerical value [0 to 9] (30H–39H), and decimal point (2EH)
* Numerical values are right-aligned.
A space (20H) is used when there is no numerical value.
SP (One character): Space [ ] (20H)
U1~U3 (Three character): Unit
: Space
* When the output is unstable, a unit (three characters) may be a space (20H).
<CR><LF>: terminator
Example:
[123.4567g] : +
[o - Err] :
[u - Err] :
six characters seven characters
68 RL-TA Series Operation Manual
123.4567△g<CR><LF>
H<CR><LF>
L<CR><LF>
Page 73

17.5.2 Special format 2
Unit
Output
ASCII code
mg
mg
(6DH) (67H)
g g (67H)
carat
ct
(63H) (74H)
ounce
oz
(6FH) (7AH)
pound
lb
(6CH) (62H)
troy ounce
ozt
(6FH) (7AH) (74H)
penny weight
dwt
(64H) (77H) (74H)
grain
gr
(67H) (72H)
tael(Hong Kong)
tlh
(74H) (6CH) (68H)
tael(SG)
tls
(74H) (6CH) (73H)
tael(Taiwan)
tlt
(74H) (6CH) (74H)
momme
mom
(6DH) (6FH) (6DH)
tola
tla
(74H) (6CH) (61H)
parts counting
pcs
(70H) (63H) (73H)
percentage weighing
%
(25H)
unit converting
#
(23H)
(**H) : ASCII code
This output format is applied when [7.1F 42] is selected in Function 1.
1 2 3 4 5 6 7 8 9 10 11 12 13 14 15 16 17 18 19 20
S1 S2 S3 SP D1 D2 D3 D4 D5 D6 D7 D8 D9
Stability
information
Measurement data (including polarity and decimal
Space
point)
S1~S3 (three character): Stable: [S
S] (53H) (20H) (53H), Unstable: [SD]: (53H) (20H) (44H)
SP (One character): Space [ ](20H)
D1~D10 (10 character): Set value error Polarity plus/zero: Space [ ] (20H), Minus: [-] (2DH)
numerical value [0 to 9] (30H–39H), and decimal point (2EH)
* Numerical values are right-aligned.
A space (20H) is used when there is no numerical value.
SP(One character):Space[ ](20H)
U1~U3 (One to three character): Unit
D10 SP U1 U2 U3 CR LF
Unit
(One to three
Space
characters)
Termi-
nator
: Space
* This f orma t has a variable length, with the number of characters varying from one to three depending o n
<CR><LF>: terminator
Example:
[123.4567g] : S
[o - Err] : S
[u - Err] : S
RL-TA Series Operation Manual 69
the unit.
S123.4567g<CR><LF>
+<CR><LF>
-<CR><LF>
Page 74

18 Use Printers
18.1 Setting up the Printer
(1) Use a dot matrix or thermal RS-232 printer with the balance.
(2) Set proper print functions (print control) with the balance referring to the instruction manual for your
printer.
(3) Make the baud rate and other settings compatible between the balance and the printer.
18.2 Outputting calibration results
18.3 Output of Measurement Data in Compliance with ISO/GLP/GMP
1. Set Function 1.
Set the ISO/GLP/GMP-compatible item to [F GLP 1] and the GLP-compatible item for
measurement data to [F2. od. 1].
2. Header output.
Press and hold the Print key for a few seconds.
[HEAd] is displayed and the header is then output.
3. Measurement data output.
Measurement data can be output at any time during measurements.
4. Footer output.
Press and hold the Print key for a few seconds after the
measurement is completed.
The display indicates [Foot] and a footer is output.
(Continued on next page.)
70 RL-TA Series Operation Manual
Page 75

(1) Upon printing calibration/span test results or ISO/GLP/GMP compatible outputs, date and time data is
also printed.
Check the date and time set in the balance before printing. (Refer to Section 15: Date and Time
Setup on page 51).
(2) Do not press any keys on the printer during printing. Refer to Section 19 “Output in Compliance
with ISO/GLP/GMP” described from page 75 for sample prints.
(3) While the data is being output in a special format, the measurement data cannot be printed.
RL-TA Series Operation Manual 71
Page 76

19 Output in Compliance with ISO/GLP/GMP
When a span adjustment or span test is successfully completed, the results are printed in the following manner.
The printed items vary with the model and calibration methods. ERR and weight error lines are printed only
when weight error is selected in Function 2.
(1) Span adjustment using built-in weights
English Japanese (Katakana)
72 RL-TA Series Operation Manual
Page 77

(2) Span adjustment with external weight
English Japanese (Katakana)
(3) Span test using built-in weights
English Japanese (Katakana)
RL-TA Series Operation Manual 73
Page 78

(4) Span test with external weight
English Japanese (Katakana)
(5) Calibration with built-in weight
English Japanese (Katakana)
74 RL-TA Series Operation Manual
Page 79

(6) Measurement data
1) Header
English Japanese (Katakana)
2) Footer
English Japanese (Katakana)
RL-TA Series Operation Manual 75
Page 80

20 Removing the Windshield Door
20.1 Removing the Windshield Door
1. Remove the pan and pan base.
2. Turn the windshield ring counterclockwise until it stops.
3. Pull the windshield straight up to remove it.
* When installing the windshield, firmly secure it to the main body of the balance so that it does not fall
off.
76 RL-TA Series Operation Manual
Page 81

20.2 Caring for the balance
Clean the windshield and main body of the balance by wiping them with a damp, soft cloth.
Do not use items such as chemical agents, solvents, or wipes that could damage the windshield panel.
Contact us if you need to replace the windshield.
RL-TA Series Operation Manual 77
Page 82

21 Operate on Batteries
The battery unit is a piece of factory-installed optional equipment.
Alkaline, Oxyride, manganese, nickel hydride, or NiCd batteries can be used with the balance.
The battery unit does not include batteries or rechargeable batteries. Use a commercially available battery
charger to recharge batteries. The balance cannot be used to recha rg e batterie s.
To operate the balance on batteries, pull out the battery case and insert four AA batteries.
The icon is displayed when the balance is operated on batteries. As the batteries get weaker, the
icon changes to
or (flashing). When the icon changes to (flashing), recharge or replace
the batteries.
The battery lifetime shown below (only as a guide) varies depending on the type of batteries used and
whether the backlight is on or off.
Type of battery
Nickel hydride* 6 hours 10 hours
Oxyride 2.5 hours 6 hours
Alkaline 2 hours 4 hours
Status of backlight
On Off
* Assuming batteries with a capacity of 2,700 mAh are used.
Follow the following instructio ns for sa fe use:
1. Do not disassemble or modify the batteries. Take care to ensure you insert batteries with the positive
and negative poles correctly inserted, and be careful about short circuits. Such mishandling could
damage the batteries, or cause the balance to fail or ignite.
2. Do not put the batteries into a fire because they may explode.
3. Do not mix old and new batteries, or batteries of different types or manufacturers. Doing so is
dangerous.
4. If the balance is not going to be used for a long time, store it with the batteries removed.
5. Do not use batteries that leak.
6. Observe the precautions printed on the batteries or rechargeable batteries.
7. Dispose of batteries in accordance with local regulations.
78 RL-TA Series Operation Manual
Page 83

22 Troubleshooting
Symptom
Cause
Measures to Take
No display
The AC adapter is not connected.
→ Ensure that the AC adapter is
→ Replace the batteries.
The display is
flashing.
The balance is influenced by wind
external object.
→ Read Precautions Relat ing to
Weight indication
The display error is caused
The tare weight is set or not.
→ Perform span adjustment of
The balance cannot be
The balance is affected by wind
Mechanical parts have failed.
→ Check how to calibrate the
[o - Err] is displayed.
T he meas ured weight ex c eeds
Mechanical parts fail.
→ Check the total weight.
[u - Err] is displayed.
The pan or pan base is removed.
Mechanical parts have failed.
→ Install the pan and pan base
properly.
[C2 - Err] is
The backup battery to power the
→ Reset the date and time.
balance was purchased.
[b - Err] is displayed.
The balance is influenced by
balance have failed.
→ Contact our technical service
The display is turned
No display
T he batteries were ex haust ed.
→ Replace the batteries.
AC adapter.
[A - Err] is displayed.
The built-in weight or drive unit has
failed.
→ Contact our technical service
personnel or your local dealer.
* Parentheses contain a page to refer to.
unstable.
The display takes time
to be stabilized.
The display does not
move with the M sign
contains an error.
calibrated.
(An error message
appears.)
The batteries are exhausted.
or vibration.
The balance is placed on an
unstable base.
The pan, tare, or sample put on
the balance is in contact with an
because the balance has not
been used for a long period of
time or has been relocated to
another location.
The adjusters (feet) are not
settled, and the balance is not
kept horizontal.
or vibration.
There is large weight error for the
external reference weights.
connected.
Use (pages 3 to 6).
Adjust the response using the
single-touch response setting
function (page 12).
the balance (page 45).
→ Check that the balance is kept
horizontal (page 10).
→ Set the tare range correctly.
balance before performing
calibration. Refer to Hints on
page 47.
displayed.
[d - Err] is displayed.
off When operated on
batteries
The [ ] icon blinks.
the weighing capacity.
(Measurable range = Weight of
container + Weight of samples)
clock has run out.
static electricity or noise.
The electric components of the
The display was turned off by the
auto power off function.
→ Change the container.
If an error message appears
frequently, contact our
Technical Service Division or
the retailer from whom the
personnel or your local dealer.
→ Disable the auto power off
function if desired (page 53).
→ Operate the balance on the
RL-TA Series Operation Manual 79
Page 84

23 Specifications
23.1 Basic Specifications
Model
Item
Weighing capacity [g] 80 g 120 g 220 g
Minimum readability [g] 0.0001 g 0.0001 g 0.0001 g
Minimum unit weight (for
parts counting) [g]
Lower weight limit
(for percent balance) [g]
Built-in weights Equipped
Dimensions of the pan
TA-80 TA-120 TA-220
0.0001 g 0.0001 g 0.0001 g
0.01 g 0.01 g 0.01 g
φ80 mm
(1) Weighing system ............................... Tuning fork system
(2) Tare range ......................................... Full capacity
(3) Display .............................................. The LCD segment can display up to eight digits.
The segment is 16.5 mm high, and displays 8 digits for a weight.
Can display a bar graph of up to 40 bars and various messages.
(4) Display when overloaded ................ [o - Err] is displayed when the weighing capacity is exceeded
by 9 divisions.
(5) Output ............................................... Bi-direction RS232C outpu t, output for peripherals
(6) Supported printer............................... CSP-160
(7) Temperature and humidity ranges ..... 10 to 30°C, 80% RH or lower
(8) AC adapter ........................................ Dedicated AC adapter: DC9 V, AC120 V or AC230 V
(9) Options .............................................. Optional battery unit*
Specific gravity measurement kit
* The battery unit is a piece of factory-installed optional equipment.
80 RL-TA Series Operation Manual
Page 85

23.2 Weighing Capacity and Minimum Readability by Unit
Model
Unit
mg
gram (g)
carat (ct)
ounce (oz)
pound (lb)
troy ounce (ozt)
penny weight (dwt)
grain (GN)
tael (tl)
(Hong Kong)
tael (tl)
(Singapore,Malaysia)
tael (tl)
(Taiwan)
momme (mom)
tola (to)
TA-80 TA-120 TA-220
80000 120000 220000
0.1 0.1 0.1
80 120 220
0.0001 0.0001 0.0001
400 600 1100
0.0005 0.0005 0.001
2.8 4.2 7.7
0.000005 0.000005 0.000005
0.17 0.26 0.48
0.000001 0.000001 0.000001
2.5 3.8 7
0.000005 0.000005 0.000005
51 77 140
0.0001 0.0001 0.0001
1200 1800 3300
0.002 0.002 0.002
2.1 3.2 5.8
0.000005 0.000005 0.000005
2.1 3.1 5.8
0.000005 0.000005 0.000005
2.1 3.2 5.8
0.000005 0.000005 0.000005
21 32 58
0.00005 0.00005 0.00005
6.8 10 18
0.00001 0.00001 0.00001
RL-TA Series Operation Manual 81
Page 86

24 Unit Conversion Table
Unit gram carat ounce pound troy ounce penny weight
1g 1 5 0.03527 0.00220 0.03215 0.64301
1ct 0.2 1 0.00705 0.00044 0.00643 0.12860
1oz 28.34952 141.74762 1 0.06250 0.91146 18.22917
1lb 453.59237 2267.96185 16 1 14.58333 291.66667
1ozt 31.10348 155.51738 1.09714 0.06857 1 20
1dwt 1.55517 7.77587 0.05486 0.00343 0.05 1
1GN 0.06480 0.32399 0.00229 0.00014 0.00208 0.04167
1tl (Hong Kong) 37.429 187.145 1.32027 0.08252 1.20337 24.06741
1tl (SGP,Mal) 37.79936 188.99682 1.33333 0.08333 1.21528 24.30556
1tl (Taiwan) 37.5 187.5 1.32277 0.08267 1.20565 24.11306
1mom 3.75 18.75 0.13228 0.00827 0.12057 2.41131
1to 11.66380 58.31902 0.41143 0.02571 0.37500 7.5
Unit grain
(Hong Kong)
tael
tael
(Singapore,
Malaysia)
tael
(Taiwan)
momme tola
1g 15.43236 0.02672 0.02646 0.02667 0.26667 0.08574
1ct 3.08647 0.00534 0.00529 0.00533 0.05333 0.01715
1oz 437.5 0.75742 0.75 0.75599 7.55987 2.43056
1lb 7000 12.11874 12 12.09580 120.95797 38.88889
1ozt 480 0.83100 0.82286 0.82943 8.29426 2.66667
1dwt 24 0.04155 0.04114 0.04147 0.41471 0.13333
1GN 1 0.00173 0.00171 0.00173 0.01728 0.00556
1tl (Hong Kong) 577.61774 1 0.99020 0.99811 9.98107 3.20899
1tl (SGP,Mal) 583.33333 1.00990 1 1.00798 10.07983 3.24074
1tl (Taiwan) 578.71344 1.00190 0.99208 1 10 3.21507
1mom 57.87134 0.10019 0.09921 0.1 1 0.32151
1to 180 0.31162 0.30857 0.31103 3.11035 1
82 RL-TA Series Operation Manual
Page 87

TA Series Limited Warranty
Rice Lake Weighing Systems (RLWS) warrants that all RLWS equipment and systems manufactured and sold
by RLWS and properly installed by an authorized RLWS Distributor or Original Equipment Manufacturer
(OEM) will operate per written specifications as confirmed by the Distributor/OEM and accepted by RLWS.
All systems and components are warranted against defects in materials and workmanship for five years.
RLWS warrants that the equipment sold hereunder will conform to the current written specifications authorized
by RLWS. RLWS warrants the equipment against faulty workmanship and defective materials. If any
equipment fails to conform to these warranties, RLWS will, at its option, repair or replace such goods returned
within the warranty period subject to the following conditions:
• Upon discovery by Buyer of such nonconformity, RLWS will be given prompt written noti ce with a detailed
explanation of the alleged deficiencies.
• Individual electronic components returned to RLWS for warranty purposes must be packaged to prevent
electrostatic discharge (ESD) damage in shipment. Packaging requirements are listed in a publication, Protecting
Your Components From Static Damage in Shipment, available from RLWS Equipment Return Department.
• Examination of such equipment by RLWS co nfi rms that the nonconformity actually exists, and was not caused by
accident, misuse, neglect, alteration, improper installation, i mproper repair or improper testing; RLWS shall be the
sole judge of all alleged non-conformities.
• Such equipment has not been modified, altered, or changed by any person other than RLWS or its duly authorized
repair agents.
• RLWS will have a reasonable time to repair or replace the defective equipment. Buyer is responsible for shipping
charges both ways.
• In no event will RLWS be resp onsible for travel time or on-location repairs, including assembly or disassembly of
equipment, nor will RLWS be liable for the cost of any repairs made by others.
THESE WARRANTIES EXCLUDE ALL OTHER WARRANTIES, EXPRESSED OR IMPLIED, INCLUDING
WITHOUT LIMITATION WARRANTIES OF MERCHANTABILITY OR FITNESS FOR A PARTICULAR
PURPOSE. NEITHER RLWS NOR DISTRIBUT OR W ILL, IN ANY EVENT, BE LIABLE FOR INCIDENTAL OR
CONSEQUENT I AL DAMAGES.
RLWS AND BUYER AGREE TH AT RLWS’ SOLE AND EXCLUSIVE LI ABILITY HEREUNDER IS LIM ITED
TO REPAIR OR REPLACEMENT OF SUCH GOODS. IN ACCEPTING THIS WARRANTY, THE BUYER
WAIVES ANY AND ALL OTHER CLAIMS TO WARRANTY.
SHOULD THE SELLER BE O T H ER THAN RLWS, TH E BUYER AGREES T O L O OK O NL Y T O T HE SEL L ER
FOR WARRANTY CLAIMS.
NO TERMS, CONDITIONS, UNDERSTANDING, OR AGREEMENTS PURPORTING TO MODIFY THE
TERMS OF THIS WARRANTY SHALL HAVE ANY LEGAL EFFECT UNLESS MADE IN WRITING AND
SIGNED BY A CORPORATE OFFICER OF RLWS AND THE BUYER.
© 2003 Rice Lake Weighing Systems, Inc. Rice Lake, WI USA. All Rights Reserved.
RICE LAKE WEIGHING SYSTEMS • 230 WEST COLEMAN STREET • RICE LAKE, WISCONSIN 54868 • USA
RL-TA Series Operation Manual 83
Page 88

 Loading...