

Page 1
Survivor PL
Pitless Modular Railroad Track Scale
Installation Manual
®
98740 Rev B
Page 2

Page 3

Contents
Technical training seminars are available through Rice Lake Weighing Systems.
Course descriptions and dates can be viewed at www.ricelake.com/training
or obtained by calling 715-234-9171 and asking for the training department.
About This Manual ................................................................................................................................... 1
1.0 Introduction.................................................................................................................................. 1
1.1 Safety. . . . . . . . . . . . . . . . . . . . . . . . . . . . . . . . . . . . . . . . . . . . . . . . . . . . . . . . . . . . . . . . . . . . . . . . . 2
2.0 Installation ................................................................................................................................... 3
2.1 Foundation Installation . . . . . . . . . . . . . . . . . . . . . . . . . . . . . . . . . . . . . . . . . . . . . . . . . . . . . . . . . . . . 3
2.2 Weighbridge Installation . . . . . . . . . . . . . . . . . . . . . . . . . . . . . . . . . . . . . . . . . . . . . . . . . . . . . .
2.3 Approach and Dead Space Hardware Installation. . . . . . . . . . . . . . . . . . . . . . . . . . . . . . . . . . . . . . . . 6
2.4 Rail Installation . . . . . . . . . . . . . . . . . . . . . . . . . . . . . . . . . . . . . . . . . . . . . . . . . . . . . . . . .
2.5 Grouting . . . . . . . . . . . . . . . . . . . . . . . . . . . . . . . . . . . . . . . . . . . . . . . . . . . . . . . . . . . . . .
3.0 Junction Box and Grounding ....................................................................................................... 8
3.1 Load Cells to Junction Box. . . . . . . . . . . . . . . . . . . . . . . . . . . . . . . . . . . . . . . . . . . . . . . . . . . . . . . . . 8
3.2 Junction Box Connections . . . . . . . . . . . . . . . . . . . . . . . . . . . . . . . . . . . . . . . . . . . . . . . . . . . . .
3.3 Junction Box to Indicator . . . . . . . . . . . . . . . . . . . . . . . . . . . . . . . . . . . . . . . . . . . . . . . . . . . . .
3.4 Indicator to Peripherals. . . . . . . . . . . . . . . . . . . . . . . . . . . . . . . . . . . . . . . . . . . . . . . . . . . . . . .
3.5 Single-Point Ground Conductor . . . . . . . . . . . . . . . . . . . . . . . . . . . . . . . . . . . . . . . . . . . . . . . . . . . . . 9
6 Electrical Ground Connections . . . . . . . . . . . . . . . . . . . . . . . . . . . . . . . . . . . . . . . . . . . . . . . . . . . .
3.
Survivor PL Limited Warranty.................................................................................................................. 8
. . . . . 3
. . . . . . . . . 7
. . . . . . . . . 7
. . . . 9
. . . . . 9
. . . . . 9
. . 9
© Rice Lake Weighing Systems. All rights reserved. Printed in the United States of America.
Rice Lake Weighing Systems is an ISO 9001 registered company.
Specifications subject to change without notice.
Version 1.0,
May 31, 2013
Page 4

ii Survivor® PL Installation Manual
Rice Lake continually offers web-based video training on a growing selection
of product-related topics at no cost. Visit www.ricelake.com/webinars.
Page 5

About This Manual
This manual is intended for use by service technicians responsible for installing and servicing Survivor® PL pitless
modular railroad track scales.
Authorized distributors and their employees can view or download this manual from the Rice Lake
Weighing Systems distributor site at
www.ricelake.com/manuals.
1.0 Introduction
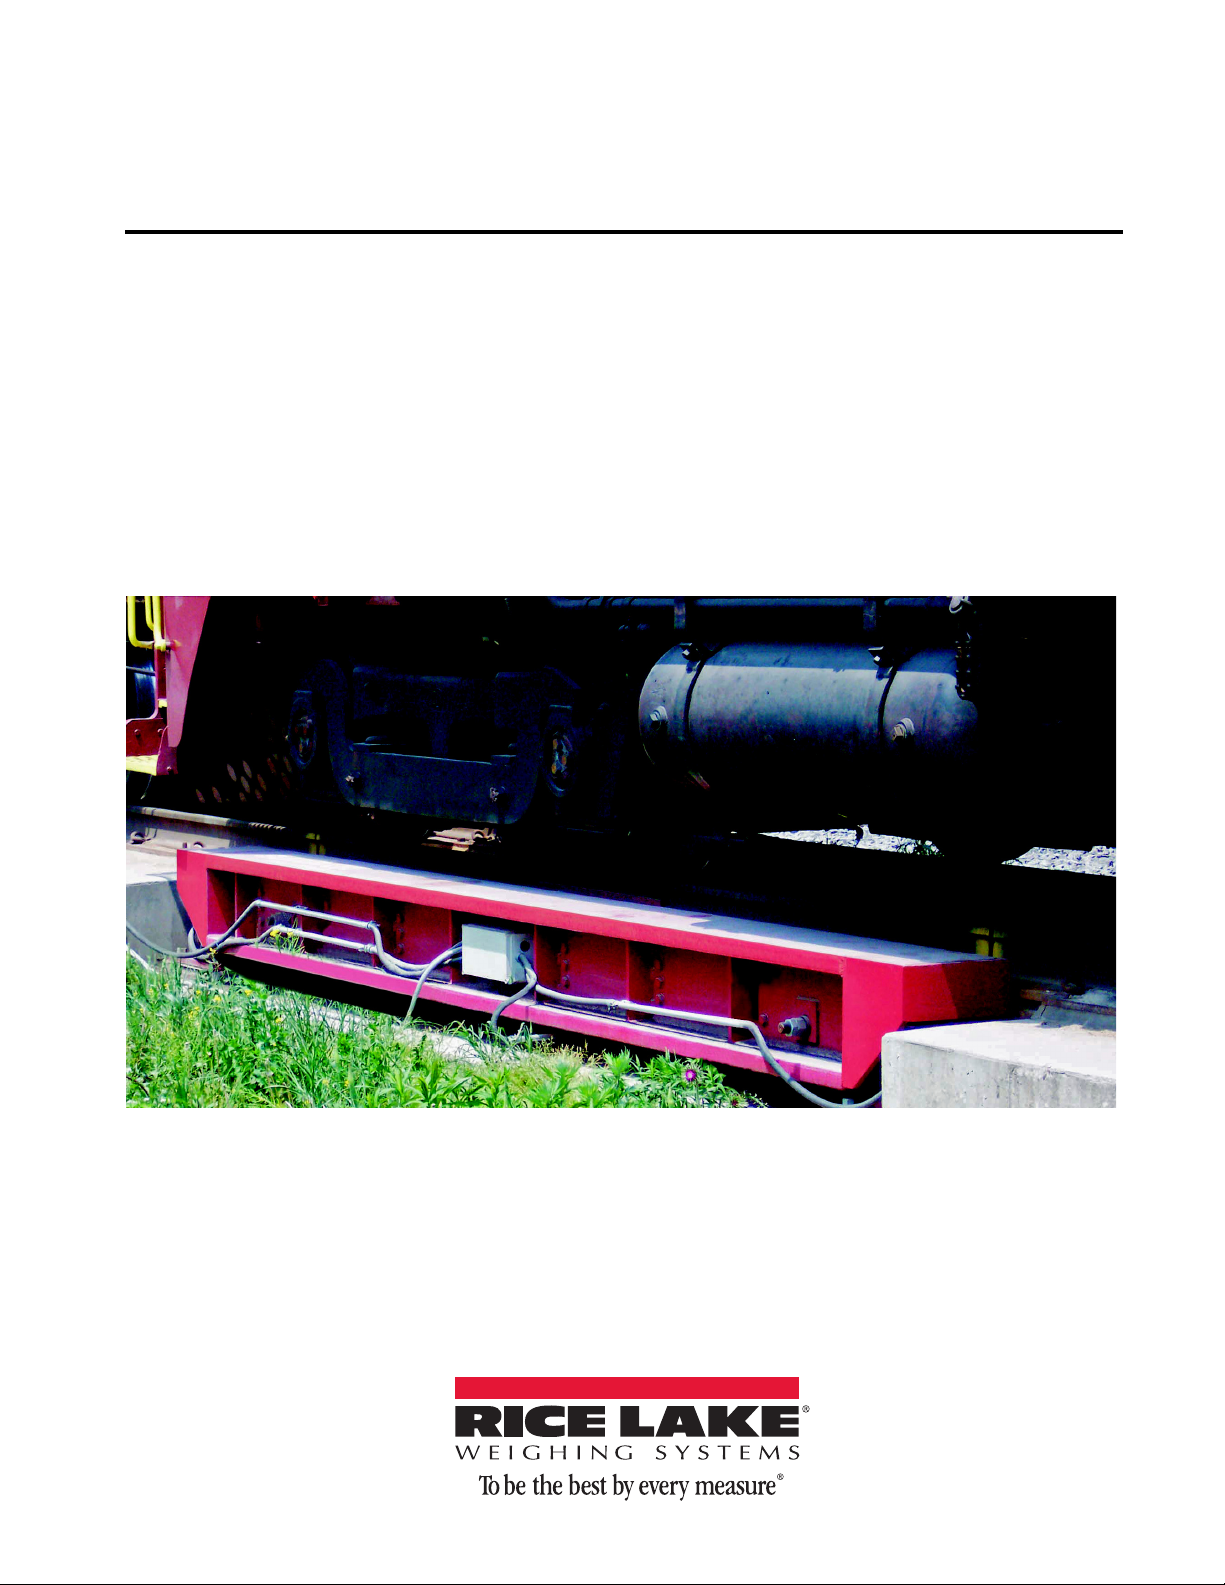
The Survivor® PL is a low-profile, pitless modular railroad track scale. This heavy-duty workhorse should provide
decades of accurate rail car weighing.
Onboard Features
Features of the basic Surv
• Gross capacity - 85 tons to 175 tons.
• Sectional capacity - 85 tons.
• Module sizes available in 12’6”, 15’, 18’, and 25’.
• Platform width - 7’8”, 18.5” low-profile design.
• Bolted checkered steel top plate; side accessible.
• Designed for 115 lb. and 132 lb. rail.
• Longitudinal and lateral c
• 100K CSP1 100K load cells.
• Lightning and SS suppression kit.
• Rail clips for deck.
• Anti-creep angles.
• Low-profile above-grade installation.
• Outside access covers for load cells.
• Copper transient bypass cables.
• NTEP-certified, CC#02-087, A1.
• Meets AREMA and Cooper E-80 design specs.
Optional features and accessories include:
• Approach rail base plates, rail clips, nuts,
• Anchor bolts for approach rail plates.
• Custom sizes available.
• Hardware for intermediate section.
• Anchor bolts for load cell and check stands.
The Su
conducted in-house under exacting quality control standards. Each railroad track scale is manufactured under the
precise guidelines outlined by ISO 9001 standards. All weighbridge components are sandblasted to SSPC-A-SP6
standards and cleaned with a hot phosphate cleaning process to remove grease and oil contaminants. After
assembly, all Survivor
finish coat of a two-component high solids urethane paint that protects the weighbridge’s structural integrity and
ensures a long life.
rvivor
®
PL is manufactured on-site at Rice Lake Weighing Systems. All railroad track scale production is
ivor® PL include:
ecking assemblies.
h
w
ashers, and anti-creep angles.
®
track scales are painted with a two-component high solids urethane primer, as well as a
Introduction 1
Page 6
1. 1 S af et y
WARNING
Important
CAUTION
WARNING
DANGER
Safety Symbol Definitions:
Indicates an imminently hazardous situation that, if not avoided, will result in death or serious injury.
Model Configuration
PL-12-85 Single 12’6” 85 tons
PL-15-85 Single 15’ 85 tons
PL-18-85 Single 18’ 85 tons
PL-12-12-170 Single/Single 12’6” + 12’6” 170 tons
PL-12-18-170 Single/Single 12’6” + 18’ 170 tons
PL-12-15 Single/Single 15’ + 12’ 170 tons
PL-15-18 Single/Single 15’ + 18’ 170 tons
PL-18-18-170 Single/Single 18’ + 18’ 170 tons
PL-15-15 Single/Single 15’ + 15’ 170 tons
PL-12-25-200 Single/Double 12’6” + 25’ 175 tons
PL-15-25 Single/Double 15’ + 25’ 175 tons
PL-25 Double 25’ 175 tons
PL-25-25-230 Double/Double 25’ + 25’ 175 tons
Platform
Size Capacity
Table 1-1. Survivor® PL Series Platform Sizes
Indicates a potentially hazardous situation that, if not avoided
includes hazards that are exposed when guards are removed.
Indicates a potentially hazardous situation that, if not avoided may result in minor or moderate injury.
Indicates information about procedures that, if not observed, could result in damage to equipment or
corruption to and loss of data.
General Safety
Do not operate or work on this equipment unless you have read and understand the instructions and
warnings in this manual. Failure to follow the instructions or
death. Contact any Rice Lake Weighing Systems dealer for replacement manuals. Proper care is your
responsibility.
Failure to heed may result in serious injury of death.
Some procedures described in this manual ar
service personnel only
DO NOT allow minors (children) or inexperience
DO NOT operate without all shields and guards in place.
DO NOT use for purposes other then weight taking.
DO NOT place fingers into slots or possible pinch points.
DO NOT use any load bearing component that is
DO NOT use this product if any of the c
DO NOT exceed the rated load limit of the unit.
DO NOT make alterations or modifications to the unit.
DO NOT remove or obscure warning labels.
Keep hands, feet and loose clothing away from moving parts.
e potentia
d persons to operate this unit.
omponents are cracked.
lly dangerous. These procedures are to be performed by qualified
wor
n beyond 5% of the original dimension.
could result in serious injury or death, and
heed the warnings could result in injury or
2 Survivor
®
PL Installation Manual
Page 7

2.0 Installation
Note
Leveling bolts
Load cell lower
base plate
Anchor bolts
Load cell
Load cell base plate
Load Cell Installed
Load cell spacer plate
This section describes procedures for installing the foundation and weighbridge for of the Survivor® PL railroad
track scale.
2.1 Foundation Installation
Please reference foundation drawings supplied by Rice Lake Weighing Systems for the scale you have purchased.
Do not start construction of the foundation if you do not have certified prints.
1. Pour the scale slab(s).
2. Pour the approach slab and, if applicable, dead
Anchor bolts should protrude from the concrete enough for the lower base plates to be secured onto them.
2.2 Weighbridge Installation
The following steps describe the procedure for installing the Survivor® PL weighbridge.
1. Set load cell lower base plates over the pre-cast anchor bolts.
2. Install leveling bolts into base plates as shown in Figure 2-1.
slab over rebar or optional anchor bolts.
3. Install load cell, spacer plate, and base plate onto lower base plates.
Figure 2-1. Leveling Bolts Installed into Lower Base Plate
Figure 2-2. Load Cell, Spacer Block, and Base Plate
Installation 3
Page 8

4. Set longitudinal brackets (2) and side brackets (2) over pre-cast anchor bolts.
Check rod bracket
End rail support plate
Note
Install upper load
cell components
Weighbridge module pocket
Ground strap
hole
When bolts are tight,
plates will be moveable
WARNING
Figure 2-3. Install Brackets
The rods for the checking system, should be placed beneath the scale prior to setting of the modules.
5. Remove steel top plates from weighbridge module. Mark plates to identify location for re-assembly.
6. Install bearing block, upper mount plate, spacer tubes, bearing cus
7. Set the weighbridge module on 5” setting blocks. Center the module between approaches.
hions, and shim plate in each load cell
pocket of weighbridge module.
Figure 2-4. Upper Load Cell Plate Mounting Procedure
4 Survivor
Crush hazard, keep hands, feet and other body parts clear when setting weighbridge modules in place.
Moving parts can crush and cut.
®
PL Installation Manual
Page 9

Wooden setting
block
Figure 2-5. Weighbridge Module on Setting Blocks
Jack
Load cell
leveling bolts
Upper load cell
mount plate
Note
8. Using a jack and shims, level the module and set its elevation between 2 1/8” and 2 1/4” above concrete
approaches.
Figure 2-6. Module Elevation
9. Using leveling bolts, raise and level the load cell assemblies to contact the upper mount bearing plates.
Figure 2-7. Load Cell Assembly
10. Jack the weighbridge to allow removal of setting blocks and shims.
11. Install lower base plate washers and nuts.
Do not torque nuts until after plates are grouted.
12. Install check rods and hardware. Set check rods level with a horizontal plane to within +/- 2 degree.
Installation 5
Page 10

Check Rod
Figure 2-8. Check Rod Level with Horizontal Plane
Note
13. Weld spacer plates (P/N 71860) to weighbridge to secure it in place.
14. Repeat steps 1-13 for the seco
nd weighbridge module.
2.3 Approach and Dead Space Hardware Installation
The below instructions describe the installation of approach and dead space hardware.
Reference drawings provided for approach and dead space for important details.
1. Install approach plates on anchor bolts.
Figure 2-9. Approach Plate on Anchor Bolts
2. Install approach plates at the required elevation using shims or jam nuts beneath each plate.
3. Install dead space rail plates on anchor bolts.
4. Install dead space rail plates at the required elevation.
5. The rail can now be installed.
6. Once the rail is installed, the elevation plat
es are ready to grout.
6 Survivor
®
PL Installation Manual
Page 11

2.4 Rail Installation
Note
Note
The following instructions describe the installation of rail sections on the Survivor® PL.
1. Cut A.R.E.A. rail sections using 45-degree mitered rail head cuts at the weigh
transitions.
Figure 2-10. Mitered Rail Head Cuts Location
2. Set rail support plates over the pre-cast anchor bolts on the approach and center section foundations.
3. Set weigh rails and approach rails onto the rail support plates.
4. Shim and align rails to match elevation of scale and set the desired grade.
rail and approach rail
Option: Install jam nuts under approach rail support plates to act as a leveling device.
5. Install rail clips and secure rails in place.
6. Install anti-creep rail anchors.
2.5 Grouting
Prior to grouting, re-check all weighbridge and rail alignment, levels, and elevations.
1. Use an epoxy-type 9000 psi grout under the load cell base plates, and a non-shrink cement-type grout
under the approac
Do not grout under the longitudinal check brackets or side check brackets.
2. After grout has hardened, tighten/torque nuts on all anchor bolts.
3. The checking system can now be tightened. Bri
h and center section rail support plates.
ng the nuts up to snug, then use jam nuts to jam.
Installation 7
Page 12

3.0 Junction Box and Grounding
Load Cell
Cable to
Connector
SI - White
SI - Red
EX - Green
EX - Black
SHD - Shield
+
+
-
+SI
-SI
+EX
-EX
SHD
+SI
-SI
+EX
-EX
SHD
+SI
-SI
+EX
-EX
SHD
+SI
-SI
+EX
-EX
SHD
J3
J4
J7
J8
J6
J5
J2
J1
+SI
-SI
+EX
-EX
SHD
+SI
-SI
+EX
-EX
SHD
+SI
-SI
+EX
-EX
SHD
+SI
-SI
+EX
-EX
SHD
Load Cell #1 Load Cell #3
Load Cell #8 Load Cell #6
Load Cell #2 Load Cell #4
Load Cell #7 Load Cell #5
+SI
-SI
+EX
-EX
SHD
-SEN
+SEN
SHD - Shield
+SI
-SI
+EX
-EX
SHD
-SEN
+SEN
Indicator/J10
Expansion/J9
Cable to Indicator
SI - White+
SI - Red-
EX - Green+
EX - Black-
SEN - Yellow-
SEN - Blue+
Load Cell
Cable to
Connector
SI - White
SI - Red
EX - Green
EX - Black
SHD - Shield
+
+
-
+SI
-SI
+EX
-EX
SHD
+SI
-SI
+EX
-EX
SHD
J3
J4
J2
J1
+SI
-SI
+EX
-EX
SHD
+SI
-SI
+EX
-EX
SHD
Load Cell #1 Load Cell #3
Load Cell #8 Load Cell #6
+SI
-SI
+EX
-EX
SHD
-SEN
+SEN
SHD - Shield
+SI
-SI
+EX
-EX
SHD
-SEN
+SEN
Indicator/J10
Expansion/J9
Cable to Indicator
SI - White+
SI - Red-
EX - Green+
EX - Black-
SEN - Yellow-
SEN - Blue+
Detail A
Detail B
Pocket 1
Conduit
Pocket 1 and 4
Conduit run to J-Box
Pocket 2 and 3
Conduit run to J-Box
Module A Module B
Pocket 2
Conduit
Pocket 3
Conduit
Pocket 3 and 4
Conduit run to J-Box
Module C
Conc.
Pier
3
4
2
1
6
5
4
3
2
1
Pockets 1, 2, 5, 6
Conduit run to J-Box
Pocket 1 Conduit
Pocket 1and 6 Conduit
Pocket 2
Conduit
Detail A
Detail B
Note
Cable installation instructions for the weigh module(s) are included in the following paragraphs.
3.1 Load Cells to Junction Box
Each load cell is equipped with 30' of load cell cable, sufficient to reach a centrally-located junction box on
standard scales. A conduit adapter and a 14" section of 3/4" flexible conduit is supplied for both ends of each load
cell cable located at the load cell and at the junction box. Main conduit runs between these 14" flexible end sections
are 3/4" galvanized metal conduit already installed on the deck as shown above.
Flexible conduit can not come in contact with the ground. Plastic tie wraps are included in the hardware
shipping box and should be used to tie up the flexible conduit.
8 Survivor
®
PL Installation Manual
Figure 3-1. J-Box Wiring and Conduit
Page 13

3.2 Junction Box Connections
Important
Each junction box is large enough to hold the summing board, transient protection devices, packaged desiccant,
and extra load cell cable coiled inside the enclosure. An industrial corrosion inhibitor and desiccant such as the
RLWS Industrial Corrosion Inhibitor (PN 16037) should be added to the junction box enclosure before final
closure.
A summing card mounted within the junction box is u
are clearly marked as to function.
sed to make all cable terminal connections. All terminal pins
3.3 Junction Box to Indicator
Sixty feet of six-wire homerun cable is supplied for wiring the junction box to the indicator. It is run in 3/4"
galvanized metal conduit from the junction box to the indicator. Conduit for this purpose is to be obtained locally.
A 30" flexible conduit section and conduit connector is provided where this cable exits the junction box. Do not run
any other electrical cables in or near the conduit to the indicator.
3.4 Indicator to Peripherals
All 3/4" conduit for cabling from the indicator to remote displays and other peripheral devices is to be obtained
locally. Conduit runs may be buried in a trench or secured above ground. Use separate conduit runs for AC power
and DC data lines to avoid interference. As a general guideline, run AC and DC cables in separate trenches if
possible. When DC data cables must run in the same trench as AC power lines, separate cables as much as possible
(preferably more than 34" apart).
3.5 Single-Point Ground Conductor
A bare 10 gauge solid wire is to be run from the scale frame to the grounding lug on the junction box then
underground to the main AC power earth ground. If the DC transient protection board is installed, the ground
conductor should also be connected to the transient protection board’s ground lug.
3.6 Electrical Ground Connections
Improper grounding systems are often a cause of corrupted data from ground loop current flows and
costly lightning damage to electronics.
Always strive for a single-point grounding system. Do not drive ground rods at the scale location which
establishes separate earth grounds for the scale. These separate earth grounds will not share the same zero reference
as the existing earth ground for the AC power system. This difference in electrical potential invites ground-loop
current flow between the separate grounds, often corrupting serial data like RS-232 which depends on a stable zero
reference.
In addition, a separate earth ground system at the scale can actually invite lightning
• A minor power line surge should immediately be shunted to ground. If a separate ground system exists at
the scale with a lower
damaging load cells on its way.
• A nearby lightning ground strike may instantly raise the zero pote
while leaving the scale house ground rod unaffected. That lightning surge will now take the easiest path to
the lower-potential ground—through the scale wiring and back to the scale house ground, possibly
damaging the indicator on its way.
Therefore, the best grounding system for the scale is the same grounding s
system. The 120 VAC power source used to power the indicator will be connected to an existing earth grounded
rod system at the scale house or other building where the indicator is located. This should consist of a double
ground rod system of two 5/8" x 8' copper rods driven 8' deep at the service entrance where the local utility
company brings their lines into the building.
The local utility company can test the resistance of the existing ground rods with a clamp-on megohmeter th
measures zero resistance.
grounding system is inadequate, the utility company can suggest methods to improve the system. It’s crucial that
the scale owner authorize and make the recommended improvements to assure an adequate electrical ground. Do
not connect the scale to the AC power supply until the grounding system is adequate.
potential than the main ground, the surge may travel out to the scale ground rod,
ntial of a ground rod at the scale location,
ystem used for the incoming AC power
A reading of 3¾ or less is acceptable as a ground. If the test determines that the
or power surg
e damage:
at
Junction Box and Grounding 9
Page 14

Be certain each load cell grounding strap is securely connected to the top plate and bottom plate of each load cell
Grounding
Strap
To DC Protection Ground
Connection before Indicator
10 ga. Bare Ground Wire
Ground Lug
R41
JP17
JP7
R52
R50
R40
R24
R14
R15
JP20
JP10
R26
R51
R49
R47
JP16
R45
R43
JP9
R23
R21
JP6
JP8
R17
R38
R36
R34
JP11
R32
R30
R28
R10
R8
JP1
R4
R2
R33
JP12
JP2
VR9
JP19
R48
VR7
JP18
R42
R44
R22
R25 R16
R18
VR2
R19
R39
VR10
R35
R37
VR11
R27
R29
R31
R9
R11
R12
R1
R3
R5
VR5
R6
JP5
JMP/NEGJMP/POS
VR8
VR3
VR1
VR12
VR6
J1
VR4
J2
R13
R7
EXPANSION/J9
J5
ARC
R46
JP4
JP3
ARGND
JP14
JP15
JP13
L3
L4
L2
J8
J4
J3
J6
L1
R20
J7
INDICATOR/J10
JP
TRIM
TRIM
TO
-EX
+EX
+SI
-EX
+EX
+SI
-EX
+EX
1
+SI
-EX
+EX
+SI
JP
JP
TO
SIGNAL
2005
SIGNAL
CUT
TO
DISABLE
CUT
CELL#
CELL#
CELL#
SHD
1
SHD
-SI
1
-SI
SHD
-SI
1
-SI
SHD
SIGNAL
CUT
TO
CUT
SECT#
DISABLE
CELL#
CELL#
SIGNAL
SIGNAL SIGNAL
D
L
D
DISABLE
CELL#
SECT#
DISABLE
CELL#
RICE LAKE WEIGHING SYSTEMS
JP
-EX
+EX
+SI
-EX
+EX
+SI
-EX
+EX
+SI
-EX
+EX
+SI
SIGNAL
TRIM
TRIM
TRIM
TRIM
TRIM
TRIM
Assembly
-EX
-EX
+EX
+SI
SHD
1
SHD
-SI
1
-SI
1
-SI
SHD
1
-SI
SHD
CONNECT BOTH SHUNTS
TO APPLY SIGNAL
SECT#
SIGNAL
SIGNAL
SIGNAL
CELL#
PN Rev.
+SI
-SI
-SI
SECT#
+SEN
SHD
+SEN
SHD
DISCONNECT BOTH SHUNTS
TO REMOVE SIGNAL
+EX
-SEN
-SEN
CUT TRACE TO ISOLATE SENSE LINE
Transient Board Connectors
Grounding Lug
Note
mount. There should be metal-to-metal contact with no presence of paint or grout. This strap is designed to channel
power surges on the deck around—rather than through—the load cell to ground.
Figure 3-2. Grounding Strap on Load Cell Mount
These, and all, ground connections must be torqued to a specified value and retorqued at regular service intervals.
A thick coating of anti-oxidant grease should be maintained on all ground connections to prevent corrosion.
A separate grounding system conductor must extend uninterrupted from the ma
in service panel ground to the scale
to protect load cells and scale wiring from lightning and other transient damage. This ground wire conductor must
be an unsheathed #10 copper wire or larger. Run the bare ground wire conductor intact from the AC power ground
rod to the scale in a separate trench. Bring the wire up from the trench near the junction box and attach it to the
ground lug of the junction box. A #10 bare ground wire is run from the ground lug of the junction box to one of the
junction box mounting studs on the scale frame, thus grounding the scale frame to the same single-point ground as
the AC power for the indicator.
Figure 3-3. Junction Box Ground Wire Connections.
The scale frame must be connected with 10 ga. wire to the ground lug of the transient protection board inside
the junction box.
Scales with more than one junction box require ground straps t
boxes need to be connected to the scale frame.
The final ground wire connection must be at the AC pow
10 Survivor
®
PL Installation Manual
er supply ground terminal or ground rod.
o be
installed between modules. In addition, all junction
Page 15

AC Power
Supply
#10 Copper
Ground Wire
Serial
Communication
Homerun
Cable
Load Cell
Cable
UJB-3T6
DC Transient Protection
RLWS PN 21134
TP-232
DC Transient Protection
RLWS PN 33185
TP-232
DC Transient Protection
RLWS PN 33185
SOLA S1K 520
AC Transient Protection
RLWS PN 110812
AC Outlet
SOLA S1K520
AC Transient Protection
RLWS PN 110812
AC Outlet
Power Company Ground Rod
*Always verify that installed wiring is properly grounded
R41
JP17
JP7
R52
R50
R40
R24
R14
R15
JP20
JP10
R26
R51
R49
R47
JP16
R45
R43
JP9
R23
R21
JP6
JP8
R17
R38
R36
R34
JP11
R32
R30
R28
R10
R8
JP1
R4
R2
R33
JP12
JP2
VR9
JP19
R48
VR7
JP18
R42
R44
R22
R25 R16
R18
VR2
R19
R39
VR10
R35
R37
VR11
R27
R29
R31
R9
R11
R12
R1
R3
R5
VR5
R6
JP5
JMP/NEGJMP/POS
VR8
VR3
VR1
VR12
VR6
J1
VR4
J2
R13
R7
EXPANSION/J9
J5
ARC
R46
JP4
JP3
ARGND
JP14
JP15
JP13
L3
L4
L2
J8
J4
J3
J6
L1
R20
J7
INDICATOR/J10
JP
TRIM
TRIM
TO
-EX
+EX
+SI
-EX
+EX
+SI
-EX
+EX
1
+SI
-EX
+EX
+SI
JP
JP
TO
SIGNAL
2005
SIGNAL
CUT
TO
DISABLE
CUT
CELL#
CELL#
CELL#
SHD
1
SHD
-SI
1
-SI
SHD
-SI
1
-SI
SHD
SIGNAL
CUT
TO
CUT
SECT#
DISABLE
CELL#
CELL#
SIGNAL
SIGNAL SIGNAL
D
L
D
DISABLE
CELL#
SECT#
DISABLE
CELL#
RICE LAKE WEIGHING SYSTEMS
JP
-EX
+EX
+SI
-EX
+EX
+SI
-EX
+EX
+SI
-EX
+EX
+SI
SIGNAL
TRIM
TRIM
TRIM
TRIM
TRIM
TRIM
Assembly
-EX
-EX
+EX
+SI
SHD
1
SHD
-SI
1
-SI
1
-SI
SHD
1
-SI
SHD
CONNECT BOTH SHUNTS
TO APPLY SIGNAL
SECT#
SIGNAL
SIGNAL
SIGNAL
CELL#
PN Rev.
+SI
-SI
-SI
SECT#
+SEN
SHD
+SEN
SHD
DISCONNECT BOTH SHUNTS
TO REMOVE SIGNAL
+EX
-SEN
-SEN
CUT TRACE TO ISOLATE SENSE LINE
Transient Board Connectors
Grounding Lug
186210
R41
JP17
JP7
R52
R50
R40
R24
R14
R15
JP20
JP10
R26
R51
R49
R47
JP16
R45
R43
JP9
R23
R21
JP6
JP8
R17
R38
R36
R34
JP11
R32
R30
R28
R10
R8
JP1
R4
R2
R33
JP12
JP2
VR9
JP19
R48
VR7
JP18
R42
R44
R22
R25 R16
R18
VR2
R19
R39
VR10
R35
R37
VR11
R27
R29
R31
R9
R11
R12
R1
R3
R5
VR5
R6
JP5
JMP/NEGJMP/POS
VR8
VR3
VR1
VR12
VR6
J1
VR4
J2
R13
R7
EXPANSION/J9
J5
ARC
R46
JP4
JP3
ARGND
JP14
JP15
JP13
L3
L4
L2
J8
J4
J3
J6
L1
R20
J7
INDICATOR/J10
JP
TRIM
TRIM
TO
-EX
+EX
+SI
-EX
+EX
+SI
-EX
+EX
1
+SI
-EX
+EX
+SI
JP
JP
TO
SIGNAL
2005
SIGNAL
CUT
TO
DISABLE
CUT
CELL#
CELL#
CELL#
SHD
1
SHD
-SI
1
-SI
SHD
-SI
1
-SI
SHD
SIGNAL
CUT
TO
CUT
SECT#
DISABLE
CELL#
CELL#
SIGNAL
SIGNAL SIGNAL
D
L
D
DISABLE
CELL#
SECT#
DISABLE
CELL#
RICE LAKE WEIGHING SYSTEMS
JP
-EX
+EX
+SI
-EX
+EX
+SI
-EX
+EX
+SI
-EX
+EX
+SI
SIGNAL
TRIM
TRIM
TRIM
TRIM
TRIM
TRIM
Assembly
-EX
-EX
+EX
+SI
SHD
1
SHD
-SI
1
-SI
1
-SI
SHD
1
-SI
SHD
CONNECT BOTH SHUNTS
TO APPLY SIGNAL
SECT#
SIGNAL
SIGNAL
SIGNAL
CELL#
PN Rev.
+SI
-SI
-SI
SECT#
+SEN
SHD
+SEN
SHD
DISCONNECT BOTH SHUNTS
TO REMOVE SIGNAL
+EX
-SEN
-SEN
CUT TRACE TO ISOLATE SENSE LINE
Transient Board Connectors
Grounding Lug
JB8SPT Junction Box
With Transient Protection
RLWS PN 91783
JB8SPT Junction Box
With Transient Protection
RLWS PN 91783
Figure 3-4. Single-Point Grounding Diagram
Junction Box and Grounding 11
Page 16

Survivor PL Limited Warranty
Statement of Limited Warranty
Subject to the terms and conditions as stated herein: Rice Lake Weighing Systems (hereafter referred to as “RLWS”) warrants its equipment
to be free from defects in material and factory workmanship for a period of time from the date of shipment as stated in this document.
Electronic Components
Load cells, junction boxes, and internal cabling are warranted against manufacturing defects provided the scale and all electronic devices
have been properly installed, grounded and sealed by RLWS dealer.
Weighbridge Components
Applies to RICE LAKE
SURVIVOR® models
Five
(5)
years -
and RT
weighbridge structure
Terms and Conditions of Limited Warranty
and is subject to the inspection, analysis and determination by RLWS regarding the nature and cause of any failure.
Defective components – mechanical or electrical – will be repaired or replaced free of any obligation to the owner within ninety (90) days after
date of installation. For the remainder of the product warranty period, defective components (mechanical or electrical), will be repaired or
replaced provided such services are preformed by an authorized RLWS Dealer and equipment owner agrees to pay Dealer for these services.
Service technician labor and travel expenses are not covered by this warranty. RLWS may require the faulty components be returned to the
factory, freight prepaid, at the discretion and authorization of RLWS.
This warranty does not extend to any labor, material, or service charges involved in removal or replacement of equipment.
RLWS is not responsible and will not be held liable for losses, injury or damage caused to persons or property resulting during installation or
failure during use of RLWS products or any consequential damages that may arise from their use.
RLWS reserves the right to incorporate improvements in material and design of the products without notice and is not obligated to incorporate
the same improvements in equipment previously manufactured.
In certain cases, such as used equipment or peripheral equipment not manufactured by RLWS, a reduced warranty may apply. Specific
details to these exceptions are provided separately or at the time of purchase.
Two (2) years - load cells, junction boxes, suspension system. This covers SURVIVOR PL and RT Rail Scales.
Exclusions to the warranty include but are not limited to: corrosion, lightning,
SURVIVOR PL
surges concrete & rebar or any other items supplied by others, excessive wear,
cosmetic defects that do not affect performance, use and damage caused by electrical
surges resulting from welding on or near scale.
This obligation is limited exclusively to original equipment manufactured or supplied by RLWS
RLWS shall not be obligated under any warranty different than as set forth herein. The RLWS warranty is limited to the initial customer and
installation and is not transferable in the event of resale.
Conditions Which Void Limited Warranty
This warranty shall not apply to equipment which:
• Has had repairs and modifications not authorized by RLWS which in RLWS’ judgment has affected the performance
• Has been subject to misuse “overloading”,
or act of God
• Has had serial number altered, defaced or removed
• Had not followed RLWS recommendations for epoxy, galvanizing, or
environments
• Has not been grounded according to RLWS recommended procedure
Freight Carrier Damage Claims for equipment damaged in transit must be referred to the freight carrier. Visible damage should be reported
immediately. Concealed damage as soon as possible in any case, within fifteen (15) days of receipt of shipment, in accordance with freight
carrier regulations.
THE FOREGOING IS IN LIEU OF ALL OTHER WARRANTIES, EXPRESSED O
DESCRIPTION OF THE PRODUCT. This warranty statement sets forth the extent of our liability for breach of any warranty or deficiency in
connection with the sale or use of the product. It is understood that RLWS will not be liable for consequential damages or any nature, including but
not limited to, loss of profit, delays or expenses, whether based on tort or contract.
negligent handling, improper installation, accident, damage by fire, water, submersion
stainless steel construction for installation in harsh
R IMPLIED INCLUDING ANY WARRANTY EXTENDED BEYOND THE
© Rice Lake Weighing Systems, Inc. Rice Lake, WI USA. All Rights Reserved.
RICE LAKE WEIGHING SYSTEMS • 230 WEST COLEMAN STREET • RICE LAKE, WISCONSIN 54868 • USA
8 Survivor
®
PL Installation Manual
Page 17

Page 18

Rice Lake Weighing Systems
May 31, 2013 PN 118677 Rev B
 Loading...