

Page 1

Prove
Statistical Printer
User Guide
159225 Rev A
Page 2

Page 3

Contents
Technical training seminars are available through Rice Lake Weighing Systems.
Course descriptions and dates can be viewed at www.ricelake.com/training
or obtained by calling 715-234-9171 and asking for the training department.
1.0 Introduction............................................................................... 1
1.1 Safety Instructions . . . . . . . . . . . . . . . . . . . . . . . . . . . . . . . . . . 1
1.2 Overview . . . . . . . . . . . . . . . . . . . . . . . . . . . . . . . . . . . . . . . . . . 1
1.3 Keypad Functions . . . . . . . . . . . . . . . . . . . . . . . . . . . . . . . . . . . 2
1.4 Low Power Mode . . . . . . . . . . . . . . . . . . . . . . . . . . . . . . . . . . . 2
1.5 Status LED . . . . . . . . . . . . . . . . . . . . . . . . . . . . . . . . . . . . . . . . . 2
2.0 Setup ......................................................................................... 3
2.1 Insert Batteries . . . . . . . . . . . . . . . . . . . . . . . . . . . . . . . . . . . . . 3
2.2 Charging the Printer . . . . . . . . . . . . . . . . . . . . . . . . . . . . . . . . . 3
2.3 Turning the Unit On . . . . . . . . . . . . . . . . . . . . . . . . . . . . . . . . . . 3
2.4 Configuring the Printer For a Balance . . . . . . . . . . . . . . . . . . . 4
3.0 Configuration ............................................................................ 5
3.1 Set Print Mode . . . . . . . . . . . . . . . . . . . . . . . . . . . . . . . . . . . . . 6
3.2 Serial Interface . . . . . . . . . . . . . . . . . . . . . . . . . . . . . . . . . . . . . 7
3.3 Software Selectable Functions. . . . . . . . . . . . . . . . . . . . . . . . . 7
4.0 Operation................................................................................... 8
5.0 Appendix ................................................................................... 9
5.1 Power on Self Test . . . . . . . . . . . . . . . . . . . . . . . . . . . . . . . . . . 9
5.2 Status LEDs . . . . . . . . . . . . . . . . . . . . . . . . . . . . . . . . . . . . . . . 10
5.3 Paper Out . . . . . . . . . . . . . . . . . . . . . . . . . . . . . . . . . . . . . . . . 10
5.4 Head Thermal Limit . . . . . . . . . . . . . . . . . . . . . . . . . . . . . . . . . 10
5.5 Opening the Paper Reservoir Lid . . . . . . . . . . . . . . . . . . . . . . 11
5.6 Replacing Paper Roll . . . . . . . . . . . . . . . . . . . . . . . . . . . . . . . 11
5.7 Disposal . . . . . . . . . . . . . . . . . . . . . . . . . . . . . . . . . . . . . . . . . . 11
5.8 Replacement Parts . . . . . . . . . . . . . . . . . . . . . . . . . . . . . . . . . 12
5.9 Specifications . . . . . . . . . . . . . . . . . . . . . . . . . . . . . . . . . . . . . 12
Prove Statistical Printer Limited Warranty ........................................ 13
© Rice Lake Weighing Systems. All rights reserved.
Rice Lake Weighing Systems is an ISO 9001 registered company.
Specifications subject to change without notice.
Version 1.0 November 2013
Contents i
Page 4

ii Prove Statistical Printer
Rice Lake continually offers web-based video training on a growing selection
of product-related topics at no cost. Visit www.ricelake.com/webinars.
Page 5

1.0 Introduction
WARNING
Note
This manual contains operating procedures for the Prove statistical printer and
provides you with all the information necessary for setup and operation.
This manual can be viewed and downloaded from the Rice Lake Weighing
Systems website at www.ricelake.com.
1.1 Safety Instructions
Don’t pour any liquid near the equipment, as it may result in electric shock.
Only qualified service personnel should open the equipment.
Don’t repair or adjust energized equipment alone under any circumstances.
Someone capable of providing first aid must always be present for your safety.
Danger of explosion if battery is incorrectly replaced. Replace only with the
equivalent type recommended by the manufacturer.
Dispose of batteries according to the manufacturer’s instructions.
Hazardous moving parts, keep fingers and other body parts away.
Failure to heed may result in serious injury or death.
To prevent equipment damage:
Keep the equipment away from humidity.
Before you connect the equipment to the power outlet, check the
voltage of the power source.
Disconnect the equipment from the voltage of the power source to
prevent possible transient over-voltage damage.
1. 2 Ov e rv i ew
The Prove statistical printer is an ultra-compact, lightweight portable printer that is
housed in an innovative enclosure. It is designed to work with Rice Lake balances,
TC/TP, TA, Equipoise, the CW-90 indicator and A&D GF balances.
Features include:
• Easy load paper
• Power supply options
• RS-232 interface
• High speed, high resolution printing capability
• Quiet, non-impact system
• Maintenance free
• Ultra-compact and lightweight
• High reliability line head mechanism
• Versatile for use with text or graphics
• Low power mode
• Range of configurable options
Introduction 1
Page 6
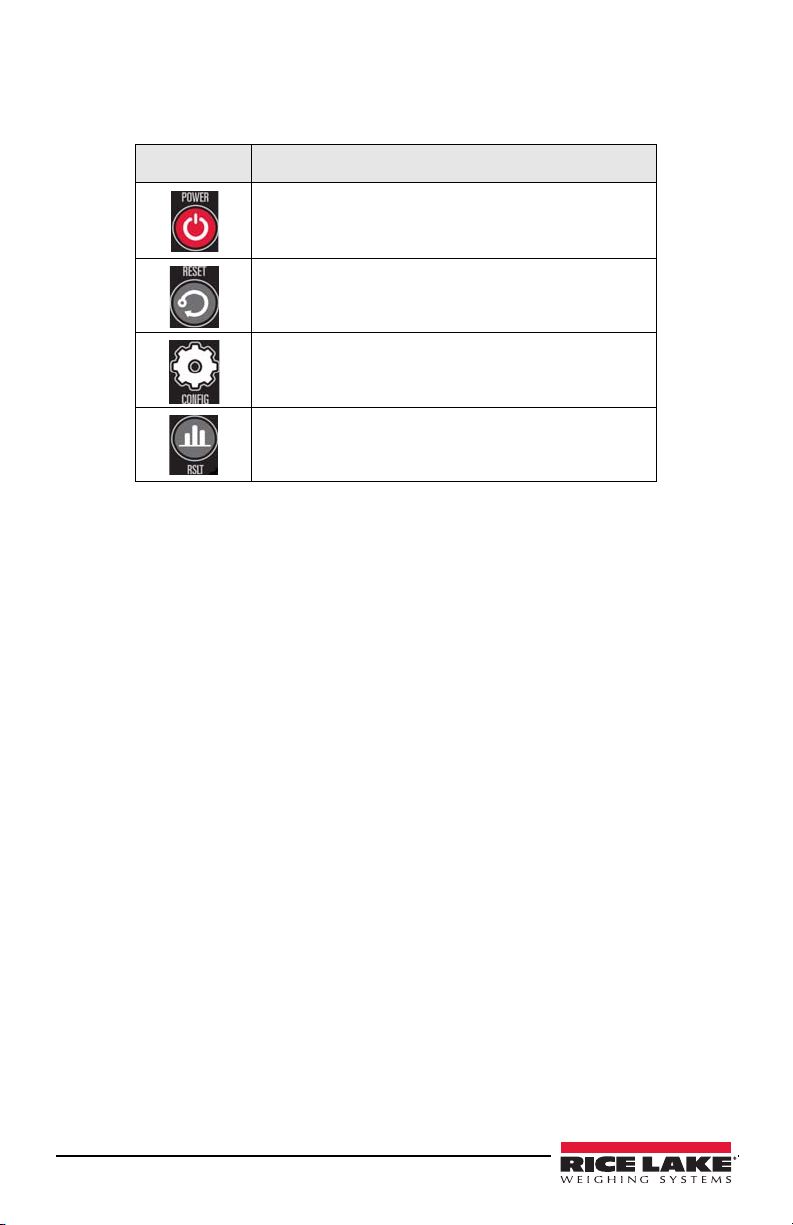
1.3 Keypad Functions
The Prove statistical printer has four buttons and a status LED light. The function of
each one is described below
Key Description
.
Used to turn the printer on or off.
Resets the printer back to zero.
Allows the user to access configuration
parameters.
Press this button to print out the statistical results.
Table 1-1. Key Functions
1.4 Low Power Mode
The Prove statistical printer incorporates two low power modes. These can be configured via
option 9 (see Section 3 on page 5 for more information), but the printer will not enter low
power mode if the charger is attached.
Sleep Mode
While in Sleep Mode, the printer enters low power mode after a preset period of inactivity.
Once asleep, the printer can be woken up by sending a NULL character one second before data
is to be printed, or the printer can be woken up by pressing the Mode button.
Auto Off Mode
In this mode, the printer cannot be woken by any data transfer and must be powered on
manually.
1.5 Status LED
The Prove statistical printer incorporates an LED indicator to report conditions of the printer.
2 Prove Statistical Printer
Page 7

2.0 Setup
Note
This section describes procedures for setting up the Prove statistical printer.
2.1 Insert Batteries
Each unit comes with four NiMH rechargeable batteries. They have been removed
from the unit during transit. To insert the batteries back into the unit, remove the
battery cover from the base of the printer and insert the batteries, taking care to ensure
the batteries are inserted correctly. Use the illustration located inside the battery
compartment to guarantee the batteries are inserted correctly.
2.2 Charging the Printer
When the printer is first delivered there may be little or no charge in the printer’s
batteries. Make sure the printer is turned off. Connect the power adapter to the printer
and plug it into an outlet.
It should be allowed to charge for a total of 16 hours before it is used for the first time.
It is recommended to connect the printer to the power adapter and recharge the
batteries as soon as the status LED indicates a low battery.
The printer can be connected to the power adapter continuously to trickle charge the
batteries. If the printer is asleep, it will wake up when the adapter is connected and
will not sleep while it is connected. To “fast” charge the batteries, the printer must be
turned off.
If the batteries in the printer become exhausted, printing will become faint, erratic or
not at all. Turn the printer off and recharge the batteries for at least 15 minutes before
attempting any further printing. The power adapter can’t supply the full power
requirements for the printer during printing, so the batteries must be partially charged
before printing is possible.
Always use a Rice Lake approved power adapter. Use of an
unapproved power adapter will void the printer’s warranty.
The printer comes with a 110-240 AC adapter with a universal plug set. Use the
appropriate adapter for your needs.
Figure 2-1. Multiple Plug-in Heads
2.3 Turning the Unit On
Once the batteries have been charged, open the paper cup lid and ensure that a roll of
paper is there and that there are no foreign objects inside the paper cup. Close the lid,
making sure that the paper passes through the paper exit slot.
Briefly press the
and the printer mechanism will reset. A brief press of the Power button will turn the
printer off. When the printer is asleep, press the Power button to wake the printer up.
Setup 3
Power button to turn the printer on. The status LED will illuminate
Page 8

2.4 Configuring the Printer For a Balance
To operate the Prove statistical printer with various balances you must configure the
balances with the following settings to work with the printer.
Equipoise Balance
Connector: part number 130789
Settings: 9600 baud rate, 8 Data Bits, None
F3 - TP Ticket Printer, P port, press Print
GF Balance
Connector: part number 41279
Settings:
SiF bPS 4 - 9600 baud
btPr 2 - 8 bits none
CrLF 0 - CR LF
tYPe 0 - A & D standard format
TC/TP
Connector: part number 158583
Spec settings:
7. I. F.2 seven digit
7.I.o.c.7 Press memory print key
72 b.1. 4 - 9600 baud rate
CW-90
Verify settings: 9600 baud rate, 8 Data Bits, None
Set up Print out
<G><NL2>
TA
7 I. F * 2 Numeric 7-digit
7 1 oc * 7 Output once when print key is pressed
7 2 bL * 4 9600 baud rate
7 3 PR * 0
7 6 un * 0
7 7 rEs * 1
4 Prove Statistical Printer
Page 9

3.0 Configuration
The Prove statistical printer incorporates a number of configurable options, each of
which has a number of settings. The default settings of the standard printer are
detailed in Table 3-1 in bold. To change the settings of any option, follow the
directions below.
1. Ensure power to the printer is off.
2. Press and hold the
(LED) will flash five times to show that the printer is in configuration mode.
Release the
3. Press the
Power button the same number of times as the option that you want to
change (for example, to change the baud rate, press the
4. After a short delay, the status light will flash the same number of times as the
option you have chosen. If you make a mistake at this stage, simply wait a
moment, and the printer will power on without changing any options.
5. To proceed with configuration, press the
times as the setting you wish to make.
Mode button. In approximately five seconds the status light
Mode button.
Power button twice).
Power button the same number of
Option
Numbers
1 RS-232 Protocol 8, no parity
2 RS-232 Baud Rate 115200
3 RS-232 Flow Control None
4Font Arial 16, 24 CPL
5 Character Format Normal
Description Settings
8, odd parity
8, even parity
7, odd parity
7, even parity
57600
38400
19200
9600
4800
2400
1200
600
300
Software
Hardware
Arial 12, 32 CPL
Arial 8, 48 CPL
Double width
Double height
Double width and height
Setting
Number
1
2
3
4
5
1
2
3
4
5
6
7
8
9
10
1
2
3
1
2
3
1
2
3
4
Table 3-1. Configuration Options
Configuration 5
Page 10

Option
Numbers
6 Print Density Lowest
7Printer Current Highest
8Print Format Standard paper, normal printing
9 Sleep/Wake-up Never sleep
Description Settings
Standard paper, upside down
printing
Labels, normal printing
Labels, upside down printing
Sleep after one minute
Sleep after two minutes
Sleep after five minutes
Sleep after ten minutes
Off, one minute
Off, two minutes
Off, five minutes
Off, ten minutes
Table 3-1. Configuration Options
Setting
Number
1
2
3
4
1
2
3
4
1
2
3
4
1
2
3
4
5
6
7
8
9
3.1 Set Print Mode
There are two ways to set up the print mode on the Prove statistical printer.
• Print everything on a label
• Scales and balance mode
Scales and Balance Mode (Statistical)
1. Power on the printer
2. Press and hold the
3. Release the
4. After five seconds, the LED will flash 10 times.
5. Press the
CONFIG button.
6. After five seconds the LED will flash twice and reset.
Tape Printer Mode (Non-Statistical)
1. Power on the printer
2. Press and hold the
3. Release the
4. After five seconds, the LED will flash 10 times.
5. Press the
6. After five seconds the LED will flash twice and reset.
6 Prove Statistical Printer
CONFIG button twice.
CONFIG button until the LED on the unit flashes.
CONFIG button and press 10 times.
CONFIG button until the LED on the unit flashes.
CONFIG button and press 10 times.
Page 11

3.2 Serial Interface
Power
RS-232
interface
The Prove statistical printer uses a standard RS-232 interface. The printer is fitted
with a 6-way RJ12 socket that plugs into the following location.
Figure 3-1. RS-232C Plug in Location
Pin assignments and interface signals are shown in Table 3-2.
Pin Signal I/O Definition
1 GND N/A Signal ground
2 TxD 0 Transmitted date to host
3 RxD 1 Received data from host
4 CTS 0 Clear to send
5 N/C N/A No connection
6 N/C N/A No connection
Table 3-2. RS-232C Pin Assignments
3.3 Software Selectable Functions
The following selectable functions are available with the Prove statistical printer.
• Underline
• Double height
• Double width
•Graphics
• Horizontal tab, plus setting
• Form feed, plus setting
• 11 selectable international character sets
• Reverse printing
• Inverse printing
• Reset
• Barcodes
Configuration 7
Page 12

4.0 Operation
Operation of the Prove statistical printer is simple.
1. Enter all of the data into the printer.
2. Press the
The following printout illustrates an example of a TA balance.
Result button to print out the statistical data.
Figure 4-1. TA Balance Printout
8 Prove Statistical Printer
Page 13

5.0 Appendix
5.1 Power on Self Test
The self test procedure checks most of the printer’s functions (printer mechanism,
control circuitry, firmware version, etc), except for the serial interface.
When the printer is turned off, press and hold the power button for approximately two
seconds. Release the power button and the printer will power on and print a self-test
report.
Figure 5-1. Self Test Sample Printout
Appendix 9
Page 14

5.2 Status LEDs
The following table shows the status LEDs and their conditions.
LED indication Condition Solution
On Printer on NA
Off Printer off or asleep NA
Short Flash Every Second Fast charging MCP7810-349 only
* * *
Paper out Fit new paper into printer
** ** **
*** *** ***
*** *** ***
Thermal head too hot Allow head to cool
Battery cutout (no charge
remaining)
Battery low (approximately
20% of charge remaining)
Table 5-1. LED Status Lights
Recharge batteries MCP7810-349
5.3 Paper Out
The printer will automatically detect when the printer paper has run out, and report
this using the status LED. Replace the paper roll described in Section 5.6.
5.4 Head Thermal Limit
After extensive printing the print head temperature may rise to an unusable level. The
status LED will report when this occurs, and printing will stop un til the head
temperature returns to normal levels.
10 Prove Statistical Printer
Page 15

5.5 Opening the Paper Reservoir Lid
Note
To open the printer, squeeze and pull the level upward and forward until the lid is
released from its locked position. To avoid damage to the unit, do not use excessive
force.
Figure 5-2. Opening Paper Reservoir
5.6 Replacing Paper Roll
When the paper roll needs replacing, use the following steps.
1. Open the paper reservoir lid and remove the remaining paper.
2. Reel off a few centimeters from a new roll of paper.
3. Hold approximately five centimeters of paper outside the printer as the roll is
placed into the reservoir.
4. Close the lid by applying gentle and equal amounts of pressure on each side
until the lid is in the locked position. Now tear the surplus away.
The thermal side of the paper should be facing forward.
Figure 5-3. Replace Paper Roll
5.7 Disposal
If in use in the EU the printer should be disposed of in accordance with the Waste
Electrical and Electronic Regulations (WEEE Regulations). This also applies with
national requirements in other countries.
The Prove statistical printers contain batteries that should be disposed of by a
qualified hazardous material handler.
Appendix 11
Page 16

5.8 Replacement Parts
The following is a list of replacement parts associated with the Prove statistical printer.
Part No Description
Universal power supply (USA, EU and UK heads)
75947 Thermal printer paper roll, 25 m
Serial data cable (RJ12/D9)
Battery, AA, 12V, Ni-MH (4 required)
Table 5-2. Replacement Parts
5.9 Specifications
Printing System Direct thermal line head
Max characters per line 48, 32, 24 (default)
Character matrix 24x8, 24x12, 24x16
Character size 3mm x 2mm, 3mm x 1.5mm, 3mm x 1mm
(approximately 13, 17, 25cpi)
Horizontal dot pitch 0.125mm (approximately 200 dpi)
Vertical dot pitch 0.123mm
Text line composition 24 x 384 dots
Printing width 44mm
Average printing speed 10 lines per second (max)
Power Supply - MCP7810-349 Internal 4 x 1.2V NiMH 1600mAH, AA cells
Paper width 58mm
Paper capacity 45mm dia. 25m (standard paper)
Recommended paper Thermal paper (PN 75947)
Character set ASCII
Country codes USA, France, Germany, UK, Denmark I/II,
Sweden, Italy, Spain, Japan
Interface date format RS-232C (9600, 8 Data, 1 Stop, No parity)
Connector 6-way, RJ12 socket
Baud rates 300, 600, 1200, 4800, 9600, 19200, 38400,
57600, 115200
Handshake hardware (CTS line) or
software (XON/XOFF) buffer size
Operating range 32° to 122°F (0° to 50°C)
Storage range -4° to 140°F (-20° to +60°C)
Charging range 50° to 113°F (+10° to +45°C)
MTBF Approx. 10 million lines (20 C, print ratio = 25%)
Charge life Approximately 6000 lines (18m) of continuous
Table 5-3. Printer Specifications
5 Kbytes
printing
12 Prove Statistical Printer
Page 17

Prove Statistical Printer Limited Warranty
Rice Lake Weighing Systems (RLWS) warrants that all RLWS equipment and
systems properly installed by a Distributor or Original Equipment Manufacturer
(OEM) will operate per written specifications as confirmed by t he Distributor/OEM
and accepted by RLWS. All systems and components are warranted against defects in
materials and workmanship for one year.
RL WS warrants that the equipment sold hereunder will conform to the current written
specifications authorized by RLWS. RLWS warrants the equipment against faulty
workmanship and defective materials. If any equipment fails to conform to these
warranties, RLWS will, at its option, repair or replace such goods returned within the
warranty period subject to the following conditions:
• Upon discovery by Buyer of such nonconformi ty, RLWS will be given prompt
written notice with a detailed explanation of the alleged deficiencies.
• Individual electronic components returned to RLWS for warranty purposes must
be packaged to prevent electrostatic discharge (ESD) damage in shipment.
Packaging requirements are listed in a publication, “Protecting Your Components
From Static Damage in Shipment,” available from RLWS Equipment Return
Department.
• Examination of such equipment by RLWS confirms that the nonconformity
actually exists, and was not caused by accident, misuse, neglect, alteration,
improper installation, improper repair or improper testing; RLWS shall be the sole
judge of all alleged non-conformities.
• Such equipment has not been modified, al tered, or changed by any person other
than RLWS or its duly authorized repair agents.
• RLWS will have a reasonable time to repair or replace the defective equipment.
Buyer is responsible for shipping charges both ways.
• In no event will RLWS be responsible for travel time or on-location repairs,
including assembly or disassembly of equipment, nor wil l RLWS be liable for the
cost of any repairs made by others.
T
HESE WARRANTIES EXCLUDE ALL OTHER WARRANTIES, EXPRESSED OR IMPLIED,
INCLUDING WITHOUT LIMITATION WARRA NTIES OF MERCHANTABILITY OR
FITNESS
IN ANY EVENT, BE LIABLE FOR INCIDENTAL OR CONSEQUENTIAL DAMAGES.
RLWS
HEREUNDER
ACCEPTING
TO
S
TO
N
MODIFY
MADE
BUYER.
FOR A PARTICULAR PURPOSE. NEITHER RLWS NOR DISTRIBUTOR WILL,
AND BUYER AGREE THAT RLWS’ SOLE AND EXCLUSIVE LIABILITY
IS LIMITED TO REPA IR OR REPLACEMENT OF SUCH GOODS. IN
THIS WARRANTY, THE BUYER WAIVES ANY AND ALL OTHER CLAIMS
WARRANTY.
HOULD THE SELLER BE OTHER THAN RLWS, THE BUYER AGREES TO LOOK ONLY
THE SELLER FOR WARRANTY CLAIMS.
O TERMS, CONDITION S, UNDERSTANDING, OR AGREEMENTS PURPORTING TO
THE TERMS OF THIS WARRANTY SHALL HAVE ANY LEGAL EFFECT UNLESS
IN WRITING AND SIGNED BY A CORPORATE OFFICER OF RLWS AND THE
© Rice Lake Weighing Systems, Inc. Rice Lake, WI USA. All Rights Reserved.
RICE LAKE WEIGHING SYSTEMS • 230 WEST COLEMAN STREET
Appendix 13
RICE LAKE, WISCONSIN 54868 • USA
Page 18

Notes
14 Prove Statistical Printer
Page 19

Page 20

230 W. Coleman St. t Rice Lake, WI 54868 t USA
U.S. 800-472-6703 t Canada/Mexico 800-321-6703 t International 715-234-9171 t Europe +31 (0) 88 2349171
www.ricelake.com www.ricelake.mx www.ricelake.eu www.ricelake.co.in m.ricelake.com
© Rice Lake Weighing Systems 09/2014 PN 159225 Rev A
 Loading...