

Page 1
Quick Start Guide Explorer® Pro-HC
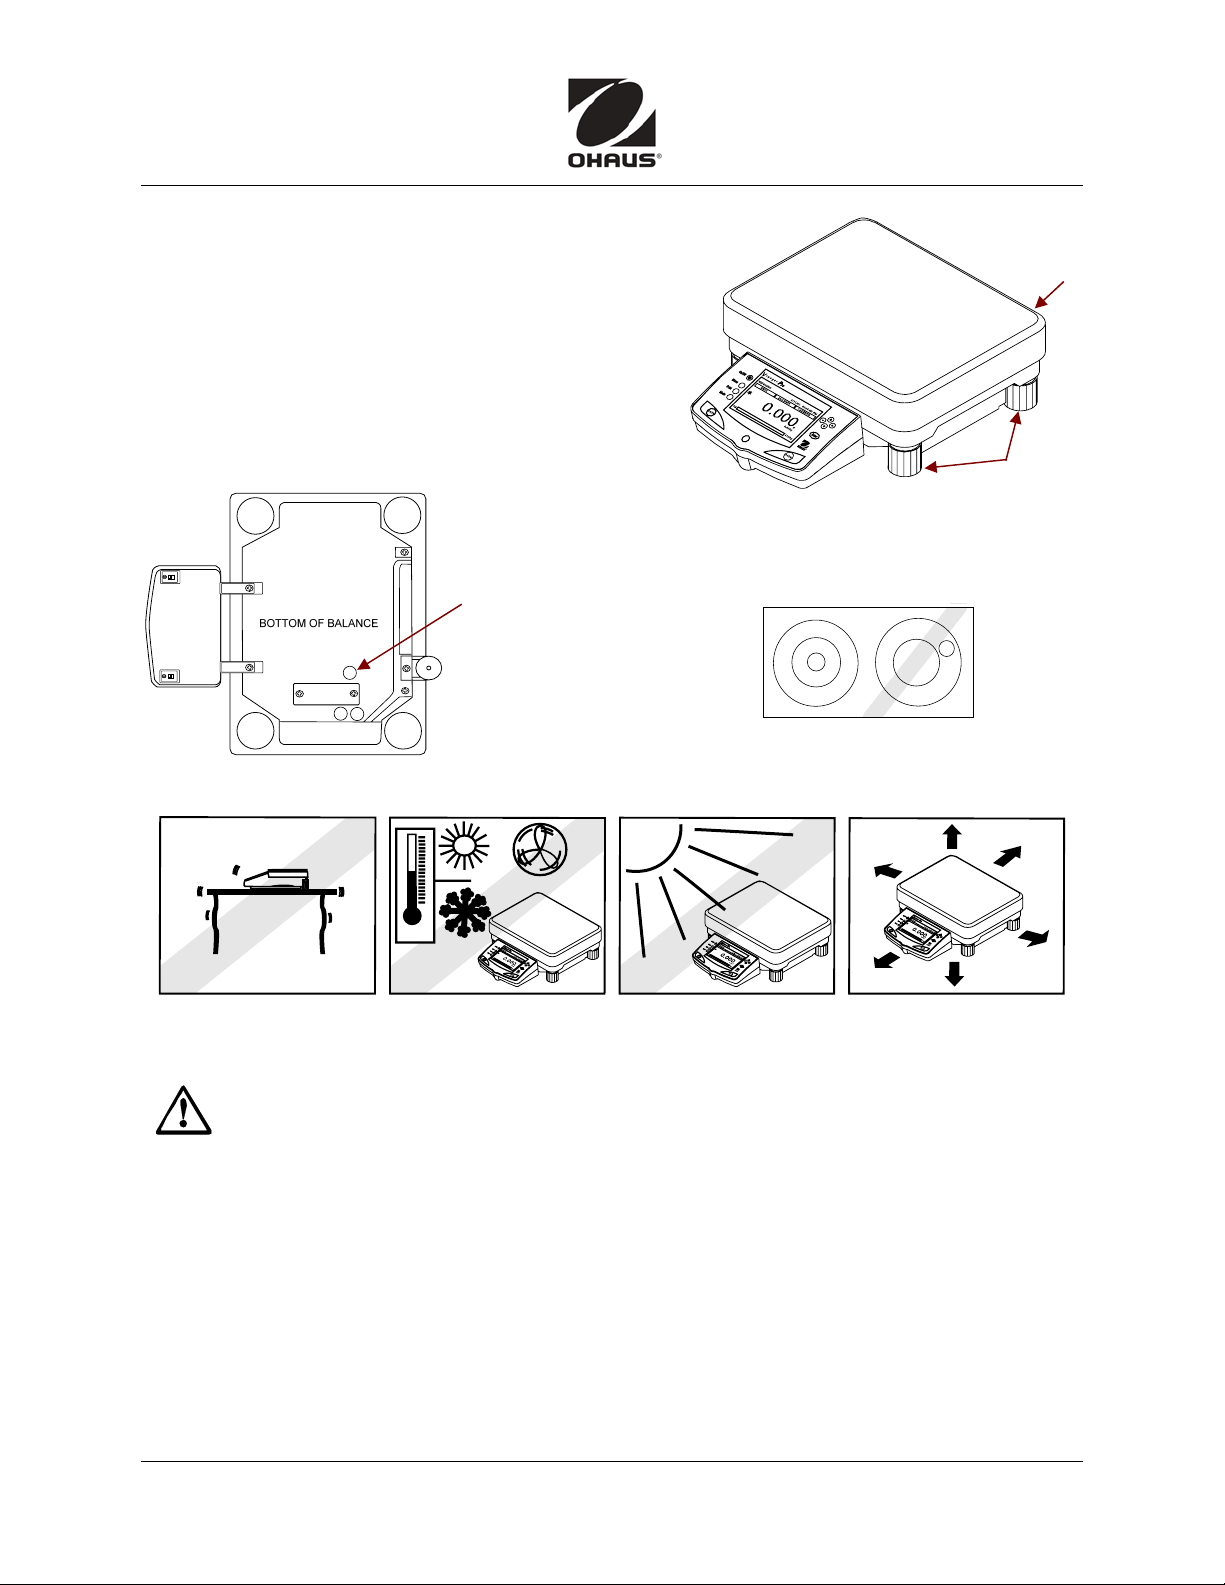
PREPARATION FOR USE
Place stainless steel weighing pan atop black
rubber pads.
Power
Check that local line voltage matches voltage
printed on the scale’s power adapter. If not,
do not connect the scale to the power supply.
Contact an Ohaus dealer.
To use Weigh
Below hook,
remove the
protective cover
on the bottom of
the balance.
SELECTING THE LOCATION:
Place on a firm, steady surface with sufficient space.
Leveling
Leveling
Level the scale:
Adjust feet so bubble is centered.
Bubble
Feet
Avoid excessive air current, vibrations, heat sources, or rapid temperature changes.
SAFETY PRECAUTIONS
For safe and dependable operation of this product, observe the following safety
precautions:
• Verify that the input voltage printed on the power adapter and the plug type matches
the local power supply.
• Be sure the power cord does not pose an obstacle or tripping hazard.
• Disconnect the product from power supply when cleaning.
• Do not operate this product in hazardous or unstable environments.
• Do not drop loads on the pan.
• Use only approved accessories and peripherals.
• Operate the product only under ambient conditions specified in the Instruction Manual.
• Service should be performed by authorized personnel only.
Ohaus Corporation www.ohaus.com i Explorer® Pro-High Capacity Quick Start Guide
Page 2
Explorer® Pro-HC Quick Start Guide
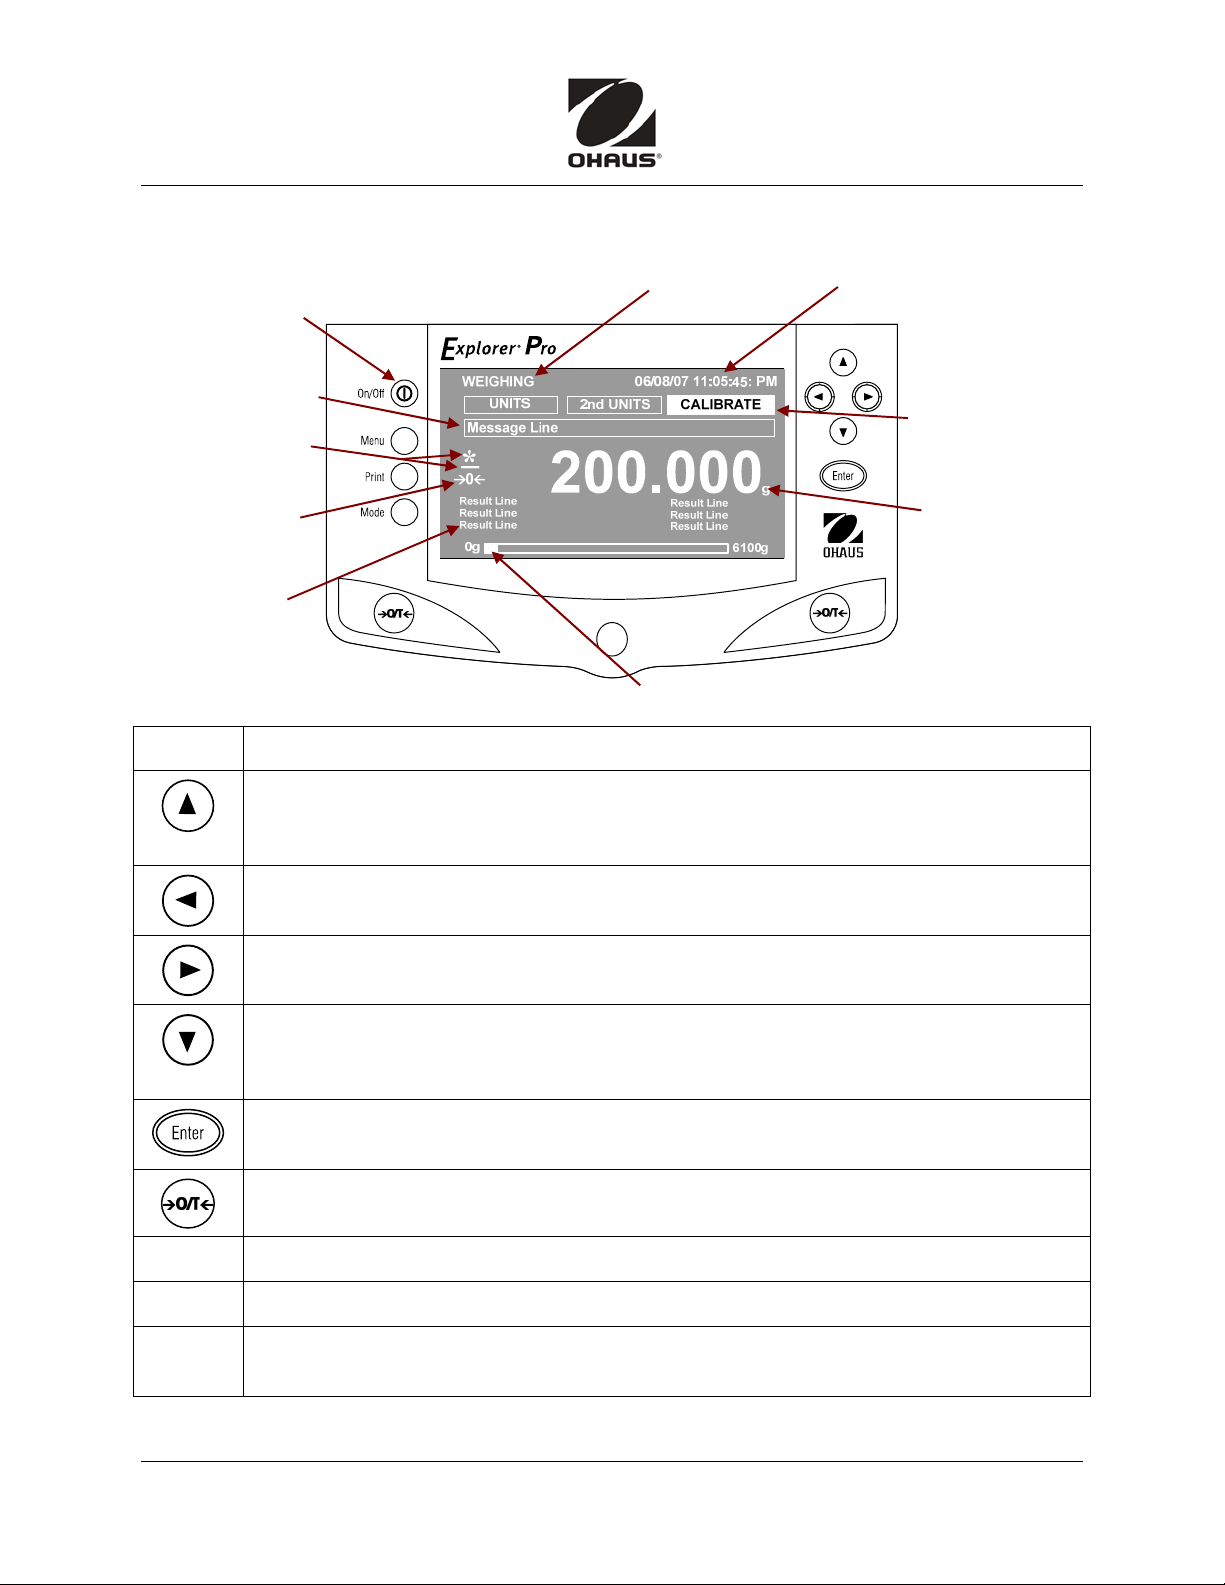
CONTROLS
Power On/Off Button
Message line contains
instructional messages
Stability indicator
& Negative value
indicator
Center of Zero
indicator
(LFT models)
Result lines display
results of balance
operations
Active Application
Indicator
Capacity Bar: shading indicates capacity used –
meaning varies by application.
Date and time
See menu (p. 4) for setup.
Soft Keys – See
details in table.
Unit of measure
indicator. (g=grams)
See menu (p. 4) for
available units.
Button Function
In Menu mode, press to move selection bar up, highlight the activated field, or
change settings of a selected field in increasing order.
In alphanumeric field, press to increment number or letter.
In Menu mode, press to move cursor to left (eg, to change date setting).
In Application mode, press to move to the next soft key selection to the left.
In Menu mode, press to move cursor to right (eg, to change date setting).
In Application mode, press to move to the next soft key selection to the right.
In Menu mode, press to move selection bar down, highlight the activated field, or
change settings of a selected field in decreasing order.
In alphanumeric field, press to decrement number or letter.
In application modes, press Enter to accept Soft-key selection.
In menu mode, press Enter to accept and save parameter of selected items.
Press to perform Tare function or Zero function.
Mode
Print
Press to cycle through all active application modes.
Press to send data in Result Lines to COM port (printer or PC).
Menu
Explorer® Pro High Capacity Quick Start Guide ii Ohaus Corporation www.ohaus.com
In Application modes, press to call Menu screen.
In Menu mode, press to return to application mode.
Page 3

Quick Start Guide Explorer® Pro-HC
OPERATION
POWER On/Off: Use the On/Off button to turn power on or off.
Allow time for the balance to stabilize after moving it from an area which is at a
different temperature than the area where it is to be operated. Allow one hour
for each 5° F or 3° C temperature change before using the unit.
After temperature stabilization, allow 20 minutes for top-loading models, and at
least 2 hours for analytical models with draft shields, for the electronics to stabilize.
To Zero or Tare the balance, press ¼O/T».
Weighing
Place item to be weighed on the pan. The display indicates
gross weight in selected measuring unit. (Sample: 200g)
Weighing with a container: With no load on the pan, zero the
balance. Place an empty container on the pan. Press Tare.
Zero is displayed. Add material. Its net weight is displayed.
Remove container; its weight is shown as a negative number.
ADDITIONAL OPERATIONS
Changing Unit of Measure in Weighing Mode:
Use arrow keys to highlight UNITS or 2nd UNITS.
Choose from available units for main (larger) display and
(if desired) another unit for secondary (smaller) display.
If an available unit is not displayed, use the menu to enable it.
(See back page.)
Parts Counting
In Parts Counting mode, the balance determines quantity based
on average piece weight (APW), so parts must be uniform.
The default is 10 pieces. Use this to count parts without setup.
Tare balance if needed. With NEW COUNT highlighted,
press Enter.
Place 10 pieces on pan (as instructed). Press Enter.
Display indicates APW and sample size.
Place parts to be counted on pan. Count is displayed.
Soft Keys: SAMPLE SIZE and SETUP
To manually change the sample size, highlight SAMPLE SIZE
and press Enter. Use arrows to adjust number.
Use the Parts Counting Setup menu for a range of adjustments:
Change to Check or Fill modes, choose preferred weighing unit,
preset sample size, APW or Tare weight, etc.
See Instruction Manual for details on Check and Fill Parts Counting
modes, and for Percent Weighing, Animal Weighing, Check
Weighing, Gross/Net/Tare Weighing, Filling, and Differential
Weighing. Also for the following applications:
Formulation, Statistics, SQC and Density
Ohaus Corporation www.ohaus.com iii Explorer® Pro High Capacity Quick Start Guide
Page 4

Explorer® Pro-HC Quick Start Guide
MENU NAVIGATION
Menu
Press Menu to enter the submenu.
Scroll up or down through menus.
Move cursor left or right within field.
Select a highlighted menu item.
Menu
Exit Menu (when pressed in Menu mode). Alternate: scroll to Exit, press Enter.
MENU STRUCTURE (Appearance may vary on different models. Functions are the same.
For more details on specific functions, see Instruction Manual.)
MENU: Scroll down or up through
options on Main Menu screen.
Highlight desired option, press Enter.
OPTIONS menu appears.
Scroll to desired option, press Enter.
Use arrows to change settings,
In the UNITS menu select units to be
available in applications. (Scroll down
further for Newtons-N, Mommes-m,
Ticals-t, Custom-Cst and Exit.)
INTERFACE defaults are shown here.
press Enter to select.
Change settings as needed.
APPLICATION MODES:
Select applications to be available.
(Scroll to your choice,
press Enter.)
PRINT OPTIONS:
All are set to Off as the default.
LOCKOUT: All menus are unlocked
normally, except in Legal For Trade
models. If any needed function is locked
(eg, Calibration), unlock it here.
Restore default settingsin the menu
if unwanted changes have been made.
For Readout, GLP Print Options, and Library menus, see Instruction Manual.
Reset as needed.
FACTORY RESET:
*80253126* P/N 80253126
Explorer® Pro High Capacity Quick Start Guide iv Ohaus Corporation www.ohaus.com
 Loading...