

Page 1
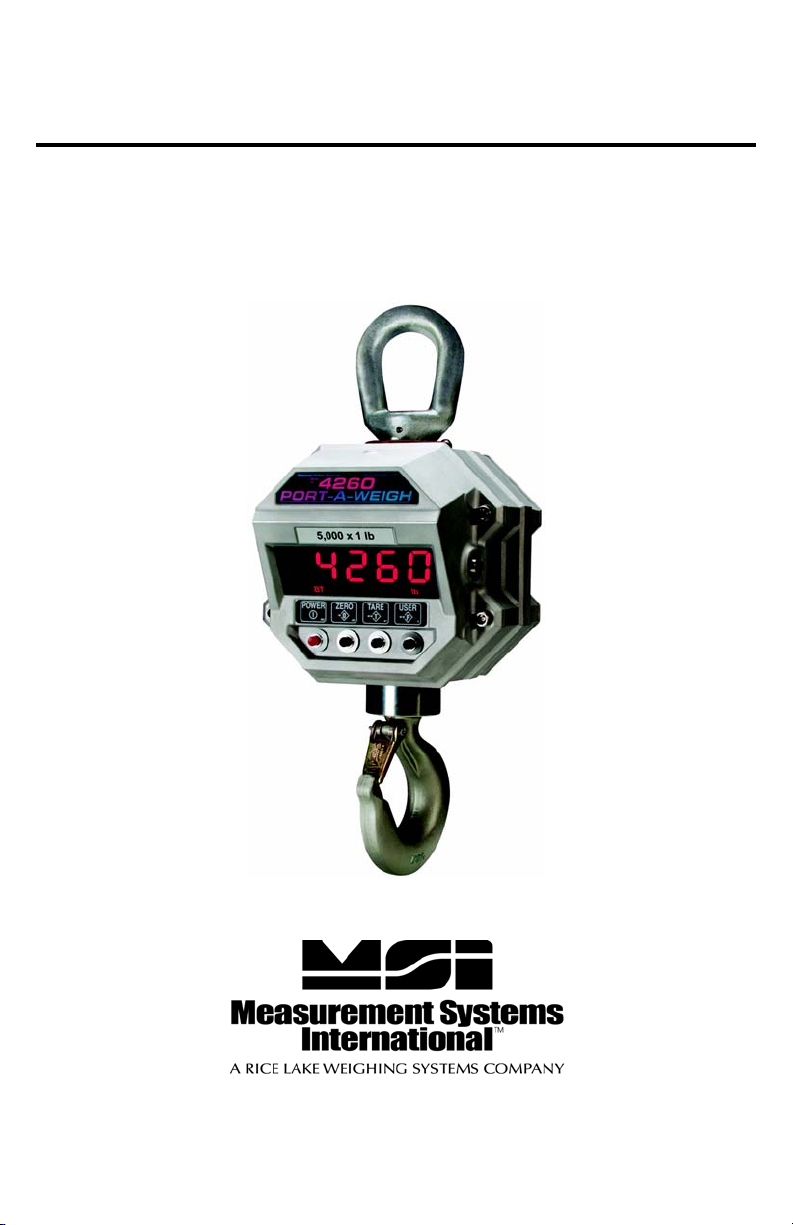
MSI-4260B
Port-A-Weigh Crane Scales
Operator’s Manual
152159 Rev A
Page 2

Page 3

Technical training seminars are available through Rice Lake Weighing Systems.
Course descriptions and dates can be viewed at www.ricelake.com/training
or obtained by calling 715-234-9171 and asking for the training department.
Contents
1.0 Introduction ...........................................................................1
1.1 Safety Section .................................................................... 2
1.2 General Information ........................................................... 4
1.2.1 Operator’s Manual & MSI-4260 Conventions .....................4
1.3 MSI-4260 Annunciators ..................................................... 5
1.4 Specifications .................................................................... 6
1.5 Features ............................................................................. 8
1.6 Options ............................................................................... 8
1.7 Unpacking .......................................................................... 8
1.8 Installation .......................................................................... 9
1.9 Battery Pack .................................................................... 10
1.9.1 Battery Life .......................................................................10
1.9.2 Battery Use Guidelines .....................................................10
1.9.3 Battery Charger ................................................................11
1.9.4 Battery Removal & Replacement ......................................12
1.10 Comm Port ....................................................................... 13
1.10.1 Comm Port Cables ..........................................................13
1.11 Servicing the MSI-4260 ................................................... 14
1.12 RF Connectivity ............................................................... 15
1.12.1 FCC Statement (for 802.15.4 Option) ...............................15
1.12.2 International RF Certs (for 802.15.4 Option) .....................15
2.0 Operation .............................................................................16
2.1 Power ............................................................................... 16
2.2 Zero .................................................................................. 16
2.3 Tare .................................................................................. 17
3.0 User Defined Function Keys .................................................18
4.0 Set Up ...................................................................................21
4.1 Menu Map ........................................................................ 21
4.2 Function Keys .................................................................. 22
4.3 Auto- Off ........................................................................... 23
4.4 Sleep ................................................................................ 24
4.5 Display Brightness ........................................................... 25
4.6 Set Points ......................................................................... 26
4.7 Total Mode ....................................................................... 28
4.8 Units ................................................................................. 29
4.9 Filter Setup ....................................................................... 30
© Rice Lake Weighing Systems. All rights reserved. Printed in the United States of America.
Specifications subject to change without notice.
Rice Lake Weighing Systems is an ISO 9001 registered company.
February 2013
Page 4

Rice Lake continually offers web-based video training on a growing selection
of product-related topics at no cost. Visit www.ricelake.com/webinars.
5.0 Calibration ...........................................................................31
5.1 Initial Calibration .............................................................. 34
5.2 Guidelines for Capacity and Resolution ......................... 35
5.3 C-Cal Calibration ............................................................. 36
5.4 Calibration Setup Menu ................................................... 38
5.4.1 Standard ..........................................................................39
5.5 Auto Zero Maintenance ................................................... 40
6.0 RF Remote Control Option ...................................................42
6.1 Description ....................................................................... 42
6.2 Functions ......................................................................... 42
6.3 Setting the Transmitter Address ..................................... 43
6.4 Setting the Receiver Address ......................................... 43
6.4.1 Resetting the 4260 RF Remote Receiver ..........................43
6.5 Contention and Jamming Considerations ...................... 44
6.6 Battery Replacement ....................................................... 44
6.7 RF Remote Control FCC Statement ............................... 45
7.0 RF Remote Display Option ...................................................46
7.1 Introduction ...................................................................... 46
7.2 COMM SEtup Menu ......................................................... 46
7.3 Printer / Serial Output Setup ........................................... 47
7.3.1 Control Modes .................................................................47
7.4 Standard Print Strings ..................................................... 47
7.5 802.15.4 RF Network Setup ........................................... 50
8.0 Appendix ..............................................................................53
8.1 Troubleshooting ............................................................... 53
8.1.1 Service Counters ..............................................................55
8.2 MSI-4260 Port-A-Weigh Dimensions .............................. 56
The MSI Limited Warranty 57
ii MSI-4620 Operator’s Manual
Page 5

1.0 Introduction
The MSI-4260 Port-A-Weigh is a combination of the sound and proven mechanical
design of the industry standard MSI-4260 with today’s most advanced electronics to
provide a superb feature set unmatched by any crane scale in its class or price range.
The MSI-4260 is versatile, reliable, accurate and user friendly to operate.
The MS
OSHA safety standards
and RF Remote Display (using the MSI-8000 Remote Display) are available to further
enhance the performance and application versatility of the MSI-4260.
If you have any questions or comments please contact
I-4260 is designed to meet or exceed requirements of applicable ASME, ANSI,
. Multiple options and accessories, including RF Remote Control
Measurement Systems International
Phone (toll free): 1-800-874-4320
Authorized distributors and their employees can view or download this
manual from the Measurement Systems International site at:
www.msiscales.com.
Introduction 1
Page 6
1.1 Safety Section
CAUTION
WARNING
Important
WARNING
Safety Symbol Definitions:
Indicates a potentially hazardous situation that, if not avoided,
could result in death or serious injury, and includes hazards that
are exposed when guards are removed.
Indicates a potentially hazardous situation that, i
result in minor or moderate injury.
Indicates information about procedures that, if not observed,
could result in damage to equipment or corruption to and loss of
data.
Do not operate or work on this equipment unless you have read and
understand the instructions and warnings in this manual. Contact
any Measurement Systems International dealer for replacement
manuals. Proper care is your responsibility.
f not avoided may
General Safety
Failure to heed may result in serious
DO NOT allow minors (children) or inexperienced persons to operate this unit.
DO NOT stand near the load being lifted as it is a potential falling hazard. Keep a
safe distance.
DO NOT use for purposes other then weigh
DO NOT use any load bearing component that i
dimension.
DO NOT use the Scale if any of the components of the load train are cracked,
deformed, or show signs of fatigue.
DO NOT exceed the rated load limit of the Scal
structure.
DO NOT allow multi-point contact with the hook, shackle, or lifti
Scale.
DO NOT allow high torque on the Scale unless it is specifically designed for high
torque.
DO NOT make alterations or modifications t
devices.
DO NOT use improperly rated or sized shackl
shackles.
DO NOT remove or obscure warning labels.
For guidelines on the safe rigging and l
dynamometers, read the "MSI Crane Scale Safety and Periodic Maintenance
Manual" (available at www.msiscales.com).
Keep hands, feet and loose clothing
There are no user serviceable parts within the MSI-4260. Any repairs are to be
performed
by qualified service personnel only.
away from moving parts.
t taking or dynamic load monitoring.
o the Scale or associated load bearing
oading of overhead scales and
injury of death.
s worn beyond 5% of the original
e, rigging elements, or the lifting
ng eye of the
es. Use only MSI recommended
2 MSI-4260 Port-A-Weigh Operator’s Manual
Page 7

st
ZERO TARE USER
es
POWER
T
F
5 digit 1.2/30.5 mm
high brightness LED
weight display
RS-232 Serial Port
IP-68 rated push buttons
User Programmable
Function Key
Sealed calibration
switch
LED annunciators
Push button legend
Acknowledge
annunciator
Key Descriptions
es
st
ZERO
T
F
POWER
Figure 1-1 MSI-4260 Front Panel
Power Key - Turns the MSI-4260 On and Off.
Zero Key - Used to zero out residual weight on the scale.
TARE
USER
Tare K e y - removes weight of containers, trucks or carriers and places
the scale in the Net weight mode.
TARE key functions Tare In, Tare Out.
To see the gross weight without resetting the Tare value, program the
USER key
User Key- Programmable to user selectable functions. These are
as NET/GROSS.
described in the USER key Setup section. This key is defaulted to the
TEST function.
Introduction 3
Page 8

1.2 General Information
1.2.1 Operator’s Manual & MSI-4260 Conventions
1. Keys used in operations are printed in BLUE and capitalized.
2. Screen shots that are used in menus are displayed in RED and shown in a
7-segment font. Not all characters can be displayed with this font, but a close
approximation is shown.
3. If a function key does not work, it is probably because the MSI-4260 is not setup
to support the key. For example, if the Function Key is set for
also setup the TOTAL mode in the Setup Menu.
4. When in Setup Menus, the ZERO key drops back one menu level. At the root
menu level, the ZERO key stores the changes and returns to the weight mode.
5. When in Setup Menus, the POWER key returns you directly to the Weight
Display without storing the changes.
6. When in Setup Menus, the USER key functions as the scroll key.
7. When in Setup Menus, the TARE key functions as the ENTER/SELECT key.
TOTAL, you must
4 MSI-4260 Port-A-Weigh Operator’s Manual
Page 9
1.3 MSI-4260 Annunciators
The MSI-4260 uses blue and red LEDs to indicate weight mode and other
information.
The STABLE annunciator indicates that the weight has settled within
the motion window (usually ±1d). When this symbol is off the scale
will not zero, tare, or totalize.
0
PK
NET
TTL
x1K
BT
kg
lb
Center-of-Zero – Indicates the weight is within 1/4d of zero.
PEAK - Indicates the scale is in peak hold mode.
NET - Indicates the scale is in Net weight mode.
A Tare weight is subtracted from the gross weight.
TOTAL - (Blue LED) Indicates the scale is displaying the Total weight.
This is a temporary display lasting less than 5 seconds.
X1000 - (Blue LED) Usually used in conjunction with the TOTAL LED
to allow accumulation of weight beyond the 5-digit display capacity.
LO BATT - Appears when approximately 10% of battery life remains,
LED blinks when automatic shutdown is eminent.
kg - (Red LED) Indicates weight display is in kilograms.
lb - (Red LED) Indicates weight display is in pounds.
SET POINTS - User programmable set points for early overload
warnings.
Blue LED - Setpoint 1
Green LED = Setpoint 2
Red LED - Setpoint 3
ACK - Acknowledge LED is used to provide feedback to the
operator that incoming remote commands have been received
(Green LED).
Also used for acknowledging successful Auto-Total operations.
Introduction 5
Page 10

1.4 Specifications
Accuracy ±(0.1% +1d). ‘d’ equals one displayable increment.
Resolution Standard displayed resolution: 2500-3750’d’.
Standard
Capacities
Power Battery operated, 12V rechargeable sealed lead acid battery pack
Display 5 digit, large 1.2 in (30.5 mm) numeric red GaAIAs Light Emitting
Operating
Te mp
Operating Time 100 hours typical/150 hours max. (depends on operating mode)
Enclosure NEMA 4/1P65 powder coated alodined cast aluminum
Load Cell Standard 350 Ω Bridge, MSI Trinocular (>10k lb.)
USER Programmable multifunction button for use as
CAL Wire sealed calibration switch (located on the left side of the front
Auto Zero
Maintenance
Auto-Off Mode Prolongs battery life by turning POWER off after 15, 30, 45 or 60
Auto-Sleep
Mode
Units kg, lb (other units available with custom calibrations)
Filtering Selectable:
Totalization Standard: Press button or Automatic; TOTAL weight up to 99999 X
Peak Uses unfiltered faster reading of A/D (>400 readings per second)
Set Points Three internal standard Set Points and three ultra bright LEDs on
Resolutions to 10000’d’ (non LFT units only) are possible.
Internal A/D resolution 24 bits
lb 500 2000 5000 10000 20000 30000 50000 70000 100000
kg 250 1000 2500 5000 10000 15000 25000 35000 50000
(standard Port-A-Weigh Charger).
Up to 100 hours of battery life with Automatic Sleep Mode and
Automatic Power Off
Diode (LED)
-40°F to +122°F (-40°C to +50°C), LFT range -10°C to +40°C
TEST, TOTAL, UNIT, PEAK, NET/GROSS, VIEW TOTAL, LEARN
(for RF Remote Control)
casting).
Initiates full digital calibration procedure.
Standard, can be disabled internally
minutes (operator determined) of no scale activity
Prolongs battery life by dimming LED display after 5, 15, or 30
minutes of no activity
• OFF, Low (LO)
• Medium (HI-1)
• High (HI-2)
1000 kg or lb
indicator panel.
Set Point relay options are available, contact factory.
Table 1-1. Specifications
6 MSI-4260 Port-A-Weigh Operator’s Manual
Page 11
WARNING
Service
Counter
Construction
OPTIONS
Wireless
Remote
Controler
Wireless
Remote Display
Two independent 32 bit registers;
• Register 1 updated each time weight exceeds 25% of capacity;
• Register 2 updated each time weight exceeds overload;
When register 1 exceeds 16383 or register 2 exceeds 1023, display
reads “LCnt” for load cell counter;
Test function shows the two readings in order
All features are housed in heavy duty, cast aluminum housing
onsisting of three sections:
c
• The front of the scale houses the display, controls and all
electronics
• The center section contains the load cell, lifting eye and hook
• The rear of the scale features a quick access battery
compartment
Table 1-1. Specifications
m) typical range Line-of-Sight. Uses 418 MHz (USA)
50 (15
handheld transmitter. 315MHz and 433MHz options are available
for international applications
100 (30m)
handheld transceiver.
typical range Line-of-Sight. Uses 802.15.4, 2.4GHz
Table 1-2. Options
The MSI-4260 Port-A-Weigh scale has a safe mechanical
overload of 200%, and an ultimate overload of 500%. Overloads
greater than 500% may result in structural failure and dropped
loads. Dropped loads may cause serious personal injury or death.
Introduction 7
Page 12

1.5 Features
• Designed to meet or exceed applicable US and international safety standards.
• Up to 100 hours of weighing time utilizing Automatic Sleep Mode.
• Automatic Power Off conserves battery life by sensing no activity after 15, 30,
45 or 60 minutes, determined by operator, and turns off power.
• Automatic sleep Mode preserves battery life by dimming the LED display after
5, 15, or 30 minutes of no activity.
• Rugged construction throughout. Buttons are sealed and rated for over 1 million
operations.
• Precise high resolution (2500 division standard and up to 10,000 possible) 24 bit
A/D conversion coupled with advanced RISC micro controller provides world
class features and accuracy.
• Five large, 1.2 inch (30.5 mm) LED digits for clear weight readings from a
distance. Display tilted down for easier viewing from below.
• Easy to maintain: Full digital calibration assures reliable, repeatable
measurements. Can be calibrated without test weights using MSI C-Cal
technology.
• Selectable for kg/lb unless prohibited by LFT regulations.
• Automatic or manual weight totalization for loading operations.
• Easily customized for special applications.
• Hi speed PEAK Mode for wire and rope stress analysis.
• Three Set Points can be set for any in-range weight for operator alerts or process
control.
• ScaleCore Technology providing quick and easy software updates and
calibration/setup backup.
• Two Service counters ensure Load Train safety by warning the user to perform a
Load Train safety check when the lift count gets high or the scale has been
overloaded repeatedly.
1.6 Options
Options which you may have ordered with your Port-A-Weigh may include the
following:
• RF Remote Controller
• RF Remote Display
• 802.11 WiFi Connectivity
• 85-265 VAC input power.
• Audible Alarm (triggered by Set Point 1)
1.7 Unpacking
When unpacking the scale from the shipping container, ensure that all assembly parts
are accounted for. Check the scale for any visible damage and immediately report any
damage to your shipper. It is advisable to use the original shipping container when
shipping or transporting the MSI-4260.
8 MSI-4260 Port-A-Weigh Operator’s Manual
Page 13
1.8 Installation
Note
WARNING
Important
The MSI-4260 features a heavy duty, cast aluminum enclosure rated at NEMA 4 IP
66. It installs easily by hanging it on the crane, using properly sized shackles.
Please refer to MSI’s brochure, “Crane Safety” when installing
model
MSI-4260
.
One of the most common installation problems is using an oversize shackle or too
large a hook to interface with the MSI-4260. This can cause off center loading and
stress points that will reduce the life of the lifting eye or hook.
Use the appropriate interface hardware for
• If your interface hardware does not fit
the capacity of the scale.
properly, MSI can supply the MSI-4260
with oversize lifting eyes or shackle interfaces.
• If the crane hook is too large to fit in the lifting eye with s
ingle point interface,
then install the scale using adaptive rigging.
• If multiple attachments are needed, use a shackle or
ring to attach the multiple
lines to thus keeping a single point attachment to the scale.
Single point attachments are necessary to ensure the safety and
accuracy of the scale system.
Regular maintenance inspections of the liftin
performed to ensure safety. Pay particular attention for signs of
stress on any element in the load train.
g system should be
Introduction 9
Page 14

1.9 Ba tte ry Pa ck
Note
Note
The MSI-4260 is powered by a 12 volt Sealed Lead Acid rechargeable battery.
The battery will operate for up to 100 hours (depending on LED brightness setting)
befo
re requiring recharging.
In order to conserve battery life, the scale inc
which senses operational status for no activity after 15, 30, 45, or 60 minutes, and
turns the scale off.
An additional battery saving feature is the Automatic Sleep
preserves battery life by dimming the display after 5, 15, or 30 minutes of no scale
activity.
Charging time for a completely discharged battery is up to 8 hours. A spare battery
pack is recommended to
To obtain maximum service life from your batteries they should be stored
between -4°F and 122°F (-20°C and +50°C). Stored batteries should be
recharged every three months. Battery is fully charged when the status
indicator is flashing.
keep the MSI-4260 in continuous operation.
1.9.1 Battery Life
The MSI-4260 battery life depends on a number of factors:
• Brightness of the LED Display and number of segments lit.
• Amount of RF activity, and the age.
• Condition of the SLA (sealed lead acid) battery.
The MS
approximately 10.5V. You must recharge the battery when this happens.
SLA batteries do not suffer from memory effects and actually benefit from frequent
recharging. Recharge the battery whenever it is convenient even when it still has
available life.
Due to the maintenance discharge imposed on the battery by the M
electronics, do not store the MSI-4260 with the battery inside. Remove the battery
if it will not be used for more than 2 weeks.
I-4260 will automatically turn the scale off when the SLA battery drops to
Leaving a discharged battery in the scale, which has a maintenance
battery drain, can result in a deep discharged battery which will shorten
its service life.
ludes an Automatic Power Off Mode
Mode. This feature
SI-4260
1.9.2 Battery Use Guidelines
• Recharge whenever convenient. Do not wait for the scale to shut itself off if your
work situation permits.
• If you need the scale continuously
the drained battery as close as possible to the low battery warning, or earlier.
• SLA Batteries that have not been deep discharged should withstand 500 to 1500
char
ging cycles.
• The low battery warning will indicate about 2-4 hours of additional use before
the MSI-
•If the MS
4260 turns itself off.
I-4260 is not going to used again soon, remove the SLA battery to
prevent deep discharge while the unit is in storage.
• Recycle the battery to an authorized recycling
20 hours or less.
10 MSI-4260 Port-A-Weigh Operator’s Manual
, keep a fully charged spare battery. Replace
center when average life drops to
Page 15
1.9.3 Battery Charger
Note
Charge Indicator Light
Amber = Charging
Green = Float
Note
Note
Note
Each MSI-4260 is shipped with a battery charger designed to charge and maintain the
battery. Exact charging time will depend on the degree of discharge of the battery. A
battery removed when the low battery warning first appears should take about 4 hours
to fully charge.
When the battery is new, it might take significantly longer for the initial
charge. MSI recommends charging a new battery for 24 hours. It might
take several charge/discharge cycles before full capacity is reached.
Deep discharged batteries will also take significantly longer to charge.
Figure 1-2 Batte ry Charger
The charger is a universal input type and is rated for 100-240VAC, 50-60Hz. AC
power cords
Using the Charger
1. Remove the battery from the MSI-426
2. Connect the charger assembly to the AC supply (86-260VAC). The charge
3. Plug in the polarized connector to the jacks on the battery.
4. The Charge Status light should turn AM
5. Charge until the status light turns GREEN.
When the charge cycle is complete you can (and should) leave the battery on the
charger until it is needed. The charger keeps a maintenance float charge on the battery
to ensure the best possible operation times. For scales that are in high usage, MSI
recommends obtaining a spare battery so one can always be on the charger.
suitable for any world location are available from MSI.
0. See Figure 1-3.
icator light should be green.
ind
If the power status light fails to illuminate, check your AC power
connection and make sure the Vin jack is fully seated. AC power cords
suitable for any world location are available from MSI.
BER indicating fast charge.
The charger is a 3 stage float charger that can be left on the battery
indefinitely. It has a dual color LED to indicate the charging state:
RED – Fast Charge Mode.
GREEN – Charged or Float Charge.
If the status light remains Green when the battery is first plugged in, the
batt
ery may be defective.
To obtain maximum service life from your batteries, the manufacturer
suggests recharging after each 20 hours of use. Continuous deep
discharging will reduce maximum battery life cycle estimated at 2000
cycles.
Introduction 11
Page 16
1.9.4 Battery Removal & Replacement
CAUTION
Important
1. Turn the MSI-4260 Off.
2. With one hand, hold the battery access cover.
3. Release the two latches holding the battery access cover. Remove the latch by
sing in on the spring catch, and pull on the latch lever.
pres
4. Carefully lower the cover and when possible, hold the
battery might be loose and subject to falling.
5. Remove the battery by pulling straight back.
6. Install a fully charged battery by plugging it in to the exposed battery jacks. The
MSI-426
0 may or may not turn on once the new battery is installed.
7. Reseat the access panel.
8. Reset the latches. Make sure the latches are completely latched and the plate is
firmly in place.
battery in place. The
Figure 1-3 Remove Battery
Periodically, inspect the battery latches for fit. Adjust the screw
latch by rotating the catch on its threads to maintain a tight seat
on the battery O-ring.
The 12V Sealed Lead Acid Battery can be a dangerous falling
hazard. When opening the battery hatch, be sure to hold the
battery to prevent it from falling. These batteries contain Lead
and should be recycled when it has reached its end of life.
12 MSI-4260 Port-A-Weigh Operator’s Manual
Page 17
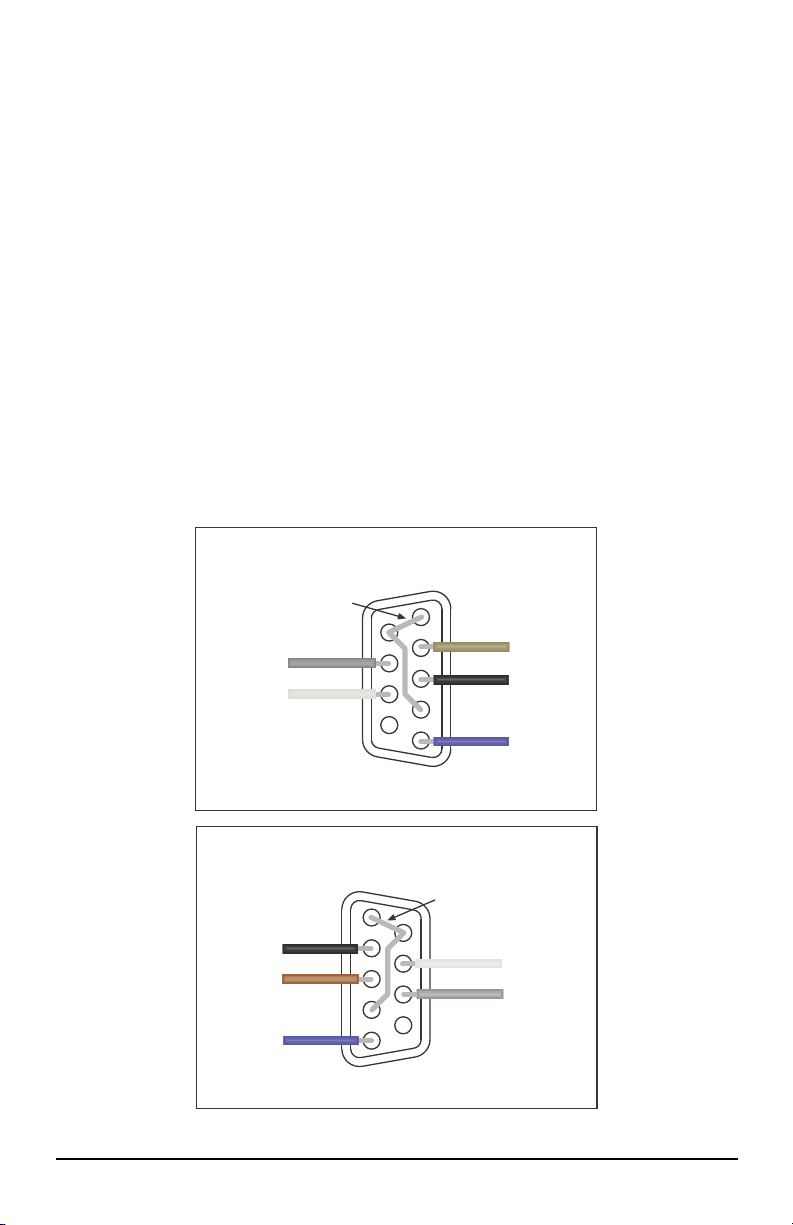
1.10 Com m P ort
1
2
3
4
5
6
7
8
(NC) 9
Brown (TD)
Black (RD)
Blue (GND)
Grey (CTS)
White (RTS)
Jumper 1-6-4
RS-232 DCE
9-Pin Female ‘D’
Solder Cup View
Standard wiring for direct
4260 to Computer connection
1
2
3
4
5
6
7
8
9 (NC)
Brown (TD)
Black (RD)
Blue (GND)
Grey (CTS)
White (RTS)
Jumper 1-6-4
RS-232 DTE
9-Pin Male ‘D’
Solder Cup View
Wiring for direct 4260 to
Printer/Scoreboard connection
The MSI-4260 has a single Comm Port allowing access to the embedded ScaleCore
through the Terminal Access Mode or MSI Software. The Terminal Access Mode is
used for updating scale firmware while MSI Software can be used for calibration and
configuration, backup and adjusting scale settings. This Comm Port is not intended
for output use as it is usually impractical to use a cable connected port on a Crane
Scale.
1.10.1 Comm Port Cables
The MSI-4260 comes standard with one Comm Port Cable wired for RS-232 (MSI P/
N 501705-0001) following the AT standard for 9 pin serial cables (DCE). An unterminated cable is available (MSI P/N 12023) if you wish to wire your own serial
cable for RS-232.
Comm Port Cable Color Code RS-232
• Brown – Transmit output from CellScale, connect to receive
• Black – Receive input to CellScale, co
• Grey – CTS Input to CellScale. Connect to R
nnect to transmit of DTE.
TS or RTR output of DTE.
• White – RTS/RTR output from CellScale. Connect to CTS input of DTE.
• Blue – Signal Ground
• Drain Wire – Connect to metal shell.
of DTE.
Figure 1-4 Comm Port Cable Assignments
Introduction 13
Page 18
1.11 Servicing the MSI-4260
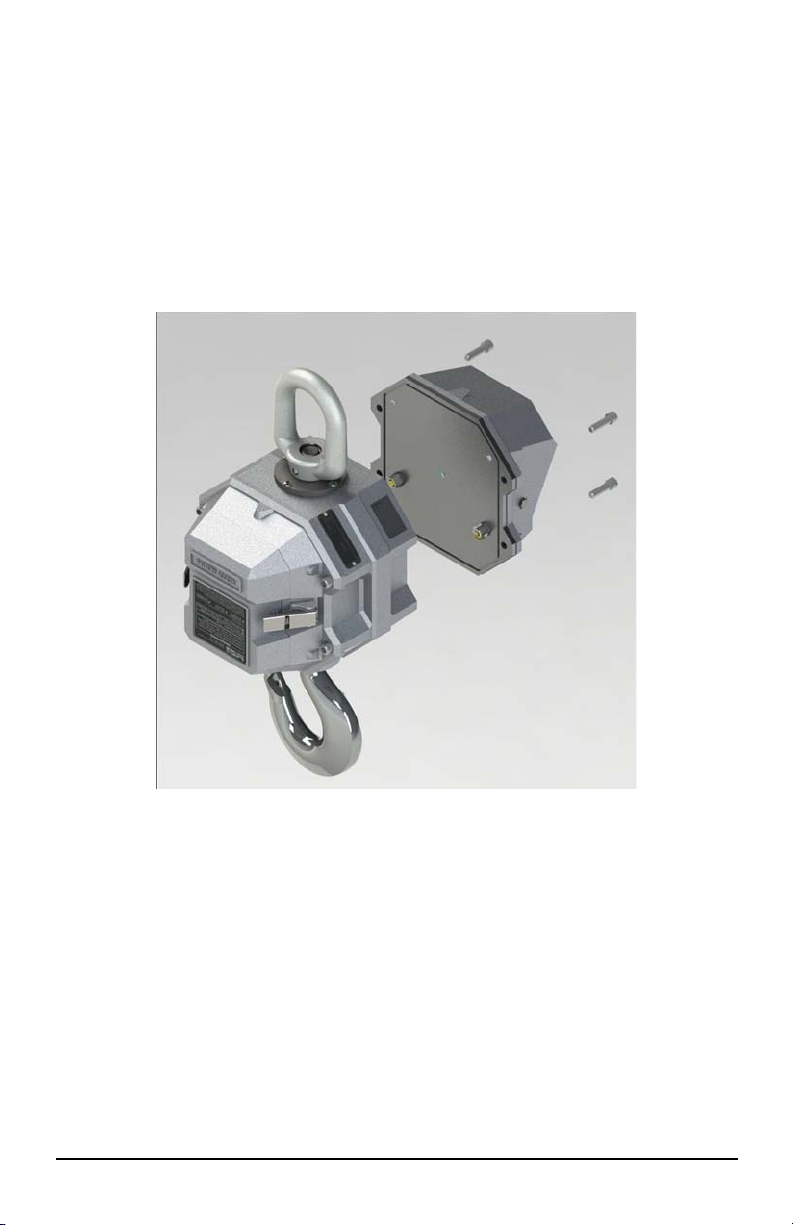
MSI’s Dealer Network provides both on-site and depot servicing of MSI-4260 Crane
Scales. Please contact your local dealer. MSI also operates a service center for all our
products.
Contact MSI Service at 1-206-433-0199 to obtain an RMA (returned material
aut
horization). Due to the weight and size of many of our products, it is not always
necessary to return the whole scale. If the electronics are at fault, you can often return
just the front casting section. See Figure 1-5.
There are no user serviceable parts inside the M
with module and harness swaps.
SI-4260. Depot repair is performed
Figure 1-5 Remove Front Casting
To remove front casting electronics
1. Remove 4 Cap Screws.
2. Unplug connectors.
14 MSI-4260 Port-A-Weigh Operator’s Manual
package:
Page 19

1.12 RF Connectivity
The MSI-4260 has several options for RF Connectivity:
1. 802.15.4 – Standards based DSSS (Direct Sequence Spread Spectrum)
connection at 2.4 GHz This is used for connectivity to MSI’s Model 8000 hand
held remote display. It can also be used with a 802.15.4 modem to connect to
scoreboards or computers.
2. 802.11b,g,n – Standards based DSSS WiFi connection at 2.4 GHz. For operation
on an 802.11 Access Point to Ethernet networks.
This Operator’s Manual will cover option 1 as it is the most common.
Options 2 and 3 are detailed in option manuals.
1.12.1 FCC Statement (for 802.15.4 Option)
Contains FCC ID: OUR-XBEEPRO
The enclosed device complies with Part 15 of the FCC Rules. Operation is subject to
the following two conditions: (i.) this device may not cause harmful interference and
(ii.) this device must accept any interference received, including interference that may
cause undesired operation.
1.12.2 International RF Certs (for 802.15.4 Option)
Canada Radio Cert. No.: IC: 4214A-XBEEPRO
Australia & New Zealand: AS4268:3000
Japan: Certificate of Radio Equipment in Japan No.: 08215111/AA/02
Europe and much of Asia:
The product is compliant with the following standards and/or other normative
documents:
Safety (article 3.1A) EN60950-1:2001
EMC (article 3.1b) ETSI EN 301 489-1 v1.7.1 (2007-04) In accordance with the
specific requirements of ETSI EN 301 489-17 v1.2.1 (2002-08)
Spectrum (article 3.2) ETSI EN 300 328 v1.7.1 (2006-10)
Introduction 15
Page 20
2.0 Operation
es
POWER
st
ZERO
Note
2.1 Power
To turn on the power.
1. Press
• LED will light all segments at full brightness as a display test.
• Display brightness will change to the setting determined in the Display
• Software version number will display.
• The M
2.2 Zero
Sets the Zero reading of the Scale. Use the ZERO key to take out small deviations in
zero when the scale is unloaded. (See Section 2.3 for zeroing (Taring) package or
pallet weights)
1. Press
Rules for Use:
• Works in GROSS mode or NET mode. Zeroing while in Net mode will zero
• The scale must be stable within the Motion window
• The scale will accept a zero setting over the full Range of the scale (NTEP
, the following will display in order:
Menu.
SI-4260 is ready for use.
The weight reading must be stable within the motion window for the zero
function to work.
The scale digits display 0 (or 0.0 or 0.00, et
The backup memory in the MSI-4260 stores the zero reading, and can
restore it
even if the power fails.
c).
the gross weight causing the display to show the negative Tare value.
. The scale will not zero
if the stabilizer annunciator is off. The Scale will “remember” that it has a
zero request for 2 seconds. If motion ceases within the motion window in
that time, the scale will zero.
an
d other Legal-for-trade models may have a limited zero range). Zero
settings above 4% of full scale will subtract from the overall capacity of the
scale.
For example if you zero out 100 lb on a 1000 lb scale the overall capacity of
the scale will
reduce to 900 lb, plus the allowed over-range amount.
16 MSI-4260 Port-A-Weigh Operator’s Manual
Page 21

2.3 Tare
TARE
T
Note
TARE
T
Tare is typically used to zero out a known weight such as a packing container or pallet
and display the load in NET weight. A Tare value is entered by pressing the TARE
key. The TARE function in the MSI-4260 is defined as a Tare-In, Tare-Out operation.
The first press of the TARE key stores the current weight as a tare value and then the
scale subtracts the tare value from the gross weight and changes the display to NET
mode. The next press of the TARE key will clear the Tare value and revert the display
to GROSS mode.
To view the Gross weight without clearing
the function “NET/GROSS.” The RF Remote Control has a Net/Gross permanently
available.
To Tare and Display the Net Weight
1. Press
.
The weight reading must be stable within the motion window for the tare
function to work.
The scale digits display 0 (or 0.0 or 0.00, et
changes to NET.
The backup memory in the MSI-4260 stores the T
restore it even if power fails.
To Clear the Tare and revert to Gross Weight
1. Press
. The Net annunciator will turn off and the Gross annunciator will
turn on.
Tare - Rules for Use:
• Only positive gross weight readings can be tared.
• The stable annunciator (
stable.
• Setting or changing the tare has no effect on the Gross zero setting.
• Taring will reduce the apparent over range of the scale.
For example, taring a 100 lb container on a 1000 lb scale, the scale will
overl
oad at a net weight of 900 lb (1000-100) plus any additional allowed
overload (usually ~4% or 9d).
• The scale stores the Tare value in non-volatile
power is cycled.
the Tare Value, program the USER key to
c) and the weight mode
are reading and can
) must be off. The weight reading must be
memory and is restored when
Operation 17
Page 22

3.0 User Defined Function Keys
Note
The following function descriptions are for optional user defined functions that are
programmed on the front panel USER key or the two function keys (F1 & F2) on the
RF Remote Control. The functions TOTAL, VIEW TOTAL, and NET/GROSS are
available full time on the RF Remote Control. To enable any of the USER key
functions, you must set up the USER keys following the procedures in Section 4.0.
TEST
The TEST function provides an LED test that li
Model number followed by the Software Version number, the battery voltage and then
performs a display test that counts from 00000 to 99999. Other internal tests are
performed and if any test fails, an Error Code will display. See Section 8.1 for a
troubleshooting guide. Press the USER k
single step through all the test functions. In the single step mode, use the USER key
to scroll through the available test functions and the TARE key to start or display the
individual tests. Use the ZERO key to exit individual tests. Use the ZERO key to exit
entirely from the TEST function.
– MSI-
Ve rs io n.
– Batte
– Display T
99999.
–
TOTAL
4260 Software Version Number: Press TARE to see the Software
ry Voltage: Press TARE to see the battery voltage.
est: Press TARE to have the display count up from 00000 to
Cal Constant Display: Press TARE to view the C-CAL value.
The Total Mode must be programmed from the Setup Menus before the
USER key will function.
ghts all LEDs at once, next the SW
ey again within two seconds to enable a
For accumulation of multiple weighments. The accumulator always uses the
displayed weight, so GROSS and NET readings can be added into the same TOTAL.
There are four Modes of totalizing: Manual and three Auto Modes. The Manual Mode
requires the TOTAL button be pressed with the weight on the scale. The weight will
be added to the previously accumulated value. This assures that a weight on the scale
is only added to the total once. Both the manual and three auto total modes require
that the weight on the scale return below 0.5% (relative to full scale) of GROSS
ZERO or NET ZERO before the next weighment can be added. Applied weight must
be ≥1% of full scale above GROSS ZERO or NET ZERO before it can be totaled.
MANUAL TOTAL
The US
Weight is > 1% of Capacity and has not been totaled
add the current weight to the TOTAL weight. The ACK LED’s blink to indicate the
weight was accepted. The TOTAL annunciator lights and the Total weight is
displayed for five seconds and then the number of samples is displayed for two
seconds.
Current Weight has been Totaled
weight for five seconds (View Total) without changing the Total value. The TOTAL
annunciator will light during the TOTAL weight display. After five seconds of Total
Weight display, the number of samples is displayed for two seconds.
18 MSI-4260 Port-A-Weigh Operator’s Manual
ER key under the MANUAL TOTAL mode functions in this manner:
– Pushing the USER key will
– Pushing the USER key will display the Total
Page 23

Weight is <1% of Capacity – The USER key functions as “View Total” only and
Note
Note
functions as View Total until the 1% threshold is exceeded to allow the next addition
to the total value.
AUTO TOTAL
The USER k
ey under the AUTO TOTAL mode functions as Auto Total On / Auto
Tota l O ff.
The Auto Mode has three variations which are programmed in the
• AutoL
oad – Any settled weight above the ‘Rise above’ threshold will be
SETUP menu:
automatically totaled. Then the scale must fall below the ‘Drop below’ threshold
before another total is allowed.
• AutoN
orm – This mode takes the last settled weight to auto total with. The total
occurs only once the scale goes below the threshold. This allows the load to be
adjusted without a total occurring. Once the load is removed, the scale uses the
last settled reading for total.
• AutoHig
h – Similar to the AutoNorm mode except the scale uses the highest
settled reading. Useful for loads that can’t be removed all at once.
Any Total Mode will not function while the scale is in motion. Make sure
the
the filter setting or increase the size of the scale division (d) in the Init Cal
procedure.
is on. If the system fails to achieve stable readings, increase
View Total
The Function key activates the Total weight display followed by the number of
sampl
es. While the display is showing the Total, Total is cleared by pressing ZERO.
Net / Gross
Switches the display between Net and Gross modes. Net
Weight is defined as Gross
Weight minus a Tare Weight.
RF Remote Control, and the MSI-8000 have this function as a standard
feature. On the MSI-8000, you must configure a Function Key to Net/
Gross Mode to enable this feature.
To Switch Between Net Mode and Gross Mode:
1. Press the USER key (Setup to the Net/Gross function).
2. The NET/GROSS key will only function if a Tare value has been established.
3. Switching back to Gross mode from Net mode will not clear the Tare value. This
al
lows the operator to use the Gross Mode temporarily without having to
reestablish the Tare value. Only clearing the Tare or setting a new Tare will
change the tare value held before switching into Gross Mode.
OIML LFT units only: The NET/GROSS key is temporary action only. The Gross
weig
ht is displayed for two seconds and then the display returns to the Net Mode. The
only way to return to permanent Gross readings is to clear the Tare (See Section 2.3).
PRINT
If print option is installed this menu choice wi
ll appear. The setup of the print function
is covered in the Option manual.
User Defined Function Keys 19
Page 24

LEARN
Used for programming the RF Remote Control. This function is detailed in Section
6.0.
PEAK HOLD
Peak Hold will only update the display when a higher peak weight reading is
established.
The Peak Hold function uses a high speed mode of the A/D converter allowing it to
capture transient weights at a far higher rate than typical scales. Peak hold is cleared
and re-enabled with the USER key.
PEAK HOLD is not available on NTEP or OIML LFT certified scales.
UNIT
The Function key will switch the weight units between pounds and kilograms.
UNIT switching is not available on OIML certified LFT scales.
20 MSI-4260 Port-A-Weigh Operator’s Manual
Page 25

4.0 Set Up
)YQF
IYQF
DII
GLVSO
6W3W
6W3W
6W3W
WRWDO
/($51
81L7
ILOWU
2))
WHVW
WRWDO
YWWO
1(W
U
8QLW
3+OG
2II
II
/R
+L
+L
DYWR
/R
/R
+L
+L
kg lb
2))
UHDW
/(66
Number Entry
Off
Test Display
(default)
*Total
*View Total
*Net/Gross
**Units
***Peak Hold
USER KEY
FUNCTIONS
TOTAL MODE
Total Off (default)
Total On Manual
Autototal on Load
Autototal Normal
Autototal on High Load
2II
WWO2Q
$/R$'
$QRU
$+L
USER
F
Function User Key 1
Function User Key 2
Auto Off Time
LED Display Intensity
Set Point 1
Set Point 2
Set Point 3
Total Mode
RF Remote Learn
Weight Units**
Weight Filter***
SETUP MENU
Disabled (default)
15 minutes
30 minutes
45 minutes
1 hour
AUTO OFF TIME
OFF (disabled)
Low (default)
High Filter
Very High Filter
SOFTWARE FILTER
LED DISPLAY INTENSITY
Auto by Light Sensor (default)
Dim (longest battery life)
Medium Dim
Medium Bright
Maximum Bright
See RF Remote
Setup Procedure
POWER
* Function always available on the RF Remote
** Function not available or non-functional in OIML R76 & 1Unit modes
*** Function not available or non-functional in OIML R76 or NTEP HB44 modes
With the Power off, hold
down the USER key, then
turn the Power on
USER
F
TARE
ENTER / SELECT
POWER
EXIT and Cancel Changes
ZERO
EXIT and SAVE
USER
F
SCROLLs through Menu Choices
Set Point Off
(default)
Greater Than
Less Than
Totals on first stable load
Totals the last stable load
Totals the highest stable load
Totals by pressing the USER key
Autototal Normal and Autototal High
do not total until the scale is unloaded.
URVV
QHW
U
WRWDO
W&QW
SP WEIGHT MODE
Gross (default)
Net or Gross
Total
Total Count (n)
4.1 Menu Map
Figure 4-1. Setup Menu Map
Set Up 21
Page 26

4.2 Function Keys
1)
With the 4260 off, press and hold
the USER key, then press the
POWER key.
...or while the 4260 is on, press USER
and POWER simultaneously.
2)
The first item of the Setup Menu
is “Func1”.
3)
To setup the User key press
TARE. The current User key
function is displayed.
4)
Select the User key function by
scrolling through the choices with
the USER key. See the list of
available functions on the Setup
Menu Map.
This procedure scrolls through all
available choices for illustration
purposes only.
In this example, we’ll set F1 to the TEST
function.
5)
When the desired User Key
function is displayed, press
TARE. The next item in the Setup
Menu appears.
6)
Either press ZERO to exit Setup
and store all changes, or
continue to another Setup Menu
item using the USER Key.
Function Key Setup
)YQF
WRWD/
)YQF
Next Setup Menu Item
2II
blinking
QHW U
YWWO
/($U1
blinking
blinking
blinking
blinking
3+/G
2II
XQLW
WHVW
blinking
blinking
blinking
blinking
7HVW
blinking
Store and return to
weight display
6WRUH
USER
F
USER
F
USER
F
USER
F
USER
F
USER
F
USER
F
USER
F
USER
F
USER
F
TARE
T
TARE
T
ZERO
O
sto
Hold
USER
F
esc
POWER
Cancel all setup
changes
esc
POWER
The MSI-4260 has 1 user definable function key on the Front Panel, and an additional
user definable function Function key on the RF Remote Control that can be
programmed to any of several functions.
22 MSI-4260 Port-A-Weigh Operator’s Manual
Figure 4-2. Function Keys
Page 27

4.3 Auto- Off
1)
With the 4260 off, press and hold
the USER key, then press the
POWER key.
...or while the 4260 is on, press USER
and POWER simultaneously.
2)
The first item of the Setup Menu
is “Func1”. Scroll to “A-OFF” with
the USER key.
3)
To setup the A-Off timing, press
TARE. The current Auto-Off time
is displayed.
4)
Select the Auto Off time by
scrolling through the choices with
the USER key.
In this example, we’ll set 60 minutes as
the Auto-Off time.
5)
When the desired time is
displayed, press TARE. The next
item in the Setup Menu appears.
6)
Either press ZERO to exit Setup
and store all changes, or
continue to another Setup Menu
item using the USER Key.
Auto-Off Setup
)YQF
6/((3
Next Setup Menu Item
2II
blinking
blinking
blinking
blinking
blinking
$2))
Store and return to
weight display
6WRUH
Hold
USER
F
esc
POWER
USER
F
USER
F
USER
F
USER
F
USER
F
USER
F
TARE
T
TARE
T
ZERO
O
sto
Cancel all setup
changes
esc
POWER
The Auto-Off feature, when enabled, prolongs the battery life of the scale by turning
POWER off when the scale is not in use. Any time a button is depressed (any button),
or the detected weight is in Motion exceeding 5 or 10d, the time limit is reset.
Therefore, the scale will stay on indefinitely if the weight is changing or any button is
pressed at least once. With Auto-Off disabled, the scale will remain on; only pressing
POWER will turn it off (or if the battery is depleted).
Figure 4-3. Auto-Off
Set Up 23
Page 28

4.4 Sleep
1)
With the 4260 off, press and hold
the USER key, then press the
POWER key.
...or while the 4260 is on, press USER
and POWER simultaneously.
2)
The first item of the Setup Menu
is “Func1”. Scroll to “Sleep” with
the USER key.
3)
To setup the Sleep timing, press
TARE. The current Auto-Off time
is displayed.
4)
Select the Sleep start time by
scrolling through the choices with
the USER key.
In this example, we’ll set 30 minutes as
the Sleep start time.
5)
When the desired time is
displayed, press TARE. The next
item in the Setup Menu appears.
6)
Either press ZERO to exit Setup
and store all changes, or
continue to another Setup Menu
item using the USER Key.
Sleep Setup
)YQF
GLVS/
Next Setup Menu Item
2II
blinking
Store and return to
weight display
blinking
blinking
blinking
6/((3
6WRUH
Hold
USER
F
esc
POWER
USER
F
USER
F
USER
F
USER
F
USER
F
TARE
T
TARE
T
ZERO
O
sto
Note
The SLEEP feature reduces power consumption by automatically turning off the
display during periods of inactivity. While in the Sleep Mode, the Green
Acknowledge annunciator will blink at a 1s rate to indicate the MSI-4260 is in sleep
mode. To wake up either a button must be pushed (front panel or RF remote), or the
weight must change by 5 d or more.
SLEEP must be set to less time than the Auto-Off timer.
For example, set SLEEP to five minutes and Auto-Off to 30 minutes.
24 MSI-4260 Port-A-Weigh Operator’s Manual
Figure 4-4. Sleep Setup
Page 29

4.5 Display Brightness
1)
With the 4260 off, press and hold
the USER
key, then press the
POWER
key.
...or while the 4260 is on, press
USER
and POWER
simultaneously.
2)
The first item of the Setup Menu
is “Func1”. Scroll to “diSPL” with
the USER
key.
3)
To setup the Display brightness,
press
TARE. The current
brightness setting is displayed.
4)
Select the display brightness by
scrolling through the choices with
the USER
key. The menu
brightness changes as you scroll
through the choices.
In this example, we’ll set the brightness
to the AUTO, light sensing brightness
control.
5)
When the desired display
brightness setting is displayed,
press
TARE. The next item in
the Setup Menu appears.
6)
Either press
ZERO to exit Setup
and store all changes, or
continue to another Setup Menu
item using the
USER Key.
Display Brightness Setup
)YQF
+L
6W3W
Next Setup Menu Item
/R
dimmest setting
$YWR
+L
medium high setting
light sensing auto setting
brightest setting
GLVS/
/R
medium low setting
Store and return to
weight display
6WRUH
Hold
USER
F
esc
POWER
USER
F
USER
F
USER
F
USER
F
USER
F
USER
F
Cancel all setup
changes
esc
POWER
TARE
T
TARE
T
ZERO
O
sto
The Display Setup menu is used to set the display brightness. There are four fixed
brightness settings and one automatic light sensing brightness setting.
Auto setting will automatically detect the ambient light and adjust
the display accordingly.
Bright light will cause the display to be at the brightest setting. The display brightness
will reduc
e as ambient light reduces. The four fixed brightness settings, LO-1, LO-2,
HI-1, and HI-2 change the average current in the display. Lower settings increase
battery life.
the brightness of
Figure 4-5. Display Brightness
Set Up 25
Page 30

4.6 Set Points
URV6
1)
With the 4260 Off, press and
hold the USER key, then press
the POWERkey.
...or while the 4260 is on, press USER
and POWER simultaneously.
2)
Scroll through the Setup Menu
choices by pressing the USER
key. Stop when the LED displays
“StPt1”, “StPt2”, or “StPt3”.
3)
When the desired Set Point is
displayed, press TARE. The
display blinks “OFF”, or if
previously programmed, the last
set mode.
4)
Select the Set Point mode by
scrolling through the choices with
the USER key. “GrEAt” (greater
than) indicates the Set Point will
trigger when the weight exceeds
the value. “LESS” (less than) will
trigger the set point when the
weight is less than the value.
This example scrolled through all available
choices for illustration purposes only.
5)
When the desired Set Point
Mode is displayed, press TARE.
6)
Next select the type of weight
value the set point is assigned
to. Use the USER key to scroll
through the choices.
This example scrolled through all
available choices for illustration
purposes only.In this example, we’ll
enter Gross as a weight mode because
we are going to use the set point as a
safety warning.
7)
When the desired weight mode
is shown, push TARE. Next the
current Set Point value is
displayed.
If there was a previous
value, it is displayed. If no value has
been entered, a zero will appear. To
keep the displayed value, press ZERO .
8)
Press the USER key. The first
digit blinks at zero. Use the
USER key to scroll through the
numbers. When the desired
number is shown, push TARE.
In this example, we’ll enter 240 as a
Set Point value.
Set Point Setup
VWSW
UHDW
QHW U
WFQW
URV6
WRWDO
blinking
blinking
blinking
blinking
2II
blinking
/(66
UHDW
blinking
Set Point responds to Gross Weight regardless of the display.
Set Point responds to Net or Gross Weight.
Set Point responds to the Totaled Weight.
Set Point responds to the Total Count (number of samples).
Set Point responds to Gross Weight regardless of the display.
USER
F
USER
F
USER
F
Hold
USER
F
esc
POWER
USER
F
TARE
T
TARE
T
TARE
T
USER
F
USER
F
USER
F
USER
F
USER
F
blinking
USER
F
USER
F
QHW U
blinking
Set Point responds to Net or Gross Weight.
TARE
T
blinking blinking
The MSI-4260 supports three set points. Common uses of set points are for warnings
or process control. The MSI-4260 comes standard with LED outputs for a triggered
set point. Set Point 1 is Blue, Set Point 2 is Green and Set Point 3 is Red. The MSI-
4260 has an audible output option that is triggered by Set Point 1. Contact MSI for
other Set Point Output Options.
26 MSI-4260 Port-A-Weigh Operator’s Manual
Figure 4-6. Set Point Setup
Page 31

TARE
T
TARE
T
TARE
T
USER
F
Number value entry continued
9) When the desired number is
shown, push
TARE
a second
time to set the value. The next
Setup Menu item is displayed.
10) Either press ZERO to exit Setup
and store all changes, or
continue to another Setup Menu
item using the USER Key.
fixed blinking
blinking blinking
6W3W
fixed next setup menu item
Store and return to
weight display
6WRUH
USER
F
USER
F
Cancel all setup
changes
esc
POWER
ZERO
O
sto
To enter a decimal point, push
POWER while the digit is blinking.
Error Correction: If you input a
wrong value, press ZERO to step
back one digit and change the digit
with the USER
key.
USER
F
USER
F
USER
F
TARE
T
fixed blinking
blinking blinking
Set Point Setup (continued)
Figure 4-7. Set Point Setup (continued)
Set Up 27
Page 32

4.7 Total Mode
1)
With the 4260 off, press and hold
the USER key, then press the
POWER key.
...or while the 4260 is on, press USER
and POWER simultaneously.
2)
The first item of the Setup Menu
is “Func1”. Scroll to “totaL” with
the USER key.
3)
To setup the Total Mode, press
TARE. The current Total Mode
setting is displayed.
4)
Select the Total Mode by scrolling
through the choices with the
USER key.
In this example, we’ll set the Total Mode
to the Auto-High mode. The Auto High
mode uses the highest stable reading
as the total value, and totals when the
load is removed.
5)
When the desired Total Mode
setting is displayed, press TARE.
The next item in the Setup Menu
appears.
6)
Either press ZERO to exit Setup
and store all changes, or
continue to another Setup Menu
item using the USER Key.
Total Mode Setup
)YQF
$/RDG
)LOWU
Next Setup Menu Item
2))
blinking, Total Off
$+L +
$/$67
Total on stable load
Total highest stable Load
Total last stable load
WRWD/
WWO2Q
Total with pushbutton
Store and return to
weight display
6WRUH
USER
F
USER
F
Hold
USER
F
esc
POWER
USER
F
USER
F
USER
F
USER
F
TARE
T
TARE
T
ZERO
O
sto
Cancel all setup
changes
esc
POWER
The MSI-4260 can keep track of all weighments using the Total feature. Either
manual total, which totals by pushing a configured USER key on the front panel or
the RF Remote, or Auto-Total, which can be used to automatically add up each
weighment. See the Total mode descriptions for details on the various Total modes.
To use Manual Total, you must also program a User Key. Auto Total modes do not
need a user key, but if a User key is setup for Total, then it will function as a total on /
total off.
28 MSI-4260 Port-A-Weigh Operator’s Manual
Figure 4-8. Total Mode Setup
Page 33

4.8 Units
1)
With the 4260 off, press and hold
the USER key, then press the
POWER key.
...or while the 4260 is on, press USER
and POWER simultaneously.
2)
The first item of the Setup Menu
is “Func1”. Scroll to “Unit” with
the USER key.
3)
To setup the weight units, press
TARE. The display will blink
“Unit”.
4)
Change the weight units by
pressing the USER key. The unit
is indicated by the annunciators.
5)
When the desired unit setting is
annunciated, press TARE. The
next item in the Setup Menu
appears.
6)
Either press ZERO to exit Setup
and store all changes, or
continue to another Setup Menu
item using the USER Key.
Units Setup
)YQF
)YQF
Next Setup Menu Item
8QLW
blinking
Store and return to
weight display
6WRUH
USER
F
8QLW
TARE
T
TARE
T
ZERO
O
sto
Cancel all setup
changes
esc
POWER
8QLW
blinking
lb
8QLW
blinking
kg
USER
F
Hold
USER
F
esc
POWER
USER
F
USER
F
Note
Units can be changed in two ways:
• Program a User Function Key to Units
• Change the units with the setup menu with the following procedure
The OIML LFT scales do not allow units to be changed.
Figure 4-9. Unit s Setup
Set Up 29
Page 34

4.9 Filter Setup
TARE
T
TARE
T
ZERO
O
sto
1)
With the 4260 off, press and hold
the USER key, then press the
POWER
key.
...or while the 4260 is on, press USER
and POWER simultaneously.
2)
The first item of the Setup Menu
is “Func1”. Scroll to “Filtr” with
the USER key.
3)
To setup the filter, press TARE .
The display will blink the current
filter setting.
4)
Change the filter setting by
pressing the USER key.
There are four available filter settings.
Not all choices are shown in this
example.
5)
When the desired filter setting is
annunciated, press TARE. The
next item in the Setup Menu
appears.
6)
Either press ZERO to exit Setup
and store all changes, or
continue to another Setup Menu
item using the USER Key.
)YQF
+L
High Filter 1
2))
Blinking
Store and return to
weight display
)LOWU
2))
Blinking
/2
Low Filter, Blinking
8QLW
Next Setup Menu Item
USER
F
USER
F
Cancel all setup
changes
esc
POWER
Filter Setup
Hold
USER
F
esc
POWER
USER
F
USER
F
USER
F
Changing the filter settings allows the scale to adjust to situations where there is a lot a
movement in the structure. If the reading is not stable, it can often be improved by
increasing the filter setting. Settling time will be longer as the filter setting is increased.
However, the
still controlling vibration even with high filter settings.
MSI-4260 employs algorithms that speed up large weight changes while
Figure 4-10. Filter Setup Menu Map
30 MSI-4260 Port-A-Weigh Operator’s Manual
Page 35

5.0 Calibration
XQ/G
/R$'
Blinks
Capacity
1)
Remove the seal screw. With
a small screwdriver press the
Cal Switch behind the seal
screw.
The CAL Setup Menu
appears.
2)
Press TARE (functioning as
ENTER) to Start the
Calibration Procedure.
3)
The display reads “UnLd”
(unload) indicating you
should remove all weight
from the hook.
4)
Ensure the 4260 is
motionless, then press
TARE. The 4260 sets the
zero calibration point. Wait
while the display is blinking.
5)
If the zero is in range, the
scale will display “PASS”.
Then “LoAd1” is displayed.
6)
Load the scale with a
precision test weight.
For single
span point calibrations a test weight
of 20% of capacity or more is
recommended.
7)
PressTARE. The 4260
flashes the capacity. If you
are loading the scale with
the capacity weight, skip to
step 10.
&$/
Standard Calibration
Procedure
3$66
No weight
on hook
Flashes
Zero
Lift Test
Weight
example capacity
blinking
Remove
Hex Seal
Screw
Cal Switch
Access
Press Switch
behind the hole
with a small
Screwdriver
TARE
T
TARE
T
TARE
T
The MSI-4260 is calibrated using standard weights. It is required that the weight used
is at least 10% of full capacity in order to achieve rated accuracy. For example, use at
least a 500kg test weight to calibrate a 5000kg capacity scale. Although a single span
point is usually adequate for rated accuracy, the MSI-4260 supports Multi-Point
calibration with up to 4 span points + Zero.
When adequate test weights
calculated constant calibration which is referred to as C-Cal. To use C-Cal, a
previously generated C-Cal number must be known. MSI supplies replacement load
cells for the MSI-4260 with the C-Cal value stamped on the serial number label.
There are three aspects of calibration:
• Standard Calibration – is
tial Calibration – is used to setup both the capacity and resolution (d) of the
• Ini
scale. It differs from Standard Calibration only in the initial steps. Initial
Calibration is performed after a Calibration Reset which completely erases the
calibration and setup memory.
• C-Cal – If the las
without weights.
are not available, the MSI-4260 can be calibrated using a
used for maintenance and routine calibration.
t calculated C-Cal values is known, the scale can be calibrated
Figure 5-1. Standard Calibration Procedure
Calibration 31
Page 36

p
8)
To enter a calibration
weight other than
capacity, press USER . The
display far left digit will
flash zero indicating that
a number should be
entered.
blinking
Error Correction: If you input a wrong
value, press ZERO to step back one
digit and reenter.
USER
F
5 times
fixed
blinking blinking
blinking
blinking
blinking
blinking
fixed
fixed
fixed
3DVV
9)
Press the USER key to
scroll the number and
the TARE key to enter
each digit of the
calibration weight.
In this example, we’ll enter 2500
kg on a 5000 kg capacity scale.
Do not push the TARE key two
times in a row until the entire
number is showing..
To add a decimal point, push the
POWER key while the number is
blinking.
10)
When the entire value of
the test weight is displayed
and the weight and scale
are stable, press TARE to
finish off the weight entry.
If the resultant cal value is
within limits, the display will
read “PASS” briefly.
11)
The display now reads
“Load2”. The 4260
allows multipoint
calibration. If more Cal
Points are desired (up to
3 additional) press
TARE. If a single point
cal is all that’s needed,
press ZERO and jump to
step 15.
12)
Load the scale with the next
test weight. The display
offers the reading that will
occur without adjusting the
value. If the weight value
shown is acceptable push
TARE and skip to step 14.
If the calibrated value needs
adjusting, go to step 13.
Test weights can be any in-capacity
weight, the order is not important.
The 4260 supports 5-Point Cal,
Zero
and up to 4 span points.
13)
Press the USER key to
scroll the number and
the TARE key to enter
each digit of the
calibration weight value.
When the entire calibration
weight is displayed, push
TARE a second time to
finalize the calibration span
point. If the resultant cal
value is within limits, the
display will read “PASS”
briefly.
Example Value only.
/RDG
To set Next
Span Point
To skip additional
Span Points
To scroll the digit
To Enter the digit
into the cal weight
value
To complete the cal
weigh value entry
3DVV
USER
F
You can cancel calibration by
pressing Power and the scale
will reset to the previous
calibration constants.
USER
F
USER
F
TARE
T
ZERO
O
sto
TARE
T
USER
F
TARE
T
USER
F
TARE
T
USER
F
TARE
T
TARE
T
TARE
T
USER
F
TARE
T
TARE
T
32 MSI-4260 Port-A-Weigh Operator’s Manual
Figure 5-2. Standard Calibration Procedure (continued)
Page 37

15)
The display shows “CAL’d”
to indicate that the
calibration was successful.
16)
Press TARE. The display
flashes “C-CAL” followed
by the C-CAL number.
Make a note of this number.
If the X1000 annunciator is lit,
also make a note of that.
This number is used to calibrate when
test weights are unavailable. C-CAL
does not replicate multipoint
calibrations.
17) Press ZERO to store the
calibration constants, or
after 8 seconds,the
calibration constants will
automatically stored. After
the Store message is
displayed, the scale goes
to the next item on the Cal
Menu, “SEtuP”.
18)
Press ZERO to exit the Cal
menus and start up the
standard weight display.
The 4260 is ready for use.
19) After ensuring the
calibration is acceptable,
replace the Hex Seal Screw.
&&D/
Example Value only.
VWRUH
&$/G
6HWYS
Flashing
ZERO
O
sto
ZERO
O
sto
ZERO
O
sto
TARE
T
ZERO
O
sto
If the scale is being used as a LegalFor-Trade device, place a LeadWire Seal through the Cal Side
Bored Hex Head Screw over to the
adjacent Side Bored Cap Screw.
To skip the
C-CAL step
14)
The display now reads
“LoAd3” or “LoAd4”.
Repeat steps 12 and 13
for additional span points
press TARE or press
ZERO if you are finished.
After LoAD4 has passed, the 4260
will automatically advance to the next
step.
/RDG
/RDG
or
To enter another
span point
TARE
T
Figure 5-3. Standard Calibration Procedure (continued)
Calibration 33
Page 38

5.1 Initial Calibration
1) Turn the 4260 off.
2) Remove the seal screw. With
a small screwdriver press and
hold the CAL Switch behind
the seal screw.
3) While holding down the CAL
switch, press the POWER
switch.
4) The display blinks “rESEt”.
5) To reset all calibration
constants and setup
parameters, press TARE.
6) The 4260 requests a
confirmation by displaying
“Sure?”.
To cancel the Reset press
the POWER key.
7) To complete the reset, press
TARE. The Calibrate menu
appears. You must now
recalibrate the system.
8) PressTARE to start the initial
calibration procedure. The
display shows "Unit". You
select the units you wish to
calibrate in.
9) Press TARE to select the
calibration unit.
10) Use the USER key to choose
between lb and kg. When the
desired unit is shown, press
TARE.
11) Next, set the capacity in the
selected units. Capacity must
be set no higher than the load
cell rated capacity.
12) Press TARE to enter the
capacity setting screen. A
capacity of 10000 is the initial
value.
If 10000 units is the desired
capacity press TARE and skip to
step 16.
13) To change the capacity, press
USER.
Initial Calibration
Resetting Capacity and Countby (d)
UHVHW
blinking
6YUH"
&$/
8QLW
8QLW
blinking
&$3
blinking
blinking
Error Correction: If you input a
wrong value, press ZERO to step
back one digit and reenter.
To enter a decimal point, push
POWER while the digit is blinking
Remove
Hex Seal
Screw
Cal Switch
Access
Press Switch
behind the hole
with a small
Screwdriver
lb
8QLW
blinking
kg
TARE
T
TARE
T
TARE
T
TARE
T
TARE
T
TARE
T
USER
F
USER
F
Use this procedure only if the capacity and count-by (d) needs to be modified. The
initial steps of the initial calibration will totally erase user setups as well as any
previous calibration.
34 MSI-4260 Port-A-Weigh Operator’s Manual
Figure 5-4. Initial Calibration
Page 39

5 times
blinking
blinking
blinking
fixed
fixed
fixed
Continue inputing the desired
capacity using the USER key
for scrolling the number and
the TARE key to store the
number.
15) Finalize the capacity value
by pressing the TARE key on
an unblinking display. In our
example, once the number
2500 is fixed on the display,
press TARE to store the
capacity value.
16) Next the scale division size
‘d’ is set. Press TARE to
begin.
In this example we’ll set
the ‘d’ to 2 units.
17) Use the USER key to
scroll through the
recommended scale
divisions.
The first ‘d’ offered is
the standard division for the given
capacity. Setting a ‘d’ size that
results in total resolution higher than
1:5000 is not recommended for
stability reasons.
18) When the desired scale ‘d’
is displayed, press TARE.
The “UnLd” display
appears and the scale is
ready for calibration.
Follow the Standard
Calibration procedure
starting at step 3.
G
blinking
blinking
XQ/G
Capacity is set.
‘d’ is set.
Proceed to Standard
Calibration starting at Step 3.
USER
F
TARE
T
TARE
T
TARE
T
TARE
T
TARE
T
TARE
T
USER
F
USER
F
USER
F
USER
F
TARE
T
14) The first digit blinks. Use the
USER key to scroll through
the numbers. When the
desired number is shown,
push TARE.
In this example, we’ll enter
2500 as a capacity.
fixed
blinking blinking
blinking
TARE
T
USER
F
USER
F
USER
F
5.2 Guidelines for Capacity and Resolution
Crane Scales are subject to forces that regular floor scales do not see. Many bridge
cranes, hoist cranes, and mobile cranes lack rigidity and tend to bounce or swing
when loads are lifted. For this reason, MSI recommends that resolution is kept in the
1:2000 to 1:3000 range. Some improvement in stability can be achieved by increasing
the filtering. However, you should never program resolution that is far greater than
you need. If the MSI-4260 display is never stable, it is recommended that the
resolution is reduced and/or filtering increased.
Figure 5-5. Initial Calibration (continued)
Calibration 35
Page 40

Due to LFT requirements and general scale design criteria, the weight must be stable
Note
Important
for certain features to work: ZERO – Weight must be stable to be Zeroed. TARE –
Weight must be stable to be Tared. TOTAL – Weight must be stable to be added to the
total registers. One way to improve the stability is to increase the filtering, at the risk
of increasing settling time. The other is to increase the ‘d’ (reduce resolution). The
third way is to increase the “Motion Window”. The MSI-4260 defaults to ±1d as a
motion window. It can be changed at MSI to a higher value if desired. Often ±3d is
chosen for bridge cranes as these tend to have a lot of bounce to them. This of course
carries an accuracy penalty adding ±3 d to the total accuracy of the scale if the zero or
tare operation happens to capture the weight in a valley or peak.
Setting capacity is dictated primarily by the
capability of the load cell. MSI supplies
the MSI-4260 in many capacities.
Never set the capacity of the scale higher than the rating of the load cell.
Due to excellent linearity of the MSI S-Beam load cell, it is acceptable to set lower
capacities to better match the crane the MSI-4260 is used on. For example, if the hoist
is rated for 9000 lb, you can use an MSI 10000 lb MSI 4260 and reset the capacity to
9000 lb so that the Scale will indicate overload at 9000 lb instead of 10000 lb.
Derating as much as 50% of the capacity is usually acceptable, but the scale may be
less stable if the ‘d’ is decreased.
Due to kg to lb conversions, the capacity of all MSI-4260
systems is rated
approximately 20% higher than the rated capacity in pounds. This is to allow the kg
capacity to be exactly 1/2 the number of the pounds capacity.
5.3 C-Cal Calibration
When adequate test weights are not available, the MSI-4260 can be calibrated using a
programmed constant calibration which is referred to as C-Cal. To use C-Cal, a C-Cal
number must be known from a previous calibration. MSI supplies replacement load
cells for the MSI-4260 with the C-Cal value stamped on the serial number label.
When a calibration is performed with test weights, a new C-Cal is generated. C-Cal
can be used when the electronics are replaced to get an approximate calibration that
may be suitable for non L-F-T applications.
The C-Cal number must be known prior to starting this
procedure. For a
this number on the Calibration Record, the Serial number tag,
and on the calibration log found inside the battery compartment.
C-Calibration reduces slightly the absolute accuracy of the system if the electronics
are replaced or a new load cell is installed, and is intended for non-critical use only.
Legal-for-Trade installations require that the MSI-4260 is calibrated using test
weights. If a system was originally multi-point calibrated, the C-CAL calibration will
erase the additional span points, as C-Cal is only a two point calibration (Zero and
Span at 10% of capacity).
MSI-4260
with its original Load Cell, MSI prints
36 MSI-4260 Port-A-Weigh Operator’s Manual
Page 41

XQ/G
&&$/
1) Remove the seal screw. With
a small screwdriver press the
Cal Switch behind the seal
screw.
The CAL Setup Menu
appears.
2) Press the USER key to
scroll to the C-Cal menu
selection.
3) PressTARE to Start the CCal Procedure.
If this calibration is using a cleared
4260, the INITIAL CALIBRATION
procedure will start here. You must
set the cal unit, capacity, and countbefore proceding to step 4,
4) The display reads “UnLd”
(unload) indicating you should
remove all weight from the
hook.
5) PressTARE. The 4260 sets
the zero calibration point.
6) if the zero is in range, the scale
will display “PASS”.
7) Next the display reads
“CCAL?” to ask that you look
up the C-Cal value to be used.
8) PressTARE. The 4260 is
ready for numeric entry of the
C-CAL value.
9) To enter an C-Cal value
press USER. The display
far left digit will flash zero
indicating that a number
should be entered.
&$/
C-Cal Calibration
Procedure
blinking
3$66
No weight
on hook
Flashes
Zero
Input C-Cal value
blinking
&&D/
TARE
T
TARE
T
TARE
T
USER
F
USER
F
Remove
Hex Seal
Screw
Cal Switch
Access
Press Switch
behind the hole
with a small
Screwdriver
blinking
Figure 5-6. C-Cal Calibration Procedure
Calibration 37
Page 42

10) Press the USER key to
scroll the number and the
TARE key to enter each
digit of the C-Cal value.
In this example, we’ll enter the CCal value of 2503. However, it
should be noted that most C-CAL
values are 5 digits.
Do not push the TARE key two
times in a row until the entire
number is entered. C-Cal’s less
than 4 digits will not be accepted.
If the number is too small the
display will read “LittL” and go
back to the “C-CAL” message.
Error Correction during number
entry: If you input a wrong value,
press ZERO to step back one
digit and reenter.
For the rare C-CAL number that
includes a decimal point
and the
X1000 annunciator, press the
POWER key to enter the decimal
point followed by an additional
press of the POWER key to input
the X1000 factor.
11) Once the entire number
is entered (not blinking)
press the TARE key to
complete the entry of the
C-Cal value.
12) If the Calibration was
successful, the display
will read “PASS” followed
by “CAL’D”.
13) C-Cal is complete. Push
ZERO. The next Cal
Setup menu item
appears.
14) Push ZERO to store the
calibration and return to
scale operation.
5 times
fixed
blinking blinking
blinking
blinking
blinking
blinking
blinking
3$66
Store and return to
weight display
6WRUH
xed
blinking
fixed
fixed
fixed
blinking
6HWYS
&$/·'
next Menu item
USER
F
USER
F
USER
F
USER
F
USER
F
USER
F
USER
F
USER
F
TARE
T
TARE
T
TARE
T
TARE
T
TARE
T
ZERO
O
sto
ZERO
O
sto
USER
F
TARE
T
5.4 Calibration Setup Menu
The Calibration Setup Menu contains two items beyond Calibration: Standard and
Auto Zero Maintenance “Auto0”. In addition, more menus will appear that are
transferred from the Main Setup Menu when Legal-for-Trade settings are used.
38 MSI-4260 Port-A-Weigh Operator’s Manual
Figure 5-7. C-Cal Calibration Procedure (continued)
Page 43

&$/
&&D/
6HWYS
6WDQG
$YWR
LQGYV
+E
U
XQLW
2Q
2II
Cal Standard
Auto Zero
Maintenance
Calibrate with Weights
Calibrate with Constant
Industrial Setting
(default)
Handbook 44, NTEP
R-76, OIML
Industrial, restricted to
1 Weight Unit
AZM On
AZM Off
Remove
Hex Seal
Screw
Cal Switch
Access
Press Switch
behind the hole
with a small
Screwdriver
USER
F
Figure 5-8. Calibration Setup Menu Map
5.4.1 Standard
There are 4 selections in the standards menu.
1. Industrial (indu5) – This is the most common setting for the 4260. With the
In
dustrial standard, you have full range zero, access to units switching, filters,
and peak hold.
2. Handbook 44 (Hb-44) – Sets the scale to enable only approved features per the
NTEP
HB-44 rules and regulations. Access is denied to Peak Hold, and the zero
range may be limited. The Filter menu is moved to the Cal Setup Menu, so
filters are only accessible through the Cal Seal.
3. R-76 (r-76) – Sets the scale to enable on
Only kg weight units are available. The zero range is limited to 5% (-2 +3%
relative to Calibrate zero). Net/Gross function is temporary. once Net weight is
established, pushing an F key set for Net/Gross will cause a maximum 5 second
display of the Gross weight. You must clear the Tare to display Gross weight
constantly. Other metrological aspects are changed to meet R-76 requirements.
4. One Unit (1unit) – The one unit Standard is exactly the same as Industrial,
except units switching is inhibited.
Another use of the One Unit standard is to allow the scale to be calibrated in
units other than lb or kg, since conversions are eliminated.
Contact MSI for more information on the Standards settings.
ly approved features per OIML R-76.
This is useful for Metric only countries.
Calibration 39
Page 44

TARE
T
TARE
T
TARE
T
ZERO
O
sto
ZERO
O
sto
USER
F
USER
F
If you are already in the Cal menu
skip to step 2
1) Remove the seal screw (cut
lead wire seal if present). With
a small screwdriver press the
Cal Switch behind the seal
screw.
The CAL Setup Menu
appears.
2) Press the USER key to
scroll to ”Setup” .
3) Press TARE to enter the Cal
Setup Menu.
4) Press TARE to enter the
Standard Menu. The current
standard setting is displayed.
5) Scroll to the desired standard
using the USER key. .
6) Press TARE to set the
standard. The display goes to
the next item in the CAL Setup
Menu.
7) Either press ZERO twice to
exit Setup and store all
changes, or continue to
another Setup Menu item
using the USER Key.
&$/
LFT Standard Setup
VHWYS
6WDQG
LQGXV
XQLW
$YWR
Next Cal Setup Menu Item
Store and return to
weight display
&D/
6WRUH
Calibrate Menu
Remove
Hex Seal
Screw
Cal Switch
Access
Press Switch
behind the hole
with a small
Screwdriver
5.5 Auto Zero Maintenance
The MSI-4260 employs an autozeroing maintenance mechanism to adjust the zero
reading to the Center-of-Zero (COZ) COZ is defined as the weight reading is within
1/4 ‘d’ of zero. AZM continuously adjusts zero to maintain COZ. It is recommended
that AZM is on to maintain the highest accuracy. However, there are circumstances
when it should be turned off. This can happen when minor variations of weight occur
while picking up scale attachments and the variations fall within the AZM capture
window. The AZM capture window (usually 1 ‘d’) and capture time (usually 8
seconds) can be adjusted by MSI to meet custom requirements. The settings of AZM
are dictated in Legal-for-Trade Standards and cannot be adjusted.
40 MSI-4260 Port-A-Weigh Operator’s Manual
Figure 5-9. LFT Standard Setup
Page 45

TARE
T
TARE
T
TARE
T
USER
F
USER
F
ZERO
O
sto
ZERO
O
sto
If you are already in the Cal menu
skip to step 2
1) Remove the seal screw. With
a small screwdriver press the
Cal Switch behind the seal
screw. The CAL Setup Menu
appears.
2) Press the USER key to
scro ll to ”Setup” .
3) Press TARE to enter the Cal
Setup Menu.
4) Press USER to scroll to the
“Auto0” menu.
5) Press TARE to enter the AutoZero Menu. The current setting
is displayed (blinking)
6) Change the setting between
On or OFF using the USER
key.
7) Press TARE to set the
Autozero. The display goes to
the next item in the CAL Setup
Menu.
8) Either press ZERO twice to
exit Setup and store all
changes, or continue to
another Setup Menu item
using the USER Key.
&$/
Auto Zero
Maintenance Setup
VHWYS
6WDQG
$YWR
2II
6WDQG
Next Cal Setup Menu Item
Store and return to
weight display
&D/
6WRUH
Calibrate Menu
Blinking
2Q
Blinking
USER
F
Remove
Hex Seal
Screw
Cal Switch
Access
Press Switch
behind the hole
with a small
Screwdriver
Figure 5-10. Auto Zero Maintenance
Calibration 41
Page 46

6.0 RF Remote Control Option
Scale Remote Controller
Measurement Systems International
NET
GROSS
F2
ZERO
F1
TARE
TOTAL
F3
F4
6.1 Description
MSI-4260 Series RF Indicators can be equipped with an
RF Remote Control (RFRC). The RFRC is a transmit
only device that can be used
functions. The default switch functions can be changed in
the Function Key menus and used for any MSI-4260
programmable functions. Range will vary from 25' to
100' (50' typical) depending on room conditions and line
of sight to the display. The remote receiving antenna is
behind the red lens of the meter and best range will occur
when the display is visible to the operator using the
RFRC.
The RFRC provides the ability to turn the MSI-4260 on
re
motely. The RFRC is available in three versions
differing only in transmit frequency. The standard USA
version operates at 418MHz. Available alternative
frequencies are 315MHz and 433MHz primarily for use
in countries other than the USA.
6.2 Functions
The default functions of the RF Remote control
duplicates the functions of the front panel keys on MSI-
4260 RF Indicator. The POWER, ZERO, NET/GROSS,
TARE, TOTAL, and VIEW TOTAL keys function
identically. The TOTAL still must be enabled and
configured in the MSI-4260 before the Total features will
function properly.
The F1 key corresponds to the USER key on the 4260
unique to the remote and the function is set using the Func2 setup menu.
When a successful transmission is achieved, the ACK green
the MSI-4260 front panel.
to perform basic scale
front panel. The F2 key is
light will illuminate on
42 MSI-4260 Port-A-Weigh Operator’s Manual
Page 47

6.3 Setting the Transmitter Address
MODE_IN
window
CREATE
button
The MSI RF Remote Control Transmitter
allows the selection of one of 16,777,216
24
(2
) unique addresses. All transmitters
are supplied set to the same address. To
avoid contention with other units or to
create unique relationships, the address
should be changed. This is accomplished
by using a paper clip or probe to press the
CREATE button on the board through the
hole in the back of the case.
1. Press the button and a LED will light
up
in the MODE_IND window,
indicating that the address is being
created. The address will be
randomized for as long as the button
is held down.
2. Release the button and the
3. Press all the buttons one by one that the transmitter will have the authority to
omized address will be saved
rand
and the LED will begin flashing to
indicate that the Control Permissions may now be set.
access. Press the CREA
for it to time out. The address and Control Permissions are now set.
TE button with the paper clip again or wait 17 seconds
6.4 Setting the Receiver Address
Once the transmitter is setup, you must now program the corresponding MSI-4260 to
match. The steps are:
1. Program the USE
the battery from the MSI-
battery is plugged back in.
2. Start LEARN by pressing the US
MSI-4260 battery).
3. Press each key on the Transmitter that you plan to use. During the “LEARN”
p
rocess the ACK annunciator will blink. You must complete all button pushes
before it times out in 17 seconds.
Any MS
MSI-4260s to the same remote since they will all respond at the same time if they are
in range.
6.4.1 Resetting the 4260 RF Remote Receiver
I-4260 can learn up to 7 different remotes. However, never program multiple
1. Program the Func1 USER key to be Learn.
1. Press USER.
1. Press ZERO.
1. Reprogram the MSI-
R key to “LEARN” (See Section 4.2). You can also remove
4260. Then the “LEARN” mode will start when the
ER key on the 4260 front panel (or plug in the
4260 using the “Setting the Receiver Address” procedure.
RF Remote Control Option 43
Page 48

6.5 Contention and Jamming Considerations
Battery
access
It is important to understand that only one transmitter at a time can be activated within
a reception area. While the transmitted signal consists of encoded digital data, only
one carrier of any frequency can occupy airspace without contention at any given
time. This is not to say that you cannot have multiple remote controls for the MSI-
4260, but rather that you can’t use two simultaneously.
The RF Remote Control is a narrow band low power device
jamming immunity of the Spread Spectrum Modem used by the MSI-4260 to
communicate to the Remote Display. Powerful sources of RF energy in the 418MHz
region can jam the remote and prevent it from operating. In this circumstance, trying
either of the two other available RF Remote frequencies (433MHz and 315MHz)
might solve the problem. Before ordering the RF Remote Control option, some effort
to research RF devices used in the immediate area would be useful in avoiding
jamming the control signals.
It is the end users responsibility to confirm
legal for use in your location. 418MHz is legal throughout the USA and Canada.
433MHz is legal in Europe. 315MHz is commonly used for Garage Door Openers
and is legal in the USA, but other location legalities have to be investigated.
In spite of the potential for jamming the Remote Control, the receiver
from false reception due to the 24 bit encoding. Therefore no functions will be
inadvertently executed.
that the chosen operating frequency is
and does not have the
is very immune
6.6 Battery Replacement
The remote unit utilizes a CR-2032 Button Lithium Cell.
In normal use it will provide 1-2 years of operation.
Ac
cess for replacement is accomplished by removing the
battery access cover by pressing down firmly on the label
area and sliding it off. Once the unit is open, remove the
battery by sliding it from beneath the holder. Replace the
cell with the same type while observing the polarity
shown. Once the new battery is installed, both the
transmitter and MSI-4260 will have to learn new
addresses. Follow both procedures for setting addresses.
The MSI RF Remote has been pre-certified for FCC Part
15
and Industry Canada RSP-100 compliance. The
433.92MHz version has also been tested for CE compliance for use in the European
Union. The 315MHz and 418MHz versions are not legal for use in Europe.
44 MSI-4260 Port-A-Weigh Operator’s Manual
Page 49

6.7 RF Remote Control FCC Statement
Instruction to the User:
This equipment has been tested and found to comply with the limits for a Class B
digital device, pursuant to Part 15 of the FCC Rules. These limits are designed to
provide reasonable protection against harmful interference in a residential
installation. This equipment generates, uses and can radiate radio frequency energy
and, if not installed and used in accordance with the instructions, may cause harmful
interference to radio communications. However, there is no guarantee that
interference will not occur in a particular installation. If this equipment does cause
harmful interference to radio or television reception, which can be determined by
turning the equipment off and on, the user is encouraged to try to correct the
interference by one or more of the following measures: Reorient or relocate the
receiving antenna. Increase the separation between the equipment and receiver.
Connect the equipment into an outlet on a circuit different from that to which the
receiver is connected. Consult the dealer or an experienced radio/TV technician for
help.
This equipment has been certified to comply with the limits for a Class B computing
device, pursuant to FCC Rules. In order to maintain compliance with FCC
regulations, shielded cables must be used with this equipment. Operation with nonapproved equipment or unshielded cables is likely to result in interference to radio
and TV reception. The user is cautioned that changes and modifications made to the
equipment without the approval of manufacturer could void the user’s authority to
operate this equipment
RF Remote Control Option 45
Page 50

7.0 RF Remote Display Option
3ULQW
U)
(WKQW
Serial Out Setup
rF Modem
Ethernet
COMM MENU
Serial String
Control
Continuous
Output Rate
6WUQ
&QWUO
5DWH
2Q2II
6&LG
&KQO
QHWLG
RF On/Off
ScaleCore ID
RF Channel
Network ID
2Q2II
6&LG
Eth On/Off
ScaleCore ID
Range 0-254
2II
86(U
/R$G
&RQW
Print Disabled
Print using F-Key
Print on stable Load
Output Continuously
Number entry output rate
in seconds (0-65535)
0 is as fast as possible
PRINT CONTROL
2Q
2II
RF On
RF Off
2Q
2II
E-On
E-Off
PRINT SETUP
RF SETUP
ETHERNET SETUP
SERIAL STRINGS
1= Current Wt (Wt-Unit-Mode )
2= Net Wt (Wt-Unit-Net )
3= Gross Wt (Wt-Unit-Grs )
4= Tare Wt (Wt-Unit-Tare )
5= Total Wt (Wt-Unit-Total )
6= Total Count (#Samples-TCNT )
7= Current Wt (no units or mode )
8=
(Reserved)
9= CR-LF ( )
Range 0-254
Range 12-23
Range 1 to 99999
Press Simultaneously
TARETUSER
F
7.1 Introduction
The MSI-4260 can communicate with peripheral devices using RS-232, 802.15.4, or
802.11/b,g,n WiFi. Only one communications type can exist at a time. Due to the
difficulty of dangling RS-232 cables from a hanging crane scale, the RF options are
more commonly used for gathering weight data. The RS-232 port located on the right
side of the MSI-4260 is useful for setup and calibration using a computer and MSI’s
SCCMP Software. (SCCMP operation is detailed in the SCCMP User Guide). For RF
operation, the MSI-4260 uses an 802.15.4 transceivers to communicate between
MSI’s Model 8000 RF Remote Display. 802.15.4 operates in the 2.4GHz ISM band
and does not require the end user to obtain a license. 802.15.4 can coexist with other
2.4GHz systems if caution is taken to isolate antennas at least 10 feet or 3 meters from
the Crane Scales and MSI-8000 equipment. MSI-8000 based RF systems are Peer to
peer. However, for multiple scale connections, the MSI-8000 acts as the network
coordinator. Also available is The 802.11 WiFi option for communicating directly to a
standard RF access point. This option is covered by the WiFi for ScaleCore User
Guide.
7.2 COMM SETUP MENU
46 MSI-4260 Port-A-Weigh Operator’s Manual
Figure 7-1. Comm Menu Setup
Page 51

7.3 Printer / Serial Output Setup
The RS-232 Comm Port is capable of outputting tension data. All the weight modes
the RF linked weight device can measure are available in user formatted form. The
Control Mode programs what causes the MSI-4260 to print. The modes are: 1) When
an assigned F-Key is pressed, one transmission of the selected string type is output. 2)
On Load – When the tension on the link is stable, one transmission will output. Then
the tension must return to zero to enable another print output. 3) Continuous Program the interval in seconds up to 65,535 seconds. Setting the interval to 0 will
set an interval as fast as the system can go. To disable printing set the control mode to
“OFF”.
The MSI-4260 Comm Port settings are independent of the print settings in the
connected MSI-8000. They reside only in the MSI-4260.
Far more complex print / serial strings can be introduced using MSI’s SCCMP setup
program. See SCCMP User Guide for more details.
7.3.1 Control Modes
The user can select four control modes:
1. User – Printing is controlled by the operator pushing the PRINT key (usually
F3).
2. Load – One print output when a stable load is reached. The scale must return to
near zero before another print will occur. Other configurations of “On Load” are
available using the SCCMP program.
3. Continuous – The MSI-8000 will continuously output the data at a rate
controlled by the “rAtE” (RATE) menu.
4. OFF – Printing is disabled. Power consumption is lower with print off.
7.4 Standard Print Strings
1- Current tension. Fixed output length: 16. Leading zeros suppressed except for
the LSD.
TTTTTTTspUUspMMMMMcrlf
where TTTTTTT is tension data with -sign if necessary. UU is the units, MMMMM is
the tension mode which for “1” is either NET or GROSS.
2 - Net tension. Fixed output length: 16. Leading zeros suppressed except for the
LSD.
TTTTTTTspUUspNETspspcrlf
3 - Gross Tension. Fixed output length: 16. Leading zeros suppressed except for
the LSD.
TTTTTTTspUUspGROSScrlf
4 - Tare Weight. Fixed output length: 16. Leading zeros suppressed except for the
LSD.
TTTTTTTspUUspTARE crlf
RF Remote Display Option 47
Page 52

5 - Total Weight. Fixed output length: 16. Leading zeros suppressed except for the
1)
With the MSI-8000 on, press the
TARE key and the USER keys
simultaneously.
2)
The LCD shows “Print”. Press
TARE
.
3)
The sub-menu item “StrnG”
(String) appears. Press TARE
.
4)
The current Print Mode format
number is displayed.
5)
Setup a print format with one or
more digits representing the data
tyoe required for the print output.
In this example, we’ll set the Print format
for a Net, Gross, Tare output with a
carriage return/line feed between each
print output. The number entry required
will be 2349. The 2 is for Net weight,
the 3 for Gross weight, the 4 for Tare
weight, and the 9 inserts a space before
the next print output.
6)
Using the USER Key, scroll
through the digits until the desired
digit is shown, then press TAR E
to enter the digit value. Repeat
for the remaining digits.
7)
When the entire number is
displayed press TARE. The next
item in the Print menu appears,
“Cntrl”.
8)
Press TARE to enter the Print
Control Menu. The last set control
mode will appear.
9)
To change the print control mode,
press USER .
In this example, we’ll set the Print Control
Mode to Continuous.
Printer / Output Setup
blinking
blinking
fixed
fixed
fixed
&QWUO
Next Print Menu Item
3ULQW
6WUQ
blinking
fixed
blinking
Example Value
blinking
blinking
2))
2)) 8V(U
Function Key PrintsPrint is disabled
1= Current Wt (Wt-Unit-Mode )
2= Net Wt (Wt-Unit-Net )
3= Gross Wt (Wt-Unit-Grs )
4= Tare Wt (Wt-Unit-Tare )
5= Total Wt (Wt-Unit-Total )
6= Total Count (#Samples-TCNT )
7= Current Wt (no units or mode )
8= (Reserved)
9= CR-LF ( )
TARE
T
TARE
T
TARE
T
TARE
T
TARE
T
TARE
T
TARE
T
USER
F
USER
F
USER
F
USER
F
TARE
T
USER
F
USER
F
USER
F
Press Simultaneously
TARE
T
USER
F
LSD.
TTTTTTTTTspUUspTTLcrlf
6 - Number of Samples Totaled. Fixed output length: 16. Leading zeros
suppressed except for the LSD.
spspspspspsp
7 - Current Weight Mode (Net, Gross, Peak, etc.)
sp
MMMMMcrlf
8 or 9 - Carriage Return, Line Feed. Used to add a space between print records.
crlf
SSSSSSSspT- C NTspcrlf
48 MSI-4260 Port-A-Weigh Operator’s Manual
Figure 7-2. Printer Output Menu
Page 53

10) Press USER key until the desired
print control mode is shown.
11) When the desired print mode is
shown, pushTARE to save. The
next Print setup item, “rAte”
appears. If you have set
Continuous (Cont) as your print
control, proceed to step 12). For
any other Control mode jump to
step 15.
12)
Press TARE to enter the Print
rate number entry screen. The
current print rate appears on the
LCD.
In this example, we’ll set the Print Rate
to an output rate of once every 2
seconds.
/R$G &RQW
Function Key PrintsPrint is disabled
UDWH
Next Print Menu Item
TARE
T
USER
F
USER
F
blinking
Example Value
The number represents the print
interval rate in seconds. Use 0 for the
fastest the MSI-8000 can go (~5 times
per second). To set a once a minute
transmission, set the rate to 60. To
set once per hour, set the rate to 3600, etc. Largest possible
entry is 65535 which is >18 hours.
TARE
T
13) Press USER to change the Print
rate. Scroll the number with the
USER key. Enter each number
with the TARE key.
14) When the entire number is
displayed, press TARE again to
finalize the seconds entry. The
next Print Menu Item appears,
“String”.
15) Exit the Print Setup Menu by
pressing ZERO twice. The
message “Store” appears briefly
then normal system operation
starts.
blinking
blinking
fixed
6WUQ
3ULQW 6WRUH
USER
F
ZERO
O
sto
ZERO
O
sto
TARE
T
TARE
T
USER
F
Figure 7-3. Printer Output Menu (continued)
RF Remote Display Option 49
Page 54

7.5 802.15.4 RF Network Setup
3ULQW
U)
(WKQW
Serial Out Setup
rF Modem
Ethernet
RF MENU
2Q2II
6&LG
&KQO
QHWLG
RF On/Off
ScaleCore ID
RF Channel
Network ID
2Q
2II
RF On
RF Off
RF SETUP
Range 0-254
Range 12-23
Range 1 to 99999
Press Simultaneously
TARETUSER
F
(MSI-8000 Connection)
When equipped with the 80
8000 Remote Display or an 802.15.4 Modem. The MSI-4260 uses three numbers to
connect to an 802.15.4 piconet:
1. ScaleCore ID – This number is used to uniquely identify each ScaleCore de
in a Piconet. It has a range of 0-254 and must not be duplicated within the same
RF Channel. For the MSI-8000 as network coordinator, MSI recommends a
number for the MSI-4260 from 0-3 if multiple units will be connected to the
MSI-8000. If a single MSI-4260 is all that’s needed, then any number up to 254
is acceptable.
2. RF Channel – Establishes the base network th
match. This number must be in the range of 12-23.
3. Network ID – This is a 64 bit number that all interconnected devices must
match. The MSI-4260 limi
99999. Do not use a small number here to help avoid other 802.15.4 networks
that default to a Network ID of 0.
For all devices that must interconnect, the RF Channel and Network ID must match.
The ScaleCore ID must be unique. The MS
a weight data source should be set to a ScaleCore ID of 0. Then if other slave devices
are added, they can be added in sequence.
2.15.4 Option, the MSI-4260 can connect with an MSI-
vice
at all interconnected devices must
ts this number to a max of 5 digits for a range of 0-
I-4260 or other MSI RF equipment that is
Figure 7-4. RF Menu
50 MSI-4260 Port-A-Weigh Operator’s Manual
Page 55

2Q2II
2Q
3ULQW
RF Setup Procedure
VFLG
U)
example ScID Value
fixed
blinking blinking
Error Correction: If you input a wrong value, press ZERO to step
back one digit and reenter.
&KQ/
USER
F
TARE
T
TARE
T
TARE
T
TARE
T
TARE
T
TARE
T
TARE
T
1)
With the power on, open the
Comm Setup Menu by
pressing the TARE and
USER keys simultaneously.
The COMM Setup Menu
appears. The first menu
choice is “Print”.
2)
Press USER to scroll to the
RF Setup menus.
3)
Press TARE to enter the RF
setup menu.
4)
The display reads “OnOff”
Confirm the 8000 RF is on
by pressing TARE. If it is off,
use the USER key to change
it to on. Then push TARE
.
Off is only used when the 8000 is
hardwired to a Dyna-Link.
5)
Press TARE . Next the “Scid”
(ScaleCore ID) screen is
shown
6)
Press TARE . The current
Scid number is shown.
If the offered Scid value is correct,
push TARE and jump to step 10.
In this example we’ll enter 3 as an SCID
number. Any value from 1-254 is
acceptable. However, MSI
recommends a value from 20 – 30.
7)
To input the SCID value,
press USER to start the
number entry process..
8)
Use USER to change the
number, and TARE to
enter the number. Add the
next digit by pushing
USER and scrolling as
required. Repeat this
sequence until the entire
SCID number is entered.
9)
Once the entire SCID
value is entered, press
TARE to finalize the
number.
10) The next RF Setup
parameter is “ChnL”
(Channel). Press TARE to
start the number entry
process.
USER
F
USER
F
Press Simultaneously
TARETUSER
F
Figure 7-5. RF Setup Menu
RF Remote Display Option 51
Page 56

11) The current RF Channel
number is displayed.
If the offered RF Channel value is
correct, push TARE and jump to
step 14.
blinking
12)
Press USER and using
the previous process,
enter the RF Channel
number.
Recommended RF Channel numbers
range from 12 to 23. In this example
we’ll use 21 as the RF Channel.
13) When the desired RF
Channel number is
shown and fixed, press
TARE.
14)
The next RF Setup Menu
item is the “nEtid”
(Network ID). Press
TARE to see the current
Net ID number.
If the offered Network ID value is
correct, push TARE and jump to
step 17.
15) Using the numeric entry
process as before, input
a network ID number.
Press F2 to start a new
number.
Allowed Network ID numbers range
from 0 to 99999. MSI recommends
a random number of at least four
digits to ensure that the 8000
system won’t conflict with any
other 802.11.4 networks (Zigbee).
16)
When the final number is
shown and fixed, press
TARE to store the
Network ID.
17)
The RF Setup Menu goes
to the first menu, “OnOff”.
Press the ZERO key to
exit out of the RF Setup
Menus.
18)
Press ZERO again to exit
the COMM Setup Menu
and store the new RF
Network numbers.
QHWLG
blinking
blinking
fixed
blinking
3ULQW
blinking
fixed
current Net ID blinking
blinking
6WRUH
example value only
2Q2II
USER
F
USER
F
TARE
T
USER
F
USER
F
TARE
T
TARE
T
TARE
T
TARE
T
ZERO
O
sto
ZERO
O
sto
USER
F
Repeat number
entry procedure
52 MSI-4260 Port-A-Weigh Operator’s Manual
Figure 7-6. RF Setup Menu (continued)
Page 57

8.0 Appendix
8.1 Troubleshooting
Problem Possible Cause Solution
Display is blank when
POWER button is
depressed
Display does not
function properly, front
panel button does not
function normally or
scale will not turn off
Scale does not
respond to weight
changes
Display over ranges
below 100% capacity
Display Drifts AZM (Auto0) is turned off Tu r n A Z M o n
Displayed weight
shows large error
Display reading not
stable
Display toggles
between “Error” and
“Load”
Discharged battery Recharge, allow at least 4 hours
charge
Defective battery Replace
Corroded battery or
battery contacts
Defective switch or circuit
board
Improperly updated
software
Faulty Circuit Board Requires Authorized Service
Loose connectors Requires Authorized Service
Out of calibration Calibrate
Faulty Load Cell Replace
Load Cell Connector Check connector and wires
Tared weight is added to
load to determine
overload point
Zero requires adjustment Rezero the scale
Too much weight has
been zeroed
Rapid temperature
changes such as moving
the scale from indoors to
outdoors
Scale not zeroed before
load is lifted
lb/kg units causing
confusion
Requires recalibration Recalibrate
Excessive vibration in
crane system
Excessive side loading Improve load train symmetry
Load cell faulty Check load cell connections
Weight exceeds capacity Reduce weight immediately
Faulty load cell or wiring Check load cell and load cell
Clean contacts
Requires Authorized Service
Reinstall Software
Return to Gross weight mode
Rezero the scale
Wait until the scale temperature
has stabalized
Zero the scale with no load
attached
Select proper units
Increase filtering or increase ‘d’ in
Cal
wiring
Table 8-1. Troubleshooting
Appendix 53
Page 58

Problem Possible Cause Solution
Display toggle between
“Error” and “UnLd”
Display toggles
between “Error” and
“A2DLo”
Display toggles
between “Error” and
“buttn”
RF Remote does not
work
Some RF Remote keys
do not work but the
ACK light blinks
Lo Batt is blinking Battery is low Recharge Battery
Unit turns on, then
immediately off
Weight will not zero System not stable Stable annunciator must turn on
Weight will not Zero,
Tare or Total
Set Point Lights Blink Set point is enabled and
Manual Total does not
work
Weight in below the zero
range.
Calibration faulty Recalibrate
Faulty Load Cell or wiring Check load cell connections
A/D is saturated negative Check load cell and load cell
A key is stuck or is being
held down
Units not mated See Section 6.3 and Section 6.4.
Keys were not enabled
during the setup process
Battery is low Recharge Battery
Zero out of range LFT units have limited zero range.
System is not stable Wait for Stable annunciator to
the trigger point has been
reached
A Function key is not set
to “Total”
Weight must be stable Increase filtering for more stability
If scale is in compression, remove
the source.
wiring
Check switches for damage
Ensure that a remote is not
transmitting continuously
Enable keys by running the
transmitter and receiver address
procedures
for Zero to function. Increase
filtering for more stability.
Increase filtering for more stability
Reduce the weight or use Tare
instead
turn on, or if in a mechanically
noisy crane, increase the filtering
or increase the size of the scale
increment ‘‘d’. It is also possible
to increase the motion window.
Contact MSI if you have a
problem getting the MSI-4260 to
zero, tare, or total due to stability
issues.
Disable set points if they are not
needed
Set up Func1 or Func2 for “Total”
Table 8-1. Troubleshooting
54 MSI-4260 Port-A-Weigh Operator’s Manual
Page 59

Note
WARNING
Note
Problem Possible Cause Solution
Auto Total does not
work
Weight must be stable Wait for the stable annunciator to
turn on, or Increase filtering for
more stability.
Weight thresholds not
r
eached
You must exceed 1% of capacity
for autototal to work. Then you
must drop below 0.5% of
capacity for additional
weighments to register.
Table 8-1. Troubleshooting
8.1.1 Service Counters
The MSI-4260 maintains two service counters for safety.
• The first counter counts the number of times the scale has been overloaded.
• The second counter counts lifts above 25% of capacity.
These counters serve to warn the user to in
overloads, also when there is a chance of fatigue failure. The power up routine will be
interrupted when the lift counter exceeds 16383 lifts or the overload counter exceeds
1023 overloads. If the screen displays LFCnt when unit is powered on :
1. Push TARE to display the 25% lift counter.
2. Push TARE again to see the overload lift counter.
3. Push the ZERO key to acknowledge the warning and return to standard scale
operatio
n.
The power up warning message won't appear again for another 16383
lifts ( or 1023 overloads).
spect the load train after a number of
To access the service counters:
4. Program a user function key to be TEST (see function key setup).
5. Press TEST (USER).
6. Within two seconds of pressing t
he TEST (USER) key, press TARE.
7. The display flashes “LFCnt” (for Lift Counter) followed by the number of times
the weight has exceeded 25% of c
8. Press TEST (USER). The display flashes “OLCnt”
apacity.
(for Overload Counter)
followed by the number of times the weight has exceeded capacity.
9. Press TEST (USER). The display
flashes the C-Cal value.
10.Press TEST (USER). Returns to standard weighing mode.
Only a MSI factory representative can reset the service counters,
as these are important safety warning features. Depending on
the circumstances, a thorough load train inspection might be
necessary to ensure user safety.
Reference MSI’s “Crane Scale Safety and Periodic Maintenance manual” (Pub.
243-08-94D) for proper loadi
your
MSI-4260
and is included in the CD shipped with your crane scale.
crane scale. This publication is available at www.msiscales.com
After the service counters are viewed a few times, the automatic warning
stops, but the counters continue to monitor lifts.
ng techniques to improve the safety and longevity of
Appendix 55
Page 60

8.2 MSI-4260 Port-A-Weigh Dimensions
Capacity Resolution** A* B* C* D* E* F Hook
Eye Nut or
Shackle
Shipping
Wt
500 lb 0.2 lb 18.3 in 2.25 in 3.06 in 1.44 in 1.41 in >5
>5>5>5>5>5>5>5>7>6.5>5>5>54.9
4.75
4.3
4.545
4.554.5
–
5 ton alloy CR # 7 53 l b
250 kg 0.1 kg 465 mm 57.1 mm 77.7 mm 37.0 mm 36.0 mm – swivel eye nut 24 kg
2,000 lb 1 lb 18.3 in 2.25 in 3.06 in 1.44 in 1.41 in –
5 ton alloy CR # 7 53 l b
1,000 kg 0.5 kg 465 mm 57.1 mm 77.7 mm 37.0 mm 36.0 mm – swivel eye nut 24 kg
5,000 lb 1 lb 20.5 in 2.50 in 3.50 in 1.81 in 1.69 in –
7 ton alloy CR #8 62 lb
2,500 kg 0.5 kg 521 mm 64.0 mm 89.0 mm 46.0 mm 42.9 mm – swivel eye nut 28 kg
10,000 lb 2 lb 20.5 in 2.50 in 3.50 in 1.81 in 1.69 in –
7 ton alloy CR # 8 62 l b
5,000 kg 1 kg 521 mm 64.0 mm 89.0 mm 46.0 mm 42.9 mm – swivel eye nut 28 kg
20,000 lb 5 lb 28.5 in 4.00 in 6.25 in 2.62 in 2.41 in –
15 ton alloy CR # 11 105 lb
10,000 kg 2 kg 724 mm 101.6 mm 159 mm 66.5 mm 61.2 mm – swivel eye nut 47 kg
30,000 lb 10 lb 30.0 in 4.00 in 6.25 in 3.00 in 3.19 in –
22 ton alloy CR # 11 125 lb
15,000 kg 5 kg 762 mm 101.6 mm 159 mm 76.2 mm 81.0 mm – swivel eye nut 55 kg
50,000 lb 10 lb 41.0 in 5.00 in 6.00 in 3.62 in 3.63 in 15.0 in
30 ton alloy CR 25 ton 235 lb
25,000 kg 5 kg 1041 mm 127 mm 152 mm 92.0 mm 92.0 mm 381 mm swivel shackle # 2130 106 kg
70,000 lb 20 lb 43.2 in 5.00 in 6.00 in 4.56 in 3.75 in 15.0 in
37 ton alloy CR 40 ton alloy 270 lb
35,000 kg 10 kg 1097 mm 127 152 mm 116 mm 95.0 mm 381 mm swivel shackle # 2140 121 kg
100,000 lb 20 lb 52.1 in 5.75 in 6.65 in 5.06 in 4.25 in 16.25 in
45 ton alloy
CR 55 ton alloy 420lb
50,000 kg 10 kg 1324 mm 146 mm 169 mm 129 mm 108 mm 413 mm
swivel
shackle # 2140 189 kg
60 ton alloy
CR 55 ton alloy 510lb
swivel
shackle # 2140 231 kg
75 ton alloy
CR 55 ton alloy 630 lb
swivel
shackle # 2140 286 kg
CR = Crosby or equivalent.
* These dimensions also apply to 50/70/100000 lb. units with hook and shackle.
** Resolution subject to change for NIST and OIML appr
oved units.
Safety
Factor
Alternate Hooks
for 100,000 lb
10.00”
254mm
C
9.28”
236mm
13.37”
340mm
D
E
F
A
B
56 MSI-4260 Port-A-Weigh Operator’s Manual
Page 61

The MSI Limited Warranty
MEASUREMENT SYSTEMS INTERNATIONAL, INC., WARRANTS load sensing
elements and meters against defects in workmanship and materials for a period of one
year from date of purchase and warrants electrical cables and batteries against the
same defects for a period of ninety (90) days from date of purchase.
Any device which proves defective during the warranty period will be replaced or
repaired at no charge; provided that the defective device is returned to the Company
freight pre-paid.
In no event shall the Company be liable for the cost of any repairs or alterations made
by others except those repairs or alterations made with its specific written consent,
nor shall the Company be liable for any damages or delays whether caused by
defective workmanship, materials or otherwise.
The Company shall not be liable for any personal injury or property damage resulting
from the handling, possession or use of the equipment by the customer.
The warranty set forth herein is exclusive and is expressly in lieu of all other
warranties, express or implied, including without limitation any implied warranties of
merchantability or fitness, or of any other obligations or liability on the part of the
Company.
The liability of the Company under this warranty is limited solely to repairing or
replacing its products during the warranty periods; and the final judgment and
disposition of all claims will be made by MEASUREMENT SYSTEMS
INTERNATIONAL, INC.
Appendix 57
Page 62

Notes
58 MSI-4260 Port-A-Weigh Operator’s Manual
Page 63

Page 64

A RICE LAKE WEIGHING SYSTEMS COMPANY
Measurement Systems
International
TM
14240 Interurban Avenue South Suite 200 Ɣ Seattle, WA 98168-4661 Ɣ USA
Phone: 206-433-0199 Ɣ Fax: 206-244-8470
www.ricelake.com www.ricelake.mx www.ricelake.eu www.ricelake.co.in m.ricelake.com
© Rice Lake Weighing Systems 11/2013 152159 Rev A
 Loading...