

Page 1
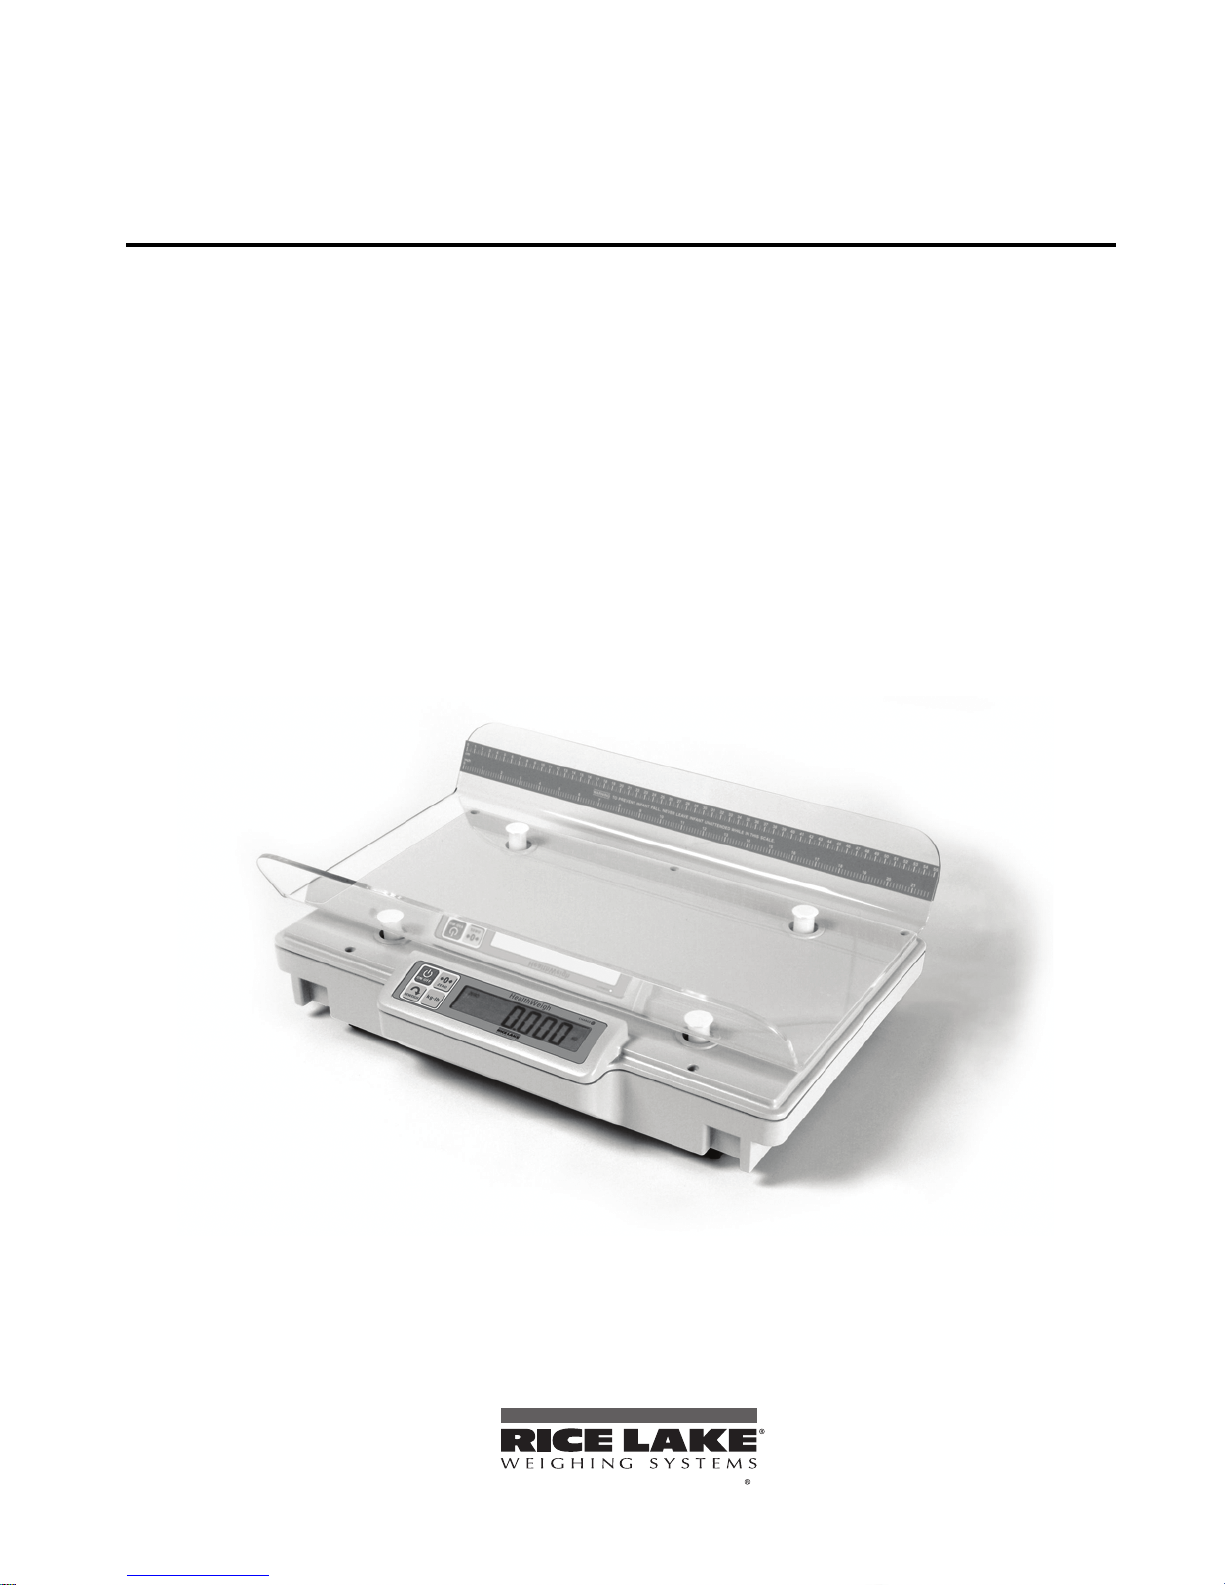
Rice Lake Neonatal Scale
To be the best by every measure
610-10-2 Series
Technical &Operating
Instructions
118767
Page 2

Page 3

Contents
Technical training seminars are available through Rice Lake Weighing Systems.
Course descriptions and dates can be viewed at www.ricelake.com or obtained
by calling 715-234-9171 and asking for the training department
1.0 Introduction.................................................................................................................................. 1
2.0 Assembly Instructions ................................................................................................................. 2
3.0 Scale Setup.................................................................................................................................. 4
4.0 Scale Operation ........................................................................................................................... 6
5.0 Calibration ................................................................................................................................... 7
5.1 Numeric Data Entry . . . . . . . . . . . . . . . . . . . . . . . . . . . . . . . . . . . . . . . . . . . . . . . . . . . . . . . . . . . . . . 7
6.0 Troubleshooting & Testing........................................................................................................... 8
6.1 Test Mode . . . . . . . . . . . . . . . . . . . . . . . . . . . . . . . . . . . . . . . . . . . . . . . . . . . . . . . . . . . . . . . . . . . . . 9
7.0 Maintenance .............................................................................................................................. 10
7.1 Basic Maintenance . . . . . . . . . . . . . . . . . . . . . . . . . . . . . . . . . . . . . . . . . . . . . . . . . . . . . . . . . . . . . . 10
7.2 Cleaning . . . . . . . . . . . . . . . . . . . . . . . . . . . . . . . . . . . . . . . . . . . . . . . . . . . . . . . . . . . . . . . . . . . . . . 10
8.0 Specifications............................................................................................................................ 11
For More Information ............................................................................................................................. 12
Neonatal Scale Limited Warranty ......................................................................................................... 13
© 2010 Rice Lake Weighing Systems. All rights reserved. Specifications subject to change without notice.
November 2010
Page 4

ii Neonatal Technical and Operating Instructions
Rice Lake continually offers web-based video training on a growing selection
of product-related topics at no cost. Visit www.ricelake.com/webinars.
Page 5
1.0 Introduction
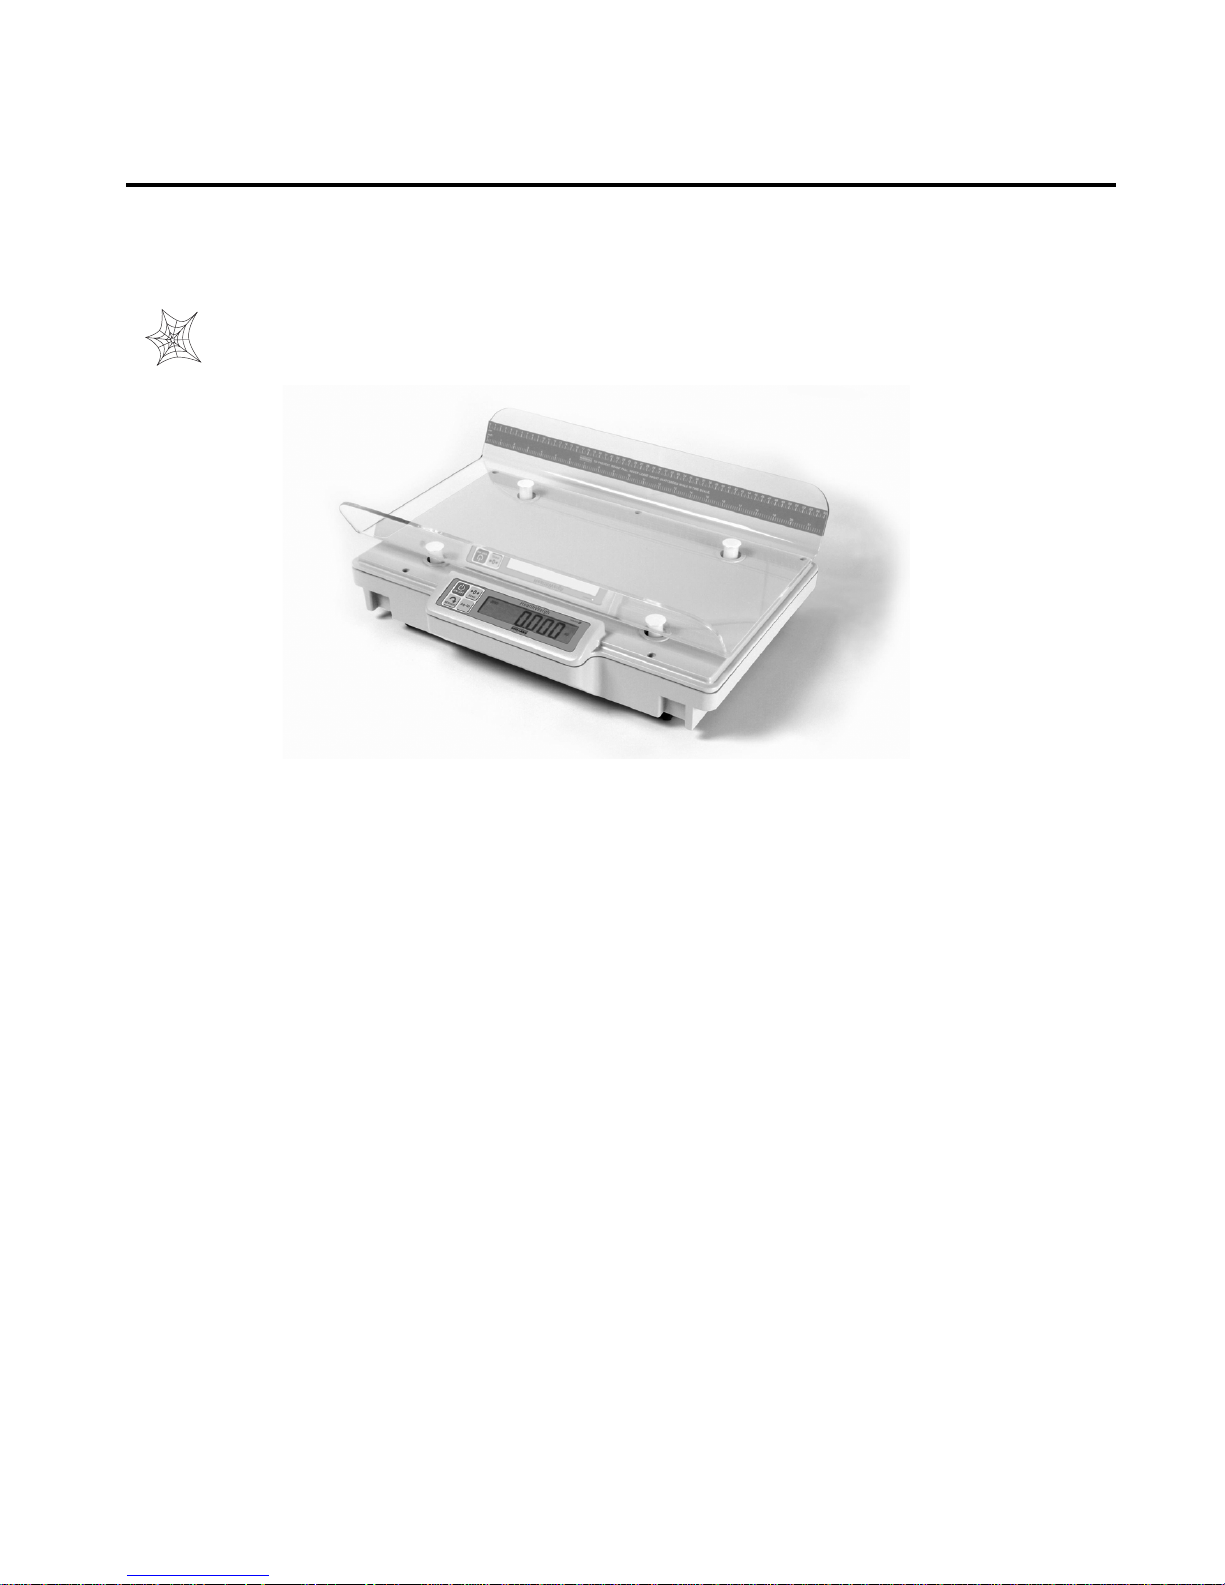
The Rice Lake Neonatal Scale provides precise weighing of babies and neonates. Highly sophisticated
microprocessor technology allows accurate, reliable, and repeatable weighments every time. Movement
compensation technology eliminates errors caused by spontaneous movement of the baby and the weight display
can be displayed in pounds/ounces or in kilograms.
This manual can be viewed and downloaded from the Rice Lake Weighing Systems web site at
www.ricelake.com/health. Rice Lake Weighing Systems is an ISO 9001 registered company
Figure 1-1. Rice Lake Neonatal Scale
With the Rice Lake Neonatal Scale, there are certain precautions that should be taken to prevent injury to the
baby and damage to your scale. Please follow these instructions carefully;
• Do not transport the scale while the infant is on the weighing tray.
• Do not drop the scale or subject it to violent shocks.
• For accurate weighing, the scale must be placed on a flat, stable surface.
• For accurate weighing, verify proper operation according to the procedure described in this manual
before each use.
• Do not use around flammable liquids.
• Operation at other voltages and frequencies than specified could damage your equipment.
1
Page 6
2.0 Assembly Instructions
The Rice Lake Neonatal Scale comes with three pieces. Those pieces include:
• Weighing tray
• Base assembly
•Power supply
Remove each part to be assembled from its carton and unwrap the packing material carefully to prevent
scratching the unit’s parts.
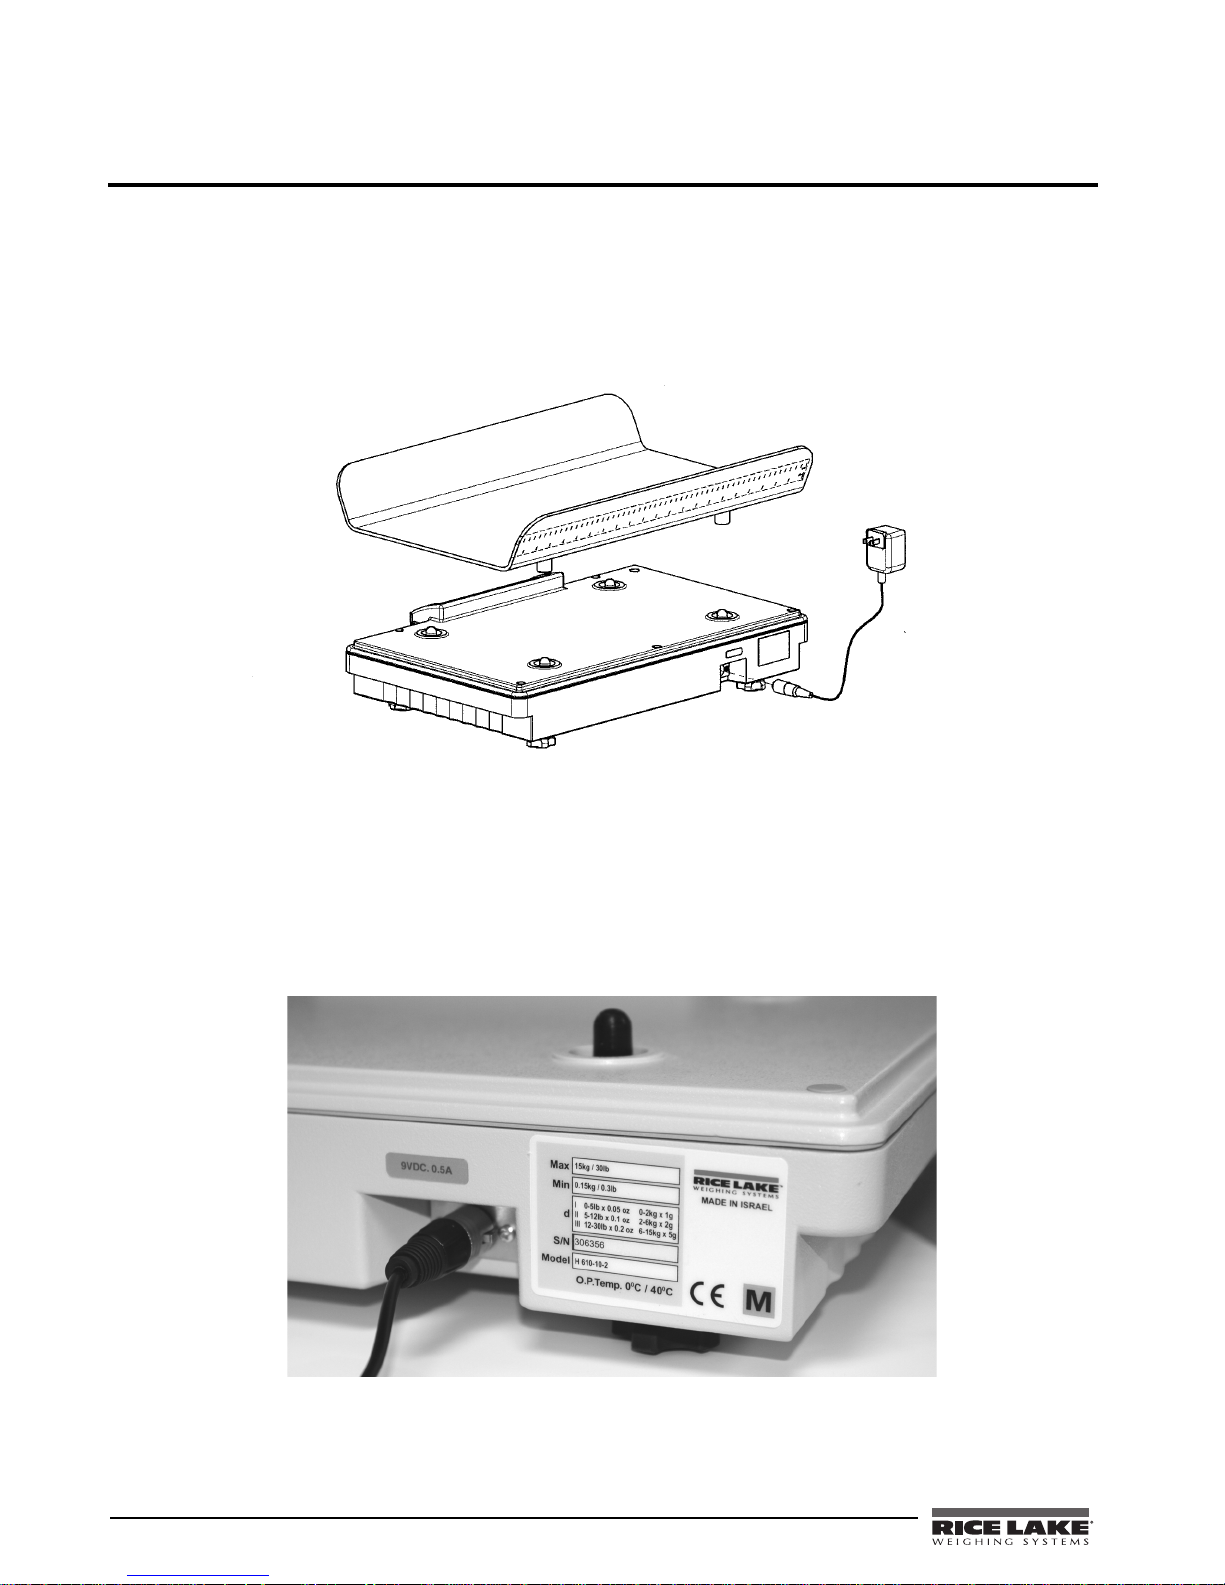
Figure 2-1. Neonatal Assembled Parts
1. Place the base assembly on a sturdy, flat surface.
2. Attach the weighing tray to the base assembly.
3. Plug in the power supply.
Power Supply
The Rice Lake Neonatal Scale has a 120VAC or 230VAC adaptor to use when power is not readily available. The
AC power adaptor plugs into the back of the indicator as shown in Figure 2-2.
2 Neonatal Technical and Operating Instructions
Figure 2-2. AC Power Connection Site
Page 7
The Rice Lake Neonatal Scale is also capable of running on its internal sealed lead-acid rechargeable battery if
no additional power source is available. The battery life is approximately 75 hours. If the
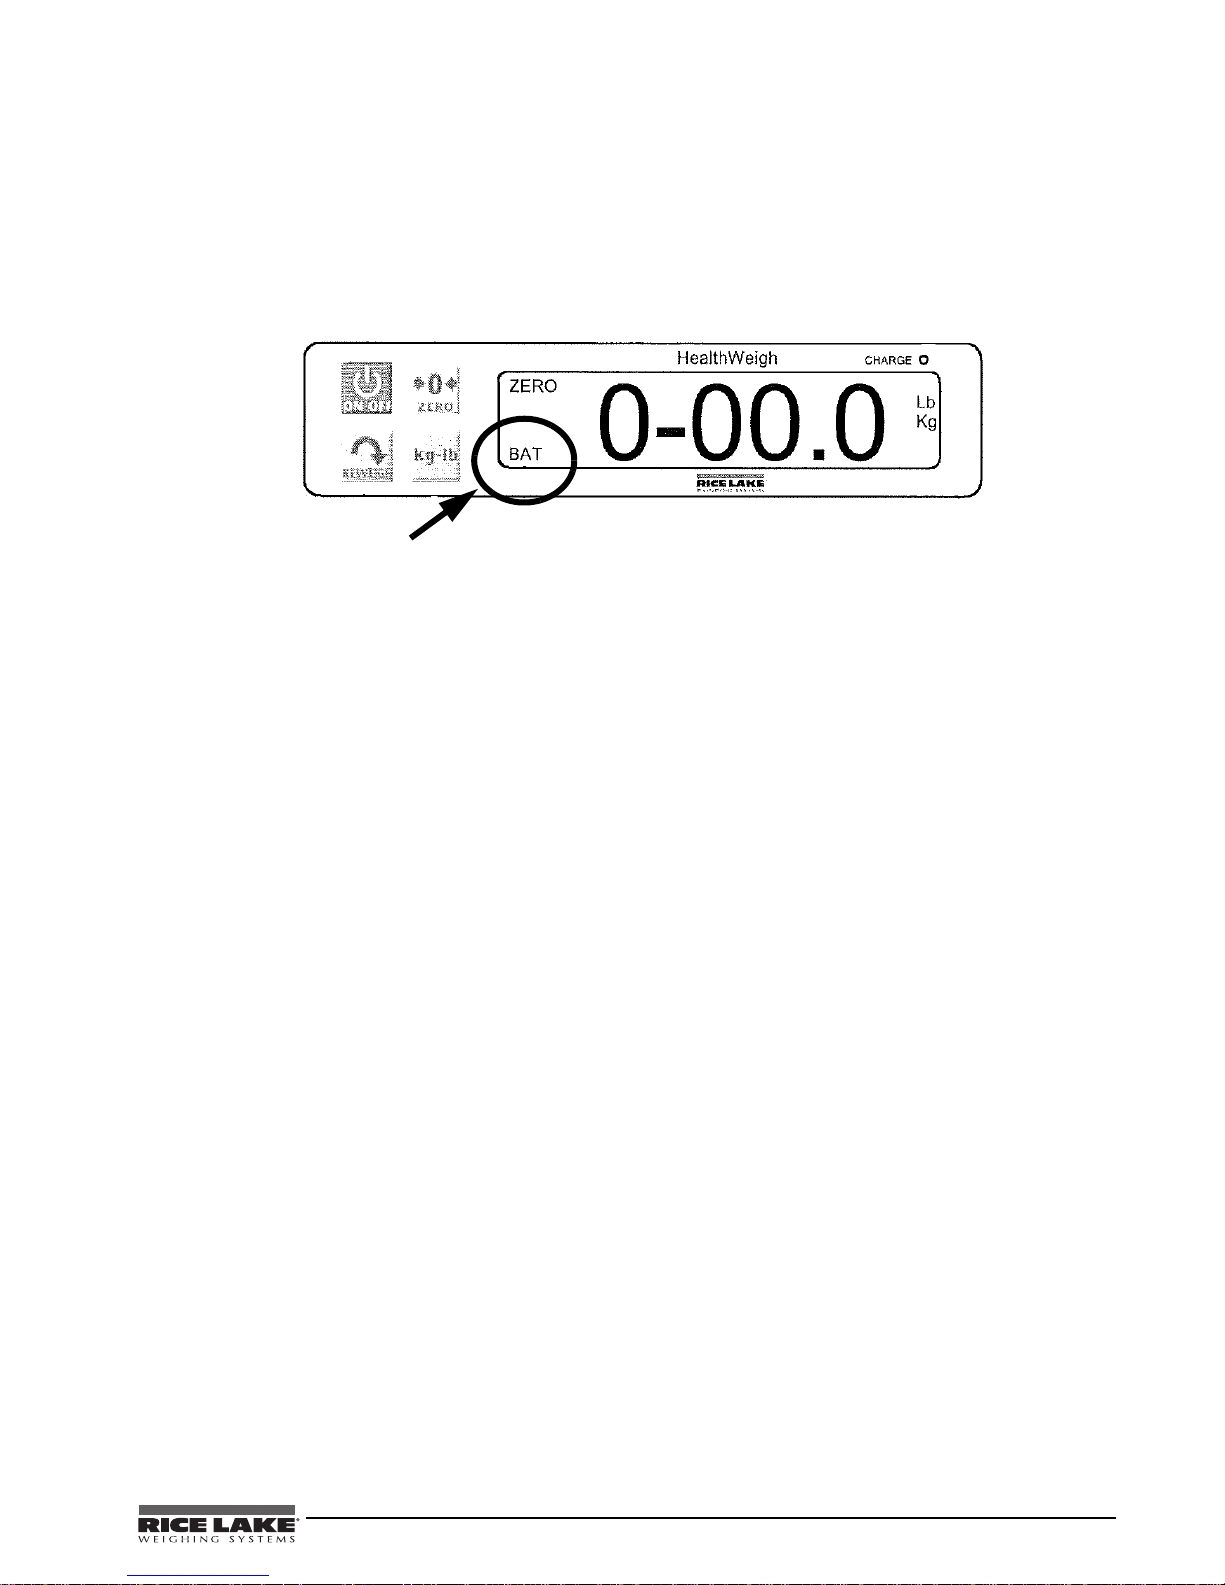
LO Bat indicator is
showing on the display, recharge battery or connect the scale to an AC power source as soon as possible for
accurate weighing.
Battery Charging
When the scale is on, the BAT display indicates that the scale battery requires recharging. The scale should be
connected to an AC power source.
Figure 2-3. Low Battery Display Location
When the AC adaptor is connected to a power source, the rechargeable battery goes into recharge mode.
NOTE: To maintain battery longevity we recommend you charge it on a regular basis rather than waiting until it is fully
discharged.
Neonatal Technical and Operating Instructions - Assembly Instructions 3
Page 8
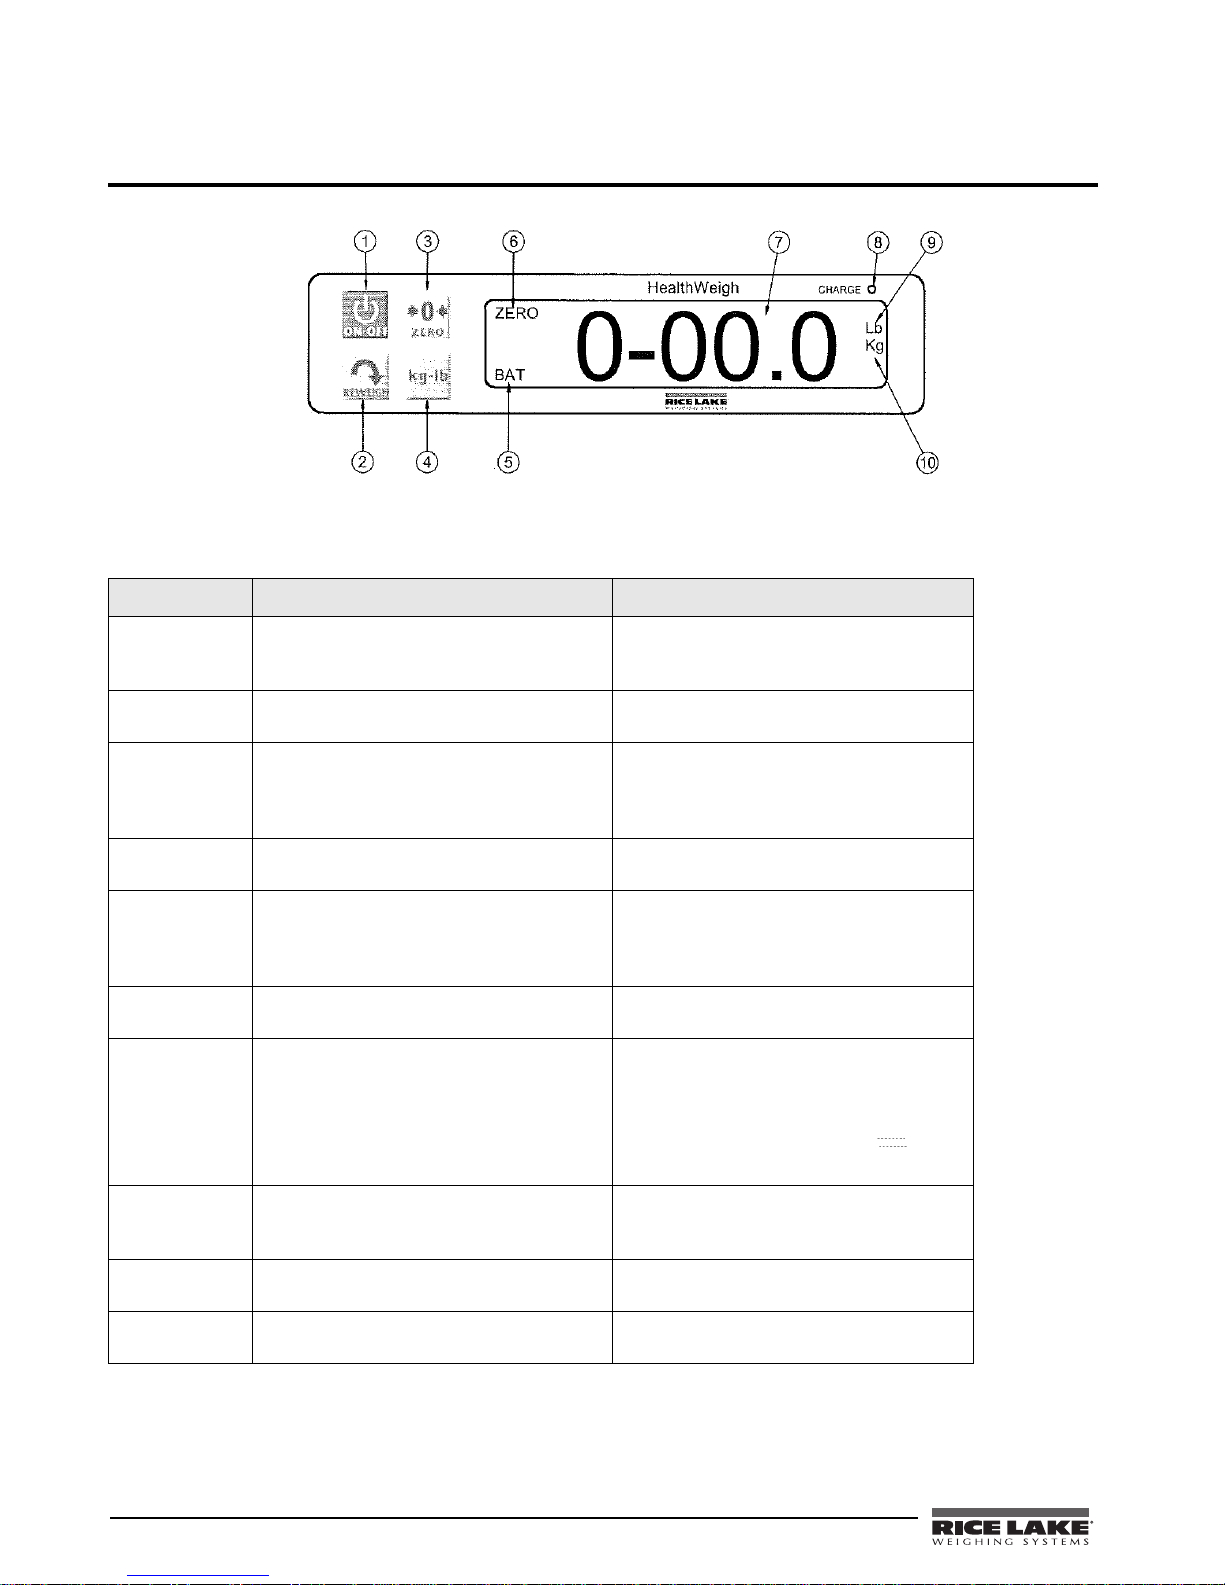
3.0 Scale Setup
Figure 3-1. Neonatal Display
Use the following table to identify what each part of the display does.
Item Description Function
1 ON-OFF key
One short push for On
One short push for Off
2 REWEIGH key
One short push
3 ZERO key
When the scale is turned on, use one short
push
4 Kg/Lb key
One short push
5 BAT indicator When the scale is on, this display indicates
6 ZERO indicator When the scale is on, this display indicates
7 6-Digit LCD Digital display The LCD displays the infant weight in
8 CHARGE indicator This is displayed when the scale is on and is
9 LB indicator When the scale is on, this display indicates
10 KG indicator When the scale is on, this display indicates
This key turns the scale on and off
This key allows repeated reweighing of an
infant
This zeros the digital display prior to
weighing. It enables the cancellation (tare) of
weight of blankets or other accessories on
the scale.
This key selects either pounds/ounces or
kilograms
that the scale battery requires recharging.
The scale should be connected to an AC
power source.
that the scale is stable and ready for use
pounds/ounces or kilograms and shown by
the LB or KG indicator on the right side of
the display. When the REWEIGH key is
depressed, the display will blink until
the infant’s weight is determined.
connected to an AC power source and the
battery is in the charging process
that the scale is weighing in pounds/ounces
that the scale is weighing in kilograms
Table 3-1. Front Panel, Showing Annunciators
4 Neonatal Technical and Operating Instructions
Page 9

Use the following steps to set up your Rice Lake Neonatal Scale when you initially power it up.
1. To operate the unit using the AC adaptor, plug the AC adaptor cable into the back of the scale as shown
in Figure 2-2 2, and the AC adaptor plugs into a power source.
2. Press the
3. When the self test function is complete, the digital display should read:
ON-OFF key to turn on the scale.
0-00.00 if set up in Lb/Oz or 0.000
if set up to read in Kg. The Charge indicator should also be illuminated on the display up until the battery
is fully charged.
4. Place a weight (not exceeding 30 lbs) on the scale. The digital display should blink until the
weight calculation is complete.
5. Press the
6. Pressing the
Kg-Lb key to select the weight mode, either in pounds/ounces or kilograms.
REWEIGH key forces the scale to recompute the weight of the item on the scale.
7. Remove the weight from the scale. The digital display will continue to show the weight of the item that
was on the scale.
8. Press the
ZERO key and the display will return back to zero.
9. Disconnect the scale from the AC power source. The scale will automatically switch over to battery
power and if a rechargeable battery is in use, the
NOTES:
Charge indicator will turn off.
• If the setup procedure failed, refer to the troubleshooting section of this manual. If the problem is not
resolved, refer to a qualified service provider.
• The rechargeable batteries automatically go into recharge mode when the AC adaptor is connected to the
power source. When the cable is inserted into the power source, the LED light up red which is located to
the left hand side of the cable on the back of the indicator. When the battery is completely recharged, the
LED changes from red to green.
• After the procedure, if you are using a rechargeable battery, connect the scale to an AC power source for
at least eight hours to recharge the battery.
Neonatal Technical and Operating Instructions - Scale Setup 5
Page 10

4.0 Scale Operation
The Rice Lake Neonatal Scale can accurately weigh neonates and babies up to 30 lbs. Use the following steps to
weigh a baby.
1. Press the
2. Wait until the
3. Place a pad on the weighing tray. Make sure that the edges of the pad are on the tray and are not touching
the surface on which the scale is positioned.
4. Press the
5. Place the infant on the scale. The display will blink until the weight of the infant is determined.
6. Press the
7. Remove the infant from the scale. The digital display should continue to read the infant’s weight until
REWEIGH or the ZERO key is pressed.
NOTE: If the scale is not used for five minutes, it switches off to save battery life and power. To restart the scale, press
the ON-OFF key.
ON-OFF key to turn the scale on.
0-00.0 (if set up in Lb/Oz) appears on the digital display or 0.000 if set up in Kg.
ZERO key to cancel the weight of the pad or other accessory that is on the weighing tray.
REWEIGH key to weigh the infant again (used to achieve a more accurate result).
6 Neonatal Technical and Operating Instructions
Page 11
5.0 Calibration
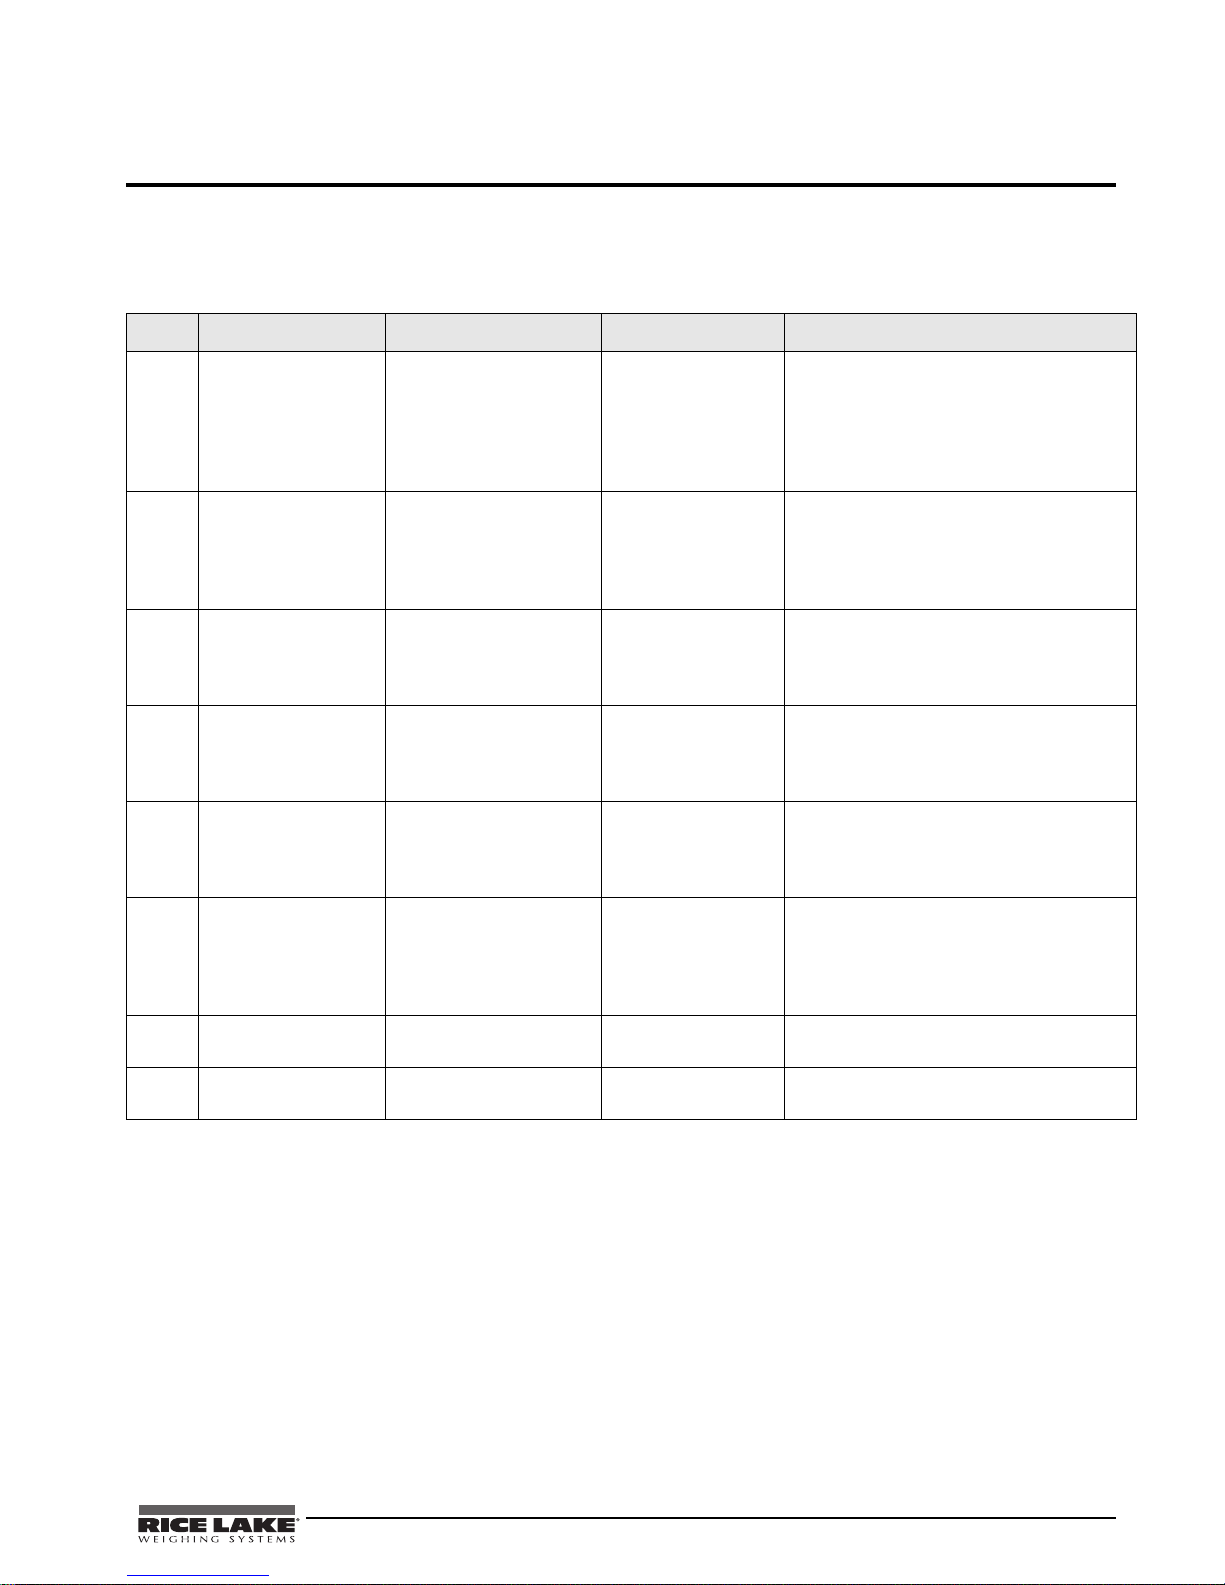
The Rice Lake Neonatal Scale is pre-calibrated from the factory. But if you need to calibrate the scale, the scale
must be turned on. Once the scale is turned on, press the
keys until
LOAD appears on the display alternating with the suggested weight for calibration.
The following chart illustrates the calibration procedure.
Step Function Display Available Parameters
REWEIGH and ZERO keys simultaneously. Hold those
1 Turn the scale on.
While START is
displayed, press and
hold the Kg-Lb and
REWEIGH keys until
CAL is displayed.
2 Sets the value of the
Enters into calibration
mode
calibration weight you are
going to use for
calibrating the span value
of the scale
StArt The scale automatically advances to Step 2
LOAd <-> XXX.X Use the numeric data entry as explained in
the numeric data entry section, to change
the value.
To advance to the next function, press the
REWEIGH key.
CLEAr Clear the platform and be sure of the
scale’s stability.
To advance to the next function, press the
REWEIGH key.
- - - - - PUT <-> XXXX
CAL
FAC tOr <-> XXXX
SAvE The scale displays that it has saved that
dONE To save the new calibration, press the
StArt
XXXX
Place the requested weight on the scale.
This will display for a few seconds.
To advance to the next function, press the
REWEIGH key.
This will be displayed for a few seconds
and shows the current calibration factor.
To advance to the next function, press the
REWEIGH key.
calibration value.
Remove the calibration load from the tray.
To advance to the next function, press the
REWEIGH key.
REWEIGH key.
Remove the weight from the scale and the
display now is ready and reads 0000.00
5.1 Numeric Data Entry
Use the ZERO key to change the numeric data entry while setting up the various configuration parameters and
while in calibration mode.
Use the following steps:
1. Press and hold the
2. Release the
3. A double click on the
4. Repeat steps 1-3 until the desired number is reached.
Kg-Lb key, the rightmost digit on the display will begin to increment.
Kg-Lb key to stop the increments.
Kg-Lb key will cause the right hand digit to move one place to the left.
Table 5-1. Calibration Menu
Neonatal Technical and Operating Instructions - Calibration 7
Page 12
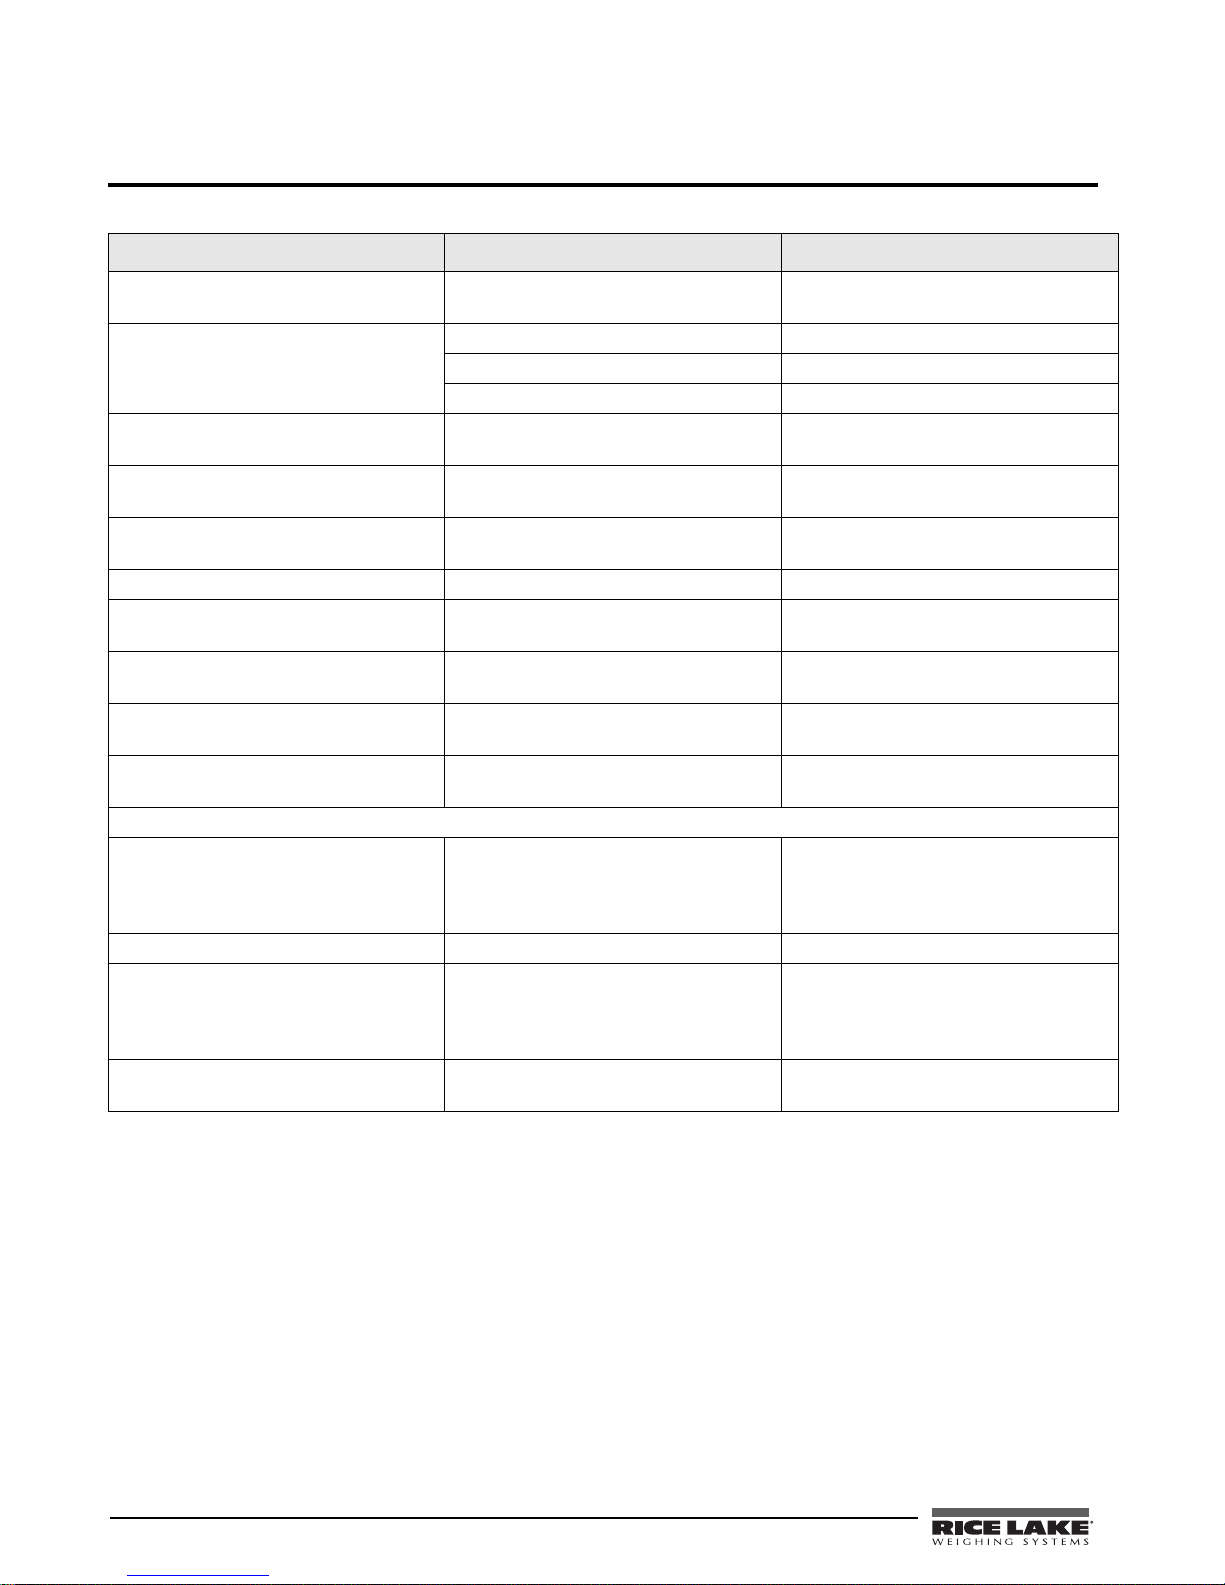
6.0 Troubleshooting & Testing
Refer to the following instructions to check and correct any failure before consulting service personnel.
Symptom Possible Cause Corrective Action
Scale does not turn on when using the
rechargeable battery
Scale does not turn on Dead battery Connect the scale to a power source
Questionable weight or the scale does
not zero
The display shows a STOP message The load on the scale exceeds the
The display shows LO Bat message The rechargeable battery is low Recharge the battery according to
The display shows -------- message The load is in under-load condition Make sure the weighing tray is placed on
The display shows Err message as detailed in the table below
Err 2 Low saturation state (low A/D) The load cell is not connected properly.
Err 3 High saturation state (high A/D) See Err 2
Err 6 Unstable weight. Cannot calibrate Check the load cells’ mechanical
Err 7 Mathematical error; division by zero.
Dead battery Connect the scale to a power source
Faulty electrical outlet Use a different electrical outlet
Bad power supply Replace adaptor
External object is interfering with the scale Remove the infant/interfering object from
the weighing tray from the scale
Display did not show 0.0 before weighing Remove the infant, zero the scale and
begin the weighing process again
Scale is not placed on a level surface Place the scale on a stable surface and
begin the weighing process again
The weighing tray is not placed properly Place the weighing tray in its proper place
Scale is out of calibration Check the weight with a known weight
value
Remove the excess weight and use the
capacity
Cannot calculate the calibration factor
scale according to its stated limit
instructions
the base properly
Check the cables and mechanical
connections. If the problem persists,
replace the load cells.
surroundings and see that nothing
touches them and that the cables are
properly welded.
Will show then trying to calibrate with no
calibration weights on the scale
8 Neonatal Technical and Operating Instructions
Table 6-1. Troubleshooting Table
Page 13
6.1 Test Mode
1PXFS0GG
1PXFS0O0GG
45"35 3&8&*(),FZ
5&45
7FSTJPO
#"5
"%
'"$503
"U
1SFTTBOE
IPME
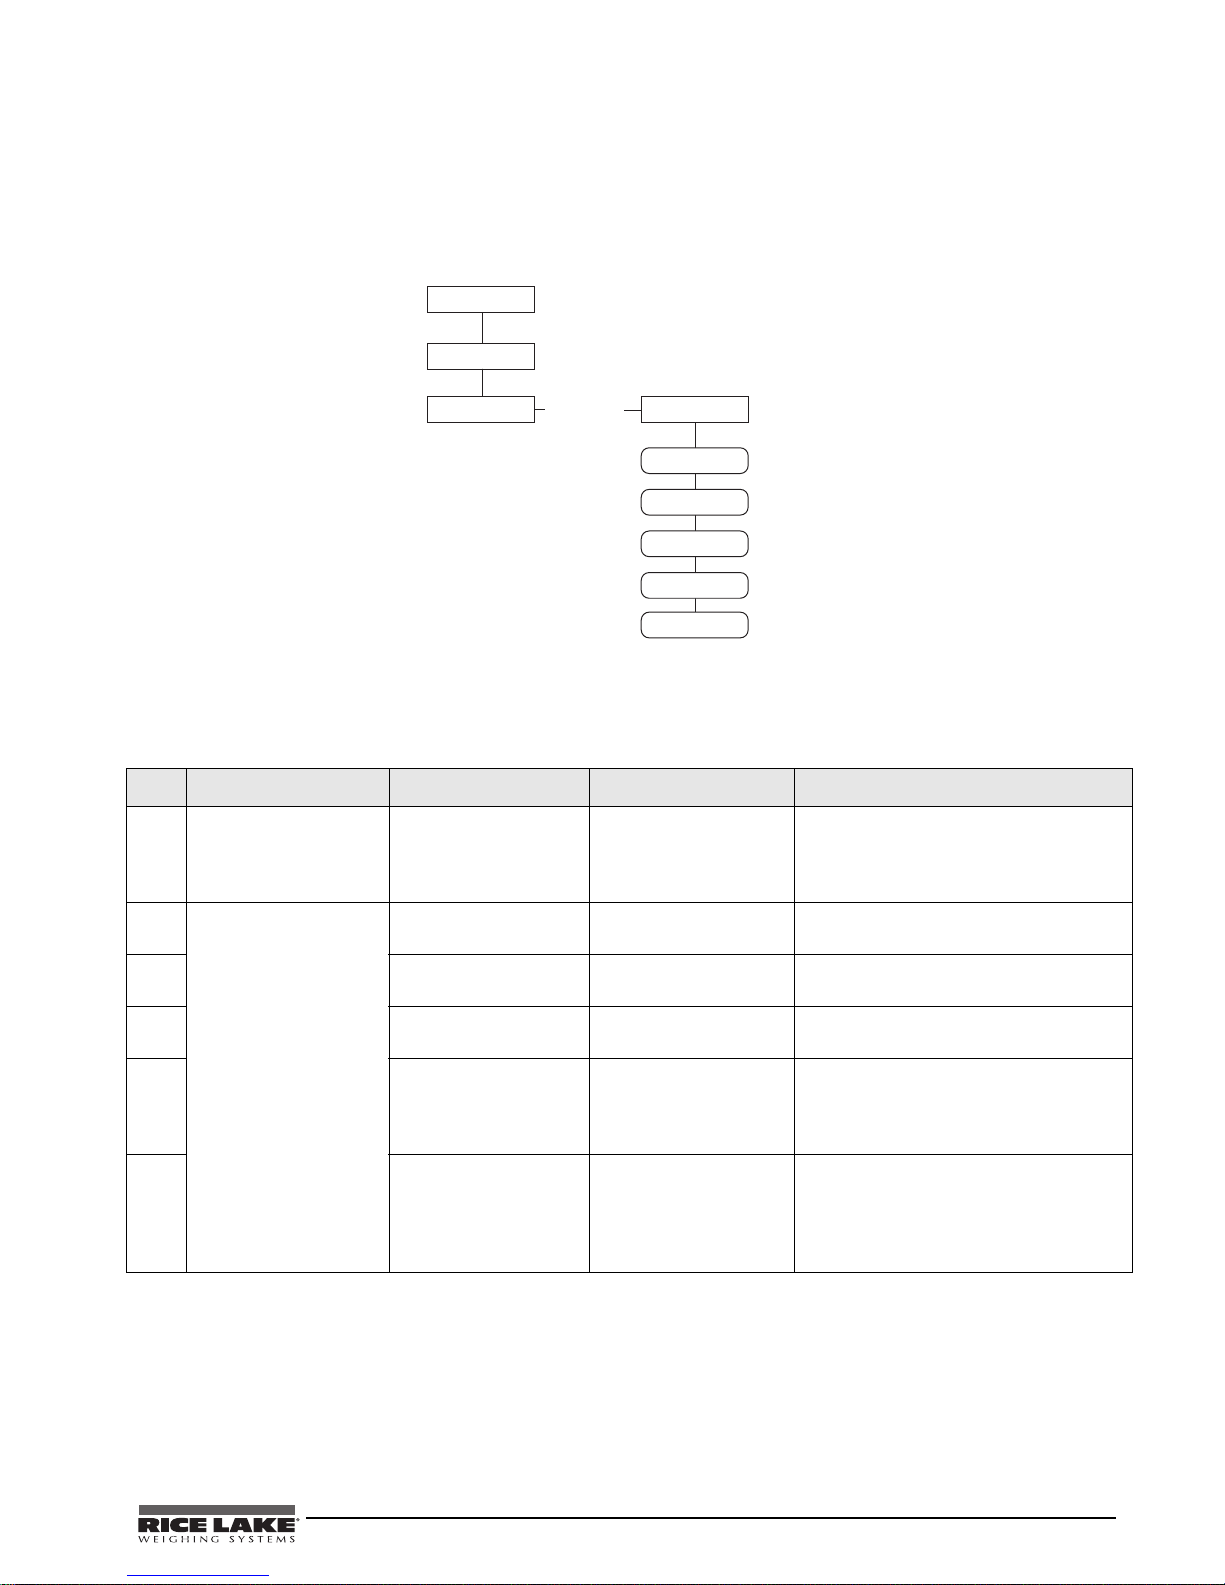
The test mode menu is a special mode used for checking the systems’ state and for troubleshooting. Entry into
this mode is possible only when the scale is turned off. To access the test mode parameter, press and hold the
REWEIGH key when starting the unit. Alternating between the parameters is performed by pressing the REWEIGH
key.
Figure 6-1. Test Mode Menu Structure
Table 6-2 lists the various display messages when testing the scale.
NOTE: < - > means that you can toggle between two values.
Step Function Display Available Parameters
1 With the scale turned
off, simultaneously
press the REWEIGH
and ON/OFF keys
2 Identifies the software IDIdEnt < - > 10999 Press the REWEIGH key to advance to
3 Shows the current
4 Shows the current A/D
5 Checks for current
6 This function sends the
This enters into the test
mode of the scale.
weight value
value
battery level
unit back into test
mode again to cycle
through the menus
again.
Table 6-2. Test Mode Menu
StArt The scale automatically advances to Step
2.
the next function
tESt < - > 0.0 To advance to the next function, press the
REWEIGH key.
A-d < - > XXXX To advance to the next function, press the
REWEIGH key.
bAt < - > XXX or nO bAt If the nO bAt is displayed, there are not
batteries in the unit.
To advance to the next function, press the
REWEIGH key.
FACtOr < - > XXXXX Go through the menu system again or to
exit test mode, press the ON-OFF key to
turn off the indicator.
Neonatal Technical and Operating Instructions - Troubleshooting & Testing 9
Page 14

7.0 Maintenance
The following section provides instructions for maintaining and cleaning the Rice Lake Neonatal Scale.
Maintenance operations other than those described in this section should be performed by qualified service
personnel.
7.1 Basic Maintenance
Before the first use of the scale and after periods of non-use, check the scale for proper operation and function. If
the scale does not operate correctly, contact qualified service personnel.
Go through the following steps for basic maintenance.
1. Check the overall appearance of the entire scale for any obvious signs of damage, abuse, etc.
2. Inspect the condition of the AC adaptor for cord cracking or fraying, or for broken or bent prongs.
7.2 Cleaning
Proper care and cleaning is essential to ensure a long life of accurate and effective operation. Before beginning
the cleaning process, disconnect the scale from the AC power source.
1. Clean all external surfaces with a clean, damp cloth or tissue. Mild soap and water solution may be used.
Dry with a clean soft cloth.
2. Do not immerse the scale into cleaning or other liquid solutions.
3. Do not use Isopropyl alcohol or other solutions to clean the display surface.
10 Neonatal Technical and Operating Instructions
Page 15

8.0 Specifications
Capacity and Graduation: 0 - 5 Lb x 0.05 oz (0 - 2 Kg x 1 g)
5 - 12 Lb x 0.1 oz (2 - 6 Kg x 5 g)
12 - 30 Lb x 0.2 oz (6 - 15 Kg x 5 g)
Power Requirements: 120 VAC-9VDC-50Hz / 230 VAC-9VDC-50Hz
Environmental: Operating temperature: 50 to +95ºF (10 to +35ºC)
Storage temperature: 32 to +122ºF (0 to +50ºC)
Humidity: 85% relative humidity
Dimensions: 22 x 16 x 7.75" (56 x 40.5 x 20 cm)
Weight: 21 Lb (9.5 Kg)
Neonatal Technical and Operating Instructions - Specifications 11
Page 16

For More Information
System Manuals
• Rice Lake Neonatal Scale Operation Instructions, PN 103987
Literature
• Medical Scales - Neonatal Scale 4 Color, PN 106420
Web Site
• http://www.ricelake.com/health
Contact Information
Hours of Operation
Knowledgeable customer service representatives are available 6:30 a.m. - 6:30 p.m. Monday through Friday and
8 a.m. to 12 noon on Saturday. (CST)
Telephone
• Sales/Technical Support 800-472-6703
• Canadian and Mexican Customers 800-321-6703
• International 715-234-9171
Immediate/Emergency Service
For immediate assistance call toll-free 1-800-472-6703 (Canadian and Mexican customers please call
1-800-321-6703). If you are calling after standard business hours and have an urgent scale outage or emergency,
press 1 to reach on-call personnel.
Fax
Fax Number 715-234-6967
Email
• US sales and product information at [email protected]
• International (non-US) sales and product information at [email protected]
Mailing Address
Rice Lake Weighing Systems
230 West Coleman Street
Rice Lake, WI 54868 USA
12 Neonatal Technical and Operating Instructions
Page 17

Neonatal Scale Limited Warranty
Rice Lake Weighing Systems (RLWS) warrants that all RLWS equipment and systems properly installed by a
Distributor or Original Equipment Manufacturer (OEM) will operate per written specifications as confirmed by
the Distributor/OEM and accepted by RLWS. All systems and components are warranted against defects in
materials and workmanship for two years.
RLWS warrants that the equipment sold hereunder will conform to the current written specifications authorized
by RLWS. RLWS warrants the equipment against faulty workmanship and defective materials. If any equipment
fails to conform to these warranties, RLWS will, at its option, repair or replace such goods returned within the
warranty period subject to the following conditions:
• Upon discovery by Buyer of such nonconformity, RLWS will be given prompt written notice with a
detailed explanation of the alleged deficiencies.
• Individual electronic components returned to RLWS for warranty purposes must be packaged to
prevent electrostatic discharge (ESD) damage in shipment. Packaging requirements are listed in a
publication, Protecting Your Components From Static Damage in Shipment, available from RLWS
Equipment Return Department.
• Examination of such equipment by RLWS confirms that the nonconformity actually exists, and was
not caused by accident, misuse, neglect, alteration, improper installation, improper repair or
improper testing; RLWS shall be the sole judge of all alleged non-conformities.
• Such equipment has not been modified, altered, or changed by any person other than RLWS or its
duly authorized repair agents.
• RLWS will have a reasonable time to repair or replace the defective equipment. Buyer is responsible
for shipping charges both ways.
• In no event will RLWS be responsible for travel time or on-location repairs, including assembly or
disassembly of equipment, nor will RLWS be liable for the cost of any repairs made by others.
HESE WARRANTIES EXCLUDE ALL OTHER WARRANTIES, EXPRESSED OR IMPLIED, INCLUDING WITHOUT
T
LIMITATION
RLWS NOR DISTRIBUTOR WILL, IN ANY EVENT, BE LIABLE FOR INCIDENTAL OR CONSEQUENTIAL DAMAGES.
RLWS
REPAIR
OTHER CLAIMS TO WARRANTY.
ALL
HOULD THE SELLER BE OTHER THAN RLWS, THE BUYER AGREES TO LOOK ONLY TO THE SELLER FOR
S
WARRANTY
N
O TERMS, CONDITIONS, UNDERSTANDING, OR AGREEMENTS PURPORTING TO MODIFY THE TERMS OF THIS
WARRANTY
OFFICER
WARRANTIES OF MERCHANTABILITY OR FITNESS FOR A PARTICULAR PURPOSE. NEITHER
AND BUYER AGREE THAT RLWS’S SOLE AND EXCLUSIVE LIABILITY HEREUNDER IS LIMITED TO
OR REPLACEMENT OF SUCH GOODS. IN ACCEPTING THIS WARRANTY, THE BUYER WAIVES ANY AND
CLAIMS.
SHALL HAVE ANY LEGAL EFFECT UNLESS MADE IN WRITING AND SIGNED BY A CORPORATE
OF RLWS AND THE BUYER.
© 2010 Rice Lake Weighing Systems, Inc. Rice Lake, WI USA. All Rights Reserved.
RICE LAKE WEIGHING SYSTEMS • 230 WEST COLEMAN STREET • RICE LAKE, WISCONSIN 54868 • USA
Neonatal Technical and Operating Instructions - Specifications 13
Page 18

PN 118767 11/10
 Loading...