

Page 1
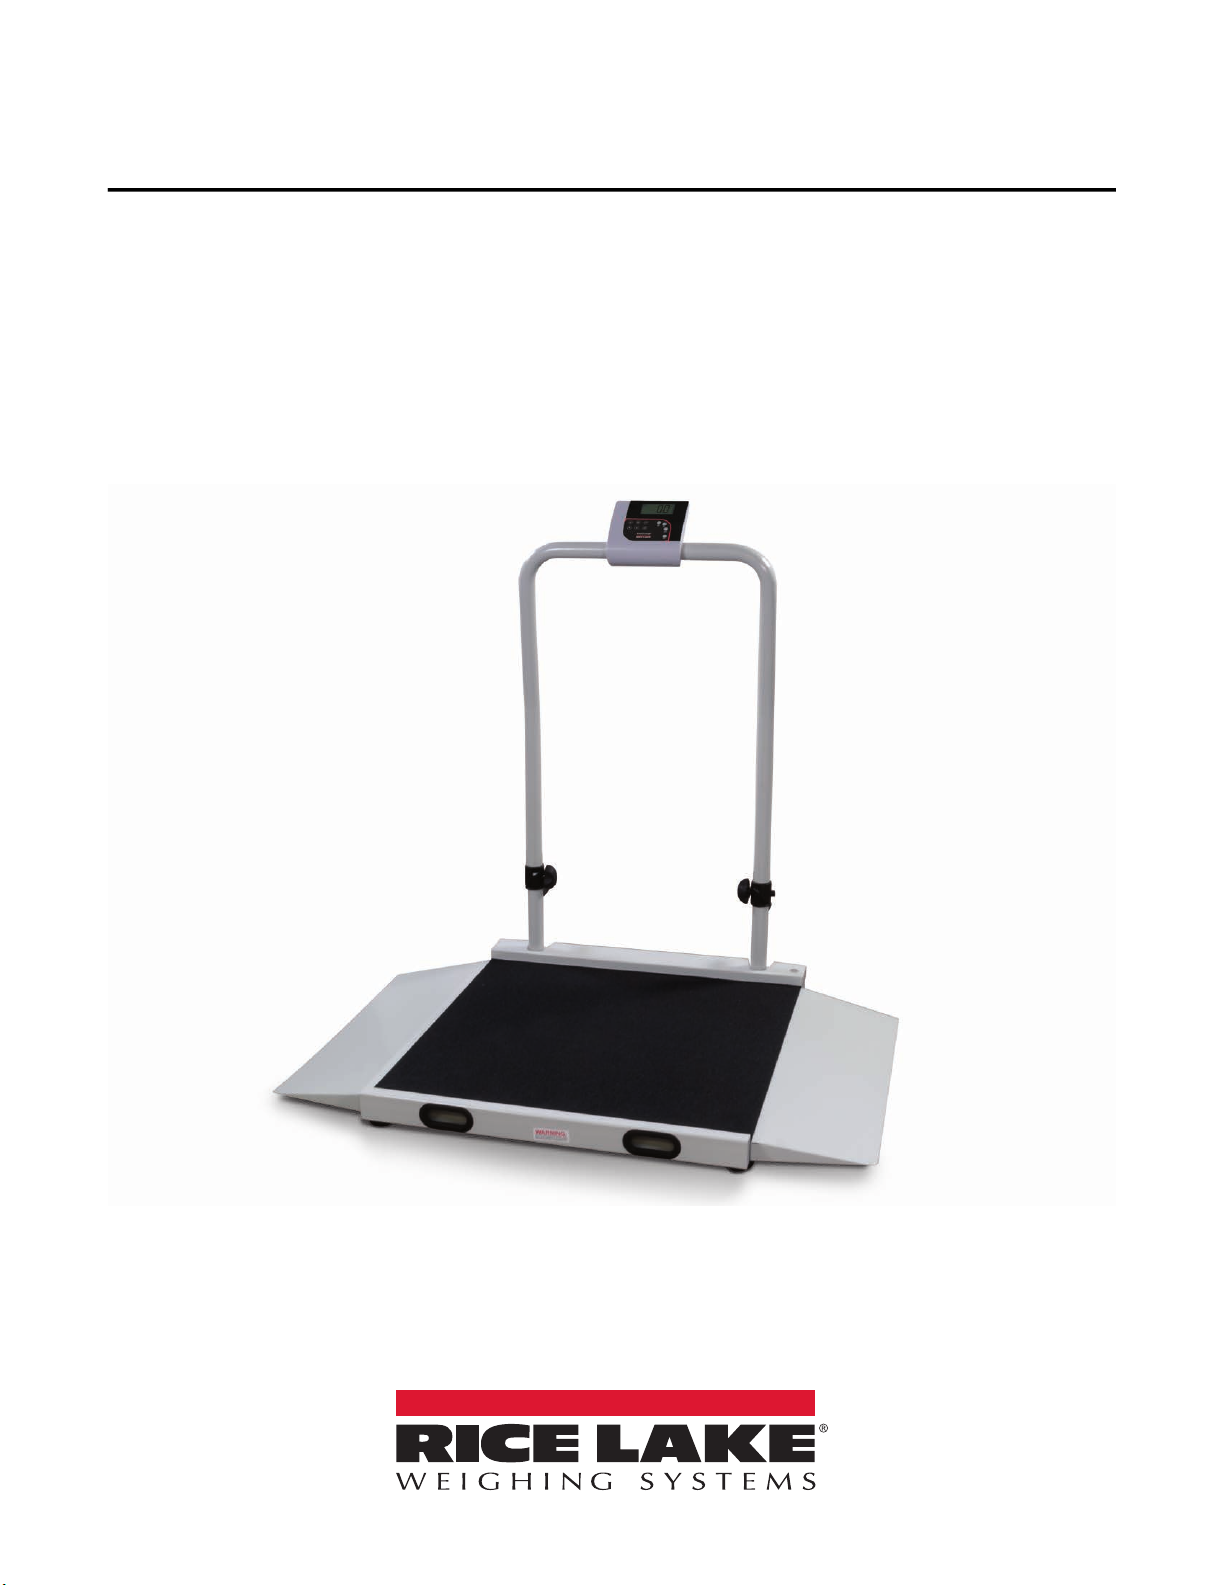
Digital Wheelchair Scale
Software Revision 11525
Operation Manual
350-10-3M
PN 194980April 19, 2019
Page 2

An ISO 9001 registered company
© Rice Lake Weighing Systems. All rights reserved.
Rice Lake Weighing Systems
®
is a registered trademark of
Rice Lake Weighing Systems.
All other brand or product names within this publication are trademarks or
registered trademarks of their respective companies.
All information contained within this publication is, to the best of our knowledge, complete and
accurate at the time of publication. Rice Lake Weighing Systems reserves the right to make
changes to the technology, features, specifications and design of the equipment without notice.
Page 3

Page 4

Page 5

Contents
Contents
1.0 Introduction . . . . . . . . . . . . . . . . . . . . . . . . . . . . . . . . . . . . . . . . . . . . . . . . . . . . . . . . . . . . . . . . . . . . . . . . . . . . 1
1.1 Safety . . . . . . . . . . . . . . . . . . . . . . . . . . . . . . . . . . . . . . . . . . . . . . . . . . . . . . . . . . . . . . . . . . . . . . . . . . . . . . . . . . . . . . . . . . . . . 1
1.2 Scale Assembly. . . . . . . . . . . . . . . . . . . . . . . . . . . . . . . . . . . . . . . . . . . . . . . . . . . . . . . . . . . . . . . . . . . . . . . . . . . . . . . . . . . . . . 2
1.2.1 Scale Unpacking . . . . . . . . . . . . . . . . . . . . . . . . . . . . . . . . . . . . . . . . . . . . . . . . . . . . . . . . . . . . . . . . . . . . . . . . . . . . . 2
1.2.2 Repacking . . . . . . . . . . . . . . . . . . . . . . . . . . . . . . . . . . . . . . . . . . . . . . . . . . . . . . . . . . . . . . . . . . . . . . . . . . . . . . . . . . 2
1.2.3 Scale Setup . . . . . . . . . . . . . . . . . . . . . . . . . . . . . . . . . . . . . . . . . . . . . . . . . . . . . . . . . . . . . . . . . . . . . . . . . . . . . . . . . 2
1.2.4 Attaching the Feet to the Scale . . . . . . . . . . . . . . . . . . . . . . . . . . . . . . . . . . . . . . . . . . . . . . . . . . . . . . . . . . . . . . . . . . 3
1.2.5 Inserting Batteries . . . . . . . . . . . . . . . . . . . . . . . . . . . . . . . . . . . . . . . . . . . . . . . . . . . . . . . . . . . . . . . . . . . . . . . . . . . . 4
1.2.6 AC Power Connections . . . . . . . . . . . . . . . . . . . . . . . . . . . . . . . . . . . . . . . . . . . . . . . . . . . . . . . . . . . . . . . . . . . . . . . . 4
2.0 Scale Operation . . . . . . . . . . . . . . . . . . . . . . . . . . . . . . . . . . . . . . . . . . . . . . . . . . . . . . . . . . . . . . . . . . . . . . . . . 5
2.1 Key Descriptions . . . . . . . . . . . . . . . . . . . . . . . . . . . . . . . . . . . . . . . . . . . . . . . . . . . . . . . . . . . . . . . . . . . . . . . . . . . . . . . . . . . . . 5
2.2 Weighing . . . . . . . . . . . . . . . . . . . . . . . . . . . . . . . . . . . . . . . . . . . . . . . . . . . . . . . . . . . . . . . . . . . . . . . . . . . . . . . . . . . . . . . . . . . 6
2.3 Hold/Release Function . . . . . . . . . . . . . . . . . . . . . . . . . . . . . . . . . . . . . . . . . . . . . . . . . . . . . . . . . . . . . . . . . . . . . . . . . . . . . . . . 6
2.4 Preset Tare . . . . . . . . . . . . . . . . . . . . . . . . . . . . . . . . . . . . . . . . . . . . . . . . . . . . . . . . . . . . . . . . . . . . . . . . . . . . . . . . . . . . . . . . . 6
2.5 Toggle Tare. . . . . . . . . . . . . . . . . . . . . . . . . . . . . . . . . . . . . . . . . . . . . . . . . . . . . . . . . . . . . . . . . . . . . . . . . . . . . . . . . . . . . . . . . 6
2.6 Using the Body Mass Index (BMI) Function . . . . . . . . . . . . . . . . . . . . . . . . . . . . . . . . . . . . . . . . . . . . . . . . . . . . . . . . . . . . . . . . 7
2.6.1 LB Mode. . . . . . . . . . . . . . . . . . . . . . . . . . . . . . . . . . . . . . . . . . . . . . . . . . . . . . . . . . . . . . . . . . . . . . . . . . . . . . . . . . . . 7
2.6.2 KG Mode . . . . . . . . . . . . . . . . . . . . . . . . . . . . . . . . . . . . . . . . . . . . . . . . . . . . . . . . . . . . . . . . . . . . . . . . . . . . . . . . . . . 7
3.0 RS-232 Communication . . . . . . . . . . . . . . . . . . . . . . . . . . . . . . . . . . . . . . . . . . . . . . . . . . . . . . . . . . . . . . . . . . 8
3.1 Pushbutton Keypad Print . . . . . . . . . . . . . . . . . . . . . . . . . . . . . . . . . . . . . . . . . . . . . . . . . . . . . . . . . . . . . . . . . . . . . . . . . . . . . . 8
3.2 USB Connection . . . . . . . . . . . . . . . . . . . . . . . . . . . . . . . . . . . . . . . . . . . . . . . . . . . . . . . . . . . . . . . . . . . . . . . . . . . . . . . . . . . . . 9
4.0 Troubleshooting and Testing . . . . . . . . . . . . . . . . . . . . . . . . . . . . . . . . . . . . . . . . . . . . . . . . . . . . . . . . . . . . . 12
5.0 Maintenance . . . . . . . . . . . . . . . . . . . . . . . . . . . . . . . . . . . . . . . . . . . . . . . . . . . . . . . . . . . . . . . . . . . . . . . . . . . 13
5.1 Basic Maintenance . . . . . . . . . . . . . . . . . . . . . . . . . . . . . . . . . . . . . . . . . . . . . . . . . . . . . . . . . . . . . . . . . . . . . . . . . . . . . . . . . . 13
5.2 Cleaning . . . . . . . . . . . . . . . . . . . . . . . . . . . . . . . . . . . . . . . . . . . . . . . . . . . . . . . . . . . . . . . . . . . . . . . . . . . . . . . . . . . . . . . . . . 13
6.0 Specifications . . . . . . . . . . . . . . . . . . . . . . . . . . . . . . . . . . . . . . . . . . . . . . . . . . . . . . . . . . . . . . . . . . . . . . . . . 14
© Rice Lake Weighing Systems ● All Rights Reserved i
Page 6

350-10-3M Digital Wheelchair Scale
ii
Page 7
Introduction
DANGER
WARNING
CAUTION
IMPORTANT
WARNING
1.0 Introduction
The 350-10-3M Digital Wheelchair Scale is a user-friendly, quality scale, designed for safe weighing of mobility challenged
individuals. Movement compensation technology ensures sound, accurate weighments.
The scale is set up to use motion sensing technology, to determine actual weight of a moving patient. The weight can be
displayed in pounds or kilograms. To obtain a tare weight, See Section 2.4 on page 6.
The wheelchair scale has a unique folding feature that enables easy transportation and simplifies assembly, avoiding the need
for field wiring and recalibration. All that is required is to open the packaging and unfold the scale.
1.1 Safety
Safety Signal Definitions:
Indicates an imminently hazardous situation that, if not avoided, will result in death or serious injury. Includes
hazards that are exposed when guards are removed.
Indicates a potentially hazardous situation that, if not avoided, could result in serious injury or death. Includes
hazards that are exposed when guards are removed.
Indicates a potentially hazardous situation that, if not avoided, could result in minor or moderate injury.
Indicates information about procedures that, if not observed, could result in damage to equipment or corruption
to and loss of data.
General Safety
Do not operate or work on this equipment unless this manual has been read and all instructions are understood.
Failure to follow the instructions or heed the warnings could result in injury or death. Contact any Rice Lake
Weighing Systems dealer for replacement manuals.
Failure to heed could result in serious injury or death.
Electric shock hazard!
There are no user serviceable parts. Refer to qualified service personnel for service.
The unit has no power switch, to completely remove power from the unit, disconnect the power source.
For pluggable equipment the socket outlet must be installed near the equipment and must be easily accessible.
Always disconnect from main power before performing any work on the device.
Do not allow minors (children) or inexperienced persons to operate this unit.
Do not operate without all shields and guards in place.
Do not use for purposes other then weighing applications.
Do not place fingers into slots or possible pinch points.
Do not use this product if any of the components are cracked.
Do not make alterations or modifications to the unit.
Do not remove or obscure warning labels.
Do not use near water, avoid contact with excessive moisture.
© Rice Lake Weighing Systems ● All Rights Reserved 1
Page 8

350-10-3M Digital Wheelchair Scale
Note
IMPORTANT
Note
1.2 Scale Assembly
Use the following information to unpack and set up the 350-10-3M Digital Wheelchair Scale.
1.2.1 Scale Unpacking
Place the unopened box in an open area that has ample room for unpacking the scale.
The 350-10-3M Digital Wheelchair Scale box is bulky, so two people are recommended for unpacking.
Recommended tools needed to set up the scale:
• Scissors or a box cutter
Using scissors or a box cutter, cut the strapping bands that secure the box together. Immediately after opening the box, visually
inspect the scale to ensure all parts are included and undamaged.
Parts contained in the shipping box include:
• Scale
• Manual
• AA batteries (6)
• Scale feet (4)
Figure 1-1. Box Contents Packed in Styrofoam
1.2.2 Repacking
If the 350-10-3M Digital Wheelchair Scale must be returned for modification, calibration or repair, the scale must be properly
packed with sufficient packing materials. Whenever possible, use the original carton when shipping the scale back.
Damage caused by improper packaging is not covered by the warranty.
1.2.3 Scale Setup
Move the scale into the area where the weighing process will occur. Place the scale on a hard, level surface for the most
accurate weighments. Placing the scale on thin carpeting is not recommended.
1. Locate the operation manual from inside the box and set aside as it will provide instructions on the proper 350-10-3M
Digital Wheelchair Scale removal and set up.
2. Using two people, remove the scale out of the box by the scale base.
Do not lift the scale out of the box by its handle as this can cause the hinges to break or affect the scale operation.
2
Page 9

Introduction
CAUTION
Note
1.2.4 Attaching the Feet to the Scale
The 350-10-3M Digital Wheelchair Scale comes with four feet that must be attached to the scale base for proper operation. The
four feet are located in the parts box in the original shipping box. Use the following steps to attach the feet to the scale.
1. Tip the scale onto it’s side on a level surface so the scale base is accessible.
When tipping the scale, be cautious of surroundings to prevent potential injuries.
2. Rotate the four round feet clockwise into the scale base until secure as shown in Figure 1-2. Feet are secure when no
mechanical binding is present.
Figure 1-2. Secure Scale Platform Feet
3. To prevent interference with the scale base, screw each foot counterclockwise four entire turns. The scale will not
weigh properly if the feet restrict the scale platform.
4. Gently set the scale base down on to the floor. Ensure there is minimal clearance between the scale base and the floor
without having the scale base contacting the floor.
Figure 1-3. Scale Base Clearance
5. It is important to ensure that the scale is completely level. Gently press down on all corners of the scale base to ensure
that there are no high spots or rocking of the scale base.
An uneven base will produce inaccurate weight readings.
6. Loosen the knobs by rotating counterclockwise and set the scale arms upright.
Figure 1-4. Loosen the Durable Hinges to Set Handles Upright
7. Tighten the two hinges on the 350-10-3M Digital Wheelchair Scale by tightening the two knobs by rotating clockwise to
secure the handrail mounted indicator.
© Rice Lake Weighing Systems ● All Rights Reserved 3
Page 10

350-10-3M Digital Wheelchair Scale
1.2.5 Inserting Batteries
The six AA batteries that come with the scale offer an average of 25 hours of continuous use.
To install the batteries:
1. Open the battery chamber cover by loosening the thumbscrew.
Figure 1-5. Thumbscrew Location
2. Insert batteries into the battery chamber.
Figure 1-6. Battery Chamber
3. Close the battery chamber.
If an external power supply or USB power supply is connected, the battery flag on the display is turned off.
When using battery or USB power supply, the backlight power is deducted to 60%.
1.2.6 AC Power Connections
Use the optional 120 VAC or 230 VAC adapter (PN 133077) when power is available. The optional AC power adapter plugs into
the back of the indicator. Rice Lake Weighing Systems offers optional AC adapters. Using an unauthorized adapter supplied by
Rice Lake Weighing Systems voids all warranties.
Connect the optional AC power source shown in Figure 1-7.
AC Adapter Connection
Figure 1-7. Power Connection
4
Page 11

2.0 Scale Operation
On/O
LB/KG
Print
Zero
Hold
Release
BMI
TARE
T
CLEAR
ENTER
CAUTION
The Rice Lake Digital Wheelchair Scale display has 10 front panel keys, See Figure 2-1.
Figure 2-1. Front Panel Display Keys
2.1 Key Descriptions
Key functions are described in Table 2-1.
Key Name Function
On/Off Powers the scale on or off
Scale Operation
Print
LB/KG
Zero Clears the weight off the scale and returns it to zero after three seconds; only functions if the current weight
Hold Release Displays most current weight value on the display; a second press releases the weight value; not active
BMI Enables access to the BMI (Body Mass Index) function; only works if there is a locked weight on the display
TARE Used to subtract the weight off the scale, example: oxygen tank, other equipment
CLEAR Returns to normal weighing when the BMI value is being displayed; while in BMI mode,
ENTER Used to accept height in BMI mode; accepts the value of the parameter last entered and moves to the next
Up Arrows Adjusts height input (0.5 in/0.5 cm) while in BMI mode; adjusts the value of the flashing digit/number
Down Arrows Adjusts height input (0.5 in/0.5 cm) while in BMI mode; adjusts the value of the flashing digit/number
Sends data out from the RS-232 port; allows to toggle between kilograms and pounds providing that it is
enabled in configuration mode; cannot toggle while in the BMI mode
is stable and zero, up to 2% of max weight
while in BMI mode
and the BMI function is turned on in the configuration mode
the height display causes the value to return to the default of 190.0 cm, 5 ft, 7.5 inches
stage; press during scale start up to enter ID display (pre-parameter mode)
Table 2-1. 350-10-3M Digital Wheelchair Scale Key Functions
The front panel key display are very sensitive so only a gentle pushing motion is required to obtain results.
© Rice Lake Weighing Systems ● All Rights Reserved 5
Page 12

350-10-3M Digital Wheelchair Scale
Note
Note
TARE
T
TARE
T
Note
TARE
T
ENTER
2.2 Weighing
Use the following steps to weigh.
1. Press to turn on the scale. 0.0 prompts along with ZERO on the display.
2. When the patient steps on the scale the display shows the weight of the patient. The LOCK annunciator is on in the
upper display and beeps to indicate the end of the weighing process.
3. Press to change the display from kg to lb.
4. To turn off the scale, press and hold until OFF prompts.
2.3 Hold/Release Function
Use the following steps to use the Hold/Release function.
1. Press to turn on the scale. 0.0 prompts along with ZERO on the display.
2. Press when the patient is on the scale.
3. The weight and HOLD & LOCK annunciators remain on the display when the patient steps off the scale.
4. Press again to return to zero.
Pressing will not work while in Hold/Release function.
Pressing prior to the patient getting on the scale will also work.
2.4 Preset Tare
Use the following steps to use the Preset Tare.
1. Press to turn on the scale. 0.0 prompts along with ZERO on the display.
2. Place wheelchair on the scale.
3. Press until the display returns to 0.0 and NET prompts on the display.
4. Remove the wheelchair from the scale. The weight will prompt with a negative symbol to the left of it.
5. Seat the patient in a wheelchair. The display identifies the patient weight. The NET annunciator is still active. The
weight of the wheelchair remains stored in memory.
6. Repeat Step 5 to cancel the tare weight, press and hold until NET disappears from the display and the display
turns back to 0.0 and GROSS prompts.
Tare weight is also canceled when the scale is turned off.
2.5 Toggle Tare
Use the following steps to use the Toggle Tare function.
1. Press when the weight is set to 0.0. The default values prompts while 0.0 is flashing (default is programmed to
be 33.0 lb/15.0 kg) on the display.
2. Use and to adjust the value. Press to start the tare function. The NET annunciator turns on instead
of the GROSS annunciator.
6
Page 13

Scale Operation
BMI
ENTER
CLEAR
BMI
ENTER
CLEAR
2.6 Using the Body Mass Index (BMI) Function
Use the following steps in determining the BMI.
2.6.1 LB Mode
1. Ensure that the scale is at zero.
2. Have the patient step on the scale to obtain a weight.
3. The LOCK annunciator is illustrated on the display.
4. Press . The BMI and FT/IN annunciators are lit on the display and a default value of 5 ft and 7.5 in (5-07.5) is
flashing.
5. Use and to adjust the height value.
6. Press .
7. The BMI value and BMI annunciator is shown on the display. Press to return to the weighing mode and the BMI
function will be turned off.
2.6.2 KG Mode
1. Ensure that the scale is at zero.
2. Have the patient step on the scale to obtain a weight.
3. The LOCK annunciator is illustrated on the display.
4. Press . The BMI and CM annunciators are lit on the display and a default value of 170.0 cm (170.0) is flashing.
5. Use and to adjust the height value.
6. Press .
7. The BMI value and BMI annunciator is shown on the display. Press to return to the weighing mode or step off
the scale and the BMI function will be turned off.
© Rice Lake Weighing Systems ● All Rights Reserved 7
Page 14

350-10-3M Digital Wheelchair Scale
Note
3.0 RS-232 Communication
The 350-10-3M Digital Wheelchair Scale comes with an RS-232 port which enables weight data to be transmitted to other
devices. The RS-232 cable with DB-9 connector (PN 100719) is available from Rice Lake Weighing Systems, See Figure 3-1
on page 9 for RS-232 connections.
The parameters of RS-232 are:
• 9600 baud (selectable baud rate)
• 8 data bits
• 1 stop bit
• No parity
• No handshaking
There are three methods of communication:
• Pushbutton keypad print
• Standard remote protocol
• Escape protocol
3.1 Pushbutton Keypad Print
With a stable, in-range weight, press and hold for at least three seconds, or until the scale emits two quick beeps.
If the scale does not beep after five seconds, release as the weight was either in motion or out of range.
• The scale will send out the following 21 character string if displaying just weight and not BMI:
xxxxxxxxx<SP>uu<SP>mmmmm<SP><CR><LF>
Where:
xxxxxxxxx is the weight with decimal point and “-” sign, if negative uu is the unit (lb or kg)
mmmmm is the mode (gross or net)
Examples:
-10 lb net = <SP><SP><SP><SP>-10.0<SP>lb<SP><SP>Net<SP><SP><SP><CR><LF>
10 lb gross = <SP><SP><SP><SP><SP>-10.0<SP>lb<SP>Gross<SP><CR><LF>
• The scale will send out the following data while in BMI mode (displaying the BMI value):
Setting Value
Gross Weight 215 lb
Tare Weight 0.0 lb
Net Weight 215 lb
Patient height 6–01.0 ft
Patient BMI 28.4
Table 3-1. BMI Data
8
Page 15

RS-232 Communication
3.2 USB Connection
The Rice Lake Digital Wheelchair Scale has the capability of connecting to a PC using a USB connection and a USB cable (not
included). That connection location is shown in Figure 3-1.
USB Connection
RS-232 Connection
Load Cell Connection
Figure 3-1. USB Connection Port and RS-232 Connection Port
Connecting software and downloads will be addressed by the IT department and may vary. Basic information on USB driver
®
installation using Windows
is described in the following steps and serves only as an example. The USB driver can be
downloaded from the Rice Lake Weighing Systems website at the following location; http://www.ricelake.com/software.aspx.
1. Select Medical/Health Scales.
2. Select Software.
3. Select Get Downloads.
4. Select Download to download the driver. Selecting a download will prompt a download notification.
5. Found New Hardware Wizard prompts.
Figure 3-2. Found New Hardware Wizard
6. Follow the prompts to complete installation.
© Rice Lake Weighing Systems ● All Rights Reserved 9
Page 16

350-10-3M Digital Wheelchair Scale
7. Select No, not this time then select Next.
Figure 3-3. No, Not This Time
8. Select Install the software automatically then select Next.
9. Allow the driver to install.
10
Figure 3-4. Install The Software Automatically
Figure 3-5. Software Installation
Page 17

RS-232 Communication
Note
10. Completing the Found New Hardware Wizard prompts when installation is complete. Select Finish.
Figure 3-6. Finish Installation
11. To verify the installation, view the driver information in Device Manager.
Figure 3-7. Driver Selection
12. To print a ticket using the USB driver, open the software driver and the port assigned to that driver is shown.
13. Ensure that the USB cable is properly connected and unit is on.
14. Another terminal type program (such as Hyperterminal or Putty) needs to be opened and connected through the USB
driver to the indicator to be able to see the information being sent to the PC. A port needs to be established, so select
the port that is assigned to Parpar and print the ticket. The following example tickets will print.
Figure 3-8. Example Tickets
A single print ticket has four spaces after “patient weight” and only one space between weight and lb in the examples
shown above.
© Rice Lake Weighing Systems ● All Rights Reserved 11
Page 18

350-10-3M Digital Wheelchair Scale
4.0 Troubleshooting and Testing
Refer to the following table to check and correct any failure before contacting service personnel.
Symptom Possible Cause Corrective Action
Scale does not turn on Dead battery Replace battery or connect to AC power
Faulty electrical outlet Use a different electrical outlet
Bad power supply Replace adapter
Questionable weight or the scale does not zero External object is interfering with the scale Remove the interfering object from the scale
Display did not show 0.0 before weighing Help the patient off the scale, zero the scale and begin the
weighing process again
Scale is not placed on a level floor Ensure the scale is level and begin the weighing process
again
Scale is out of calibration Check the weight with a known weight value
The display shows a STOP message The load on the scale exceeds the
capacity of the scale
The display shows LO Bat message The battery is low Replace batteries
The display shows Err message as detailed below
Err 2 Low saturation state (low A/D) The load cell is not connected properly; check the cables
Err 3 High saturation state (high A/D) See Err 2
Err 6 Unstable weight; cannot calibrate Check the load cell mechanical surroundings and ensure
SAT Damaged load cell cable Replace load cell cable
Table 4-1. Troubleshooting Table for the 350-10-3M Digital Wheelchair Scale
Remove the excess weight and use the scale according to
manufacture specifications
and mechanical connections; if the problem persists,
replace the set of load cells
nothing is contacting the load cell and that the cables are
properly welded
12
Page 19

Maintenance
5.0 Maintenance
The following section provides instructions for maintaining and cleaning the 350-10-3M Digital Wheelchair Scale.
5.1 Basic Maintenance
Before the first use of the scale and after periods of non-use, check the scale for proper operation and function. If the scale
does not operate correctly, contact qualified service personnel.
Go through the following steps for basic maintenance.
1. Check the overall appearance of the entire scale for any obvious signs of damage.
2. Inspect the condition of the AC adapter for cord cracking or fraying or for broken or bent prongs.
5.2 Cleaning
Proper care and cleaning is essential to ensure a long life of accurate and effective operation. Before beginning the cleaning
process, disconnect the scale from the AC power source.
1. Clean all external surfaces with a clean, damp cloth or tissue. Mild soap and water solution may be used. Dry with a
clean soft cloth.
2. Do not immerse the scale into cleaning or other liquid solutions.
3. Do not use isopropyl alcohol or other solutions to clean the display surface.
© Rice Lake Weighing Systems ● All Rights Reserved 13
Page 20

350-10-3M Digital Wheelchair Scale
6.0 Specifications
Power
Input 120 VAC-9VDC-50Hz / 230 VAC-9VDC-50Hz
Dimensions
Platform Dimensions 48.5 in W x 29.5 in L x 3 in H
Battery Type
Power Consumption 6 AA size alkaline batteries
Battery Use 25 hours continuous use; automatic power-off can be configured
Data Communications RS-232 with RJ-45 jack
USB connection Selectable baud rate, default - 9600, 8 bits; no parity, 1 stop bit
No handshaking
Environmental
Operating Temperature 50°F-104°F (14°C-40°C)
Storage Temperature 32°F-158°F (0°C-70°C)
Humidity 85% relative humidity
Capacity and Graduation
Capacity 1000 lb (453 kg)
Graduation 0.2 lb (0.1kg)
Certifications and Approvals
RoHS Compliant
14
Page 21

Page 22

April 19, 2019
PN 194980
 Loading...