

Page 1
CARPET
EXTR ACTOR
model RCE
Owner’s Manual
1
Page 2

Contents
IMPORTANT SAFETY INSTRUCTIONS 2
Grounding instructions 3
Description of the extractor 4
Before using your extractor for the first time 5
Operation
While operating the machine 6
Cleaning with accessory tools 7
Draining the recovery tank 8
Draining the solution tank 8
Maintenance and Care
Filter maintenance 8
Extractor maintenance 9
Problem Solving Guide
Troubleshooting 10
Helpful hints 11
Owner’s Information 12
Warranty 13
Page 3

2
3
IMPORTANT SAFETY INSTRUCTIONS
Grounding Instructions
This machine is intended for household use. It is designed to clean carpet and upholstery
in an indoor environment and is not constructed for any other use. Use only recommended
cleaning solutions and accessory tools.
All operators must read, understand and practice the following safety precautions.
WARNING:
To reduce the risk of fire, electric shock or injury:
Do not operate machine:
- Unless trained and authorized.
- Unless operator manual is read
and understood.
- In flammable or explosive areas.
- Unless cord is properly grounded.
- With damaged cord or plug.
- If not in proper operating condition.
- In outdoor areas.
- In standing water.
- With the use of an extension cord.
Before operating machine:
- Make sure all safety devices are in
place and operate properly.
When using machine:
- Do not run machine over cord.
- Do not pull machine by plug or cord.
- Do not pull cord around sharp edges
or corners.
- Do not unplug by pulling on cord.
- Do not stretch cord.
- Do not handle plug with wet hands.
- Keep cord away from heated surfaces.
- Report machine damage or faulty operation
immediately.
- Follow mixing and handling instructions on
chemical containers.
The manufacturer cannot accept responsibility for damage
caused when the appliance is not used according to the
instructions, or for uses other than those for which it
was intended.
Before leaving or servicing machine:
- Turn off machine.
- Unplug cord from wall outlet.
When servicing machine:
- Unplug cord from wall outlet.
- Avoid moving parts. Do not wear loose
jackets, shirts, or sleeves.
- Use manufacturer supplied or approved
replacement parts.
WARNING: Hazardous voltage. Shock or
electrocution can result. Always
unplug machine before servicing.
WARNING: Flammable materials can cause
an explosion or fire. Do not use
flammable materials in tank(s).
WARNING: Flammable materials or reactive
metals can cause an explosion
or fire. Do not pick up any of
these items and materials.
This carpet extractor must be grounded. If it should malfunction or break down, grounding
provides a path of least resistance for electric current to reduce the risk of electric shock.
This carpet extractor is equipped with a cord having an equipment-grounding conductor and
grounding plug. The plug must be plugged into an appropriate outlet that is properly installed
and grounded in accordance with all local codes and ordinances.
This carpet extractor is for use on a nominal 120-volt circuit and has a ground plug
(see illustration). Make sure the carpet extractor is connected to an outlet having the same
configuration as the plug. No adapter should be used with this carpet extractor.
WARNING – Improper connection of
the equipment-grounding conductor
can result in the risk of electric shock.
Check with a qualified electrician or
service person if you are in doubt as to
whether the outlet is properly grounded.
Do not modify the plug provided with
the carpet extractor – if it will not fit the
outlet, have a proper outlet installed by
a qualified electrician.
Grounded
Grounding
Outlet
Grounded
Outlet Box
SAVE THESE INSTRUCTIONS.
Page 4

4
5
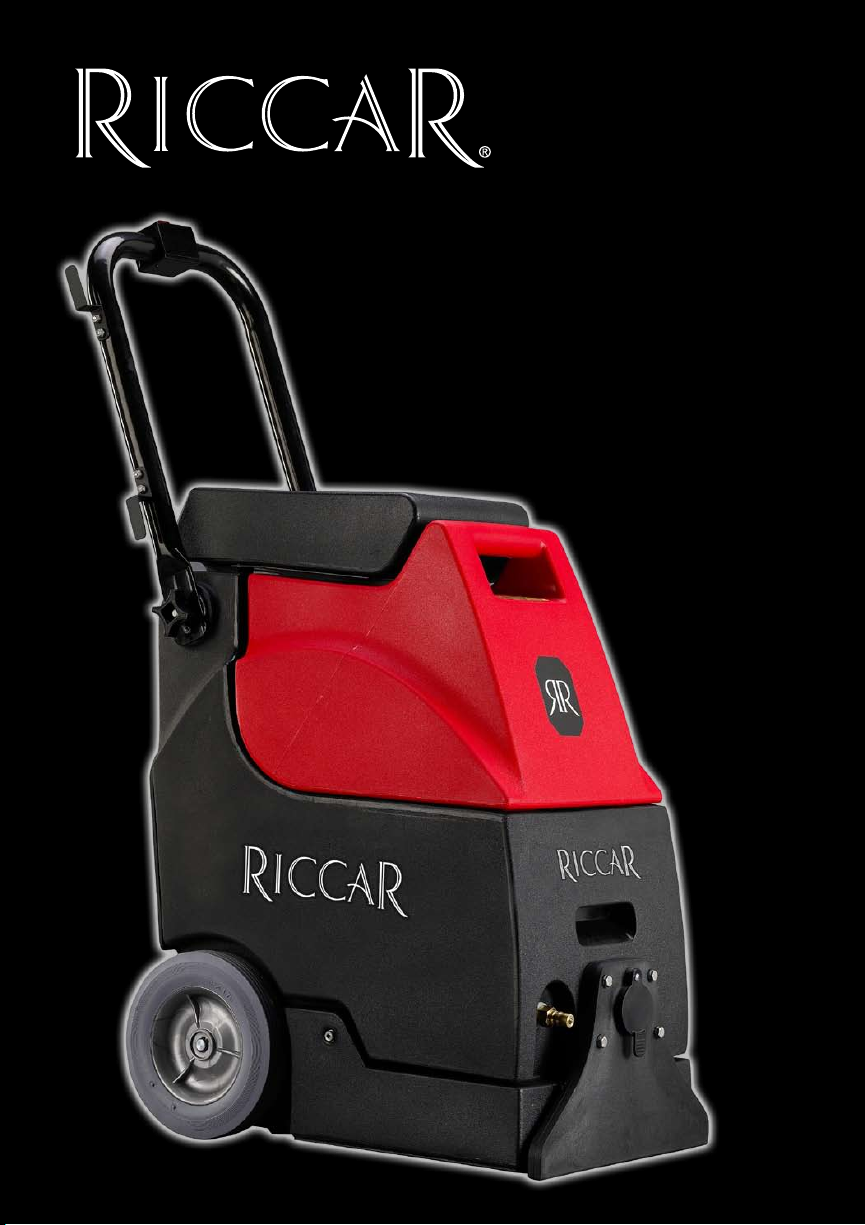
Description of the Extractor
5
6
7
13
10
11
13
8
9
12
1
2
3
14
7 Recovery tank cover
13
Before Using Your Extractor for the First Time
• The machine is shipped fully assembled and
is ready for use.
• Adjust handle from transport position. To
adjust, while standing behind the machine
4
lift handle to desirable operating height. Turn
right knob forward while turning left knob
backward to tighten handle in operating
position (fig 1).
• Hinge open cover and remove recovery tank
from machine. Make sure the float shut-off
screen and filter are in place before use.
• Using a clean bucket, ll solution tank
with 15L (4 gal) of hot water, 60°C (140°F)
maximum (fig 2). Observe solution tank hose
at rear of machine when filling. The hose
indicates the amount of water in solution tank.
Do not use recovery tank to fill machine. Use
a clean bucket.
• Replace recovery tank and close cover
after filling.
• Plug machine’s power cord into a grounded
wall outlet.
Figure 1
Figure 2
1 Main on / off power switch
2 Pump reset button
3 Brush reset button
4 Power cord hooks
5 Solution button
6 Folding handle
8 Recovery tank
9 Solution tank
10 Accessory hose coupler
11 Accessory hose port
12 Nozzle
13 Folding handle lock knob
14 Solution tank drain hose
Attention: Do not use recovery tank to fill
solution tank. Residual dirt or debris could
cause damage to solution pump.
Warning: Flammable materials can cause
an explosion or fire. Do not use flammable
materials in tank(s).
For Safety: When using machine, follow
mixing and handling instructions on Riccar
chemical containers.
Note: Use Riccar Extractor Detergent only.
Page 5

6
7
Operation Attachment Cleaning
For Safety: Do not operate machine unless
operator manual is read and understood.
• Vacuum carpet thoroughly and remove
other debris.
• Turn main power switch on.
• To begin cleaning carpets, push button on
handle with thumbs and slowly pull machine
backward (fig 1).
• Release handle button at end of path and
continue to pull machine backward to pick
up excess solution.
• Tip machine back on wheels and push
machine forward to begin next path.
While operating the machine
• Overlap each path by 2 inches.
Figure 1
• Connect accessory hose to hose coupler
(fig 1) and hose port (fig 2) located at front of
machine.
• Connect accessory tool to coupler and hose
cuff on the other end of the hose (fig 3).
• Turn main power switch on.
• To clean stairs or upholstery, squeeze trigger
on accessory tool to release solution.
Release trigger and continue to pull tool
over surface to pick up excess solution.
Note: When cleaning upholstery, always
check cleaning instructions sewn in
furniture by the manufacturer.
• After cleaning, squeeze trigger for ve
seconds after turning main power switch off
to relieve water pressure from tool before
disconnecting hose.
Figure 1
Figure 2
• Work away from outlet and power cord to
prevent cord damage.
• Periodically check for excessive foam
buildup in recovery tank.
Attention: Excessive foam buildup will not
activate the float shut-off screen.
• If brush stops, the circuit breaker may have
been tripped. Unplug power cord and
check brush for obstruction. Push brush
reset button to resume (fig 2).
Figure 2
• To clean heavily soiled areas, repeat cleaning
path from a different direction.
• When the unit is no longer dispensing
cleaning solution or the recovery tank is
full, empty the recovery tank and fill
solution tank (see “Draining Tanks”).
Figure 3
Page 6

8
9
Maintenance Maintenance
Draining Tanks
For Safety: When servicing machine, unplug
cord from wall outlet.
Draining recovery tank
• Turn machine off and unplug power cord.
• Hinge open cover, lift recovery tank out
and empty.
Note: Make sure to rinse out recovery tank
after each use. Do not use this tank to fill
machine with cleaning solution.
Draining solution tank
• Remove solution tank drain hose at rear of
machine and empty remaining solution
(fig 1).
• Replace drain hose (g 2).
Figure 1
Figure 2
For Safety: When servicing machine, unplug
cord from wall outlet.
Regular Maintenance Tips
• Empty and rinse out recovery tank
thoroughly.
• Remove oat shut-off screen from hinged
cover above the recovery tank cover and
clean (fig 1).
• Drain remaining water from solution tank
(see “Draining Tanks”).
Figure 1
• Clean solution tank external lter.
(see “Filter Maintenance”).
• Remove any entangled carpet bers and
debris from brushes underneath machine
(fig 2).
Filter Maintenance
To clean the external filter, remove the
recovery tank and locate the filter. Remove
the filter screws, grasp the inner handles and
pull out the filter (fig 3). Rinse the filter inside
and out. You can then replace the filter by
snapping the filter back into the solution tank
and reattaching the screws.
• Remove any debris lodged in nozzle.
• Wipe off power cord and check for damage,
replace if necessary. Coil cord neatly
around cord hooks after use.
Figure 3
Figure 2
Page 7

10
11
Problem
Cause
Solution
Machine does not operate
Brush motor does not operate
Solution pump does not operate
Poor solution pick-up
Extractor not plugged in
Plug in unit.
Main on/off switch not turned to the on
position.
Turn machine on.
Building circuit breaker tripped.
Unplug machine from wall outlet.
Check and reset circuit breaker in
building. Plug in machine and turn on
to operate. If building circuit breaker
trips again, discontinue use.
Brush motor circuit breaker tripped.
Let motor cool and reset brush motor
breaker button at rear of machine.
Solution pump circuit breaker tripped.
Let pump cool and reset pump
breaker button at rear of machine.
Button on handle not pushed.
Push solution button on handle.
Pulling machine too fast.
Slow down cleaning process.
Clogged float shut-off screen.
Open recovery tank cover and clean
lint off screen.
Accessory tool vacuum hose port cover
is loose or missing.
Check vacuum hose port cover.
Any other service should be done by an Authorized Service Representative.
Service 1-888-6-RICCAR
To locate your nearest retailer, visit our website at www.riccar.com
Service 1-888-6-RICCAR
Problem Solving Guide Problem Solving Guide
Problem
Cause
Solution
If machine is leaking
If you hear a louder,
higher-pitched motor noise
There is no fluid in the clear drain
hose, or there is no solution on
your carpet
If there is no solution on your
carpet
The drain hose is loose.
Check to ensure the solution tank
drain hose (clear tube) is securely
connected.
Solution tank is empty.
Empty recovery tank, refill solution
tank and make sure the ball in the
float shut-off screen is moving freely,
not jammed.
Solution tank is low or empty.
Refill the solution tank.
The two spray tips on the bottom of the
extractor are clogged.
Locate the two spray nozzles on the
bottom of the machine (they are
located up and behind the brushroll).
Rotate each nozzle 1/4 turn, and pull
the nozzle off the machine. Poke a
straight pin through the hole to unclog
the tip. Remove debris. Rinse nozzle,
then reattach.
Any other service should be done by an Authorized Service Representative.
Service 1-888-6-RICCAR
To locate your nearest retailer, visit our website at www.riccar.com
Service 1-888-6-RICCAR
Troubleshooting
Please check each item below if you have trouble with the carpet extractor.
Unplug the carpet extractor from the power supply before servicing.
Helpful Hints
Please check each item below if you have trouble with the carpet extractor.
Unplug the carpet extractor from the power supply before servicing.
Page 8

12
13
Owner’s Information (keep this for your records)
Warranty
The model and serial number of this product may be found on the back of the unit. You
should note the model and serial number of your carpet extractor in the spaces provided
below, and retain this book as a permanent record of your purchase.
Date of purchase __________________________________________________
Serial number __________________________________________________
Model number __________________________________________________
Purchased from:
Store name __________________________________________________
Address __________________________________________________
City, State, Zip __________________________________________________
Telephone __________________________________________________
What is Covered:
This warranty covers any defects in material and workmanship in your new
Riccar carpet extractor and applies exclusively to the original purchaser.
How Long Coverage Lasts:
Warranty coverage for the Riccar carpet extractor lasts two years. Warranty
for the Riccar extractor tanks lasts ten years.
What is Not Covered:
• Damage to the extractor which occurs from neglect, abuse, alterations,
accident, misuse or improper maintenance.
• Normal replacement items: cords and lters.
What Riccar Will Do:
This warranty provides, at no cost to you, all labor and parts to place this
carpet extractor in correct operating condition during the warranted period.
How to Get Service:
Warranty service can only be obtained by presenting the extractor to an
Authorized Riccar Retailer. A proof-of-purchase and product serial number
will be required before service is rendered. To locate your nearest Riccar
Retailer, please call 1-888-6-RICCAR or visit the Riccar website at
www.riccar.com.
Specifications
Model: RCE
Rating: 120V/60Hz
Amps: 12
THIS WARRANTY IS EXCLUSIVE AND IN LIEU OF ANY AND ALL OTHER
WARRANTIES WHETHER WRITTEN, ORAL, EXPRESSED OR IMPLIED,
(INCLUDING ANY WARRANTY OF MERCHANTABILITY OR FITNESS FOR
A PARTICULAR PURPOSE). THIS WARRANTY DISCLAIMS LIABILITY FOR
INCIDENTAL, OR CONSEQUENTIAL DAMAGES.
How State Law Applies:
This warranty gives you specific legal rights, and you may also have other
rights which vary from state to state.
Page 9

14
15
Notes Notes
Page 10

www.riccar.com
16
RCE-MANUAL©2008 Tacony Corporation
 Loading...