

Page 1
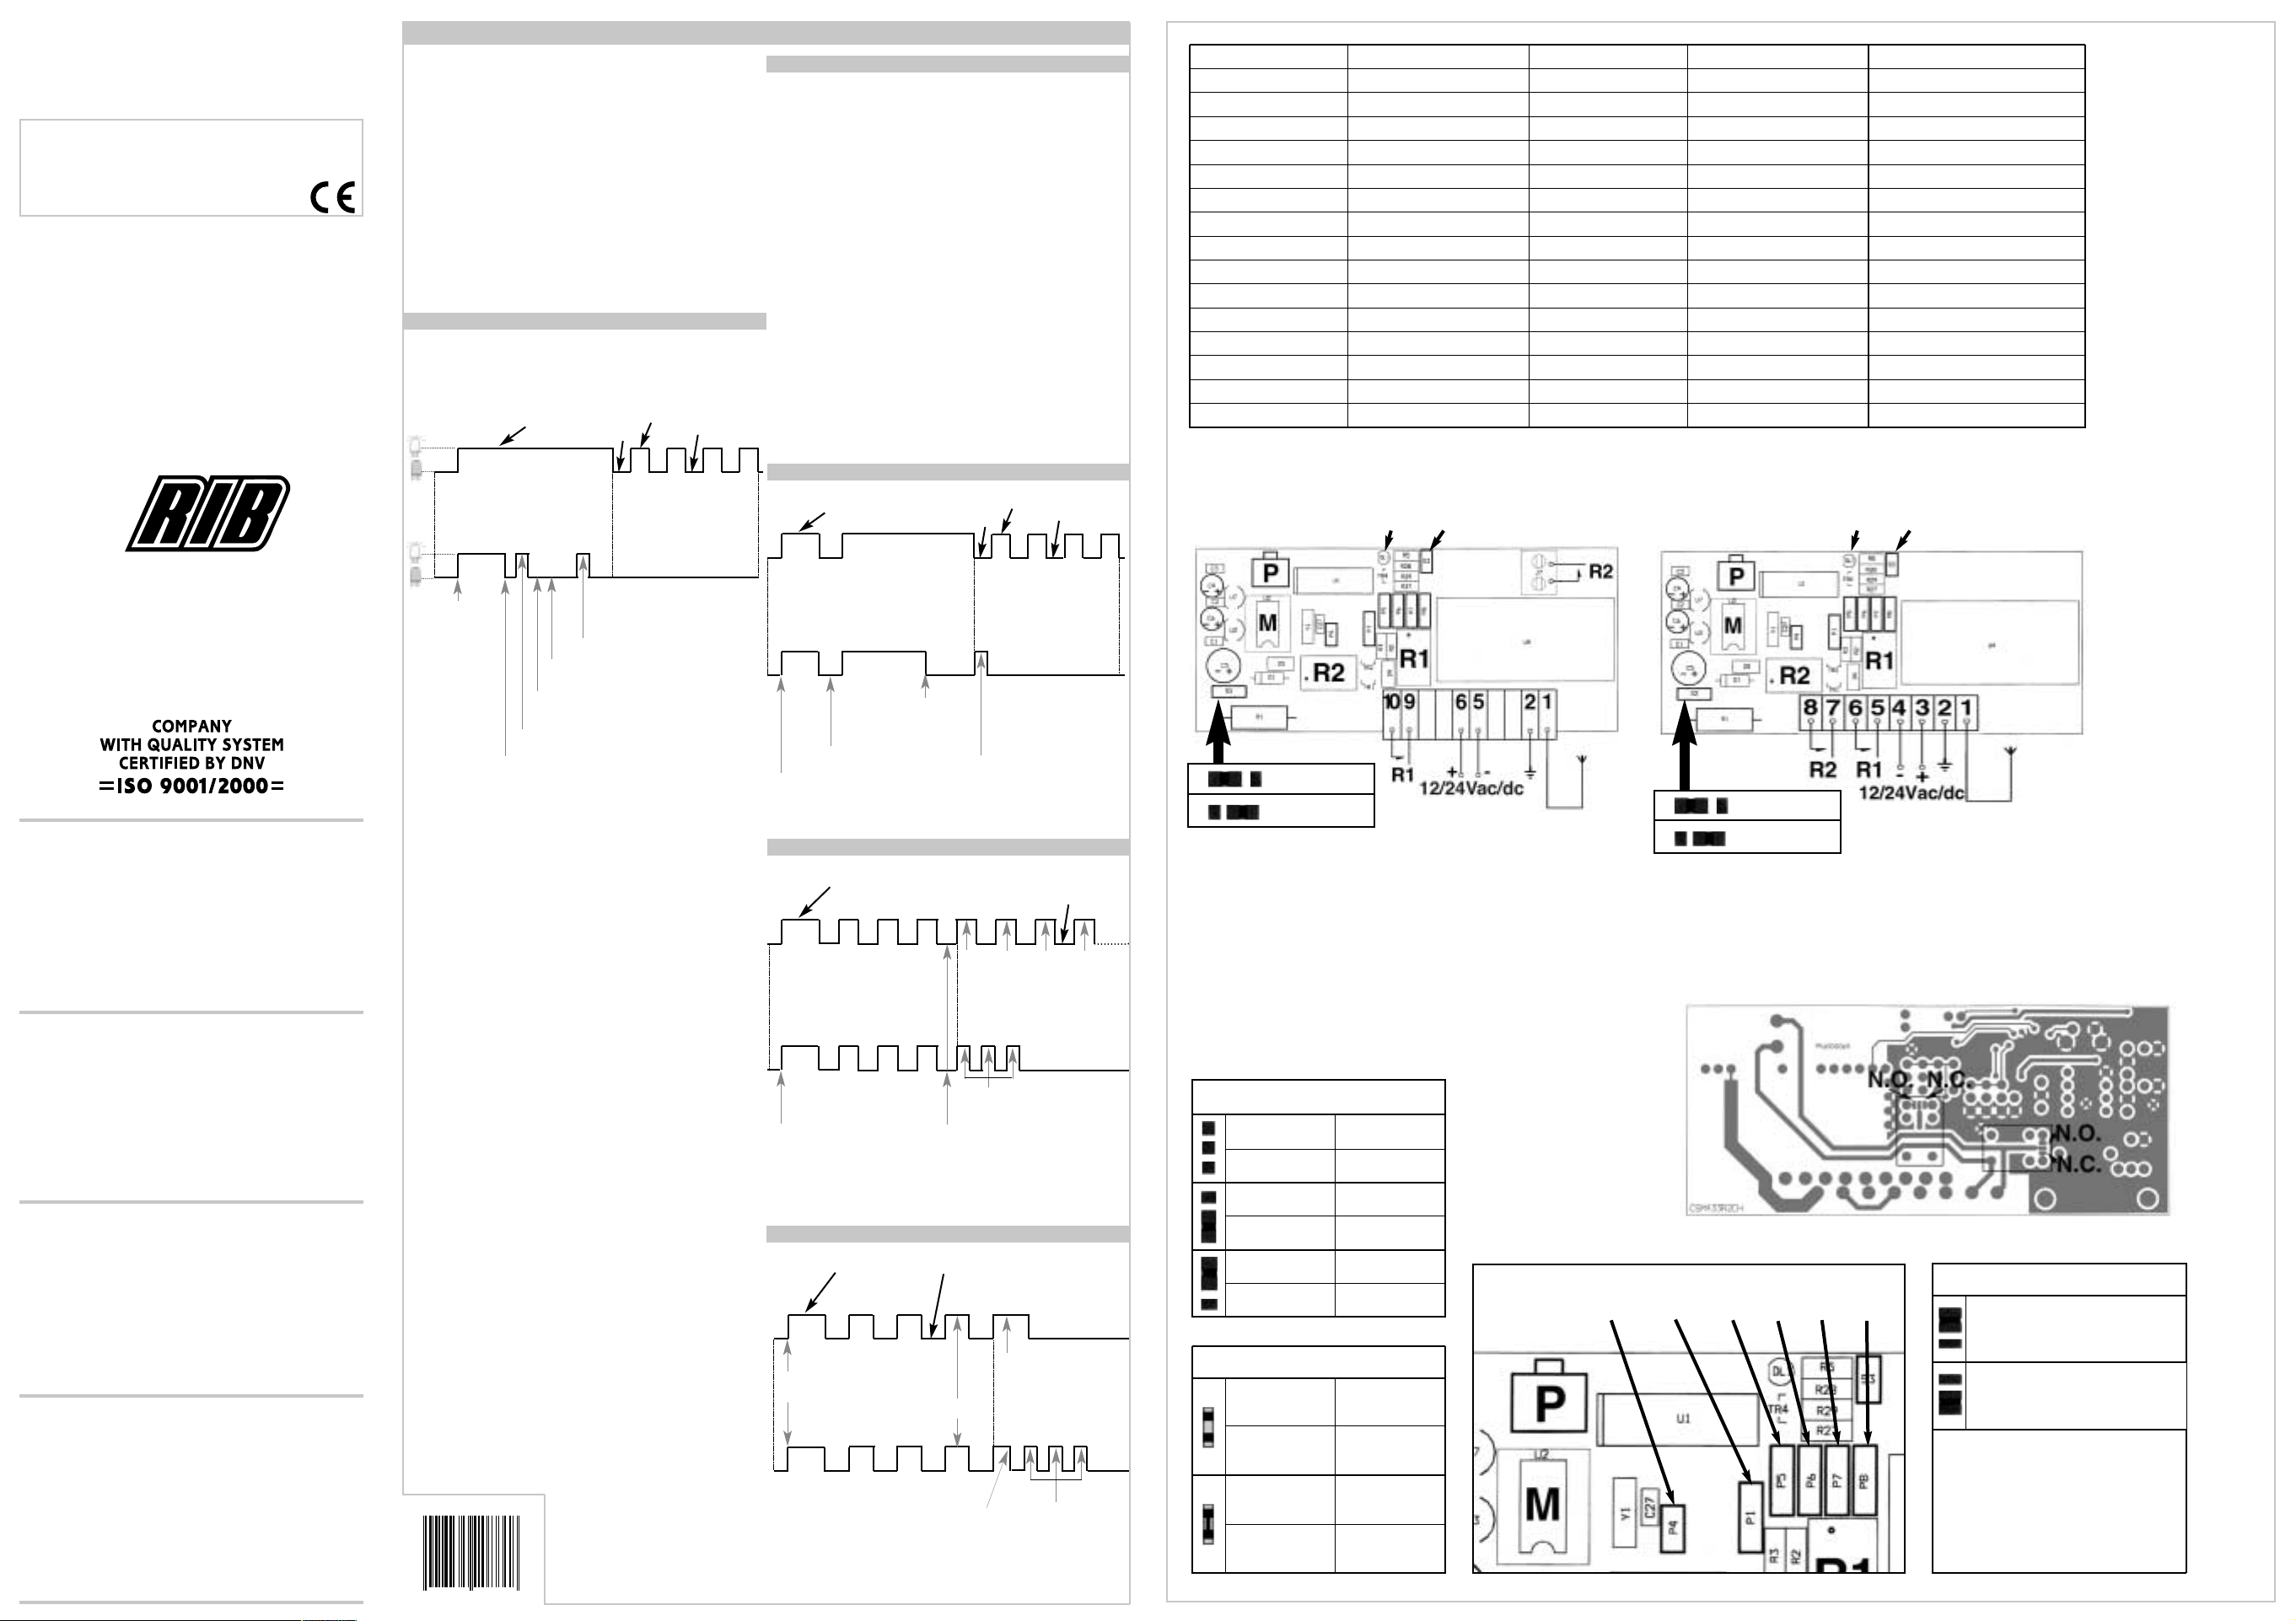
VISTA LATO COMPONENTI
L - Led
M - Memoria
P - Pulsantino
R1 - Relé 1
R2 - Relé 2
VUE COTE COMPOSANTS
L - Led
M - Mémoire
P - Bouton-poussoir
R1 - Relais 1
R2 - Relais 2
COMPONENTS SIDE
L - Led
M - Memory
P - Push button
R1 - Relay 1
R2 - Relay 2
BAUTEILSEITE
L - Led
M - Speicher
P - Drucktaster
R1 - Relais 1
R2 - Relais 2
RELAY SELECTION
MEMORIZZAZIONE E
CANCELLAZIONE
AUTORIZZATE
MEMORISATION ET
EFFACEMENT
AUTORISES
BLOCCO
MEMORIZZAZIONE E
CANCELLAZIONE
TOTALE
BLOCAGE TOTAL DE
MEMORISATION ET
EFFACEMENT
AUTHORIZED
DELETION AND
MEMORIZATION
ZULÄSSIGES
SPEICHERN UND
LÖSCHEN
TOTAL DELETION AND
MEMORIZATION
DISABLED
SPERRE
SPEICHERN
UND LÖSCHEN
P1
MEMORIA
15 CODICI
MEMORIA
250 CODICI
MEMORIA
1000 CODICI
MEMOIRES
15 CODES
MEMOIRES
250 CODES
MEMOIRES
1000 CODES
15-CODE
MEMORY
250-CODE
MEMORY
1000-CODE
MEMORY
SPEICHER
15 CODES
SPEICHER
250 CODES
SPEICHER
1000 CODES
CARATTERISTICHE TECNICHE
FREQUENZA RICEZIONE
FREQUENZA INTERMEDIA
IMPEDENZA INGRESSO
SENSIBILITÀ
ALIMENTAZIONE
ASSORBIMENTO A RIPOSO
ASSORBIMENTO CH ATTIVO
DECODIFICA
N° CANALI
CONTATTO RELÉ
TEMPO ECCITAZIONE
TEMPO DISECCITAZIONE
TEMPERATURA DI LAVORO
DIMENSIONI
PESO
CARACTERISTIQUES TECHNIQUES
FREQUENCE DE RECEPTION
FREQUENCE INTERMEDIAIRE
IMPEDANCE D’ENTREE
SENSIBILITE
ALIMENTATION
CONSOMMATION AU REPOS
CONSOMMATION CH ACTIF
DECODAGE
NOMBRE DE CANAUX
CONTACT RELAIS
TEMPS D’EXCITATION
TEMPS DE DESEXCITATION
RESISTANCE A LA TEMPERATURE
DIMENSIONS
POIDS MAXIMUN
TECHNICAL DATA
RECEPTION FREQUENCY
INTERMEDIATE FREQUENCY
INPUT IMPEDANCE
SENSITIVITY
POWER SUPPLY
ABSORPTION AT REST
ABSORPTION WITH CH ACTIVE
DECODIFY
N. CHANNELS
RELAY CONTACT
EXCITATION TIME
DE-EXCITATION TIME
OPERATING TEMPERATURE
DIMENSIONS
WEIGHT
TECHNISCHE EIGENSCHAFTEN
EMPFANGSFREQUENZ
MITTLERER FREQUENZBEREICH
EINGANGSIMPEDANZ
EMPFINDLICHKEIT
VERSORGUNG
AUFNAHME IM RUHEZUSTAND
AUFNAHME MIT AKTIVEM CH
DECODIERUNG
KANALANZAHL
RELAISKONTAKT
ANZUGZEIT
ABFALLZEIT
TEMPERATURWECHSELBESTÄNDIGKEIT
ABMESSUNGEN
GEWICHT
433-A
433,92 MHz
-
52 ohm
>2,24µV
12-24Vac/dc
15mA
25mA
RX433-A 2CH
cod.ACG5051 - c/m ACG5052
ATTENZIONE
1° - LEGGERE E SEGUIRE TUTTE LE ISTRUZIONI.
2° - Tenete i comandi dell'automatismo (pulsantiera, telecomando etc.) fuori dalla
portata dei bambini.
3° - Effettuare le operazioni di comando da punti ove l'automazione sia visibile.
4° - Utilizzare i telecomandi solo in vista dell'automazione.
5° - Questo libretto d'istruzioni è rivolto esclusivamente a del personale
specializzato.
LA DITTA RIB NON ACCETTA NESSUNA RESPONSABILITÀ per eventuali danni
provocati dalla mancata osservanza nell'installazione delle norme di sicurezza
attualmente in vigore.
ATTENTION
1° - LIRE ET SUIVRE TOUTES LES INSTRUCTIONS.
2° - Gardez les commandes de l'automatisme (boutons poussoirs, telecommande
etc.) hors de la portée des enfants.
3° - Il faut donner les commandes d'un lieu, où on peut voir l'automatisme.
4° - Il faut utiliser les émetteurs seulement si on voit le portail.
5° - Ce manuel d'instruction est adresse seulement au personnel specialisé.
L'enterprise R.I.B. n'accepte aucune responsabilité pour des dommages eventuels
provoqués par le manque d'observation lors de l'installation des normes de securité
actuellement en vigueur.
ATTENTION
1° - READ AND FOLLOW ALL THE INSTRUCTIONS.
2° - Keep the automatism controls (push-button, remote control, etc) out of the reach
of children.
3° - Command pulses must be given from sites, where You can see the gate.
4° - Use transmitters only if You can see the gate.
5° - This instruction booklet is for specialized personnel only.
R.I.B. accepts no responsibility for any damage caused by the safety regulations at
present in force not being observed during installation.
ACHTUNG
1° - LESEN UND BEFOLGEN SIE AUFMERKSAM ALLE ANWEISUNGEN.
2° - Bewahren Sie die Geräte für die automatische Steuerung (Drucktaster,
Funksender, u.s.w.) an einem für Kinder unzugänglichen Platz auf.
3° - Die Betätigung der automatischen Steuerungs soll nur ausgeführt werden wenn
die automatische Anlage sichtbar ist.
4° - Die Funksender nur inn den Fällen benützen wenn die automatische Anlage
sichtbar ist.
5° - Diese Montageanweisung kann ausschließlich von der Fachleuten
gebraucht werden.
Die Firma R.I.B. haftet nicht für eventuelle Schäden, die bei der Installation durch
Nichtbeachtung der zur Zeit gültigen Sicherheitsvorschriften entstanden sind.
ITALIANO
LATO SALDATURE - COTE SOUDURES
WELDING SIDE - LÖTSEITE
BREVETTATO - BREVETE - PATENTED - PATENTIERT
SOSTITUZIONE MEMORIA CON CAPACITÀ MAGGIORE
Il ricevitore nella versione standard viene fornito di una memoria con
capienza di 15 codici. Per avere una memoria con capacità maggiore
dovete sostituire al posto del componente standard “M”, presente sul
ricevitore, un componente che viene fornito optional con capacità di 250
codici (cod. CET91070) o di 1000 codici (cod. CET91080).
Per far ciò seguite questa procedura:
1° Togliete tensione ed estraete il ricevitore dal connettore sulla
centralina e selezionate il tipo di memoria che volete utilizzare
(ponticello “P1”).
2° Estraete la memoria dal relativo zoccolo facendo attenzione alla tacca
di riferimento.
3° Inserite la nuova memoria facendo attenzione alla tacca di riferimento.
4° Inserite il ricevitore nel connettore dopo di che inserite la tensione.
5° Eseguite una cancellazione di tutti i codici ripulendo la memoria da
eventuali codici inseriti.
6° Seguite la normale procedura di memorizzazione dei codici.
N.B.: In caso rimettendo in funzione il ricevitore, il led rimanga acceso,
verificate che la memoria sia montata correttamente.
Il ricevitore necessita di un'antenna altrimenti la portata si riduce a pochi
metri. L'antenna deve essere installata il più in alto possibile.
É possibile utilizzare un contatto normalmente aperto (n.o.) oppure uno
normalmente chiuso (n.c.) eseguendo una saldatura sui ponticelli, sul
lato saldature, come indicato nello schema di Fig.1. Il ricevitore viene
fornito di serie con contatto normalmente aperto (n.o.).
DIGITAL
2
0,5A 125V
300mS
300mS
-10 ÷ +55°C
96x43x20
28÷36g
24Vac/dc
12Vac/dc
PER OTTENERE UN CORRETTO
FUNZIONAMENTO DEL
RICEVITORE, I CAMBIAMENTI
ALLA DISPOSIZIONE DEI
PONTICELLI DEVONO ESSERE
ESEGUITI IN ASSENZA DI
TENSIONE
AFIN D’OBTENIR UN
FONCTIONNEMENT CORRECT
DU RECEPTEUR, LES
CHANGEMENTS DE POSITION
DES PONTETS DOIVENT ETRE
REALISES HORS TENSION.
TO OBTAIN THE CORRECT JOB
OF THE RECEIVER THE
POSITION OF THE JUMPER HAS
TO BE CHANGED ONLY IN
ABSENCE OF POWER SUPPLY.
FÜR DIE RICHTIGE ARBEIT DES
EMPFÄNGERS, BEI
VERÄNDERUNG DER
STELLUNG DES JUMPERS
SPANNUNG ABTRENNEN .
R
ICEVITORECONCONNETTORE
- R
ECEPTEURAVECCONNECTEUR
R
ECEIVERWITHCONNECTOR
- E
MPFÄNGERMITVERBINDER
R
ICEVITORECONMORSETTIERA
- R
ECEPTEURAVECBORNIER
R
ECEIVERWITHPLUG
- E
MPFÄNGERMITKLEMMENLEISTE
P4
CANCELLAZIONE SINGOLO CODICE RADIO
VERIFICA NUMERO DI CODICI INSERITI
0,5s
0,5s
Led spento
CANCELLAZIONE TOTALE DEI CODICI RADIO INSERITI
10s tempo utile per
trasmettere il codice da
cancellare col
telecomando
Questi 4 lampeggi indicano il
termine del tempo concesso
alla cancellazione del singolo
codice.
Codice non cancellato
Il codice cancellato sarà
segnalato da un
lampeggio, se trasmesso.
2s
0,5s
2s
0,5s
Conferma codice cancellato
Trasmesso codice da
cancellare
Premere pulsante P e
mantenere premuto
Rilasciare pulsante P
Led acceso
2s
2s
0,5s
1° 2°
ecc.
Altri
codici
inseriti
3°
0,5s
1° 2° 3°
Premere pulsante P e
mantenere premuto
Led acceso
Led spento
3 lampi = Nessun codice
inserito o Memoria vuota
3 lampi = Conferma
memoria vuota
Pulsante P premuto per
un’istante
1° codice
Rilasciare pulsante P
dopo 3° lampeggio
2° codice
3° codice
4° codice
2s
2s
0,5s
0,5s
1°
2°
3°
2s
0,5s
0,5s
1°
2°
3°
1°
2°
3°
Tempo utile per premere il
pulsante P e cancellare
tutti i codici
Mancata conferma
cancellazione
Rilasciare pulsante P
Premere pulsante P e
mantenere premuto
Led acceso
Led spento
APPRENDIMENTO CODICI
N.B.: In caso di errori nella procedura di utilizzo del pulsante, ripetere
l’operazione dopo aver eseguito un RESET inserendo e disinserendo
per 1 secondo il Jumper.
10s tempo utile per trasmettere
il codice da memorizzare col
telecomando
Questi 4 lampeggi indicano il
termine del tempo concesso
alla memorizzazione dei codici.
Apprendimento codice non
eseguito.
Apprendimento codice eseguito.
Un successivo inpulso del
telecomando azionerà il relé.
tempo?
250ms
250ms codice appreso
0,5s
0,5s
Trasmissione codice
250ms conferma codice
Premete il pulsante
P e rilasciatelo
immediatamente
4 secondi di tempo a disposizione per
trasmettere la conferma del codice radio
Led acceso
Led spento
SEGNALAZIONI LED
1 Lampeggio* = Segnale non valido
1 Lampo** = Codice memorizzato o cancellato secondo la
procedura scelta.
2 Lampeggi = Codice già presente
2 Lampi = Segnali radio sovrapposti durante la registrazione.
Cancellare il codice e reinserirlo.
3 Lampeggi = Memoria satura (max 15 codici se trasmissione
standard)
3 Lampi = Memoria vuota, nessun codice inserito.
4 Lampeggi = Termine tempo utile per memorizzare o cancellare un
singolo codice.
4 Lampi = Si vuole cancellare un codice non presente in memoria
10 Lampi = Memorizzazioni bloccate
* Lampeggio: accensione led per 0,50 secondi
**Lampo: accensione led per 0,25 secondi
RESET - Ogni volta che si effettua un cambiamento della
configurazione eseguite un reset ponticellando i due pin segnalati
nello schema.
Prima di alimentare il ricevitore controllate che il ponticello di
cambio tensione sia impostato sulla tensione desiderata. Se così
non fosse agite come indicato nello schema per selezionare il nuovo
valore di tensione desiderato.
APPRENDIMENTO CODICI
Il ricevitore riconosce un determinato numero di codici da Voi registrati
nella sua memoria utilizzando la procedura di “autoapprendimento”.
Questa procedura si attiva agendo sul pulsantino “P” presente sul
ricevitore.
RESET
L
P5 P6 P7 P8
P4 P1
24Vac/dc
12Vac/dc
RESET
L
P5 => CHANNEL A
P6 => CHANNEL B
P7 => CHANNEL C
P8 => CHANNEL D
RELE 1
RELE 2
fermare la trasmissione
ACG5051 ACG5052
Fig.1
25014 CASTENEDOLO (BS)-ITALY
Via Matteotti, 162
Telefono ++39.030.2135811
Fax ++39.030.21358279-21358278
e-mail: [email protected]
Web Address: http://www.ribind.it
ISTRUZIONI PER L'USO
INSTRUCTIONS POUR L'UTILISATION
OPERATING INSTRUCTIONS
BEDIENUNGSANLEITUNGEN
Dichiariamo sotto la nostra responsabilità che questo prodotto è
conforme alle seguenti norme e Direttive
Le fabricant certifie en engageant sa seule responsabilité que les
produit est conforme aux Normes et Directives ci-dessous:
We declare, on our own responsibility, that this product comply with
the following standards and Directives
Wir erklären unter unserer Verantwortung, daß dieses Produkt mit
den folgenden Standards und den Richtlinien übereinstimmen
1999/5/CE
CVA1735 - 01062004 - Rev. 01
®
automatismi per cancelli
automatic entry systems
8 028265 108868 >
Page 2
REMPLACEMENT MEMOIRE DE CAPACITÉ SUPERIEURE
Le récepteur de la version standard est équipé d’une mémoire pouvant
contenir 15 codes. Pour obtenir une mémoire de capacité supérieure,
l’installateur devra remplacer le composant standard “M” qui se trouve
dans le récepteur par un composant fourni sur demande, contenant 250
codes (code CET91070) ou 1000 codes (code CET91080).
Dans ce but, procédez de la façon suivante:
1) Mettez hors tension et sortez le récepteur du connecteur sur le
dispositif central et sélectionnez le type de mémoire que vous désirez
utiliser (pontet P1).
2) Sortez la mémoire de son socle en faisant attention a l’encoche de
référence.
3) Introduisez la nouvelle mémoire, en faisant attention a l’encoche de
référence.
4) Introduisez le récepteur dans le connecteur, puis remettez sous
tension.
5) Effectuez un effacement de tous les codes en vidant la memoire de
codes eventuellement inserrés.
6) Suivez la procédure normale de mémorisation des codes.
N.B.: Si, lorsque vous remettez en marche le récepteur, la LED reste
allumée, assurez-vous que la mémoire a été correctement
installée.
Le récepteur nécessite une antenne, sinon la portée est réduite à
quelques mètres. L’antenne doit être installée en position verticale.
On peut utiliser un contact normalement fermé (n.f.) ou normalement
ouvert (n.o.) en agissant sur le pontet, comme indiqué dans le schéma
Fig.1. Le récepteur est fourni de serie avec un contact normalement
ouvert (n.o.)
REPLACING MEMORY FOR GREATER CAPACITY
The standard version receiver is provided with a memory having a 15code capacity.
To increase this capacity, You should replace the standard component
“M” on the receiver with the optional 250-code (code CET91070) or 1000code (code CET91080) component.
To do so, follow this procedure :
1) Switch off power, extract the receiver from the connector on the control
box and select desired memory capacity (jumper P1).
2) Remove the memory module from its base, checking the reference
slot.
3) Insert the new memory module correctly with reference to the slot.
4) Insert the receiver into the connector, then switch power back on.
5) Delete all the codes from the memory.
6) Follow the normal code-memorisation process.
N.B. If the indicator LED stays “ON” when the receiver is operating,
check that the memory module has been fitted correctly.
The receiver requires an antenna; otherwise its range is reduced to a few
meters. The antenna must be installed in a vertical position as high as
possible.
Either a normally closed (n.c.) or normally open (n.o.) contact may be
used, soldering contacts, as shown in the diagram Fig.1.
The receiver is generally supplied with a normally open contact.
SPEICHERERWEITERUNG
Der Standardspeicher des Empfängers unterstützt maximal 15 Codes.
Zur Erweiterung dieser Kapazität muß der Installationstechniker das
Standard-Bauteil “M” am Empfänger durch ein Zubehörteil mit Kapazität
für 250 (Art.Nr. CET91070) oder 1000 Codes (Art.Nr. CET91080)
ersetzen.
Hierzu folgendermaßen verfahren:
1.) Spannung abtrennen, Empfängerverbinder von Steuerung abstecken
und gewünschten Speichertyp anwählen (Jumper P1).
2.) Speicher aus dem Anschlußsockel herausziehen, hierbei auf die
Bezugsmarke achten.
3.) Neuen Speicher einstecken und hierbei auf die Bezugsmarke achten.
4.) Empfänger an Verbinder anschließen und daraufhin Spannung
geben.
5.) Alle in Speicherung abgelegten Codes löschen.
6.) An dieser Stelle die normale Speicherprozedur durchführen.
Merke: Sollte die Led nach Inbetriebnahme des Empfängers weiterhin
aufleuchten, den korrekten Speichereinbau überprüfen.
Für den Empfängerbetrieb ist eine Antenne erforderlich, da die
Reichweite sonst auf wenige Meter schrumpft.
Größtmögliche Einbauhöhe der Antenne auswählen.
Empfänger sind mit Öffner ausgestattet.
Gemäß Übersicht läßt sich durch Lötung des Jumpers ein Öffner bzw.
Schließer verwenden Fig1.
FRANÇAISE DEUTSCH
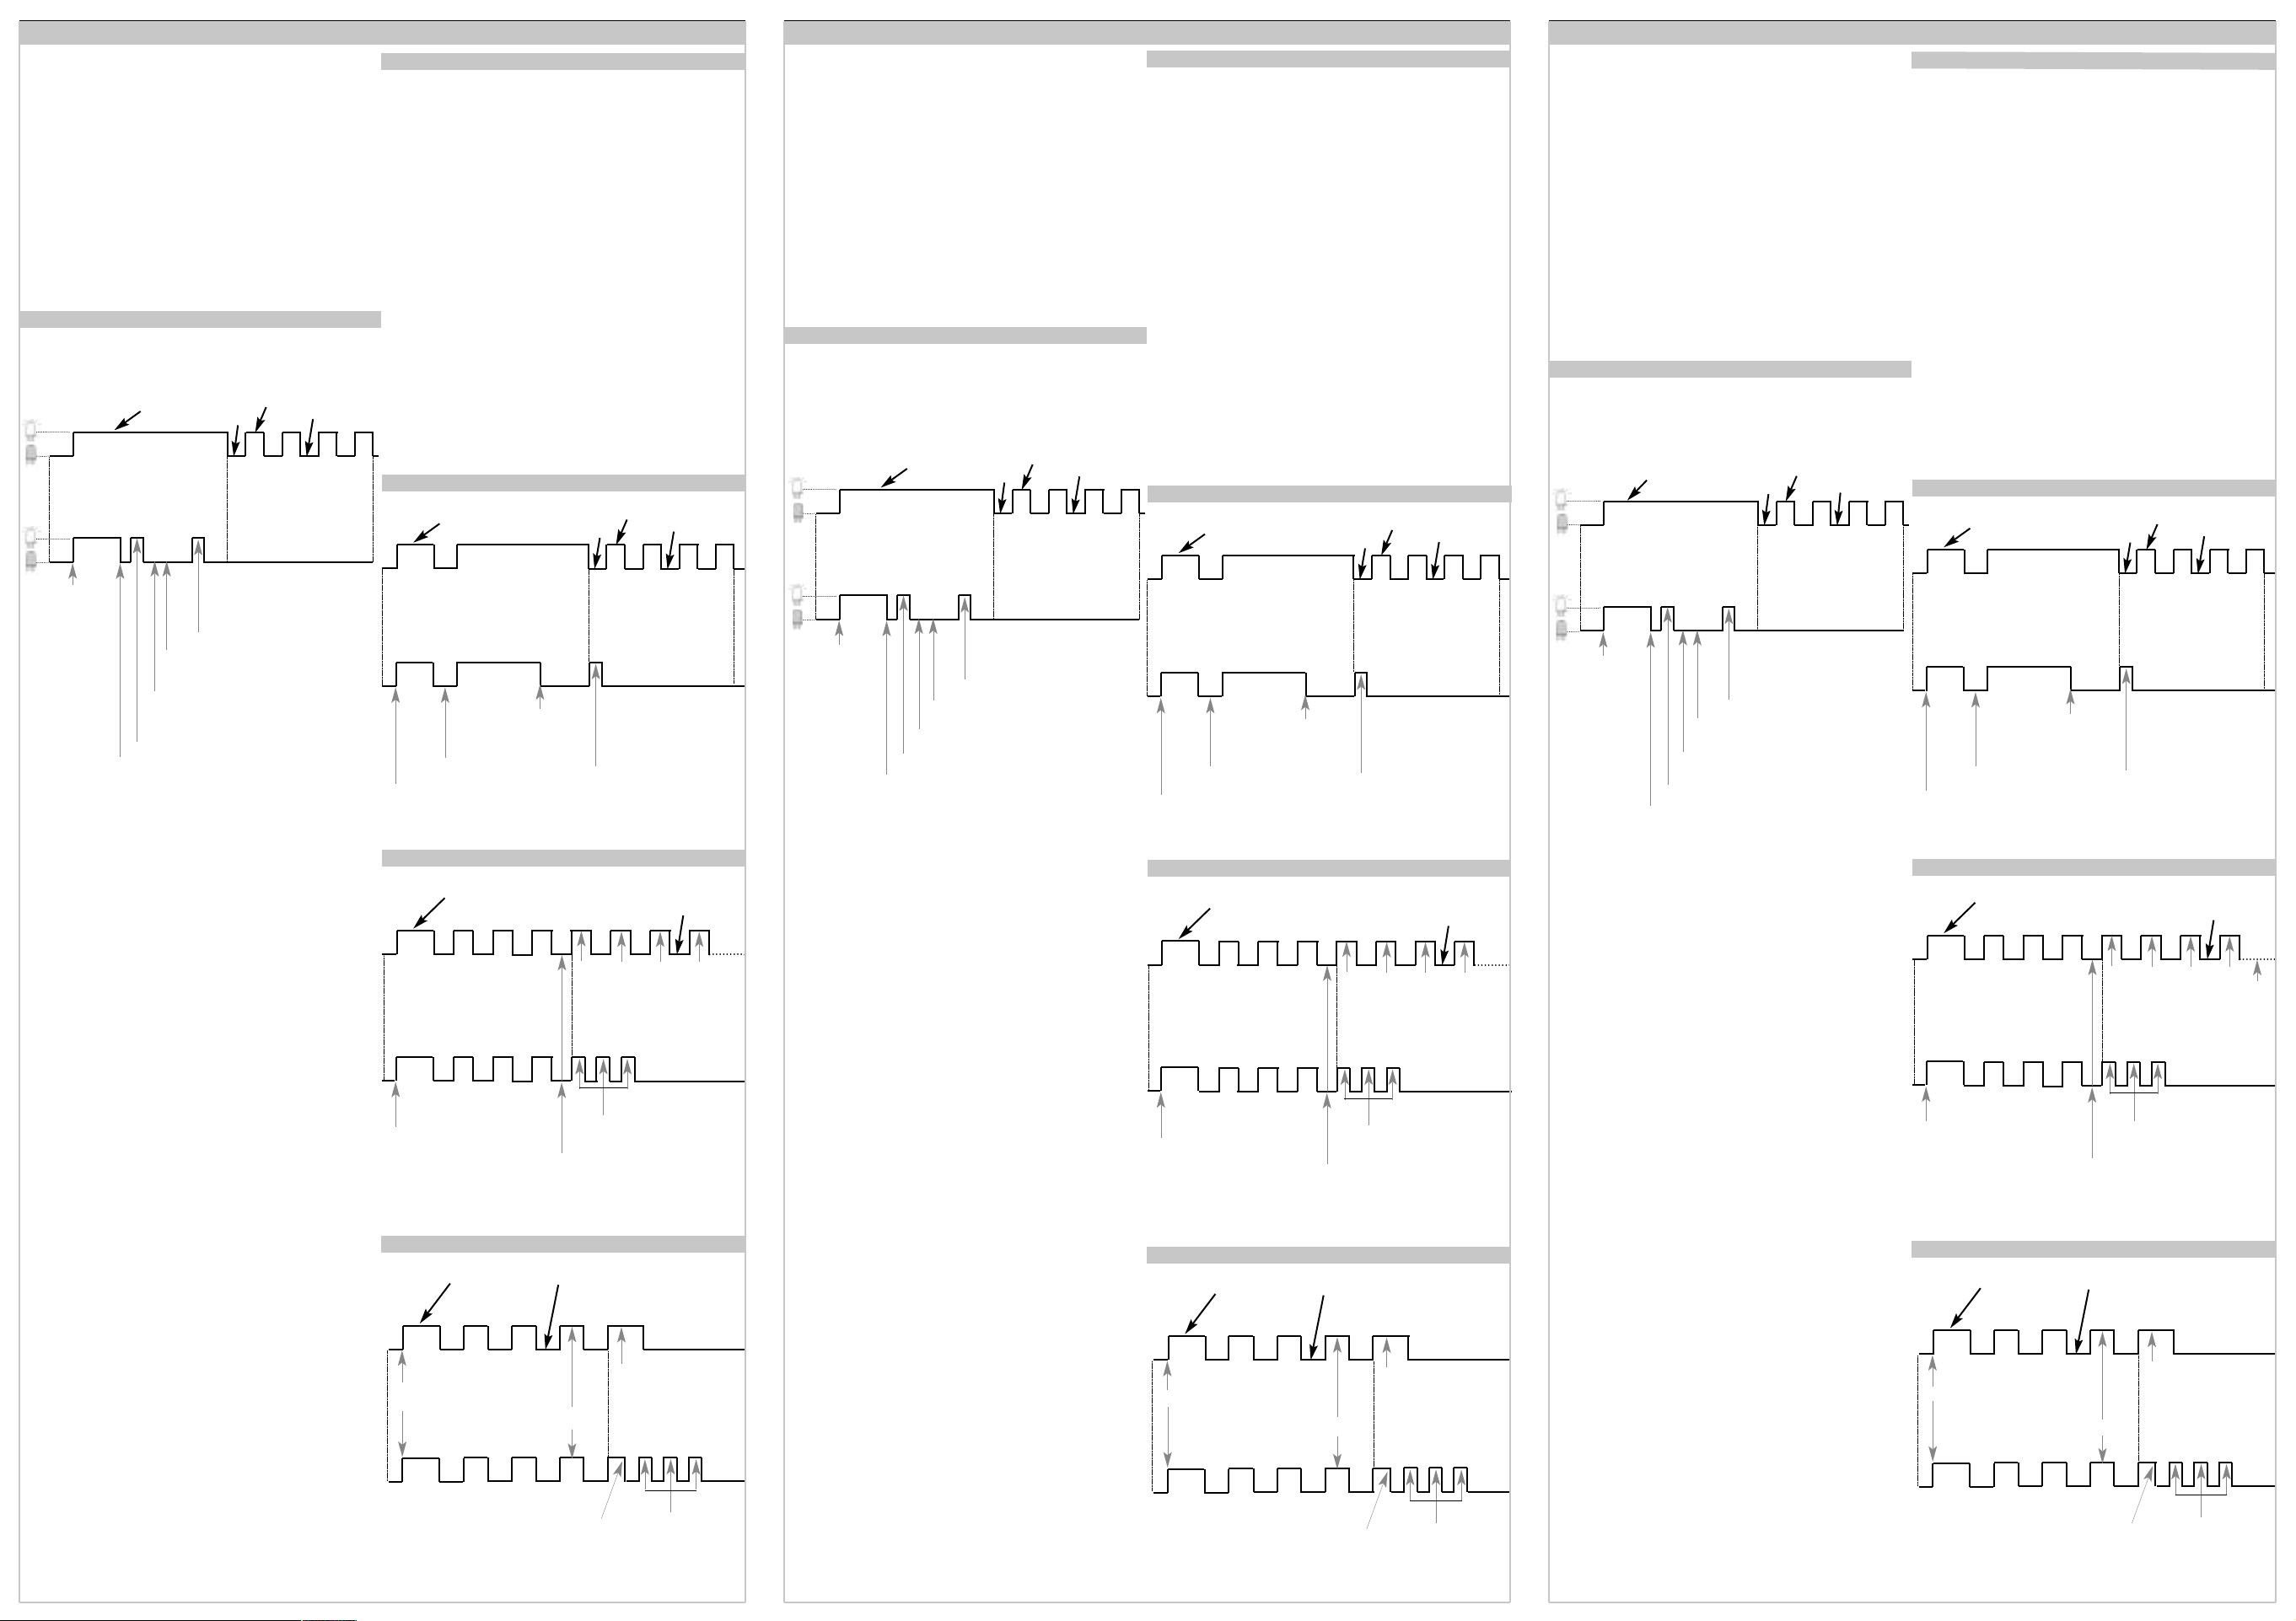
EFFACEMENT D’UN CODE RADIO
VERIFICATION DU NOMBRE DE CODES RADIO SAISIS
0,5s
0,5s
Led éteinte
EFFACEMENT TOTAL DES CODES RADIO SAISIS
10s de temps utile pour
transmettre le code à
effacer avec la
télécommande
Ces 4 clignotements indiquent
que le temps admis pour
l’effacement des codes est
écoulé.
Code non effacé.
Le code effacé sera
signalé par un
clignotement, si transmis.
2s
0,5s
2s
0,5s
Confirmation code effacé
Transmission du code à
effacer
Appuyer sur le poussoir P et le
mantenir enfoncé
Relâcher le poussoir
Led allumée
2s
2s
0,5s
1° 2°
etc.
Autres
codes
entrés
3°
0,5s
1° 2° 3°
Appuyer sur le poussoir P et le
mantenir enfoncé
Led allumée
Led éteinte
3 flashes = Aucun code saisis
ou Mémoire vide
3 flashes = Mémoire vide
Poussoir P enfoncé un
instant
1er code
Relâcher le poussoir P apres le
3ème clignotement
2e code
3e code
4e code
2s
2s
0,5s
0,5s
1°
2°
3°
2s
0,5s
0,5s
1°
2°
3°
1°
2°
3°
Temps utile pour la pression du
poussoir P et pour effacer tous
les codes
Confirmation
d’effacement non
réussie
Relâcher le poussoir P
Appuyer sur le poussoir P
et le mantenir enfoncé
Led allumée
Led éteinte
SINGLE RADIO CODE CANCELLATION
CHECK OF RADIO CODES ENTERED
0,5s
0,5s
Led off
CANCELLATION OF ALL RADIO CODES ENTERED
10 second time interval to
transmit code to be
cancelled by means of
remote control
4 long flashes indicate end of
time allowed for cancellation of
single code.
Code no cancelled.
The cancelled code will
be indicated by one long
flash
2s
0,5s
2s
0,5s
Code cancellation confirmation
Code to cancel
transmitted
Keep P pressed
Release P
Led on
2s
2s
0,5s
1° 2°
etc.
Other
codes
entered
3°
0,5s
1° 2° 3°
Keep P pressed
Led on
Led off
3 short flashes = No code
entered or memory empty
3 short flashes =
Memory empty
confirmation
Press P briefly
code 1
Release P after the third long flash
code 2
code 3
code 4
2s
2s
0,5s
0,5s
1°
2°
3°
2s
0,5s
0,5s
1°
2°
3°
1°
2°
3°
Time interval to press
pushbutton P and cancel
all codes
No cancel
confirmation
Release P
Keep P pressed
Led on
Led off
LÖSCHEN EINES EINZELNEN FUNKCODES
ÜBERPRÜFUNG DER NUMMER DER EINGEGEBENEN CODES
0,5s
0,5s
Led ausgeschaltet
VOLLSTÄNDIGES LÖSCHEN DER EINGEGEBENEN FUNKCODES
10s nutzbare Zeit für die
Übertragung des mit der
Fernbedienung zu
löschenden Codes
Diese 4 Aufblinkvorgänge
signalisieren das Ende der für
die Speicherung der Codes
zugelassenen Zeit.
Code nicht gelöscht.
Der gelöschte Code wird
nach erfolgter
Übertragung durch ein
Aufblinken angezeigt.
2s
0,5s
2s
0,5s
Bestätigung des zu
löschenden Coden
Übertragung des zu
löschenden Codes
ausgeführt.
Taste P drücken und
gedrückt halten
Taste loslassen
Led eingeschaltet
2s
2s
0,5s
1° 2°
u.s.w.
Andere eingegebene
Codes
3°
0,5s
1° 2° 3°
Taste P drücken und
gedrückt halten
Led eingeschaltet
Led ausgeschaltet
3 Blitzvorgänge = Kein Code
eingegeben oder Speicher leer.
3 Blitzvorgänge =
Bestätigung für leeren
Speicher
Taste P für einen
Augenblick betätigt
1. Code
Taste P nach dem 3. Aufblinkvorgang
loslassen
2. Code
3. Code
4. Code
2s
2s
0,5s
0,5s
1°
2°
3°
2s
0,5s
0,5s
1°
2°
3°
1°
2°
3°
Nutzbare Zeit zur
Betätigung von Taste P
und Löschung sämtlicher
Codes
Fehlende
Bestätigung für
Löschvorgang
Taste P loslassen
Taste P drücken und
gedrückt halten
Led eingeschaltet
Led ausgeschaltet
APPRENTISSAGE DU CODE
N.B.: En cas d’erreurs dans la procédure d’utilisation du poussoir,
répéter l’opération après avoir effectué une RAZ en insérant et
désinsérant pendant 1s le cavalier.
10s de temps utile pour
transmettre le code à
mémoriser avec la
télécommande
Apprentissage du code non
effectué. Ces 4 clignotements
indiquent que le temps admis
pour la mémorisation des
codes est écoulé.
Apprentissage du code effectué.
Une impulsion successive de la
télécomande commandera le relais
temps?
250ms
250ms code appris
0,5s
0,5s
Transmission du code
250ms confirmation du code
Appuyer sur le
poussoir P et le
relâcher aussitôt.
4 s à disposition pour transmettre la
confirmation du code radio.
Led allumée
Led éteinte
SIGNALISATIONS DE LA LED
1 clignotement* : Le code reçu n’existe pas parmi ceux qui ont été
mémorisés
1 Éclair** : Le code reçu a été mémorisé
2 clignotements : Le nouveau code existe déjà dans la mémoire.
2 Éclairs : Différents signaux ont été reçus, pendant la
procédure d’apprentissage. Effacer le code et le
retaper.
3 clignotements : La mémoire est saturée (15 codes maximum si
transmission standard)
3 Éclairs : Aucun code n’est enregistré dans la mémoire.
4 clignotements : Fin du délai accordé pour effectuer la procédure
d’apprentissage ou d’effacement pour un code.
4 Éclairs : La procédure d’effacement indique que vous essayez
d’effacer un code qui n’existe pas dans la mémoire.
10 Éclairs : Mémorisations bloquées
*Clignotement : Led allumée pour 0,5s
**Éclair: Led allumée pour 0,25s
RADIO CODE ACQUISITION
N.B.: In the event of errors during the pushbutton operation
procedure, repeat the operation after resetting by wiring in Jumper
for 1 second and then removing.
10 second interval to transmit
code settings by means of
remote control.
4 long flashes indicate the end
of the time available to set
codes.
Code not acquired.
Code acquisition complete, the next
pulse from the remote control
activates relay
time?
250ms
250ms code acquired
0,5s
0,5s
Code transmission
250ms code confirmed
Press P and
release immediately
4 second time interval available to transmit
Led on
Led off
LED SIGNALS
1 long flash*: Code received is not present in memory.
1 SHORT FLASH**: Code received has been memorised.
2 long flashes: New code already exists in memory.
2 SHORT FLASHES: Different signals received during self-learning
procedure (repeat recording procedure) Cancel
code and re-enter.
3 long flashes: Memory saturated (max. 15 codes if standard
transmission).
3 SHORT FLASHES: No code is recorded in memory (after cancel total
memory or new receiver/circuit board).
4 long flashes: End of max. time for new-code self-learning
procedure (max. 10 secs).
4 SHORT FLASHES: During the delete procedure, indicates that code
requested for deletion does not exist in memory.
10 SHORT FLASHES:setting locked
*Long flash: Led ON for 0,5s
**Short flash: Led ON for 0,25s
LERNEN DER FUNKCODES
HINWEIS: Bei Fehlern bezüglich der Verwendung der Taste ist der
Vorgang nach Ausführung eines RESETS durch Ein- und Ausrücken
der Drahtbrücke für die Dauer von einer Sekunde zu wiederholen.
10s nutzbare Zeit für die
Übertragung des mit der
Fernbedienung zu den
Speicherncodes
Diese 4 Aufblinkvorgänge
signalisieren das Ende der für
die Speicherung der Codes
zugelassenen Zeit.
Lernen des Codes nicht
ausgefürt.
Lernen des Codes ausgerführt.
Durch einen anschließenden Impuls
der Ferbedienung wird die Öffnung
geschltet.
Zeit?
250ms
250ms für Lernen des Codes
0,5s
0,5s
Übertragung des Codes
250ms für Bestätigung des Codes
Taste P drücken
und unverzüglich
loslassen
4 Sekunden verfügbare Zeit zur Übertragung der
Bestätigung des Funk-Codes
Led eingeschaltet
Led ausgeschaltet
LED-MELDUNGEN
1 Aufblinken* = Ungültiges Signal.
1 Blitzvorgang** = Code gespeichert oder gelöscht je nach
angewählter Prozedur.
2 Aufblinkvorgänge = Code bereits vorhanden.
2 Blitzvorgänge = Überlagerte Funksignale bei Registrierung.
Code löschen und nochmals eingeben.
3 Aufblinkvorgänge = Speicher gesättigt (max. 15 Codes bei
Standard-Übertragung).
3 Blitzvorgänge = Speicher leer, kein Code eingegeben.
4 Aufblinkvorgänge = Ende der nutzbaren Zeit zur Speicherung oder
Löschung eines einzelnen Codes.
4 Blitzvorgänge = Versuch der Löschung eines nicht im Speicher
vorhandenen Codes.
10 Blitzvorgänge = Speicherungen gesperrt.
*Aufblinken: Led eingeschaltet für 0,5s
**Blitzvorgänge: Led eingeschaltet für 0,25s
RESET - Each time the configuration is changed, RESET the device
making ajumper between the two pins shown in the scheme.
Before feeding the receiver with power supply make sure that the
jumper used to change the power supply is set on the wished
voltage. If this is not the case carry out the instructions shown in
the scheme to select the wished voltage.
CODE LEARNING
As indicated above, each receiver recognises a given number of codes
recorded by You in its memory. The code recording procedure is called
“self-learning”.
This procedure must be activated by You using push-button “P” on the
receiver circuit board.
RESET - Chaque fois que l’on fait un changement de la
configuration effectuer un reset en faisant un pont entre les deux
pins signalés dans le schéma.
Avant d’alimenter le récepteur, controler que le cavalier de
changement de tension soit positionné sur le voltage souhaité. Se
référer au schema pour selectioner une nouvelle valeur de tension.
APPRENTISSAGE DES CODES
Le récepteur reconnaît un nombre déterminé de codes enregistrés par
vos soins dans sa mémoire utilisant la procédure appelée “autoapprentissage”.
Cette procédure s’effectue en agissant sur le bouton “P” qui se trouve sur
la carte du récepteur.
RESET - Bevor jeder Änderung der Konfiguration muß ein RESET
durch einen Jumper zwischen den zwei in der Zeichnung
angegeben pins durchgeführt werden.
Bevor der Empfänger beschickt wird, muss der Jumper für die
Spannungsänderung fuer die gewuenschte Spannung vorbereitet
sein. Sollte das nicht der Fall sein, wählen Sie die neue
gewuenschte Spannung wie bei Zeichnung.
CODE-ERLERNUNG
Wie bereits erwähnt, erkennt der Empfänger eine gewisse Anzahl von
Codes, die der Installationstechniker eingespeichert hat.
Die Ablegung der zulässigen Steuercodes wird als “Erlernphase”
bezeichnet.
Für diese Prozedur muß der Installationstechniker die Taste “P” auf der
Empfängerplatine drücken.
ENGLISH
Arrêter la transmission
Stop transmission
die Übertragung stoppen
 Loading...