


[1]
Catalog No. RWC – 2
RHYNO2 OPERATOR’S
MANUAL - USA
NOTICE: This tool is specially designed to cut 0.240 inch (7 mm) laminated glass only.
Use of this product to cut materials other than laminated glass may damage the tool
and voids the warranty.
TO REDUCE THE RISK OF INJURY, USER MUST READ AND UNDERSTAND OPERATOR’S
MANUAL.

[2]
WARNING: USERS MUST READ ALL
INSTRUCTIONS
WARNING: To reduce the risk of
injury, read the instruction manual before
use. Read all warnings, safety
instructions, and maintenance
instructions before use and/or before
performing any maintenance.
Supervision is required when
inexperienced or underage (<18 years)
operators use this tool.
Definitions: Safety Guidelines
The definitions below describe the level of severity for each signal word. Please
read the manual and pay attention to these symbols.
DANGER: Indicates an imminently hazardous situation which, if not avoided,
will result in death or serious injury.
WARNING: Indicates a potentially hazardous situation which, if not avoided,
could result in death or serious injury.
CAUTION: Indicates a potentially hazardous situation which, if not avoided,
may result in property damage.
NOTICE: Indicates a practice not related to personal injury which, if not avoided,
may result in property damage.
United States and International Patent
Pending.
RHYNO Windshield Cutter™ is a Trademark of
EnTheos Design Solutions, LLC.
SYMBOLOGY
V
Volts
Properly Recycled Batteries
Hz
Hertz
AC
Alt ernat i ng Current
DC
Direc t Current
A
Ampere
AWG
Ameri c an Wire Gage
LED
Light Emitting Diode
C
Celcius
WARNING – to reduce the ris k
of injury , user must read
instruction m anual
F
Fahrenheit
Laminated
Glass
Plastic
Wood
Metal
RWC-1 14.4
0-2800
Strokes
1/4" (7 mm) - - - RWC -15 120 1 14.4 RWC -10 14.4
RWC-2 14.4
0-3850
Strokes
1/4" (7 mm) - - - RWC -25 240 0.5 14.4 RWC-11 14.4
RHYNO Windshield Cutter Specifications
Maximum Capacities
Tool
Catalog
Number
Tool
Voltage
(V)
No Load
Speed
Charger
Catalog
Number
AC Input
Voltage
(V)
AC Input
Current
(A)
DC
Output
Voltage
(V)
Battery
Catalog
Number
Battery
Output
Voltage
(V)

[3]
1) WORK AREA SAFETY
a. Keep work area clean and well lit.
Cluttered or dark areas invite accidents.
b. Do not operate power tools in
explosive atmospheres, such as in the
presence of flammable liquids, gases or
dust. Power tools create sparks which
may ignite the dust or fumes.
c. Keep children and bystanders away
while operating a power tool.
Distractions can cause you to lose
control.
2) ELECTRICAL SAFETY
a. Power tool plugs must match the
outlet. Never modify the plug in any
way. Do not use any adapter plugs
with earthed (grounded) power tools.
Unmodified plugs and matching outlets
will reduce risk of electric shock.
b. Avoid body contact with earthed or
grounded surfaces such as pipes,
radiators, ranges and refrigerators.
There is an increased risk of electric
shock if your body is earthed or
grounded.
c. Do not expose power tools to rain or
wet conditions. Water entering a
power tool will increase the risk of
electric shock.
d. Do not abuse the cord. Never use the
cord for carrying, pulling or unplugging
the power tool. Keep cord away from
heat, oil, sharp edges or moving parts.
Damaged or entangled cords increase
the risk of electric shock.
e. When operating a power tool
outdoors, use an extension cord
suitable for outdoor use. Use of a cord
suitable for outdoor use reduces the
risk of electric shock.
f. If operating the power tool in damp
locations is unavoidable, use a Ground
Fault Circuit Interrupter (GFCI)
protected supply. Use of a GFCI
reduces the risk of electric shock.
3) PERSONAL SAFETY
a. Stay alert, watch what you are doing
and use common sense when
operating a power tool. Do not use a
power tool while you are tired or
under the influence of drugs, alcohol
or medication. A moment of
inattention while operating power tools
may result in serious personal injury.
b. Use personal protective equipment.
Always wear eye protection.
Protective equipment such as safety
glasses, dust mask, protective gloves or
hearing protection used for appropriate
conditions will reduce personal injuries.
c.
Prevent unintentional starting. Ensure
the switch is in the off-position before
connecting to power source and/or
battery pack, picking up or carrying the
tool. Carrying power tools with your
finger on the switch or energizing the
power tools that have the switch on
invites accidents.
d. Remove any adjusting key or wrench
before turning the power tool on. A
wrench or a key left attached to a
WARNING: Read all safe ty w arnin gs an d all in structions. Failure to
follow the warnings and ins tructions ma y result i n elect ric shoc k, f ire and/or
serious injury.
Save all warnings and instructions for future reference.
GENERAL POWER TOOL SAFETY WARNINGS

[4]
rotating part of the power tool may
result in personal injury.
e. Do not overreach. Keep proper footing
and balance at all times. This enables
better control of the power tool in
unexpected situations.
f. Dress properly. Do not wear loose
clothing or jewelry. Keep your hair,
clothing and gloves away from moving
parts. Loose clothes, jewelry or long
hair can be caught in moving parts.
g. If devices are provided for the
connection of dust extraction and
collection facilities, ensure these are
connected and properly used. Use of
dust collection can reduce dust-related
hazards.
4) POWER TOOL USE AND CARE
a. Do not force the power tool. Use the
correct power tool for your application.
The correct power tool will do the job
better and safer at the rate for which it
was designed.
b. Do not use the power tool if the switch
does not turn on and off. Any power
tool that cannot be controlled with the
switch is dangerous and must be
repaired.
c. Disconnect the plug from the power
source and/or the battery pack from
the power tool before making any
adjustments, changing accessories, or
storing power tools. Such preventive
safety measures reduce the risk of
starting the power tool accidentally.
d. Store idle power tools out of the reach
of children and do not allow persons
unfamiliar with the power tool or
these instructions to operate the
power tool. Power tools are dangerous
in the hands of untrained users.
e. Maintain power tools. Check for
misalignment or binding of moving
parts, breakage of parts and any other
condition that may affect the power
tool’s operation. If damaged, have the
power tool repaired before use. Many
accidents are caused by poorly
maintained power tools.
f. Keep cutting tools sharp and clean.
Properly maintained cutting tools with
sharp cutting edges are less likely to
bind and are easier to control.
g. Use the power tool, accessories and
tool bits, etc. in accordance with these
instructions, taking into account the
working conditions and the work to be
performed. Use of the power tool for
operations different from those
intended could result in a hazardous
situation.
5) BATTERY TOOL USE AND CARE
a. Recharge only with the charger
specified by the manufacturer. A
charger that is suitable for one type of
battery pack may create a risk of fire
when used with another battery pack.
b. Use power tools only with specifically
designated battery packs. Use of any
other battery packs may create a risk of
injury and fire.
c. When battery pack is not in use, keep
it away from other metal objects like
paper clips, coins, keys, nails, screws,
or other small metal objects that can
make a connection from one terminal
to another. Shorting the battery
terminals together may cause burns or
a fire.
d. Under abusive conditions, liquid may
be ejected from the battery; avoid
contact. If contact accidentally occurs,
flush with water. If liquid contacts
eyes, additionally seek medical help.
Liquid ejected from the battery may
cause irritation or burns.
6) SERVICE
a. Have your power tool serviced by a
qualified repair person using only
identical replacement parts. This will
ensure that the safety of the power
tool is maintained.

[5]
WARNING: Tool use can generate and
disburse particles and dust which project
outward from the cutting blades that may
impact the face, eyes, hands or other body
parts. ALWAYS use ANSI Z87.1 or
equivalent safety certified eye protection
during operation. Everyday eyeglasses are
NOT safety glasses.
WARNING: Tool use can generate and
disburse particles and dust which may cause
serious and permanent respiratory or other
injury. ALWAYS use NIOSH/OSHA safety
certified respiratory protection during
operation.
WARNING: Exposed and cut glass along
with pieces and particles can cut your skin.
ALWAYS wear cut-resistant gloves
constructed of leather, canvas or equivalent
during operation.
WARNING: Do not expose tool and
accessories to water or wet conditions.
Water entering a power tool will increase
the risk of electric shock.
WARNING: Depending on duration and
conditions of use, this tool may generate
noise which may contribute to hearing loss.
ALWAYS use ANSI S12.6 or equivalent
safety certified hearing protection during
operation.
WARNING: Tool use may generate
particles, dust, or vapor which contains
chemicals known to cause cancer, birth
defects or other reproductive harm. Some
examples of these chemicals include:
• Copper and plastic from wiring
Your risk from these exposures varies,
depending on how often you do this type of
work. To reduce your exposure to these
chemicals, work in a well-ventilated area,
and work with approved safety equipment,
such as safety certified dust masks which
are specially designed to filter out
microscopic particles. Avoid prolonged
contact with dust by allowing particles or
dust to enter the mouth, eyes or lay on the
skin which can promote absorption of
harmful chemicals.
Hold power tool by insulated gripping
surfaces when performing an operation
where the cutter blades may contact
hidden wiring. Cutting blades contacting
“live” wires may make exposed metal parts
of the power tools “live” and could give the
operator an electric shock.
Air vents on tool cover moving parts and
should be avoided. Loose clothes, jewelry
or long hair can be caught in moving parts.
WARNING: Do not use this tool if you
are extremely tired, cannot maintain
adequate attention or are under the
influence of drugs, alcohol or medication.
A moment of inattention while operating
power tools may result in serious injury.
WARNING: Do not use this tool in
explosive atmospheres, such as in the
presence of flammable liquids, gases or
dust. Power tools create sparks which may
ignite the gas or fumes.
READ AND SAVE ALL INSTRUCTION FOR
FUTURE REFERENCE.
ADDITIONAL SAFETY RULES FOR SHEARS

[6]
1) MAINTENANCE AND STORAGE
a. Do not charge or use battery in
explosive atmospheres, such as in the
presence of flammable liquids, gases or
dust. Inserting or removing the battery
from the charger may ignite the dust or
fumes.
b. NEVER force battery pack into charger.
DO NOT modify battery pack in any way
to fit into a non-compatible charger as
battery pack may rupture causing
serious personal injury.
c. Charge the battery packs only in charger
provided with this tool.
d. DO NOT splash or immerse in water or
other liquids.
e. Do not store or use the tool and battery
pack in locations where the
temperature may reach or exceed 120°F
(50°C) (such as outside sheds or metal
buildings in summer).
WARNING: Fire Hazard. Never
attempt to open the battery pack for any
reason. If battery pack case is cracked or
damaged, do not insert into charger. Do
not crush, drop or damage battery pack.
Do not use a battery pack or charger that
has received a sharp blow, been dropped,
run over or damaged in any way (i.e.
pierced with a nail, hit with a hammer,
stepped on).
WARNING: Fire hazard. Do not store
or carry battery so that metal objects can
contact exposed battery terminals. For
example, do not place battery in aprons,
pockets, tool boxes, product kit boxes,
drawers, etc., with loose nails, screws, keys,
etc. Transporting batteries can possibly
Exposed battery terminals may cause
fire if the terminals inadvertently come
in contact with conductive materials
such as keys, coins, hand tools and the
like. The US Department of
Transportation Hazardous Material
Regulations (HMR) actually prohibit
transporting batteries in commerce or on
airplanes (i.e. packed in suitcases and
carry-on luggage) UNLESS they are
properly protected from short circuits. So
when transporting individual batteries,
make sure that the battery terminals are
protected and well insulated from
materials that could contact them and
cause a short circuit.
2) LITHIUM-ION BATTERIES
a. Do not incinerate the battery pack
even if it is severely damaged or is
completely worn out. The battery
pack can explode in a fire. Toxic fumes
and materials are created when lithium
ion battery packs are burned.
b. If battery contents come into contact
with the skin, immediately wash the
area with mild soap and water. If
battery liquid gets into the eye, rinse
water over the open eye for 15 minutes
or until irritation ceases. If medical
attention is needed, the battery
electrolyte is composed of a mixture of
liquid organic carbonates and lithium
salts.
c. Contents of opened battery cells may
cause respiratory irritation. Provide
fresh air. If symptoms persist, seek
medical attention.
WARNING: Burn hazard. Battery liquid may be flammable if exposed to spark or
flame.
SAFETY INSTRUCTIONS FOR BATTERY PACKS
NOTICE: The batteries included with your hand tool are not fully charged out of the
carton. Before using the battery packs, read the safety instructions below. Then
follow charging instructions outlined.

[7]
1) MAINTENANCE AND STORAGE
a. SAVE THESE INSTRUCTIONS – This
operator’s manual contains important
safety and operating instructions for
RHYNO Windshield Cutter™ 14.4V
batteries and 14.4V chargers.
b. Before using the batteries and charger,
read this operator’s manual and all
labels on the tool, battery pack and
charger.
c. Use RHYNO Windshield Cutter™ 14.4V
Lithium-ion batteries only on 14.4V
Lithium-ion tool and 14.4V Lithium-ion
charger. Use with other tools and
batteries may result in increased risk of
fire, electric shock or personal injury.
d. Avoid dangerous environments. Do
not charge battery pack in rain, snow,
damp or wet locations. Do not use
battery pack or charger in the presence
of explosive atmospheres (gaseous
fumes, dust or flammable materials)
because sparks may be generated when
inserting or removing battery pack,
possibly causing fire.
e. Charge in a well-ventilated area. Do
not block charger vents. Keep them
clear to allow proper ventilation. Do
not allow smoking or open flames near
a charging battery pack. Vented gases
may explode.
f. Maintain charger cord. When
unplugging charger, pull plug rather
than cord to reduce the risk of damage
to the electrical plug and cord.
Never carry charger by its cord. Keep
cord from heat, oil and sharp edges.
Make sure cord will not be stepped on,
tripped over or subjected to damage or
stress. Do not use charger with damaged
cord or plug. Have a damaged cord
replaced immediately with identical
replacement parts (see “Maintenance”).
g. Do not use an extension cord unless it is
absolutely necessary. Using the wrong,
damaged or improperly wired extension
cord could result in the risk of fire and
electrical shock. If an extension cord
must be used, plug the charger into a
properly wired 16 gage or larger
extension cord with pins that are the
same number, size and shape as the pins
on the charger. Make sure that the
extension cord is in good electrical
condition.
h. Charger RWC-15 is rated for 120V AC
only. Charger RWC-25 is rated for 240V
AC only. Charger must be plugged into
an appropriate receptacle with a
matching rating.
i. Use only recommended attachments.
Use of an attachment not recommended
or sold by the battery pack or battery
charger manufacturer may result in an
increased risk of fire, electric shock or
personal injury.
j. Unplug charger when not in use.
Remove battery pack from unplugged
chargers.
Do not disassemble charger.
Incorrect
reassembly may result in an increased
risk of fire, electric shock, electrocution
or exposure to battery chemicals. If
SAFETY INSTRUCTIONS FOR BATTERY CHARGERS
WARNING: Read and save these instructions for future reference. This manual
contains important safety and operating instructions for battery chargers. Before
using charger, read all instructions and cautionary markings on charger, battery
p
ack, and product using the battery pack.

[8]
charger is damaged, take it to a certified
RHYNO Windshield Cutter™ service
facility.
l. Battery chemicals cause serious
burns. Never allow contact with skin,
eyes
m. Do not operate charger if it has
received a sharp blow, been dropped,
or otherwise damaged in any way.
Contact the manufacturer for further
instructions.
n. Do not short circuit. A battery pack
will short circuit if a metal object
makes a connection between the
positive and negative contacts on the
battery pack. Do not place a battery
pack near anything that may cause a
short circuit, such as coins, keys or
nails in your pocket. A short circuited
battery pack may cause fire and
personal injury.
o. Store your battery packs and charger
in a cool, dry place. Do not store
battery pack where temperatures may
exceed 120°F (50°C) such as in direct
sunlight, a vehicle or metal building
during the summer.
CAUTION: To reduce the risk of
injury, charge only RHYNO Windshield
Cutter™ Lithium-ion batteries with only
RHYNO Windshield Cutter™ chargers.
Other types of chargers may cause
personal injury or damage. Do not wire a
battery pack to a power supply plug or car
cigarette lighter. Batteries will be
permanently disabled or damaged.
WARNING: Burn hazard. To reduce
the risk of injury, charge only RHYNO
Windshield Cutter batteries. Other types
of batteries may burst causing personal
injury and damage.
WARNING: Shock hazard. Do not
allow any liquid to get inside charger.
Electric shock may result.
WARNING: Do not burn or incinerate
a battery pack even if it is damaged, dead
or completely discharged. When burned,
toxic fumes and materials are created.
WARNING: Shock hazard. ALWAYS
unplug charger before cleaning or
maintenance. Do not allow water to flow
into AC plug. Use a Ground Fault Circuit
Interrupter or GFCI to reduce shock
hazards.
WARNING: Burn hazard. NEVER allow
battery chemicals to come into contact
with eyes, skin or mouth. If a damaged
battery pack leaks battery chemicals, use
rubber or neoprene gloves to dispose of it.
If skin is exposed to battery fluids, wash
with soap and water and rinse with
vinegar. If eyes are exposed to battery
chemicals, immediately flush with water
for 15 minutes and seek medical attention.
Remove and dispose of contaminated
clothing.
WARNING: Use ONLY the battery
charger and battery(s) provided with this
tool set. Only this battery charger is
matched to the lithium-ion battery for your
power tool. Use charger indoors only.
NOTICE: The battery is supplied partially
charged. To ensure full capacity of battery,
completely charge the battery in the battery
charger before using your power tool for
the first time. The lithium-ion battery can be
charged at any time without reducing its
service life. Interrupting the charging
procedure does not damage the battery.
Battery is protected against deep
discharging by the “electric cell protection.”
When the battery is empty, the tool will
stop by means of a protective circuit. The
tool will not operate until a charged battery
has been re-installed.
WARNING: DO NOT continue to press
the On/Off switch after the machine has
[9]
been automatically switched off. The
battery can be damaged.
2) WHEN TO CHARGE BATTERY PACK
a. The fuel gage on the left side of the
motor indicates the current battery
capacity. The fuel gage has 3 levels:
- 3 bars ~ >80% capacity
- 2 bars ~ 50-80%
- 1 bar ~ 20-50%
- 0 bars ~ <20%
b. Remove the battery pack from the tool
for charging when needed. RHYNO
Windshield Cutter™ Lithium-ion battery
packs do not develop “memory” when
charged after only a partial discharge. It
is not necessary to run down the
battery pack before placing it on the
charger.
c. You can “top off” each battery pack at
any time or at any level of battery
charge as needed.
d. The only time that it is necessary to
charge a battery pack is if it has reached
the end of its charge. To signal the end
of its charge, power to the tool will stop.
No-load run time is about 45 minutes.
30-40 windshields can be cut out with a
single charge, depending on air
temperature.
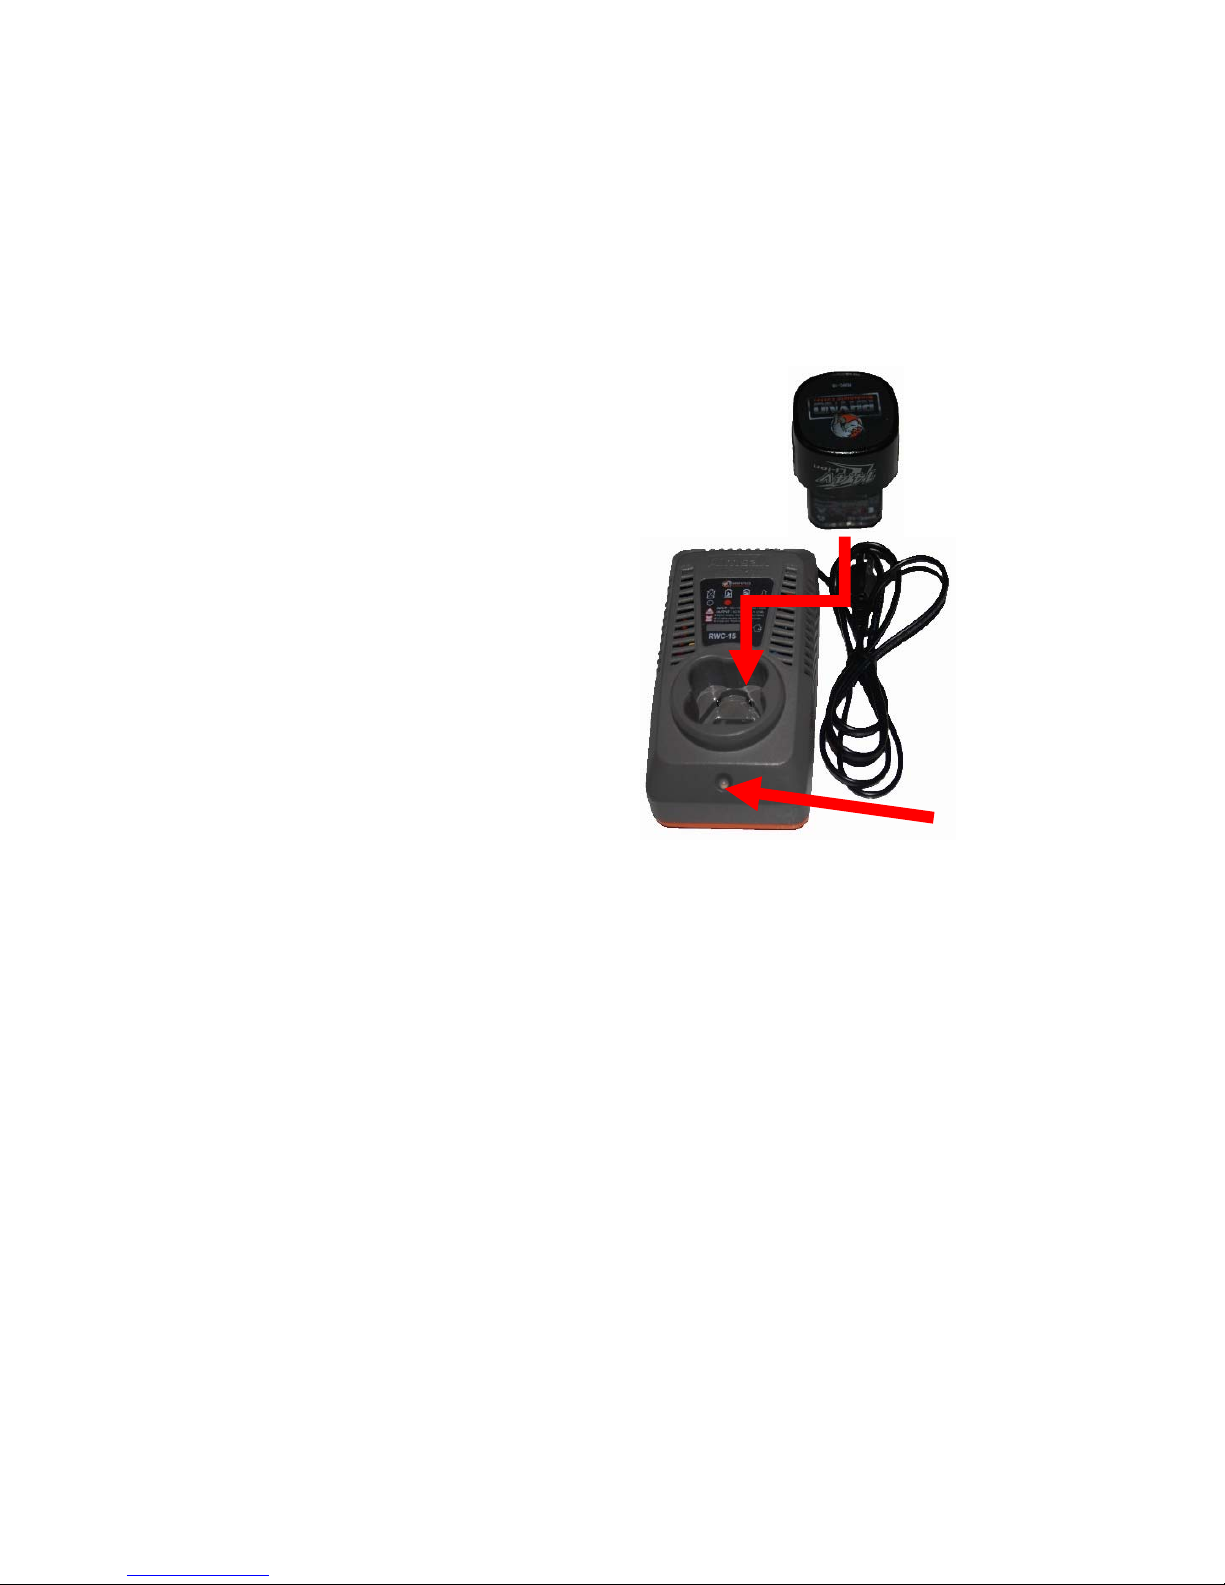
3) CHARGING A BATTERY PACK
a. Align the battery pack with the bay and
slide the battery pack into the charger as
far as possible. The red LED will indicate
charging is ongoing.
b. The battery charger LED light will
indicate ready when blinking GREEN.
c. After inserting the battery pack fully
into the charger slot, the LED will
indicate RED while charging.
d. When charging is complete, the LED will
indicate GREEN.
If the battery pack or charger is out of
the normal temperature range of 32°F113°F (0°-45°C) the LED will indicate
RED & GREEN.
e. A fully discharged battery pack with an
internal temperature in the normal
range will charge in about 15-20
minutes. Heavily cycled batteries may
take longer to completely charged.
NOTICE: Hot or cold batteries will take
longer to charge.
NOTICE: Inverters or generators rated to
100 watts or higher can be used to power
charger.
LED
4) CLEANING
Clean out dust and debris from charger
vents and electrical contacts by blowing
with compressed air. Use only mild soap
and a damp cloth to clean the battery
pack and charger, keeping away from the
electrical contacts. Certain cleaning
agents and solvents are harmful to
plastics and other insulted parts. Some
of these include gasoline, turpentine,
lacquer thinner, paint thinner,
chlorinated cleaning solvents, ammonia
and household detergents containing
ammonia. Never use flammable or
combustible solvents around batteries,
charger or tools.
5) REPAIRS
The charger has no serviceable parts.

[10]
1) INTENDED USE
a. The RHYNO Windshield Cutter is
designed to cut laminated glass or filmcovered glass like vehicle or building
windows with a thickness of up to 0.240
inches (7 mm). DO NOT use under wet
conditions or in presence of flammable
liquids or gases. This glass cutter is a
professional power tool. DO NOT let
children come into contact with the
tool. Supervision is required when
inexperienced operators use this tool.
To activate the tool, squeeze the trigger
switch (8). To stop the tool, release the
trigger switch. Your tool is equipped
with a brake. The blades will stop when
the trigger switch if fully released.
c. The variable-speed trigger switch allows
you to start cutting at a slow speed. The
further you squeeze the trigger, the
faster the tool will operate. For
maximum tool life, use variable speed
during starts, stops and cornering.
SAFETY INSTRUCTIONS FOR TOOL OPERATION
WARNING: Read and save these instructions for future reference. This manual
contains important safety and operating instructions for battery chargers. Before
using charger, read all instructions and cautionary markings on charger, battery
pack, and product using the battery pack.
1
104
7
3
9
5
2
6
1 – Dynamic Cutter Blade
2 – Static Cutter Blades
3- Shear Head
4- Motor
5- Variable S
p
eed Trigger Switch
6 - Handle
7 - Battery Pack
8 - Blade Screws
9 - Work light
10 - Drive Control
8

[11]
d. Your tool is equipped with a single work
light (9). The work light will be activated
when the trigger switch is squeezed.
e. Your tool is equipped with a Motor
Control switch (10). This switch locks the
trigger while in the center position and
permits motor drive when to the left.
WARNING: Work light is for providing
light to the immediate work surface and is
not intended to be used as a flashlight.
f. Your tool is equipped with three cutting
blades, one dynamic (1) and two
stationary or static (2). The middle blade
reciprocates up and down between the
two static blades to cut the glass.
g. To remove the battery (7), from the
handle (6) of the tool, press both
unlocking buttons and firmly pull the
battery outward from the handle.
h. Align the battery pack with the rails of the
tool’s handle and slide it firmly into the
handle until you hear the lock snap into
place.
WARNING: SHEAR HAZARD. ALWAYS
keep hands, fingers, hair, clothing and/or
other body parts clear and away from
between or near cutting blades. Severe
injury will result.
i. WARNING: SHEAR HAZARD. To reduce
the risk of serious personal injury,
disconnect the battery pack before making
any adjustments, maintenance or
removing/installing attachments or
accessories.
2) CUTTING LAMINATED GLASS
a. Don personal protective equipment
including ANSI approved safety
goggles, respirator and cut-resistant
gloves.
b. Place suction lifters on laminated glass
to be cut and activate the suction by
lifting the movable handle.
c. Grasp tool handle with the right hand
with a pistol grip and place left hand
along motor housing.
d. Many newer vehicles have glass
configurations which increase the
energy required to make purchase
into the windshield glass. When
attempting to make purchase, 2
methods are recommended 1) impact
with a halligan bar and 2) impact with
the cutter blade tips.
e. Make purchase with the halligan bar in
the desired location to begin cutting.
f. If the tool blade tips are to be used,
impact the glass moderately at a 90°
angle or perpendicular. If after 2-3
impacts have not breeched the glass,
stop immediately. (NOTE: The
operator can get a “feel” when the
glass is very tough after only 2-3
impacts).
g. If the glass in that location is curved
significantly or is very close to the
edge near support like the A-pillar,
move your purchase point to a new
location which is flat or near flat and
try 2-3 more impacts.
h. If this further fails to make purchase,
stop and use the mini halligan bar
provided with the tool set to make
purchase.

[12]
i. Once purchase has been achieved,
place dynamic cutting blade inside
glass hole and activate the trigger
switch to begin cutting.
j. Ensure tool is positioned with glass
parallel to the angle tool on the shear
head while cutting. DO NOT PUSH
HARD. Let the tool do the cutting.
k. Remove from the glass and begin
again in the original location cutting
along the bottom to the mid-line.
l. Gain access at the opposing A-pillar
moving along the bottom to meet the
opposite cut.
m. Remove from the glass. While
gripping the tool with the opposite
hand, gain access using the 2
nd
plunge
point at the A-pillar and cut upward.
Grip the suction lifter with the
opposite hand and finish the cut
moving inward to meet the opposite
cut.
n. Upon completing the cut, remove the
windshield with the opposite hand by
lifting with the suction lifter and
dispose.
3) CUTTER BLADE REPLACEMENT
a. Remove battery from tool and place to
the side.
b. Remove the cutter blade screws with
the allen key provided with your kit
and place to the side.
c. Remove the cutter blade set from the
shear head and place to the side.
d. Remove replacement cutter blade set
from its packaging and remove any
securements (i.e. wire tie).
e. As a complete unit, insert cutter blade
set as shown back into the shear head
taking caution to align the dynamic
cutting blade fork in the center of the
shear head.
f. Replace cutter blade screws and
tighten about ¼ turn.
REPLACEMENT PARTS
The battery pack for RHYNO1 is RWC-10,
while the RHYNO2 Battery Pack is RWC-
11. The battery charger for RHYNO1/2 is
RWC-15 for TYPE A plug, RWC-16 for Type
G plug, RWC-17 for Type C plug and RWC18 for TYPE I plug. The RHYNO1 cutter
blade set is RWC-100. The RHYNO2 cutter
blade set is RWC-101. All these
components are replaceable parts for the
RHYNO Windshield Cutter™. Contact
info:
We Cut The Glass, LLC.
4960 William Flynn Highway
Suite 6, #350
Allison Park, PA 15101
Toll Free: 800.883.1094 Fax
484.991.1952
Email: info@wecuttheglass.com

[13]
STORAGE RECOMMENDATIONS
a. The best storage place is one that is
cool and dry away from direct sunlight
and excess heat or cold.
b. Long storage will not harm the battery
pack or charger. Under proper
conditions, battery pack and charger
can be stored for at least 1 year or
more.

[14]
© Copyright 2015 – We Cut The Glass, LLC.

[15]
THIS PAGE INTENTIONALLY LEFT BLANK.

[16]
LIMITED WARRANTY
Every RHYNO Windshield Cutter™ tool including battery and battery charger, is
warranted to the original purchaser only to be free from defects in material and
workmanship. Subject to certain exceptions, We Cut The Glass, LLC will repair or
replace any part which after examination, is determined by We Cut The Glass, LLC to
be defective in material or workmanship for a period of two (2) years after the date of
purchase unless otherwise noted. Return of the tool to a RHYNO Windshield Cutter™
factory service center location, freight prepaid and insured, is required. A copy of the
proof of purchase should be included with the return product. This warranty does not
apply to damage that personnel, misuse, alterations abuse, normal wear and tear, lack
of maintenance or accidents. The manufacturing date of the product will be used to
determine the warranty period if no proof of purchase is provided at the time of
warranty service is requested.
ACCEPTANCE OF THE EXCLUSIVE REPAIR AND REPLACEMENT REMEDIES DESCRIBED
HEREIN IS A CONDITION OF THE CONTRACT FOR THE PURCHASE OF EVERY RHYNO
Windshield Cutter™. IF YOU DO NOT AGREE TO THIS CONDITION, YOU SHOULD NOT
PURCHASE THE PRODUCT. IN NO EVENT SHALL WE CUT THE GLASS, LLC BE LIABLE FOR
ANY INCIDENTAL, SPECIAL, CONSEQUENTIAL OR PUNITIVE DAMAGES, OR FOR ANY
COSTS, ATTORNEY FEES, EXPENSES, LOSSES OR DELAYS ALLEGED TO BE AS A
CONSEQUENCE OF ANY DAMAGE TO, FAILURE OF, OR DEFECT IN ANY PRODUCT
INCLUDING, BUT NOT LIMITED TO, ANY CLAIMS FOR LOSS OF PROFITS. SOME STATES
DO NOT ALLOW THE EXCLUSION OR LIMITATION OF INCIDENTAL OR CONSEQUENTIAL
DAMAGES, SO THE ABOVE LIMITATION OR EXCLUSION MAY NOT APPLY TO YOU. THIS
WARRANTY IS EXCLUSIVE AND IN LIEU OF ALL OTHER EXPRESS WARRANTIES, WRITTEN
OR ORAL. TO THE EXTENT PERMITTED BY LAW, WE CUT THE GLASS, LLC DISCLAIMS
ANY IMPLIED WARRANTIES, INCLUDING WITHOUT LIMITATION ANY IMPLIED
WARRANTY OF MERCHANTABILITY OR FITNESS FOR A PARTICULAR USE OR PURPOSE;
TO THYE EXTENT SUCH DISCLAIMER IS NOT PERMITTED BY LAW, SUCH IMPLIED
WARRANTIES ARE LIMITED TO THE DURATION OF THE APPLICABLE EXPRESS
WARRANTY AS LASTS, SO THE ABOVE LIMITATION MAY NO APPLY TO YOU. THIS
WARRANTY GIVES YOU SPECIFIC LEGAL RIGHTS, AND YOU MAY ALSO HAVE OTHER
RIGHTS WHICH VARY FROM STATE TO STATE. This warranty applies to product sold in
the USA and Canada Only.
The cutter blades are not warranted for damage due to neglect, accident, misuse or
from improper installation or repair. No warrant is provided for any product which
has been modified in any way. Check with your international supplier to determine if
internatiional warranties apply. Our sole liability is to repair or replace covered parts
and components. This is the exclusive remedy for consequential damages.
Obtain from us while this warranty is valid and in-effect, prior authorization for return
or repair of covered parts and companents is required.
 Loading...