

RHINO Watchguard Digital V2 Instruction Manual

Watchguard Digital V2
Back-To-Base Monitored Alarm System with
Wireless Detectors, Remote Controls
& Wireless External Siren
Designed in Australia. Made in Taiwan
I N S T R U C T I O N M A N U A L
R e v 1 . 1
Thank you for purchasing an Australian Designed RhinoCo Technology Product.
Please read this manual carefully before installation and keep it in a safe place
for future reference.

Contents
Contents ............................................................................................................................... 2
Introduction ........................................................................................................................... 4
G
ENERAL SYSTEM DESCRIPTION
1. About the Watchguard Digital™ SecureNet Back-to-Base Monitoring Centre.......... 8
2.
General Terms Of Sale ............................................................................................ 9
3.
Monitoring Service Plans ....................................................................................... 10
4.
Monitoring Plan Costs............................................................................................ 11
5. Automated Billing Procedure .................................................................................. 12
6. Changing System Settings ..................................................................................... 12
Installation........................................................................................................................... 13
P
LANNING THE INSTALLATION
W
ATCHGUARD DIGITAL MAIN CONTROL UNIT BASIC CONNECTION DIAGRAM
S
TEP
1: I
NSTALL THE MAIN CONTROL UNIT
S
S
TEP
TEP
HANGING YOUR SYSTEM FROM THE HOME TO THE BUSINESS OR BASIC PLANS
2: C
3: I
NSTALL THE WIRELESS
Installing the Wireless PIR Detectors ......................................................................... 17
About The Wireless Passive Infrared Detector (PIRW) .............................................. 19
Tips for positioning ..................................................................................................... 19
Powering the Detector ................................................................................................ 21
Warm up period.......................................................................................................... 21
Walk Test Mode For The Wireless PIR Detectors ...................................................... 22
Adjusting The Detection Sensitivity ............................................................................ 22
Dual Edge Sensing (DES) technology ‘explained’...................................................... 23
S
TEP
NSTALLING THE EXTERNAL SIREN
4: I
Wireless Siren Auto Test ............................................................................................ 28
S
TEP
5: C
ONNECTING TO THE SECURENET DIGITAL MONITORING CENTRE
Step A- Register Your Alarm System ......................................................................... 29
Step B – Add your account details.............................................................................. 30
Step C – Add your contact details .............................................................................. 31
Step D- Login to the SecureNet Digital Monitoring Centre ......................................... 32
Step E- Set Up My Sensors........................................................................................ 33
Step F (Optional) – Enable Patrol Guard Responses For Your Account .................... 33
Step G- Test Your Account......................................................................................... 34
Table Of Transmitted Alarm Messages ...................................................................... 35
Operation............................................................................................................................ 37
M
ASTER KEY SWITCH ON MAIN CONTROL UNIT
E
XIT
& E
NTRY DELAYS
E
NTRY DELAY (FOR USE WITH THE OPTIONAL WIRELESS KEYPAD
...................................................................................................... 37
Alarm Modes....................................................................................................................... 38
AWAY M
STAY M
ODE
................................................................................................................... 38
ODE
.................................................................................................................... 38
DISARMING ................................................................................................................... 38
PANIC M
R
EMOTE CONTROL FUNCTIONS
ODE
................................................................................................................... 39
Programming ...................................................................................................................... 41
TO ADD A NEW REMOTE......................................................................................... 41
TO DELETE ALL REMOTES...................................................................................... 42
TO ADD A DETECTOR.............................................................................................. 42
TO DELETE A DETECTOR........................................................................................ 43
WALK TEST MODE ................................................................................................... 43
.......................................................................................... 7
............................................................................................. 13
.......................... 14
......................................................................... 15
: .... 16
PIR D
ETECTORS
............................................................... 17
......................................................................... 26
........................... 29
................................................................... 37
)...................................... 37
.......................................................................................... 40
2

ZONE FEATURE PROGRAMMING............................................................................44
WIRELESS SIREN AUTO TEST.................................................................................45
WIRELESS SIREN DISABLE......................................................................................45
Maintenance........................................................................................................................46
R
EAL TIME CLOCK BATTERY
AIN CONTROL UNIT BACKUP BATTERY
M
T
HE REMOTE CONTROL
T
HE WIRELESS
PIR D
...............................................................................................46
..............................................................................46
.....................................................................................................47
ETECTOR
..........................................................................................47
Replacing the Batteries ...............................................................................................47
Cleaning the Pyro Sensor ...........................................................................................48
Cleaning the Case and Lens.......................................................................................48
T
HE WIRELESS EXTERNAL SIREN BACKUP BATTERY
F
REQUENTLY ASKED QUESTIONS
(FAQ) .............................................................................49
.............................................................48
Warranty & Monitoring Terms..............................................................................................51
W
ARNING LIMITATIONS
ONITORING SERVICE STANDARD AGREEMENT
M
& W
ARRANTY
..................................................................................51
...................................................................53
3

Introduction
Your Watchguard Digital Alarm System is a state-of-the-art wireless security system,
designed for simple
and integrates with the SecureNet monitoring system for total 24-hour protection for you,
your family and your property.
Your Watchguard Digital alarm system connects to the SecureNet monitoring system
(ongoing charges apply) through a phone line connection. If an alarm is triggered or an event
occurs, you will be notified via phone, email or SMS. You also have the option to send out a
guard to inspect your premises in an alarm event. The SecureNet monitoring system has a
secure internet interface that you can use to customise your system providing you with better
protection and allow you to view your system status and alarm logs from anywhere in the
world.
Watchguard Digital Features Include:
Features:
Quick and Simple Do It Yourself (DIY) Installation
Remote Controls to arm / disarm your system or send a panic alarm from anywhere within
operating range on your premises.
DIY (Do It Y
ourself) installation. It is suitable for home or business use
High Gain -112dBm Superheterodyne Radio Receiver
The remote controls utilise Code Hopping technology to protect against scanning and code
grabbing, with more than 4 billion security combinations chosen at random.
8 Zones, allowing up to 8 wireless sensor devices including smoke detectors, passive
infrared movement sensors, reed switches and impact sensors to be utilised.
Long-life lithium batteries used on all sensors as well as automatic low battery warning to
indicate when they need replacing.
Tamper detection on all system parts including panel and wireless sensors.
Extra wireless sensors are available including reed switches, smoke detectors and shock
sensors.
Comes pre-configured to work with the SecureNet Digital Monitoring Centre providing total
24 hour protection.
External siren with Tamper protection, AC failure notification, Battery failure notification,
supervision failure notification (if the external siren does not report to the main unit for
24hours), Powerful Siren with auto 5 minute timeout and Blue flashing strobe for ARM,
DISARM and HOME ARM visual conformation.
Radio interference detection for maximum system integrity.
4

Included Components:
1 Main Control Unit 2 Remote Controls
3 Wireless External Siren & Keys 4 Power Supplies
5 Wireless Passive Infrared Detectors 6 Main Control Unit Keys
7 Mounting Material
8
Screws
5

Optional Components:
9. Wireless Keypad
A wireless keypad can be placed inside the entrance to your premises,
allowing people to arm and disarm the system using a pin number instead
of remote controls.
This enables multiple user access without needing extra remote controls.
10. Wireless Reed Switch
The Wireless Reed is used for detecting the opening of windows or doors.
They contain long life lithium batteries that last up to 5 years, and the
system will automatically notify you when they need replacing.
11. Wireless Smoke Detector
The Wireless Smoke Detector will trigger an alarm whenever smoke or fire
is detected. The detector contains a long life battery and the system will
notify you when it requires replacing.
12. Wireless Impact Sensor / Reed
The Wireless Impact Sensor will trigger an alarm when it detects a sudden
impact to an adjacent window or door. The sensor has long life batteries
and the system will notify you when it needs replacing. It also includes the
same functionality as the Wireless Reed Switch i.e. it can be used to
detect when a door is swung open normally, or if the door is trying to be
forcefully opened i.e. by kicking the door down.
13. Wireless Emergency Pendant
Designed with the elderly or invalid person in mind. Large rubber button.
Nylon lanyard included. Splash proof. Dipswitch Coding.
14.
ENSA ENergy SAving Wireless Automated Light Switch
This replacement light switch incorporates a unique receiver, which is able
to utilise any of the wireless sensor devices above to enable automatic
activation of your lights (400W max load). Includes variable adjustment for
light on time (from 3 minutes to 1 hour), and variable adjustment for setting
the desired level of darkness at which you want the lights to turn on
automatically. Switch also still allows full manual operation.
15.
ENSA Wireless Power Point
Simply plug into your power point and then connect your appliance (up to
10 amps load). Now you can use any of the wireless sensors above to
enable automatic / wireless activation of the device. Ideal for lamps, fans,
older air conditioners without remotes etc. Also Includes variable
adjustment for light on and variable adjustment for setting the desired level
of darkness at which you want the lights to turn on automatically.
6

WATCHGUARD DIGITAL
BACK-TO-BASE MONITORED ALARM SYSTEM
The purpose of this document is to provide you with full explanations and instructions (in
layman’s terms) for your Watchguard Digital Alarm System and the 24 Hr Monitoring Service
provided. It also outlines the ongoing monitoring service fees, the automated billing service,
as well as your full warranty terms & conditions.
General System Description
Your Watchguard Digital is a high-quality, professional grade monitored security system
specifically designed for ease of use and installation. It incorporates the latest state-of-the-art
technologies and yet is extremely simple to install and operate. Simply connect the system to
the mains power via a low voltage plug pack, connect it to telephone line and mount the
wireless detectors and external siren, and that’s it! This is a truly "plug & secure" do-it-yourself system, without any complicated programming or cabling. You can utilise any of our
additional wireless motion, reed switch, impact or smoke detectors to expand the system to
meet your needs.
This system is also compatible with our ENSA™ Smart Home Energy Saving & Home
Automation products.
Standard System Components:
1 x MAIN CONTROL UNIT. The main control unit is the central processing unit or “the brain”
of the system, communicating with all the devices and to the monitoring station via its digital
dialler. Eight fully programmable zones, each with full or part arming modes allow you to
completely customise your system. The compact stylish design makes for an easy and
discreet installation. The unit incorporates a powerful internal piezo siren and a rechargeable
backup battery allowing the system to continue to operate in the event of a complete power
failure. If a remote control is lost or damaged, two override keys are supplied so you can
manually shutdown the system via the mechanical key switch built into the main control unit.
2 x HIGH SECURITY CODE HOPPING REMOTE CONTROLS. These two button remote
controls allow you to easily arm and disarm the system or activate the panic facility from
virtually anywhere around your premises. These high security remote controls cannot be
copied by scanning or code grabbing. Up to 7 remote controls can be used. Our optional
Wireless Keypad (Part: WKP) offers PIN number security and multi-user access.
2 x WIRELESS MOTION DETECTORS. These detect any unauthorised body-heat
movement within an area, incorporating intelligent digital signal processing (DSP) and Dual
Edge Sensing (DES) technologies. These detectors have been developed to virtually
eliminate false alarms yet still provide maximum security. The Advanced Wireless
Supervision (AWS) technology constantly monitors battery and tamper conditions. An
innovative swivel bracket design allows for a quick and simple installation. With the power
saving mode and lithium batteries the detectors will give you an extended battery life of
approximately 3 years. The system will automatically let you know when the sensor batteries
require replacement, or if the sensors fail to communicate.
7

1x WIRELESS EXTERNAL HIGH POWER SIREN AND STROBE.
This unit is designed to be easily mounted under an eave. No cabling is required between
the main control unit and the siren. Simply connect to AC mains via the included plug pack,
which is supplied with a ready to connect 10m long cable. This unit incorporates a powerful
siren and flashing blue strobe. It receives radio signals from the main control unit to sound
upon alarm activation, as well as provide audible & visual arm/disarm confirmation when
using the wireless remotes or wireless keypad. When an alarm event occurs the siren will be
activated for 5 minutes. The external siren is tamper protected so if the unit is removed from
the wall it will communicate back to the main control unit and notify you of the alarm event.
The unit also incorporates a rechargeable backup battery in the event of a mains power
failure. The external siren has a built in AC failure notification & backup battery failure
notification. The external siren also features “wireless supervision” so in case the main
control unit can no longer communicate to the external siren for greater than 24 hours, you
will be automatically notified. 2 mechanical override keys are provided for use in case of
malfunction.
1. About the Watchguard Digital™ SecureNet Back-to-Base Monitoring Centre
Watchguard Digital™ professional Back-to-Base Monitoring is an integrated part of the
security system. Monitoring dramatically increases your level of protection. If your alarm
activates, you simply can't rely upon neighbours to call the police or to attend your premises.
You need a third party who will notify you, security*, police, fire, or medical services when an
emergency arises. Only professional monitoring can provide this service.
The Watchguard Digital™ SecureNet Monitoring Centre is a 24-Hour operational station,
equipped with custom designed digital servers for processing incoming alarm data, and is
also constantly manned 24 hours a day by security trained professionals for whenever
human intervention may be required.
The Digital Monitoring Centre servers automatically process the data they receive within
seconds from your Watchguard Digital Alarm System and act according to your predetermined instructions i.e. commence calling contacts, send SMS alert messages, emails
etc. This functionality rapidly accelerates response times when compared to human
processing. Within seconds the system notifies you or your designated contacts, identifying
the reason for activation, and allows you to acknowledge receiving the alert message or
choose the appropriate response. Human operator assistance is also available at anytime
during the notification process, if ever required.
Once installed, your Watchguard Digital is ready to communicate with the Digital Monitoring
Centre. No additional programming is required. Simply connect the main control unit to your
telephone line and you’re ready to go.
8

KEY FEATURES OF THE DIGITAL MONITORING CENTRE:
ONLINE ACCESS. Our secure, user-friendly web interface allows you to customize your
alarm system, access and view its status and logs from anywhere, at anytime.
INTERACTIVE NOTIFICATION. Designate up to five contacts (yourself, family, friends,
neighbours or security) notifying them of the alarm activation details via a user-friendly
interactive voice phone call. This process is escalated until contact is established. Email and
SMS Text Message notifications are also available.
NO CREDIT CARD REQUIRED. There is no credit card required for normal billing. The low
monthly monitoring service fee simply appears on your current telephone account**.
24-HOUR CUSTOMER SUPPORT. Customer Support and Technical Help is available 24
hours a day, 7 days a week by calling 1300 653 533
Requirements:
*Alarm patrol response is optional and operates independently from our monitoring system.
An additional charge will incur if you request this service. This is NOT included in your
monthly monitoring charge. A valid credit card is required to access this service. Current
patrol guard response charges will be provided when registering for this service.
**Standard phone line (PSTN) capable of dialling 1300 numbers for alarm event reporting
and 1900 numbers access for monthly monitoring charges.
***The Watchguard Digital Alarm is an integrated security system and requires monitoring to
function.
General Terms Of Sale
2.
Your Watchguard Digital has been sold to you on the basis that it is a fully monitored alarm
system, and that an ongoing monthly monitoring service fee is applicable. You cannot use
your Watchguard Digital as part of a non-monitored alarm system or with another monitoring
service provider as the system will not operate.
Your Watchguard Digital must be connected to a regular phone line for two specific reasons:
firstly, for the purposes of communicating with the Digital Monitoring Centre and secondly, to
allow automated billing of the monitoring service to your regular phone account. If you do
not connect the unit to your phone line (or the phone line fails), the unit will not be able to
send the automatic monthly billing signal and receive acknowledgement. If this occurs, you
will find that you will simply not be able to arm the system anymore – it will be rendered
useless.
What will happen if I do not connect my Watchguard Digital to a phone line, or the line
fails?
When you connect power to the main control unit, 1 hour after power connection your
Watchguard Digital will attempt to dial out via the phone line to charge for the first months
monitoring service fee. If unsuccessful, the unit will keep trying once every hour for a total of
24 hours. If still unsuccessful, after these 24 attempts, the next time you disarm the system,
the unit will enter “shutdown mode” and will be rendered useless until it is re-connected to a
working phone line.
9

You will know when the system is in “shutdown mode” as you will hear 4 beeps from both the
main control unit and external siren whenever you try to arm/disarm the system.
For greater piece of mind your Watchguard Digital will automatically carry out a self-test
once per week and call the Digital Monitoring Centre to confirm that the telephone line you
have connected your Watchguard Digital to, is operational. If the Digital Monitoring Centre
does not receive the weekly self-test signal, then the system will contact you and advise you
of the line problem.
Monitoring Service Plans
3.
You can select from 3 different monitoring plans – either the Home Plan, the Business Plan,
or the Basic Plan. To change between plans, please refer to page 16 of this manual.
Default setting: Home Plan.
THE HOME PLAN:
This plan is designed for normal residential homes, where you need only be contacted in the
event of the alarm being triggered (due to burglary, fire, or duress activation) or there is a
service message from the system (i.e. low detector battery). You can configure your system
to alert up to 5 people via voice phone call, SMS Text Message or Email alert.
Please note: To prevent sending unnecessary alert messages, if you accidentally trigger
your alarm system and then disarm it within 30 seconds, the DIGITAL MONITORING
CENTRE will automatically cancel sending any alert messages.
THE BUSINESS PLAN:
This plan is designed for commercial installations and adds to the Home Plan the additional
key feature of “OPENING & CLOSING” reports. This means you can choose to be informed
via phone, SMS or email if your Watchguard Digital has not been armed/disarmed within
certain times, or has been armed / disarmed at an irregular time. For example, you are a
shop owner and your shop opening hours are 9am to 5pm from Monday to Friday. You can
have the Digital Monitoring Centre programmed so that if your shop is not opened (i.e. alarm
system disarmed) by 9am then you can be automatically notified via phone, SMS or email.
You can also pre-set a closing time window to advise you if the alarm has not been armed by
a certain time – this is VERY important for businesses, as the alarm is simply not going to
work if it is not turned on! In our example, the shop owner may wish to be advised by 5.30pm
if his Watchguard Digital has not been armed. Furthermore, he can also be notified if there is
an “out of hours” opening or closing i.e. the shop owner wants to be notified if anyone turns
the alarm on or off on a Saturday or Sunday when the shop should be closed. With your
Watchguard Digital you can also assign staff members with their own individual remote
controls or wireless keypads, so you can identify exactly which staff member has turned the
system on or off at any time.
STANDARD FEATURES OF BOTH THE HOME & BUSINESS PLANS:
When the alarm is triggered, your Watchguard Digital will automatically make a phone call to
a special 13 number (the cost of this call is 25 cents), and send the electronic data of the
alarm event to the Digital Monitoring Centre. The Digital Monitoring Centre will then follow
your pre-programmed instructions and phone / SMS / email your designated contacts. You
may also select to send a security patrol guard to your premises, or speak with a human
operator at any time. If you have selected for a guard to be dispatched to your premises, you
will be called on completion of the guard’s visit to provide report details.
Please note: The cost of on-site security patrol guard responses is NOT included in the
standard HOME or BUSINESS plans. The guard response service is also not available in all
suburbs & towns. A credit card is also required for automated guard billing purposes.
10

THE BASIC PLAN:
The Basic Plan is designed for people who only want a very low cost, limited alarm
monitoring service whereby they receive all alarm event notification via SMS Text or Email
Messaging only
are: SMS & Email Messages are not as reliable as voice communication (can be delayed),
and are also easy to be ignored by the recipient. Other disadvantages are that you can not
speak directly to an operator, and you can not select to dispatch a guard to your premises
unless you call the Digital Monitoring Centre & provide your credit card details. If you select
the Basic Plan, you accept that you are not receiving the full benefits & protection level that
your Watchguard Digital & professional SecureNet Monitoring service can provide.
Monitoring Plan Costs
4.
Once you have purchased your Watchguard Digital System from your dealer, you will be
billed automatically each month for the monitoring service as long as you choose to have the
system connected to your phone line. The ongoing monitoring service charge is simply billed
to your regular phone account.
If you no longer require a monitored security system, you may simply disconnect your
Watchguard Digital from the phone line and no further payment is required. Please note that
the product is then of no use to you as it will simply enter “shutdown mode” as described
earlier in this document.
The cost of the HOME PLAN is $29.90 per month including GST.
This cost is exclusive of all local call charges made by the system to the DIGITAL
MONITORING CENTRE*. The plan includes up to 10 voice / SMS alarm notification calls to
all nominated recipients per month & unlimited email notifications. Additional voice / SMS
alarm notification calls will be charged at $1 each per alarm event.
The cost of the BUSINESS PLAN is $34.90 per month including GST.
This cost is exclusive of all local call charges made by the system to the DIGITAL
MONITORING CENTRE*. The plan includes up to 20 voice / SMS alarm notification calls to
all nominated recipients per month & unlimited email notifications. Additional voice / SMS
alarm notification calls will be charged at $1 each per alarm event.
The cost of the BASIC PLAN is $12.90 per month including GST.
This cost is exclusive of all local call charges made by the system to the DIGITAL
MONITORING CENTRE*. The plan includes unlimited email notifications and up to 10 SMS
notification messages per month (eg. 10 SMS messages to 1 keyholder or 2 messages to 5
keyholders etc). Additional SMS alarm notification messages will be charged at $1 each per
alarm event.
These prices are current as of the 1/01/06, but may be varied after 2 years after consultation
with you.
••••
When your Watchguard Digital requires communicating with the Digital Monitoring
Centre, the cost of the call (25 cents) will be billed to your regular phone account.
. The main disadvantages compared to the regular Home/Business Plans
11

Optional Alarm Patrol Guard Response
If you select the option of sending a Patrol Guard to your premises, then you must register
online and provide your credit card details, or alternatively call 1300 653 533 during business
hours. Each response will be charged directly to your credit card. The guard response
service is also not available in all suburbs & towns. Current patrol guard response charges
will be provided when registering for this service.
5. Automated Billing Procedure
Once per month, your Watchguard Digital automatically calls a special 1900 number, and
this in turns adds the monthly monitoring service fee of $29.90, $34.90 or $12.90 to your
regular phone bill. This system is superior to most current billing methods, as it means you
do not need to receive a separate monitoring bill, or worry that you may not have sufficient
funds in a direct deposit or credit card account.
The call costs for your Watchguard system dialing the DIGITAL MONITORING CENTRE 13
number (25 cents per call) are additional to the monitoring service fee, and will also appear
on your regular phone bill.
6. Changing System Settings
During registration you will be provided with a unique username & password, which will
enable you to login and securely access all your monitoring account information via the
internet at www.watchguardalarms.com.au. You can also change your password at any time.
You will have total control at all times over all user programmable settings such as who to
alert, when to send alerts, in what order to send alerts and by what method per user (i.e.,
phone, SMS or email). You can also update zone descriptions and user names yourself.
Furthermore, you also have access to a full history log of all alarm activations, showing the
date / time / zone number etc. Business Plan subscribers will also have details recorded of
each time the system has been armed/disarmed, and by what user.
If you do not have internet access, you can always speak to one of our customer service
representatives during business hours on 1300 653 533 who can make the changes over the
phone for you - you must of course provide your confidential username & password. We will
then mail you a confirmation letter outlining your new system settings. It is your responsibility
to ensure all programmed settings such as contact phone numbers, email addresses etc are
correct and advise if there are any errors.
12
Installation
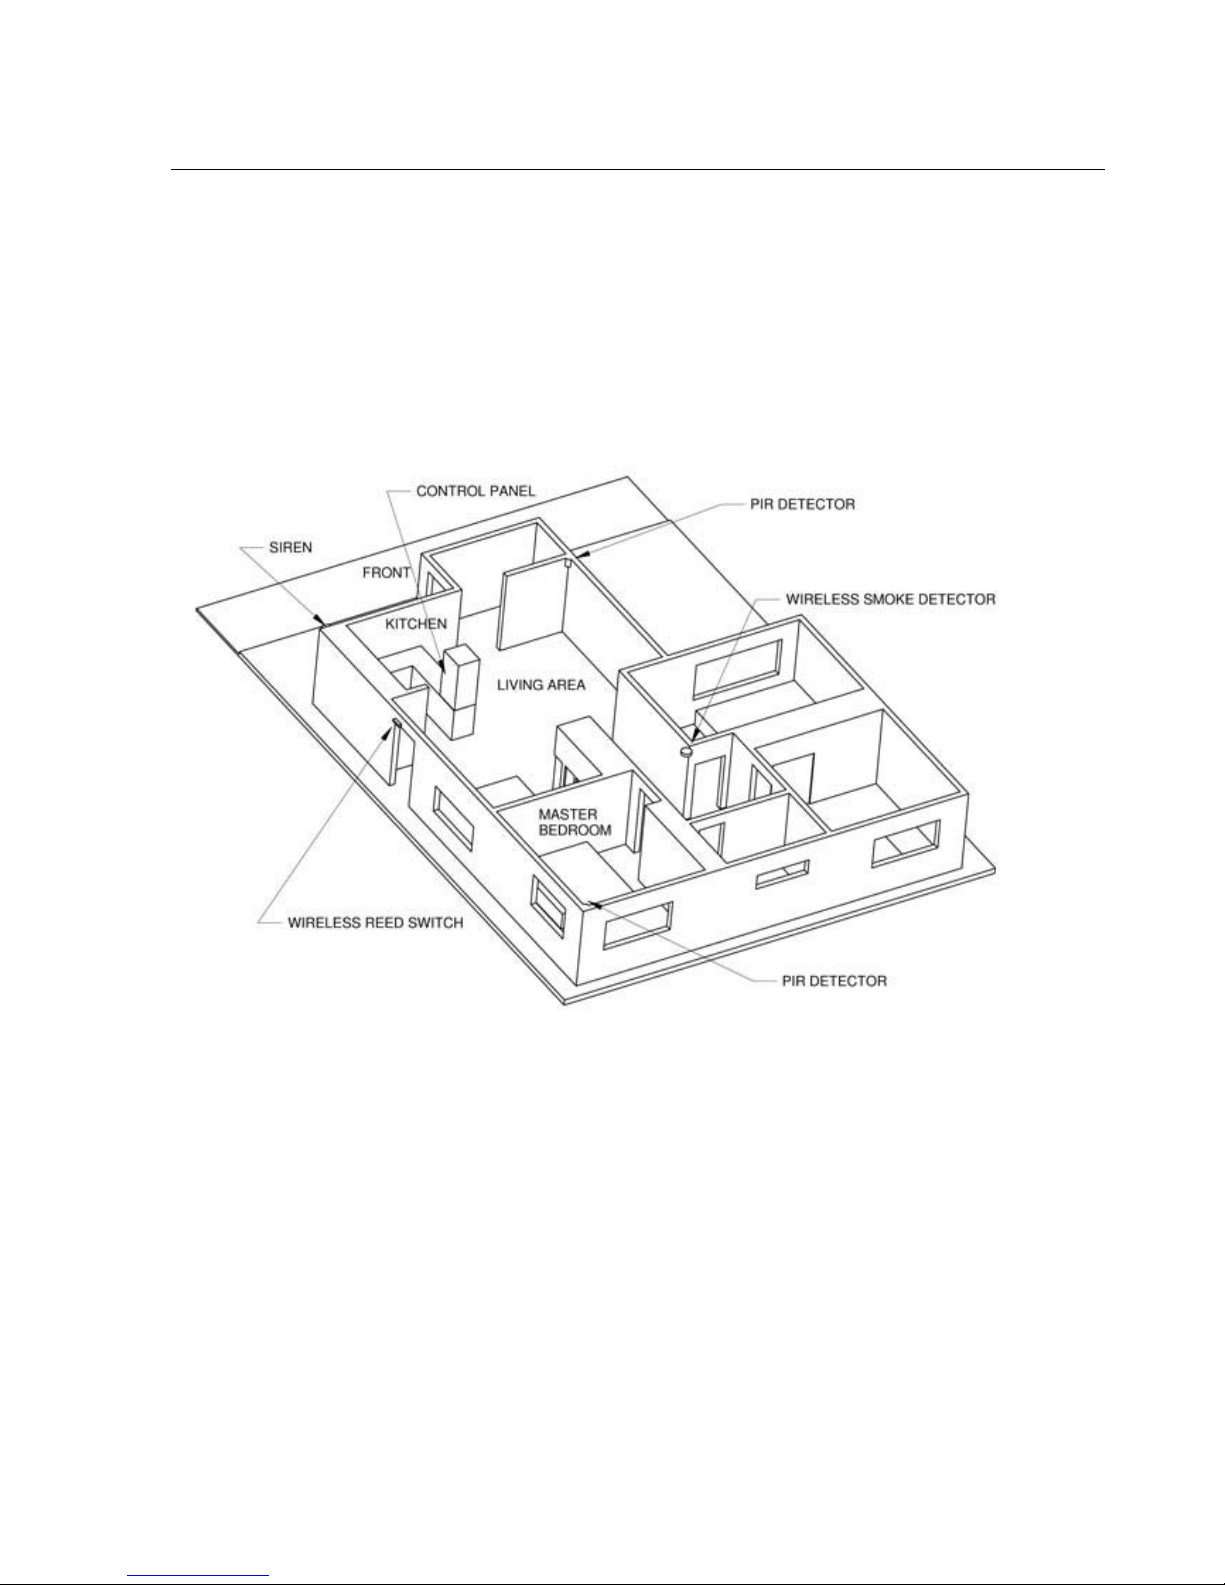
Planning the Installation
To get the best possible protection from your Watchguard Digital alarm system, it is
imperative that you follow the following guidelines on where to place the system
components. Below is a diagram of where we suggest you should place the Main Control
Unit, the External Siren and the Detectors.
Please Note: The main unit will enter test mode when first turned on. This mode will allow
you to verify that all wireless devices you have installed work correctly. When the unit is
turned on, Walk Test Mode is entered by default. Please see instructions to complete the
Walk Test Mode. Refer page 43.
Typical Alarm System Layout, with optional wireless smoke sensor & wireless reed switch
shown.
Installation Sequence:
1. Install the Main Control Unit.
2. If required, change your Monitoring Plan from the Home Plan (default setting) to the
Business or Basic Plans. Refer to Page 16.
Note: This must be done the very first time the main control unit is turned on.
3. Install the Wireless PIR Sensors.
4. Install the External Siren and Perform Auto Wireless Siren Test
5. Register with the SecureNet Digital Monitoring Centre.
6. Customise Programming (if required). Refer Page 41.
13

Watchguard Digital Main Control Unit Basic Connection Diagram
1
3
Diagram not to scale
To power point
To phone line
2
The diagram above shows the 3 standard connections for the Main Control Unit:
1. Low Voltage Power Adapter for connection to your power point.
2. Telephone Line Connection using the supplied lead. Please note the wall socket plug
is removable to allow for both old and new style phone sockets.
Optional Connection For Your Existing Phone i.e. if you wish to share an existing phone / fax
line access point with your Watchguard Digital; connect your phone to this socket. Please
note: Whenever your Watchguard Digital communicates with the Digital Monitoring Centre, it
will automatically disconnect any phone connected to this socket so as to give immediate
priority to the outgoing alarm information.
14

control unit to the on position.
Antenna
Step 1: Install The Main Control Unit
The Main Control Unit requires both AC power and a phone line to be plugged in. Therefore,
it should be located as close as possible to a power and phone outlet and preferably
mounted out of sight. For maximum wireless range, mount the unit at a height of 1.5m or
greater from the floor, and ensure there are no metal objects directly adjacent to the
antenna.
Note: Make the antenna as straight as possible, as even small bends can reduce the
wireless range significantly. DO NOT ever attempt to shorten or lengthen the antenna.
Installing the Main Control Unit
vertical & straight
– Keep
1. Drill mounting holes (7mm Diameter) into
the chosen location (preferably 1.5m or
greater from the floor).
2. Once installed, the antenna on the back of
the main control unit must be straightened
so that it is vertical.
3. Push the supplied wall plugs into the holes
then mount the unit on the wall using the
supplied screws.
4. Plug the power adapter (with the right angle
plug) into your power point (leaving it
switched off), and connect the right angle
plug into the Main Control Unit.
5. Connect your phone line via the line socket
using the lead provided. If using a regular
phone from the same wall socket, connect it
to the phone socket.
6. Turn the power point on where the power
adapter is connected.
7. Prepare to select billing plan if you intend to
change the plan (Default: Home Plan)
8. If there is no change to the monitoring plan,
Turn the master key switch on the main
The Watchguard Digital has been designed with most single & two storey residential /
business premises in mind. In some instances however, (due to the construction of the
building) range may be diminished, and this may require you to locate either the main control
unit, the external siren, or the alarm detector closer to one another to achieve reliable
performance. Carrying out Auto Siren test (Refer Page 45) and Walk Test (Refer Page 43)
will ensure best operation.
15

Step 2: Changing Your System From The Home To The Business or Basic Plans:
The RED LED indicator on the main control unit will now flash
Immediately press and hold down the necessary button/s for
your selected plan on a remote control until the confirmation
Your Watchguard Digital is pre-programmed at the factory on the Home Plan. If you wish to
change to the Business or Basic Plans, please follow the procedure below.
TO CHANGE BETWEEN HOME, BUSINESS & BASIC PLANS
1.
2.
3.
Turn the Main Control Unit off via the key switch.
After waiting at least 5 seconds, turn the main control unit key
switch back to the on position.
very quickly.
4.
5. COMPLETE
Immediately
beeps are heard (approx 5 seconds).
Button 1 Home Plan
Button 2 Business Plan
Buttons 1& 2 together Basic Plan
One beep Home Plan
Two beeps Business Plan
Three beeps Basic Plan
PLEASE NOTE:
system, you must notify the SecureNet Digital Monitoring Centre by speaking to an operator
on 1300 653 533.
If you wish to change back to the Home Plan after registering your
16

Walk test the detector and adjust facing angle as necessary
Step 3: Install the Wireless PIR Detectors
Installing the Wireless PIR Detectors
On then rear of each detector is a sticker indicating the preprogrammed zone number. Starting with Zone 1, power up
the detector by removing the plastic insulator under one the
batteries. Then wait 3 minutes for the detector to warm up.
1.
Remove plastic from
under battery terminal
2.
Set dipswitches 1 and 3 on the main control unit to on.
3.
4.
5.
6.
Open and close the front cover of the detector. The
detector can now be walk tested for 3 minutes.
so that the red light on the detector turns on whenever you
walk past it. The unit will beep out the zone number of the
detector whenever it is triggered i.e. zone 1 will beep once.
The unit will not beep out the zone number if the radio
signal strength is not strong enough.
For information on Walk Test see page 22 and page 43.
Mount the detector if walk test was successful.
Press Button 2 to exit Walk Test mode.
7.
ZONE
FEATURE
By default zones are active in both home and away modes.
To modify the zone’s features continue following this
procedure, otherwise go to step 10.
PROGRAM
17
 Loading...