

Page 1

Table of Contents
Before You Begin. . . . . . . . . . . . . . . . . . . . . . . . . . . . . . . . . . . . . . . . . . . . . . . . . . . . . . . . . . 2
Package Contents. . . . . . . . . . . . . . . . . . . . . . . . . . . . . . . . . . . . . . . . . . . . . . . . . . . 2
What You Will Need . . . . . . . . . . . . . . . . . . . . . . . . . . . . . . . . . . . . . . . . . . . . . . . . . 3
Installation. . . . . . . . . . . . . . . . . . . . . . . . . . . . . . . . . . . . . . . . . . . . . . . . . . . . . . . . . . . . . . . 4
Determine the Mounting Location. . . . . . . . . . . . . . . . . . . . . . . . . . . . . . . . . . . . . . 4
Attach the Screen Bracket to the Screen. . . . . . . . . . . . . . . . . . . . . . . . . . . . . . . . . 4
Attach the Swing Arm Bracket to the Cabinet. . . . . . . . . . . . . . . . . . . . . . . . . . . . . 5
Attach the Screen to the Swing Arm Bracket . . . . . . . . . . . . . . . . . . . . . . . . . . . . . 7
Notices . . . . . . . . . . . . . . . . . . . . . . . . . . . . . . . . . . . . . . . . . . . . . . . . . . . . . . . . . . . . . . . . . 8
Specifi cations. . . . . . . . . . . . . . . . . . . . . . . . . . . . . . . . . . . . . . . . . . . . . . . . . . . . . . . 8
Page 2
Before You Begin
Stop: Read this entire manual! Do not attempt to install this product if you do
STOP
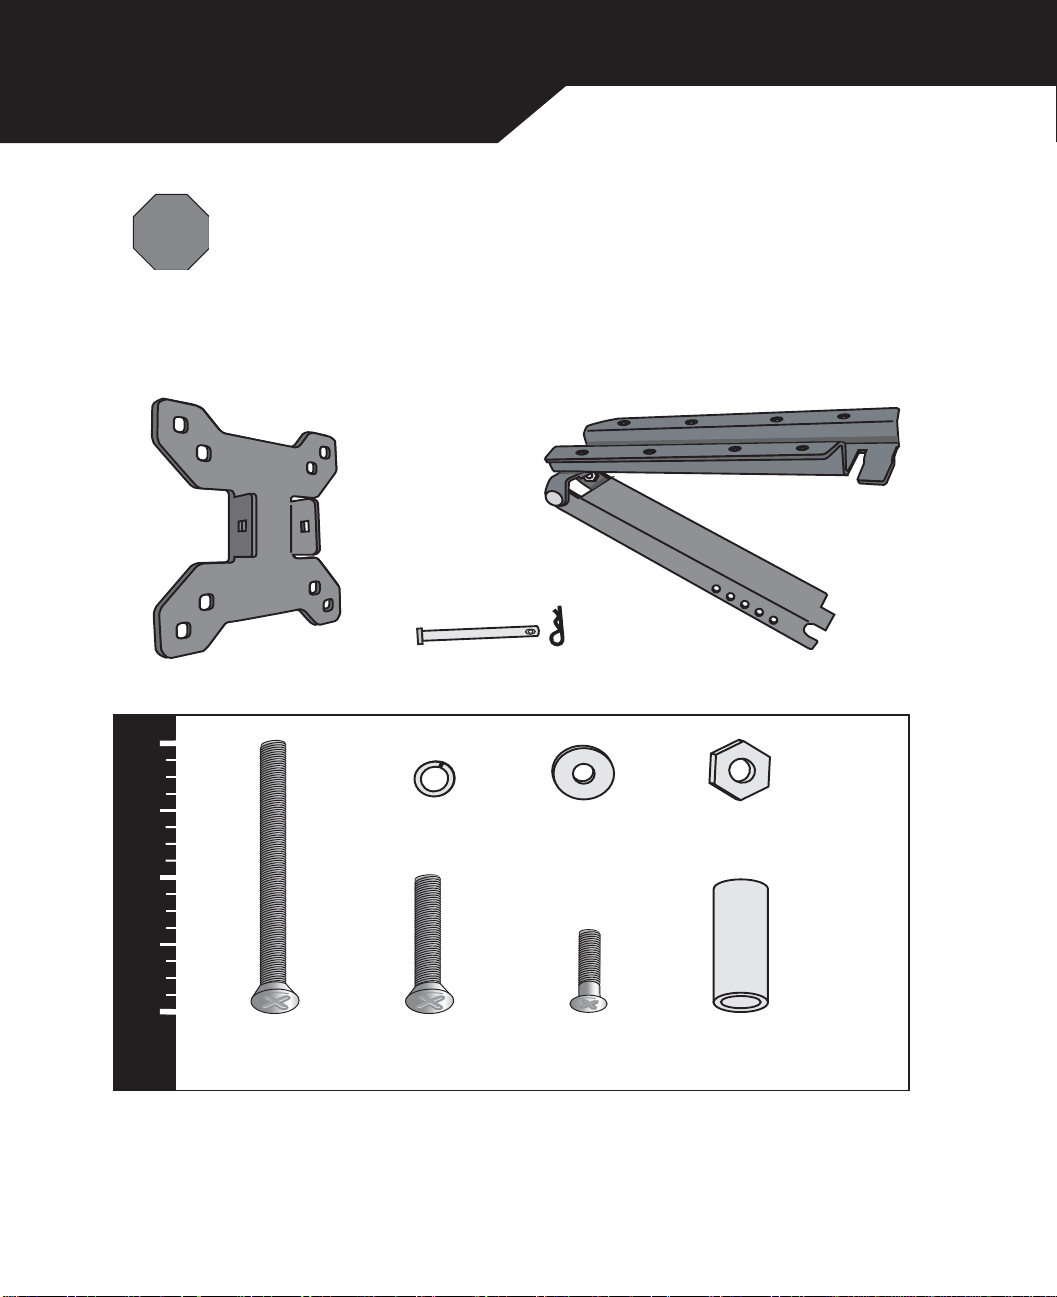
Package Contents
Verify that you have received all of the parts listed below:
not understand the instructions or if there are missing or defective parts. If you are
in doubt, contact a qualifi ed contractor to install the mounting bracket. Improper
installation may result in damage to the TV or other property, or personal injury.
2
1
INCHES
0
Screen Mount
4 - 2" Swing
Arm Screws
Pin & Pin Clip (Removed)
4 Swing Arm
Lock Washers
4 - 1" Swing
Arm Screws
4 Screen
Washers
4 -1/2" Philips
Screen Screws
Swing Arm Bracket
4 Swing Arm
Mounting Screw Nuts
4 - 1" Large
Screen Spacers
If any parts are missing or damaged, contact Rhino Mounts at 605-232-4077 for a
replacement. Rhino Mounts is not liable for damage or injury caused by incorrect mounting,
incorrect assembly or incorrect usage.
2 www.rhinomounts.com
Page 3

What You Will Need
You will need these tools to install your wall mount bracket:
• Measuring T ape
• Pencil or Pen
• Electric Drill
• 3/16” Drill Bit
• Phillips Screwdriver
• 3/8” Socket Wrench or Crescent Wrench
www.rhinomounts.com 3
Page 4
Installation
The FPM1300 supports mounting of " at screens that conform to the VESA mounting
specifi cation with 75mm or 100 mm hole spacing. Measure the distance between the four
mounting holes on your screen to ensure that they measure either 75mm (3 inches) or 100
mm (4 inches) center to center. Installing your FPM1300 involves the following steps:
1. Determine the Mounting Location
2. Attach the Screen Bracket to the Screen
3. Attach the Swing Arm Bracket to the Cabinet
4. Attach the Screen to the Swing Arm Bracket
Determine the Mounting Location
Decide where you want to hang your screen. A good location is near an electrical outlet,
and within cable reach of any components you plan to connect to the screen.
Warning: The mounting surface must support the weight of the bracket and
screen while stationary and moving to different positions. If the surface is not
!
strong enough, it may result in damage to the screen, cabinet and bodily injury.
Empty the contents from the cabinet where you want to mount the screen. Determine
whether there is enough clearance for the screen and mounting bracket between the cabinet
bottom and the counter top. The bracket can add up to four inches to the clearance needed.
Attach the Screen Bracket to the Screen
1. If the screen has an attached base, remove it, saving the screws. If the screws fi t
securely into the mounting holes on the back of the screen, use these screws to
mount the bracket to the screen. If they do not, fi nd screws in the provided hardware
that fi t securely into the screen mounting holes. The screws should not move side to
side or pull out. If they do, use other screws that fi t better.
2
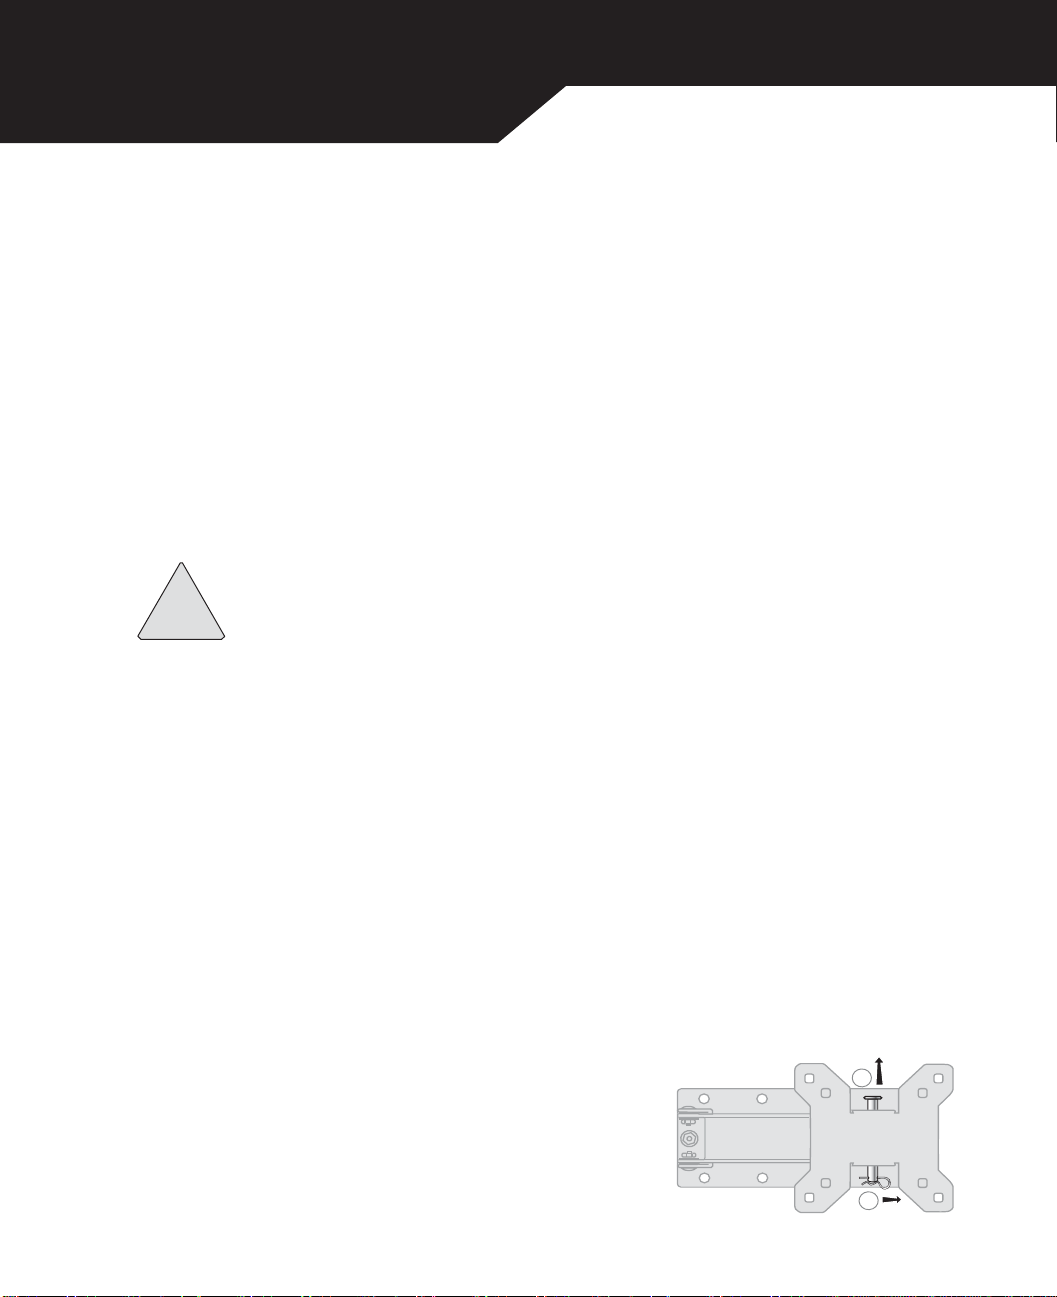
2. Remove the screen bracket from the swing arm
bracket by sliding the locking clip off the pin and
sliding the pin out. The screen mount should lift off.
1
4 www.rhinomounts.com
Page 5
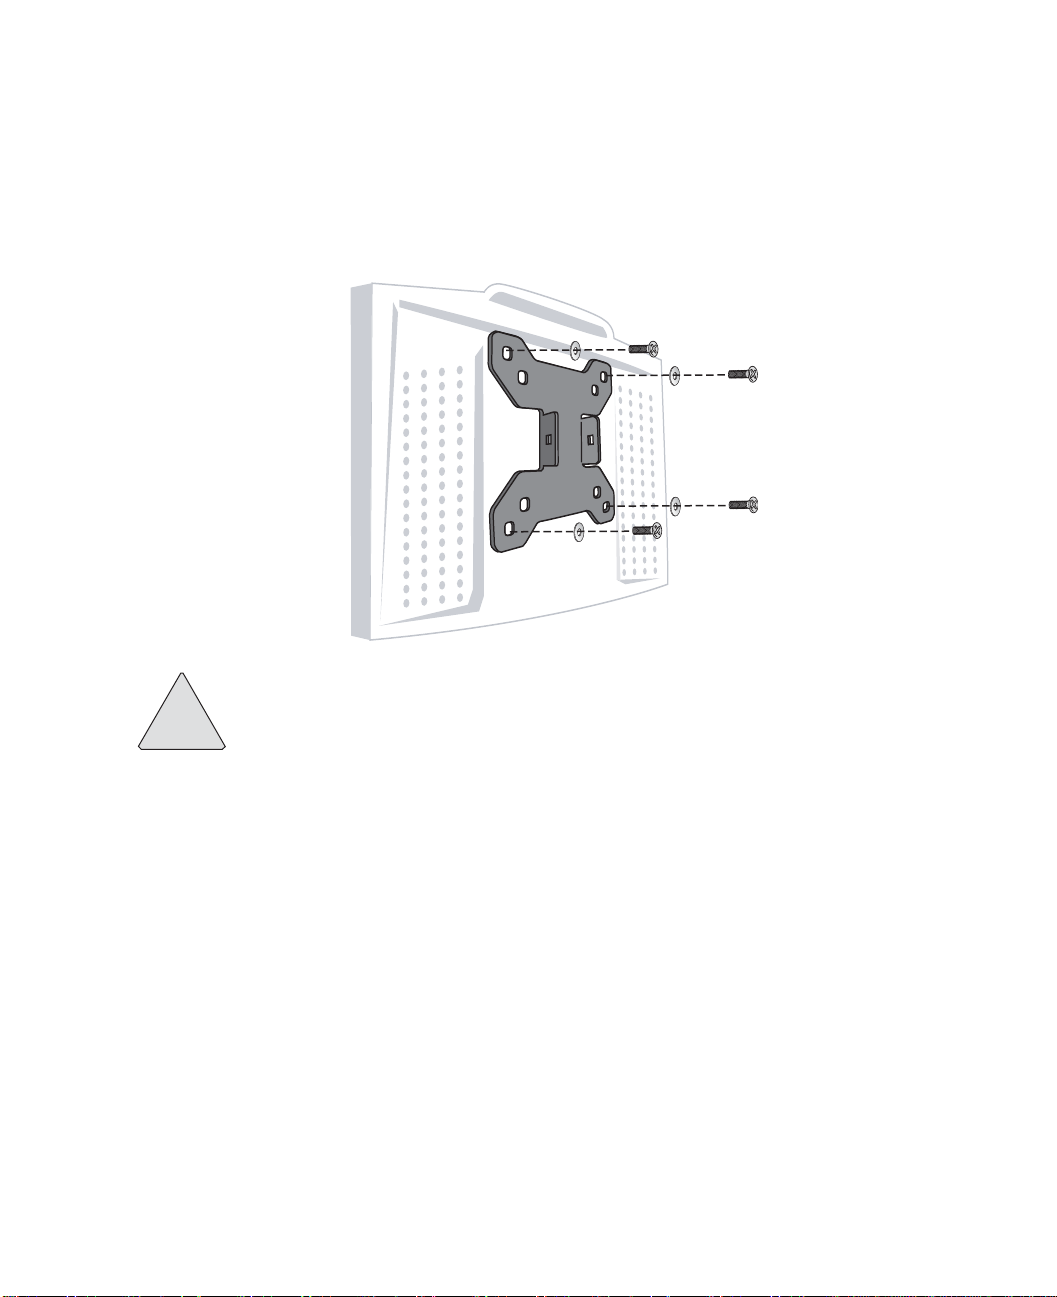
3. Align the screen bracket ov er the four holes on the back of the screen. Make sure that
the screen washers fi t between the screen screws and the screen mount so that the
screw head completely covers the washer hole with some overlap. If you can see any
gap between the washer hole and the scre w head, or if the screw head fi ts inside of the
washer, fi nd another washer that fi ts better.
4. Mount the bracket onto the screen as shown below.
Caution: With the screen mount and washer s in place, test the length of the
screws to ensure that they do not extend past the depth of the screen mounting
!
holes. If the screws are too long, they can extend into the back of the screen and
damage it.
Attach the Swing Arm Bracket to the Cabinet
If your screen is less than 12 inches high or does not need to be folded up under the cabinet,
the best place to mount the swing arm bracket is under the cabinet so that it is out of the
way. However, if you have a larger screen that needs to fold under the cabinet, you can
mount the bracket so that it extends beyond the front of the cabinet thus accommodating
the extra screen height when folded under the cabinet.
www.rhinomounts.com 5
Page 6
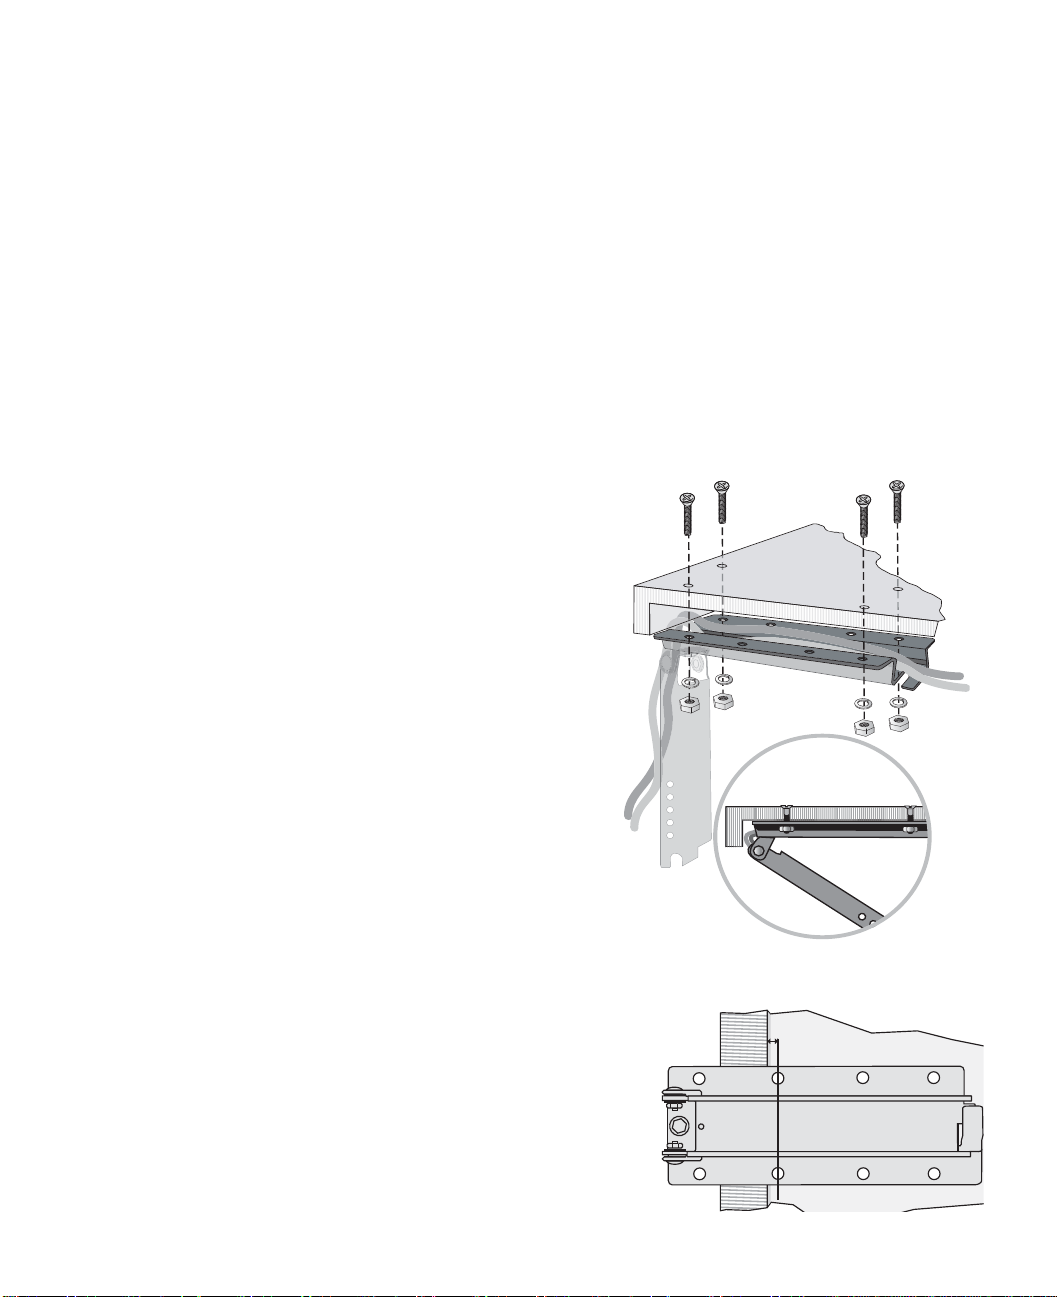
To Mount the Swing Arm Bracket Under the Cabinet:
1. Before attaching the swing arm, determine how far the bracket should be set back
from the cabinet front. To mount the screen so that the screen front is lined up
with the cabinet front, the setback distance should be the screen depth plus ¾ of an
inch. To mount the screen so that the screen front is set back from the cabinet front,
add the additional distance to the screen depth plus ¾ of and inch to determine the
overall setback distance.
2. Hold the bracket up to the cabinet bottom so that the front of the bracket it set back
the distance determined in step #1. Align the swing arm bracket so that the front is
parallel with the cabinet front. Insert a pencil or pen into the four swing arm bracket
holes that are the farthest from each other and draw a mark in the center of each of
the holes. Additional holes are provided for added mounting " exibility.
3. Using a 3/16 inch drill bit, drill holes at each of
the locations you marked in step #2.
4. Before mounting the bracket, route the cables
through the ‘u-shaped’ channel in the bracket so
that they are enclosed between the bracket and
the cabinet bottom.
5. While holding the swing arm bracket in place
under the cabinet, insert screws through the
top of the cabinet shelf down through four of
the holes. Place a lock washer and nut over
each screw and tighten. The screw top should
countersink into the shelf until it is " ush.
To Mount the Swing Arm Bracket So It
Extends Beyond the Cabinet Front:
1. Place the bracket on top of the cabinet shelf. Move
the bracket so that the second row of holes is 1/8
inch from the inner-most edge of the cabinet lip.
2. Insert a pencil or pen into the four swing arm bracket
mounting holes farthest from each other, and draw a
mark in the center of each hole.
6 www.rhinomounts.com
1/8"
Page 7
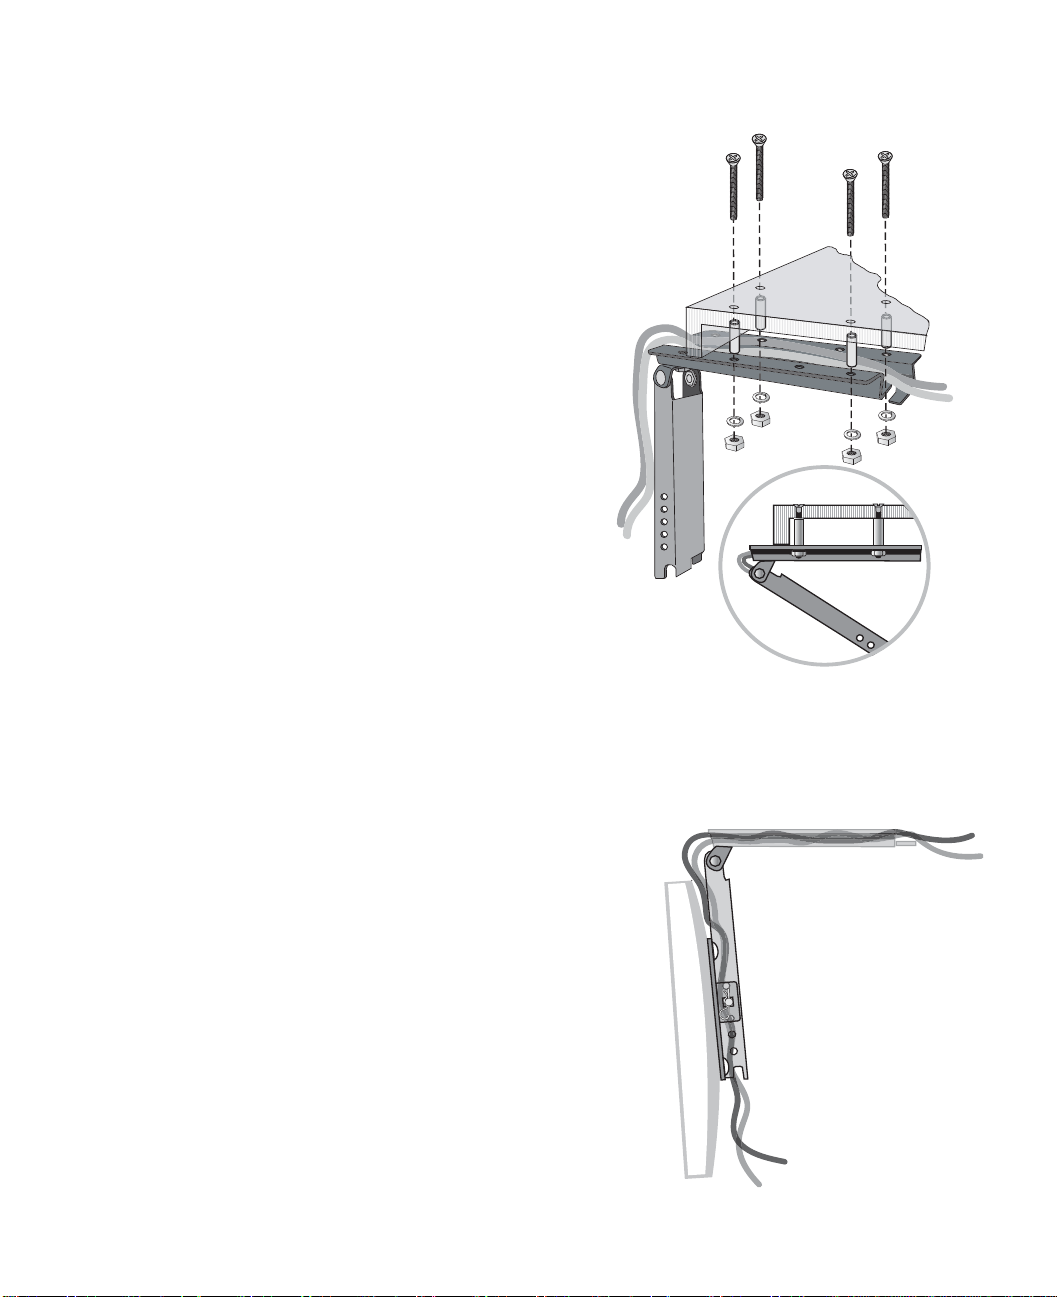
3. Using a 3/16 inch drill bit, drill holes at each of the locations you marked making sure
that the drill bit is completely vertical as you drill.
4. Move the bracket to the bottom of the cabinet.
Before mounting the bracket, route the cables
through the ‘u-shaped’ channel in the bracket
so that they are enclosed between the bracket
and the cabinet bottom.
5. While holding the swing arm bracket in place,
insert a screw through the top of the cabinet
shelf down through four of the bracket holes.
Place a 1 inch spacer on each screw between
the bracket and the cabinet bottom. Position
the bracket and then place a lock washer and
nut over each screw and tighten. The top of
the screw should countersink into the top of
the shelf until it is " ush.
Attach the Screen to the Swing Arm Bracket
1. Facing the cabinet, pull the swing arm bracket to the right until it clears the locking
tab.
2. Pull the swing arm down until it is at least vertical
(up and down) with the cabinet.
3. Route the cables down through the channel of the
swing arm. Then hold the back of the screen next
to the swing arm so that the screen bracket tabs
are positioned on either side of the swing arm.
With the holes lined up, slide the pin through the
screen bracket and swing arm. Once the pin is fully
inserted, slide the locking clip through the hole at
the end of the pin to prevent it from sliding out.
4. Finish connecting the cables and plug the screen
into power.
www.rhinomounts.com 7
Side View
Page 8
Notices
Caution: This mounting bracket is intended for use only with the maximum
weight indicated. Use with products heavier than the maximum weights indicated
!
Specifi cations
Weight Rotation Tilt Range Maximum Load Weight
4 lb 360 degrees 90 degrees back 17 lb
Made in the U.S.A.
© 2005 Rhino Mounts. All rights reserved.
may result in instability and possibly cause injury.
8 www.rhinomounts.com
Page 9

www.rhinomounts.com 9
Page 10

Rhino Guard Warranty
Rhino Mounts warrants to the original purchaser of its mounting brackets for the life of the bracket,
that the bracket shall be free from defects in assembly, material, or workmanship and will repair or
replace, at its sole discretion, a defective bracket free of charge, provided the bracket is returned to
Rhino Mounts prepaid by purchaser. Unauthorized service or repairs by anyone other than Rhino
Mounts or a pre-approved repair facility renders this warranty void and shall release Rhino Mounts
from any further responsibility or obligation.
Rhino Mounts will repair or replace up to a maximum of $10,000.00, at its option, any component
(television, projector, monitor or screen) which is damaged by a Rhino Mounts bracket’s failure to
perform* when that product is properly installed** for its intended use. This Lifetime Warranty is
subject to the limitations and exclusions set forth herein. Rhino Mounts will repair or replace the
damaged components (television, monitor or screen) at Rhino Mounts option, up to an amount equal
to the fair market value of the damaged equipment or the original purchase price of the equipment,
whichever is less, up to the maximum amount set forth above.
Rhino Mounts reserves the right to inspect the damaged component, the Rhino Mount bracket
alleged to have failed, and the site where the damage occurred. All costs of shipping the Rhino
Mount bracket and damaged component to Rhino Mounts for inspection shall be borne solely by
the purchaser. Rhino Mounts reserves the right to negotiate the costs of repairs. If Rhino Mounts
determines, in its sole discretion, that it is impractical to ship the damaged component or bracket to
Rhino Mounts, Rhino Mounts may designate, in its sole discretion, a component (television, monitor
or screen) repair facility to inspect and estimate the cost to repair. The cost, if any, of shipping
the component to and from such repair facility and of such estimate shall be borne solely by the
purchaser. Damaged components must remain available for inspection until the claim is fi nalized.
Whenever claims are settled, Rhino Mounts reserves the right to be subrogated under any existing
insurance policies the claimant may have.
All above warranties are null and void if: the Rhino Mounts bracket in use during the occurrence is
not provided to Rhino Mounts for inspection upon Rhino Mounts’ request at the sole expense of
the purchaser; or if Rhino Mounts determines that the Rhino Mounts bracket has been improperly
installed, altered in any way or tampered with; or if it is determined by Rhino Mounts that the damage
did not result from the Rhino Mounts product’s failure or that in fact no occurrence took place; or
the repair or replacement of the damaged equipment is covered under a manufacturer’s warranty;
or Rhino Mounts determines that the equipment was not used under normal operating conditions
or in accordance with any labels or instructions. Improper installation voids the warranty. The Rhino
Mounts warranty and insurance only protects against damage to properly connected and installed
equipment where Rhino Mounts has determined, in its sole discretion, that the damage resulted from
a Rhino Mounts product failure, and does not protect against acts of God such as " ood, earthquake,
war, vandalism, theft, normal-use wear and tear, corrosion or abuse. Any damage caused by failure to
observe instructions for installation, or product limitations specifi ed in the product manual or product
10 www.rhinomounts.com
Page 11

specifi cation sheet, or mounting on unsuitable surfaces will not be covered by the Rhino Mounts
warranty.
The warranty described herein shall be IN LIEU OF any other warranty, express or implied, including
but not limited to, any warranty of MERCHANTABILITY or FITNESS FOR A PARTICULAR PURPOSE.
In no event shall Rhino Mounts be liable for incidental, special, direct, indirect consequential or
multiple damages such as, but not limited to, lost business or profi ts arising out of the sale or use of
any Rhino Mounts products, even if advised of the possibility of damages. This warranty and insurance
gives you specifi c legal rights, and you may also have other rights, which may vary from state to state.
Some states do not allow the exclusion of limitation of incidental or consequential damage so the
above limitations may not apply to you.
The warranty and insurance is valid only for the original purchaser of the product and only if the
original purchaser registers the purchase on-line at www.rhinomounts.com or by mailing a copy of the
purchase receipt and product warranty registration card to RhinoGuard, P.O. Box 1547, North Sioux
City, SD 57049 within thirty (30) days of the date of purchase. All damage claims against the product
must be made within fi fteen 15 days from the date of the occurrence and must be accompanied by a
receipt for the damaged bracket or the warranty is void. Warranty is only valid in USA and Canada.
To fi le a warranty claim please write to us at RhinoGuard, P.O. Box 1547, North Sioux City, SD 57049,
within 15 days of the occurrence. Please provide to us or have the following information available:
a. Rhino Mounts bracket part number.
b. The equipment that was used with the Rhino Mounts bracket at the time of the occurrence.
c. The component that was damaged during the occurrence and the extent of the damage.
d. The date of the occurrence.
e. Where you purchased the Rhino Mounts product.
f. Date you purchased the Rhino Mounts product.
g. Copy of the original receipt for the damaged product.
* Failure to perform in accordance with that bracket’s specifi cations sheet or product manual
** Properly installed in accordance with that bracket’s installation instruction sheet or bracket manual
and only when mounted on approved surfaces.
www.rhinomounts.com 11
Page 12

12 www.rhinomounts.com
 Loading...