

Page 1
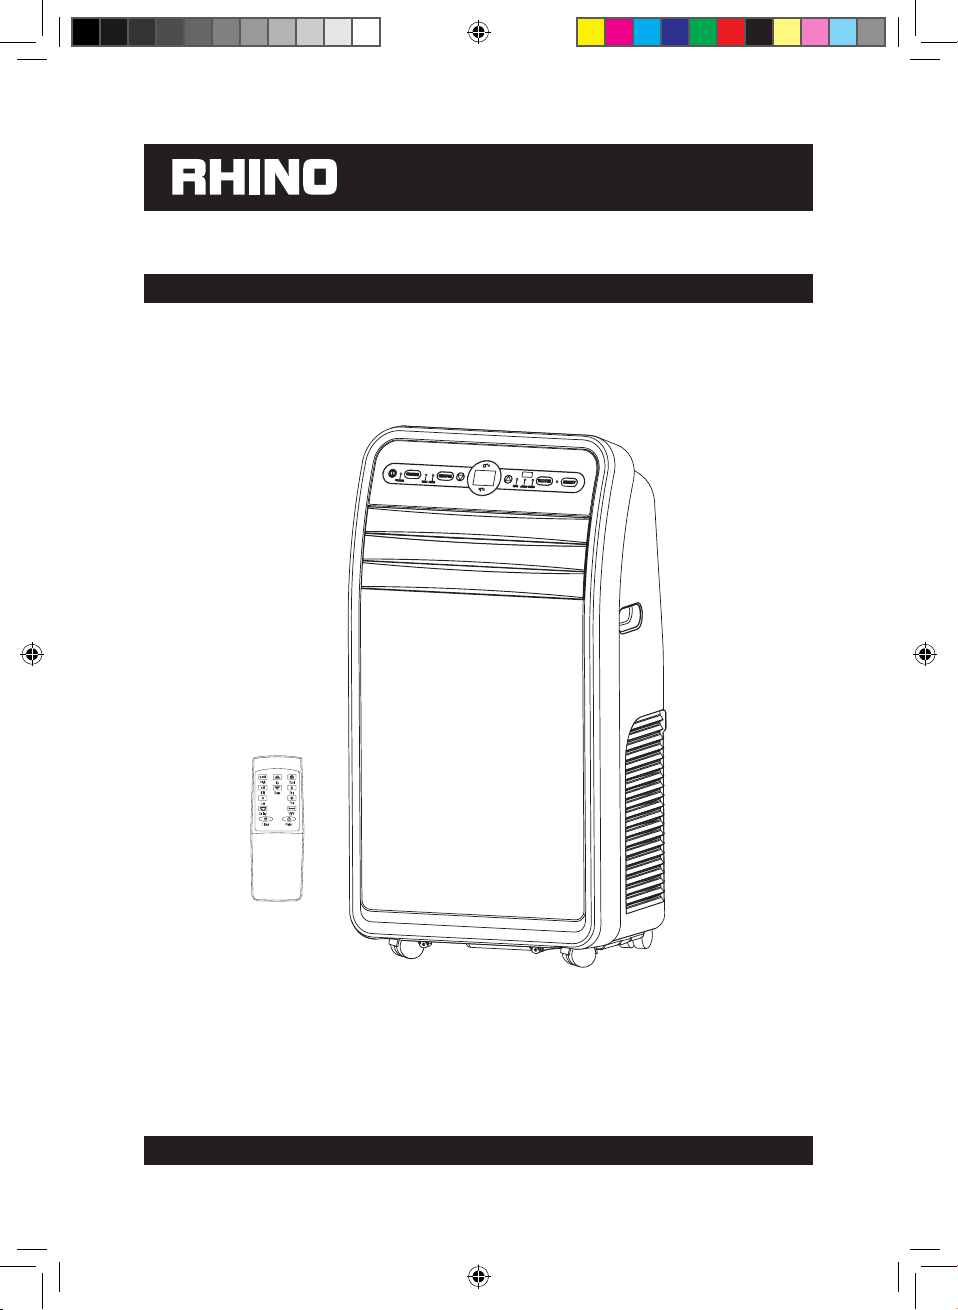
PORTABLE AIR CONDITIONER
OPERATING INSTRUCTIONS
RHINO 9000: H03620
RHINO 12000: H03621
RHINO - designed and distributed by Birchwood Price Tools. Birchwood Price Tools is a trading name of Toolstream Limited.
BD20A1222RMS19 - 001
Air Con UI.indd 1 31/01/2019 13:30
Page 2
USER MANUAL
Thank you for choosing this Rhino portable air conditioner. Please read the Manual carefully
before operation. In case of any issues please contact your distributor or the manufacturer.
CONTENT
Important Safety Tips
Precautions 3
Product Introduction
Main Parts and Components 4
Control Panel and Remote Controller 5
Product Operation
Placement and Installation 6
Operation Method 8
Cleaning and Maintenance
Drainage Method 9
Maintenance 9
Common Failures and Diagnosis
Intelligent Error Detection 10
Fuse Parameters 10
Troubleshooting 10
BEFORE INITIATION
To avoid damage, place the unit in an upright position for at least 24 hours before initiation.
Make sure that the air outlet and air inlet are never blocked.
Only operate the unit on a horizontal surface to ensure no water leaks out.
2
Air Con UI.indd 2 31/01/2019 13:30
Page 3
IMPORTANT SAFETY TIPS
PRECAUTION
Please read the manual carefully before operating the machine:
•
This machine is for household or light industrial use only.
•
This machine is for indoor use only. Please place it in a dry environment.
•
Check the power cord frequently. When the power cord, plug or A/C is damaged, please
don’t operate. If the power cord is not long enough, a power extension cable can be used.
•
The A/C should be away from a heat source and avoid direct sunlight.
•
Turn off the A/C before unplugging.
•
Turn off and unplug the A/C before removing, cleaning or replacing parts.
•
Clean the A/C according to the manual.
•
Children are not allowed to play with the A/C.
•
Don’t insert your ngers or any hard object in to the air outlet.
•
Don’t place the A/C near or next to water or other liquid. Prevent water or liquid from
entering the A/C.
•
If the power cord is damage the unit should not be used and repaired immediately by
quali ed persons, manufacturers representative or the manufacturer.
•
Please use only the accessories provided with the A/C, using any other parts may result in
damage or impaired performance.
•
Keep any required ventilation openings clear of obstruction;
•
Ducts connected to an appliance shall not contain a potential ignition source;
•
When the portable air conditioner or dehumidi er is turned on, the fan can work
continuously under normal conditions to provide the minimum air volume of 100m3/h even
when the compressor is closed due to the low temperature.
•
Do not perforate any of the components in the refrigerant circuit. Refrigerant gas may be
odourless
SPECIAL WARNING:
•
Place the A/C on even ground and install it vertically, to ensure normal operation
of the compressor.
•
The A/C should be at least 50cm away from surrounding objects. Keep air inlet and
outlet clear of obstructions.
•
Don’t use the A/C next to ammable liquids or within a solvent laden environment.
•
Don’t use aerosols, any airborne solvents or any ammable substances within the operating
area of the A/C.
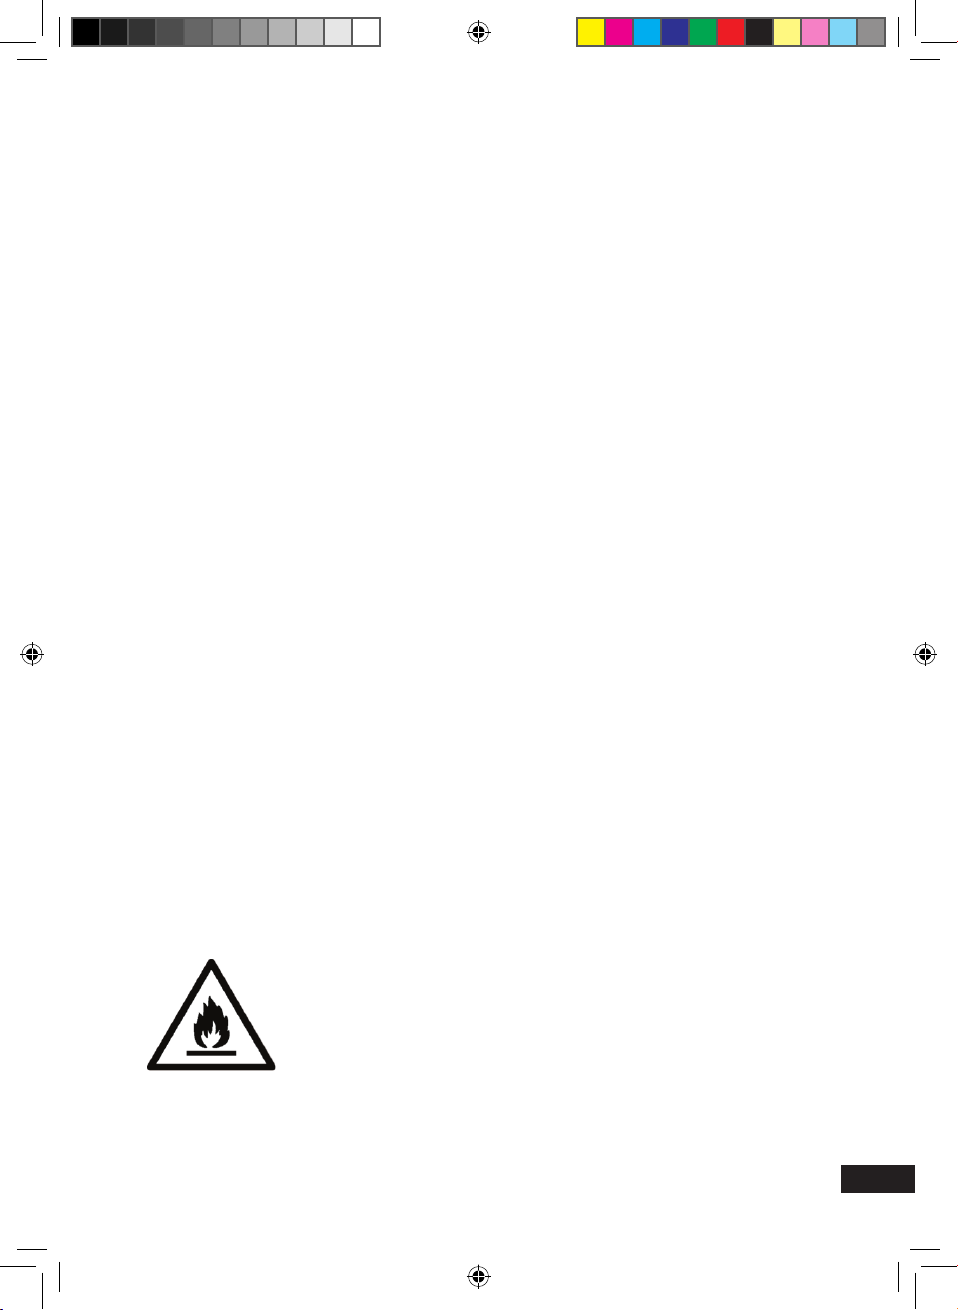
Additional warning for appliance with R290 refrigerant gas
(refer to the rating plate for the type of refrigerant gas used)
READ THE MAUAL CAREFULLY BEFORE USING THE APPLIANCE
R290 refrigerant gas complies with European environmental
directives. This appliance contains approximately 235g (9000) 245g
CAUTION
Air Con UI.indd 3 31/01/2019 13:30
(12000) of R290 refrigerant gas Appliance shall be installed, operated
and stored in a room with a fl oor area larger than 12m².
3
Page 4
PRODUCT INTRODUCTION
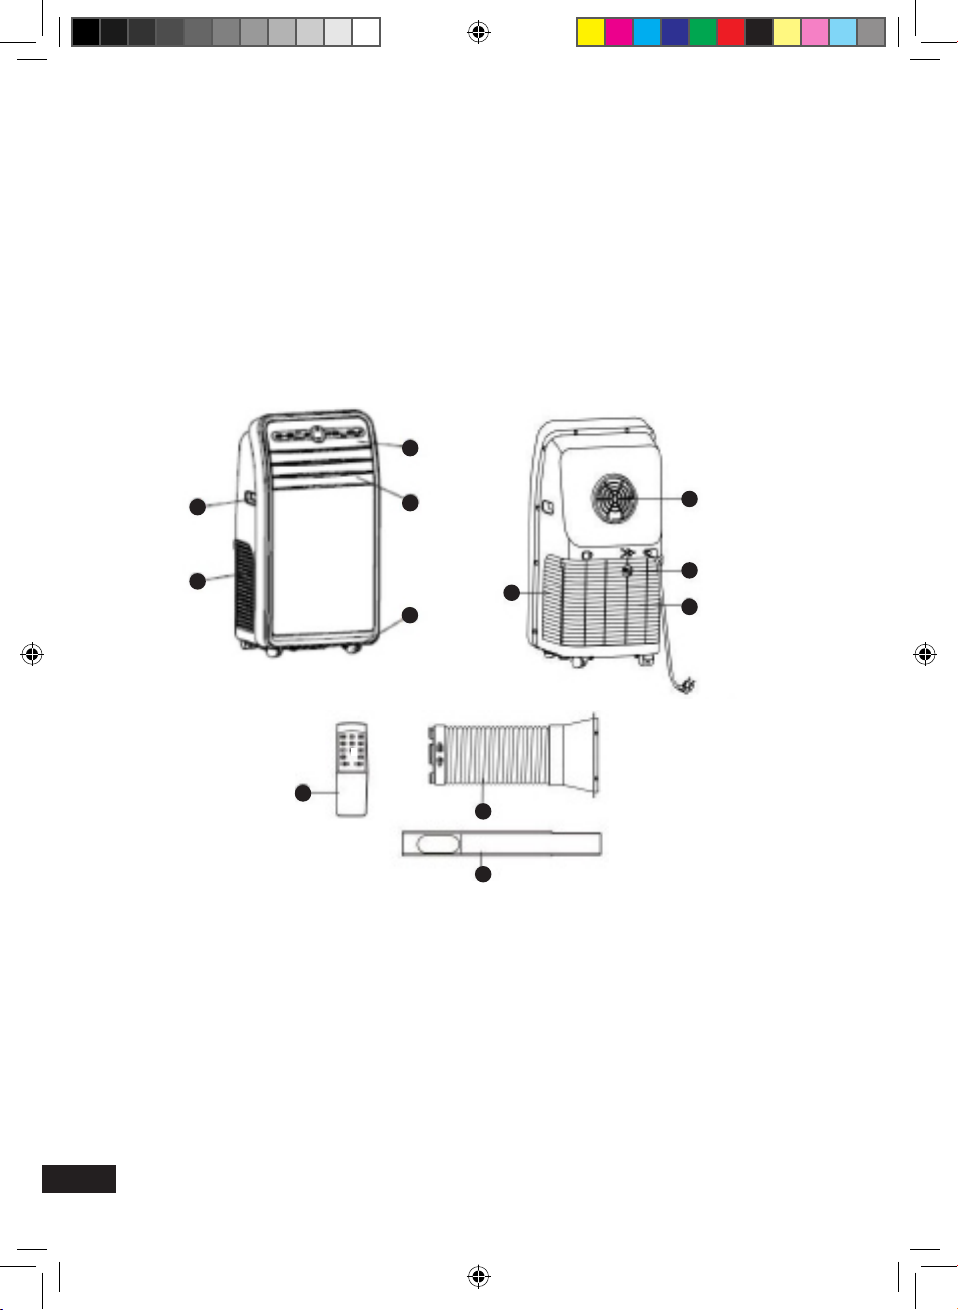
MAIN PARTS AND COMPONENTS
1. Handle
2. Air inlet (L)
3. Control panel
4. Air adjustment louvres
5. Caster
6. Remote controller
1
2
6
7. Air inlet (R)
8. Air outlet
9. Dehumidication drainage nozzle
10. Air inlet grille
11. Exhaust duct assembly
12. Window sealing plate assembly
3
4
7
5
11
8
9
10
12
4
Air Con UI.indd 4 31/01/2019 13:30
Page 5
8
5 4 3 2 1
7
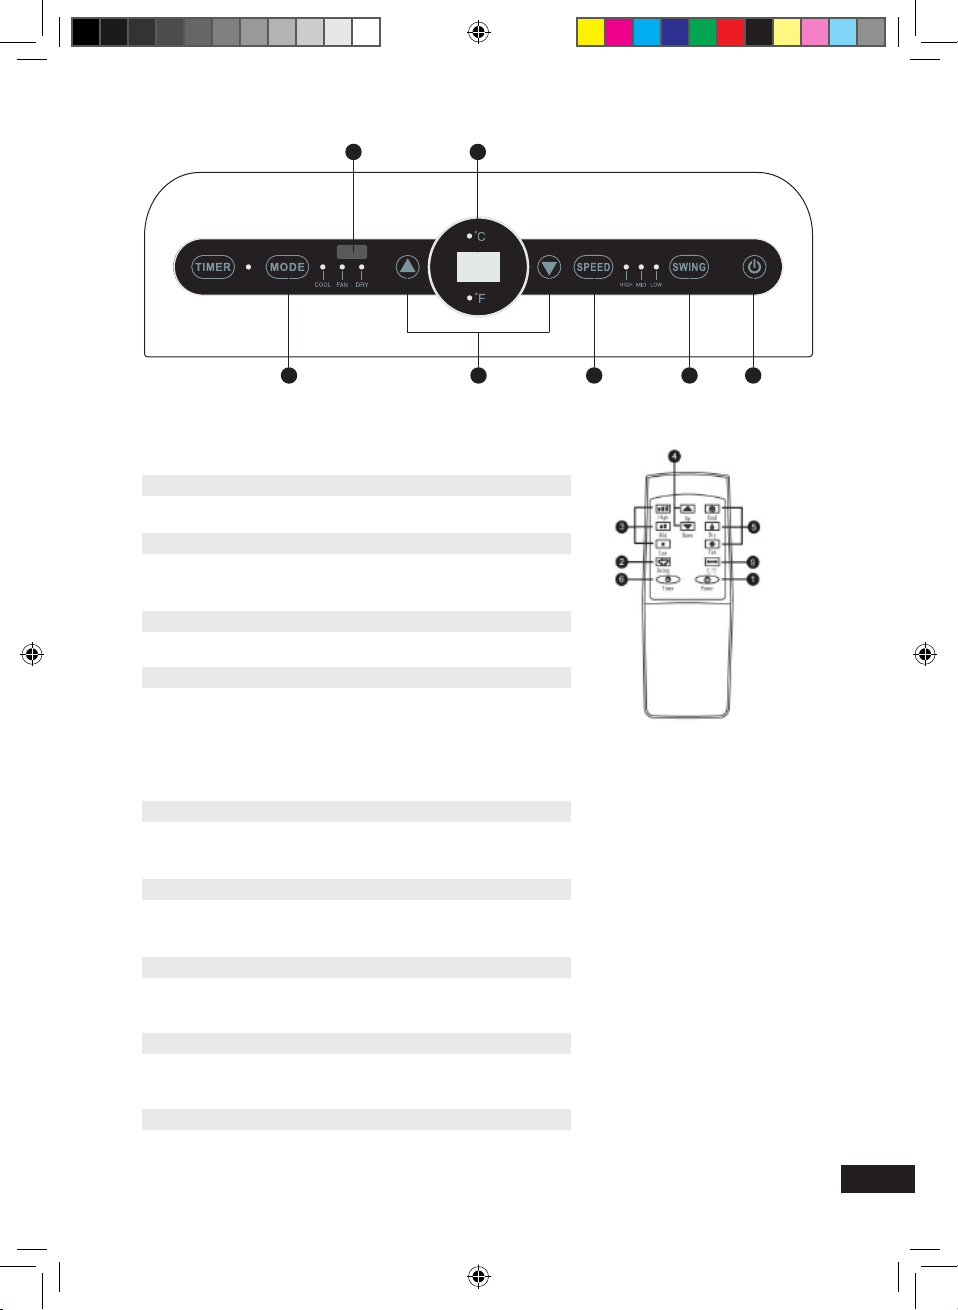
CONTROL PANEL AND REMOTE CONTROLLER
1. Power Button
Press the button to turn ON/OFF the A/C.
2. Swing Button
Press this button at any time after turning on the A/C to
swing the air louvres automatically.
3. Speed Button
Press the button to choose high/mid/low fan speed.
4. Temperature / time adjusting Button
Press the button at cooling mode to increase/reduce
the setting temperature; press it at timing mode to
adjust timing ON/OFF time; press Up and Down button
simultaneously to switch Fahrenheit and Centigrade
degree temperature.
5. Mode Button
Press the button to choose COOL (Air Conditioning), FAN
(Forced Air), DRY (Dehumidication).
6. Timer Button
Press the button at standby mode to set ON time. Press
this button at ON mode to set OFF time.
7. Temperature / time display window
This window displays the adjusted temperature
and time.
8. Remote controller receiving window
This window is used to receive the signal from the remote
controller.
9. °C/°F switching Button
Press the button to switch between °C and °F on the
remote control.
5
Air Con UI.indd 5 31/01/2019 13:30
Page 6
PLACEMENT AND INSTALLATION
PLACEMENT
•
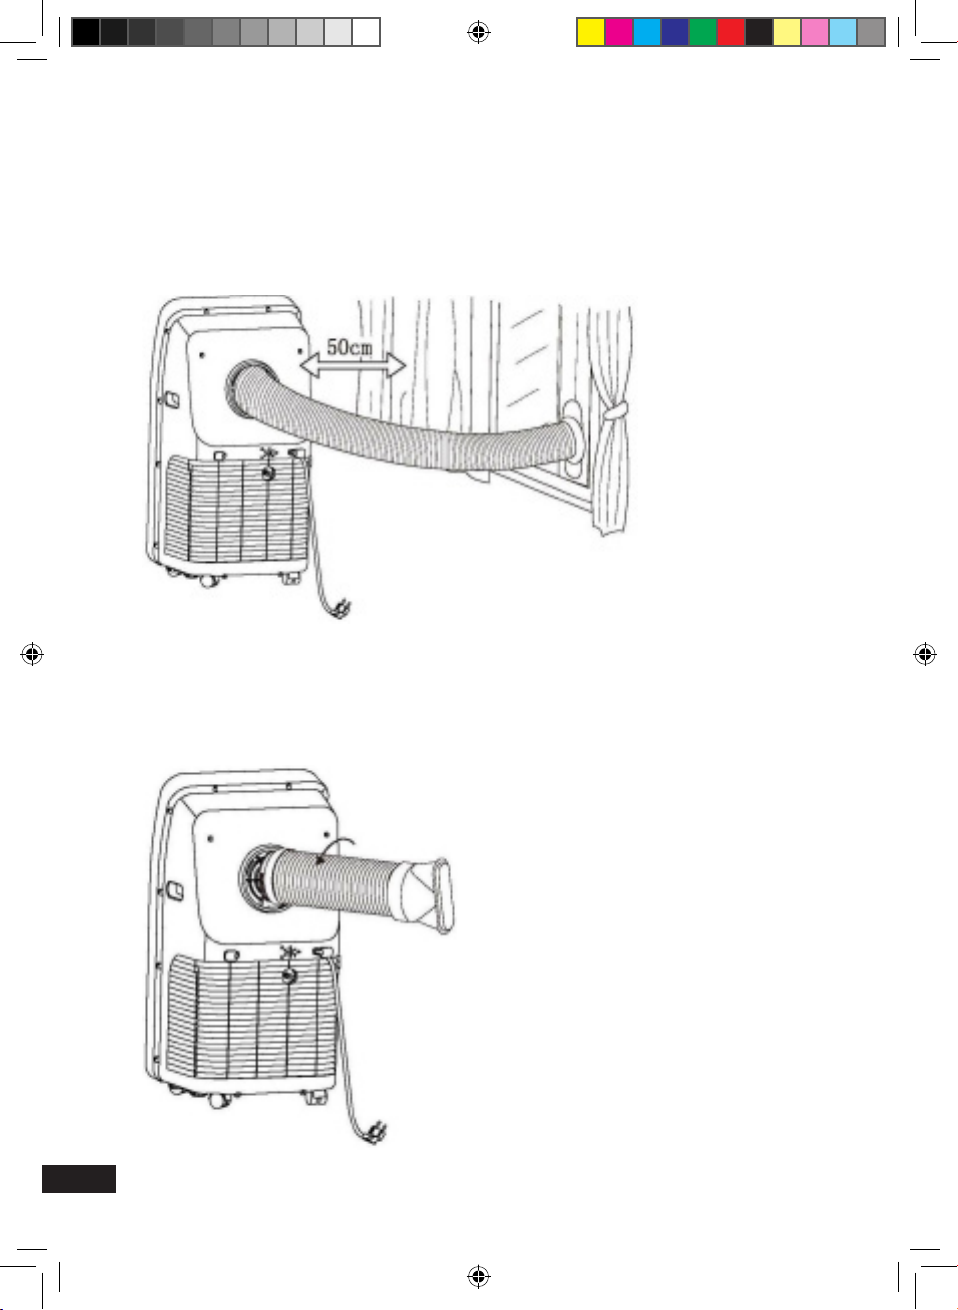
Place the A/C on dry level surface, and keep it at least 50 cm’s away from any objects/
surfaces to ensure optimum ventilation.
INSTALLATION
•
To connect the exhaust duct assembly into the rear of the A/C align and twist anti-clockwise
to secure into position.
6
Air Con UI.indd 6 31/01/2019 13:30
Page 7
•
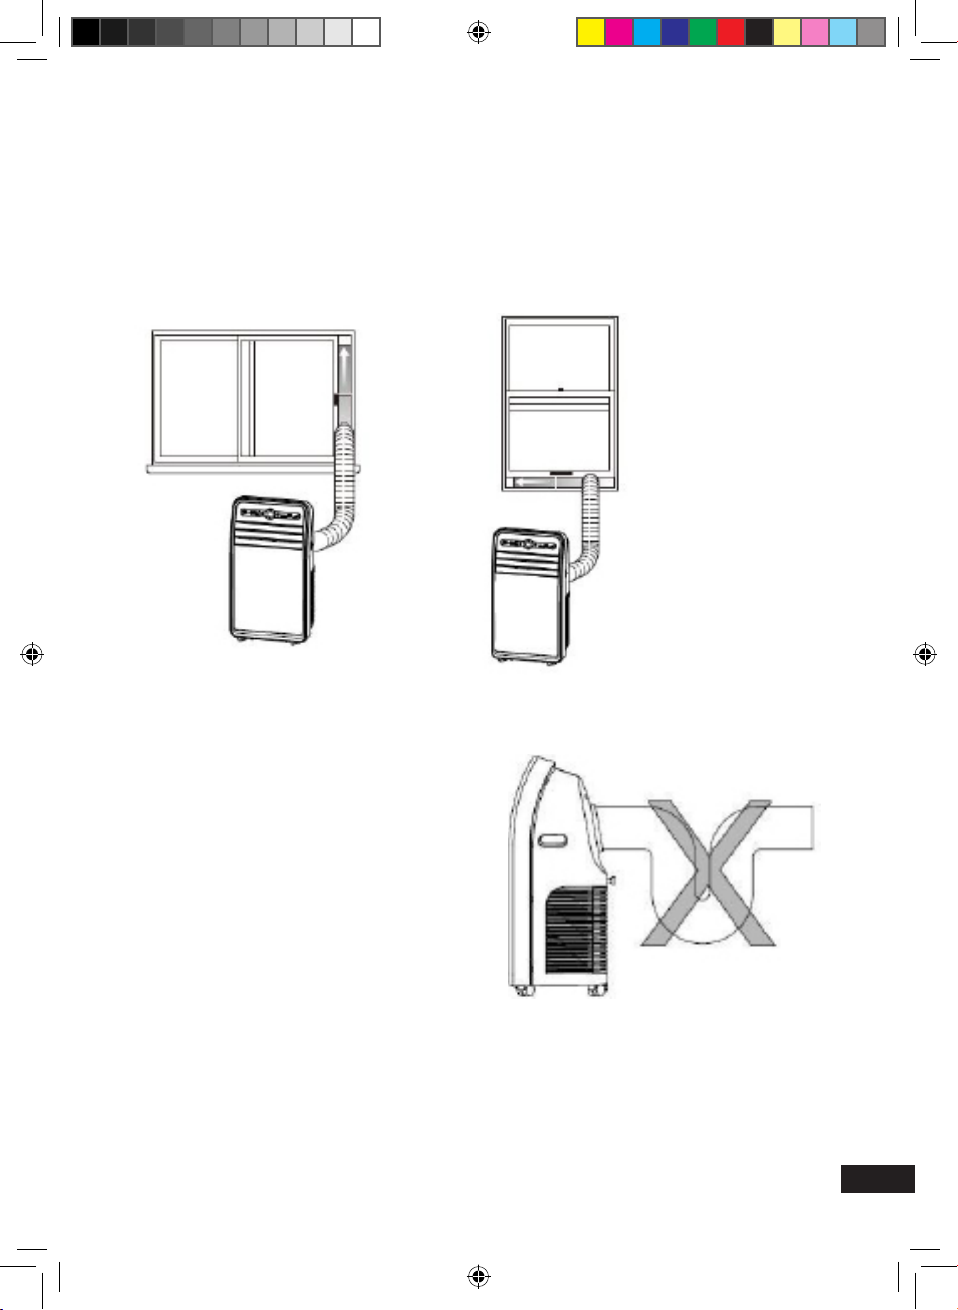
Insert the air exhaust hose into the window sealing plate, adjust opening width of window
so that the window can match with the sealing plate properly; length of the sealing plate is
adjustable.
•
If your window does not accommodate this style of tting, ensure the venting externally to
the room to be cooled and secure in position. NB the temperature of the air expelled from
the duct will be warm and therefore consideration is required if the outlet of the duct is
not outside.
INCORRECT INSTALLATION
•
It’s important to keep the exhaust duct
smooth. Incorrect installation will affect
the performance of the A/C.
•
Prevent the exhaust duct from bending
/ kinking above 90°, restricted exhaust
air ow will impair performance and may
cause failure.
•
Ensure air can ow smoothly through
the duct.
WARNING:
The exhaust duct is designed especially
for this model. Don’t replace or lengthen it;
otherwise it could result in failure or poor
performance.
7
Air Con UI.indd 7 31/01/2019 13:30
Page 8
OPERATION METHOD
COOLING MODE (COOL)
Please read the manual carefully before operating the machine:
•
When the A/C enters cooling mode automatically, or COOL mode is selected after power
ON, the cooling indicator lamp lights up.
•
Press Up/Down key to adjust setting temperature.
•
Press Speed key to choose High/Mid/Low speed.
FAN MODE (FAN)
•
When pressing mode key or choosing FAN mode by pressing the remote controller, the fan
indicator lamp lights up.
•
Press Speed key to choose High/Mid/Low fan speed.
•
Temperature can’t be set, it will operate at the room temperature.
DEHUMIDIFICATION MODE (DRY)
•
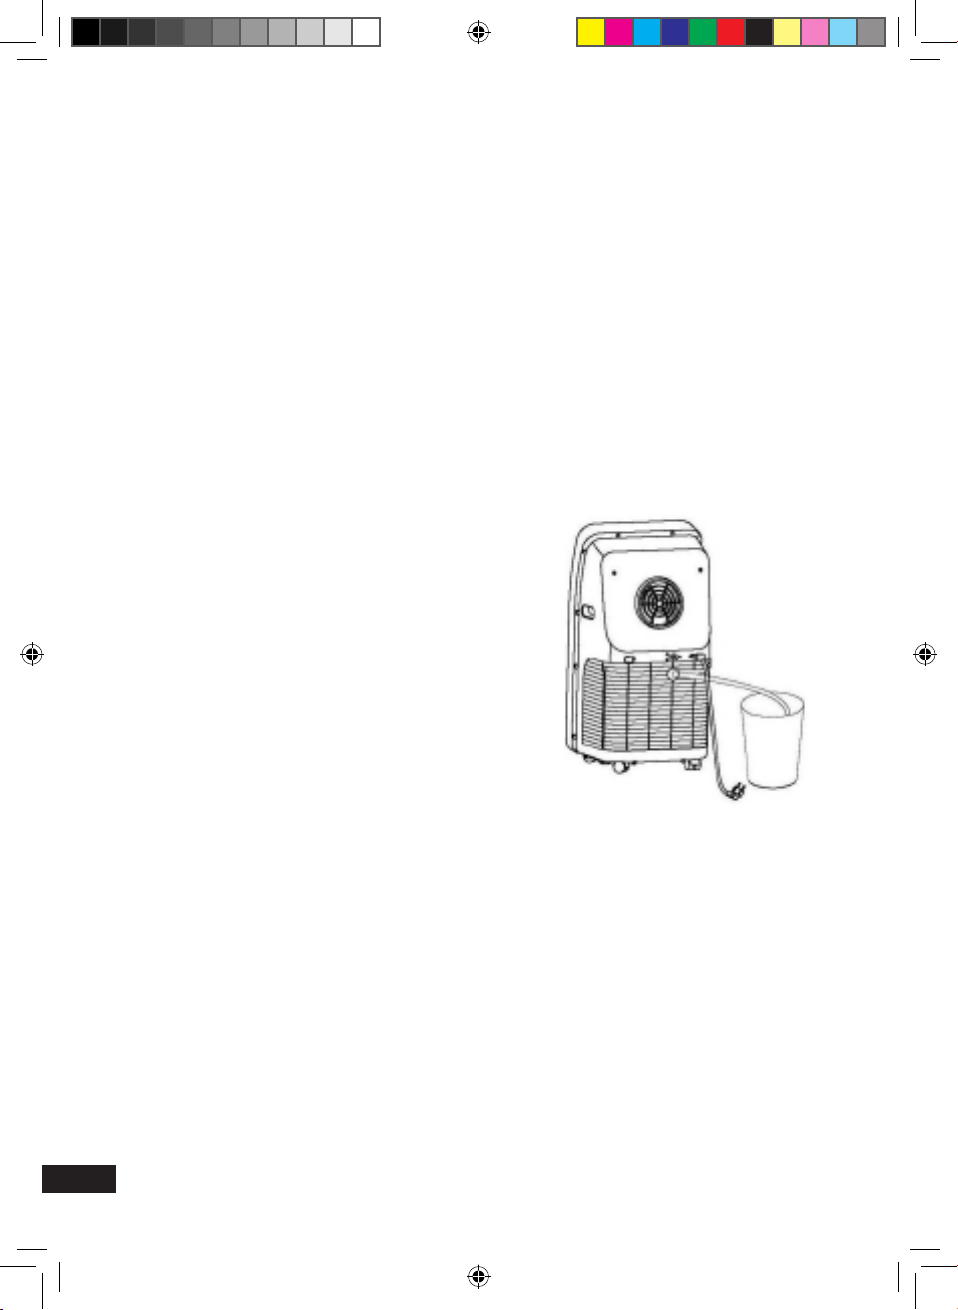
When pressing mode key or choosing DRY mode by
pressing the remote controller, the dehumidication
indicator lamp lights up.
•
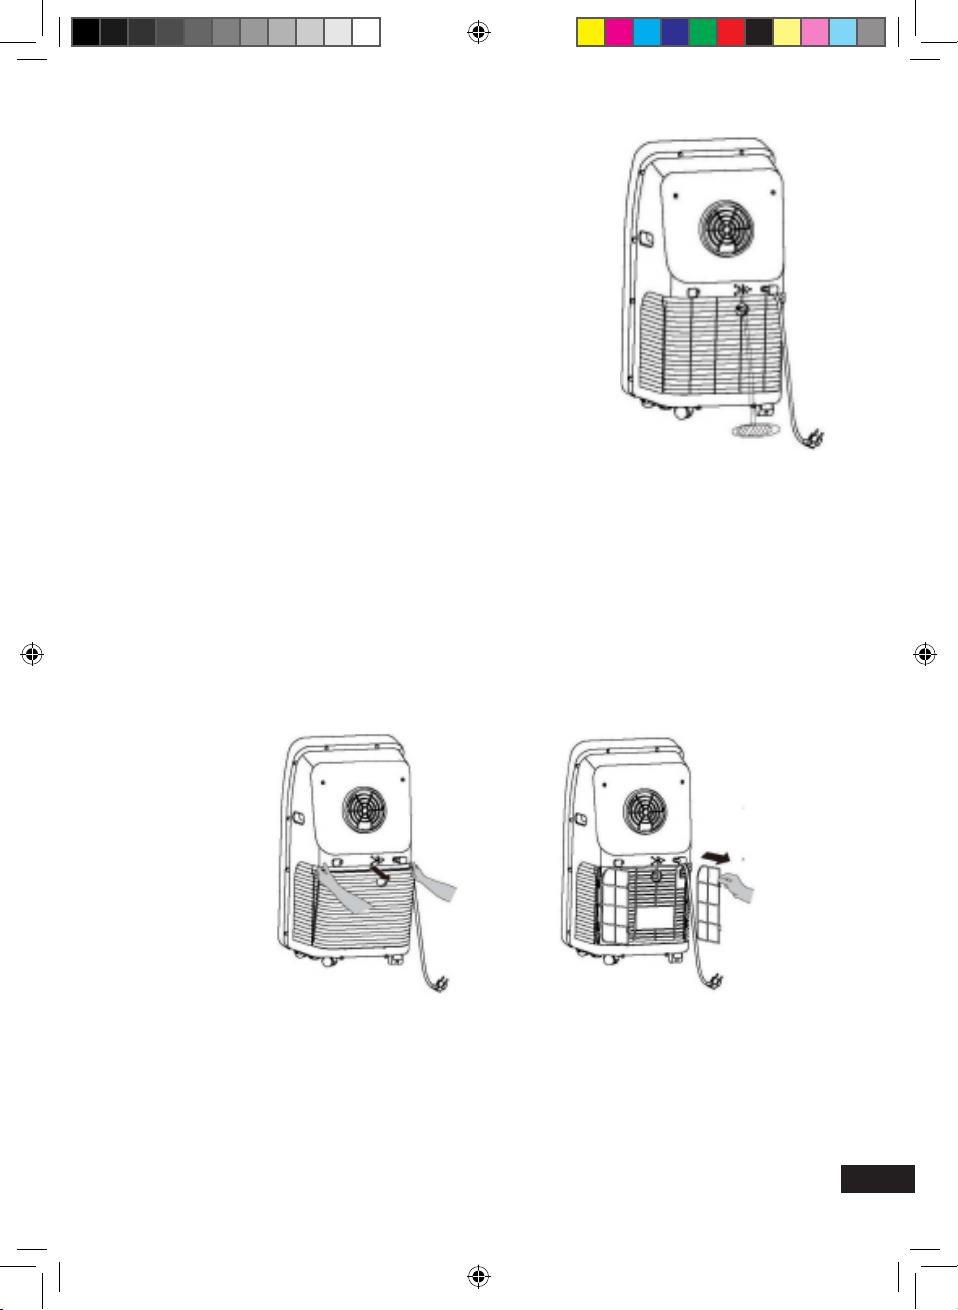
Remove the dehumidication water plug, insert the
water drainage pipe (supplied). Please the other end
of the drainage pipe in a collection vessel or direct
into a drain, ensure the drain or vessel is below the
level or the outlet drain on the A/C. As shown on the
gure to the right.
•
In dehumidication mode, if the room temperature
is ≥17°C the compressor will switch on. If the room
temperature is °≤16°C the compressor will switch
off. Once the room temperature achieves ≥17°C the
compressor will switch on.
•
In dehumidication mode, the fan is defaulted to run
at low speed, and air speed can’t be adjusted.
•
The temperature can’t be set when using the
dehumidify function. Remove the exit pipe plug
otherwise it will cause a decrease in performance
and appear “FL” water full alarm.
TIMER MODE
•
Whilst the unit is in standby mode, press the Timer button to the set the ON time. Press the
UP or DOWN key to adjust the delay before the A/C switches on. Note the units displayed
are in hours (1-24hrs) and only allows to set the switch on time. The timer indicator will
illuminate.
•
Whilst the unit is ON. press the Timer button to set the OFF time.Press the UP or DOWN
key to adjust the delay before the A/C switches off. Note the units displayed are in hours
(1-24hrs) and only allows to set the switch on time. The timer indicator will illuminate
8
Air Con UI.indd 8 31/01/2019 13:30
Page 9
CLEAN AND MAINTENANCE
DRAINAGE METHOD
This product is equipped with automatic water vaporization
system. The condenser is cooled with the circulating of
condensing water, so as to improve cooling efciency and save
energy.
•
If the internal vessel is full of water, the display screen
will display “FL”, and the compressor stops working
automatically. After power off, unscrew the water cover,
pull out the water plug to drain off water, and it will become
normal after being restarted.
MAINTENANCE
Notice: in order to avoid electric shock, please turn off the A/C
and unplug before maintenance or repair.
CLEANING
•
Unplug before cleaning.
•
Wipe with soft semi-dry cloth. Don’t use chemical cleaners.
FILTER SCREEN
•
Wash the lter screen once every two weeks. If it is blocked by dust, efciency of the A/C
will be reduced.
•
Take out the air inlet grille and pull out the lter screen at both sides according to the
direction shown in the following gures.
•
Put the lter screen into the warm water (about 40°C) added with neutral detergent, dry the
lter after cleaning in the shade, avoid direct sunlight.
SEASONAL CLEANING
If the A/C will not be used for a long time:
•
Pull out the water plug to drain.
•
Run the A/C in fan mode for 2H untill its dry inside.
•
Turn off the A/C and unplug.
•
Wash the lter screen and reassemble it.
•
Dismantle the exhaust duct and store it properly.
•
Cover the A/C with a plastic bag and place it in a dry place.
9
Air Con UI.indd 9 31/01/2019 13:30
Page 10
COMMON FAILURES AND DIAGNOSIS
INTELLIGENT ERROR DETECTION
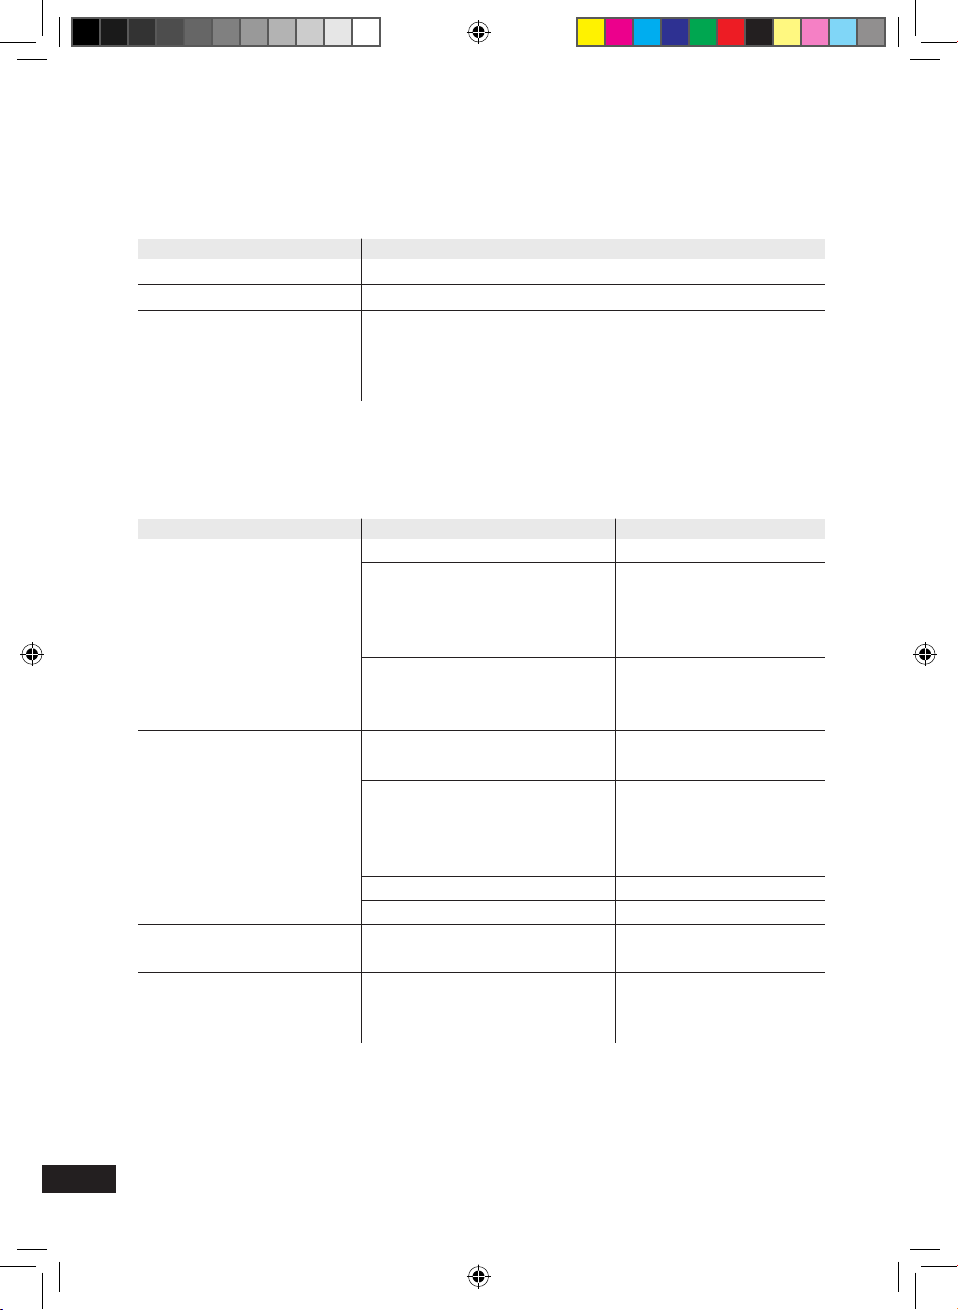
Error-detecting code Multi-functional defection
E1 Error of the coils temperature sensor.
E2 Error of indoor temperature sensor.
E4 Anti-freezing protection: temperature of the coil is too low
and whole A/C is off. When temperature exceeds 8°C,
the protection is released and previous working state is
recovered.
FUSE PARAMETERS Specication: ø5×20mm - Voltage: 250V AC - Current: 3.15A
TROUBLE SHOOTING
Trouble Cause Solution
The A/C doesn’t work.
The A/C starts frequently.
The A/C is making a
loud noise.
The compressor doesn’t
work.
Notice: When there is any abnormal performance to the A/C, turn the unit off
and unplug, then contact a qualified professional person, the distributor or the
manufacturer.
Not plugged in.
The display panel displays “FL”.
Time off function is started.
Direct sunlight.
Doors and windows keep
opening; there are lots of
people or a heat source
in the room.
Filter screen is very dirty.
Air inlet or outlet is blocked.
The A/C is placed unevenly.
Its delay protection has started.
Plug the unit in.
Restart the A/C after the
power off and draining,
normal function should
return.
The A/C can be restarted 3
minutes after being turned
off.
Remove/ limit direct sunlight
or re-position the A/C.
Close door and windows,
remove heat source.
Clean or replace it.
Remove blockage.
Place it on a even and rm
ground, avoid shaking.
Wait for 3 minutes, turn it
back on after temperature
decreases.
The above technical parameters are subject to change without notice.
10
Air Con UI.indd 10 31/01/2019 13:30
Page 11
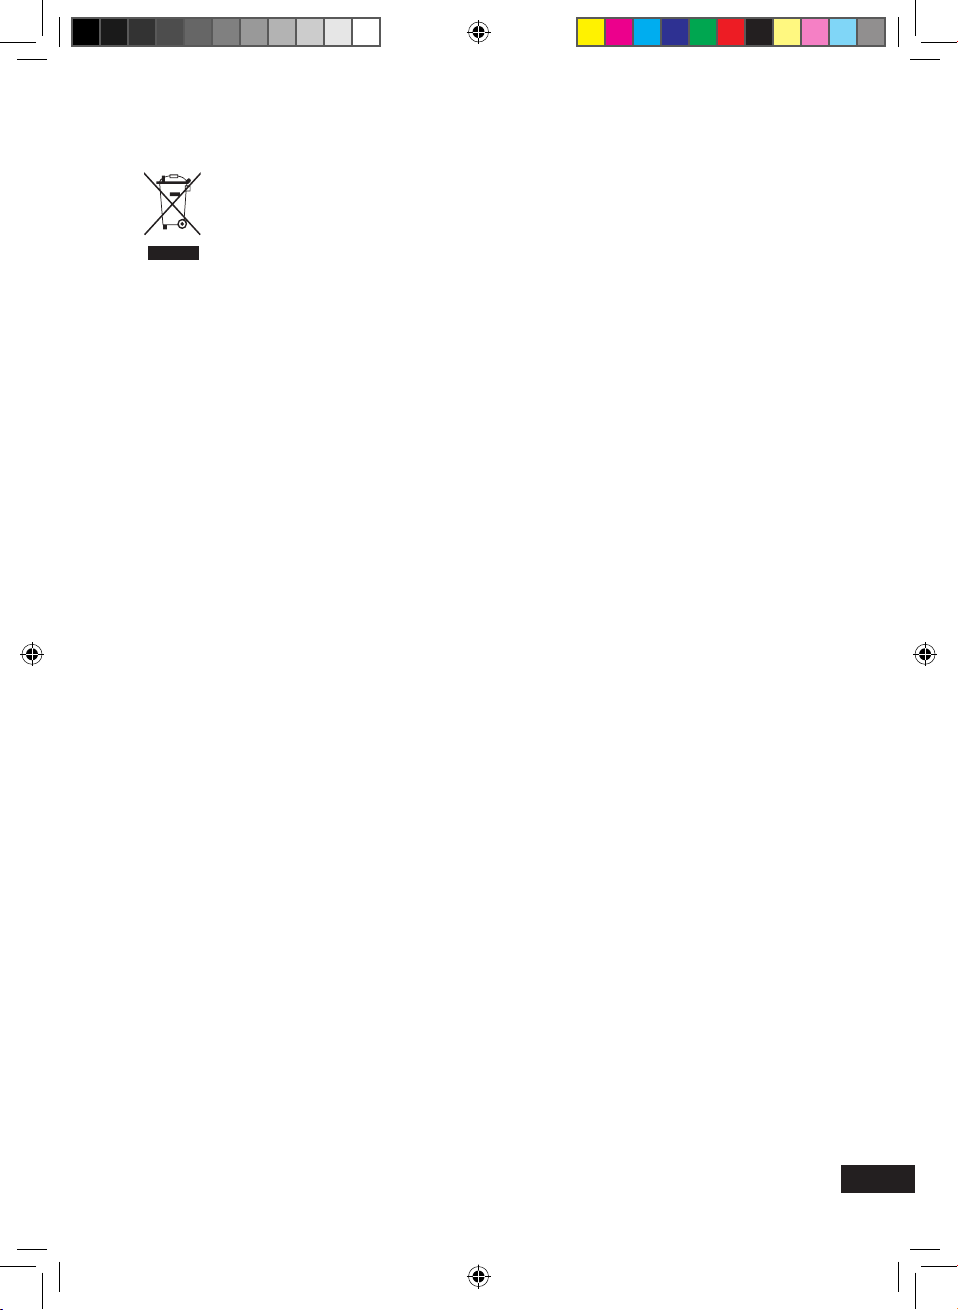
Meaning of crossed – out wheeled dustbin:
Do not dispose of electrical appliances as unsorted municipal waste, use separate
collection facilities.
Contact your local government for information regarding the collection systems available.
If electrical appliances are disposed of in landlls or dumps, hazardous substances can leak
into the groundwater and get into the food chain, damaging your health and well-being.
When replacing old appliances with new ones, the retailer is legally obligated to take back
your old appliance for disposal, free of charge.
11
Air Con UI.indd 11 31/01/2019 13:30
Page 12
Rhino designed and distributed by Birchwood Price Tools.
Birchwood Price Tools is a trading name of Toolstream Limited.
Air Con UI.indd 12 31/01/2019 13:30
 Loading...