

Page 1
!
!
Use & Care Manual
®
With Installation Instructions for the Installer
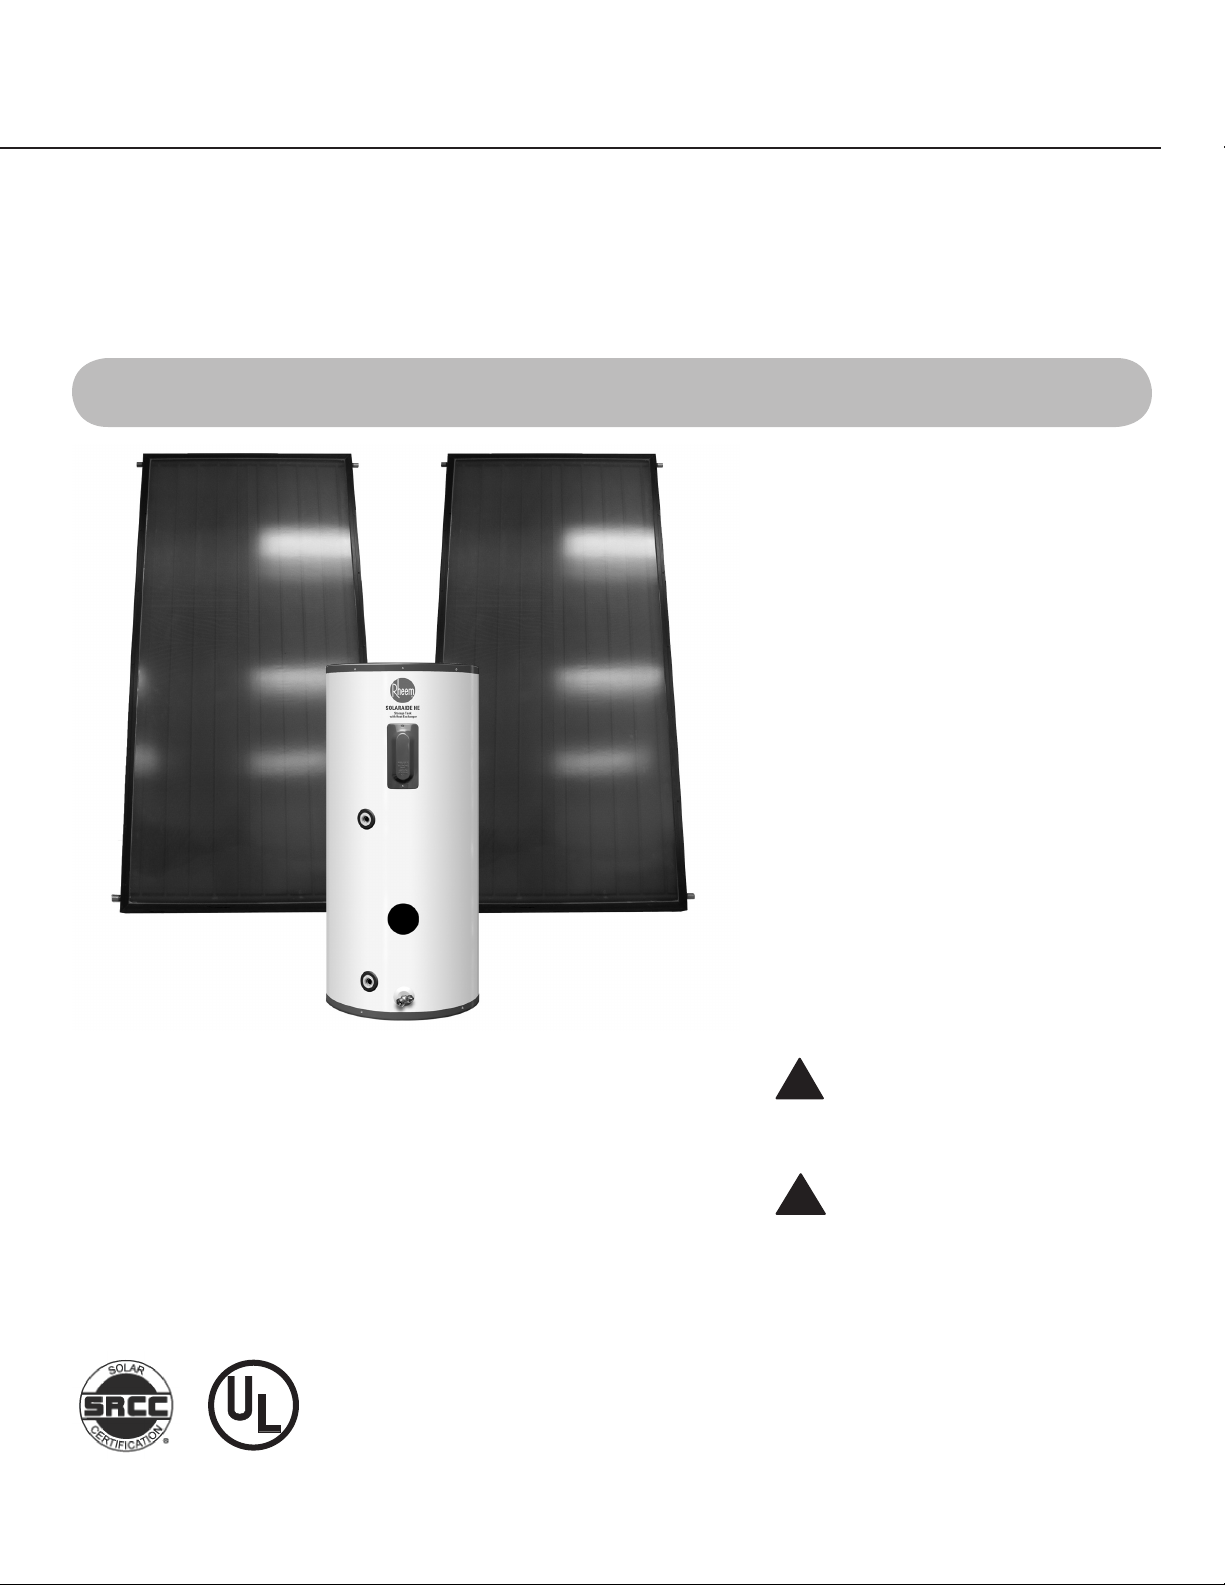
Pumped Solar Water
Heating Systems
The purpose of this manual is twofold:
one, to provide the installer with the basic
directions and recommendations for the proper
installation and adjustment of the water heater;
and two, for the owner–operator, to explain
the features, operation, safety precautions,
maintenance and troubleshooting of the water
heater. This manual also includes a parts list.
It is very important that all persons who are
expected to install, operate or adjust this
water heater read the instructions carefully
so they may understand how to perform
these operations. If you do not understand
these instructions or any terms within it, seek
professional advice.
This Solar Water Heating system is for the models listed below:
RS80-48BP
RS120-64BP
Any questions regarding the operation,
maintenance, service or warranty of this
water heater should be directed to the seller
from whom it was purchased. If additional
information is required, refer to the section on
“If you need service.”
Do not destroy this manual. Please read
carefully and keep in a safe place for future
reference.
Recognize this symbol as an
indication of Important Safety
Information!
California Proposition 65 Warning:
This product contains chemicals
known to the State of California to
cause cancer, birth defects or other
reproductive harm.
AP14490 (12/08)
Page 2

Safety Information
!
!
!
!
FOR YOUR RECORDS
Introduction ............ 3, 4
Safety Precautions ....... 5, 6
Preface
1) Introduction . . . . . . . . . . . .1
2) System Description and
Operational Principle . . .1
3) Installation Requirements -
General ..............3
4) Installation Requirements -
Specic ..............4
5) Start Up Procedures .....14
6) Three Modes of System
Operation . . . . . . . . . . . 14
7) Isolating the Major
Components and
Shut Down Procedures . 15
8) Summer Vacation
Recommendations . . . . 15
9) Maintenance and
Troubleshooting ......16
Write the model and serial numbers here:
Model Number of Solar System Tank: ____________________________________
Serial Number of Solar System Tank: _____________________________________
Model Number of Collector Panel #1: ____________________________________
Serial Number of Collector Panel #1: _____________________________________
Model Number of Collector Panel #2: ____________________________________
Serial Number of Collector Panel #2: _____________________________________
Model Number of Solar System Pump: ___________________________________
Serial Number of Solar System Pump: ____________________________________
Model Number of Solar System Control: _________________________________
Serial Number of Solar System Control: _________________________________
You can find them on a label on the appliance.
Staple sales slip or cancelled check here.
Proof of the original purchase date is needed to obtain service
under the warranty.
READ THIS MANUAL
Inside you will find many helpful hints on how to use and
maintain your water heater properly. Just a little preventive
care on your part can save you a great deal of time and money
over the life of your water heater.
You’ll find many answers to common problems in the Before
You Call For Service section. If you review our chart of
Troubleshooting Tips first, you may not need to call for service
at all.
READ THE SAFETY INFORMATION
Your safety and the safety of others are very important. There
are many important safety messages in this manual and on your
appliance. Always read and obey all safety messages.
10) Solaray System Component
Parts . . . . . . . . . . . . . . . 17
11) Estimated Component
Life . . . . . . . . . . . . . . . . 19
12) System Model Numbers 19
13) Collector Specications . 20
14) SunEarth Collector Warranty
Statement . . . . . . . . . . . 22
All safety messages will follow the safety alert symbol and
either the word “DANGER”, “WARNING”, “CAUTION” or
“NOTICE”.
These words mean:
and/or damage to property.
Notice:
2
specified procedure or maintain
a specific condition.
This is the safety alert symbol. Recognize this symbol
as an indication of Important Safety Information!
This symbol alerts you to potential hazards that can
kill or hurt you and others.
DANGER
that will result in death or serious
injury.
WARNING
could result in death or serious injury
CAUTION
may result in minor or moderate
injury.
An imminently hazardous situation
A potentially hazardous situation that
A potentially hazardous situation that
Attention is called to observe a
Page 3

Introduction
!
Thank you for purchasing a solar water heating
system. It is one of the most effective and troublefree systems available today. In addition to reducing
your water-heating bills, it will help preserve precious
natural resources by using free energy from the sun.
As with an electric or gas water heater, your new
solar water heating system operates automatically to
ensure you will always have an ample supply of hot
water. However, there are simple steps you can take
to increase both its efficiency and service life.
This manual provides the manufacturers recommended
procedures for Rheem solar water-heating systems.
The procedures are essential for correct installation,
troubleshooting and maintenance.
Read each section of this manual thoroughly before
beginning work on the system.
CAUTION: Changes to the design or intended
use of the Rheem Solar Water Heating System will
void the manufacturers warranty. Installation,
troubleshooting, and maintenance must be
performed by a qualified technician.
This manual will help you get the most out of your
solar water heating system. Please read it carefully
when the installation is complete, and review it from
time to time to refresh your memory about the service
requirements and safety measures.
The Operation section of the manual contains
important information regarding the system procedures
as well as safety measures pertaining to the system. It
is important that you follow these guidelines to ensure
safe, efficient and trouble-free operation.
While the system requires very little maintenance,
there will be a periodic need for some upkeep. The
Maintenance section outlines those requirements for
service, which you may do yourself, as well as those
procedures best performed by a qualified service
technician.
The solar energy system described by this manual,
when properly installed and maintained, meets the
minimum standards established by the Florida Solar
Energy Center, in accordance with Section 377.705,
Florida Statutes. This certification does not imply
endorsement or warranty of this product by the Florida
Solar Energy Center or the state of Florida.
The components of the system include a water storage
tank, solar collector panels, expansion tank, pump
valves and fittings.
In locations which are subject to temperatures below
41°F, a mixture of heat transfer fluid and water
circulates through the solar collector panels. This fluid
is heated by the sun, then circulated through a heat
exchange, heating the potable (drinking) water inside
the storage tank. The heat transfer fluid is a non-toxic,
food-grade liquid, which provides freeze protection
for the closed loop heat transfer loop. It is colored to
differentiate the closed system fluid from the potable
water supply.
This circulation of the heat transfer fluid is
accomplished by a pump and sensors. These solar
water heaters are referred to as closed loop systems.
Your hot water is stored in a steel tank lined with
porcelain enamel and thickly insulated to help
maintain the water temperature throughout the day and
night.
To ensure your hot water supply is never depleted, the
system is equipped with a backup heater or heating
element. When there may be insufficient solar energy,
you are still assured of all the hot water you will need.
While your system is one of the most efficient
available, there are two simple steps you can take to
increase your water-heating cost savings.
The Troubleshooting section contains steps you can
take if the system is not performing, as it should.
The solar energy system described by this manual,
when properly installed and maintained, meets
the minimum standards established by the Solar
Rating and Certification Corporation (SRCC). This
certification does not imply endorsement or warranty
of this product by the SRCC.
3
Page 4

Introduction continued...
Keep the use of the Backup Heater to a Minimum
You can save the most money on your water-heating
bills by using the backup heater on your system as
little as possible. If the sun shines brightly between I0
am and 3 pm, enough heat will normally be generated
to keep the water hot throughout the rest of the day
and night.
However, on days when the sky is cloudy or when
large quantities of hot water are being used, we
suggest that the backup heater be left “ON” overnight
to ensure adequate hot water the next morning.
Try to use Hot Water during Daylight Hours
When possible, schedule heavy hot water use, such
as dish washing, laundry and showers, in the middle
of the day. If hot water usage occurs while the sun is
up, the fresh (cold) water added to the storage tank is
heated more quickly.
When water is used late in the day or at night, the
fresh water entering the tank will be heated by the
element so hot water is available in the morning.
4
Page 5
!
!
& #0)'4
*16
9CVGTVGORGTCVWTGQXGT° (ECP
ECWUGUGXGTGDWTPUKPUVCPVN[QT
FGCVJHTQOUECNFU
%JKNFTGPFKUCDNGFCPFGNFGTN[CTG
CVJKIJGUVTKUMQHDGKPIUECNFGF
5GGKPUVTWEVKQPOCPWCNDGHQTG
UGVVKPIVGORGTCVWTGCVYCVGT
JGCVGT
(GGNYCVGTDGHQTGDCVJKPIQT
UJQYGTKPI
6GORGTCVWTGNKOKVKPIXCNXGUCTG
CXCKNCDNGUGGOCPWCN
$740
IMPORTANT SAFETY INFORMATION.
!
!
R
E
S
E
T
R
E
S
E
T
TURN OFF
POWER
BEFORE
SERV ICING
90°F150°F
125°F
(66°C)
(52°C)
(32°C)
READ ALL INSTRUCTIONS BEFORE USING.
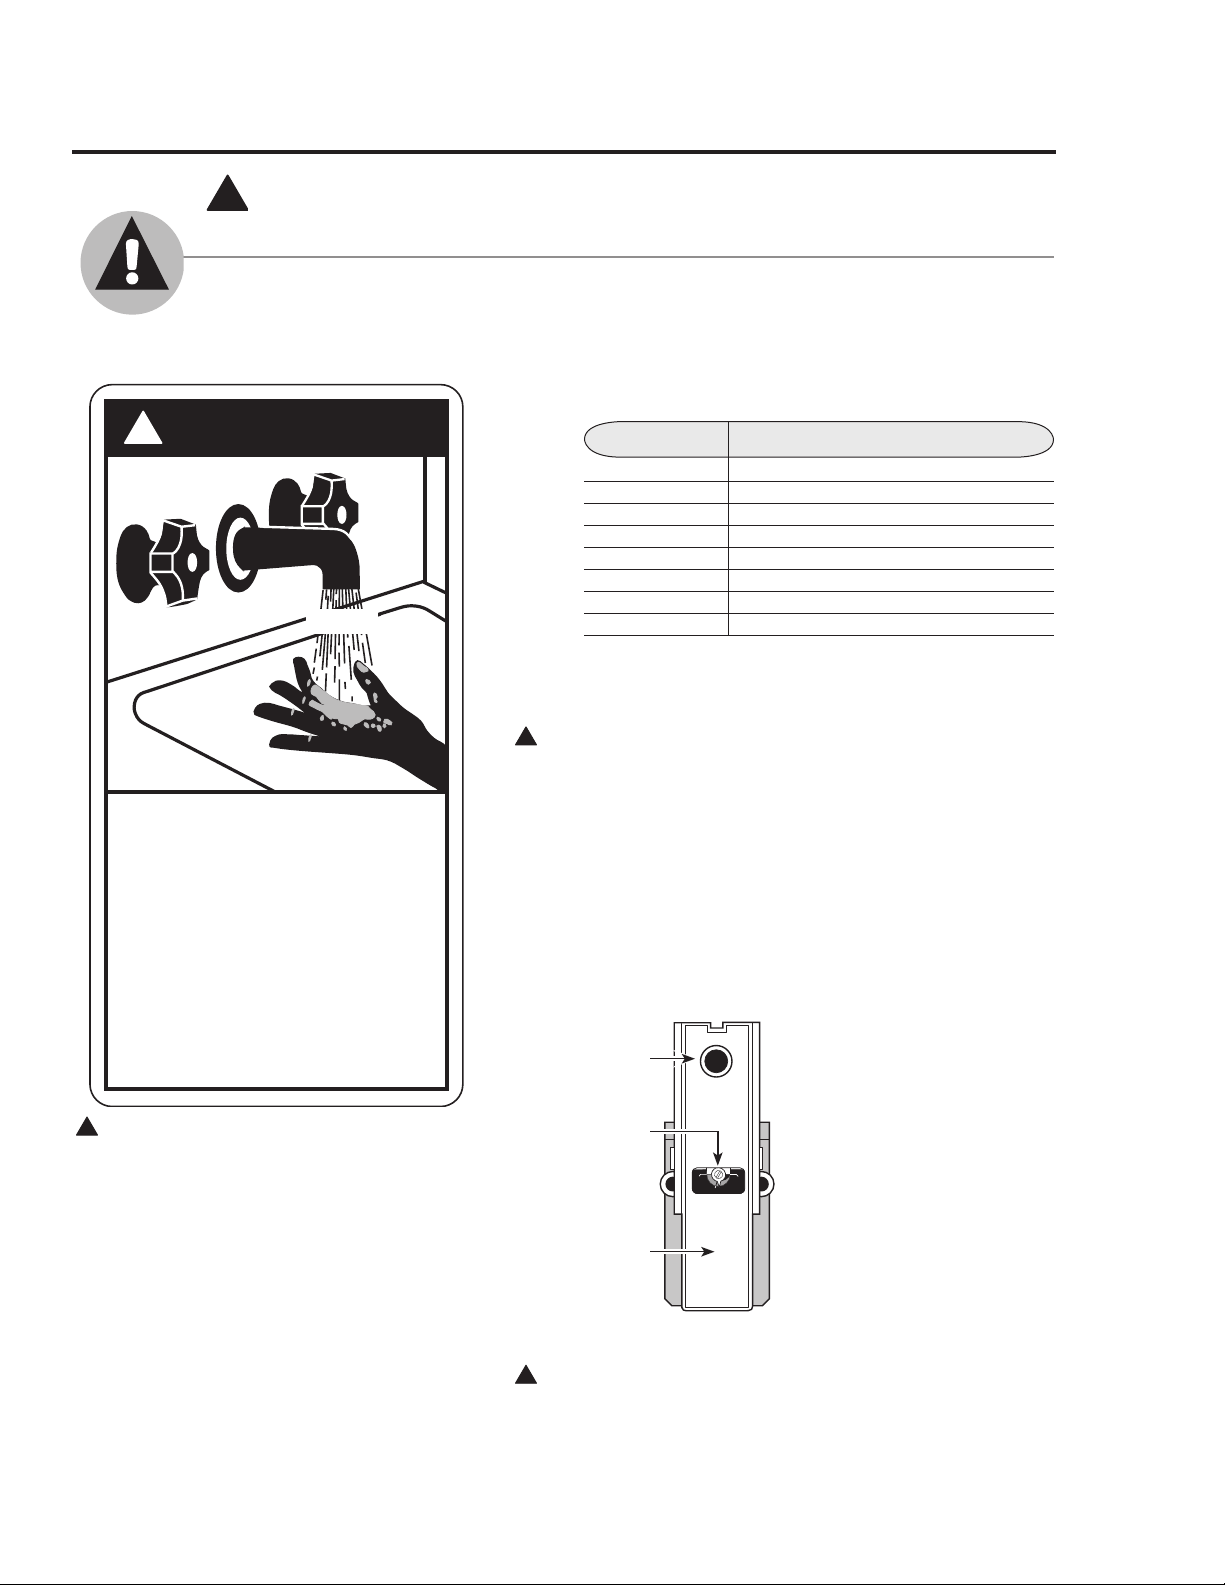
DANGER!
WATER TEMPERATURE SETTING
Safety and energy conservation are factors to be considered when selecting the water
temperature setting of water heater’s thermostat. Water temperatures above 125°F
can cause severe burns or death from scalding. Be sure to read and follow the warnings
outlined on the label pictured below.
Time/Temperature Relationship in Scalds
Temperature Time To Produce a Serious Burn
120°F More than 5 minutes
125°F 1½ to 2 minutes
130°F About 30 seconds
135°F About 10 seconds
140°F Less than 5 seconds
145°F Less than 3 seconds
150°F About 1½ seconds
155°F About 1 second
Table courtesy of Shriners Burn Institute
DANGER: Burns from Hot Water and
Steam - Use extreme care when opening relief
valves, charging closed loop, and filling storage
tank.
The electrical element booster thermostat has
been factory set at 50°C (120°F) to reduce the
risk of scald injury. Adjusting the thermostat to a
higher setting is not recommended. Hotter water
increases the potential for Hot Water Scalds.
The chart shown above may be used as a guide
in determining the proper water temperature for your home.
DANGER: Households with small children, disabled,
or elderly persons may require a 120°F or lower thermostat
setting to prevent contact with “HOT” water.
NOTICE: Mixing valves should be installed to reduce the
point of use water temperature by mixing hot and cold water
in branch water lines. Contact a licensed installer or the local
plumbing authority for further information.
The temperature of the water in the water heater can be regulated by setting the temperature dial of the adjustable surface
mounted thermostat located behind the jacket access panel.
This thermostat controls the
Reset button
water heater’s heating element only. (A separate thermostat should be utilized in
Thermostat
dial pointer
monitoring the temperature
from the collector).
To comply with safety regulations the thermostat is
Thermostat
protective
factory set at 120° F or less
where local codes require.
cover
DANGER: Hotter water increases the potential for Hot
Water SCALDS.
5
Page 6
IMPORTANT SAFETY INFORMATION.
!
READ ALL INSTRUCTIONS BEFORE USING.
WARNING!
For your safety, the information in this manual must be followed to minimize the risk
of fire or explosion, electric shock, or to prevent property damage, personal injury, or loss
of life.
Be sure to read and understand the entire Use and Care Manual before attempting
to install or operate this water heater. It may save you time and cost. Pay particular
attention to the Safety Instructions. Failure to follow these warnings could result in
serious bodily injury or death. Should you have problems understanding the instructions
in this manual, or have any questions, STOP, and get help from a qualified service
technician, or the local utility.
FOR INSTALLATIONS IN THE STATE OF CALIFORNIA
California Law requires that residential water heaters must be braced, anchored or
strapped to resist falling or horizontal displacement due to earthquake motions. For
residential water heaters up to 52 gallon capacity, a brochure with generic earthquake
bracing instructions can be obtained from: Office of the State Architect, 1102 Q Street,
Suite 5100, Sacramento, CA 95814 or you may call 916-445-8100 or ask a water heater
dealer.
However, applicable local codes shall govern installation. For residential water heaters
of a capacity greater than 52 gallons, consult the local building jurisdiction for acceptable
bracing procedures.
SAFETY PRECAUTIONS
Have the installer show you the location of the circuit breaker and how to shut it off if
necessary. Turn off the circuit breaker if the water heater has been subjected to overheating,
fire, flood, physical damage or if the ECO fails to shut off.
● Read this manual entirely before installing
or operating the water heater.
● Use this appliance only for its intended
purpose as described in this Use and Care
Manual.
● Be sure your appliance is properly installed
in accordance with local codes and the
provided installation instructions.
● Do not attempt to repair or replace any part
of your water heater unless it is specifically
recommended in this manual. All other
servicing should be referred to a qualified
technician.
READ AND FOLLOW THIS SAFETY INFORMATION
CAREFULLY.
SAVE THESE INSTRUCTIONS
6
Page 7

PREFACE
Let us rst offer two words of grateful appreciation.
Thank You! We sincerely appreciate your business.
Rheem also wishes to say thank you for "going
solar". Solar water heating systems help to reduce
our nation’s dependence on polluting fossil fuels,
minimize the greenhouse gas emissions associated
with conventional water heating and, very
importantly, lower your monthly utility costs.
Your Rheem solar water heating system has
been designed to meet exacting SRCC OG-300
certication requirements. The components found
in your system have been selected for their proven
reliability, longevity and performance in your specic
region of the country.
1) INTRODUCTION
Solar water heating systems are climate and site
specic appliances. Different types of solar systems
are installed around the world in accordance with
regional weather and water quality conditions. System
performance varies as a function of the household
hot water load, including daily showers, laundry and
kitchen uses, average ground water and ambient air
temperatures, the home’s roof pitch and orientation,
and, of course, the seasonal intensity of solar
radiation. These variables, some of which change
from home to home on the same neighborhood street,
will determine how much energy and money your
Rheem system will save on an annual basis.
Your Rheem solar system is known as a "forced
circulation" system because it utilizes a mechanical
pump to efciently circulate the Dow Chemical
Dowfrost HD propylene glycol heat transfer uid
(HTF) throughout the system. The HTF protects the
collector piping from freezing and inhibits scaling
deposits that can reduce performance in "open-loop"
systems utilizing potable water as the HTF. Proper
application and maintenance of the HTF can protect
your Rheem solar water heating system to minus 30°
Fahrenheit.
Rheem solar system. This system is required to be
installed by properly licensed solar or plumbing
contractors in accordance with SRCC Standard OG300 and all applicable national, state and local codes,
ordinances and regulations governing solar water
heating installations, as well as good trade practices.
Failure to follow the procedures and practices
described in this manual can void the manufacturer's
warranty for specic component parts.
This manual covers installations utilizing two
Rheem solar collectors with a single solar storage
tank and also two tank systems that include a solar
storage tank and a conventional water heater. For
simplicity, the singular form will be used throughout
this manual when referring to all of these components
and system permutations. Frequent reference is made
throughout this manual to specic component parts.
The placement of each component can be seen in
system schematic gures 16 and 17. A description of
each component and its function is found in Section
10.
2) SYSTEM DESCRIPTION AND
OPERATIONAL PRINCIPLE
The key components in the Rheem solar water
heating system include the solar collector, solar
storage tank with integral heat exchanger, circulation
pump, differential thermostat, expansion tank,
pressure gauge, mixing valve and the non-toxic
propylene glycol heat transfer uid (HTF).
The Rheem solar collector is the heart of the system.
Simply stated, when the sun is shinning, heat energy
is absorbed by the solar collector’s all copper
absorber plate and tranferred to the HTF circulating
through the solar collector. The system pump
efciently circulates this heated uid through the
collector piping and integral tank heat exchanger. As
the HTF passes through the heat exchanger the heat
in the uid is transferred by conduction to the potable
water in your solar storage tank. As this process is
continuously repeated during the average sunny day
the temperature in your solar storage tank rises.
This manual is intended as a basic solar water heating
primer. Our goal is to familiarize you with the proper
installation, operation, and maintenance of your
When the solar collector absorber plate is
approximately sixteen degrees hotter than the
temperature in the bottom of your solar storage tank,
7
Page 8
the controller will turn the circulating pump on. When
fig. 1
COLLECTOR ORIENTATION
approximately twelve degrees hotter than the
temperature in the bottom of your solar storage
tank, the controller will turn the circulating pump
on. When the temperature difference has been
reduced to four degrees, the controller automat-
ically turns the pump off.
Both single and double tank Solaray systems are
designed to provide three separate modes of sys-
tem operation. The system will, (1) accommo-
date 100% solar operation, (2) serve as a pre-
heater to your solar storage tank or back-up
water heater, or (3) bypass the solar collector and
run 100% on utility power. Section Six provides
fig.2
STAGGERED MOUNT
COLLECTOR SPACING
the temperature difference has been reduced to eight
degrees, the controller automatically turns the pump
off.
Both single and double tank Rheem systems are
designed to provide three separate modes of system
operation. The system will, (1) accommodate 100%
solar operation, (2) serve as a preheater to your solar
storage tank or back-up water heater, or (3) bypass the
solar collector and run 100% on utility power. Section
Six provides instructions for setting the system for
automatic operation in each of these three modes.
The Dowfrost HD HTF protects your Rheem solar
system against freezing. Dowfrost HD can provide
reliable freeze protection at temperatures as low
as minus 30° Fahrenheit if properly applied and
maintained. Use of uninhibited propylene glycol,
plain water or a concentration of these two uids as
the HTF in this system is strictly prohibited.
Propylene glycol can degrade over time. The process
of degradation is accelerated in presence of oxygen
and/or heat. We strongly encourage you to establish
a preventative maintenance schedule with your
installation contractor. The HTF pH level must be
maintained between 8 and 10 in order to prevent
glycol oxidation and corrosion of the collector piping.
Rheem’s collector warranty specically excludes
freeze damage for any reason and absorber plate
damage resulting from the oxidation of the propylene
glycol HTF.
8
Page 9
In order to completely protect the integrity of the
LATITUDE 25°N 30°N 35°N 40°N 45°N 50°N
COLL. TILT 35° 40° 45° 50° 55° 60°
A B A B AB A B AB AB
FLAT 29 96 33 113 37 145 41 145 44 145 48 145
5° 1/12 25 83 29 93 33 113 37 132 41 133 44 141
9° 2/12 22 74 26 82 30 77 34 110 38 115 41 118
14° 3/12 17 66 22 72 26 82 30 92 34 95 38 98
18° 4/12 14 61 18 66 22 74 26 82 30 85 34 87
ROOF 23° 5/12 10 58 14 60 18 66 22 72 26 74 30 77
PITCH 27° 6/12 7 58 11 58 15 61 19 66 23 68 27 70
30° 7/12 4 58 8 58 13 58 17 62 21 65 25 66
34° 8/12 0 58 5 58 9 58 13 58 17 60 22 62
37° 9/12 0 58 3 58 7 58 11 58 15 58 19 58
40° 10/12 0 58 0 58 4 58 8 58 13 58 17 58
43° 11/12 0 58 0 58 2 58 6 58 10 58 14 58
45° 12/12 0 58 0 58 0 58 4 58 8 58 13 58
DIMENSIONS A AND B ARE DESIGNATED IN INCHES
TABLE 1
3.2 The installation shall conform to all federal,
state and local regulations, codes, ordi-
nances and standards governing solar
water heating system installations, and the
contractor shall adhere to sound building
safety and trade practices. Special consid-
eration must be given to building code
requirements for the penetration of struc-
tural members and fire rated assemblies.
3.3 The solar collector must be located in a
structurally sound area of the roof that will
fig.3
SIDE PITCH MOUNTING
solar collector and piping, the system is designed to
be drained manually if subject to extended periods
of disuse or persistent hard freeze conditions below
minus 30° Fahrenheit. (See Sections 8.1 and 8.2
below).
3) INSTALLATION REQUIREMENTS GENERAL
3.1 The contractor shall obtain all required permits
and approvals.
3.5 The homeowner and contractor shall conrm the
location of all roof and ground mounted components
in advance of the installation.
4) INSTALLATION REQUIREMENTS SPECIFIC
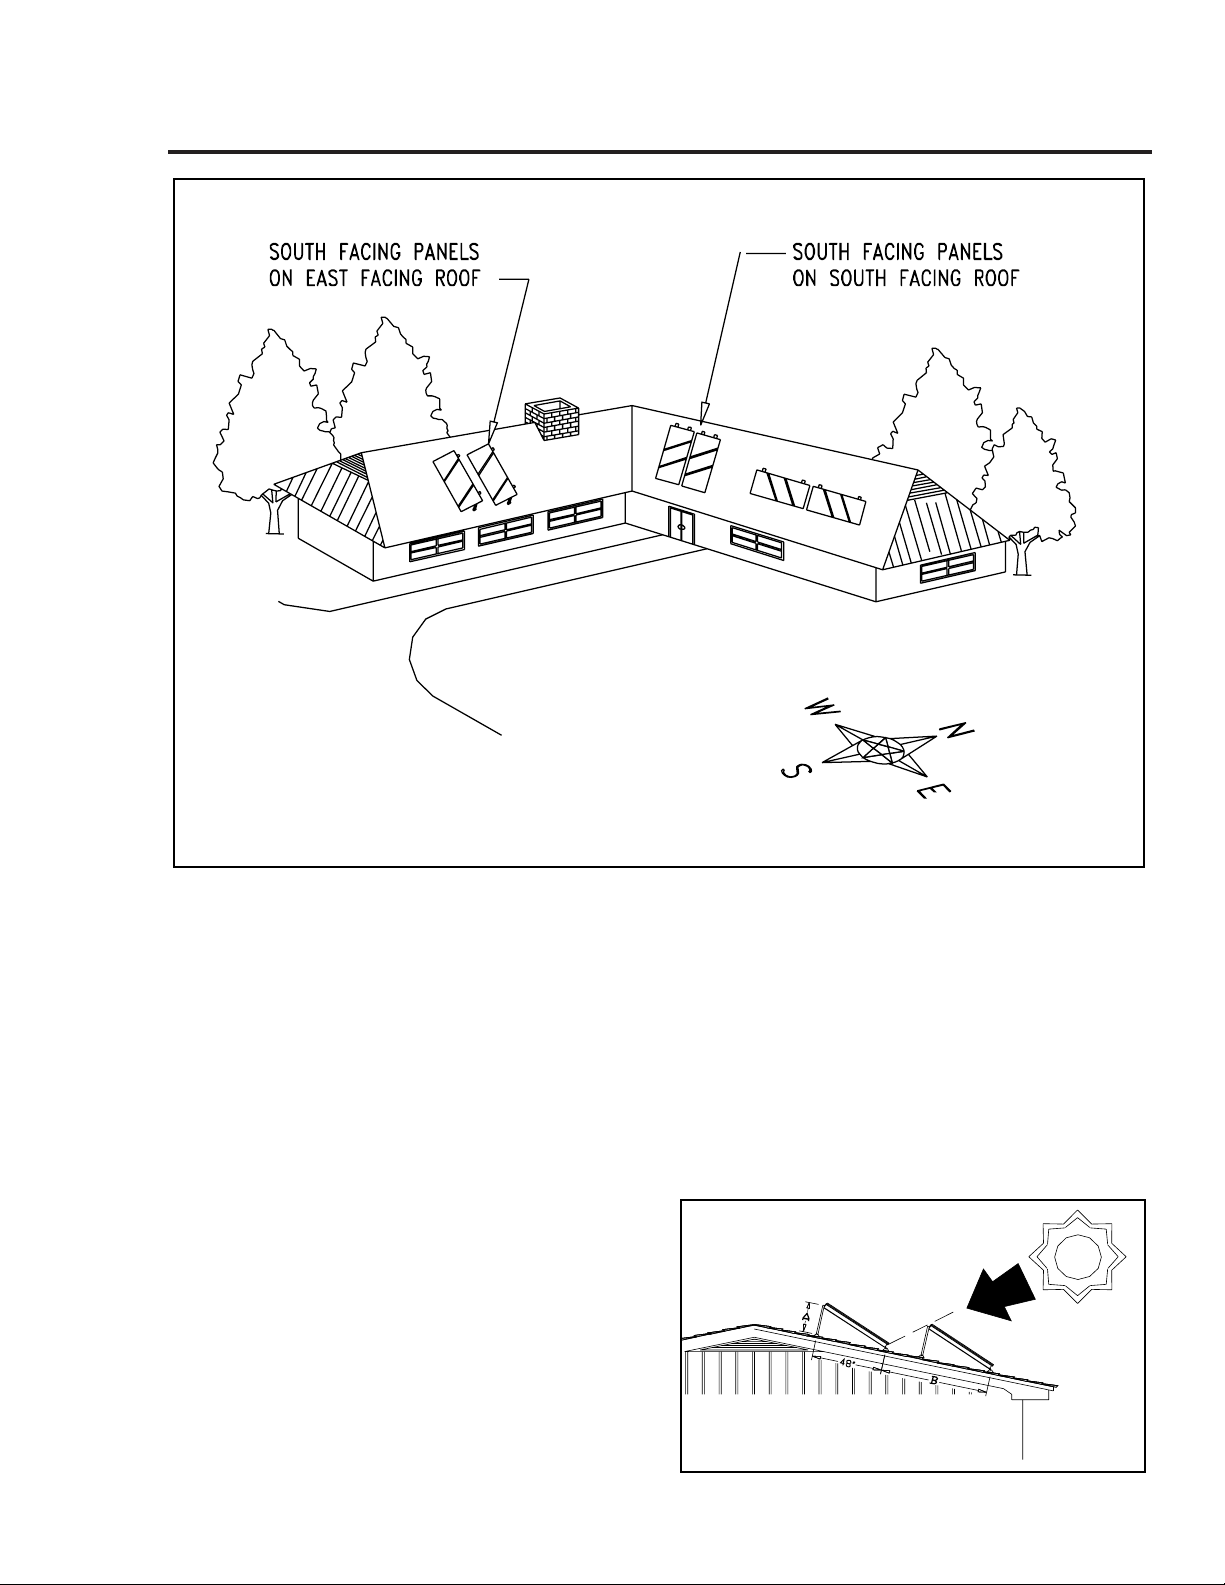
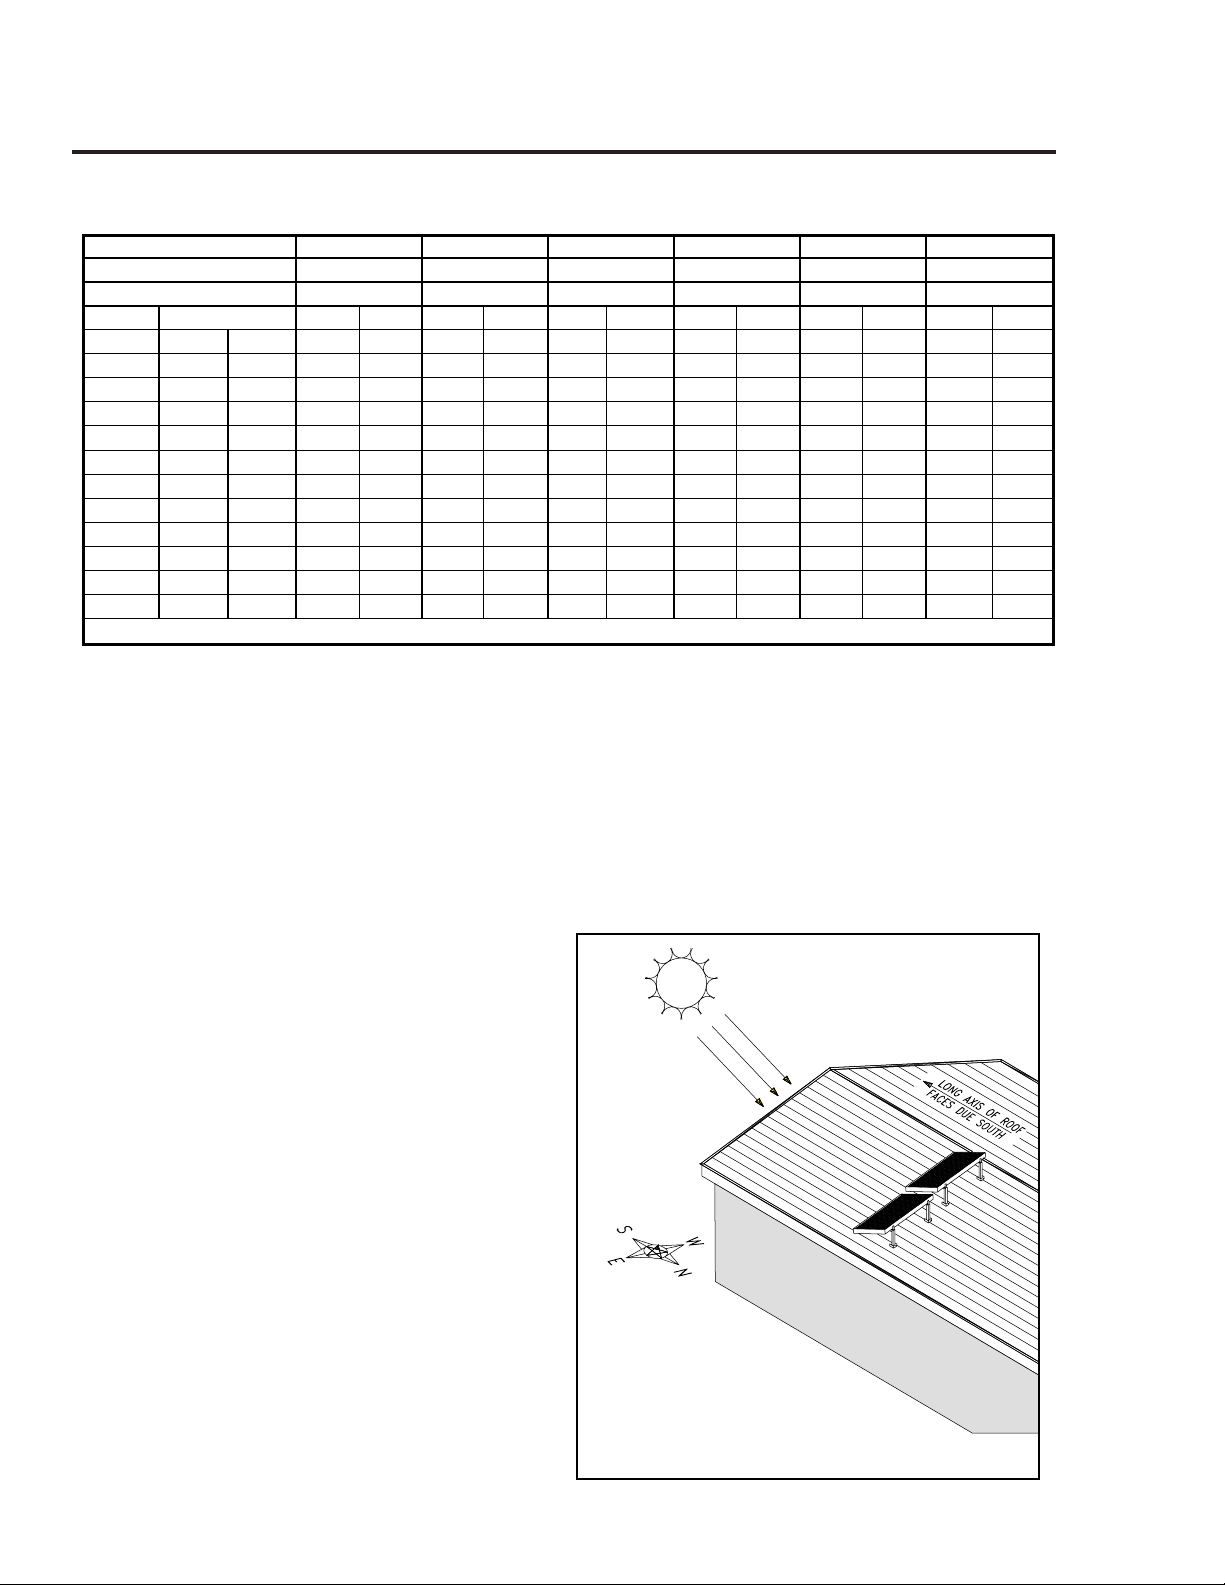
4.1 Collector Orientation
The performance of solar water heating systems
3.2 The installation shall conform to all federal, state
and local regulations, codes, ordinances and standards
governing solar water heating system installations,
and the contractor shall adhere to sound building
safety and trade practices. Special consideration
must be given to building code requirements for
the penetration of structural members and re rated
assemblies.
3.3 The solar collector must be located in a
structurally sound area of the roof that will be
unshaded for the majority of the day all year round.
Adjacent buildings and trees should be checked for
possible winter shading. An instrument such as the
Pathnder can be used for solar site analysis.
3.4 Before the installation the contractor shall inspect
the condition of the roof and notify the homeowner
of any existing roof damage or necessary repairs.
9
Page 10
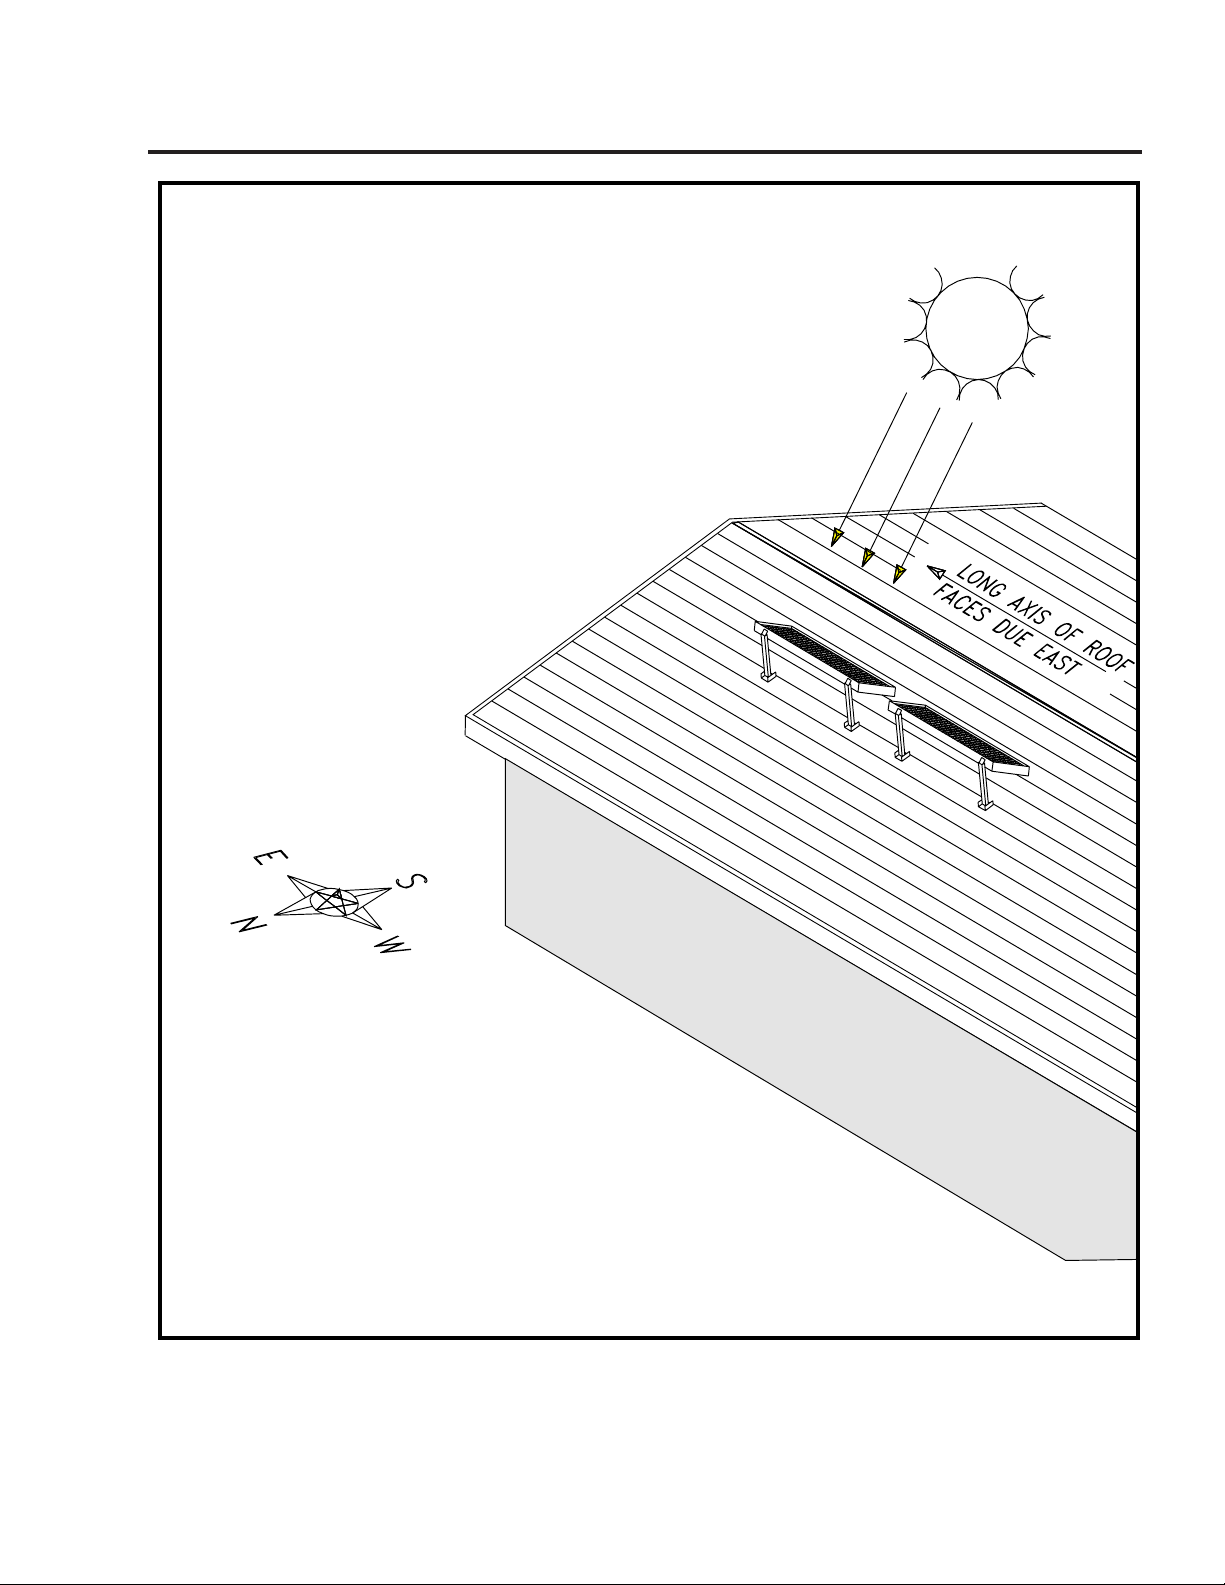
fig.4
REVERSE PITCH MOUNTING
in the Northern Hemisphere is optimized when the
collector is mounted facing True South. Performance,
however, suffers very little when the collector is
oriented no more than 45° East or West of True South.
10
The collector should be unshaded by any permanent
obstacle between 9:00 a.m. and 3:00 p.m. on any day
of the year.
Page 11
4.2 Collector Tilt
fig.5
COMPOSITION SHINGLE MOUNTING
Optimal annual efciency is achieved by tilting the
solar collector at an angle that equals your latitude
plus an additional 10°. This tilt angle favors the lower
winter sun when collector performance is at it’s lowest
and minimizes overheating during the hottest summer
months.
The solar collectors in a two collector staggered
mount installation must be spaced far enough apart to
prevent winter shading. Figure 2 and Table 1 show the
correct spacing between collectors to prevent shading
on December 21, when the sun is at its lowest angle.
horizontal orientation on the roof (See Figure 1).
Although the collector is protected from freeze
conditions by the glycol HTF and does not normally
need to be drained, it is still important to slope the
collectors just slightly to allow for complete drainage
if necessary. The recommended slope is 1/4" per foot
of horizontal run.
To ensure proper water drainage from the glazing
the collectors must maintain a minimum angle from
horizontal of at least 10°. Never mount the collector
directly or parallel to a at roof surface. Use "Solar
Strut" tilt mount kits to rack the collectors to the
proper angle.
4.3 Basic Mounting Procedures
The Rheem solar collector in your Rheem solar
system can be mounted in either a vertical or
The collector should be mounted as close to the
storage tank as possible to minimize heat loss in the
piping runs. If the home has attic access, mounting the
collectors near the roof peak provides for additional
11
Page 12

Installing the water heater.
fig.6
SHINGLE ROOF MOUNTING
attic workspace.
The solar collector should be mounted on the roof in
accordance with these general principles:
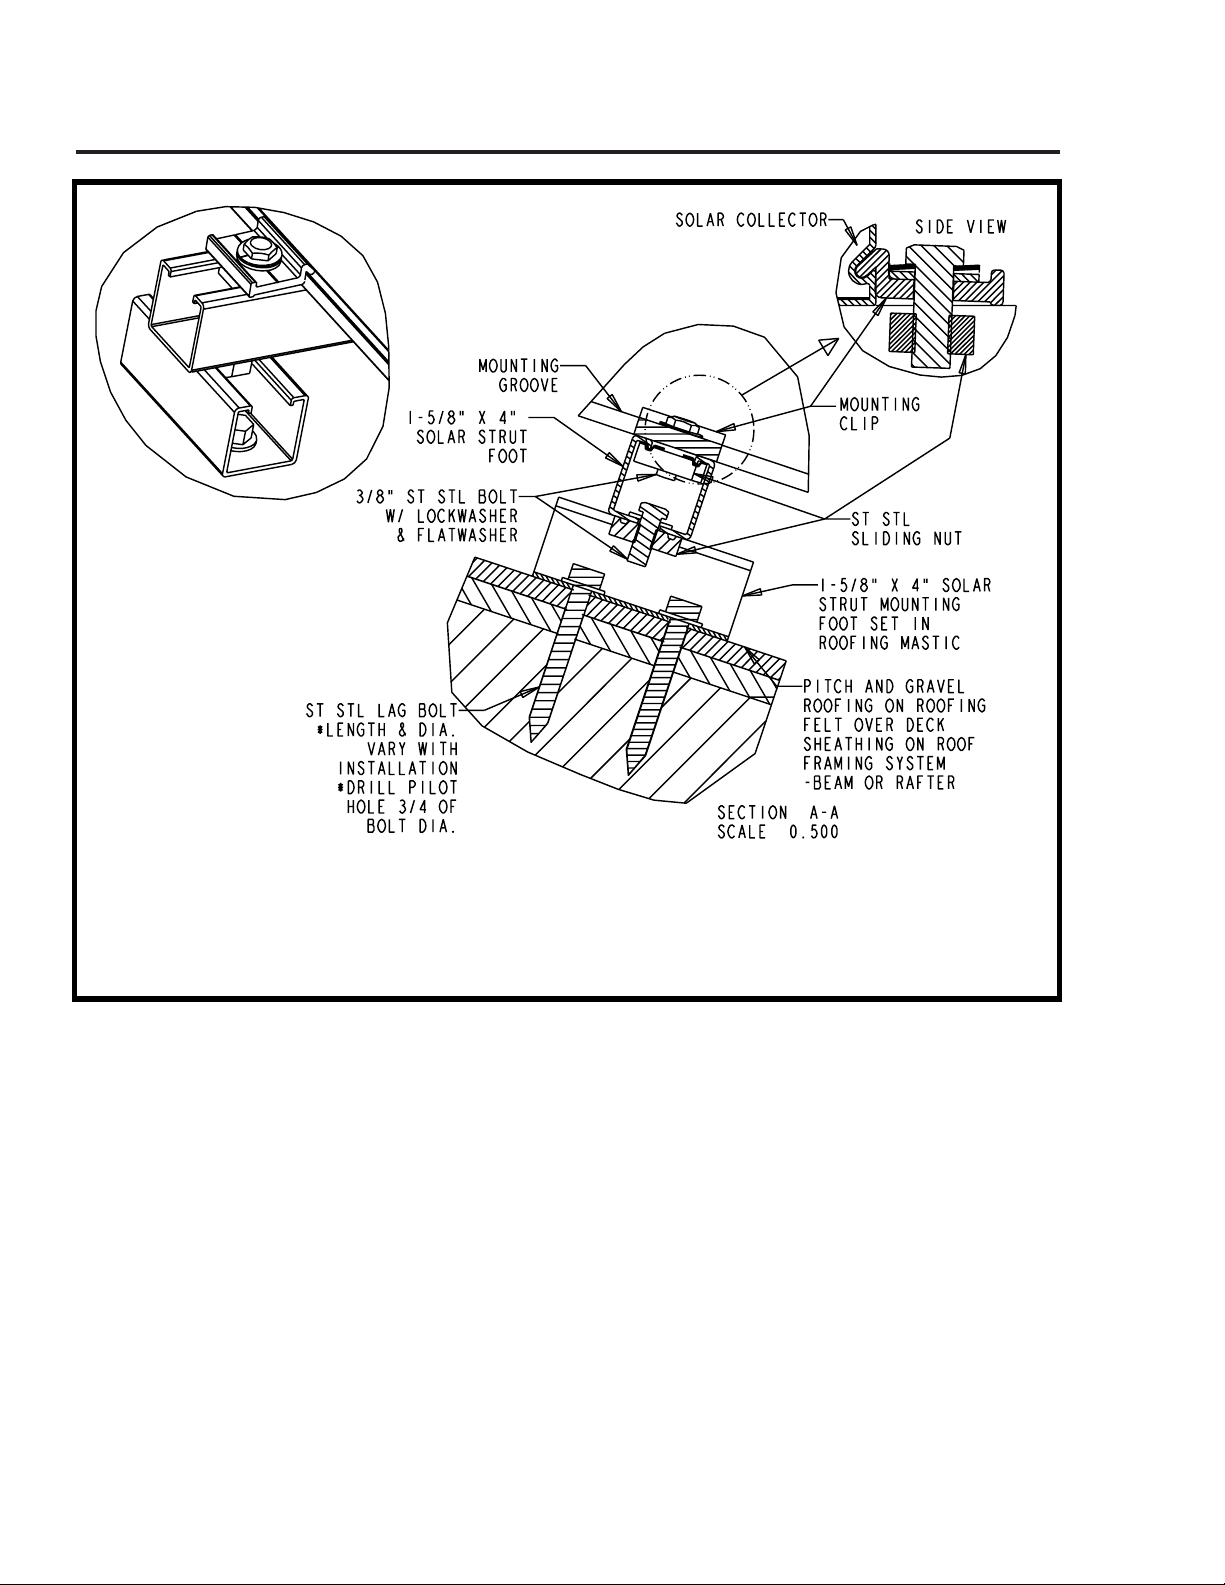
4.3.1 The most important structural consideration is
to securely anchor the solar collector and the Rheem
mounting hardware to the structural members of the
roof with stainless steel hanger or lag bolts. The solar
collector must be attached to the mounting hardware as
detailed in Figures 5–12. (Note: The drawings in this
manual detail mounting hardware for the Rheem series
collector.)
4.3.2 The collector must be raised from the roof
surface to allow for rainwater and debris to pass under
12
the collectors and for proper ventilation of the roong
material. There should be at least 3" of clearance
between the roof surface and the bottom of the solar
collectors.
4.3.3 In selecting mounting hardware and fasteners
it is extremely important to avoid galvanic corrosion
resulting from the direct contact of incompatible
metals. Use of Rheem anodized aluminum Rheem
mounting hardware and stainless steel lag or
hanger bolts, lock washers and round washers is
recommended. In climates subject to severe winters or
high humidity use of galvanized fasteners is prohibited.
4.3.4 Preserving the integrity of the roof membrane
is the most important roong consideration. Ensure
Page 13

that all roof penetrations required to plumb and mount
fig.7
TILE ROOF MOUNTING
the solar collector are properly ashed and sealed in
accordance with standard roong practices.
4.3.5 If the region is subject to hurricane conditions,
additional steps may be required to secure the collector
and mounting hardware to the structural members. In
certain areas of the country, local building codes may
require collector wind load testing or prescribe specic
mounting procedures. Consult your local building
department.
4.4 Collector Loop Pipe Insulation
The collector loop cold supply and hot return lines
must be well insulated with a high quality exible
closed cell insulation to minimize heat loss. The wall
thickness of the pipe insulation should not be less than
3/4". A 1" wall thickness is required in all areas prone
to annual hard freeze conditions. When it comes to pipe
insulation the rule is simple: thicker is better. Use 3/4"
Armaex (or similar) exible elastomeric closed cell
thermal insulation.
To the extent possible, slide the insulation material
over the pipe without cutting or taping. All butt joints
must be sealed with contact adhesive. The use of
rigid polyethylene pipe insulation is prohibited. The
temperatures generated by your collector in the summer
months or under stagnation conditions can melt this
type of material.
13
Page 14

Installing the water heater.
fig.8
TILE ROOF MOUNTING
Any above ground exterior pipe insulation is subject
to UV degradation and must be wrapped with foil tape
or painted with two coats of high quality water-based
acrylic resin coating as supplied by the insulation
manufacturer. Use 3/4" Armaex (or similar) exible
elastomeric closed cell thermal insulation.
4.5 Collector Plumbing
Rheem requires the use of all copper and brass ttings
in the collector loop plumbing. Couplings rather than
unions should be used to join the collectors to avoid
leaks and uid loss. Use only lead-free solder. Use
of 50/50 lead solder is expressly prohibited. Use of
galvanized steel, CPVC, PVC, or any other type of
plastic pipe is prohibited.
14
Piping in new solar installations can be covered with
dirt, grease, solder ux or other impurities that over
time affect the quality of the glycol HTF. A thorough
cleaning is required before charging the system with
glycol. Carefully review the cleaning procedures in
"Charging The System" outlined below.
All vertical piping between the storage tank and
the collector shall be supported at each story or at
maximum intervals of ten feet (10'). Copper plumbers
tape or tube strap is required. The pipe insulation
may not be compressed or crimped by the strapping
material.
The installation of all horizontal and vertical piping
may not reduce the performance or rating of any
structural member or re rated assembly. Adhere to all
applicable local codes and ordinances.
Page 15

4.6 Collector Sensor Placement
fig.9
FLUSH MOUNTING
Figure 13 for collector sensor installation detail.
The collector sensor must be located on the hot
water return line as close to the collector as possible.
Sensors are typically accurate to +/- 1/2°F if properly
installed and weatherized. To maximize sensor
accuracy, attach the anged portion of the sensor to
the Rheem collector header pipe with a stainless steel
hose clamp. Wire nuts used to connect the sensor and
low voltage wiring shall be all plastic, sealed with
silicone and thoroughly wrapped in electrician’s tape.
The sensor "bundle" must be placed under the
rubber pipe insulation covering the collector header.
Thoroughly wrap and weatherize the insulation with
electrician’s tape or insulation tape as provided by
the manufacturer (Rubatex Insul-Tape or equal). See
4.7 Low Voltage Wiring
The low voltage wiring used to connect the sensors
to the controller should be a minimum18 AWG.
The wiring should be bare or tinned copper, two
conductor, PVC insulated, with a PVC UV rated gray
jacket suitable for exterior use. Use Eastman Wire &
Cable No. 5704, Belden Wire and Cable No. 8461 or
equal.
4.8 Installing the Solar Storage Tank and Expansion
Tank
In plumbing the solar storage tank and expansion tank
make sure that all the components are accessible and
15
Page 16

Installing the water heater.
fig.10
FLUSH MOUNTING
easy to reach. Provide for clear access to the storage
tank, pump, expansion tank, mixing valve, time clock
(optional, not provided) and other key components. If
a component in the potable water side of the system
may require future service or maintenance make the
connections with brass unions. Use only brass nipples
and unions and copper and brass ttings in plumbing
the solar storage tank and expansion tank. The use
of galvanized ttings or nipples, di-electric unions,
CPVC, PVC or other plastic pipe is prohibited.
Hard copper connections to the city cold water
supply line and the home hot water feed lines
are recommended. The gaskets in standard water
heater ex hose connectors can become brittle and
compressed over time and begin leaking on the water
heater. If not detected in a timely manner even a small
drip or leak may cause serious damage to the tank’s
electrical components or, in extreme cases, may cause
the tank to leak from the outside in.
Tank plumbing is required to provide for the isolation
of the solar storage tank from the city cold water
supply line by means of an isolating ball valve (No.
23).
Line thermometers shall be installed in the collector
supply and return lines to allow for a simple
diagnostic check of proper system operation. On
a sunny day the hot water return line should be
approximately 5 – 12° warmer than the water in
the collector supply line. Compare the temperature
readings in the two line thermometers (No. 3).
16
Page 17

In a single tank system install a third thermometer
fig.11
TILT MOUNT
(No. 3) directly after the mixing valve above the solar
storage tank. In a two tank system you may install the
third thermometer either directly above the hot outlet
on the solar storage tank or after the mixing valve on
the back-up water heater.
The circulation pump shall be the Grundfos model
17
Page 18

Installing the water heater.
fig.12
STAND OFF TILT MOUNT
UPS15-5BFC/LC, 115 volt. The pump shall be
prewired with a 6’ line cord so that it can be plugged
directly into the 115 volt receptacle on the side of
the differential control. Two way ball valves must
be installed on either side of the circulating pump
(Nos.12 and 14) so that the pump can be isolated
from the collector loop. Repairs or routine system
maintenance can be completed without introducing air
into the system or draining the HTF.
The expansion tank shall have a minimum 150 PSIG
working pressure and have a total volume of not less
than 4.4 gallons. The standard factory charge should
be 40 PSIG. The expansion tank shall be Rheem/Ruud
Therm-X-Guard Model RRT- 12 or equal (No. 8).
A high quality thermostatic mixing valve is a required
18
component in all OG-300 certied systems and should
be plumbed in line with brass union connections for
ease of future repair or replacment (No. 32). The
specied mixing valve shall be the Heatguard model
HGBASE or equal and shall have an operating range
between 95°F and 140°F. The mixing valve shall be
set to 120°F.
The temperatures generated by your Rheem system
will vary throughout the year. In the Northern
Hemisphere the water temperature will be hottest
in the spring and summer months while cooler
temperatures are to be expect from November through
March. On sunny days system temperatures may
range between 110ºF to 180ºF depending upon the
season and hot water demand. The mixing valve
described above blends the hot and cold water
Page 19

!
that over time affect the quality of the glycol HTF.
A thorough cleaning is required before charging
the system with glycol. Carefully review the
cleaning procedures in "Charging The System"
outlined below.
All vertical piping between the storage tank and
the collector shall be supported at each story or
at maximum intervals of ten feet (10'). Copper
plumbers tape or tube strap is required. The pipe
insulation may not be compressed or crimped by
the strapping material.
The installation of all horizontal and vertical pip-
ing may not reduce the performance or rating of
any structural member or fire rated assembly.
Adhere to all applicable local codes and ordi-
nances.
4.6 Collector Sensor Placement
The collector sensor must be located on the hot
water return line as close to the collector as pos-
sible. Sensors are typically accurate to +/- 1/2°F
if properly installed and weatherized. To maxi-
mize sensor accuracy, attach the flanged portion
of the sensor to the SunEarth collector header
pipe with a stainless steel hose clamp. Wire nuts
used to connect the sensor and low voltage
wiring shall be all plastic, sealed with silicone and
thoroughly wrapped in electrician’s tape.
fig.15
fig.13
COLLECTOR
SENSOR
COLLECTOR PLUMBING - HORIZONTAL MOUNT
supplies to deliver hot water to your xtures at a safe,
controlled temperature.
WARNING: SCALDING CAN OCCUR
WITHIN FIVE SECONDS WHEN WATER
TEMPERATURES APPROACH 140ºF. THE
MIXING VALVE SHOULD BE ADJUSTED BY
YOUR CONTRACTOR TO PROVIDE WATER
TO YOUR FIXTURES AT NO MORE THAN
120ºF.
The 3/4" cold water supply line to the solar storage
tank must be insulated with minimum 7/8" X 1/2"
pipe insulation to a minimum distance of 5' behind the
storage tank, or to the wall if closer than 5'.
4.9 Tank Sensor Placement
Figure 18 details the proper placement of the solar
storage tank sensor. Make sure the sensor is secured
to the threaded stud on the storage tank with a 10-24
stainless steel nut.
Thoroughly weatherize the wire connections in
accordance with the roof sensor detail above. Replace
the berglass insulation batting and close the access
cover.
A properly licensed contractor must make the 230
volt electrical connection to the water heater or solar
storage tank and the electronic time switch (Optional
No. 33). If your solar contractor is not allowed by
law to make these connections consult a licensed
electrician.
Never activate the circuit breaker controlling the
electrical heating element until the solar storage tank
is completely lled with water. This will prevent “dry
ring” of the heating element. The electrical heating
element will be destroyed almost instantaneously if
not completely submerged in water when activated.
Make sure the water heater circuit breaker is off until
the solar storage tank is completely lled.
19
Page 20

We recommend the use of a 115 volt differential
!
fig.14
COLLECTOR PLUMBING - VERTICAL MOUNT
control with a factory installed six foot line cord. The
installation requires one 115 volt outlet to be installed
near the solar storage tank. Plug the control into the
outlet. The circulation pump line cord is plugged into
the receptacle on the side of the controller. A 230 volt
control and circulation pump may be substituted, but
troubleshooting the components in the future becomes
more difcult.
20
4.11 Charging the System
WARNING: Under no circumstances can any
fluid other than Dowfrost HD be used, alternate
fluids could be hazardous to your health.
Once the components are plumbed you are ready to
ll the solar storage tank with water and to charge
the collector loop with a mixture of heat transfer uid
(HTF) and distilled or deionized water. The use of
Page 21

fig.14
fig.15
COLLECTOR PLUMBING - VERTICAL MOUNT
COLLECTOR PLUMBING - HORIZONTAL MOUNT
regular tap water as a mixing agent is prohibited.
Proceed as follows:
4.11.1 Begin by lling the solar tank with water. Do
this by opening the cold water isolation ball valve
to the solar tank (No. 23). When the tank is lled,
inspect all threaded ttings and solder joints for leaks.
4.11.2 Fill and pressurize the solar collector loop
with water. Begin by connecting a washing machine
hose to the upper charge valve (No. 9) and ll the
collector loop with water. The isolation ball valve
(No. 10) remains closed at this point. While the hose
is still connected to the upper charge valve and the
water is running, open the lower purge/drain valve
(No. 11) and let the water run out until it is free of
impurities or debris that might have entered the piping
as the components were plumbed. Run the water
long enough to eliminate any air bubbles that may be
trapped in the system.
Close the lower purge/drain valve. The collector
loop now has been subjected to city pressure and the
pressure gauge should read somewhere in the range
of 50 - 75 PSI in most cases (No. 7). Make a nal
inspection of the collector plumbing connections
to ensure that there are no leaks anywhere in the
collector loop piping.
4.11.3 After you have determined the integrity of the
entire piping system turn on the circulating pump. Do
21
Page 22

fig.16
SINGLE TANK SYSTEM SCHEMATIC
this by setting the manual switch within the controller
to the “on” position. Run the pump for a full ve
minutes and carefully check to ensure there is proper
uid ow and that all the air has been purged from
the solar collector glycol loop. An inexpensive ow
meter such as manufactured by Blue White Industries
or Letro is recommended as an optional system
22
component. A ow meter allows you to monitor and
adjust the ow rate through the piping and also to
visually inspect the HTF uid quality.
Set the controller to the "off" position and proceed to
the next step.
Page 23

4.11.4 Mix the Dowfrost HD propylene glycol and
fig.17
DOUBLE TANK SYSTEM SCHEMATIC
distilled water mixture in accordance with Table 4
and Table 5 in a large clean bucket. You will need a
second empty bucket as well. The charging process
also will require a low ow diaphragm pump (Flojet
or equal) to ll and pressurize the collector loop.
Connect the discharge side of the pressure pump
to the upper charge faucet (No. 9) Place the pump
suction side hose in the glycol solution. Close the
isolation ball valve (No. 10) and connect a second
hose to the lower charge faucet (No. 11). Place the
other end of the hose in the empty bucket.
23
Page 24

Open the upper charge faucet and allow the pressure
fig.18
TANK SENSOR
from the expansion tank to push the water in the
glycol loop back to prime the pressure pump. When
the hose in the bucket containing the glycol mixture
stops bubbling you may begin charging the collector
loop with glycol.
With both charge faucets now open, run the Flojet
pressure pump until the pinkish glycol mixture begins
owing into the empty bucket. Quickly switch the
hose from the empty/return bucket to the bucket
containing the glycol mixture. Continue to circulate
the uid using the pressure pump until the bubbling
has stopped and the air has been purged.
4.11.5 After charging the collector loop, shut the
lower charge faucet and let the pressure pump
drive up the loop pressure to the appropriate level
(Generally in the range of 25 PSI). To more accurately
calculate the proper pressure measure the height of the
solar collector above the solar storage tank and divide
this number by 2.31. Then add 20 PSI to this number.
As a word of caution, the pressure in the glycol
loop should not exceed 45 PSI when the system is
24
operational on a good sunny day. Contact your solar
contractor if the charged collector loop pressure
exceeds this threshold.
Your Rheem solar water heating system must be
charged and the uid quality maintained by an
experienced contractor. If the system is drained during
the winter, or you notice a signicant drop in collector
loop pressure, contact your installation contractor
immediately for service. The glycol HTF provides
the freeze protection for your system and must be
properly maintained. An experienced contractor
should periodically check the HTF uid quality.
4.11.6 Dowfrost HD HTF
To ensure maximum effectiveness for corrosion
protection, the glycol inhibitor package is designed
for a minimum 25-30 percent concentration of
glycol in water. Table 4 shows the concentrations of
Dowfrost HD required to provide freeze and burst
protection at various temperatures. Use the mixture
most appropriate for your climate. Do not use a
higher glycol to water concentration than necessary,
Page 25

as this will adversely impact the relative heat transfer
fig.19
ELECTRICAL COMPONENTS
efciency of the solution.
Generally, for an extended margin of protection, you
should select a temperature that is at least 5°F lower
than the expected lowest ambient temperature. These
gures are examples only and should not be regarded
as specications. As conditions are not within our
control, neither Rheem nor Dow Chemical guarantees
that freeze damage may not occur at temperatures
other than shown.
Water used to dilute the HTF must meet certain
minimum standards for purity. Impurities in the
dilution water can increase metal corrosion, reduce the
effectiveness of corrosion inhibitors, increase inhibitor
25
Page 26

depletion rate, and cause the formation of scale and
Open the upper charge faucet and allow the
pressure from the expansion tank to push the
water in the glycol loop back to prime the pres-
sure pump. When the hose in the bucket con-
taining the glycol mixture stops bubbling you
may begin charging the collector loop with glycol.
With both charge faucets now open, run the
Flojet pressure pump until the pinkish glycol mix-
ture begins flowing into the empty bucket.
Quickly switch the hose from the empty/return
bucket to the bucket containing the glycol mix-
ture. Continue to circulate the fluid using the
pressure pump until the bubbling has stopped
and the air has been purged.
4.12.5 After charging the collector loop, shut
Table 4
Percent (volume) Glycol Concentration Required
Temperature F For Freeze Protection For Burst Protection
20 18% 12%
10 29 20
0 36 24
-10 42 28
-20 46 30
-30 50 33
-40 54 35
-50 57 35
-60 60 35
collector glycol loop. An inexpensive flow meter
such as manufactured by Blue White Industries or
Letro is recommended as an optional system
component. A flow meter allows you to monitor
and adjust the flow rate through the piping and
also to visually inspect the HTF fluid quality.
Set the controller to the "off" position and pro-
ceed to the next step.
4.12.4 Mix the Dowfrost HD propylene glycol
and distilled water mixture in accordance with
Table 4 and Table 5 in a large clean bucket. You
will need a second empty bucket as well. The
charging process also will require a low flow
diaphragm pump (Flojet or equal) to fill and pres-
surize the collector loop.
Connect the discharge side of the pressure pump
to the upper charge faucet (No. 9) Place the
pump suction side hose in the glycol solution.
Close the isolation ball valve (No. 10) and con-
nect a second hose to the lower charge faucet
(No. 11). Place the other end of the hose in the
empty bucket.
Open the upper charge faucet and allow the
pressure from the expansion tank to push the
water in the glycol loop back to prime the pres-
sure pump. When the hose in the bucket con-
taining the glycol mixture stops bubbling you
may begin charging the collector loop with glycol.
With both charge faucets now open, run the
Flojet pressure pump until the pinkish glycol mix-
ture begins flowing into the empty bucket.
Quickly switch the hose from the empty/return
bucket to the bucket containing the glycol mix-
ture. Continue to circulate the fluid using the
pressure pump until the bubbling has stopped
and the air has been purged.
4.12.5 After charging the collector loop, shut
the lower charge faucet and let the pressure
pump drive up the loop pressure to the appropri-
ate level (Generally in the range of 25 PSI). To
more accurately calculate the proper pressure
measure the height of the solar collector above
the solar storage tank and divide this number by
2.31. Then add 20 PSI to this number. As a word
of caution, the pressure in the glycol loop should
not exceed 45 PSI when the system is operational
on a good sunny day. Contact your solar con-
tractor if the charged collector loop pressure
exceeds this threshold.
Your SolaRay solar water heating system must be
charged and the fluid quality maintained by an
experienced contractor. If the system is drained
during the winter, or you notice a significant drop
in collector loop pressure, contact your installa-
tion contractor immediately for service. The gly-
col HTF provides the freeze protection for your
system and must be properly maintained. An
experienced contractor should periodically check
the HTF fluid quality.
4.12.6 Dowfrost HD HTF
To ensure maximum effectiveness for corro-
sion protection, the glycol inhibitor package
is designed for a minimum 25-30 percent
concentration of glycol in water. Table 4
shows the concentrations of Dowfrost HD
required to provide freeze and burst protection at
various temperatures. Use the mixture most
Table 4
Percent (volume) Glycol Concentration Required
Temperature F For Freeze Protection For Burst Protection
20 18% 12%
10 29 20
0 36 24
-10 42 28
-20 46 30
-30 50 33
-40 54 35
-50 57 35
-60 60 35
Table 5
Total Collector Loop Fluid Capacity In Gallons*
1 Collector System 4 Gallon
2 Collector System 5 Gallons
other deposits on the heat exchanger's internal heat
transfer surfaces.
Distilled or deionized water is required.
The HTF pH level must be maintained between 8 and
10 to minimize corrosion and glycol oxidation in the
piping system.
5) SYSTEM START-UP PROCEDURES
Throughout the installation procedures outlined
in Section 4 above, emphasis has been placed on
the correct procedures for plumbing and wiring
the components, checking for plumbing leaks,
pressurizing the collector glycol loop, and eliminating
any trapped air that can impact uid quality and pump
performance. Having completed these tasks it is time
to start up your Rheem solar water heating system.
When the glycol loop has been fully charged and
the pressure is around 25 psi (check the pressure
gauge, No. 7), set the differential controller to
the "Automatic" setting. This will activate your
circulating pump. The controller allows you to set the
"on" differential. Turn the red rotary switch inside the
control housing to 12.
Adjust the valve settings in accordance with Section 6
below.
26
6) THREE MODES OF SYSTEM OPERATION
Both single and double tank Rheem systems are
designed to accommodate three separate modes of
operation. Your solar water heating system can, (1)
provide 100% solar operation during good weather, or
(2) serve as a preheater to your electric water heater
adding solar energy when and as available, or (3)
completely bypass the solar collector loop and solar
storage tank and run 100% on utility power during
inclement weather.
Single Tank Operating Instructions:
6.1 100% Solar Operation:
Turn off the circuit breaker to your solar storage
tank. If a water heater time switch has been installed,
set the switch to the "off" position. If you have a
mechanical timer remove the trippers from the face of
the switch.
6.2 Solar Preheat
Leave the circuit breaker to your solar storage
tank on and set the tank thermostat to the lowest
acceptable temperature setting. The electric resistance
heating elements will come on only when the tank
temperature falls below the thermostatic set point.
If the solar heated water entering the tank is warmer
than the thermostatic set point, the electric heating
elements will not come on. If you have a water heater
timer, you may preset the timer to turn the heating
element on and off at specied times throughout the
day if desired.
6.3 100% Utility Power
Leave the circuit breaker to your solar storage tank on
and close the isolation ball valves in the collector loop
(Nos. 5 and 10). In this mode of operation you must
turn off the circulation pump. To turn the pump off
Page 27

when the tank temperature falls below the ther-
mostatic set point. If the solar heated water
entering the tank is warmer than the thermosta-
tic set point, the electric heating elements will
not come on. If you have a water heater timer,
you may preset the timer to turn the heating ele-
ment on and off at specified times throughout
the day if desired.
6.3 100% Utility Power
Leave the circuit breaker to your solar storage
tank on and close the isolation ball valves in the
collector loop (Nos. 5 and 10). In this mode of
operation you must turn off the circulation
pump. To turn the pump off open the controller
and change the operational setting from auto-
matic to off. Failure to turn off the pump can
quickly damage the pump motor, shaft, bearings
or impeller.
Two Tank System Instructions:
6.4 100% Solar Operation
fig.19a
100% SOLAR
OPERATION
open the controller and change the operational setting
from automatic to off. Failure to turn off the pump can
quickly damage the pump motor, shaft, bearings or
impeller.
Two Tank System Instructions:
6.4 100% Solar Operation
Follow the instructions for single tank systems above.
You also must change the position of the three way
ball valves above both the solar storage tank and the
back-up water heater (Nos. 24 and 26). Valve handle
No. 24 must be in the horizontal position. Valve
handle No. 26 must be in the vertical position. See
Figure 19a, 100% Solar Operation.
6.5 Solar Preheat
Follow the instructions for the single tank system for
setting the thermostat and the heating elements for
automatic operation. The three way valve above the
solar storage tank (No. 24) must be in the vertical
position. Each valve handle (Nos. 24, 25 and 26) must
be placed in the horizontal position. See Figure 19b,
Solar Preheat.
6.6 100% Utility Power
Follow the instructions for the single tank system
above. All three ball valves above the heaters (Nos.
24, 25 and 26) must have the valve handles placed in
the horizontal position. See Figures 19c 100% Utility
Power and 19d.
7) ISOLATING THE MAJOR COMPONENTS
AND SYSTEM SHUT DOWN PROCEDURES
Your Rheem solar water heating system is designed
so that the key components can be easily isolated
for emergency repairs or routine maintenance. By
shutting a single valve you can isolate the entire
system from the pressurized cold water supply line
(No. 23). In the case of a storage tank or tting leak
immediately shut this valve and call your installation
contractor for service.
The collector loop can be isolated from the solar
storage tank by closing isolation ball valves Nos.
5 and 10. If the pressure in this loop drops or you
nd a glycol leak shut these valves and contact your
installation contractor. Turn the circulating pump off
by setting the controller to the “off” position.
In two tank systems the solar storage tank can be
isolated from the back-up water heater.
Set the valve handle on the three way ball valve (No.
24) to the horizontal position and close the isolation
ball valve (No. 25). By closing these two valves the
tank can be serviced or replaced. The operation of the
back-up water heater will not be effected.
The back-up water heater in two tank systems also can
be isolated from the rest of the system. Close the cold
water supply line ball valve (No. 23) and set the three
way valve handle above the conventional water heater
(No. 26) to the vertical position. Set the two way ball
valve handle (No. 30) directly above the heater to the
horizontal position.
27
Page 28

8) SUMMER VACATION
Follow the instructions for single tank systems
above. You also must change the position of the
three way ball valves above both the solar stor-
age tank and the back-up water heater (Nos. 24
and 26). Valve handle No. 24 must be in the hor-
izontal position. Valve handle No. 26 must be in
the vertical position. See Figure 19a, 100% Solar
Operation.
6.5 Solar Preheat
SHUT DOWN PROCEDURES
Your SolaRay solar water heating system is
designed so that the key components can be eas-
ily isolated for emergency repairs or routine
maintenance. By shutting a single valve you can
isolate the entire system from the pressurized
cold water supply line (No. 23). In the case of a
storage tank or fitting leak immediately shut this
valve and call your installation contractor for
service.
The collector loop can be isolated from the solar
storage tank by closing isolation ball valves Nos.
5 and 10. If the pressure in this loop drops or you
find a glycol leak shut these valves and contact
your installation contractor. Turn the circulating
fig.19b
SOLAR
PREHEAT
RECOMMENDATIONS AND PROCEDURES
ANY BODY OF WATER. BE CAREFUL. THE
HTF MAY BE EXTREMELY HOT!
Solar water heating systems can build up very high
t e m p e r a t u r e s when there is no daily draw on
the system. If a short summer vacation is planned
the best way to dissi-pate heat in the system is to set
the controller to the "on" position. The circulating
pump will run twenty-four hours a day and cool
off the water in the solar storage tank at night. The
collector radiates heat back to the atmosphere at night,
preventing the system from stagnating at very high
temperatures. This will not harm the pump or add
substantially to your monthly utility bill. Remember
to set the control to the "Automatic" setting upon your
return!
During extended summer vacations (4 weeks or more)
it is advisable to either cover the solar collectors with
an opaque material or to manually drain the collector
loop HTF. Rheem recommends that you cover the
collectors if practical.
If you choose to drain the HTF in the collector loop
follow these steps:
8.1 Turn the controller to the “off” position (No. 18).
8.2 Connect one end of a garden hose to the purge/
drain valve (No 11) and place the other end in a ve
gallon bucket. Open the valve and gravity will drain
the heat transfer uid into the bucket. A licensed
recycler, reclaimer or incinerator must dispose of the
Dowfrost HD.
DO NOT DUMP DOWFROST HD INTO A
STORM SEWER, ON THE GROUND OR INTO
8.3 If the system is installed with an optional time
clock make sure the clock is not preset to go "ON"
during your absence. If you have a mechanical time
switch, remove the "on" tripper from the clock face
(No. 33).
When you return home contact your service contractor
to recharge the system with HTF. After the system has
been recharged, set the controller to the “automatic”
position. Reset the time switch.
9) MAINTENANCE AND TROUBLESHOOTING
The following simple procedures are intended to
optimize the performance of your Rheem solar water
heating system and also to extend the life of the
primary components.
9.1 Fluid Quality: It is extremely important to monitor
the quality of the Dowfrost HD HTF on a periodic
basis. The chemical composition of the heat transfer
uid may change over time. System pH must be
maintained between 8 and 10 to avoid damage to the
collector loop and absorber plate piping.
9.2 The second most important component in your
system, at least from a longevity standpoint, is often
ignored and never seen. We are referring to the
sacricial "anode rod" installed in your solar storage
tank (No. 20). Typically constructed from magnesium,
anode rods are installed in "glass lined" water heaters
and storage tanks to inhibit corrosion.
As the name implies, the "sacricial" anode rod is
28
Page 29

izontal position. Valve handle No. 26 must be in
the vertical position. See Figure 19a, 100% Solar
Operation.
6.5 Solar Preheat
Follow the instructions for the single tank system
for setting the thermostat and the heating ele-
ments for automatic operation. The three way
valve above the solar storage tank (No. 24) must
be in the vertical position. Each valve handle
(Nos. 24, 25 and 26) must be placed in the hori-
zontal position. See Figure 19b, Solar Preheat.
6.6 100% Utility Power
isolate the entire system from the pressurized
cold water supply line (No. 23). In the case of a
storage tank or fitting leak immediately shut this
valve and call your installation contractor for
service.
The collector loop can be isolated from the solar
storage tank by closing isolation ball valves Nos.
5 and 10. If the pressure in this loop drops or you
find a glycol leak shut these valves and contact
your installation contractor. Turn the circulating
pump off by setting the controller to the “off”
position.
In two tank systems the solar storage tank can be
isolated from the back-up water heater.
Set the valve handle on the three way ball valve
(No. 24) to the horizontal position and close the
isolation ball valve (No. 25). By closing these two
valves the tank can be serviced or replaced. The
operation of the back-up water heater will not be
effected.
The back-up water heater in two tank systems
also can be isolated from the rest of the system.
Close the cold water supply line ball valve (No.
23) and set the three way valve handle above the
conventional water heater (No. 26) to the vertical
position. Set the two way ball valve handle (No.
fig.19b
fig.19c
SOLAR
PREHEAT
100% UTILITY
POWER
consumed so that the tank lining is not. At a certain
point in the process, the anode rod is no longer
completely effective and the corrosive processes
begin to eat away at the tank's glass lining. In time the
solar storage tank, like any other gas or electric water
heater, will begin to leak. The process is not reversible
and the tank must be replaced.
System temperatures and water quality affect the rate
at which the anode rod is consumed. In general, the
higher the average system temperature the faster the
rate of corrosion. By changing the anode rod after the
fth year of system operation, and every three to ve
years thereafter, it is possible to extend the life of the
solar storage tank. Periodic replacement of the anode
rod in your solar storage tank can signicantly extend
the tank life.
maintain a high level of thermal performance.
9.5 Check the exterior pipe insulation annually and
patch or repair any exposed surfaces or degraded
areas. Repaint as necessary.
9.6 In the unusual instance of collector glass
breakage, the glass should be replaced immediately.
This will reduce the likelihood of water accumulating
inside the collector and deteriorating the insulation.
Contact your installation contractor.
9.7 If you detect a glycol or water leak, or the glycol
loop pressure drops unexpectedly, contact your
installation contractor immediately to diagnose the
problem and recharge the system.
9.3 The solar storage tank also should be ushed
annually to minimize sediment build-up on the bottom
of the tank. If you live in an area with high mineral
content in your water, ush the tank on a semi-annual
basis. Disconnect the power to the solar tank at the
circuit breaker or time switch (if present) before
ushing. Turn the controller to the off position.
Open the ush valve on the bottom of the storage
tank (No. 15) and drain a sufcient volume of water
to eliminate the sediment. After the procedure is
complete make sure the tank is completely full of
water before restoring power to the thermostat and
heating element. Turn the controller to the "on"
position.
9.4 If you live in a dusty climate it is a good idea to
wash off the dirt that settles on the collector glass
once a month. Clean glass allows the collector to
9.8 If it’s been a sunny day and you don’t have hot
water, rst make sure that the controller is set in the
automatic position. If the controller is properly set
and the pump has not been running, unplug the line
cord from the controller receptacle and plug the pump
directly into a nearby 115 volt outlet. If the pump does
not run it may need to be replaced. If the pump does
run when plugged directly into the wall outlet, the
problem may be located in the controller or one of the
10k ohm sensors. Contact your installation contractor
for service.
9.9 If you have a full tank of hot water before bed
and the solar storage tank is cold in the morning, the
check valve (No. 4) may not be seating correctly and
should be cleaned or replaced. Also make sure that
the circulating pump is not running after 6:00 p.m.
If the pump is running and the control indictor light
"Solar" #1 is on after 6:00 p.m., check both sensors to
29
Page 30

pump off by setting the controller to the “off”
position.
In two tank systems the solar storage tank can be
isolated from the back-up water heater.
Set the valve handle on the three way ball valve
(No. 24) to the horizontal position and close the
isolation ball valve (No. 25). By closing these two
valves the tank can be serviced or replaced. The
operation of the back-up water heater will not be
effected.
The back-up water heater in two tank systems
also can be isolated from the rest of the system.
Close the cold water supply line ball valve (No.
23) and set the three way valve handle above the
conventional water heater (No. 26) to the vertical
position. Set the two way ball valve handle (No.
30) directly above the heater to the horizontal
position.
8) SUMMER
VACATION REC-
OM M EN D A-
TIONS AND
PROCEDURES
Solar water heat-
ing systems can
build up very high
temperatures
when there is no
daily draw on the
system. If a short
summer vacation
is planned the
best way to dissi-
fig.19c
fig.19d
VALVE POSITION DIAGRAM
2-TANK SYSTEM
100% UTILITY
POWER
see that they calibrate to 10K ohm resistance at 77°F.
If you nd a defective sensor replace it immediately.
Note that in a two tank system nighttime heat loss will
be harder to detect, especially if you are operating in
the solar preheat mode. Check the line thermometers
(No. 3) in the collector loop piping to detect night
thermosiphoning.
9.10 If the weather is poor and the auxiliary heating
element will not re, the bright red reset button on
the thermostat may have to be depressed to be reset.
Single tank systems have one heating element and
thermostat. Double tank systems with conventional
electric water heaters have two heating elements and
thermostats (see g 17, No. 29).
Never remove the protective access plate on the
exterior of the solar storage tank or conventional
water heater without disconnecting the 230 volt power
supply at the circuit breaker.
After the circuit breaker has been turned off, remove
the access plate on the storage tank or water heater
and depress the red reset button on the thermostat. If it
clicks when depressed the heating element should re
30
immediately when you reconnect the circuit breaker.
It the reset button does not click and you do not
have hot water after one hour, the heating element or
thermostat may be defective. Contact your installation
contractor for service.
In two tank systems the conventional electric water
heater will be wired for electrical back-up. The solar
tank will serve solely as a storage tank and will not be
wired.
10) Rheem SYSTEM COMPONENT PARTS
See Figures 16 and 17 for the location of the specic
components numbered below.
1) Rheem Solar Collector(s): Absorbs the sun's heat
energy and transfers this heat to the HTF circulating
through the collector. (Provided)
2) Collector Sensor: Wired to the system controller.
Works in conjunction with the tank sensor to
automatically turn your circulating pump on and off at
preset temperature differentials. (Provided)
Page 31

3) Tank and Line Thermometers: Used to determine
proper system operation. Line thermometers will
show an approximate 5 - 12° temperature dif ference
between the collector supply and return lines on sunny
days. In a single tank system the tank thermometer
will read the temperature of the water after the mixing
valve feeding your xtures. In two tank systems
the thermometer will read the nished solar tank
temperature. (Provided)
4) Check Valve: This valve is installed to stop or
minimize convective evening heat loss in the system.
The heat in the solar storage tank will rise through
the collector loop piping in the evening into the
much cooler solar collector and dissipate heat unless
prevented from doing so by a check valve. Check
valves are also sometimes referred to as one way
valves. (Provided)
5) Isolation Ball Valve: Used in conjunction with
component No. 10 to isolate the solar collector loop
from the solar storage tank. (Not Provided)
6) Pressure Relief Valve: Will release glycol loop
HTF at 150 PSI. If this valve opens and HTF uid is
expelled contact your contractor immediately. This
valve also can be opened to drain the HTF from the
charged glycol loop for replacement. (Provided)
7) Pressure Gauge: Indicates the pressure in the
charged glycol collector loop. (Provided)
12) Isolation Ball Valve: When closed in conjunction
with No. 14 will isolate the circulation pump for
repair or replacement. (Not Provided)
13) Circulating Pump: Circulates the HTF through the
collector loop. (Provided)
14) Isolation Ball Valve: When closed in conjunction
with No. 12 will isolate the circulation pump for
repair or replacement. (Not Provided)
15) Flush Valve: Used to drain the solar storage tank
and to ush sediment from the tank on an annual
basis. (Not Provided)
16) Tank Sensor: Wired to your controller. Works
in conjunction with the collector sensor to turn your
circulating pump on and off at preset temperature
differentials. (Provided)
17) Cold Water Dip Tube: Forces incoming city
cold water to the bottom of the solar storage tank to
prevent mixing with the warm water at the top of the
tank. (Provided)
18) Differential Thermostat: Known as the controller.
Automatically turns the circulating pump on and off
when there is sufcient heat to be gained from the
solar operation. The controller also may be set to limit
high temperature build up in the solar storage tank.
(Provided)
8) Expansion Tank: Pre-charged with air to allow for
the expansion and contraction of the glycol HTF as it
heats and cools. (Not Provided)
9) Charge Valve: Used to charge the collector loop
with glycol and also to eliminate air from the system.
(Not Provided)
10) Isolation Ball Valve: Used in conjunction with
component No. 5 to isolate the solar collector loop
from the solar storage tank. Also used with the charge
valves to ll and pressurize the collector glycol loop
(Nos. 9 and 11). (Not Provided)
11) Drain/Purge Valve: Used to charge the collector
loop with glycol, purge air from the loop and drain the
heat exchange uid. (Not Provided)
19) Heat Exchanger: Transfers heat from the solar
collector loop to the potable water in the solar storage
tank. (Provided)
20) Anode Rod: The "sacricial" anode rod is
installed in your solar storage tank to prevent
corrosion to the tank lining by neutralizing aggressive
water action. Anode rods have a nite life and
require periodic replacement depending on annual
tank temperatures and water quality. Determine
a replacement schedule with your installation
contractor. (Provided)
21) Heating Element & Tank Thermostat: The solar
storage tank is equipped with an auxiliary 4500 watt,
230 volt electrical heating element. The thermostat
controls the temperature setting of the auxiliary
heating element. (Provided)
31
Page 32

22) Temperature and Pressure Relief Valve:
Universally required by the plumbing code on water
heaters. Will automatically release and dump water at
either 150 PSI of pressure or 210° F in temperature.
(Provided)
23) Cold Water Supply Line Isolation Ball Valve:
When open allows potable water to ll the solar
storage tank or back-up water heater. When closed
isolates the solar storage tank and backup water heater
from the pressurized city cold water supply line. (Not
Provided)
24) Three Way Ball Valve: Used in conjunction with
component No. 26 to establish the proper mode of
system operation. (Not Provided)
25) Isolation Ball Valve: Used in conjunction with
component No. 24 to completely isolate the solar
storage tank for repair or replacement as necessary.
(Not Provided)
26) Three Way Ball Valve: Used in conjunction with
component No. 24 to establish the proper mode of
system operation. (Not Provided)
time switch is a highly recommended option. (Not
Provided)
34) Thermal Well (Not Pictured)
11) Rheem SYSTEM MODEL NUMBERS:
RS80-48BP
RS120-64BP
WWW.RHEEM.COM
PLEASE VISIT OUR WEB SITE FOR NEW
PRODUCT UPDATES, ANSWERS TO
FREQUENTLY ASKED QUESTIONS (FAQ) AND
USEFUL INFORMATION ABOUT SOLAR WATER
HEATING SYSTEMS.
27) Cold Water Dip Tube: See No.16 above. 28)
Anode Rod: See No. 18 above. 29) Heating Elements
and Thermostats: See No. 19 above. In a two tank
system the back-up electric water heater has two
heating elements and two thermostats. (Provided)
30) Temperature and Pressure Relief Valve: See No.
22 above. (Provided)
31) Optional Isolation Ball Valve. Use with
component No. 26 to completely isolate the back-up
water heater for repair or replacement. (Not Provided)
32) Mixing Valve: Automatically blends hot water
from the solar storage tank with incoming city cold
water to an acceptable set point. A mixing valve must
be installed on every Rheem solar water heating
system. (Provided)
33) Optional Time Switch: Allows you to
automatically or manually turn the auxiliary heating
element in the solar storage tank on and off. A
32
Page 33

333435
Page 34

Page 35

Page 36

IF YOU NEED SERVICE
1. Should you have any questions about your new water heater, or if it
requires adjustment, repair, or routine maintenance, it is suggested that you
first contact your installer, plumbing contractor or previously agreed upon
service agency. In the event the firm has moved, or is unavailable, refer
to the telephone directory, commercial listings or local utility for qualified
service assistance.
2. Should your problem not be solved to your complete satisfaction, you
should then contact the Manufacturer’s National Service Department at
the following address:
1241 Carwood Court
Montgomery, Alabama 36117
Phone: 1-800-432-8373.
When contacting the manufacturer, the following information will be
requested:
a. Model and serial number of the water heater as shown on the rating plate
attached to the jacket of the heater.
b. Address where the water heater is located and physical location.
c. Name and address of installer and any service agency who performed
service on the water heater.
d. Date of original installation and dates any service work was performed.
e. Details of the problems as you can best describe them.
f. List of people, with dates, who have been contacted regarding your
problem.
36
 Loading...