

Page 1

STEP 5: Connecting to the Internet.
● After the WiFi Module is installed and the Water Heater is powered, all
three LEDs should blink simultaneously, indicating that the module is
ready to be configured for use on the home network. [NOTE: In this state
the module is operating as a WiFi Access Point.]
● If you haven’t already, download the free EcoNet App from the Apple App
Store or Google Play store.
● Ensure that you have the MAC Address you captured in Step 1 above.
● While near the WiFi module, open the EcoNet app and follow the
instructions presented within the app.
NOTE: Some mobile devices may fail to re-launch the EcoNet app
after the first network connection step is completed. In order to
continue installation, manually return to the EcoNet app and follow the
remaining instructions.
Additional Tip
To repeat the setup process or change the Internet
connection settings at any time, simply press the WLAN
SETUP button on the WiFi Module. This will reset the
module to its factory defaults. Once pressed, all three
LEDs will start blinking simultaneously, indicating that
the module has been reset.
Fig. 1
Fig. 2
Fig. 3
Fig. 2
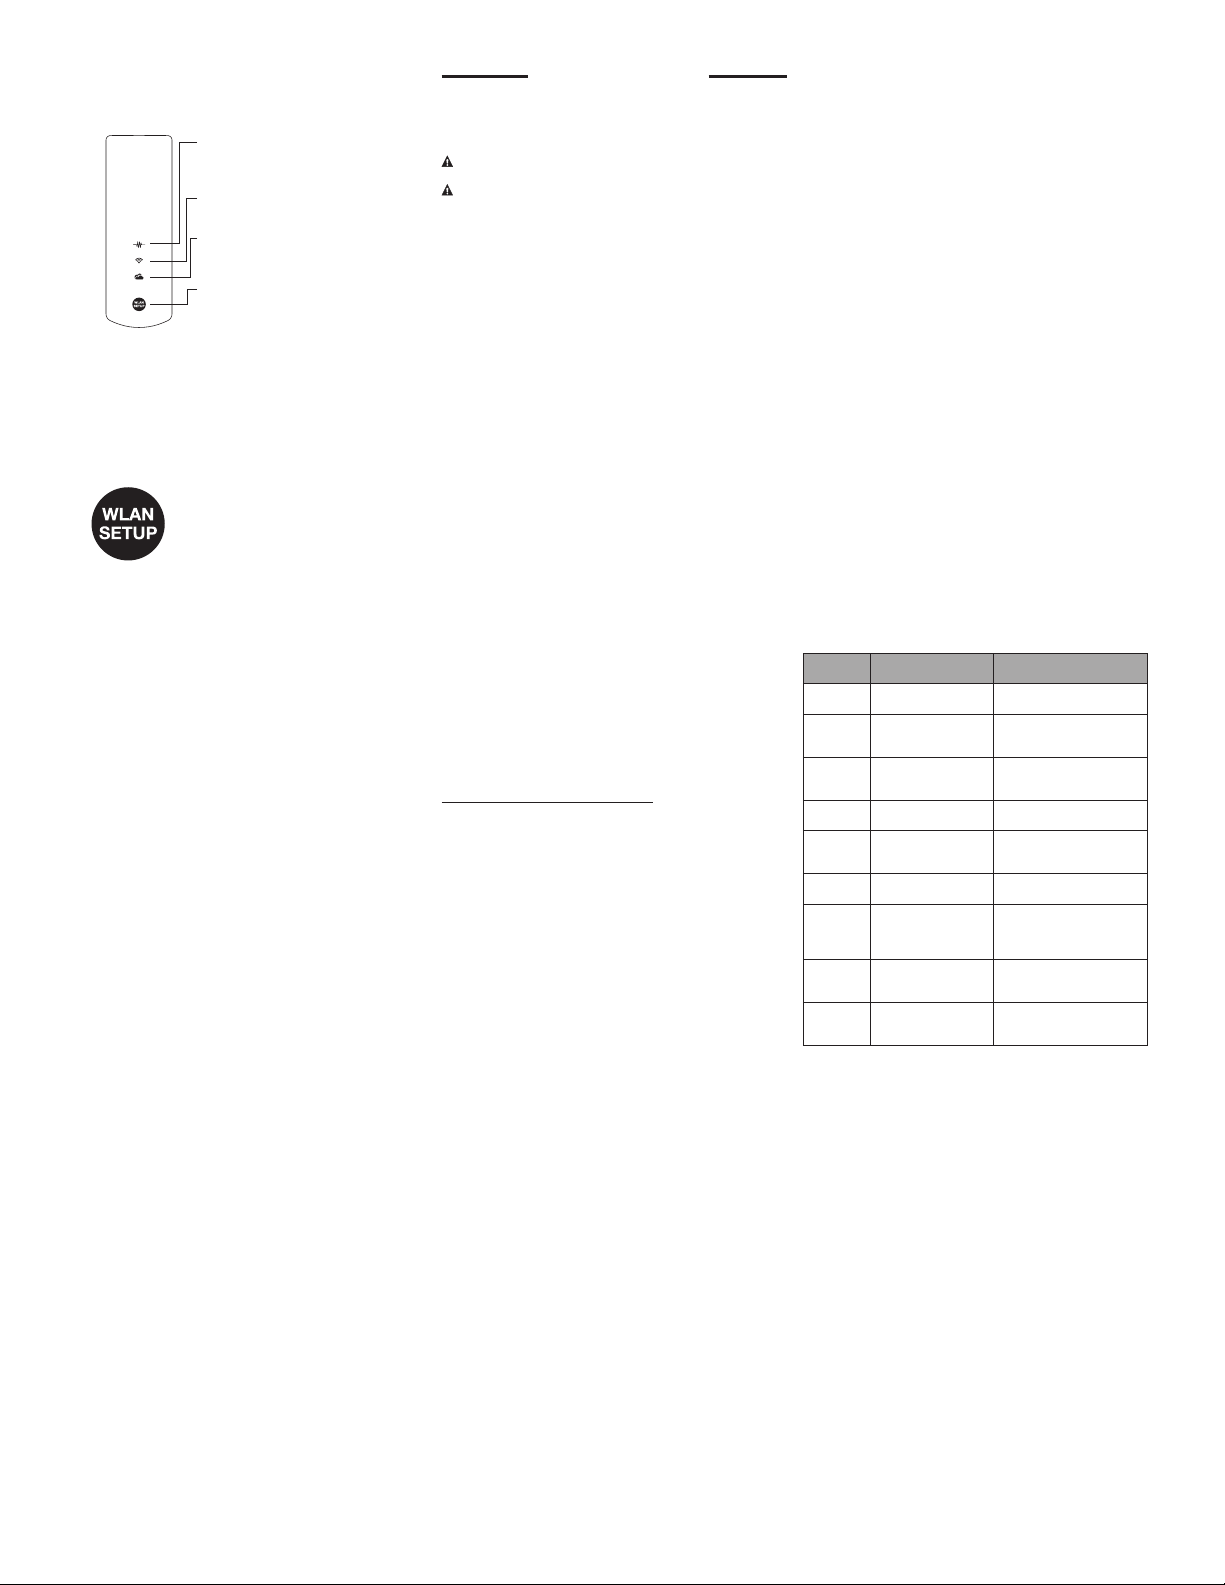
Middle LED indicates
WiFi connection.
Top LED indicates power and
connection to equipment.
Lower LED indicates an active
connection to the cloud/server.
The WL AN SETUP button
is used to reset the WiFi
configuration/connection.
Fig. 5
SMARTEC ECONET
TRANSLATOR KIT
Installation Instructions
This water heater is pre-installed with Smartec EcoNet Translator. Refer to
below instruction to setup the translator and WiFi module.
CAUTION: Disconnect power before working on the water heater.
Warning: WiFi module needs to be installed indoors.
STAND-ALONE OPERATION SETUP
1. If only one Gas Tankless Water Heater is connected to the EcoNet Bus,
you can now start using the SMARTEC EcoNet Translator to monitor and
control the water temperature of your Gas Tankless Water Heater through
the EcoNet App (see WiFi instructions). Remember to wait 60 seconds
before starting operation.
2. The user can enable/disable the water heater and set/view the water
outlet temperature using the Remote Control connected to the unit or
wirelessly through the EcoNet App.
MANIFOLD OPERATION SETUP
If more than one water heater is connected together in a Manifold
configuration continue with this section. Otherwise, skip to Alarms section.
1. Remove front cover from the water heater.
2. To allow the SMARTEC EcoNet Translator to control Gas Tankless Water
Heaters in a manifold configuration, each manifolded unit should be
connected to a SMARTEC EcoNet Translator.
3. Connect manifolded units serially using both/any of the Econet ports
located on the EcoNet Translator and the provided RJ25 cable.
4. Enter the setup menu by pressing the two buttons simultaneously located
on the SMARTEC EcoNet Translator for 5 seconds. If successful, you will
see a “1” instead of a “01” on the display.
5. Press the right button to change the number assigned to each water
heater. The number displayed will increase with each button press.
6. Each unit in the manifold should be numbered sequentially. This means
that if the user has 4 units connected in a manifold mode, then they
should be numbered 01, 02, 03 and 04. Maximum number of units
supported in manifold is 20.
To return to the main menu press the left button.
7. Connect the Remote Control included with the water heater only to
number 01 when in manifold configuration. The remote control connected
to number 01 will control all units in manifold.
8. The user can enable/disable the water heaters and set/view the water
outlet temperature using the Remote Control connected to number 01 or
wirelessly through the App.
Pressing the left button scrolls the menu items. Pressing the right button
chooses the menu item and changes the menu choice as follows:
Menu Item Function
1 Instance / EcoNet Bus number (1-20)
2 Number of Manifold Heaters (1-20), 1 = No
3 Recirculation Mode 0= OFF, 1=ON
The menu will exit after 10 seconds if no buttons are pressed. Changes
will be saved upon menu exit.
9. Only unit number “01” will have menu item 2 available. This menu item
tells the manifold manager (number 01) how many heaters are connected
in the manifold system.
10. Pressing the right button when in menu item 2 will increase the number
of manifolded units the manager will detect.
Once all units on the manifold are numbered correctly, the configuration
will be completed. Power cycle all units. Wait 60 seconds before starting
operation.
* All switches in the water heaters controller must be in the off position.
RECIRCULATION PUMP OPERATION
If you have a recirculation pump installed in your system follow the next
steps to setup your system.
MANIFOLD
Use menu item 3 to turn ON recirculation mode only in the water
heater unit with number 1 assigned. All other units connected in
the manifold are left as is. Power cycle all water heaters in the
manifold.
STAND ALONE
Use menu item 3 to turn ON recirculation mode. Power cycle your
water heater.
Note: Recirculation mode is intended for setups of 3 or more manifolded
units.
HIGH TEMPERATURE SETTING
If you have a water heater chip that allows a higher water temperature
set-point (185°F) installed in your unit follow these steps to set it up with
the EcoNet translator. The following steps are for stand-alone units and
number/instance 01 in a manifold setup.
With unit ON:
1. Change your set-point to 100°F using the remote or the EcoNet App.
Wait 10 seconds.
2. Disconnect translator from unit.
3. Turn off unit by pressing the power button on the remote control.
4. Turn DIP1 switch 4 ON (Refer to the water heater Use & Care Manual).
The remote control starts to blink.
5. Press max button for 2 seconds.
6. Turn DIP1 switch 4 OFF.
7. Press the Power button in your remote control.
8. Connect translator to unit.
9. Wait 60 seconds.
10. Change the set-point to the desired value using the remote control the
EcoNet App.
Note: If you change the set-point to 140 and below you will have to
repeat the process again.
For manifold setup it is necessary to complete the following process for
each water heater that is not number 01:
1. Disconnect translator from unit.
2. Turn off unit by pressing the power button on the remote control.
3. Turn DIP1 switch 4 ON. The Red LED in the control board starts to blink.
4. Press max button for 2 seconds. Red LED stays solid.
5. Turn DIP1 switch 4 OFF.
6. Disconnect water heater unit from wall power.
manifold operation.
7. Connect translator to unit.
8. Plug back water heater unit to power outlet.
ALARMS
If the EcoNet WiFi module is configured correctly, the user will receive a
notification in the App regarding the detected alarm.
Additionally the remote control may display the alarms.
When an alarm is detected, the number displayed in the translator will blink.
When this occurs, the user should connect to the App in order to identify the
issue that was detected.
To clear warnings or alarms press the left button on the EcoNet translator
for 5 seconds until all segments on the LED displays are on. Then release
the button and alarms will be cleared.
TROUBLESHOOTING
● Verify that the WiFi module is connected and properly configured.
● If a fault is detected in any of the water heaters connected to EcoNet,
please refer to the EcoNet App in order to troubleshoot any alarms in
your water heater.
● If your WiFi signal strength is too weak at your Water Heater’s location,
you may still be able to use the WiFi Kit by using a WiFi Range Extender.
Contact your favorite electronics retailer for more information.
● If connection is lost, verify that the lights in your WiFi module are solid. If
not, unplug and plug the power cord to the module.
● Contact customer service if a fault is detected.
Phone: 1-866-720-2076 - Water Heater Customer Service.
1-800-255-2388 - EcoNet Customer Service Number (Module WiFi)
Website: www.Rheem.com/EcoNet
Error Code Description Solution
Unknown Error from the
A100
Tankless Control
A107 Water Detected
Water Sensor Not
S300
Installed
Possible Freezing
S103
Conditions
S104 Service Reminder
S105 Change Water Filter
Translator to Water
A201
Heater Comm.Failure
EcoNet Water Heater
A203
Comm.Failure
Water Heater Comm.
A203
Failure Instance X
Contact water heater customer
service.
There is water present inside
the water heater, check for
leaks or other sources of
water.
Verify the water sensor is
connected properly to the
EcoNet translator.
Heat Exchanger temperature
is too low.
Friendly reminder to have your
water heater serviced. 200 hrs
of operation have passed.
Change lter if installed, if not
disregard warning.
Verify connection between
EcoNet translator and water
heater control board. Reset
power to unit.
Verify EcoNet wiring to WiFi
module or to another EcoNet
translator. Reset power to unit.
In manifold, verify wiring
between units. Reset power to
all water heaters.
AP18492 (01/17)
ECONET WiFi KIT
Installation Instructions
BEFORE YOU BEGIN
● The EcoNet WiFi Kit is intended for use with EcoNet Enabled products.
DO NOT attempt to use this kit with other equipment.
● The EcoNet WiFi Kit requires a broadband home Internet connection
and WiFi network in order to operate. Use a mobile phone or other WiFi
capable device to ensure that the home’s WiFi network is accessible
from the Water Heater’s location.*
STEP 1: Record the MAC Address.
● Locate the MAC Address on the back of your module as depicted in
Figure 1, and record it. You will need this information in the future and
may be asked for it during the setup process. Take a digital photo using
a mobile device, or write it in the space provided below.
MAC Address: _____-_____-_____-_____-_____-____
Media Access Control (M AC)
Address location
STEP 2: Connect the Communication Cable.
● Insert one end of the Communication Cable into the jack found on the
bott om of the WiF i module as depicted in Figure 2.
● Remove front cover from the water heater and insert the other end of
the Communication Cable into one of the EcoNet port on your EcoNet
Translator.
● Replace front cover and power the unit.
STEP 3: Permanently Attach the WiFi Module.
● Ensure that both plugs on the Communication Cable are securely
attached as described above.
● Remove the protective paper from one side of the Adhesive Tape and
affix it to the back of the WiFi Module above the label with the MAC
Address.
● Select a location for attaching the WiFi Module to the indoor location
of your preference which does not cause severe tension in the
Communication Cable.
● Remove the protective paper from the remaining side of the Adhesive
Tape and press the Module against a clean flat surface of the Water
Heater as depicted in Figure 3 for indoor models.
● WiFi module and power connector need to be located indoor.
STEP 4: Install the power cord.
● Install power cord into power jack at bottom of module and plug
transformer to a power source.
Sample
Page 2
Si el módulo EcoNet WiFi está configurado correctamente, el usuario
Si se detecta una falla en cualquiera de los calentadores de agua
STEP 5: Connecting to the Internet.
● After the WiFi Module is installed and the Water Heater is powered, all
three LEDs should blink simultaneously, indicating that the module is
ready to be configured for use on the home network. [NOTE: In this state
the module is operating as a WiFi Access Point.]
Fig. 5
Top LED indicates power and
connection to equipment.
Middle LED indicates
WiFi connection.
Lower LED indicates an active
connection to the cloud/server.
The WL AN SETUP button
is used to reset the WiFi
configuration/connection.
● If you haven’t already, download the free EcoNet App from the Apple App
Store or Google Play store.
● Ensure that you have the MAC Address you captured in Step 1 above.
● While near the WiFi module, open the EcoNet app and follow the
instructions presented within the app.
NOTE: Some mobile devices may fail to re-launch the EcoNet app
after the first network connection step is completed. In order to
continue installation, manually return to the EcoNet app and follow the
remaining instructions.
Additional Tip
To repeat the setup process or change the Internet
connection settings at any time, simply press the WLAN
SETUP button on the WiFi Module. This will reset the
module to its factory defaults. Once pressed, all three
LEDs will start blinking simultaneously, indicating that
the module has been reset.
SMARTEC ECONET
TRANSLATOR KIT
Intrucciones de instalación
Este calentador de agua tiene preinstalado el Smartec EcoNet Translator.
Consulte las instrucciones que siguen a continuación para configurar el
Translator y el módulo WiFi.
ATENCIÓN: desconecte la alimentación eléctrica antes de trabajar
en el calentador de agua.
Advertencia: el módulo WiFi debe instalarse en interiores.
CONFIGURACIÓN PARA OPERACIÓN INDEPENDIENTE
1. Si hay un solo calentador de agua a gas sin tanque conectado al bus
EcoNet, usted puede comenzar ahora a usar el SMARTEC EcoNet
Translator para monitorear y controlar la temperatura del agua de su
calentador de agua a gas sin tanque por medio de la aplicación EcoNet
App (vea instrucciones de WiFi). Espere 60 segundos después de
energizar para utilizar su unidad.
2. El usuario puede habilitar/deshabilitar el calentador de agua y establecer/
ver la temperatura de salida del agua por medio del control remoto
conectado a la unidad, o de manera inalámbrica a través de la EcoNet
App.
CONFIGURACIÓN DE LA OPERACIÓN DE MANIFOLD
Si hay más de un calentador de agua conectado conjuntamente en una
configuración de manifold, continúe con esta sección. De lo contrario,pase
a la sección Alarmas.
1. Retire la cubierta frontal del calentador de agua.
2. Para permitir que el SMARTEC EcoNet Translator controle los
calentadores de agua a gas sin tanque en una configuración de manifold,
cada unidad acoplada debe conectarse a un SMARTEC EcoNet
Translator.
3. Conecte las unidades acopladas en serie mediante ambos o alguno de
los puertos EcoNet ubicados en el EcoNet Translator y el cable RJ25
provisto.
4. Ingrese al menú de configuración oprimiendo simultáneamente los
dos botones ubicados en el SMARTEC EcoNet Translator durante 5
segundos. Si el funcionamiento es correcto, usted verá un “1” en lugar
de un “01” en la pantalla.
5. Oprima el botón derecho para cambiar el número asignado a cada
calentador de agua. El número visualizado aumentará con cada
pulsación del botón.
6. Cada unidad del manifold debe numerarse de manera secuencial. Esto
significa que si el usuario tiene 4 unidades conectadas en modo de
manifold, deben tener las numeraciones 01, 02, 03 y 04. La cantidad
máxima de unidades conectadas en un manifold es 20.
Para volver al menú principal, oprima el botón izquierdo.
7. Conecte el Control Remoto incluido con el calentador de agua al número
01 cuando esté en la configuración de manifold. El control remoto
conectado al número 01 controlará todas las unidades del manifold.
8. El usuario puede habilitar/deshabilitar los calentadores de agua y
establecer/ver la temperatura de salida del agua por medio del control
remoto conectado al número 01, o de manera inalámbrica a través de
la App.
Al oprimir el botón izquierdo se recorren los ítems del menú. Al oprimir
el botón derecho se elige el ítem del menú y se cambia la selección del
menú, como sigue:
Item del menú Función
1 Instancia / Número de bus EcoNet (1-20)
2 Cantidad de calentadores acoplados (1-20),
3 Modo de Recirculacion 0=Apagado, 1=encendido
Si no se oprimen botones durante 10 segundos, se sale del menú. Al salir
del menú se guardan los cambios.
9. Solo la unidad número “01” tendrá disponible el ítem de menú 2. Este
ítem de menú le dice al administrador de manifold (número 01) cuántos
calentadores están conectados en el sistema de manifold.
10. Al oprimir el botón derecho cuando se está en el ítem de menú 2,
aumenta la cantidad de unidades acopladas que el administrador
detectará.
Una vez que todas las unidades del manifold estén correctamente
numeradas, la configuración ha finalizado.
* Todos los switches en los controladores de los calentadores de agua
tienen que estar en la posición de apagado.
OPERACION CON BOMBA DE RECIRCULACION
Si tiene instalada una bomba de recirculacion, siga los siguientes pasos
para configurar su Sistema.
MANIFOLD
Use el item del menú 3 para encender el modo de recirculación
solo con el calentador de agua asignado al numero 01. Todas
las otras unidades conectadas en manifold se quedan sin
cambio alguno. Desconecte y reconecte la energia en todos los
calentadores de agua en el manifold.
OPERACION INDEPENDIENTE
Use el item del menú 3 para encender el modo de recirculación.
Desconecte y reconecte la energia en todos los calentadores de
agua en el manifold.
Nota: El modo de recirculación esta diseñado para configuraciones de
3 o más unidades en manifold.
CONFIGURACION DE TEMPERATURA ALTA
Si tiene un chip para calentador de agua que le permita establecer una
temperatura de salida alta (185°F) instalado en su unidad, entonces siga
estos pasos para configurarlo con su EcoNet translator. Los siguientes
pasos son para unidades individuales y para la unidad con la instancia/
numero 01 en configuracion manifold.
Con el calentador de agua encendido:
1. Cambie el set-point de temperatura a 100°F usando el control remoto o
la Aplicación EcoNet. Espere 10 segundos.
2. Desconecte el EcoNet translator del calentador de agua.
3. Apague la unidad presionando el botton the power en el control remote.
4. Cambie a encendido el switch 4 del DIP1 en la tarjeta de control de
su calentador de agua (Refierase al Manual de Uso y Cuidado de su
calentador de agua). El control remoto empieza a parapadear.
5. Presiona el boton MAX en la tarjeta de control del calentador de agua por
2 segundos. El control remote deja de parpadear.
6. Cambie a apagado el switch 4 del DIP1.
7. Presione el boton de power en el control remote.
8. Conecte el EcoNet translator de vuelta al calentador de agua.
9 Espere 60 segundos.
10. Cambie la temperatura deseada en el control remoto o usando la
Aplicación EcoNet.
Nota: Si cambia la temperatura a 140°F o menos, tendra que repetir el
proceso de nueva cuenta.
1= no hay operación de colector.
Para configurar el manifold es necesario completer el siguiente proceso
para cada calentador de agua que no sea el número/instancia 01:
1. Desconecte el EcoNet translator del calentador de agua.
2. Apague la unidad presionando el botton the power en el control remote.
3. Cambie a encendido el switch 4 del DIP1 en la tarjeta de control de
su calentador de agua (Refierase al Manual de Uso y Cuidado de su
calentador de agua). El LED rojo en la tarjeta de control empieza a
parapadear.
4. Presiona el boton MAX en la tarjeta de control del calentador de agua por
2 segundos. El LED rojo se mantiene encendido.
5. Cambie a apagado el switch 4 del DIP1.
6. Desconecte el calentador de agua de la alimentacion de la pared.
7. Conecte el EcoNet translator de vuelta al calentador de agua.
8. Conecte el calentador de agua a la alimentacion de la pared.
ALARMAS
recibirá una notificación en la App respecto a la alarma detectada.
Además, el control remoto puede exhibir las alarmas.
Cuando se detecta una alarma, el número que se visualiza en el Translator
destellará. Cuando esto ocurre, el usuario debe conectarse a la App para
identificar el problema que se detectó.
Para limpiar las alarmas presione el botón izquierdo en el traductor EcoNet
por 5 segundos hasta que todos los segmentos en los displays LED estén
encendidos. Después suelte el botón y las alarmas serán limpiadas.
LOCALIZACIÓN DE FALLAS
● Verifique que el módulo WiFi esté conectado y correctamente configurado.
●
conectados al EcoNet, consulte la App de EcoNet a fin de investigar las
alarmas de su calentador de agua.
● Si la intensidad de su señal de WiFi es demasiado débil en la ubicación
de su calentador de agua, tiene la posibilidad de seguir utilizando el
Kit de WiFi mediante el uso de un Extensor de rango de WiFi. Para
obtener más información, contacte con su tienda minorista de electrónica
preferida.
● Si se pierde la conexión, verifique que las luces de su módulo WiFi estén
constantemente encendidas. Si no, desenchufe y vuelva a enchufar el
cable de alimentación eléctrica al módulo.
● Si detecta una falla, contacte con el servicio al cliente.
Teléfono: 1-866-7 20-2076 - Servicio al cliente de calentadores de agua.
1-800-255-2388 - Número de Servicio al cliente de EcoNet (Modulo WiFi)
Sitio Web: www.Rheem.com/EcoNet
Código de
Error
Descripción Solución
Error desconocido del
A100
controlador tankless
A107 Agua detectada
Sensor de agua no
S300
instalado
Posibles condiciones de
S103
congelamiento
S104 Recordatorio de servicio
S105 Cambie el ltro de agua
Falla de comunicación
A201
del traductor al calentador
de agua
Falla de comunicación
A203
EcoNet
Falla de comunicación
A203
en calentador de agua
instancia X
Contacte al servicio al cliente
de calentadores de agua.
Hay agua presente dentro del
calentador de agua, busque
fugas u otras fuentes de agua.
Verique que el sensor de
agua esta conectado al
traductor EcoNet.
La temperatura del Intercambiador
de Calor es muy baja.
Recordatorio de servicio.
200 horas de operacion han
pasado.
Cambie el ltro si esta instalado,
de lo contrario ignore esta alerta.
Verique la conexión entre
traductor EcoNet y el
calentador de agua. Reinicie
la unidad.
Verique el cableado al modulo
de WiFi o a otro traductor EcoNet.
Reinicie la unidad.
En colector, verique el
cableado entre las unidades.
Reinicie todas las unidades.
Page 3

8. Connectez le contrôleur traducteur au chauffe-eau.
9. Attendez pendant 60 secondes.
10. Changez la température de consigne jusqu’à la valeur voulue.
Note: Si vous souhaitez un peu plus tard régler la température de
consigne à une valeur inférieure à 60°C (140°F), il faut effectuer à
nouveau cette procédure.
Dans le cas d’une installation de chauffe-eau en parallèle, il faut effectuer
la procédure qui suit pour tous les autres chauffe-eau (soit, autre que le
numéro 1):
1. Déconnectez le contrôleur traducteur du chauffe-eau.
2. Mettez le chauffe-eau à OFF en appuyant sur le bouton d’alimentation
de la télécommande.
3. Déplacer à la position ON le micro-interrupteur 4 de la baguette DIP1.
La DEL rouge de la carte électronique se met à clignoter.
4. Maintenez le bouton MAX enfoncé pendant 2 secondes. La DEL rouge
reste allumée en continu.
5. Déplacez à la position OFF micro-interrupteur 4 de la baguette DIP1.
6. Coupez l’alimentation électrique du chauffe-eau (déconnectez-le de sa
prise murale).
7. Connectez le contrôleur traducteur au chauffe-eau.
8. Reconnectez le chauffe-eau à sa prise murale.
ALERTES
Si le module WiFi EcoNet est configuré correctement, l’utilisateur recevra
une notification dans l’application au sujet de l’alerte détectée.
En plus la télécommande pourra afficher les alertes.
Quand une situation d’alerte est détectée, le numéro affiché dans le
traducteur va clignoter. Quand cela se produit, l’utilisateur doit se connecter
à l’application de façon à identifier le problème qui a été détecté.
Pour effacer les avertissements ou des alarmes, appuyez sur le bouton
gauche sur le traducteur EcoNet pendant 5 secondes jusqu’à ce que tous
les segments sur les écrans LED sont allumés. Ensuite, relâchez le bouton
et les alarmes seront effacées.
DÉPANNAGE
● Vérifiez que le module WiFi est bien connecté et correctement configuré.
● Si un défaut est détecté dans un des chauffe-eau connectés à EcoNet,
veuillez vous référer à l’application EcoNet pour le dépannage de toutes
les alertes de votre chauffe-eau.
● Si la force de votre signal WiFi est insuffisante à l’endroit de votre chauffe-
eau, vous pourrez encore utiliser le kit WiFi à l’aide de l’amplificateur de
portée du WiFi. Contactez votre revendeur de matériel électronique pour
plus d’informations.
● Si la connexion est perdue, vérifiez que les voyants sur votre module
WiFi sont allumés et ne clignotent pas. Si ce n’est pas le cas, débranchez
puis rebranchez le cordon d’alimentation du module.
● Contactez le service à la clientèle si un défaut est détecté:
Téléphone: 1-866-720-2076 - Service à la clientèle des chauffe-eau.
1-800-255-2388 - Service à la clientèle pour EcoNet (WiFi)
Site Web: www.Rheem.com/EcoNet.
Code
d’erreur
Description Solution
A100
Erreur inconnue du
contrôle Tankless
A107 Eau détecté
S300
Détecteur d’eau non
installé
S103
Conditions de congélation
possibles
S104 Rappel de service
S105 Changer le ltre d’eau
A201
Panne de communication
chauffe-eau Traducteur
A203
Erreur de communication
EcoNet
A203
Panne de communication
en instance X de chauffe-
eau
Fig. 1
Media Access Control (MA C)
Address location
Sample
Fig. 2
Fig. 3
Fig. 2
connexion WiFi.
Fig. 5
Middle LE D indicates
WiFi connection.
Top LED indicates power and
connection to equipment.
Lower LED indicates an active
connection to the cloud/ser ver.
The WL AN SETUP button
is used to reset the WiFi
configuration/connection.
Fig. 5
Fig. 1
Exemple
Emplacement de l’adresse
MAC de commande d’accès
au suppor t
Fig. 1
Fig. 1
Media Access Control (M AC)
Address location
Sample
Fig. 2
Fig. 3
Fig. 2
Le voyant DEL du milieu
indique une connexion WiFi.
Le voyant DEL supérieur
indique l’alimentation et la
connexion à l’équipement.
Le voyant DEL inférieur indique
une connexion active au
nuage/serveur.
Le bouton WL AN SETUP
(CONFIGUR ATION DU RÉSEAU
LOCAL SANS FIL) sert à
réinitialiser la configuration/
connexion WiFi.
Fig. 5
Middle LED indicates
WiFi connection.
Top LED indicates power and
connection to equipment.
Lower LED indicates an active
connection to the cloud/server.
The WL AN SETU P button
is used to reset the WiFi
configuration/connection.
Fig. 5
ECONET WiFi KIT
Intrucciones de instalación
ANTES DE COMENZAR
● El Kit de WiFi EcoNet está diseñado para su uso con productos
habilitados para EcoNet. NO intente utilizar este kit con otros equipos.
● El Kit de WiFi EcoNet requiere para operar una red de WiFi y conexión
a Internet doméstica de banda ancha. Utilice un teléfono celular u otro
dispositivo compatible con WiFi para asegurarse de que la red de WiFi
del hogar esté accesible desde la ubicación del calentador de agua.*
PASO 1: Registre la dirección MAC.
● Localice la dirección MAC en el dorso de su módulo, como se ilustra
en la Figura 1, y regístrela. Necesitará esta información en el futuro. Es
posible que se le solicite durante el proceso de configuración. Tome una
foto digital con un dispositivo móvil, o escríbala en el espacio siguiente.
Dirección MAC: _____-_____-_____-_____-_____-____
Ubicación de la dirección del
Control de Acceso a Medios (MAC)
PASO 2: Conecte el cable de comunicación.
● Inserte un extremo del cable de comunicación en el conector hembra que
se encuentra en el fondo del módulo WiFi, como se ilustra en la Figura 2.
● Retire la cubierta frontal del calentador de agua e inserte el otro extremo
del cable de comunicación en uno de los puertos EcoNet de su EcoNet
Translator.
● Vuelva a colocar la cubierta frontal y energice la unidad.
PASO 3: Haga la conexión permanente del módulo WiFi.
● Asegúrese de que ambos enchufes del cable de comunicación estén
conectados firmemente, como se describió antes.
● Retire el papel protector de un lado de la cinta adhesiva y fíjela al dorso
del módulo WiFi, sobre la etiqueta con la dirección MAC.
● Seleccione una ubicación para fijar el módulo WiFi en la ubicación
interior de su preferencia que no cause una tensión severa en el cable
de comunicación.
● Retire el papel protector del lado restante de la cinta adhesiva, y oprima
el módulo contra una superficie plana y limpia del calentador de agua,
como se ilustra en la Figura 3 de modelos para interiores.
● El módulo WiFi y el conector de alimentación deben colocarse en
interiores.
PASO 4: Instale el cable de alimentación.
● Instale el cable de alimentación en el conector hembra de alimentación
que está en el fondo del módulo, y enchufe el transformador a una fuente
de alimentación.
Muestra
PASO 5: Conexión a Internet.
● Después de instalar el módulo WiFi y de energizar el calentador de agua,
los tres LED deben destellar simultáneamente, indicando que el módulo
está listo para ser configurado para su uso en la red del hogar. [NOTA:
En este estado, el módulo está funcionando como Punto de acceso de
WiFi].
Fig. 5
La luz LED superior indica
corriente eléctrica y conexión
al equipo.
La luz LED central indica
conexión por WiFi.
La luz LED inferior indica
que hay una conexión activa
a la nube/ servidor.
El botón WLA N SETUP se usa
para reconfigurar la conexión/
configuración por WiFi.
● Si todavía no lo ha hecho, descargue la aplicación gratuita EcoNet App
del Apple App Store o Google Play Store.
● Asegúrese de tener la dirección MAC que capturó en el Paso 1 anterior.
● Mientras esté cerca del módulo WiFi, abra la aplicación EcoNet y siga las
instrucciones presentadas dentro de la aplicación.
NOTA: Algunos dispositivos móviles pueden fallar en el reinicio de la
aplicación EcoNet después de realizar el primer paso de la conexión
a la red. A fin de continuar la instalación, regrese manualmente a la
aplicación EcoNet y siga las instrucciones restantes.
Consejo adicional
Para repetir el proceso de configuración o cambiar
la configuración de conexión a Internet en cualquier
momento, no tiene más que oprimir el botón
CONFIGURACIÓN DE WLAN (WLAN SETUP) del
módulo WiFi. Esto hará regresar el módulo a sus valores
predeterminados de fábrica. Una vez oprimido el botón,
los tres LED comenzarán a destellar simultáneamente,
indicando que el módulo se ha reiniciado.
SMARTEC ECONET
TRADUCTEUR KIT
Ce chauffe-eau comporte un traducteur SMARTEC EcoNet installé à
l’avance. Référez-vous aux instructions qui suivent pour la mise en œuvre
du traducteur et du module WiFi.
ATTENTION : Débranchez l’alimentation électrique avant d’intervenir
sur le chauffe-eau.
Avertissement : Le module WIFI a besoin d’être installé à l’intérieur.
MISE EN SERVICE EN AUTONOME
1. Si un seul chauffe-eau à gaz sans réservoir est connecté au bus EcoNet,
vous pouvez maintenant démarrer l’utilisation du traducteur SMARTEC
EcoNet pour surveiller et contrôler la température de l’eau de ce chauffeeau via l’application EcoNet (voir les instructions pour WiFi).Attendre 60
secondes apies la mise sous tension pour utiliser votre appareil.
2. L’utilisateur peut activer/désactiver le chauffe-eau et régler/visualiser la
température de l’eau en sortie à l’aide de la télécommande branchée sur
l’appareil ou en liaison sans fil par l’application EcoNet.
MISE EN SERVICE AVEC COLLECTEUR
Si plusieurs chauffe-eau sont interconnectés en configuration de collecteur,
poursuivez avec cette section. Sinon vous pouvez passer directement à la
section sur les Alertes.
1. Ôtez le couvercle frontal du chauffe-eau.
2. Pour permettre au traducteur SMARTEC EcoNet de contrôler des
chauffe-eau à gaz sans réservoir dans une configuration à collecteur,
chaque appareil connecté doit être relié à un traducteur SMARTEC
EcoNet.
3. Reliez les chauffe-eau du même collecteur en série en utilisant un ou
les deux ports EcoNet situés sur le traducteur EcoNet et le câble RJ25
fourni.
4. Entrez dans le menu de configuration en appuyant en même temps sur
les deux boutons du traducteur SMARTEC EcoNet pendant 5 secondes.
Normalement vous devrez voir “1” au lieu de “01” sur l’affichage.
5. Appuyez sur le bouton de droite pour modifier le numéro attribué à
chaque chauffe-eau. Le numéro affiché va augmenter à chaque appui
sur le bouton.
6. EChaque chauffe-eau sur le collecteur doit être numéroté en séquence.
Cela veut dire que si l’utilisateur a 4 chauffe-eau interconnectés en mode
par collecteur, ils doivent être numérotés respectivement 01, 02, 03 et
04. Le nombre maximal de chauffe-eau sur un même collecteur est
de 20.
Pour revenir au menu principal appuyez sur le bouton de gauche.
7. Connectez la télécommande incluse avec le chauffe-eau uniquement
sur l’appareil numéro 01 dans cette configuration de collecteur. Cette
télécommande du 01 va contrôler tous les chauffe-eau interconnectés.
8. L’utilisateur peut activer/désactiver le chauffe-eau et régler/visualiser la
température de l’eau en sortie à l’aide de la télécommande branchée sur
l’appareil 01 ou en liaison sans fil par l’application EcoNet.
L’appui sur le bouton de gauche fait défiler les articles du menu. L’appui
sur le bouton de droite sélectionne l’article du menu et modifie le choix du
menu comme suit:
Rubrique du menu Fonction
1 Instance / N° sur bus EcoNet (1-20)
2 Nombre de chauffe-eau au collecteur
3 Mode de Recirculation 0= éteindre, 1=allumer
Vous sortez du menu après 10 secondes s’il n’y a pas eu d’action sur
un des boutons. Les changements seront sauvegardés dès la sortie du
menu.
9. Seul le chauffe-eau numéro 01 aura l’article 2 du menu de disponible.
Cette rubrique du menu indique au gestionnaire du collecteur (numéro
01) combien de chauffe-eau sont connectés au système de collecteur.
10. L’appui sur le bouton de droite en étant à la rubrique 2 du menu
Une fois que tous les chauffe-eau sur le collecteur sont correctement
numérotés, la configuration sera terminée, redémarrez votre systéme et
attendre 60 secondes avant de commencer.
* Tous les interrupteurs des régulateurs de chauffe-eau doivent être en
position d’arrêt.
INSTALLATION AVEC POMPE DE RECIRCULATION
Si votre système de production et de distribution d’eau chaude est équipé
d’une pompe de recirculation, veuillez configurer votre chauffe-eau selon la
procédure qui suit.
Utiliser l’option de menu 3 pour activer le mode de recirculation,
Utiliser l’option de menu 3 pour activer le mode de recirculation.
Remarque: Le mode de recirculation est destiné à des configurations
de 3 unités ou plus.
SÉLECTION DU RÉGLAGE HAUTE TEMPÉRATURE
Si votre chauffe-eau est équipé d’une carte commerciale qui est en mesure
de produire de l’eau chaude pour la désinfection (à une température
de 85°C/185°F), suivez la procédure qui suit pour configurer l’interface
traducteur EcoNet. La procédure qui suit concerne les chauffe-eau individuel
et votre chauffe-eau en parallèle auquel a été assignée la position 1.
Alors que le chauffe-eau est alimenté en électricité:
1. Changez la température de consigne à 100 ° F à l’aide de la
télécommande ou l’application EcoNet. Attendre 10 secondes.
2. Déconnectez le traducteur du chauffe-eau.
3. Mettez le chauffe-eau à l’arrêt en appuyant sur le bouton d’alimentation
de la télécommande murale.
4. Sur la carte électronique de votre chauffe-eau, déplacer à la
position ON le micro-interrupteur 4 de la baguette DIP1 (reportezvous au manuel d’utilisation et d’entretien de votre chauffe-eau). La
télécommande se met à clignoter.
5. Maintenez le bouton Max enfoncé pendant 2 secondes.
6. Déplacez à la position OFF le micro-interrupteur 4 de la baguette DIP1.
7. Appuyez sur le bouton d’alimentation de la télécommande.
Instructions d’installation
(1-20), 1 = Pas de fonctionnement en mode
collecteur
augmentera le nombre d’appareils interconnectés que le gestionnaire
détectera.
CHAUFFE-EAU EN PARALLÈLE (3 et +)
seulement sur votre chauffe-eau auquel a été assignée la position
1. Ne touchez pas aux micro-interrupteurs des autres appareils de
votre groupe de chauffe-eau. Une fois la modification effectuée,
coupez l’alimentation électrique (prise murale) et réalimentez
tous les chauffe-eau de votre groupe.
CHAUFFE-EAU INDIVIDUE
Une fois la modification effectuée, coupez l’alimentation électrique
(prise murale) du chauffe-eau et réalimentez-le.
Page 4

Fig. 1
Media Access Control (MA C)
Address location
Sample
Fig. 2
connexion WiFi.
Fig. 5
Middle LE D indicates
WiFi connection.
Top LED indicates power and
connection to equipment.
Lower LED indicates an active
connection to the cloud/ser ver.
The WL AN SETUP button
is used to reset the WiFi
configuration/connection.
Fig. 5
8. Connectez le contrôleur traducteur au chauffe-eau.
9. Attendez pendant 60 secondes.
10. Changez la température de consigne jusqu’à la valeur voulue.
Note: Si vous souhaitez un peu plus tard régler la température de
consigne à une valeur inférieure à 60°C (140°F), il faut effectuer à
nouveau cette procédure.
Dans le cas d’une installation de chauffe-eau en parallèle, il faut effectuer
la procédure qui suit pour tous les autres chauffe-eau (soit, autre que le
numéro 1):
1. Déconnectez le contrôleur traducteur du chauffe-eau.
2. Mettez le chauffe-eau à OFF en appuyant sur le bouton d’alimentation
de la télécommande.
3. Déplacer à la position ON le micro-interrupteur 4 de la baguette DIP1.
La DEL rouge de la carte électronique se met à clignoter.
4. Maintenez le bouton MAX enfoncé pendant 2 secondes. La DEL rouge
reste allumée en continu.
5. Déplacez à la position OFF micro-interrupteur 4 de la baguette DIP1.
6. Coupez l’alimentation électrique du chauffe-eau (déconnectez-le de sa
prise murale).
7. Connectez le contrôleur traducteur au chauffe-eau.
8. Reconnectez le chauffe-eau à sa prise murale.
ALERTES
Si le module WiFi EcoNet est configuré correctement, l’utilisateur recevra
une notification dans l’application au sujet de l’alerte détectée.
En plus la télécommande pourra afficher les alertes.
Quand une situation d’alerte est détectée, le numéro affiché dans le
traducteur va clignoter. Quand cela se produit, l’utilisateur doit se connecter
à l’application de façon à identifier le problème qui a été détecté.
Pour effacer les avertissements ou des alarmes, appuyez sur le bouton
gauche sur le traducteur EcoNet pendant 5 secondes jusqu’à ce que tous
les segments sur les écrans LED sont allumés. Ensuite, relâchez le bouton
et les alarmes seront effacées.
DÉPANNAGE
● Vérifiez que le module WiFi est bien connecté et correctement configuré.
● Si un défaut est détecté dans un des chauffe-eau connectés à EcoNet,
veuillez vous référer à l’application EcoNet pour le dépannage de toutes
les alertes de votre chauffe-eau.
● Si la force de votre signal WiFi est insuffisante à l’endroit de votre chauffe-
eau, vous pourrez encore utiliser le kit WiFi à l’aide de l’amplificateur de
portée du WiFi. Contactez votre revendeur de matériel électronique pour
plus d’informations.
● Si la connexion est perdue, vérifiez que les voyants sur votre module
WiFi sont allumés et ne clignotent pas. Si ce n’est pas le cas, débranchez
puis rebranchez le cordon d’alimentation du module.
● Contactez le service à la clientèle si un défaut est détecté:
Téléphone: 1-866-720-2076 - Service à la clientèle des chauffe-eau.
1-800-255-2388 - Service à la clientèle pour EcoNet (WiFi)
Site Web: www.Rheem.com/EcoNet.
Code
d’erreur
Description Solution
Erreur inconnue du
A100
contrôle Tankless
A107 Eau détecté
Détecteur d’eau non
S300
installé
Conditions de congélation
S103
possibles
S104 Rappel de service
S105 Changer le ltre d’eau
Panne de communication
A201
chauffe-eau Traducteur
Erreur de communication
A203
EcoNet
Panne de communication
A203
en instance X de chauffeeau
Contacter le service à la
clientèle de chauffe-eau.
L’eau est présente à l’intérieur
du chauffe-eau, vérier les
fuites ou d’autres sources
d’eau.
Vérier le capteur d’eau est
correctement connecté au
traducteur EcoNet.
Température Echangeur de
chaleur est trop faible.
Rappel amical à avoir votre
chauffe-eau desservie. 200
heures de fonctionnement se
sont écoulés.
Changer le ltre si vous l’avez
installé, sinon ignorer
avertissement.
Vériez la connexion entre
EcoNet traducteur et chauffe-eau
carte de contrôle. Réinitialiser la
puissance à l’unité.
Vérier le câblage EcoNet au
module WiFi ou à un autre
traducteur EcoNet. Réinitialiser
la puissance à l’unité.
Dans le collecteur, vérifier le câblage
entre les unités. Réinitialiser la
puissance à tous les chauffe-eau.
KIT WiFi ECONET
Instructions d’installation
AVANT DE COMMENCER
● Ce kit EcoNet WiFi est prévu pour être utilisé avec des produits
activés pour EcoNet. Essayez NE PAS d’utiliser de kit avec un autre
équipement.
● Le kit EcoNet WiFi nécessite une connexion domestique à Internet
à large bande et un réseau WiFi pour pouvoir fonctionner. Utilisez
un téléphone mobile ou un autre appareil disposant du WiFi pour
vous ass urer que le réseau WiFi domestique est accessible depuis
l’emplacement du chauffe-eau.*
ÉTAPE 1: Notez l’adresse MAC.
● Repérez l’adresse MAC au dos de votre module comme c’est illustré en
Figure 1, et notez-la. Vous aurez besoin de cette information plus tard,
elle pourra vous être demandée durant le processus de mise en œuvre.
Prenez cette adresse en photo avec votre téléphone portable, ou écrivezla à l’emplacement ci-dessous.
MAC Address: _____-_____-_____-_____-_____-____
Fig. 1
Emplacemen t de l’adresse
MAC de comm ande d’accès
au suppor t
ÉTAPE 2: Connectez le câble de communication.
● Insérez une extrémité du câble de communication dans le jack RJ25 qui
se trouve en bas du module WiFi comme c’est montré en Figure 2.
Fig. 2
● Ôtez le couvercle frontal du chauffe-eau et insérez l’aitre extrémité du
câble de communication dans un des ports EcoNet sur votre traducteur
EcoNet.
● Remettez en place le couvercle frontal et branchez électriquement le
chauffe-eau.
ÉTAPE 3: Fixez le module WiFi de façon permanente.
● Assurez-vous que les deux fiches RJ25 du câble de communication sont
bien insérées comme décrit précédemment.
● Pelez le papier de protection sur une face de la bande adhésive et collez-
la au dos du module WiFi au-dessus de l’étiquette portant son adresse
MAC.
● Choisissez un emplacement de votre choix à l’intérieur pour fixer le
module WiFi, qui ne cause pas de tension importante au câble de
communication.
● Ôtez le papier de protection de la face restante de la bande adhésive et
pressez le module contre une surface plane et propre du chauffe-eau,
comme c’est montré en Figure 3 pour des modèles d’intérieur.
Fig. 3
● Le module WiFi et le connecteur d’alimentation doivent être situés à
l’intérieur.
ÉTAPE 4: Installez le cordon d’alimentation.
● Installez le cordon d’alimentation dans le jack d’alimentation en bas
du module, et branchez le transformateur de l’autre côté sur une prise
secteur.
Exemple
ÉTAPE 5: Connectez à Internet.
● Une fois que le module WiFi est installé et que le chauffe-eau est
alimenté, les trois voyants à DEL doivent clignoter simultanément, pour
indiquer que le module est prêt à être configuré pour une utilisation
sur le réseau domestique [NOTE : Dans cette configuration le module
fonctionne comme un point d’accès WiFi].
Le voyant DEL supérieur
indique l’alimentation et la
connexion à l’équipement.
Le voyant DEL du milieu
indique une connexion WiFi.
Le voyant DEL inférieur indique
une connexion active au
nuage/serveur.
Le bouton WL AN SETUP
(CONFIGUR ATION DU RÉSEAU
LOCAL SANS FIL) sert à
réinitialiser la configuration/
● Si cela n’a pas déjà été fait, téléchargez l’application EcoNet gratuite
depuis Apple App Store ou Google Play store.
● Assurez-vous que vous possédez bien votre adresse MAC relevé à
l’étape 1 précédente.
● En étant à proximité du module WiFi, ouvrez l’application EcoNet et
suivez les instructions qu’elle vous donne.
REMARQUE : Certains appareils mobiles ne relancent pas l’application
EcoNet une fois que la première étape de connexion est finie. Pour
poursuivre l’installation, revenez manuellement à l’application EcoNet
et suivez les instructions suivantes.
Conseil additionnel
Pour répéter le processus de mise en œuvre ou changer
les paramètres de connexion Internet à n’importe quel
moment, il vous suffit d’appuyer sur le bouton WLAN
SETUP sur le module WiFi. Cela va ramener le module
à ses paramètres d’usine par défaut. Après cet appui,
les trois voyants à DEL vont commencer à clignoter
simultanément, pour indiquer que le module a bien été
restauré.
 Loading...