

Page 1

Owners Guide
and
Installation Instructions
Electric
Boiling Water Unit
Models 3, 5, 7.5, 10, 15, 25, & 40 Litre
This boiling water unit must be installed and serviced by a qualified person. Please leave this guide with the householder.
Page 2

2
Austral
ia Only
Notice to Victorian Customers from the
Victorian Plumbing Industry Commission.
This
boiling unit
must be installed by a licensed person as required by the Victorian Building
Act 1993.
Only a licensed person will give you a Compliance Certificate
, showing that the work complies
with all the relevant standards. Only a licensed person will have insurance protecting their
workmanship for 6 years. Make sure you use a licensed person to install this boiling water unit
and ask for your Compliance Certificate.
Page 3

3
Contents
ABOUT YOUR BOILING WATER UNIT ............................................................. 4
INTRODUCTION ................................................................................................. 4
SETTING THE TIMER FUNCTIONS ................................................................... 7
A) SETTING THE CLOCK .......................................................................... 8
B) SET TIMER TO STD/AUTO MODE ........................................................ 8
C) PROGRAMMING ‘SET ON/OFF TIMES’ ............................................... 9
D) PROGRAMMING ‘SLEEP DELAY TIMER’ .......................................... 10
E) SELECTING ‘FILTER LIFE’ FUNCTIONS ........................................... 10
F) ACCESSING ‘SERVICE MENU’ ........................................................... 11
ERROR CODES ................................................................................................ 11
INSTALLATION ................................................................................................. 18
WATER SUPPLY CONNECTION ..................................................................... 19
OVERFLOW / VENT CONNECTION IMPORTANCE ........................................ 19
ELECTRICAL REQUIREMENTS ...................................................................... 22
COMMISSIONING ............................................................................................. 23
FAULT FINDING GUIDE ................................................................................... 24
SPECIFICATIONS ............................................................................................. 25
DIMENSIONS AND MOUNTING SPECIFICATIONS ........................................ 26
DIMENSIONS SPECIFICATIONS ..................................................................... 27
RHEEM WARRANTY ........................................................................................ 28
Page 4

4
ABOUT YOUR BOILING WATER UNIT
INTRODUCTION
Thank you for choosing our Rheem Boiling Water Unit. Please take a few minutes to
read this booklet because it contains important information about the correct
installation and operation of your boiling water unit. The Rheem Boiling Water Unit
supplies boiling water. It is made from high quality copper and is designed to be
installed indoors. The Rheem Boiling Water Unit is supplied with all the required
safety controls for installation (not including the isolation valve prior to the boiling
water unit).
WARNING:
This boiling water unit is only intended to be operated by persons who have the
experience or the knowledge and the capabilities to do so. This boiling water
unit is not intended to be operated by persons with reduced physical, sensory or
mental capabilities i.e. the infirm, or by children. Children should be supervised
to ensure they do not interfere with the boiling water unit.
This boiling water unit uses 230-240 V AC electrical power for operation of the
control systems and the electrically operated components. The removal of the
access cover(s) will expose 230-240 V wiring. They must only be removed by a
qualified person.
SAFETY
This boiling water unit is supplied with an over temperature cut-out on the boiling
element to prevent element burn out in the event of control failure. If the electrical
supply cord to the boiling water unit is damaged, it must be replaced by a qualified
competent person in order to avoid becoming a hazard. In Australia phone Rheem
Service on 131 031, in New Zealand phone your nearest Rheem Service Centre on
0800 657 335 for an inspection. For extra electrical protection against power surges
and spikes it is recommended that the user install a surge protector prior to the
boiling water unit.
WARNING:
The Rheem warranty may not cover faults if any of the installed safety devices
are tampered with.
Page 5

5
TO TURN OFF THE BOILING WATER UNIT
The boiling water units are supplied with a programmable timer (see page 6), Rheem
recommend the timer function be used to conserve energy.
If it is necessary to turn off the boiling water unit:
• Switch off the electrical supply at the isolating switch to the boiling water unit.
• Close the cold water isolation valve at the inlet to the boiling water unit.
TO TURN ON THE BOILING WATER UNIT
• Open the cold water isolation valve fully on the cold water line to the boiling water
unit.
• Switch on the electrical supply at the isolating switch to the boiling water unit.
Note:
The boiling water unit may not appear to turn on immediately when it is first switched
on as the electronic controller will automatically check the system prior to allowing
water into the boiling water unit (this could be up to 10 seconds).
On initial start up after installation, this boiling water unit automatically runs through
a set-up cycle to detect the boiling point of water. During this cycle steam may
discharge from the vent pipe for a short time. This set-up cycle will take up to 18-30
minutes depending on unit, and when completed (boiling point detected) the unit will
commence incremental filling. It is important NOT to operate the tap during the set-up
cycle because it may affect the operating temperature of the unit.
IS THIS BOILING WATER UNIT INSTALLED CORRECTLY?
Installation requirements are shown under Installation (on page 18).
The boiling water unit must be installed:
• by a qualified person, and
• in accordance with the installation instructions, and
• in compliance with Standards AS/NZS 3500.4, AS/NZS 3000 and all local
codes and regulatory authority requirements.
In New Zealand, the installation must also conform to Clause G12 of the New Zealand Building Code
DOES THE WATER QUALITY AFFECT THE BOILING WATER UNIT?
The boiling water unit is suitable for most public water supplies, however some water
qualities may have detrimental effects on the boiling water unit, its components and
fittings. If you are in a known harsh water area you must first read Water Supplies
(on page 16). If you are not sure, have your water quality checked against the
conditions described on page 16.
Page 6

6
HOW LONG WILL THE BOILING WATER UNIT LAST?
There are a number of factors that will affect the length of service the boiling water
unit will provide. These include but are not limited to the water quality, the water
usage pattern etc. Refer to “Precautions” below However, your boiling water unit is
supported by a comprehensive Rheem warranty (refer “Rheem Warranty” on page
28).
PRECAUTIONS
The boiling water unit must be maintained in accordance with the Owner’s Guide and
Installation Instructions.
If this boiling water unit is to be used where an uninterrupted boiling water supply is
necessary for your application or business you should ensure that you have back up
redundancy within the building. This should ensure the continuity of boiling water
supply in the event that this boiling water unit were to become inoperable for any
reason. We recommend you seek advice from your plumber or specifier about your
needs and building back up redundancy.
HOW YOUR BOILING WATER UNIT WORKS
The boiling water unit is designed to operate using mains water pressure by
connecting directly to the mains water supply. If the mains supply pressure in your
area exceeds 1000kPa a secondary pressure limiting valve must be fitted. The
supply pressure should be greater than 50 kPa (3-10Litre), 75kPa (15-25L) or
100kPa (40L) for the Rheem Boiling Water Unit operating to its optimum
performance.
BOILING WATER
The Rheem Boiling Water Unit is electronically controlled to obtain the maximum
performance, and incorporates further safety devices to prevent over temperature
and over filling.
ELECTRONIC CONTROLLER & TIMER
Your Rheem boiling water unit incorporates smart heating software and an electronic
timer to obtain the best efficiency for the energy used. The electronic timer allows the
user to program when the unit is on or off and when the sleep mode activates to
save energy. Also the operator has the availability to indicate and diagnose any
system faults that occur without the need to unnecessarily call for a service
technician. (Refer “Setting the Timer” on page 7)
Page 7

7
SETTING THE TIMER
TIMER FUNCTIONS
Function
Mode
Description
Clock N/A Set clock time.
STD/AUTO
STD BWU ‘ON’ 24 hours 7 days.
AUTO
BWU operates according to programmed ‘Set
ON/OFF Times’.
Set ON/OFF
Times
N/A Program ON/OFF times for AUTO mode.
Sleep Delay Time N/A
Program delay-off time from last usage
(operates in AUTO mode only).
Filter Life*
Remaining Life Displays remaining filter life in litres.
Filter Reset
Resets filter ‘Remaining Life’ to ‘Set Filter Life’
setting. Utilised when replacing filter.
Set Filter Life Program filter life start value in litres.
Service Menu
Error Codes
Displays alpha error codes (refer to page 11 for
error codes and their meanings).
Boiling Temp
Displays the current boiling water temperature in
ºC.
Calib. Reset
Reactivates automatic boiling point calibration
operation.
Temp Override
Manually select calibrated temp setting.
Selectable from 70 – 99 ºC.
Software Version
Displays Timer and Controller software versions
(top = Timer, lower = Controller).
Temp Show
ON/OFF
Enable/disable boiling water temperature display
on timer screen (in ºC).
TB Treq
Displays boiling water temperatures in ºC. (TB =
calibrated temp, Treq = maintained temp).
*Boiling Water Units do not have a water filter however filter life functions can be
utilised if the water supply to the BWU has a water filter fitted.
To select a Timer Mode
Press the (Prog) button until the desired mode is displayed on the screen. Press the
(Accept) button to confirm selection. Pressing (Cancel) button at any time returns
the unit to the main menu. Any functions previously accepted will be retained.
Note: The display will revert back to main menu from any mode if a button has not
been pressed for 1 minute.
Page 8

8
A) Setting the Clock
1. Press and release the (Prog) button, ‘Clock’ is displayed flashing on the
screen.
2. Press and release the (Accept) button to confirm selection. ‘Set Clock Day’
will be displayed on the screen with the day selection shown flashing.
3. Press and release the (Up) button until the desired day is selected.
4. Press and release the (Accept) button to confirm selection. ‘Set Clock HOUR’
will be displayed on the screen with the hours section of the time shown
flashing.
5. Press and release the (Up) button until the desired hour (24 hour time)
appears flashing on the screen.
6. Press and release the (Accept) button to confirm selection. ‘Set Clock MIN’
will be displayed on the screen with the minutes section of the time shown
flashing.
7. Press and release the (Up) button until the desired minute appears flashing
on the screen.
8. Press and release the (Accept) button to confirm selection. The display will
revert to the main menu and the time setting will be saved.
B) Set Timer to STD/AUTO Mode
1. Press and release the (Prog) button until ‘Timer STD/AUTO’ is displayed
flashing on the screen.
2. Press and release the (Accept) button to confirm selection. ‘STD’ will be
displayed flashing on the screen.
3. Pressing and releasing the (Up) button alternates between the ‘STD’ and
‘AUTO’ icons.
4. Press and release the (Accept) button when the ‘STD’ or ‘AUTO’ icon is
shown on the display. The display will revert to the main menu. If ‘STD’ is
selected the unit will operate 24 hours a day. If ‘AUTO’ is selected the unit will
operate according to the pre set times on the timer (refer to ‘Programming Set
ON/ OFF Times’ below).
Note: If the timer is in AUTO mode and is in an ‘OFF’ period, the pressing of any
Timer button or lever on the tap will reactivate the unit. The unit will then
operate normally until the next programmed ‘OFF’ time.
Page 9

9
C) Programming ‘Set ON/OFF Times’ (For Use in ‘AUTO’ Mode)
Note: A highlighted numeral i.e. 7:00 indicates that the highlighted numeral 7 is
flashing on the display. X:XX is your time setting.
1. Press and release the (Prog) button until ‘Set ON/OFF Time’ is displayed
flashing on the screen.
2. Press and release the (Accept) button to confirm selection. ‘SUN 7:00 – 7:00
Set ON hour’ will be displayed on the screen.
3. Press and release the (Up) button until the desired hour appears flashing on
the screen.
4. Press and release the (Accept) button to confirm selection. ‘SUN X:XX –
X:XX Set ON minute’ will be displayed on the screen.
5. Press and release the (Up) button until the desired minutes appear flashing
on the screen.
6. Press and release the (Accept) button to confirm selection. SUN X:XX – X:XX
Set OFF hour’ will be displayed on the screen.
7. Press and release the (Up) button until the desired hour appears flashing on
the screen.
8. Press and release the (Accept) button to confirm selection. ‘SUN X:XX –
X:XX Set OFF Minute’ will be displayed on the screen.
9. Press and release the (Up) button until the desired minutes appear flashing
on the screen.
10. Press and release the (Accept) button to confirm selection. MON 7:00 –
17:30 Set ON hour’ will be displayed on the screen.
11. Continue steps 3 – 8 for Monday through to Saturday. When step 8 is
completed for Saturday the display will automatically revert to the main menu
and the program will be saved.
Note: To program the unit to be in ‘OFF’ mode for an entire day, set the ‘ON’ and
‘OFF’ times to be the same i.e. ON = 0:00 OFF = 0:00.
D) Programming ‘Sleep Delay Time
1. ’Press and release the (Prog) button until ‘Sleep Delay Time’ is displayed
flashing on the screen.
2. Press and release the (Accept) button to confirm selection. ‘Sleep Delay Time
OFF’ will be displayed on the screen with ‘OFF’ flashing.
3. Press and release the (Up) button until the desired time setting appears
flashing on the screen. Each consecutive push and release of the (Up) button
increases the time setting in one hour increments up to a maximum of 6
hours. If the (Up) button is pressed and released after ‘6’ is reached ‘OFF’ will
be displayed and if accepted, the sleep delay timer will be turned off.
4. When the desired setting is reached press and release the (Accept) button to
confirm selection. The display will revert to the main menu and the setting will
be saved.
Page 10

10
D) Programming ‘Sleep Delay Timer’ Continued
Note: The sleep function puts the unit in a standby mode after a user defined period
(1 – 6 hours). The unit will enter ‘Sleep’ mode if it has not been used for the
programmed ‘Sleep Delay Time’ period. During ‘Sleep mode’ the unit will
maintain the boiling water temperature at 0ºC instead of the normal Treq
(Temperature required) approximately 97ºC. To exit sleep mode, press any
Timer button or lever on the tap to reactivate the unit. The unit will then operate
normally.
E) Selecting ‘Filter Life’ Functions
The Filter Life function has three modes to select from, ‘Remaining Life’, ‘Filter
Reset’ and ‘Set Filter Life’. The Filter Life is factory set to OFF as the default setting.
These modes are accessed as follows:
Accessing ‘Remaining Life’
1. Press and release the (Prog) button until ‘Filter Life’ is displayed flashing on
the screen. Note: if ‘Remaining Life – COUNT IS OFF’ is displayed on the
screen proceed directly to step 3 otherwise proceed to step 2.
2. Press and release the (Accept) button to confirm selection. ‘Remaining Life
XXXX Litres’ will be displayed on the screen where XXXX is the value of
remaining filter life in litres.
3. Press and release the (Cancel) or (Accept) button to revert back to the main
menu.
Activating ‘Filter Reset’ & ‘Set Filter Life’
1. Press and release the (Prog) button until ‘Filter Life’ is displayed on the
screen. Note: if ‘Remaining Life – COUNT IS OFF’ is displayed on the screen
proceed directly to step 3 otherwise proceed to step 2.
2. Press and release the (Accept) button to confirm selection. ‘Remaining Life
XXXX Litres’ will be displayed on the screen.
3. Press and release the (Up) button. ‘Filter Reset’ is displayed on the screen.
4. Press and release the (Accept) button to confirm selection. ‘Are You Sure’ will
be displayed flashing on the screen.
5. Press and release the (Accept) button to confirm selection. ‘Set Filter Life
YYYY Litres’ is displayed on the screen (with ‘YYYY Litres’ flashing) where
YYYY is the previous preset value in litres. Note: ‘OFF’ may be displayed
flashing on the screen if the previous value was set to OFF.
6. Press and release the (Up) button until the desired setting appears flashing on
the screen. Each consecutive push and release of the (Up) button increases
the capacity setting in 1,000 litre increments from a start value of 1,000 litres
up to a maximum setting of 14,000 followed by OFF.
7. Press and release the (Accept) button to confirm selection. The display will
revert to the main menu and the setting will be saved.
Page 11

11
F) Accessing ‘Service menu’
The service menu has seven modes to select from (refer to ‘Timer Functions’ on
page 7). This function allows easy identification of problems occurring with the unit
by the service technicians (see details on the table below for Product error codes).
Each mode is accessed as follows:
Select Appropriate Service Mode
i Error Codes
ii Boiling Temp
iii Calib Reset
iv Temp. Override
v Software Version
vi Temp Show ON/OFF
vii TB Treq
Product Error Codes
i) Accessing Error Codes
1. Press and release the (Prog) button until ‘Service’ is displayed on the screen.
2. Press and release the (Accept) button to confirm selection. ‘Error Codes’ will
be displayed on the screen.
3. Press and release the (Cancel) or (Accept) button to revert back to the main
menu.
Note: An error code will be automatically cleared from the display when the fault
relating to that error code is rectified and the BWU is re-powered. Refer to
the error code table below for error codes and their meaning.
Error Code Table
ERROR CODE ERROR CODE
Hot Thermistor Fault O/C- S/C A* Low Level Probe Fault H
Chiller Unit Cold Thermistor O/C or
S/C (Normal)
B High Level Probe Fault J
Heating Triac S/C – Uncontrolled
Temperature Rise
C*
Water Heating Fault –
Element Not Heating
L
Expired Filter E
Watch Dog Software
Reboot
M
Calibration Time Out G
Rapid Temperature Rise –
Empty Tank
N
Page 12

12
Notes: Error Code Table
Fault codes without an asterisk (*) are informational only and the boiling water unit
will continue to operate however the affected section may not function.
* displayed is a critical fault. BWU unit will shut down and control board relay will deenergise. In Australia phone Rheem service on 131 031, in New Zealand call a
Rheem Service Centre 0800 657 335 for a service call.
(1) Lazer BWU’s do not have a ‘chiller’ unit and therefore will always display error
code B. This is normal operation.
(2) Although other error codes are available they are not utilised by Lazer BWU’s.
ii) Accessing Boiling Temp
Press and release the (Prog) button until ‘Service’ is displayed on the screen.
1. Press and release the (Accept) button to confirm selection. ‘Error Codes’ will
be displayed on the screen with any error codes listed below.
2. Press and release the (Up) button until ‘Boiling Temp XXX ºC’ is displayed on
the screen where XXX is the current boiling water temperature in ºC.
3. Press and release the (Cancel) or (Accept) button to revert back to the main
menu.
iii) Activating Calibration Reset Mode
Different altitudes will cause water to boil at different temperatures. To prevent the
water in the boiling water tank from boiling continuously (which is energy inefficient)
the boiling water unit is fitted with an altitude calibration function which automatically
operates when the unit is operated for the first time or if ‘calibration reset mode’ is
activated. If the boiling water delivery temperature is not hot enough or the unit
continuously boils, ’calibration reset mode’ should be activated to recalibrate the unit.
When the unit is calibrating, the BWU will boil the water twice (approximately 60
seconds each time) in order to calibrate the optimum boiling point according to
altitude. During this procedure steam and water droplets will be vented from the vent
outlet on the tap. The entire calibration period will take approximately
18 – 30
minutes and must not be interrupted; this includes operation of the tap outlet.
1. Press and release the (Prog) button until ‘Service’ is displayed on the screen.
2. Press and release the (Accept) button to confirm selection. ‘Error Codes’ will
be displayed on the screen with any error codes listed below.
3. Press and release the (Up) button until ‘Calib. Reset’ is displayed on the
screen.
4. Press and release the (Accept) button to confirm selection. ‘Are You Sure’
will be displayed on the screen.
Page 13

13
iii) Activating Calibration Reset Mode Continued,
5. Press and release the (Accept) button to activate calibration mode. ‘Error
Codes’ will be displayed on the screen with any error codes listed below.
6. Press and release the (Accept) button to revert back to the main menu
‘Calibrating Do Not Interrupt’ will be displayed on the timer screen and the unit
will recalibrate the boiling water temperature. When calibration is complete the
timer display will automatically revert back to the main menu.
iv) Activating Temp Override
Temperature override allows the installer to set the calibrated temperature to perform
a fast calibration when the unit is operated for the first time, or to change the boiling
water temperature to a selectable value from 70ºC – 99ºC.
1. Press and release the (Prog) button until ‘Service’ is displayed flashing on the
screen.
2. Press and release the (Accept) button to confirm selection. ‘Error Codes’ will
be displayed on the screen with any error codes listed below
3. Press and release the (Up) button until ‘Temp override’ is displayed on the
screen.
4. Press and release the (Accept) button to confirm selection. The current
calibrated (or preset) boiling water temperature will be displayed flashing on
the screen.
5. Press and release the (Up) button until the desired setting appears flashing on
the screen. Each consecutive press and release of the (Up) button increases
the boiling water temperature setting in 1º increments from 70ºC to a
maximum of 99 ºC.
6. Press and release the (Accept) button. ‘Are You Sure’ will be displayed
flashing on the screen.
7. Press and release the (Accept) button to confirm selection after which time
the timer screen will revert back to the main menu, ‘Calibrating Do Not
Interrupt’ will be displayed on the timer screen and the unit will recalibrate the
boiling water temperature to the new selected temperature. When calibration
is complete the timer display will automatically revert back to the main menu.
v) Accessing Software Version
1. Press and release the (Prog) button until ‘Service’ is displayed on the screen.
2. Press and release the (Accept) button to confirm selection. ‘Error Codes’ will
be displayed on the screen with any error codes listed below.
3. Press and release the (Up) button until ‘Software Version’ is displayed on the
screen.
4. Press and release the (Accept) button to confirm selection. The software
version will be displayed on the screen. The top digits refer to the timer
software version and the lower digits refer to the controller software version.
5. Press and release the (Cancel) or (Accept) button to revert back to the
service menu. ‘Error Codes’ will be displayed on the screen.
6. Press and release the (Cancel) or (Accept) button to revert back to the main
menu.
Page 14

14
vi) Permanently Display the Boiling Water Temperature
(Temp Show ON/OFF)
This function allows the temperature of the water within the boiling water unit to be
permanently displayed on the timer display screen.
1. Press and release the (Prog) button until ‘Service’ is displayed on the screen.
2. Press and release the (Accept) button to confirm selection. ‘Error Codes’ will
be displayed on the screen with any error codes listed below.
3. Press and release the (Up) button until ‘TempShow ON/OFF’ is displayed on
the screen.
4. Press and release the (Accept) button to confirm selection. The current
setting, ‘ON’ or ‘OFF’ will be displayed flashing on the screen.
5. Press and release the (Up) button to cycle between ON and OFF.
6. Press and release the (Accept) button to confirm selection. The display will
revert to the service menu. ‘Error Codes’ will be displayed on the screen.
7. Press and release the (Cancel) or (Accept) button to revert back to the main
menu.
vii) Accessing Calibrated & Required Temperature (TB Treq) Information
This function allows the user to see what Temperature the unit calibrated to, and
the subsequent required temperature the unit is required to be maintained at.
1. Press and release the (Prog) button until ‘Service’ is displayed on the screen.
2. Press and release the (Accept) button to confirm selection. ‘Error Codes’ will
be displayed on the screen with any error codes listed below.
3. Press and release the (Up) button until ‘TB Treq’ is displayed on the screen.
Under the letters ‘TB’ the boiling water calibration temperature will be
displayed in ºC. Under the letters ‘Treq’ the temperature the unit will maintain
the water at will be displayed in ºC.
4. Press and release the (Cancel) or (Accept) button to revert back to the main
menu.
Keypad Lock
This function is for extra security to prevent tampering with the unit settings. Default
setting is disabled.
To activate keypad lock
1. Press and release the (Prog) button until ‘Keylock’ is displayed on the screen.
2. Press and release the (Accept) button to confirm selection. ‘Key lock enable’
will be displayed on the screen.
3. Press and release the (Accept) button to confirm selection. ‘Keypad Locked’
will be displayed on the screen when any button is pressed.
To deactivate keypad lock
Page 15

15
Press (Prog) and (Up) buttons simultaneously for a period of approximately 5
seconds until ‘Keypad Locked’ disappears from the screen and display returns to
normal.
Page 16

16
Operating the Boiling Water Unit Tap
The boiling water unit has a push - pull tap assembly. Water flows from the tap
directly below the lever when the lever is operated.
Water Supplies
Your boiling water unit is manufactured to suit the water conditions of most
Australian and New Zealand metropolitan water supplies. However, there are some
known water supplies which can have detrimental effects on the boiling water unit
and its operation and/or life expectancy. If you are unsure of your water quality, you
can obtain information from your local water supply authority. This boiling water unit
should only be connected to a water supply which complies with these guidelines for
the Rheem warranty to apply.
Chloride and PH
In a high chloride water supply, the water can corrode stainless steel parts and
cause them to fail. Where the chloride level exceeds 250 mg/L the Rheem warranty
does not apply to the boiling water unit. The pH is used as a measure of the water’s
alkalinity and acidity. In an acidic water supply, the water can attack metal parts and
cause them to fail. Where the pH is less than 6.8, the water is acidic and the Rheem
warranty does not apply to the boiling water unit.
Saturation Index
The saturation index is used as a measure of the water’s corrosive or scaling
properties. In a corrosive water supply, the water can attack copper parts and cause
them to fail. Where the saturation index is less than –1.0, the water is corrosive and
the Rheem warranty does not apply. In a scaling water supply, calcium carbonate is
deposited out of the water onto any hot metallic surface. Where the saturation index
exceeds +0.80, the Rheem warranty does not apply to the storage vessel unless a
water softening device is installed.
WARNING
BOILING WATER UNIT
S NOT INSTALLED IN ACCORDANCE WITH THE
ABOVE ADVICE WILL NOT BE COVERED BY THE RHEEM WARRANTY.
Page 17

17
SAVE A SERVICE CALL
Check the items below before making a service call. You will be charged for
attending to any condition or fault that is not related to manufacture or failure of a
part.
Not Enough (Or No) Boiling Water
• Is the electricity switched on?
Inspect the wall power socket to see if it is switched on. Also check the fuse or circuit
breaker at the switchboard to see if it is tripped.
• Is the timer in the off period?
If the timer has been set to turn off and the unit is below the optimum delivery
temperature.
Water Not Hot Enough?
Heavy usage
You may find that due to heavy boiling water usage the water temperature may be
lower than normally expected due to insufficient heating time being allowed.
High altitude
The boiling water unit is fitted with automatic altitude calibration to prevent the water
from continually boiling, which is energy inefficient. Different altitudes will cause the
unit to boil at different temperatures. If you believe the water temperature is not hot
enough, recalibrate the unit see page 12.
High Electricity Bills
Should you at any time, feel your electricity account is too high, we suggest you
check the following points: The boiling water units are supplied with a programmable
timer and sleep mode. Check to see if these features have been activated. Refer to
‘Setting the Timer on page 7.
Unit Will Not Switch Off
The electronic timer will only switch the unit on or off when it is in “Auto” mode (See
section B on page 8), otherwise the unit will operate 24 hours a day 7 days a week.
No Water Coming Out Of The Tap
There may have been a large draw off prior. Wait a minute for the unit to fill enough
for you to get water out. If water will still not come out of the tap check the timer
screen, if there is an error message contact Rheem service. In Australia phone 131
031, in New Zealand phone Rheem Service Centre on 0800 657 335 to resolve any
problems with the unit.
Page 18

18
INSTALLATION
LOCATION
This boiling water unit is suitable for indoor installation only.
INSTALLATION STANDARDS
The boiling water unit must be installed:
• by a qualified person, and
• in accordance with the installation instructions, and
• in compliance with Standards AS/NZS 3500.4, AS/NZS 3000 and all local codes
and regulatory authority requirements.
In New Zealand, the installation must also conform to Clause G12 of the New
Zealand Building Code.
BOILING WATER UNIT APPLICATION
If this boiling water unit is to be used where an uninterrupted boiling water supply is
necessary for the application or business, then there should be redundancy within
the building. This should ensure the continuity of boiling water supply in the event
that this boiling water unit was to become inoperable for any reason. We recommend
you provide advice to the system owner about their needs and the buildings backup
redundancy.
OPENING THE UNIT
The jacket is removed from all models, by undoing the 4 retaining screws at the top
and bottom of the jacket, and pulling the jacket forward.
MINIMUM CLEARANCES
For ventilation reasons, all units require a minimum clearance of 50mm on all sides.
For ease of servicing (where there is sufficient space) Rheem recommend 300mm
clearance from the top of all units. For element replacement reasons Rheem
recommend clearance of 150mm from the right hand side of 3 to 10 litre units and
300mm from the left hand side of the 15 to 40 litre units. Rheem recommend a
minimum clearance of 400mm measured from the underside of the BWU jacket to
any sink bench.
MOUNTING
The BWU when installed is suspended from mounting screws located into keyhole
slots at the back of the BWU (refer to Dimension & Mounting Specification on page
26).
Be sure that the mounting screws are securely inserted into the keyhole slots. The
screws MUST be anchored in such a way, that they will hold the weight of the unit
when filled with water, (refer to the specifications table on page 25).
Page 19

19
WARNING
WATER SUPPLY CONNECTION
Cold mains pressure water (refer to Specifications on page 25) for minimum water
pressures) must be piped and connected to the ½” BSP inlet fitting located on the left
hand side underneath the unit. An accessible isolating valve must be installed near
the unit. This unit contains an inlet strainer on the water inlet connection (refer to
figure 1 below). For rear entry connection on 3-10 Litre models, we recommend that
you use prefabricate your pipework ease of connection.
VENT AND INLET CONNECTION
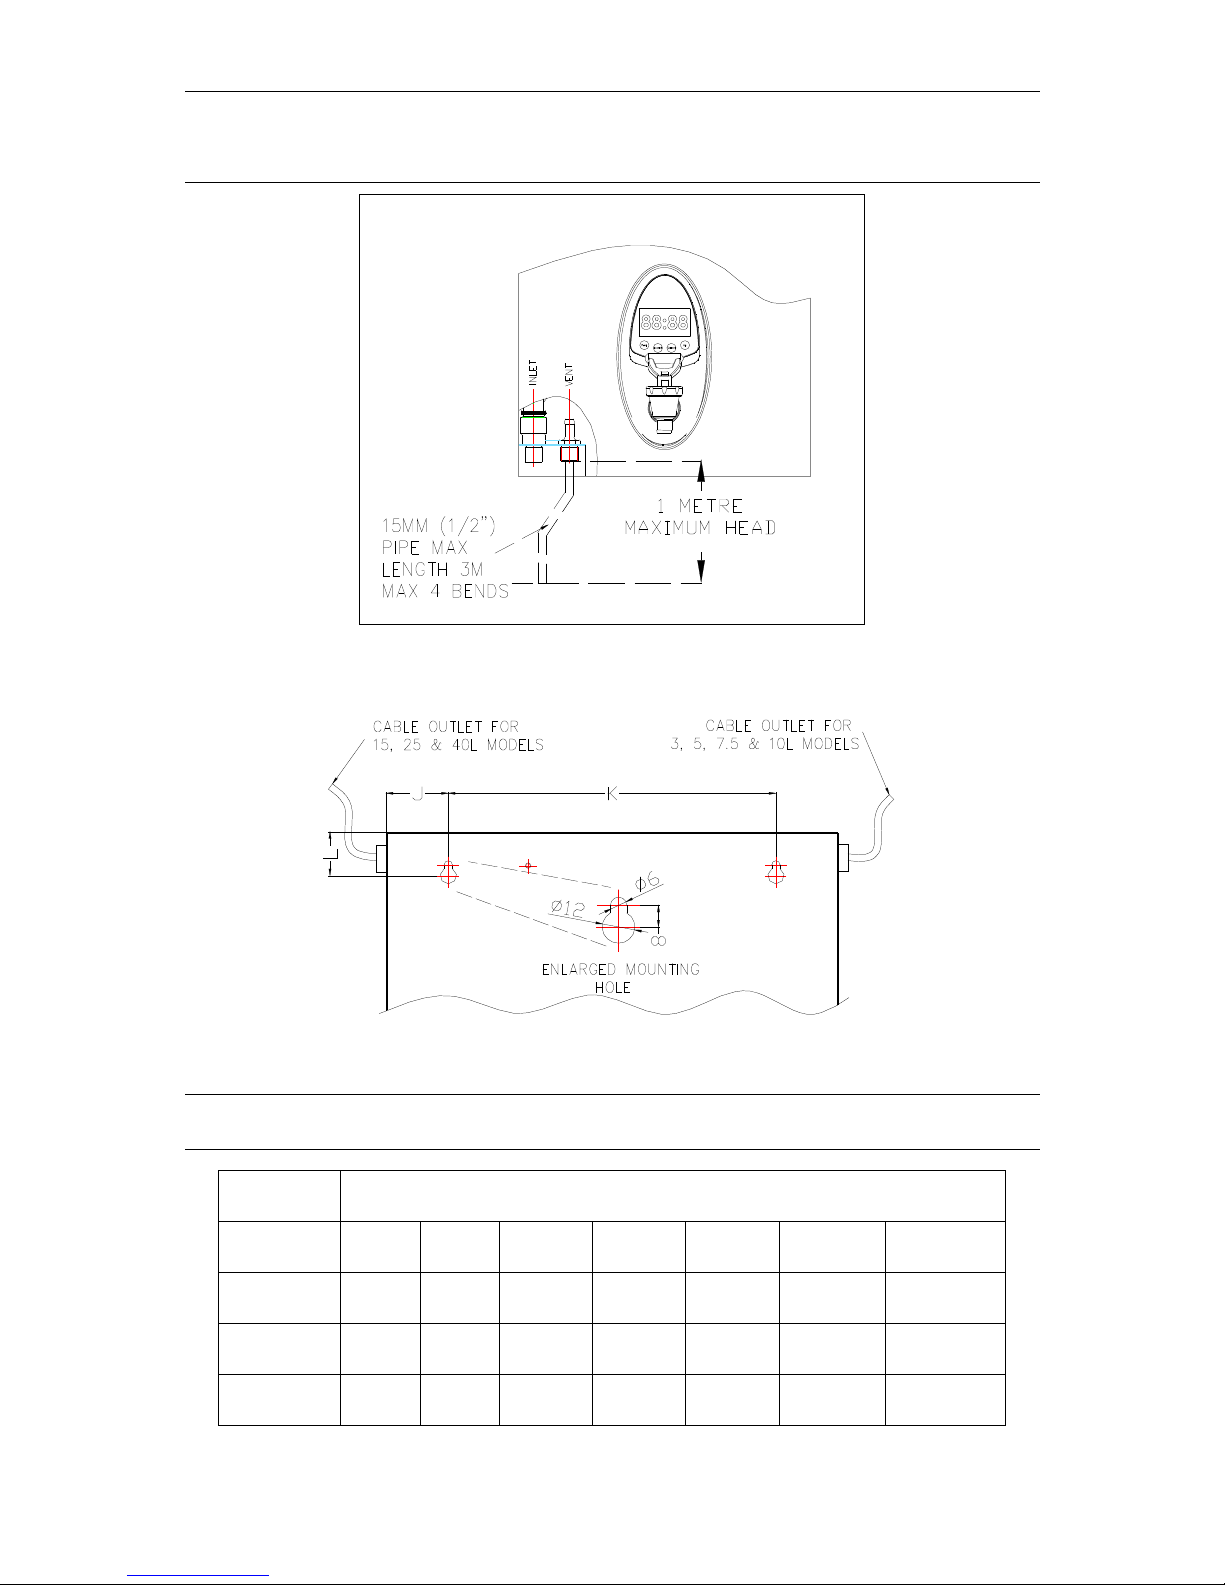
OVERFLOW / VENT CONNECTION IMPORTANCE
Connect a 15 mm (½”) pipe to the overflow/vent connection (½”BSP nipple).This
pipe is to be made of a material such that continuous steam will not degrade it (i.e.
copper). This pipe must have a continuous fall, not exceeding 3 metres in length and
or contain no more than 4 bends (refer to figure 1).
WARNING
Before drilling into the wall make sure that the screw positions avoid any pipe-work
or electrical cables. Allow 4 mm clearance between the screw head and the wall
for locating the unit.
Serious damage can occur to person or property if incorrect material is used and
the overflow/vent pipe degrades whilst in use.
Figure 1: Overflow / Vent Connection All Models.
Page 20

20
WARNING
WARNING
DRAINING
To drain 3-25L models, turn unit off and open tap until no water flows out. Remove
unit from wall and tip over with tap open until unit is empty. For 40L units, a drain
plug is accessible from the bottom of the unit (note switch unit off before draining)
WARNING
IMPORTANT
Installation and maintenance of the Rheem Boiling Water unit shall be carried
out by a qualified service person. In Australia phone Rheem service on 131
031, in New Zealand phone your nearest Rheem Service Centre on 0800 657
335.
If the site situation requires an overflow/vent pipe exceeding 3 metres in length,
then a tundish will be required for the overflow/drain discharge. The drain pipe
work must not exert a pressure of more than 1 metre of head on the Rheem
boiling unit (refer to figure 2). During normal operation of the BWU, the
overflow/vent connection may discharge small quantities of steam and
condensate, so it is ESSENTIAL that the drain pipe is attached to the overflow
vent connection. This drain pipe must discharge to waste at a point where no
scald injury, nuisance, inconvenience, nor damage is caused to people or
property in the immediate vicinity.
Before draining the unit, ensure the appliance has been switched off, and water
is not hot enough to scald.
Ensure the overflow/vent line remains open because the BWU tank is not
designed to be pressurised. Where freezing may occur, protect the pipes and
install an air break. It is recommended to install an air break in the overflow/vent
drain line, no more than 300 mm from the BWU. Also it is important to connect
the overflow/vent and water inlet correctly. Incorrect connection of pipe work
may damage the unit.
Page 21

21
SERVICING
It is suggested for peak performance that the Boiling Water Unit be serviced
every six months in harsh water areas, every 12 months in normal water areas.
WARNING
Minor Six Month Maintenance
It is recommended minor maintenance be performed every six months by the
dwelling occupant.
To ensure continuing satisfactory operation, it is suggested that the inlet strainer be
serviced every six months by a qualified service person. Where poor water quality is
present it is recommended to install an additional auxiliary filter.
Major Five Year Service
It is recommended a major five year service be conducted on the boiling water unit.
The service must be conducted by a qualified person. In Australia phone Rheem
Service on 131 031 or their nearest Accredited Service Technician. In New Zealand
phone your nearest Rheem Service Centre on 0800 657 335.
Note: The five year service and routine replacement of any components are not
included in the Rheem warranty. A charge will be made for this work.
The major service includes:
• Check the electric heating unit for excessive calcium build up or corrosion and
replace if necessary.
• Visually check the unit for any potential problems.
• Inspect all connections.
TAP OUTLET
To prevent damage during transport the tap is wrapped and placed within the boiling
water unit. The tap is connected to the tap extension by a chrome-plated nut and
tightened using a 29mm AF spanner.
Servicing must be performed by suitably qualified persons.
Page 22

22
ELECTRICAL REQUIREMENTS
WARNING
• 220 – 240 Volts AC, 50 Hz, Single Phase
• 7.5 Amps on 3 Litre
• 10 Amps on 5, 7.5,10 & 15 litre models
• 15 Amps on 25 litre model
• 20 Amps on 40 litre model
A flexible cord is supplied on all 3, 5, 7.5, 10 and 15 Litre models. Do not loosen the
cord grip or pull excess cord into the BWU. If the supply cord of this unit is damaged,
it must be replaced by the manufacturer or a qualified service person.
The 25 and 40 litre models must be installed with fixed wiring. A means of
disconnection from all active (phase) conductors of the power supply must be
incorporated during installation in accordance with the wiring rules.
This boiling water unit contains electronic equipment and insulation tests must
only be conducted between neutral and earth or between active and earth.
Page 23

23
COMMISSIONING
To Turn On and Fill the Boiling Water Unit
• Turn on the water supply and then the electrical supply at the isolating switch to the
boiling water unit.
• The unit should begin filling (check for external leaks)
• Set the timer. Refer to “Setting the Timer” on page 7
IMPORTANT:
On initial start up, this boiling water unit automatically runs through a set-up cycle
to detect the boiling point of water. During this cycle steam may discharge from the
vent pipe for a short time. This set-up cycle will take up to 18-30 minutes depending
on unit, and when completed (boiling point detected) the unit will commence
incremental filling. It is important NOT to operate the tap during the set-up cycle
because it may affect the operating temperature of the unit. Explain to the
householder or responsible officer the functions and operation of the boiling water
unit. Upon completion of the installation and commissioning of the boiling water unit,
leave this guide with the responsible officer.
The factory setting for the unit is programmed to automatically operate 24 hours a
day, 7 days a week. It is highly recommended for the user to program the timer, as
this will increase the life of the unit, and consume less power (see page 7 for Setting
the Timer). The electronic controller constantly monitors and controls the water level
and water temperature to optimise the boiling water delivery.
Operation based on an inlet water temperature of 18ºC
Lazer
Size
Approx Recovery
Litres / Hour
Approx. time to heat full
Capacity
(in minutes)
3.0 L 17.5 12
5.0 L 21 15
7.5 L 21 22
10 L 21 29
15 L 21 40
25 L 33 40
40 L 41 50
Page 24

24
FAULT FINDING GUIDE
*
It is strongly recommended that any REMEDY be carried out by a qualified service
person
*
Rheem Boiling Water Unit - Fault Finding Guide
Symptom Possible Cause Remedy
1
The unit does not
fill with water
There Is No Power Supply
There Is No Water Supply
The Filter Is Blocked
Electronic Controller Failure
Solenoid Valve Failure
Water Filter Is Blocked
Check The Electrical Supply
Check The Water Supply
Check The Inlet Strainer, Clean Or Replace
Test & Replace The Electronic Controller
Check Resistance Of Solenoid, Replace If
Broken
Check The Filter, Replace If Blocked
2
The unit fills with
water to low level
and does not heat
Thermal Cut Out Has Tripped
Heating Element Failure
Electronic Controller Failure
Thermistor Failure
Reset Thermal Cut Out
If The Heating Element Is Correctly Wired,
Check The Element Resistance. Replace If
Broken
Test & Replace The Electronic Controller
Replace Thermistor
3
The unit boils
continually
Low Atmospheric Air Pressure
Electronic Controller Failure
Thermistor Failure
Recalibrate The Unit
Test & Replace The Electronic Controller
Replace Thermistor
4 The unit overflows
Incoming Water Pressure Is Too
High
Solenoid Valve Failure
Level Probe Failure
Reduce Incoming Water Pressure
Turn The Unit Off. If Water Still Flowing
Replace Solenoid Valve
• Clean The Level Probe
• Check Condense Not Bridging Probe
• Check Angle Of High Level Probe
• Replace Probe
Also refer to Error Code Table on Page 11
Page 25

25
SPECIFICATIONS
Note
(1)
If the supply pressure exceeds 1000kPa, a pressure limiting valve must be installed
upstream of the BWU.
In areas with poor water quality an additional filter should be installed.
SPECIFICATION CLASSIC SERIES
3 Litre 5 Litre 7.5 Litre 10 Litre 15 Litre 25 Litre 40 Litre
Approx Weight (kg)
Empty 6 8 9 10 15 17 19
Approx Weight (kg) Full 10 15 19 22 34 47 67
Minimum Water
Pressure kPa 50 50 50 50 75 75 100
Maximum Water
Pressure kPa 1000 1000 1000 1000 1000 1000 1000
Element Size kW 1.8 2.4 2.4 2.4 2.4 3.6 4.6
Page 26
26
DIMENSIONS AND MOUNTING
SPECIFICATIONS
Overflow and Vent Connections
Mounting Dimension Specifications
Classic Models
Dimension 3 Litre 5 Litre 7.5 Litre 10 Litre 15 Litre 25 Litre 40 Litre
J mm 46 46 46 46 75 75 75
K mm 189 241 241 241 340 340 340
L mm 31 31 31 31 20 20 20
Page 27

27
DIMENSIONS SPECIFICATIONS
Dimension 3 Litre 5 Litre 7.5 Litre 10 Litre 15 Litre 25 Litre 40 Litre
A mm 283 334 334 334 490 490 490
B mm 143 176 176 176 180 235 325
C mm 400 430 515 615 615 615 615
D mm 234 267 267 267 271 326 416
E mm 40 40 40 40 8 8 8
F mm 50 50 50 50 32 32 32
G mm 53 53 53 53 103 103 103
H mm 18 18 18 18 32 32 32
N mm 212 245 245 245 249 304 394
M mm 142 167 167 167 245 245 245
Page 28

28
Rheem Warranty
Rheem Boiling Water Unit Warranty New Zealand & Australia
In addition to your legal rights, Rheem New Zealand Limited makes the following promise to the owner. We will repair or, if necessary,
replace a defective boiling water unit or part of it, which has failed due to faulty manufacture on the following terms and conditions:
1. THE RHEEM WARRANTY – GENERAL
1.1 This warranty is given by Rheem Australia Pty Limited ABN 21 098 823 511 of 1 Alan Street, Rydalmere New South Wales
or Rheem New Zealand Limited of 475 Rosebank Road as applicable..
1.2 Rheem offer a trained and qualified national service network who will repair or replace components at the address of the
boiling water unit subject to the terms of the Rheem warranty. Australia Only:- Rheem Service, in addition can provide
preventative maintenance and advice on the operation of your boiling water unit. The Rheem Service contact number is
available 7 days a week on Australia 131 031 with Service personnel available to take your call from 8am to 8pm daily (hours
subject to change).
1.3 For details about this warranty, you can contact us on Australia 131 031 or New Zealand 0800 657 335 or in Australia, by
email at warrantyenquiry@rheem.com.au (not for service bookings), or at rheem@rheem.co.nz in New Zealand.
1.4 The terms of this warranty are set out in section 2 and apply to boiling water units manufactured after 1st January 2012.
1.5 If a subsequent version of this warranty is published, the terms of that warranty will apply to boiling water units manufactured
after the date specified in the subsequent version.
2. TERMS OF THE RHEEM WARRANTY AND EXCLUSIONS TO IT
2.1 The decision of whether to repair or replace a faulty component is at Rheem’s sole discretion.
2.2 Where a failed component or cylinder is replaced under this warranty, the balance of the original warranty period will remain
effective. The replacement does not carry a new Rheem warranty.
2.3 Where the boiling water unit is installed outside the boundaries of a metropolitan area as defined by Rheem or further than
25 km from either (Australia only) a regional Rheem branch office or an Accredited Rheem Service Agent's office, (New
Zealand Only) a Rheem service centre, the cost of transport, insurance and travelling between the (Australia only) nearest
branch office or Rheem Accredited Service Agent’s office, or (New Zealand Only) a Rheem service centre and the installed
site shall be the owner’s responsibility.
2.4 Where the boiling water unit is installed in a position that does not allow safe or ready access, the cost of that access,
including the cost of additional materials handling and/or safety equipment, shall be the owner’s responsibility. In other
words, the cost of dismantling or removing cupboards, doors or walls and the cost of any special equipment to bring the
boiling water unit to floor or ground level or to a serviceable position is not covered by this warranty.
2.5 This warranty only applies to the original and genuine Rheem boiling water unit in its original installed location and any
genuine Rheem replacement parts.
2.6 If the boiling water unit is not sized to supply the hot water demand in accordance with the guidelines in Rheem’s boiling
water unit literature, any resultant fault will not be covered by Rheem's warranty.
2.7 The Rheem warranty does not cover faults that are a result of:
a) Accidental damage to the boiling water unit or any component (for example: (i) Acts of God such as floods, storms, fires,
lightning strikes and the like; and (ii) third party acts or omissions).
b) Misuse or abnormal use of the boiling water unit.
c) Installation not in accordance with the Owner’s Guide and Installation Instructions or with relevant statutory and local
requirements in the State or Territory in which the boiling water unit is installed.
d) Connection at any time to a water supply that does not comply with the water supply guidelines as outlined in the
Owner’s Guide and Installation Instructions.
e) Repairs, attempts to repair or modifications to the boiling water unit by a person other than Rheem Service or a Rheem
Accredited Service Technician.
f) Faulty plumbing or faulty power supply.
g) Failure to maintain the boiling water unit in accordance with the Owner's Guide and Installation Instructions.
h) Transport damage.
i) Fair wear and tear from adverse conditions (for example, corrosion).
j) Cosmetic defects.
2.8 If you require a call out and we find that the fault is not covered by the Rheem warranty, you are responsible for Australia
Only:-our standard call out charge, New Zealand only, the cost of the call out charge. If you wish to have the relevant
component repaired or replaced by Rheem that service will be at your cost.
2.9 Subject to any statutory provisions to the contrary, this warranty excludes any and all claims for damage to furniture, carpet,
walls, foundations or any other consequential loss either directly or indirectly due to leakage from the boiling water unit, or
due to leakage from fittings and/ or pipe work of metal, plastic or other materials caused by water temperature, workmanship
or other modes of failure.
Page 29

29
Rheem Warranty
Rheem Boiling Water Unit Warranty New Zealand & Australia
3. WHAT IS COVERED BY THE RHEEM WARRANTY FOR THE BOILING WATER UNIT DETAILED IN THIS
DOCUMENT
3.1 Rheem will repair or replace a faulty component of your boiling water unit if it fails to operate in accordance with its
specifications as follows:
This Rheem
warranty covers
commercial and
industrial
installations.
Warranty Period
Warranty Cover
What components are
covered
The period in which the
fault must appear in order
to be covered
What coverage you receive
Years
All components
1
Free replacement of failed component, or if
necessary, replacement of the Boiling Water
Unit, free of charge, including labour.**
Page 30

30
Rheem Warranty
Rheem Boiling Water Unit Warranty New Zealand & Australia
4. ENTITLEMENT TO MAKE A CLAIM UNDER THIS WARRANTY
4.1 To be entitled to make a claim under this warranty you need to:
a) Be the owner of the boiling water unit or have consent of the owner to act on their behalf
b) Contact Rheem Service without undue delay after detection of the defect and, in any event, within the applicable
warranty period.
4.2 You are not entitled to make a claim under this warranty if your boiling water unit:
a) Does not have its original serial numbers or rating labels.
b) Is not installed in Australia or New Zealand.
5. HOW TO MAKE A CLAIM UNDER THIS WARRANTY
5.1 If you wish to make a claim under this warranty, you need to:
a) Contact Rheem on Australia 131031 or Rheem in New Zealand on 0800 657 335 and provide owner’s details, address
of the boiling water unit, a contact number and date of installation of the boiling water unit or if that’s unavailable, the date
of manufacture and serial number (from the rating label on the boiling water unit)
b) (Australia Only) Rheem will arrange for the boiling water unit to be tested and assessed on-site.
c) (New Zealand Only) A Rheem service centre will arrange for the boiling water unit to be tested and assessed on-site.
d) If Rheem determines that you have a valid warranty claim, Rheem will repair or replace the boiling water unit in
accordance with this warranty
5.2 Any expenses incurred in the making of a claim under this warranty will be borne by you.
6. THE AUSTRALIAN CONSUMER LAW (AUSTRALIA ONLY)
6.1 Our goods come with guarantees that cannot be excluded under the Australian Consumer Law. You are entitled to a
replacement or refund for a major failure and for compensation for any other reasonably foreseeable loss or damage. You
are also entitled to have the goods repaired or replaced if the goods fail to be of acceptable quality and the failure does not
amount to a major failure.
6.2 The Rheem warranty (set out above) is in addition to any rights and remedies that you may have under the Australian
Consumer Law.
INSTALLATION NOTES:
Revision Date: 16 NOV 2011 316937E
RHEEM
www.rheem.com.au
www.rheem.co.nz
FOR SERVICE TELEPHONE
131 031 AUSTRALIA
0800 657 335 NEW ZEALAND
or refer to your local Yellow Pages
 Loading...