

Page 1
取扱説明書
(保証書付)
Instruction Manual
この度は、RGBlue 製品をお買い上げいただき、誠にありがとうございます。
本製品をご使用の前に、この取扱説明書をよくお読みください。
また、本書には保証書も付いていますので大切に保管してください。
Thank you for purchasing an RGBlue product.
Before using this product, please read this Instruction Manual thoroughly.
This manual contains the Warranty Card. Please retain it carefully.
LM5K2500V
ライトモジュール
Light Module
BM3400B
バッテリーモジュール
Battery Module
Page 2

製品の特徴
RGBlue 水中ライトは、水中撮影用途に特化した新しい思想に
よりつくられた光源です。
• モジュレーションシステム
1.光源(ライトモジュール)と電源(バッテリーモジュー
ル)が、オリジナルのバヨネット構造により簡単に接続・
取外しができるシステムです。
2.ご使用の用途に合わせて、モジュールのみを追加購入す
ることが可能です。
• バックアップ防水機構
各モジュールがそれぞれ防水構造*1をもっているため、
セッティング時の浸水の懸念がありません。
*1
各モジュールは単体で IPX6 相当、ライト使用時(モジュー
ルを接続した状態)で耐水深 100M 防水機構。ただし、水中
での接続・取外しはできませんので、ご注意ください。
※ IPX6 とは、「あらゆる方向からの強い噴流水による有害な影
響がない」耐水性の規格です。
• 撮影に最適な光源
1.単一面発光する COB(Chip on Board) タイプの LED を採
用し、複数 LED タイプにみられるマルチシャドー
*2
や配光
ムラを解消しました。
2.高演色 Ra80、色温度 5000K の光源を使用し、より自
然な色を再現。
3.配光はビデオ撮影にも十分な 100°を確保。
4.最大光量は全光束 2500lm。
5.特 殊 集 光レンズ(標 準アクセサリー)により、配光 を100 °から
6 0 °に 絞 り タ ー ゲ ッ ト を よ り 明 る く 照 射 し ま す 。
*2
マルチシャドーとは、複数の LED を使ったライトを使用し
たときに発生する多重の影のことです。
• シンプルオペレーション
プッシュボタン2個のみで、ON/OFF、4段階調光、無段階調
光を行います。
• 多彩な安全機構
各種の安全回路*3、オーバープレッシャーバルブを搭載。
*
3
高温保護、過充電保護、過放電保護、過電流保護、ショート保護
2
Page 3

はじめに
• 本書の内容を無断で複写することは、個人利用をのぞき禁止
されています。
• 本製品の内容については、予告無しに変更することがあります。
• 本製品の不適切な使用により、損害が生じた場合第三者からの
いかなる請求に関し、当社では一切の責任を負いません。
• 本製品の故障、当社指定外の第三者による分解、修理、改造
その他の理由により生じた損害に関し、当社では一切の責任
を負いません。
※本製品には、電子回路や充電式リチウムイオン電池が組込まれ
ていますので、分解、改造は決して行わないでください。感
電やけがの恐れがあります。
※製品の内部に水や異物が入ったと思われる時は、すみやかに
使用をやめ電源を切って、お買上げの販売店か当社にご相談
ください。
目次
安全上のご注意...................................4
本体一覧............................................6
各部位名称.........................................7
防水仕様について................................9
ご使用前のメンテナンス................... 10
ご使用方法...................................... 12
本体を充電する................................ 14
本体の操作方法................................ 15
アクセサリーについて...................... 16
ご使用後のメンテナンス................... 17
製品仕様......................................... 18
アフターサービス............................. 19
保証規約......................................... 19
保証書............................................ 40
3
Page 4

安全上のご注意
■安全上のご注意
• 製品を正しく安全にお使いいただくために、ご使用の前には
この「安全上のご注意」を必ずお読みください。
• この「安全上のご注意」には安全のための重要な情報が記載
されていますので、必ず守ってください。
• 以下の表示の区分は、記載内容を守らず、誤った使い方をし
た場合に生じる危害や損害の程度を説明しています。
危険
死亡または重傷を負う危険性が大きいと想定
される内容です。
警告
死亡または重傷を負う可能性が想定される内
容です。
注意
損害を負うことや、物的損害発生が想定され
る内容です。
次に示す内容を守らず、誤った使い方をした場合、発火、発熱、
破損、液漏れなどにより、やけど、けが、失明などの原因になり
ます。
危険
• 分解・改造をしない。
• モジュールを単体で水中に持ち込まない。
※ライトモジュールとバッテリーモジュールは水中での接続・
取外しはできません。
• 火の中に入れたり、オーブンで加熱しない。
• 高温の場所で使用や放置をしない。
• 落下や衝撃を加えると、ガラスが割れたり部品が破損するこ
とがありケガの原因になります。
• 乳幼児の手の届く場所に置かない。
警告
• 人の目に向けて点灯させない。
• バッテリーモジュールおよび充電プラグの充電端子を、金属
のピンなどでショートさせない。
• AC アダプターの定格電圧(AC100V 〜240V) で使用する。
• AC アダプターを液体で濡らしたり、濡れたままで使用しない。
4
Page 5

• AC アダプターや家庭用電源、AC アダプター接続端子内に
ほこりがたまってないかを定期的に点検する。
• AC アダプターのコードが傷んだら使用しない。
• 家庭用電源や AC アダプターは、プラグを根元まで確実に差
し込む。
• 本体を振り回したり投げたりしない。
注意
• 陸上では長時間(5 分以上)点灯させない。
• 床や机などの上に、光源を下向きにした状態で点灯させない。
• 異臭、異常音、変形、煙が出るなどの異常が生じた場合は、
直ちに使用を中止する。
• 水中にエントリーする際に、本製品を持ったまま飛び込まない。
• モジュール接合時は、Oリングの点検を行う。
• モジュールの接合は、正しく行う。
• バッテリーモジュール単体での保管時は、付属の絶縁キャッ
プを装着する。
• 長期間使用しない場合は、AC アダプターをコンセントから
抜く。
5
Page 6

本体一覧
6
絶縁キャップ
ライトモジュール LM5K2500V バッテリーモジュール BM3400B
※絶縁キャップ付き
充電式バッテリーを内蔵した
電源、ライトモジュールと接
続して使用します。
LED光源、バッテリーモジュー
ルと接続して使用します。
Page 7

各部位名称
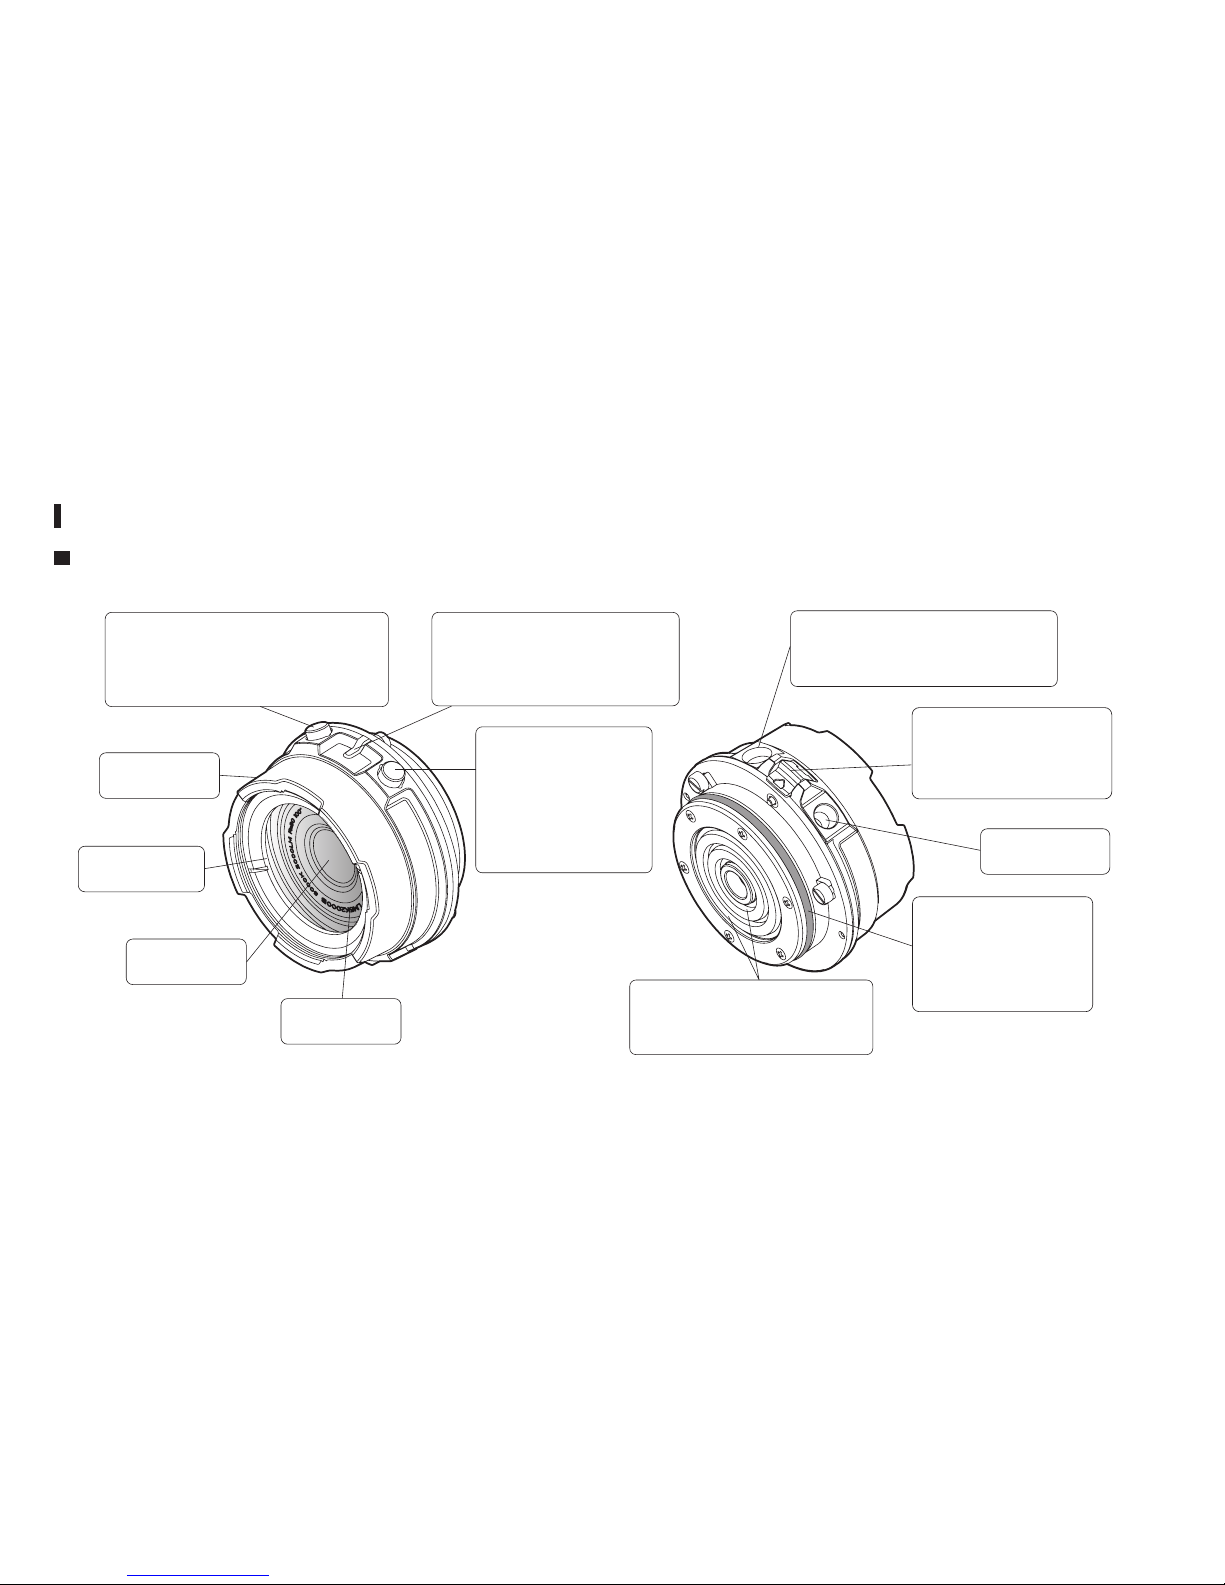
■ライトモジュール LM5K2500V
7
LED
リフレクター
強化ガラス
ライトヘッド
+/UPボタン
調光アップ、−/DOWN
ボタンとの併用で電源
ON/OFF
−/DOWN ボタン
調 光 ダ ウ ン、+/UP
ボタンとの併用で電
源 ON/OFF
インジケーター
電源 ON、バッテリー
残量、エラー発生を表
示します
ロックレバー
バッテリーモジュールから
取り外すときに使用します
Oリング
ライトモジュールとバッ
テリーモジュールの接続
部を防水します
光通信受信口
別売リモコンを使用するときに使用
します
電気接点
水などに濡れた場合は、きれいに
拭き取ってください
三脚ネジ穴
Page 8

各部位名称
■バッテリーモジュール BM3400B
8
ストラップ用穴
電気接点
水などに濡れた場合は、き
れいに拭き取ってください。
また、塩水などに触れて
ショートしたときは安全回
路により一時的に使用でき
なくなります
※復帰方法については、防
水仕様についてをお読み
ください。
ロックリング
アクセサリー固定プレート
充電端子
充電時の方向性
(+ー の 極 性)は
ありません
オーバープレッシャーバルブ
絶縁キャップ
Page 9

防水仕様について
• 各モジュールの内側は、接続・取外し時に濡れても水が内
部に侵入しないよう IPX6 相当の防水構造になっています。
ただし、水の中に入れたり、水中での接続・取外しはできま
せんので、ご注意ください。
※ IPX6 とは、「あらゆる方向からの強い噴流水による有害な
影響がない」耐水性の規格です。
• 各モジュールの内側が水に濡れた場合は、毛羽立たない乾い
た布などで完全に水分を拭き取ってください。また、塩水な
どに濡れた場合は真水で湿らせた布などできれいに塩水を拭
き取り、完全に乾燥させてください。
• バッテリーモジュールの電気端子が塩水などに濡れてショート
した場合、内部の安全回路が作動し一時的に使用できなくなり
ます。その場合は、上記の方法で拭き取り、乾燥させた後、AC
アダプター + 充電プラグより充電を行うことで復帰いたします。
• 各モジュールが接続された状態(水中で使用する状態)での、
耐水深は 100M です。100M以上の水深では使用できません。
またこの防水は、お客様のメンテナンスにより保たれます。
※専用充電プラグおよび ACアダプターは防水仕様ではありま
せんので、水に濡らさないようにご注意ください。
耐水深 100M
9
Page 10

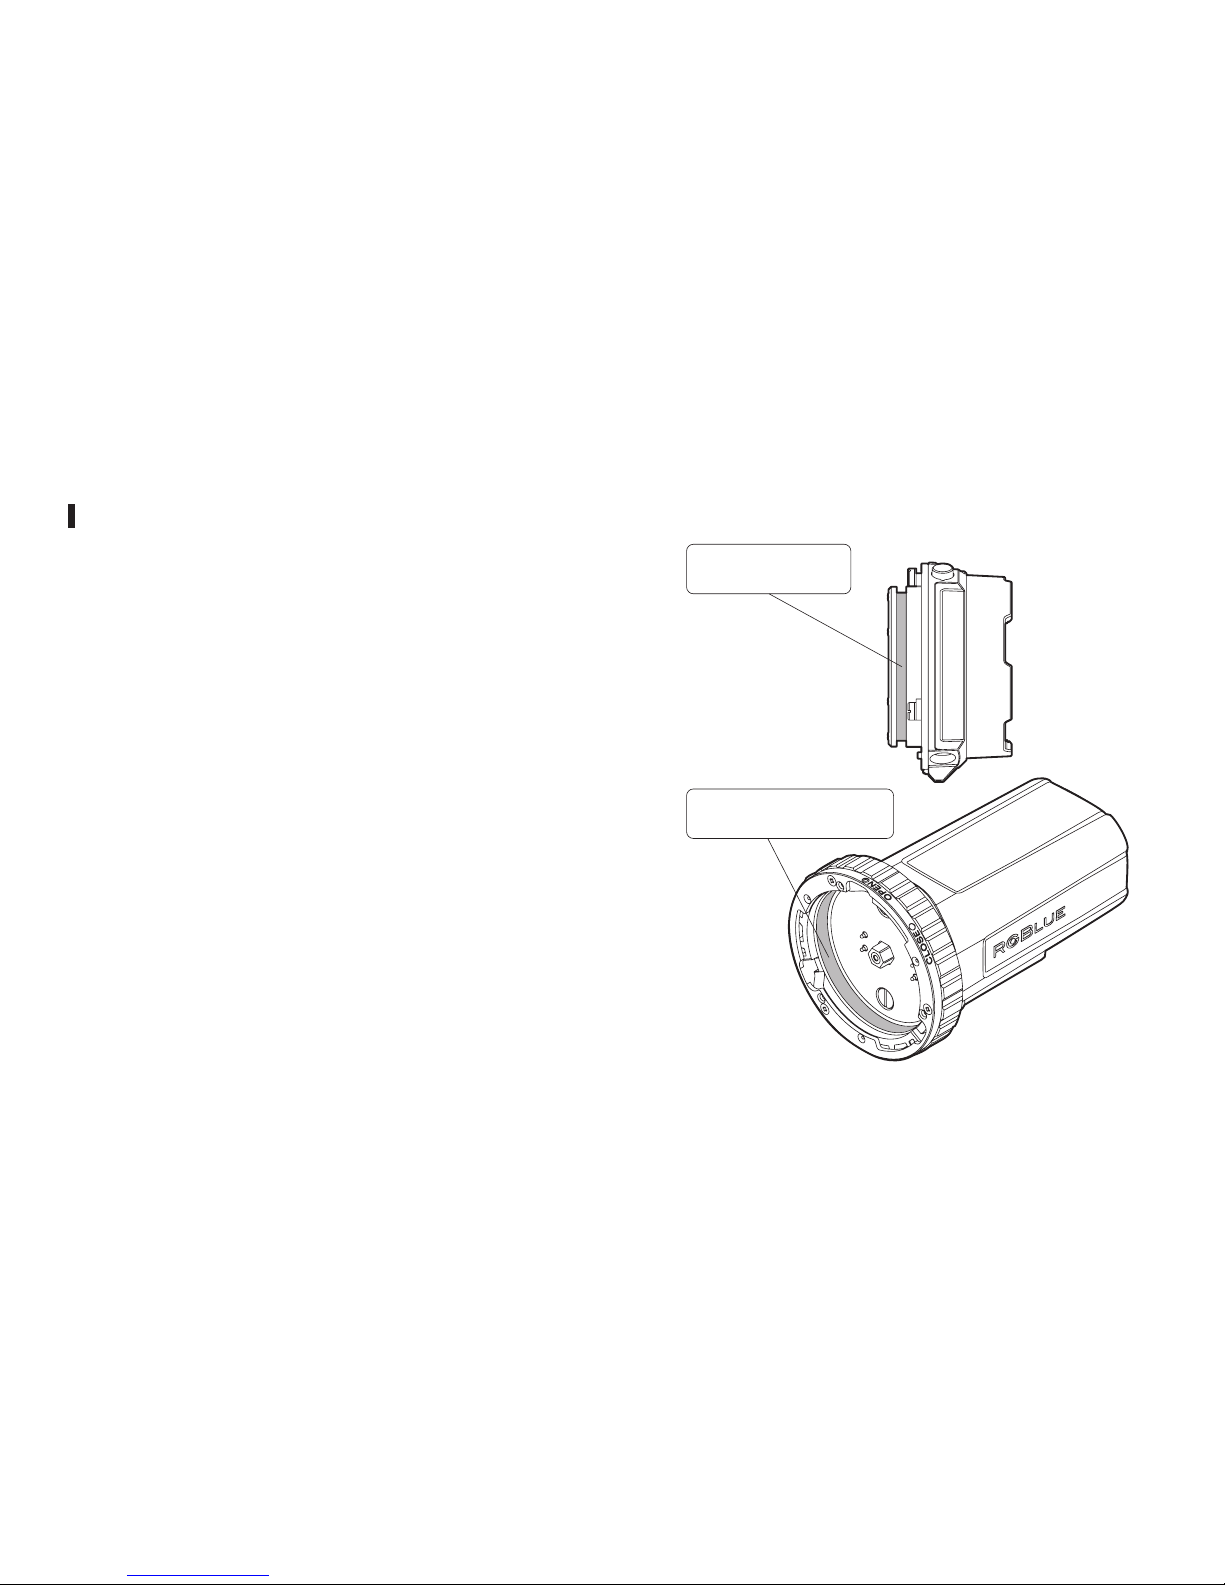
ご使用前のメンテナンス
本製品の耐水深 100M 防水は、ライトモジュールの Oリングお
よび Oリング溝とバッテリーモジュールの Oリング当て付け面
が密着することによって機能を保っています。
ご購入直後でも水中で使用する前には必ず、以下のメンテナン
スを行ってください。
• Oリングは消耗品ですので目安として 1 年に一回は交換して
ください。以下に示す異常があった場合は、必ず新品の専用
O リングと交換してください。
• グリスは必ず、専用シリコングリスを使ってください。
10
Oリング溝
Oリング当て付け面
Page 11

1.Oリングリムーバーを使用し、Oリングを取り外します。
2.Oリングにゴミや異物などが付いていないか?キズやヒビ
割れが無いか?確認します。
※もし、異常がある場合は新品の Oリングに交換してください。
3.Oリング溝を綿棒などできれいにします。
4.Oリングに専用グリスを塗布します。
5.Oリングを取付けます。
※取付ける際は、Oリングにキズを付けないように注意して
ください。
6.バッテリーモジュールの Oリング当て付け面に異物が付
いていないことを確認し、モジュールを接続します。
11
Page 12
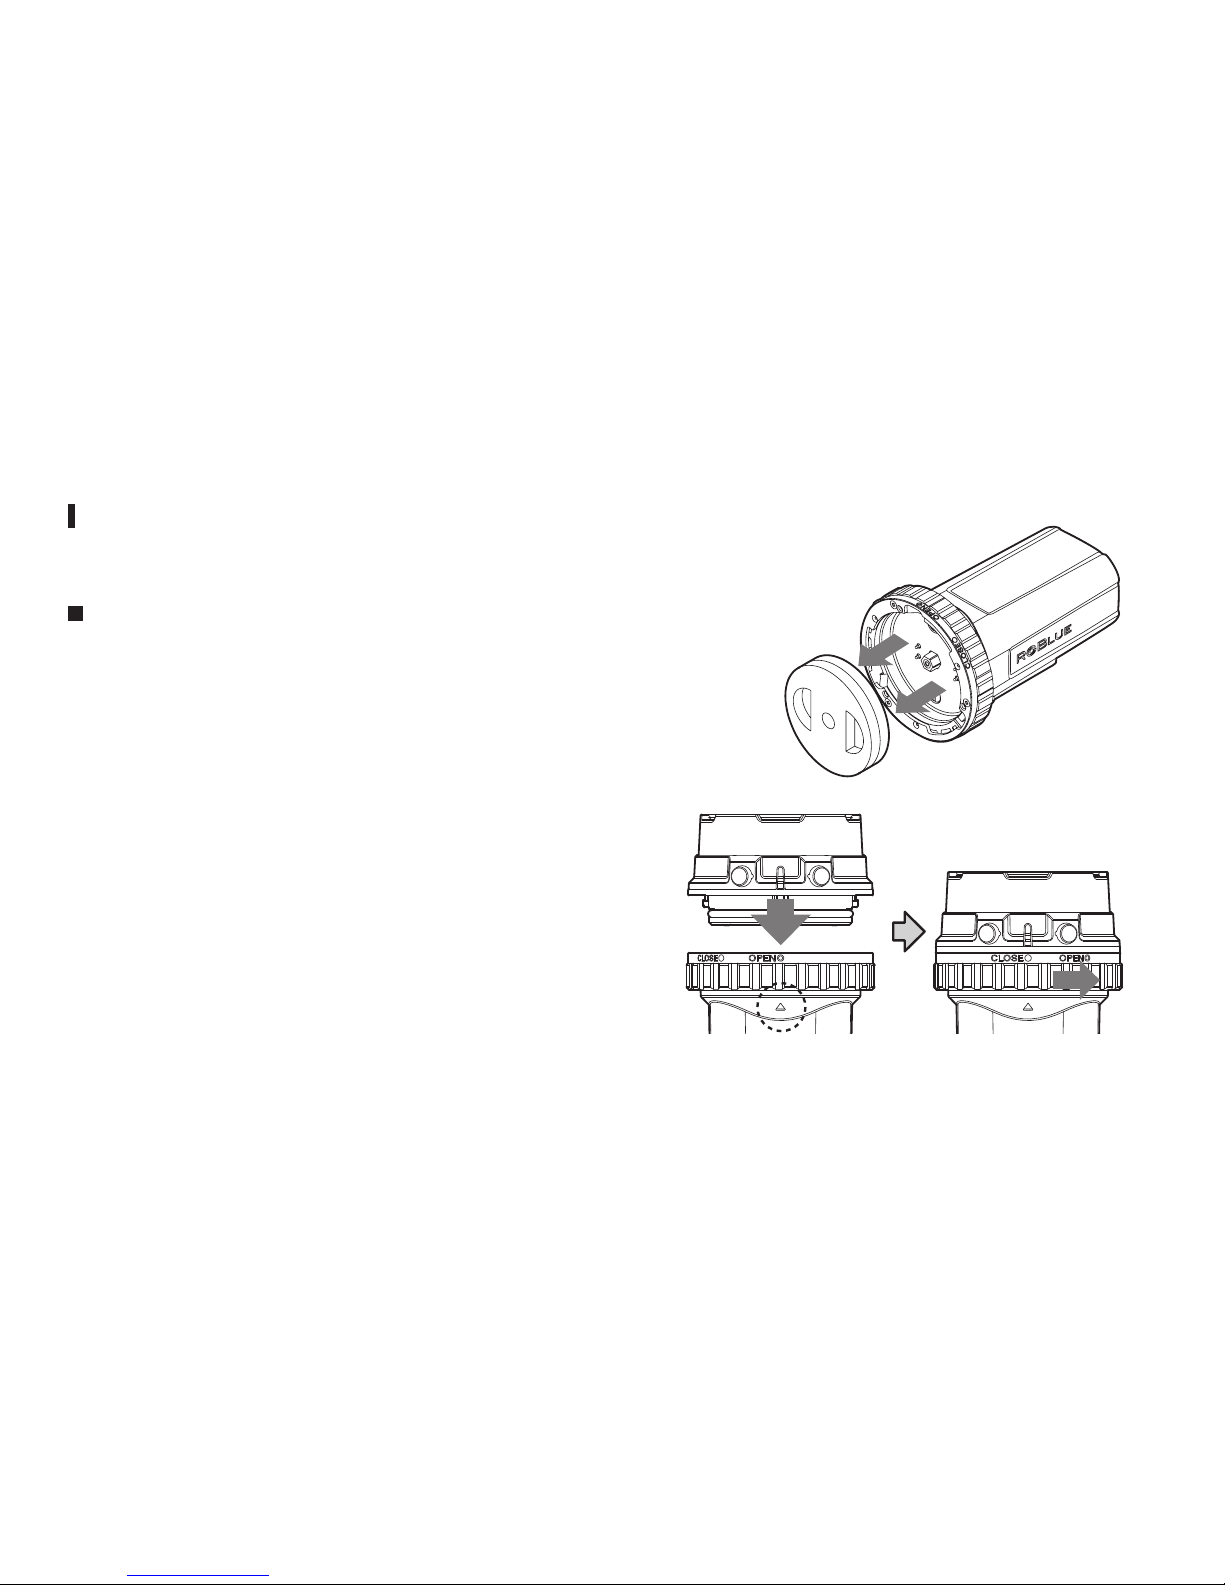
ご使用方法
ライトモジュールとバッテリーモジュールの接続・取外し方法
です。
■接続
ライトモジュールに Oリングがついていることを確認してくだ
さい。
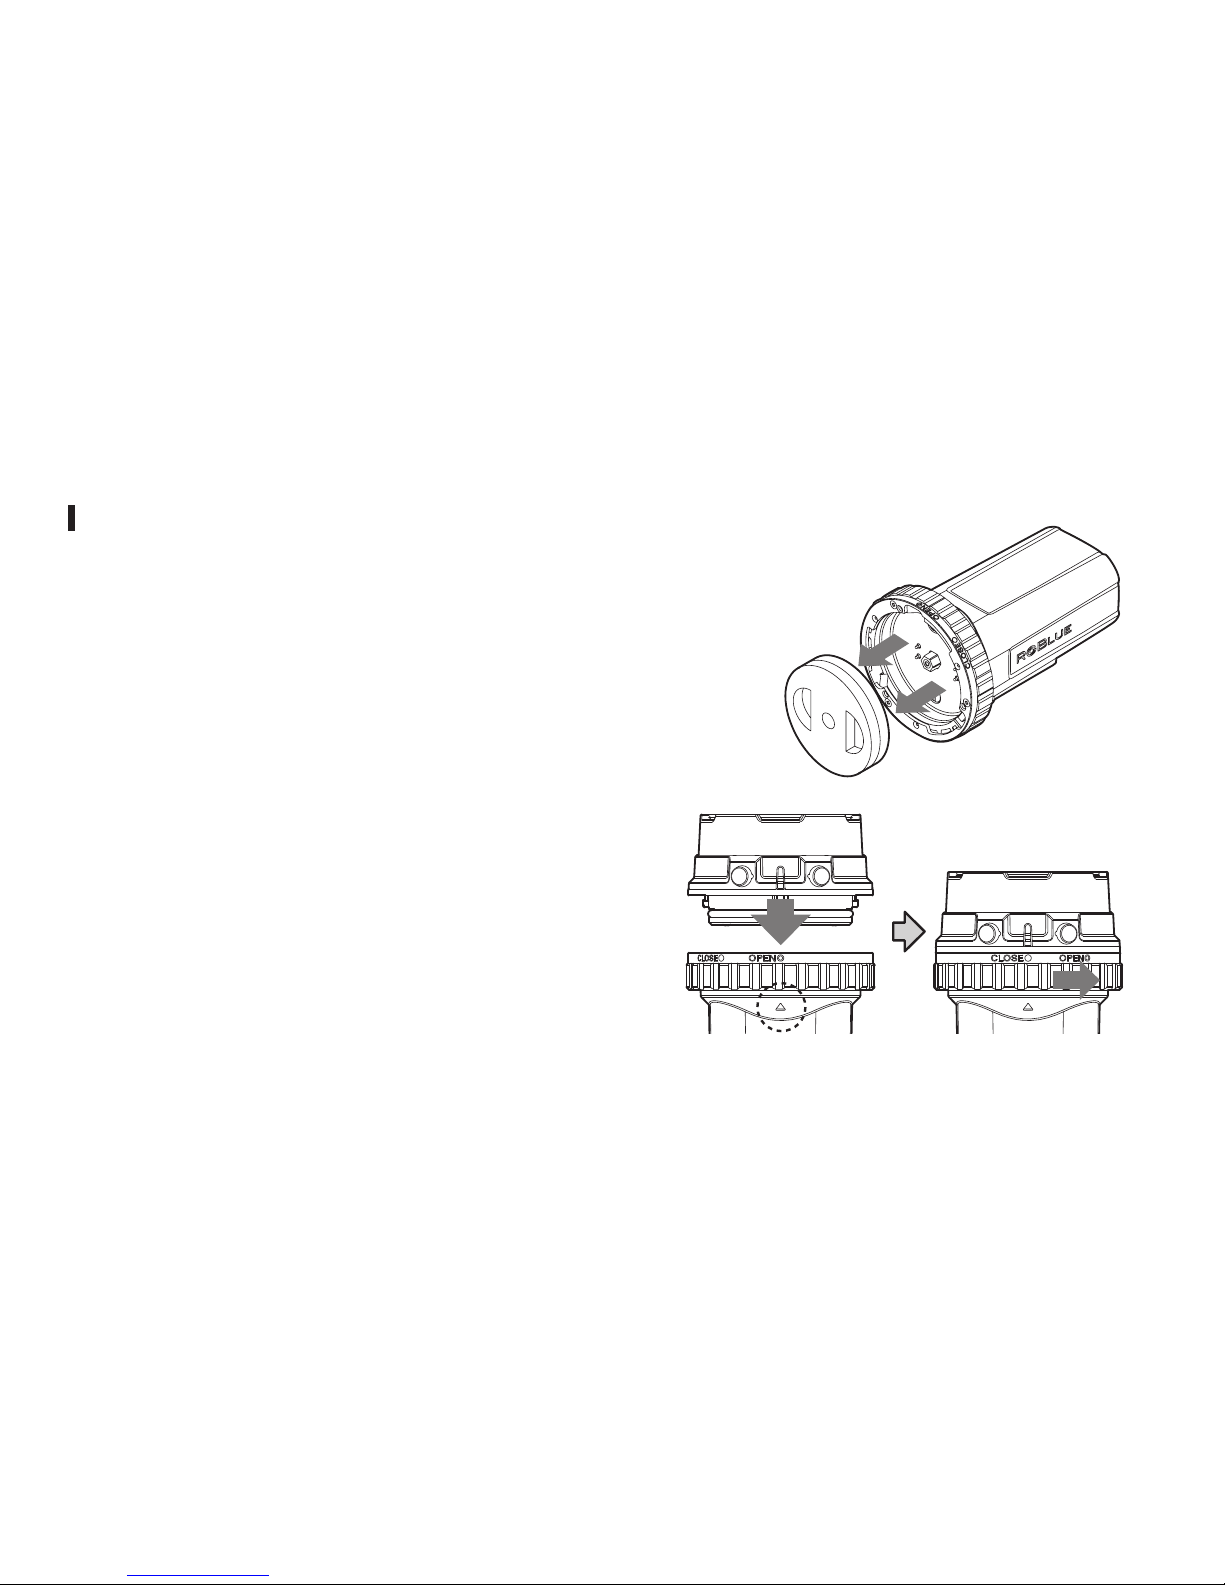
1.バッテリーモジュールに装着されている絶縁キャップを
取外します。
※バッテリーモジュール単体での保管時には、必ずこの絶縁
キャップを取付けてください。
2.バッテリーモジュールの▲にロックリングの OPEN 指標◎
を合わせ、ライトモジュールのインジケーターと OPEN 指
標◎を合わせ最後まで差し込みます。
※
接続向きが 3方向あり、どちらの向きでも接続が可能です。
3.ロックリングを回し、▲に CLOSE 指標○を合わせ「カチッ」
と音がしたらロックされます。
12
Page 13
■取外し
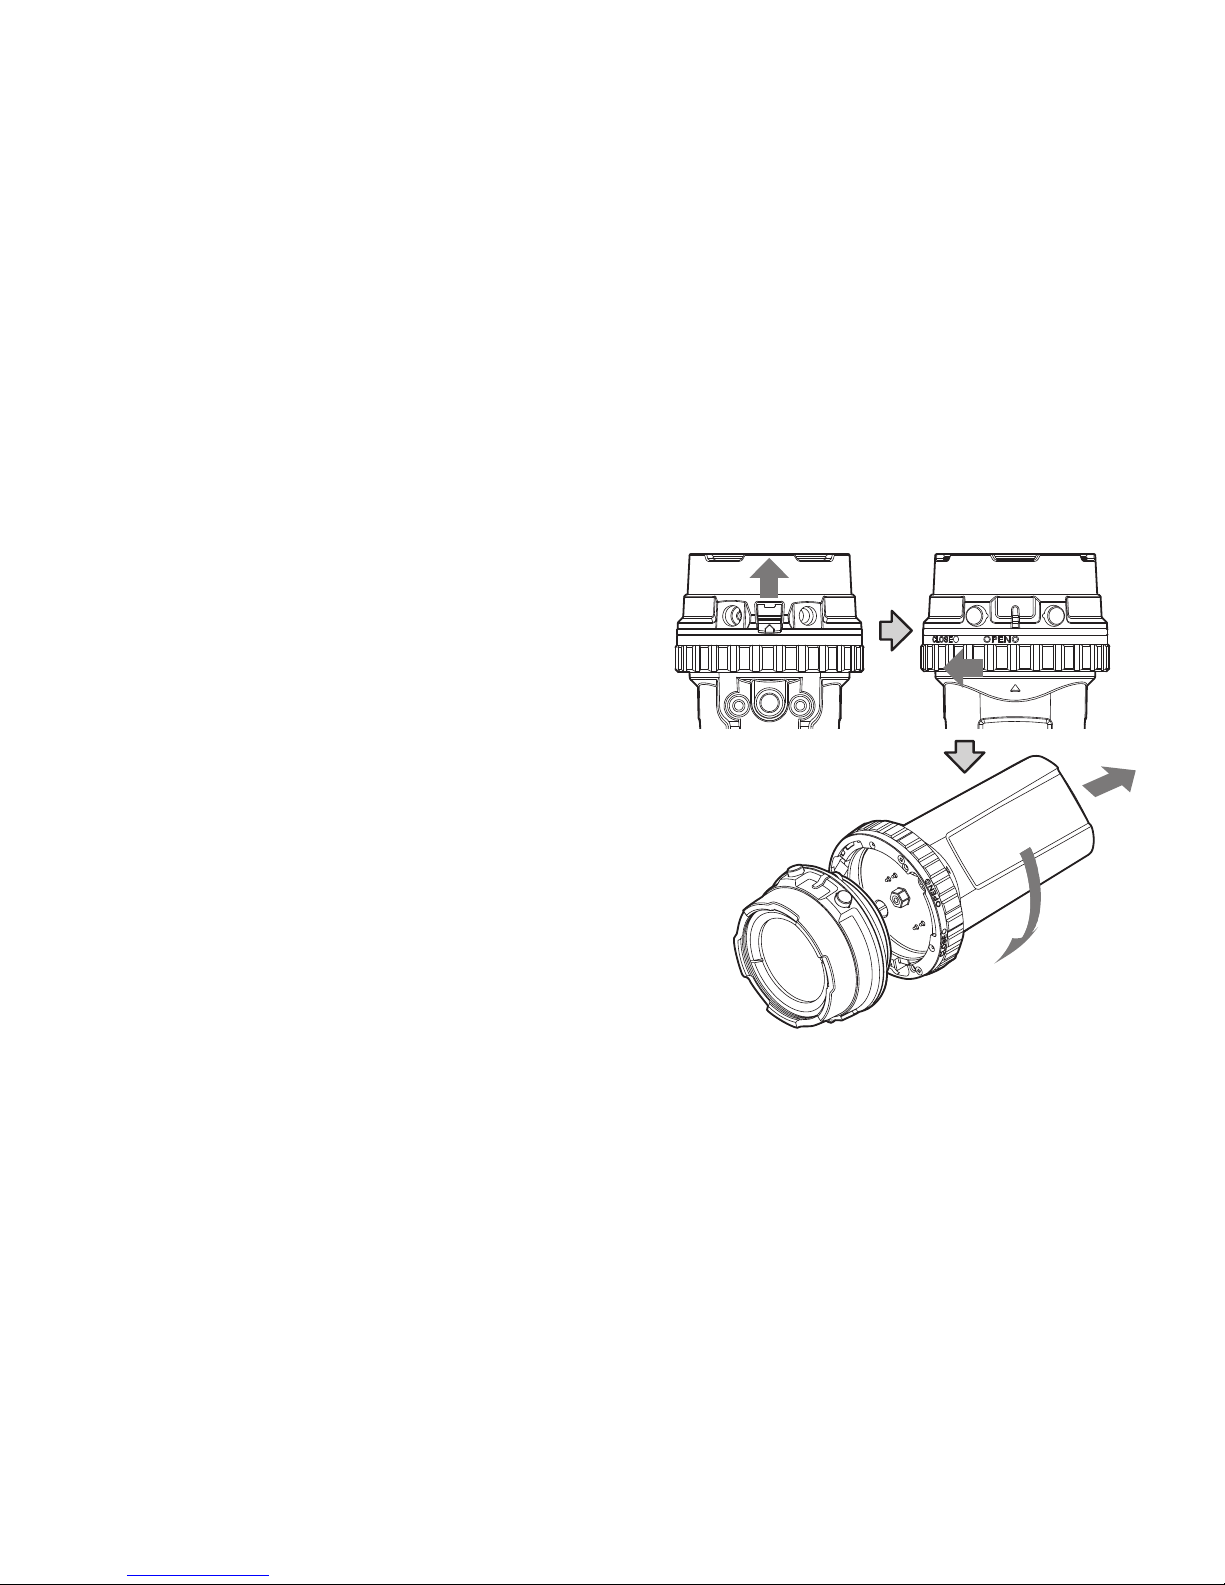
1. ライトモジュールのロックレバーを引き、ロックリングの
OPEN ◎を▲まで回します。
2.ロックリングを OPEN 方向に回しきった後、ライトモ
ジュールを下向きに固定しバッテリーモジュールを左側
に回します。
13
Page 14

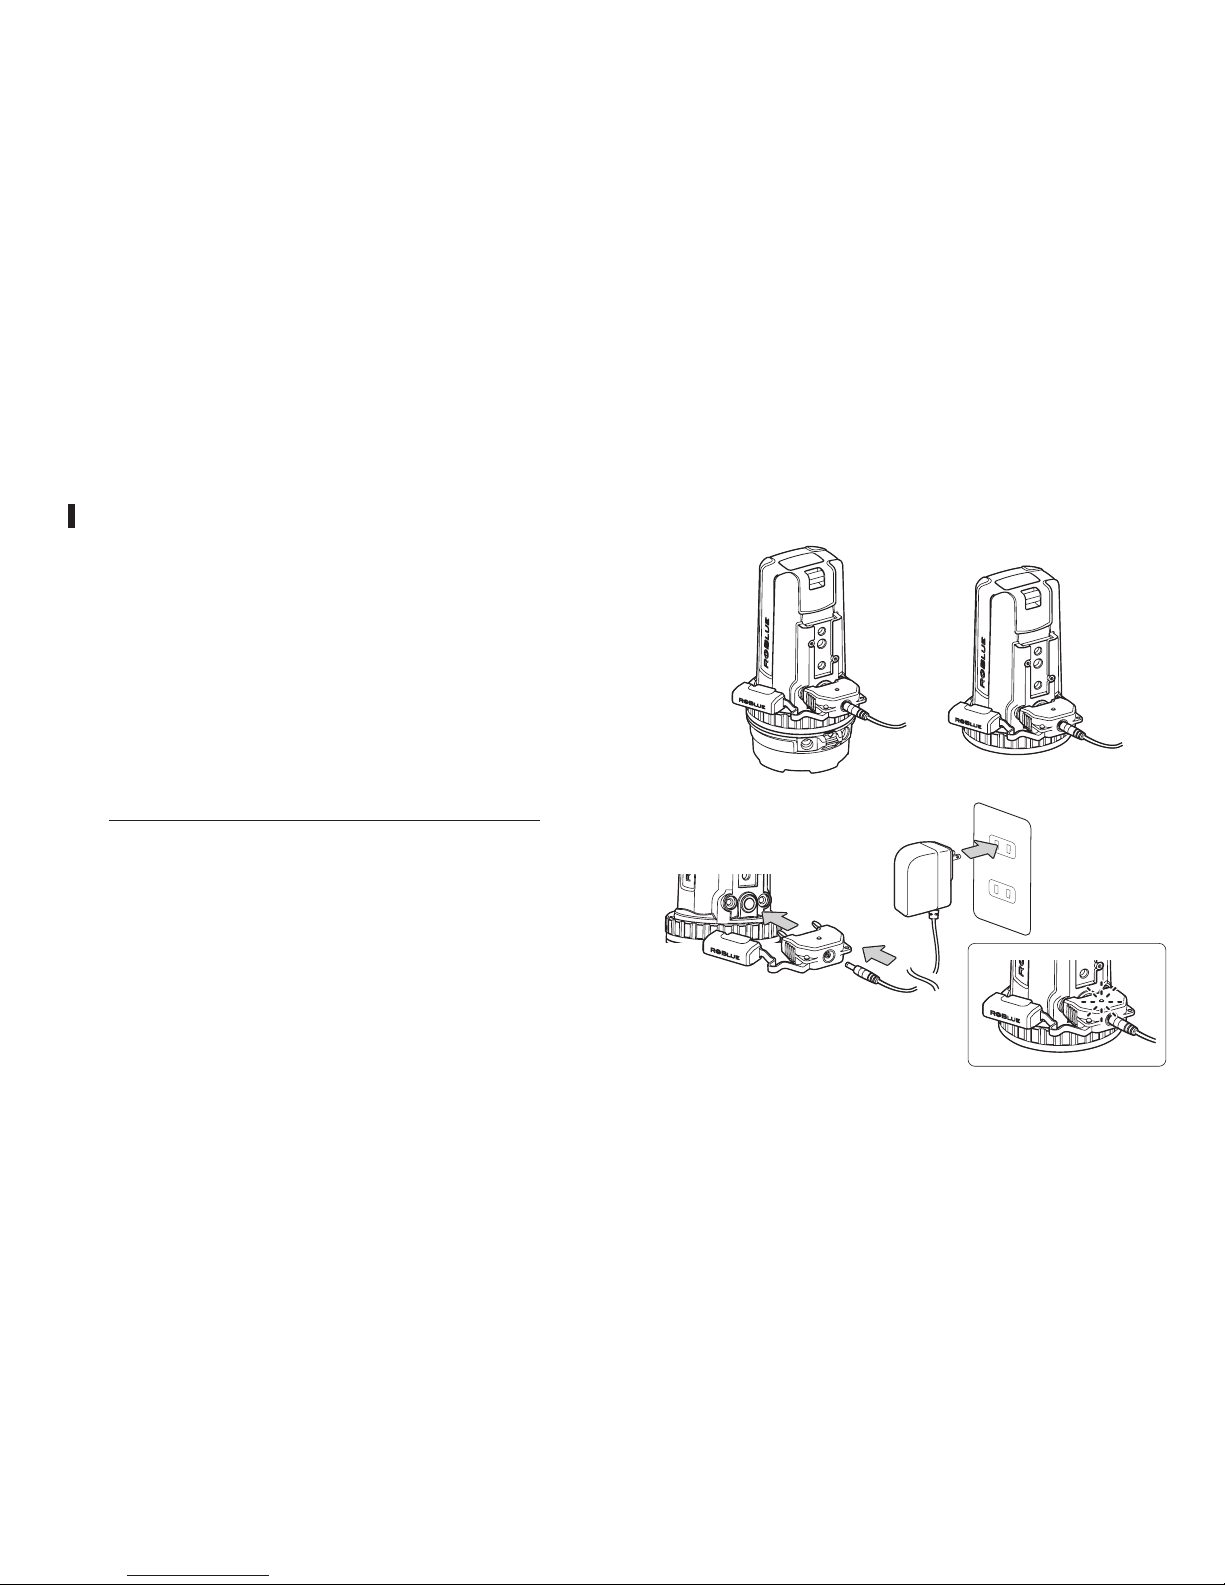
本体を充電する
充電は、各モジュールが接続された状態、およびバッテリーモ
ジュール単体のみの状態いずれの状態でも可能です。
1.AC アダプターと充電プラグを取付けます。
2.充電プラグのキャップを取外し、バッテリーモジュー
ルの充電端子に差し込みます。
※プラグに方向性(+ーの極性)はありません。
3.AC アダプターをコンセントに差し込みます。
4.充電プラグの充電表示ランプが点灯したら充電が開
始されます。
5.充電プラグの充電表示ランプが消灯したら充電完了です。
※満充電まで約 3 時間です。使い切った状態から満充電した
場合の目安です。実際の充電時間や充電回数は電池の使用状
況や環境温度、その他の要因により異なります。
14
①
③
②
④
各モジュールが接続された状態 バッテリーモジュール単体
Page 15

本体の操作方法
本製品は、不用意に点灯しないよう2段階の操作によって電源
が入るように設計されております。
動作は、電源 OFF →電源 ON →調光→電源 OFF の手順とな
ります。
■電源 ON
1.+/UPボタンと−/DOWN ボタンを同時に長押し、インジケー
ターが点滅したら +/UP ボタンを 1 回押してください。
2.インジケーターが点滅から点灯へ変わり、電源 ON の状
態になります。また、その時のインジケーターの色がバッ
テリー残量を示します。
※長押し後の点滅は、その後 +/UP ボタンを押さないと 5 秒
程度で消え、電源 OFF の状態に戻ります。
同時長押し→点滅中に +/UP ボタン押し→電源 ON
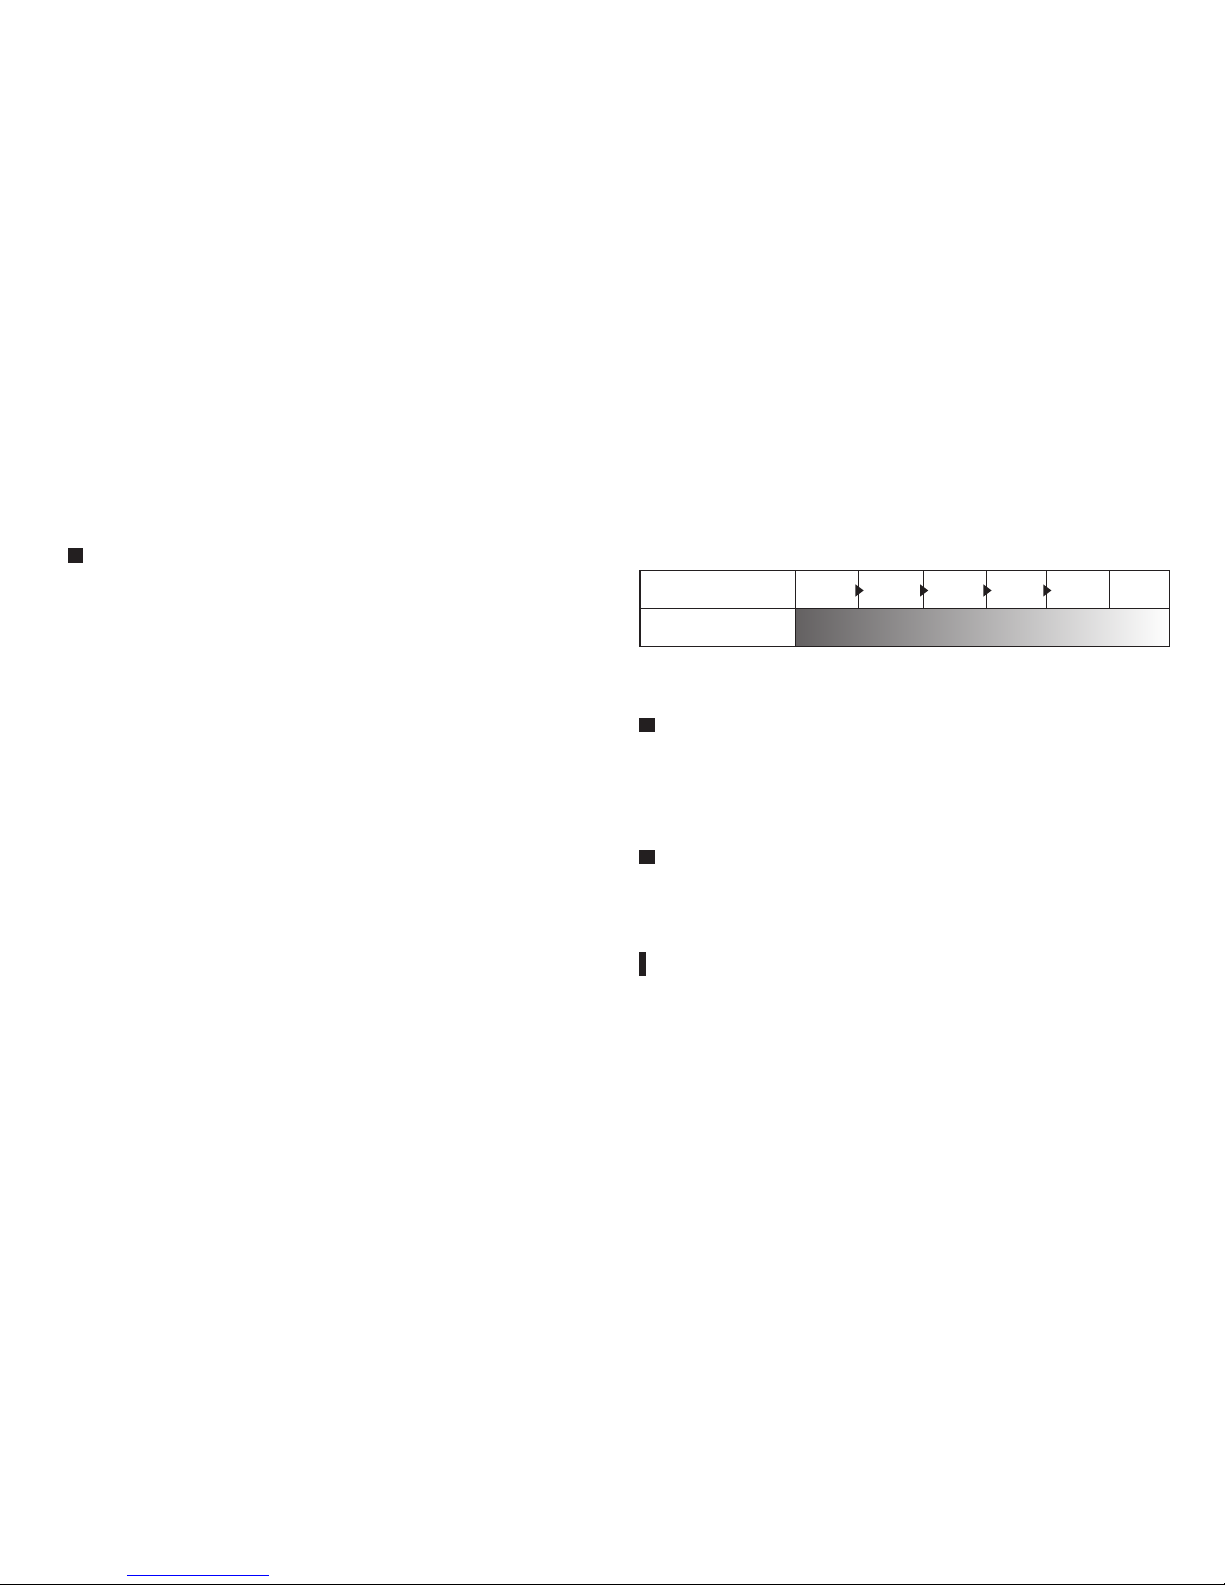
• バッテリー残量の目安
※電源 ONの状態(インジケーターが点灯している状態)では、
ライトが点灯していなくても、少しずつバッテリーを消耗し
ます。よって、長時間使用しないときには電源を OFFにして、
潜水前に電源を ONにすることをお勧めします。
バッテリー残量が 5%以下となった場合、自動的に最小値の
光量に減光し調光は行えなくなります。
バッテリー残量
100%〜 50% ブルー
調光レベルによっても、表示が変
化しますが製品の仕様によるもの
で故障ではありません。
50%〜 20% パープル
20%〜 5% イエロー
5%以下 レッド
• その他の表示
点滅:内部が規定温度より高くなった場合、安全回路が作動し
正常な温度に戻るまで減光し点滅し続けます。
15
Page 16

■調光
4段階調光と無段階調光では、以下のように光量の調整範囲が
異なります。
• +/UP ボタンを 1 回押すごとに光量が上がり、以下の光量
で止まります。
600lm → 1000lm → 1500lm → 2000lm
• −/DOWN ボタンを 1 回押すごとに光量が下がり、消灯で止
まります。
2000lm → 1500lm → 1000lm → 600lm →消灯
• 各ボタンを長押しすると、無段階の調光調整を開始し、指を
離した光量で止まります。
• +/UP ボタン長押し・最大光量(2500lm)
• −/DOWN ボタン長押し・最小光量(400lm)
各光量と連続点灯時間
4段階調光
連続点灯時間
OFF
600lm
310 分
1000lm
160 分
1500lm
95 分
2000lm
60 分
無段階調光
連続点灯時間
400lm
550 分
2500lm
45 分
※点灯時間は充電済 BM3400B を使用時の目安です。
■点滅モード
• 電源 ON の状態で−/DOWN ボタンを1秒間長押しすると点
滅モードになります。点滅モードを止める場合は、−/DOWN
ボタンを押すと電源 ON の状態に戻ります。
■電源 OFF
• +/UP ボタンと−/DOWN ボタンを同時に押すと OFF にな
ります。
アクセサリーについて
別紙、アクセサリーの取扱説明書をご覧ください。
16
Page 17

ご使用後のメンテナンス
• ご使用後は、レンズなどを取外し、ご使用時の状態のまま(各
モジュールが接続された状態)常温の真水に 1 時間以上浸け
て塩分を取り除いてください。
• 真水から取り出した後は、乾いた布などで水分を取り除き、
直射日光の当たらないところで自然乾燥させてください。
(注意)ヘアードライヤーや直射日光などでの乾燥は、製品や O リン
グの劣化や変形の原因となり、故障や浸水の原因となります。
• 長時間使用しない場合は、ライトモジュールとバッテリーモ
ジュールを取外して、バッテリーモジュールに絶縁キャップ
をして保管してください。
• スペアの専用 Oリングや専用シリコングリスは消耗品です。
無くなった場合は、お買い求めください。
• バッテリーモジュールは制御基板を内蔵しているため、保管
状態でも少しずつバッテリーを消費しますが、故障ではあり
ません。ご使用前は再充電することをお勧めします。
17
Page 18

製品仕様
光源 LED
照射角度 100°集光レンズ使用時 60°
色温度 5000K
演色性 Ra80
全光束 •LED 素子 2700lm
•製品出力4 段階調光時最大 2000lm
•無段階調光時最大 2500lm
使用環境 水中 ※陸上で連続点灯すると、高温になり安全装置より
減光または消灯します。
調光 4 段階(600lm/1000lm/1500lm/2000lm)
無段階 400 〜 2500lm
LED 表示 バッテリー残量 / ブルー→パープル→イエロー→レッド
エラー / レッド点滅
連続点灯時間
※点灯時間は充
電済 BM3100G
を使用時の目安
です。
4段階調光時
600lm/ 310 分1000lm/160 分
1500lm/ 95 分2000lm/ 60 分
無段階調光時
400lm/550 分〜 2500lm/45 分
充電方式 ACアダプター + 専用プラグ
電源
充電式リチウムイオンバッテリー 3350mA/7.2V(24Wh)
電池寿命
*1
約 500 回
耐水深 100M IPX8(JIS 保護等級8)
大きさ
最大径 /Max.Ф 64.2mm×123.5mm(突起部を除く)
重量 陸上 420g/ 水中 170g
使用温度範囲 − 5℃〜+ 45℃
保存温度範囲 − 5℃〜+ 45℃
保存湿度範囲 20%〜 60%
材質、処理 耐蝕アルミ合金 / 硬質アルマイト、PC、光学ガラス / 化
学強化ガラス
赤外線受光口
リモートコントロールで調光可能
※別売リモートコントロール使用時
安全規格 CE,FCC,PSE
ライトリングネジ径
M49JIS 規格対応
ボトムプレート / ヘッド
三脚ネジ対応 JIS規格対応
*1
電池寿命とは、充電できる容量がバッテリー容量の 50% 以下に低下した状
態を指します。従いまして、その状態でもバッテリーは使用できます。
18
Page 19

アフターサービス
■内蔵電池の交換について
電池の交換に関しては、弊社ホームページをご覧ください。
http://www.rgblue.jp
■保証内容および修理に関して
1 保証書の「お買上げ日」、「販売店印」を必ずご確認の上、内容をよくお
読みいただき、大切に保管してください。
2 保証期間はお買上げ日より1年間です。
3 修理をお申しつけされる場合
保証期間中:製品に保証書を(本書)を添えて、お買上げの販売店にご
持参ください。保証書に記載された内容に基づき修理いたします。
保 証 期 間 外:
修理が可能な場合は、ご要望により有料で修理いたします。
4 その他 、製品に関するお 問い 合わせ、ご質問などがござ いましたら、弊
社までご連絡ください。
製 造 元 : 株 式 会 社 エ ー オ ー ア イ・ジ ャ パ ン
Tel:03-3984 -2993
受付時間:月〜金10:00〜17:00(土日祝日はお休み)
〒170-0013東京都豊 島区東池 袋1-47-6鈴忠ビル2F
保証規約
1 保証期間内でも次のような場合には有料修理となります。
[1]
ご使用上の誤り、あるいは改造や不当な修理による故障および損傷
[2] お買上げ後の不適切な取扱い(例えば落下)、あるいは輸送、移
動などによる故障および損傷
[3] 火 災・地 震・水 害・落 雷・そ の 他 の 天 災 地 変 、なら び に 公 害・塩
害・ガス害(硫化ガスなど)・異常電圧・指定外の使用電源(電
圧、周波数)・その他の外部要因による故障および損傷
[4] 業務用としての使用、あるいは一般家庭用以外に使用された場合
の故障および損傷
[5] 本 書のご提示 がない場合
[6]本書にお買上げ年月日、お客様名、販売店名の記入がない場合、
あるいは字句を書き換えられた場合
[7]設定の調整、変更、消耗部品の交換
2 本書に記 入されてい るお買 上げ 販売店に修理をご依頼になれない 場合
には、弊社にお問い合わせください。
3 本書は日本国内においてのみ有効です。
4
本書は再発行いたしませんので、紛失しないよう大切に保管してください。
この保 証書は、本書に明 示した期間および条件 のもとにおいて無料修理
をお約 束 す る も の で す。従って、こ の 保 証 書 に よって お 客 様 の 法 律 上 の 権
利を制限するものではありませんので、保証期間が経過した後の修理に
ついてご不明の場合は、お買上げの販売店もしくは弊社にお問い合わせ
ください。
19
Page 20

Product Features
The RGBlue Underwater Lighting System is a light source based
on a new concept specialized for underwater photography.
•Modulation system
1. The light source (Light Module) and power source (Battery
Module) can be connected and disconnected easily thanks
to an original bayonet construction.
2. Single module can be purchased additionally according to
the usage of the system.
•Backup waterproofing mechanism
Each module is given an independent waterproofing structure
*1
to eliminate the risk of water penetration during setting.
*1
Each module is provided with an IPX6-equivalent
waterproofing mechanism withstanding a water depth of 100
meters during lighting (i.e. when the modules are connected).
However, remember that the modules cannot be connected
or disconnected under water.
* IPX6 is a liquid ingress protection standard with which water
projected in jets from any direction shall have no harmful effects.
•Light source optimized for photography
1. A COB (Chip On Board) type LED that emits light from a
single plane is used so the problems observed with multi-
LED type light source, such as multi-shadow phenomenon
*2
and light distribution irregularities, are eliminated.
2. The light source with high color rendering index of Ra80
and color temperature of 5000K is used to reproduce highly
natural colors.
3. Light distribution is 100º, which is wide enough for video
recording.
4. The maximum light intensity is 2500 lm total flux.
5. A special condensing lens (standard accessory) can narrow
the light distribution from 100º to 60º for brighter illumination
of the target.
*2
The multi-shadow phenomenon refers to the shadows
produced when a light with multiple LEDs is used.
•Simple operation
Only a couple of pushbuttons can control the switch ON/OFF,
4-step brightness control and non-step brightness control.
•Various safety mechanisms
Multiple safety circuits*3 and an over-pressure valve is built in.
*3
High-temperature protection, over-charge protection, overdischarge protection, over-current protection and shortcircuiting protection.
20
Page 21

Introduction
· It is inhibited to duplicate the contents of this manual without
permission from RGBlue except for personal use.
· The contents of this manual may be subject to change without
prior notice.
· In case improper use of this product causes damages, RGBlue
will not assume any liabilities against any claim from a third
party.
· RGBlue will not assume any liabilities for the damage incurred
by malfunction of this product or other reasons including
disassembly, repair or modification by a third party other than
the parties designated by RGBlue.
* As this product includes electronic circuitry and lithium ion
battery, never attempt to disassembly or modify it. Otherwise, a
risk of electric shock or injury may result.
* If a liquid or foreign object enters the product, immediately stop
using it, switch it off and contact your dealer or RGBlue.
Table of Contents
Safety Precautions .......................................22
Modules .......................................................24
Nomenclature ...............................................25
Notes on Waterproofing Specifications ..........27
Maintenance before Use ...............................28
Connection/Disconnection Methods ..............30
Battery Charge .............................................32
Operation .....................................................33
Accessories .................................................34
Maintenance after Use ..................................35
Product Specifications ..................................36
After-Sale Servicing ......................................37
Warranty Terms ............................................37
Warranty Card ..............................................40
21
Page 22

Safety precautions
Safety precautions
· To ensure safe and correct use, be sure to read the “Safety
Precautions” before using the product.
· The “Safety Precautions” contain the information critical for your
safety. Be always sure to heed the information given here.
· The following symbols describe the degrees of risk and damage
that may be caused if the information given under each symbol
is not observed.
DANGER
Indicates an imminently hazardous
situation which, if not avoided, could
result in death or serious injury.
WARNING
Indicates a potentially hazardous
situation which, if not avoided, may
result in death or serious injury.
CAUTION
Indicates a potentially hazardous
situation which, if not avoided, may result
in serious injury or equipment damage.
If the product is used improperly without observing the following
information, fire ignition, heat generation, equipment damage or
liquid leak may cause a burn, injury or loss of sight.
DANGER
· Do not disassemble or modify the modules.
· Do not soak a single module in water without connecting it to
the other module.
* The Light Module and Battery Module cannot be connected
or disconnected to each other under water.
· Do not throw the modules in fire or heat them excessively in an
oven.
· Do not use or leave the modules in an area exposed to high
temperatures.
· Do not apply a strong impact to the modules, such as dropping
them. Otherwise, the broken glass or damaged components
may cause an injury.
· Do not place the modules in the reach of children.
WARNING
· Do not project the light toward human eyes.
· Do not short-circuit the charge terminals of the Battery Module
or charge plug with a metallic object such as a pin.
22
Page 23

· Always use the AC adapter in the rated voltage range (100 to
240 V AC).
· Do not let the AC adapter get wet with a liquid or use it while it
is wet.
· Check periodically that the AC adapter, household power outlet
and AC adapter’s connectors are free of dust.
· Do not use the AC adapter cord if it is damaged.
· Insert the plugs all the way into the household power outlet and
AC adapter.
· Do not swing around or throw the modules.
CAUTION
· Do not switch the light on for an extended period (more than 5
min.) overland.
· Do not emit switch the light on when the light source is placed
downward on a floor or desktop.
· Do not use the modules if any irregularity, including abnormal
odor, heat generation, discoloration or deformation, is observed
during use.
· When taking water, do not jump in while holding the modules.
· Check the O-ring when connecting the modules.
· Connect the modules properly.
· When storing the Battery Module alone, be sure to attach the
provided insulation cap.
· When the modules are not to be used for a long period, be sure
to unplug the AC adapter from the power outlet.
23
Page 24

Modules
24
Insulation cap
Light Module LM5K2500V Battery Module BM3400B
* With insulation cap.
This is the power source
incorporating a rechargeable
battery. It is used by connecting
to the Light Module.
This is the LED light source, which
is used by connecting to the
Battery Module.
Page 25
Nomenclature
Light Module LM5K2500V
LED
Reflector
Reinforced glass
Light head
+/UP button
Increases the brightness. Pressing
simultaneously with the -/DOWN
button switches the power ON/OFF.
-/DOWN button
Decreases the
brightness. Pressing
simultaneously with
the +/UP button
switches the power
ON/OFF.
Indicator
Indicates the power ON status,
remaining battery power and an
error.
Lock lever
Used when disconnecting
the Light Module from the
Battery Module.
O-ring
Makes the connection
between the Light
Module and Battery
Module watertight.
Optical communication receiver
Used when the optional remote
control unit is used.
Electrical contact
If this gets wet, wipe moisture
completely away.
Tripod thread
25
Page 26

Nomenclature
Battery Module BM3400B
26
Strap hole
Electrical contact
If this gets wet, wipe
moisture completely away.
If it is short-circuited by
contact with salt water, it
becomes temporarily
unusable by the function of
the safety circuitry.
* For the recovery method,
see “Notes on Waterproofing
Specifications” .
Lock ring
Accessory lock plate
Charge terminal
No directionality (+/polarity) is specified
for charging.
Over-pressure valve
Insulation cap
Page 27

Notes on Waterproofing Specifications
· Each module is provided with an IPX6-equivalent waterproof
construction so that water does not penetrate it even when it
gets wet during connection or disconnection. However, note
that a single module cannot be soaked in water and that the
modules cannot be connected or disconnected underwater.
*
IPX6 is a liquid ingress protection standard with which water
projected in jets from any direction shall have no harmful effects.
· Should the inner side of a module is moistened by water, wipe
the moisture completely away using a lint-free, dry cloth. If it is
moistened by salt water, wipe the salt water completely away using
a cloth moistened with fresh water and then dry it completely.
· If the electrical terminal of the Battery Module is short-circuited by
contact with salt water, it becomes temporarily unusable by the
function of the internal safety circuitry. If this happens, wipe it with
the method described above, dry it and then recharge the battery
by means of the AC adapter and charge plug to recover power.
· When the two modules are connected (ready for underwater
use), the withstanding water depth is 100 meters. The
modules cannot be used in a depth over 100 meters. However,
remember that this waterproofing is retained only when the user
performs optimum maintenance.
* The dedicated charge plug and AC adapter are not
waterproof. Be careful not to moisten them.
Withstanding water depth: 100 meters
27
Page 28
Maintenance before Use
The 100-meter waterproofing of this product is retained by the
close contact between the O-ring of the Light Module, its O-ring
groove and the O-ring applying surface of the Battery Module.
Including the first use after purchase, be sure to perform the
following maintenance before using this product underwater.
· The O-ring is a consumable part, which should be replaced at
least every year. If any irregularity such as the one mentioned on
the next page is found, be sure to replace it with a brand-new
O-ring.
· Always use the specified silicon grease.
O-ring groove
O-ring applying surface
28
Page 29

1. Remove the O-ring using the O-ring remover.
2. Check that the O-ring is free of dirt, foreign object, crack or
damage.
* If any irregularity is found, replace it with a brand-new
O-ring.
3. Clean the O-ring groove with a cotton swab, etc.
4. Apply special grease on the O-ring.
5. Attach the O-ring.
* Be careful not to damage the O-ring during attaching.
6. Check that the O-ring applying surface of the Battery Module
is free of foreign object and connect the modules.
29
Page 30
Connection/Disconnection Methods
The following steps explain how to connect and disconnect the
Light Module and Battery Module.
Connection
Ensure that the O-ring is attached to the Light Module.
1. Remove the insulation cap from the Battery Module.
* Always attach the insulation cap to the Battery Module
when storing it without connecting to the Light Module.
2. After aligning the OPEN index ◎with the index ▲ on
the lock ring and the OPEN index ◎ with the indicator
on the Light Module, fit the Light Module all the way in.
* There are three connection directions, making possible
connection from any one of them.
3. Turn the lock ring so that the CLOSE index ◯ is aligned
with ▲. When a “click” sound is heard, the ring is locked in
position.
30
Page 31

Disconnection
1. While pulling the Light Module’s lock lever, turn the lock ring
on the Battery Module until the OPEN index ◎ is aligned
with ▲.
2. After the lock ring has been turned until the OPEN marking,
hold the product so that the Light Module faces down and
turn the Battery Module counterclockwise to remove.
31
Page 32
Battery Charge
The battery of this product can be charged either when the two
modules are connected or when the Battery Module is standalone
without the Light Module.
1. Prepare the AC adapter with charge plug.
2. Remove the cap from the charge plug and insert the plug
into the charge terminal of the Battery Module.
* No directionality (+/- polarity) is specified for the plug.
3. Plug the AC adapter into a power outlet.
4. The charge indicator on the charge plug lights to indicate
the start of charging.
5. Charging is complete when the charge indicator on the
charge plug extinguishes.
* It takes about three hours until full charge. Note that this is
only for reference when the battery is charged from a fully
depleted state to a fully charged state. The actual charging
time and battery life depends on many factors such as
usage conditions and temperature.
①
③
②
④
Two modules are connected Battery Module alone
32
Page 33

Operation
To prevent unintended lighting, this product is designed to turn
on in two steps of operations.
The operation follows the sequence of Power OFF → Power ON
→
Brightness control → Power OFF.
Power ON
1. Press and hold the +/UP and -/DOWN buttons
simultaneously. When the indicator starts to flash, press the
+/UP button shortly once.
2. The indicator stops flashing and starts steady lighting,
indicating that the power is on. The color of the indicator at
this time indicates the remaining battery power.
* If the +/UP button is not pressed, the flashing started by
simultaneous holding of the buttons finished in about five
seconds, and the product returns to the power off status.
Simultaneous holding → Pressing +/UP during flashing → Power ON
•Remaining battery power indication
* When power is on (when the indicator light is steady),
battery power is used even when the light is not on. It is
recommended to switch the power off when the light is not
used for an extended period of time and switch the power on
right before diving.
When the remaining battery power drops below 5%, the light
is automatically dimmed to the minimum intensity and the
brightness control is disabled.
Remaining battery power indication
100% - 50% Blue
The indication varies depending
on the light intensity level. This is
because of the product specifications
and not a malfunction.
50% - 20% Purple
20% - 5% Yellow
<5% Red
•Other indications
Flashing: When the internal temperature rises above the
specified level, safety circuitry is activated and the
indicator is dimmed and continues flashing until the
temperature returns to normal.
33
Page 34
Brightness control
The brightness control ranges of the 4-step brightness control
and non-step brightness control are different as described below.
· Each press of the +/UP button increases the brightness by one
step. The increase stops at the following light intensity.
600 lm→ 1000 lm → 1500 lm→2000 lm.
· Each press of the -/DOWN button decreases the brightness by
one step. The decrease stops when the light is extinguished.
2000 lm →1500 lm →1000 lm →600 lm →Extinguished.
· Pressing and holding a button starts non-step brightness
control. The light intensity at the moment the button is released
is set as the light brightness.
· Maximum light intensity reached by pressing/holding the +/UP
button: 2500 lm.
· Minimum light intensity reached by pressing/holding the -/
DOWN button: 400 lm.
Light intensity levels and continuous lighting period
4-step brightness control
continuous lighting period
OFF
600 lm
310 min.
1000 lm
160 min.
1500 lm
95 min.
2000 lm
60 min.
Non-step brightness control
continuous lighting period
400 lm
550 min.
2500 lm
45 min.
* The lighting periods are standard values when the fully-charged
BM3400B is used.
Flash mode
· When the –/DOWN button is kept pressed for more than 1
second with the power ON, the flash mode will be engaged. To
disengage the flash mode, press the –/DOWN button again; the
power ON condition will be restored.
Power OFF
· Press the +/UP and –DOWN buttons simultaneously to switch
power off.
Accessories
Please refer to the instructions for accessories in a separate
manual.
34
Page 35

Maintenance after Use
· After finishing the use of the product, remove the lens, etc.
(without disconnecting the modules) and soak the product in
fresh water under normal temperature for more than one hour to
eliminate the salt content.
· After taking the product out of the fresh water, wipe with a dry
cloth to eliminate moisture and let the product dry naturally in a
place not exposed to direct sunlight.
(NOTE) Do not dry the product with a hair dryer or direct
sunlight, as this may cause degradation or deformation
of the product and O-ring, which may eventually lead to
a failure or water penetration.
· When the product is not to be used for a long period,
disconnect the Light Module and Battery Module, and attach
the insulation cap to the Battery Module before storing the two
modules.
· The special O-ring and special silicon grease are consumable
articles. If you run out of the spares, please purchase them.
· The battery gradually depletes even in a storage condition since
the Battery Module incorporates a control PCB. Note that it is not
malfunction. It is recommended to recharge the battery before use.
35
Page 36

Product Specifications
Light source LED
Irradiation angle
100º, 60º when a condensing lens is used
Color temperature 5000K
Color rendering index Ra80
Total flux · LED: 2700 lm
· Product output: Max. 2000 lm with 4-step
brightness control.
· Max. 2500 lm with non-step brightness control.
Operating environment
Underwater. * If lit continuously overland, the
product temperature increases so the safety
circuitry dims or extinguishes the light.
Brightness control 4-step: 600 lm, 1000 lm, 1500 lm, 2000lm.
Non-step: 400 to 2500 lm.
LED indication Remaining battery power / Blue → Purple →
Yellow → Red and Error / Red flashing.
Continuous lighting
period
* Lighting periods
are standard values
when the fully-charged
BM3100G is used.
4-step brightness control:
600 lm/310 min., 1000 lm/160 min.,
1500 lm/ 95 min., 2000 lm/ 60 min.
Non-step brightness control:
400 lm/550 min. to 2500 lm/45 min.
Charge method AC adapter + Special plug
Power supply
Rechargeable lithium ion battery, 3350 mA / 7.2 V (24 Wh).
Battery life*1 Approx. 500 times
Withstanding water depth
100 meters, IPX8 (JIS protection class 8)
Dimensions
Max. dia.
Φ
64.2 mm x 123.5 mm (excluding
projections)
Weight 420 g overland, 170 g underwater
Operating temperatures
-5ºC to +45ºC (23ºF to 113ºF)
Storage temperatures -5ºC to +45ºC (23ºF to 113ºF)
Storage humidity 20% to 60%
Materials, treatment
Corrosion-resistant aluminum alloy / hard anodized
aluminum, PC, optical glass/ chemically strengthened glass.
IR receiver Brightness control from remote control. * When
the optional remote control unit is used.
Safety standards CE, FCC, PSE
Light ring thread diameter
M49, JIS standard compliant.
Bottom plate/head Tripod screw compatible, JIS standard compliant.
*1
The battery life is regarded to be expired when the rechargeable
capacity drops below 50% of the original battery capacity.
Consequently, the battery is still usable after the battery life is expired.
36
Page 37

After-Sale Servicing
Replacement of built-in battery
For the replacement of the battery built into the Battery Module,
please visit our website below.
http://www.rgblue.jp
Warranty and After-Sale Servicing
1 Confirm that the “Date of purchase” and “Signature of
dealer” are entered in the Warranty Card on the back cover
of this manual, read its terms and conditions thoroughly, and
retain it carefully.
2 The warranty period is one (1) year from the date of purchase.
3 When the instrument needs servicing:
Before expiration of the warranty period: Bring the
instrument to your dealer together with the Warranty Card
(this manual). We will service the instrument according to the
terms and conditions of the Warranty Card.
After expiration of the warranty period: We will service the
instrument for fees provided that the servicing is possible.
4 If you have any questions, please contact
AOI Japan Co., Ltd
.
AOI Japan Co., Ltd.
Tel.: +81 3 3984 2993
Reception hours: 10:00–17:00, Monday–Friday, (Closed: Saturday,
Sunday and national holidays)
2F Suzuchu Bldg., 1-47-6, Higashi-ikebukuro, Toshima-ku, Tokyo,
170-0013 Japan
Warranty terms
1 Even if the instrument fails before the expiration of the warranty period,
there will be a charge for servicing in the following cases.
[1]
Malfunction or damage due to misuse, modification or improper
repair.
[2]
Malfunction or damage due to improper handling (e.g. dropping) after
purchase or caused during transportation or moving.
[3]
Malfunction or damage due to a fire, earthquake, flood, lightning,
other Act of God, deterioration of environment, salt damage, gas
damage (by sulfide gas, etc.), abnormal voltage, use of non-specified
power supply (voltage or frequency) or other extrinsic factors.
[4]
Malfunction or damage during use for business purpose or a purpose
other than the general household use.
[5]
Servicing request without submitting the Warranty Card.
[6]
Submission of Warranty Card in which the date of purchase,
customer name and/or dealer name are not entered or in which
these entries are altered.
[7]
Adjustment/modification of settings, replacement of consumable
parts.
2 If you are unable to contact the dealer the name of which is entered in the
Warranty Card, please contact AOI Japan Co., Ltd.
3 This Warranty is effective only in Japan.
4 This Warranty Card will not be re-issued. Please retain it carefully so as
not to lose it.
This Warranty Card undertakes free servicing under the terms and
conditions prescribed explicitly in it. This Warranty Card therefore does not
limit the legal rights of the users. If you have any inquiry including that on
the servicing after expiration of the warranty period, please contact your
dealer or AOI Japan Co., Ltd.
37
Page 38

Memo
38
Page 39

39
Page 40
RGBlue
保証書
/ WARRANTY CARD
持込修理
/ Bring-in servicing
品番
/ Model
LM5K2500V/BM3400B
保証期間
/ Period
本体 1年間
/ Main body : One year
※お買上げ日
/ *Date of purchase
年 月 日
/ Year: /Month: /Day:
※お客 様
*Customer
お名前
/ Name
ご住所
/ Address
電 話
/ Phone
( ) −
※販売 店
*Dealer
住 所・店 名
/ Address Name
電 話
/ Phone
( ) −
保証書
40
お買上げ日から上記保証期間中に、取扱説明書、本体表示などの注
意書きに従った正常な使用状態で故障した場合には、本書記載内容
にもとづき無料修理いたします。製品と本保証書をご持参のうえ、
お買上げの販売店に修理をご依頼ください。
※印欄に記入のない 場合 は無 効となります。必ずご確認ください。
株式会社エーオーアイ・ジャパン
Tel:03-3984-2993
受付時間:月~金 10:00 ~ 17:0 0( 土 日 祝 日 は お 休 み)
〒 170-0013 東京都豊島区東池袋 1-47-6 鈴忠ビル 2F
If the instrument fails to function properly under normal and proper usage in compliance with
the instructions in the User Manual or on the instrument within one (1) year from the date of
purchase, we will service the instrument free of charge in accordance with the terms and
conditions of this Warranty Card. Please request servicing from your dealer by submitting the
Warranty Card together with the instrument.
The Warranty Card is invalid if the information marked * is not entered. Be sure to confirm the
presence of these entries immediately after purchase.
AOI Japan Co., Ltd.
Tel.:
+81 3 3984 2993
Reception hours: 10:00–17:00, Monday–Friday, (Closed: Saturday, Sunday and national holidays)
2F Suzuchu Bldg., 1-47-6, Higashi-ikebukuro, Toshima-ku, Tokyo, 170-0013 Japan
Printed in ChinaSL016P005-00
40
見本
 Loading...