

RF Technology Safe Place Smart Sense, Safe Place Standard Infant, Safe Place Patient User Manual

Safe Place
Transmitters
User Guide

Compliance
© 2018 RF Technologies, Inc. All specifications subject to change without notice.
® and ™ indicate trademarks owned by RF Technologies, Inc.
This device complies with Part 15 of the FCC rules.
Operation is subject to the following two conditions:
• This device may not cause harmful interference.
• This device must accept any interference
received, including interference that may cause
undesired operation.
Changes or modifications not expressly approved by
the party responsible for compliance can void the user’s
authority to operate the equipment.
Cet appareil est conforme avec Industrie Canada
exempt de licence Rss standard(s). Son
fonctionnement est soumis aux deux conditions
suivantes :
• cet appareil ne peut causer d'interférences, et
• cet appareil doit accepter toute interférence, y
compris des interférences qui peuvent provoquer
un fonctionnement indésirable du périphérique
Les changements ou modififications à cet appareil sans
expressément approuvée par la partie responsable de
conformité pourraient annuler l'autorité de l'utilisateur
de faire fonctionner cet équipement.
All Rights Reserved. No Part of this work may be reproduced or copied in any form or by any
means without written permission from RF Technologies, Inc.

Contents
CONTENTS
CONTENTS ................................................................................. 1
WARNINGS AND CAUTIONS .................................................... 3
Warnings ............................................................................... 3
Cautions ................................................................................ 5
PREFACE .................................................................................... 7
Overview ............................................................................... 7
Intended Audience ................................................................ 8
Contact Information ............................................................... 8
Technical Support ........................................................... 8
Customer Care ............................................................... 9
Sales ............................................................................... 9
Additional Detailed Documents ............................................. 9
Product Warranty .................................................................. 9
GENERAL INFORMATION ....................................................... 11
Introduction.......................................................................... 11
Transmitters ........................................................................ 11
Smart Sense ................................................................. 12
Standard Infant ............................................................. 12
Patient ........................................................................... 12
Warranty Expiration Date .................................................... 13
Banding ............................................................................... 13
Smart Sense ................................................................. 14
Standard Infant ............................................................. 18
Patient (Locking) ........................................................... 19
TESTING AND CARE ............................................................... 23
Transmitter Testing ............................................................. 23
Visual Inspection........................................................... 23
Operation ...................................................................... 24
Safe Place Transmitters User Guide Page 1 of 36
0510-1121-G

Contents
Signal Strength ............................................................. 24
Weekly Testing ............................................................. 25
Transmitter Cleaning and Care ........................................... 25
Approved Cleaners ....................................................... 28
Non-Approved Cleaners ............................................... 28
Replacing the Clamp ........................................................... 29
SPECIFICATIONS ..................................................................... 31
Smart Sense Transmitter .................................................... 31
Standard Infant Transmitter ................................................ 32
Patient (Locking) Transmitter .............................................. 33
Banding ............................................................................... 34
REVISION HISTORY................................................................. 35
Page 2 of 36 Safe Place Transmitters User Guide
0510-1121-G

Warnings and Cautions
Warnings
WARNINGS AND
CAUTIONS
It is important for your facility to implement and enforce the
following WARNINGS and CAUTIONS in order to keep all
equipment functioning properly. Disregarding the information and
instructions in this document is considered abnormal use and may
result in injury or system failure.
ACCESSORIES (SUPPLIES)—To ensure resident
safety and proper operation of equipment, use only parts
and accessories manufactured or recommended by RF
Technologies, Inc. Parts and accessories not
manufactured or recommended by RF Technologies,
Inc. may not meet the requirements of the applicable
safety and performance standards.
Failure to use the components and supplies
specified by RF Technologies, Inc. may result in
equipment and/or system failure.
Safe Place Transmitters User Guide Page 3 of 36
0510-1121-G
SYSTEM WIRING—All permanent supply connections
must be done in accordance with National Electric Code,
NFPA 70.
INSTALLATION AND CONFIGURATION—It is the
responsibility of the facility to follow the installation
instructions carefully, as outlined in the applicable
system guides, and to use the components and supplies
specified by RF Technologies, Inc. for all installations.
Failure to use the components and supplies
specified by RF Technologies, Inc. may result in
equipment and/or system failure.

Warnings and Cautions
STATIC DISCHARGE—Do not touch the conductor
portion of any conductor or port. Damage to the device
may result.
EXPLOSION HAZARD—These devices should not be
used in the presence of flammable gas mixtures. It
should also not be used in oxygen enriched
atmospheres.
STRANGULATIONS AND TRIPPING HAZARD—Due to
the possibility of strangulation, all cables and cords
should be routed away from the resident’s throat. Cables
and cords must be routed in a way to prevent tripping
hazards.
INSTRUCTIONS FOR SET UP AND USE—It is the
responsibility of the facility to follow the instructions for
set up and use carefully, as outlined in this manual, and
to use the components and supplies specified by RF
Technologies, Inc. for set up and use. Do not attempt to
use extension cords or other equipment not supplied by
RF Technologies, Inc.
Failure to use the components and supplies
specified by RF Technologies, Inc. may result in
equipment and/or system failure.
SYSTEM INSPECTION—It is the responsibility of the
facility to establish and facilitate a regular inspection
schedule for your system. RF Technologies, Inc.
recommends quarterly inspections of your system for
safety and performance by a qualified RF Technologies,
Inc. representative.
To arrange for a quarterly inspection by RF
Technologies, Inc., call our Technical Support
Department at (800)-669-9946 or (262) 790-1771.
Failure to provide regular inspection of these
products may result in equipment and/or system
failure.
Page 4 of 36 Safe Place Transmitters User Guide
0510-1121-G

Warnings and Cautions
Cautions
MR UNSAFE
SYSTEM MAINTENANCE AND TESTING—It is the
responsibility of the facility to establish and facilitate a
regular maintenance schedule for your system, as
outlined in the applicable system guides. This includes
regular inspection, testing, and cleaning. RF
Technologies, Inc. recommends monthly maintenance
and testing of your system. It is also recommended that
your facility keep records of maintenance and test
completions.
Failure to provide regular maintenance and testing
of these products may result in equipment and/or
system failure.
USER TRAINING—Only users who have received
adequate training on the use of the system, as outlined
in this manual, should use the system. It is the
responsibility of the facility to ensure all users have been
trained.
Failure to adequately train employees may cause
system failure due to user error. In addition,
incorrect use of the equipment may also result in
system failure.
All RF Technologies transmitters, pendants and banding
material “PRODUCT” have been determined to be MR
Unsafe as defined by ASTM F 2503-05. Use of
“PRODUCT” in a Magnetic Resonance Imaging system
will cause injury to residents and staff, MR system
malfunction or “PRODUCT” malfunction. Do not bring
“PRODUCT” into the MR system area and follow your
facilities policies to classify and label “PRODUCT” as
MR Unsafe.
Safe Place Transmitters User Guide Page 5 of 36
0510-1121-G
DISPOS AL—At the end of their service life the products
described in this manual, as well as accessories (i.e.
lithium batteries, banding material, disposable pads,
etc.), must be disposed of in compliance with all
applicable federal, state and local guidelines regulating
the disposal of products containing potential
environmental contaminants. Dispose of the packaging
material by observing the applicable waste control
regulations

Warnings and Cautions
RESIDENT GENERATED ALARMS—Do not rely
exclusively on resident generated alarms for resident
care and safety. The alarm function of equipment in the
possession of residents must be verified periodically and
regular resident surveillance is recommended.
RESIDENT MONITORING—The most reliable method
of resident monitoring combines close personal
surveillance with correct operation of monitoring
equipment. It is the responsibility of the facility to
periodically check on residents in possession of RF
Technologies, Inc.'s equipment (i.e. Pendants, Pull
Cords, Control Units) to mitigate risk of inappropriate use
of equipment or strangulation and stumbling hazards
from cables and cords.
PRODUCT WARRANTIES—Failure to follow the
Warnings and Cautions in this guide voids any and all
Product Warranties.
WORN OR DAMAGED PARTS—If the devices or
cables are worn or damaged, you must have the product
serviced. For more information, see the section entitled
“Service and Return.”
Page 6 of 36 Safe Place Transmitters User Guide
0510-1121-G

Preface
Overview
PREFACE
This guide provides detailed instructions
about using the SAFE PLACE
as well as specific requirements.
The SAFE PLACE transmitters are
components of the 9450 System which
monitors doors, elevators, hallways, and
stairwells to assist staff in monitoring patients
in a facility.
The various transmitters and devices of the
system alerts staff if a transmitter’s banding
material is tampered with, cut, or opened
without authorization (referred to as Cut Band
for Infant and Emergency Department
systems only), or if monitored devices in the
system are not functioning properly. An alarm
also sounds if a transmitter is detected in an
Exit Alarm Zone. If the system fails to detect
a transmitter within its monitored area, a No
Signal/Check Transmitter alarm is issued.
Depending upon which equipment you have
installed, the 9450 System can automatically
lock doors and deactivate elevators.
In addition, if the system in your facility
includes computers, an alarm also sounds at
a Central Server and its network of Client
computers. The computer software will
identify which patient sounded the alarm and
the exit where the alarm occurred.
®
transmitters
Safe Place Transmitters User Guide Page 7 of 36
0510-1121-G

Preface
Intended
Contact
Technical
Audience
WARNING: The 9450 System is designed
and intended to work in conjunction with a
facility’s overall patient security program,
including reasonable operating policies and
procedures. The 9450 System, by itself,
cannot prevent abductions or the elopement
of patients.
The SAFE PLACE Transmitters User Guide
is intended for caregivers who use the Safe
Place transmitters. It includes detailed
information about banding, care and
cleaning, testing the transmitters, alarms and
transmitter specifications.
This guide should only be used by persons
who have read the Software User Guide and
received training on the use of the System. It
is not intended as a substitute for reading the
Software User Guide. Always refer to the
Software User Guide for complete
instructions and warnings.
Information
Page 8 of 36 Safe Place Transmitters User Guide
Support
For more information about RF Technologies,
Inc. products, go to www.rft.com
For technical support, contact the Technical
Support Team at:
(800) 669-9946, option 5 or (262) 790-1771
tech@rft.com
.
0510-1121-G

Customer
Care
Sales
Additional
Product
Preface
For questions on part replacement or for
ordering new parts, contact the Customer
Care Team at:
(800) 669-9946, option 2
Detailed
Documents
Warranty
customercare@rft.com
For questions regarding system add-ons,
contact your Sales Manager.
Documentation for the 9450 System is
available in Portable Document Format
(PDF) on the 9450 System Documentation
CD-ROM. Please contact your RF
Technologies sales representative for
replacement CD ROMs.
Product Warranty information can be found
on the system’s CD-ROM or with your
original system proposal and invoice.
Safe Place Transmitters User Guide Page 9 of 36
0510-1121-G

Preface
This page intentionally left blank.
Page 10 of 36 Safe Place Transmitters User Guide
0510-1121-G

General Information
Introduction
Transmitters
GENERAL INFORMATION
This chapter provides general information
about the transmitters. It includes
information on the transmitters, printed
warranty dates, banding the transmitters,
required transmitter testing, replacing the
clamp on a transmitter, and care and
cleaning.
The transmitters are lightweight and
compact. They can be left on the patient
during bathing but prolonged exposure to
wet conditions and complete submersion
should be avoided.
SUBMERSION—Prolonged submersion may
result in equipment and/or system failure and
voids any and all Product Warranties.
Safe Place Transmitters User Guide Page 11 of 36
0510-1121-G
When activated, a transmitter sends a signal
that is received by Exit Alarm Receivers and
Alarming Band Receivers. If a patient
wearing a transmitter is detected in an Exit
Alarm Zone and the door is open, an alarm
sounds at the exit as well as at a Central
Server and its network of Client computers.
RADIO FREQUENCY: The radio frequency
(RF) characteristics of certain metal crib carts
may interfere or block the Infant transmitter’s
signal during transport, preventing detection
by the system’s Exit Receiver.

General Information
Smart Sense
Standard
Patient
Infant
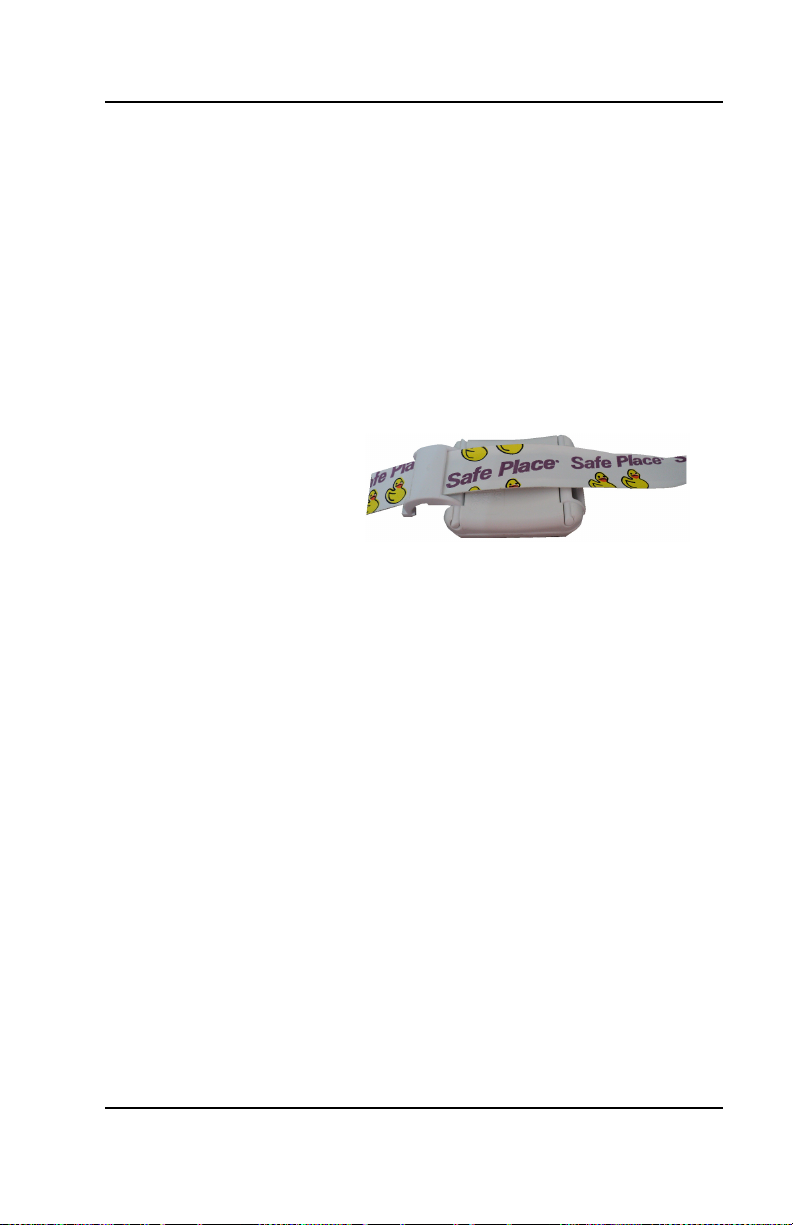
There are three types of Safe Place
transmitters:
Smart Sense Standard Infant Patient (locking)
The Smart Sense transmitter is worn on an
infant’s ankle. It senses when the
transmitter is loose or no longer in contact
with the infant.
Like Smart Sense, the Standard Infant
transmitter is worn on the infant’s ankle and
provides cut-band protection.
Page 12 of 36 Safe Place Transmitters User Guide
The Patient (locking) transmitter is worn on
the wrist or ankle and provides cut-band
protection, but requires a key to open and
lock. It is ideal for older pediatric to adult
patients who may be prone to opening
clasps.
0510-1121-G

Warranty
Expiration
Banding
Date
General Information
Each transmitter is stamped with a warranty
expiration date. This date indicates the date
that RF Technologies’ warranty on that
transmitter expires. If the warranty period
has expired, discard the transmitter
immediately.
Smart Sense
Standard Infant
WARNING: Using a transmitter beyond the
printed expiration date can result in system
failure, elopement, and/or abduction.
NOTE: All banding material types must not
remain on a patient for longer than 72 hrs (3
days). If the material is kept on longer than
this specified period of time, you may
receive false alarms from that transmitter.
CAUTION: You must test all transmitters
prior to use to verify proper operation. This
includes every time that the band is
replaced. Failure to test the transmitters
before use can result in system failure,
abduction, and/or an elopement. In addition,
failure to test transmitters voids the RF
Technologies Product Warranty.
Patient Transmitter
Safe Place Transmitters User Guide Page 13 of 36
0510-1121-G
General Information
Smart Sense
The Smart Sense technology combines the
Smart Sense transmitter and Smart Sense
banding material to give you the capability
to recognize if a transmitter has been
removed from an infant or if it has been
tampered with or is loose.
The following are the measurements for
tamper detection (referred to as Band Off for
Infant systems only):
Resistance—banding material no
longer stretching with infant's movement
Capacitance—change in contact
between transmitter and infant
Depending on your facility, one or two
measures for tamper detection can be
configured for activation. Refer to Configure
Units in the applicable Series Software
Administrator Guide.
Page 14 of 36 Safe Place Transmitters User Guide
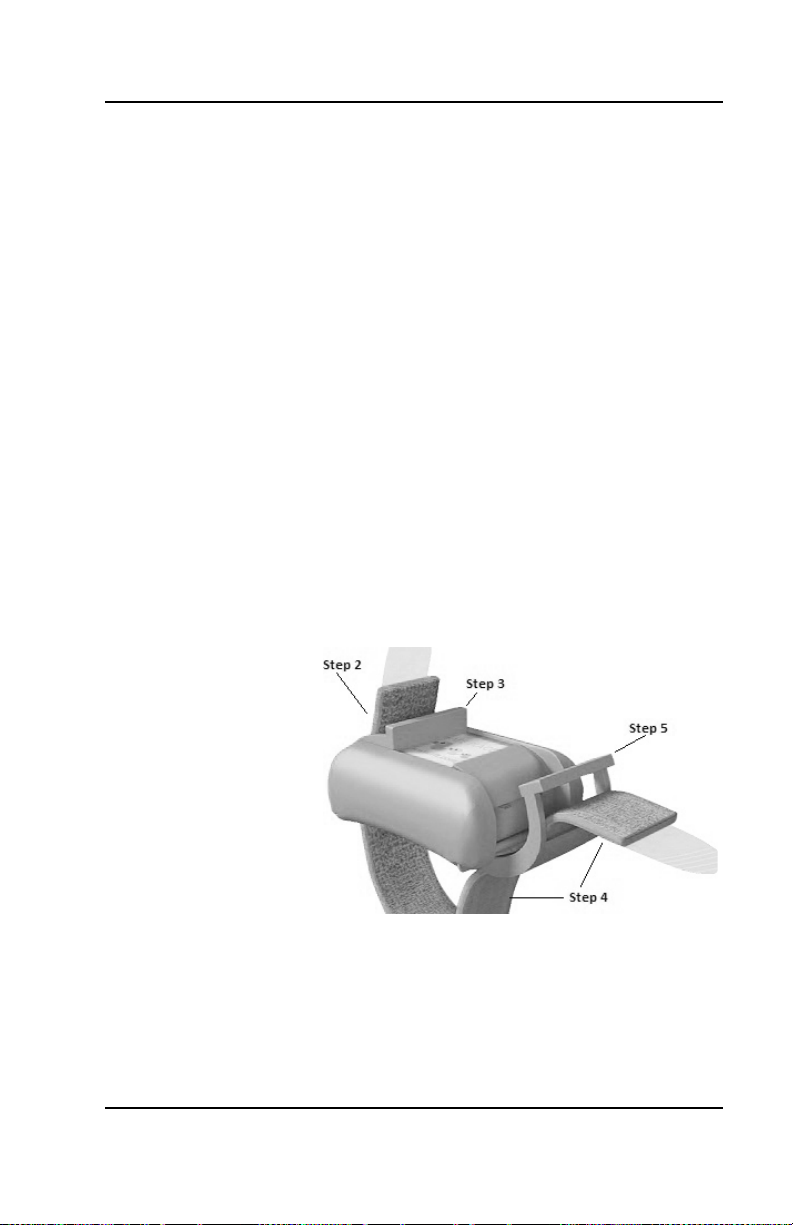
To band the Smart Sense transmitter:
1. Remove the Smart Sense banding
material (with the plastic guide tabs still
attached) from the plastic backing.
0510-1121-G

General Information
2. With the yellow-side of the banding
3. Pull the tab until it clears the clamp and
WARNING: Only Smart Sense banding
material can be used to fasten Smart Sense
transmitters. Use of any other banding
material with the Smart Sense transmitters
voids the RF Technologies' Product
Warranty and could result in system failure.
material facing outwards, use the plastic
guide tab to thread the banding material
from the bottom slot out through the top
slot on the first clamp.
CAUTION: Do not thread both sides of the
banding material through the clamps until
you are ready to secure the transmitter to
the infant. Pre-threading may allow the
transmitter to auto-enroll and alarm.
push the clamp lever down until it snaps
shut.
4. Place the transmitter with banding
material around the infant’s ankle and
thread the banding material through the
second transmitter clamp slot.
CAUTION: Ensure transmitter is banded
properly. It should fit snugly against the skin
without an air gap between the transmitter
and skin, yet allow the band and transmitter
to be turned on the ankle. Over-tightening
the band will not reduce the number of
alarms and could cause patient injury.
Safe Place Transmitters User Guide Page 15 of 36
0510-1121-G
General Information
5. Close the second clamp. The transmitter
7. Use safety scissors to cut off the excess
becomes active one minute after the
clamps are snapped into place. The 60
second grace period allows the
transmitter to be re-opened once the
transmitter’s second clamp has been
secured.
6. Remove the plastic guide tabs and
discard.
banding material. Try not to cut bands
too short to allow room to adjust in the
future.
When it is time for an infant to leave your
facility, he/she must be discharged from the
software (refer to the applicable Series User
Guide).
To discharge the Smart Sense transmitter:
1. Assure that clamps are firmly closed on
both sides with banding material in
place.
2. Check census screen to confirm that the
transmitter to be discharged is
communicating with the system
(indicated by Monitored displayed in
transmitter Status column).
Page 16 of 36 Safe Place Transmitters User Guide
0510-1121-G

General Information
3. Tend to and clear any alarms displayed
6. Discard the used banding material (refer
on the screen for the transmitter being
discharged.
4. Request a discharge function for the
transmitter and complete the action
within the allotted time specified in the
software by your facility.
5. Open the Smart Sense transmitter
clamps to remove the banding material.
CAUTION: Do not slip the banding material
off the infant’s extremity; doing so may
result in a Band Off alarm.
CAUTION: Do not leave the banding
material in the Smart Sense transmitter
clamps after discharge; doing so may result
in the transmitter re-enrolling.
to the Disposal caution in the Important
Warnings section of this guide).
7. Finally, the transmitter must be
disinfected in order to be ready to be
used again.
Safe Place Transmitters User Guide Page 17 of 36
0510-1121-G
General Information
Standard
Infant
To band a Standard Infant transmitter:
1. Cut off 6-8” of the banding material from
the roll.
2. Open the clamps of the transmitter by
gently pulling them outward, one clamp
at a time, from the top of the transmitter.
3. Thread with duck-side of banding
material up.
4. Advance the banding material from the
bottom slot out through the top slot on
the clamp.
5. Secure only one-side of the transmitter.
6. Place the transmitter with banding
material around infant’s ankle then
thread and secure second clamp. The
band must be tight enough to help stop
the transmitter from slipping off, and
loose enough to avoid discomfort.
7. The transmitter becomes active one
minute after the clamps are snapped
into place. The 60 second grace period
allows the transmitter to be re-opened
once the transmitter’s second clamp
has been secured.
Page 18 of 36 Safe Place Transmitters User Guide
0510-1121-G

General Information
8. Use safety scissors to cut off the excess
Patient
(Locking)
banding material. Try not to cut bands
too short to allow room to adjust in
future.
To band a patient transmitter:
1. Cut off 6-8” of the banding material from
the roll.
2. Verify that the transmitter is unlocked.
See the “Unlock a Transmitter” section
for further details.
3. Open the clamps of the transmitter by
gently pulling them outward, one clamp
at a time, from the top of the transmitter.
4. Insert the banding material through the
slot on the non-locking clamp side of the
patient transmitter, from bottom to top,
with the white side facing out.
Safe Place Transmitters User Guide Page 19 of 36
0510-1121-G

General Information
5. Guide the banding material through until
it bumps against the stop.
6. Push in the clamp until it snaps into
place.
7. Insert the banding material through the
slot on the locking clamp side of the
transmitter, from bottom to top.
8. Guide the banding material through the
slot at the top of the clamp. DO NOT
snap the clamp into place.
9. Slide the transmitter and banding
material onto the ankle or wrist of a
patient according to your facility’s
policies and procedures.
10. Adjust the band so that the transmitter
is in a comfortable position on the
patient.
Page 20 of 36 Safe Place Transmitters User Guide
0510-1121-G

General Information
11. The band must be tight enough to help
stop the transmitter from slipping off,
and loose enough to avoid discomfort.
12. Push the unsnapped side of the clamp
until it snaps into place. The transmitter
becomes active one minute after the
clamps are snapped into place. The 60
second grace period allows the
transmitter to be re-opened once the
transmitter’s second clamp has been
secure.
13. Use safety scissors to cut off the excess
banding material.
To unlock a transmitter:
1. Insert the Locking Clamp Key into the
hole on the top-side of the transmitter.
2. Turn the key ¼ turn in any direction.
3. Stop and pull with the key until the
locking side of the clamp opens.
4. Remove the Locking Clamp Key.
5. Pull back the non-locking side of the
clamp.
6. Follow the instructions to band or
loosen the approved banding material
and slip the Transmitter off of the
patient.
Safe Place Transmitters User Guide Page 21 of 36
0510-1121-G

General Information
This page intentionally left blank.
Page 22 of 36 Safe Place Transmitters User Guide
0510-1121-G

Transmitter
Visual
1. Verify that the warranty expiration date
Testing
Testing and Care
TESTING AND CARE
You must test all transmitters prior to use to
verify proper operation. This includes every
time that the band is replaced.
All steps are mandatory.
WARNING: Do not use the transmitter tester
on a transmitter with an expiration date that
has expired. Results may not be accurate.
Do not use a transmitter beyond its
expiration date.
CAUTION: Failure to test the transmitters
before use can result in system failure
and/or an abduction or elopement. In
addition, failure to test transmitters voids the
RF Technologies Product Warranty
Inspection
Safe Place Transmitters User Guide Page 23 of 36
0510-1121-G
that is stamped on the transmitter is not
expired.
2. Visually inspect the transmitter for
damage or loose parts.
3. Attach a band to the transmitter (See
Banding).

Testing and Care
Operation
Signal
1. Physically enter an Exit Zone with the
Test the operation of the transmitter using
the Transmitter Tester (PN 9450-0050). The
transmitter tester will detect whether or not a
transmitter is emitting a signal, but cannot
indicate the strength of the signal
1. Place the transmitter tester directly on
the transmitter.
2. Press and hold the button on the left
side of the transmitter tester.
3. The device beeps once when you
initially press the button.
4. While holding the button in, the indicator
light flashes and a tone sounds once
per second, wait for at least 3 flashes of
the indicator light and 3 tones from the
transmitter tester to verify that the
transmitter is functioning correctly.
5. If the transmitter fails this test, check the
battery in the tester. The transmitter
tester requires a 9V battery.
6. Retest the transmitter. If it fails a second
time, DO NOT USE THE
TRANSMITTER and contact RF
Technologies Technical Support Team
at (800)669-9946 or (262) 790-1771.
Strength
Page 24 of 36 Safe Place Transmitters User Guide
transmitter and walk through the door.
2. An alarm must occur when the
transmitter is within 4-feet of the
monitored door. If applicable, the door
also locks.
3. If an alarm does not occur, DO NOT
USE THE TRANSMITTER and contact
RF Technologies Technical Support
Team at (800)669-9946 or (262) 790-
1771.
0510-1121-G

Weekly
Testing
Transmitter
and Care
Testing and Care
The following testing is required weekly for
transmitters in use on patients. All steps are
mandatory.
1. Test the operation of transmitters using
the transmitter tester.
2. Visually inspect transmitters for damage
or loose parts.
3. Verify that the warranty expiration date
stamped on the transmitter has not
expired. If the warranty period has
expired, discard and replace the
transmitter immediately.
4. Your facility must keep records of test
and transmitter inspection.
Cleaning
To clean a transmitter after use:
NOTE: Never take a patient to a door to test
their transmitter.
This section provides detailed information
about cleaning and caring for a transmitter.
1. Remove the banding material from the
transmitter and dispose of it.
CAUTION: Use of non-approved cleaners
on transmitters can cause permanent
damage to the transmitter and the piercing
contacts and will void any and all
warranties.
Safe Place Transmitters User Guide Page 25 of 36
0510-1121-G

Testing and Care
2. Use the provided brush to clean the
4. Allow the cleaner to remain on the
hard-to-reach areas. After each use,
brushes can be disposed of or
disinfected with alcohol according to
your facility’s infection control
procedures.
3. Disinfect the transmitter with an
approved cleaner.
NOTE: In order to avoid nuisance alarms,
cleaning procedures must be performed at
least 100 feet from any Alarming Band
Zone.
CAUTION: Using an approved cleaner does
not confirm the suitability of the cleaner to
meet your infection control standard; it only
indicates that the transmitter will not be
harmed by the cleaner.
The transmitters may be wiped, sprayed or
rinsed with water or the approved cleaners
during cleaning, but must not be soaked.
Soaking transmitters may result in
equipment and/or system failure.
transmitter for the amount of time
specified by the manufacturer. When
using surface disinfectants and
decontaminant cleaners, always follow
the manufacturer’s instructions.
5. Wipe the transmitter with a clean cloth
or towel, and then allow the transmitter
to air-dry. The transmitter can also be
rinsed with water, if required to in the
manufacturer’s instructions.
Page 26 of 36 Safe Place Transmitters User Guide
0510-1121-G

Testing and Care
6. Inspect the piercing contacts on the
transmitter. The contacts must be gold
in color and not bent or out of alignment.
If the piercing contacts are NOT gold in
color or are bent out of alignment,
discard the transmitter.
7. Close the clamps on the transmitter
8. Place the clean transmitter in a storage
container for future use.
Safe Place Transmitters User Guide Page 27 of 36
0510-1121-G

Testing and Care
Approved
Non-Approved
Cleaners
Following is a list of approved cleaners/
solutions recommended for use when
cleaning the transmitter.
®
Neutral Quat Hi-Tor® Plus
3M
Airx® 109A Isopropyl Alcohol
Cavicide®
Caviwipes™
Cavicide1™
Caviwipes1™
Clorox Healthcare®
Hydrogen Peroxide
Cleaner Disinfectants
Ecolab® Quik Fill 920 Steriplex® SD RTU
Health-Tec™ Virex® II-256
Cleaners
Bleach
Cleaners containing
Bleach
Cidex® Activated
Cidex
Cidex
3M™ Phenolic
Oxivir TB
®
Sani-Cloth® HB
PDI
®
Sani-Cloth Plus
PDI
®
Super-Sani
PDI
Quest 256
These cleaners may cause plastic
embrittlement and erosion.
PDI® Sani-Cloth® AF3
®
Virex
®
Plus
®
OPA
Virex
TB
®
HB
®
Page 28 of 36 Safe Place Transmitters User Guide
NOTE: Some agents are intended for
topical, antimicrobial use only and will not
destroy viruses such as Hepatitis B and
HIV.
0510-1121-G

Replacing
the Clamp
Testing and Care
In some cases, you need to replace
damaged transmitter clamps. This is done
by opening the existing clamps, snapping
them off of the transmitter, and inserting
new clamps.
To replace a transmitter clamp:
1. Open the clamps all the way and gently
remove them from the transmitter.
2. Insert the first clamp into the transmitter
by inserting the right oval-shaped pin
into the hole on the right of the
transmitter.
3. Next, line the left oval-shaped pin up
with the hole on the left side of the
transmitter.
4. Gently snap the left oval-shaped pin into
the hole.
5. Close and secure the clamp.
Safe Place Transmitters User Guide Page 29 of 36
0510-1121-G

Testing and Care
6. Repeat the previous steps for the
second clamp.
CAUTION: Use care around the piercing
contacts on the transmitter as they are
extremely sharp. Placing your fingers
directly on the piercing contact can result in
injury.
Page 30 of 36 Safe Place Transmitters User Guide
0510-1121-G

Smart Sense
Temperature
Composition
Battery Life
RFT Part Number
Description
Transmitter
Specifications
SPECIFICATIONS
Size
Weight
Color
Operating
Frequency
Regulations
9450-6066-1
9450-6262-1
1.63 x 1.18 x 0.625 inches
0.71 ounces
Yellow
32–122° Farenheit (0–50° Celsius)
Latex Free Co-polyester Plastic
1 year, Lithium Ion
Depending on model:
66 KHz
262 KHz
FCC, Part 15b
Industry Canada RSS Standard(s)
Conforms to UL Standard 294
Smart Sense Infant Transmitter (66 kHz)
Smart Sense Infant Transmitter (262 kHz)
9450-0050
Safe Place Transmitters User Guide Page 31 of 36
0510-1121-G
Transmitter Tester
Specifications
Standard Infant
Temperature
Composition
Battery Life
Transmitter
Size
Weight
Color
Operating
Frequency
Regulations
Part Number Description
9450-0066
9450-0262
9450-0050
Safe Place Infant Transmitter (66 kHz)
Safe Place Infant Transmitter (262 kHz)
Transmitter Tester
1.63 x 1.18 x 0.625 inches
0.71 ounces
White
32–122° Farenheit (0–50° Celsius)
Latex Free Co-polyester Plastic
1 year, Lithium Ion
Depending on model:
66 KHz
262 KHz
FCC, Part 15b
Conforms to UL Standard 294
Page 32 of 36 Safe Place Transmitters User Guide
0510-1121-G
Patient
(Locking)
Size
Weight
Color
Part Number
Description
Transmitter
Specifications
1.63 x 1.18 x 0.625 inches
0.71 ounces
White with Red Key
Operating
Temperature
Composition
Battery Life
Frequency
Regulations
0500-0084
0500-0084K
9450-4066
9450-4262
9450-4000
9450-0050
32–122° Farenheit (0–50° Celsius)
Latex Free Co-polyester Plastic
1 year, Lithium Ion
Depending on model:
66 KHz or 262 KHz
FCC, Part 15b
Conforms to UL Standard 294
Key, Durable Locking Band Clamp
Locking Clamp Key Kit, 10-pack
Patient Care Transmitter (66 kHz) with Locking
Clamps
Patient Care Transmitter (262 kHz) with Locking
Clamps
Locking Clamps Replacement
Transmitter Tester
Safe Place Transmitters User Guide Page 33 of 36
0510-1121-G

Specifications
Banding
Sense
Infant
Part Number
Description
Smart
Size
Material
Color
Storage
Conditions
Pre-cut 6” length Dispenser box
Soft nylon; latex
free
Yellow Duck print White or purple
Store in clean,
dry conditions
between 50-80°
Less than 75%
humidity
3000-0237
3000-0239K
3000-0223
3000-0225
Safe Place Infant Smart Sense Banding (6”), Precut, Box of 100
Safe Place Infant Smart Sense Banding (10”),
Pre-cut, 10-pack, used for staff training
Safe Place Infant Bands, Duck Print, Box
Patient Care Banding, Naugahyde, White
Standard
with 100 feet
Polyethylene
(plastic) with soft
nylon backing;
latex free
Store in clean, dry conditions under
90°
20-50% humidity
Patient
Dispenser box
with 80 feet
Naugahyde with
acetate fabric
facing skin; latex
free
Page 34 of 36 Safe Place Transmitters User Guide
3000-0229
Patient Care Banding, Heavy Duty, Purple
0510-1121-G

Revision History
Revision
Change
REVISION HISTORY
A Release
B Added list of approved cleaning products
C Updated format, updated warranty expiration date
section, and updated specifications section
Fixed minor document bugs
D Updated approved cleaners section
E Updated format and logos
Removed Alerts section (information contained in the
software reference guides)
F Added Oxivir TB to Approved Cleaner List
G Added the ICC French translations to the Compliance
section
Safe Place Transmitters User Guide Page 35 of 36
0510-1121-G

Revision History
This page intentionally left blank.
Page 36 of 36 Safe Place Transmitters User Guide
0510-1121-G


www.rft.com
3125 North 126th Street, Brookfield, WI 53005
Phone 800.669.9946 fax 262.790.1784
0510-1121-G
Release Date: 06/2018
 Loading...