


3125 N. 126th St.
Brookfield, WI 53005 USA
PH: (800) 669-9946 or (262) 790-1771
www.rft.com
info@rft.com
Mobile Locating Solution
User Guide
User Guide
P/N: 0510-0216-B_Draft 3
Released: 1/16/06
Users must read this guide before using the product.

Contents
Specifications
System Overview - - - - - - - - - - - - - - - - - - - - - - - - - - - - - - - - - - - - - - - 5
Seeker Installation - - - - - - - - - - - - - - - - - - - - - - - - - - - - - - - - - - - - - - 7
Using the Seeker Software. - - - - - - - - - - - - - - - - - - - - - - - - - - - - - - - - 9
The Main Window - - - - - - - - - - - - - - - - - - - - - - - - - - - - - - - - - - - - - - 9
Troubleshooting.- - - - - - - - - - - - - - - - - - - - - - - - - - - - - - - - - - - - - - - 24
Specifications- - - - - - - - - - - - - - - - - - - - - - - - - - - - - - - - - - - - - - - - - 26
Pocket PC
Operating System: Pocket PC 2003
Recommended Processor: 400MHz (or higher)
Recommended Memory: 64MB Main Memory (or higher)
Must have at least one Compact Flash slot
Operating Time (Battery Life): See Pocket PC Manual
RF Reader
Interface: Compact Flash
Read Range: 0-300 Feet (outdoor line of sight)
Frequency: 433 MHz
Compliance: FCC Part 15
Capacity: 240 Dept. & 240 Tags
Total Capacity: 57,600 Tags
Software
Copyright 2006 by RF Technologies, Inc.
All rights reserved. No part of this work may be reproduced or copied in any
form or by any means without written permission from RF Technologies, Inc.
2
PinPoint Seeker Application
Integrates with PinPoint Mobile Resource Manager Software version 3.5 or higher.
Ta g
Dimensions: 1.9" x 1.38" x 0.7"
Battery Life: 2 Years
Power Source: 3.6V Lithium Battery
Frequency: 433 MHz
Compliance: FCC Part 15
27

Getting the Tag to sound or flash
• The beeper and light are controlled by checkboxes on the Find Tags window. Make
sure the correct selections are made before performing a search.
Selecting the correct communications port
In most cases the Seeker application will detect the Plug and Play ID of the RF Reader and
configure it for the correct communications port. If the application can not find the RF
Reader it is possible to manually configure the communications port. Open the Settings
window. In the Communication Port box, select a Comm Port ID. Attempt to perform a
Find operation from the Find Tags window. Check the status of the RF Reader LED to
determine if the application is communicating with the card. Repeat until the correct port is
identified.
Compliance
Federal Communication Commission (FCC) Compliance
This device complies with Part 15 of the FCC Rules. Operation is subject to the
following two conditions: (1) this device may not cause harmful interference, and
(2) this device must accept any interference received, including interference that
may cause undesired operation.
This equipment generates, uses, and can radiate radio frequency energy and, if not
installed and used in accordance with the instruction manual, may cause harmful
interference to radio communications. Operation of this equipment in a residential
area is likely to cause harmful interference in which case the user will be required
to correct the interference at his own expense. Changes or modifications not
expressly approved by the party responsible for compliance voids the user’s
authority to operate the equipment.
Industry Canada Compliance
Changes or modifications not expressly approved by RF Technologies could void
the user’s authority to operate the equipment. The Term “IC” before the radio
certification number only signifies that Industry Canada technical specifications
were met.
26
Operation is subject to the following two conditions: (1) this device may not cause
harmful interference, and (2) this device must accept any interference received,
including interference that may cause undesired operation.
3

Important Warnings
Troubleshooting
It is important for your facility to implement and enforce the following warnings
in order to keep all equipment functioning properly.
WARNING: Installation and Configuration
It is the responsibility of the facility to follow the installation instructions
carefully and to use the components and supplies specified by RF
Technologies, Inc. for all installations.
Failure to use the components and supplies specified by RF T echnologies, Inc.
may result in equipment and/or system failure.
WARNING: User Training
It is the responsibility of the facility to implement structured training procedures
for all employees using the system. Only users who have received adequate
training on the use of the system should use the system.
Failure to adequately train employees may cause system failure due to user
error. In addition, incorrect use of the equipment may also result in system
failure.
WARNING: System Maintenance and Testing
It is the responsibility of the facility to establish and facilitate a regular
maintenance schedule of your system. This includes regular inspection, testing,
and cleaning.
Failure to provide regular maintenance and testing of these products may result
in equipment and/or system failure.
Use the following Troubleshooting tips.
If the Pocket PC application no longer responds
• Reboot the Pocket PC with a hard-reset. Typically a hard-reset can be performed by
pressing a recessed reset button on the Pocket PC. Consult the Pocket PC user manual for
the location of the reset button.
• It is also possible that the battery is nearing expiration in the mobile reader. Consult the
Pocket PC user Manual for details on replacing or recharging the battery.
• The RF Reader may have come loose in the socket. Remove and reinsert the RF Reader
in the compact flash socket.
If the Pocket PC does not communicate with the MRM Services
• Make sure that the host name and port are properly entered on the Settings
Services tab. Make sure that the services are running on their respective host
machines.
If the application starts reacting slowly
• The history table may be too large to provide adequate performance. Check the number
of entries in the history table by opening the Settings window. If the number of entries is
over 10,000 entries you may want to Clear History.
Viewing and analyzing data on another machine
• The history table can be exported to a Comma Separated Values (CSV) file. This file can
then be viewed by spreadsheet applications such as Microsoft Excel. To export a CSV file
open the Settings window. Click Export History. A save file dialog appears. Save the file to
a known location. Retrieve the file through the sync cradle and Microsoft Active-Sync
application explorer. See the Pocket PC documentation for details on using Active-Sync.
WARNING: Failure to follow the Warnings and Cautions in this
guide voids any or all Product Warranties.
4
25
Integrate with MRM
You can integrate the Seeker database with the PinPoint Mobile Resource
Manager (MRM) software. This is a feature option that comes with the Seeker
Mobile Locating Solution. For more information, contact RF Technologies, Inc.
at (800) 669-9946 or (262)790-1771.
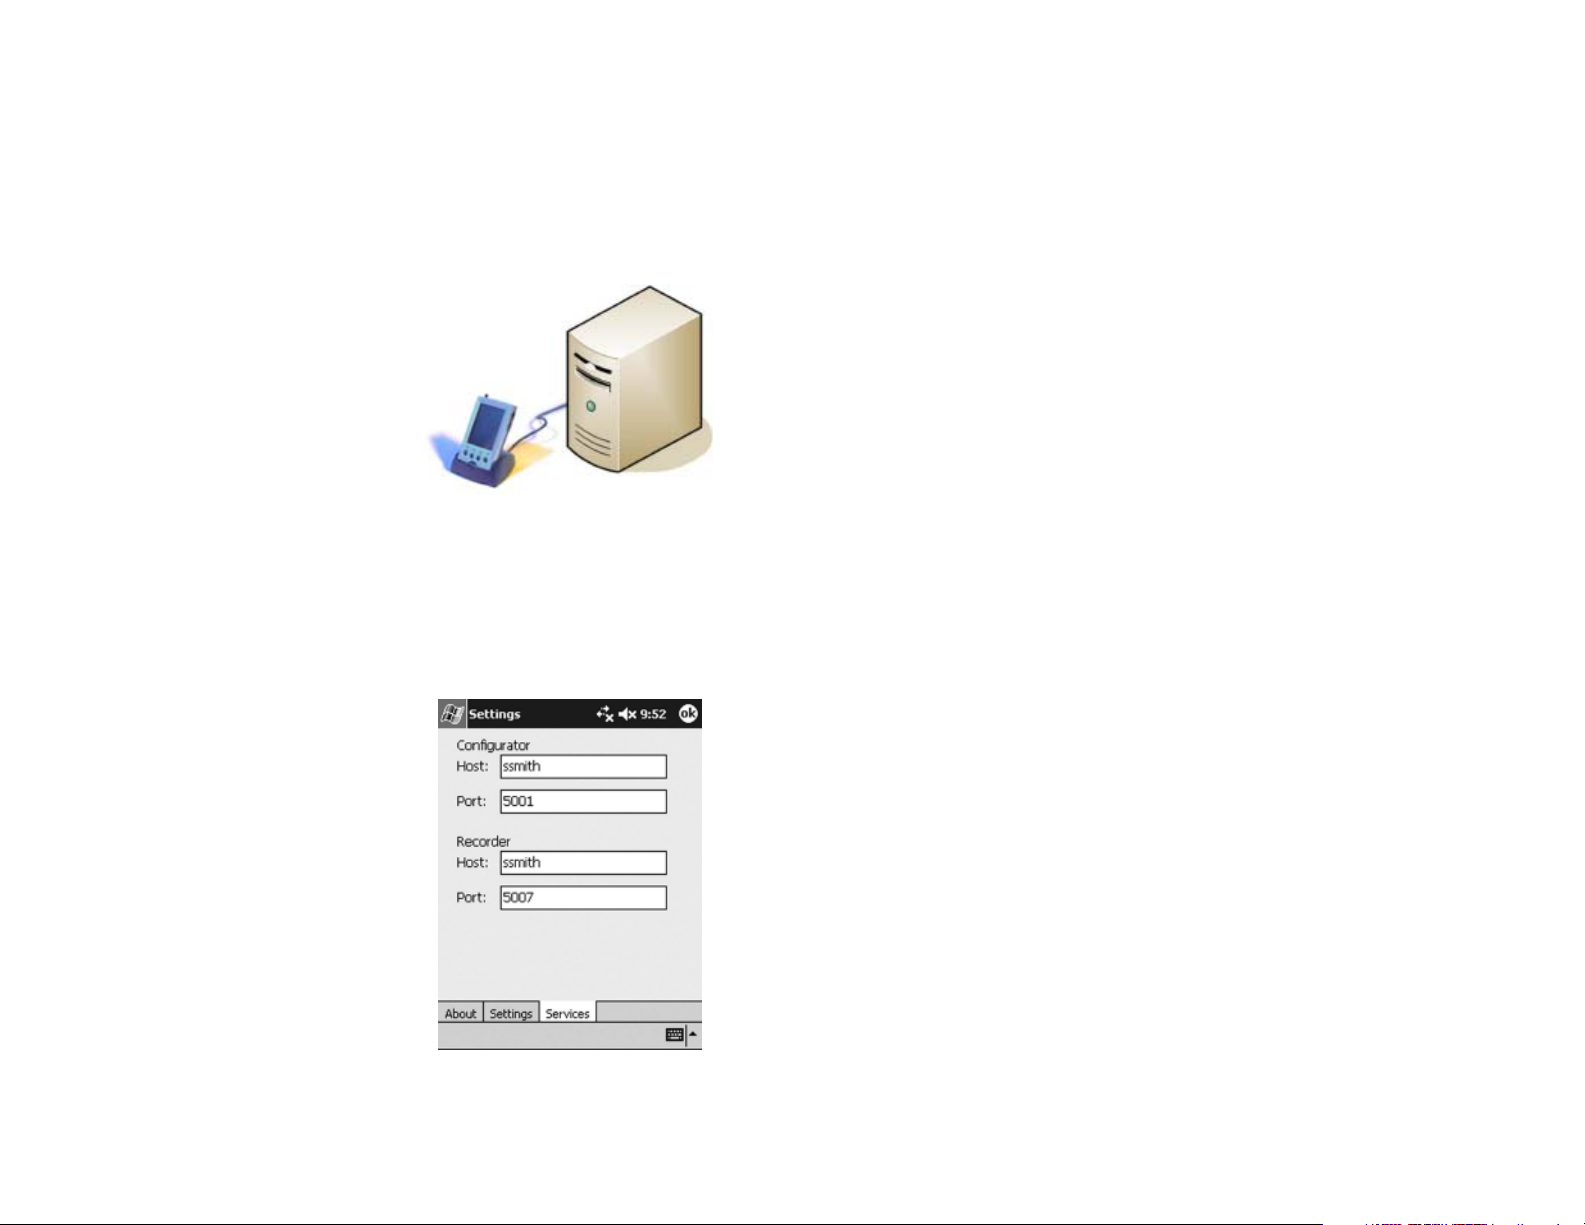
Service Tab
The PinPoint MRM Services are
required when integrating the Seeker
database with the MRM database.
The Services Tab in the Seeker
application enables you to configure the
host name and port for the PinPoint
Services. A network connection is
created when the Pocket PC is placed in
the sync cradle. When you select
download or upload from the main window in the Seeker software, the Pocket
PC communicates through the network connection and retrieves data. To find the
correct Configurator /Recorder host names and port, see your PinPoint MRM
Administrator.
Preface
Introduction
This guide explains the basic features of the Seeker Mobile Locating Solution.
This guide is intended for audiences who are using the Seeker Mobile Locating
Solution in their facilities.
About this Guide
The Seeker Mobile Locating Solution User Guide is intended for individuals who use
the system. It includes detailed information about the Seeker Tags and software.
Contact Information
• For more information about RF Technologies, Inc. products go to www.rft.com.
• For technical support, contact (800) 669-9946 or (262) 790-1771.
• For questions or comments about the Seeker Mobile Locating Solution documentation,
contact the RF Technologies Technical Publications team at techpubs@rft.com.
To enter a host name and port in the Seeker software
1. Tap Settings.
2. Tap Services
3. In the Host box, type the name of the
computer hosting the service.
4. In the Port box, type the port number used
by the service.
24
Product Warranty
Product Warranty information can be found on the system’s CD Rom or with your
original system proposal and invoice.
5

System Overview
Settings Tab
The Seeker Mobile Locating Solution is a resource tracking system that uses a
Pocket PC and RF Reader to read Radio Frequency Identification (RFID) Tags.
The mobile reader is used to “search” an area for “Tags” that are attached to
resources. The reader can find an individual Tag, or search for all Tags with a
specific Department ID. When a Tag is within range of the mobile reader, an
audible beep and light is generated by the Tag so a user can locate the
equipment. The beep and light features can be disabled using the Seeker
software if desired.
A local database in the mobile reader associates Tags and resources. When a Tag
is found, the mobile reader displays the Department Name, Tag ID, resource
name, description, and the signal strength. The signal strength provides an
estimated distance from the reader to the Tag. A picture of the resource can also
be associated with the Tag information.
The Seeker Mobile Locating Solution can be integrated with the PinPoint
Mobile Resource Manager (MRM) software to provide extended visibility to the
data captured through the reader. Information from the mobile reader can be
uploaded to the PinPoint databases and then viewed by PinPoint applications.
Additionally, utilization and location reports can be generated using captured
data from the mobile reader.
Uses for the Solution include
• Locate misplaced equipment
• Remotely identify inventory
• Find equipment scheduled for maintenance
Special Features include
• User-programmable RFID Tags
• Compact size
• 0-100ft range through walls, up to 300ft in open areas.
• Tag beeper and light helps physically locate equipment
• Down-loadable data to host using sync cradle
You can specify the polling threshold value, the communications port, and the
locations ruleset from this window.
Threshold – Indicates the minimum signal strength required for a Tag to be
displayed in the Tag list. Increasing the threshold value decreases the Tag read
range. The suggested value is 5.
Demo – When in demo mode each Find
operation will return a Tag in the Tag List.
This can be used for training and
demonstration purposes. Tags returned are
always in department 1.
Comm Port – In cases were the
application does not automatically discover
the RF Reader the Comm Port can be
manually selected.
Ruleset – Select the ruleset to be used to
retrieve locations from the PinPoint
Configurator Service. Once selected the
user must perform another download to
retrieve the locations.
Use Resource Name – When selected the
Find Tags window will display the Resource name box instead of the Department
and Tag ID boxes. Resource Names come from the local offline Tags database
created by the Tag Entry window.
Import and Export Files
Import Files – Imports a CSV file to fill the offline Tags table and Department
table in the database.
• Tag Fi le na m e: Se e ke rTa gs .c sv
• Department Filename: SeekerDepartment.csv
Export Files – Exports a CSV file that can be used to archive or transfer the Tag
and Department information.
6
23

Settings
System Components
About Tab
Seeker software information is located on the About tab in the Setting window. It
displays the application version and operating system version.
To display Seeker software information
1. Tap Settings from the Main Window.
2. Select the About Ta b.
HELPFUL HINTS
Be sure to have this information
available when contacting the RF
Technologies Customer Support Team.
The following components comprise the Seeker Mobile Locating Solution.
Ta g s
Tags are small and can be attached to resources using the
adhesive tape that is included with them. Tags can also be
mounted with a lanyards (or zip strip) through the lanyard
clip opening at the top of the Tag.
When a Tag is found by the Pocket PC, it responds with its
unique Tag ID and a status message that indicates its battery
condition. Tags can be programmed to beep and flash a light
which allows users to gain a rough indication of where the Tag is located.
RF Reader with External Antenna
The Compact Flash (CF) RF Reader with external
Antenna includes the receiver circuitry and the
microprocessor. The microprocessor helps in
decoding the Tag signals to obtain the Department ID,
Tag ID, and the status of the Tag. The information is
transferred to the Pocket PC using standard CF
protocols.
Pocket PC
22
The Pocket PC includes the Microsoft Pocket PC
Operating System. The Pocket PC supports the
Compact Flash standard CF+/Type II for the
addition of the RF Reader.
Software
The software and documentation are provided on a
CD-ROM.
7

Seeker Installation
Viewing History
To install the Seeker Software
1. Using a sync cable or cradle, connect your Pocket PC to the computer. For additional information, see the documentation that arrived with the Pocket PC.
NOTE: You must install Active Sync on your computer. See the User
Documentation that came with the Pocket PC.
2. Insert the Seeker software and documentation CD into the drive on the computer.
3. Double-click My Computer.
4. Navigate to the CD drive.
For example, x:\, where x is the CD drive letter.
5. Double-click setup.exe.
6. Follow the instructions on the screen to finish the installation.
The Seeker software is uploaded to the Pocket PC through the sync cradle.
Installing the RF Reader
To Install the RF Reader
1. Insert the RF Reader into the compact flash slot on the Pocket PC.
2. Be sure the card is fit properly in the compact flash connector.
HELPFUL HINTS
The RF Reader does not require a custom
driver and communicates directly with the
Seeker application.
The RF Reader includes a LED to show that
it is powered and that it is communicating
with the Pocket PC. LED flashes at powerup and when communication begins.
Each time a Tag is received, a record is created in the History table in the Seeker
database. The historical records can be viewed in the View History window. Each
record is presented with a time stamp of when the Tag was found and the resource
name or Department/Tag ID.
The historical records can be filtered using the Date Time Picker. Sequences of
records from a start to an end date can also be displayed.
To select a start and end date
1. Click Start Date arrow to display the Date Picker.
The View History window defaults to today’s
date for both start and end.
2. Select Start Date from the Date Picker.
3. Click End Date arrow to display a second Date Picker.
4. Select End Date from the Date Picker.
The History List updates with the new range
of values.
5. The number of records returned by the date range appears in the lower left corner.
Clear and Export History
Clear History – Clears the local storage
History table by deleting all of its entries.
Should be performed when record retrieval
becomes slow during history views.
Export History – Creates a CSV file of the
current history data. Displays a File Save
Dialog window.
8
21

Write Tags
Mounting Seeker Tags
This selection is used for programming tag
IDs. Each Tag is manufactured with a unique
ID, which is located on the front of the Tag.
The last two digits on the label are the default
Department ID and Tag ID. This enables Tags
to be used without the need to program them
immediately.
Tags can be regrouped by programming a new Department ID into each Tag. A
Tag must be erased before a new Department and Tag ID can be programmed. Any
Tag that is erased and receives the “Write” message will take on the new IDs. This
means that you must immediately program the new Department and Tag ID into an
erased Tag.
To erase a Tag
1. On the Main window, tap Write Tags.
2. In the Department drop-down, select a
Department ID number.
3. In the Ta g box, select a Tag ID.
4. Click Erase.
5. Tag should beep indicating it has been erased.
Do Not erase another Tag until you write a new
Department and Tag ID to the blank Tag.
To write to a blank Tag
1. In the Department box, select a new Department ID.
2. In the Ta g box, select a new Tag ID.
Department ID
Tag ID
The Seeker Tag can be attached using an adhesive pad that can be purchased with
the Tag. The following section provides detailed steps about applying the Tag
using the adhesive pad.
To apply the adhesive pad to the Tag
1. Remove an adhesive pad from the strip of paper.
2. Turn the Tag onto its front.
3. Line the adhesive pad up with the back of the Tag.
4. Apply the adhesive pad.
5. Verify that the pad is applied correctly and is not hanging over the sides of the Tag.
To attach a Tag to a resource using an adhesive pad
1. Obtain the resource to which you want to apply the Tag. The resource surface should be clean, dry and free of condensed moisture.
2. Remove the adhesive plastic guard.
3. Firmly attach the Tag to the resource. Ideal application
temperature range is 70°F to 100°F (21°C to 38°C).
4. Press firmly and hold for a couple of minutes to activate the pressure sensitive adhesive.
After application, the bond strength will increase as the adhesive flows onto the surface.
At room temperature approximately 50% of ultimate bond strength will be achieved after
20 minutes, 90% after 24 hours and 100% after 72 hours.
3. Click Wr it e .
4. Tag beeps indicating it has accepted the new values.
HELPFUL HINTS
Do NOT erase more than one Tag at a time.
Be sure to attach a label to the Tag that indicates its new Department and Tag ID.
The initial Tag ID can be determined by looking at the serial number label.
DO NOT program two Tags with the same Department and Tag ID.
20
HELPFUL HINTS
Do not place the Tag inside of a metal container because the signal is
blocked and the system may not function properly.
Perform a search after you mount the Tag to test for reception.
Perform a search to verify that the audible tone is loud enough and
the light is visible.
9

Using Seeker Software
Working Online
This section provides detailed information about using the Seeker Software to
perform basic finds for resources.
To start the Seeker Software
1. On the Pocket PC, tap Start->Seeker.
If this is the first time the you have used the Seeker application on this Pocket PC, a
progress bar is displayed during the creation of the database and tables.
2. Once the database and tables are created the Seeker Main window appears.
During start-up, the Seeker Software searches for the RF Reader and selects the
appropriate communication port for operation. If the card cannot be found you may
need to use the Settings window to try each of the available communication ports until
the correct port is found.
The Main Window
This window is the main navigation area. The
Main window displayed will depend on
whether you have your system set to work
offline or online.
Find Tags – Opens a window to select
department and Tag IDs or resource name to
search for.
Work Online/Offline – Determines the mode
of operation for the application. This
determines which database is used.
Write Tags – Writes and erases the
Department and Tag IDs in a Tag.
In the online mode, two additional selections appear: Download and Upload.
These selections enable the Seeker Software to remain synchronized with the
PinPoint Mobile Resource Manager software system.
The Download selection retrieves the ruleset, locations, and Tag tables from the
PinPoint Configurator Service. The Upload selection sends the History table,
one record at a time, to the PinPoint Recorder Service.
Download Data from MRM
All the tables required for operation of online
mode are retrieved from the Configurator
Service. A dialog appears showing the status
of each table as it is downloaded.
To download data from MRM
1. Be sure the Seeker is in Working Online mode.
2. Tap Download from the Main Window
Uploading Data to MRM
Each time a Tag is found, a record is created
in the History table in the Seeker database.
This record includes a time stamp, Tag ID,
and location (if online). In order to make
this information visible to the entire
PinPoint system, you must upload the
information to the PinPoint Recorder Service.
The Recorder Service stores it in the PPDataLog database table.
View History – Records of each find are stored
in the Pocket PC. This utility is used to review
these archival records.
Settings – Changes settings such as threshold,
ruleset selection, clearing the history, and
exporting the history to a CSV file.
10
To upload data to MRM
1. Be sure the application is in W orking Online mode.
2. T ap Upload from the Main Window
HELPFUL HINTS
The PinPoint Services host name and port must be entered in the Settings
Services tab.
Downloading and Uploading data may take some time, please be patient.
19

Department Entry
Find Tags
The Department Entry allows users to enter information about departments used
to group Tags.
To add Department information
1. Tap Add. The Add Department window appears.
2. In the Department box, select a Department ID.
3. In the Name box, type in the department name.
4. Tap OK, to save the department information.
To edit Department information
1. Select the department you wish to edit.
2. Tap Edit. The Edit Department window appears.
3. In the Name box, edit the department name.
The Find Tags window appears in one of three
modes.
1. Working offline using Resource Names
You must select a resource to search for by
selecting its resource name from the Resource
box. Department searches can not be performed
when using the resource names.
T o operate in this mode select the Use Resource
Names checkbox in the Settings window.
2. Working offline using Department and Tag
Select a Department and a Tag. In offline mode
the user can select a department and then “Any”
T ag or a specific T ag in the Tag List (see
illustration on top of page 12).
3. Working online using PinPoint Data
You select the location they are currently occupying and the Tag to find. When Tags
are received they are matched to a record in the local database. The database
information is used to provide additional details about the T ag and asset (see
illustration on bottom of page 12). Department searches can not be performed when
working online.
NOTE: In online mode, the locations and resources are retrieved from
the PinPoint Mobile Resource Manager. See the “Integrating with Mobile
Resource Manager” in this guide for details.
4. Tap OK, to save the department information.
To delete Department information
1. Select the department you wish to edit.
2. Tap Edit. The Edit Department window appears.
3. In the Name box, edit the department name.
4. Tap OK, to save the department information.
18
11

Selecting a Tag to Find
To find a Tag using Department and Tag
1. In the Department box, select a Department ID.
2. In the Ta g box, select a Tag ID.
3. Select the Beep checkbox, to hear the Tag beep. Select the Light checkbox to see the Tag fl as h.
4. Move the Range slider to the right to increase the range.
Adjusting the Range increases and decreases
the range at which Tags respond. A lower
setting decreases the range that Tags can be
read from the RF Reader.
5. Click Find to start searching for Tags.
To edit a Tag/resource association
1. In the Tag Entry list, select an item to edit.
2. Tap Edit.
The Edit Tag window appears.
3. In the Resource box, type the name for this
resource.
4. In the Description box, type a description for this
resource.
5. Next to the Image field, tap the ellipses (…) box to
link an image to the entry.
6. Select the bitmap to be used to represent the resource.
NOTE: It is best to keep the size of the bitmap or jpeg as small as possible (maximum of 12Kb). Large images may not appear.
7. Tap OK, to save the changes.
To find a Tag using Resource and Locations
1. In the Resource box, select the Resource
associated with the Tag.
2. If applicable, select the Location from the
Location box. The Locations are
downloaded from the PinPoint
Configurator Service.
3. Select the Beep checkbox, to hear the Tag beep. Select the Light checkbox to see the Tag fl as h.
4. Move the Range slider to the right to increase the range.
Adjusting the Range increases and
decreases the range at which Tags respond.
A lower setting decreases the range that
Tags can be read from the RF Reader.
5. Click Find to start searching for Tags
To delete a Tag/resource association
1. In the T ag Entry list, select an item to delete.
2. Tap Delete.
3. The item disappears from the list.
To clean a Seeker Tag after use
1. If necessary, remove the Seeker Tag from the resource.
You can clean the Tag on the resource if you prefer.
2. Wet a cotton swab or paper towel with Isopropyl Alcohol.
3. Cleanse the Seeker Tag.
4. Cleanse the surface of the resource.
5. Let the Seeker Tag and the resource surface dry before reapplying the Seeker Tag with the adhesive pad.
12
17

Working Offline
Find Results
The Offline mode allows you to find a Tag by its Tag Entry and Department
Entry. Each Tag received in this mode is displayed with its Tag ID and
Department ID, along with the Receive Signal Strength Indicator (RSSI) at
which it was received. The RSSI indicates a relative distance from the reader. If
the tag has a low battery, an low battery icon is displayed above the signal
strength bar.
NOTE: Each Tag received is added to the History Table.
Tag Entry
The Tag Entry allows the user to associate a Tag with its resource, Edit resource
information, or Delete a Tag/resource association.
To associate a Tag with a resource
1. Tap Add. The Add Tag window appears.
2. In the Department box, select a Department ID.
3. In the Ta g box, select a Tag ID.
4. In the Resource box, type the name for this
resource.
5. In the Description box, type a description for
this resource.
6. Next to the Image field, tap the ellipses (…) box
to link an image to the entry.
7. Select the bitmap to be used to represent the resource.
Each Tag found is displayed with its Tag
ID, Department ID, battery status, and
Receive Signal Strength Indicator (RSSI) at
which it was received. The RSSI indicates a
relative distance from the reader. If the Tag
is further away, the RSSI bar graph is
lower. Additionally a low battery icon
appears above the signal strength bar if the
Tag has a low battery.
Low Battery Indicator
Receive Signal Strength Indicator (RSSI)
If a resource name and description was
entered, the first line of the Tag List will
contain the resource name and the second
line will contain the description of the
resource.
Selecting a Tag in the Tag List displays
additional details about the Tag.
NOTE: It is best to keep the size of the
bitmap or jpeg as small as possible
(maximum of 12Kb). Large images may
not appear.
8. Tap OK, to save the Tag/resource association.
16
13

Progress Bar
Viewing Tag Details
During a search a progress bar is displayed. The Tag count in the lower left
corner is increased as Tags are received. Once all the Tags are received the
progress bar will indicate “Complete” and the Tag List will be filled with the
Tags received.
Tag Count
The Tag count increases in increments as each Tag is received. The Tags,
however, will not be displayed in the Tag List until all Tags are received or the
time has expired.
Selecting a Tag in the Find Tags window
displays the Tag Details window.
The Tag Details window provides
additional information about the Tag and
enables the specified Tag to be found
again.
In offline mode, the Tag ID, Department
ID, manufacturing date, low battery
status, and RSSI are displayed.
Additionally, the resource name,
description, and resource image are also
displayed if available.
In online mode, the Tag ID, resource,
manufacturing date, low battery status,
RSSI, and description are displayed. The
resource and description come from the database.
To further determine the location of a Tag
1. Click Find to search for the specified Tag.
2. The RSSI bar graph is updated with a new signal strength value.
The Tag beeps and lights based on the
checkbox selections from the previous find.
14
NOTE: If the Tag is not found again during a Find the RSSI bar turns gray.
15
 Loading...