

Page 1
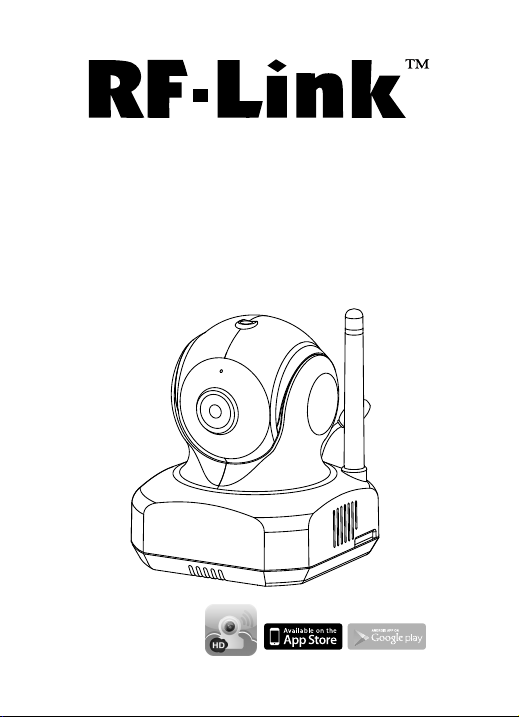
Model: VMI-1201
Smart iCAM
Remote HD Wi-Fi
DIY Surveillance Camera
User's Manual
Please read carefully before using this equipment.
Page 2
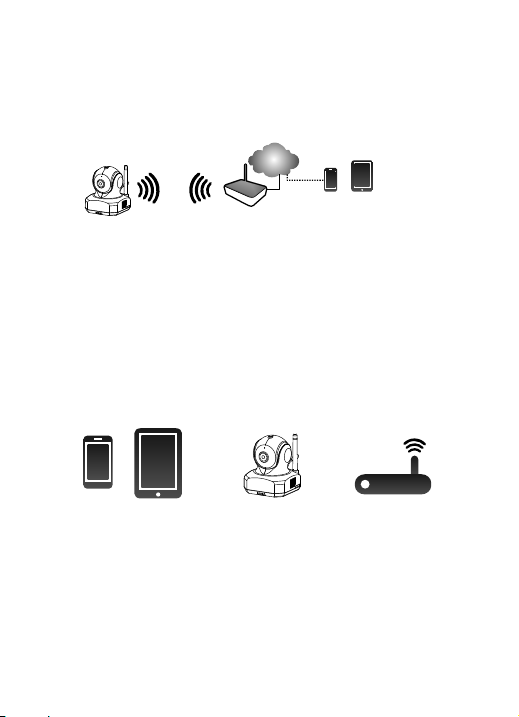
Watch the things that matter to you
anytime and anywhere
Internet
Smart iCAM
Smart
iCAM is a wireless network camera. It can connect with your
smartphone or tablet via wireless technology, and monitor everything
that matters to you on your smartphone or tablet anywhere and anytime.
Wi-Fi Router
Smartphone,Tablet
Before you start you need:
iPhone, iPad,
Android smartphone
or Android tablet
Smart iCAM
1
Wi-Fi router
Page 3
EN
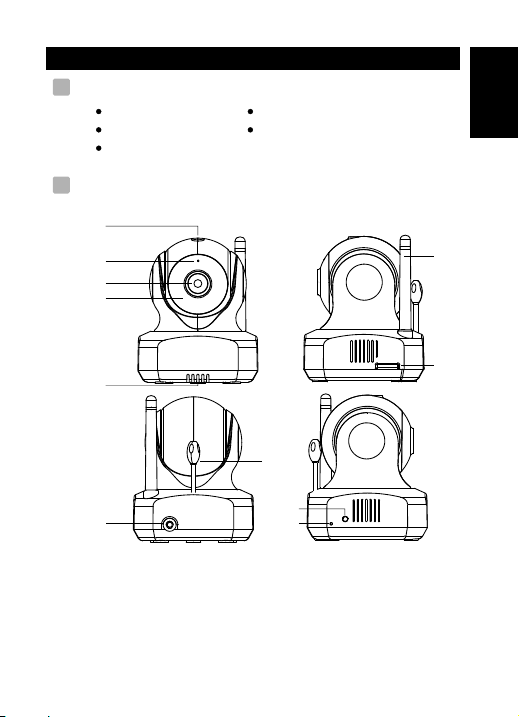
Packa ge C ont en ts
1
One Ca me ra
One Ad ap te r
One Sc re w an d On e Wall An ch or
Produ ct L ayout
2
Came ra
1
2
3
4
Two Cab le C li ps
This U se r' s Ma nu al
ENGLISH
6
5
8
1.Light sensor
2.Microphone
3.Camera lens
4.Infrared LEDs
5.
Speaker
6.Antenna
9
11
10
Micro SD Card slot
7.
8.Power adapter socket
9.Temperature sensor
10.Reset button
11.P ow er /S ta tu s LE D
2
7
Page 4
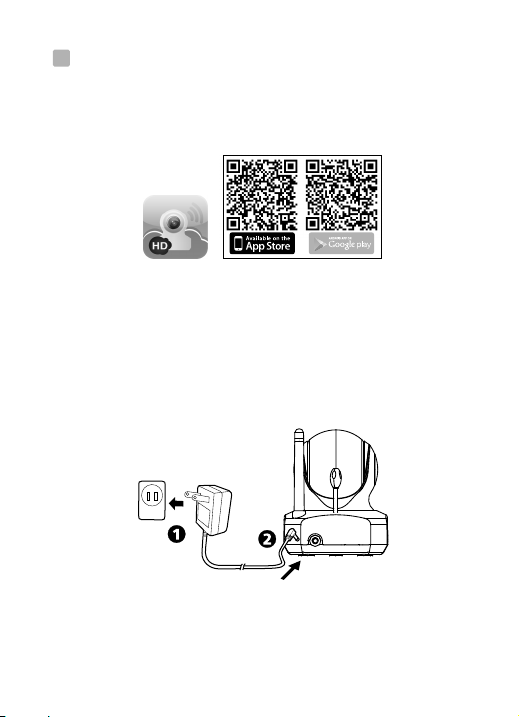
Getti ng S tar te d
3
3. 1
Download Smart iCAM app
Key in the keyword “Smart iCAM” or scan the QR code and
download the app from Apple App Store (iPhone/iPad) or
Google Play Store (Android).
3.
2
Power on the camera
Plug one end of the provided power adapter into a wall outlet and
the other end into the back of the camera to turn on the camera.
The LED on the camera will light up light orange. It takes about 30
to 60 seconds for initial setup and then the LED will start to blink a
dark orange color.
3. 3
First-time Setup
3
Page 5
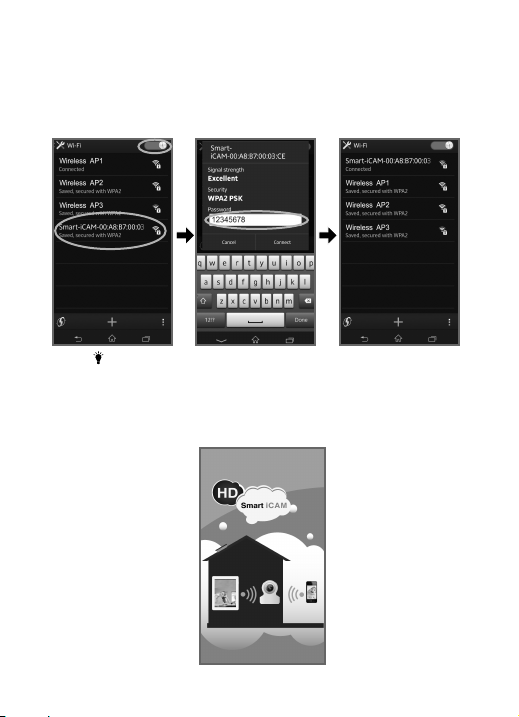
3. 3. 1
Connect your smartphone or tablet to the camera
1. Turn on the Wi-Fi of your smartphone or tablet.
2. Se lect “S mart- iCAM _X X : XX : XX…” u nder Wi- Fi N et works
and e nter th e passw ord. Th e de fault p as sw ord is “1 23456 78”.
Note: If you cannot find “Smart-iCAM_XXXXXX” under Wi-Fi
Networks and the LED on the camera is not blinking, please
follow step 3.6 of this user manual to reset the camera.
3. Launch the Smart iCAM app on your smartphone or tablet.
The welcome screen will be displayed.
4
Page 6
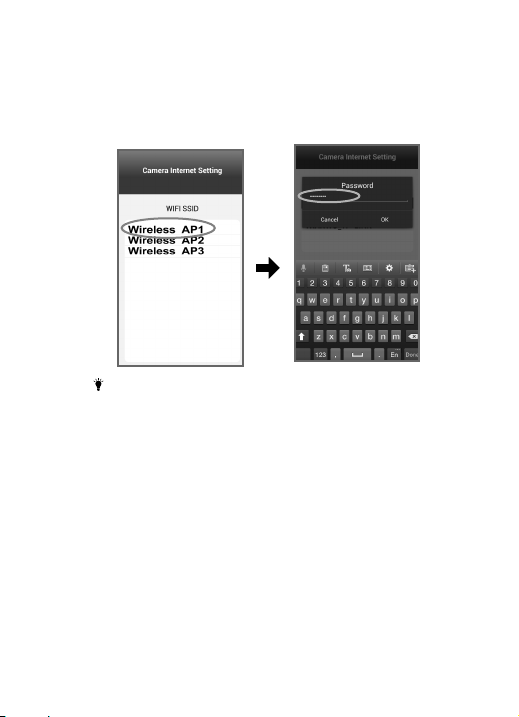
4. Set up an Internet connection
The camera will scan for available Wi-Fi networks (SSID). Select the
name of the Wi-Fi network (SSID) that you wish to connect with the
camera and enter the password of your Wi-Fi router if necessary.
First-time setup is now complete.
Note 1: Once you complete Internet setup, the LED on the camera
will turn green after about 1 minute.
2:
Wi-Fi SSID is the wireless network name.
If the camera cannot find the Wi-Fi network you wish to
3:
connect to, please make sure the camera and the Wi-Fi
router are within range of each other.
4: If you type in the wrong SSID password the camera will
beep three times and then reset to factory default
automatically. Please close the App and follow step 3.3 in
the user manual to set up the camera again.
5: If you have completed Internet set up but the Power/Status
LED is still orange, please check the Wi-Fi router is OK and
make sure the camera and Wi-Fi router are within range of
each other.
6: Make sure your mobile phone is connected to the Wi-Fi
AP/Router you assigned after set up
5
Page 7

3. 3. 2
Viewing live video
1. Select the camera icon in Camera List to view video from the camera.
2. Touch th e image d ispla y area of t he scre en and sl ide on th e
scr een for p an-ti lt func tion.
3. Touch the image display area of the screen and move fingers
apart for digital zoom function.
6
Page 8

3. 4
Add camera to other smartphones or tablets
3. 4. 1
Add camera in LAN (Your mobile phone and
camera are connected to the same Wi-Fi router.)
1. Download the Smart iCAM app.
2. Turn on the Wi-Fi of your smartphone or
tablet and then tap the screen to select
which Wi-Fi router your camera has been
connected to.
3. Launch the Smart iCAM app on your
smartphone or tablet.
4. Tap the “Add New Camera” icon to add
a camera.
5. Tap the screen to select which camera
you wish to add under
“Available Camera List”.
6. Enter password for the camera.
The default password is “admin”.
7. Tap the camera icon in Camera List to view video from
the camera.
If you enter the wrong password, please tap the camera
Note:
icon again and then retype the correct password.
7
Page 9

3. 4. 2
Add camera through remote setup (Your mobile and
camera are NOT connected to the same Wi-Fi router.)
1. Download the Smart iCAM app.
2. Please make sure your smartphone or tablet can link to the
Internet via a Wi-Fi router or 3G/4G mobile network.
3. Launch the Smart iCAM app.
4. Tap the “Add New Camera” icon.
5. Tap the “Add Remote Camera” icon to enter “Add a Remote
Camera” screen.
6. Tap in the UID and password of the camera you want to add.
Note 1: Tap the i (information) icon in live video screen to
get UID information. The UID is 20 characters.
2: The default password is “admin”.
3: If you enter the wrong password, please tap the camera
icon and then retype the password.
7. Tap the camera icon in Camera List to view video from the camera.
3. 5
Add more cameras (Multi-camera)
Follow step 3.3 in the user manual to complete first-time setup for
each camera.
Note: Up to 10 cameras can be added.
8
Page 10

3. 6
Reset the camera to factory default
When the camera has been on for at least 1 minute, press the reset
button (using a small object or a pin) for 5 to 10 seconds.
The camera will beep 3 times and take about 1 minute to reset. The
LED will start to blink a dark orange color.
Note 1: If you do not hear a beeping sound, reset has failed. Please
turn the camera back on and press the rest button again.
Note 2: If you replace a new Wi-Fi router or if you forget the camera
password, the camera needs to be reset to factory default.
Please refer to 3.3 - First time setup in the user manual, to
set up the camera again.
Opera ti on Mo de
4
4. 1
Viewing Live Video
1
2
3
4
5
6
9
Page 11

1. Information :
Tap the icon to get information about the camera.
2. Camera name :
3. Temperature display
4. Photo folder :
Tap the icon to see all of the photos you have taken.
5. Snapshot :
Tap the icon to save a snapshot of the camera on your
smartphone or tablet.
6. Audio ON/OFF :
Tapping the icon can turn on/off sound.
When the audio icon is off , you can speak through the
camera unit of your smartphone or tablet.
4. 2
Camera Setting
Tap the icon to enter camera setting screen.
1
2
3
4
5
6
7
8
Note: For security and management purposes, the following
functions cannot be set when your mobile phone and camera
are not connected to the same Wi-Fi router.
Change Name/Password Voice Detection
Motion Detection Video Setting
Record
10
Page 12

1. Reconnect: If the camera status is “offline”, you need to tap
“Reconnect” to re-establish the Internet connection.
Note: When you complete the camera set up, please tap the “Reconnect”
icon to ensure the Internet connection is successful.
2. Delete: Delete camera from Camera List.
3. Event Viewer: View event logs.
4. Change Name/Password: Change the camera name or password.
The default camera password is “admin”.
To protect your privacy, we strongly
recommend you change the camera
password on a regular basis.
5. Motion Detection:
a. Enable/Disable motion detection.
b. A motion detection event can trigger the
push message alert function and motion
recording function.
Note:
Motion recording is only possible
when a micro SD card is inserted into the camera. To remove
memory card, please disable motion detection first.
c. Touch the image display area of the screen and then slide onto
the screen to outline the motion detection area.
d. The interval between checks is 1 minute.
11
Page 13

6. Record:
Tap the icon to enable HD 720p recording, tap it again to
disable recording.
Note 1:
Recording is only possible when a micro SD card is
inserted into the camera.
2:
The system supports micro SD cards with a maximum
capacity of 32GB.
3: An
1GB memory card is able to record about 1 hour of
video. New images will overwrite old images when the
card is full.
4: If motion detection is not activated, the camera will
record continuously.
5: To playback recorded file
Place the micro SD card into an SD card adapter.
Connect the card adapter to a computer.
Use a media player such as VLC to playback the
recorded file.
Do not remove the memory card while recording is still in
progress, otherwise the recording will be damaged.
7. Voice Detection (VOX):
a. Smart iCAM supports voice detection and push message alert
functions. When the sound from the camera reaches the setting
level, the camera will send an alert message to your smartphone
or tablet, and the camera also can play a pre-recorded voice or
melody automatically.
b. Tapping the sensitivity level bar can adjust the sensitivity level or
disable the VOX function. With the level set to high, the camera
microphone will detect sounds that are lower in volume.
c. Tap the Voice Recorder icon to start recording a voice or melody
that can be played by the camera when VOX is triggered. Tap the
Stop icon to stop recording. Maximum recording time is 10
seconds. The Voice Recorder is only effective when a micro SD
card is inserted into the camera.
d. The interval between VOX checks is 1 minute.
12
Page 14

Note: When using an Android mobile, if you “Exit” the App,
the push message function will not work. In
mode the push message function is still effective.
8. Video Setting:
a. Flip: Tap the Flip icon to flip the video when mounting the
camera on the ceiling.
b. Mirror: Mirror or invert the image.
c. Video Resolution: the number of distinct pixels in each
dimension that can be displayed, i.e.
HD (1280X720) /VGA(640X480) /QVGA(360X240).
“Background”
d. Bit rate: the number of bits conveyed per second in
telecommunications. The higher the rate the greater the
bandwidth consumption.
e. Frame Rate: The frequency at which camera produces unique
consecutive images called frames. The higher the frame rate,
the smoother the video will appear, but that requires more
processing power and system bandwidth. Frame rate varies
according to network conditions, mobile phone performance,
image resolution and object situation.
13
Page 15

a
c
d
e
b
Note 1: To view a camera remotely from outside your home or
office network, the camera needs to be configured to
QVGA resolution to allow better access.
2:
If your mobile and camera are connected to the same router,
but still some camera setting buttons are hidden, please exit
and launch APP again to make sure all camera settings
buttons are effective.
If you select HD or VGA resolution, video streaming
quality may be affected because of insufficient network
bandwidth.
14
Page 16

Troubleshooting
Users cannot connect the camera to a smartphone/tablet through
Wi-Fi router or 3G/4G mobile network
Make sure the power plug is pushed all the way in.
Make sure the camera is turned on and power/status LED is green.
Make sure the camera and the Wi-Fi router are within range of each other.
Make sure the smartphone/tablet is connected to the Internet through a
Wi-Fi or 3G/4G mobile network.
Video streaming is slow or lags
If there is a microwave oven in use near the camera or Wi-Fi router,
remove the oven or turn it off.
Make sure the camera and the Wi-Fi router are within range of each other.
The speed of video feed from the camera largely depends on the speed of the
connection you are using.
Internet speed, either from your Wi-Fi network or 3G/4G mobile network, has
a high impact on the performance of the product. The faster and more stable the
connection speed, the faster you can view video from the camera.
Lower the video resolution, bit rate and frame rate.
There are three main types of broadband Internet connection; ADSL, cable and
fiber optic. If you use an ADSL connection, please set video resolution at QVGA.
To view the camera remotely from outside home or office networks, it needs
to be configured to QVGA resolution to allow better access.
Care and Maintenance
Keep all parts out of reach of children.
Fingerprints or dirt on the lens surface can adversely affect camera performance.
Avoid touching the lens surface with your fingers.
Should the lens become dirty, use a blower to blow off dirt and dust, or a soft,
dry cloth to wipe the lens clean.
Keep the camera dry. Precipitation, humidity and other liquids containing minerals
will corrode electronic circuits.
Do not use or store in dusty or dirty areas.
Do not store in hot areas. High temperatures can shorten the life of electronic devices
and warp or melt certain plastics.
Do not store in very cold areas. When the system warms up (to its normal temperature),
moisture can form inside the case, which may damage electronic circuit boards.
Do not attempt to open the case. Non-expert handling of the device may damage the system.
Avoid dropping or strong shocks.
Operate this product using only the power supply included or provided as an accessory.
Do not overload electrical outlets or extension cords as this can result in fire or electric shock.
15
Page 17

FCC State men t
This equipment has been tested and found to comply with the limits for a Class B
digital device, pursuant to Part 15 of the FCC Rules. These limits are designed to
provide reasonable protection against harmful interference in a residential
installation. This equipment generates, uses and can radiate radio frequency
energy and, if not installed and used in accordance with the instructions, may
cause harmful interference to radio communications. However, there is no
guarantee that interference will not occur in a particular installation. If this
equipment does cause harmful interference to radio or television reception, which
can be determined by turning the equipment off and on, the user is encouraged to
try to correct the interference by one or more of the following measures:
Reorient or relocate the receiving antenna
Increase the separation between the equipment and receiver
Connect the equipment into an outlet on a circuit different from that to
which the receiver is connected
Consult the dealer or an experienced radio/TV technician for help
This device complies with Part 15 of the FCC Rules. Operation is subject to the
following two conditions: (1) this device may not cause harmful interference,
and (2) this device must accept any interference received, including interference
that may cause undesired operation.
Caution
To comply with FCC RF exposure compliance requirements, a separation
distance of at least 20 cm must be maintained between the antenna of this
device and all persons.
This Transmitter must not be co-located or operating in conjunction with
any other antenna or transmitter.
Changes or modifications to this unit not expressly approved by
the party responsible for compliance could void the user authority to operate
the equipment.
16
Page 18

Following the safety tips
To prevent deaths and injuries associated with camera cords,
make sure the camera and AC adapter cords are always out of
reach of the baby by least 3 feet (1 meter).
Note: This is important even if your baby is not yet standing
or mobile.
3 fee t
(1 me tre)
ada pter
cab le
Never use extension cords with AC adapters. Only use the
AC adapters provided.
Specifications
Camera
Frequency
Antenna
Modulation
Image Sensor
Lens
IR LED
Video compression
Audio
Recording
Pan & Tilt
Dimensions
Weight
Power
Operating temperature
Spe cific ation s are subj ect to ch ange wi thout p rior no tice.
* iPh one, iPa d are tr adema rks of Appl e Inc. , regist ered i n the U.S. and othe r coun tries .
* Goo gle Play is a trad emark of Googl e Inc.
Thi s item is i n compl iance w ith the e ssent ial req uirem ents an d other r eleva nt
pro visio ns of Dir ectiv e 1999/ 5/EC.
2.4 GHz
Dipole antenna
DBPSK, DQPSK, CCK and OFDM
Color CMOS
f 3.0mm, F 2.4
8 pcs
H.264
Two-way audio talk (half-duplex)
Support Micro SDHC Card,
class 6 or above, up to 32GB
H: 270 deg, V:120 deg
8.5(W) x 10.6(H) x 8.5(D) cm
229g
DC 5.9V, 2A
0℃ ~ 40℃ (32℉ ~ 104℉)
17
Page 19

Page 20

408-0 00 75 3- 00
 Loading...