


M250 Reader
User Manual

M250 Reader User Manual
M250 Reader 1
Introduction 1
Features 1
Package Contents 2
Hardware 2
LED Indicators 2
Connectors 4
Antennas 4
Environmental Conditions 4
Upgrading Reader Firmware 6
Tag Orientation 6
Antenna Orientation 6
Getting Started 9
Configuring the Reader for DHCP 9
Reader Web Console 12
Add aTag Group Code 13
Summary 14
Tools 15
Ping a Server 15
Reboot theReader 15
Configuration 16
Reader Configuration 17
Users 18
Up Connect 19
Time 20
Serial Ports 21
Resetting the Reader 22
Mounting the Reader 23
Appendix I
Warranty and Service I
Limited Standard Warranty Terms I
Standard Warranty Limitations I
Obtaining Service & Support I
RF Code Customer Support II
Using the M240 or M250 Reader withWindows 7 III
RF Code Support and Professional Services XII
i

Trademarks
RF Code™ and the RF Code logo are trademarks of RF Code, Inc. Microsoft®, Windows, Windows
Server, SQL Server, and Internet Explorer are trademarks of the Microsoft Corporation in the United
States and other countries. PostgreSQL™ is a registered trademark of the PostgreSQL Global
Development Group. Intel Core Duo Processor ™ is a trademark of Intel Corporation in the US and/or
other countries. Firefox® is a registered trademark of the Mozilla Foundation. ChromeTMis a trademark of
Google, Inc. Safari® is a trademark of Apple Inc., registered in the US and other countries. IBM® and
WebSphere® are trademarks of IBM Corporation, registered in the USand/or other countries. Oracle™,
Java™, and Java Management Extensions™ are registered trademarks of Oracle and/or its affiliates.
BACnet® is a registered trademark of ASHRAE. Modbus™ is a trademark of the Modbus Organization,
Inc. Eclipse™ and BIRT™ are trademarks of the Eclipse Foundation, Inc. NetBotz™ is a Registered
Trademark of American Power Conversion Corporation. The Bluetooth® word mark and logos are
registered trademarks owned by Bluetooth SIG, Inc. and any use of such marks by RF Code is under
license. All other product names are copyright and registered trademarks or trade names of their respective
owners.
Bluetooth QD ID: B012541
ii

Copyright Statement
M250 Reader User Manual REV 05
Copyright © 2008-2017 RF Code, Inc. All Rights Reserved.
This document, the hardware, and the firmware described therein are furnished under license and may only
be used or copied in accordance with the terms of such license. The information in these pages is furnished
for informational use only, is subject to change without notice, and should not be construed as a
commitment by RF Code, Inc. RF Code assumes no responsibility or liability for any errors or inaccuracies
that may appear in these pages.
Information in this document is provided solely to enable system and software users to use RF Code
products. RF Code reserves the right to make changes without further notice to any products herein. RF
Code makes no warranty, representation, or guarantee regarding the suitability of its products for any
particular purpose, nor does RF Code assume any liability arising out of the application or use of any
product, and specifically disclaims any and all liability, including without limitation consequential or
incidental damages.
The user of this system is cautioned that any changes or modifications to this system, not expressly
approved by RF Code, Inc., could void the warranty. Every effort has been made to supply complete and
accurate information. However, RF Code assumes no responsibility for its use, or for any infringements of
patents or other rights of third parties, which would result.
RF Code, Inc.
9229 Waterford Centre Blvd.
Suite 500
Austin, TX 78758
www.rfcode.com
iii

Regulatory Compliance
FCC Compliance
This device complies with part 15 of the FCC Rules. Operation is subject to the following two conditions:
(1) This device may not cause harmful interference, and (2) this device must accept any interference
received, including interference that may cause undesired operation.
This equipment has been tested and found to comply with the limits for a Class A digital device, pursuant
to part 15 of the FCC Rules. These limits are designed to provide reasonable protection against harmful
interference when the equipment is operated in a commercial environment. This equipment generates, uses,
and can radiate radio frequency energy and, if not installed and used in accordance with the instruction
manual, may cause harmful interference to radio communications. Operation of this equipment in a
residential area is likely to cause harmful interference in which case the user will be required to correct the
interference at his own expense.
Industry Canada Compliance Statement
This Class A digital apparatus meets the requirements of the Canadian Interference-Causing Equipment
Regulations.
Avis de conformité à la réglementation d’Industrie Canada
Cet appareil numérique de la classe A respecte toutes les exigences du Règlement sur le matériel brouilleur
du Canada.
The system is designed to operate with RF Code RFID Tags – whose operating frequency is 433.92 MHz
which have been certified or are in the certification process. These devices comply with part 15 of the FCC
rules. Operation is subject to the following two conditions:
(1) these devices may not cause harmful interference, and
(2) these devices must accept any interference received, including interference that may
cause undesired operation.
a. FCC ID: P6F2005433 for beacon intervals greater than, or equal to 10 seconds.
CECompliance
This is a Class A product. In a domestic environment, this product may cause radio interference, in which
case the user may be required to take adequate measures. This equipment complies with the requirements
relating to electromagnetic compatibility, EN 55022 class A, the essential protection requirement of
Council Directive 89/336/EEC on the approximation of the laws of the Member States relating to
electromagnetic compatibility.
iv

WEEECompliance
Do Not Dispose Product with Municipal Waste. Special Collection/Disposal Required.
v

Battery Statement
RF Code warrants all to be free from defects in materials and workmanship for a period of one year. Based
on the ratings and specifications from the battery manufacturers, RF Code develops usage models to
calculate the life of the . Like all models there are assumptions and approximations involved. The values
are to be taken as engineering estimates – not guaranteed performance.
vi

M250 Reader
M250 Reader
Introduction
The 433 MHz M250 reader interprets and reports the radio frequency messages emitted by RF Code
tags. Tag transmissions can be processed in real-time to quickly locate and identify tagged assets or
personnel in defined areas. The M250 reader is compatible with wired and wireless networks for rapid
integration into an organization’s IT infrastructure. With a modular design and low price, the M250
Reader provides an economical solution to a wide variety of asset tracking problems. RF Code’s
patented communication protocols allow for very high tag densities. Large populations of tags can be
monitored using a single reader. The M250 reader’s maximum sensitivity (maximum range) depends
upon the installation, location and antenna configuration. This manual provides instructions for the
M250 Reader setup and operation.
Features
Some of the features included in the M250 Reader are:
l Instantaneous tag reporting
l Optional Wi-Fi interface
l High throughput performance supports large tag populations
l Patented anti-collision technology to manage high tag densities
l Dual Channel Receiver provides tag signal reception diversity
l Support for up to 32 tag group codes
l Support for multiple connections over the same port
M250 Reader UserManual 1

M250 Reader
Package Contents
The M250 Reader System package contents are:
l M250 Reader
l Two ¼-wave helical antennas
l 110/220 VAC to 12VDC Power Supply and Cord
Hardware
The Reader is housed in a 5.79 inch by 0.82 inch by 5.75 inch (14.7 cm by 2.1 cm by 14.5 cm) metal
chassis and contains the internal components of an RFID Reader combined with connections to allow
for both Ethernet and Wi-Fi (optional) connectivity.
LED Indicators
There are two LEDs mounted on the front of the M250 Reader.
l On-Ready LED: This LED indicates the Reader has power applied through an external
power adapter.
l Tag Activity LED: This LED is used for two purposes: (1) to show the status of the Reader
while in standby mode and (2) to show Tag detections while in operation.
1. Operating: The Tag Activity LED flashes intermittently, indicating the Reader has
read one or more Tags each time it flashes. Because the Reader can decode Tags
faster than the light can be turned on and off, a single flash may indicate more than
one Tag being decoded.
2. Standby Mode: The Tag Activity LED turns on and off at a distinctive rate that
indicates the Reader is in standby mode.
There are four LEDs mounted on the back of the M250 Reader.
M250 Reader UserManual 2

l Link/Activity: This LED indicates that the M250 Reader is connected to the network. The
Link light stays solid when there is no network activity and flashes when activity is present.
l 100/10: When on, this LED indicates a 100MBit Ethernet connection. When off, this LED
indicates a 10MBit Ethernet connection.
l In Use: This LED indicates there is a connection to the M250 Reader and tag data is being
read from the reader.
l Status: This LED indicates that the M250 Reader is connected and receiving power.
M250 Reader UserManual 3

Connectors
Several connectors are housed on the back of the M250 Reader.
l Power - DC barrel jack: allows for connection to an AC power brick that outputs 12VDC.
l Power - DC terminal block: allows for direct connection to DC power sources. Power
requirements are 12 to 24 VDC.
Note: Direct AC power connection is not supported for this device.
l Wi-Fi (not available on the Standard version): A Wi-Fi antenna connection port allows
for connection of an external Wi-Fi antenna that is available with the Wi-Fi Enabled M250
Reader. The M250 Reader supports 802.11b and 802.11g protocols.
l Ethernet: RJ-45 Ethernet jack.
l USB-A: Future expansion.
l USB-B: A plug that allows for serial connectivity for configuration and tag event output.
Figure 1: Reader Data Connectors
Antennas
Each M250 Reader comes with two ¼-wave helical antennas. These antennas provide a tag read-range
of approximately 100 meters (open air when no background RF interference is present). The reader’s
maximum sensitivity (maximum range) depends upon the operating environment.
Environmental Conditions
The M250 Reader is approved for use within the temperature ranges set forth below.
M250 Reader UserManual 4

l Operation: -4 to +158 degrees Fahrenheit (-20 to +70 degrees Celsius)
l Storage: -40 to +176 degrees Fahrenheit (-40 to +80 degrees Celsius)
M250 Reader UserManual 5

Upgrading Reader Firmware
The M250 Reader has the ability to be updated as new firmware is released. To upgrade the firmware,
launch the Reader Configuration Utility, found on the RF Code Reader Utilities downloadable image.
For information regarding this process, please refer to the Reader Configuration Utility User Manual
available from the RF Code support website. Firmware can also be upgraded by downloading the
latest version from the support site:
http://www.rfcode.com/support_downloads
Important: It is vital these updates be obtained directly from RF Code or its
authorized partners, since these files define the operation of the Reader.
Corrupted files will render the Reader inoperable.
Tag Orientation
Wherever possible, RF Code Tags should be placed in the same orientation (plane) in order to
optimize the Reader’s ability to receive transmissions from the tags. The tags should not be placed
closer than 1/2 inch in proximity to one another.
Other tag considerations are:
l Tag transmissions, signal propagation, and read-range are diminished when tags are moun-
ted very close to the ground.
l Read-range will vary when tags are mounted to metal objects; the signals will not penetrate
solid metal.
l Care should be taken when mounting tags near metal racks, rails, or conveyor belts.
l Tag performance is diminished near water; signals are not propagated through water.
Antenna Orientation
The M250 Reader has two receiver channels (Channel A and Channel B) that can operate
independently or jointly to provide diversity for signal reception from active RFID tags.
M250 Reader UserManual 6

Figure 2: Antenna Positioning
Each antenna post supplies an RF signal to the two parallel radio receivers in the M250 Reader.
Antenna input impedance is 50 ohms nominal.
Both the type of antennas used and the Reader range setting determine the effective read range. The
normal Reader-range features are defined using ¼-wave helical antennas. These antennas are
appropriate for most Reader applications. Optional antennas that offer diverse receiving properties or
extend the range of the Reader are available for the M250 Reader. Contact your RF Code reseller for
more information.
The Reader can operate with one antenna on either antenna post, but the benefit of receiver diversity is
only obtained when both antennas are attached and pointed in different directions.
To achieve the best receiver diversity:
l Antenna Angle from Reader: Point the antennas at different angles from the Reader.
l Antenna Angle from Each Other: Antennas should be at 90-degree angles relative to each
other.
l Height: As a rule, the higher a Reader is positioned above the ground or floor, the better the
Reader’s detection range.
Important: Do not allow antennas to overlap. Keep the antennas separated.
Allowing the antennas to overlap reduces the effectiveness of each antenna.
To minimize RF interference:
l Separation: Maintain a minimum of four to six feet of separation between the Reader anten-
nas and potential RF radiators such as computers, monitors, printers, and electronic office
equipment. RF emissions from equipment local to the environment where the Reader is
deployed can limit the Reader’s effective read range.
M250 Reader UserManual 7

l Height: Do not operate the Reader on or close to the floor or ground. Grounded and reflect-
ive metallic structures around the Reader and/or Tags affect the system’s performance. For
best results, the Reader should be mounted as high above the ground as reasonably possible.
TIP: Low-loss SMA coaxial extension cables may be used to extend the antennas from the
Reader (available separately).
M250 Reader UserManual 8

Getting Started
Readers should be configured (if necessary) prior to being installed in their permanent locations.
Readers must be configured prior to use if the IP address needs to be assigned or if the “Up Connect”
feature (explained below in this document) is to be used. This is done through the Reader
Configuration Utility which is available in the downloadable image provided by RF Code. This
software is also available for download from the RF Code web page, support.rfcode.com. Readers
may not need to be pre-configured if the intent is to use DHCP for IP address assignment.
Configuring the Readerfor DHCP
By default the reader is set to DHCP and will be automatically assigned a DHCP address by a DHCP
server if one is available. If a DHCP server is present, the reader will attempt to request a hostname for
DNS resolution as well. Most, but not all DHCP servers are implemented in a way that will allow
DNS resolution for DHCP clients that request a specific name. The M250 will request a hostname
similar to rfcodexxxxxx.domainname.com where xxxxxx are the last six digits of the MAC address of
the wired Ethernet interface on the reader and domainname is your domain that the DHCP server will
provide. A label on the bottom of the reader lists the default hostname for each reader.
To Configure the Reader forDHCP:
1. Attach a power source to the M250 Reader (AC power brick, DC power, or Power Over Ethernet cable).
2. Attach an Ethernet cable to the Ethernet port of the M250 Reader and to an available network
port on the switch.
Note: For initial configuration, the M250 Reader must be attached to a network port that is on
the same subnet as the PC that you are using to connect to the M250 Reader with.
3. Open a web browser window and type http://rfcodexxxxxx.domainname.com where rfco-
dexxxxxx is the default hostname listed on the bottom of the reader and domainname is the
domain handed out by the DHCP server.
4. If you are able to browse to the M250 Reader, then DHCP worked properly. You may configure features like Up Connect, configure security, or use the web-based diagnostics. If the
reader was not found, then your DHCP server probably does not support hostname resolution
and you will need to use a static IP address to connect the reader to your network or alternately
configure “Up Connect” to connect your reader to your RFID application. Use the instructions
below (Configuring the Reader for Static IP Address or DHCP with Up Connect) to configure
your M250 Reader.
M250 Reader UserManual 9

Configure the Reader forStatic IP Addressor DHCP withUp
Connect
1. Install the RCU on the PC being used to configure the reader.
Note: If you run into any issues installing the driver, refer to the following RF Code KB
Article: support.rfcode.com/customer/portal/articles/721801
2. Connect the reader to the USB port. Depending on which device you have, this may require
using a USB-A–to–USB-B cable like those included in a RF Code pilot pack.
Note: USB cables are not provided with purchases other than pilot packs; they can be
purchased at an electronics store or big box general retailer.
3. When prompted, install the RFCUSB.inf driver from the downloaded image’s installation directory.
4. Run the configuration utility.
a. Select Local as the connection method. The M250 Reader should be seen on one of
the COM ports listed.
b. Select the COM port and click Next.
c. If desired, change any setting in the configuration tabs including the IP address and Up
Connect settings.
d. Click Save Changes so that the configuration is saved to the reader.
5. After a static IP is entered, you will be able to connect to the M250 Reader with a web
browser. If you wish to use DHCP, the Reader Configuration Utility will also report the IP
address that has been assigned to the reader. However, this address may change. If you choose
to configure the reader using a static IP, use the Up Connect feature to connect the M250
Reader to an RF Code software system such as CenterScape or Asset Manager.
Note: If the M250 Reader is provided with wireless networking, the Ethernet interface should
be disabled after the wireless interface is connected. While both interfaces may be enabled at
the same time, only one will be routable.
6. Attach the provided ¼-wave helical antennas, ensuring proper steps have been taken to maximize desired read-range through antenna orientation (Please refer to the Antenna Orientation
section of this document).
7. Mount the M250 Reader using the process described in the Mounting section of this document.
8. Configure the M250 Reader within RF Code’s CenterScape or Asset Manager using the web
UI.
a. open the web UI and log in.
b. Navigate to Admin Console >Configuration >Readers.
c. Select a Reader from the list to configure that reader, or click New to add a reader.
d. Complete all required and any additional desired fields. In the Up Connect Settings sec-
tion, set the fields to:
l Up Connect Enabled: Check this box.
l Up Connection Reader ID: Complete this field with the information you
used when configuring Up Connect in the RCU or in the web portal (GUI).
M250 Reader UserManual 10

l Up Connection Password: Complete this field with the information you
used when configuring Up Connect in the RCU or in the web portal (GUI).
l Confirm Password: Complete this field with the information you used
when configuring Up Connect in the RCU or in the web portal (GUI).
e. Click Save Changes.
Please refer to the Reader Configuration Utility User Manual for further instruction on using the
Reader Configuration Utility. Once you have configured the M250 Reader with the Reader
Configuration Utility, you may access the M250 Reader directly by accessing the Reader Web
Console to perform further diagnostic and configuration tasks.
Note: To obtain Tag data or customize the way the M250 Reader sends Tag data to your
software application please refer to the Reader API document available on the RF Code
website: http://support.rfcode.com.
M250 Reader UserManual 11

Reader WebConsole
Once an IP address has been assigned to the M250 Reader using the Reader Configuration Utility
software, the Reader Web Console can be accessed to give you a direct connection to the Reader. To
access the Reader Web Console, open a web browser and type the IP address of the reader in the URL
address bar. The main console screen will appear. If you configured a username and a password with
the Reader Configuration Utility, you may be prompted for this information before you will be able to
access the Reader Web Console.
Figure 3: Reader Web Console
There are two main tasks available to you in the Reader Web Console: Diagnostics and Configuration.
M250 Reader UserManual 12

Task orSub-Task Purpose
Configuration
Network Configuration
Reader Configuration
Users Add user authentication to the M250 Reader.
Up Connect
Time
Diagnostics Use this task menu to assess the conditions of the reader.
Tags
Summary
Use this task menu to set up the reader or modify settings.
View and modify the different types of network configurations you have set up for the Reader.
View and adjust the Noise Floor level for Channel A
and Channel B of the Reader.
Allows for reader communication with Zone Managers
to be more “firewall friendly”. When this option is selected, the M250 Reader is configured to initiate the contact
with the Zone Manager rather than requiring that access
be granted to allow the Zone Manager to connect to readers behind a firewall.
Allows the time settings to be configured for a Reader.
By default this Reader function is already set to local
time with access configured for three NTP (Network
Time Protocol) Servers.
Verification tool to ensure that the reader is online and
detecting tags.
Reports version, model, IPaddress, and other information that has been configured for the Reader.
Reboot
Button available from Summary sub-task allows you to
reboot reader.
Add a Tag GroupCode
The Tags sub-task can be accessed by navigating to Diagnostics > Tags. If the Reader has not been
configured to accept data from tags, add the appropriate tag group codes.
To add a group code, click the Add button and a window will appear. Enter a group code and
treatment code (see below) to test the Reader with. Click the OK button to add the Tag Group. If your
reader is online and reading tags properly you should begin to see tag data in the main task screen.
All RF Code tags are defined as being members of a specific group, and have a unique tag ID number
within that group. The group code is a string of six letters and is assigned by RF Code. Each group
code is unique for a given tag type. When an RF Code reader is configured, it can be supplied with up
to 32 group codes. Each group code has a corresponding treatment code. The treatment code instructs
the application software how to interpret the payload data for each tag event within that group code.
RF Code tags have the ability to transmit various types of data within their radio frequency beacons
such as flags for various sensors including for motion, panic, tamper, infrared location, humidity,
pressure, temperature, and low battery amongst others. The group code and unique, numeric tag ID are
printed on a label affixed to each tag.
M250 Reader UserManual 13

Figure 4: Group ID, Tag ID, and Treatment Code Location
Note: A support page with the most updated list of group/treatment codes is available to help
you determine your specific Group Code and Treatment Code:
support.rfcode.com/customer/portal/articles/843080
Figure 5: Example Tag Data in Tags Sub-Task
Summary
The Summary sub-task can be accessed by navigating to Diagnostics > Summary. This sub-task is
available to provide a report of version, model, IP address, etc. information that has been configured
for the Reader.
M250 Reader UserManual 14

Figure 6: Summary Sub-Task
Tools
The Tools sub-task can be accessed by navigating to Diagnostics > Tools. This sub-task is available to
test reader connection with a server or to reboot the reader.
Ping a Server
To ping a server, type in the Hostname of the server and choose a Protocol from the drop down list
(Both, IPV4 or IPV6), then click the Ping button.
Reboot the Reader
To reboot the Reader, click the Reboot button. You will be prompted with a dialog box to confirm if
you want to reboot the reader. If you would like to reboot the reader, select the Reboot button. If you
want to opt out, select the Don’t Reboot button.
M250 Reader UserManual 15

Figure 7: Tools Sub-Task
Configuration
Within the Configuration task, there are five sub-tasks that will allow you to modify reader settings that
were initially configured using the Reader Configuration Utility: Network Configuration, Reader
Configuration, Users, Up Connect, and Time.
NetworkConfigurations
The Network Configuration sub-task can be accessed by navigating to Configuration > Network
Configuration. Within this sub-task you may view and modify the different types of network
configurations you have set up for the Reader. Please refer to the Reader Configuration Utility Manual
for more information regarding specific network configuration tasks.
SSL Certificate Configuration
By default, when HTTPS is enabled, a self-signed 10-year SSL certificate is generated so that
communication on HTTPS port is encrypted. To communicate with both encryption and
authentication, an SSL certificate must be digitally signed by a well-known certificate authority (CA).
Please contact your Network or System Administrator for obtaining a signed SSL Certificate.
To configure the M250 Reader with the SSL Certificate, perform the following steps:
M250 Reader UserManual 16

1. Obtain a private key using a preferred tool or a certificate authority may provide this service.
Please archive the key and file in a safe place for security purposes. This key will be needed
for SSL certificate configuration later.
2. A Certificate Signing Request (CSR) is generated based on the private key.
3. Submit the CSR to a certificate authority.
4. The certificate authority issues an SSL certificate based on the CSR and in a PEM format.
5. Once a signed SSL certificate is obtained from CA, import it to the M250 Reader:
6. Copy the SSL certificate portion from “BEGIN CERTIFICATE” to “END CERTIFICATE”
from the PEM and paste it into the “SSL Certificate” field.
7. Copy the private key and paste it to “SSL Private Key” field.
8. Click the Save Changes button for the signed SSL certificate to take effect.
Note: If a signed SSL certificate configuration is not successful (for example if the SSL
Certificate and the SSL Private Key do not match) the M250 Reader’s self-signed certificate
will take place.
Figure 8: Network Configuration Sub-Task
Note: If you modify any settings, click the Save Changes button.
Reader Configuration
The Reader Configuration sub-task can be accessed by navigating to Configuration > Reader
Configuration.
Within this sub-task you may view and adjust the Noise Floor level for Channel A and Channel B of
the Reader.
M250 Reader UserManual 17

Figure 9: Reader Configuration Sub-Task
l Channel A Dynamic Noise Floor: When this box is checked, the noise floor for this chan-
nel is adjusted automatically.
l Channel A Noise Floor: Enter a value to set the noise floor for channel A antenna.
l Channel B Dynamic Noise Floor: When this box is checked, the noise floor for this chan-
nel is adjusted automatically.
l Channel B Noise Floor: Enter a value to set the noise floor for channel B antenna.
Click the Save Changes button when you have completed your adjustments to the Reader settings.
Users
The Users sub-task can be accessed by navigating to Configuration > Users. This sub-task can be
used to add user authentication to the M250 Reader.
Figure 10: Users Sub-Task
M250 Reader UserManual 18

Add a User
1. Click the New button.
2. Enter a username, password, confirm the password and select a user role.
l Administrator: has complete access and control of the Configuration and Diagnostic task
l Configuration View: has view only access to the Configuration task and can utilize the Dia-
gnostics tasks
l Event View: only has access to the Diagnostics tasks of the Reader
3. Click the Save Changes button.
Note: The first user that must be created is the Admin user, so the user role will default to
Administrator.
Note: After a user is created, neither the User ID field nor the Role field can be changed. A
new password can be assigned, but to change either the ID or the Role of a user, the user must
be deleted and then created again as a new user.
Delete a User
To delete a user, select the user from the list that you wish to delete and click the Delete button.
Up Connect
The Up-Connect sub-task can be accessed by navigating to Configuration > Up Connect. This sub-
task allows for reader communication with Zone Managers to be more “firewall friendly”. When this
option is selected, the M250 Reader is configured to initiate the contact with the Zone Manager rather
than requiring that access be granted to allow the Zone Manager to connect to readers behind a
firewall.
Figure 11: Up Connect Sub-Task
M250 Reader UserManual 19

Configuring Up Connect
To add an Up Connect Configuration, click the New button. Populate the following fields and click
the Save Changes button.
l ID: Enter a name for the Up Connect configuration.
l Enabled: Check this box to enable the reader to up connect to a Zone Manager.
l Hostname: Input the IP address of the Zone Manager that the reader should connect to.
l Port: Input the port number over which the reader will communicate with the Zone Man-
ager.
l Up Connect ID/Password: Input and verify a reader ID and password that will be utilized
in the Up Connect configuration of Zone Manager.
Note: if you want to enable and use Up Connect, you must also configure the Up Connect
settings in the M250 or Zone Manager web console as well.
l Status: Once the Up Connect link has been configured, this field will populate with the con-
nections status for the Up Connect link. User configuration is not require for this field.
l Message: This field will populate with a message regarding the status of the Up Connect
link. User configuration is not required for this field.
Deleting an Up-Connect Configuration
To delete an Up Connect Configuration, select the configuration from the list that you wish to delete
and click the Delete button.
Time
The Time sub-task can be accessed by navigating to Configuration > Time. This sub-task allows the
time settings to be configured for a Reader. By default this Reader function is already set to local time
with access configured for three NTP (Network Time Protocol) Servers. Users may need to adjust
these settings for their own network security policies. There are three primary ways that users may
desire to configure their time settings:
Figure 12: Time Sub-Task
M250 Reader UserManual 20

l Default: In this instance, the time would be automatically set using the NTP Server and then
would continue to automatically keep time by periodically checking with the three default
NTP Servers provided from the factory.
l Automatic Time Configuration: In this instance, the time can be manually set by choosing
a date and time from the pull-down menu and clicking the Set to your computer’s time button. Then the NTP Server that are configured by default can be edited, deleted, or moved by
clicking on the corresponding button. Finally, click upon the Save Changes button to save
the configuration.
l Manual Time Configuration: In this instance, the time can be configured manually by
selecting a date and time from the pull-down menu and clicking the Set to your computer’s
time button. Then delete the default NTP servers by selecting each one in turn and clicking
the Delete button. Finally, click the Save Changes button to save the configuration.
Serial Ports
The Serial Ports sub-task allows for the configuration of the Reader for USB Serial Device integration
(such as a Global Positioning System device).
Figure 13: Serial Ports Sub-Task
To access this sub-task a USB serial device must be plugged into the Reader. Once you have plugged
the device into the Reader, access the Serial Ports sub-task by navigating to Configuration > Serial
Ports. The serial device will appear in the list on the left and you will notice that the Serial Port
configuration menu (on the right) is populated by default based on settings obtained from the serial
device. Some configuration may be necessary for your serial device. The configuration (if any) that is
needed will be determined by consulting the device literature (user manual, etc.) that came with your
serial device.
M250 Reader UserManual 21

Resetting the Reader
To reset the Reader settings back to the factory defaults, follow these steps:
1. Verify that power is applied to the Reader.
2. Flip the Reader upside-down.
3. Using a pointed object, press the Reset button for five (5) seconds.
Note: Make sure you can tacitly feel the button being depressed. For example, most ball-point
pens are not long enough to engage the button.
4. Release the Reset button. The lights will blink, and then the Reader will reboot.
5. The Reader will now be reset to the factory default settings.
Figure 14: Reader Reset Button Illustration
M250 Reader UserManual 22

Mounting the Reader
To mount the Reader, please use the following steps:
1. Flip the Reader upside-down and use the four screws provided to attach the mounting plate to
the bottom of the Reader.
2. Attach the RF antennas and the WiFi antenna (for optional Wi-Fi enabled M250 Readers).
3. Thread screws (not provided) through the mounting cut-outs on the mounting bracket and
mount the Reader to the wall or ceiling.
4. Attach the provided power supply cord to the Reader and to an available electrical outlet or use
the PoE (Power over Ethernet) feature to power the reader. All M250 Readers support and
have built-in PoE and do not require an external adapter.
Figure 15: Reader Mounting Plate Illustration
M250 Reader UserManual 23

Appendix
Warranty and Service
Limited StandardWarranty Terms
RF Code warrants its products to be free from defects in materials and workmanship for a period of 1
year (12 months) for hardware and software from the date of purchase from RF Code. Its obligation
under this warranty is limited to repairing or replacing, at its own sole option, any such defective
products. This warranty does not apply to equipment that has been damaged by accident, negligence,
or misapplication or has been altered or modified in any way. This warranty applies only to the original
purchaser (end-user) and is not transferable.
Standard Warranty Limitations
Except as provided herein, the entire liability of RF Code and its suppliers under this limited warranty
will be that RF Code will use reasonable efforts to repair or replace, without charge, all defective
Products returned to RF Code by a Customer, all as more particularly described in the End User
Warranty. Except for the express warranties stated herein, RF Code makes no other representations or
warranties and RF Code hereby disclaims, all other warranties, express, implied, statutory, or
otherwise, including without limitation, any warranty of merchantability, noninfringement of third
party intellectual property rights, fitness for a particular purpose, performance, satisfactory quality, or
arising from a course of dealing, usage or trade practice.
ObtainingService & Support
For in-warranty service, customers have several options. Customers having difficulty with RF Code
products should attempt to solve those problems through RF Code’s Technical Support Problem
Escalation Process:
First, contact the RF Code representative or other distributor from whom the RF Code product was
purchased for information on how to obtain local support.
Second, contact the RF Code Customer Support via e-mail.
Third, contact the RF Code Customer Support via the Support Line.
For product returns, the support engineer will provide a return material authorization (RMA) number.
No returns will be accepted without an RMA number. If the warranty expired, there is a charge for
M250 Reader UserManual I

repair or replacement per RF Code’s out-of-warranty policy. For full details of the RF Code RMA
policy, please review the “RF Code Warranty, RMA, and Extended Warranty Policy” document.
RF Code Customer Support
RF Code Customer Support gives entitled customers and partners the ability to contact RF Code about
installation and usage-related questions as well as make defect inquiries about eligible products that are
covered under RF Code warranty agreements. A team of technical specialists can be contacted
electronically or via phone.
The Support Line is available to provide General Support during normal business hours: Monday
through Friday, 8:00 a.m. to 5:00 p.m. Central time, excluding national holidays.
Online Resources: support.rfcode.com
E-mail: support@rfcode.com
Voice: 512.439.2244 or toll-free at 866.830.4578
M250 Reader UserManual II
Using the M240 or M250 Reader with
Windows 7
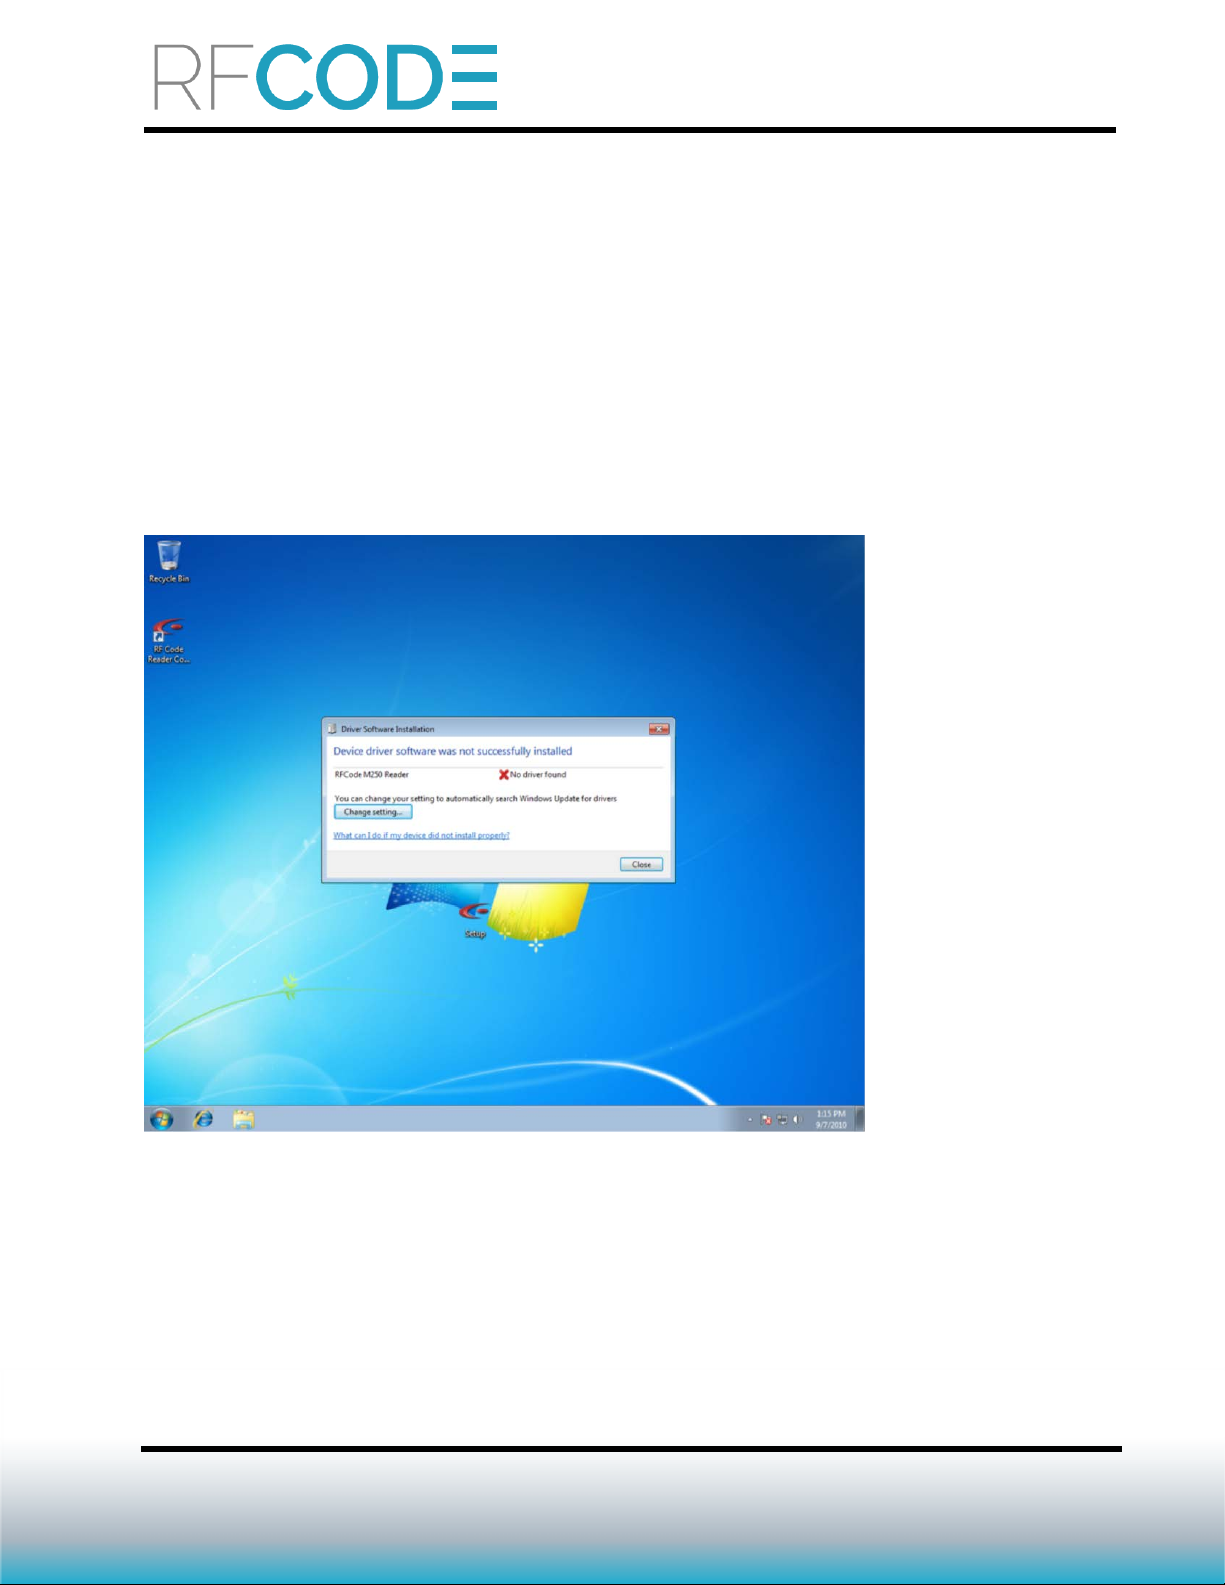
To use the M240 or M250 Reader with the Windows 7 Operating System, the following additional
configuring steps should be performed:
1. Install the M240 or M250 Reader driver software that came with your RF Code Reader Configuration Utility downloaded image.
Figure 1: Reader Driver Software Installation
M250 Reader UserManual III

1. Navigate to Start > All Programs > Devices and Printers.
Figure 2: Navigate to Devices and Printers
M250 Reader UserManual IV

1. Right-click on the RF Code M240 or M250 Reader and select Properties.
Figure 3: Select Reader Properties
M250 Reader UserManual V

1. Access the Hardware tab and select Properties.
Figure 4: Select Properties in the Hardware Tab
M250 Reader UserManual VI

1. Click Change Settings and Update Driver.
Figure 5: Update Driver Option
M250 Reader UserManual VII

1. Choose Browse my computer for driver software.
Figure 6: Browse My Computer Option
M250 Reader UserManual VIII

1. Select the folder in which you have installed the Reader Configuration Utility.
Figure 7: Folder Selection
M250 Reader UserManual IX

1. A dialog box will appear that will indicate that Windows can’t verify the publisher of the
driver software. Click Install this driver software anyway.
Figure 8: Install Driver Software
M250 Reader UserManual X

1. You will see a dialog box indicating that the driver software has been installed successfully.
You can now access your M240 or M250 Reader using the Reader Web Console.
Figure 9: Reader Driver Installed Successfully
M250 Reader UserManual XI

RF Code Support and Professional Services
For additional information about functionality that is not described in this document, please visit the RF
Code support website and/or contact RF Code Support.
For more information about RF Code Professional Services, refer to:
rfcode.com/solutions/professional-services
M250 Reader UserManual XII
 Loading...