

Rexel Auto+ 250X User Manual [dk]

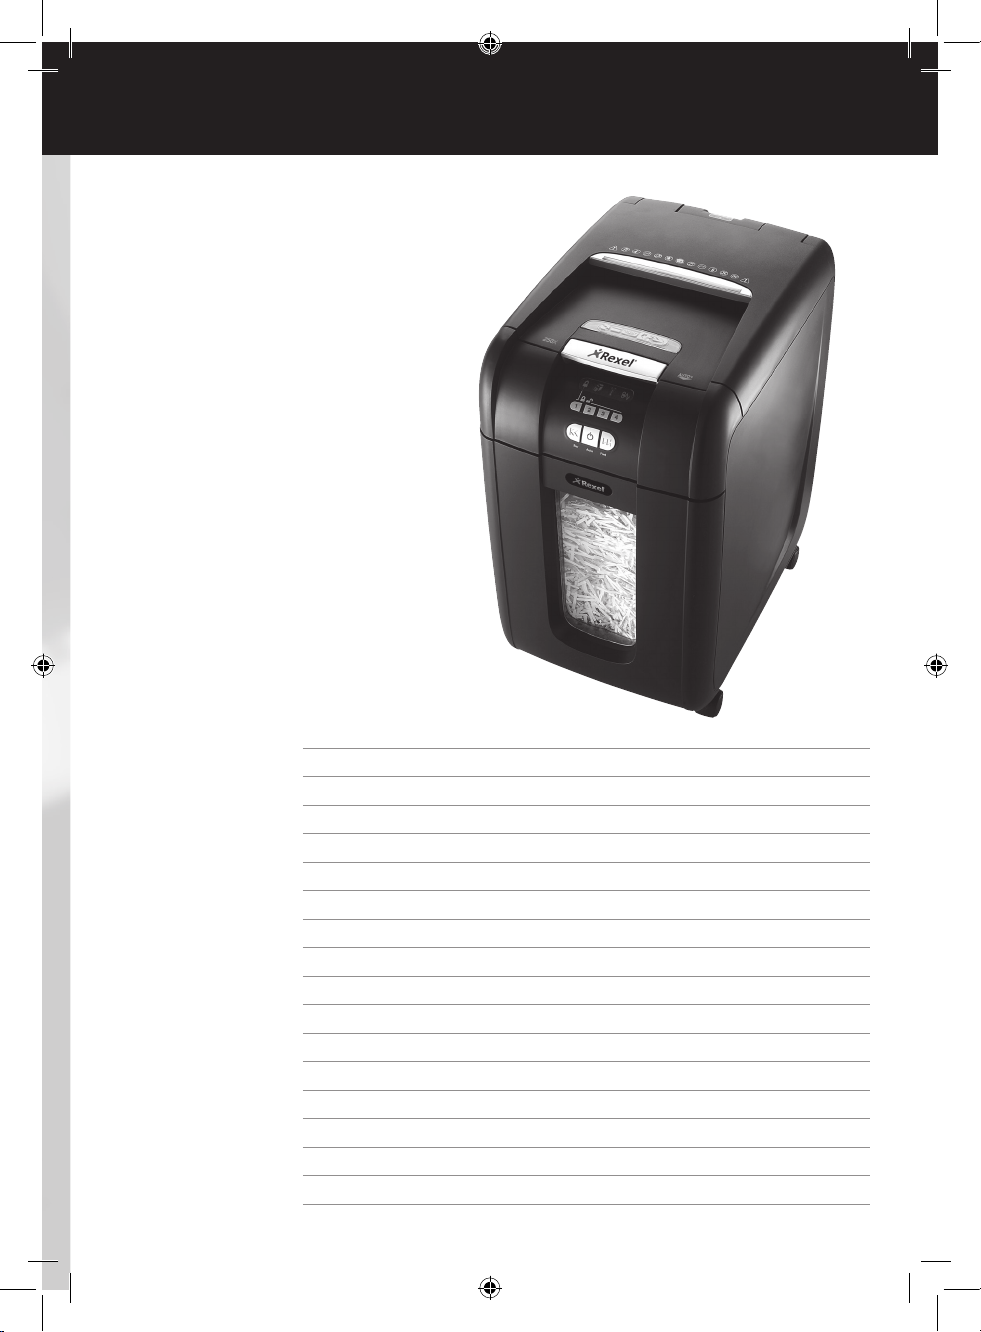
Auto+ 250X
G
Instruction Manual
F
Manuel d’utilisation
D
Bedienungsanleitung
I
Manuale d’istruzioni
O
Gebruiksaanwijzing
E
Manual de instrucciones
P
Manual de Instruções
T
Kullanım Kılavuzu
K
Οδηγίες
c
Brugsvejledning
FI
o
Käyttöopas
NO
o
Bruksanvisning
S
Bruksanvisning
Q
Instrukcja obsługi
CZ
o
Návod k obsluze
H
Használati útmutató
RUS
o
Руководствo по
зкcплyатации
™
English 4
Français 8
Deutsch 12
Italiano 16
Nederlands 20
Español 24
Português 28
Türkçe 32
Ελληνικά 36
Dansk 40
Suomi 44
Norsk 48
Svenska 52
Polski 56
Česky 60
Magyar 64
Pyccкий 68
U
U
J
D
U
U
U
U
U
A
U
B
U
M
U
K
U
L
U
G
L
U
U
U
U
U
N
O
P
R
S
U
C
U
E
U
Q
I
H
F
R
U
1 2 3
4
7
5 6
8
4

Specifications
Rexel Auto+ 250X
Sheet Capacity
Manual Feed Slot
Sheet Capacity
Auto-feed Chamber
Duty Cycle
Run Time from Cold
Volts / Hz
Amperage
Motor Watts
8 sheets (80gsm)
250 sheets (80gsm)
12 min ON / 40 min OFF
16 minutes
230V / 50Hz
1.2 Amps
270 Watts
Introduction
Thank you for choosing this shredder from Rexel. We are sure it will
serve you well, but please take a little time to study these instructions to
ensure you get the best out of your machine.
Safety First
To guard against injury, the following basic safety precautions must be
observed in the set-up of this product.
• Ensure the machine is plugged into an easily accessible power outlet,
and ensure the cable is not likely to trip up a passer by.
• Any attempt to repair this unit by unqualified personnel will invalidate
the warranty. Please return to supplier.
• Unplug your shredder before moving it or when it is not in use for an
extended period of time.
• Do NOT operate with a damaged power supply cord or plug, after it
malfunctions, or after it has been damaged in any manner.
• Do NOT overload electrical outlets beyond capacity as this can result
in fire or electrical shock.
• The socket-outlet should be installed near the equipment and shall be
easily accessible.
• Do NOT alter the attachment plug. The plug is configured for the
appropriate electrical supply.
• Do NOT use near water.
• Do NOT use aerosol dusters or cleaners.
• Do NOT spray anything into the shredder.
• Do NOT load the auto-feed chamber with unopened junk mail,
magazines, bound documents etc.
Although this shredder has been designed to comply with UL 60950
safety standards including the “probe accessibility tests”, do not operate
the shredder near children or pets.
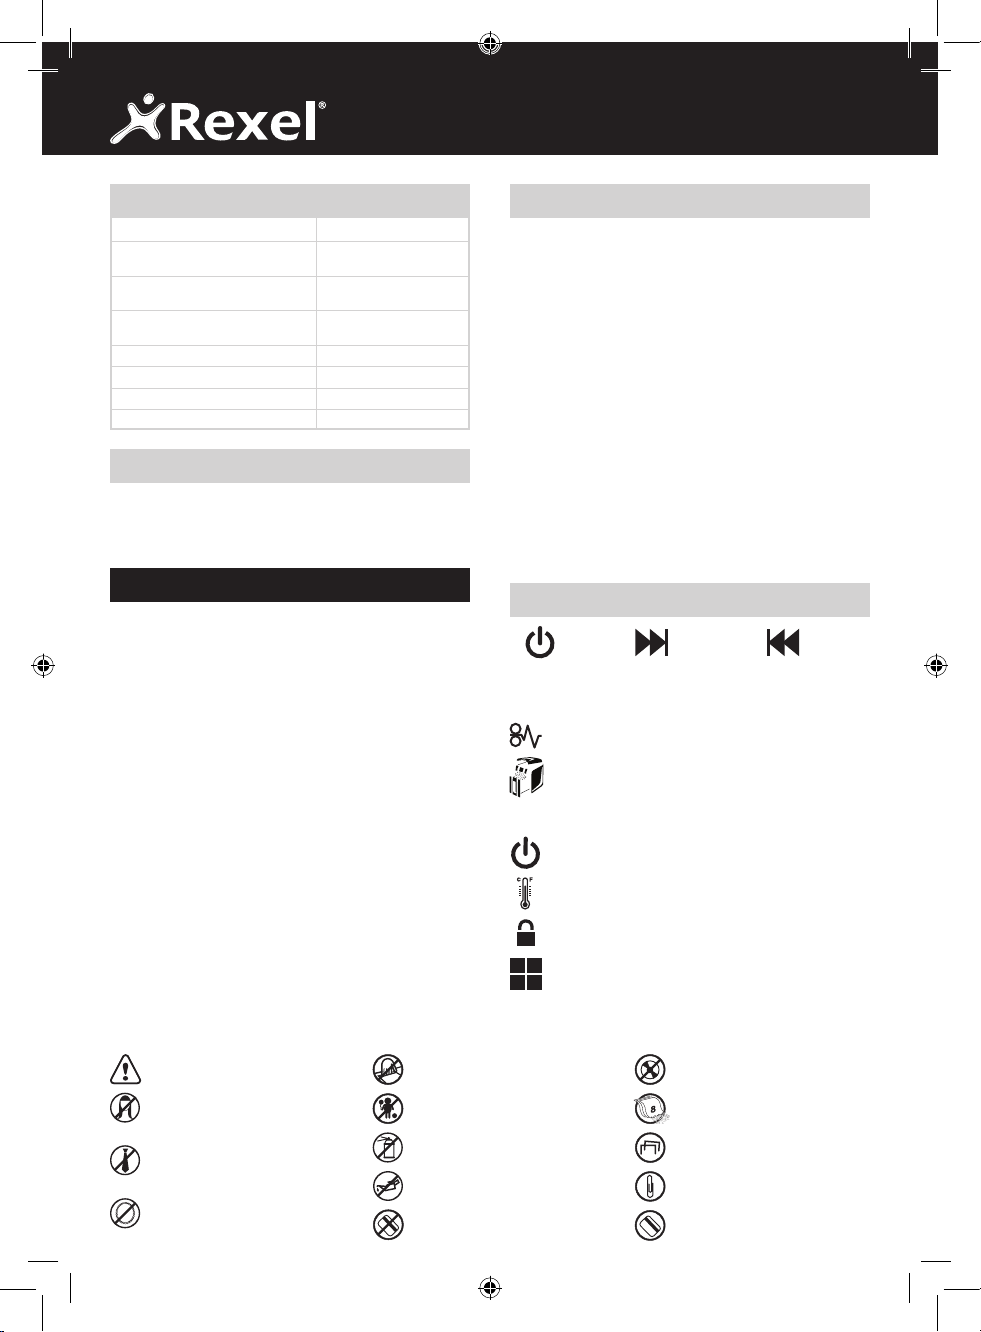
Safety First
This means you should be careful
because long hair can become
entangled in the cutters.
This means be careful of ties and other
loose clothing which could become
entangled in the cutters.
This means be careful of loose
jewellery which could become
entangled in the cutters.
4
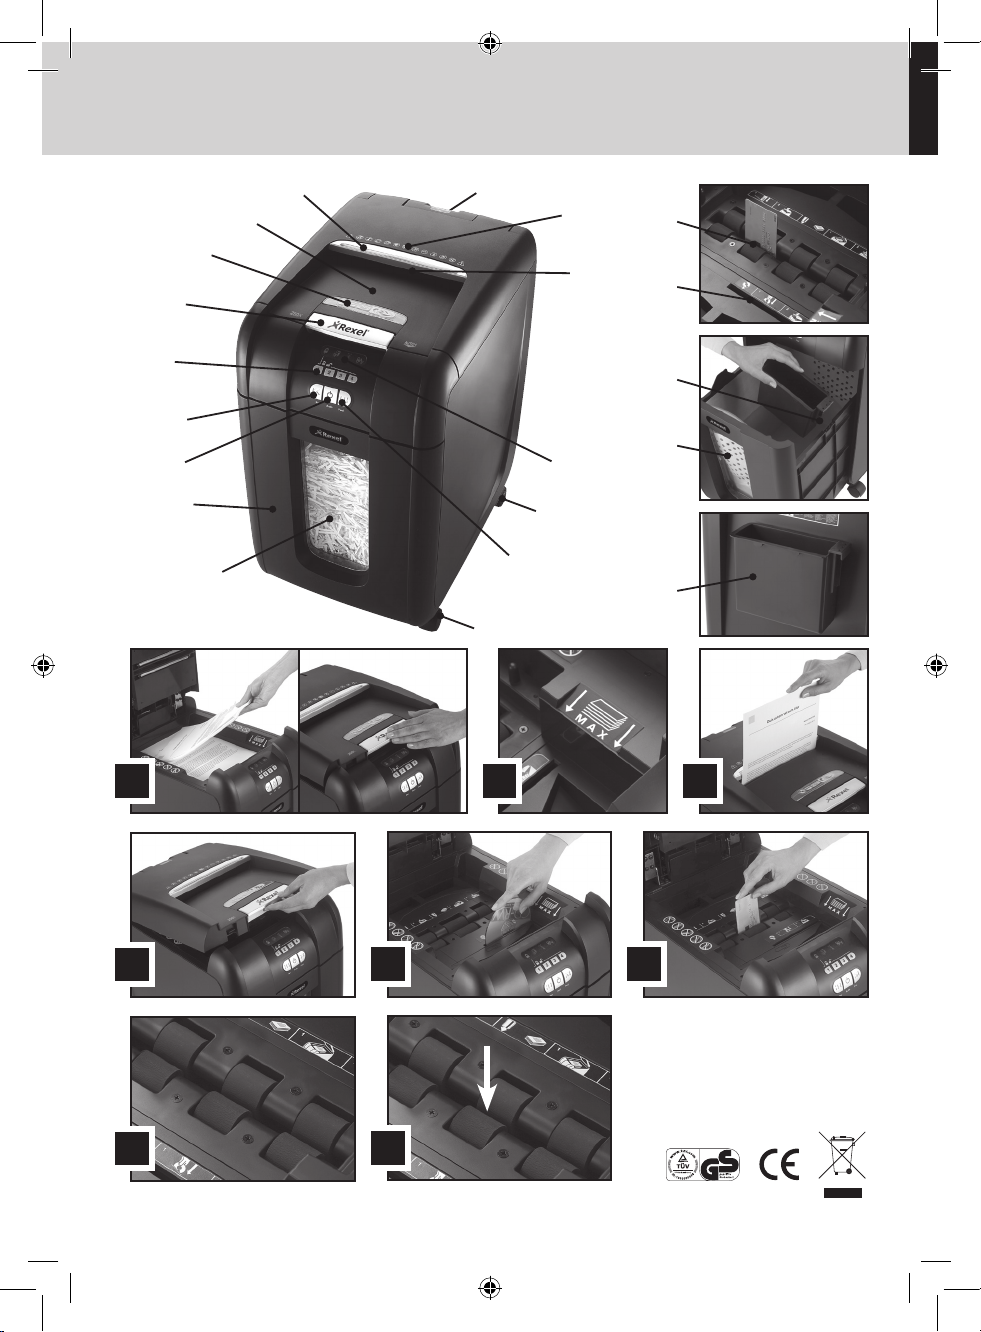
Description of product parts
U
A
ON/OFF switch (at rear of machine)
U
Important safety symbols
B
(see shredder control panel below)
U
Jam free indicator
C
U
Paper loading door handle
D
U
Paper loading door
E
U
Door for bin
F
U
Continuous jam boost button
G
U
Auto button
H
U
Reverse button
I
U
Paper loading door locking mechanism –
J
PIN password buttons
U
Indicator panel
K
U
Casters
L
U
Manual feed entry slot
M
U
Credit card entry slot
N
U
CD entry slot
O
U
CD bin ‘in use’ location
P
U
Paper stack viewing window
Q
U
Pull out bin with viewing window
R
U
CD bin in storage location
m
S
Control Panel and Indicators
Auto
Jam Free Indicator – This alerts the user when too much
U
C
paper is fed into the manual feed slot (see section on Jam Free
Technology).
Paper jam indicator – This means there is a paper jam in the
auto feed chamber.
Paper Loading Door/Bin Door Open or Bin Full indicator –
This means either:
• Paper loading door is open
• Bin is open
• Bin is full
Power On indicator – This means the machine is turned on.
Cool Down indicator – This means the machine is cooling
down.
Lock indicator – This means the paper loading door is locked
(during shredding).
132
Paper loading Door Locking Mechanism – PIN Password
Buttons Enter a four digit code, to lock the loading door during
4
shredding.
This means don’t reach into the feed
opening of the cutters.
This means keep children away from
shredder.
This means no aerosols.
This means no oil lubricant (oil sheets
only).
This means do not insert credit cards
into the manual feed slot.
Continuous
Jam Boost
This means do not insert CDs into the
manual feed slot.
Sheet capacity of manual feed entry
slot.
This means the shredder can accept
small staples.
This means the shredder can accept
small paperclips.
This means the shredder can accept
credit cards.
Reverse

G
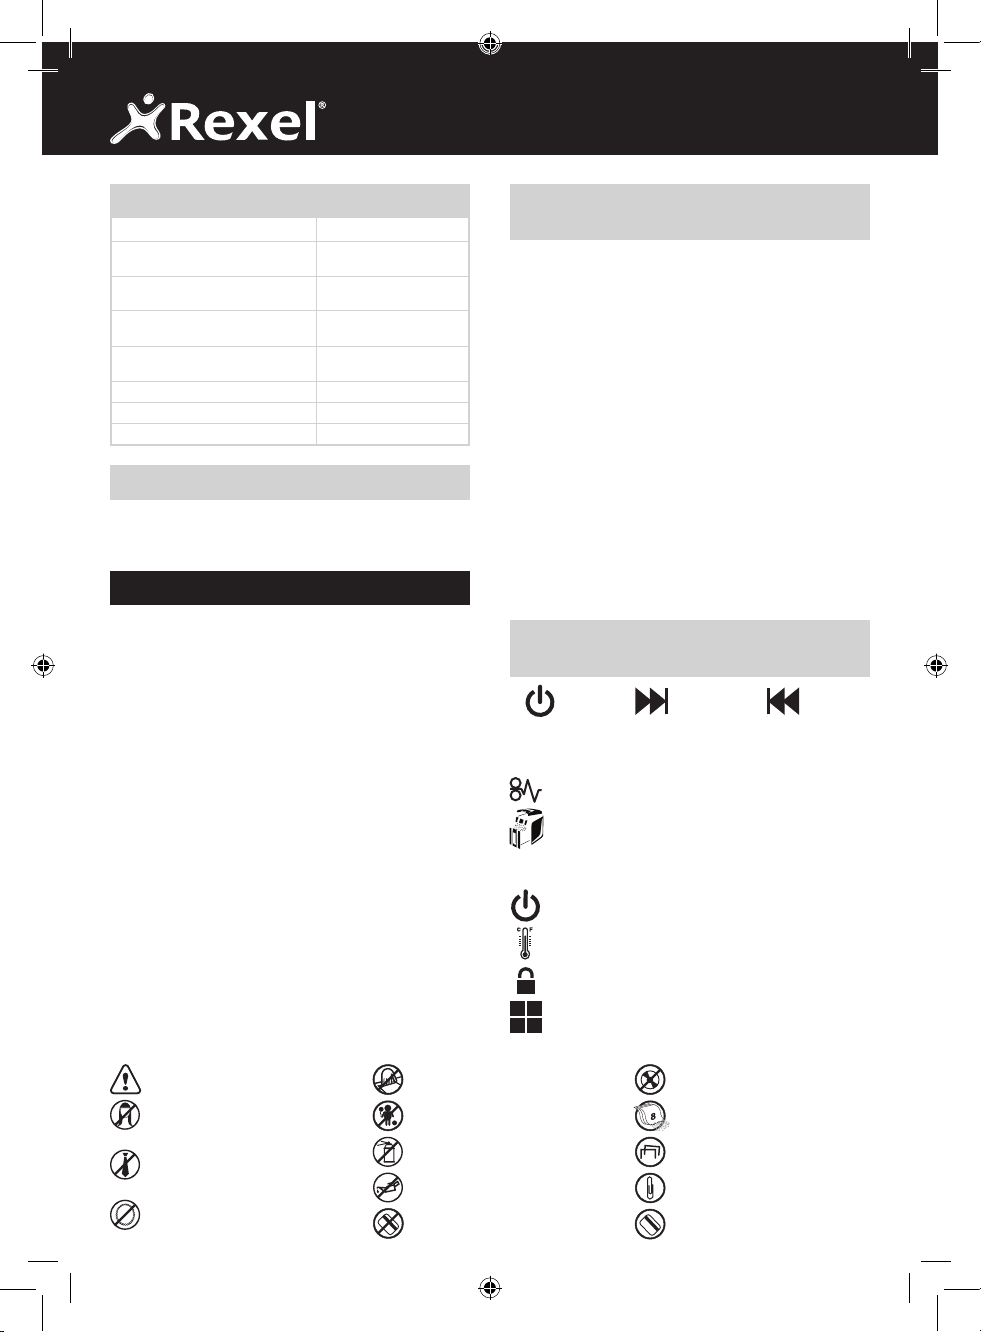
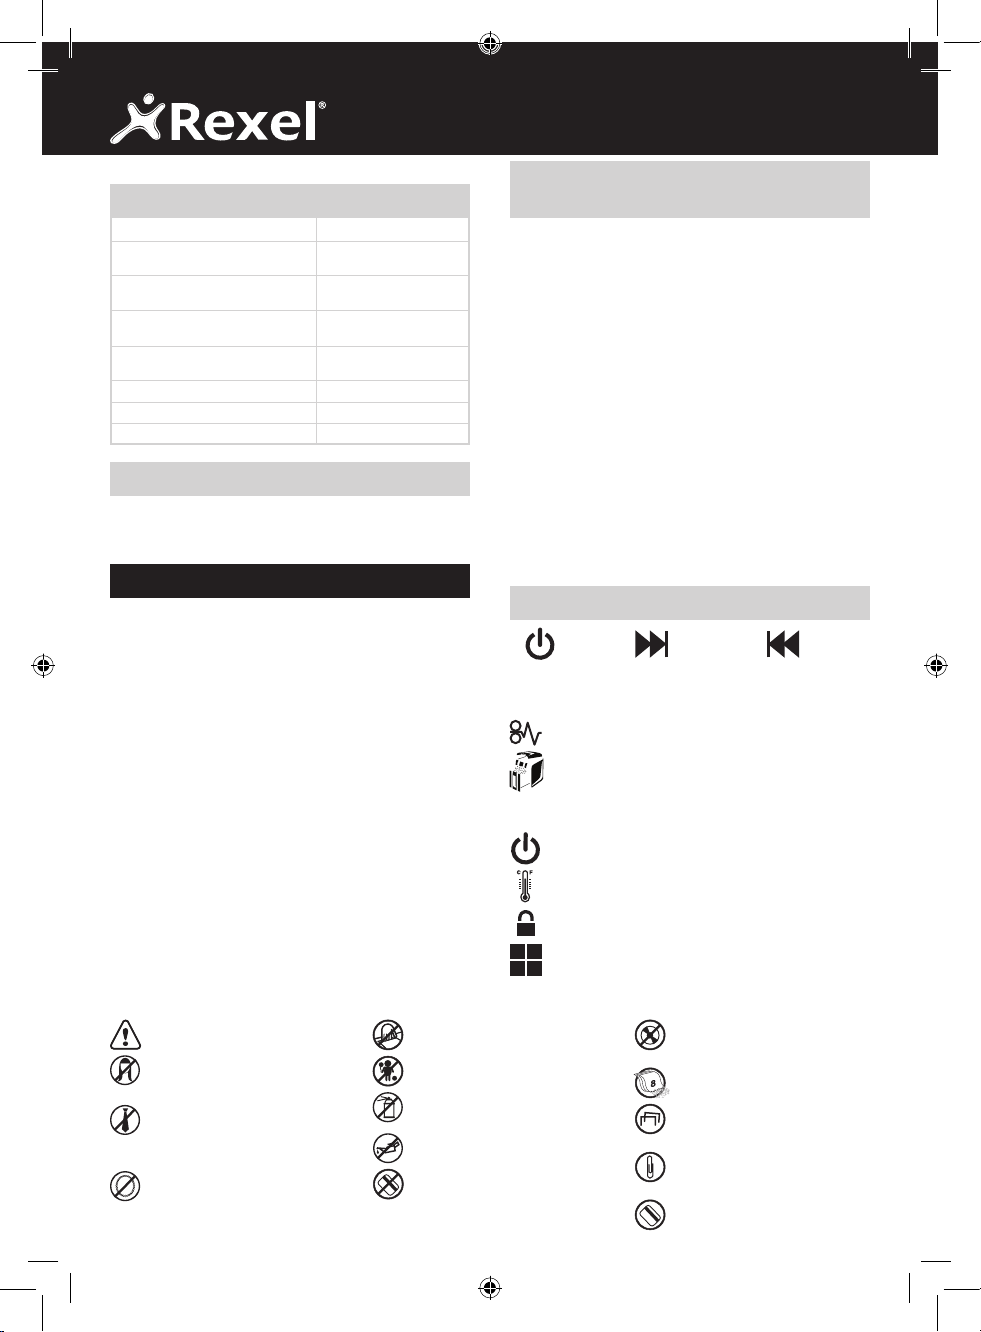
Illuminated Icons Explained
LED Illumination
Lock Bin Full/ Cool down Paper Jam Auto Jam Free
Door Open Indicator
Colour of symbol Green Red Red Red Red Blue Green Red
Power ON/OFF switch OFF
Sleep mode
Power ON/OFF switch ON
Stand by
Auto mode light light
Continuous jam boost mode light light
Reverse mode light light light
Paper loading door open light light light
Bin full/bin open light light light
Motor is cooling down flash light light
Paper jam light light light
Too many sheets are being fed into manual feed slot light light
Cutters are self-cleaning flash light light
Entering PIN password flash
Paper loading door is locked light
Incorrect PIN password has been entered flash x3
Correct PIN password re-entered flash x3
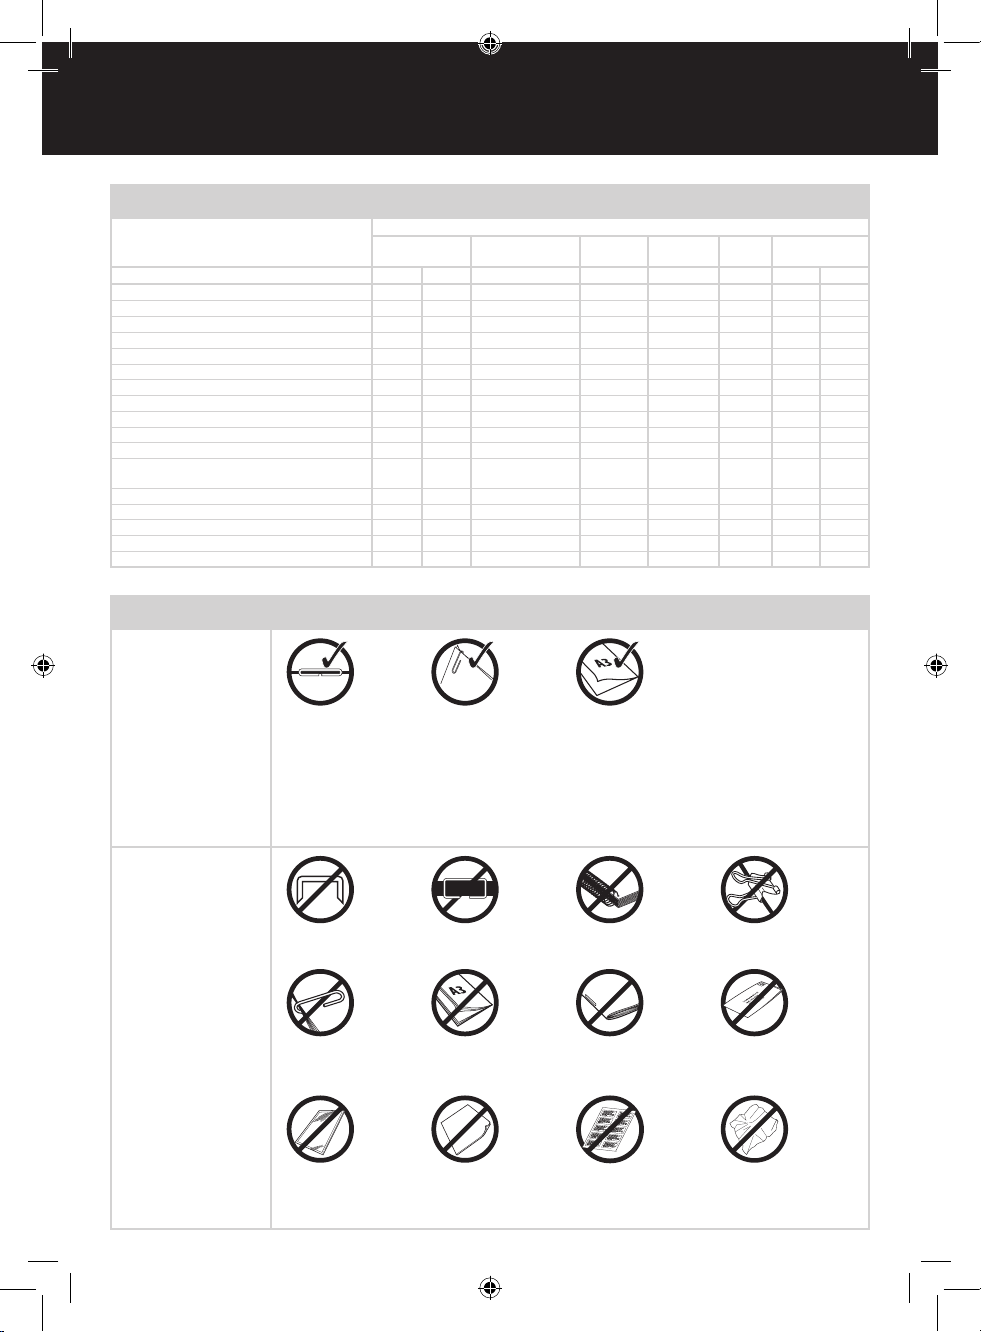
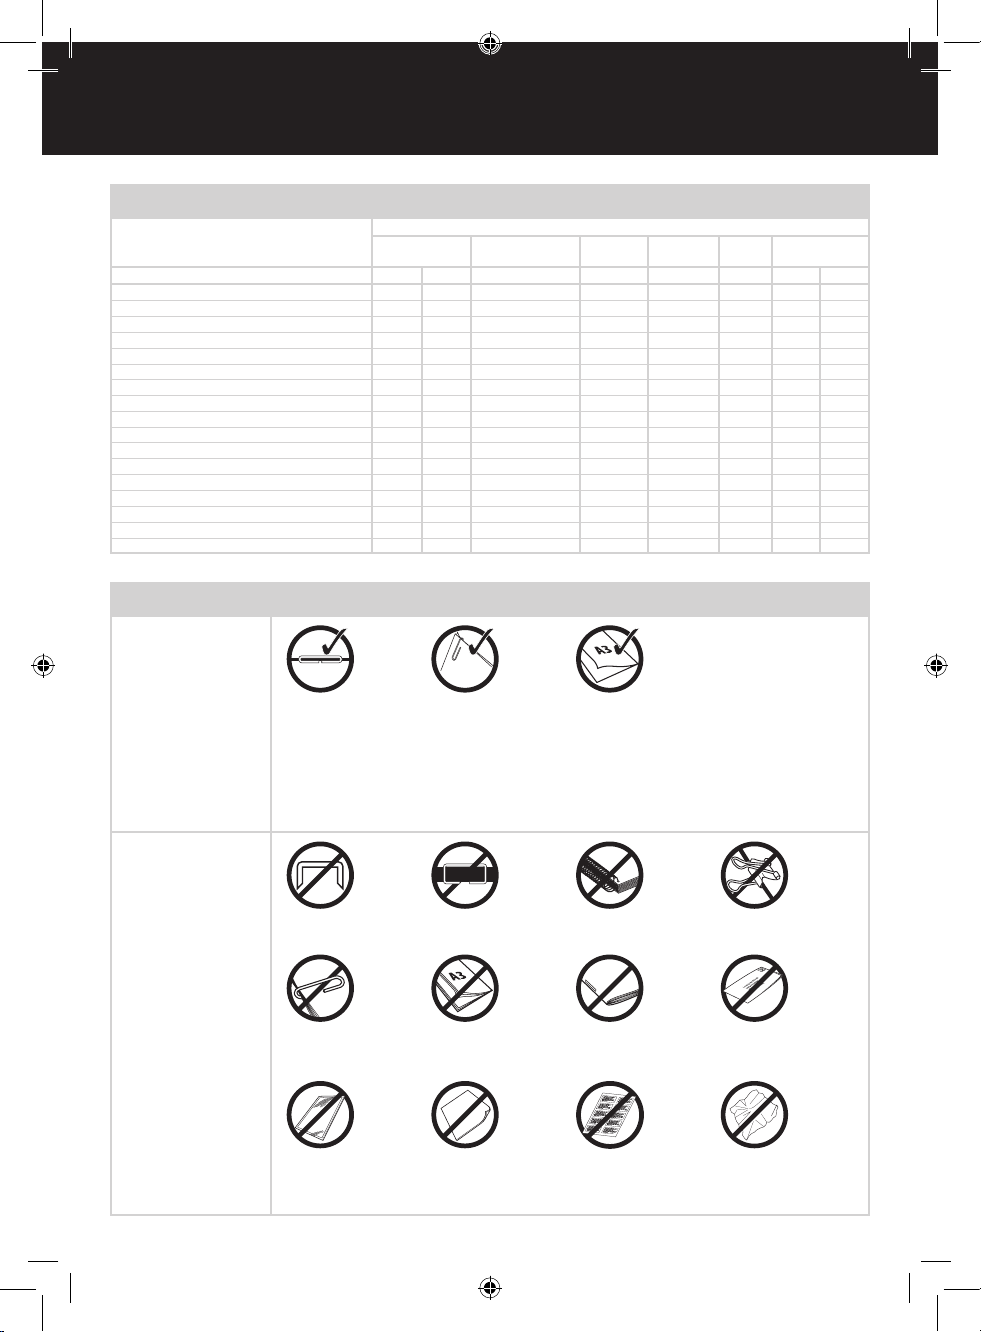
Auto+ 250X Shredding Capability
Auto+ 250X CAN shred
the following:
• Stapled paper
25mm within the corner
• 26/6 and 24/6 or smaller
staples
• Small sized paper loaded
centrally
• 250 sheets colour printing
• Paper clip paper
25mm within the corner
• Capable of shredding small/
medium (max wire thickness
= 0.9 mm) paper clips
• 250 sheets plain paper
• >100gsm paper (through
manual feed slot ONLY)
• A3 folded in half
max. 2 sheets
• 250 sheets single sided
printed paper
• 80 gsm paper
- A4 - 210mm x 297mm
- A5 - 148mm x 210mm
- A3 single sheet folded in
half to make A4
Although the Auto+
250X will accept
fastened sheets,
Rexel recommend
that staples and paper
clips are removed prior
to shredding to extend
the life of the product.
Auto+ 250X CANNOT
shred the following:
• Heavy Duty Staples. Check the
staple leg length is not greater
than 6mm.
• Large clips. Check the length
of the paperclip is not longer
than 32mm.
• Plastic sheets, laminated
documents, plastic folders, glossy
paper or a sheet covered with
print on both sides.
• A document with more than
25 sheets held together by a
staple or clip.
• Multiple folded sheets*
(e.g. A3 sheets folded in half).
• Thick paper or card • Adhesive labels • Crumpled sheets*
* We recommend you feed these types of documents through the manual feed slot. However, the
Auto+ 250X can automatically shred folded and crumpled sheets if flattened out prior to loading.
• Bound documents • Bulldog clips
• Magazines or other documents
bound by multiple staples
or clips
• Unopened mail* e.g. junk mail.
Open mail and place in autofeed or feed through manual
feed slot.
5
Auto-feed Technology
The Auto+ 250X has been designed to automatically shred up to 250
sheets from the auto-feed chamber and up to 8 sheets through the
manual feed slot. The auto-feed mechanism has been designed to
handle paper fastened with staples and paper clips and to only pull a
few sheets of paper into the cutting mechanism to minimise the risk of
paper jams.
Operation
1 Unpack the product.
2 Connect the shredder to mains supply.
3 Ensure the ON/OFF button on the back of the machine is in the ON
position, which will illuminate the blue standby symbol (
4 To commence shredding, press the Auto button (
the shredder into auto mode. You are now ready to shred.
5 To load the shredder, simply lift the loading door handle (see fig 1) to
open the loading door and insert documents. You can open the door
further to 90 degrees for easier access if required Load up to 250
sheets at a time into the feed chamber. Do not fill above the 250
MAX level, this could damage the shredder (see fig 2).
6 The shredder will start the shredding cycle automatically ONLY after
closing the loading door (see fig 1).
Attention: If required you can now lock the loading door by entering
a 4 digit code (see below).
7 If you only have up to 8 sheets to shred, you can use the manual
feed slot, provided the auto feed chamber is empty (see fig 3).
8 Insert paper to be shredded into the feed area. The shredder will
detect the paper and start automatically.
9 If the shredder is left in auto mode for more than 2 minutes without
being used, the shredder will automatically turn back to standby
mode in order to save power.
J The shredder will automatically ‘wake up’ from sleep mode when
paper is inserted into the shred mouth or you open the loading door.
There is no need to press the Auto button (
).
).
), which sets
Locking the Paper Loading Door
For additional security the paper loading door can be locked during the
shredding of confidential material.
To lock shredder:
1
Place documents in tray. Close paper loading door (see fig 1).
2
Press any 4 digits. REMEMBER YOUR CODE!
Shredder unlocks automatically when:
• 4 digit code is re-entered.
• Shredding is complete.
• Shredder is inactive for 30 minutes (but documents remain in tray)
Bin or Loading Door Open Safety
Function
As a safety precaution, if the bin or loading door is opened during
shredding, the shredder will stop and icon will illuminate.
Jam Free Technology in manual
feed slot
Sensors in the paper feed area measure the thickness of paper about
to be shredded. The ability to shred or not is communicated through red
and green lighting. Green means that the stack of paper is within the
shredders sheet capacity and OK to shred. Red means that you have too
much paper, remove some sheets in order to shred.
Given that you are unable to shred more sheets of paper than the
shredder is capable of shredding, paper jams are prevented.
This prevents time wasted through reversing paper and unblocking jams
not to mention the mess it can create.
Rare Occasions of Jamming
In the unlikely event of the shredder jamming, the Auto+ 250X will stop
shredding. Check that the bin is not full then try clearing the jam using
the reverse (
to Auto mode (
instructions.
) and continuous jam boost ( ) buttons then return
). If this is unsuccessful follow the reverse function
Reverse Function
1 Should you wish to reverse paper out whilst shredding, a reverse
2 Reverse the paper out then turn the machine off using the ON/
3 To resume shredding return the slide switch to the auto position
) has been fitted for your convenience.
button (
OFF switch at the rear of the shredder. Remove the paper from the
manual feed slot (if being used) or open the loading door, remove
the remaining stack of paper, then pull the jammed paper free of the
cutting mechanism.
) and turn on the shredder by using the ON/OFF switch at the
(
rear of the shredder.
Over Heating
If the Auto+ 250X is used continuously for over 24 minutes the
shredder may overheat and the cool down indicator will illuminate red
). Please allow the shredder to cool down. When the shredder is
(
ready to be used the thermometer symbol will no longer illuminate. If the
shredder needs to cool down while shredding, no action is needed. The
shredder will automatically restart shredding paper once it has cooled
down after periods of continuous use. All you need to do is ensure paper
is loaded into the chamber and the bin is empty when the machine is
cooling down.
Bin Full
The shredder will not function when the bin is full and the bin full
) is illuminated. You should empty the bin.
symbol (
• Pull open the bin slowly to empty.
• Push the empty bin back into place and press the auto button to
resume shredding.
6

G
CD Shredding
A separate CD tray is provided to collect the shredded CD shards,
ensure that this is correctly mounted onto the bin before shredding.
1 Lift up the paper loading door (see fig 4).
2 Always insert CDs in the CD slot (see fig 5). Only shred one CD at a
time.
3 Close the paper loading door.
4 Empty the CD bin after 8 CDs to avoid waste spilling over into the
paper waste bin.
5 Remove the CD tray before recommencing to shred paper.
Credit Card Shredding
1 Lift up the paper loading door (see fig 4).
2 Insert the credit card into the roller as shown (see fig 6). Only shred
one credit card at a time.
3 Close the paper loading door.
Rexel encourages customers to recycle shredded paper. Please
note that shredded paper cannot be recycled if mixed with credit
card shards. If recycling, please separate shredded paper and
credit cards.
Self-cleaning Cutters
After emptying and replacing a full bin, the shredder will run in reverse
for 4 seconds, stop for 2 seconds and then forward for 4 seconds to
clear away any remaining paper from the cutter mechanism. This
unique ‘self-cleaning’ mechanism is additional jam prevention
technology from Rexel.
Maintenance
The rollers on the auto-feed mechanism may become dirty over time,
please wipe clean with a dry cloth to maintain maximum product
performance (see fig 7).
The auto-start infra-red sensor, located in the paper feed entry-slot, can
occasionally become covered in paper-dust causing the shredder to
run despite no paper being fed into the machine. Switch the shredder
off at the rear of the machine and carefully clean the sensor using a
cotton-swab (see fig 8).
Lubrication of the Shredder
Only use Rexel Oil Sheets (2101948 & 2101949) to lubricate. ACCO
Brands Europe accepts no liability for product performance or safety
when other types or brands of lubricants are used on any part(s) of
this machine. Rexel recommend using an oil sheet after the bin has
been emptied three times (and for on-going three bin cycle thereafter).
Insert the oil sheet into the manual feed slot and NOT in the auto-feed
chamber. Using an oil sheet in the auto-feed chamber will contaminate
the feed rollers preventing the auto-feed mechanism shredding. Follow
the maintenance instructions if the rollers become contaminated.
Shredder Accessories
We recommend that a paper waste sack for recycling shredded paper is
used on all models.
Accessory Part Number Box Qty
Recycling Waste Sack 1765029EU 20 sacks
Oil Sheets 2101949 20
2101948 12
Guarantee
ACCO Brands Europe warrants its products and their parts against
defects in materials and workmanship under normal use for a period
of 24 months from the original date of purchase. During this period we
will repair or replace a defective product or part subject to the following
warranty conditions:
The warranty applies only to defects in materials and workmanship
under normal use and does not extend to damage to the Product or
parts which result from:-
- alteration, repair, modification or service carried out by anyone
other than an authorised ACCO service centre.
- accident, neglect, abuse or misuse owing to failure to comply with
the normal operating procedures for a product of this type.
Nothing in this Warranty shall have the effect of excluding the liability of
ACCO in respect of death and personal injury caused by the negligence
of ACCO. This Warranty is offered (subject to these terms and conditions)
in addition to, and does not affect your statutory rights.
For any questions relating to your warranty, please contact your local
service agent (see back cover).
Additional Guarantee
ACCO Brands Europe guarantees the cutting blades of the shredder to
be free from defects in material and workmanship for 15 years from the
date of purchase by the original consumer.
*Please note that the cutter blades will be progressively worn down
by shredding fastened sheets (staples and paperclips) - this is not
covered in the warranty. The Auto+ 250X has been design to shred up
to 50 credit cards and 50 CDs in the standard 2 year warranty period.
Any excessive credit card or CD shredding will invalidate the extended
cutter warranty.
These conditions shall in all respects be governed and construed in
accordance with English Law and subject to the exclusive jurisdiction of
the English Courts.
7
Spécifications
Capacité de destruction
Fente d’alimentation manuelle
Capacité de destruction
Compartiment d’auto-alimentation
Cycle de fonctionnement
Durée de fonctionnement initiale
après démarrage à froid
Volts/Hz
Ampérage
Puissance du moteur
Rexel Auto+ 250X
8 feuilles (80 g/m
250 feuilles (80 g/m
12 min marche /
40 min arrêt
16 minutes
230 V / 50 Hz
1,2 A
270 watts
2
)
2
)
Introduction
Merci d’avoir choisi ce destructeur Rexel. Veuillez prendre quelques minutes
pour lire le mode d’emploi qui vous indiquera comment profiter au maximum de
votre nouvel appareil.
La sécurité d’abord
Pour vous protéger contre les accidents, veuillez observer les consignes de
sécurité de base suivantes lors de l’installation de l’appareil.
• Branchez le destructeur dans une prise de courant facile d’accès, en veillant à
ce que personne ne puisse trébucher sur le fil.
• La garantie sera annulée en cas de tentative de réparation par du personnel
non qualifié. En cas de problème, renvoyez l’appareil au fournisseur.
• Débranchez l’appareil avant de le déplacer ou en cas d’inutilisation prolongée.
• N’utilisez PAS l’appareil en cas d’endommagement de la fiche ou du
cordon d’alimentation, après un mauvais fonctionnement ou après un
endommagement quelconque.
• Ne surchargez PAS les prises électriques au-delà de leur capacité, au risque
de causer un incendie ou de subir un choc électrique.
• L’appareil doit être installé à proximité d’une prise de courant facilement
accessible.
• Ne modifiez PAS la fiche. La fiche est configurée pour une alimentation
électrique déterminée.
• N’utilisez PAS l’appareil près de l’eau.
• N’utilisez PAS de bombe aérosol dépoussiérante ou nettoyante.
• Ne pulvérisez AUCUN produit dans le destructeur.
• Ne mettez PAS, entre autres, d’imprimés publicitaires sous enveloppe, de
revues ni de documents reliés dans le compartiment d’auto-alimentation.
Bien que ce destructeur ait été conçu conformément aux normes de sécurité
UL 60950, intégrant les « essais d’accessibilité à l’aide de sondes », n’utilisez
jamais le destructeur à proximité d’enfants ou d’animaux domestiques.
La sécurité d’abord
Faites preuve de diligence si vous avez les
cheveux longs car ils pourraient s’emmêler
dans le bloc de coupe.
Attention aux cravates et autres vêtements
amples qui pourraient être happés par le
bloc de coupe.
Attention aux bijoux qui pourraient être
8
happés par le bloc de coupe.
m
Ne mettez pas la main dans la fente
d’alimentation pour saisir des feuilles.
Gardez le destructeur hors de portée des
enfants.
N’utilisez pas de bombes aérosols.
N’utilisez pas de lubrifiant liquide
(uniquement des feuilles lubrifiantes).
N’insérez pas de cartes bancaires dans la
fente d’alimentation manuelle.
Description des composants
du produit
U
A
Commutateur marche/arrêt (arrière de l’appareil)
U
Symboles de sécurité importants
B
(voir panneau de contrôle du destructeur ci-dessous)
U
Voyant anti-bourrage
C
U
Poignée du couvercle du compartiment
D
U
Couvercle du compartiment
E
U
Paroi avant de la corbeille extractible
F
U
Touche de déblocage par marche avant en continu
G
U
Bouton mode automatique
H
U
Touche marche arrière
I
U
Mécanisme de verrouillage du couvercle du compartiment –
J
Touches de saisie de code PIN
U
Panneau d’indicateurs
K
U
Roulettes
L
U
Fente d’alimentation manuelle
M
U
Fente d’alimentation pour carte bancaire
N
U
Fente d’alimentation pour CD
O
U
Emplacement de la corbeille à déchets CD en cas d’utilisation
P
U
Fenêtre de visualisation de la liasse papier
Q
U
Corbeille extractible avec fenêtre de contrôle du niveau de
R
remplissage
U
Emplacement de la corbeille à déchets CD en cas d’inutilisation
S
Panneau de contrôle et
indicateurs du destructeur
Mode
automatique
Voyant anti-bourrage – Il avertit l’utilisateur au cas où celui-ci
U
C
alimente trop de papier dans la fente d’alimentation manuelle (voir
section sur la technologie anti-bourrage).
Indicateur de bourrage – Il indique l’existence d’un bourrage de
papier dans le compartiment d’auto-alimentation.
Indicateur corbeille pleine/porte ouverte – Il indique l’une des
possibilités suivantes :
• le couvercle du compartiment est ouvert
• la corbeille est ouverte
• la corbeille est pleine
Indicateur de mise sous tension – Il indique que l’appareil est allumé.
Indicateur de refroidissement – La machine est en train de se refroidir.
Indicateur de verrouillage – Il indique que le couvercle du
compartiment est verrouillé (pendant la destruction).
132
Mécanisme de verrouillage du couvercle du compartiment –
Touches de saisie de code PIN Saisissez un code à quatre chiffres
4
pour verrouiller le couvercle du compartiment pendant la destruction.
Marche avant
en continu
N’insérez pas de CD dans la fente
d’alimentation manuelle.
Capacité de destruction de la fente
d’alimentation manuelle.
Le destructeur peut accepter de petites
agrafes.
Le destructeur peut accepter de petits
trombones.
Le destructeur peut détruire les cartes
bancaires.
Marche
arrière
F
Explication des icônes lumineuses
Voyants LED
Verrouillage Corbeille pleine/ Refroidisse- Indicateur Auto Anti-bourrage
Porte ouverte ment de bourrage
Couleur du symbole Vert Rouge Rouge Rouge Rouge Bleu Vert Rouge
Commutateur marche/arrêt, arrêt
Mode de veille
Commutateur marche/arrêt, marche
Mise en veille
Mode automatique Allumé Allumé
Mode anti-bourrage par marche avant en continu Allumé Allumé
Mode marche arrière Allumé Allumé Allumé
Couvercle du compartiment ouvert Allumé Allumé Allumé
Corbeille pleine/ouverte Allumé Allumé Allumé
Refroidissement du moteur Clignote Allumé Allumé
Bourrage papier Allumé Allumé Allumé
Insertion d’un trop grand nombre de feuilles dans la fente
d’alimentation manuelle
Auto-nettoyage des lames Clignote Allumé Allumé
Saisie du code PIN Clignote
Le couvercle du compartiment est verrouillé Allumé
Saisie d’un code PIN incorrect Clignote x3
Nouvelle saisie du code PIN correct Clignote x3
Capacité de destruction de l’Auto+ 250X
L’Auto+ 250X PEUT
détruire ce qui suit :
• Feuilles agrafées à 25 mm du
coin au plus
• Agrafes 26/6 et 24/6 ou plus
petites
• Feuilles petit format chargées
centralement
• 250 feuilles imprimées en couleur
• Feuilles avec trombone, à 25 mm
du coin au plus
• Trombones petits/moyens
(épaisseur maxi du fil = 0,9 mm)
• 250 feuilles de papier blanc
• Papier > 100 g/m
via la fente d’alimentation
manuelle)
2
(uniquement
• Feuille A3 pliée en deux –
2 feuilles maxi
• 250 feuilles de papier imprimées
d’un côté
• Papier de 80 g/m
- A4 – 210 mm x 297 mm
- A5 – 148 mm x 210 mm
- Une seule feuille A3 pliée en
2
deux au format A4
Allumé Allumé
Bien que l’Auto+ 250X
accepte les feuilles
attachées, Rexel conseille
d’enlever les agrafes
et trombones avant
la destruction afin de
prolonger le cycle de vie
de l’appareil.
L’Auto+ 250X NE PEUT
PAS détruire ce qui suit :
• Agrafes grande capacité. Vérifiez
que l’agrafe ne fait pas plus de
6 mm de haut.
• Gros trombones. Vérifiez que le
trombone ne fait pas plus de 32
mm de long
• Feuilles en plastique, documents
plastifiés, dossiers en plastique,
papier brillant ou une feuille
imprimée recto/verso
• Un document de plus de 25
feuilles attachées avec une
agrafe ou un trombone.
• Plusieurs feuilles pliées*
(p. ex. plus de deux feuilles
A3 pliées en deux)
• Papier épais ou carton • Étiquettes adhésives • Feuilles froissées*
* Nous conseillons d’alimenter ces types de documents via la fente d’alimentation manuelle. L’Auto+ 250X peut cependant détruire
automatiquement des feuilles pliées et froissées à condition qu’elles soient aplaties avant leur alimentation dans le destructeur.
• Documents reliés • Pinces double clip
• Revues ou autres documents
reliés à l’aide de plusieurs
agrafes ou trombones
• Du courrier sous enveloppe*, comme des imprimés
publicitaires. Ouvrez le courrier et placez-le dans
le compartiment d’auto-alimentation ou insérez-le
dans la fente d’alimentation manuelle.
9
Technologie d’auto-alimentation
L’Auto+ 250X a été conçu pour détruire automatiquement jusqu’à 250 feuilles
placées dans le compartiment d’auto-alimentation et jusqu’à 8 feuilles par le
biais de la fente d’alimentation manuelle. Le mécanisme d’auto-alimentation a
été conçu pour détruire les feuilles attachées avec une agrafe et un trombone et
pour n’introduire que quelques feuilles de papier à la fois sur le mécanisme de
coupe afin de réduire les risques de bourrage.
Fonctionnement
1
Déballez l’appareil.
2
Branchez le destructeur à une prise secteur.
3
Vérifiez que le commutateur marche/arrêt situé à l’arrière de l’appareil est
en position de marche
4
Pour démarrer la destruction automatique, appuyez sur la touche centrale
de mode automatique
sur la touche de mode automatique s’allume. Vous pouvez maintenant
commencer à détruire vos documents.
5
Pour ouvrir le couvercle et charger le destructeur, soulevez simplement la
poignée du couvercle du compartiment (voir fig. 1) et insérez les documents.
Vous pouvez ouvrir le couvercle à un angle de 90 degrés pour faciliter la
manipulation si besoin est. Chargez jusqu’à 250 feuilles à la fois dans le
compartiment d’auto-alimentation. Ne dépassez PAS le niveau MAXIMUM
de 250 feuilles au risque d’endommager le destructeur (voir fig. 2).
6
Le destructeur se mettra automatiquement à fonctionner UNIQUEMENT si
vous avez fermé le couvercle du compartiment (voir fig. 1).
Attention ! Si besoin est, vous pouvez maintenant verrouiller le couvercle
du compartiment en saisissant un code à 4 chiffres (voir ci-dessous).
7
Si vous ne voulez détruire que jusqu’à 8 feuilles, vous pouvez utiliser la
fente d’alimentation manuelle à condition que le compartiment d’autoalimentation soit vide (voir fig. 3).
8
Insérez les feuilles à détruire dans la fente d’alimentation manuelle. Le
destructeur détecte le papier et lance automatiquement la destruction.
9
Si le destructeur est laissé en mode automatique pendant plus de 2 minutes
sans servir, il se met automatiquement en mode de veille afin d’économiser
de l’énergie.
J
À l’alimentation de papier dans la fente d’insertion ou à l’ouverture du
couvercle du compartiment, le destructeur passe automatiquement du
mode de veille au mode de fonctionnement. Il est inutile d’appuyer sur la
touche de mode automatique
( )
.
( )
, auquel cas le symbole de mise en veille bleu
( )
.
Verrouillage du couvercle du
compartiment
Pour accroître la sécurité, le couvercle du compartiment peut être verrouillé
pendant la destruction de documents confidentiels.
Comment verrouiller le destructeur :
1
Placez les documents dans le bac du compartiment de destruction. Fermez
le couvercle du compartiment (voir fig. 1).
2
Saisissez 4 chiffres de votre choix. N’OUBLIEZ PAS CE CODE !
Le destructeur se déverrouille automatiquement dans les cas suivants :
• à la saisie du code à 4 chiffres
• si la destruction est terminée
• si le destructeur est inactif pendant 30 min (mais que les documents sont
toujours dans le compartiment)
Fonction d’arrêt automatique en cas
de corbeille ou couvercle ouvert
Par mesure de sécurité, si la corbeille ou le couvercle du compartiment est
ouvert pendant la destruction, le destructeur s’arrête de fonctionner et l’icône
s’allume.
10
Technologie anti-bourrage en
cas d’alimentation manuelle
Des capteurs situés dans l’aire d’alimentation du papier mesurent l’épaisseur
de la liasse à détruire. Le destructeur indique sa capacité à détruire ou non la
liasse entière par le biais d’un voyant lumineux vert ou rouge. Vert signifie que
la liasse respecte la capacité de destruction et peut être détruite. Rouge signifie
que la liasse est trop épaisse et que vous devez retirer quelques feuilles avant
la destruction.
Comme il vous est ainsi impossible de détruire un nombre de feuilles excédant
la capacité de destruction, les bourrages sont évités.
Plus de perte de temps à renverser la marche et retirer le papier, ni à nettoyer le
désordre occasionné !
Rares cas de bourrage
Dans le cas improbable de bourrage, l’Auto+ 250X s’arrête de fonctionner.
Vérifiez alors si la corbeille est pleine, puis essayez d’éliminer le bourrage à
l’aide des touches marche arrière (
puis remettez-le en mode automatique (
instructions d’utilisation de la fonction de marche arrière.
) et marche avant en continu ( ),
). Si le bourrage persiste, suivez les
Fonction marche arrière
1
Si, lors de la destruction de papier, vous souhaitez faire ressortir les feuilles
par l’avant, utilisez la touche marche arrière (
à cet effet.
2
Faites ressortir le papier par l’avant, puis mettez le destructeur hors tension
à l’aide du commutateur marche/arrêt situé à l’arrière de l’appareil. Retirez
le papier de la fente d’alimentation manuelle (en cas d’utilisation) ou ouvrez
le couvercle du compartiment et retirez les feuilles restantes, puis enlevez le
papier du mécanisme de coupe.
3
Pour reprendre la destruction, mettez l’appareil sous tension à l’aide du
commutateur marche/arrêt situé à l’arrière de l’appareil et appuyez sur la
touche de mode automatique (
4
La fonction marche arrière ne fonctionne pas tant que le destructeur est
verrouillé.
).
) mise à votre disposition
Surchauffe
Si l’Auto+ 250X sert continuellement pendant plus de 24 minutes, il risque de
surchauffer auquel cas l’indicateur de refroidissement rouge s’allume (
Veuillez alors laisser l’appareil se refroidir. Lorsque le destructeur peut être de
nouveau utilisé, le symbole à thermomètre s’éteint. S’il a besoin de se refroidir
en cours de destruction, votre intervention est inutile. En effet, il recommence
automatiquement la destruction du papier dès qu’il s’est refroidi après une
période d’utilisation continue. Il vous suffit de vérifier que le papier est chargé
dans le compartiment d’auto-alimentation et que la corbeille est vide pendant
que l’appareil se refroidit.
).
Corbeille pleine
Le destructeur ne fonctionne pas si la corbeille est pleine, auquel cas le symbole
corbeille pleine (
• Retirez lentement la corbeille pour la vider.
• Remettez la corbeille vide en place en la poussant et appuyez sur la touche
mode automatique pour relancer la destruction.
) s’allume. Vous devez alors vider la corbeille.
F
Destruction de CD
Le destructeur est doté d’un bac à déchets de CD séparé pour récupérer les
morceaux de CD détruits. Veillez à bien l’installer sur la corbeille avant de
procéder à la destruction.
1
Soulevez le couvercle du compartiment (voir fig. 4).
2
Insérez toujours les CD dans la fente d’alimentation pour CD (voir fig. 5).
Ne détruisez qu’un seul CD à la fois.
3
Fermez le couvercle du compartiment.
4
Videz le bac à déchets de CD après la destruction de 8 CD pour éviter que
les déchets retombent dans la corbeille à papier.
5
Retirez le bac à déchets de CD avant de reprendre la destruction de papier.
Destruction de cartes bancaires
L’Auto+ 250X peut détruire les cartes bancaires. Pour cela, appuyez sur la
touche de mode automatique (
1
Soulevez le couvercle du compartiment (voir fig. 4).
2
Insérez la carte bancaire dans les rouleaux selon l’illustration de fig. 6. Ne
détruisez qu’une seule carte bancaire à la fois.
3
Fermez le couvercle du compartiment.
Rexel encourage ses clients à recycler le papier déchiqueté. Veuillez noter
que le papier déchiqueté ne peut pas être recyclé s’il est mélangé à des
morceaux de carte bancaire. Pour le recyclage, veuillez séparer le papier
déchiqueté et les morceaux de carte bancaire.
), puis :
Lames auto-nettoyantes
Après le vidage et la remise en place de la corbeille, le destructeur fonctionne
en marche arrière pendant 4 secondes, s’arrête pendant 2 secondes puis se
met en marche avant pendant 4 secondes pour dégager tout déchet de papier
du mécanisme de coupe. Cette fonction « d’auto-nettoyage » unique vient
complémenter la technologie anti-bourrage de Rexel.
Maintenance
Les rouleaux du mécanisme d’auto-alimentation peuvent se salir au cours du
temps. Veuillez les essuyer avec un linge sec afin d’optimiser la performance de
l’appareil (voir fig. 7).
Lorsque le capteur à infrarouges de démarrage automatique, situé dans la
fente d’alimentation, est recouvert de poussière de papier, ce qui arrive parfois,
le destructeur continue de fonctionner même sans papier. Éteignez alors le
destructeur à l’aide du commutateur marche/arrêt situé à l’arrière de l’appareil
et nettoyez avec soin le capteur avec un coton tige (voir fig. 8).
Lubrification du destructeur
Utilisez uniquement les feuilles lubrifiantes Rexel (2101948 & 2101949) à cet
effet. ACCO Brands Europe décline toute responsabilité concernant la sécurité
ou la performance du produit lorsque d’autres types ou marques de lubrifiant
sont utilisés sur un ou plusieurs composants de cet appareil. Rexel conseille de
lubrifier l’appareil à l’aide d’une feuille lubrifiante après trois vidages de corbeille
(puis ensuite tous les trois vidages de corbeille). Insérez la feuille lubrifiante
dans la fente d’alimentation manuelle et NON PAS dans le compartiment d’autoalimentation. Si vous mettez la feuille lubrifiante dans le compartiment d’autoalimentation, les rouleaux seront contaminés et le mécanisme d’alimentation
automatique ne pourra pas alimenter le papier dans le mécanisme de coupe. En
cas de contamination, suivez les instructions de maintenance.
Accessoires du destructeur
Nous vous conseillons d’utiliser, avec tous les modèles, un sac à déchets papier
pour recycler les particules de papier.
Accessoire Numéro de pièce Quantité en boîte
Sac à déchets à recycler 1765029EU 20 sacs
Feuilles lubrifiantes 2101949 20 feuilles
2101948 12 feuilles
Garantie
ACCO Brands Europe garantit ses produits et leurs composants contre tout
défaut de matériel et de fabrication, en cas d’utilisation normale, pendant 24
mois à compter de la date d’achat initiale. Pendant cette période, nous nous
engageons à réparer ou remplacer un produit ou une pièce défectueuse sous
réserve des conditions de garantie suivantes :
La garantie s’applique uniquement aux défauts de matériel et de fabrication
dans le cadre d’une utilisation normale et ne couvre pas les dommages causés
au produit ou à ses pièces résultant de :
- la transformation, la réparation, la modification ou le dépannage exécuté
par quiconque autre que le centre d’entretien agréé ACCO ;
-
les accidents, actes de négligence, abus d’usage ou mauvais usages en
raison du non-respect du mode d’emploi normal pour un produit de ce type.
Aucune des dispositions de la présente garantie n’aura pour effet d’exclure la
responsabilité d’ACCO en cas de décès et de blessures corporelles causées par
la négligence d’ACCO. Cette garantie est offerte (sous réserve des présentes
conditions) en sus de vos droits légaux qui ne sont pas remis en cause.
Pour toute autre question concernant votre garantie, veuillez contacter votre
centre d’entretien local (voir plat verso).
Garantie supplémentaire
ACCO Brands Europe garantit les lames du destructeur contre tout défaut de
matériel et de fabrication pendant 15 ans à compter de la date d’achat initiale.
* Veuillez noter que la destruction de feuilles attachées par un trombone ou une
agrafe usera progressivement les lames et n’est pas couverte par la garantie.
L’Auto+ 250X est destiné à détruire jusqu’à 50 cartes bancaires et 50 CD au
cours de la période de garantie standard de 2 ans. Toute destruction excessive
de cartes bancaires ou de CD annulera la garantie supplémentaire pour les
lames.
Ces conditions seront à tous égards régies par le droit anglais et interprétées
conformément à celui-ci, et soumises à la compétence exclusive des tribunaux
anglais.
11
Technische Daten
Rexel Auto+ 250X
Zufuhrkapazität
Einzugsschlitz der manuellen Zufuhr
Zufuhrkapazität
Fach der Automatikzufuhr
Arbeitszyklus
Dauerbetrieb nach Kaltstart
Netzanschluss
Stromstärke
Leistungsaufnahme, Motor
8 Blatt (80 g/m²)
250 Blatt (80 g/m²)
12 min in Betrieb,
40 min im Standby
16 min
230V, 50Hz
1,2 A
270 W
Einführung
Vielen Dank für Ihre Wahl dieses Aktenvernichters von Rexel. Er wird
Ihnen sicherlich gute Dienste leisten. Zur Gewährleistung des optimalen
Betriebs empfehlen wir, dass Sie sich zunächst etwas Zeit zum
Durchlesen dieser Anweisungen nehmen.
Sicherheit geht vor
Zur Vermeidung von Personenschäden müssen die folgenden
grundlegenden Sicherheitshinweise beachtet werden:
• Das Gerät an einer einfach zugänglichen Steckdose anschließen und
dafür sorgen, dass das Netzkabel keine Stolpergefahr bildet.
• Bei einem Instandsetzungsversuch durch eine nicht qualifizierte
Person wird die Garantie ungültig. Bei Reparaturbedarf das Gerät an
den Händler zurückschicken.
• Zum Umstellen des Geräts, bzw. wenn es längere Zeit nicht benutzt
wird, den Netzstecker ziehen.
• Das Gerät nicht verwenden, wenn das Netzkabel oder der Netzstecker
beschädigt ist, wenn eine Betriebsstörung aufgetreten ist oder wenn
das Gerät beschädigt wurde.
• Die Steckdose darf nicht überlastet werden, ansonsten besteht Brand-
und Stromschlaggefahr.
• Das Gerät in der Nähe der Steckdose aufstellen und dafür sorgen,
dass diese einfach zugänglich ist.
• Keine Veränderung am Netzstecker vornehmen. Er ist auf die
ortsübliche Stromversorgung ausgelegt.
• Das Gerät nicht in der Nähe von Wasser betreiben.
• Keine Druckluftsprays oder Reinigungsmittel verwenden.
• Nichts in den Aktenvernichter sprühen.
• Keine ungeöffnete Werbepost, Zeitschriften, gebundene Dokumente
etc. in die automatische Zufuhr einlegen.
Der Aktenvernichter entspricht der Sicherheitsnorm UL 60950 und
ist fingersicher. Er ist dennoch nicht in der Nähe von Kindern oder
Haustieren zu verwenden.
Sicherheit geht vor
Lange Haare vom Gerät fernhalten,
damit sie nicht in das Schneidwerk
geraten.
Krawatten und andere lose Kleidungsstücke
vom Gerät fernhalten, damit sie nicht in
das Schneidwerk geraten.
Losen Schmuck vom Gerät fernhalten,
12
damit er nicht in das Schneidwerk gerät.
Gerätekomponenten
U
A
Betriebsschalter (Geräterückseite)
U
Wichtige Sicherheitssymbole
B
(s. „Bedienfeld“ unten)
U
Anti-Stau-Anzeige
C
U
Ladetürgriff
D
U
Ladetür
E
U
Vorderseite des ausziehbaren Abfallbehälters
F
U
Staubeseitigungstaste (Vorwärts-Dauerbetrieb)
G
U
Automatik-Starttaste
H
U
Rückwärtsbetriebstaste
I
U
Ladetürverriegelung –
J
PIN-Code-Tasten
U
Anzeigenfeld
K
U
Rollfüße
L
U
Einzugsschlitz der manuellen Zufuhr
M
U
Kreditkarteneinzugsschlitz
N
U
CD-Einzugsschlitz
O
U
CD-Restebehälter (in Gebrauch)
P
U
Sichtfenster
Q
U
Ausziehbarer Abfallbehälter mit Sichtfenster
R
U
CD-Restebehälter (bei Nichtgebrauch)
S
m
Nicht in den Einzugsschlitz fassen.
Kinder vom Gerät fernhalten.
Keine Sprühmittel verwenden.
Kein Schmieröl (nur Schmiermittelblätter)
verwenden.
Kreditkarten nicht über den Einzugsschlitz
der manuellen Zufuhr einführen.
Bedienfeld und Anzeigen
Anti-Stau-Anzeige: weist den Anwender darauf hin, dass
U
C
zu viel Papier in die manuelle Zufuhr eingeführt wurde (siehe
Abschnitt „Anti-Stau-Technik“).
Papierstauanzeige: leuchtet bei einem Papierstau in der
Automatikzufuhr.
Ladetür/Abfallbehältertür offen oder Behälter voll: weist
auf einen der folgenden Zustände hin:
• Ladetür offen
• Abfallbehälter offen
• Abfallbehälter voll
Betriebsanzeige: leuchtet bei eingeschaltetem Gerät.
Abkühlungsanzeige: leuchtet, wenn sich das Gerät in der
Abkühlphase befindet.
Verriegelungsanzeige: weist darauf hin, dass die Ladetür bei
laufendem Vernichtungsvorgang verriegelt ist.
Ladetürverriegelung – PIN-Code-Tasten Zur Verriegelung
132
der Ladetür während der Aktenvernichtung einen vierstelligen
4
Code eingeben.
RückwärtsVorwärtsAuto
CDs nicht über den Einzugsschlitz der
manuellen Zufuhr einführen.
Zufuhrkapazität der manuellen Zufuhr.
Kleine Heftklammern müssen nicht
entfernt werden.
Kleine Büroklammern müssen nicht
entfernt werden.
Zur Vernichtung von Kreditkarten
geeignet.
D
Erläuterung der Anzeigen
LED-Beleuchtung
Verriegelungs- Abfallbehälter voll/ Abkühlung Papierstau- Auto Anti-Stau
anzeige offen, Ladetür offen anzeige
Farbe der Anzeige Grün Rot Rot Rot Rot Blau Grün Rot
Gerät ausgeschaltet
Standbymodus
Gerät eingeschaltet
Betriebsbereit
Automatikbetrieb An An
Staubeseitigung/Vorwärts-Dauerbetrieb An An
Rückwärtsbetrieb An An An
Ladetür offen An An An
Abfallbehälter voll/offen An An An
Motorabkühlung läuft Blinkt An An
Papierstau An An An
Zu viel Papier in der manuellen Zufuhr An An
Schneidwerk-Selbstreinigung Blinkt An An
PIN-Code-Eingabe Blinkt
Ladetür verriegelt An
Ungültige PIN-Code-Eingabe Blinkt x3
Korrekte PIN-Code-Wiederholung Blinkt x3
Für die Vernichtung geeignetes Material
Mit dem
Aktenvernichter
Auto+ 250X KÖNNEN
folgende Materialien
vernichtet werden:
• Geheftetes Papier
(max. Abstand zwischen
Heftklammer und Ecke:
25 mm)
• Heftklammern einer Größe
bis 26/6 und 24/6
• Kleinformatiges Papier
(mittig ausrichten)
• 250 Farbdruckblätter
• Papier mit Büroklammer
(max. Abstand zwischen
Büroklammer und Ecke:
25 mm)
• Kleine/mittlere Büroklammern
(max. Stärke: 0,9 mm)
• 250 Blatt Normalpapier
• Papier >100 g/m²
(NUR über manuelle Zufuhr)
• Auf halbes Blatt gefaltetes
A3-Papier (max. 2 Blätter)
• 250 einseitig bedruckte Blätter
• 80-g/m²-Papier
- A4 (210 x 297 mm)
- A5 (148 x 210 mm)
- A3-Einzelblatt, auf A4 gefaltet
Der Auto+ 250X kann
zwar geklammerte
Dokumente vernichten,
es wird jedoch
empfohlen, Büro-/
Heftklammern vor
dem Vernichten zu
entfernen, um die
Lebensdauer des
Geräts zu verlängern.
Folgende Materialien
sind für den
Aktenvernichter
Auto+ 250X NICHT
geeignet:
• Industrielle Heftklammern
einer Länge über 6 mm
• Große Büroklammern einer
Länge über 32 mm
• Kunststoffblätter/-ordner,
laminierte Dokumente,
Hochglanzpapier, beidseitig
bedruckte Blätter.
• Dokumente mit 25 oder mehr
Blatt mit einer Heftklammer
oder Büroklammer
• Mehrere gefaltete Blätter*
(z. B. mehr als zwei hälftig
gefaltete A3-Blätter)
• Dickes Papier, Karton • Selbstklebende Etiketten • Zerknitterte Blätter*
* Es wird empfohlen, diese Art von Dokumenten über den Einzugsschlitz zuzuführen. Gefaltete und zerknitterte
Blätter die vor der Zufuhr geglättet werden, können jedoch im Auto+ 250X im Automatikmodus vernichtet werden.
• Gebundene Dokumente • Briefklemmen
• Zeitschriften oder mit
mehreren Büro-/Heftklammern
zusammengefügte Dokumente
• Ungeöffnete Post* (z. B.
Werbesendungen) öffnen und in
die Automatikzufuhr einlegen oder
über den Einzugsschlitz zuführen.
13
Automatikzufuhr
Mit dem Auto+ 250X können bis zu 250 Blatt Papier über die automatische
Zufuhr und bis zu 8 Blatt über den Einzugsschlitz vernichtet werden. Die
Automatikzufuhr kann Papier mit Heft-/Büroklammern verarbeiten und zieht
zur Vermeidung von Papierstaus nur wenige Blätter auf einmal ein.
Betrieb
1
Gerät auspacken.
2
Das Gerät an eine Netzsteckdose anschließen.
3
Darauf achten, dass der Betriebsschalter hinten am Gerät eingeschaltet ist.
4
Zum Starten des Geräts die mittlere Automatik-Starttaste
drücken. Die blaue Standbyanzeige auf der Taste leuchtet dann auf,
und das Gerät wird in den Automatikbetrieb versetzt. Das Gerät ist jetzt
einsatzbereit.
5
Zum Einlegen von Papier die Ladetür am Griff öffnen (s. Abb. 1),
dann das Papier einlegen. Falls erforderlich, kann die Ladetür weiter
geöffnet werden (bis auf 90 Grad). Das Papier (bis zu 250 Blatt) in
die Automatikzufuhr einlegen. Die MAX-Markierung (s. Abb. 2) darf
nicht überschritten werden. Andernfalls besteht die Gefahr einer
Beschädigung des Geräts.
6
Das Gerät wird erst nach Schließen der Ladetür automatisch gestartet
(s. Abb. 1).
Achtung: Falls gewünscht, kann die Ladetür nun durch Eingabe eines
vierstelligen Codes (s. unten) verriegelt werden.
7
Sollen nur bis zu 8 Blatt vernichtet werden, kann der Einzugsschlitz
verwendet werden (s. Abb. 3). Die Automatikzufuhr muss hierfür leer sein.
8
Das zu vernichtende Papier in den Einzugsschlitz der manuellen
Zufuhr einführen. Der Aktenvernichter ermittelt das Papier und startet
automatisch.
9
Verbleibt der Aktenvernichter über 2 Minuten lang im Automatikmodus
und wird nicht benutzt, schaltet er automatisch zur Stromeinsparung in
den Standbymodus.
J
Sobald Papier in den Einzugsschlitz eingeführt wird, schaltet das Gerät
automatisch in den Betriebsmodus um. Die Automatik-Starttaste
muss hierfür nicht gedrückt werden.
( )
( )
Anti-Stau-Technik der manuellen
Zufuhr
Die Sensoren im Papierzufuhrbereich messen die Stapeldicke. Anhand
der Farbe der LED (rot oder grün) ist erkennbar, ob das eingeführte Papier
vernichtet werden kann oder nicht. Grün bedeutet, dass der Papierstapel im
Rahmen der Blattkapazität des Aktenvernichters liegt und somit verarbeitet
werden kann. Rot bedeutet, dass zu viel Papier eingeführt wurde und einige
Blätter entfernt werden müssen, bevor der Stapel vernichtet werden kann.
Da nie mehr Blätter zugeführt werden können, als der Aktenvernichter
tatsächlich vernichten kann, werden Papierstaus vermieden.
Der mit der Staubeseitigung verbundene Zeitaufwand sowie die daraus
resultierenden Widrigkeiten entfallen somit.
Staubehebung
Sollte wider Erwarten ein Papierstau auftreten, wird der Gerätebetrieb
eingestellt. Prüfen, ob der Abfallbehälter voll ist. Wenn nicht, den
Papierstau durch Betätigen der Rückwärtsbetriebstaste (
Vorwärts-Dauerbetriebstaste (
Automatikbetrieb (
die Anweisungen zum Rückwärtsbetrieb befolgen.
) beseitigen, dann wieder in den
) schalten. Lässt sich der Stau so nicht beheben,
) und der
Rückwärtsbetrieb
1
Das Gerät besitzt eine Rückwärtsbetriebstaste
eingezogenes Papier wieder herausgeführt werden kann.
2
Das Papier über den Rückwärtsbetrieb ausgeben lassen, dann das
Gerät am Betriebsschalter an der Geräterückseite ausschalten. Bei
Verwendung der manuellen Zufuhr das Papier aus dem Einzugsschlitz
herausziehen oder die Ladetür öffnen und den verbliebenen
Papierstapel entfernen, dann das feststeckende Papier aus dem
Schneidwerk ziehen.
3
Zur Wiederaufnahme des Gerätebetriebs das Gerät am Betriebsschalter
an der Geräterückseite einschalten und die Automatik-Starttaste
drücken.
4
Bei verriegeltem Gerät ist kein Rückwärtsbetrieb möglich.
( )
, mit deren Hilfe
( )
Verriegelung der Ladetür
Für zusätzliche Sicherheit sorgt die Ladetürverriegelung, die während der
Vernichtung von vertraulichem Material aktiviert werden kann.
Gerät verriegeln:
1
Zu vernichtendes Papier in das Zufuhrfach einlegen. Ladetür schließen
(s. Abb. 1).
2
Vierstelligen Code über die Tasten eingeben. MERKEN SIE SICH DEN
CODE!
Das Gerät wird automatisch entriegelt, wenn:
• der vierstellige Code erneut eingegeben wird
• die Aktenvernichtung beendet ist
• es 30 Minuten lang nicht in Betrieb war (Dokumente verbleiben im Fach)
Sicherheitsstopp
Wird während des Vernichtungsvorgangs der Abfallbehälter herausgezogen
oder die Ladetür geöffnet, wird der Gerätebetrieb gestoppt, und die Anzeige
leuchtet auf.
14
Überhitzung
Wird der Auto+ 250X mehr als 24 Minuten lang ununterbrochen verwendet,
kann es zu einer Überhitzung kommen. In diesem Fall leuchtet die rote
Abkühlungsanzeige
sobald das Gerät ausreichend abgekühlt ist. Wird eine Abkühlung während
eines Vernichtungsvorgangs erforderlich, ist kein Bedienereingriff vonnöten.
Der Gerätebetrieb wird automatisch eingestellt und wieder aufgenommen,
sobald das Gerät ausreichend abgekühlt ist. Während des Abkühlens kann
Papier in die Automatikzufuhr eingelegt und der Abfallbehälter geleert
werden.
)
(
. Das Gerät abkühlen lassen. Die Anzeige erlischt,
Voller Abfallbehälter
Wenn der Abfallbehälter voll ist, stellt das Gerät den Betrieb ein, und die
Abfallbehälteranzeige
werden.
• Den Abfallbehälter langsam herausziehen.
• Den geleerten Behälter in das Gerät zurückschieben und die AutomatikStarttaste drücken, um den Betrieb wieder aufzunehmen.
( )
leuchtet. Der Abfallbehälter muss dann geleert
D
Vernichtung von CDs
Zum Auffangen des CD-Abfalls dient ein separater CD-Restebehälter. Darauf
achten, dass dieser richtig im Abfallbehälter sitzt.
1
Ladetür öffnen (Abb. 4).
2
CDs stets in den CD-Einzugsschlitz einführen (Abb. 5). Jeweils nur eine
CD zuführen.
3
Ladetür schließen.
4
Den CD-Restebehälter nach dem Vernichten von acht CDs leeren, damit
keine CD-Reste in den Papierabfallbehälter geraten.
5
Soll anschließend wieder Papier vernichtet werden, den CD-
Abfallbehälter abnehmen.
Vernichtung von Kreditkarten
Im Auto+ 250X können Kreditkarten vernichtet werden. Die AutomatikStarttaste (
1 Ladetür öffnen (Abb. 4).
2 Kreditkarte in die Rollen einführen (s. Abb. 6). Jeweils nur eine
3 Ladetür schließen.
Der Umwelt zuliebe sollte das Papier nach der Vernichtung als
Altpapier entsorgt werden. Dies ist jedoch nicht möglich, wenn es mit
Kreditkartenresten vermischt ist. Dafür sorgen, dass Kreditkartenreste
nicht in das Altpapier geraten.
) drücken, dann wie folgt vorgehen:
Kreditkarte zuführen.
Schneidwerk-Selbstreinigung
Nach dem Leeren und Einsetzen des Abfallbehälters läuft das Gerät
zur Beseitigung von Papierresten aus dem Schneidwerk 4 Sekunden
im Rückwärtsbetrieb, hält 2 Sekunden an und läuft dann 4 Sekunden
im Vorwärtsbetrieb. Diese Selbstreinigung ist eine zusätzliche
Spezialstauvermeidungstechnik von Rexel.
Wartung
Da sich an den Rollen der Automatikzufuhr nach einiger Zeit Schmutz
ansammelt, müssen diese zur Gewährleistung der optimalen Geräteleistung
regelmäßig mit einem trockenen Tuch gereinigt werden (s. Abb. 7).
Obwohl kein Papier in das Gerät eingeführt wird, kann der Infrarotsensor
der Startautomatik am Einzugsschlitz gelegentlich ausgelöst werden, wenn
sich viel Papierstaub daran abgesetzt hat. Das Gerät am Betriebsschalter
an der Geräterückseite ausschalten und den Sensor vorsichtig mit einem
Wattestäbchen reinigen (s. Abb. 8).
Schmieren des Geräts
Zum Schmieren des Geräts ausschließlich Schmiermittelblätter von
Rexel (2101948 und 2101949) verwenden. ACCO Brands Europe
übernimmt keine Haftung für die Produktleistung oder -sicherheit bei
Verwendung anderer Schmiermittel. Rexel empfiehlt den Einsatz von
Schmiermittelblättern erstmalig nach dem dritten Leeren des Abfallbehälters
(und dann regelmäßig nach jedem dritten Leeren des Behälters). Das
Schmiermittelblatt in die manuelle Zufuhr einführen. Keinesfalls die
Automatikzufuhr verwenden! Bei Verwendung von Schmiermittelblättern
in der Automatikzufuhr werden die Zufuhrrollen verunreinigt, sodass keine
automatische Papierzufuhr in das Schneidwerk mehr möglich ist. Bei
Verunreinigung der Zufuhrrollen die Wartungsanweisungen befolgen.
Zubehör
Zu Recyclingzwecken wird für alle Modelle empfohlen, Abfallbeutel aus
Papier zu verwenden.
Zubehör Bestellnr. Gebinde
Recycelbare Abfallbeutel 1765029EU 20 Abfallbeutel
Schmiermittelblätter 2101949 20 Stk.
2101948 12 Stk.
Garantie
Alle ACCO Brands Europe-Produkte und deren Bauteile unterliegen
bei normaler Verwendung und Wartung einer zweijährigen Garantie
ab Kaufdatum auf Material und Verarbeitungsqualität. Während des
Gewährleistungszeitraums wird ein defektes Gerät oder Bauteil unter den
nachfolgend aufgeführten Bedingungen entweder repariert oder ersetzt.
Diese Garantie deckt ausschließlich Mängel bei Material und
Verarbeitungsqualität ab, wenn das Gerät zweckgemäß verwendet wird.
Durch eine der folgenden Ursachen hervorgerufene Schäden an Produkten
oder deren Bauteilen werden nicht abgedeckt:
- Modifizierung, Reparatur oder Wartung, die nicht vom autorisierten
ACCO-Servicepersonal durchgeführt wurde
- Unfälle, Nachlässigkeit, Missbrauch oder falsche Anwendung aufgrund
einer Missachtung der für ein Gerät des jeweiligen Typs normalen
Einsatzmethoden
Diese Garantie hat keinerlei ausschließende Wirkung auf die Haftbarkeit
von ACCO bei Tod oder Personenschaden aufgrund einer Verletzung der
Sorgfaltspflicht seitens ACCOs. Diese Garantie gilt (gemäß den vorliegenden
Bedingungen) zusätzlich zu jeglichen gesetzlich vorgeschriebenen Rechten
und hat auf diese keinerlei Auswirkungen.
Bei Fragen zur Garantie hilft der örtliche Kundendienst (s. hintere
Umschlagseite) weiter.
Zusatzgarantie
Das Schneidwerk unterliegt einer fünfzehnjährigen Garantie auf Material und
Verarbeitung ab Erstkaufdatum.
*Bei Einsatz zur Vernichtung zusammengehefteter oder geklammerter Blätter
verschleißt das Schneidwerk schneller. Dies wird durch die Garantie nicht
abgedeckt. Das Modell Auto+ 250X ist auf die Vernichtung von bis zu 50
Kreditkarten und 50 CDs während der zweijährigen Standardgarantiedauer
ausgelegt. Bei einer übermäßigen Nutzung des Geräts zur Vernichtung
von Kreditkarten oder CDs wird die Zusatzgarantie auf das Schneidwerk
ungültig.
Sämtliche Aspekte dieser Bedingungen unterliegen der englischen
Gesetzgebung, ausschließlicher Gerichtsstand ist England.
15
Scheda tecnica
Rexel Auto+ 250X
Capacità di taglio
Imboccatura per alimentazione manuale
Capacità di taglio
Vassoio alimentatore automatico
Ciclo di lavoro
Durata primo ciclo di funzionamento
con distruggidocumenti a freddo
Volt / Hz
Amperaggio
Watt motore
2
8 fogli (80gm
)
250 fogli (80gm
12 minuti di funzionamento /
40 minuti di inutilizzo
16 minuti
230V; 50Hz
1,2 Amps
270 Watt
2
)
Introduzione
Grazie per aver scelto questo distruggidocumenti Rexel. Siamo certi che si rivelerà di
grande aiuto nello svolgimento della vostra attività. Si prega di leggere attentamente
queste istruzioni per ottenere la massima prestazione dalla macchina.
Precauzioni di sicurezza
Per evitare infortuni osservare sempre le seguenti elementari norme di sicurezza
quando installate questo prodotto.
• Controllare che la macchina sia installata in un luogo che consenta di accedere
facilmente alla presa e che il cavo di alimentazione non si trovi in posizione tale da
far inciampare le persone.
• Qualsiasi intervento di riparazione della macchina effettuato da personale non
qualificato annullerà la garanzia. Rendere l’unità al fornitore.
• Scollegare il distruggidocumenti dalla presa prima di spostarlo oppure quando non
se ne prevede l’uso per periodi di tempo prolungati.
• NON utilizzare la macchina se il cavo di alimentazione o la spina sono danneggiati,
in caso di cattivo funzionamento o se l’unità è stata danneggiata in qualsiasi modo.
• NON sovraccaricare le prese della corrente oltre la propria capacità poiché questo
può causare incendi o pericolo di folgorazione.
• La presa di alimentazione va installata vicino alla macchina e in un luogo che
consenta di accedervi facilmente.
• NON modificare la spina di collegamento in quanto è configurata per la sorgente di
alimentazione appropriata.
• NON utilizzare la macchina vicino ad acqua.
• NON utilizzare antipolvere o detergenti aerosol.
• NON spruzzare nessuna sostanza nel distruggidocumenti.
• NON caricare il vassoio dell’alimentatore automatico con buste chiuse contenenti
lettere e materiale pubblicitario, riviste, documenti rilegati ecc.
Questo distruggidocumenti è stato progettato nel rispetto della normativa UL 60950 in
materia di sicurezza, compresi i “test di accesso con l’utilizzo di sonde metalliche”, ma
non deve in nessun caso essere messo in funzione vicino a bambini o animali domestici.
Precauzioni di sicurezza
Questo simbolo significa che bisogna prestare
attenzione in quanto i capelli lunghi possono
rimanere impigliati nel gruppo di taglio.
Questo simbolo indica che bisogna fare attenzione
a cravatte e ad altri articoli di abbigliamento con
lacci o parti non fissate che potrebbero rimanere
impigliate nel gruppo di taglio.
Questo simbolo indica che bisogna fare attenzione
a eventuali gioielli indossati e penzolanti o non
interamente fissati al corpo che potrebbero
16
rimanere impigliati nel gruppo di taglio.
m
Questo simbolo significa che non si devono mettere
le mani nell’imboccatura del gruppo di taglio.
Questo simbolo significa che è necessario tenere
i bambini lontani dal distruggidocumenti.
Questo simbolo significa che non si possono
utilizzare bombolette aerosol.
Questo simbolo indica di non lubrificare con olio
(solo fogli di lubrificazione).
Questo simbolo significa che non bisogna
inserire carte di credito nell’imboccatura per
l’alimentazione manuale.
Descrizione delle parti del
distruggidocumenti
U
A
Interruttore acceso/spento (sulla parte posteriore della macchina)
U
Importanti simboli di sicurezza (vedere illustrazione del pannello di
B
controllo del distruggidocumenti sotto riportata)
U
Spia antinceppamento
C
U
Maniglia sportello vassoio caricamento carta
D
U
Sportello di caricamento
E
U
Cestino estraibile
F
U
Tasto avanzamento continuo per rimozione inceppamento.
G
U
Tasto di avviamento automatico
H
U
Tasto reverse
I
U
Meccanismo di blocco dello sportello di caricamento –
J
tasti per digitare il codice PIN
U
Pannello display
K
U
Ruote girevoli
L
U
Imboccatura per alimentazione manuale
M
U
Imboccatura per carte di credito
N
U
Imboccatura per CD
O
U
Posizione del cestino per i CD quando viene utilizzato
P
U
Finestra di controllo livello carta
Q
U
Cestino estraibile con finestra di controllo del livello della carta tagliata
R
U
Posizione del cestino per i CD quando non viene utilizzato
S
Pannello di controllo e spie luminose
Avviamento
automatico
Spia antinceppamento – Avverte l’utente quando è stata caricata troppa
U
C
carta nell’imboccatura per l’alimentazione manuale (vedere la sezione sulla
tecnologia antinceppamento).
Spia inceppamento – indica che la carta si è inceppata nel vassoio di
alimentazione automatica
Spia di cestino pieno/sportello di caricamento aperto – Questo
significa che si è verificata una delle seguenti situazioni:
• Sportello di caricamento aperto
• Cestino non posizionato correttamente
• Cestino pieno
Spia di “Acceso” – Indica che il distruggidocumenti è acceso
Spia di raffreddamento – indica che il distruggidocumenti si sta
raffreddando
Spia di sportello bloccato – indica che lo sportello di caricamento della
carta è bloccato (durante le operazioni di distruzione dei documenti)
132
Meccanismo di blocco dello sportello di caricamento della carta Tasti per digitare il codice PIN: Digitare un codice PIN a quattro cifre per
4
bloccare lo sportello di caricamento durante le operazioni di taglio
Funzionamento
continuo in avanti
Questo simbolo significa che non
bisogna inserire CD nell’imboccatura per
l’alimentazione manuale.
Capacità di taglio dell’imboccatura per
alimentazione manuale
Questo simbolo significa che il
distruggidocumenti è in grado di distruggere
documenti pinzati con punti piccoli.
Questo simbolo significa che il
distruggidocumenti è in grado di distruggere
documenti con graffette piccole.
Questo simbolo significa che il
distruggidocumenti è in grado di distruggere
carte di credito.
Reverse

I
Spiegazione delle icone luminose
Illuminazione a LED
Sportello Cestino pieno/sportello Raffredd. Spia Auto Antinceppamento
bloccato di caricamento aperto inceppamento
Colore del simbolo Verde Rosso Rosso Rosso Rosso Blu Verde Rosso
Interruttore acceso/spento, posizione di SPENTO
Modalità Sleep
Interruttore acceso/spento, posizione di ACCESO
Modalità standby
Modalità funzionamento automatico Illuminato Illuminato
Avanzamento continuo per rimozione inceppamento Illuminato Illuminato
Modalità reverse Illuminato Illuminato Illuminato
Sportello di caricamento aperto Illuminato Illuminato Illuminato
Cestino pieno/non posizionato correttamente Illuminato Illuminato Illuminato
Motore in corso di raffreddamento
Inceppamento Illuminato Illuminato Illuminato
Troppi fogli inseriti nell’imboccatura di alimentazione manuale Illuminato Illuminato
Autopulizia dei coltelli di taglio in corso
Codice PIN in corso d’inserimento
Sportello di caricamento bloccato Illuminato
È stato inserito un codice PIN errato
Il codice PIN reinserito è corretto
Luce lampeggiante
Luce lampeggiante x3
Luce lampeggiante x3
Tipi di documenti che la Auto+ 250X è in grado di distruggere
La Auto+ 250X È in grado
di distruggere i seguenti
tipi di documento:
• Documenti pinzati, il punto deve
essere posizionato a non più di
25mm dall’angolo
• Punti 26/6 o 24/6 o più piccoli
• I fogli di piccole dimensioni devono
essere caricati in posizione centrale
• 250 fogli stampati a colori
• Fogli con graffette, la graffetta deve
essere posizionata a non più di
25mm dall’angolo
• Graffette piccole/medie (spessore
massimo filo metallico 0.9mm)
• 250 fogli di carta bianca
• Carta > 100 gm
2
(solo attraverso
l’imboccatura per l’alimentazione
manuale)
Luce lampeggiante
• Fogli formato A3 piegati a metà –
• 250 fogli di carta, stampati solo
• Carta da 80 gm
Illuminato Illuminato
Luce lampeggiante
max. 2 fogli
su un lato
2
- A4 - 210mm x 297mm
- A5 - 148mm x 210mm
- Foglio A3 piegato in due per
creare formato A4
Illuminato Illuminato
Anche se l’Auto+ 250X
è in grado di distruggere
documenti pinzati e
graffettati, Rexel consiglia di
rimuovere punti e graffette
prima di inserire i fogli nella
macchina in quanto ciò
consente di prolungare la
vita utile del prodotto.
La Auto+ 250X NON È
in grado di distruggere
i seguenti tipi di
documento:
• Verificare che la lunghezza della
gamba del punto non sia superiore
a 6mm.
• Graffette di grandi dimensioni.
Verificare che la lunghezza della
graffetta non sia superiore a 32mm
• Fogli di plastica, documenti
laminati, cartelline in plastica,
carta patinata o lucida o fogli
stampati su entrambi i lati
• Documenti composti da più di
25 fogli tenuti insieme da un punto
o da una graffetta
• Fogli multipli ripiegati* (ad
esempio più di due fogli formato
A3 piegati in due)
• Carta molto spessa o cartoncino • Etichette adesive • Fogli accartocciati o molto spiegazzati*
* Consigliamo di inserire questo tipo di documenti attraverso l’imboccatura di alimentazione manuale. L’Auto+ 250X è in grado di
distruggere automaticamente fogli piegati e spiegazzati se sono stati stesi e appiattiti prima di essere caricati nella macchina.
• Documenti rilegati • Molle fermafogli Bulldog
• Riviste o altri documenti rilegati
con più punti o graffette
• Buste chiuse*, come per esempio quelle contenenti
materiale pubblicitario. Aprire la busta e inserire
busta e fogli nel vassoio di alimentazione automatica
o nell’imboccatura di alimentazione manuale.
17
Tecnologia di alimentazione
automatica
Il distruggidocumenti Auto+ 250X è stato progettato per distruggere
automaticamente fino a 250 fogli se utilizzato con il sistema di alimentazione
automatica e fino a 8 fogli con il sistema di alimentazione manuale tramite l’apposita
imboccatura. Il meccanismo di alimentazione automatica è stato progettato per
gestire anche documenti pinzati e graffettati estraendo un numero limitato di fogli
per volta dal vassoio di alimentazione allo scopo di ridurre al minimo il rischio di
inceppamento.
Funzionamento
1
Estrarre il distruggidocumenti dalla confezione.
2
Collegare il distruggidocumenti alla rete di alimentazione.
3
Controllare che l’interruttore di acceso/spento sul retro della macchina sia nella
posizione di ‘ON’ (acceso)(
4
Per iniziare l’operazione di distruzione dei documenti, premere il tasto di
avviamento automatico centrale (
standby sul tasto di avviamento automatico e attiva la modalità di avviamento
automatico. È ora possibile iniziare a distruggere fogli.
5
Per caricare il distruggidocumenti basta sollevare la maniglia dello sportello di
caricamento (vedere fig. 1) per aprire lo sportello e inserire i documenti. Se
necessario è possibile portare manualmente l’apertura dello sportello fino a 90°.
Caricare fino a 250 fogli per volta nel vassoio di alimentazione automatica. Non
riempire il vassoio oltre il livello MAX, corrispondente a 250 fogli, in quanto ciò
può danneggiare il distruggidocumenti (vedere fig. 2).
6
La macchina inizierà automaticamente a distruggere i documenti SOLO dopo la
chiusura dello sportello di caricamento (vedere fig. 1).
Attenzione: se necessario è adesso possibile bloccare lo sportello di
caricamento carta digitando un codice PIN a 4 cifre (vedere sotto).
7
Se avete solo fino a 8 fogli da distruggere, potete usare l’imboccatura
per l’alimentazione manuale, a condizione che il vassoio dell’alimentatore
automatico sia vuoto (vedere fig. 3).
8
Inserire i fogli da distruggere nell’imboccatura di alimentazione manuale.
Il distruggidocumenti rileverà lo spessore dei fogli e verrà avviato
automaticamente.
9
Se lasciato nella modalità di funzionamento automatico per più di 2 minuti senza
essere utilizzato, il distruggidocumenti ritornerà automaticamente alla modalità
standby per risparmiare corrente.
J
Il distruggidocumenti si ‘sveglierà’ dalla modalità Sleep quando vengono inseriti
i fogli nell’imboccatura della macchina o viene aperto lo sportello di caricamento
della carta.. Non è necessario premere il tasto di avviamento automatico (
).
). Questo illumina il simbolo blu di
Blocco dello sportello di
caricamento della carta
Per garantire maggiore sicurezza lo sportello di caricamento della carta può essere
bloccato durante la distruzione di documenti riservati.
Per bloccare lo sportello:
1
Inserire i documenti nel vassoio di alimentazione della carta. Chiudere lo
sportello di caricamento della carta (vedere fig. 1).
2
Digitare 4 cifre a vostra scelta. RICORDATE IL CODICE PIN!
Lo sportello di caricamento del distruggidocumenti si sblocca automaticamente
quando:
• Viene digitato nuovamente il codice PIN a 4 cifre.
• L’operazione di distruzione è stata completata.
• Il distruggidocumenti rimane inutilizzato per 30 minuti (ma nel vassoio di
alimentazione automatica rimangono ancora dei documenti)
18
Funzione di sicurezza in caso
di cestino non correttamente
posizionato o sportello di
caricamento aperto
A scopo precauzionale, per garantire la sicurezza, se il cestino viene spostato o lo
sportello di caricamento aperto durante le operazioni di taglio, il distruggidocumenti si
arresta e si illumina l’icona.
Imboccatura di alimentazione
manuale dotata di tecnologia
antinceppamento
Sensori collocati nell’area di alimentazione dei fogli misurano lo spessore della carta
da distruggere. Il distruggidocumenti comunicherà all’utente, mediante l’illuminazione
della spia in rosso o verde, se la macchina è in grado o meno di distruggere fogli.
La spia verde indica che lo spessore dei fogli da distruggere rientra nella capacità di
taglio della macchina e che è quindi possibile procedere all’operazione di distruzione.
La spia rossa indica che i fogli sono troppi e che è necessario rimuoverne alcuni per
consentire alla macchina di iniziare a distruggere i documenti.
Grazie a questa tecnologia non è possibile distruggere un numero di fogli superiore
alla capacità di taglio del distruggidocumenti e si impedisce quindi che la macchina
si inceppi.
Di conseguenza, non si spreca tempo a far funzionare la macchina in reverse per
liberare i fogli e si evita di creare problemi e disordine.
Casi rari di inceppamento
Nell’improbabile eventualità che il distruggidocumenti s’inceppi, l’Auto+250X si
arresta automaticamente. Controllare che il cestino non sia pieno e poi cercare
di rimuovere l’inceppamento premendo prima il tasto di reverse (
avanzamento continuo (
Se questo sistema non funziona, seguire le istruzioni per il funzionamento in reverse.
), e infine il tasto di funzionamento automatico ( ).
Funzionamento in reverse
1
Il distruggidocumenti è dotato, per una maggiore facilità d’uso, di un tasto
reverse (
) per poter cambiare all’occorrenza la direzione di distruzione dei
fogli e consentire la fuoriuscita della carta.
2
).
Selezionare la modalità reverse per recuperare la carta, poi spegnere il
distruggidocumenti utilizzando l’interruttore acceso/spento sul retro della
macchina. Rimuovere la carta dall’imboccatura di alimentazione manuale (se
utilizzata) o aprire lo sportello di caricamento, rimuovere dal vassoio la carta
rimanente e poi togliere manualmente la carta inceppata dal gruppo di taglio.
3
Per continuare l’operazione di distruzione dei documenti accendere il
distruggidocumenti azionando l’interruttore acceso/spento posto sul retro della
macchina e premere il tasto di avviamento automatico (
4
La funzione reverse non è disponibile quando lo sportello di caricamento del
distruggidocumenti è bloccato.
).
Surriscaldamento
Se l’Auto+250X è utilizzata senza interruzione per più di 24 minuti, il
distruggidocumenti può surriscaldarsi e in questo caso s’illumina la spia rossa di
raffreddamento (
il distruggidocumenti sarà di nuovo pronto per essere usato, la spia del simbolo del
termometro sarà spenta. Se il distruggidocumenti ha bisogno di raffreddarsi mentre è
in funzione, non è necessario fare niente. La macchina riprenderà automaticamente
a tagliare la carta quando si sarà raffreddata dopo il periodo d’interruzione. L’unica
cosa da fare mentre la macchina si raffredda è assicurarsi che la carta sia caricata
nel vassoio dell’alimentatore automatico e che il cestino sia vuoto.
). Si prega di lasciar raffreddare il distruggidocumenti. Quando
), poi di
I
Cestino pieno
Il distruggidocumenti non funziona se il cestino è pieno e si è illuminato il simbolo di
cestino pieno (
• Estrarre lentamente il cestino da svuotare.
• Rimettere a posto il cestino vuoto e premere il tasto che attiva la modalità di
funzionamento automatico per riprendere la distruzione dei fogli.
). In questo caso è necessario svuotare il cestino.
Distruzione di CD
Un vassoio separato per la raccolta degli sfridi di CD viene fornito in dotazione con
la macchina per raccogliere gli sfridi di CD. Assicurarsi che il vassoio sia montato
correttamente sul cestino prima di iniziare le operazioni di distruzione.
1
Sollevare lo sportello di caricamento (vedere fig. 4).
2
Inserire sempre i CD nell’apposita imboccatura per i CD (vedere fig. 5).
Distruggere solo un CD alla volta.
3
Chiudere lo sportello di caricamento.
4
Svuotare il vassoio per la raccolta degli sfridi di CD dopo aver distrutto 8 CD per
evitare che gli sfridi cadano nel comparto della carta tagliata.
5
Rimuovere il vassoio per la raccolta degli sfridi di CD prima di riprendere
l’operazione di distruzione della carta.
Distruzione di carte di credito
L’Auto+250X è in grado di distruggere carte di credito. Premere il tasto di avviamento
automatico (
1
2
3
Rexel incoraggia i propri clienti a riciclare la carta tagliata. Si prega di notare
che la carta tagliata non può essere riciclata se frammista a frammenti di
carte di credito. Se intendete riciclare la carta, tenere separati carta e carte
di credito.
) del distruggidocumenti e poi eseguire le seguenti operazioni:
Sollevare lo sportello di caricamento (vedere fig. 4).
Inserire la carta di credito tra i rulli come mostrato nella fig. 6. Distruggere solo
una carta di credito per volta.
Chiudere lo sportello di caricamento
Autopulizia dei coltelli di taglio
Dopo che il cestino è stato svuotato e rimesso a posto, il distruggidocumenti
funzionerà in reverse per 4 secondi, si arresterà per 2 secondi e poi ripartirà in avanti
per 4 secondi per eliminare eventuale carta rimasta nel gruppo di taglio. Questo
meccanismo di ‘autopulizia’, unico nel suo genere, rappresenta un miglioramento
della tecnologia antinceppamento Rexel.
Manutenzione
Nel corso del tempo sui rulli del meccanismo di alimentazione automatica può
accumularsi della sporcizia, pulirli con un panno asciutto per mantenere inalterate le
prestazioni del prodotto (vedere fig. 7).
Il sensore a infrarossi per l’avviamento automatico, situato nell’imboccatura di
alimentazione della carta, può a volte venir ricoperto da polvere di carta e questo
causa il funzionamento della macchina anche quando non è stata inserita della carta.
Spegnere il distruggidocumenti azionando l’interruttore sul retro della macchina e
pulire con cura il sensore usando un batuffolo di cotone (vedere fig. 8).
Lubrificazione del
distruggidocumenti
Per lubrificare il distruggidocumenti utilizzare solo fogli di lubrificazione Rexel
(2101948 & 2101949). ACCO Brands Europe declina ogni responsabilità
relativamente a prestazioni e sicurezza del prodotto se vengono utilizzati altri
tipi o marchi di lubrificante su qualsiasi parte di questo distruggidocumenti.
Rexel consiglia di utilizzare un foglio di lubrificazione dopo tre svuotamenti del
cestino (e successivamente ogni terzo svuotamento del cestino). Inserire il foglio
di lubrificazione nell’imboccatura di alimentazione manuale e NON nel vassoio
di alimentazione automatica. Mettendo il foglio di lubrificazione nel vassoio di
alimentazione automatica si causa la contaminazione dei rulli e questo impedisce
al meccanismo di alimentazione automatica di inviare la carta al gruppo di taglio.
Se i rulli si sporcano, seguire le istruzioni di manutenzione.
Accessori del distruggidocumenti
Si consiglia di utilizzare su tutti i modelli gli appositi sacchi di carta per riciclare la
carta tagliata.
Accessorio Numero parte Quantità in una
confezione
Sacchi di ricambio per riciclaggio 1765029EU 20 sacchi
Fogli di lubrificazione 2101949 20 fogli
2101948 12 fogli
Garanzia
ACCO Brands Europe garantisce che i propri prodotti e le relative parti sono privi
di difetti di materiale e lavorazione in normali condizioni d’uso per un periodo di 24
mesi dalla data originale di acquisto. Durante detto periodo, ACCO Brands Europe
provvederà a riparare o sostituire prodotti o parti difettosi in base alle seguenti
condizioni di garanzia.
La garanzia è valida solo per difetti di materiale e lavorazione in normali condizioni
d’uso e non copre eventuali danni arrecati al prodotto o alle relative parti risultanti da:
- alterazioni, riparazioni, modifiche o interventi di assistenza tecnica non
effettuati da personale di centri di assistenza tecnica ACCO autorizzati.
- incidenti, negligenza, abuso o uso improprio dovuto alla mancata osservanza
delle normali procedure operative per un prodotto di questo tipo.
Nessuna dichiarazione in questa garanzia implica l’esclusione di responsabilità di
ACCO relativamente alla morte o a danni personali causati da negligenza da parte di
ACCO. Questa garanzia viene offerta (subordinatamente a questi termini e condizioni)
in aggiunta e senza pregiudizio alcuno ai diritti riconosciuti dalla legge vigente.
Per qualsiasi domanda relativa alla garanzia, siete pregati di rivolgervi al centro di
assistenza per il vostro paese (vedere l’ultima di copertina).
Garanzia addizionale
ACCO Brands Europe garantisce che i coltelli di taglio del distruggidocumenti sono
privi di difetti di materiale e lavorazione per 15 anni dalla data di acquisto da parte
del consumatore originale.
* Si prega di notare che la distruzione di fogli provvisti di graffette o punti causa la
graduale usura dei coltelli di taglio e che tale usura non è coperta dalla garanzia. Il
distruggidocumenti Auto+ 250X è stato progettato per distruggere fino a un massimo
di 50 carte di credito e 50 CD nell’arco del periodo di garanzia standard di 2 anni. La
distruzione di un numero eccessivo di carte di credito o di CD annullerà la garanzia
addizionale sui coltelli di taglio.
Queste condizioni sono regolamentate ed interpretate a tutti gli effetti in conformità
alla legislazione inglese e subordinate all’esclusiva giurisdizione dei tribunali inglesi.
19

Specificaties
Rexel Auto+ 250X
Velcapaciteit
Invoeropening voor handmatige toevoer
Velcapaciteit
Automatisch invoervak
Bedrijfscyclus
Bedrijfstijd, koude start
Volt / Hz
Ampère
Motor Watt
8 vellen (80 gsm)
250 vellen (80 gsm)
12 min. ACTIEF /
40 min. STAND-BY
16 minuten
230 V / 50 Hz
1,2 A
270 W
Inleiding
Gefeliciteerd met de aankoop van deze papiervernietiger van Rexel. We zijn er
van overtuigd dat u veel plezier van deze machine zult hebben; voor het optimale
gebruik van deze machine, is het raadzaam deze gebruiksaanwijzing goed door
te lezen.
Veiligheid voorop
Om letsel te voorkomen, moet u de volgende voorzorgsmaatregelen in acht
nemen bij de opstelling van dit product.
• Steek de stekker in een toegankelijk stopcontact en zorg er voor dat niemand
over het snoer kan struikelen.
• Als een onbevoegd persoon deze machine probeert te repareren, vervalt de
garantie. Stuur de machine terug naar de leverancier.
• Haal de stekker uit het stopcontact voordat u de papiervernietiger verplaatst of
als de machine langere tijd niet zal worden gebruikt.
• Gebruik de papiervernietiger niet met een beschadigd snoer of een
beschadigde stekker, nadat hij een defect heeft vertoond of nadat hij op enige
wijze is beschadigd.
• Zorg ervoor dat het stopcontact niet overbelast is, omdat dit brand of een
elektrische schok kan veroorzaken.
• Het stopcontact moet zich in de buurt van de machine bevinden en goed
toegankelijk zijn.
• Wijzig de stekker niet. De stekker is samengesteld voor de juiste elektrische
voeding.
• Gebruik de papiervernietiger niet in de buurt van water.
• Gebruik geen stofverwijderings- of schoonmaakmiddelen in spuitbussen.
• Spuit niets in de papiervernietiger.
• Plaats geen ongeopende reclamefolders, tijdschriften, gebonden documenten,
enz. in het automatische invoervak.
Ook al voldoet deze papiervernietiger aan de UL 60950 veiligheidsnormen en is
de machine vingerveilig, toch wordt aangeraden de machine niet in de buurt van
kinderen of huisdieren te gebruiken.
Veiligheid voorop
Wees voorzichtig met lang haar, omdat het
in de snijkop verstrengeld kan raken.
Wees voorzichtig met dassen en andere
loszittende kledingstukken die in de snijkop
verstrengeld kunnen raken.
Wees voorzichtig met loszittende juwelen
die in de snijkop verstrengeld kunnen raken.
20
Steek uw hand niet in de invoeropening
van de snijkop.
Houd kinderen uit de buurt van de
papiervernietiger.
Gebruik geen spuitbussen.
Dit betekent geen oliesmering
(alleen smeervellen).
Dit betekent geen creditcards in de
invoeropening voor handmatige toevoer steken.
m
Beschrijving van de onderdelen
U
A
AAN/UIT-schakelaar (achterkant)
U
Belangrijke veiligheidssymbolen
B
(raadpleeg het regelpaneel van de papiervernietiger hieronder)
U
Antiblokkeringslampje
C
U
Hendel van de laaddeur
D
U
Laaddeur
E
U
Voorkant van verwijderbare afvalbak
F
U
Knop voor blokkeringsverwijdering, continu vooruit-stand
G
U
Auto-knop
H
U
Achteruit-knop
I
U
Vergrendelingsmechanisme voor laaddeur
J
– PIN-wachtwoordknoppen
U
Lampjespaneel
K
U
Zwenkwieltjes
L
U
Invoeropening voor handmatige toevoer
M
U
Invoeropening voor creditcards
N
U
Invoeropening voor cd’s
O
U
Locatie van cd-afvalbak, indien in gebruik
P
U
Kijkvenster voor de papierstapel
Q
U
Verwijderbare afvalbak met kijkvenster
R
U
Locatie van cd-afvalbak, indien niet in gebruik
S
Regelpaneel en lampjes
Automatisch
Antiblokkeringslampje – dit waarschuwt de gebruiker als er te veel
U
C
papier in de invoeropening voor handmatige toevoer wordt gestoken
(lees het deel over Anti-vastloop technologie).
Blokkeringslichtje – dit betekent dat er papier in het automatische
invoervak vastgelopen is.
Lampje afvalbak vol/laaddeur open – dit betekent ofwel:
• laaddeur is open
• afvalbak is open
• afvalbak is vol
Aan-lichtje – dit betekent dat de machine ingeschakeld is.
Afkoellichtje – dit betekent dat de machine aan het afkoelen is.
Vergrendelingslichtje – dit betekent dat de laaddeur is vergrendeld
(tijdens het versnipperen)
132
Vergrendelingsmechanisme voor de laaddeur – PINwachtwoordknoppen: Voer een viercijferige code in om de laaddeur
4
tijdens de werking te vergrendelen.
Continu
vooruit
Dit betekent geen cd’s in de invoeropening
voor handmatige toevoer steken.
Velcapaciteit van de invoeropening voor
handmatige toevoer.
Dit betekent dat de machine kleine nietjes
kan accepteren.
Dit betekent dat de machine kleine
paperclips kan accepteren.
Dit betekent dat de machine creditcards
kan accepteren.
Achteruit

O
Uitleg bij verlichte pictogrammen
LED-verlichting
Vergrendelings Afvalbak vol/ Afkoelen Blokkerings- Auto Antiblokkerings
laaddeur open lichtje
Symboolkleur Groen Rood Rood Rood Rood Blauw Groen Rood
AAN/UIT-stroomschakelaar, UIT
Slaapstand
AAN/UIT-stroomschakelaar, AAN
Stand-by
Auto-stand Brandt Brandt
Stand voor continu vooruit, blokkeringsverwijdering Brandt Brandt
Achteruit-stand Brandt Brandt Brandt
Laaddeur open Brandt Brandt Brandt
Afvalbak vol/afvalbak open Brandt Brandt Brandt
Motor is aan het afkoelen Knippert Brandt Brandt
Vastgelopen papier Brandt Brandt Brandt
Te veel vellen in de invoeropening voor handmatige toevoer Brandt Brandt
Zelfreiniging van messen Knippert Brandt Brandt
PIN-wachtwoord wordt ingevoerd Knippert
Laaddeur is vergrendeld Brandt
Onjuist PIN-wachtwoord
Juist PIN-wachtwoord opnieuw ingevoerd
Knippert x3
Auto+ 250X versnipperingscapaciteit
De Auto+ 250X kan
het volgende WEL
versnipperen:
• Geniet papier, binnen 25 mm
vanaf de hoek
• 26/6 en 24/6 of kleinere nietjes
• Kleine vellen, in het midden
geladen
• 250 vellen met kleurafdruk
Knippert x3
• Papier met paperclip, binnen 25
mm vanaf de hoek
• Kleine/medium paperclips (max.
draaddikte = 0,9 mm)
• 250 vellen gewoon papier
• >100 gsm papier (alleen via de
invoeropening voor handmatige
toevoer)
• A3 dubbelgevouwen - max.
2 vellen
• 250 vellen papier, enkelzijdig
afgedrukt
• 80 gsm papier
- A4 – 210 x 297 mm
- A5 – 148 x 210 mm
- A3 enkel vel, dubbelgevouwen
tot een A4
Ook al accepteert de
Auto+ 250X vastgemaakte
vellen, toch raadt
Rexel aan de nietjes en
paperclips voorafgaand
aan de versnippering te
verwijderen, zodat de
machine langer mee zal
gaan.
De Auto+ 250X kan
het volgende NIET
versnipperen:
• Zorg ervoor dat de pootjes niet
langer zijn dan 6 mm.
• Grote paperclips. Zorg ervoor
dat de paperclip niet langer is
dan 32 mm
• Plastic vellen, gelamineerde
documenten, plastic mappen,
glanzend papier of een vel dat
aan weerszijden is bedrukt
• Een document met meer dan 25
vellen die met een nietje of klem
bij elkaar gehouden worden.
• Meerdere gevouwen vellen*
(bijv. meer dan twee
dubbelgevouwen A3-vellen)
• Dik papier of kartonpapier • Zelfklevende etiketten • Gekreukeld papier*
* Aanbevolen wordt dit soort documenten door de invoeropening voor handmatige toevoer te steken.
De Auto+ 250X kan automatisch gevouwen en gekreukelde vellen versnipperen als ze van tevoren zijn vlakgemaakt.
• Ingebonden documenten • Foldback clips
• Tijdschriften of andere
documenten die vastgezet zijn
met meerdere nietjes of klemmen
• Ongeopende post*, bijv. reclamefolders.
Open de post en leg het papier in het
automatische invoervak of steek het door
de invoeropening voor handmatige toevoer.
21

Automatische toevoertechnologie
De Auto+ 250X is ontworpen om automatisch tot 250 vellen uit het
automatische invoervak te versnipperen en tot 8 vellen via de invoeropening
voor handmatige toevoer. Het automatische toevoermechanisme is geschikt
voor papier dat met nietjes en paperclips is vastgemaakt en trekt slechts enkele
vellen papier in het snijmechanisme om de kans op vastgelopen papier te
minimaliseren.
Bediening
1
Haal de machine uit de verpakking.
2
Steek de stekker in het stopcontact.
3
Zorg ervoor dat de AAN/UIT-schakelaar aan de achterkant van de machine
op ‘AAN’ staat (
4
Om met versnipperen te beginnen, drukt u op de centrale Auto-knop ( ).
Het blauwe stand-by-symbool op de Auto-knop licht op en de machine gaat
in de auto-stand staan. U kunt nu papier versnipperen.
5
Om de machine te laden, haalt u de deurhendel omhoog (zie afb. 1). Open
de laaddeur en leg de documenten in het invoervak. U kunt de deur tot
90 graden openen, als u betere toegang wilt verkrijgen. Leg tot 250 vellen
papier tegelijkertijd in het automatische invoervak. Vul het vak niet hoger dan
de 250 MAX-lijn, omdat de machine anders beschadigd raakt (zie afb. 2).
6
De papiervernietiger begint pas automatisch te functioneren nadat de
laaddeur is gesloten (zie afb. 1).
Opgelet: Zo nodig kunt u nu de laaddeur vergrendelen door een
viercijferige code in te voeren (zie verder).
7
Als u niet meer dan 8 vellen hoeft te versnipperen, kunt de invoeropening
voor handmatige toevoer gebruiken, zolang het automatische invoervak leeg
is (zie afb. 3).
8
Steek het papier dat versnipperd moet worden in de invoeropening voor
handmatige toevoer. De machine merkt het papier op en begint het
automatisch te versnipperen.
9
Als de papiervernietiger meer dan 2 minuten op de auto-stand heeft
gestaan zonder dat hij wordt gebruikt, gaat hij automatisch weer op standby staan, zodat energie wordt bespaard.
J
De machine wordt automatisch uit de slaapstand ‘gewekt’ wanneer er
papier in de invoeropening wordt gestoken of wanneer de laaddeur wordt
geopend. Het is niet nodig om op de auto-knop (
).
) te drukken.
De laaddeur vergrendelen
Als er vertrouwelijke documenten worden versnipperd, kan voor extra beveiliging
de laaddeur worden vergrendeld.
De machine vergrendelen:
1
Leg de documenten in het invoervak. Sluit de laaddeur.
2
Druk vier cijfers in. ONTHOUD DEZE CODE!
De machine ontgrendelt automatisch als:
• de viercijferige code opnieuw wordt ingevoerd.
• al het papier is versnipperd.
• de machine 30 minuten inactief is (terwijl er nog steeds documenten in het
invoervak liggen)
Veiligheidsfunctie bij open
afvalbak of laaddeur
Voor alle veiligheid stopt de papiervernietiger als de afvalbak- of laaddeur tijdens
de werking worden geopend. Ook gaat het lampje aan.
22
Anti-vastloop technologie in de
invoeropening voor handmatige
toevoer
Sensoren in de papiertoevoer meten de dikte van de papierstapel die
versnipperd moet worden. Rode en groene lichtjes geven aan of de papierstapel
versnipperd kan worden of niet. Groen betekent dat de dikte van de papierstapel
binnen de capaciteit van de machine valt en dat de stapel versnipperd zal
worden. Rood betekent dat de stapel te dik is en dat u enkele vellen moet
verwijderen, voordat het papier kan worden versnipperd.
Aangezien er nooit papierstapels worden versnipperd die dikker zijn dan de
capaciteit van de machine, worden blokkeringen voorkomen.
Hierdoor hoeft u dus geen tijd meer te verspillen aan het terugdraaien van papier
en het verwijderen van vastgelopen papier – om maar niet te spreken van de
snippers die dan overal heen vliegen!
Blokkering verhelpen
In het onwaarschijnlijke geval dat de papierversnipperaar verstopt raakt,
zal de machine stoppen. Controleer of de afvalbak vol is. Probeer vervolgens
de verstopping te verwijderen door de achteruit (
)-knoppen te gebruiken, en daarna weer naar de auto-stand ( ) terug
(
te keren. Als dit niet helpt, volgt u de aanwijzingen voor de achteruit-functie.
)- en continu vooruit
Achteruit-functie
1
Als u tijdens de versnipperingsfunctie wilt dat het papier achterwaarts uit de
machine komt, kunt u de achteruit-knop (
2
Laat het papier achteruit uit de machine lopen en schakel de machine uit
met de AAN/UIT-schakelaar aan de achterkant van de machine. Verwijder
het papier uit de invoeropening voor handmatige toevoer (indien gebruikt) of
open de laaddeur. Verwijder al het resterende papier uit het automatische
invoervak en trek het vastgelopen papier uit het snijmechanisme.
3
Als u met versnipperen wilt doorgaan, schakelt u de machine aan met de
AAN/UIT-schakelaar aan de achterkant van de machine en drukt u op de
Auto-knop (
4
De achteruit-functie kan niet worden gebruikt als de machine vergrendeld is.
).
) gebruiken.
Oververhitting
Als de Auto+ 250X langer dan 24 minuten ononderbroken wordt gebruikt,
kan de machine oververhit raken en licht het afkoellichtje rood op (
Laat de machine afkoelen. Als de papiervernietiger opnieuw gebruikt kan
worden, gaat het thermometersymbool weer uit. Als de machine tijdens de
versnipperingsfunctie moet afkoelen, hoeft u niets te doen. De machine start
de versnipperingsfunctie automatisch, zodra hij is afgekoeld na een periode
van ononderbroken gebruik. Terwijl de machine afkoelt, kunt u papier in het
automatische invoervak leggen en de afvalbak legen.
).
Afvalbak vol
De machine functioneert niet als de afvalbak vol is en het afvalbak vol-symbool
) brandt. U moet de afvalbak legen.
(
• Trek de afvalbak langzaam uit de machine, zodat u hem kunt legen.
• Duw de lege afvalbak terug op zijn plaats en druk op de auto-knop om met
versnipperen door te gaan.
O
Cd’s versnipperen
De machine heeft een aparte afvalbak voor het opvangen van cd-scherven.
Plaats deze op de juiste wijze boven op de afvalbak voor papier, voordat u cd’s
gaat versnipperen.
1
Haal de laaddeur omhoog (zie afb. 4).
2
Steek cd’s altijd in de cd-invoeropening (zie afb. 5). U kunt slechts één cd
per keer versnipperen.
3
Sluit de laaddeur.
4
Maak na 8 cd’s de cd-afvalbak leeg, anders vallen de scherven in de
afvalbak voor papier.
5
Verwijder de cd-afvalbak voordat u weer papier gaat versnipperen.
Creditcards versnipperen
De Auto+ 250X kan creditcards versnipperen. Druk op de Auto-knop ( ) en
volg deze stappen:
1
Haal de laaddeur omhoog (zie afb. 4).
2
Steek de creditcard in de rollen, zoals weergegeven in afb. 6. U kunt telkens
slechts één creditcard versnipperen.
3
Sluit de laaddeur.
Rexel moedigt klanten aan het versnipperde papier te recyclen. Let wel
dat versnipperd papier niet gerecycled kan worden als het is vermengd
met creditcardscherven. Als u wilt recyclen, moet u het versnipperde
papier en de creditcardscherven gescheiden houden.
Zelfreinigende messen
Wanneer de afvalbak is geleegd en weer op zijn plaats is gezet, zal de machine
4 seconden achteruit draaien, 2 seconden stoppen en 4 seconden vooruit
draaien om al het resterende papier uit het snijmechanisme te verwijderen. Dit
unieke zelfreinigingsmechanisme is een extra functie naast de Anti-vastloop
technologie van Rexel.
Onderhoud
De rollen van het automatische toevoermechanisme kunnen na verloop van tijd
vuil worden. Veeg ze met een droge doek schoon, zodat de machine optimaal
kan blijven presteren (zie afb. 7).
De infraroodsensor voor de automatische start in de invoeropening kan soms
met papierstof worden bedekt, waardoor de machine gaat draaien, ook als er
geen papier wordt toegevoerd. Schakel de machine aan de achterkant uit en
maak de sensor voorzichtig met een wattenstokje schoon (zie afb. 8).
De papiervernietiger smeren
Gebruik alleen olievellen van Rexel (2101948 en 2101949) om de machine
te smeren. ACCO Brands Europe accepteert geen aansprakelijkheid voor de
prestatie of veiligheid van deze machine als er andere soorten of merken
smeermiddelen zijn gebruikt. Rexel raadt aan een smeervel te gebruiken zodra
de afvalbak driemaal is geleegd (en daarna telkens nadat de afvalbak opnieuw
driemaal is geleegd). Steek het smeervel in de invoeropening voor handmatige
toevoer en NIET in het automatische invoervak. Als u een smeervel in het
automatische invoervak legt, verontreinigt u de rollen, zodat het automatische
toevoermechanisme geen papier meer naar het snijmechanisme kan leiden. Volg
de onderhoudsaanwijzingen als de rollen verontreinigd raken.
Accessoires voor de
papiervernietiger
Voor alle modellen wordt aanbevolen een papieren afvalzak te gebruiken, zodat
de zak met het versnipperd papier gerecycled kan worden.
Accessoire Onderdeelnummer Aantal per doos
Recycleerbare afvalzakken 1765029EU 20 afvalzakken
Smeervellen 2101949 20 vellen
2101948 12 vellen
Garantie
ACCO Brands Europe garandeert de producten en hun onderdelen gedurende
24 maanden na de oorspronkelijke datum van aankoop tegen materiaal- of
fabricagefouten bij normaal gebruik. Gedurende deze periode repareren
of vervangen wij een defect product of onderdeel mits aan de volgende
garantievoorwaarden is voldaan:
De garantie geldt alleen voor materiaal- en fabricagefouten bij normaal gebruik
en geldt niet voor beschadigingen aan het product of aan de onderdelen die het
gevolg zijn van:
- wijzigingen, reparaties, modificaties of onderhoud uitgevoerd door een niet
door ACCO erkend servicecentrum;
- ongelukken, achteloosheid of misbruik doordat de normale
bedrijfsprocedures van dit product niet werden opgevolgd.
Niets in deze garantie vrijwaart ACCO van de aansprakelijkheid in verband met
(fataal) persoonlijk letsel, veroorzaakt door de onachtzaamheid van ACCO. Deze
garantie (mits aan deze voorwaarden wordt voldaan) geldt extra en doet geen
afbreuk aan uw wettelijke rechten.
Als u vragen hebt over de garantie, kunt u contact opnemen met het
servicecentrum in uw land (raadpleeg het achterblad).
Extra garantie
ACCO Brands Europe biedt een garantie van 15 jaar na aankoop door de
oorspronkelijke klant dat de snijmessen van de vernietiger vrij zijn van defecten
als gevolg van materiaal- of fabricagefouten.
* N.B. De messen zullen snel slijten als vastgemaakte vellen worden versnipperd
(met nietjes en paperclips) - dit wordt niet door de garantie gedekt. De Auto+
250X is ontworpen voor de versnippering van niet meer dan 50 creditcards en
50 cd’s gedurende de standaardgarantieperiode van 2 jaar. Door overmatige
versnippering van creditcards of cd’s zal de uitgebreide garantie op het
snijmechanisme komen te vervallen.
Deze voorwaarden zijn in elk opzicht onderhevig aan en opgesteld volgens de
Engelse wetgeving en vallen onder de jurisdictie van de Engelse rechtbanken.
23
 Loading...