

Page 1

PBL64
PNL64
PTL64
PXL64
EN
Hob User Manual 2
FR Table de cuisson Notice d'utilisation 19
DE Kochfeld Benutzerinformation 38
Page 2

www.electrolux.com2
CONTENTS
1. SAFETY INFORMATION....................................................................................3
2. SAFETY INSTRUCTIONS..................................................................................5
3. PRODUCT DESCRIPTION................................................................................ 7
4. DAILY USE......................................................................................................... 8
5. HINTS AND TIPS............................................................................................... 9
6. CARE AND CLEANING....................................................................................10
7. TROUBLESHOOTING......................................................................................11
8. INSTALLATION................................................................................................ 12
9. TECHNICAL DATA...........................................................................................16
10. ENERGY EFFICIENCY.................................................................................. 17
WE’RE THINKING OF YOU
Thank you for purchasing an Electrolux appliance. You’ve chosen a product that
brings with it decades of professional experience and innovation. Ingenious and
stylish, it has been designed with you in mind. So whenever you use it, you can
be safe in the knowledge that you’ll get great results every time.
Welcome to Electrolux.
Visit our website for:
Get usage advice, brochures, trouble shooter, service information:
www.electrolux.com/webselfservice
Register your product for better service:
www.registerelectrolux.com
Buy Accessories, Consumables and Original spare parts for your appliance:
www.electrolux.com/shop
CUSTOMER CARE AND SERVICE
Always use original spare parts.
When contacting our Authorised Service Centre, ensure that you have the
following data available: Model, PNC, Serial Number.
The information can be found on the rating plate.
Warning / Caution-Safety information
General information and tips
Environmental information
Subject to change without notice.
Page 3

1. SAFETY INFORMATION
Before the installation and use of the appliance, carefully
read the supplied instructions. The manufacturer is not
responsible for any injuries or damages that are the
result of incorrect installation or usage. Always keep the
instructions in a safe and accessible location for future
reference.
1.1 Children and vulnerable people safety
• This appliance can be used by children aged from 8
years and above and persons with reduced physical,
sensory or mental capabilities or lack of experience
and knowledge if they have been given supervision or
instruction concerning the use of the appliance in a
safe way and understand the hazards involved.
• Do not let children play with the appliance.
• Keep all packaging away from children and dispose of
it appropriately.
• Keep children and pets away from the appliance when
it operates or when it cools down. Accessible parts are
hot.
• If the appliance has a child safety device, this should
be activated.
• Children shall not carry out cleaning and user
maintenance of the appliance without supervision.
• Children aged 3 years and under must be kept away
from this appliance when it is in operation at all times.
ENGLISH 3
1.2 General Safety
• WARNING: The appliance and its accessible parts
become hot during use. Care should be taken to avoid
touching heating elements. Children less than 8 years
of age shall be kept away unless continuously
supervised.
• Do not operate the appliance by means of an external
timer or separate remote-control system.
Page 4

www.electrolux.com4
• WARNING: Unattended cooking on a hob with fat or
oil can be dangerous and may result in fire.
• NEVER try to extinguish a fire with water, but switch
off the appliance and then cover flame e.g. with a lid
or a fire blanket.
• CAUTION: The cooking process has to be supervised.
A short term cooking process has to be supervised
continuously.
• WARNING: Danger of fire: Do not store items on the
cooking surfaces.
• Metallic objects such as knives, forks, spoons and lids
should not be placed on the hob surface since they
can get hot.
• Do not use a steam cleaner to clean the appliance.
• Do not use harsh abrasive cleaners or sharp metal
scrapers to clean the glass of hinged lids of the hob
since they can scratch the surface, which may result in
shattering of the glass.
• Remove any spillage from the lid before opening. Let
the hob surface cool down before closing the lid.
• If the supply cord is damaged, it must be replaced by
the manufacturer, an authorized Service or similarly
qualified persons in order to avoid a hazard.
• Where the appliance is directly connected to the
power supply, an all-pole isolating switch with a
contact gap is required. Complete disconnection in
compliance with the conditions specified in
overvoltage category III must be guaranteed. The
earth cable is excluded from this.
• When you route the mains cable, make sure that the
cable doesn't come into direct contact (for example
using insulating sleeving) with parts that can reach
temperatures of more than 50°C above room
temperature.
• WARNING: Use only hob guards designed by the
manufacturer of the cooking appliance or indicated by
the manufacturer of the appliance in the instructions
Page 5

for use as suitable or hob guards incorporated in the
appliance. The use of inappropriate guards can cause
accidents.
2. SAFETY INSTRUCTIONS
ENGLISH 5
This appliance is suitable for the
following markets: IT
2.1 Installation
WARNING!
Only a qualified person must
install this appliance.
• Remove all the packaging.
• Do not install or use a damaged
appliance.
• Follow the installation instruction
supplied with the appliance.
• Keep the minimum distance from the
other appliances and units.
• Always take care when moving the
appliance as it is heavy. Always use
safety gloves and enclosed footwear.
• Seal the cut surfaces with a sealant to
prevent moisture to cause swelling.
• Protect the bottom of the appliance
from steam and moisture.
• Do not install the appliance adjacent
to a door or under a window. This
prevents hot cookware to fall from the
appliance when the door or the
window is opened.
• If the appliance is installed above
drawers make sure that the space,
between the bottom of the appliance
and the upper drawer, is sufficient for
air circulation.
• The bottom of the appliance can get
hot. Make sure to install a noncombustible separation panel under
the appliance to prevent access to the
bottom.
2.2 Electrical Connection
WARNING!
Risk of fire and electrical
shock.
• All electrical connections should be
made by a qualified electrician.
• The appliance must be earthed.
• Before carrying out any operation
make sure that the appliance is
disconnected from the power supply.
• Make sure that the electrical
information on the rating plate agrees
with the power supply. If not, contact
an electrician.
• Make sure the appliance is installed
correctly. Loose and incorrect
electricity mains cable or plug (if
applicable) can make the terminal
become too hot.
• Use the correct electricity mains
cable.
• Do not let the electricity mains cable
tangle.
• Make sure that a shock protection is
installed.
• Use the strain relief clamp on the
cable.
• Make sure the mains cable or plug (if
applicable) does not touch the hot
appliance or hot cookware, when you
connect the appliance to the near
sockets
• Do not use multi-plug adapters and
extension cables.
• Make sure not to cause damage to
the mains plug (if applicable) or to the
mains cable. Contact our Authorised
Service Centre or an electrician to
change a damaged mains cable.
• The shock protection of live and
insulated parts must be fastened in
such a way that it cannot be removed
without tools.
• Connect the mains plug to the mains
socket only at the end of the
installation. Make sure that there is
access to the mains plug after the
installation.
• If the mains socket is loose, do not
connect the mains plug.
• Do not pull the mains cable to
disconnect the appliance. Always pull
the mains plug.
• Use only correct isolation devices: line
protecting cut-outs, fuses (screw type
Page 6

www.electrolux.com6
fuses removed from the holder), earth
leakage trips and contactors.
• The electrical installation must have
an isolation device which lets you
disconnect the appliance from the
mains at all poles. The isolation
device must have a contact opening
width of minimum 3 mm.
2.3 Gas connection
• All gas connections should be made
by a qualified person.
• Before installation, make sure that the
local distribution conditions (nature of
the gas and gas pressure) and the
adjustment of the appliance are
compatible.
• Make sure that there is air circulation
around the appliance.
• The information about the gas supply
is on the rating plate.
• This appliance is not connected to a
device, which evacuates the products
of combustion. Make sure to connect
the appliance according to current
installation regulations. Pay attention
to requirements regarding adequate
ventilation.
2.4 Use
WARNING!
Risk of injury, burns and
electrical shock.
• Remove all the packaging, labelling
and protective film (if applicable)
before first use.
• Use this appliance in a household
environment.
• Do not change the specification of this
appliance.
• Make sure that the ventilation
openings are not blocked.
• Do not let the appliance stay
unattended during operation.
• Set the cooking zone to “off” after
each use.
• Do not put cutlery or saucepan lids on
the cooking zones. They can become
hot.
• Do not operate the appliance with wet
hands or when it has contact with
water.
• Do not use the appliance as a work
surface or as a storage surface.
• When you place food into hot oil, it
may splash.
WARNING!
Risk of fire and explosion
• Fats and oil when heated can release
flammable vapours. Keep flames or
heated objects away from fats and
oils when you cook with them.
• The vapours that very hot oil releases
can cause spontaneous combustion.
• Used oil, that can contain food
remnants, can cause fire at a lower
temperature than oil used for the first
time.
• Do not put flammable products or
items that are wet with flammable
products in, near or on the appliance.
WARNING!
Risk of damage to the
appliance.
• Do not keep hot cookware on the
control panel.
• Do not let cookware to boil dry.
• Be careful not to let objects or
cookware fall on the appliance. The
surface can be damaged.
• Do not activate the cooking zones
with empty cookware or without
cookware.
• Do not put aluminium foil on the
appliance.
• Use only stable cookware with the
correct shape and diameter larger
than the dimensions of the burners.
• Make sure cookware is centrally
positioned on the burners.
• Make sure the flame does not go out
when you quickly turn the knob from
the maximum to the minimum
position.
• Use only the accessories supplied
with the appliance.
• Do not install a flame diffuser on the
burner.
• The use of a gas cooking appliance
results in the production of heat and
moisture. Provide good ventilation in
the room where the appliance is
installed.
• Prolonged intensive use of the
appliance may call for additional
Page 7

ventilation, for example opening of a
2
1 3
4
window, or more effective ventilation,
for example increasing the level of
mechanical ventilation where present.
• This appliance is for cooking
purposes only. It must not be used for
other purposes, for example room
heating.
• Do not let acid liquids, for example
vinegar, lemon juice or limescale
remover, touch the hob. This can
cause matt patches.
• Discoloration of the enamel has no
effect on the performance of the
appliance.
2.5 Care and cleaning
• Clean regularly the appliance to
prevent the deterioration of the
surface material.
• Deactivate the appliance and let it
cool down before you clean it.
• Disconnect the appliance from the
electrical supply before maintenance.
• Do not use water spray and steam to
clean the appliance.
• Clean the appliance with a moist soft
cloth. Only use neutral detergents. Do
ENGLISH 7
not use any abrasive products,
abrasive cleaning pads, solvents or
metal objects.
• Do not clean the burners in the
dishwasher.
2.6 Disposal
WARNING!
Risk of injury or suffocation.
• Contact your municipal authority for
information on how to discard the
appliance correctly.
• Disconnect the appliance from the
mains supply.
• Cut off the mains electrical cable
close to the appliance and dispose of
it.
• Flat the external gas pipes.
2.7 Service
• To repair the appliance contact an
Authorised Service Centre.
• Use original spare parts only.
3. PRODUCT DESCRIPTION
3.1 Cooking surface layout
Rapid burner
1
Semi-rapid burner
2
Auxiliary burner
3
Control knobs
4
Page 8

A
B
D
C
www.electrolux.com8
3.2 Control knob
Symbol Description
4. DAILY USE
WARNING!
Refer to Safety chapters.
4.1 Burner overview
no gas supply / off posi‐
tion
Symbol Description
ignition position / maxi‐
mum gas supply
minimum gas supply
2. Keep the control knob pushed for
equal or less than 10 seconds. This
lets the thermocouple warm up. If
not, the gas supply is interrupted.
3. Adjust the flame after it is regular.
If after some tries the burner
does not light, check if the
crown and its cap are in
correct positions.
WARNING!
Do not keep the control knob
pushed for more than 15
seconds. If the burner does
not light after 15 seconds,
release the control knob,
turn it into off position and try
to light the burner again after
minimum 1 minute.
A. Burner cap
B. Burner crown
C. Ignition candle
D. Thermocouple
4.2 Ignition of the burner
Always light the burner
before you put on the
cookware.
WARNING!
Be very careful when you
use open fire in the kitchen
environment. The
manufacturer declines any
responsibility in case of the
flame misuse.
1. Push the control knob down and turn
it counterclockwise to the maximum
gas supply position ( ).
CAUTION!
In the absence of electricity
you can ignite the burner
without electrical device; in
this case approach the
burner with a flame, turn the
control knob counterclockwise to maximum gas
supply position and push it
down. Keep the control knob
pushed for equal or less
than 10 seconds to let the
thermocouple warm up.
If the burner accidentally
goes out, turn the control
knob to the off position and
try to light the burner again
after minimum 1 minute.
Page 9

ENGLISH 9
The spark generator can
start automatically when you
switch on the mains, after
installation or a power cut. It
is normal.
The hob is supplied with the
progressive valves. They
make the flame regulation
more precise.
5. HINTS AND TIPS
WARNING!
Refer to Safety chapters.
5.1 Cookware
CAUTION!
Do not use cast iron pans,
potstones, earthenware, grill
or toaster plates. The
stainless steel can become
tarnished if it is too much
heated.
WARNING!
Do not put the same pan on
two burners.
WARNING!
Do not put unstable or
damaged pots on the burner
to prevent from spill and
injury.
CAUTION!
Make sure that the bottoms
of pots do not stand above
the control knob, otherwise
the flame heats the control
knob up.
4.3 Turning the burner off
To put the flame out, turn the knob to the
off position
.
WARNING!
Always turn the flame down
or switch it off before you
remove the pans from the
burner.
CAUTION!
Make sure that the pots are
placed centrally on the
burner in order to get
maximum stability and to get
lower gas consumption.
5.2 Diameters of cookware
Use cookware with
diameters applicable to the
size of burners.
Burner Diameter of
Rapid 180 - 260
Semi-rapid 120 - 220
Auxiliary 80 - 180
cookware
(mm)
5.3 Lid (separated kit only for
predisposed hobs)
CAUTION!
Make sure that pot handles
are not above the front edge
of the cooktop.
• The lid protects the hob from dust
when closed and collects splashes of
grease when opened. Do not use it for
other functions.
• Keep the lid clean all the time.
Page 10

www.electrolux.com10
• Make sure that the hob is cold before
you close the lid.
6. CARE AND CLEANING
• Glass lids can shatter when hot.
WARNING!
Refer to Safety chapters.
6.1 General information
• Clean the hob after each use.
• Always use cookware with clean
bottom.
• Scratches or dark stains on the
surface have no effect on how the hob
operates.
• Use a special cleaner applicable for
the surface of the hob.
Stainless steel
• Wash stainless steel parts with water,
and then dry them with a soft cloth.
• To remove burn food, fat and
stubborn stains, let them soak for a
few minutes in a small amount of mild
detergent before cleaning.
• Use cleaning products designed
specifically for cleaning stainless steel
in order to protect the steel surfaces.
• Do not use cleaning products
containing corrosive chemicals such
as chlorides, do not clean the surface
with disinfectants, stain or rust
removers and immersion cleaners.
6.2 Pan supports
The pan supports are not
resistant to washing in a
dishwasher. They must be
washed by hand.
1. Remove the pan supports to easily
clean the hob.
Be very careful when
you replace the pan
supports to prevent the
hob top from damage.
2. The enamel coating occasionally can
have rough edges, so be careful
when you wash the pan supports by
hand and dry them. If necessary,
remove stubborn stains with a paste
cleaner.
3. After you clean the pan supports,
make sure that they are in correct
positions.
4. For the burner to operate correctly,
make sure that the arms of the pan
supports are aligned with the centre
of the burner.
6.3 Cleaning the hob
• Remove immediately: melted plastic,
plastic foil, sugar and food with sugar.
If not, the dirt can cause damage to
the hob. Take care to avoid burns.
• Remove when the hob is
sufficiently cool: limescale rings,
water rings, fat stains, shiny metallic
discoloration. Clean the hob with a
moist cloth and non-abrasive
detergent. After cleaning, wipe the
hob dry with a soft cloth.
• To clean the enamelled parts, cap
and crown, wash them with warm
soapy water and dry them carefully
before you put them back on.
6.4 Cleaning the spark plug
This feature is obtained through a
ceramic ignition candle with a metal
electrode. Keep these components well
clean to prevent difficult lighting and
check that the burner crown holes are
not obstructed.
6.5 Periodic maintenance
Speak to your local Authorised Service
Centre periodically to check the
conditions of the gas supply pipe and the
pressure adjuster, if fitted.
Page 11

7. TROUBLESHOOTING
WARNING!
Refer to Safety chapters.
7.1 What to do if...
Problem Possible cause Remedy
There is no spark when
you try to activate the
spark generator.
The fuse is blown. Make sure that the fuse is
Burner cap and crown are
The flame extinguishes im‐
mediately after ignition.
The flame ring is uneven. Burner crown is blocked
The hob is not connected
to an electrical supply or it
is connected incorrectly.
placed incorrectly.
Thermocouple is not heat‐
ed up sufficiently.
with food residues.
ENGLISH 11
Check if the hob is correct‐
ly connected to the electri‐
cal supply.
the cause of the malfunc‐
tion. If the fuse is blown
again and again, contact a
qualified electrician.
Place the burner cap and
crown correctly.
After lightning the flame,
keep the knob pushed for
equal or less than 10 sec‐
onds.
Make sure that the injector
is not blocked and the
burner crown is clean.
7.2 If you cannot find a solution...
If you cannot find a solution to the
problem yourself, contact your dealer or
an Authorised Service Centre. Give the
data from the rating plate. Make sure,
you operated the hob correctly. If not the
servicing by a service technician or
dealer will not be free of charge, also
during the warranty period. The
instructions about the Service Centre
and conditions of guarantee are in the
guarantee booklet.
Page 12

MOD.
PROD. NO.
SER.N O
DATA
MOD.
PROD. NO.
SER.N O
DATA
MOD.
PROD.NO.
SER.NO.
03 IT
MADE IN ITALY
TYPE
IP20
0049
A B C
www.electrolux.com12
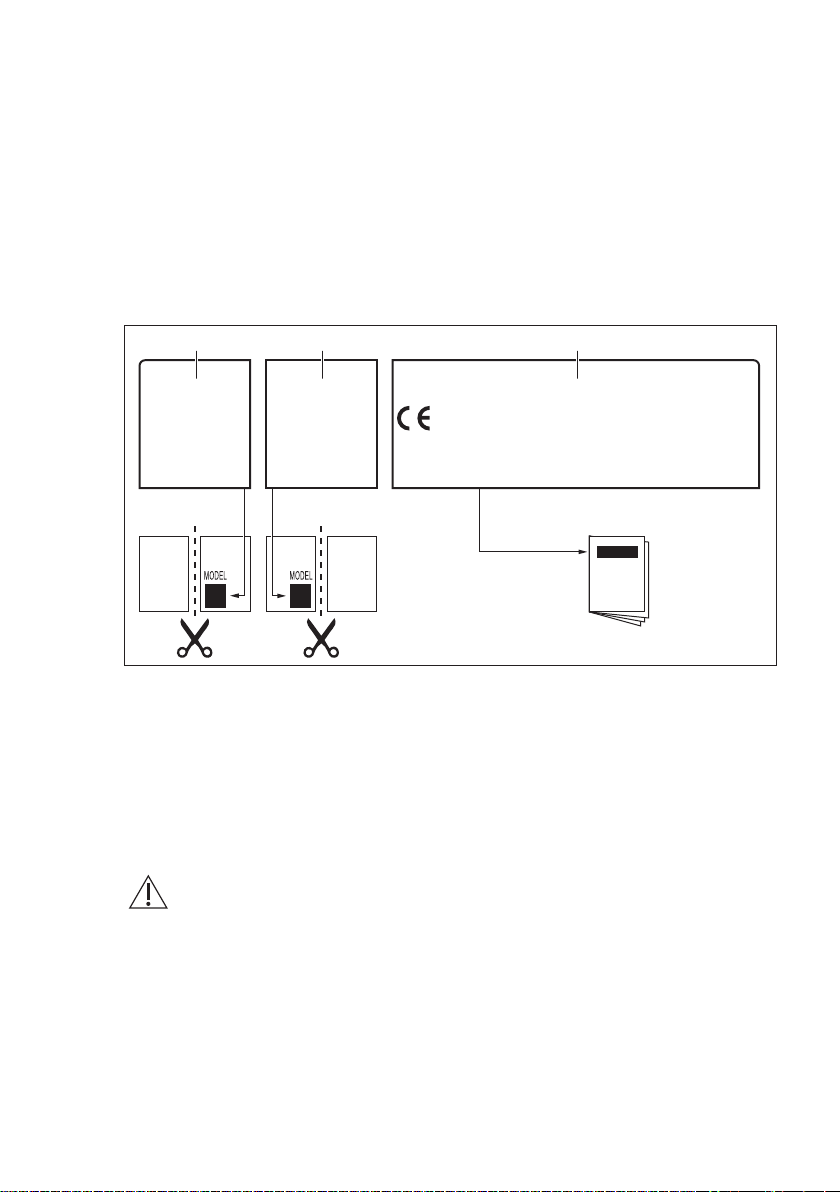
7.3 Labels supplied with the
accessories bag
Stick the adhesive labels as indicated
below:
A. Stick it on Guarantee Card and send
this part (if applicable).
B. Stick it on Guarantee Card and keep
this part (if applicable).
8. INSTALLATION
WARNING!
Refer to Safety chapters.
8.1 Before the installation
Before you install the hob, write down the
information bellow from the rating plate.
The rating plate is on the bottom of the
hob.
Model .......................................
PNC .........................................
Serial number ...........................
C. Stick it on instruction booklet.
8.2 Gas Connection
WARNING!
The following instructions
about installation,
maintenance and ventilation
must be carried out by
qualified personnel in
compliance with the
regulation in force (UNI-CIG
7129 - 7131). Make sure that
the kitchen is well ventilated:
keep natural ventilation
holes open (at least 100
cm²) or install a mechanical
extractor hood.
Choose fixed connections or use a
flexible pipe in stainless steel in
compliance with the regulation in force. If
you use flexible metallic pipes, be careful
Page 13

A B C
A
ENGLISH 13
they do not come in touch with mobile
parts or they are not squeezed. Also be
careful when the hob is put together with
an oven.
Make sure that the gas
supply pressure of the
appliance obeys the
recommended values.
If the supplied pressure has not the
specified value, it is necessary to
assemble a proper pressure regulator in
compliance with the standard UNI EN 88.
For Liquid Gas (LPG) the use of pressure
regulator is allowed only if they are in
compliance with UNI EN 12864. The
adjustable connection is fixed to the
comprehensive ramp by means of a
threaded nut G 1/2". Screw the parts
without force, adjust the connection in
the necessary direction and tighten
everything.
8.3 Injectors replacement
1. Remove the pan supports.
2. Remove the caps and crowns of the
burner.
3. With a socket spanner 7 remove the
injectors and replace them with the
ones which are necessary for the
type of gas you use (see table in
"Technical Information" chapter).
4. Assemble the parts, follow the same
procedure backwards.
5. Replace the rating plate (it is near the
gas supply pipe) with the one for the
new type of gas supply. You can find
this plate in the package supplied
with the appliance.
If the supply gas pressure is changeable
or different from the necessary pressure,
you must fit an applicable pressure
adjuster on the gas supply pipe.
8.4 Adjustment of minimum level
To adjust the minimum level of the
burners:
1. Light the burner.
2. Turn the knob on the minimum
position.
3. Remove the knob.
4. With a thin screwdriver, adjust the
A. End of shaft with nut
B. Washer supplied with the appliance
C. Elbow supplied with the appliance
Rigid connection:
Carry out connection by using metal rigid
pipes (copper with mechanical end)
(UNI-CIG 7129).
Flexible connection:
Use a flexible pipe in stainless steel
(UNI-CIG 9891) with a maximum length 2
m.
WARNING!
When installation is
complete, make sure that
the seal of each pipe fitting
is correct. Use a soapy
solution, not a flame!
bypass screw position (A).
5. If you change:
• from natural gas G20 20 mbar to
liquid gas, fully tighten the bypass
screw in.
• from liquid gas to natural gas G20
20 mbar, undo the bypass screw
approximately 1/4 of a turn.
Page 14

A
min. 55 mm
min. 650 mm
550 mm
min. 100 mm
30 mm
470 mm
www.electrolux.com14
WARNING!
Make sure the flame does
not go out when you quickly
turn the knob from the
maximum position to the
minimum position.
8.5 Electrical connection
• Make sure that the rated voltage and
type of power on the rating plate
agree with the voltage and the power
of the local power supply.
• This appliance is supplied with a
mains cable. It has to be supplied with
a correct plug which can hold the load
that the rating plate rates. Make sure
that you install the plug in a correct
socket.
• Always use a correctly installed
shockproof socket.
• Make sure that there is an access to
the mains plug after the installation.
• Do not pull the mains cable to
disconnect the appliance. Always pull
the mains plug.
• There is a risk of fire when the
appliance is in connection with an
extension cable, an adapter or a
multiple connection. Make sure that
the ground connection agrees with the
standards and regulations.
• Do not let the power cable to heat up
to a temperature higher than 90° C.
To prevent contact between the cable
and the appliance below the hob use the
clamps which are on the side of the
cabinet.
8.6 Connection cable
To replace the connection cable use only
the special cable or its equivalent. The
cable type is: H05V2V2-FT90.
Make sure that the cable section is
applicable to the voltage and the working
temperature. The yellow / green earth
wire must be approximately 2 cm longer
than the brown (or black) phase wire.
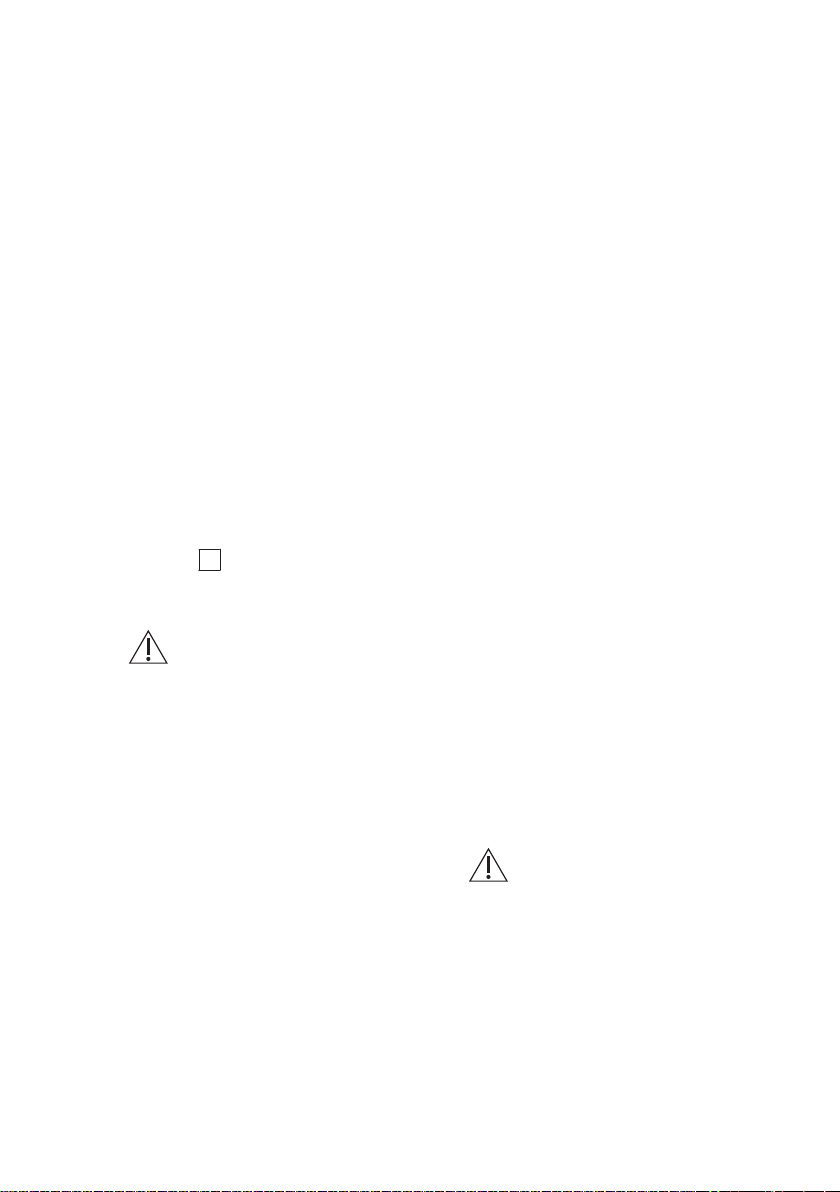
8.7 Assembly
1.
2.
3.
A. Rigid copper pipe or flexible pipe of
stainless steel
4.
Page 15

50 mm
400 mm
A
B
ENGLISH 15
8.
9.
If a furniture unit is
installed at a distance of
400 mm above the hob,
there must be a
minimum safety distance
of 50 mm to the left or
right from the edge of
the hob.
5.
A) supplied seal
B) supplied brackets
10.
6.
7.
11.
CAUTION!
Install the appliance only on
a worktop with flat surface.
Page 16

min 6 mm
min 30 mm
60 mm
b
a
min 5 mm
(max 150 mm)
www.electrolux.com16
8.8 Installing hob under the
hood
If you install the hob under a
hood, please see the
installation instructions of the
hood for the minimum
distance between the
appliances.
8.9 Possibilities for insertion
The panel installed below the hob must
be easy to remove and let an easy
access in case a technical assistance
intervention is necessary.
Kitchen unit with door
A. Removable panel
B. Space for connections
Kitchen unit with oven
The electrical connection of the hob and
the oven must be installed separately for
safety reasons and to let easy remove
oven from the unit.
9. TECHNICAL DATA
9.1 Hob dimensions
Width 580 mm
Depth 500 mm
9.2 Bypass diameters
BURNER Ø BYPASS 1/100 mm
Rapid 42
Semi-rapid 32
Auxiliary 28
Page 17

ENGLISH 17
9.3 Other technical data
Gas original: G20 (2H) 20 mbar = 8 kW
TOTAL POWER:
Electric supply: 220-240 V ~ 50/60 Hz
Appliance category: II2H3+
Gas connection: G 1/2"
Appliance class: 3
Gas replacement: G30 (3+) 28-30 mbar = 567 g/h
G31 (3+) 37 mbar = 557 g/h
9.4 Gas burners for NATURAL GAS G20 20 mbar
BURNER NORMAL POWERkWMINIMUM POWERkWINJECTOR MARK
Rapid 3,0 0,75 119
Semi-rapid 2,0 0,45 96
Auxiliary 1,0 0,33 70
9.5 Gas burners for LPG G30/G31 28-30/37 mbar
BURNER NORMAL
POWER
kW
Rapid 2,8 0,75 86 204 200
Semi-rapid 2,0 0,45 71 145 143
Auxiliary 1,0 0,33 50 73 71
MINIMUM
POWER
kW
10. ENERGY EFFICIENCY
10.1 Product information according to EU 66/2014
Model identification PBL64V;
Type of hob Built-in hob
Number of gas burners 4
INJECTOR
MARK
NOMINAL GAS FLOW g/h
G30 28-30
mbar
G31 37 mbar
PNL64V;
PTL64V;
PXL64DV;
PXL64V
Page 18

www.electrolux.com18
Left rear - Semi-rapid 59.1%
Energy efficiency per gas burner
(EE gas burner)
Energy efficiency for the gas hob
(EE gas hob)
EN 30-2-1: Domestic cooking appliances burning gas - Part 2-1 : Rational use of
energy - General
Right rear - Semi-rapid 59.1%
Left front - Rapid 59.3%
Right front - Auxiliary not applicable
59.2%
10.2 Energy saving
• Before use, make sure that the burners and pan supports are assembled correctly.
• Use cookware with diameters applicable to the size of burners.
• Center the pot on the burner.
• When you heat up water, use only the amount you need.
• If it is possible, always put the lids on the cookware.
• When the liquid starts to boil, turn down the flame to barely simmer the liquid.
• If it is possible, use a pressure cooker. Refer to its user manual.
11. ENVIRONMENTAL CONCERNS
Recycle the materials with the symbol
. Put the packaging in applicable
containers to recycle it. Help protect the
environment and human health and to
recycle waste of electrical and electronic
appliances. Do not dispose appliances
marked with the symbol with the
household waste. Return the product to
your local recycling facility or contact
your municipal office.
Page 19

FRANÇAIS 19
TABLE DES MATIÈRES
1. INFORMATIONS DE SÉCURITÉ..................................................................... 20
2. CONSIGNES DE SÉCURITÉ........................................................................... 22
3. DESCRIPTION DE L'APPAREIL......................................................................25
4. UTILISATION QUOTIDIENNE..........................................................................25
5. CONSEILS........................................................................................................27
6. ENTRETIEN ET NETTOYAGE.........................................................................28
7. EN CAS D'ANOMALIE DE FONCTIONNEMENT.............................................29
8. INSTALLATION................................................................................................ 30
9. CARACTÉRISTIQUES TECHNIQUES.............................................................35
10. RENDEMENT ÉNERGÉTIQUE......................................................................36
NOUS PENSONS À VOUS
Merci d'avoir choisi ce produit Electrolux. Avec ce produit, vous bénéficiez de
dizaines d'années d'expérience professionnelle et d'innovation. Ingénieux et
élégant, il a été conçu sur mesure pour vous. Grâce à cet appareil, vous savez
que chaque utilisation vous apportera satisfaction.
Bienvenue chez Electrolux.
Visitez notre site Internet pour :
Obtenir des conseils d'utilisation, des brochures, de l'aide, des informations :
www.electrolux.com/webselfservice
Enregistrez votre produit pour obtenir un meilleur service :
www.registerelectrolux.com
Acheter des accessoires, consommables et pièces de rechange d'origine pour
votre appareil :
www.electrolux.com/shop
SERVICE APRÈS-VENTE
Utilisez toujours des pièces d'origine.
Avant de contacter le service après-vente, assurez-vous de disposer des
informations suivantes : Modèle, PNC, numéro de série.
Vous trouverez ces informations sur la plaque signalétique.
Avertissement/Consignes de sécurité
Informations générales et conseils
Informations en matière de protection de l'environnement
Sous réserve de modifications.
Page 20

www.electrolux.com20
1. INFORMATIONS DE SÉCURITÉ
Avant d'installer et d'utiliser cet appareil, lisez
soigneusement les instructions fournies. Le fabricant ne
pourra être tenu pour responsable des blessures et
dégâts résultant d'une mauvaise installation ou
utilisation. Conservez toujours les instructions dans un
lieu sûr et accessible pour vous y référer ultérieurement.
1.1 Sécurité des enfants et des personnes vulnérables
• Cet appareil peut être utilisé par des enfants de plus
de 8 ans, ainsi que des personnes dont les capacités
physiques, sensorielles et mentales sont réduites ou
dont les connaissances et l'expérience sont
insuffisantes, à condition d'être surveillés ou d'avoir
reçu des instructions concernant l'utilisation sécurisée
de l'appareil et de comprendre les risques encourus.
• Ne laissez pas les enfants jouer avec l'appareil.
• Ne laissez pas les emballages à la portée des enfants
et jetez-les convenablement.
• Tenez les enfants et les animaux éloignés de
l'appareil lorsqu'il est en cours de fonctionnement ou
lorsqu'il refroidit. Les parties accessibles sont
chaudes.
• Si l'appareil est équipé d'un dispositif de sécurité
enfants, nous vous recommandons de l'activer.
• Les enfants ne doivent pas nettoyer ni entreprendre
une opération de maintenance sur l'appareil sans
surveillance.
• Les enfants de moins de 3 ans doivent être tenus
éloignés de l'appareil en permanence lorsqu'il est en
fonctionnement.
1.2 Sécurité générale
• AVERTISSEMENT : L'appareil et ses parties
accessibles deviennent chauds pendant son
fonctionnement. Veillez à ne pas toucher les éléments
Page 21

FRANÇAIS 21
chauffants. Les enfants de moins de 8 ans doivent
être tenus à l'écart, à moins d'être surveillés en
permanence.
• Ne faites pas fonctionner l'appareil avec un minuteur
externe ou un système de commande à distance.
• AVERTISSEMENT : Il peut être dangereux de laisser
chauffer de la graisse ou de l'huile sans surveillance
sur une table de cuisson car cela pourrait provoquer
un incendie.
• N'essayez JAMAIS d'éteindre un feu avec de l'eau.
Éteignez l'appareil puis couvrez les flammes, par
exemple avec un couvercle ou une couverture
ignifuge.
• ATTENTION : Toute cuisson doit être surveillée. Une
cuisson courte doit être surveillée en permanence.
• AVERTISSEMENT : Risque d'incendie ! N'entreposez
rien sur les surfaces de cuisson.
• Ne posez pas d'objets métalliques tels que couteaux,
fourchettes, cuillères ou couvercles sur la table de
cuisson car ils pourraient chauffer.
• N'utilisez pas de nettoyeur vapeur pour nettoyer
l'appareil.
• N'utilisez pas de produits abrasifs ni de racloirs
pointus en métal pour nettoyer le verre des couvercles
à charnière de la table de cuisson car ils peuvent
rayer la surface, ce qui peut briser le verre.
• Enlevez toute éclaboussure du couvercle avant de
l'ouvrir. Laissez la surface de la table de cuisson
refroidir avant de refermer le couvercle.
• Si le câble d'alimentation est endommagé, il doit être
remplacé par le fabricant, un service de maintenance
agréé ou un technicien qualifié afin d'éviter tout
danger.
• Si l'appareil est relié directement à l'alimentation
électrique, installez un sectionneur avec une ouverture
de contact. Il est indispensable de garantir une
déconnexion complète conformément aux conditions
Page 22
www.electrolux.com22
de surtension de catégorie III. Le fil de terre n'est pas
concerné.
• Lorsque vous acheminez le câble d'alimentation,
assurez-vous qu'il n'entre pas en contact direct (par
exemple, à l'aide d'un manchon isolant) avec des
parties pouvant atteindre des températures
supérieures de 50 °C à la température ambiante.
• AVERTISSEMENT : Utilisez uniquement les
dispositifs de protection pour table de cuisson conçus
ou indiqués comme adaptés par le fabricant de
l'appareil de cuisson dans les instructions d'utilisation,
ou les dispositifs de protection pour table de cuisson
intégrés à l'appareil. L'utilisation de dispositifs de
protection non adaptés peut entraîner des accidents.
2. CONSIGNES DE SÉCURITÉ
Cet appareil est adapté aux marchés
suivants: IT
2.1 Installation
AVERTISSEMENT!
L'appareil doit être installé
uniquement par un
professionnel qualifié.
• Retirez l'intégralité de l'emballage.
• N'installez pas et ne branchez pas un
appareil endommagé.
• Suivez scrupuleusement les
instructions d'installation fournies
avec l'appareil.
• Respectez l'espacement minimal
requis par rapport aux autres
appareils et éléments.
• Soyez toujours vigilants lorsque vous
déplacez l'appareil car il est lourd.
Utilisez toujours des gants de sécurité
et des chaussures fermées.
• Isolez les surfaces découpées à l'aide
d'un matériau d'étanchéité pour éviter
que la moisissure ne provoque de
gonflements.
• Protégez la partie inférieure de
l'appareil de la vapeur et de
l'humidité.
• N'installez pas l'appareil près d'une
porte ou sous une fenêtre. Les
récipients chauds risqueraient de
tomber de l'appareil lors de l'ouverture
de celles-ci.
• Si l'appareil est installé au-dessus de
tiroirs, assurez-vous qu'il y a
suffisamment d'espace entre le fond
de l'appareil et le tiroir supérieur pour
que l'air puisse circuler.
• Le dessous de l'appareil peut devenir
très chaud. Veillez à installer un
panneau de séparation ignifuge sous
l'appareil pour en bloquer l'accès.
2.2 Branchement électrique
AVERTISSEMENT!
Risque d'incendie ou
d'électrocution.
• L'ensemble des branchements
électriques doit être effectué par un
technicien qualifié.
• L'appareil doit être relié à la terre.
• Avant toute intervention, assurezvous que l'appareil est débranché.
• Vérifiez que les données électriques
figurant sur la plaque signalétique
correspondent à celles de votre
réseau. Si ce n'est pas le cas,
contactez un électricien.
Page 23

• Assurez-vous que l'appareil est bien
installé. Un câble d'alimentation lâche
et inapproprié ou une fiche (si
présente) non serrée peuvent être à
l'origine d'une surchauffe des bornes.
• Utilisez le câble d'alimentation
électrique approprié.
• Ne laissez pas le câble d'alimentation
s'emmêler.
• Assurez-vous qu'une protection antiélectrocution est installée.
• Utilisez un collier anti-traction sur le
câble.
• Assurez-vous que le câble
d'alimentation ou la fiche (si présente)
n'entrent pas en contact avec les
surfaces brûlantes de l'appareil ou les
récipients brûlants lorsque vous
branchez l'appareil à des prises
électriques situées à proximité.
• N'utilisez pas d'adaptateurs
multiprises ni de rallonges.
• Veillez à ne pas endommager la fiche
secteur (si présente) ni le câble
d'alimentation. Contactez notre centre
de maintenance agréé ou un
électricien pour remplacer le câble
d'alimentation s'il est endommagé.
• La protection contre les chocs des
parties sous tension et isolées doit
être fixée de telle manière qu'elle ne
peut pas être enlevée sans outils.
• Ne branchez la fiche d'alimentation à
la prise de courant qu'à la fin de
l'installation. Assurez-vous que la
prise de courant est accessible une
fois l'appareil installé.
• Si la prise de courant est lâche, ne
branchez pas la fiche d'alimentation
secteur.
• Ne tirez jamais sur le câble
d'alimentation pour débrancher
l'appareil. Tirez toujours sur la fiche.
• N'utilisez que des systèmes
d'isolation appropriés : des coupecircuits, des fusibles (les fusibles à
visser doivent être retirés du support),
un disjoncteur différentiel et des
contacteurs.
• L'installation électrique doit être
équipée d'un dispositif d'isolement à
coupure omnipolaire. Le dispositif
d'isolement doit présenter une
distance d'ouverture des contacts
d'au moins 3 mm.
FRANÇAIS 23
2.3 Raccordement au gaz
• Tous les raccordements au gaz
doivent être effectués par une
personne qualifiée.
• Avant l'installation, vérifiez que les
conditions de distribution locales
(nature et pression du gaz) sont
compatibles avec le réglage de
l'appareil.
• Assurez-vous que l'air circule autour
de l'appareil.
• Les informations concernant
l'alimentation en gaz se trouvent sur
la plaque signalétique.
• Cet appareil n'est pas raccordé à un
dispositif d'évacuation des produits de
combustion. Assurez-vous de
brancher l'appareil selon les
réglementations d'installation en
vigueur. Veillez à respecter les
exigences en matière d'aération.
2.4 Utilisation
AVERTISSEMENT!
Risque de blessures, de
brûlures ou d'électrocution.
• Avant la première utilisation, retirez
les emballages, les étiquettes et les
films de protection (si présents).
• Utilisez cet appareil dans un
environnement domestique.
• Ne modifiez pas les caractéristiques
de cet appareil.
• Assurez-vous que les orifices de
ventilation ne sont pas bouchés.
• Ne laissez jamais l'appareil sans
surveillance pendant son
fonctionnement.
• Éteignez les zones de cuisson après
chaque utilisation.
• Ne posez pas de couverts ou de
couvercles sur les zones de cuisson.
Elles sont chaudes.
• N'utilisez jamais cet appareil avec les
mains mouillées ou lorsqu'il est en
contact avec de l'eau.
• N'utilisez jamais l'appareil comme
plan de travail ou comme plan de
stockage.
• Lorsque vous versez un aliment dans
de l'huile chaude, elle peut
éclabousser.
Page 24

www.electrolux.com24
AVERTISSEMENT!
Risque d'incendie et
d'explosion.
• Les graisses et l'huile chaudes
peuvent dégager des vapeurs
inflammables. Tenez les flammes ou
les objets chauds éloignés des
graisses et de l'huile lorsque vous
vous en servez pour cuisiner.
• Les vapeurs dégagées par l'huile très
chaude peuvent provoquer une
combustion spontanée.
• L'huile qui a servi contient des restes
d'aliments pouvant provoquer un
incendie à température plus faible que
l'huile n'ayant jamais servi.
• Ne placez pas de produits
inflammables ou d'éléments imbibés
de produits inflammables à l'intérieur
ou à proximité de l'appareil, ni sur
celui-ci.
AVERTISSEMENT!
Risque d'endommagement
de l'appareil.
• Ne laissez pas de récipients chauds
sur le bandeau de commande.
• Ne laissez pas le contenu des
récipients de cuisson s'évaporer
complètement.
• Prenez soin de ne pas laisser tomber
d'objets ou de récipients sur l'appareil.
Sa surface risque d'être
endommagée.
• Ne faites jamais fonctionner les zones
de cuisson avec des récipients de
cuisson vides ou sans aucun récipient
de cuisson.
• Ne placez jamais de papier aluminium
sur l'appareil.
• Utilisez uniquement des récipients
stables ayant une forme adaptée et
un diamètre supérieur à celui des
brûleurs.
• Assurez-vous que les récipients sont
placés au centre des brûleurs.
• Assurez-vous que la flamme ne
s'éteint pas lorsque vous tournez
rapidement la manette de la position
maximale à la position minimale.
• N'utilisez que les accessoires fournis
avec l'appareil.
• N'installez pas de diffuseur de flamme
sur le brûleur.
• L'utilisation d'un appareil de cuisson
au gaz génère de la chaleur et de
l'humidité. Veillez à ce que la pièce où
est installé l'appareil soit bien aérée.
• L'utilisation intensive et prolongée de
l'appareil peut nécessiter une
ventilation supplémentaire comme
l'ouverture d'une fenêtre, ou une
aération plus efficace en augmentant
par exemple la puissance de la
ventilation mécanique si la pièce en
est dotée.
• Cet appareil est exclusivement
destiné à un usage culinaire. Ne
l'utilisez pas pour des usages autres
que celui pour lequel il a été conçu, à
des fins de chauffage par exemple.
• Ne laissez pas de liquides acides, tels
que du vinaigre, du jus de citron ou du
produit détartrant, entrer en contact
avec la table de cuisson. Cela peut
provoquer l'apparition de taches
mates.
• La décoloration de l'émail est sans
effet sur les performances de
l'appareil.
2.5 Entretien et nettoyage
• Nettoyez régulièrement l'appareil afin
de maintenir le revêtement en bon
état.
• Éteignez l'appareil et laissez-le
refroidir avant de le nettoyer.
• Débranchez l’appareil de
l'alimentation électrique avant toute
opération de maintenance.
• Ne pulvérisez pas d'eau ni de vapeur
pour nettoyer l'appareil.
• Nettoyez l'appareil avec un chiffon
doux humide. Utilisez uniquement des
produits de lavage neutres. N'utilisez
pas de produits abrasifs, de tampons
à récurer, de solvants ni d'objets
métalliques.
• Ne lavez pas les brûleurs au lavevaisselle.
2.6 Mise au rebut
AVERTISSEMENT!
Risque de blessure ou
d'asphyxie.
• Contactez votre service municipal
pour obtenir des informations sur la
Page 25

marche à suivre pour mettre l'appareil
2
1 3
4
au rebut.
• Débranchez l'appareil de
l'alimentation électrique.
• Coupez le câble d'alimentation au ras
de l'appareil et mettez-le au rebut.
• Aplatissez les tuyaux de gaz
externes.
2.7 Maintenance
• Pour réparer l'appareil, contactez un
• Utilisez exclusivement des pièces
3. DESCRIPTION DE L'APPAREIL
3.1 Description de la table de cuisson
1
2
3
4
FRANÇAIS 25
service après-vente agréé.
d'origine.
Brûleur rapide
Brûleur semi-rapide
Brûleur auxiliaire
Manettes de commande
3.2 Manette de commande
Symbole Description
pas d'alimentation en
gaz / position Arrêt
position d'allumage / ali‐
mentation en gaz maxi‐
male
4. UTILISATION QUOTIDIENNE
AVERTISSEMENT!
Reportez-vous aux chapitres
concernant la sécurité.
Symbole Description
alimentation en gaz mi‐
nimale
Page 26

A
B
D
C
www.electrolux.com26
4.1 Vue d'ensemble des
brûleurs
A. Chapeau du brûleur
B. Couronne du brûleur
C. Bougie d'allumage
D. Thermocouple
4.2 Allumage du brûleur
Allumez toujours le brûleur
avant de poser un récipient
dessus.
AVERTISSEMENT!
Faites très attention lorsque
vous utilisez une flamme
nue dans une cuisine. Le
fabricant décline toute
responsabilité en cas de
mauvaise utilisation de la
flamme.
1. Enfoncez la manette et tournez-la
vers la gauche jusqu'à la position
d'arrivée de gaz maximale ( ).
2. Maintenez la manette enfoncée
pendant 10 secondes environ. Cela
permet au thermocouple de chauffer.
Sinon, l'alimentation en gaz est
interrompue.
3. Une fois que la flamme brûle
régulièrement, réglez son débit.
Si, après plusieurs
tentatives, le brûleur ne
s'allume pas, vérifiez que la
couronne et son chapeau
sont correctement placés.
AVERTISSEMENT!
Ne maintenez pas la
manette de commande
enfoncée plus de
15 secondes. Si le brûleur
ne s'allume pas au bout de
15 secondes, relâchez la
manette de commande,
tournez-la sur la position
d'arrêt et attendez au moins
1 minute avant de réessayer
d'allumer le brûleur.
ATTENTION!
En cas de coupure
d'électricité, vous pouvez
allumer le brûleur sans
dispositif électrique : pour
cela, approchez une flamme
du brûleur, tournez la
manette vers la gauche
jusqu'à la position d'arrivée
de gaz maximale et
enfoncez-la. Maintenez la
manette de commande
enfoncée pendant environ
10 secondes pour permettre
au thermocouple de
chauffer.
Si le brûleur s'éteint
accidentellement, tournez la
manette de commande sur
la position Arrêt et attendez
au moins 1 minute avant de
réessayer d'allumer le
brûleur.
Le générateur d'étincelles
peut s'activer
automatiquement lorsque
vous allumez l'alimentation
secteur, après l'installation
ou après une coupure de
courant. C'est normal.
Page 27

FRANÇAIS 27
La table de cuisson est
fournie avec les valves de
distribution progressive.
Elles rendent le réglage de
la flamme plus précis.
4.3 Arrêt du brûleur
Pour éteindre la flamme, tournez la
manette sur la position Arrêt .
5. CONSEILS
AVERTISSEMENT!
Reportez-vous aux chapitres
concernant la sécurité.
5.1 Ustensiles de cuisson
ATTENTION!
N'utilisez pas de plats en
fonte, en stéatite, en grès,
de grils ou de plats à gratin.
L'acier inoxydable peut ternir
s'il est trop chauffé.
AVERTISSEMENT!
Ne placez pas le même
récipient sur deux brûleurs.
AVERTISSEMENT!
Ne placez pas de récipients
instables ou déformés sur le
brûleur afin d'éviter les
débordements et les
blessures.
ATTENTION!
Assurez-vous que le fond
des récipients ne dépasse
pas au-dessus de la manette
de commande sinon la
flamme fait chauffer la
manette.
AVERTISSEMENT!
Abaissez ou coupez toujours
la flamme avant de retirer
les récipients du brûleur.
ATTENTION!
Assurez-vous que les
récipients de cuisson sont
bien centrés sur le brûleur
afin de garantir leur stabilité
et de réduire la
consommation de gaz.
5.2 Diamètres des récipients
Utilisez uniquement des
récipients dont le diamètre
correspond aux dimensions
des brûleurs.
Brûleur Diamètre du
récipient
(mm)
Rapide 180 - 260
Semi-rapide 120 - 220
Auxiliaire 80 - 180
5.3 Couvercle (kit séparé uniquement pour les tables de cuisson prédisposées)
ATTENTION!
Assurez-vous que les
poignées des récipients ne
dépassent pas du devant de
la table de cuisson.
• Le couvercle protège la table de
cuisson de la poussière lorsqu'il est
Page 28

www.electrolux.com28
fermé, et recueille les projections de
graisse en position ouverte. Évitez de
l'utiliser pour tout autre usage.
• Veillez à ce que le couvercle soit
toujours propre.
• Veillez à ce que la table de cuisson
soit froide avant de refermer le
couvercle.
6. ENTRETIEN ET NETTOYAGE
• Les couvercles en verre peuvent
éclater sous l'effet de la chaleur.
AVERTISSEMENT!
Reportez-vous aux chapitres
concernant la sécurité.
6.1 Informations générales
• Nettoyez la table de cuisson après
chaque utilisation.
• Utilisez toujours un plat de cuisson
dont le fond est propre.
• Les rayures ou les taches sombres
sur la surface n'ont aucune incidence
sur le fonctionnement de la table de
cuisson.
• Utilisez un nettoyant spécialement
adapté à la surface de la table de
cuisson.
Acier inoxydable
• Lavez les éléments en acier
inoxydable à l'eau, puis séchez-les à
l'aide d'un chiffon doux.
• Pour retirer les résidus d'aliments et
de graisses brûlés ou les taches
tenaces, déposez une petite quantité
de détergent doux dessus et laissezle agir pendant quelques minutes
avant de nettoyer.
• Pour protéger les surfaces en acier,
utilisez des produits nettoyants
spécifiquement conçus pour le
nettoyage de l'acier inoxydable.
• N'utilisez pas de produits nettoyants
contenant des produits chimiques
corrosifs comme le chlorure. Ne
nettoyez pas la surface avec des
produits désinfectants, des agents
détachants ou anti-rouille, ni avec des
produits de nettoyage par immersion.
6.2 Supports de casserole
Les supports de casserole
ne sont pas adaptés au
lavage dans un lavevaisselle. Ils doivent être
lavés à la main.
1. Retirez les supports de casserole
pour nettoyer facilement la table de
cuisson.
Replacez les supports
de casserole avec soin
afin de ne pas
endommager le dessus
de la table de cuisson.
2. Lorsque vous lavez les supports de
casserole à la main, faites bien
attention lorsque vous les essuyez,
car le revêtement en émail peut
présenter des bords coupants. Si
nécessaire, retirez les taches
tenaces à l'aide d'une pâte
nettoyante.
3. Après avoir lavé les supports de
casserole, veillez à les remettre
correctement en place.
4. Pour que le brûleur fonctionne
correctement, assurez-vous que les
bras des supports de casserole sont
alignés avec le centre du brûleur.
6.3 Nettoyage de la table de cuisson
• Enlevez immédiatement : plastique
fondu, films plastiques, sucre et
aliments contenant du sucre. Sinon, la
saleté pourrait endommager la table
de cuisson. Veillez à ne pas vous
brûler.
• Une fois que la table de cuisson a
suffisamment refroidi, enlevez :
traces de calcaire et d'eau,
Page 29

FRANÇAIS 29
projections de graisse, décolorations
métalliques luisantes. Nettoyez la
table de cuisson à l'aide d'un chiffon
humide et d'un détergent non abrasif.
Après le nettoyage, séchez la table de
cuisson à l'aide d'un chiffon doux.
• Nettoyez les éléments en émail, le
chapeau et la couronne avec de l'eau
chaude savonneuse et séchez-les
soigneusement avant de les remettre
en place.
6.4 Nettoyage de la bougie
d'allumage
Cette fonctionnalité est obtenue grâce à
une bougie d'allumage en céramique
dotée d'une électrode en métal. Veillez à
maintenir ces composants propres afin
de faciliter l'allumage. Assurez-vous
également que les orifices des
couronnes des brûleurs ne sont pas
obstrués.
6.5 Entretien périodique
Contactez périodiquement votre service
après-vente pour contrôler l'état du tuyau
d'arrivée de gaz et du régulateur de
pression si votre installation en est
équipée.
7. EN CAS D'ANOMALIE DE FONCTIONNEMENT
AVERTISSEMENT!
Reportez-vous aux chapitres
concernant la sécurité.
7.1 En cas d'anomalie de fonctionnement
Problème Cause probable Solution
Il n'y a aucune étincelle
lorsque vous essayez d'ac‐
tiver le générateur d'étin‐
celle.
Le fusible a disjoncté. Vérifiez que le fusible est
Le chapeau et la couronne
La flamme s'éteint immé‐
diatement après l'alluma‐
ge.
L'anneau de flamme est ir‐
régulier.
La table de cuisson n'est
pas connectée à une sour‐
ce d'alimentation électrique
ou le branchement est in‐
correct.
du brûleur sont mal posi‐
tionnés.
Le thermocouple n'est pas
suffisamment chauffé.
La couronne du brûleur est
encrassée par des résidus
alimentaires.
Vérifiez que la table de
cuisson est correctement
branchée à une source
d'alimentation électrique.
bien la cause de l'anoma‐
lie. Si les fusibles disjonc‐
tent de manière répétée,
faites appel à un électri‐
cien qualifié.
Placez correctement le
chapeau et la couronne du
brûleur.
Maintenez la manette en‐
foncée pendant 10 secon‐
des maximum une fois la
flamme allumée.
Assurez-vous que l'injec‐
teur n'est pas bouché et
que la couronne est pro‐
pre.
Page 30
MOD.
PROD. NO.
SER.N O
DATA
MOD.
PROD. NO.
SER.N O
DATA
MOD.
PROD.NO.
SER.NO.
03 IT
MADE IN ITALY
TYPE
IP20
0049
A B C
www.electrolux.com30
7.2 Si vous ne trouvez pas de
solution...
Si vous ne trouvez pas de solution au
problème, veuillez contacter votre
revendeur ou un service après-vente
agréé. Veuillez lui fournir les informations
se trouvant sur la plaque signalétique.
Assurez-vous d'utiliser correctement
l'appareil. En cas d'erreur de
manipulation de la part de l'utilisateur, le
déplacement du technicien du service
après-vente ou du vendeur pourra être
facturé, même en cours de garantie. Les
instructions relatives au service aprèsvente et aux conditions de garantie
figurent dans le livret de garantie.
7.3 Étiquettes fournies dans le sachet des accessoires
Collez les étiquettes adhésives comme
indiqué ci-dessous :
A. Collez-la sur la carte de garantie et
envoyez cette partie (le cas échéant).
B. Collez-la sur la carte de garantie et
conservez cette partie (le cas
échéant).
8. INSTALLATION
8.1 Avant l'installation
Avant d'installer la table de cuisson,
notez les informations de la plaque
signalétique ci-dessous. La plaque
signalétique se trouve au bas de la table
de cuisson.
AVERTISSEMENT!
Reportez-vous aux chapitres
concernant la sécurité.
Modèle ...........................
PNC .............................
C. Collez-la sur la notice d'utilisation.
Numéro de série ....................
Page 31

8.2 Raccordement au gaz
A B C
AVERTISSEMENT!
Les instructions suivantes
concernant l'installation,
l'entretien et la ventilation
doivent être effectuées
uniquement par un
professionnel qualifié
conformément aux textes
réglementaires en vigueur
(UNI-CIG 7129 - 7131).
Assurez-vous que la cuisine
soit suffisamment aérée :
maintenez ouverts les
orifices d'aération naturelle
(ils doivent être équivalents
à au moins 100 cm²) ou
installez une hotte à
extraction mécanique.
Effectuez un raccordement fixe
(« rigide ») ou utilisez un tuyau flexible
en acier inoxydable selon les normes en
vigueur. Si vous utilisez des tuyaux
flexibles métalliques, ils ne doivent pas
entrer en contact avec des parties
mobiles ni être comprimés. Soyez
également vigilant lorsque la table est
installée avec un four.
Assurez-vous que la
pression de l'alimentation en
gaz de l'appareil correspond
aux valeurs recommandées.
Si la pression fournie ne correspond pas
à la valeur indiquée, il est nécessaire
d'installer un régulateur de pression
adéquat, conformément à la norme UNI
EN 88. Pour le gaz liquéfié (LPG),
l'utilisation d'un régulateur de pression
est autorisée uniquement si celui-ci est
conforme à la norme UNI EN 12864. Le
raccordement réglable est relié à la
rampe complète par un écrou fileté G
1/2 po. Vissez les pièces sans forcer,
réglez le raccordement dans le sens
nécessaire et serrez le tout.
FRANÇAIS 31
Extrémité du tuyau avec écrou
A.
B. Joint fourni avec l'appareil
C. Coude fourni avec l'appareil
Raccordement rigide :
Effectuez le raccordement en utilisant
des tuyaux métalliques rigides (en cuivre
avec embout mécanique) (UNI-CIG
7129).
Connexion flexible :
Utilisez un tuyau flexible en acier
inoxydable (UNI-CIG 9891) d'une
longueur maximale de 2 m.
AVERTISSEMENT!
Lorsque l'installation est
terminée, assurez-vous que
chaque raccord est étanche.
Utilisez une solution
savonneuse et pas de
flamme !
8.3 Remplacement des injecteurs
1. Démontez les supports des
casseroles.
2. Démontez les chapeaux et les
couronnes du brûleur.
3. À l'aide d'une clé de 7, démontez les
injecteurs et remplacez-les par ceux
qui sont nécessaires pour le type de
gaz que vous utilisez (voir le tableau
dans le chapitre « Caractéristiques
techniques »).
4. Assemblez les pièces et suivez la
même procédure dans l'ordre
inverse.
5. Remplacez la plaque signalétique
(qui se trouve près du tuyau d'arrivée
de gaz) par celle correspondant au
nouveau type d'alimentation en gaz.
Vous trouverez cette plaque dans le
sachet fourni avec l'appareil.
Page 32

A
A
www.electrolux.com32
Si la pression de l'alimentation en gaz
peut être modifiée ou est différente de la
pression nécessaire, vous devez monter
un système de réglage de la pression sur
le tuyau d'arrivée de gaz.
8.4 Réglage du niveau minimal
Pour régler le niveau minimal des
brûleurs :
1. Allumez le brûleur.
2. Tournez la manette en position
minimale.
3. Retirez la manette.
4. À l'aide d'un tournevis fin, ajustez la
position de la vis de réglage (A).
5. Si vous passez :
• du gaz naturel G20 20 mbar au
gaz liquéfié, serrez entièrement la
vis de réglage.
• du gaz liquéfié au gaz naturel
G20 20 mbar, dévissez la vis de
réglage d'environ 1/4 de tour .
AVERTISSEMENT!
Assurez-vous que la flamme
ne s'éteint pas lorsque vous
tournez rapidement la
manette de la position
maximale à la position
minimale.
8.5 Connexion électrique
• Assurez-vous que la tension nominale
et le type d'alimentation sur la plaque
signalétique correspondent bien à la
tension et à la puissance de
l'alimentation locale.
• Cet appareil est fourni avec un câble
d'alimentation. Une fiche appropriée,
capable de supporter la charge
indiquée sur la plaque signalétique,
doit être adaptée au câble
d'alimentation. Assurez-vous que la
fiche est branchée dans une prise
correcte.
• Utilisez toujours une prise de courant
de sécurité correctement installée.
• Assurez-vous que la prise de courant
est accessible une fois l'appareil
installé.
• Ne tirez jamais sur le câble
d'alimentation électrique pour
débrancher l'appareil. Tirez toujours
sur la fiche.
• L'appareil ne doit pas être raccordé à
l'aide d'un prolongateur, d'un
adaptateur ni d'une prise multiple
«risque d'incendie». Assurez-vous
que le raccordement à la terre est
conforme aux normes et
réglementations.
• Le câble d'alimentation ne doit pas
être exposé à une température
supérieure à 90 °C.
Utilisez les colliers situés sur le côté de
l'appareil pour éviter tout contact entre le
câble et l'appareil sous la table de
cuisson.
A. Tuyau en cuivre rigide ou tuyau
flexible en acier inoxydable
8.6 Câble d'alimentation
Pour remplacer le câble d'alimentation,
utilisez uniquement le câble spécial ou
son équivalent. Le type de câble est :
H05V2V2-FT90.
Assurez-vous que la section du câble
convient à la tension et à la température
de fonctionnement. Le câble de terre
jaune/vert doit être plus long d'environ
2 cm que le câble de phase marron (ou
noir).
Page 33

min. 55 mm
min. 650 mm
550 mm
min. 100 mm
30 mm
470 mm
50 mm
400 mm
FRANÇAIS 33
8.7 Montage
1.
2.
3.
Si un meuble est installé
à 400 mm au-dessus de
la table de cuisson, vous
devez laisser une
distance de sécurité
minimale de 50 mm à
gauche ou à droite du
bord de la table de
cuisson.
5.
6.
7.
4.
8.
9.
Page 34

A
B
min 6 mm
min 30 mm
60 mm
b
a
min 5 mm
(max 150 mm)
www.electrolux.com34
A) joint fourni
B) équerres fournies
10.
11.
8.9 Possibilités d'insertion
Le panneau installé sous la table de
cuisson doit être facile à retirer et
facilement accessible au cas où une
intervention technique serait nécessaire.
Élément de cuisine avec une porte
A. Panneau amovible
B. Espace pour les branchements
Élément de cuisine avec four
ATTENTION!
Installez l'appareil
uniquement sur un plan de
travail dont la surface est
plane.
Les branchements électriques de la table
de cuisson et du four doivent être
installés séparément pour des raisons de
sécurité et pour permettre un retrait facile
du four de l'ensemble.
8.8 Installation de la table de cuisson sous une hotte
Si vous installez la table de
cuisson sous une hotte,
reportez-vous aux
instructions d'installation de
la hotte pour connaître la
distance minimale
nécessaire entre les
appareils.
Page 35

9. CARACTÉRISTIQUES TECHNIQUES
9.1 Dimensions de la table de cuisson
Largeur 580 mm
Profondeur 500 mm
9.2 Diamètres des vis de réglage
BRÛLEUR Ø VIS DE RÉGLAGE 1/100 mm
Rapide 42
Semi-rapide 32
Auxiliaire 28
9.3 Autres caractéristiques techniques
FRANÇAIS 35
PUISSANCE TOTA‐
LE :
Alimentation électri‐
que :
Catégorie de l'appa‐
reil :
Raccordement au gaz : G 1/2"
Classe de l'appareil : 3
Gaz d'origine : G20 (2H) 20 mbar = 8 kW
Gaz de remplace‐
ment :
220-240 V ~ 50/60 Hz
II2H3+
G30 (3+) 28-30 mbar = 567 g/h
G31 (3+) 37 mbar = 557 g/h
9.4 Brûleurs à gaz pour GAZ NATUREL G20 20 mbar
BRÛLEUR PUISSANCE NOR‐
MALE kW
Rapide 3,0 0,75 119
Semi-rapide 2,0 0,45 96
Auxiliaire 1,0 0,33 70
PUISSANCE MINI‐
MALE kW
CARACTÉRISTI‐
QUE DE L'INJEC‐
TEUR
Page 36

www.electrolux.com36
9.5 Brûleurs à gaz pour LPG G30/G31 28-30/37 mbar
BRÛLEUR PUISSAN‐
CE NOR‐
MALE kW
Rapide 2,8 0,75 86 204 200
Semi-rapide 2,0 0,45 71 145 143
Auxiliaire 1,0 0,33 50 73 71
PUISSAN‐
CE MINI‐
MALE kW
CARACTÉ‐
RISTIQUE
DE L'INJEC‐
TEUR
10. RENDEMENT ÉNERGÉTIQUE
10.1 Informations de produit selon la norme EU 66/2014
Identification du modèle PBL64V;
Type de table de cuisson Table de cuisson
Nombre de brûleurs à gaz 4
Arrière gauche - Semi-rapide 59.1%
Efficacité énergétique selon le
brûleur à gaz
(EE gas burner)
Efficacité énergétique de la table
de cuisson
(EE gas hob)
Arrière droit - Semi-rapide 59.1%
Avant gauche - Rapide 59.3%
Avant droit - Auxiliaire non applicable
59.2%
DÉBIT DE GAZ NOMINAL
g/h
G30
28-30 mbar
G31 37 mbar
PNL64V;
PTL64V;
PXL64DV;
PXL64V
intégrée
EN 30-2-1 : Appareils de cuisson domestiques à gaz - Partie 2-1 : Utilisation
rationnelle de l'énergie - Général
10.2 Économies d'énergie
• Avant utilisation, assurez-vous que les brûleurs et les supports de casseroles sont
correctement assemblés.
• Utilisez uniquement des récipients dont le diamètre correspond aux dimensions
des brûleurs.
• Mettez le récipient au centre du brûleur.
• Lorsque vous chauffez de l'eau, n'utilisez que la quantité d'eau dont vous avez
besoin.
• Si possible, couvrez toujours les récipients avec un couvercle pendant la cuisson.
• Dès que le liquide commence à bouillir, baissez la flamme juste assez pour laisser
le liquide frémir.
• Si cela est possible, utilisez un autocuiseur Reportez-vous à son mode d'emploi.
Page 37

11. EN MATIÈRE DE PROTECTION DE
L'ENVIRONNEMENT
FRANÇAIS 37
Recyclez les matériaux portant le
symbole . Déposez les emballages
dans les conteneurs prévus à cet effet.
Contribuez à la protection de
l'environnement et à votre sécurité,
recyclez vos produits électriques et
électroniques. Ne jetez pas les appareils
portant le symbole avec les ordures
ménagères. Emmenez un tel produit
dans votre centre local de recyclage ou
contactez vos services municipaux.
Page 38

www.electrolux.com38
INHALTSVERZEICHNIS
1. SICHERHEITSHINWEISE................................................................................39
2. SICHERHEITSANWEISUNGEN...................................................................... 41
3. GERÄTEBESCHREIBUNG.............................................................................. 44
4. TÄGLICHER GEBRAUCH................................................................................45
5. TIPPS UND HINWEISE....................................................................................46
6. REINIGUNG UND PFLEGE............................................................................. 47
7. FEHLERSUCHE............................................................................................... 48
8. MONTAGE........................................................................................................49
9. TECHNISCHE DATEN..................................................................................... 54
10. ENERGIEEFFIZIENZ..................................................................................... 55
WIR DENKEN AN SIE
Vielen Dank, dass Sie sich für ein Gerät von Electrolux entschieden haben. Sie
haben ein Produkt gewählt, hinter dem jahrzehntelange professionelle Erfahrung
und Innovation stehen. Bei der Entwicklung dieses großartigen und eleganten
Geräts haben wir an Sie gedacht. So haben Sie bei jedem Gebrauch die
Gewissheit, dass Sie stets großartige Ergebnisse erzielen werden.
Willkommen bei Electrolux.
Besuchen Sie uns auf unserer Website, um:
Sich Anwendungshinweise, Prospekte, Fehlerbehebungs- und ServiceInformationen zu holen:
www.electrolux.com/webselfservice
Ihr Produkt für einen besseren Service zu registrieren:
www.registerelectrolux.com
Zubehör, Verbrauchsmaterial und Original-Ersatzteile für Ihr Gerät zu kaufen:
www.electrolux.com/shop
REPARATUR- UND KUNDENDIENST
Bitte verwenden Sie ausschließlich Original-Ersatzteile für Ihre Produkte.
Halten Sie folgende Angaben bereit, wenn Sie sich an den Kundendienst
wenden: Modell, Produktnummer (PNC), Seriennummer.
Diese Informationen finden Sie auf dem Typenschild.
Warnungs-/Sicherheitshinweise
Allgemeine Informationen und Empfehlungen
Informationen zum Umweltschutz
Änderungen vorbehalten.
Page 39

1. SICHERHEITSHINWEISE
Lesen Sie vor der Montage und dem Gebrauch des
Geräts zuerst die Gebrauchsanleitung. Bei Verletzungen
oder Schäden infolge nicht ordnungsgemäßer Montage
oder Verwendung des Geräts übernimmt der Hersteller
keine Haftung. Bewahren Sie die Anleitung immer an
einem sicheren und zugänglichen Ort zum späteren
Nachschlagen auf.
1.1 Sicherheit von Kindern und schutzbedürftigen Personen
• Das Gerät kann von Kindern ab 8 Jahren und
Personen mit eingeschränkten physischen,
sensorischen oder geistigen Fähigkeiten oder mit
mangelnder Erfahrung und/oder mangelndem Wissen
nur dann verwendet werden, wenn sie durch eine für
ihre Sicherheit zuständige Person beaufsichtigt
werden oder in die sichere Verwendung des Geräts
eingewiesen wurden und die mit dem Gerät
verbundenen Gefahren verstanden haben.
• Kinder dürfen nicht mit dem Gerät spielen.
• Halten Sie sämtliches Verpackungsmaterial von
Kindern fern und entsorgen Sie es auf angemessene
Weise.
• Halten Sie Kinder und Haustiere während des
Betriebs oder der Abkühlphase vom Gerät fern.
Berührbare Teile sind heiß.
• Falls Ihr Gerät mit einer Kindersicherung ausgestattet
ist, empfehlen wir, diese einzuschalten.
• Kinder dürfen keine Reinigung und Wartung ohne
Beaufsichtigung durchführen.
• Kinder bis zu 3 Jahren sind während des Betriebs
unbedingt von dem Gerät fernzuhalten.
DEUTSCH 39
1.2 Allgemeine Sicherheit
• WARNUNG: Das Gerät und die zugänglichen
Geräteteile werden während des Betriebs heiß. Seien
Page 40

www.electrolux.com40
Sie vorsichtig und berühren Sie niemals die
Heizelemente. Halten Sie Kinder unter 8 Jahren vom
Gerät fern, wenn sie nicht ständig beaufsichtigt
werden.
• Schalten Sie das Gerät nicht über eine externe
Zeitschaltuhr oder eine separate Fernsteuerung ein.
• WARNUNG: Kochen mit Fett oder Öl auf einem
unbeaufsichtigten Kochfeld ist gefährlich und kann zu
einem Brand führen.
• Versuchen Sie NICHT einen Brand mit Wasser zu
löschen, sondern schalten Sie das Gerät aus und
bedecken Sie die Flamme mit einem Deckel oder
einer Feuerlöschdecke.
• VORSICHT: Der Kochvorgang muss überwacht
werden. Ein kurzer Kochvorgang muss kontinuierlich
überwacht werden.
• WARNUNG: Brandgefahr: Legen Sie keine
Gegenstände auf dem Kochfeld ab.
• Legen Sie keine Metallgegenstände wie Messer,
Gabeln, Löffel oder Topfdeckel auf die Oberfläche des
Kochfelds, da diese heiß werden können.
• Reinigen Sie das Gerät nicht mit einem
Dampfstrahlreiniger.
• Benutzen Sie keine scharfen Scheuermittel oder
Metallschaber zum Reinigen des gläsernen
Klappdeckels des Kochfelds; sie könnten die
Glasfläche verkratzen und zum Zersplittern der
Scheibe führen.
• Entfernen Sie ggf. Spritzer oder ausgelaufene
Flüssigkeiten von der Abdeckung, bevor Sie sie
öffnen. Lassen Sie das Kochfeld vollständig abkühlen,
bevor Sie die Abdeckung zuklappen.
• Wenn das Netzkabel beschädigt ist, muss es vom
Hersteller, einem autorisierten Kundendienst oder
einer gleichermaßen qualifizierten Person
ausgetauscht werden, um Gefahrenquellen zu
vermeiden.
Page 41

• Ist das Gerät direkt an die Stromversorgung
angeschlossen, wird ein allpoliger Netztrennschalter
mit einem Kontaktabstand benötigt. Es muss eine
vollständige Trennung entsprechend der
Überspannungskategorie III gewährleistet sein. Dies
gilt nicht für das Erdungskabel.
• Wenn Sie das Netzkabel verlegen, achten Sie darauf,
dass es keinen direkten Kontakt mit Teilen hat, die
Temperaturen erreichen können, die mehr als 50 °C
über der Raumtemperatur liegen. (Verwenden Sie
ansonsten Isolierschläuche.)
• WARNUNG: Verwenden Sie nur Schutzabdeckungen
des Herstellers des Kochgeräts, von ihm in der
Bedienungsanleitung als geeignete und empfohlene
Schutzabdeckungen oder die im Gerät enthaltene
Schutzabdeckung. Es besteht Unfallgefahr durch die
Verwendung ungeeigneter Schutzabdeckungen.
2. SICHERHEITSANWEISUNGEN
DEUTSCH 41
Dieses Gerät ist für folgende Märkte
geeignet: IT
2.1 Montage
WARNUNG!
Nur eine qualifizierte
Fachkraft darf die Montage
des Geräts vornehmen.
• Entfernen Sie das gesamte
Verpackungsmaterial.
• Montieren Sie ein beschädigtes Gerät
nicht und benutzen Sie es nicht.
• Halten Sie sich an die mitgelieferte
Montageanleitung.
• Die Mindestabstände zu anderen
Geräten und Küchenmöbeln sind
einzuhalten.
• Seien Sie beim Bewegen des Gerätes
vorsichtig, da es sehr schwer ist.
Tragen Sie stets
Sicherheitshandschuhe und festes
Schuhwerk.
• Dichten Sie die Ausschnittskanten mit
einem Dichtungsmittel ab, um ein
Aufquellen durch Feuchtigkeit zu
verhindern.
• Schützen Sie die Geräteunterseite vor
Dampf und Feuchtigkeit.
• Installieren Sie das Gerät nicht direkt
neben einer Tür oder unter einem
Fenster. So kann heißes
Kochgeschirr nicht herunterfallen,
wenn die Tür oder das Fenster
geöffnet wird.
• Wird das Gerät über Schubladen
eingebaut, achten Sie darauf, dass
zwischen dem Geräteboden und der
oberen Schublade ein ausreichender
Abstand für die Luftzirkulation
vorhanden ist.
• Der Boden des Geräts kann heiß
werden. Achten Sie darauf eine
feuerfeste Trennplatte unter dem
Gerät anzubringen, damit der Boden
nicht zugänglich ist.
Page 42

www.electrolux.com42
2.2 Elektrischer Anschluss
WARNUNG!
Brand- und
Stromschlaggefahr.
• Alle elektrischen Anschlüsse sind von
einem geprüften Elektriker
vorzunehmen.
• Das Gerät muss geerdet sein.
• Vor der Durchführung jeglicher
Arbeiten muss das Gerät von der
elektrischen Stromversorgung
getrennt werden.
• Stellen Sie sicher, dass die
elektrischen Daten auf dem
Typenschild den Daten Ihrer
Stromversorgung entsprechen.
Wenden Sie sich anderenfalls an eine
Elektrofachkraft.
• Achten Sie darauf, dass das Gerät
ordnungsgemäß montiert wird. Wenn
freiliegende oder ungeeignete
Netzkabel oder Netzstecker (fall
vorhanden) verwendet werden, kann
der Anschluss überhitzen.
• Stellen Sie sicher, dass Sie das
richtige Kabel für den elektrischen
Netzanschluss verwenden.
• Achten Sie darauf, dass das
Netzkabel nicht lose hängt oder sich
verheddert.
• Sorgen Sie dafür, dass ein
Berührungsschutz installiert wird.
• Verwenden Sie die Zugentlastung für
das Kabel.
• Stellen Sie beim elektrischen
Anschluss des Gerätes sicher, dass
das Netzkabel oder ggf. der
Netzstecker nicht mit dem heißen
Gerät oder heißem Kochgeschirr in
Berührung kommt.
• Verwenden Sie keine
Mehrfachsteckdosen oder
Verlängerungskabel.
• Achten Sie darauf, Netzstecker (falls
vorhanden) und Netzkabel nicht zu
beschädigen. Wenden Sie sich zum
Austausch des beschädigten
Netzkabels an unseren autorisierten
Kundendienst oder eine
Elektrofachkraft.
• Alle Teile, die gegen direktes
Berühren schützen, sowie die
isolierten Teile müssen so befestigt
werden, dass sie nicht ohne
Werkzeug entfernt werden können.
• Stecken Sie den Netzstecker erst
nach Abschluss der Montage in die
Steckdose. Stellen Sie sicher, dass
der Netzstecker nach der Montage
noch zugänglich ist.
• Falls die Steckdose lose ist, schließen
Sie den Netzstecker nicht an.
• Ziehen Sie nicht am Netzkabel, wenn
Sie das Gerät vom Netzstrom trennen
möchten. Ziehen Sie stets am
Netzstecker.
• Verwenden Sie nur geeignete
Trenneinrichtungen: Überlastschalter,
Sicherungen (Schraubsicherungen
müssen aus dem Halter entfernt
werden können), Erdschlüsse,
Kontakte.
• Die elektrische Installation muss eine
Trenneinrichtung aufweisen, mit der
Sie das Gerät allpolig von der
Stromversorgung trennen können. Die
Trenneinrichtung muss mit einer
Kontaktöffnungsbreite von
mindestens 3 mm ausgeführt sein.
2.3 Gasanschluss
• Der Gasanschluss muss von einer
Fachkraft ausgeführt werden.
• Vergewissern Sie sich vor der
Montage des Geräts, dass das von
Ihrem Gaswerk gelieferte Gas (Gasart
und Gasdruck) mit der Einstellung des
Geräts kompatibel ist.
• Stellen Sie sicher, dass die Luft um
das Gerät zirkulieren kann.
• Informationen über die
Gasversorgung finden Sie auf dem
Typenschild.
• Das Gerät darf nicht an einen Abzug
für Verbrennungsprodukte
angeschlossen werden. Das Gerät
muss gemäß der aktuell geltenden
Installationsbestimmungen
angeschlossen werden. Halten Sie
die Bestimmungen hinsichtlich der
Belüftung ein.
2.4 Gebrauch
WARNUNG!
Verletzungs-, Verbrennungsund Stromschlaggefahr.
Page 43

• Entfernen Sie vor dem ersten
Gebrauch das gesamte
Verpackungsmaterial, die Aufkleber
und Schutzfolie (falls vorhanden).
• Das Gerät ist für die Verwendung im
Haushalt vorgesehen.
• Nehmen Sie keine technischen
Änderungen am Gerät vor.
• Die Lüftungsöffnungen dürfen nicht
abgedeckt werden.
• Lassen Sie das Gerät bei Betrieb
nicht unbeaufsichtigt.
• Schalten Sie die Kochzonen nach
jedem Gebrauch aus.
• Legen Sie kein Besteck und keine
Topfdeckel auf die Kochzonen. Sie
werden heiß.
• Bedienen Sie das Gerät nicht mit
feuchten oder nassen Händen oder
wenn es mit Wasser in Kontakt
gekommen ist.
• Benutzen Sie das Gerät nicht als
Arbeits- oder Abstellfläche.
• Wenn Sie Nahrungsmittel in heißes Öl
geben, kann dieses spritzen.
WARNUNG!
Brand- und
Explosionsgefahr!
• Erhitzte Öle und Fette können
brennbare Dämpfe freisetzen. Halten
Sie Flammen und erhitzte
Gegenstände beim Kochen mit Fetten
und Ölen von diesen fern.
• Die von sehr heißem Öl freigesetzten
Dämpfe können eine Selbstzündung
verursachen.
• Bereits verwendetes Öl kann
Lebensmittelreste enthalten und
schon bei niedrigeren Temperaturen
eher einen Brand verursachen als
frisches Öl.
• Platzieren Sie keine entflammbaren
Produkte oder Gegenstände, die mit
entflammbaren Produkten benetzt
sind, im Gerät, auf dem Gerät oder in
der Nähe des Geräts.
WARNUNG!
Das Gerät könnte
beschädigt werden.
• Stellen Sie kein heißes Kochgeschirr
auf das Bedienfeld.
• Lassen Sie das Kochgeschirr nicht
leerkochen.
DEUTSCH 43
• Lassen Sie keine Gegenstände oder
Kochgeschirr auf das Gerät fallen. Die
Oberfläche könnte beschädigt
werden.
• Schalten Sie die Kochzonen niemals
ein, wenn sich kein Kochgeschirr
darauf befindet, oder wenn das
Kochgeschirr leer ist.
• Legen Sie keine Alufolie auf das
Gerät.
• Verwenden Sie nur standfestes
Kochgeschirr mit der richtigen Form
und einem Durchmesser, der größer
als der der Brenner ist.
• Achten Sie darauf das Kochgeschirr
mittig auf die Brenner zu stellen.
• Vergewissern Sie sich, dass die
Flamme nicht erlischt, wenn Sie den
Einstellknopf schnell von der
höchsten zur niedrigsten Stufe
drehen.
• Verwenden Sie ausschließlich das mit
dem Gerät gelieferte Zubehör.
• Setzen Sie keinen Wärmeverteiler auf
den Brenner.
• Beim Gebrauch eines Gaskochfelds
entsteht Wärme und Feuchtigkeit.
Sorgen Sie für eine ausreichende
Belüftung in dem Raum, in dem das
Gerät aufgestellt ist.
• Bei längerer Benutzung des Gerätes
kann eine zusätzliche Belüftung
erforderlich werden, zum Beispiel
durch Öffnen eines Fensters oder die
Erhöhung der Absaugleistung der
Abzugshaube, falls vorhanden.
• Dieses Gerät ist nur zum Kochen
bestimmt. Jeder andere Gebrauch ist
als bestimmungsfremd anzusehen,
zum Beispiel das Beheizen eines
Raums.
• Lassen Sie keine säurehaltigen
Flüssigkeiten wie Essig, Zitronensaft
oder kalklösende Reinigungsmittel mit
dem Kochfeld in Berührung kommen.
Diese könnten matte Flecken
verursachen.
• Verfärbungen der Emailbeschichtung
haben keine Auswirkung auf die
Leistung des Geräts.
2.5 Reinigung und Pflege
• Reinigen Sie das Gerät regelmäßig,
um eine Abnutzung des
Oberflächenmaterials zu verhindern.
Page 44

2
1 3
4
www.electrolux.com44
• Schalten Sie das Gerät vor dem
Reinigen aus und lassen Sie es
abkühlen.
• Trennen Sie das Gerät vor
Wartungsarbeiten von der
Spannungsversorgung.
• Reinigen Sie das Gerät nicht mit
Wasserspray oder Dampf.
• Reinigen Sie das Gerät mit einem
weichen, feuchten Tuch. Verwenden
Sie ausschließlich Neutralreiniger.
Benutzen Sie keine Scheuermittel,
scheuernde
Reinigungsschwämmchen,
Lösungsmittel oder
Metallgegenstände.
• Reinigen Sie die Brenner nicht im
Geschirrspüler.
2.6 Entsorgung
WARNUNG!
Verletzungs- und
Erstickungsgefahr.
3. GERÄTEBESCHREIBUNG
3.1 Kochfeldanordnung
• Für Informationen zur
ordnungsgemäßen Entsorgung des
Geräts wenden Sie sich an die
zuständige kommunale Behörde vor
Ort.
• Trennen Sie das Gerät von der
Stromversorgung.
• Schneiden Sie das Netzkabel in der
Nähe des Geräts ab, und entsorgen
Sie es.
• Drücken Sie die äußeren Gasrohre
flach.
2.7 Service
• Wenden Sie sich zur Reparatur des
Geräts an einen autorisierten
Kundendienst.
• Verwenden Sie ausschließlich
Originalersatzteile.
3.2 Einstellknopf
Symbol Beschreibung
Keine Gaszufuhr/ausge‐
schaltet
Starkbrenner
1
Normalbrenner
2
Hilfsbrenner
3
Einstellknöpfe
4
Symbol Beschreibung
Zündstellung/maximale
Gaszufuhr
minimale Gaszufuhr
Page 45

4. TÄGLICHER GEBRAUCH
A
B
D
C
DEUTSCH 45
WARNUNG!
Siehe Kapitel
"Sicherheitshinweise".
4.1 Brennerübersicht
A. Brennerdeckel
B. Brennerkrone
C. Zündkerze
D. Thermoelement
4.2 Zünden des Brenners
Brenner stets vor dem
Aufsetzen des
Kochgeschirrs zünden.
WARNUNG!
Seien Sie bei der
Verwendung von offenem
Feuer in der Küche
besonders vorsichtig. Der
Hersteller übernimmt bei
Missachtung der
Sicherheitsbestimmungen
beim Umgang mit offenem
Feuer keinerlei Haftung.
1. Drücken Sie den Einstellknopf hinein
und drehen Sie ihn gegen den
Uhrzeigersinn auf die Position für die
maximale Gaszufuhr (
2. Halten Sie den Einstellknopf bis zu
10 Sekunden lang gedrückt. In dieser
Zeit wird das Thermoelement
).
erwärmt. Andernfalls wird die
Gaszufuhr unterbrochen.
3. Stellen Sie die Flamme ein, sobald
sie ruhig brennt.
Falls sich der Brenner nach
einigen Versuchen nicht
zünden lässt, überprüfen
Sie, ob die Brennerkrone
und der zugehörige
Brennerdeckel korrekt
sitzen.
WARNUNG!
Halten Sie den Knopf nicht
länger als 15 Sekunden
gedrückt. Sollte der Brenner
nach 15 Sekunden nicht
zünden, lassen Sie den
Knopf los, und drehen Sie
ihn in die Aus-Position.
Warten Sie dann mindestens
eine Minute, bevor Sie den
Brenner erneut zünden.
VORSICHT!
Wenn kein Strom zur
Verfügung steht, können Sie
den Brenner auch ohne
Strom zünden. Bringen Sie
eine Flamme in die Nähe
des Brenners, drehen Sie
den entsprechenden Knopf
entgegen dem Uhrzeigersinn
auf die höchste Stufe und
drücken Sie ihn dann hinein.
Halten Sie den Einstellknopf
höchstens 10 Sekunden
gedrückt, um das
Thermoelement zu
erwärmen.
Sollte der Brenner zufällig
ausgehen, drehen Sie den
Knopf in die Aus-Position
und versuchen ihn nach
einer Minute erneut zu
zünden.
Page 46

www.electrolux.com46
Nach dem Einschalten der
Stromversorgung, nach der
Installation oder nach einem
Stromausfall wird der
Funkengenerator
möglicherweise automatisch
eingeschaltet. Das ist
normal.
Das Kochfeld wird mit
Ventilen mit einem stetigen
Stellverhalten geliefert. Sie
ermöglichen eine präzisere
Einstellung der Flamme.
5. TIPPS UND HINWEISE
WARNUNG!
Siehe Kapitel
"Sicherheitshinweise".
5.1 Kochgeschirr
VORSICHT!
Verwenden Sie kein
Kochgeschirr aus
Gusseisen, Speckstein oder
Steingut und keine Grilloder Sandwichplatten.
Edelstahl kann bei zu starker
Erhitzung anlaufen.
WARNUNG!
Kochen Sie nicht mit einem
Kochgeschirrteil auf zwei
Brennern gleichzeitig.
WARNUNG!
Stellen Sie keine
beschädigten Töpfe oder
solche, die nicht standfest
sind, auf den Brenner, um
ein Verschütten und
Verletzungen zu vermeiden.
VORSICHT!
Achten Sie darauf, dass sich
die Topfböden nicht über
dem Einstellknopf befinden,
da anderenfalls die Flamme
den Einstellknopf erhitzen
könnte.
4.3 Abschalten des Brenners
Drehen Sie zum Abschalten des
Brenners den Knopf in die Aus-Position
.
WARNUNG!
Bevor Sie das Kochgeschirr
vom Brenner nehmen,
drehen Sie die Flamme
herunter oder drehen Sie sie
ganz ab.
VORSICHT!
Achten Sie darauf, dass die
Topfgriffe nicht über den
vorderen Rand des
Kochfelds hinausragen.
VORSICHT!
Stellen Sie zur Reduzierung
des Gasverbrauchs und im
Interesse einer größeren
Stabilität die Töpfe mittig auf
den Brenner.
5.2 Durchmesser des
Kochgeschirrs
Verwenden Sie nur
Kochgeschirr mit einem
Durchmesser, der der Größe
der Brenner entspricht.
Brenner Durchmesser
des Kochge‐
schirrs (mm)
Starkbrenner 180 - 260
Normalbrenner 120 - 220
Hilfsbrenner 80 - 180
Page 47

5.3 Deckel (separater Bausatz für vorbereitete Kochfelder)
6. REINIGUNG UND PFLEGE
DEUTSCH 47
• Der Deckel schützt das Kochfeld vor
Staub, wenn er geschlossen ist, und
fängt Fettspritzer auf, wenn er
geöffnet ist. Benutzen Sie ihn für
keinen anderen Zweck.
• Halten Sie den Deckel stets sauber.
• Vergewissern Sie sich, dass das
Kochfeld abgekühlt ist, bevor der
Deckel geschlossen wird.
• Glasdeckel können zerbrechen, wenn
sie erhitzt werden.
WARNUNG!
Siehe Kapitel
"Sicherheitshinweise".
6.1 Allgemeine Informationen
• Reinigen Sie das Kochfeld nach
jedem Gebrauch.
• Achten Sie immer darauf, dass der
Boden des Kochgeschirrs sauber ist.
• Kratzer oder dunkle Flecken auf der
Oberfläche beeinträchtigen die
Funktionsfähigkeit des Kochfelds
nicht.
• Verwenden Sie einen Spezialreiniger
zur Reinigung der
Kochfeldoberfläche.
Edelstahl
• Reinigen Sie Edelstahlteile mit
Wasser und wischen Sie sie mit
einem weichen Tuch trocken.
• Um eingebrannte Speisereste, Fett
und hartnäckige Flecken zu
entfernen, weichen Sie diese vor der
Reinigung mit etwas mildem
Reinigungsmittel ein.
• Verwenden Sie speziell für Edelstahl
vorgesehene Reinigungsmittel, um
die Stahloberflächen zu schützen.
• Verwenden Sie keine
Reinigungsmittel, die ätzende
Chemikalien enthalten, wie Chloride,
reinigen Sie die Oberfläche nicht mit
Desinfektionsmitteln, Fleck- oder
Rostentfernern und Tauchreinigern.
6.2 Topfträger
Die Topfträger sind nicht
spülmaschinenfest. Sie
müssen von Hand gereinigt
werden.
1. Entfernen Sie die Topfträger, um die
Reinigung des Kochfelds zu
erleichtern.
Seien Sie beim
Wiederaufsetzen der
Topfträger vorsichtig, um
Beschädigungen der
Oberseite der Kochstelle
zu vermeiden.
2. Wenn Sie die Topfträger von Hand
spülen und trocknen, seien Sie
vorsichtig, da durch das Emaillieren
gelegentlich raue Kanten entstehen
können. Entfernen Sie hartnäckige
Flecken ggf. mit einer
Reinigungspaste.
3. Vergewissern Sie sich, dass Sie die
Topfträger nach der Reinigung
wieder ordnungsgemäß eingesetzt
haben.
4. Damit der Brenner korrekt
funktioniert, stellen Sie sicher, dass
sich die Arme der Topfträger in der
Mitte der Brenner befinden.
6.3 Reinigen des Kochfelds
• Folgendes muss sofort entfernt
werden: geschmolzener Kunststoff,
Plastikfolie, Zucker bzw. zuckerhaltige
Lebensmittel. Andernfalls können die
Verschmutzungen das Kochfeld
Page 48

www.electrolux.com48
beschädigen. Achten Sie darauf, dass
sich niemand Verbrennungen zuzieht.
• Folgendes kann nach
ausreichender Abkühlung des
Kochfelds entfernt werden: Kalk-
und Wasserränder, Fettspritzer und
metallisch schimmernde
Verfärbungen. Reinigen Sie das
Kochfeld mit einem feuchten Tuch
und nicht scheuernden
Reinigungsmittel. Wischen Sie das
Kochfeld nach der Reinigung mit
einem weichen Tuch trocken.
• Reinigen Sie die emaillierten Teile,
den Brennerdeckel und die
Brennerkrone mit warmen
Seifenwasser und trocknen Sie diese
sorgfältig ab, bevor Sie sie wieder
einsetzen.
7. FEHLERSUCHE
WARNUNG!
Siehe Kapitel
"Sicherheitshinweise".
7.1 Was tun, wenn ...
6.4 Reinigen der Zündkerze
Diese Funktion erfolgt über eine
Keramikzündkerze mit Metallelektrode.
Halten Sie zur Vermeidung von
Zündschwierigkeiten diese Bauteile
immer sauber; kontrollieren Sie
außerdem, ob die Düsen der
Brennerkrone verstopft sind.
6.5 Regelmäßige Wartung
Lassen Sie regelmäßig vom Ihrem
autorisierten Kundendienst den Zustand
des Gasversorgungsrohrs und, falls
installiert, die Funktionstüchtigkeit des
Druckreglers überprüfen.
Störung Mögliche Ursache Abhilfe
Es wird kein Funke er‐
zeugt, wenn Sie den Fun‐
kenerzeuger betätigen.
Die Sicherung ist durchge‐
Brennerdeckel und Bren‐
Die Flamme erlischt gleich
nach der Zündung wieder.
Der Flammenring ist un‐
gleichmäßig.
Das Kochfeld ist nicht oder
nicht ordnungsgemäß an
die Spannungsversorgung
angeschlossen.
brannt.
nerkrone sitzen nicht rich‐
tig.
Das Thermoelement ist
nicht ausreichend erwärmt.
Die Brennerkrone ist mit
Speiseresten verstopft.
Prüfen Sie, ob das Koch‐
feld ordnungsgemäß an
die Spannungsversorgung
angeschlossen ist.
Vergewissern Sie sich,
dass die Sicherung der
Grund für die Störung ist.
Brennt die Sicherung wie‐
derholt durch, wenden Sie
sich an eine zugelassene
Elektrofachkraft.
Bringen Sie die Brenner‐
krone und den Brennerde‐
ckel in die richtige Position.
Halten Sie den Knopf nach
dem Entzünden etwa 10
Sekunden lang gedrückt.
Sorgen Sie dafür, dass die
Düse nicht blockiert und
die Brennerkrone sauber
ist.
Page 49

7.2 Wenn Sie das Problem
MOD.
PROD. NO.
SER.N O
DATA
MOD.
PROD. NO.
SER.N O
DATA
MOD.
PROD.NO.
SER.NO.
03 IT
MADE IN ITALY
TYPE
IP20
0049
A B C
nicht lösen können...
Wenn Sie das Problem nicht selbst lösen
können, wenden Sie sich an Ihren
Händler oder einen autorisierten
Kundendienst. Geben Sie die Daten, die
Sie auf dem Typenschild finden, an.
Vergewissern Sie sich, dass Sie das
Kochfeld korrekt bedient haben. Wenn
Sie das Gerät falsch bedient haben, fällt
auch während der Garantiezeit für die
DEUTSCH 49
Reparatur durch einen Techniker oder
Händler eine Gebühr an. Die
Informationen zum Kundendienst und die
Garantiebedingungen finden Sie im
Garantieheft.
7.3 Im Zubehörbeutel mitgelieferte Aufkleber
Bringen Sie die Aufkleber, wie unten
gezeigt, an:
A. Kleben Sie ihn auf die Garantiekarte
und verschicken Sie diesen Teil (falls
vorhanden).
B. Kleben Sie ihn auf die Garantiekarte
und behalten Sie diesen Teil (falls
vorhanden).
8. MONTAGE
8.1 Vor der Montage
Notieren Sie vor der Montage des
Kochfelds folgende Daten, die Sie auf
dem Typenschild finden. Das
Typenschild ist auf dem Boden des
Kochfelds angebracht.
WARNUNG!
Siehe Kapitel
"Sicherheitshinweise".
Modell ...........................
C. Kleben Sie ihn auf die
Gebrauchsanleitung.
Produktnummer
(PNC) ........................................
Seriennummer ............
Page 50

A B C
www.electrolux.com50
8.2 Gasanschluss
WARNUNG!
Die in nachstehender
Anleitung beschriebenen
Installations-, Wartungs- und
Belüftungsarbeiten müssen
von Fachpersonal unter
Beachtung der geltenden
Bestimmungen (UNI-CIG
7129 - 7131) ausgeführt
werden. Stellen Sie sicher,
dass die Küche gut belüftet
ist: Halten Sie natürliche
Belüftungsöffnungen von
mindestens 100 cm² offen
oder installieren Sie eine
mechanische Abzugshaube.
Je nach geltenden Bestimmungen kann
der Anschluss fest oder durch
Verwendung eines flexiblen
Edelstahlrohrs erfolgen. Bei Verwendung
flexibler Metallrohre muss darauf
geachtet werden, dass sie nicht mit
beweglichen Teilen in Kontakt kommen
oder eingeklemmt werden können. Wenn
das Kochfeld mit einem Backofen
installiert wird, muss ebenfalls vorsichtig
vorgegangen werden.
Achten Sie darauf, dass der
Gasdruck des Geräts den
empfohlenen Werten
entspricht.
Entspricht der gelieferte Druck nicht dem
angegebenen Wert, muss ein geeigneter
Druckregler gemäß der Norm UNI EN 88
installiert werden. Im Fall von Flüssiggas
(LPG) ist die Verwendung eines
Druckreglers nur erlaubt, wenn er der
Norm UNI EN 12864 entspricht. Das
verstellbare Anschlussstück wird an dem
Gasanschluss mit einer G 1/2"
Gewindemutter befestigt. Verschrauben
Sie die Teile ohne Kraftanwendung,
bringen Sie das Anschlussstück in die
benötigte Richtung und schrauben Sie
alle Teile fest.
Schaftende mit Mutter
A.
B. Mitgelieferte Beilagscheibe
C. Mitgelieferter Rohrbogen
Fester Anschluss:
Führen Sie den Anschluss mit festen
Metallrohren aus (Kupfer mit
mechanischem Endstück) (UNI-CIG
7129).
Flexibler Anschluss:
Verwenden Sie ein flexibles
Edelstahlrohr (UNI-CIG 9891) mit einer
maximalen Länge von 2 m.
WARNUNG!
Überprüfen Sie nach der
Installation, ob alle
Anschlussstücke dicht sind.
Verwenden Sie eine
Seifenlösung und keine
Flamme!
8.3 Austauschen der Düsen
1. Nehmen Sie die Topfträger ab.
2. Nehmen Sie Brennerdeckel und
Brennerkronen ab.
3. Entfernen Sie die Düsen mit einem
Steckschlüssel 7 und ersetzen Sie
sie durch für die verwendete Gasart
geeignete Düsen (siehe Tabelle im
Abschnitt „Technische Daten“).
4. Bringen Sie die Teile wieder an.
Führen Sie dazu die obigen Schritte
in umgekehrter Reihenfolge aus.
5. Ersetzen Sie das Typenschild (in der
Nähe der Gasversorgungsleitung)
durch das Typenschild für die neue
Gasart. Das Typenschild ist im
Beipack des Geräts enthalten.
Wenn der Gasdruck der Gasversorgung
schwankt oder nicht dem erforderlichen
Druckwert entspricht, muss ein
geeigneter Druckregler im Gaszufuhrrohr
montiert werden.
Page 51

A
A
DEUTSCH 51
8.4 Einstellen der niedrigsten
Stufe
So stellen Sie die niedrigste Stufe der
Brenner ein:
1. Zünden Sie den Brenner.
2. Drehen Sie den Knopf auf die
kleinste Flamme.
3. Ziehen Sie den Einstellknopf ab.
4. Stellen Sie mit einem kleinen
Schraubendreher die BypassSchraube (A) ein.
5. Bei Umstellung:
• von Erdgas G20 20 mbar auf
Flüssiggas, ziehen Sie die
Bypass-Schraube bis zum
Anschlag an.
• von Flüssiggas auf Erdgas G20
20 mbar, drehen Sie die BypassSchraube ca. 1/4 Umdrehung
zurück.
WARNUNG!
Vergewissern Sie sich, dass
die Flamme nicht erlischt,
wenn Sie den Einstellknopf
schnell von der höchsten zur
niedrigsten Stufe drehen.
8.5 Elektrischer Anschluss
• Vergewissern Sie sich, dass die
Netzspannung und -frequenz in Ihrer
Region mit den auf dem Typenschild
angegebenen Anschlusswerten
übereinstimmen.
• Das Gerät wird mit einem Netzkabel
geliefert. Dazu muss ein passender
Stecker verwendet werden, der für die
auf dem Typenschild angegebene
Gesamtstromaufnahme ausgelegt ist.
Achten Sie darauf, den Stecker in
eine passende Steckdose zu stecken.
• Schließen Sie das Gerät nur an eine
ordnungsgemäß installierte
Schutzkontaktsteckdose an.
• Stellen Sie sicher, dass der
Netzstecker nach der Montage noch
zugänglich ist.
• Ziehen Sie nicht am Netzkabel, wenn
Sie das Gerät von der
Stromversorgung trennen möchten.
Ziehen Sie stets am Netzstecker.
• Es besteht Brandgefahr, wenn das
Gerät mit einem Verlängerungskabel,
Adapter oder an eine
Mehrfachsteckdose angeschlossen
wird. Stellen Sie sicher, dass die
Erdverbindung den Normen und
Vorschriften entspricht.
• Das Netzkabel darf nicht heißer als 90
°C werden.
Um einen Kontakt des Kabels mit dem
Gerät unter dem Kochfeld zu vermeiden,
verwenden Sie die Haken auf den Seiten
des Gehäuses.
A. Festes Kupferrohr oder flexibles
Edelstahlrohr
8.6 Anschlusskabel
Ersetzen Sie das Anschlusskabel
ausschließlich durch das spezielle Kabel
oder ein gleichwertiges Kabel. Kabeltyp:
H05V2V2-FT90.
Vergewissern Sie sich, dass der
Kabelquerschnitt für die Spannung und
Betriebstemperatur geeignet ist. Der
gelb-grüne Erdleiter muss ca. 2 cm
länger als der braune (bzw. schwarze)
Phasenleiter sein.
Page 52
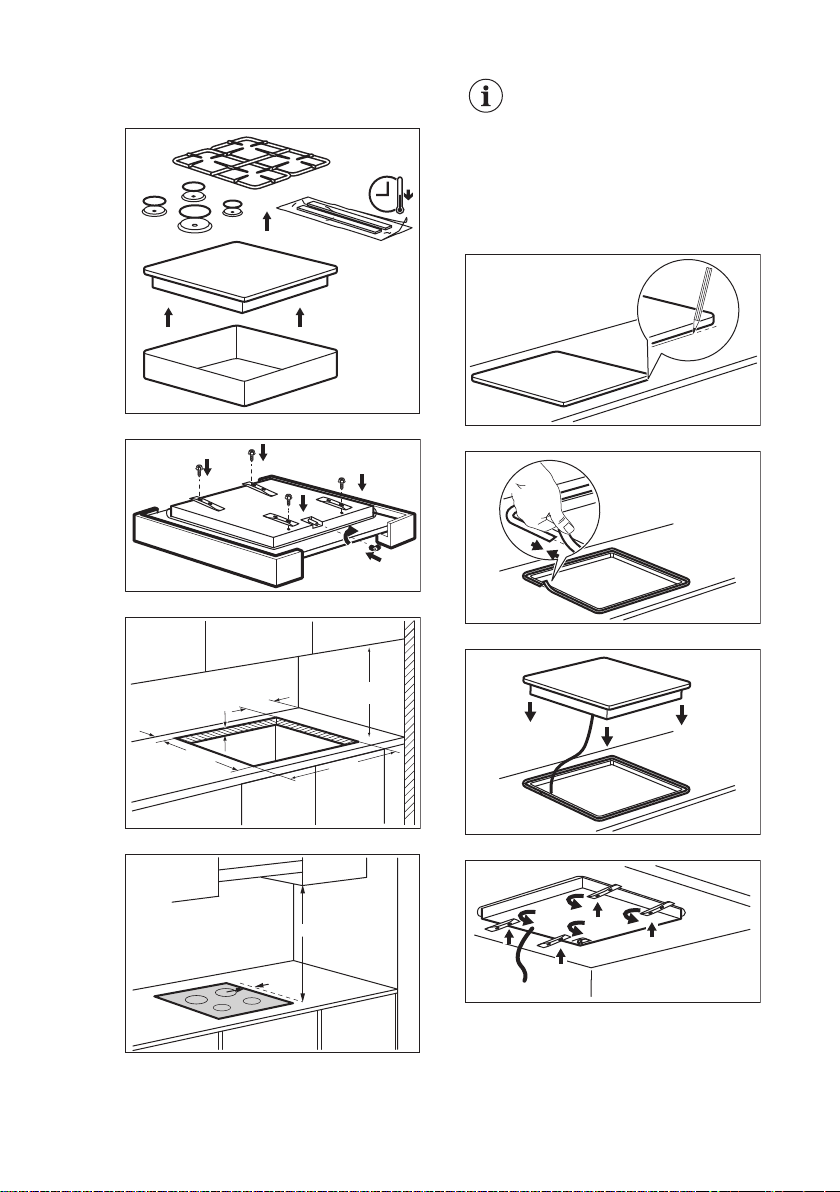
min. 55 mm
min. 650 mm
550 mm
min. 100 mm
30 mm
470 mm
50 mm
400 mm
www.electrolux.com52
8.7 Montage
1.
2.
3.
Befindet sich 400 mm
über dem Kochfeld ein
Einbaumöbel, muss ein
Sicherheitsabstand von
mindestens 50 mm links
oder rechts von der
Kochfeldkante
eingehalten werden.
5.
6.
7.
4.
8.
9.
Page 53

A
B
A) Mitgelieferte Dichtung
min 6 mm
min 30 mm
60 mm
b
a
min 5 mm
(max 150 mm)
B) Mitgelieferte Klammern
10.
11.
DEUTSCH 53
8.9 Einbaumöglichkeiten
Die unter dem Kochfeld eingebaute
Platte muss sich leicht entfernen lassen
und einen einfachen Zugang
ermöglichen, falls eine Reparatur
erforderlich wird.
Küchenschrank mit Tür
A. Entfernbare Platte
B. Raum für Anschlüsse
VORSICHT!
Montieren Sie das Gerät nur
in einer flachen
Arbeitsplatte.
Küchenschrank mit Backofen
Kochfeld und Backofen müssen aus
Sicherheitsgründen über separate
elektrische Anschlüsse verfügen. Der
Backofen muss sich leicht aus dem
Küchenschrank entfernen lassen.
8.8 Montage des Kochfelds unter der Dunstabzugshaube
Wird das Kochfeld unter
einer Abzugshaube montiert,
sehen Sie in der
Montageanleitung der
Abzugshaube nach, welcher
Mindestabstand zwischen
den Geräten eingehalten
werden muss.
Page 54

www.electrolux.com54
9. TECHNISCHE DATEN
9.1 Abmessungen des Kochfelds
Breite 580 mm
Tiefe 500 mm
9.2 Bypassdurchmesser
BRENNER Ø BYPASS 1/100 mm
Starkbrenner 42
Normalbrenner 32
Hilfsbrenner 28
9.3 Sonstige technische Daten
Gas - Original: G20 (2H) 20 mbar = 8 kW
GESAMTLEISTUNG:
Netzanschluss: 220-240 V ~ 50/60 Hz
Gerätekategorie: II2H3+
Gasanschluss: G 1/2"
Geräteklasse: 3
Gas - Ersatz: G30 (3+) 28-30 mbar = 567 g/Std.
G31 (3+) 37 mbar = 557 g/Std.
9.4 Gasbrenner für ERDGAS G20 20 mbar
BRENNER NORMALLEISTUNGkWMINDESTLEISTUNGkWINJEKTORMAR‐
Starkbrenner 3,0 0,75 119
Normalbrenner 2,0 0,45 96
Hilfsbrenner 1,0 0,33 70
KE
9.5 Gasbrenner für LPG G30/G31 28-30/37 mbar
BRENNER NORMAL‐
Starkbren‐
ner
LEISTUNG
kW
2,8 0,75 86 204 200
MINDEST‐
LEISTUNG
kW
INJEKTOR‐
MARKE
NENNGASDURCHFLUSS g/
Std.
G30 28-30
mbar
G31 37 mbar
Page 55

DEUTSCH 55
BRENNER NORMAL‐
Normal‐
brenner
Hilfsbrenner 1,0 0,33 50 73 71
LEISTUNG
kW
2,0 0,45 71 145 143
MINDEST‐
LEISTUNG
kW
10. ENERGIEEFFIZIENZ
10.1 Produktinformationen gemäß EU 66/2014
Modellidentifikation PBL64V;
Kochfeldtyp Einbau-Kochfeld
Anzahl der Gasbrenner 4
Energieeffizienz pro Gasbrenner
(EE gas burner)
Energieeffizienz für das Gas‐
kochfeld
(EE gas hob)
INJEKTOR‐
MARKE
Hinten links - Normalbrenner 59.1%
Hinten rechts – Normalbren‐
ner
Vorne links - Starkbrenner 59.3%
Vorne rechts – Hilfsbrenner nicht zutreffend
59.2%
NENNGASDURCHFLUSS g/
Std.
G30 28-30
mbar
G31 37 mbar
PNL64V;
PTL64V;
PXL64DV;
PXL64V
59.1%
EN 30-2-1: Haushalt-Kochgeräte für gasförmige Brennstoffe - Teil 2-1: Rationelle
Energienutzung - Allgemeines
10.2 Energie sparen
• Achten Sie vor dem Gebrauch darauf, dass die Brenner und Topfträger richtig
zusammengebaut sind.
• Verwenden Sie nur Kochgeschirr mit einem Durchmesser, der der Größe der
Brenner entspricht.
• Stellen Sie den Topf mittig auf den Brenner.
• Wenn Sie Wasser erwärmen, verwenden Sie nur die benötigte Menge.
• Decken Sie Kochgeschirr, wenn möglich, mit einem Deckel ab.
• Drehen Sie, sobald die Flüssigkeit zu kochen beginnt, die Flamme so weit zurück,
dass die Flüssigkeit nur leicht köchelt.
• Verwenden Sie nach Möglichkeit einen Dampfkochtopf. Beachten Sie seine
Bedienungsanleitung.
Page 56

www.electrolux.com56
11. UMWELTTIPPS
Recyceln Sie Materialien mit dem
Symbol . Entsorgen Sie die
Verpackung in den entsprechenden
Recyclingbehältern. Recyceln Sie zum
Umwelt- und Gesundheitsschutz
elektrische und elektronische Geräte.
Entsorgen Sie Geräte mit diesem Symbol
nicht mit dem Hausmüll. Bringen Sie
das Gerät zu Ihrer örtlichen
Sammelstelle oder wenden Sie sich an
Ihr Gemeindeamt.
*
Page 57

DEUTSCH 57
Page 58

www.electrolux.com58
Page 59

DEUTSCH 59
Page 60

www.electrolux.com/shop
867329932-B-182017
 Loading...