


Owner’s Manual
the D20
Revv Owner’s Manual - 1
INTRO
Congratulations and welcome to the Revv family! Thank you for trusting
Revv Amplification with such an important part of your musical endeavors.
Enjoy tone, durability, and ease of use designed to inspire.
Revv Owner’s Manual - 2

table of contents
1.0
1.1
2.0
3.0
4.0
4.1
5.0
5.1
6.0
7.0
8.0
intro
— safety instructions & warnings
— set up & power up
— front panel layout
— rear panel layout
— tubes & bias
— bias chart for D20
— MIDI
— CC Commands
— balanced out - XLR
— USB
— reactive load
warranty
— 2
— 4-6
— 7-8
— 9-11
— 12-14
— 15-16
— 16
— 17
— 18-19
— 20
— 21
— 22
— 24
Revv Owner’s Manual - 3

1.0
safety instructions & warnings
read before connecting
This product has been built by the manufacturer in accordance with IEC
62368-1 and left the factory in safe working order. To maintain this condition and ensure non-risk operation, the user must follow the advice and
warning comments found in the operating instructions. The unit conforms
to Protection Class 1 (protectively earthed). If this product shall be used in
vehicles, ships or aircraft or at altitudes exceeding 2000 m above sea
level, take care of the relevant safety regulations which may exceed the
IEC 62368-1 requirements.
Please read, understand and follow all safety instructions in this manual,
as well as those on the rear panel of the amplifier. These instructions and
warnings must be followed for your safety, and also to ensure that the amplifier will serve you for many years. Please use common sense when
operating, this is a professional instrument designed for electric guitar amplification, and should only be used with electric guitar signals.
• Do not store or operate the amplifier in
damp/wet areas.
• Do not keep items that contain liquid on
or near the amplifier
• Allow for 4-6 inches of space around
the unit when operating. This unit
produces heat and should be kept away
from flammable items/objects.
• Never obstruct the heat vent when the
unit is powered on.
• Be sure to connect to an AC power
supply that meets the power supply
specifications listed on the rear of the
unit.
• Do not use an AC power cord that is
damaged, has been pinched, or is missing prongs. Periodically inspect the
power cord for cuts or signs of stress
especially at the plug and at the point
the cord exits the device.
• Never use a damaged power cord.
• Do not expose the amplifier to high
temperature, keep away from radiators
or heat producing/supplying items.
Revv Owner’s Manual - 4
• This amplifier must be properly grounded to local standards when being operated. Do not use 2 pole extension or
power cords to supply power to this
amplifier

• Remove the AC power cord from the
amplifier when changing tubes, fuses or
when moving the amplifier. Always
replace fuses with the correct type and
rating.
• The AC power cord should be
removed from the outlet when left
unused for long periods or when there
is risk of electrical storms.
• To reduce the risk of electrical shock,
the grounding of this product must be
maintained. Use only the power supply
cord provided with this product, and
maintain the function of the center
(grounding) pin of the mains connection at any time. Do not defeat the safety
purpose of the polarized or grounding-type plug.
• Do not defeat the safety purpose of
the polarized or grounding-type plug. A
polarized plug has two blades with one
wider than the other. A grounding type
plug has two blades and a third grounding prong. The wide blade or the third
prong are provided for your safety. If the
provided plug does not fit into your
outlet, consult an electrician for
replacement of the obsolete outlet.
• No user serviceable parts inside, all
service should be done by qualified
personnel only. Do Not remove the
panels to gain entry to the inside of the
enclosure as high voltages will be present inside.
• Always make connections to the
amplifier with the power off.
• Never push objects of any kind into
this product through enclosure slots as
they may touch dangerous voltage
points or short out parts that could
result in risk of fire or electric shock .
• Your amplifier is designed to produce
high volume/sound pressure levels.
Long term exposure to these levels can
damage your hearing. Please use hearing protection when exposed to these
levels for extended periods to prevent
loss of hearing or hearing damage.
• Keep away from children.
The manufacturer only guarantees the safety, reliability and efficiency of this product if:
a) Assembly, extension, re-adjustment, modifications or repairs are carried out by the
manufacturer or by persons authorized to do so.
b) The electrical installation of the relevant area complies with the requirements of IEC
(ANSI) specifications.
c) The unit is used in accordance with the operating instructions.
d) The grounding of the center pin of the mains plug is maintained to reduce the risk of
shock.
Revv Owner’s Manual - 5

***This symbol, wherever it appears, alerts you to the presence of uninsulated dangerous voltage inside the enclosure – voltage that may be sufficient to
constitute a risk of shock.
***This symbol, wherever it appears, alerts you to important operating and
maintenance instructions in the accompanying literature. Read the manual.
***This symbol, wherever it appears, tells you: Take care! Hot surface! To
prevent burns you must not touch.
***All electrical and electronic products including batteries should be
disposed of separately from the municipal waste stream via designated
collection facilities appointed by the government or the local authorities.
Revv Owner’s Manual - 6

1.1
set up & power up
It is very important to place the amplifier in a dry location that provides
4-6” of space between the rear of the amplifier and anything in the area
that has been designated for the amplifier. Tubes produce heat, and anything flammable should be kept away. Verify that the heat vent is free from
obstruction so that the heat produced by the tubes can escape from the
interior of the amplifier.
Make sure that the power and standby switches are in the off (down)
positions. Connect the amplifier to a speaker cabinet using a good quality
speaker cable while making sure to use the correct speaker jack to support the speaker cabinet impedance. (If using the internal load, make sure
the load button on the rear is set accordingly) Next, connect the AC
power cord to the amplifier mains connector on the rear of the amplifier
and then to an AC outlet.
At this point, all other peripherals can be connected to the amplifier as
well including:
Note: A high-quality shielded instrument cable is recommended for guitar
input as well as FX loop connections to prevent unwanted noise.
• FX Loop
• Guitar and Shielded Cable
• MIDI
• XLR
• USB
• Revv Cabinet Lighting
• Headphones
Revv Owner’s Manual - 7

Once all your connections are made, move the power switch to the On
position and give the tubes at least one minute to warm up. Now is a great
time to begin setting all controls while we wait. We recommend setting
the master volume and gain controls to the lowest setting or zero (fully
counter clockwise) and all treble, mid and bass controls to the 12 o’clock
positions to begin. Set the standby switch to the Revv (up) position and
you are ready to begin exploring!
Note: Upon power up, you will have noticed that the logo lights up blue
and the clip LED illuminates. The clip LED will turn off after 2-3 seconds
post power up.
Revv Owner’s Manual - 8

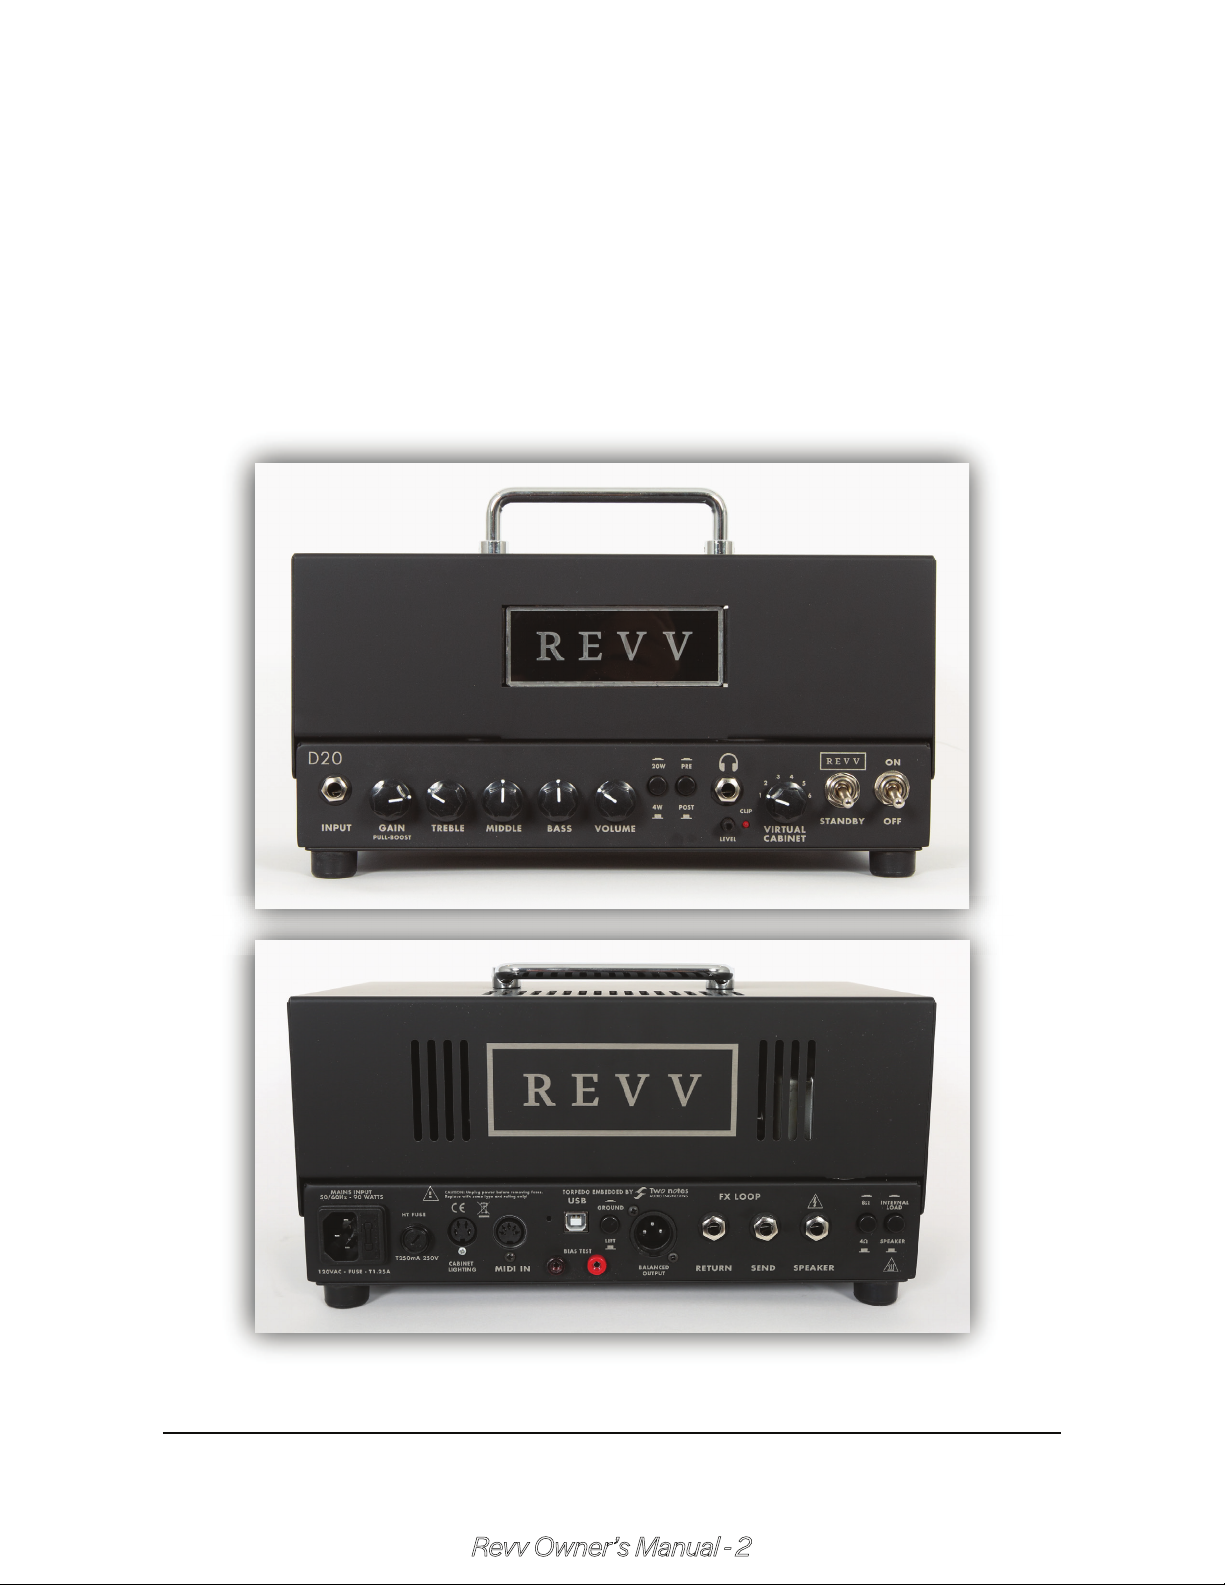
2.0
Front Panel Layout
Input - ¼” Instrument cable input.
Gain Control - The gain control will add body and drive to your signal. It is
a push/pull switch as well which when pulled out will give you a more
distorted tone. This will give you the ability to find many different sounds
and character in the range of the gain control.
NOTE: We suggest picking your favorite sounding position of the
push/pull gain control then dialing in the amount of gain to taste, as the
overall voicing is a bit different and both modes have a variety of cleaner
and crunchier tones available.
3 Band EQ - The Treble, Mid and Bass controls are passive controls and
are designed to offer a large range for different variations in both clean
and crunch tones. In conjunction with the gain control, the EQ controls
will provide some great tone!
Revv Owner’s Manual - 9

Volume Control - The volume control drives the power amplifier produc-
ing your speaker output volume, but it also provides signal to the Two
notes technology when the Pre/post switch is set to post. This will allow
you to control the volume from your speakers but also control the input
signal to the Two notes tech. This control is very versatile in the sense that
you can also drive the power amp into break up to get a heavier power
amp sound in both speaker and XLR/headphone output!
Note: Setting all the above controls (Gain, EQ, and Volume) in tandem will
result in powerful combinations as they are highly interactive. This is
useful not only to achieve a variety of different tones and the ability to
easily account for guitar/pickup changes, but also to allow you to find
your preferred “set and forget” tone that you can then effect with pedals,
your guitar’s volume knob, and playing dynamics.
Wattage Switch - This latching push button switch allows you to set the
power output of the amplifier to either 4 watts or 20 watts. 4 Watts has
considerably less headroom and as su ch can be used to really drive the
power section for a more broken up sound. 20 watts will produce more
headroom and more overall volume.
Pre/Post Switch - Because the embedded Two notes technology can
optionally provide virtual power amp simulation, you now have the ability
to choose different virtual tube types such as EL34s or 6L6s for your
power amp sound (when using the Two notes XLR out on the rear of the
amp).
The latching Pre/Post push switch will feed the embedded Two notes
Torpedo either an input signal from the Pre-amp or the power amp. “Pre”
is recommended when setting so as to not “stack” two power amps in
series. “Post” is always recommended in all other instances for optimal
tone and feel.
Revv Owner’s Manual - 10

Note: While you should not feel obligated to use this, this can be a powerful tool for advanced users looking to get a radically different sound out of
their D20 for example when recording or sending your signal direct to
front of house live.
Headphone Jack - The headphone jack on the D20 comes directly from
the Two notes output! This allows you to use the amplifier with any of the
selected virtual cabinet settings through your headphones. By utilizing
the built in reactive load, you can play the amp with no speaker using only
the headphone jack as the output for quiet playing and inspiring tone.
Headphone/XLR Output Trimpot - This trim pot, located under the headphone jack, controls the level of both the headphone jack and the XLR
connector on the rear of the amp.
Note: The power delivered by the headphones output is high enough to
remain efficient even when using high-impedance headphones. Therefore, it is possible to get very high audio levels with that output. We
strongly advise against the use of headphones with high audio levels. The
improper use of headphones can lead to irreversible damage to your
hearing.
Virtual Cabinet Switch - This 6 position selector switch will switch
through the first 6 positions of the Two notes virtual cabinet library saved
to your D20. You can change the virtual cabinets and all of their options
saved to each position by using Two notes Remote software, connected
via USB on the rear of the amplifier. Note that up to 128 can be saved via
MIDI.
Standby and Power Switch - First turn on the power switch and wait a
minute to allow the tubes to warm up. Turn on the standby switch to the
Revv position once you are ready to play.
Note: NEVER power up the amplifier without the proper speaker load
connected or reactive load switch engaged on the rear of the amplifier!
Revv Owner’s Manual - 11

3.0
Rear Panel Layout
Mains Power Connector - When plugging the amplifier into the mains A/C
wall receptacle, always make sure the amplifier power and standby
switches are in the off position. The Required voltage and fuse ratings are
marked on the amplifier underneath the mains input. Verify that they are
correct for your electrical mains supply before plugging it in.
The mains input is a 2 part assembly on the D20 , not only will it allow you
to plug the amplifier power cable into it, the main fuse is also a part of the
assembly. Should the fuse ever blow on the amplifier, you will find the fuse
in this assembly as well. There is also a spare fuse compartment built in so
you can keep a spare fuse with you. The fuse type is marked on the rear
of the amplifier.
HT Fuses - The HT fuse is in place to protect you and the amplifier from
overload conditions. Always replace them with the same type and rating
only! Always unplug the amplifier from the mains before replacing the
fuses. Fuse requirements are marked on the rear panel of the amplifier.
The HT fuse protects the High Voltage to the tubes from overloads.
Revv Owner’s Manual - 12

Cabinet Lighting - The cabinet lighting jack on the rear of the amplifier is
used to connect the D20 to Revv speaker cabinets. Because the Revv
badge on our cabinets lights up, you can illuminate the cab badge with
this jack. Simply use the 4 pin Din cable provided with all Revv cabinets
and connect the D20 to the cab lighting connector on the cabinet.
MIDI In - The MIDI In jack is used exclusively with the Two notes Torpedo
Embedded.
Note: The main purpose of this is not only saving more than 6 presets, but
also allowing on-the-fly changes of the virtual cabinet setting live. For
example, a guitarist with a MIDI/loop switcher choosing between “presets” during a set may want their clean tone to use a 2x10, their rhythm
tone to use a 2x12, their lead tone to have reverb, and so on and so forth.
USB Connector - The USB connector will connect your computer to the
D20 in order to use Two notes Remote software. Use the provided USB
cable to do so and edit the presets, create new ones from scratch, or
load your own third-party Impulse Responses!
Bias Test Jacks - The red and black test jacks on the amplifier will give you
the ability to check and set the bias of the 6V6 power tubes with a multimeter. So in the case you need to replace tubes, you can do it on the fly!
Balanced Output XLR and Ground Lift - The balanced output XLR jack is
a direct output from Two notes Torpedo Embedded. By connecting this
output to front of house or an audio interface you can capture D20’s tone
with no need for a cabinet or microphone! The ground lift switch will
defeat the ground on the D20 should you encounter ground noise from
other equipment you have connected.
Revv Owner’s Manual - 13

FX Loop Send and Return Jacks - The D20 features a high quality buffered FX loop, the send and return jacks connect to any pedals or effect
units you may want to use with the amplifier.
Let’s go through it step by step, just in case you have never used an
effects loop and don’t know how to hook it up.
The send jack will need to be connected to the input jack on your effects
unit. The output jack on the effects unit (or last pedal in your chain, if you
are connecting multiple effects in series in the loop) will then connect
back to the return jack on the amp.
Your effect is now part of the signal chain, verify that your levels are set
accordingly on the effect so you have a strong signal being sent to the
D20, then adjust the volume control on the D20 to your requirements.
Speaker Output jack - The D20 features one speaker output jack. This
output jack works in conjunction with the impedance selector push
button next to it and can support 4, 8 and 16 ohm cabinets. (See below)
Impedance Switch - The latching push button impedance switch will set
the impedance of the amplifier to match the cabinet that you plan to use
with it. The amplifier can support 4, 8 and 16 ohm cabinets.
If you want to use a 4 ohm cabinet, set the D20 to 4 ohms by making sure
the switch is “out.”
If you want to use an 8 ohm cabinet, set the D20 to 8 ohms by making sure
the switch is “in.”
If you want to use a 16 ohm cabinet, set the D20 so the switch is also “in.”
This is a “safe mismatch” which will not injure the D20. (See below)
Revv Owner’s Manual - 14

4.0
Tubes & Bias
Power Tubes - The Revv D20 has been designed to use 6V6GT power
tubes in the power section, and it is recommended that Revv 6V6GT
power tubes be used whenever replacement is necessary for optimal performance.
Preamp Tubes - The D20 amplifier uses 12AX7 preamp tubes in tube
positions V1 and V2 positions. Preamp tubes do not need to be biased
and usually have a long life, unlike power tubes. However it is possible for a
preamp tube to become faulty at any stage of its rated lifespan.
Power Tube Bias - The power tubes can be biased without opening the
chassis. You will need a digital multimeter set to the lowest DC voltage
range. (Make sure you refer to the meter’s user manual and are familiar
with the meter - not all meters are capable of reading such a small signal.)
Note: Use tubes that are matched! It is recommended that a matched
Revv brand pair of 6V6GT tubes be used when replacing the power
tubes.
Note: While the bias setting of the power tubes has been made user
friendly, we do not expect everyone to be experienced enough to perform the procedure and we strongly recommend that the procedure be
completed by an experienced technician to prevent damage to the amplifier or power tubes.
Revv Owner’s Manual - 15

Procedure:
1) If you are simply checking the bias, use your multimeter in the bias test
points to verify that the tubes are at the recommended bias setting. If the
bias setting needs to be adjusted or new tubes were installed, remove
the D20 top lid to access the tubes and bias control trimmer.
2) If you are changing tubes, change them now, make sure that the power
cable is unplugged from the amplifier.
3) Once the tubes are replaced, or you are ready to adjust the bias. Plug
the amplifier back into the mains and turn on the power switch. Make
sure the D20 is connected to a speaker or the reactive load switch is set
to internal load. Let the amplifier warm up for a minute then turn on the
standby switch.
4.1
4) Wait another 3 minutes to let the tubes warm up further. Make sure
your multimeter is connected to the bias test points on the amp. Now,
using the bias adjustment trimmer (located in the small hole inbetween
the power tubes) turn the trimmer until the required reading is visible on
the multimeter.
5) Once the bias is set as recommended, turn the power off on the D20.
Wait until the tubes are cooled off (approx 10 minutes), then put the top
lid back on the D20, fastening all 4 screws securely.
BIAS CHART for D20
Type 6V6GT
Recommended set point 50mV
Revv Owner’s Manual - 16

5.0
MIDI
The D20 amplifier is equipped with MIDI for control of the embedded Two
notes Torpedo.
Program Change - Each preset on the D20 has a single program number.
Preset 001 is recalled with MIDI PC 1, and you can recall the 128 virtual
cab presets with MIDI PC 1 through MIDI PC 128 in this manner.
Control Change - For very specific uses Control Change signals may be
appropriate. We recommend starting with PC signals (virtual cabinet
preset recall) for the D20 then only moving on to CC signals for very specific and advanced situations.
Revv Owner’s Manual - 17

5.1
MIDI CC Commands
The following table indicates the Control Change numbers for every parameter, as well as
their range and behavior. This table is valid for firmware version 4.
Parameter CC# Range Behavior
Simulation & IR Loader modes
Power Amp
On/Off 0 0-1 0 = Off ; 1 = On
Model 1 0-7 0 = Model #0 ; 1 = Model #1…
Volume 2 0-30 0 = 0dB ; 30 = 30dB
Presence 3 0-127 0 = 0% ; 63 = 50% ; 127 = 100%
Depth 4 0-127 0 = 0% ; 63 = 50% ; 127 = 100%
Type 5 0-1 0 = Triode : 1 = Pentode
Miking
On/Off 6 0-1 0 = Off ; 1 = On
Cab 8 0-x 0 = Cab #0 ; 1 = Cab #1…
File A 9 0-x 0 = File #0 ; 1 = File #1…
File B 10 0-x 0 = File #0 ; 1 = File #1…
Folder A 11 0-3 0= User 0 ; 1= User1; 2 = User 2 ; 3 = User 3
Folder B 12 0-3 0= User 0 ; 1= User1; 2 = User 2 ; 3 = User 3
Mic A 13 0-7 0 = Mic #1 ; 1 = Mic #1…
Distance A 14 0-127 0 = 0% ; 63 = 50% ; 127 = 100%
Center A 15 0-127 0 = 0% ; 63 = 50% ; 127 = 100%
Position A 16 0-1 0 = Back : 1 = Front
Level A 35 0-107 0 = -95dB ; 95 = 0dB ; 107 = 12dB
Phase A 36 0-1 0 = Normal ; 1 = Invert
Mute A 37 0-1 0 = Off (no mute) ; 1 = On (mute)
Mic B 38 0-7 0 = Mic #1 ; 1 = Mic #1…
Distance B 39 0-127 0 = 0% ; 63 = 50% ; 127 = 100%
Center B 40 0-127 0 = 0% ; 63 = 50% ; 127 = 100%
Position B 41 0-1 0 = Back : 1 = Front
Level B 42 0-107 0 = -95dB ; 95 = 0dB ; 107 = 12dB
Phase B 43 0-1 0 = Normal ; 1 = Invert
Mute B 44 0-1 0 = Off (no mute) ; 1 = On (mute)
Revv Owner’s Manual - 18

EQ
On/Off 17 0-1 0 = Off ; 1 = On
Mode 18 0-2 0 = Guitar : 1 = Bass ; 2 = Custom
Gain: Low 19 0-40 0 = -20dB ; 20 = 0dB ; 40 = 20dB
Gain: Low Mid 20 0-40 0 = -20dB ; 20 = 0dB ; 40 = 20dB
Gain: Mid 21 0-40 0 = -20dB ; 20 = 0dB ; 40 = 20dB
Gain: High Mid 22 0-40 0 = -20dB ; 20 = 0dB ; 40 = 20dB
Gain: High 23 0-40 0 = -20dB ; 20 = 0dB ; 40 = 20dB
Freq: Low Cut 45 0-127 Specific mapping to Hz
Freq: Low 46 0-127 Specific mapping to Hz
Freq: Low Mid 47 0-127 Specific mapping to Hz
Freq: Mid 48 0-127 Specific mapping to Hz
Freq: High Mid 49 0-127 Specific mapping to Hz
Freq: High 50 0-127 Specific mapping to Hz
Level
Preset Level 24 0-95 0 = -95dB ; 95 = 0dB
Reverb
On/Off 25 0-1 0 = Off ; 1 = On
Room 26 0-7 0 = Room #0 ; 1 = Room #1…
Dry/Wet 27 0-127 0 = 0% ; 63 = 50% ; 127 = 100%
Arcade mode
Cab 8 0-x 0 = Cab #0 ; 1 = Cab #1…
Mic 13 0-7 0 = Mic #1 ; 1 = Mic #1…
Room 26 0-7 0 = Room #0 ; 1 = Room #1…
Power Amp 29 0-30 0 = Off ; 1 = min ; 30 = max
Distance 30 0-44 0 = min ; 44 = max
Tone 31 0-44 0 = min ; 44 = max
Contour 32 0-40 0 = min ; 40 = max
Preset Level 33 0-107 0 = -95dB ; 95 = 0dB ; 107 = 12dB
General
Preset mode 34 0-2 0 = Simulation ; 1 = Arcade ; 2 = IR Loader
Out Level 51 0-107 0 = -95dB ; 95 = 0dB ; 107 = 12dB
Mute 52 0-1 0 = Off (no mute) ; 1 = On (mute)
Preset 54 0-127 0 = Preset #1 ; 1 = Preset #2…
Revv Owner’s Manual - 19

6.0
Balanced Out - XLR
The balanced out XLR connector on the rear of the amplifier is a direct
output from the embedded Two notes Torpedo and not direct from the
tube amplifier output itself. The purpose of this output is to be used with
audio interfaces to exclude the use of an actual speaker cabinet, using
virtual cabinets instead.
Note: The reverb or other effects that the Two notes Torpedo provides
will only be available through the output at the headphone or XLR jack
and not a real cabinet. The speaker output will always behave normally.
As an added bonus, some users will find this useful for “wet/dry” setups in
which they send a signal that utilizes reverb to front of house, while playing
through a dry cabinet.
In order to run the output of the D20 to an audio interface, connect the
D20 to the audio interface with an XLR cable. Set the amplifier up the way
you intend to play, (EQ, volume) and then adjust the output of the balanced out with the small trimmer on the front of the amplifier. You will want
to turn the level up until the clip LED illuminates and then back it off, or
adjust it to the parameters of the audio interface.
The Ground Lift switch should be set to ground (pushed in) for best
results. However, if this produces a buzz or hum because of ground loops
between the D20 and the audio interface, press the ground lift switch to
eliminate noise.
Revv Owner’s Manual - 20

7.0
USB
The D20 can be connected to Two notes Remote software in order to
manipulate all available settings and change the presets found on the
front knob of the amplifier. This is via the USB port.
You can find the Remote Software for the D20 here:
https://www.two-notes.com/downloads
Once you connect your D20 to the computer using the provided USB
cable, your computer will start recognizing the D20. This may take a
couple of minutes. Once this is complete, simply open the Remote Software and the D20 will connect.
Once connected, you can tweak all available Torpedo Embedded settings to your preferences!
Note: If you are new to studio practices such as mic placement, the difference in tonalities between different speakers, and more - Two notes has a
wealth of resources available throughout their channels to get you started. Of course, the presets are the best start in this situation!
Revv Owner’s Manual - 21

8.0
Reactive Load
The D20 comes with a built in reactive load to allow you to play without
the need for a speaker cabinet. On the rear of the amplifier there is an
internal load/speaker switch to switch between the speaker cabinet and
the reactive load. Depending on what you need, you can switch between
the two on the fly.
The speaker cabinet does not have to be unplugged when switching to
the reactive load, the switch will bypass the speaker cab and only use the
reactive load or vice versa! So you have full control by simply using the
switch.
Note: If you forget to plug in a speaker cab and run the amplifier without a
speaker cab fear not! The D20 automatically uses the reactive load if
there is no speaker plugged into the amplifier. But be aware, if there is a
cable plugged into the speaker jack on the D20 but no speaker cab
plugged into the other end of the cable, this will cause damage unless
the reactive load is engaged by using the internal load switch!
Revv Owner’s Manual - 22

For USA: This device complies with part 15 of the FCC Rules. Operation is
subject to the following two conditions: (1) This device may not cause
harmful interference, and (2) This device must accept any interference
received, including interference that may cause undesired operation.
This equipment complies with FCC radiation exposure limits set forth for
an uncontrolled environment. End users must follow the specific operating instructions for satisfying RF exposure compliance. This transmitter
meets both portable and mobile limits as demonstrated in the RF Exposure Analysis. This transmitter must not be co-located or operating in conjunction with any other antenna or transmitter except in accordance with
FCC multi-transmitter product procedures.
For Canada: This device complies with Industry Canada licence-exempt
RSS standard(s). Operation is subject to the following two conditions: (1)
this device may not cause interference, and (2) this device must accept
any interference, including interference that may cause undesired operation of the device. Under Industry Canada regulations, this radio transmitter may only operate using an antenna of a type and maximum (or lesser)
gain approved for the transmitter by Industry Canada. To reduce potential
radio interference to other users, the antenna type and its gain should be
so chosen that the equivalent isotropically radiated power (e.i.r.p.) is not
more than that necessary for successful communication.
Revv Owner’s Manual - 23

WARRANTY
This Revv Amplification Inc. product is warrantied against manufacturing
defects in material and workmanship for a period of five (5) years from the
date of purchase to the original owner. Tubes and fuses however will be
warranted for ninety (90) days from date of purchase of the product to
the original owner and speakers will be warranted for one [1] year. The
warranty starts on the date of receipt by the original owner. This warranty
is subject to the exclusions and obligations listed below.
Exclusions
Product that has been altered or are missing serial numbers will not be
covered. Items that were damaged while being shipped to or from Revv
Amplification Inc. will not be covered by this warranty. This warranty shall
not apply to repair or replacements necessitated by any cause beyond
the control of Revv Amplification Inc. including, but not limited to, any malfunction, defects, or failure caused by or resulting from unauthorized service or parts, damaged or broken tubes, improper maintenance, incorrect
line voltages, liquid damages, modification or repair by the user, misuse,
abuse, accident, neglect, or fire. Revv Amplification inc. does not authorize
any party to assume for it any other obligation or liability. In no event shall
Revv Amplification Inc. be liable for any damages arising from the use of
this product, or for any delay in the performance of this warranty due to
causes beyond our control.
Obligations
This warranty will be honored with original proof of purchase to the original owner only. Warranty work must be authorized by Revv Amplification
inc. in advance. All freight and duty (If applicable) is to be pre paid to and
from Revv Amplification inc. of all products that require and have been
approved for warranty work. Revv Amplification inc. is not liable for any
freight and or duty (if applicable) charges.
Revv Owner’s Manual - 24

Box 29 Ile De Chenes, MB Canada, R0A 0T0
info@revvamplification.com
http://www.revvamplification.com
Copyright Revv Amplification Inc. 2019
 Loading...