

Page 1
X
48,&.67$57*8,'(
FCC STATEMENT
This device complies with part 15 of the FCC Rules. Operation is subject
to the following two conditions:
(1) This device may not cause harmful interfe
(2) this device must accept any interference received, including
interference that may cause undesired operation.
This equipment has been tested and found to comply with the limits
for a Class B digital device, pursuant to Part 15 of the FCC Rules. These
limits are designed to provide reasonable protection against harmful
interference in a residential installation. This equipment generates, uses
and can radiate radio frequency energy and, if not installed and used
in accordance with the instructions, may cause harmful interference
to radio communications. However, there is no guarantee that
interference will not occur in a particular installation. If this equipment
does cause harmful interference to radio or television reception, which
can be determined by turning the equipment o and on, the user is
encouraged to try to correct the inter ference by one or more of the
following measures:
»
Reorient or relocate the receiving antenna.
»
Increase the separation between the equipment and receiver.
»
Connect the equipment into an outlet on a circuit dierent from that
to which the receiver is connected.
»
Consult the dealer or an experienc
Changes or modications not expressly approved by the party
responsible for compliance could void the user’s authority to operate
the equipment.
:
4
ed radio/TV technician for help.
K
rence, and
%
&
'
(
$
.
-
,
)
+
/
0
2
1
*
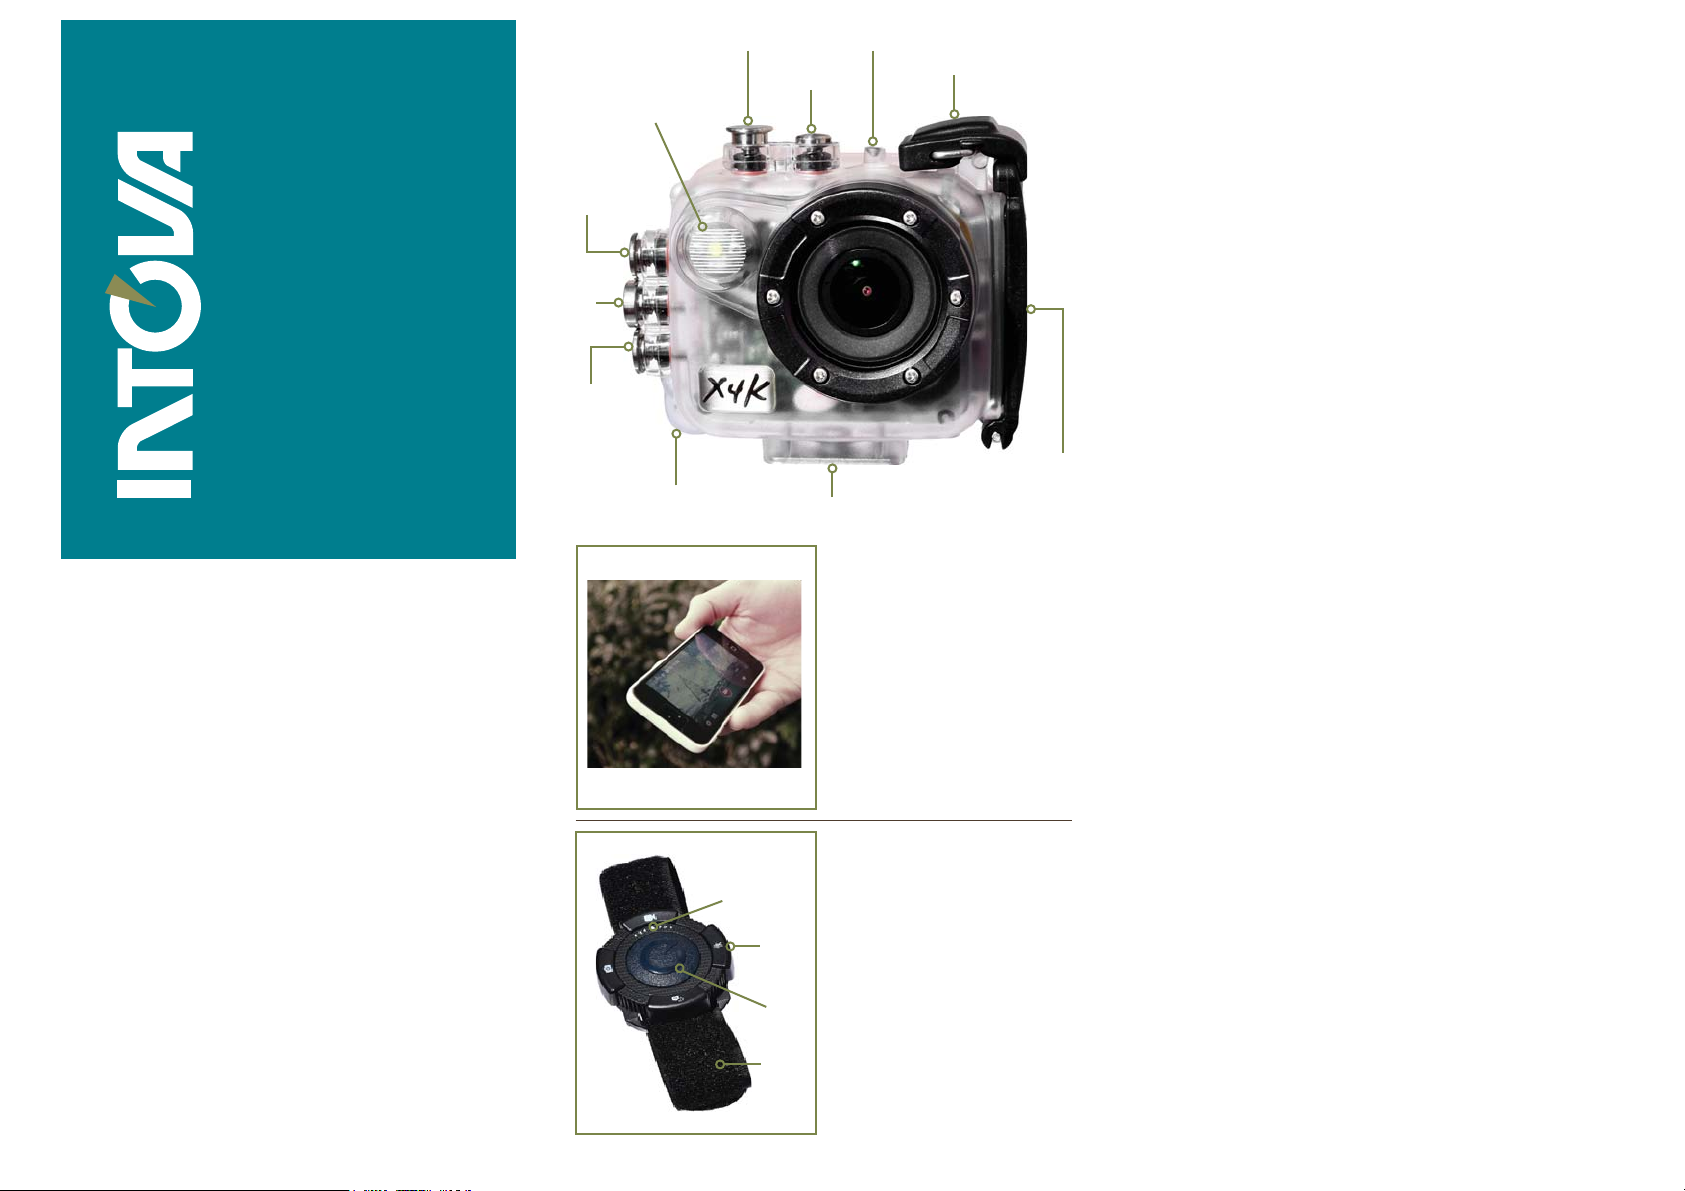
WIFI REMOTE FUNCTION
(For use above water/on land only)
1. Download & install INTOVA WiFi app
onto an iOS or Android wireless device
such as a smart phone or tablet.
2. Turn on camera’s WiFi by pressing
and holding MENU button for 2 sec
until “X” disappears from WiFi icon
on lower left corner of LCD screen.
3. Connect to X4K camera
WiFi signal: INTOVA X4K
Password: 1234567890
4. Open INTOVA WiFi app to
control camera.
2.4G REMOTE
(For use above water/on land only)
L. Selected mode indicator
» Align mode icon to select.
M. Mode selector ring
Turn ring to select video/photo/
»
time lapse/slow motion modes .
N. Remote “shutter” button
» Press to start/stop video, take photo.
O. Adjustable Velcro strap
» Attach remote to wrist or arm.
The 2.4G remote is not waterproof.
Damage due to use underwater or
exposure to water is not covered
under warranty.
For complete instructions on WiFi
or 2.4G remote go to www.intova.com
BUTTONS AND INTERFACE
A. LED Video Light/Flash
B. Shutter Button
» Video mode: start/stop
recording.
» Photo mode: shutter button.
»
View mode: enter Playback menu
1) set Video Play mode
2) select single/all le delete
»
Video Light/Flash on/o
(press & hold 2 seconds).
C. Power/Mode Button
» Power the camera on/o
(press & hold 2 seconds).
» Select Video/Photo/View mode
(quick press).
»
View mode: view thumbnails,
return to thumbnail view, exit
view mode/go to video mode.
» Video/Photo Menus: exit menus/
menu functions/function choices.
» Playback menu: exit menu and
return to view mode.
D. Indicator Light
» Red LED is ON while charging
and OFF when charge is complete.
SPECIFICATIONS AND PRECAUTIONS
»
A microSD card up to 128GB in size and minimum 95MB/s speed must be
properly inserted into the X4K camera’s card port before use.
»
If using a microSD card that was previously used in a dierent digital
device, FORMAT memory card in a computer prior to use since previously
existing les on a memory card may cause camera to malfunction.
»
Use supplied mini USB cable plugged into a computer’s USB port to
recharging camera’s li-ion battery. If using a USB wall plug adapter, the
USB output must be 5V DC and 1A. Using a dierent output voltage can
cause damage to the camera and is not covered under warranty.
If camera is not used for a prolonged period of time, the li-ion battery
»
must be recharged periodically to maintain operating ability. Allowing
total discharge of the battery may cause it to become non-functional
and is not covered under warranty.
O-ring on waterproof door must be properly maintained by inspecting
»
and removing any dirt, sand, hair, debris, etc. before and after use.
Apply minimal amount of silicone grease to O-ring only when necessary.
Too much silicone grease applied at one time or a build up of excess
silicone grease can lead to leakage and is not covered under warranty.
Do not leave or store the camera in direct sunlight. Prolonged exposure to
»
direct sunlight can damage the camera and is not covered under warranty.
»
Do not aim camera directly into the sun for a prolonged period since this
can damage the image sensor and is not covered under warranty.
Store in a cool, dr y environment.
»
»
Clean with a sof t dry cloth and take special care around lens.
LIMITED WARRANTY
This product has a limited 1 year warranty, to the original purchaser, to be free
from defects in materials and workmanship. Follow all product instructions
and warnings as warranty does not cover damage due to misuse, improper
care, accidents, or alterations. See www.intova.com for further details.
»
Flashes red when video recording
is in progress.
»
Flashes blue when remote control
function is activated.
E. Door Lock
F. Removable Housing Door
G. Tripod
H. Float Strap Attachment
I. Down Button
»
J. Menu/OK Button
K. Up Button
» Video/photo mode: Digital zoom in.
Mount
»Scroll to select: menu/menu
function/function choice/thumbnail.
Video/photo mode: Digital zoom out.
»Video playback: speed up video
playback.
»One touch LCD o/on.
» Access Menu.
»Select.
» One touch WiFi on/o.
(press & hold 2 seconds)
» Playback mode: start/stop video.
» Scroll to select: menu/menu
function/function choice/thumbnail.
» Video playback: slow down video
playback.
Page 2
QUICK START GUIDE
X
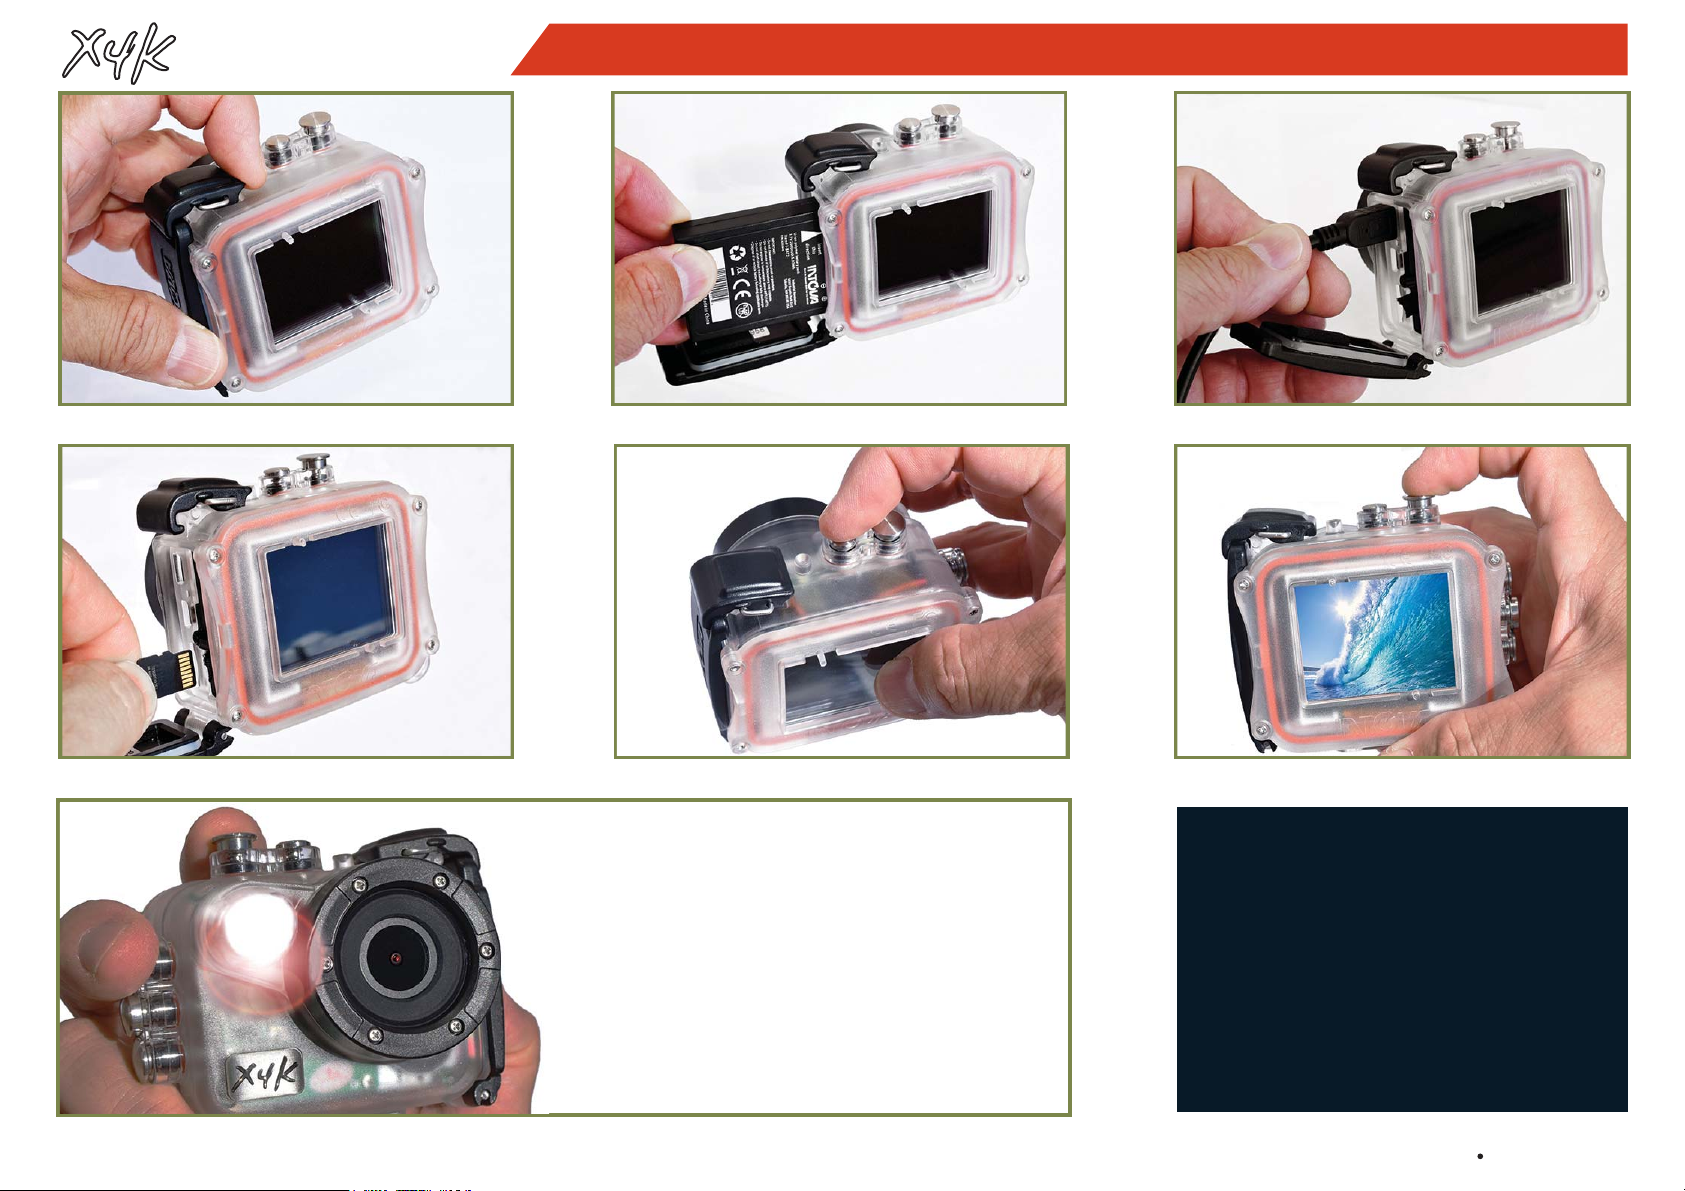
1. OPEN THE HOUSING DOOR 2. INSERT LI-ION BATTERY 3. CHARGE BATTERY
4
K
For complete instructions go to www.intova.com
4. INSERT MICRO SD CARD 5. POWER ON (press and hold 2 seconds) 6. PRESS SHUTTER TO SHOOT/RECORD
7. VIDEO LIGHT OR FLASH
* To activate LED video light: in video mode press
and hold shutter button for 2 seconds until light
bulb icon appears.
»
Video light will turn on when starting to record
and turns o when recording is stopped.
* To activate LED photo ash: in photo mode press
and hold shutter button for 2 seconds until light
bulb icon appears.
»
Photo ash will go o when taking a photo.
Note: Flash will only sync in extremely low light
to no light conditions.
Need help using your camera?
:(5(+(5()25<28
Visit our website:
ZZZLQWRYDFRP
Email customer support:
WHFK#LQWRYDQHW
Call customer support:
INDUSTRIAL REVOLUTION, INC.
SEATTLE, WA (888) 297-6062
 Loading...