

Page 1
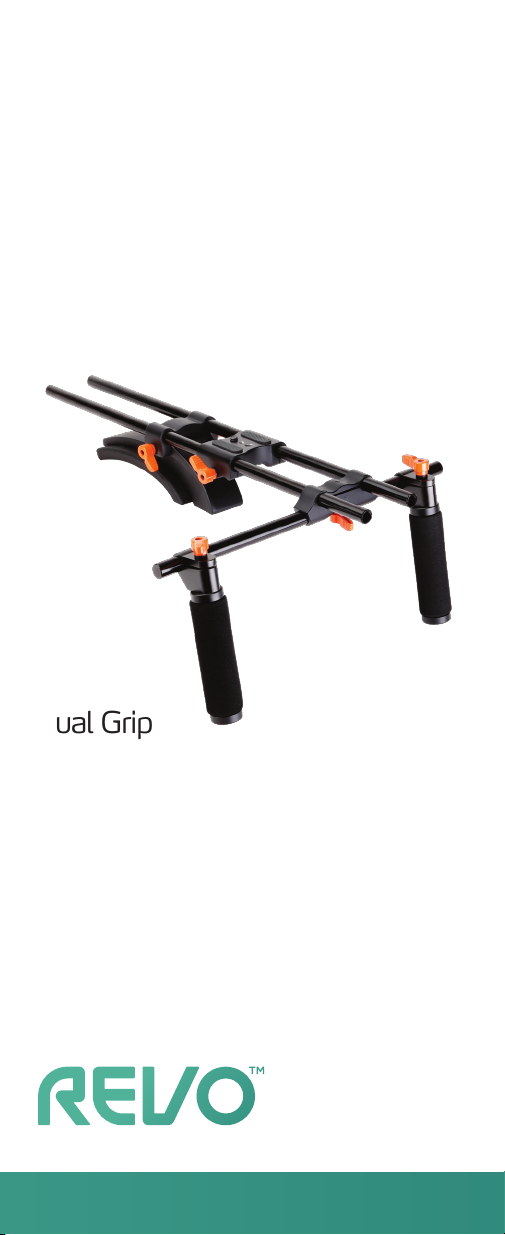
SR-1500
Dual Grip
Shoulder
Support Rig
Page 2
Thank you for choosing Revo and congratulations
on your purchase of the Revo SR-1500 Dual Grip
Shoulder Support Rig
The Revo Dual Grip Shoulder Support stabilizes your
DSLR camera, prevents rotation and reduces fatigue
so you can keep your camera steady while shooting
video—eliminating distracting camera movement for
smoother, more professional-looking movies.
Heavy-duty aluminum construction, padded dual
grips, an adjustable camera mounting plate, and a
padded shoulder support combine to make the
SR-1500 a comfortable rig, which results in better
images. The universal 15mm rail system is
compatible with a wide variety of accessories such
as a follow-focus, monitor, lights, etc. The SR-1500
can support up to 30 pounds of gear, including your
camera and accessories. It's lightweight, portable,
easy to use, and easy to assemble.
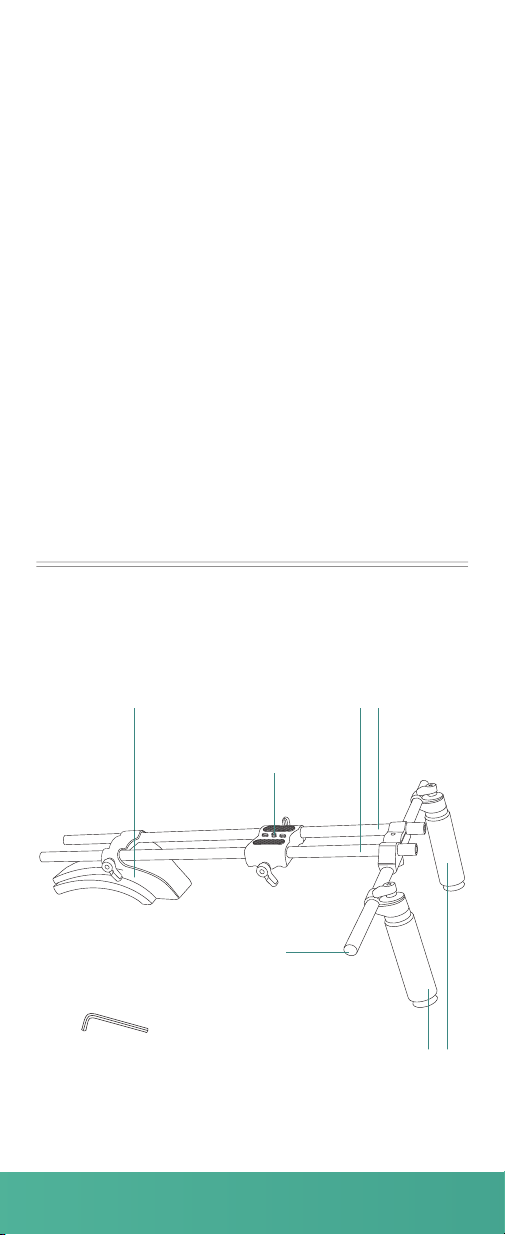
Overview
Shoulder pad
Fixed front bracket
Rails
3/8″ and 1/4″ screws
Padded hand gripsAllen wrench
Page 3
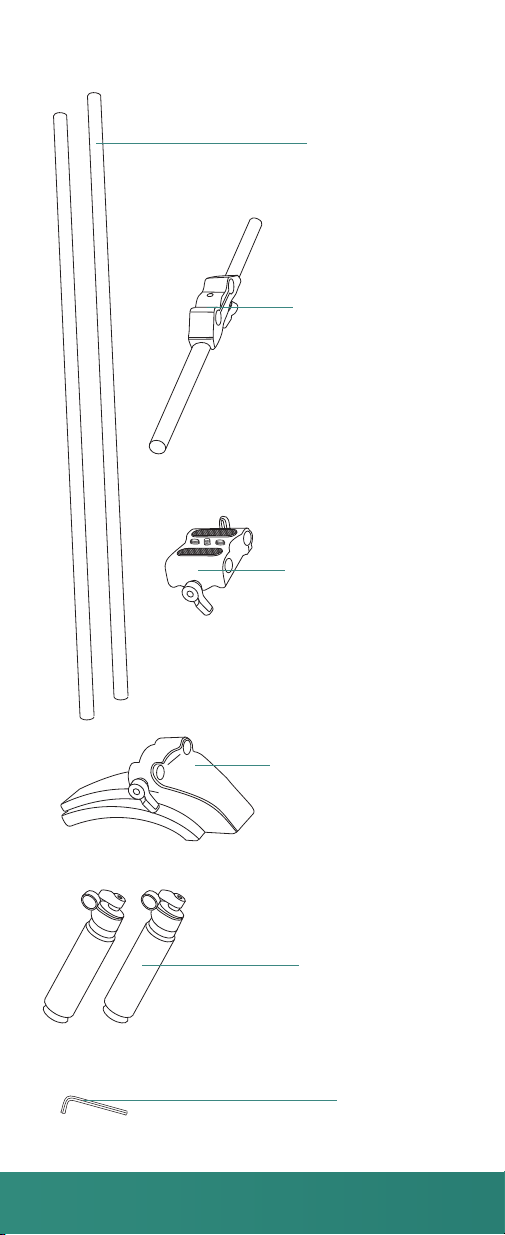
Components
Two 15mm rails
Front fixed bracket
Adjustable camera
mounting plate
Padded shoulder pad
Two padded grips
Allen wrench
Page 4

Instructions
The SR-1500 Dual Grip Shoulder Support Rig gives
you a stable platform to support your DSLR camera
when shooting video. Dual heavy-duty aluminum
rails hold a shoulder pad, camera mounting plate
and fixed front bracket with dual padded hand grips
that allow you to hold your camera steady for long
periods of time. The position of the shoulder pad and
the camera mounting plate are adjustable for
comfort and stability.
Assembling the Rig
Slide the camera mounting plate onto the two
1
rails and slide it to a point near the middle of the
rails. Tighten the orange thumb-screws just
enough so the plate can't easily move.
Slide the shoulder pad onto the rails near one end
2
of the rails (the Revo logo on the shoulder pad
should be on the side towards the f
tighten the orange thumb-screws just enough so
the pad can't slide.
At the opposite end of the rails from the shoulder
3
pad, slide the fixed front bracket onto the end of
the rails with approximately one inch of the rails
extending past the bracket. The longer portion of
the bracket rail should be on the "outside"--for a
right-handed person using the rig, the longer
portion of the bracket rail should be on the right
side of the rig. For a left-handed person, the
longer portion of the rail would be on the left side
of the rig. Tighten the orange thumb-screw
securely.
ront) and
Page 5

Slide one hand grip onto the front bracket from
4
each end, and adjust the position of the grips.
When they're positioned correctly for you, tighten
the orange thumb-screws.
Using the Rig
With the camera mounting plate, shoulder pad,
1
and dual grips assembled, place the rig on your
shoulder. Slide the shoulder pad until it's in a
comfortable position in relationship to the dual
grips. When the shoulder pad is in position,
tighten the orange thumb-screw securely to lock
it in place.
Page 6

Place the camera on the camera mounting plate,
2
using the 1/4" or 3/8" screw. Be careful to
maintain balance so the rig doesn't fall over.
Withdraw the other two camera mounting screws
enough so the camera will sit flat on the camera
mounting plate. Tighten the camera mounting
screw securely. An Allen wrench is supplied for
tightening the camera mounting screw.
Slide the camera mounting plate with the
3
camera on it on the rails until the camera is in the
position you desire. Tighten the orange
thumb-screw securely.
Note: When the SR-1500 is not in use, be sure to
remove the camera from the mounting plate.
Page 7

Warnings
• Please read and follow these instructions, and
keep this manual in a safe place.
• Handle the unit with care.
• Clean the unit with a soft, dry cloth.
• Use only parts provided by the manufacturer.
• Make sure everything is secure before proceeding.
• Make sure the item is intact and that there are no
missing parts.
• Do not exceed the maximum load capacity.
• All photos are for illustrative purposes only.
Recommended Accessories
• CW-SR1500 4.1 lb Counter Weight
Visit our website at www.revocinegear.com for more
Revo accessories.
Specifications
• Load capacity: 30 lb. (13 kg)
• Dimensions: (H×W×L) 6.5 × 5.1 × 11.75
(16.5 × 13 × 29.8 cm)
• Weight: 1.82 lb. (826 g)
Page 8

One-year Limited Warranty
Revo provides a limited warranty to the original
purchaser that this product is free from defects in
materials and workmanship under normal consumer
use for a period of one (1) year from the original
purchase date or thirty (30) days after replacement,
whichever occurs later. Revo’s responsibility with
respect to this limited warranty shall be limited
solely to repair or replacement, at Revo’s discretion,
of any product that fails during normal consumer
use. Inoperability of the product or part(s) shall be
determined by Revo. If the product has been discontinued, we reserve the right to replace it with a
model of equivalent quality and function.
To obtain warranty coverage, contact Revo to obtain
a return merchandise authorization (“RMA”) number,
and return the defective product to Revo, along with
the RMA number and proof of purchase. Shipment
of the defective product is at the purchaser’s own
risk.
This warranty does not cover damage or defect
caused by misuse, neglect, accident, alteration,
abuse, improper installation or maintenance.
EXCEPT AS PROVIDED HEREIN, REVO MAKES
NEITHER ANY EXPRESS WARRANTIES NOR ANY
IMPLIED WARRANTIES, INCLUDING BUT NOT
LIMITED TO ANY IMPLIED WARRANTY OF MERCHANTABILITY OR FITNESS FOR A PARTICULAR
PURPOSE. This warranty provides you with specific
legal rights, and you may also have additional rights
that vary from state to state.
TM
REVO
A Gradus Group Brand
© Copyright 2013 Gradus Group
www.RevoCinema.com
 Loading...