

Page 1
RM185-ID1 LCD Monitor
TFT LCD MONITOR
User's Manual
Page 2

FCC STATEMENT
This equipment has been tested and found to comply with the limits for a Class B
digital device pursuant to part 15 of the FCC Rules. These limits are designed to
provide reasonable protection against harmful interference in a residential installation.
This equipment generates, uses, and can radiate radio frequency energy and if not
installed and used in accordance with the instructions, may cause harmful interference
to radio communications. However, there is no guarantee that interference will not occur
in a particular installation. If this equipment does cause harmful interference to radio or
television reception, which can be determined by turning the equipment off and on, the
user is encouraged to try to correct the interference by one or more of the following
measures:
• Reorient or relocate the receiving antenna.
• Increase the separation between the equipment and receiver.
• Connect the equipment into an outlet on a circuit different from that to which the
receiver is connected.
• Consult the dealer or an experienced radio/TV technician for help.
• Only shielded interface cable should be used.
Finally, any changes or modifications to the equipment by the user not expressly
approved by the grantee or manufacturer could void the user’s authority to operate
such equipment
Page 3

● Table of Contents
1
1. Important safety instruction ------------------------------------------------- 2
2. Product feature ------------------------------------------------------------------- 3
3. Product installation ------------------------------------------------------------- 4 - 5
4. Function Keys -------------------------------------------------------------------- 6
5. MENU function ------------------------------------------------------------------- 7 - 8
6. Timing guide ---------------------------------------------------------------------- 9
7. Input signal detail --------------------------------------------------------------- 10
8. Product specification ---------------------------------------------------------- 11
9. Trouble shooting ---------------------------------------------------------------- 12 - 13
Page 4
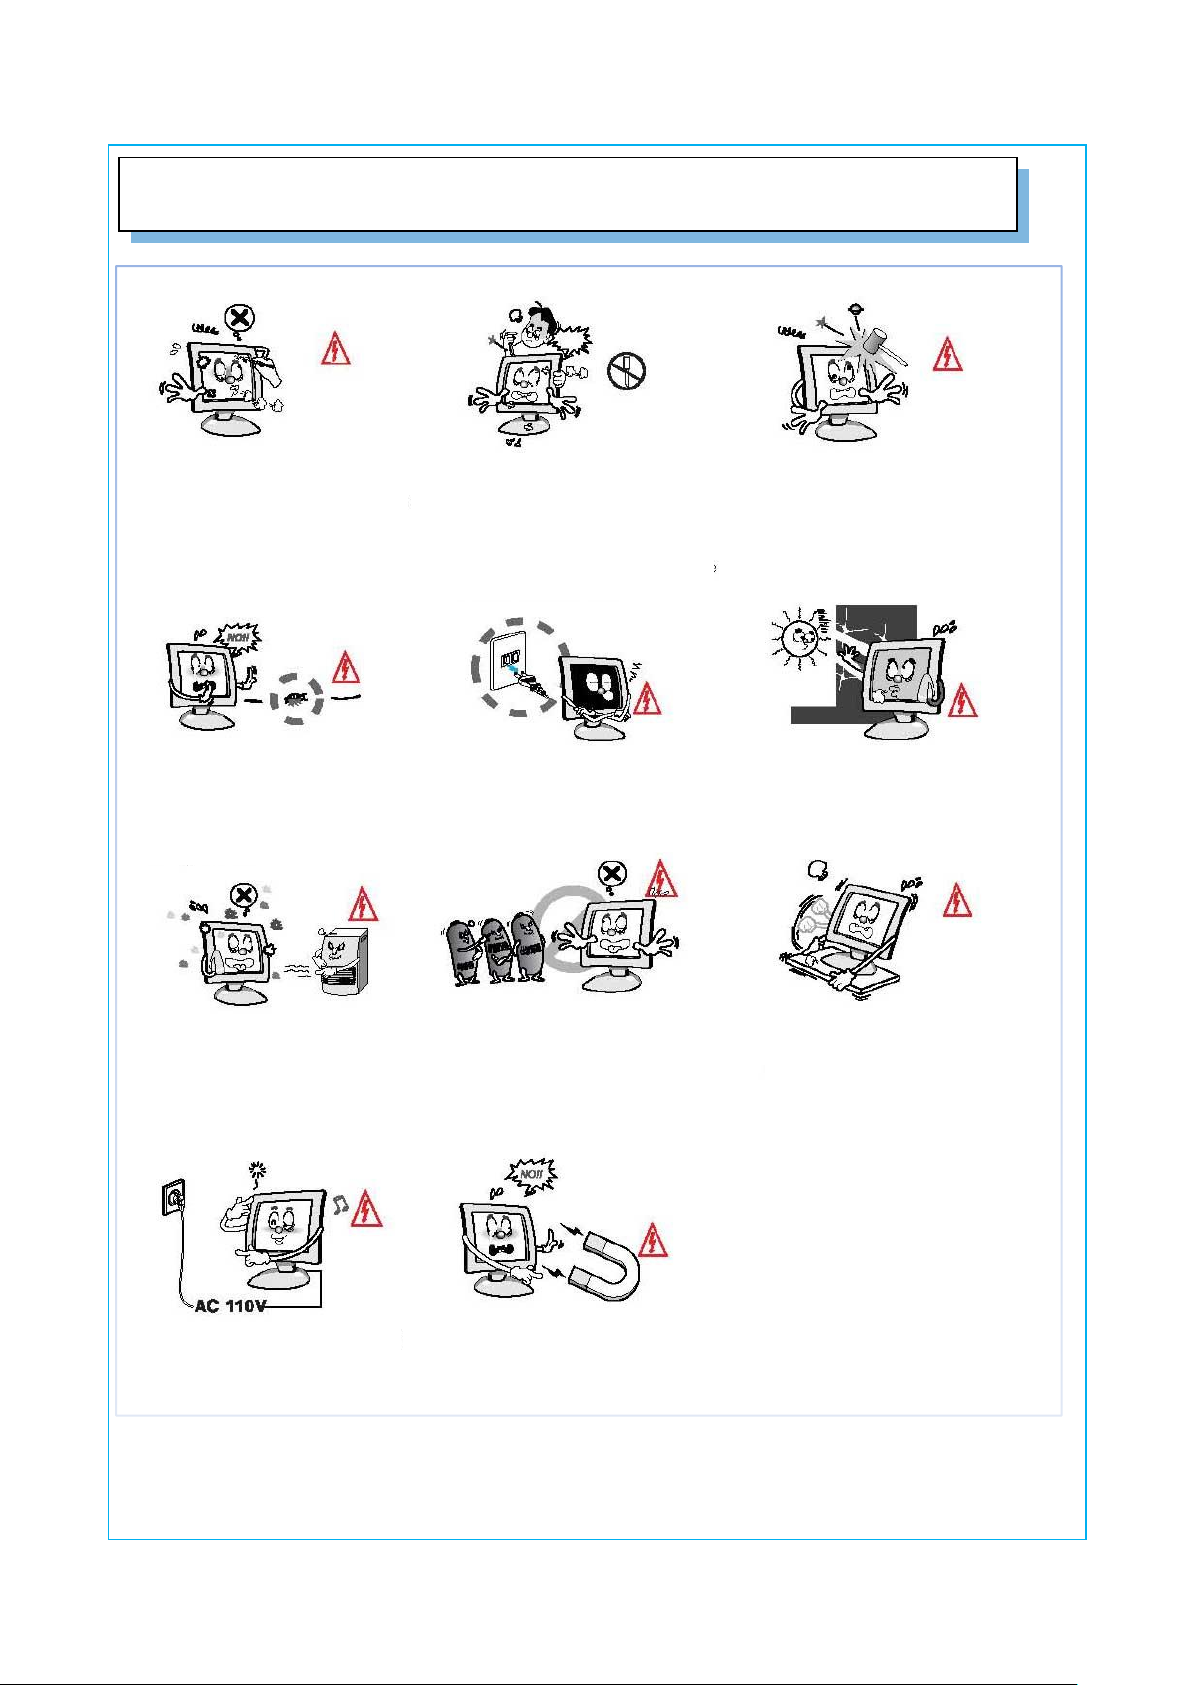
● Important safety instruction
2
Do not scratch the screen of the
LCD monitor with sharp materials
such as nails and pens.
The interior part of the monitor is
composed of electric elements. If
the monitor is broken, do not try
to disassemble it, because it is
necessary to contact appropriate
technical services in order to have
the product repaired.
Take care of the LCD monitor
so that it is not damaged by the
external impact.
Take care not to use damaged
cords and keep this product out
of reach of children and persons
who are not involved in using
the product.
Disconnect the power cable when
the monitor is not used during a
long period of time while you are
away from home.
Disconnect the power cable when
the monitor is not used during a
long period of time while you are
away from home.
Do not use this product near the
windows receiving direct sunlight
or direct natural light.
Choose a fresh and dry area
and protect the monitor from
extreme conditions of temperature
and humidity, dust and
smoke. Adequate temperature
= 0-40°C. Adequate humidity =
30-80 RH.
The LCD monitor screen can
be damaged in the case that
you clean the surface by using
acetone, ethyl alcohol or acid
detergent.
Do not install the monitor in a
sloping place that is not safe due
to the fact that the product can fall
down and be broken, thus doing
harm to other persons.
Check the power voltage before
connecting to the AC power
cable.
Take care so that the monitor
is not in contact with magnetic
materials, metals and inflammable
substances.
Page 5

● Product feature
3
▶ Introduction
This monitor is a high-resolution monitor has features of electromagnetic
wave blocking, reduction in electricity consumption and efficient use of space.
It is recommendable to read this manual before using this product.
▶ Product features
1. This monitor (RM185-ID1) has an 18.5-inch flat surface (color active Matrix TFT
LCD) with pixel size of 0.3mm (H) X 0.3mm (V) for an ultra-precision, high
resolution image.
2. The RM185-ID1 uses an 18.5-inch TFT LCD (Thin Film Transistor - Liquid Crystal
Display) panel and supports 1366 x 768 maximum resolution.
3. The RM185-ID1 is a monitor whose deflection frequency is transformed
automatically up to 30 ~ 80KHz horizontally, 56~75Hz vertically.
4. The RM185-ID1 is compatible with IBM PC and Apple Macintosh. (A different
adaptor is necessary for apple macintosh)
5. The RM185-ID1 has a power saving function less than 36W in power ON mode,
less than 2W in stand by, and 1W in power off.
6. The RM185-ID1 supports DDC, Plug &Play mode.
Page 6

● Product installation
Notice
Please make sure the following items are included with your monitor.
If any items are missing, contact your dealer.
Please use the cables that are provided. REVO does not take responsibility
for any problems that arise from using any other cables.
4
VGA Cable
Power Cord
LCD Monitor
User’S Guide
Adaptor
Audio Cable
▶ Components
Page 7

▶ Installation
25’
5
1. Please turn off the RM185-ID1 before connecting any device to it.
2. Connect adaptor cable to DC power-on on the rear side of
the RM185-ID1 then connect power cord to adaptor.
3. RM185-ID1 has 15pin VGA port.
Connect the cables properly to your DVR between VGA.
4 .Turn on your DVR and RM185-ID1.
5. Display conditions with can be adjusted by pushing control buttons
on the right side of the RM185-ID1.
6. At the user's convenience, you can adjust the display angle of
the RM185-ID1 under 25 degree to backward.
7. Please turn off the RM185-ID1 when not in use.
☞ Adjusting LCD panel angle
- Do not hold or press down on the monitor's
screen while adjusting angle since LCD
panel maybe damaged or break if severe.
- Do not lean backward excessively so that
the monitor dose not fall backwards.
- Be careful of potential damage to the stand
while adjusting angle.
Page 8

Button
Function
Hot Key
AUTO
Automatically adjusts
the picture.
MENU
Opens the Main Menu.
▲
Up / Right
VOLUME up
▼
Down / Left
VOLUME down
POWER
ON / OFF
● Function Keys
MENU
MENU
AUTO
MENU
MENU
▲ / ▼
▲ / ▼
▲ / ▼
( Open Menu Screen )
( Move to main category )
( ( Move to sub category )
( Select main category )
( Select sub category )
( Adjust set value )
( Save set value )
( Close Menu Screen )
6
▶ Operation of the function keys
▶ On Screen Display (OSD) Menu Navigation
1. Press the MENU button, the main OSD menu will be appear on the screen.
2. Press the ▲/▼ buttons to navigate through the menu then press the MENU button to make
the selection..
3. To navigate out of a menu, press the AUTO button.
Page 9

● MENU Function
▶ Color
☞ Contrast
Brightness
Color Adjust
Color Temp
50
Contrast: Adjusts contrast level at the picture.
Brightness: Adjusts brightness level at the picture.
Level of color force: Adjusts to color saturation of the picture.(Red,Green,Blue)
Red: Adjusts share of red.
Green: Adjusts share of green.
Blue: Adjusts share of blue.
Color Temp: Adjusts color Temp
▶ Image Setting
☞ Clock
Phase
Sharpness
H. position
V. position
50
Clock: Adjusts pixel's horizontal size.
Phase: Adjusts focus on the screen.
Sharpness: Adjusts the edge definition of the picture.
H.Position: Adjusts horizontal location on screen at the picture
V.position: Adjusts vertical location on screen at the picture.
7
Page 10

▶ OSD Menu
☞ OSD H.Pos
OSD V.Pos
OSD Timer
Language
50
OSD Horizontal Adjustment: Adjusts OSD menu screen's horizontal
location.(0-100)
OSD Vertical Adjustment: Adjusts OSD menu screen's vertical location.(0-100)
OSD Marking Time: Adjusts OSD menu screen's marking time within the
screen possible to set the time for disappearance of OSD menu screen up
to 30 seconds when OSD operation button is not pushed on. (Max30sec)
Language: Changes language on the OSD menu. Six languages are available
▶ Signal Source
☞ VGA
OSD Horizontal Adjustment: Adjusts OSD menu screen's horizontal
location.(0-100)
OSD Vertical Adjustment: Adjusts OSD menu screen's vertical location.(0-100)
OSD Marking Time: Adjusts OSD menu screen's marking time within the
screen possible to set the time for disappearance of OSD menu screen up
to 30 seconds when OSD operation button is not pushed on. (Max30sec)
Language: Changes language on the OSD menu. Six languages are available
OSD Horizontal Adjustment: Adjusts OSD menu screen's horizontal
location.
OSD Vertical Adjustment: Adjusts OSD menu screen's vertical location.
OSD Marking Time: Adjusts OSD menu screen's marking time within the
screen possible to set the time for disappearance of OSD menu screen up
to 30 seconds when OSD operation button is not pushed. (Max30sec)
Language: Changes language on the OSD menu. Seven languages are available
(English,French,German,Spanish,Chinese,Japanese,Korean)
Input signal:User can select input signal depending on installed device.VGA Only
▶ Volume
☞ Volume
Mute
Volume : Adjusts size of sound.
Mute: Turns audio function On/Off
▶ Setting
☞ Reset
Automatic color adjustment : Automatically adjusts screen's color
▶ Auto (Exit)
Return to initial screen
8
Page 11

ITEM
Resolution
Frequancy
Horizontal
Vertical
Horizontal
Vertical
VESA
1
640
480
37.9kHz
60Hz
2
640
480
37.9kHz
72Hz
3
640
480
37.5kHz
75Hz
4
800
600
35.1kHz
56Hz
5
800
600
37.9kHz
60Hz
6
800
600
48.1kHz
72Hz
7
800
600
46.9kHz
75Hz
8
1024
768
48.4kHz
60Hz
9
1024
768
56.5kHz
70Hz
10
1024
768
60.0kHz
75Hz
11
1280
768
48.0kHz
59Hz
12
1280
1024
64.0kHz
60Hz
13
1280
1024
80.0kHz
75Hz
14
1360
768
48.0kHz
59Hz
15
1366
768
48.0kHz
59Hz
● Timing Guide
▶ Timing guide
This product is a multi-frequency monitor.
It functions in horizontal frequencies from 30kHz to 80kHz and vertical
frequencies from 56Hz to 75Hz. Due to tis design based on microprocessor,
It offers the functions of automatic synchronization and automatic size.
9
Page 12

No.
Input / Output
Cable Type
1
DC Power
DC Power Cord
2
Audio IN
Audio Cable
3
VGA IN
15-pin VGA Signal Cable
● Input signal detail
10
! When the condition of the screen is not good, please press the "AUTO" button.
(This function may cause some temporary noise on the screen depending on VGA cards)
▶ Cable Connections
▶ Plug & Play
The adoption of the new VESA Plug and Play solution eliminates complicated and time consuming
setup. It allows you to install your monitor in a Plug and Play compatible system without the usual
hassles and confusion. Your PC system can easily identify and configure itself for use with your display.
This monitor automatically tells the PC system its Extended Display Identification Data (EDID) using
Display Data Channel(DDC) protocols so the PC system can automatically configure itself to use the
flat panel display.
▶ Warm-Up Time
All LCD monitors need time to become thermally stable whenever you turn on the monitor after letting
the monitor be turned off for a couple of hours. Therefore, to achieve more accurate adjustments of
parameters, allow the LCD monitor to be warmed up for at least 30 minutes before making any screen
adjustments.
Page 13

L C D
Type
18.5" diagonal viewable screen TFT
(Thin Film Transistor) Active matrix panel
Pixel Pitch
R, G, B vertical stripe
Display Color
16,777,216 colors
Viewing Angle
H / V
170˚ / 160˚
Contrast ratio
T y p.
1000 : 1
Brightness
T y p.
250 cd/㎡
Response Time
T y p.
5 ms
Refresh rate
M A X.
1366 x 768 @ 59Hz for optimal display
Connectors
Input signal
15-Pin VGA, Audio-in
Power
DC 12V In
Voltage /
Input
AC 100~240V, 50~60Hz
Power
Output
DC 12V
Consumption
36W (MAX)
Screen size
M A X.
409.8 mm (H) x 230.4 mm (V)
Feature
Temperature
32 F ~ 104 F (0 C ~ 40 C)
Humidity
30% RH ~ 80% RH (no condensation)
Altitude
To 10,000 feet
Storage
Temperature
- 4 F ~ 140 F (-20 C ~ 60 C)
Condition
Humidity
5% RH ~90% RH (no condensation)
Dimension
With stand
456.21(W) x 370.72(H) x 155.1(D)
Without stand
456.21(W) x 370.72(H) x 69.03(D)
Box (Outside)
506(W) x 370(H) x 140(D)
Weight
Unit / Box
4.5 kg
Function
Speaker
2W x 1
Audio in / out
Mono Mini Jack 1.5M
● Product specifications
! The design & specifications of RM185-ID1 are subject to be changed
without any pervious notice to improve its quality.
11
Page 14

● Troubleshooting
▶ No power
- Flip the power switch ON. The Power LED turns on.
- Make sure AC /DC power cord is securely connected to the power jack and to a
power outlet.
▶ Power on but no screen image
- Make sure the VGA cable attached with this monitor is tightly secured to
the VGA output port on the back of the device.
- Adjust the brightness and contrast.
▶ Image is unstable, unfocused
- Use AUTO-TUNE to adjust automatically.
- If the image is still unstable after AUTO-TUNE processing, please adjust
PHASE manually to get image focused.
- Check whether the resolution or refresh rate in windows display setting is
beyond supported range. (please refer to the specification of supported mode)
▶ Flickering
- Not enough power is being supplied to the monitor.
Connect the monitor to a different outlet. If a surge protector is being
used, there may be too many devices plugged in.
- See Timing Guide in this manual with a list of refresh rates and frequency
settings showing the recommended setting for the monitor.
▶ Wrong or abnormal colors.
- If any colors (Red, Green, or Blue) are missing, check the VGA cable to
make sure it is securely connected. Loose pins in the cable connector could
cause a bad connection.
- Connect the monitor to another computer.
- Check the graphics card for proper sync scheme (or sync polarities) to
match the monitor's specifications.
▶ Double (split) screen image
- Make sure your graphics card is set to Non-Interlaced mode.
Page 15

▶ Entire screen image rolls (scrolls) vertically.
13
- Make sure the input signals are within the LCD monitor's specified
frequency range. (Maximum : 1366 * 768 @59Hz)
- Connect the VGA cable securely.
- Try the monitor with another power source.
▶ Control buttons do not work
- Press only one button at a time.
▶ When the message of 'out of range' appears
- Restart the computer and while it is restarting, press F8 until the Startup
menu appears. Then enter to start the computer in 'safe mode'.
- Right-click the desktop, click Properties, and click Settings.
- Click Advanced, click Adapter, and then click Adapter Default from the
Refresh Rate.
- Click OK, Click OK again and then click Yes to restart the computer in
Normal mode. You can set the colors and screen area to your preferences.
 Loading...